Having your Mac broken, stolen, or lost is a nightmare itself. It is even worse when you need your computer urgently, such as in the middle of a rushed workday. For example, you lack that super-important PDF or a handy app but your Mac is out of reach. Is there a way to save the day? Yes, but only if you take care of it beforehand.
Apple offers easy-to-use tools for backing up your files, namely Time Machine and iCloud. While we definitely recommend using them, they won’t make your system up and running quickly. To achieve it, we need another approach. Let’s learn how to back up Mac to an external hard drive without Time Machine and get some additional benefits.
Additionally, to safeguard your Mac and keep your peace of mind, we recommend MacKeeper. This app delivers multilayered protection from malware, online threats, and identity theft along with Mac performance optimization. Try it today!
What is Mac hard drive cloning?
When you clone your Mac’s hard drive you create a perfect, bit-by-bit, duplicate of it. It includes the data allowing you to boot (start running) your system right from that copy. It is, of course, a temporary decision for an emergency but it’s still worth having it.
Creating a bootable copy of your Mac hard drive requires getting additional software. There are many options such as SuperDuper!, Carbon Copy Cloner, or EaseUS Todo Backup. All of them have free or trial versions, so you can check out which one works best for you.
We’ll further show how to clone a Mac hard drive using a SuperDuper! app. It’s been around for a long time but it runs on a vast variety of macOS versions, including the most recent one, macOS Catalina. SuperDuper! Is simple to use and has a free version.
How to clone your Mac hard drive
For starters, think about the data you have on your Mac. If there are a lot of useless files, we recommend deleting them first. You can easily remove all clutter at once using MacKeeper. When you do, you’ll use less space on the external hard drive.
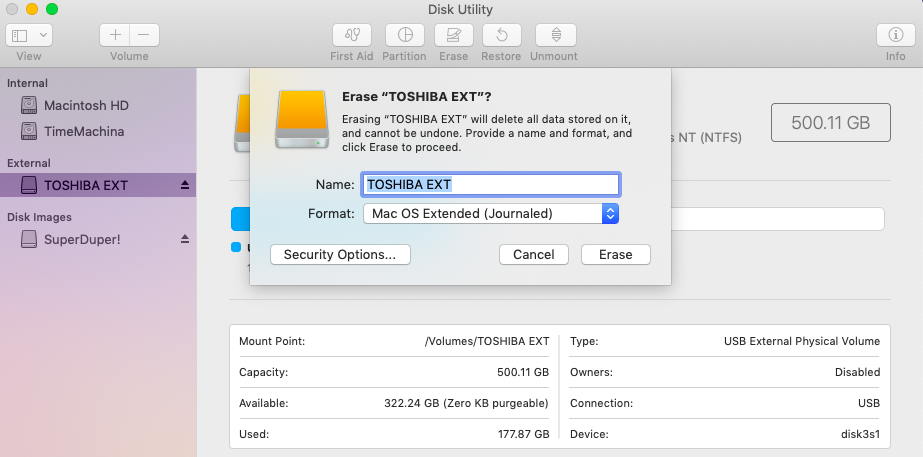
Next, before you clone a Mac hard drive, Disk Utility will help you get your external hard drive prepared for copying.
1. Format your external hard drive. Note that this will erase all its contents and make it compatible with your Mac. Make sure to copy the files you might have on the drive before you start.
- Go to Disk Utility using Spotlight Search (a magnifying glass icon in the upper left corner).
- Select your hard drive in the menu on the right
- Click on Erase in the upper menu
- Select Mac OS Extended (Journaled) in Format
- Click on Erase

2. Download and install SuperDuper!
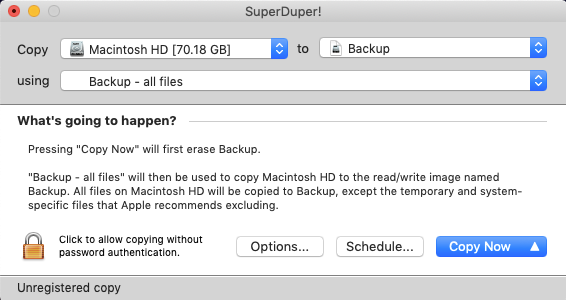
3. Choose a drive you copy from and a drive you copy to. Also, choose Backup - all files. Only this option will make a bootable copy.

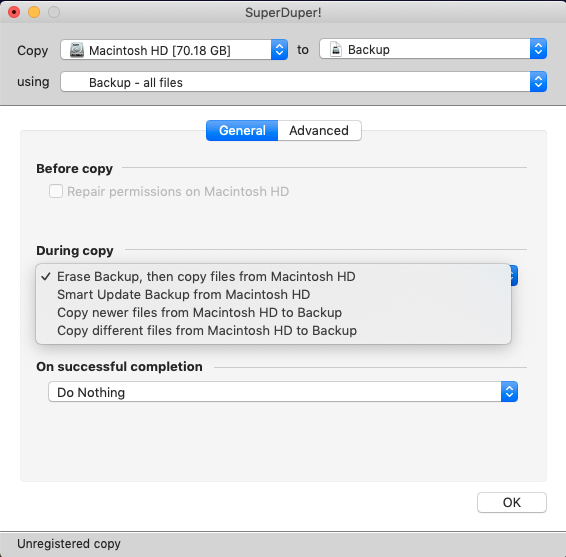
4. Go to Options for more settings. For example, if you copy your drive for the first time, use the first, default Erase Backup, then copy files from Macintosh HD. For further backups, choose one of the three other options depending on your preferences.

5. Return to the main screen and click Copy Now to make a backup.
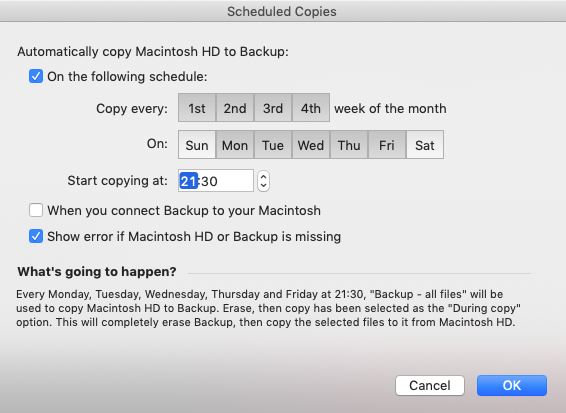
6. Return to the main screen and go to Schedule to set up regular backups. Below, you can see a default schedule, which is convenient for those who work on their Mac on weekdays. Of course, you can change this according to your needs.

How to restore a Mac backup from an external hard drive
Now that you know how to backup a Mac on an external hard drive, you also need to understand how to make use of that copy. Here are the two options:
How to restore your Mac from a clone
- Turn off your Mac
- Connect an external drive to your Mac
- Turn on your Mac and press Command and R keys at the same time when the system restarts. This way you’ll enter Recovery Mode and your Mac will boot to the macOS Utilities screen
- Click on Disk Utility > Continue
- Select your hard drive and go to Restore tab at the top of the Disk Utility window
- Select your external drive next to Restore From
- Select your Mac's hard drive next to Restore To, then click Restore
- Restart your Mac after the backup has finished restoring
How to boot from your clone using another Mac
Please note that you'll have to partition your Mac’s hard drive first. Next, do the following:
- Turn off your Mac
- Connect your external drive to your Mac
- Turn on your Mac and press Option key when you hear the startup sound
- Select your external drive with the clone backup from the list of systems to start up your computer
- Use the clone to restore files to your partitioned Mac drive
***
We hope you now have a reliable backup of your system. And if you also want to safeguard your privacy, as well as enhance your Mac’s security and performance, check out MacKeeper! It’s a great suite of tools for every Mac fan.
Read more:


