In this article you will find the following:
Why is macOS Sonoma not downloading on Mac
If you can't download macOS Sonoma, the issue may be due to low storage, network instability, or Apple server downtime. Corrupted installer files, security settings, or compatibility restrictions can also block the download. Freeing up space, checking your internet connection, and restarting your Mac are quick fixes to get the update running.
A note from our experts:
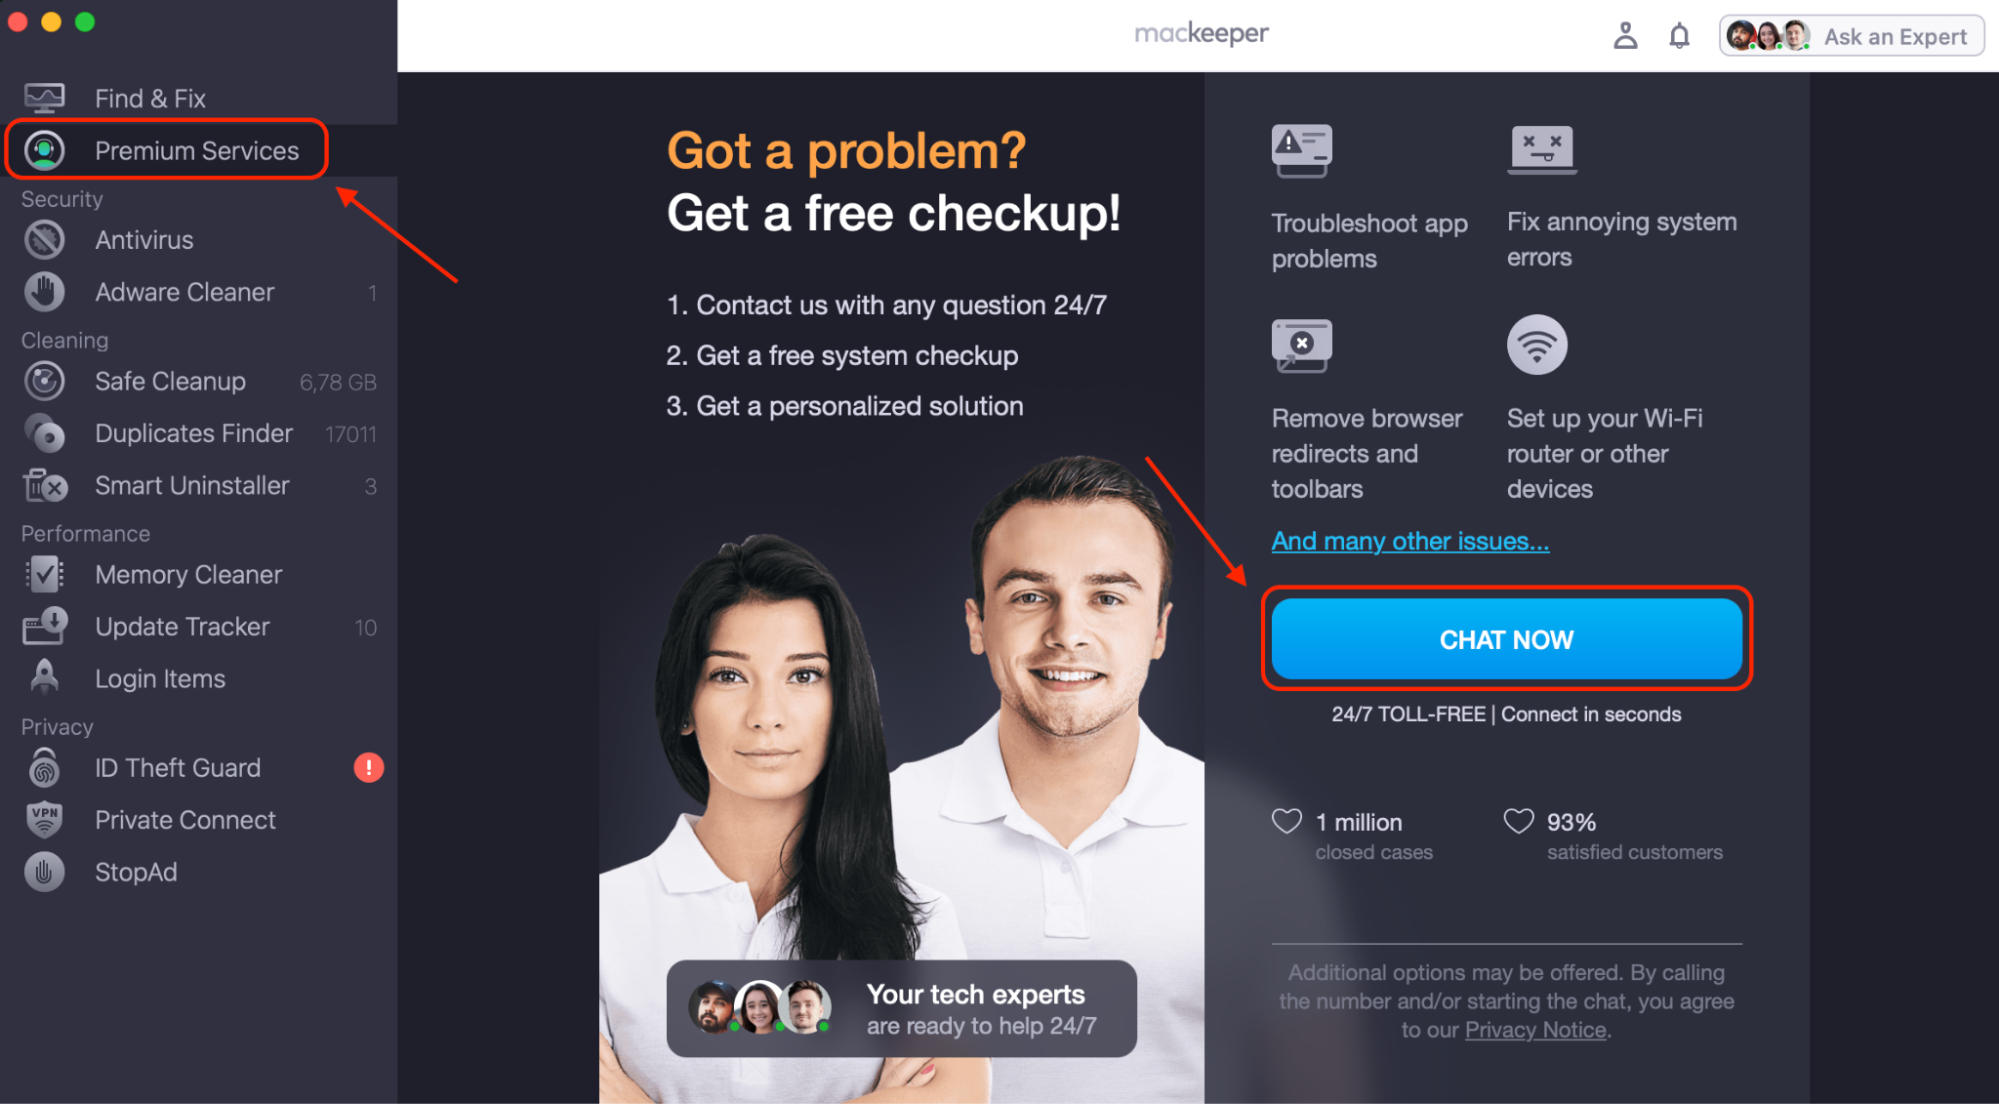
How to get expert help with MacKeeper’s Premium Services:
- Download and install MacKeeper by following the on-screen prompts.
- Open the app and select Premium Services from the sidebar.
- Click Chat Now to start a secure conversation with a Mac expert who will help resolve your issue.
What to do if you can't download and install macOS Sonoma
If macOS Sonoma not downloading is causing you issues, follow these steps:
- Free up at least 20GB of storage.
- Restart your Mac to clear glitches.
- Check your internet connection.
- Verify Apple’s servers for outages.
- Disable firewall restrictions.
- Delete and redownload the installer.
- Boot into Safe Mode by holding Shift during startup.
1. Restart your Mac
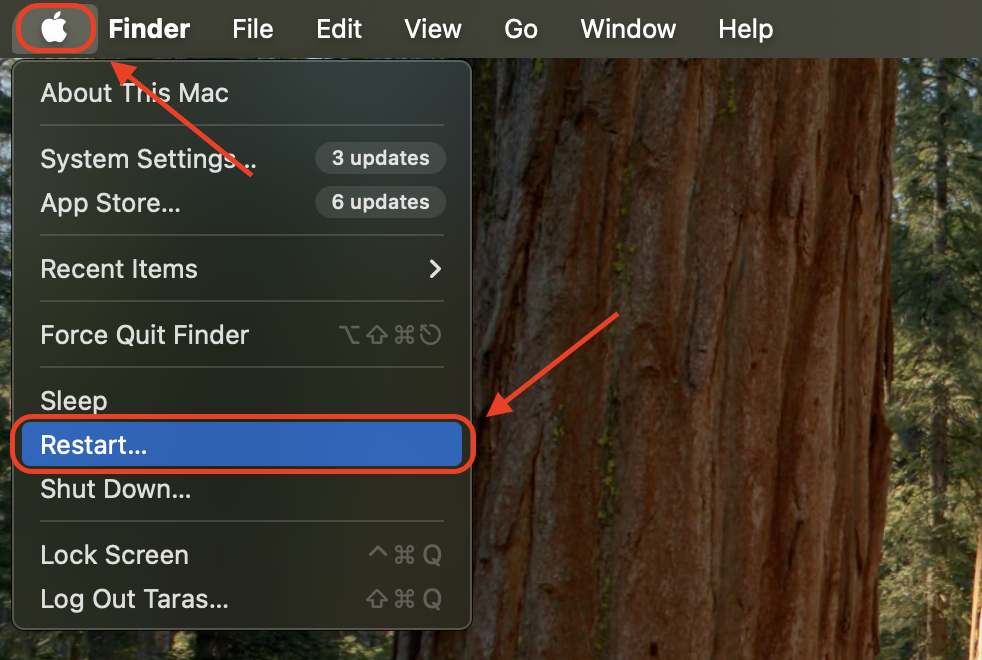
We’ve found that restarting a Mac usually resolves installation failures by refreshing system processes, reestablishing network connections, and fixing software glitches that may prevent macOS Sonoma from installing. Especially when a clean install of macOS is required for persistent issues. Here are some steps to restart your Mac:
- Click the Apple menu and select Restart.
- If your Mac is unresponsive, hold the Power button until it turns off.
- Wait a few seconds, then press the Power button again to restart.
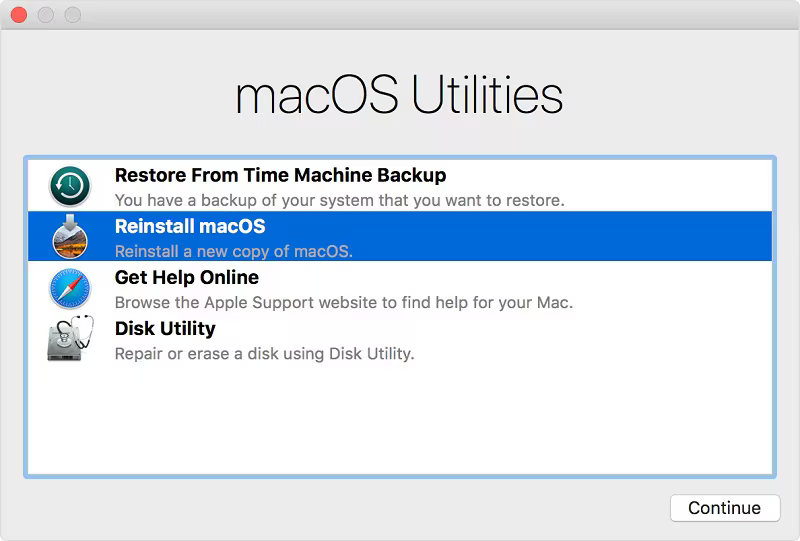
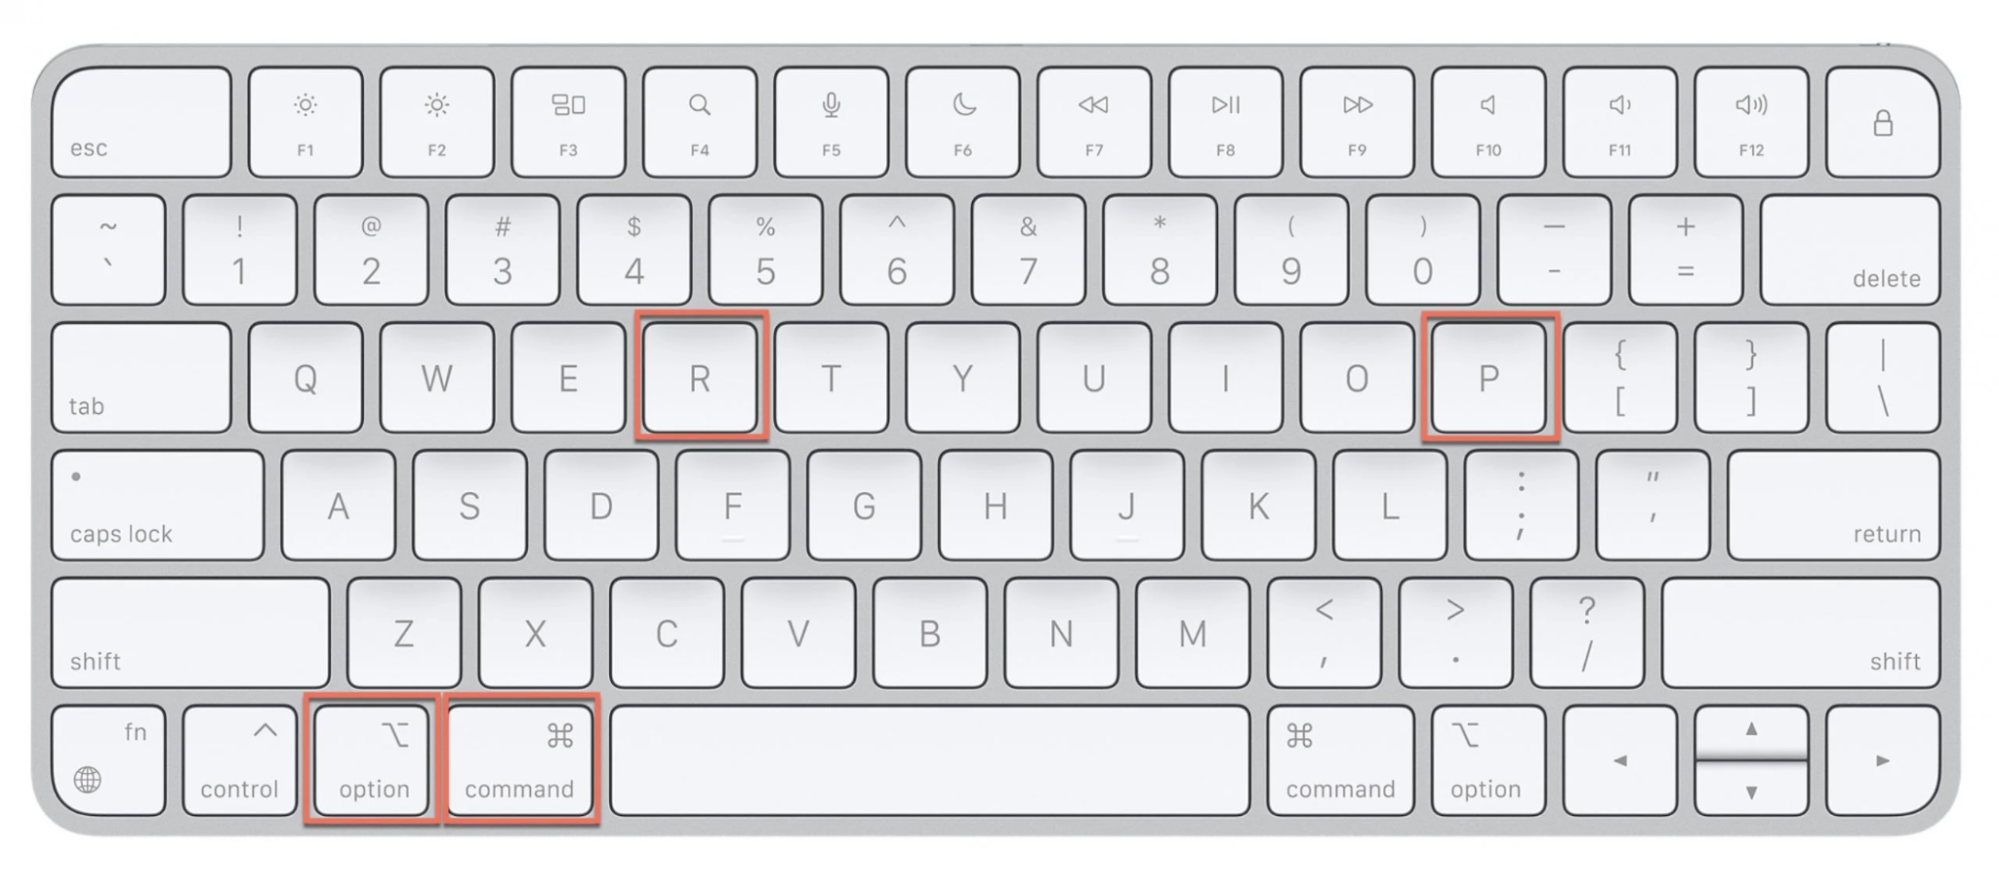
- If macOS Sonoma is still stuck, restart while holding Command + R or Shift + Option + Command + R to enter macOS Recovery Mode.
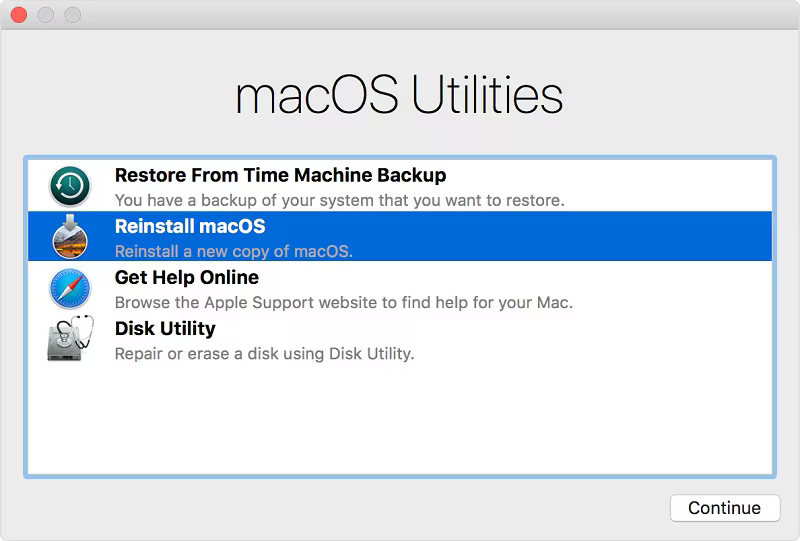
- From the macOS Utilities window, select Reinstall macOS and follow the on-screen instructions.

2. Free up storage space
We’ve seen that freeing up storage on a Mac prevents installation failures, avoids system slowdowns, and ensures there’s enough disk space for macOS Sonoma to download and install properly. Follow our instructions to free up some storage space:
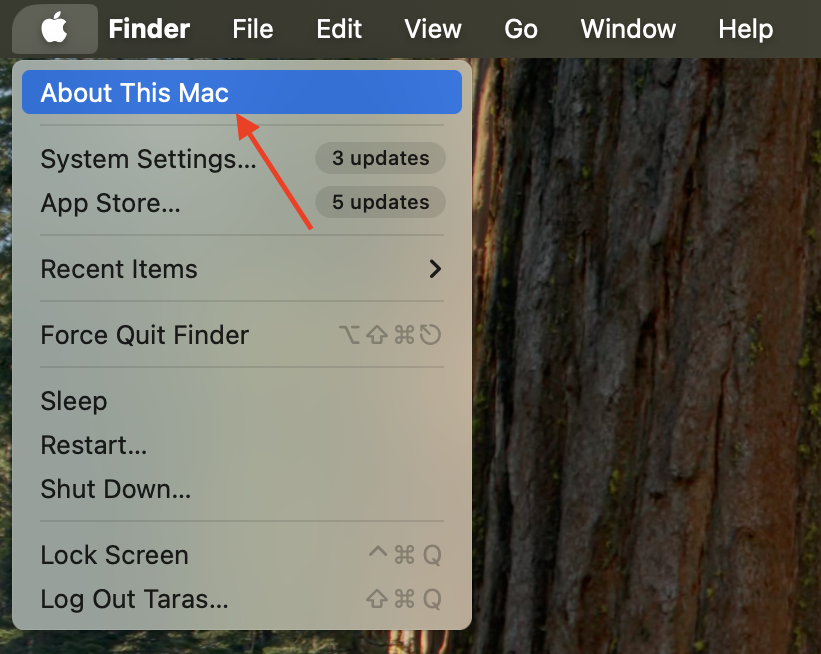
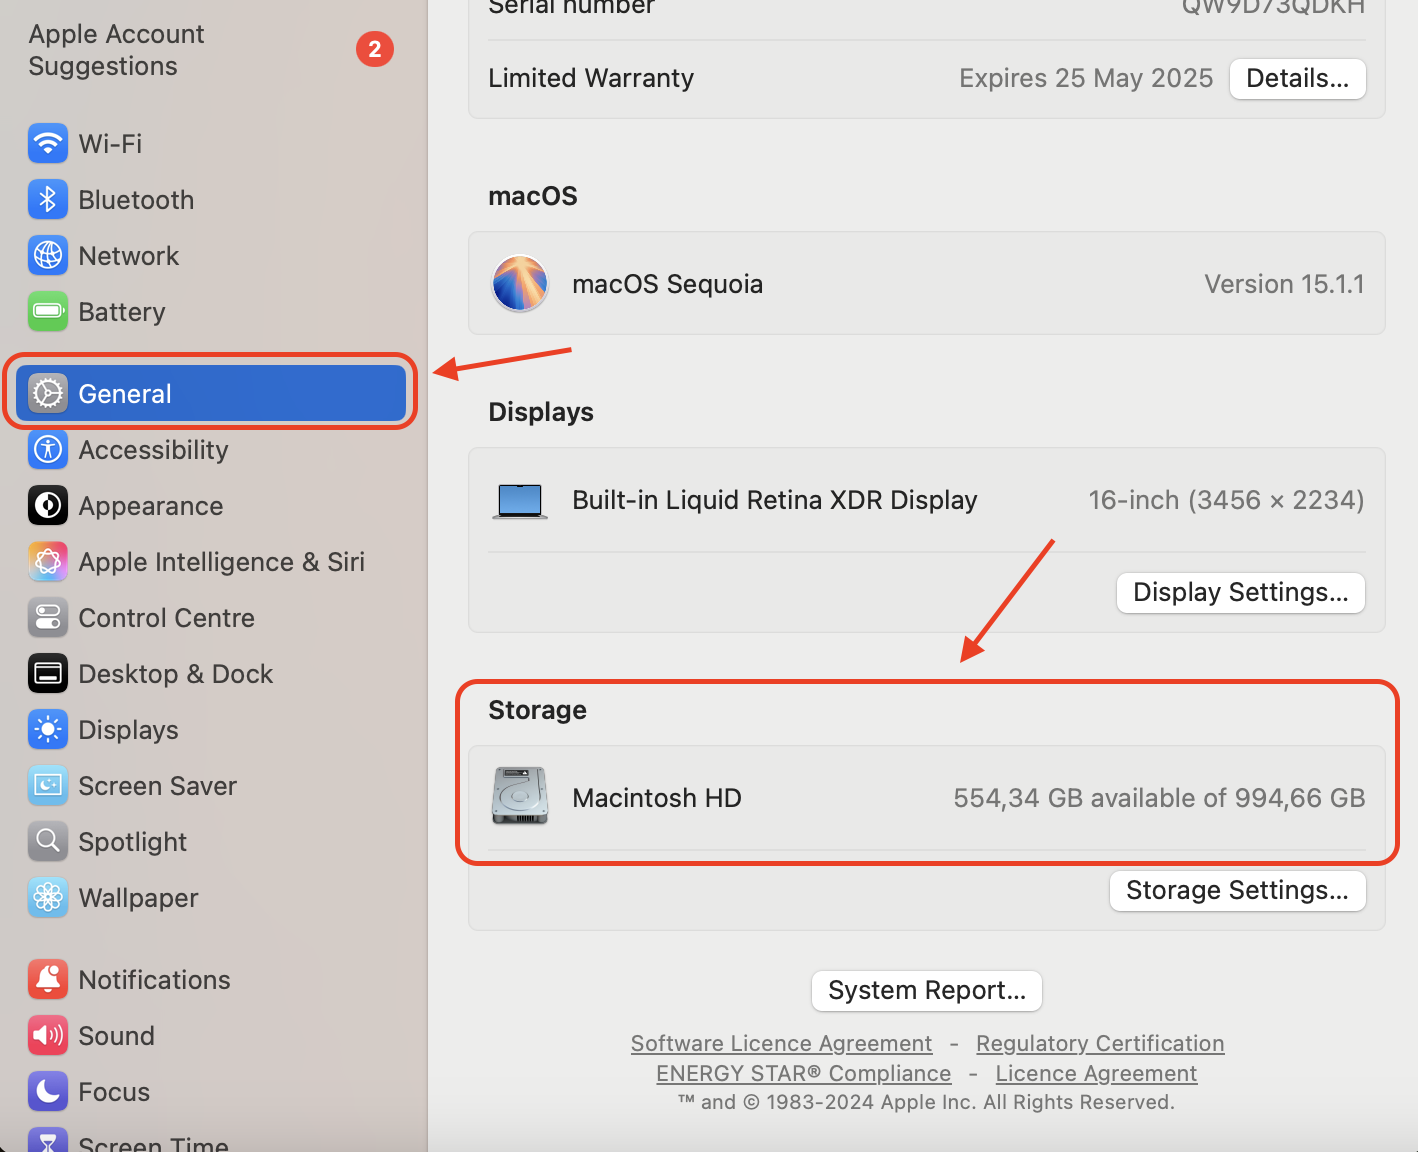
- Click the Apple menu, then select About This Mac.
- Navigate to Storage and check available free space.
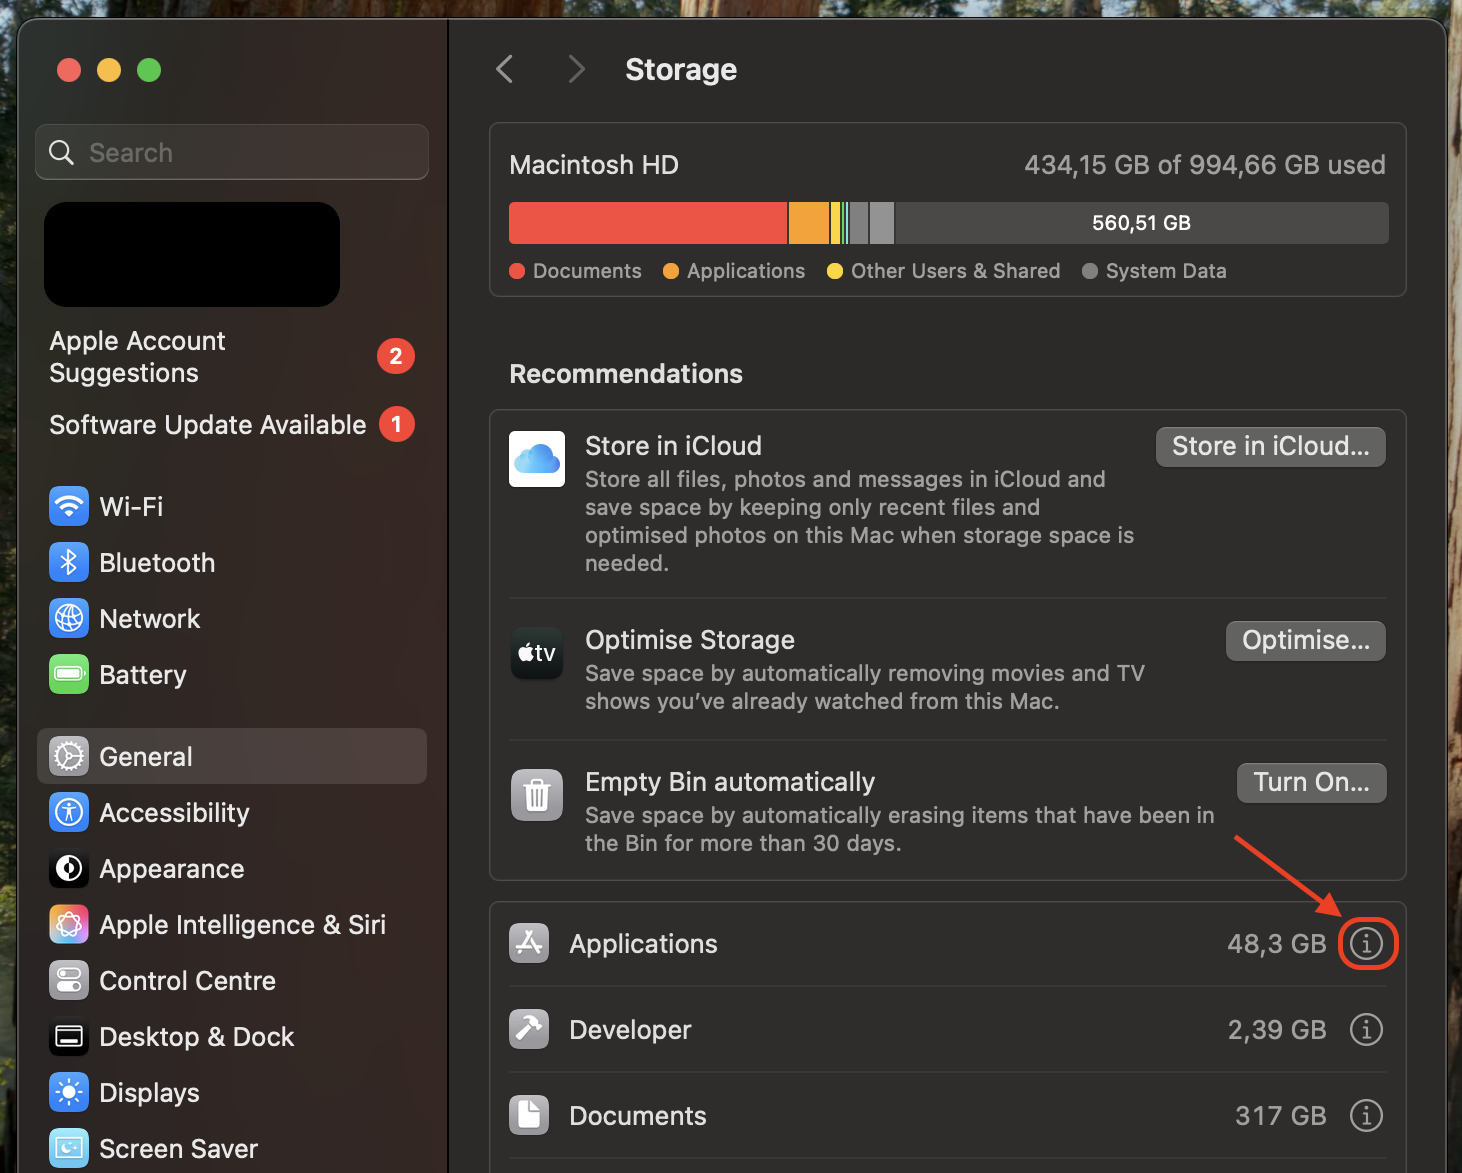
- Click Storage Settings…, then go to the ‘i’ icon, and remove unnecessary apps
- Empty the Trash to permanently remove deleted items.
- Move large files to iCloud or an external drive if additional space is needed.
- Restart your Mac and retry the macOS Sonoma installation.
3. Check macOS compatibility
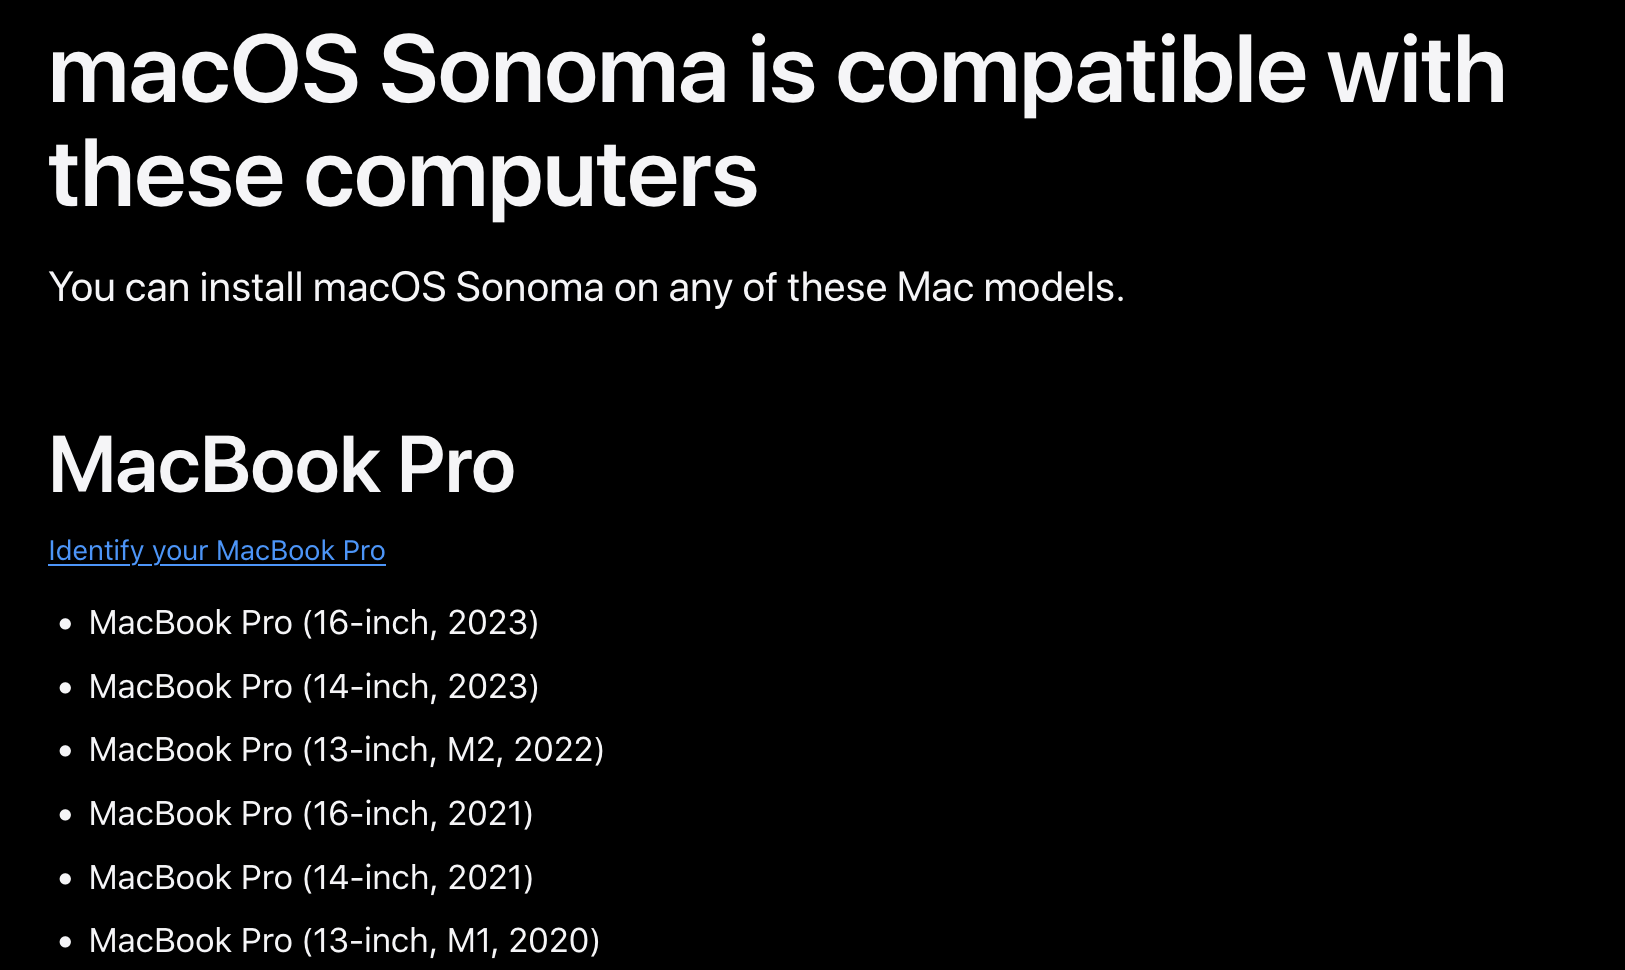
We always verify macOS compatibility first to prevent failed installations, ensure your Mac meets Apple’s system requirements, and minimize macOS Sonoma problems that could require further troubleshooting. A couple of steps to check macOS compatibility:
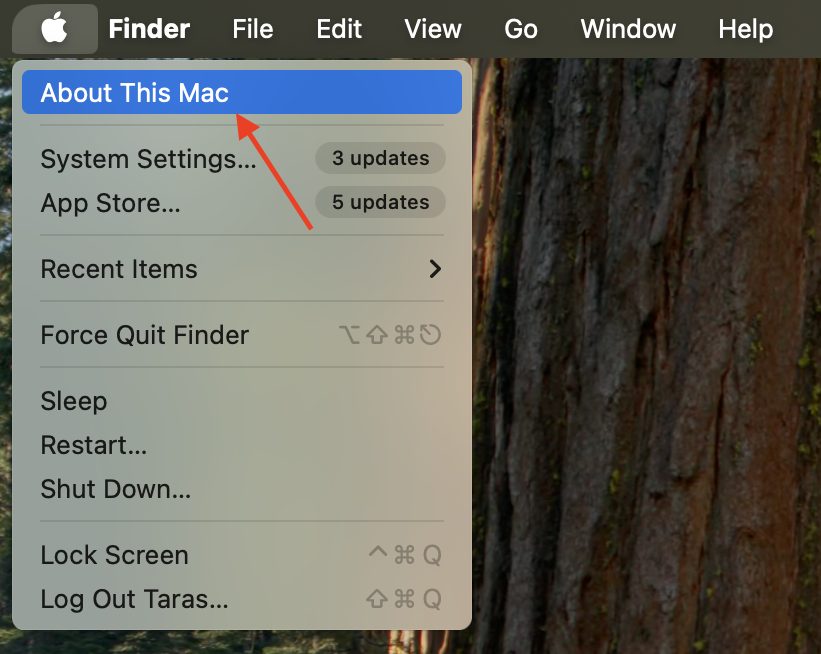
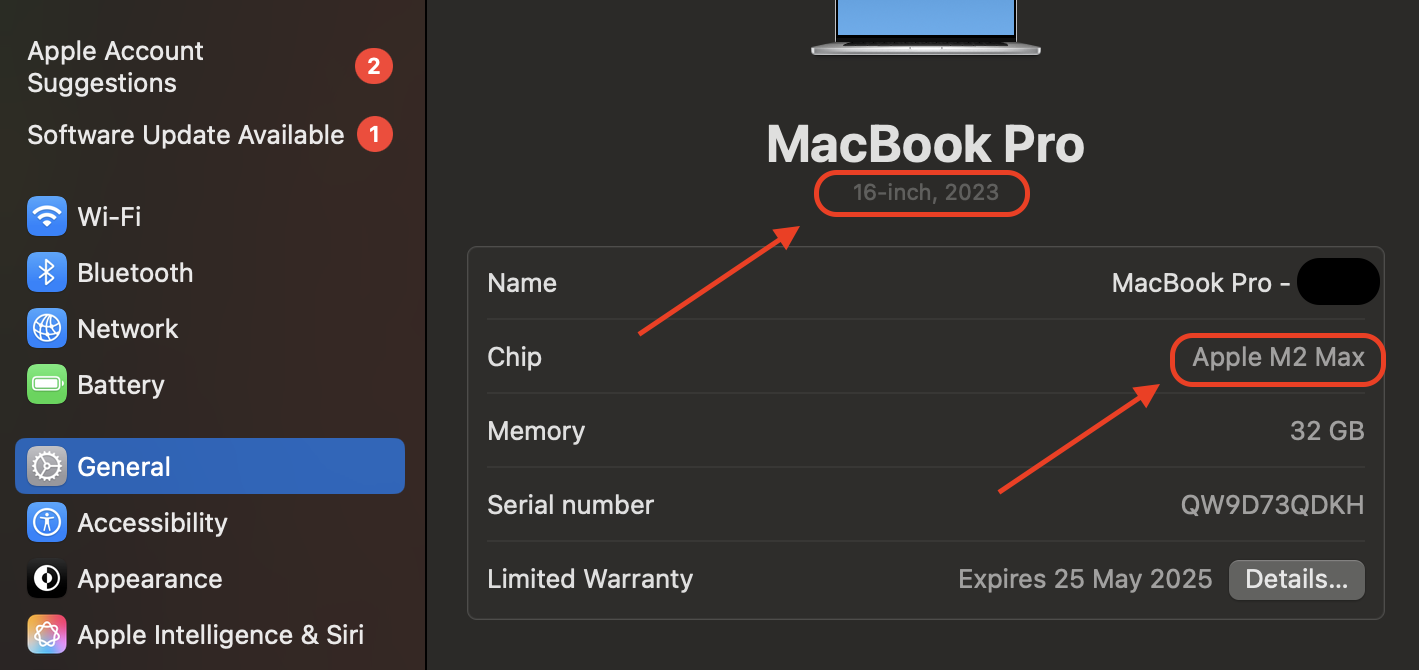
- Click the Apple menu, then select About This Mac.
- Locate your Mac model and release year.
- Visit Apple’s official macOS Sonoma compatibility list.
- If your Mac isn’t supported, consider upgrading your hardware or using an earlier macOS version.
- If your Mac is compatible but won’t install, restart and try again.
- Ensure your device is updated to the latest macOS before upgrading.
- Check for firmware updates that may be required for macOS Sonoma installation.
4. Turn off FileVault or Firewall
Our team has found that disabling FileVault and Firewall before installation prevents macOS Sonoma from getting stuck, avoids network-related restrictions, and reduces conflicts that could block system updates. Check out the following steps to turn off FileVault or Firewall:
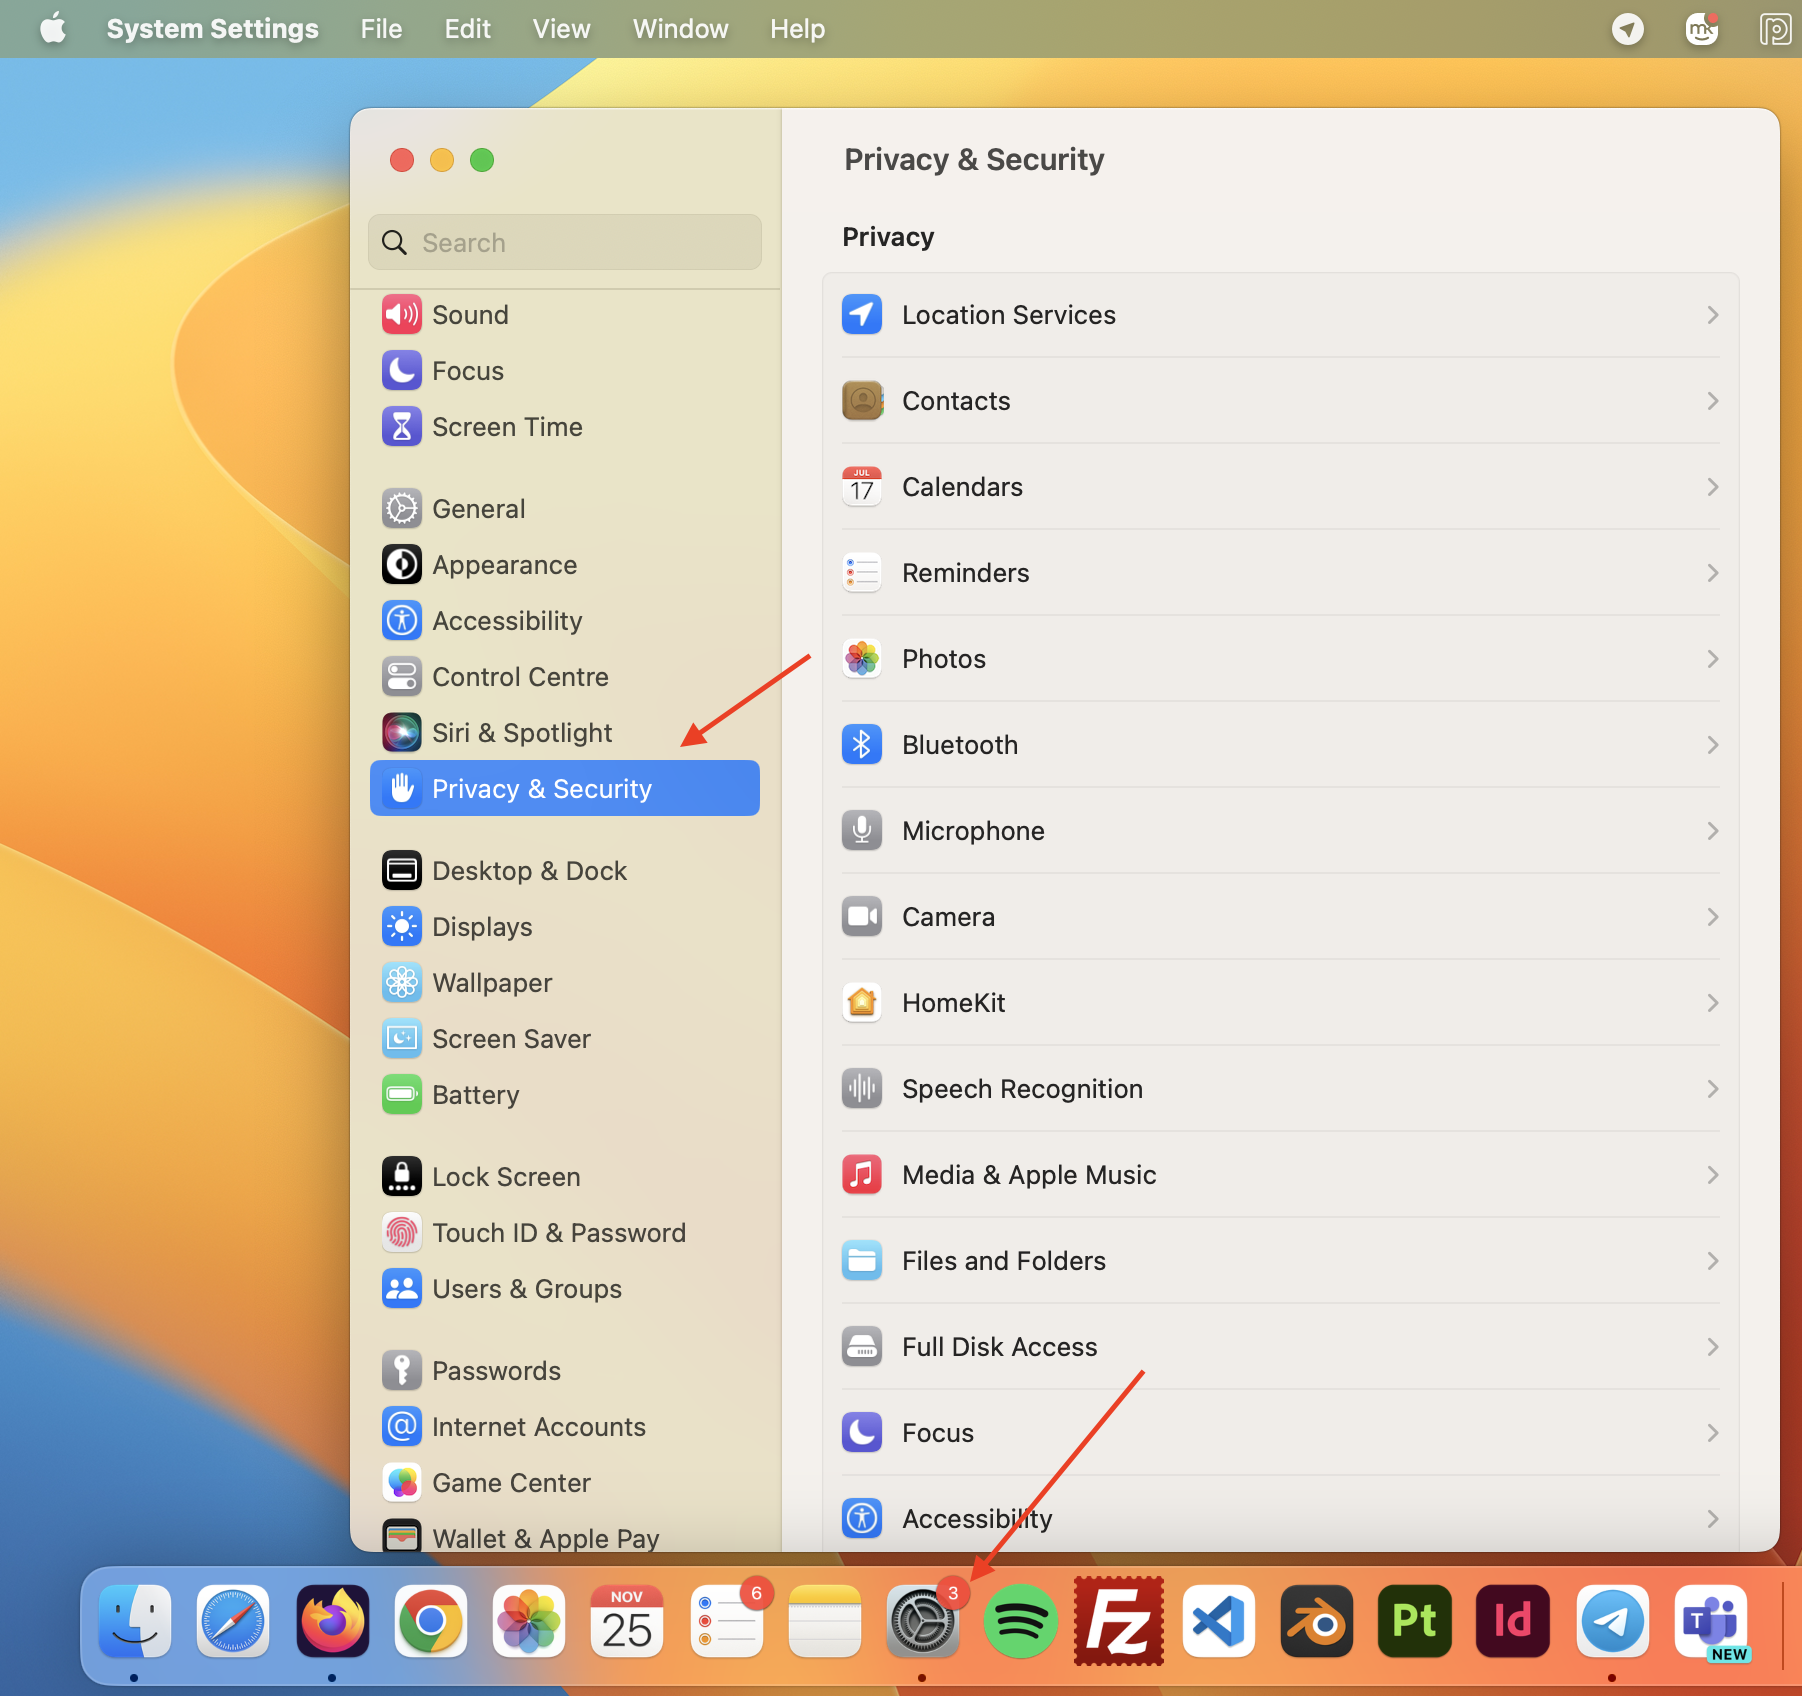
- Click the Apple menu and go to System Settings.
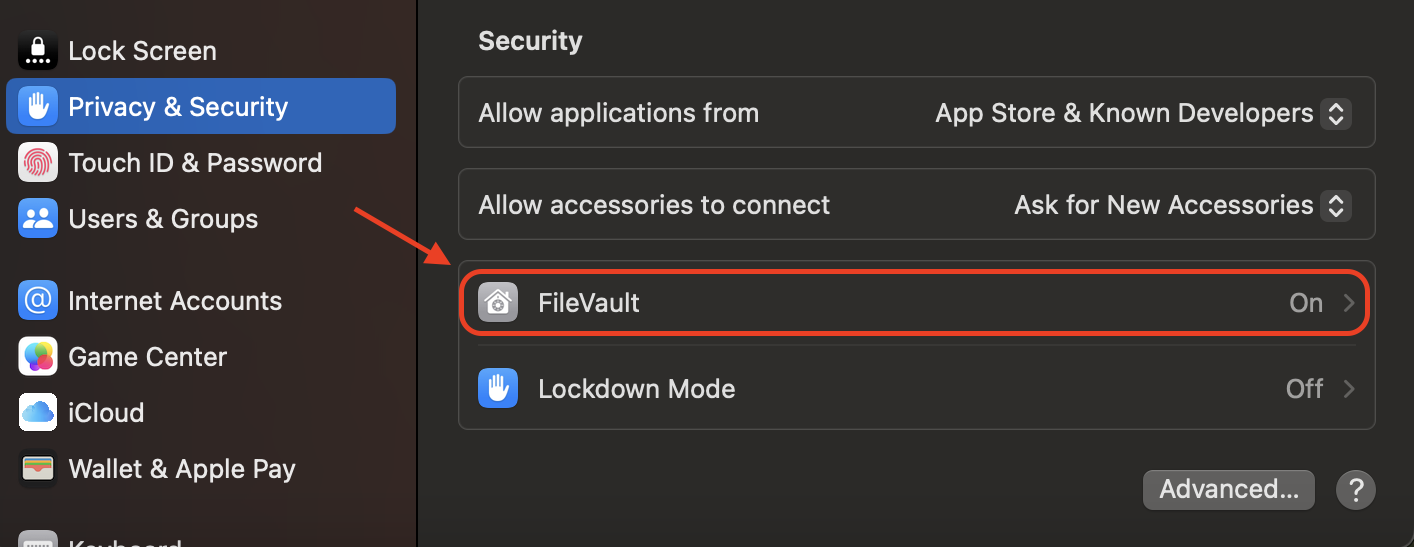
- Navigate to Privacy & Security.
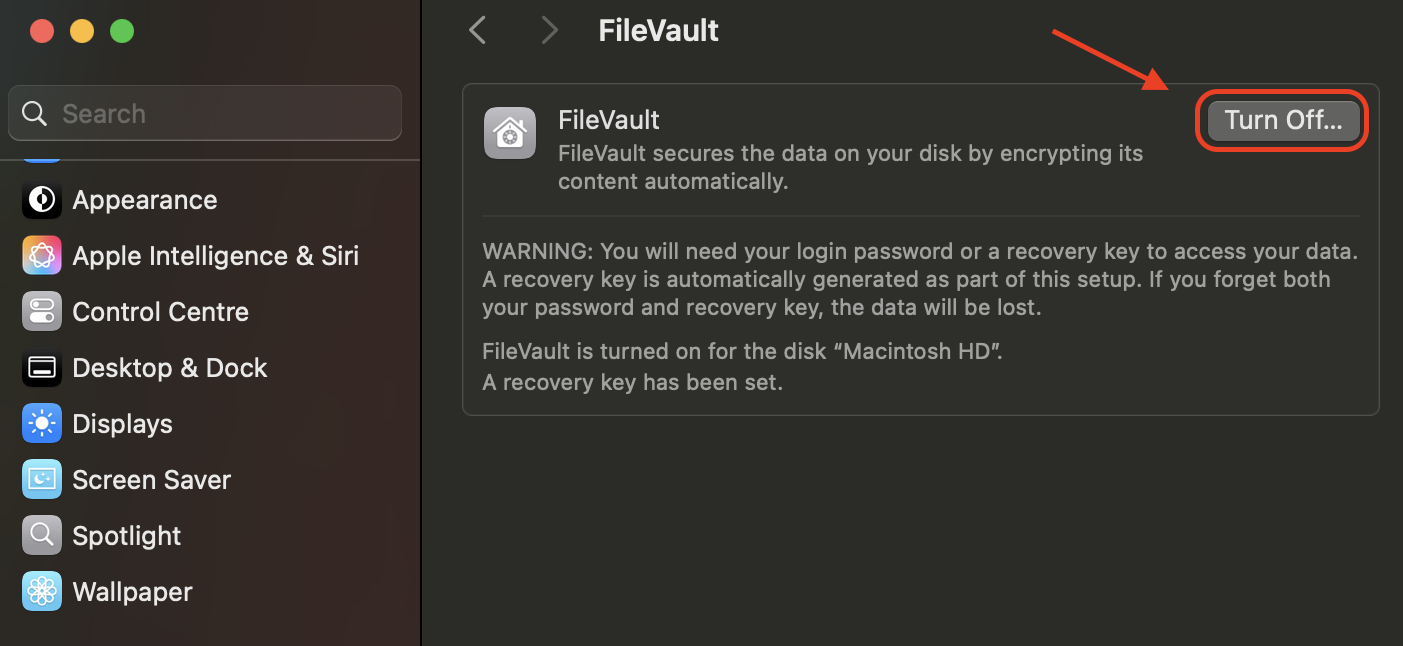
- Select FileVault, then click Turn Off FileVault (enter your password if prompted).
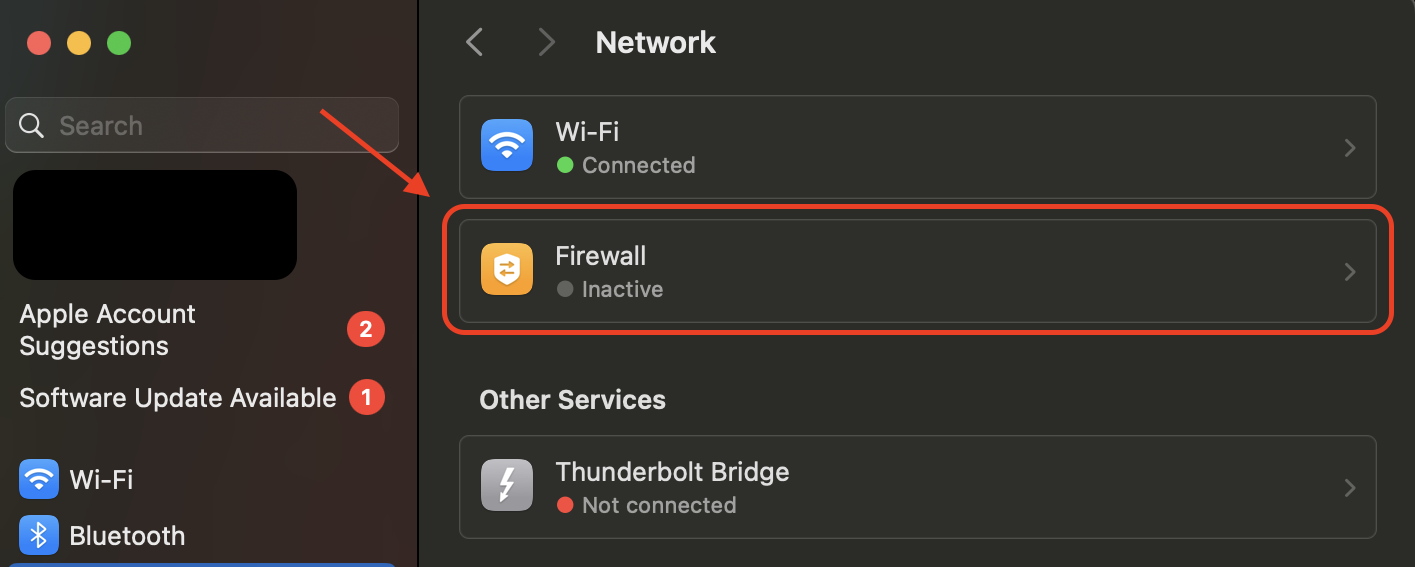
- Go to Network, select Firewall, and Turn Off Firewall to disable network restrictions.
- Restart your Mac and attempt the macOS Sonoma installation again.
- After installation, re-enable FileVault and Firewall for security.
5. Make sure you have a stable internet connection
A poor network can cause interruptions, corrupted installation files, or verification errors, so checking connectivity, optimizing your Wi-Fi settings, or using a more stable wired connection is essential. To ensure your internet isn’t the issue holding you back, follow our guide below:
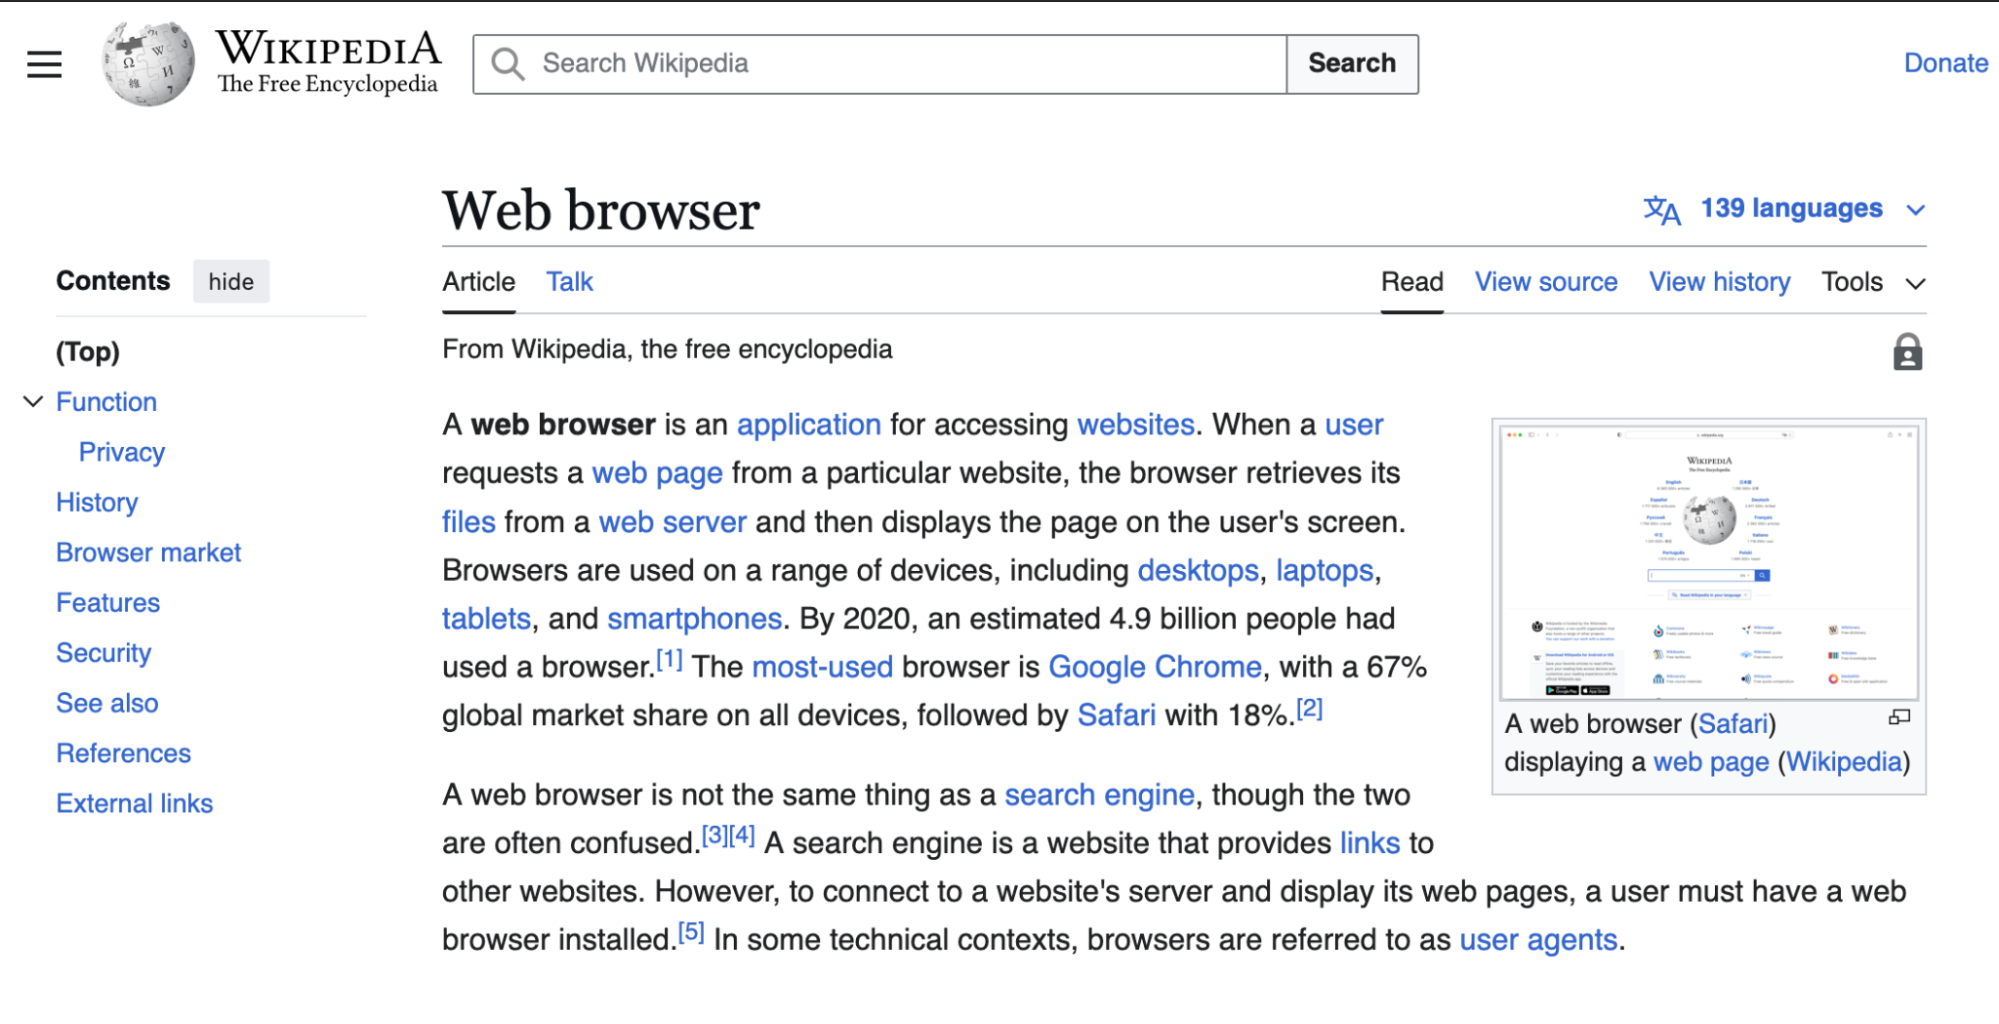
- Open a web browser and visit a website to confirm your Mac is online.
- Restart your Wi-Fi router or switch to a wired Ethernet connection for better stability.
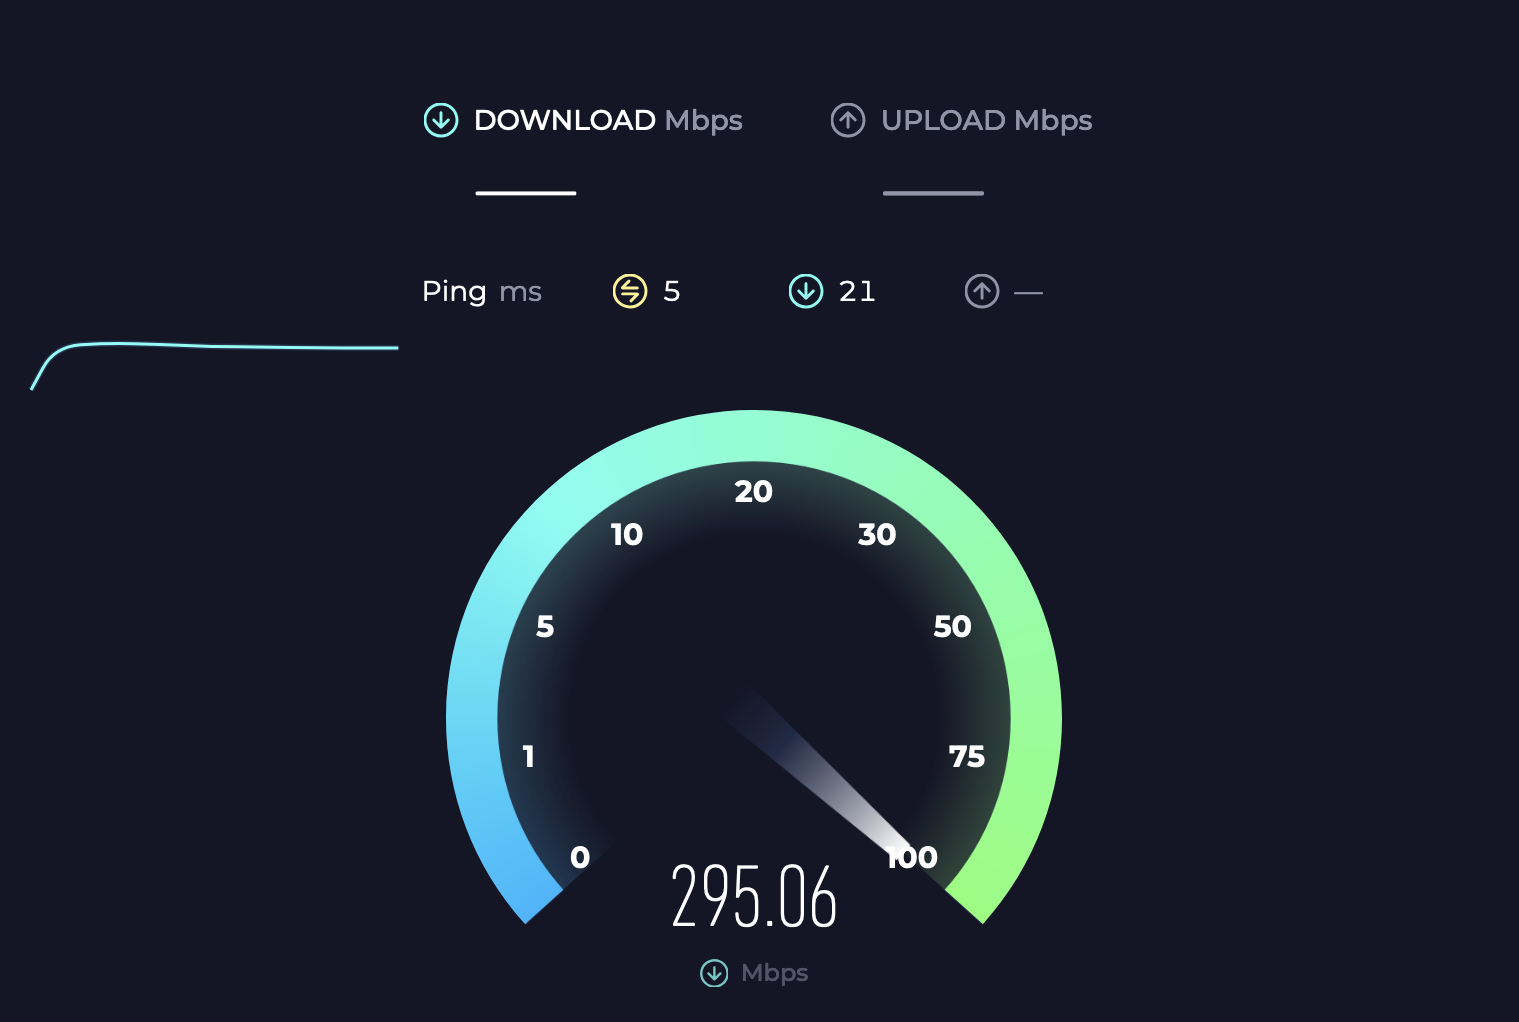
- Run a speed test to check if your internet is fast enough to download large files.
- Disconnect other devices that may be consuming bandwidth to free up resources.
- Move closer to the router or connect to a 5GHz Wi-Fi network for a stronger signal.
- Disable any VPN or proxy that might interfere with Apple’s servers.
- Restart your Mac and try downloading macOS Sonoma again.
6. Download macOS Sonoma in Safe Mode
If your Mac struggles to complete the update, booting into Safe Mode and running the installation can resolve the issue, helping to identify why won't your Mac update to Sonoma in the first place. To proceed with this, follow these steps:
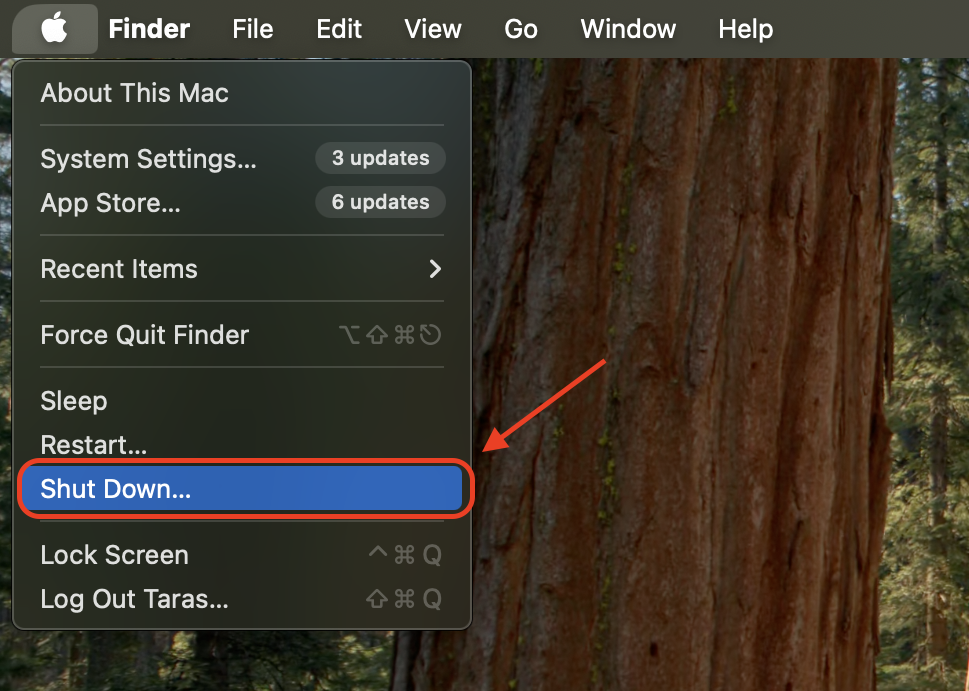
- Click the Apple menu and select Shut Down to turn off your Mac.
- Turn your Mac back on and immediately hold the Shift key until the login screen appears.
- Log in as usual. You should see Safe Mode in the top-right corner of the screen.
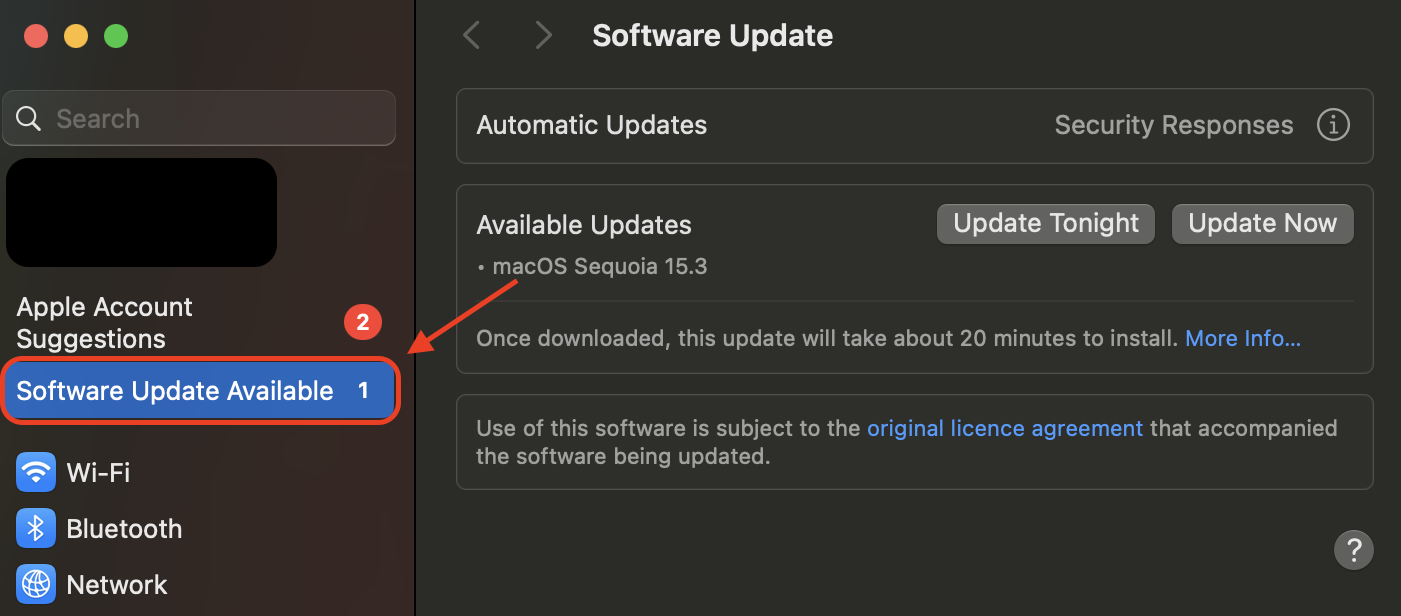
- Open System Settings, navigate to Software Update, and attempt to download macOS Sonoma.
- If the installation completes successfully, restart your Mac normally to exit Safe Mode.
- If the issue persists, download a fresh installer from Apple’s website instead of using the built-in updater.

7. Reset NVRAM/PRAM
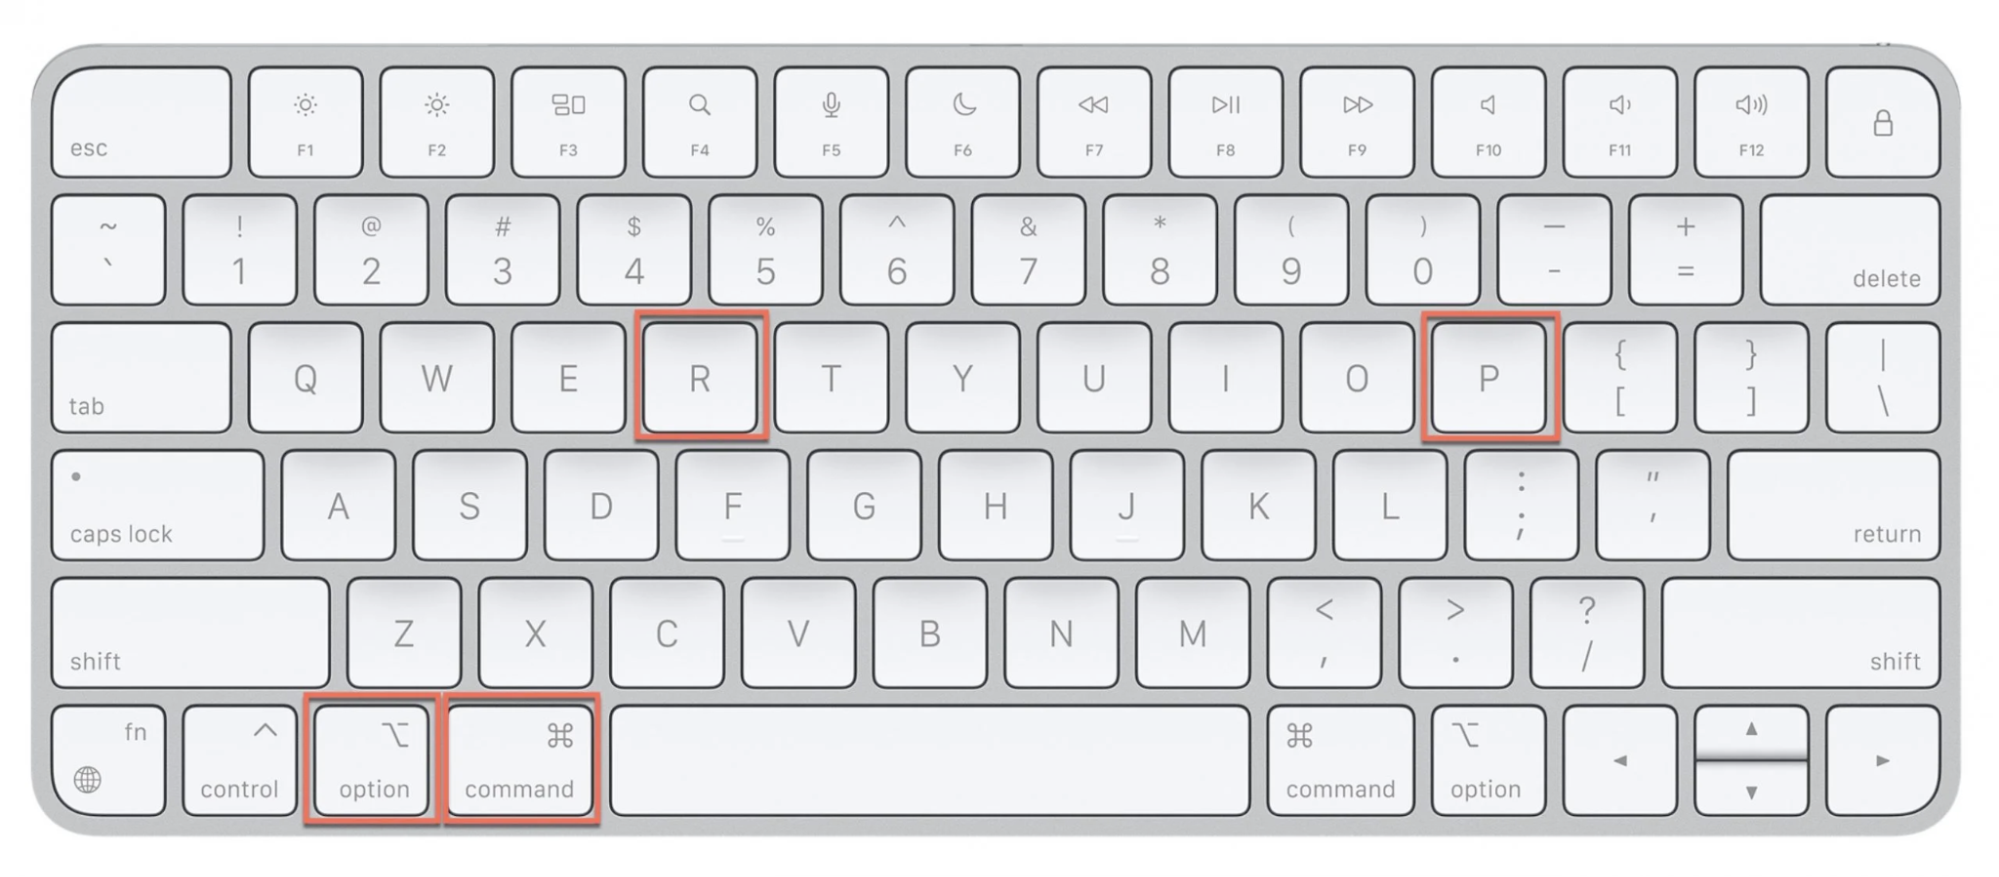
We’ve found that resetting NVRAM/PRAM helps resolve installation failures by clearing corrupted system settings related to storage, boot preferences, and network configurations. Do the following to perform the reset:
- Shut down your Mac completely before proceeding.
- Turn it on and immediately press and hold Option + Command + P + R on your keyboard.
- Keep holding the keys for about 20 seconds until your Mac restarts again.
- Release the keys and allow your Mac to boot up as usual.
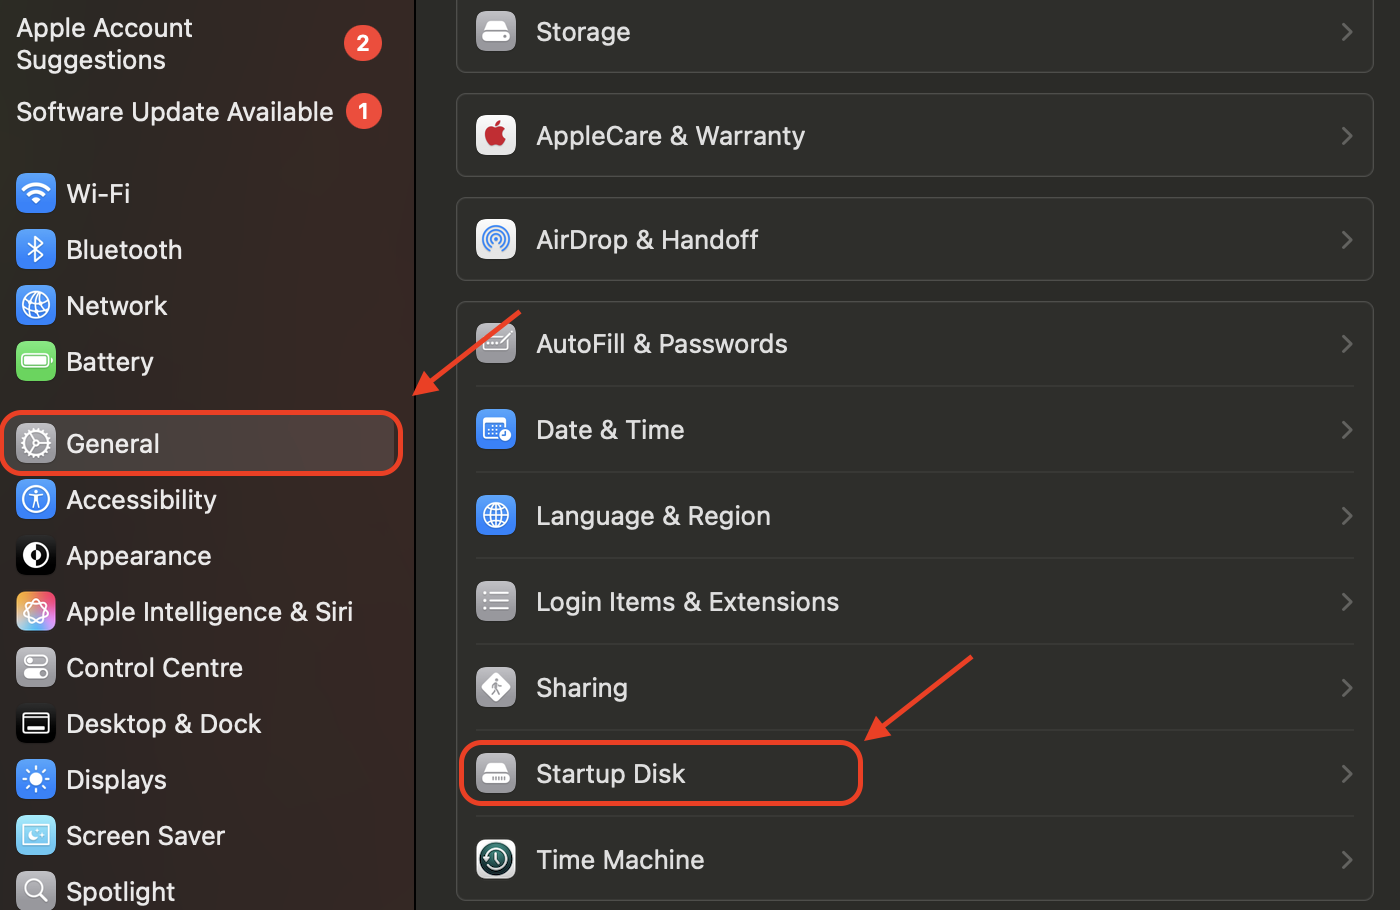
- Open System Settings > Startup Disk to verify that the correct boot disk is selected.
- Restart your Mac and try installing macOS Sonoma again.
- Resetting SMC (System Management Controller) may also help if the issue persists.
A helpful insight from our team:
Checking macOS Sonoma supported devices before attempting an update can save you time and prevent compatibility issues. Older Mac models may not receive the update, leading to failed installations or performance problems. Always verify your Mac’s eligibility on Apple’s official list before troubleshooting any update failures.
8. Clean install macOS Sonoma
If your Mac has persistent update failures, system crashes, or performance issues, erasing the drive and reinstalling the OS from scratch is often the best solution. To proceed with a clean install, follow our instructions:
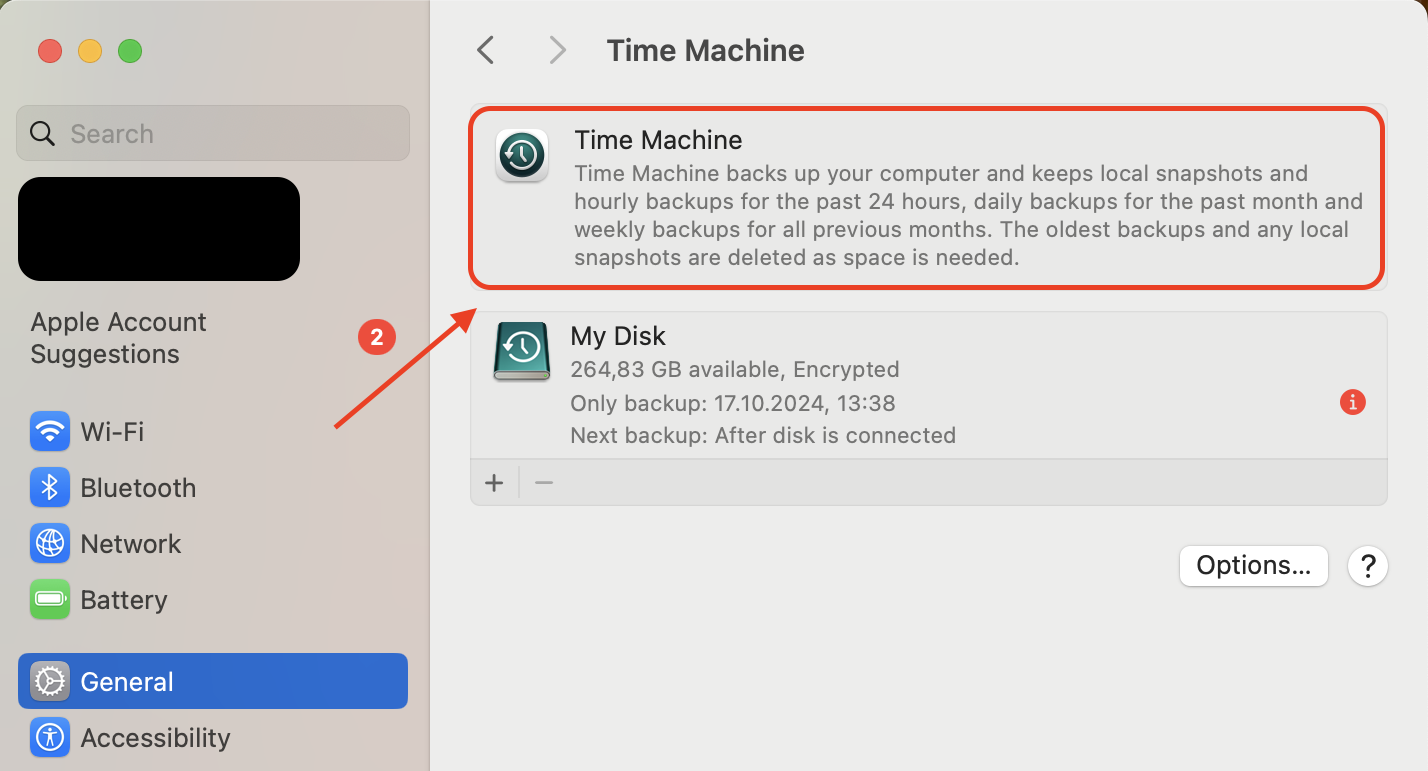
- Back up all important files using Time Machine, an external drive, or cloud storage.
- Restart your Mac and hold Command + R to enter macOS Recovery Mode.
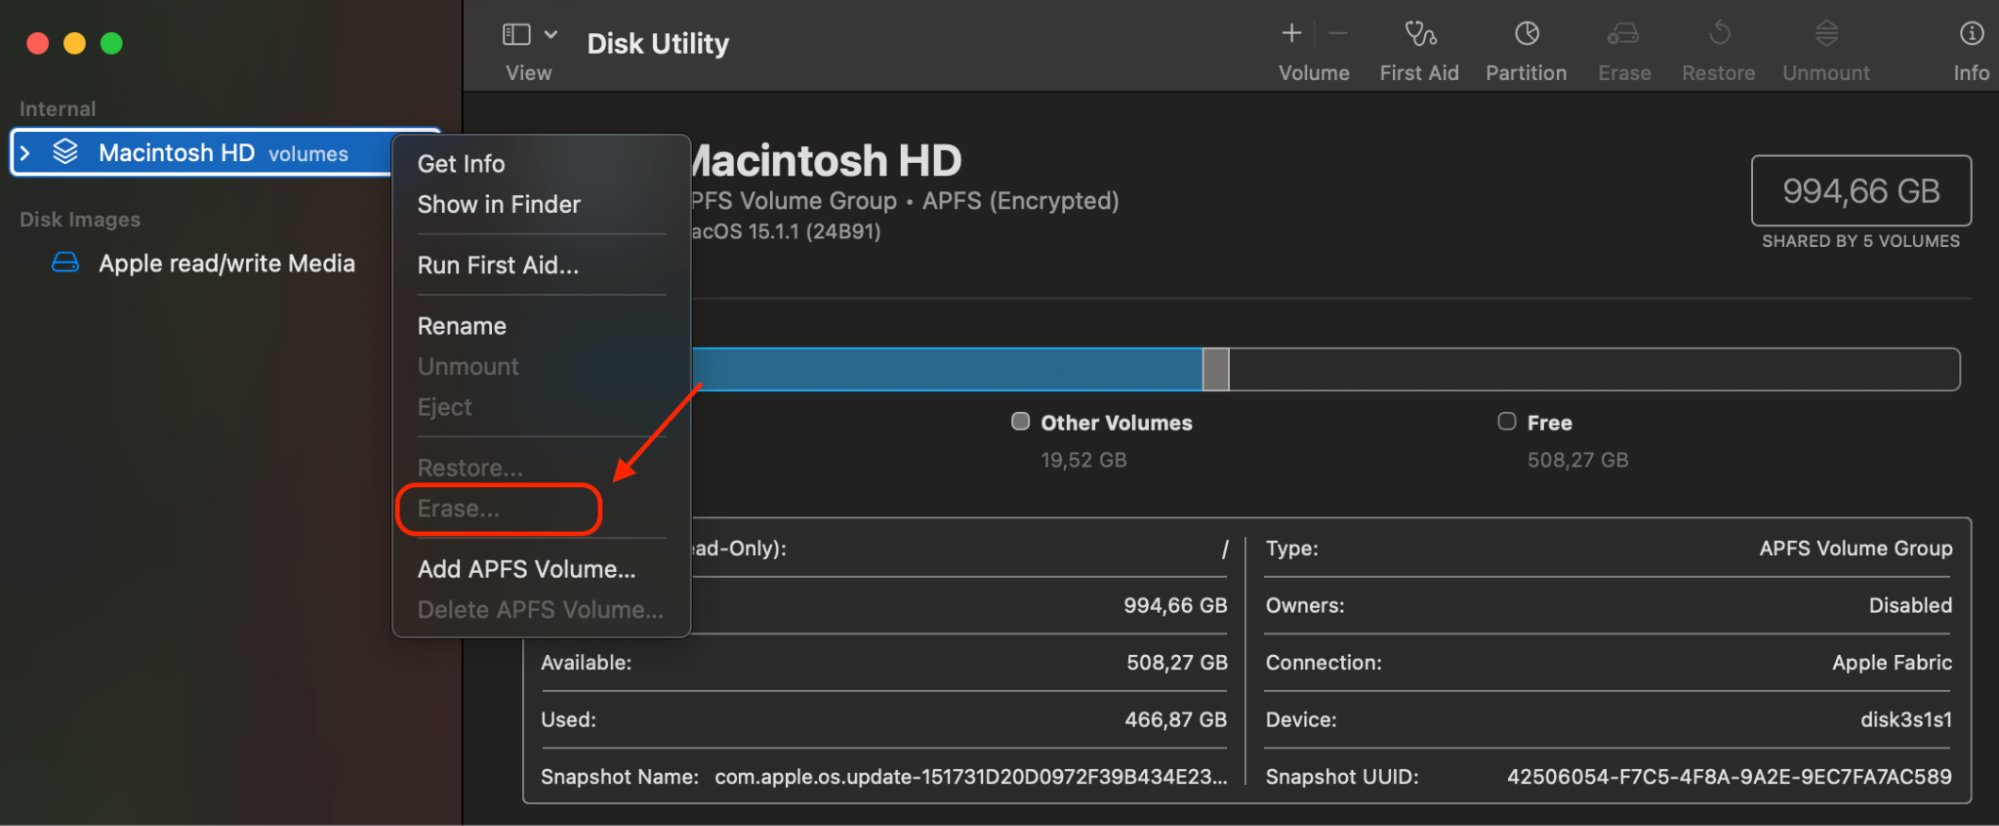
- Select Disk Utility, choose Macintosh HD, and click Erase.
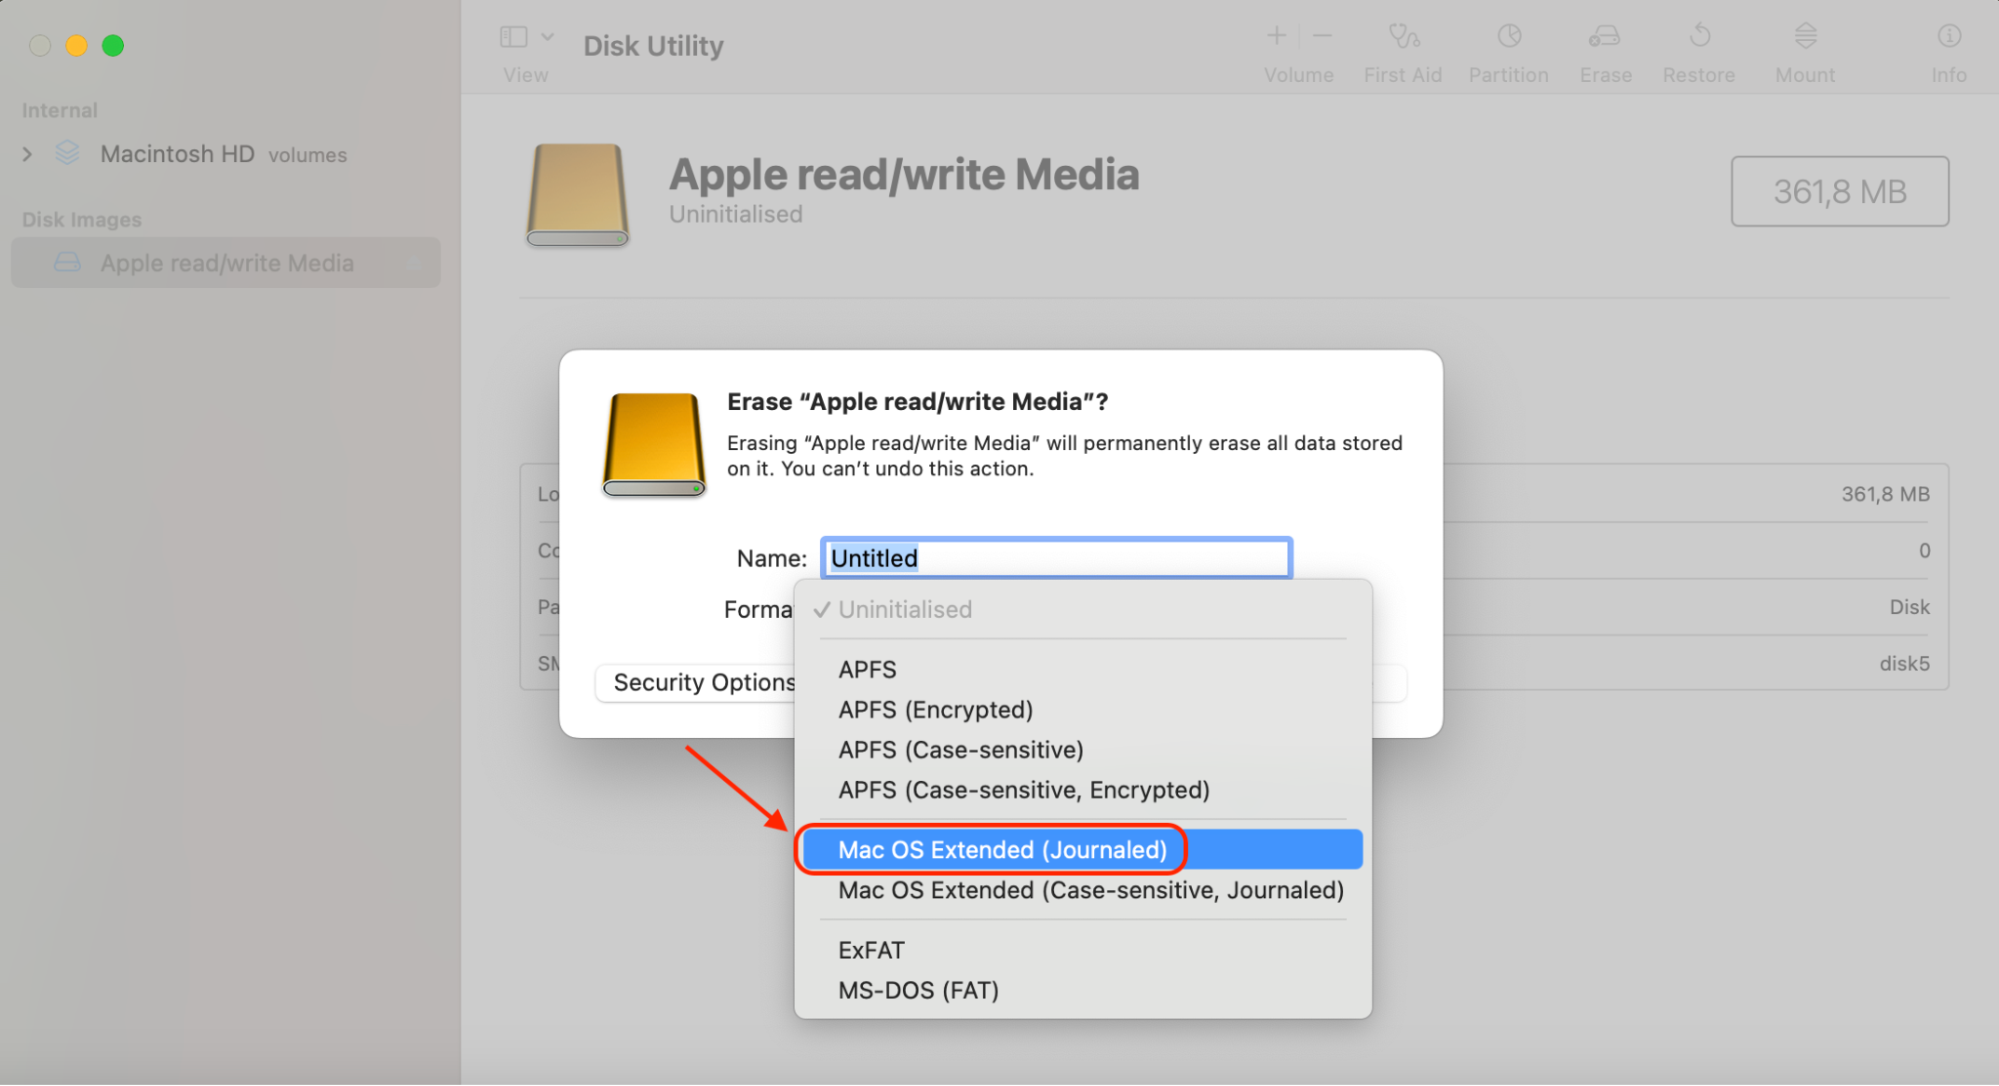
- Format the drive as APFS or Mac OS Extended (Journaled) before continuing.
- Return to the macOS Utilities screen and select Reinstall macOS.
- Follow the on-screen instructions to complete the fresh installation of macOS Sonoma.
- After installation, restore your files from the backup and reinstall the necessary applications.
Conclusion
Users often can’t download macOS Sonoma due to connectivity issues, insufficient storage, software conflicts, or system settings that interfere with the update process. Ensuring a stable internet connection, freeing up disk space, checking macOS compatibility, and resetting system memory can resolve most installation failures. If these solutions don’t work, we recommend a clean install to eliminate any deeper issues.
MacKeeper’s Premium Services provide expert assistance in diagnosing and fixing macOS Sonoma installation problems. With one-on-one support, you’ll get personalized troubleshooting to resolve stubborn update failures efficiently.
To access MacKeeper’s Premium Services:
- Open MacKeeper after installing it on your Mac.
- Click Premium Services in the sidebar.
- Select Chat Now to start a secure conversation with a Mac expert.
