In this article you will find the following:
Creating folders or labels in Gmail is a quick and easy way to keep your email in order. Here’s how to do it:
- Sign into your Gmail account.
- In the sidebar, click the plus sign next to Labels.
- Give your label a name.
- Choose if you want to nest the label under another label.
- Click Create.
If you have hundreds or even thousands of emails in your Gmail account, it can be hard to find what you’re looking for. Thankfully, Google’s popular webmail client lets you put emails under different labels. Essentially, this means you can create a folder in Gmail for specific emails.
Technically, though, they aren’t actually folders. As their name suggests, they’re labels. They act like folders but with an added advantage—you can apply multiple labels to the same emails, but the emails will only exist in one place.
As well as helping you to sort your emails into a logical order, Gmail labels can be used automatically, so incoming emails go straight into the right folders.
But if you’re new to this Gmail feature, you’ve come to the right place. In our guide, we’ll show you how to create a folder in Gmail on Mac and other Apple devices.
Before we start
Your email address is more than a place to pick up messages. It’s also used to identify yourself on other websites, so it has real value to hackers. Thankfully, you can protect yourself with MacKeeper’s ID Theft Guard. If your email address is compromised, you’ll be notified so you can take action before it’s too late.
- Download MacKeeper and open the app.
- Select ID Theft Guard from the sidebar.
- Click Scan new email.
- Enter the email address you want to protect, and click Start Scan.
- Select Continue, then toggle on Data Breach Monitor.
MacKeeper will now watch out for you in the background. Plus, it’ll optimize and protect your Mac. Check it out today and see what it can do.
How to make a new folder in Gmail on Mac
Here’s how to set up folders in Gmail on Mac:
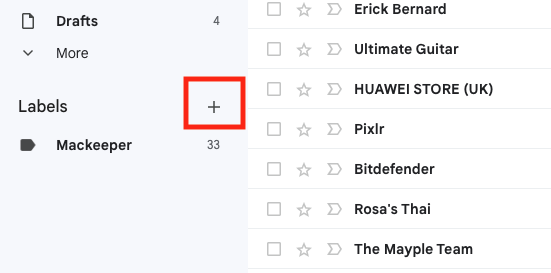
- Log into your Gmail account via your Mac web browser. Go to the sidebar and click the plus sign next to Labels.
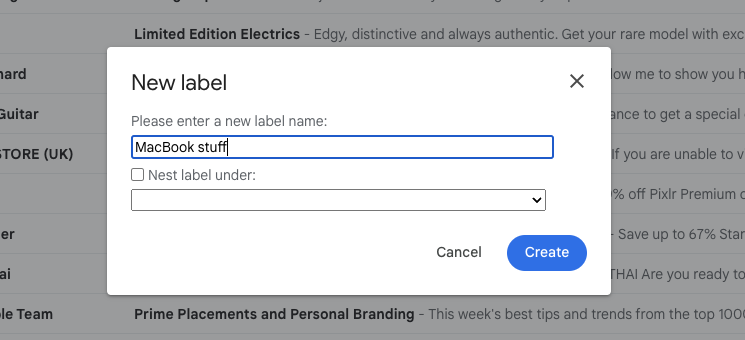
- Type in a name for your label.
- Indicate whether your label will be nested under another label, making it a sub folder. Click Create.
That’s all it takes. As you see, If you’re viewing Gmail through a web browser on a Mac desktop or MacBook, creating folders is easy.
You can now click and drag emails from your Gmail account to your new folder.
How to create folders in Gmail on mobile
Away from your computer? Follow these steps to make Gmail folders on iPhone:
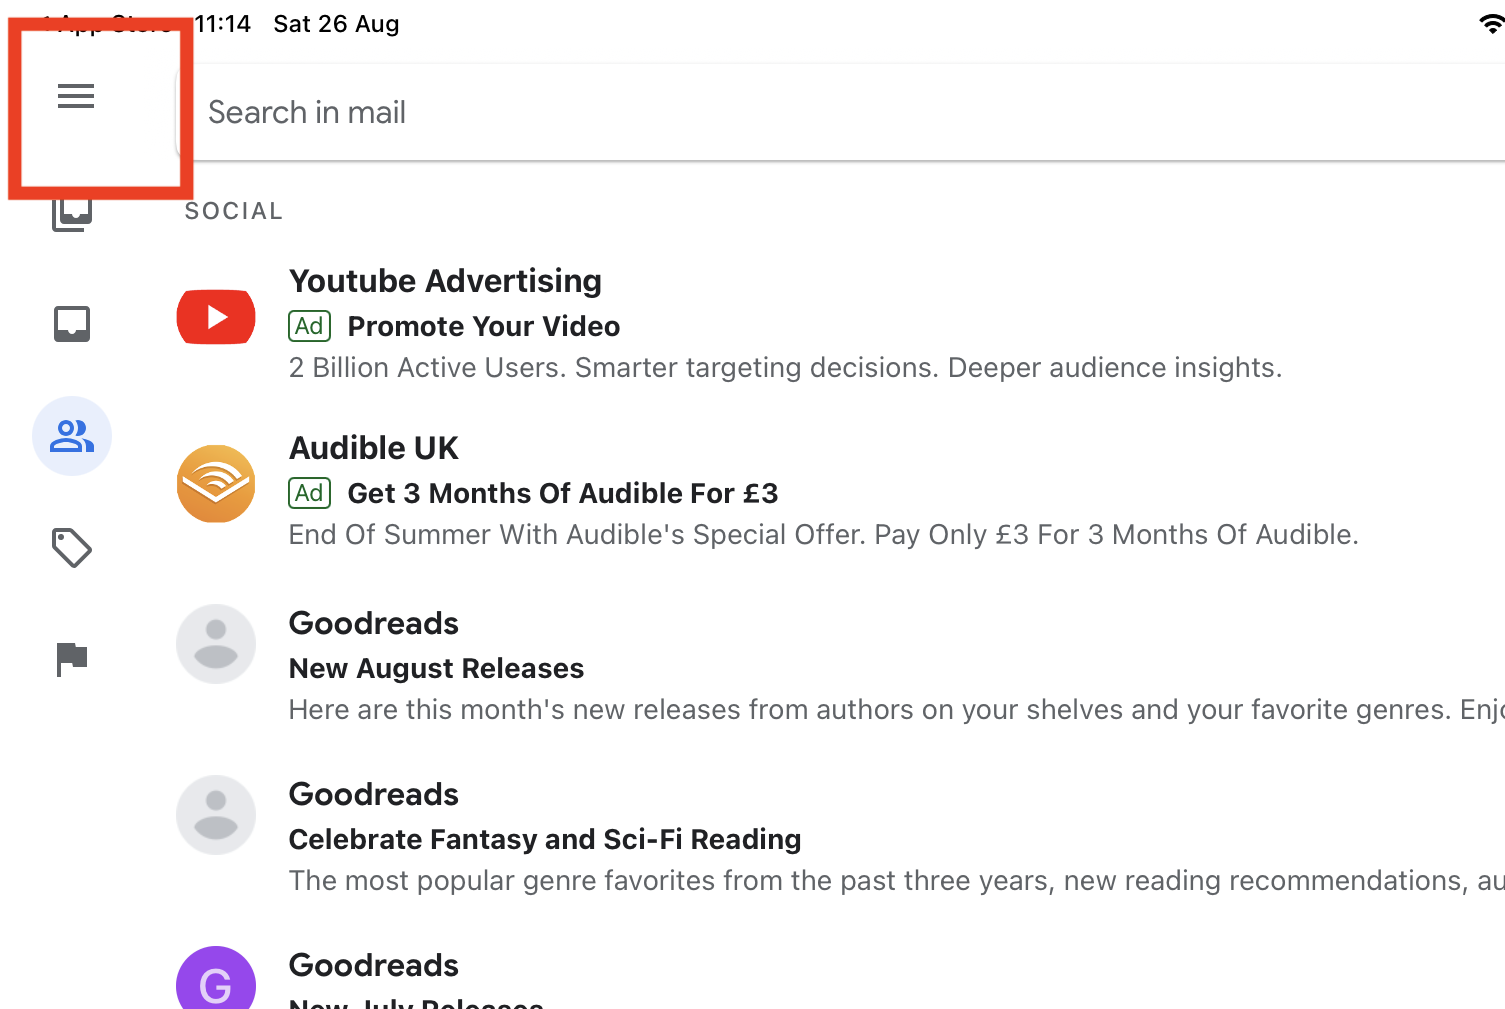
- Open and log into the Gmail app. Tap the hamburger menu icon in the top left.
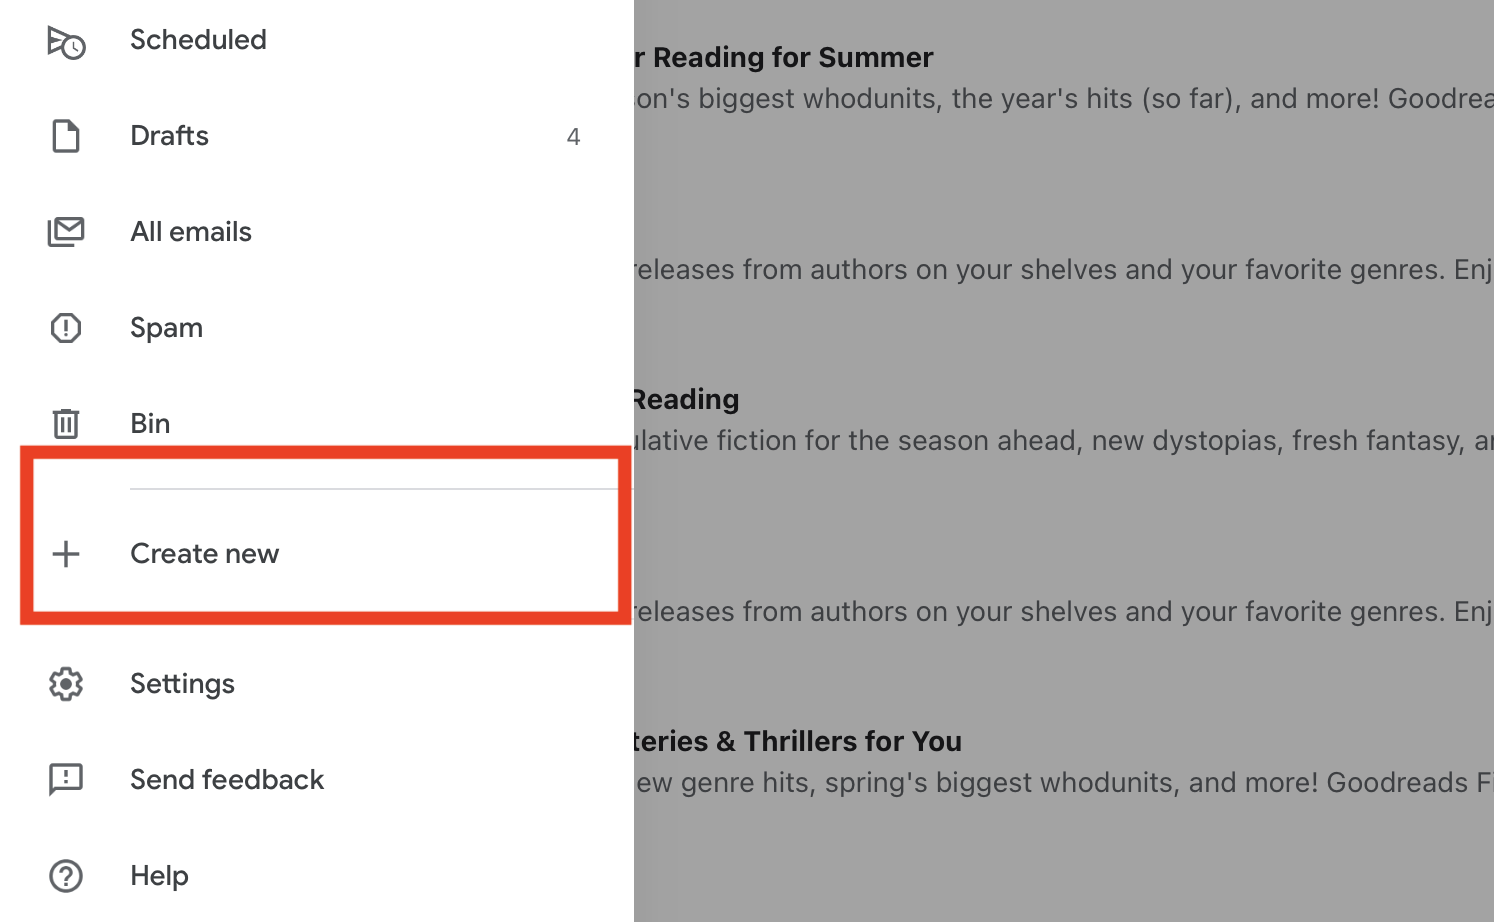
- Under Labels, tap Create new.
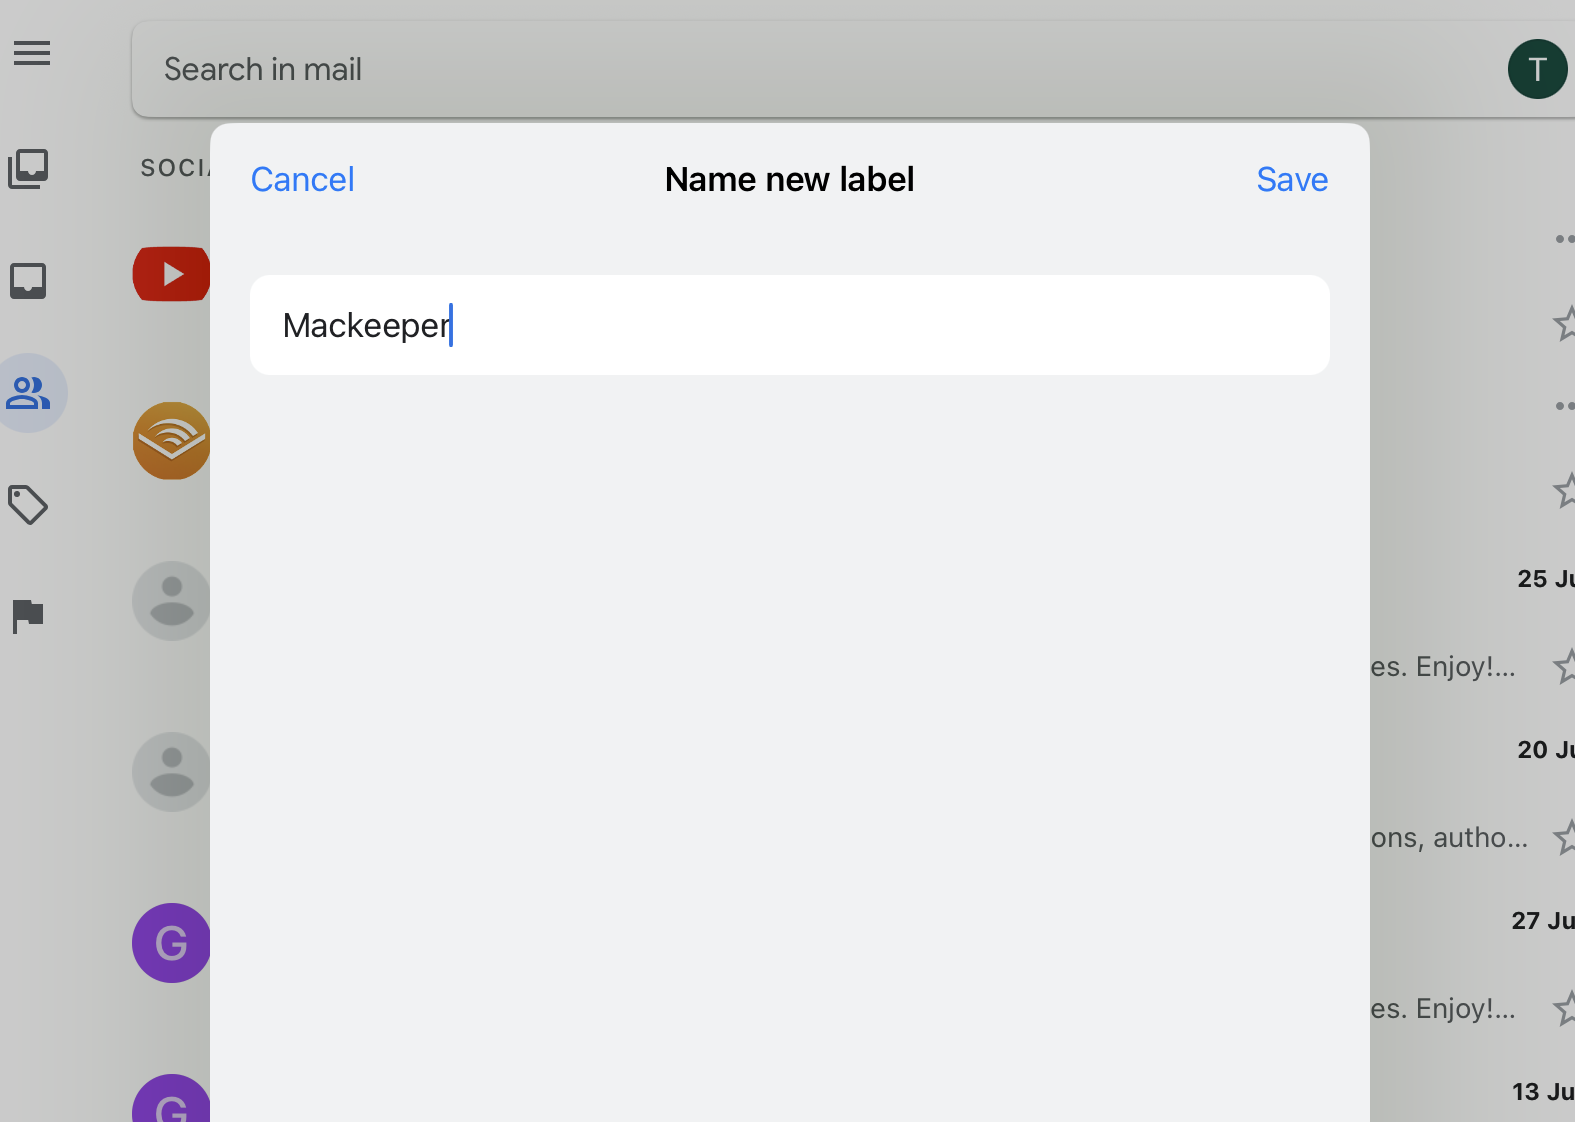
- Give your label a name, and tap Save.
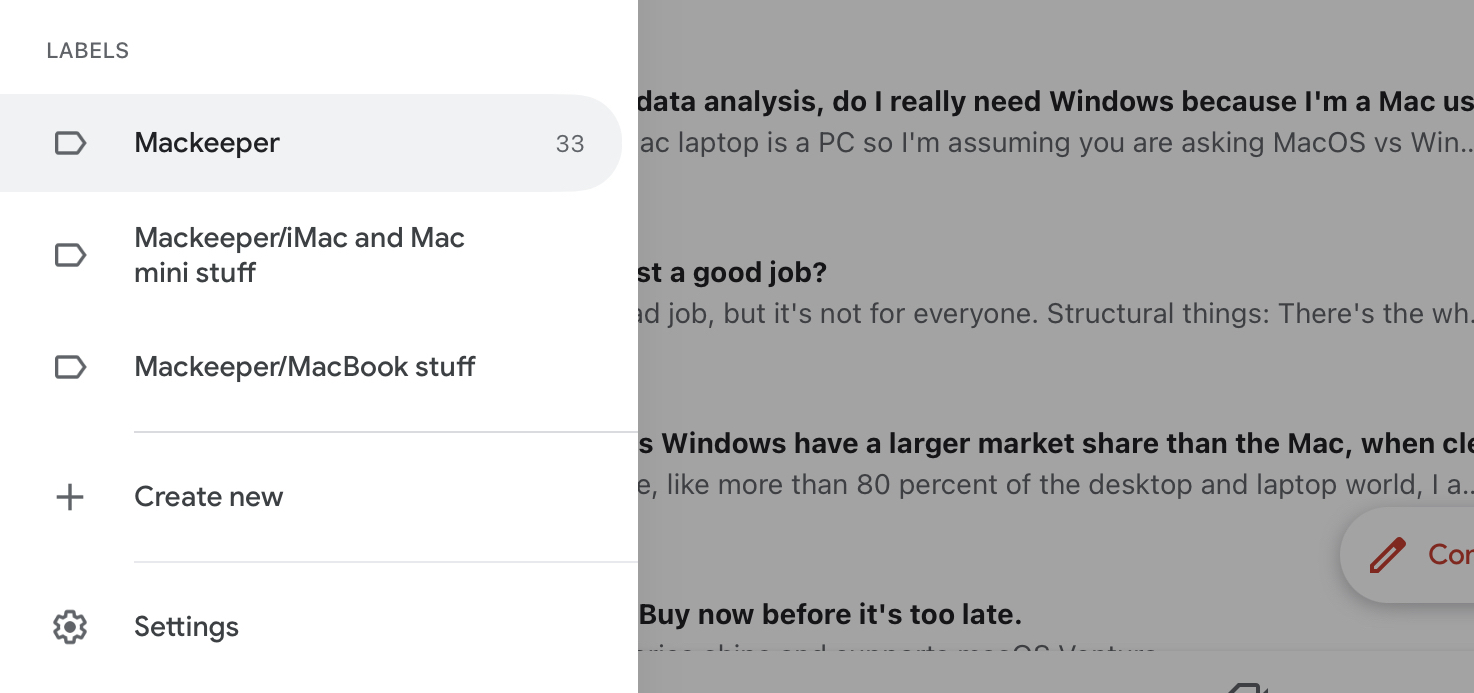
- Your new folder will now appear in the Gmail menu.
Worry not—it’s just as easy to make a folder in Gmail using an iPad app—the process is identical to the iPhone.
Note from our experts: Sadly, there’s no option to nest folders in the Gmail app on iPhone, so the Labels feature isn’t quite as useful for file organization here as it’s on Mac. Nevertheless, it’s still a good way to keep your mailbox as tidy as possible.
Editing existing folders in Gmail
Here’s how to edit existing Gmail folders:
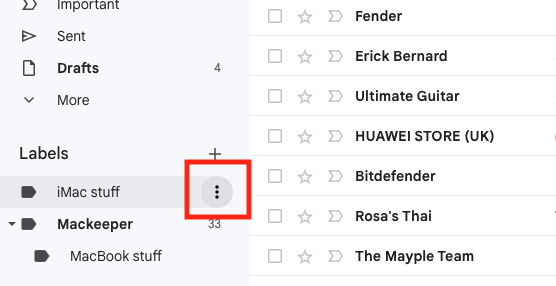
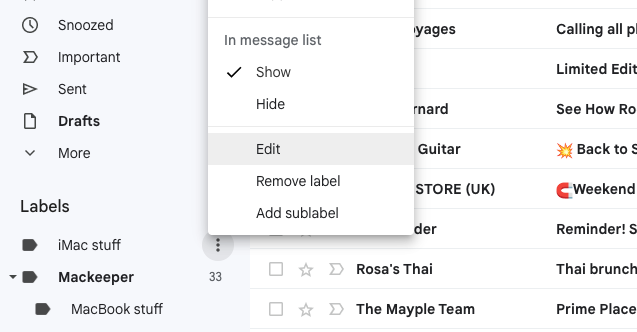
- Log into Gmail using your Mac web browser. Hover over a label in the sidebar, and click the three dots on the right.
- Click Edit.
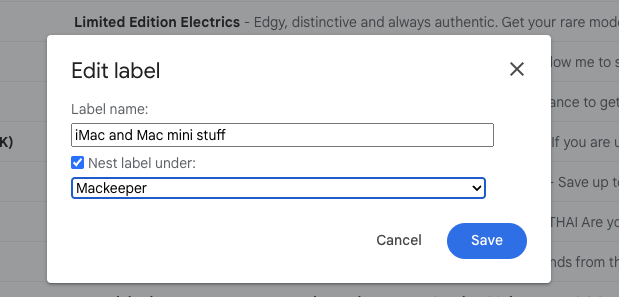
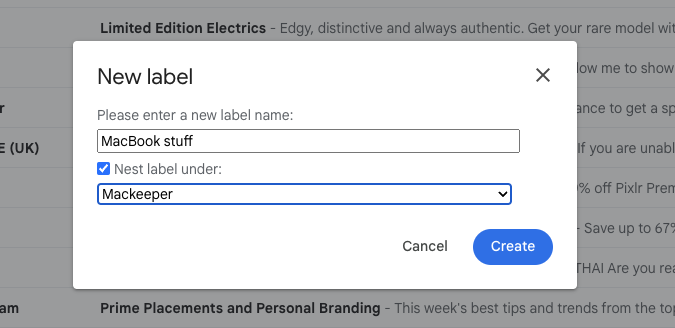
- Change the name of the label and/or move it to another label. Click Save.
Once you’ve created folders in Gmail, you can continue to make changes to them. You can only do this on a desktop or laptop machine, so hop onto your iMac or MacBook Air, and let’s get started.
Adding a new sub label to a Gmail label
Follow these steps to make a new Gmail subfolder:
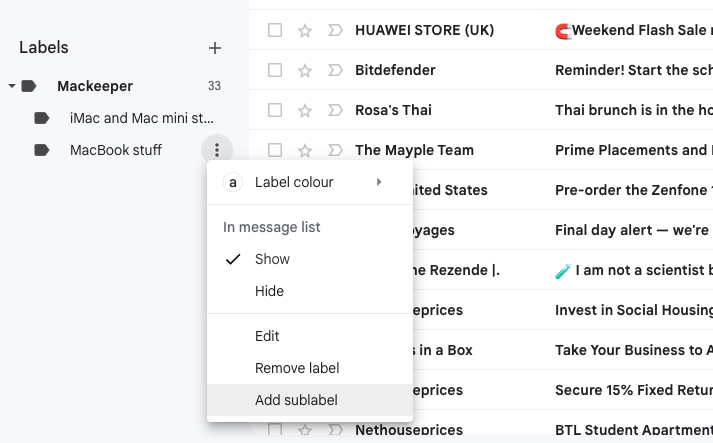
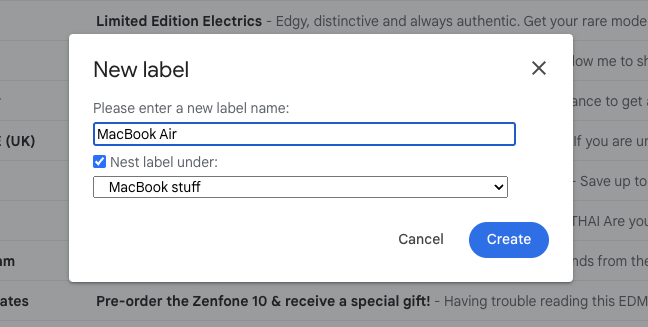
- Log into Gmail using your Mac. Hover over a label in the sidebar, and use the three dots to open the label menu. Select Add sublabel.
- Give your sublabel a name and click Create.
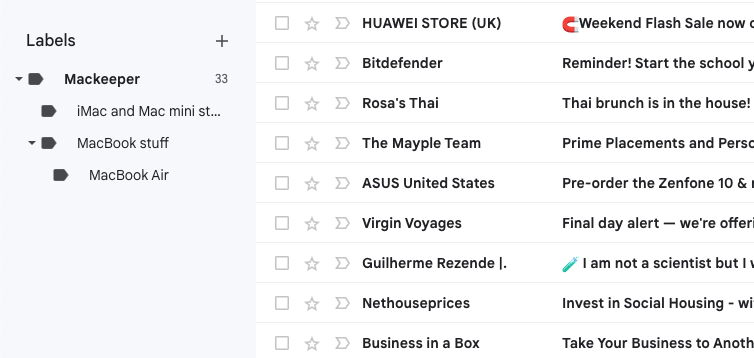
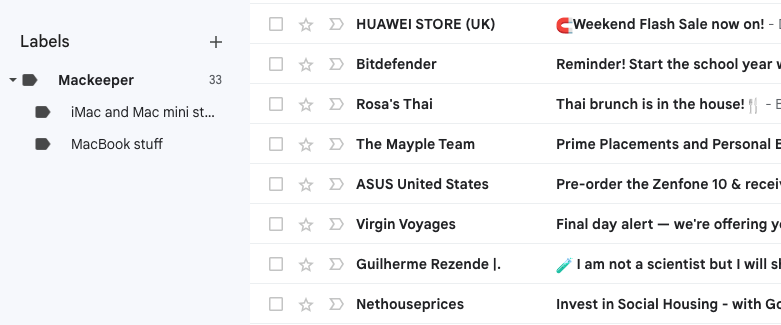
- Your new sublabel will now be ready.
As well as turning existing labels into sub folders, you can also create new Gmail sub folders from scratch.
Removing existing labels in Gmail
Here’s how to delete a Gmail label:
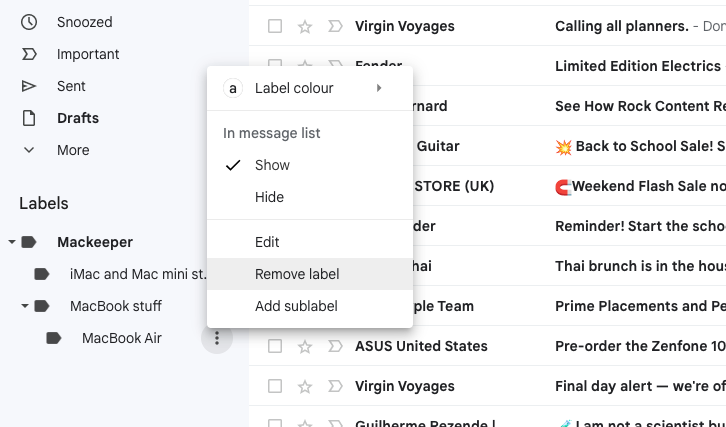
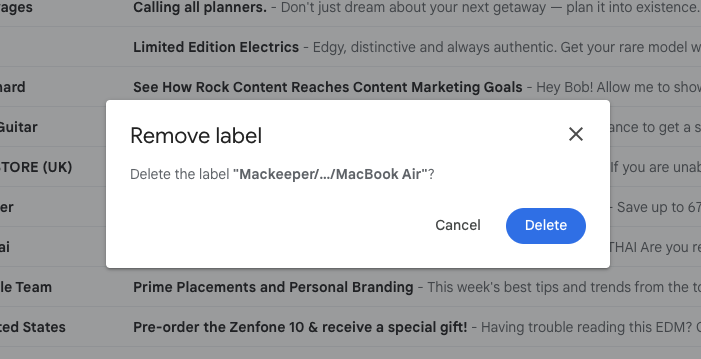
- Using Gmail in your Mac’s web browser, hover over a label in the sidebar, and click the three dots to open the label menu. Click Remove label.
- Click Delete to confirm you want to remove the label.
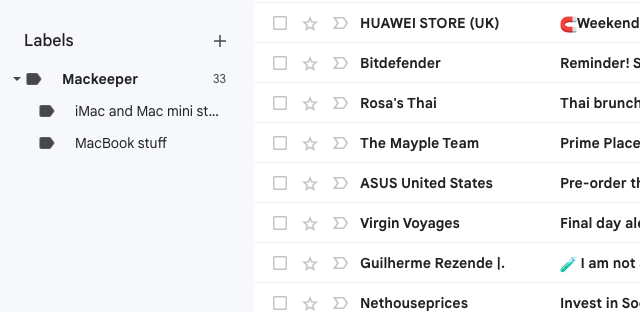
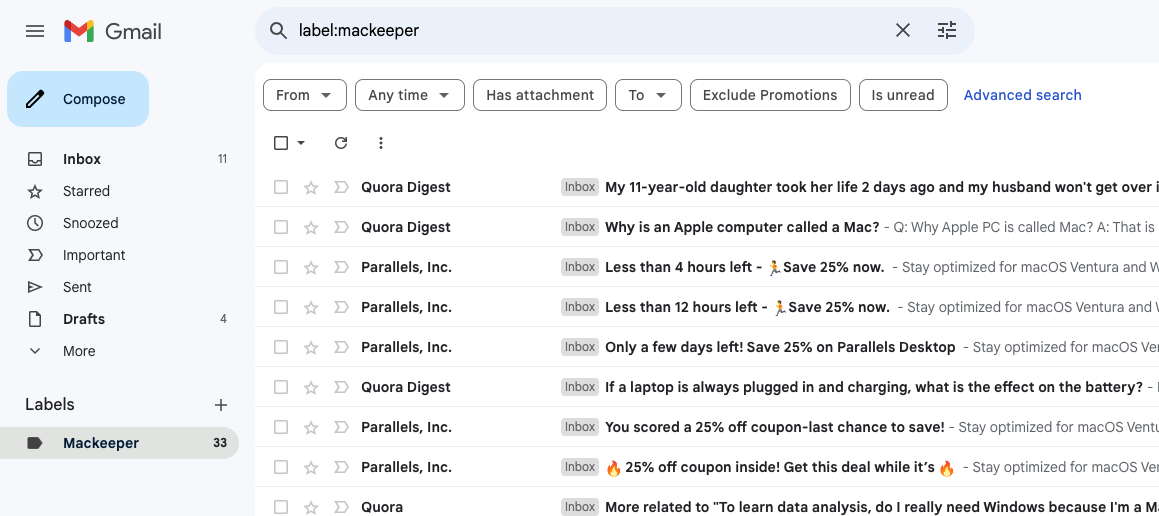
- The label will now be gone from your sidebar in Gmail.
In addition to editing labels in Gmail, you can also remove them completely. Because they’re not actually folders, and this is perfectly safe. Your mail won’t be deleted from your inbox, and any other applied labels will remain in place.
How to automatically apply labels in Gmail
You need to filter your emails so you can apply a label to the right ones:
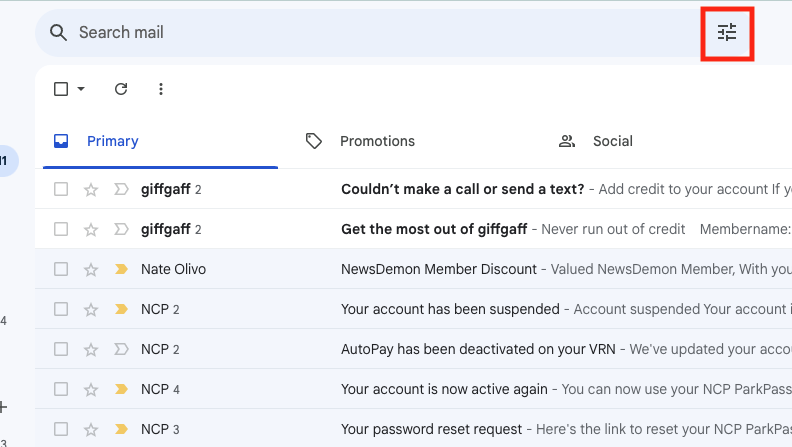
- In your Gmail account, click the filter icon on the right-hand side of the search bar.
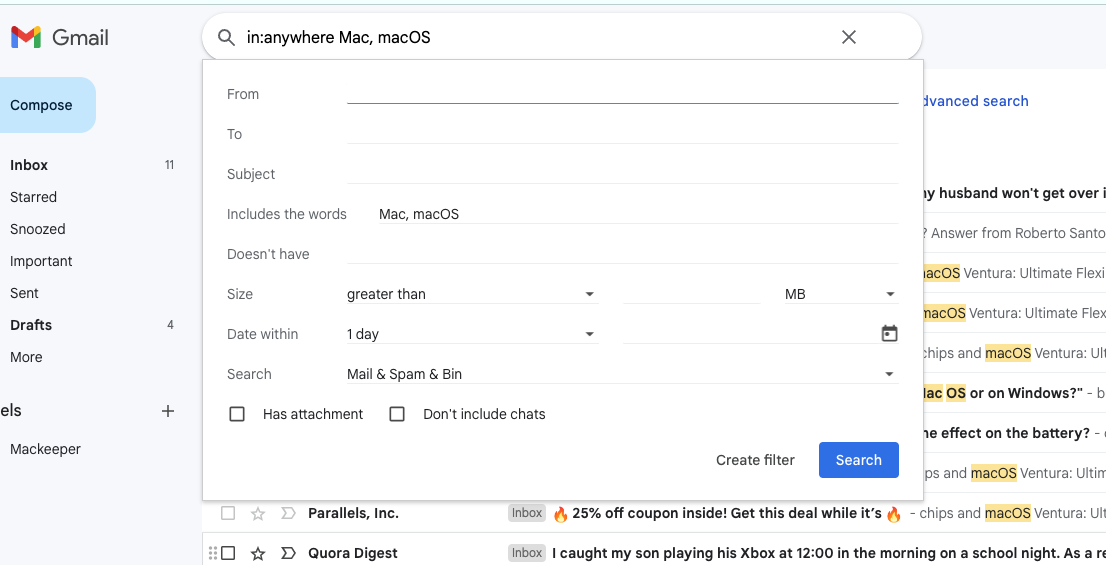
- Enter all the information you need to find the emails: a particular sender, keywords, file size, etc. Click Create filter.
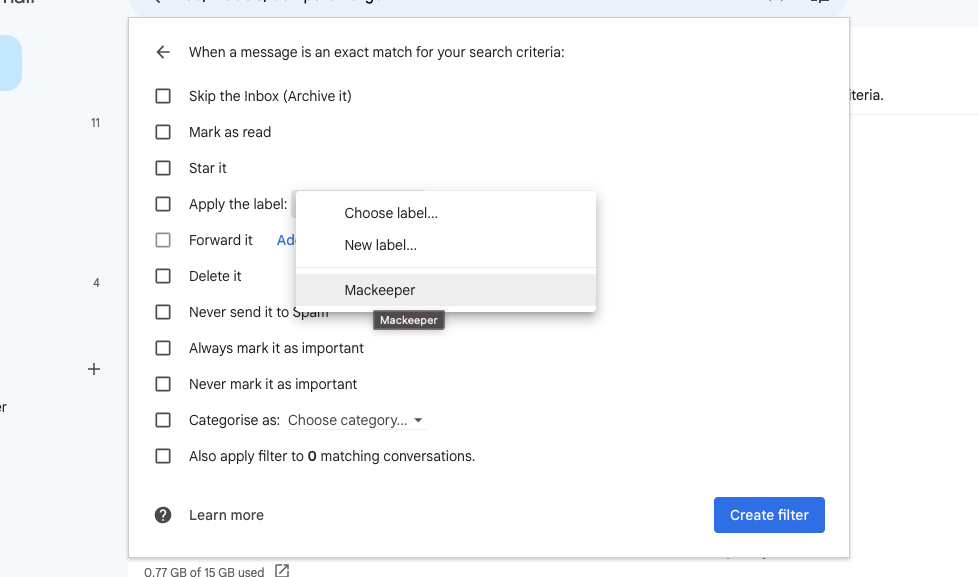
- Use the dropdown menu next to Apply the label to choose a label.
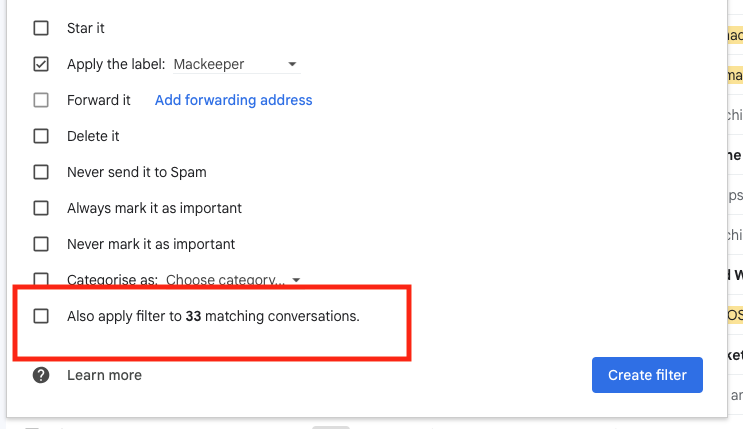
- State if you want to apply this label to existing emails.
- Click Create filter.
To automatically separate emails under different labels, you need to create rules. By doing so, you can easily sort specific emails based on a variety of criteria. For example, you could set up your Gmail to label emails from certain contacts or to separate work emails from personal ones.
Benefits of creating labels in Gmail
Although Gmail’s labels can be used like folders, they aren’t actually folders. In this case, your emails will have several labels applied to them at the same time. For example, a separate label for all your work emails or different labels for each project or contact.
It doesn’t mean how many labels you attach to an email, and the email itself won’t be affected if you delete labels. This makes Gmail’s labels a very effective way to organize and find particular messages.
Email folders vs labels—which one comes out on top? For us, it has to be labels. It’s just so convenient being able to apply multiple labels without actually having to move emails.
Email folders | Gmail labels |
| Emails can only be found in one place, so there’s potentially less confusion | Emails can have multiple labels applied to them |
| Deleting folders may delete emails, too | Deleting labels doesn’t remove emails, and other labels still apply |
| Having emails in different folders might save time when archiving emails offline | Labels only work in Gmail |
Get the most out of Gmail labels
Now that you know how to use Gmail’s Labels function, you can organize and optimize your inbox with ease. Although, strictly speaking, they aren’t folders, you can use them in a similar way to folders and get all the benefits you would with a traditional email folder system.
Of course, if you’re running low on Gmail inbox space, labels aren’t going to help. You’ll either need to buy more storage or clear out unwanted messages.
Looking to keep your local Mac files in order? Check out our guide on how to organize files on Mac. And if you’re security-conscious, you can also learn how to encrypt email on Mac. As always, make sure your email address hasn’t fallen into the wrong hands. Using MacKeeper’s ID Theft Guard, you can easily protect yourself from potential identity fraud, protecting and optimizing your Mac as well.


