In this article you will find the following:
Are you getting frustrated by the command not found error message on your Mac? It can certainly become a pest when your laptop is slow while you use your Mac for business or leisurely browse the internet. Nobody likes interruptions as well as the risk of data being unsaved, right?
But don't worry, we understand your struggle. Which is why, in this article, we’ll address how to troubleshoot the Mac command not found message in detail.
Let's begin by identifying the possible reasons for the command not found error message to show on a Mac.
- Incorrect path settings: The command might not be accessible due to an incorrect configuration in the system's PATH variable
- Missing or corrupted binaries: If the command's executable file is missing or corrupted, the system cannot locate it
- Typo errors: A simple typo in the command syntax can trigger the command not found error
- Package or software not installed: Certain commands rely on specific packages or software that might not be installed on your Mac.
Before we start:
Consider the possibility that a specific app might be malfunctioning, and thus, causing the command not found error message. To ensure all apps are running smoothly and to help prevent future errors, we recommend using MacKeeper's Update Tracker. This will keep your apps up-to-date and fix any app-related issues, and in turn, will ensure a stress-free Mac experience.
Here are the instructions to use MacKeeper's Update Tracker:
- Download and open the MacKeeper app on your Mac
- Find and click on the Update Tracker option from the MacKeeper's main menu
- Click on the Scan for Updates button to allow MacKeeper to quickly scan and detect any outdated apps. Once the scan is complete, MacKeeper will present a list of apps that require updates
- To update all the apps at once, simply click on the Update All button. Alternatively, you can choose to update specific apps by ticking the box next to the particular app you want to update and then click Update.
Alongside this article, you can also explore our other comprehensive guide on how to use Terminal on Mac if that’s also something you’d like assistance with.
How to fix "command not found" error in Mac
To fix the command not found error in your Mac Terminal, ensure that the command is spelt correctly, while its path is included in the system PATH variable.
Don't let the command not found error stop you from using your device. To troubleshoot and resolve the issue in your Mac Terminal, follow these steps:
- Verify command syntax for any typos or errors
- Ensure the necessary packages are installed on your Mac
- Manually set up the path to fix any path-related issues
- Install additional libraries, or reinstall any missing, if certain commands require them
- Consider this a last resort to fix severe issues or missing system files.
Also, during this check-up, you may find it helpful to learn more about how to use Terminal on Mac.
Check spelling
One of the most common reasons for the command not found error is incorrect syntax. Even a small typo can cause this frustrating issue. To fix it, carefully check and review the command you entered, looking for any spelling errors or mistakes in the syntax.
To avoid the command not found error, follow these recommendations:
- Verify the correct spelling of the command
- Check for proper spacing and punctuation
- Make sure the correct spellings, spacing and punctuation are consistent
- Look for missing characters or extra symbols
- Refer to the official documentation for the correct command syntax.
Have you verified that all your spelling is correct? Then move to the next section about the package installation.
Make sure the package is installed
If the command not found error message persists, it could be due to the necessary package not being installed on your Mac. Certain commands require specific packages to function correctly.
Here's how to check if the required package is installed:
- Open the Terminal app on your Mac
- Enter the command associated with the package you suspect is missing. Normally, it’s $PATH. Then press Enter
- If the package is not installed, you'll see an error message indicating the package is missing.


If you do encounter a missing package error, follow these steps to install it to the appropriate folder:
- Identify the name of the missing package from the error message
- Use the package manager appropriate for your macOS version
- Install the package by entering the command specific to the package manager.
Make sure to regularly update your package manager to keep all packages up-to-date.
Set $PATH environment
Despite most packages setting up the path automatically, occasionally users might encounter the command not found error message due to path-related issues. In such cases, manual configuration of the path environment becomes a necessity.
Here's a step-by-step guide on how to do it:
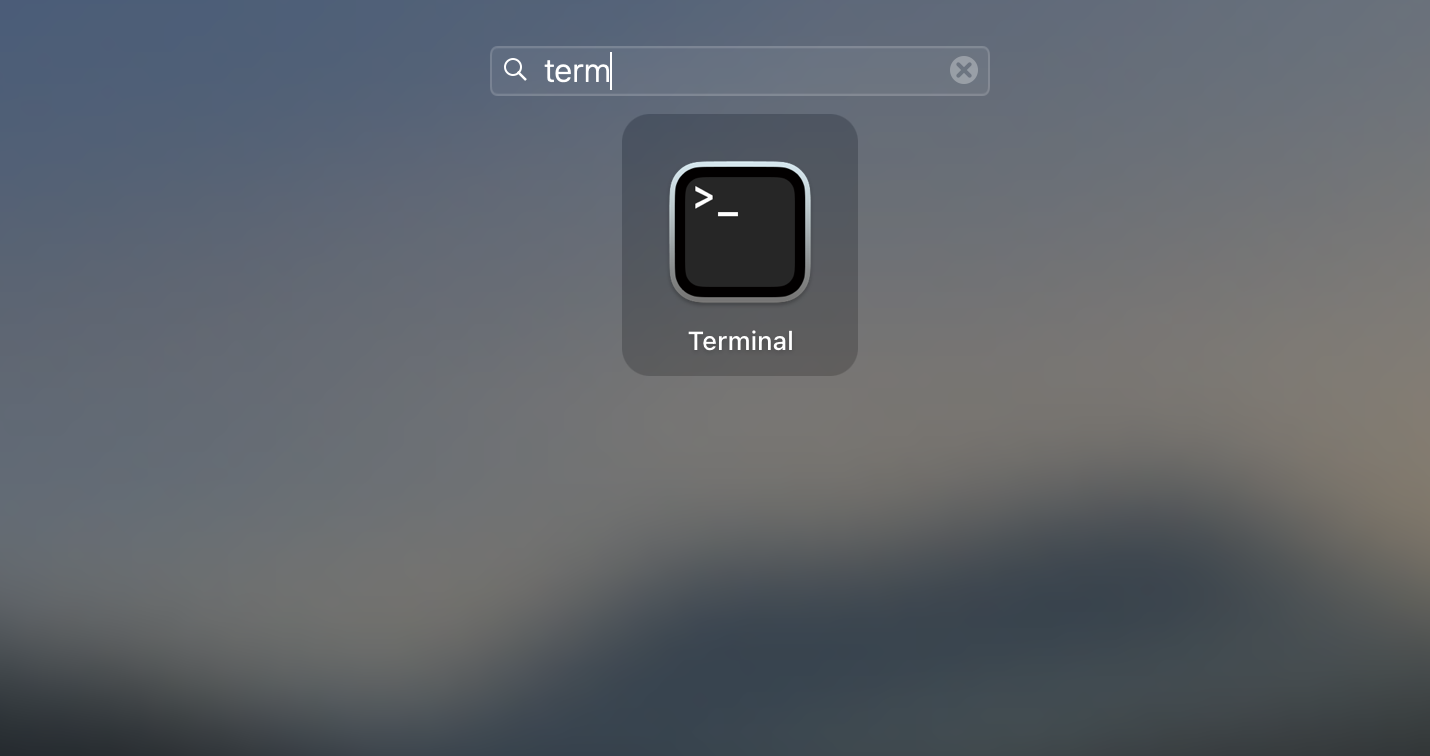
- Access the Terminal application on your Mac by clicking the Launchpad icon in your Dock, type Terminal in the search field, and then select Terminal from the search results
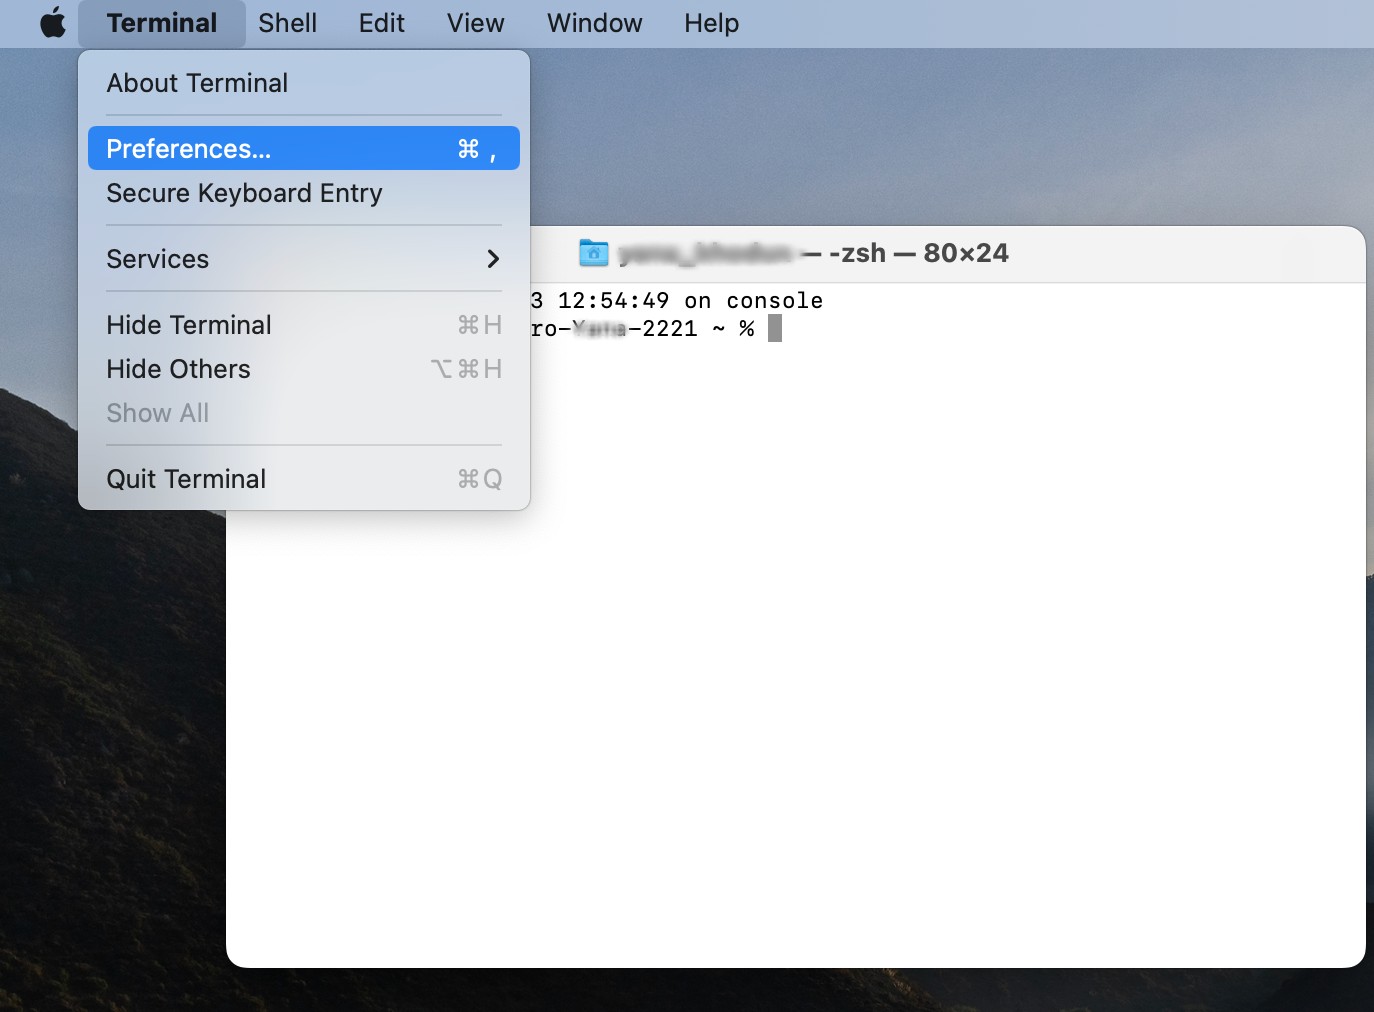
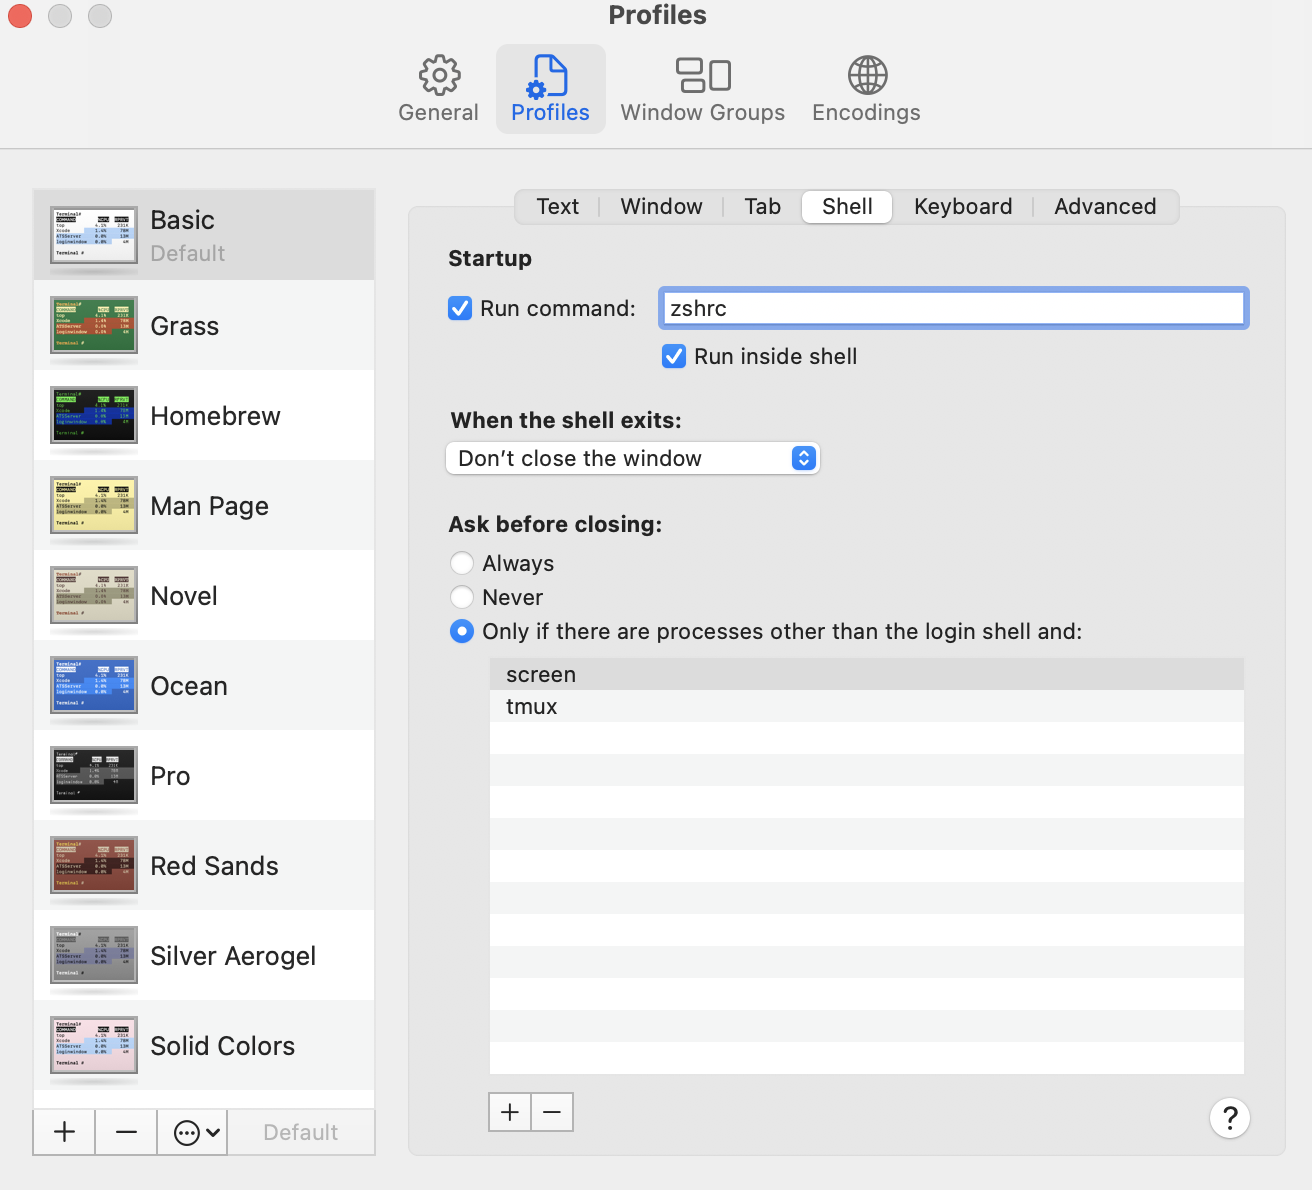
- After launching Terminal, open the Preferences from the Terminal menu
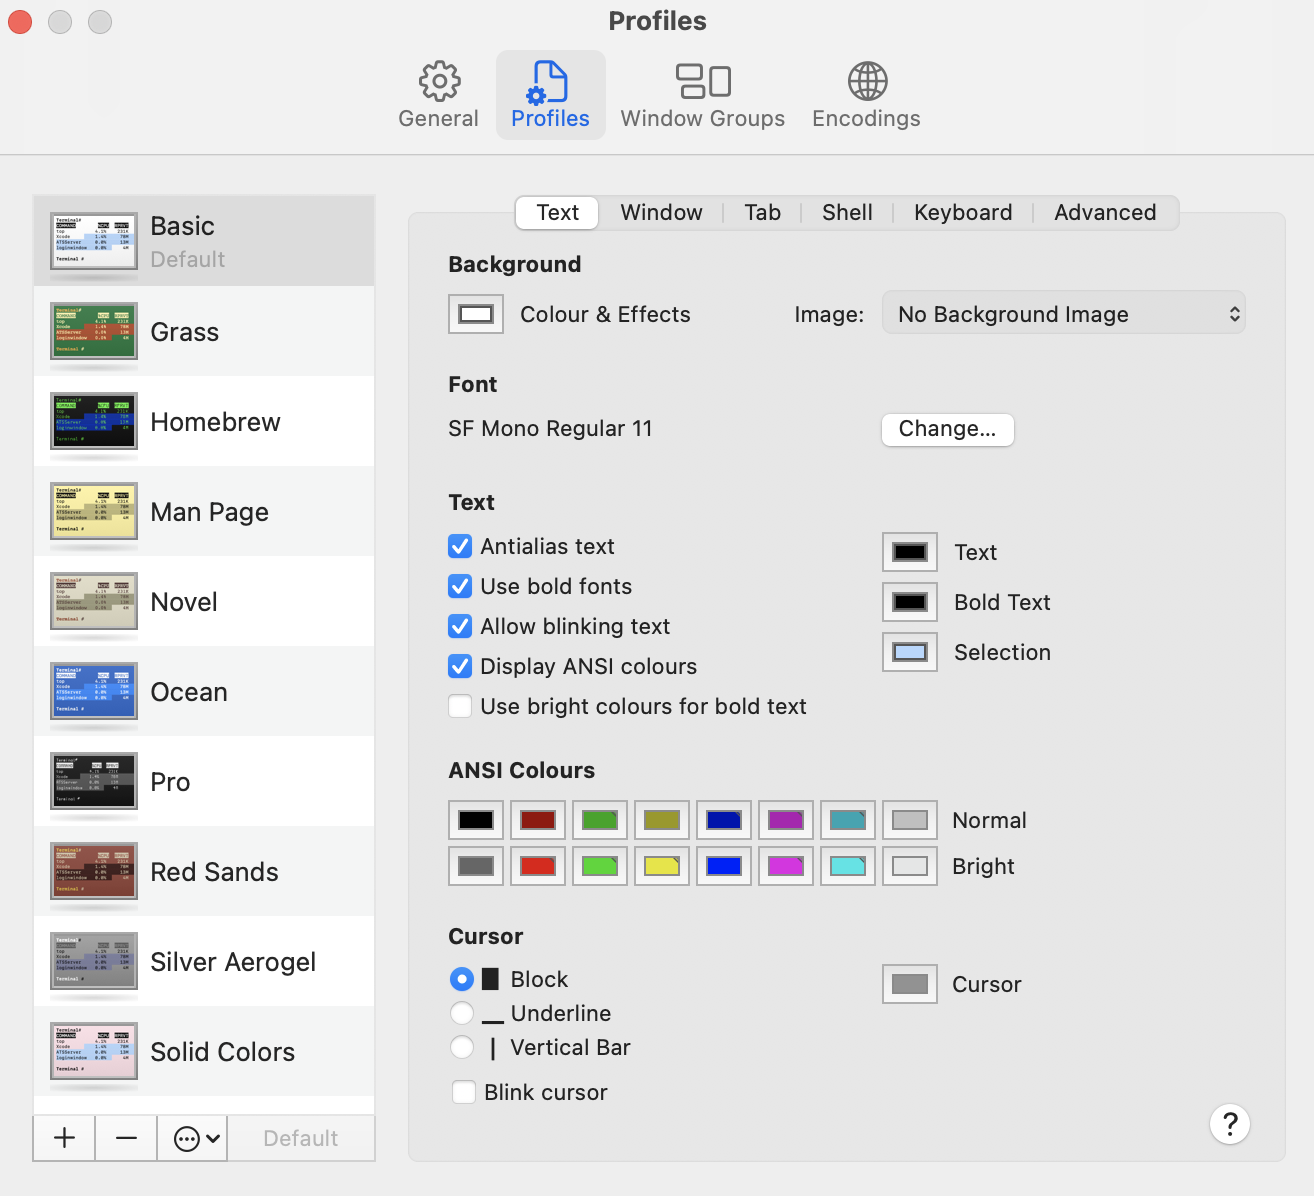
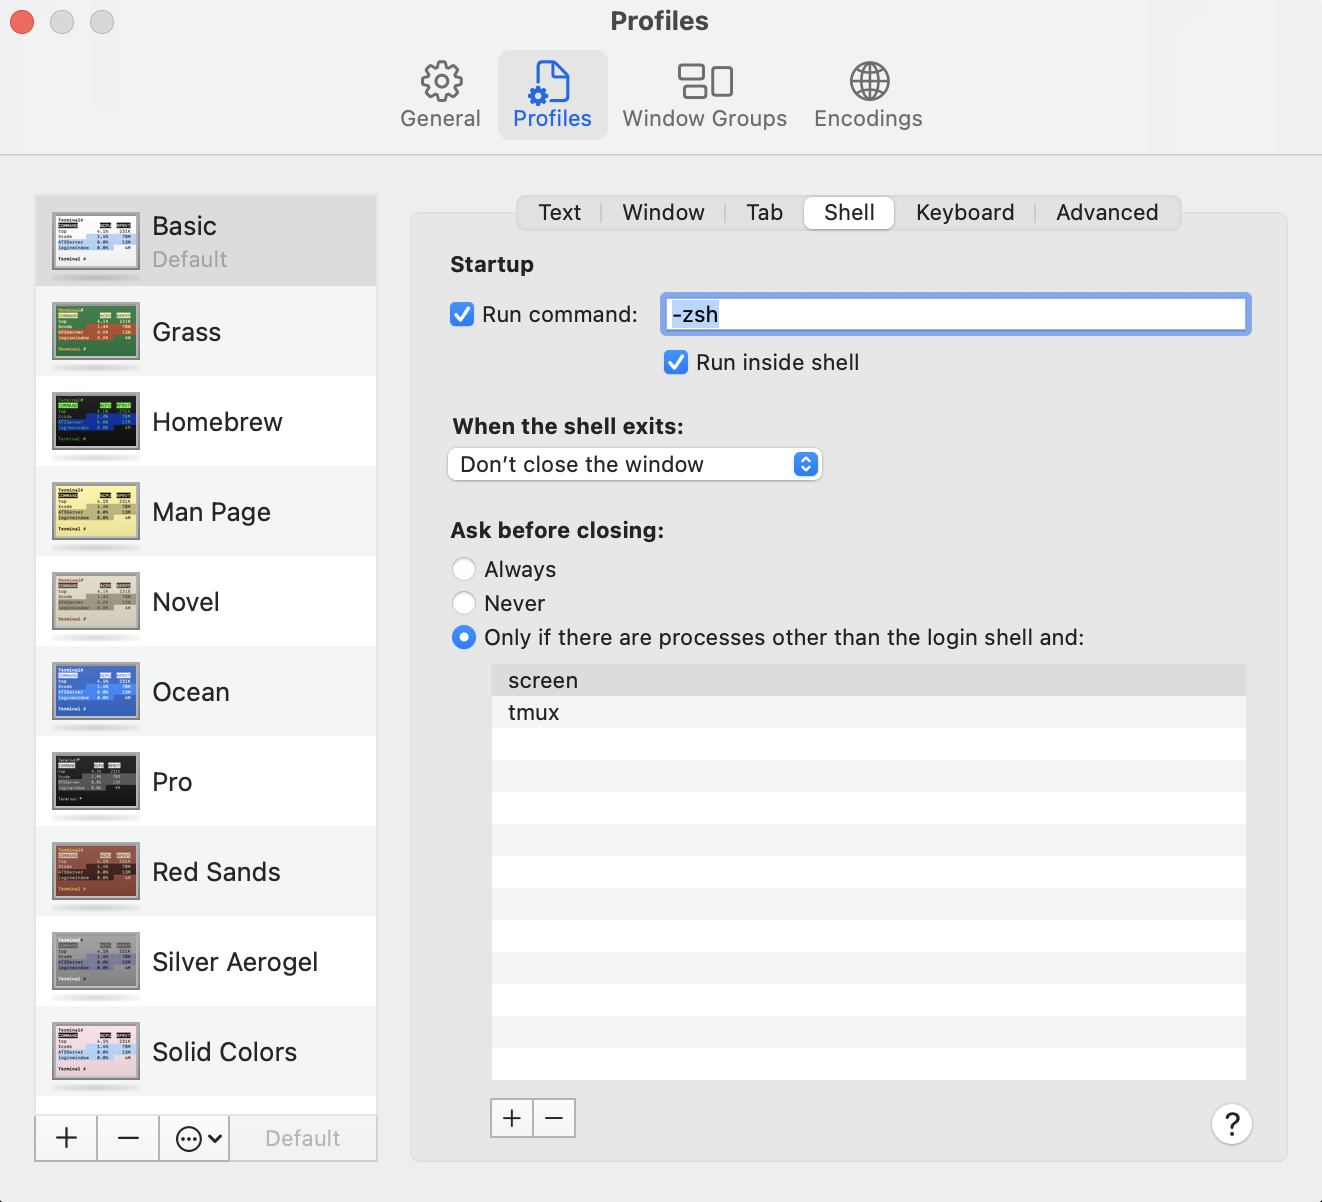
- In the Preferences window, find and select the Shell Profiles or Profiles tab
- Depending on your macOS version and the shell you're using (bash or zsh), locate and edit the respective profile file: bash_profile or zshrc
- Within the selected profile file, add the correct PATH configuration. Follow the proper syntax while adding the PATH
- Save the changes to the profile file and close the Terminal. Reopen it to apply the updated PATH configuration.
By following these steps, you can configure the $PATH environment correctly, and the command not found mac error should be resolved.
Now, let's move on to checking if any missing libraries are the reason for your command not found on Mac.
Check if any libraries are missing
Some commands may require specific additional libraries to function correctly. If the required libraries are missing, it can be the reason for the persistent command not found message.
Here's how you can check whether the necessary libraries are installed:
- Launch the Terminal application on your Mac
- Once the Terminal is open, type in the command that you think might be causing the command not found error. For example, you could try entering git or python. The Terminal will then attempt to execute the command
- If the error message indicates that a particular library is missing, you’ll need to install it.
If you’re missing libraries, here’s how to re-install them:
- Note down the name of the library mentioned in the error message
- Utilize the appropriate package manager for your macOS version. For instance, let’s take Homebrew as example. Enter the following command in Terminal: /bin/bash -c "$(curl -fsSL https://raw.githubusercontent.com/Homebrew/install/HEAD/install.sh)"
- Enter your password
- Presss Enter to install the missing library
- After installation, re-run the initial command to check if the error persists.


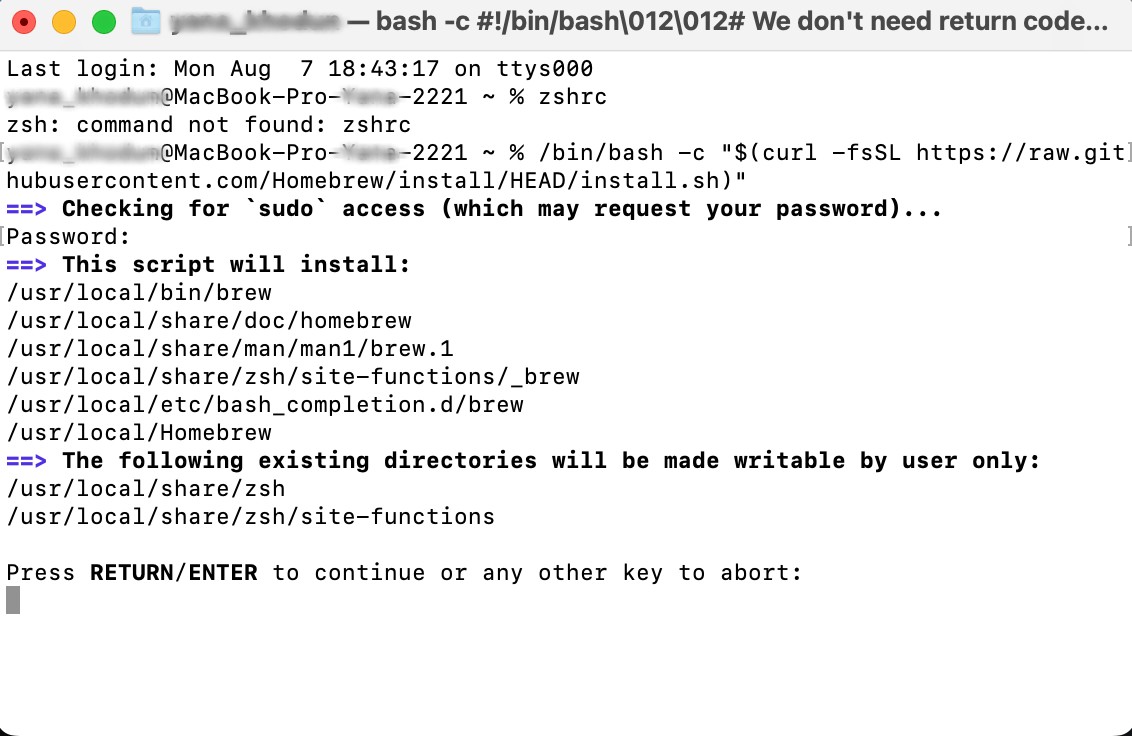
Note from our team:
This command spelling is suitable for MacOS Ventura and MacOS Monterey. To install the Homebrew library on the other macOS version, you need to enter the other command details:
- For macOS Catalina / Mojave / Big Sur:
/bin/bash -c "$(curl -fsSL https://raw.githubusercontent.com/Homebrew/install/master/install.sh)"
- For macOS High Sierra / Sierra / El Capitan:
/usr/bin/ruby -e "$(curl -fsSL https://raw.githubusercontent.com/Homebrew/install/master/install)"
Now, we've covered the steps to check for and install any missing libraries, let's move on to the very last resort solution to fix an error message — reinstalling masOS.
Reinstall macOS
This step is necessary if you need to recover any accidentally deleted critical system files or encountered severe system issues. However, before proceeding, check if you’ve backed up all your important data first.
Here is our step-by-step guide to reinstall macOS:
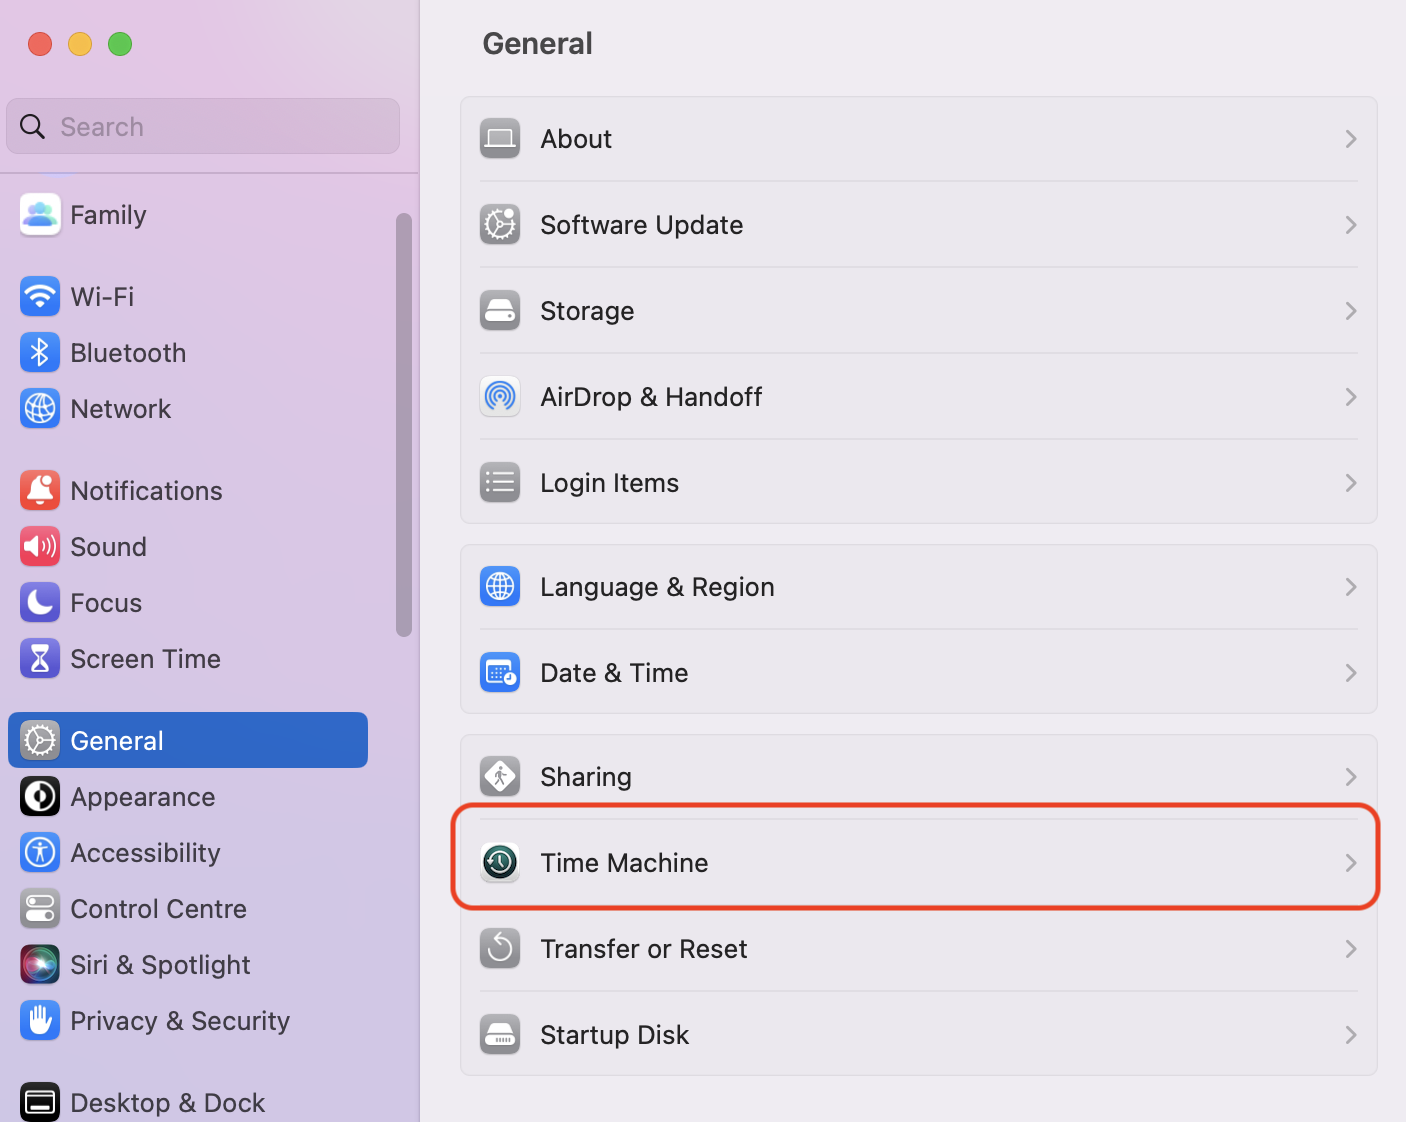
- Before reinstalling macOS, back up all your important files to an external drive or cloud storage
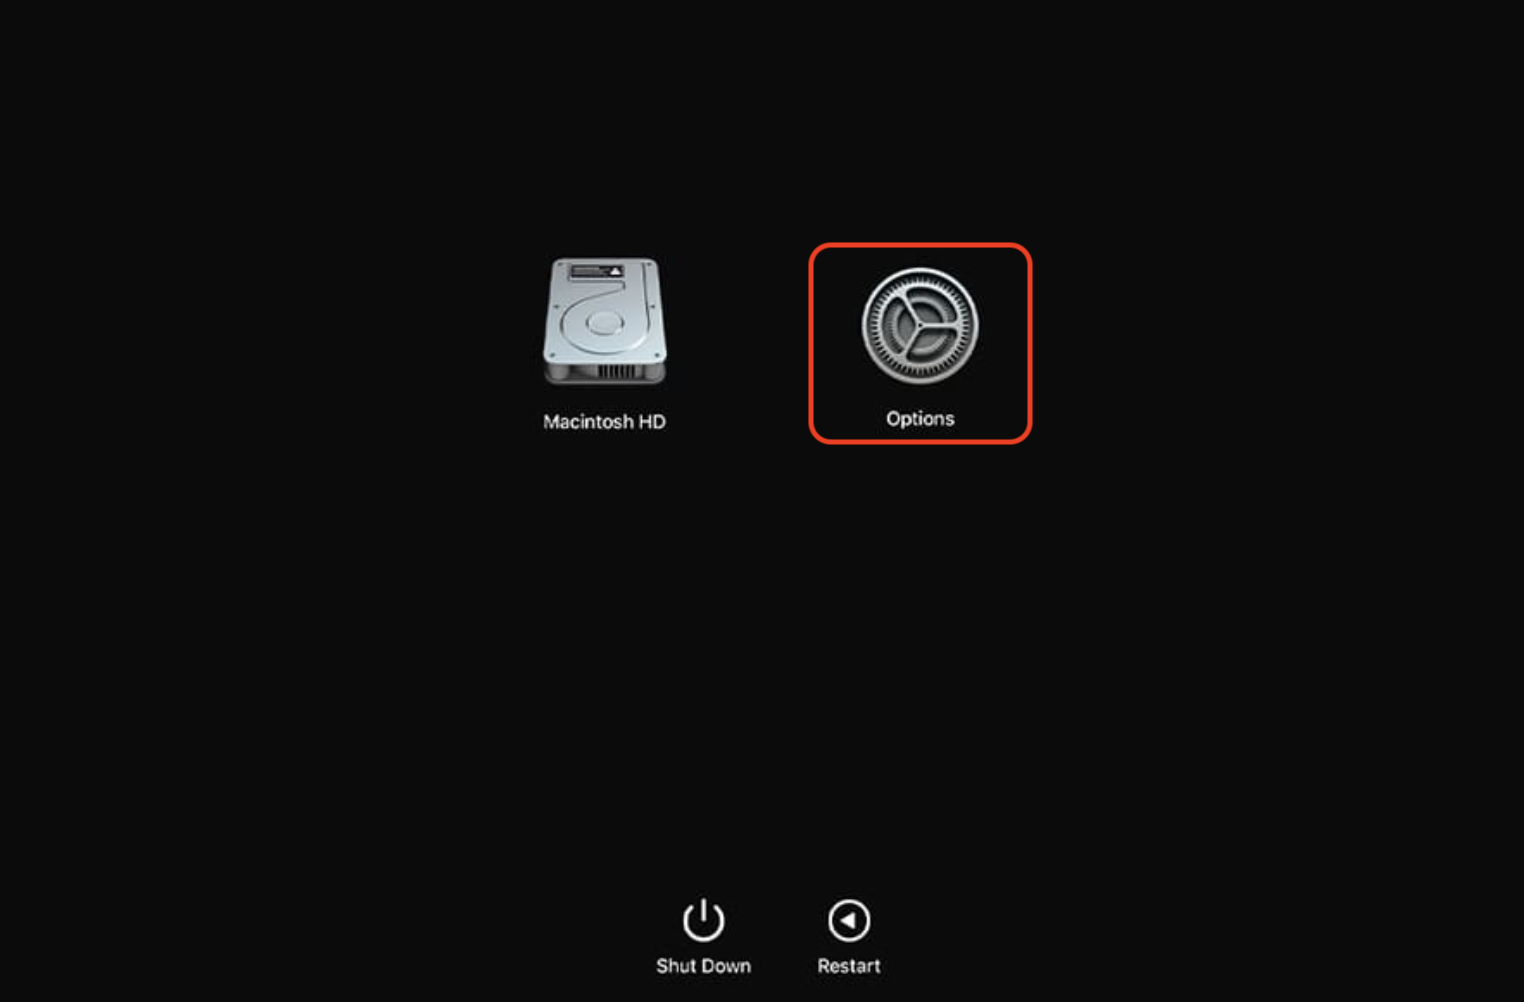
- Proceed to restart your Mac and hold down the Command + R keys until the Apple logo or a spinning globe appears. This will out your Mac into Recovery Mode
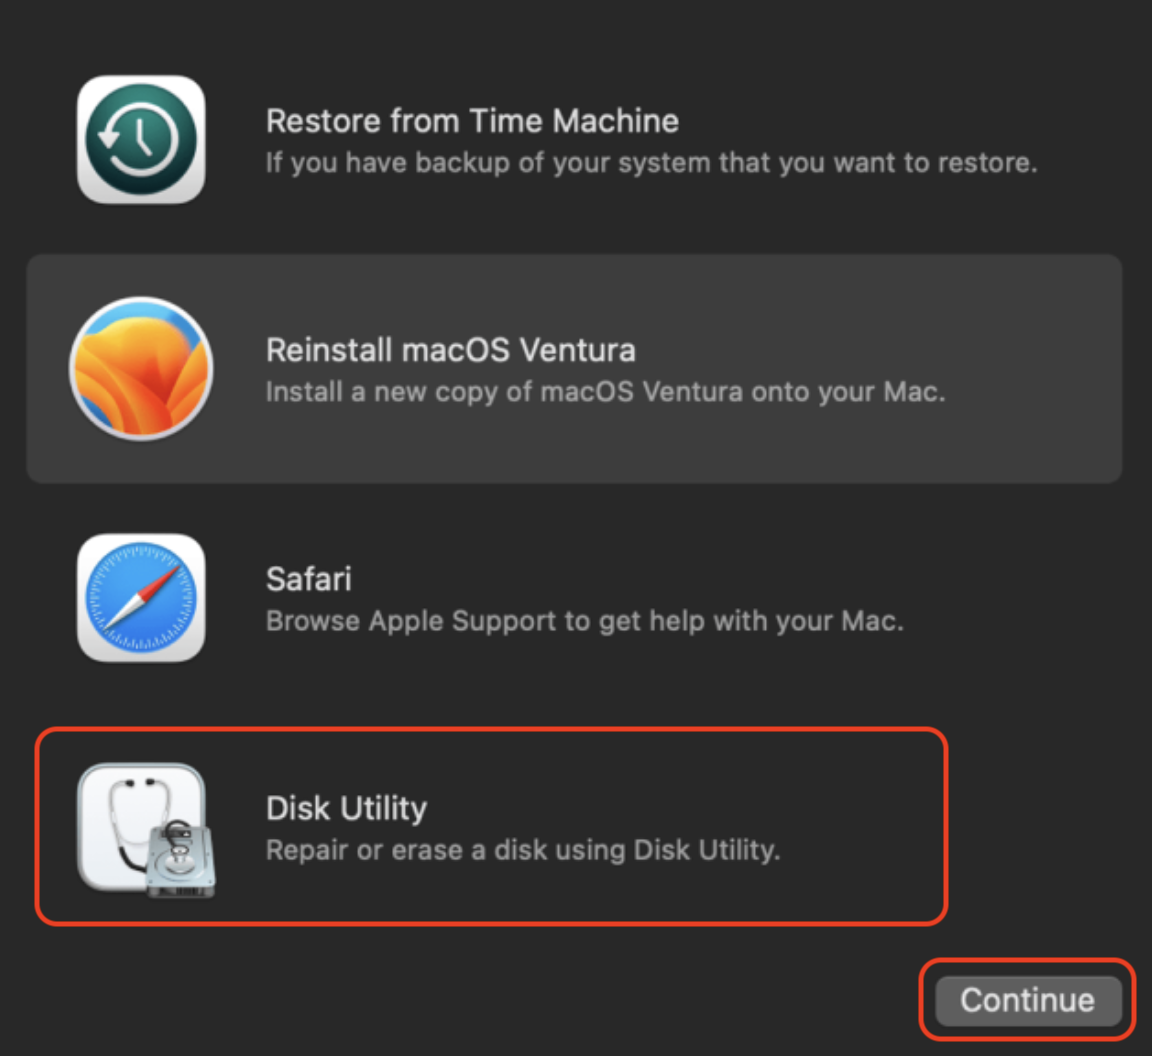
- In Recovery Mode, select Disk Utility from the macOS Utilities window
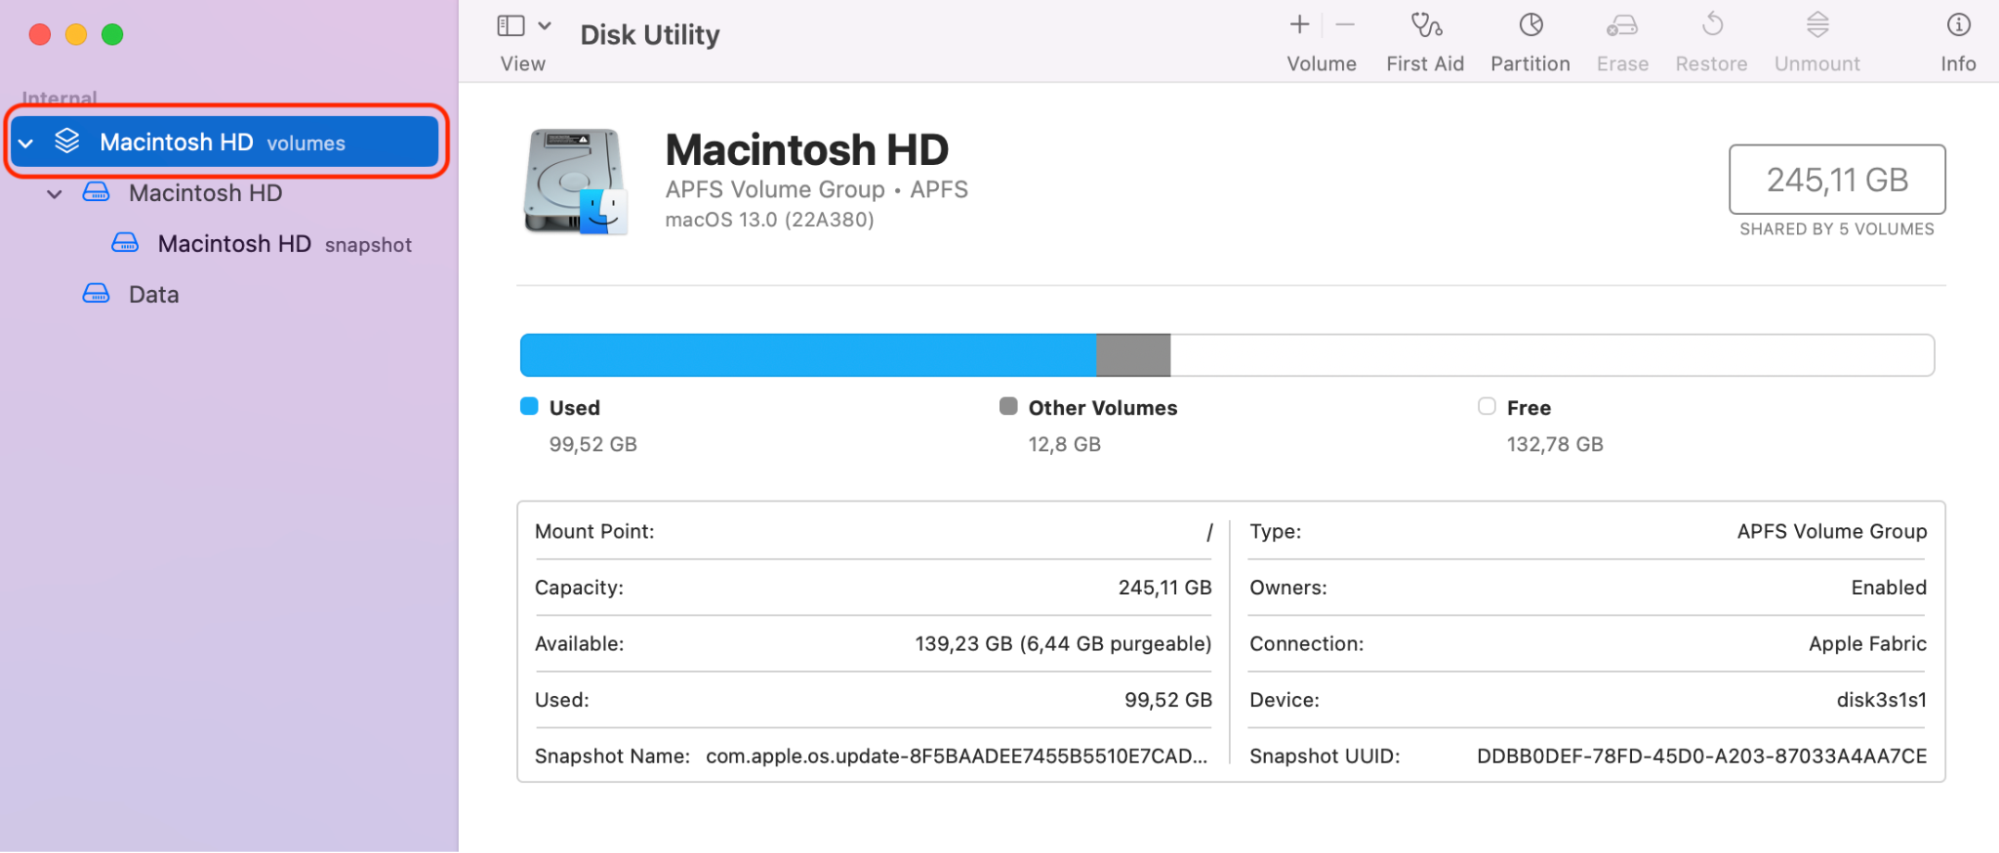
- In Disk Utility, select your Mac's startup disk from the left-hand sidebar
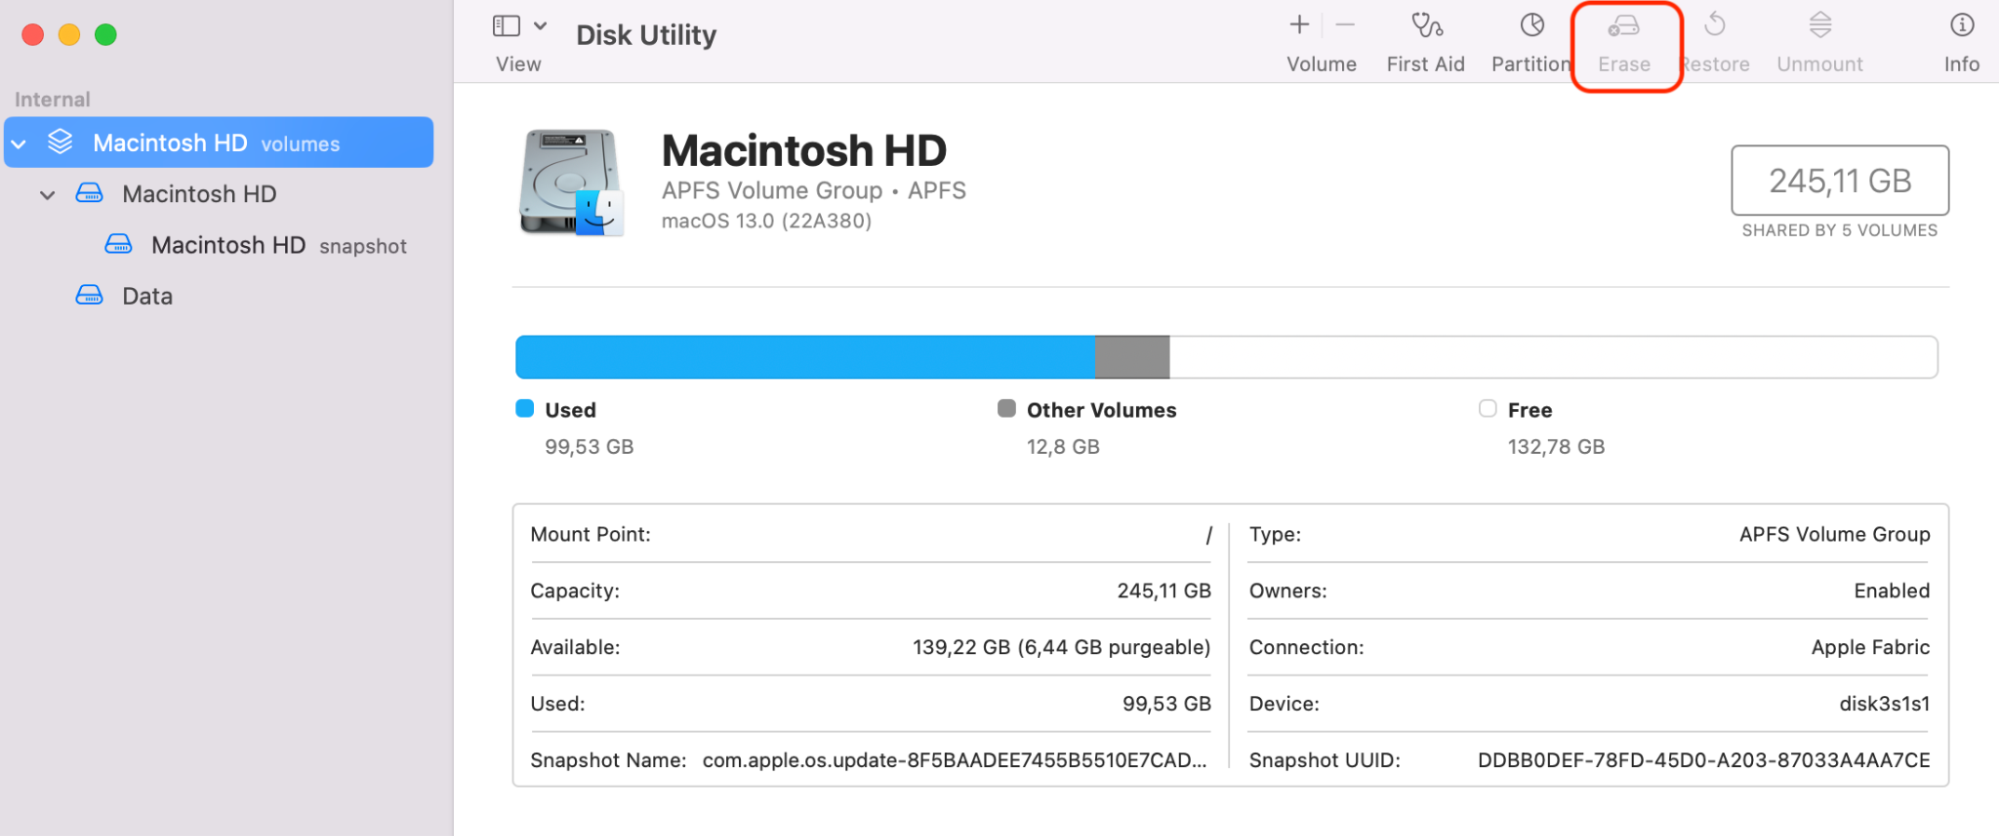
- Click on Erase and follow the on-screen instructions to format the startup disk
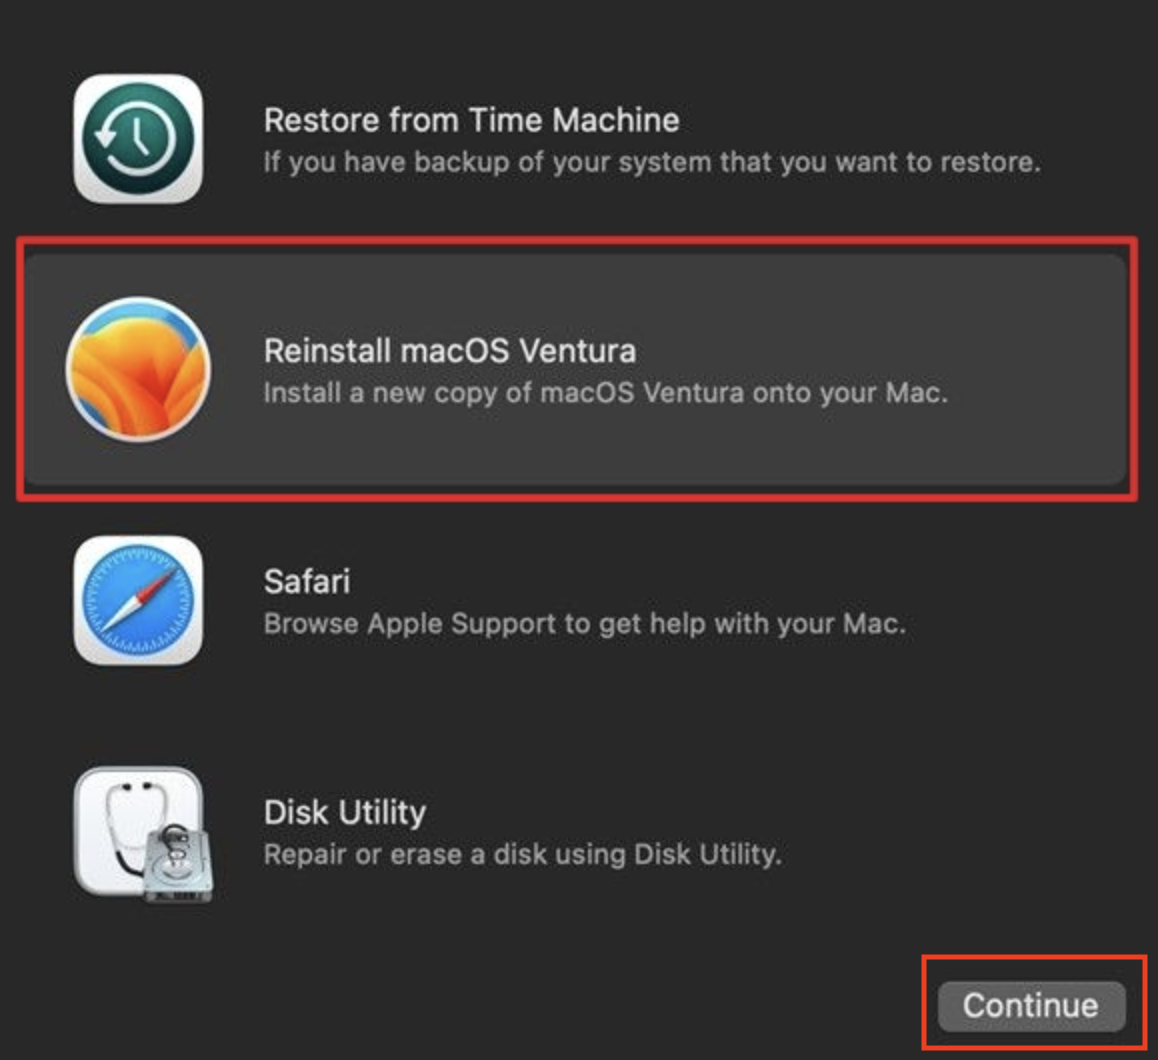
- After erasing the disk, return to macOS Utilities and select Reinstall macOS. Follow the prompts to reinstall the operating system
- After the macOS reinstallation is complete, you'll have the option to restore your data from the backup.
Warning from our experts: Reinstalling macOS will erase all data on your startup disk, so ensure you have a backup before proceeding with the above-mentioned steps. Also, if you’re unsure about the backup process, we advise you to consult Apple's support team.
Resolving the command not found error on Mac
We've explored all of the essential steps to help you resolve and troubleshoot your Mac device getting the command not found error pop-up. From checking spelling to installing missing libraries and configuring the $PATH environment, you're now equipped to overcome these command issues.
However, preventing future errors is equally crucial. MacKeeper's Update Tracker plays a vital role in keeping your macOS up-to-date and seamless, significantly reducing the chances of encountering the command not found macOS message.
Remember, reinstalling macOS should be a last resort, but if it’s required, always back up your data before attempting it.
Armed with these solutions, you're ready to conquer a Mac command not found or a Terminal command not found error message. Now explore the command line developer tools for Mac to enjoy a smoother Mac experience. Happy computing!


