Feeling annoyed by multiple notifications on your computer? We feel you. In this article, we’ll explain what causes these alerts and help you prevent and block them, including such widespread alert forms as Chrome notifications.
Stop receiving unwanted Chrome notifications by doing the following steps:
- Open Chrome on your Mac
- Click on the three dots in the right upper corner and open Settings. Alternatively press and hold Command (⌘) + , (comma) buttons
- Navigate to Privacy and security tab on the left—go to Site Settings
- Click Notifications
- Move the slider to prevent websites from requesting to send notifications
- Block notifications from the websites where you previously agreed to it
- Manually add websites you don’t want to get notifications from
Tip: Try using incognito mode (Command (⌘)+ Shift+N) in Chrome to browse without interruptions.
Important note
You should always think twice before granting browsers or apps access or permission to make changes to your device. Are you sure they’re credible? Why do they need this access? To keep your Mac safe, you really need to keep track of all processes, but we understand that it’s almost impossible to keep an eye on everything.
So if you need help—try MacKeeper. It will protect your Mac and your data with minimal involvement from you and allow you to just enjoy your Mac experience.
Now let’s have a closer look at alerts and notifications you get. They’re not the same and you’ll need to take different steps to get rid of them.
What is a Chrome push notification?
A push notification is an alert in your browser, on your desktop, or your mobile phone with a message prompting you to take some action. Like here:

Do you remember the times when you were not bombarded by ads, banners, and other web notifications? When visiting a website was only limited to what you were looking for without any imposing messages? Yes, it’s hard to imagine we ever even had those golden internet days.
Apart from push notifications, a modern internet user faces multiple pop-up ads trying to win their attention and money. On the bright side, these can be controlled in Chrome settings and with the help of an ad tracker blocker.
What’s harder to manage and control are the services that are built into websites—pre-rolls and unskippable ads when trying to watch a video online, subscription forms, support chats, cookies notifications, etc. In these cases, usually, nothing much can be done.
However, being aware of what’s popping up on your screen and what to do about it is a pretty good thing. There’s no way to turn off Chrome notifications automatically, so we’ll teach you how to do this manually. And before we discuss how to shield yourself from different kinds of push ads and stop unwanted Chrome notifications from bothering you, let’s try to figure out what’s behind all of this.
Why do you get push notifications in Chrome?
In fact, before receiving push notifications you need to agree to it. However, it’s quite easy to do so inadvertently. Let’s focus on the moment when it happens.
Once you visit a website, you may expect a window popping up under the lock icon in the address bar. Next time you see such an opt-in box with a message Show notifications next to a bell sign—here is when you need to take action.
What options do you have? You can simply close this window and ignore it for a while. However, if a website is persistently trying to engage you into subscribing, most likely it is for ads. If it is a trusted source and you do want to get push alerts in Chrome whenever an update comes up—click Allow. By giving your consent, you are automatically added to this website's subscriber list. However, if you click Block—this website will have no permission to send you alerts.
So, everything is under your control. If you have accidentally clicked Allow and don't wish to get any messages in Chrome—don't worry and read further. We'll show you how to unsubscribe.
Types of push notifications
What are the most common push notifications Mac users happen to see when using a Mac?
Web push notifications
The booming growth of online advertising has resulted in the rapid development of web push notifications. Ad publishers and networks are working hard to produce new campaigns to help their revenues thrive. This is when such browser push notification becomes a handy tool in the hands of marketers.
You must have seen multiple alerts when opening the Chrome browser. These alert messages can pop up even when you open it on a blank tab or home page and haven’t done any actions in your browser yet. Let’s dig more into what’s behind this type of push notifications.
Web push notifications can show various messages—from news, weather, ads, giveaways, exclusive deals—to scam notifications. The purpose is simple—to encourage users to navigate to a website and make a purchase or revisit it for better conversion. Very often this type of alert is used for malicious purposes trying to lure you into buying or doing what you weren’t planning to.
If you use Chrome as a preferred browser, you’ll get web push notifications is the form of Chrome notifications. To allow Chrome push notifications you need to give your consent with a click on a popup suggested by the website once visiting it. Usually, it contains Allow and Block buttons. Sometimes, websites may also ask to share your location.
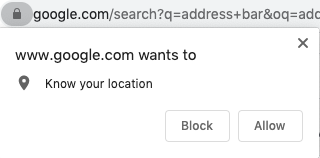
Once a push ad pops up on your Mac, you can click anywhere on this window and this will redirect you to a website. Or you can click the Close or More/Settings buttons.
Let’s imagine we’ve accepted such push notifications for airline ticket updates. What will happen next? Once a new offer for your destination appears—this is when to expect a push ad with an exclusive deal for you.
App push notifications
Another way you might get alerts on your device is through in-app push notifications. Such push messages are sent by apps you’ve installed or that were pre-installed on your Mac. This way, an app tries to inform you or give you hints about what should be done next.
For example, if you use MacKeeper, you will get a notification after it has run a background scan of your Mac and detected some outdated apps. This way you can keep an eye on app updates for a smooth Mac performance.

Or how about your Calendar reminding that tomorrow is a big day—like a flight to your dream destination or your wedding anniversary? Such push notifications can appear on lock screen first and after you’ve unlocked your Mac they are moved to the Notification Center.
Tip: To mute notifications on your desktop, hold down the Option key (alt) while you click on the Notification Center icon in the right upper corner of your screen. Once doing so it goes gray. Or alternatively, open Notification Center—go to Today tab—turn on DO NOT DISTURB.
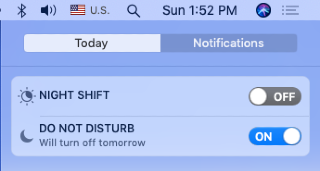
By the way, check out this useful Apple User Guide on how to deal with notifications on your Mac.
Mobile push notifications
Mobile push notifications look like text messages and alerts sent by pre-installed apps on your phone. They can be sent out anytime and you don't have to be in the app to get them. This way, an app informs you about any new update—a package delivered to your local post office, or a dating app that has found a new match for you.
Until recently, Apple stuck to strict rules by banning apps from sending out push notifications for promotions and ads. Recent App Store guidelines updates brought some changes. From now on, Apple has allowed iOS push notifications for ads, as long as users consent to receive such push messages with exclusive offers.
Useful push notifications
Not all push notifications are promotional. Push technology was primarily created to help regular readers stay informed about updates and get useful information. For example, your favorite YouTube channel goes live at 8 pm. If you don’t want to miss this live stream, you can turn on push notifications in Chrome and join the minute it starts.
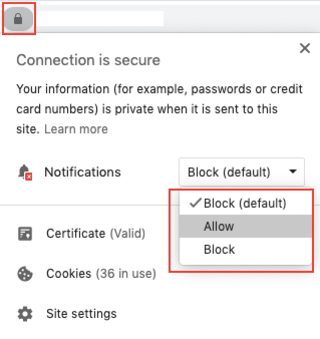
If you want to subscribe to website push notifications, here’s what you need to do:
- Open the desired website
- Click on a lock sign in the address bar
- Choose Allow from the drop-down menu next to Notifications
Malicious push notifications
It’s becoming harder and harder to distinguish a good, informative push notification from a malicious one—as the abundance of them online makes your head spin.
Modern businesses take advantage of online advertising by doing this through partners who place push ads on various websites. Of course, businesses tend to apply strict rules to these campaigns as no one wants to be associated with annoying and imposing ads. However, at times, their ad partners turn out to be irresponsible and break the rules by posting scary and aggressive ads to generate more user reactions and make more money.
Scam notifications saying that your Mac is at risk, suggestions to meet singles nearby, lottery wins—these are usually phishing attacks aimed at making internet users say good-bye to their money. Shady advertisers may sneakily hoax users into subscribing to unwanted notifications. The good news is that there are ways to stop and prevent push notifications. Read further and we’ll tell you more on how to do so in Chrome.
How to prevent and block Chrome push notifications
A few simple recommendations will save the day and help avoid receiving intrusive push notifications on Chrome. Follow these recommendations:
- Check twice before allowing a website to send you push notifications. Accept updates only from trusted and popular websites.
- If you have subscribed to unwanted updates and subscriptions, you can unsubscribe in Chrome settings or right from the website you’re on. Let’s see how to do this.
Unsubscribe from push notifications through Chrome settings
To get rid of the notifications, do the following:
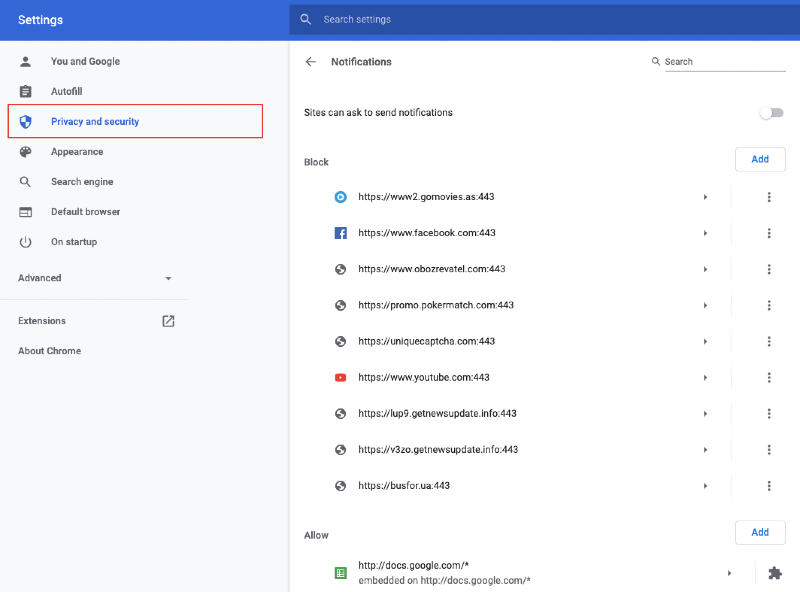
- Open Chrome—Settings (three dots in the right upper corner of the Chrome window)
- Go to Privacy and security—Notifications—click on three dots next to a website you want to block. Here you’ll see a list of all websites sending you push notifications in Chrome.
For more tips about push ads use this Chrome guide.
Unsubscribe from push notifications through a website
For a fast notifications fix:
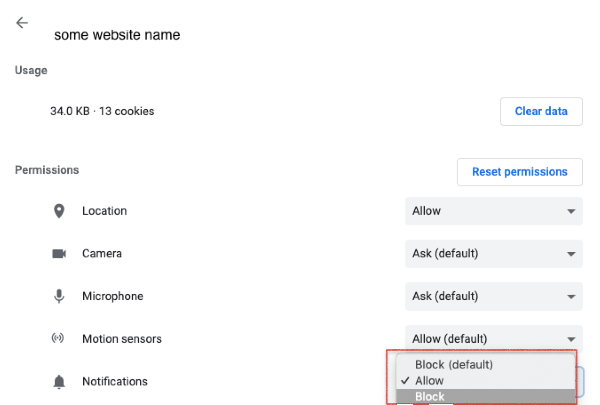
- Click on a lock icon in Chrome’s address bar
- Choose Block from the drop-down menu
For more actions:
- Click on the lock icon—go to Site settings. This will give you an overview of this website—here you can see more options like location, pop-ups, and redirects, ads, etc.
Now you know all about Chrome push notifications and how to decide for yourself whether to allow or block them. Enjoy your browsing experience!


