Life is about making memories. What way to make those memories last than to capture them on your phone or digital camera?
In most cases, we keep those photos on our smartphones or MacBooks. Occasionally, we want to take a stroll down memory lane by looking through old photos of our friends, family members, pets, and the vacations we’ve been on.
But to do that, we need to know where to find them. This article will show you how to quickly find your photos on MacBook. Let’s get started.
In this article you will find the following:
How to find your photos on Mac
The quickest way to find your photos on your Mac is by finding the Photos app. Look for it on your Mac’s taskbar and double-click on it to launch it.

Once open, you’ll see the photos in your Library, which appear in chronological order, and you will land on your most recent photos. However, you can also view your photos in different categories—you’ll find these on the left panel.
Your photos are only a fraction of what’s near and dear to you on your device. Protect your information by adding a password to your files and folders on your Mac.

The categories include Memories, People, Places, and more. Simply go down the list to view the one you want to open.
The default view shows you All Photos, but you can filter your search to find the specific photos you’re looking for. To do this, click on the filter you want to use at the top of the window—you can choose between Years, Months, and Dates to find older photos.
How to find imported photos on Mac
If you take a quick look at the side panel in the Photos app, you’ll see an Imports category toward the bottom of the Photos section. This is where all the photos you’ve imported from your phone or other device are housed.

The Photos app shows you imports sorted according to dates. Once again, when you initially open your Imports, you will land on your latest imported photos. To find photos imported earlier, simply scroll up.
You can focus your search by filtering the type of imported photos you want to see by category. To do this, click on Showing: All Items in the top-right corner of the Imports window, and choose from the Favorites, Edited, Photos, and Videos categories.

How to find downloaded photos on Mac
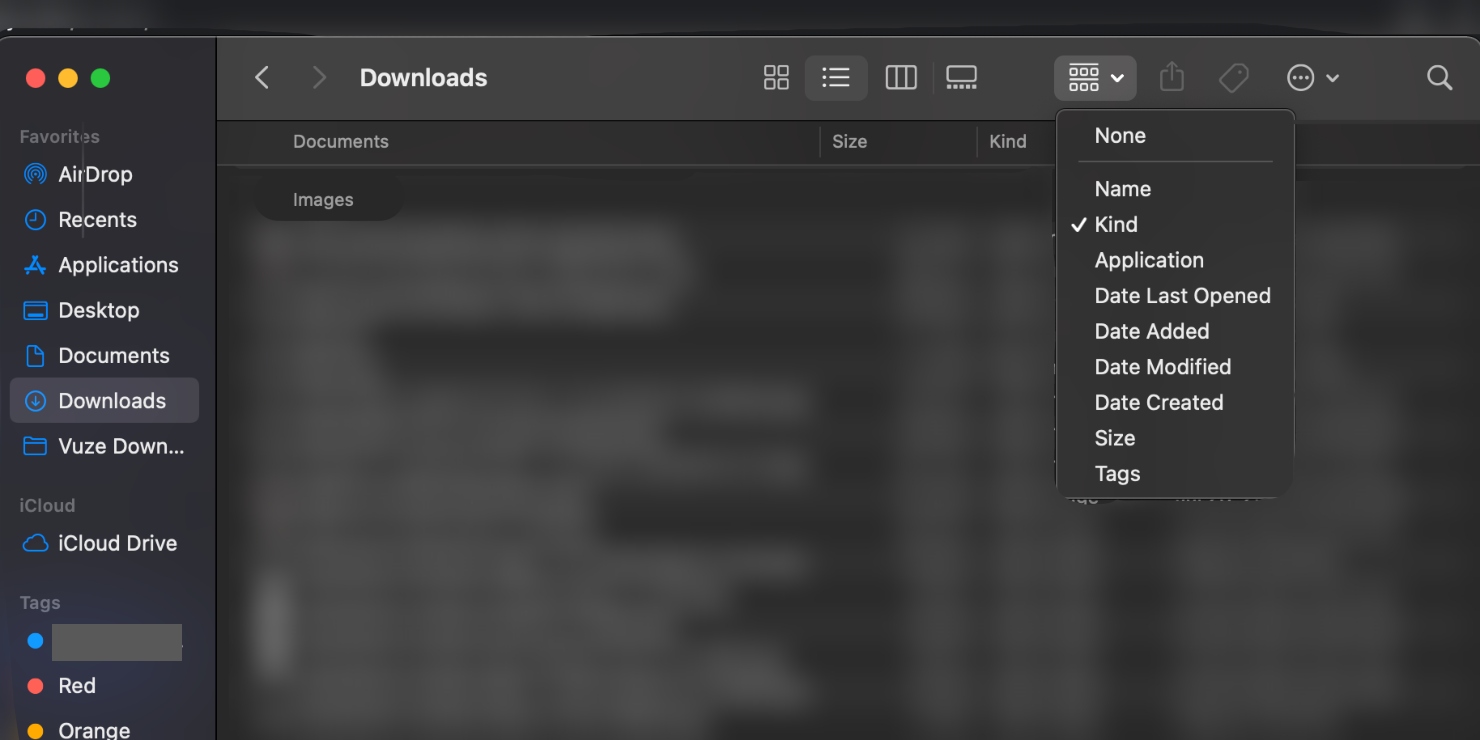
Those Pinterest ideas you save and download for later eventually come in handy. You can access those photos within moments of downloading them on your Mac. All you have to do is go to Finder in your Mac’s taskbar and then click on Downloads in the left panel.

Now scroll down your downloads and find the photos you are looking for. To find your photos quicker, you can click on the grouping icon. It’ll be the fifth one from the top-right corner, next to the upload icon. Once selected, click on Kind on the drop-down menu.

You will now see all your downloads sorted into their relevant categories. Scroll and find the Images category, and then look for your photos. This is a more convenient way to find your photos, especially if you have a lot of downloads.
How to restore deleted photos on Mac
We take so many photos that we sometimes end up deleting some by mistake when cleaning up our Mac. But don’t worry, there’s a way to get your most-loved photos back when that happens, as Mac keeps your deleted photos for up to 40 days.
To view the photos you’ve deleted, open the Photos app, then click on Recently Deleted in the left panel. It’s the last option in the Photos section.

From here, you can restore your deleted photos to avoid losing them forever. Take note of the amount of time you have left before your Mac permanently deletes them—you’ll see it below each photo, depending on when it was deleted.
For instance, if you have four days left to recover your photo, you’ll see the information “4 days left” below it. To restore a deleted photo, simply click on it once, and then click on Recover in the top-right corner of the window. Your photo should now be back in your Library.

Why you should store your photos on your iCloud
Your photos are meant to last forever. That’s why we don’t recommend managing them directly. Instead, it’s best to store and manage your photos through your iCloud on your Mac. Here’s why:
1. It maintains the quality of your photos
This keeps them in their high-resolution version, and the quality isn’t compromised as you share them.
2. It supports multiple file types
You can store a variety of file types—including JPEG, PNG, and more. It even supports raw images. You can manage your photos, like edit and share them from the iCloud, and your changes sync across all your devices.
3. It’s secure
Managing your photos on your iCloud allows you to back them up, thereby serving as an additional layer of security, over and above storing them on your device. But it also keeps your photos safe, thanks to Apple’s CloudKit framework. That means you can recover your files in the event of a hard drive or other hardware-related disaster, or even losing your Mac or iPhone. Here’s what to do if you’ve lost your phone or had it stolen.
4. It’s convenient
Storing your photos in your iCloud allows you to access them from anywhere. And you don’t need to always have your Mac with you—you can access them using any of your Apple devices. You also don’t need to manually store your iPhotos in the iCloud—the iCloud automatically syncs them for you and stores them on your Mac. It’s seamless and it just works.
5. Optimized storage
The iCloud doesn’t take up all of your device’s free storage but optimizes it instead. How does it do this, you may ask? By adjusting the amount of storage dedicated to photos as needed. The optimized storage option also allocates a portion of your Mac’s storage space to the high-resolution version of your most recent photos, while the rest are stored as low-resolution thumbnails.
Now that you know the benefits of managing your photos on your iCloud instead of managing them directly on your device, consider doing it as an additional security measure and to make your life easier. Just keep in mind that you can’t access photos stored in the iCloud without a secure and reliable internet connection.
How to remove duplicate photos on your Mac
We know you love your photos, but not enough to keep duplicates of them, right? Duplicate photos can be easy to miss. That’s why it’s best to enlist the help of a third-party tool, like a duplicate photos finder, to help weed out and do away with copies.
For the best results, we recommend MacKeeper's Duplicates Finder. This tool scans your Mac to find duplicate photos, similar photos, and duplicates of other files in no time and remove them easily. What’s more, it has a free version, which allows you to get a feel of the software before committing yourself.
To use MacKeeper’s Duplicates Finder, open the MacKeeper app on your Mac. Click on Duplicates Finder under the Cleaning tab in the left panel. The tool will scan your Mac and show you all the duplicates it finds.
Click on the box next to the Similar Photos category. Now click the Remove Selected button at the bottom of the screen. That’s it, you no longer have duplicate photos taking up space on your Mac—and it didn’t even take five minutes!
FAQs
Why can't I see photos in Finder on Mac?
If your photos are not appearing in Finder on your Mac, it means the Pictures category isn’t selected to appear in Finder’s side bar. More on that below.
How do I get pictures to show in Finder on Mac?
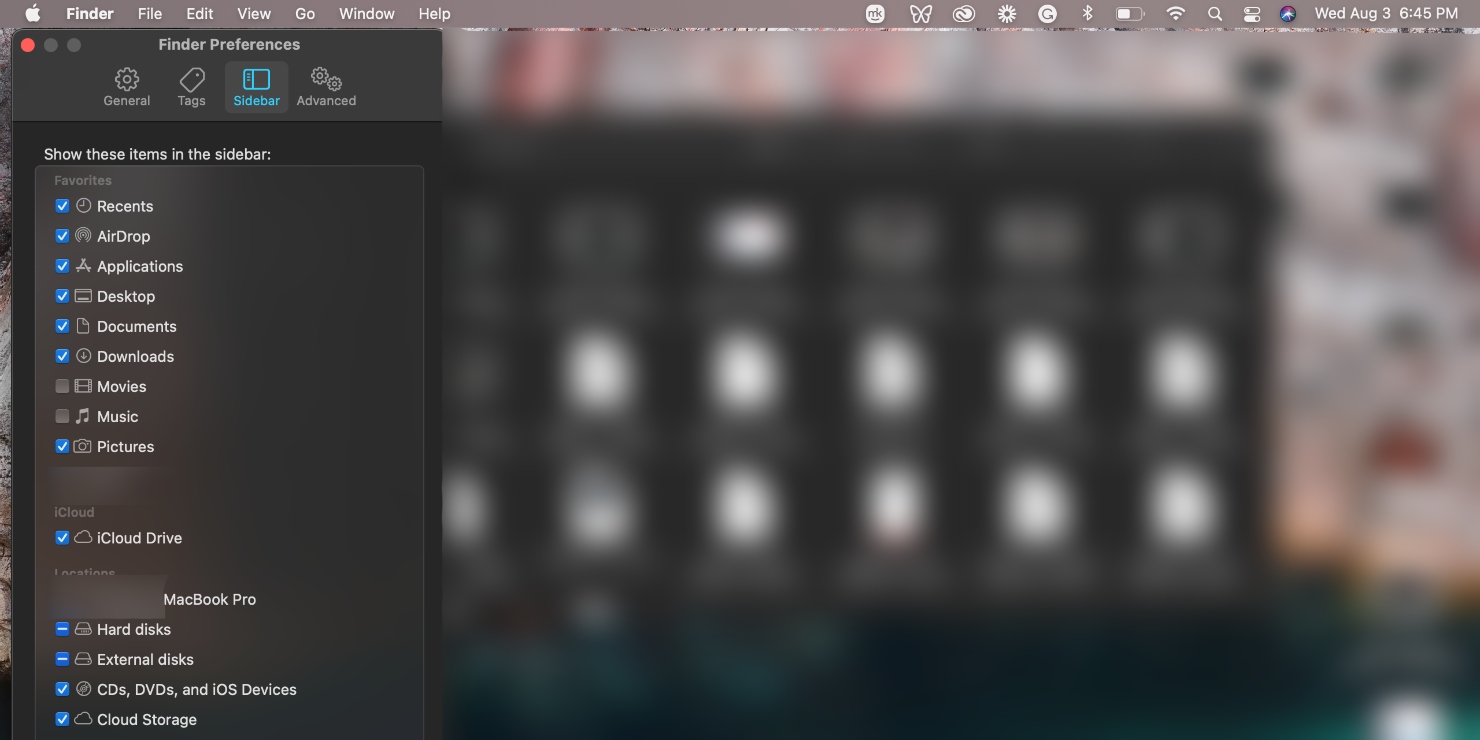
If you want your pictures to show in Finder on your Mac, you have to manually add the Pictures category to the side bar in Finder. To do this, open Finder. Click on Finder in the top-left corner of the screen, followed by Preferences.
Now scroll down the Favorites list and look for Pictures. When you’ve found it, check the box next to it.

That’s all! You should now see Pictures in Finder’s side bar.
Do imported photos stay on Mac?
Yes, you can find all your imported photos in the Photos library on your Mac, where they’re stored by default. However, you have the option to keep them in another folder or external hard drive and still view them in Photos on your Mac. To find imported photos, go to Photos > Imports.

How do you find hidden photos on Mac?
It’s not uncommon to hide photos on your Mac, especially if you share it with family members. Thankfully, you can find hidden photos easily. Simply go to Photos > View > Show Hidden Photo Album. Now click on Hidden in the left panel, then select the photo you want to show, and click on Unhide 1 Photo.

Your photo will now show up like other photos in the Library. Did you know you can hide apps on your mobile devices? Find out how to do hide apps on your iPhone and iPad now.
Find photos quickly and easily on your Mac
Mac makes it easy to find your photos. Whether you’re looking for imported photos, downloaded photos, or even hidden or deleted photos—you can find whatever you’re looking for within seconds of firing up your Mac. Now that you know how to find your beloved photos, you can keep them safe and treasure your lifelong memories forever.


