In this article you will find the following:
Many people’s Mac devices don’t run anywhere near their optimal levels because of how cluttered they become. Forgetting to delete duplicate files, not removing apps that you no longer use, and keeping caches that hinder your device’s performance are all too easy as you get caught up in everyday life.
A cluttered Mac can seriously hinder your workflow, and you may also leave your device open to potential damage—such as overheating. Some of the consequences of your Mac being cluttered include:
- Lack of organization: Cluttered Macs lead to files and folders being disorganized. As a result, you might endure stress when looking for tools that you need to complete projects.
- Lower productivity: Because you need to longer look for files and folders you need, you might waste a lot of time on pointless tasks. As such, you might not complete what you set out to do on a particular day.
- Poor computer performance: Too much clutter can result in your Mac needing to work harder, which may ultimately cause it running more slowly. Thus, you might find yourself feeling more frustrated when using your device.
You should also be aware of the potential symptoms that your Mac is cluttered.
- Frequent spinning pinwheels: Also known as the rainbow wheel, spinning pinwheels appear when apps become unresponsive. If you see them and need to force quit programs frequently, Mac clutter could be the reason.
- Too much on your desktop: A clear sign that you need to manage Mac storage is too many files, folders, and apps on your desktop. You may notice that some icons overlap when you’ve got too much clutter.
- Overheating: If your Mac is overheating, it could be due to challenges with performance—and these could be the result of clutter.
To maximize your device’s usage and longevity, I strongly advise you to regularly organize your MacBook. And today, I’ll reveal 14 ways to declutter Mac and help your computer continue performing at an optimal level.
Before we start
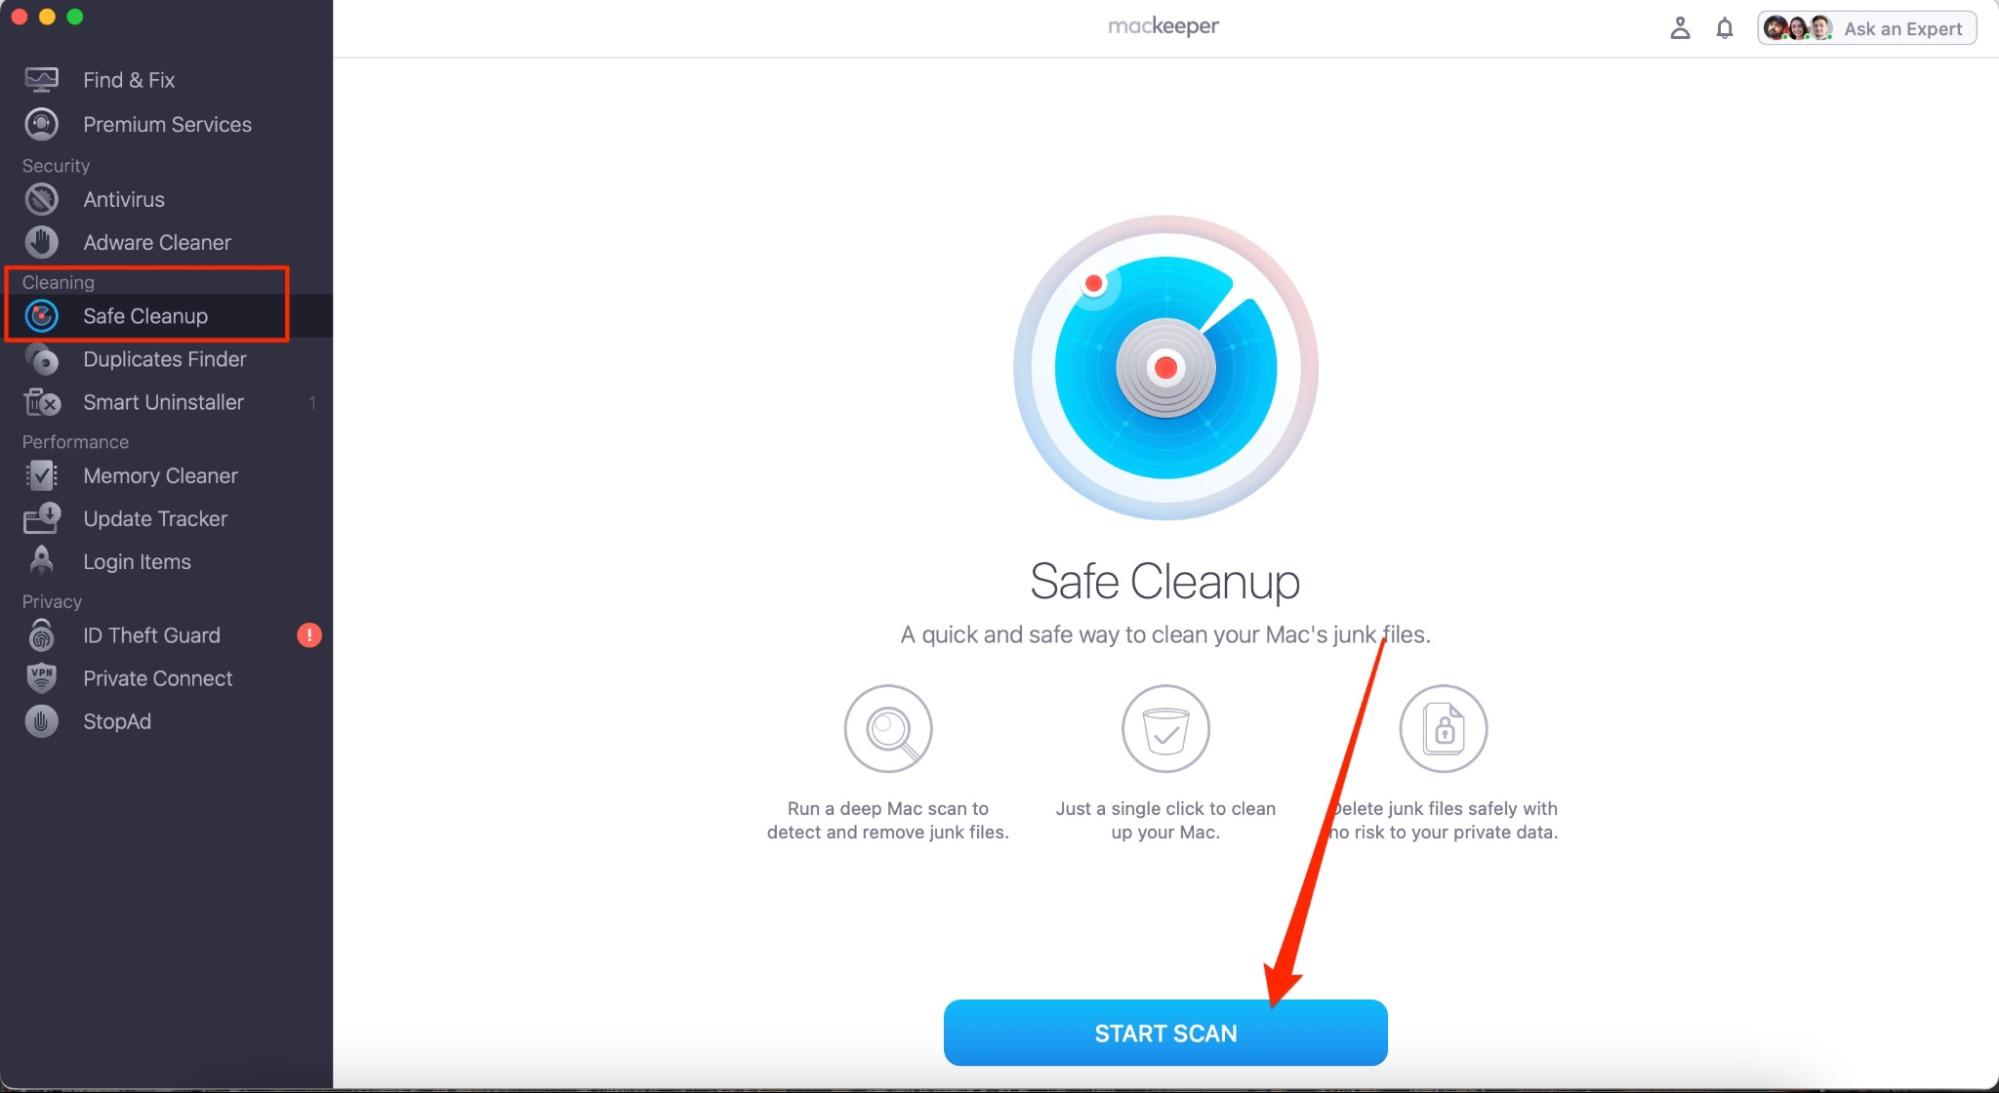
Whether you want to clean Mac files or clear Mac cache, manually sifting through your computer is exhausting. MacKeeper’s Safe Cleanup tool automatically finds duplicate files and folders, and you can easily clear caches that might stop browsers and apps from working properly.
To use MacKeeper’s Safe Cleanup:
- Download MacKeeper
- Go to Cleaning > Safe Cleanup
- Click on Start Scan
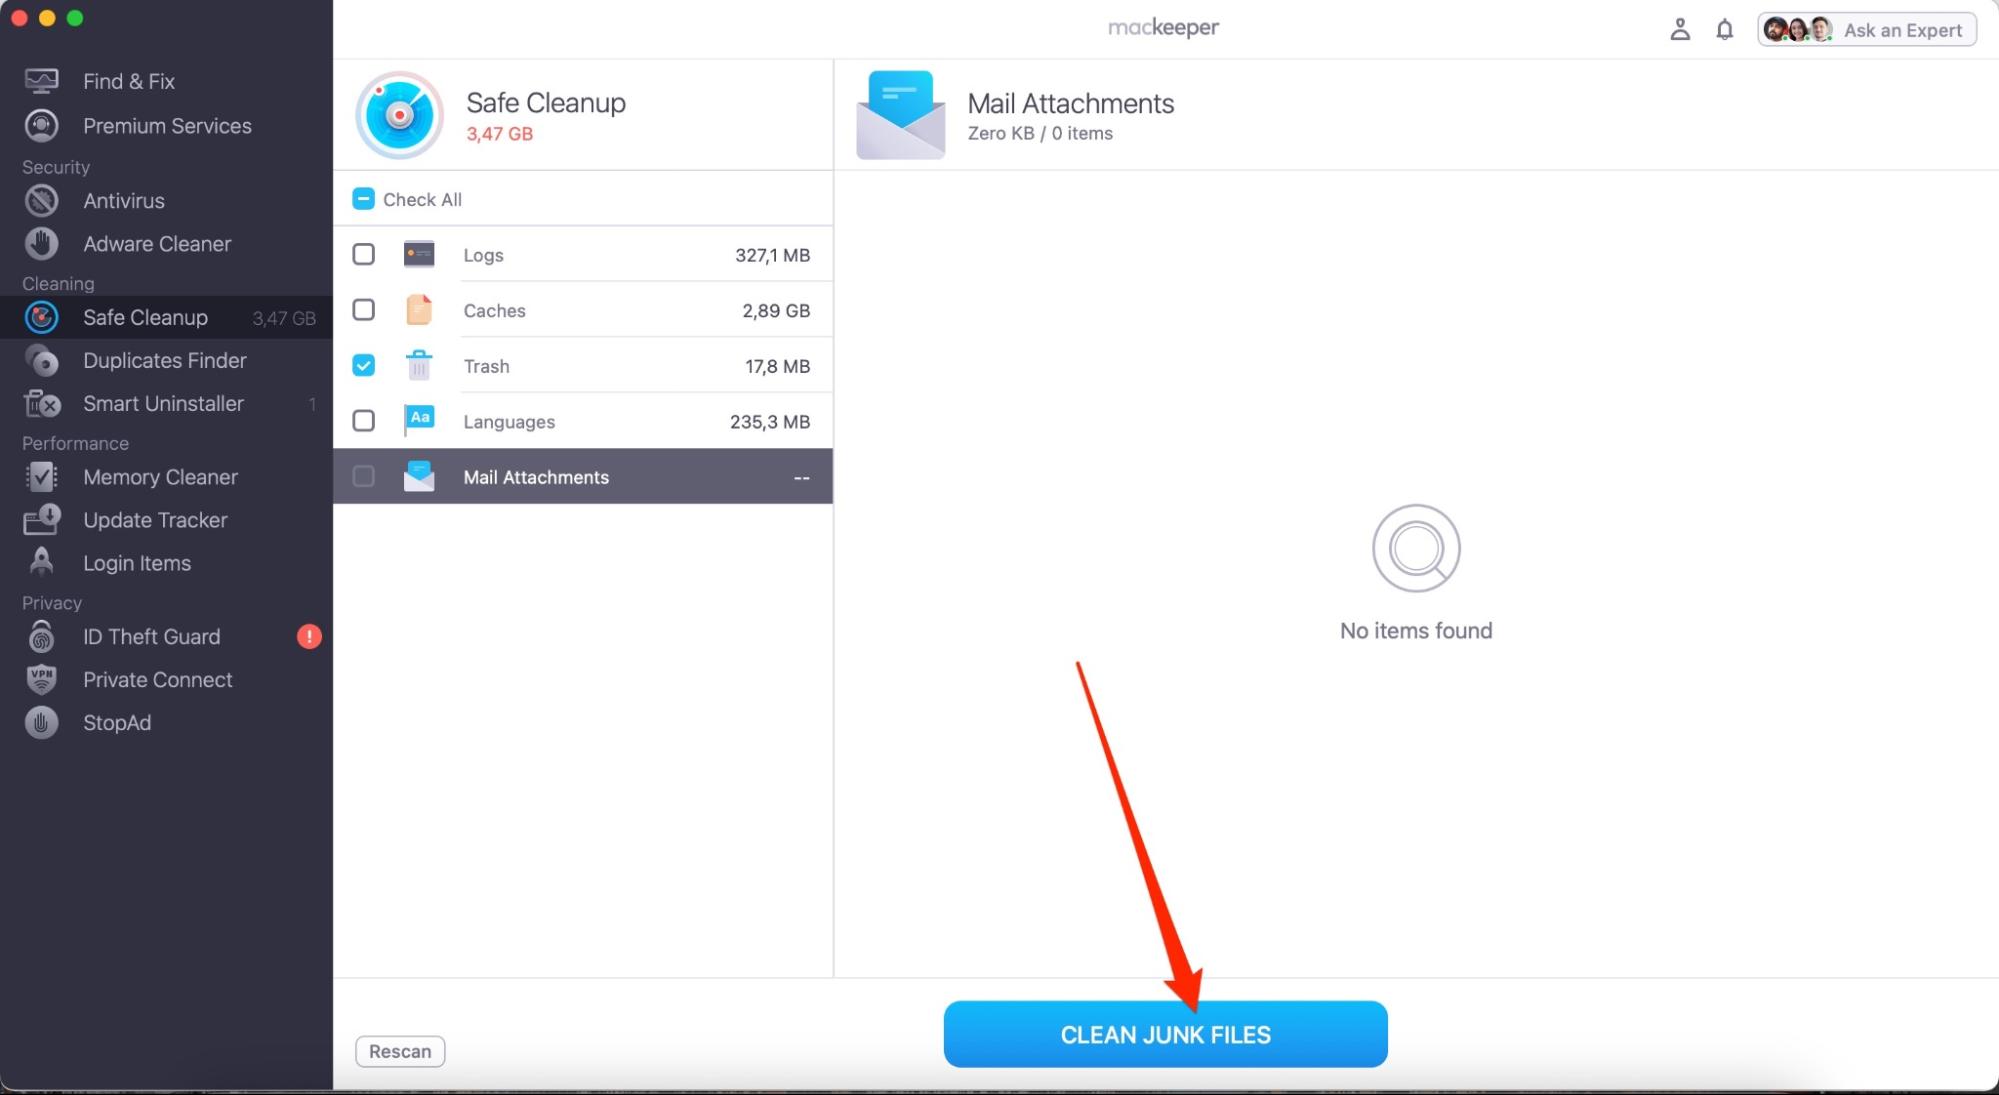
- When the scan has completed, tick the boxes for the programs you want to delete
- Select Clean Junk Files
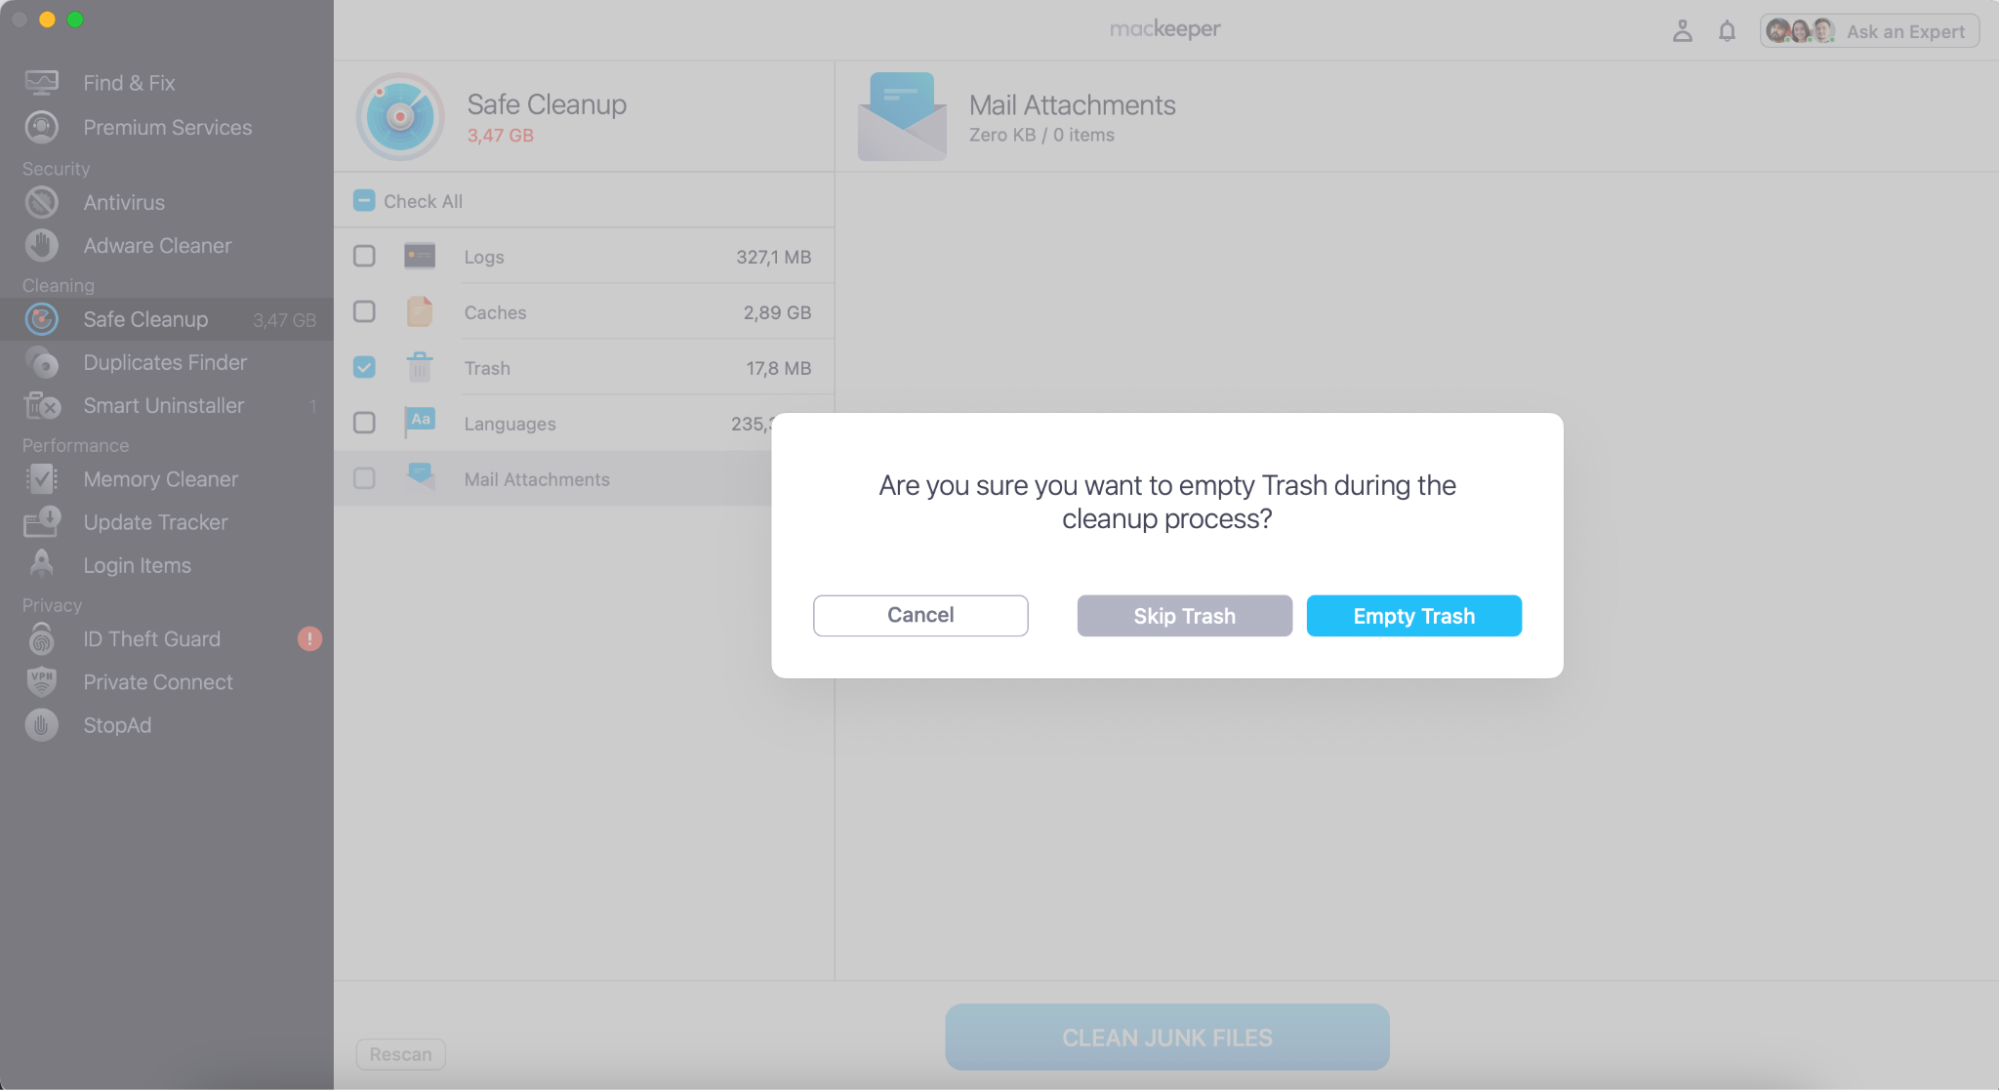
- Wait for your Mac to remove the junk files from your computer.
1. Manage storage
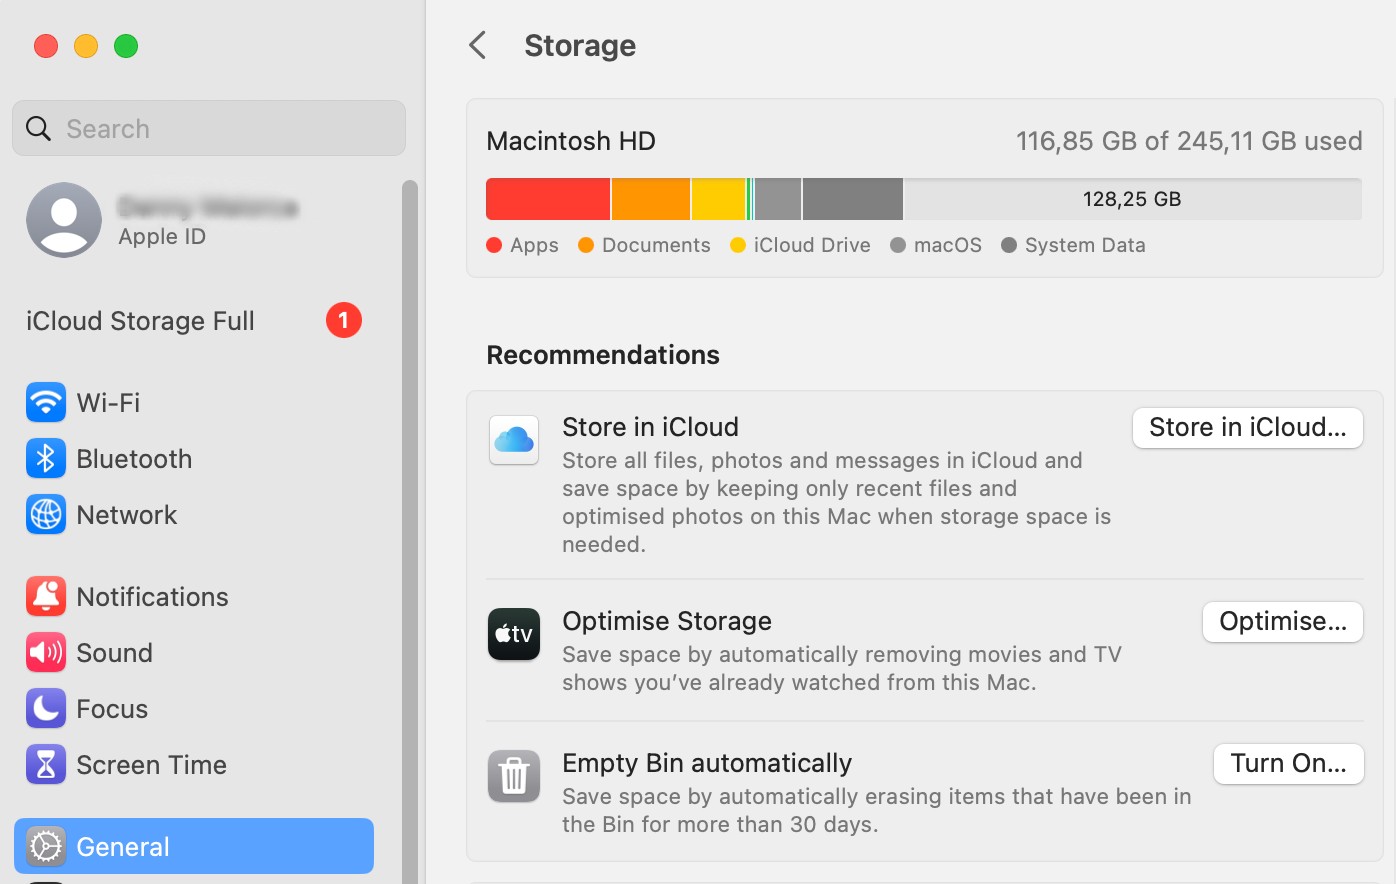
Using the Manage Mac storage tool is the first place I’d recommend starting when you declutter your Mac. The feature lets you automatically empty your Trash, and you can also choose which apps you want to delete.
The Manage storage solution also has an Optimize storage option, which deletes Apple TV shows and movies that you’ve already watched.
Here’s how to manage your Mac storage:
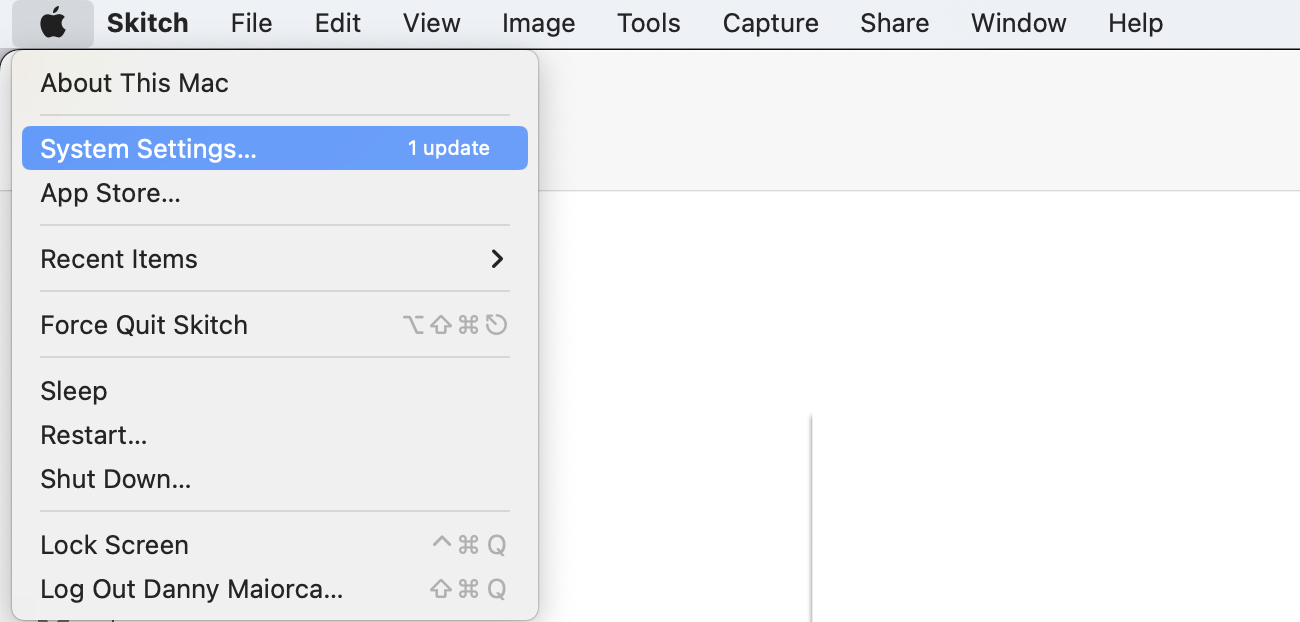
- Click on the Apple logo and go to System Settings
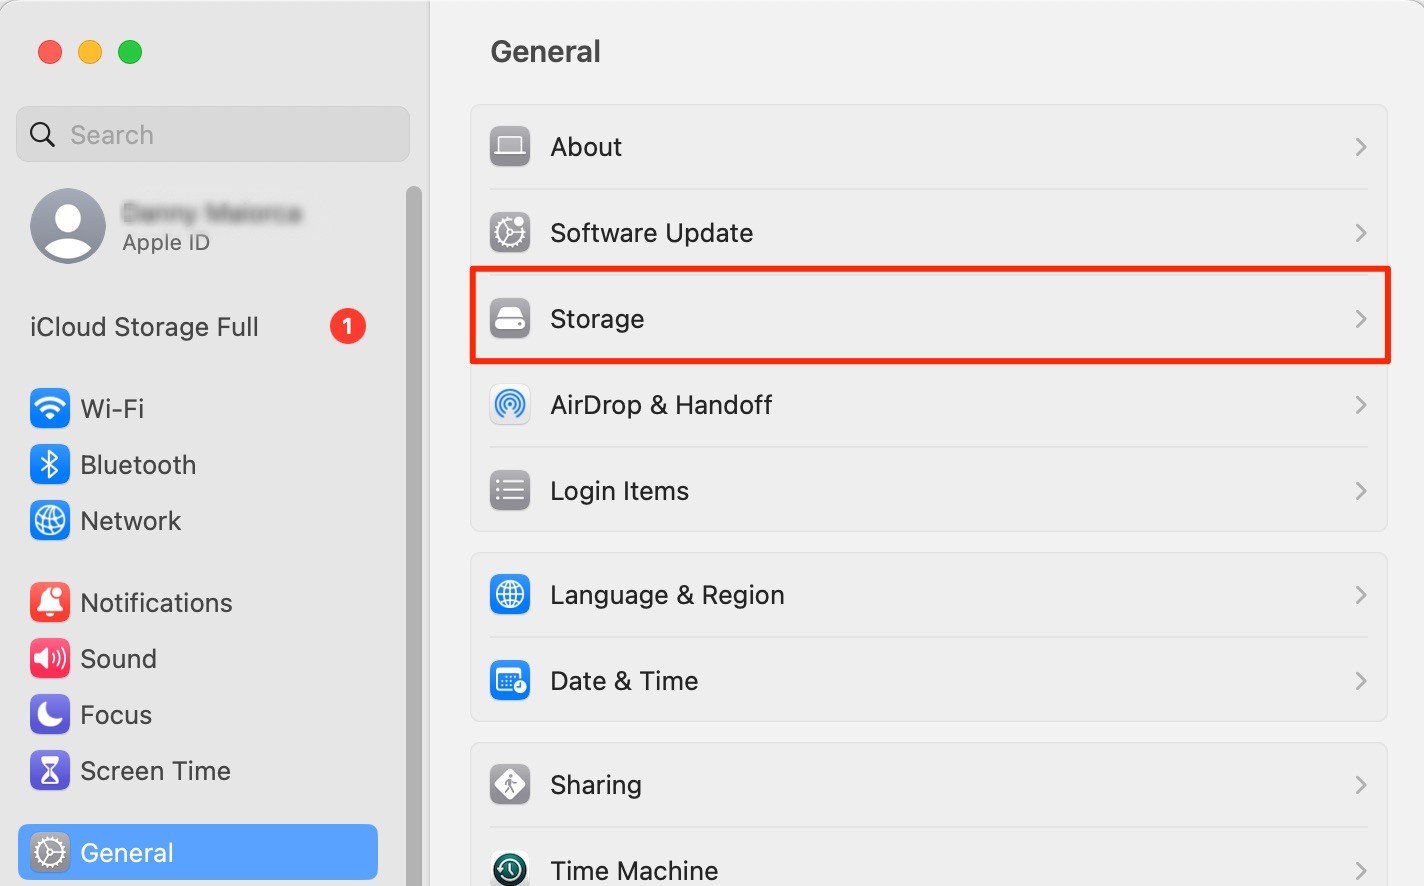
- Go to General > Storage
- Turn on the Optimize/Optimise Storage and Empty Bin/Trash Automatically features to clear those aspects
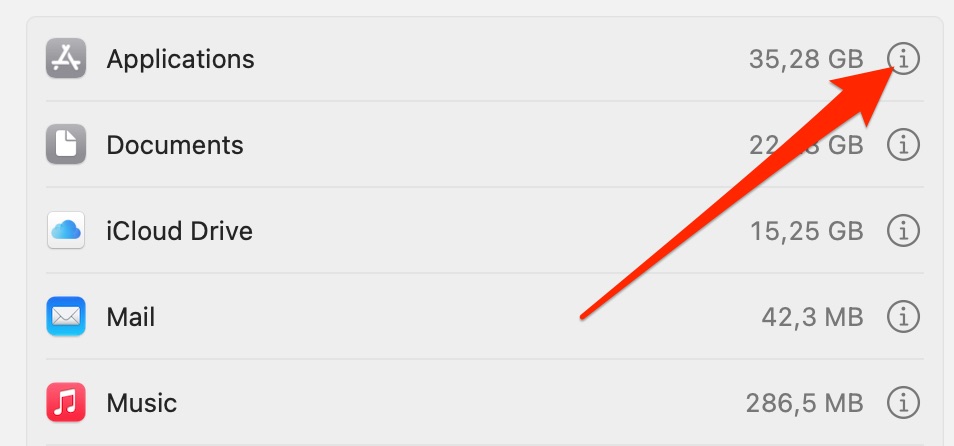
- To delete apps, documents, and so on, click on the information icon next to these tabs
- Select the apps or documents you want to remove and press Delete.
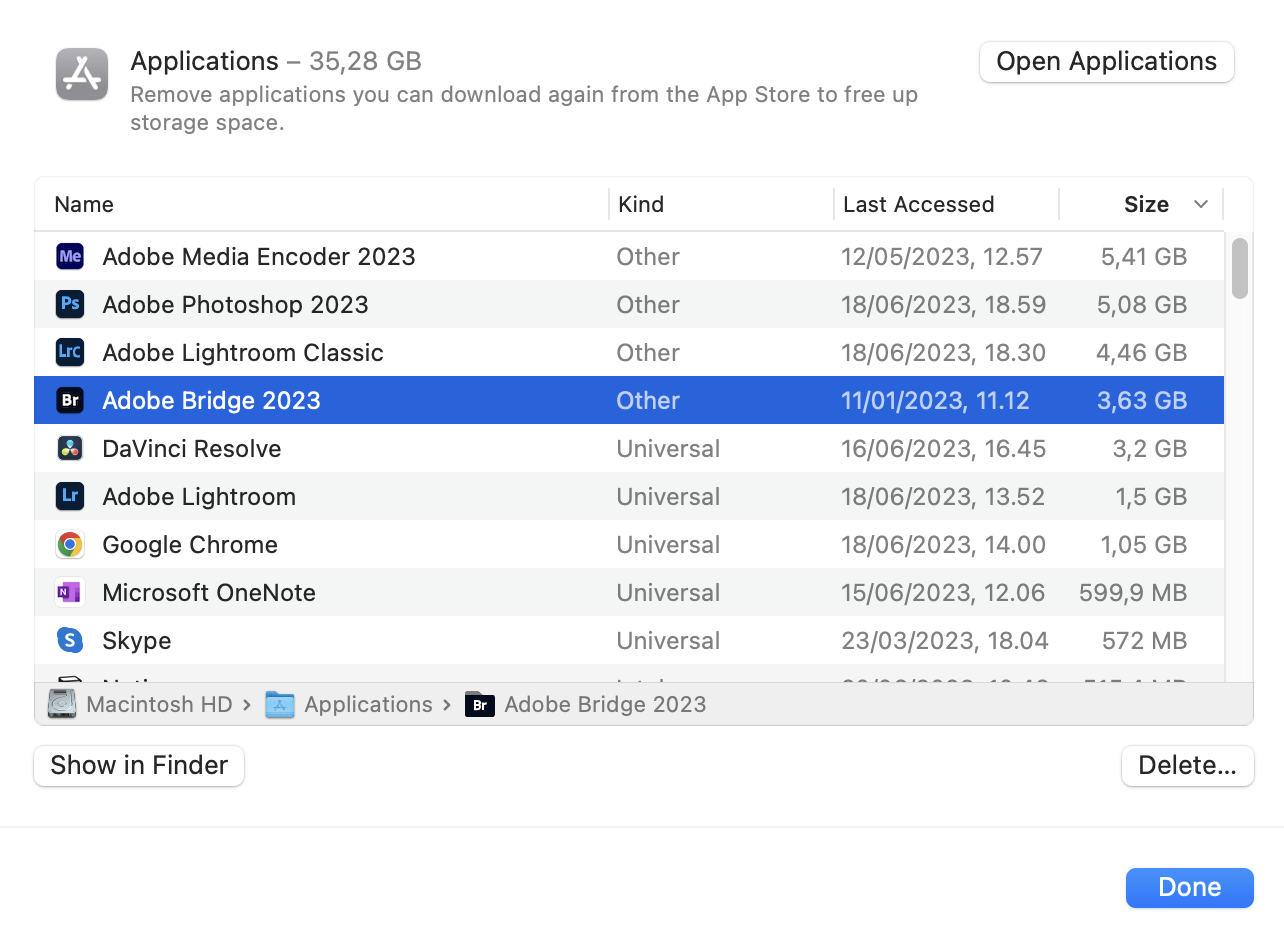
For programs and documents you don’t delete, you can organize files in plenty of other ways—such as using stacks.
In addition to the traditional method, you can use MacKeeper’s Safe Cleanup solution to remove the manual work of finding and deleting files and apps.
- Go to Cleaning > Safe Cleanup > Start Scan
- Tick the boxes you want to delete and tap Clean Junk Files
- Confirm your choice with the pop-up window.
2. Organize your desktop
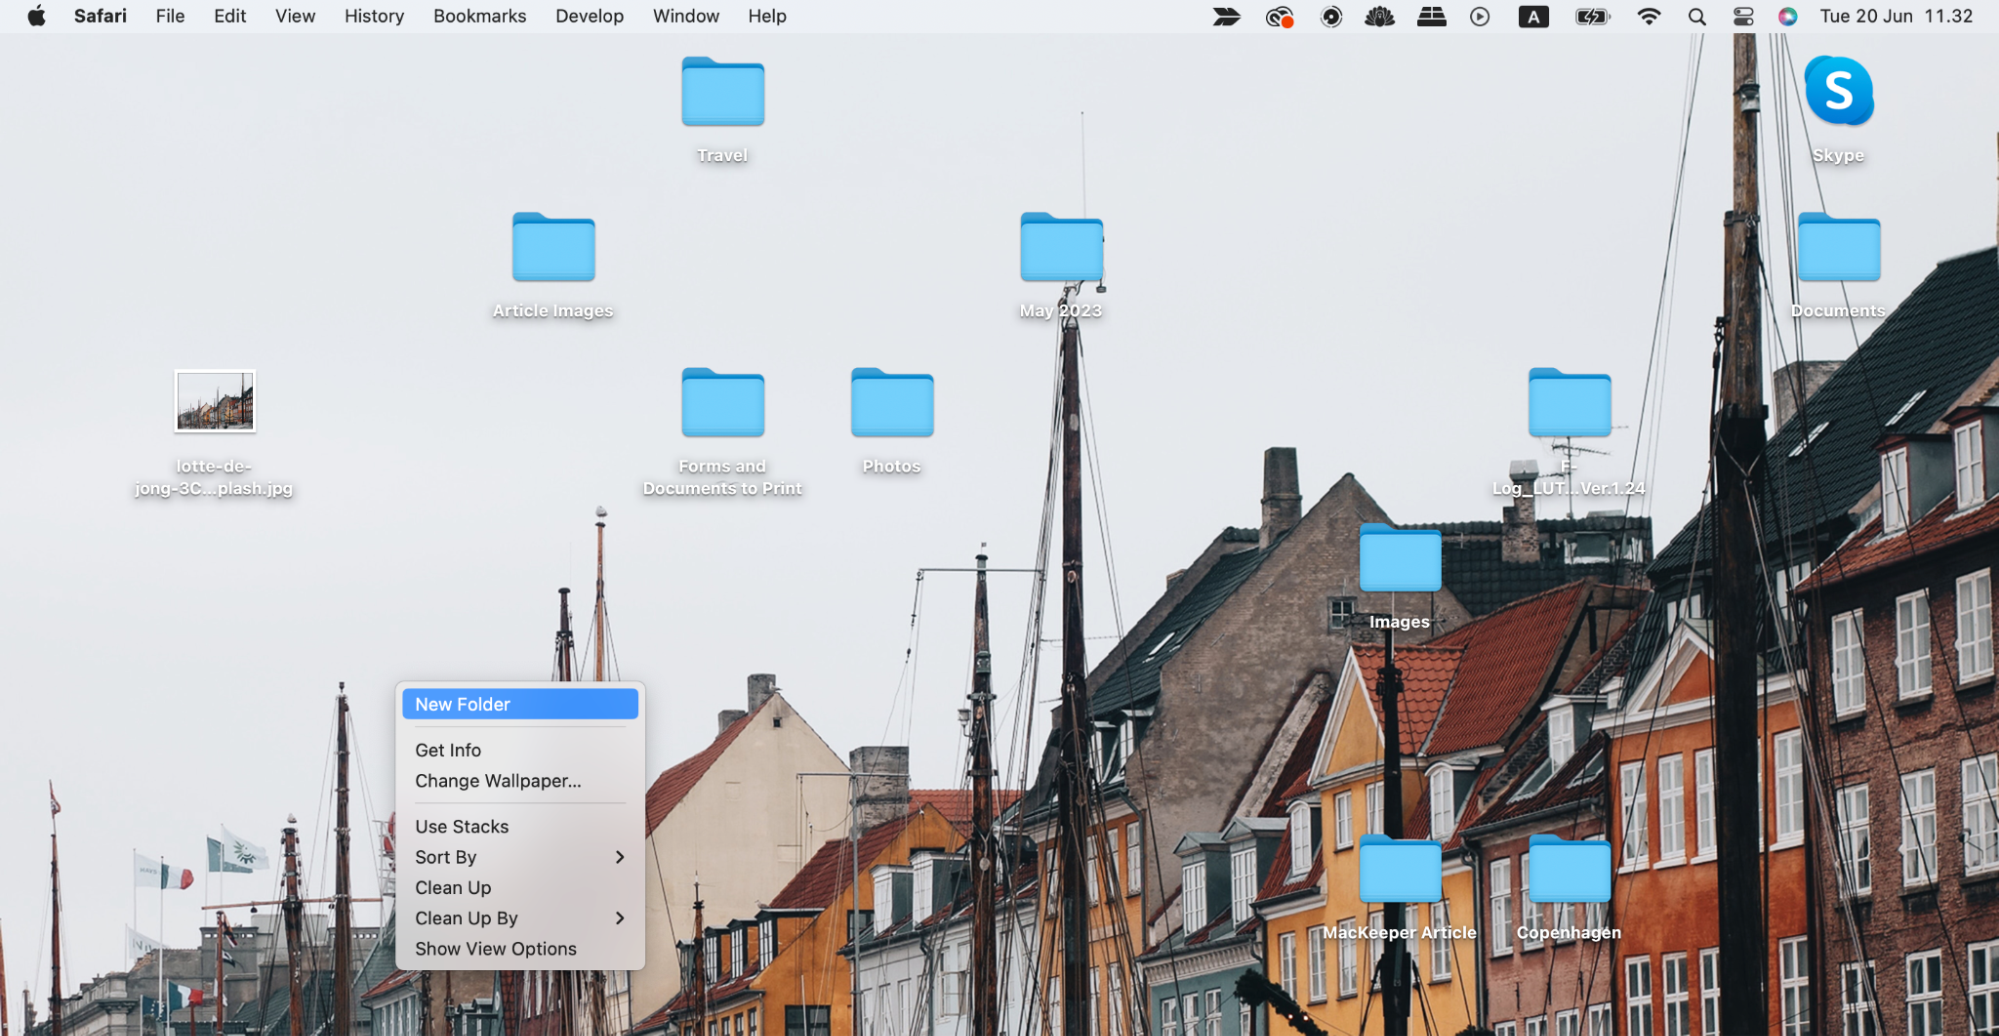
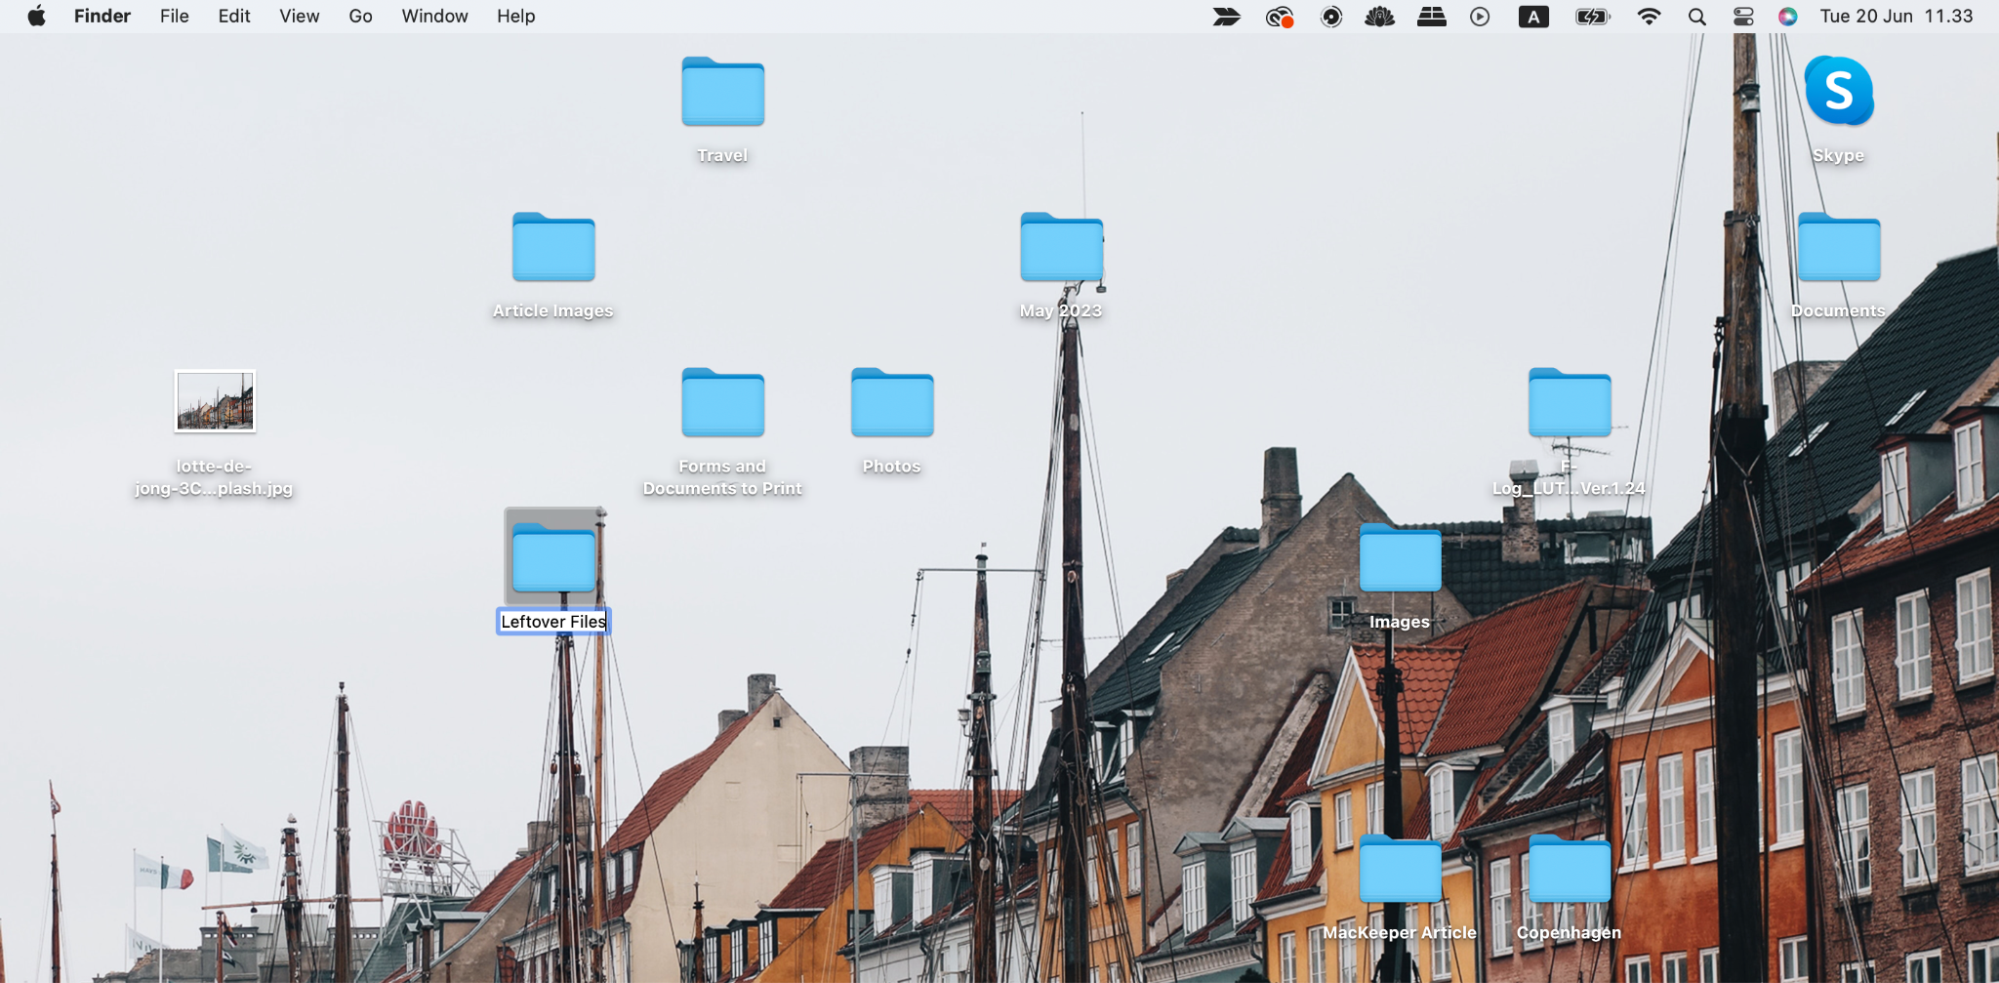
Knowing how to organize Mac desktop is another easy way to declutter your device and enhance your productivity. Creating files and folders is the best way to do this.
- Click on your Mac desktop by pressing control + trackpad simultaneously
- Select New Folder when the dropdown menu appears
- Drag and drop the files and folders that you need. Repeat this process until you’re happy with your Mac’s desktop layout.
3. Clear out your downloads folder
The Downloads folder is one of the biggest contributors to a cluttered Mac. Speaking from personal experience, I sometimes find it easy to forget about downloaded images, documents, and so on—until I realize that I don’t have as much storage space as I’d like.
Thankfully, clearing your Downloads folder is easy.
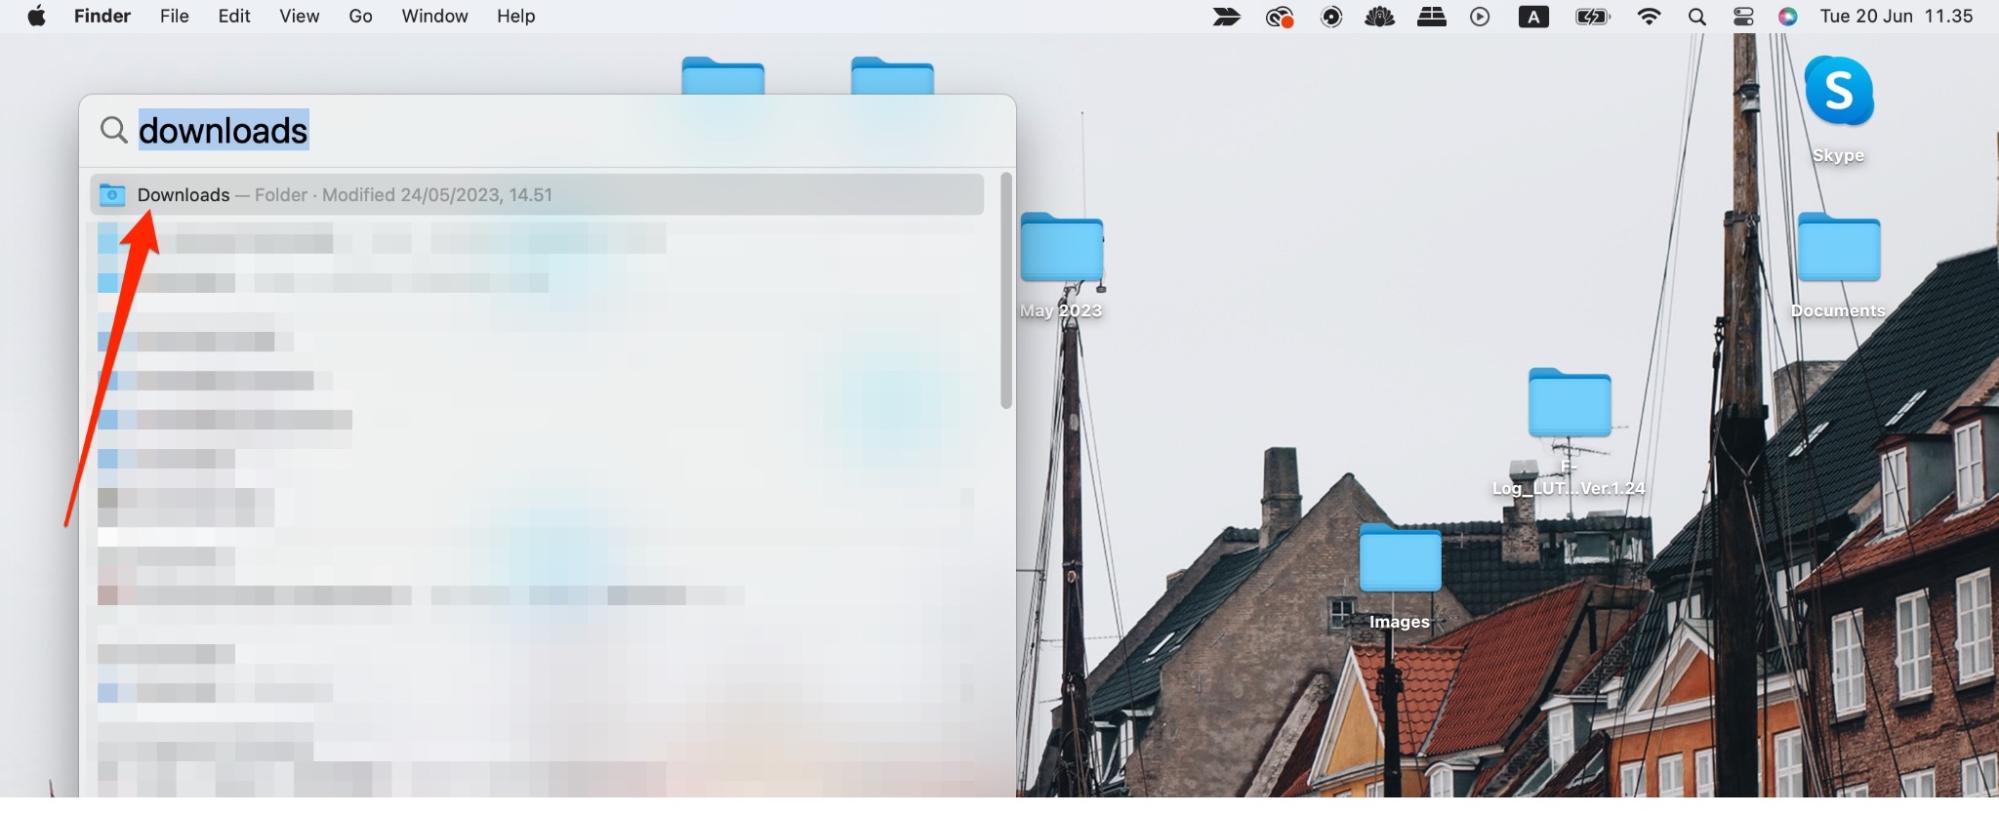
- Go to the Spotlight icon and type Downloads in the search bar
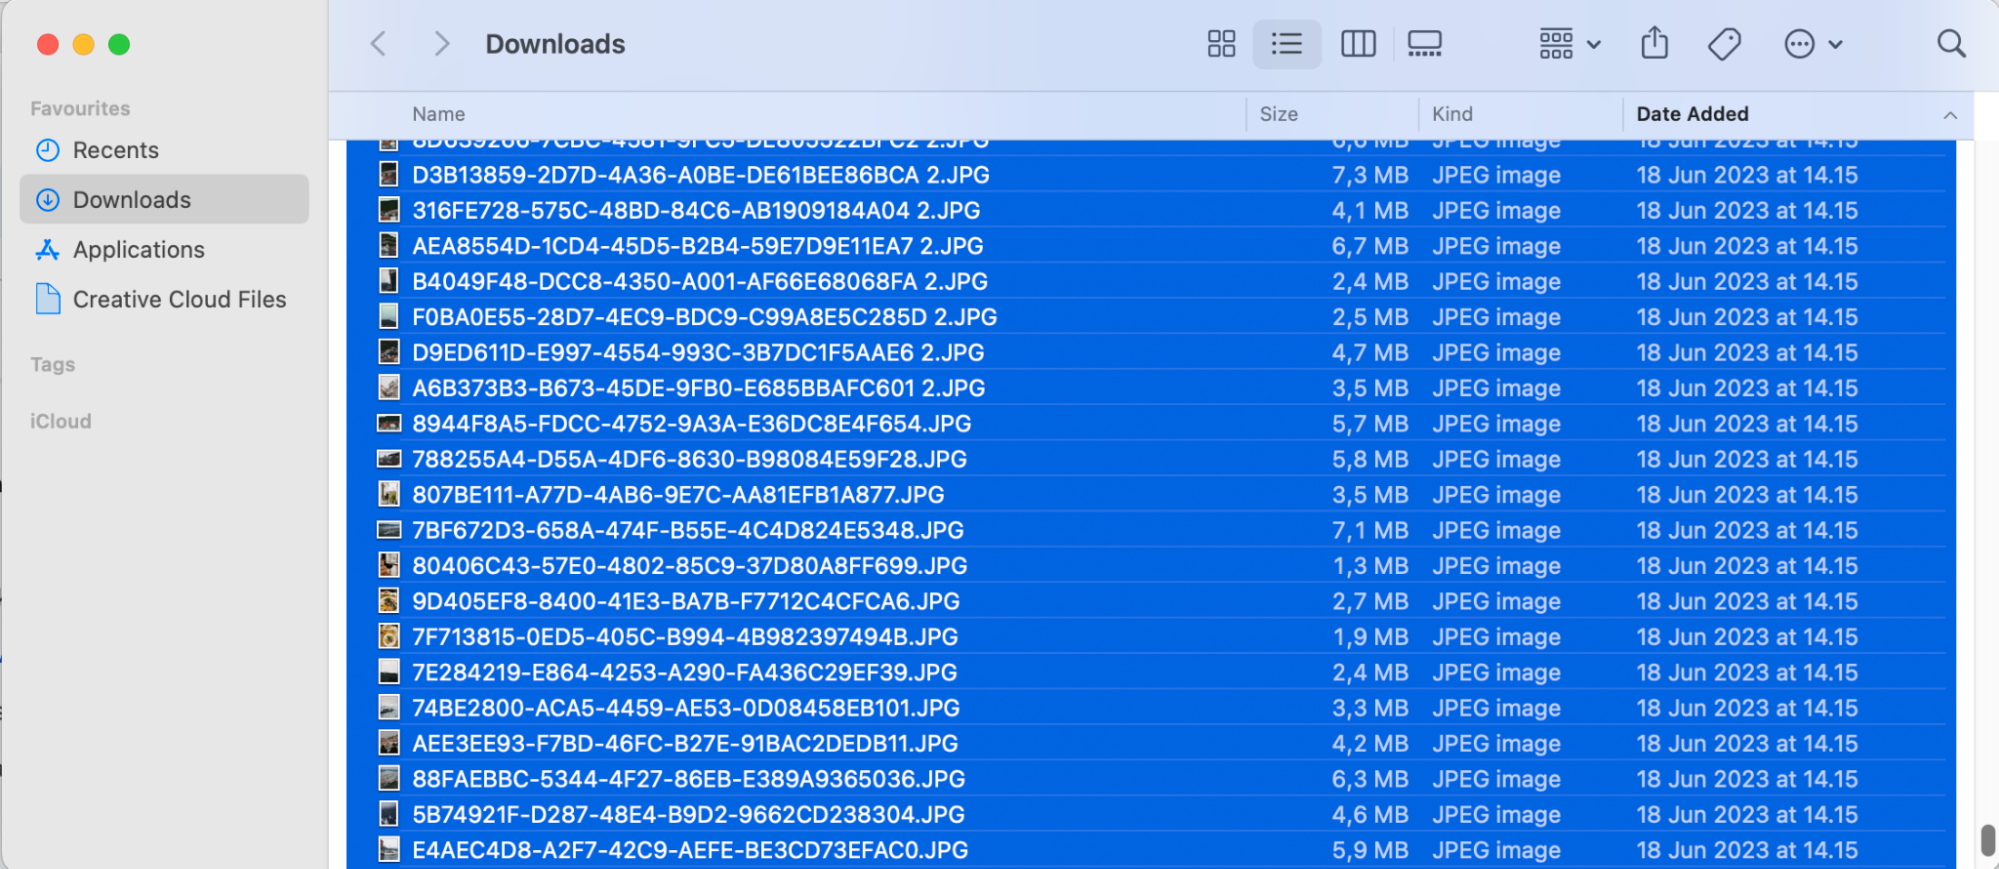
- Highlight all of the files in your folder
- Drag and drop them to your Trash
- Press Empty in the top right-hand corner
- When the pop-up window appears, confirm your choice by selecting Empty Bin/Trash.

4. Tidy up your emails
Tidying up your Mail app probably won’t clear as much space as deleting larger files on your device. However, you can still contribute to decluttering your device—and having an organized inbox makes accessing important emails much easier.
- Open the Mail app on your Mac
- Go through your files and folders. When you see emails or drafts that you no longer need, click on and highlight them. Then, select the trash icon at the top.
You can highlight multiple emails by pressing and holding onto both the control button and trackpad. Alternatively, press control + trackpad and move the cursor up or down until you’ve selected all messages within a folder.
5. Uninstall inessential apps
I recommend two options for uninstalling apps you no longer need: the traditional method and MacKeeper’s Smart Uninstaller. Below, I’ll provide instructions for both.
Let’s start by looking at the traditional method:
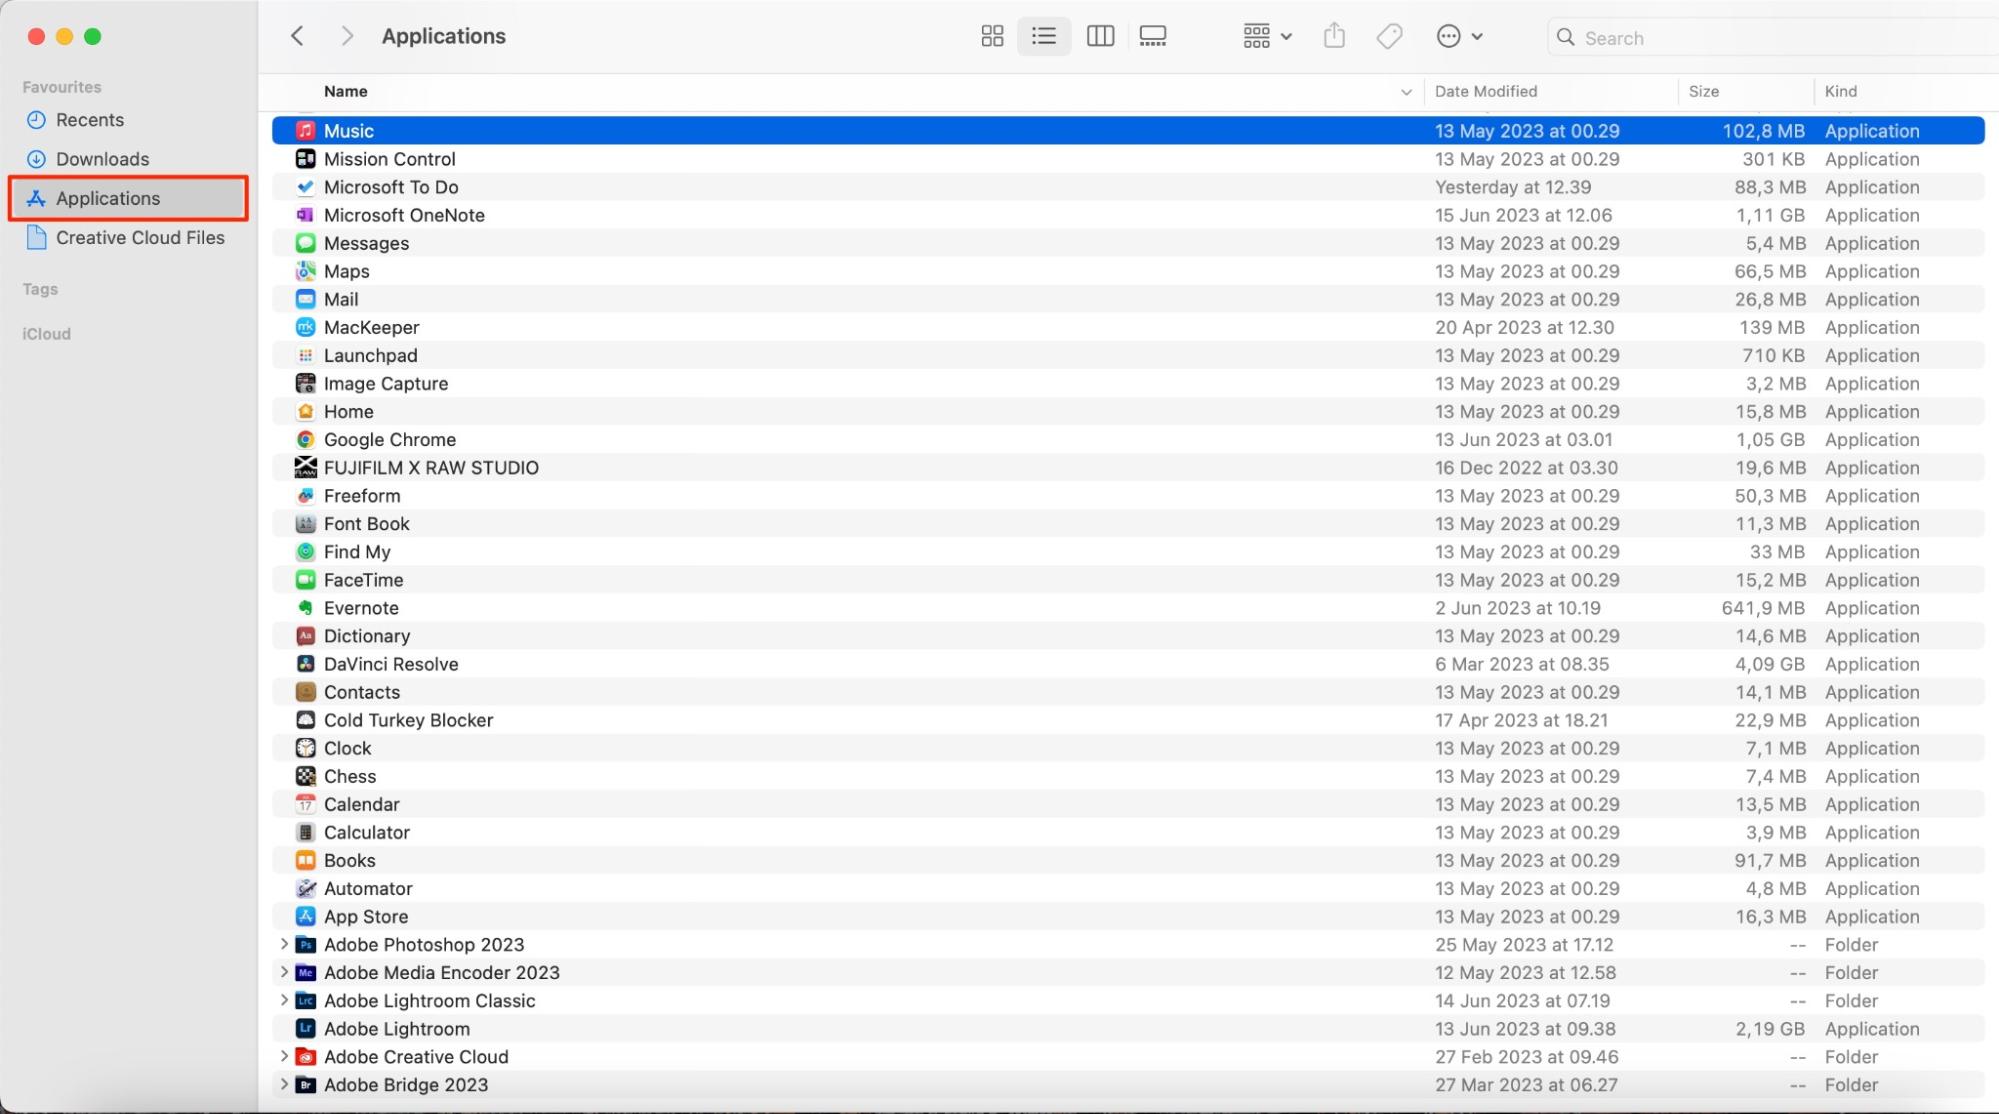
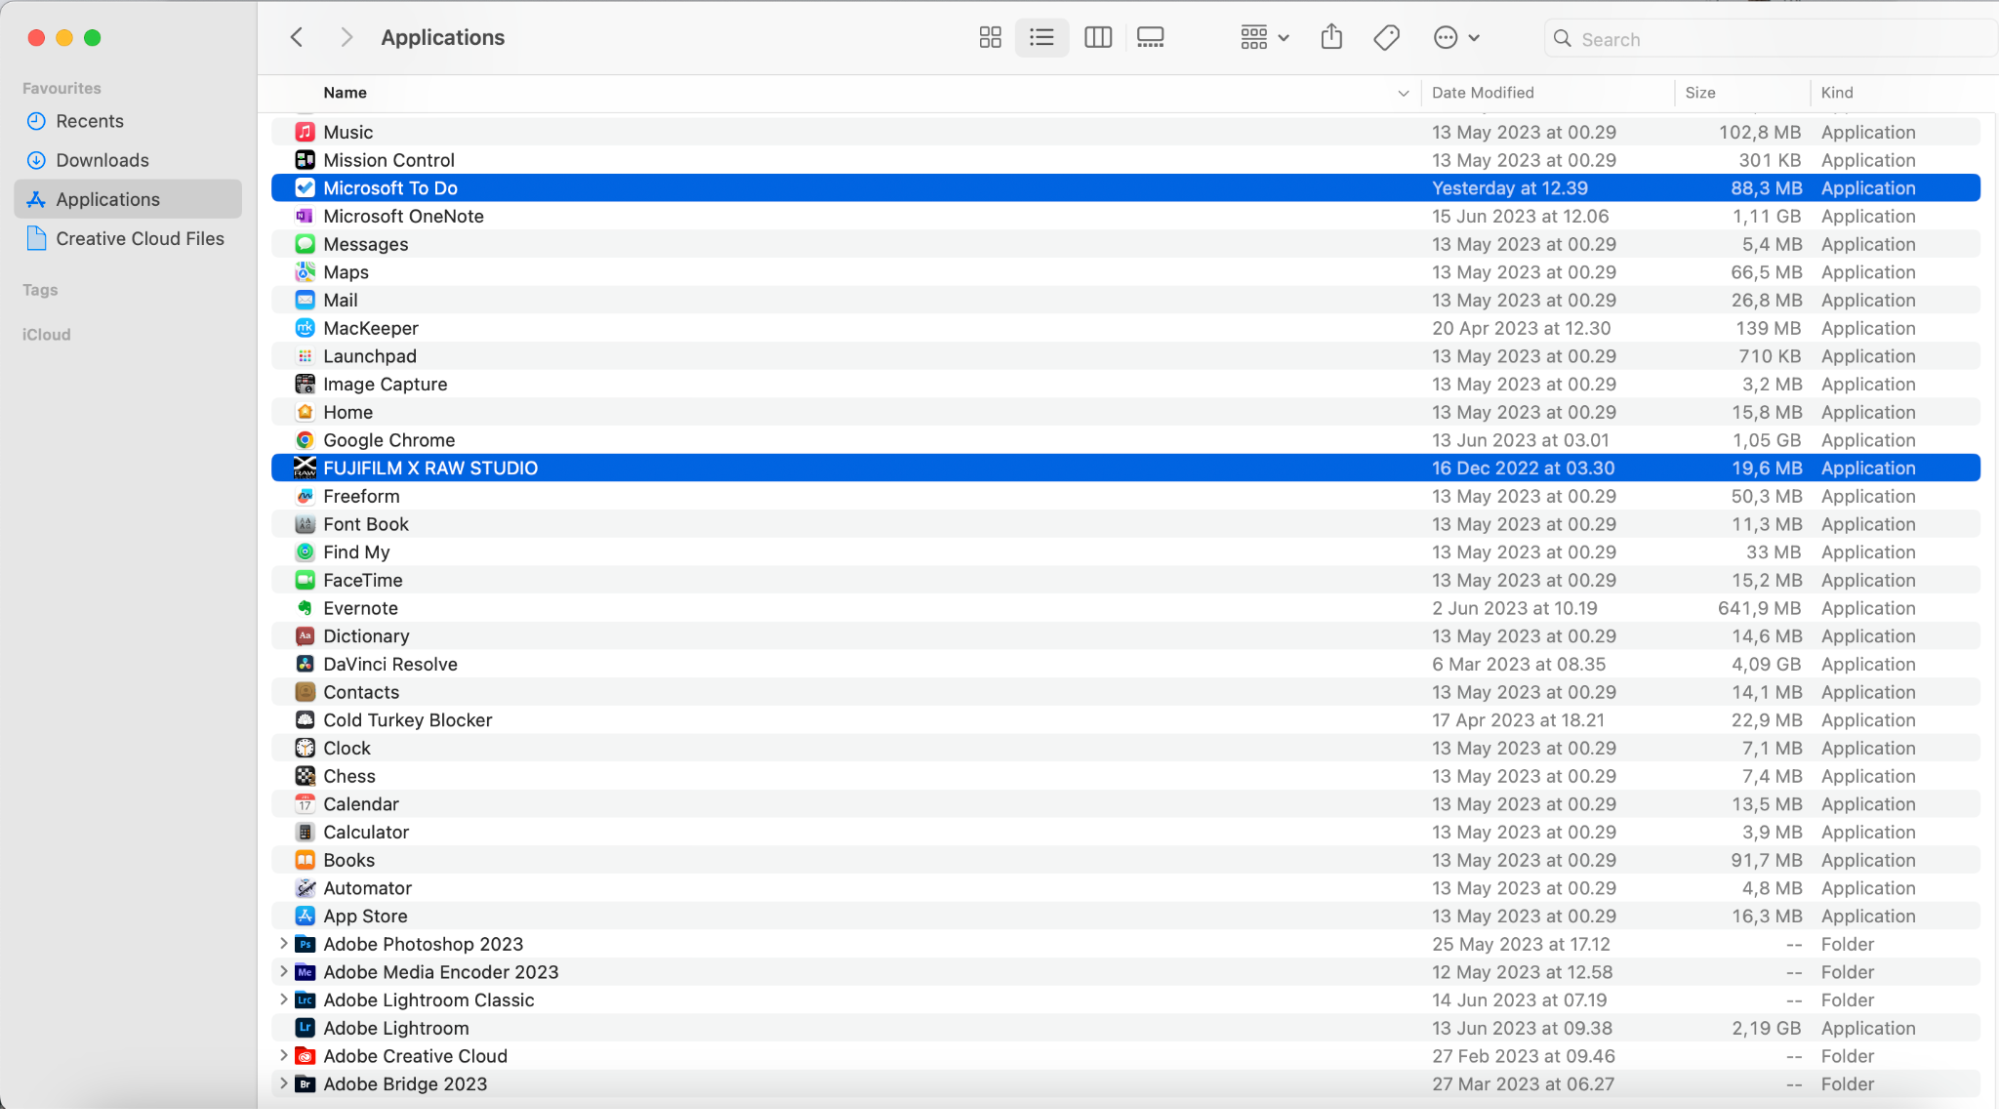
- Open Finder and go to the Applications folder
- Highlight the apps you want to uninstall and move them to the Trash folder. Then, select Empty Trash.
Also, you might need to use an uninstaller for some apps:
- Open Finder and go to Applications
- Choose the app folder for the program you’d like to remove
- You should see a file called Uninstall [App] or similar. Click on this and follow the instructions for your app.
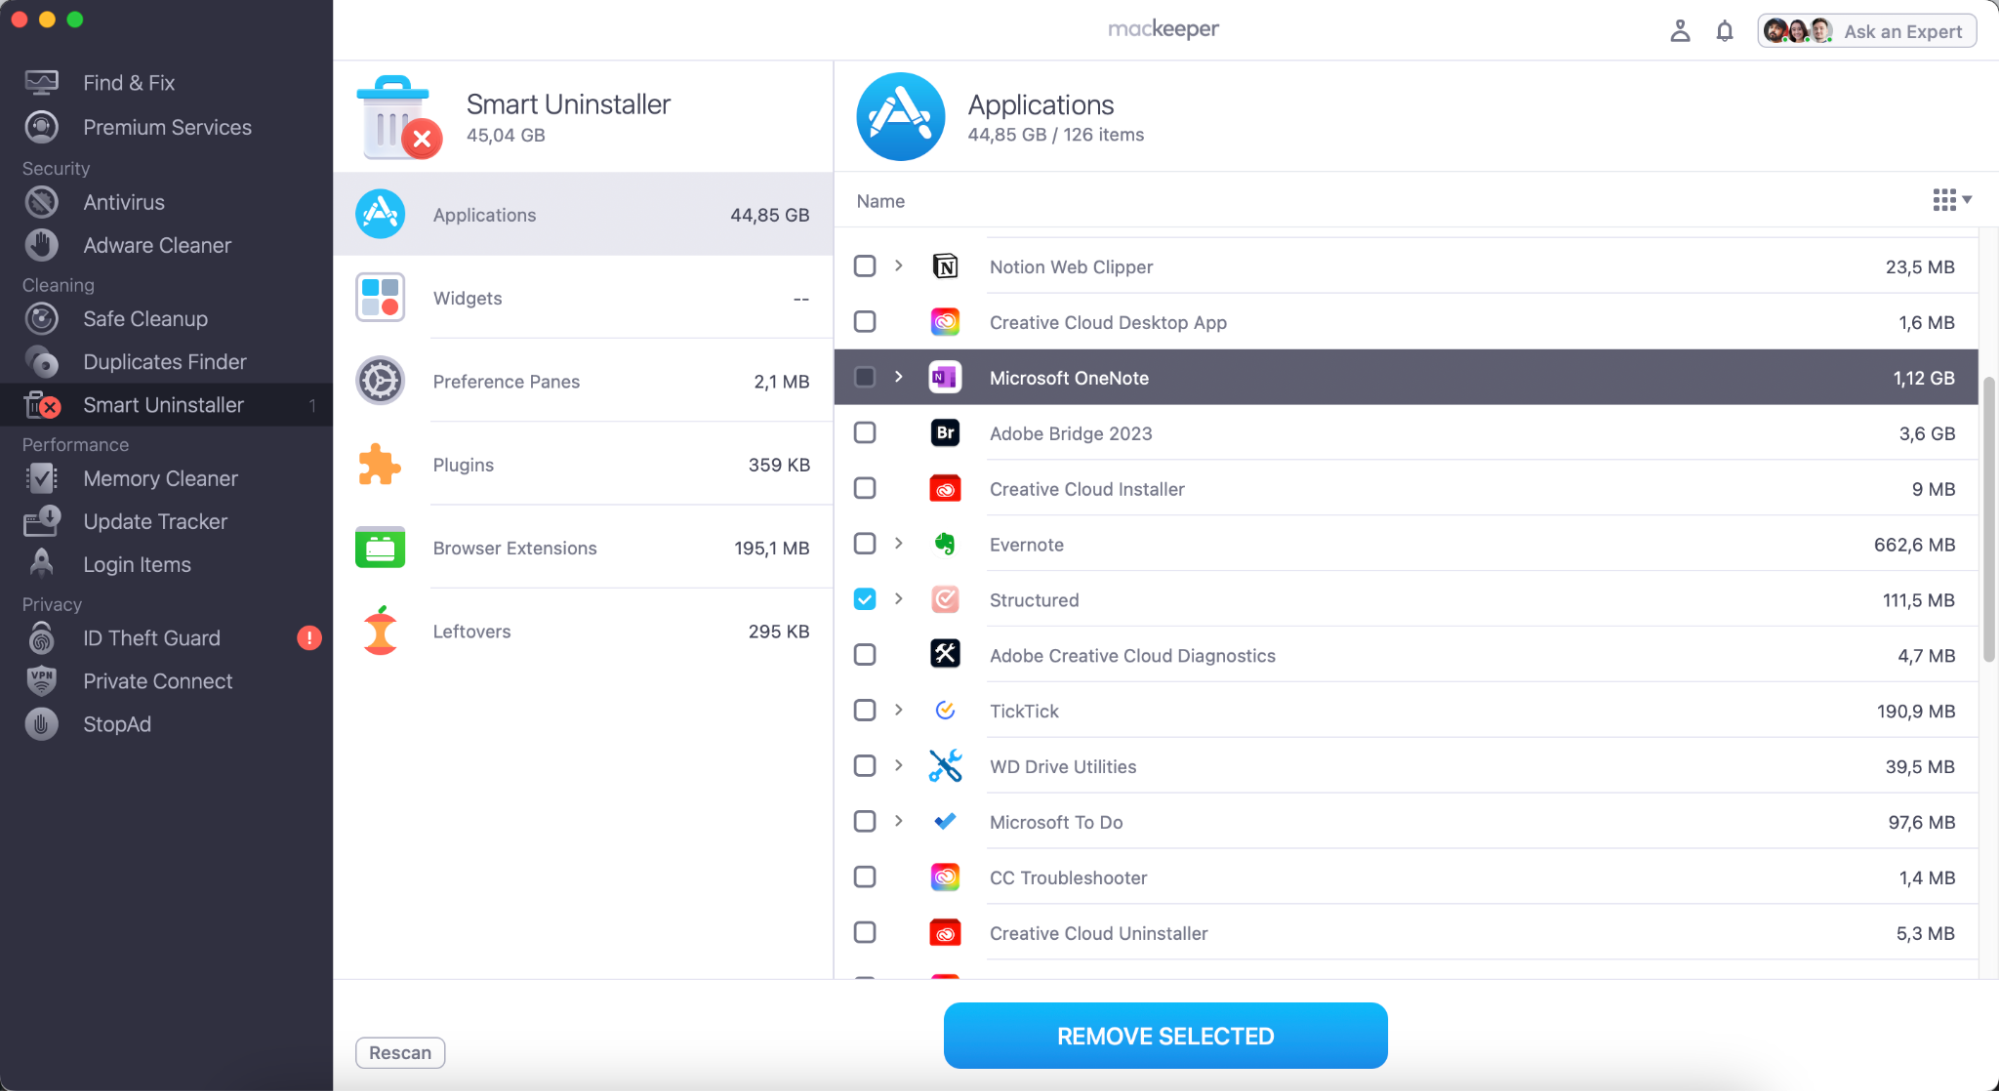
Alternatively, use MacKeeper’s Smart Uninstaller to get rid of apps you no longer need:
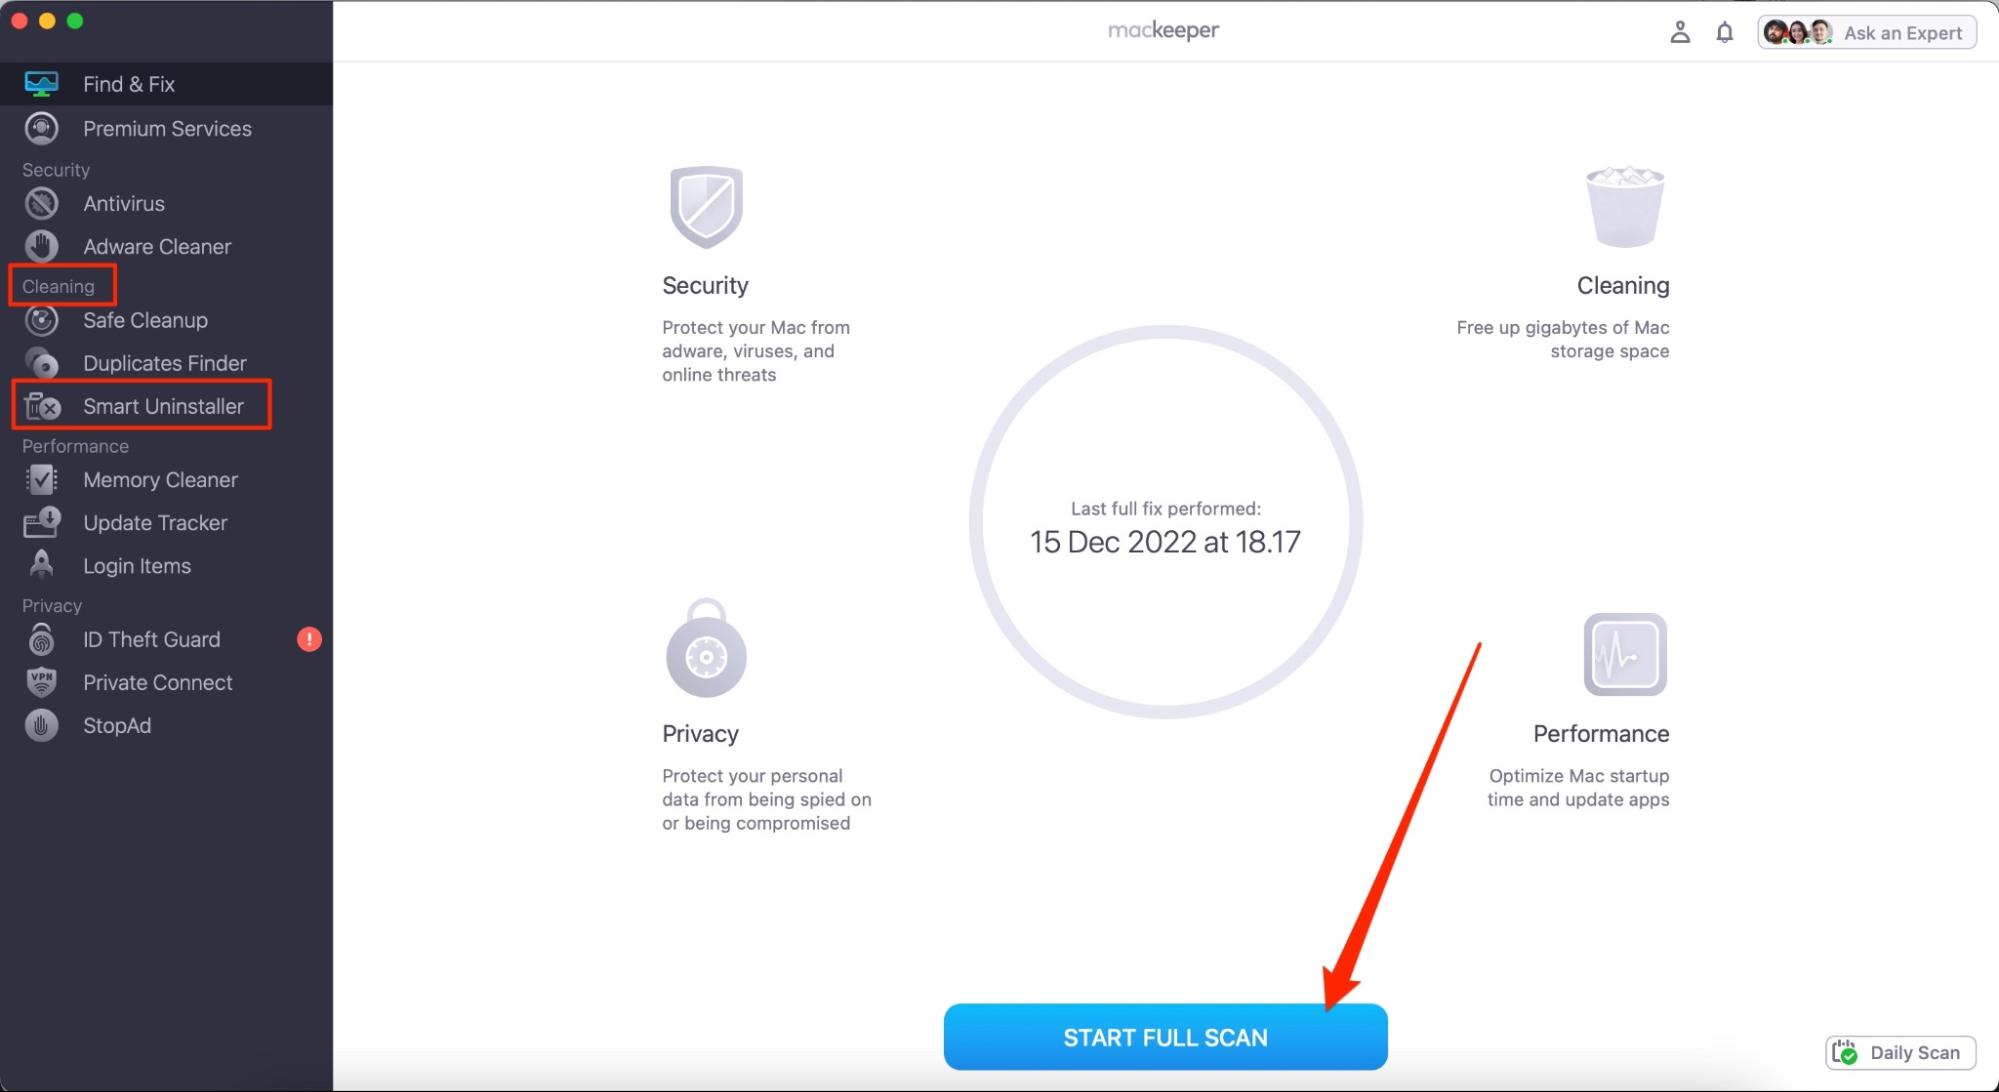
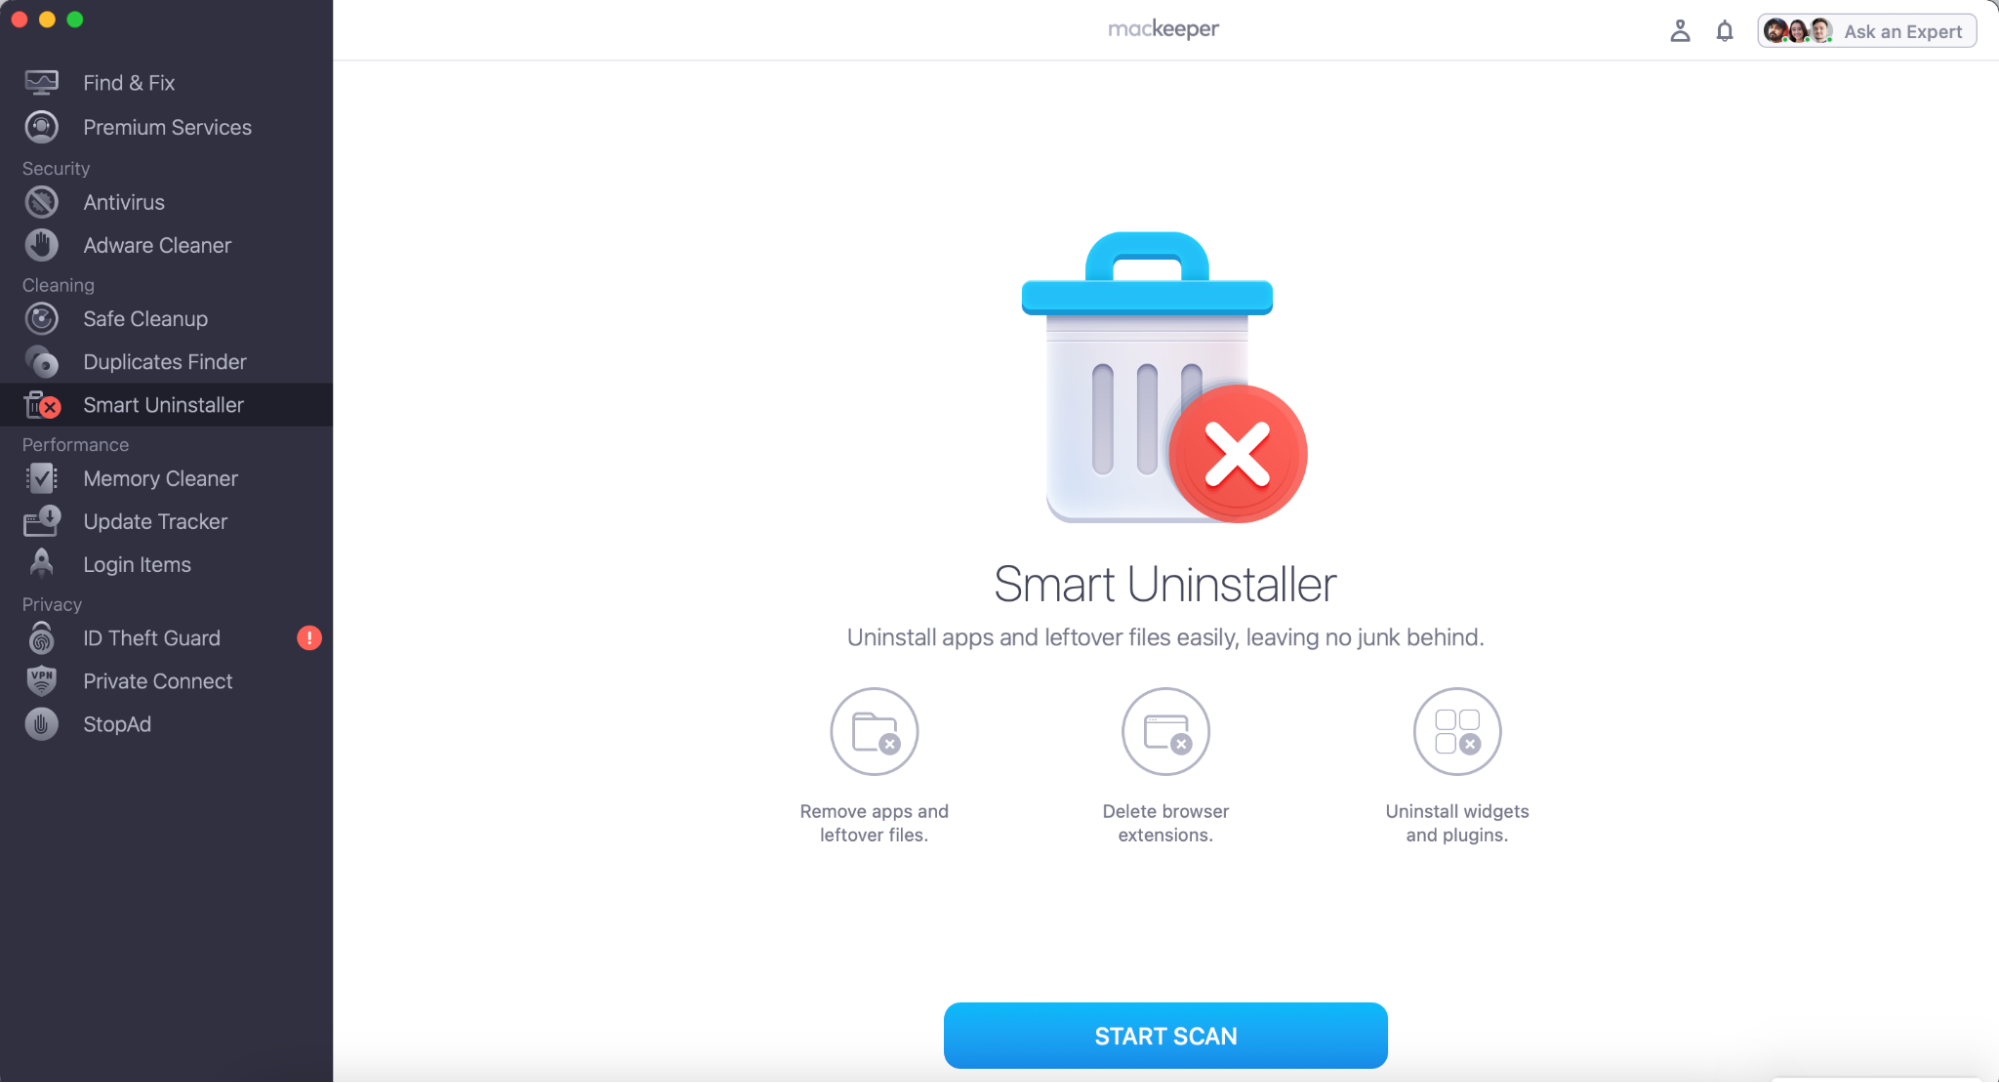
- Go to Cleaning > Smart Uninstaller
- Click on Start Scan
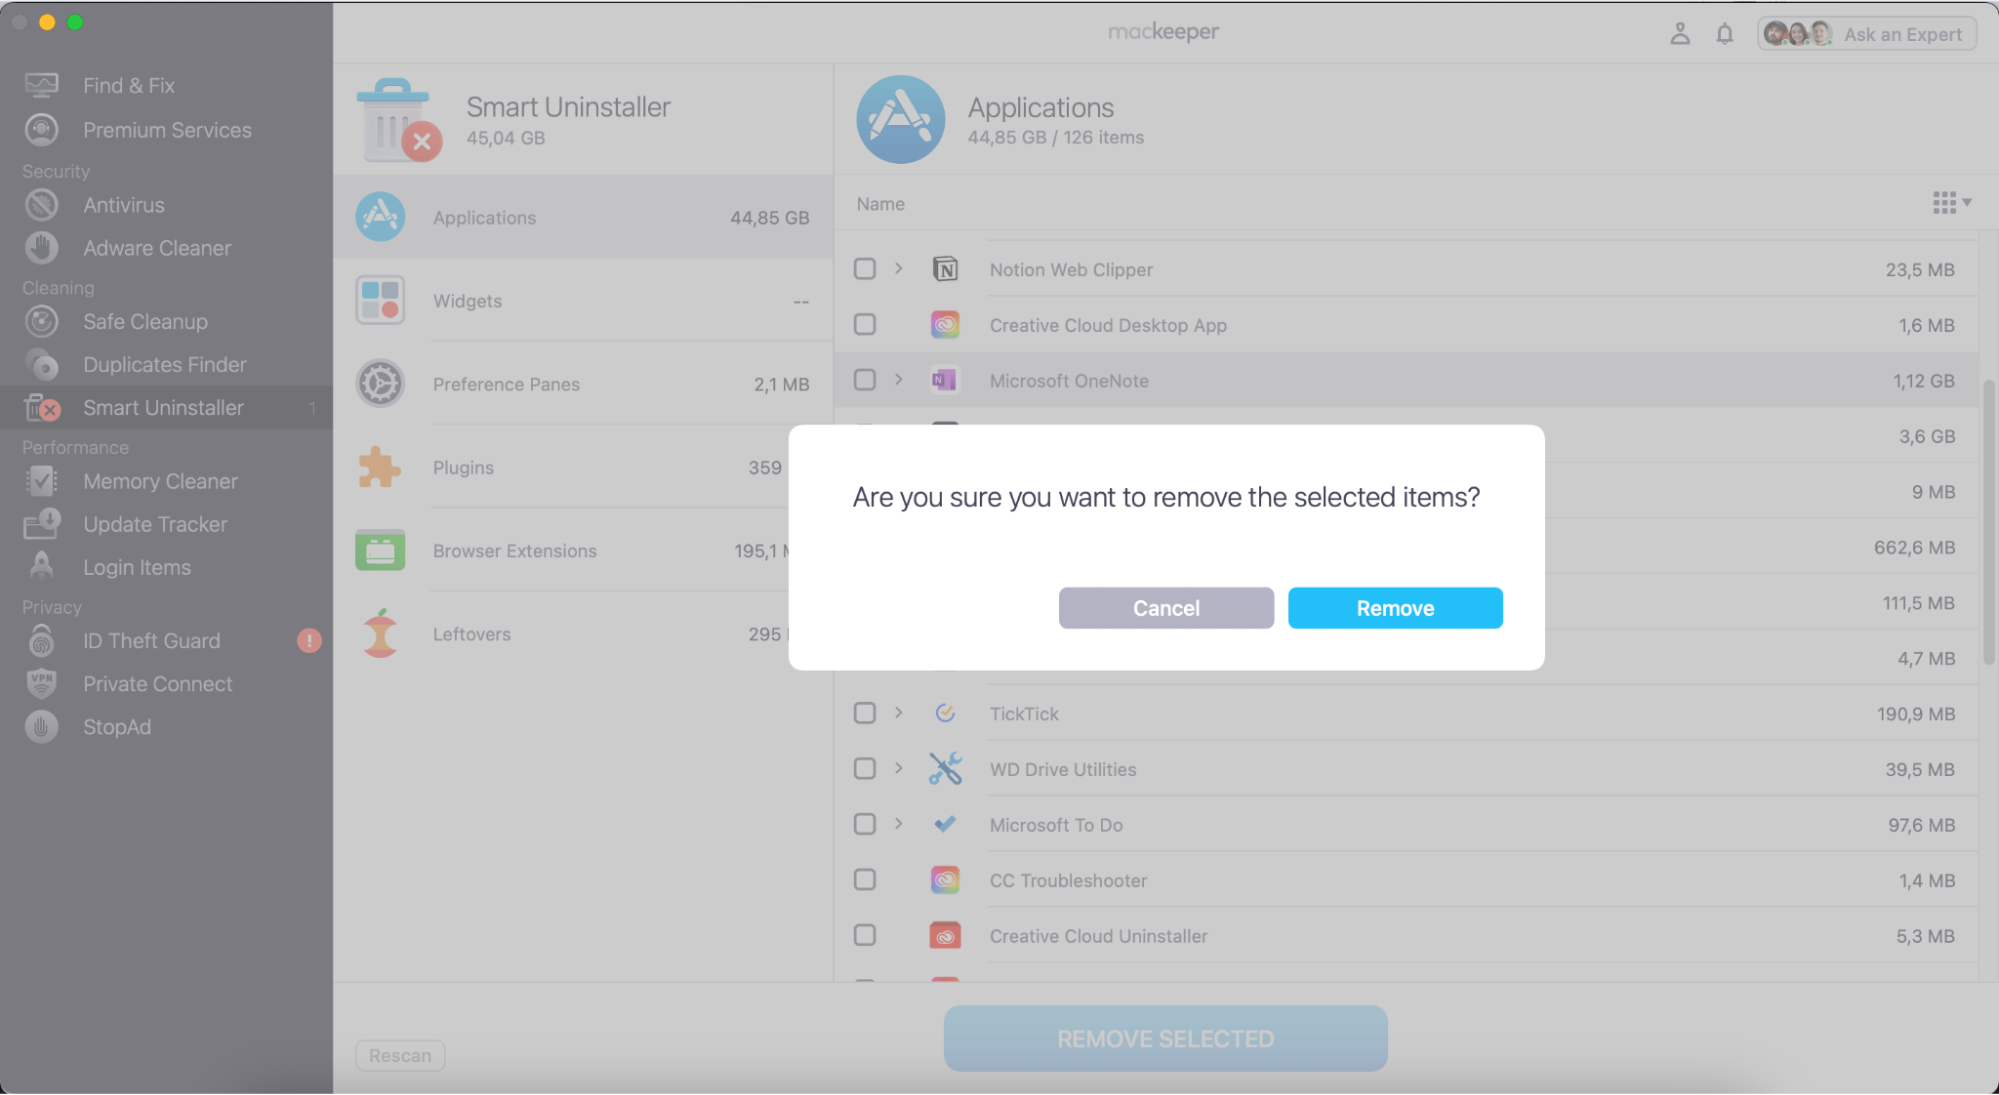
- Choose Remove Selected after ticking the boxes next to apps you want to uninstall
- Confirm your choice by clicking on Remove in the pop-up window.
6. Review and delete bookmarks
Removing unnecessary bookmarks in your browser can help you surf the web more effectively.
Here’s how to delete bookmarks in Safari:
- Go to sidebar > Bookmarks
- When you see a bookmark you want to delete, click on it with control + trackpad
- Tap Delete when the dropdown menu appears.


You can also remove bookmarks in Google Chrome:
- Open Google Chrome and click on the bookmark you want to remove beneath your URL bar
- Select Delete.
7. Clean your contacts
Removing contacts is a great way to declutter any device, including your Mac. Here’s how you can delete details for people you no longer speak to:
- Open the Contacts app
- Press control + trackpad on the contact you want to remove
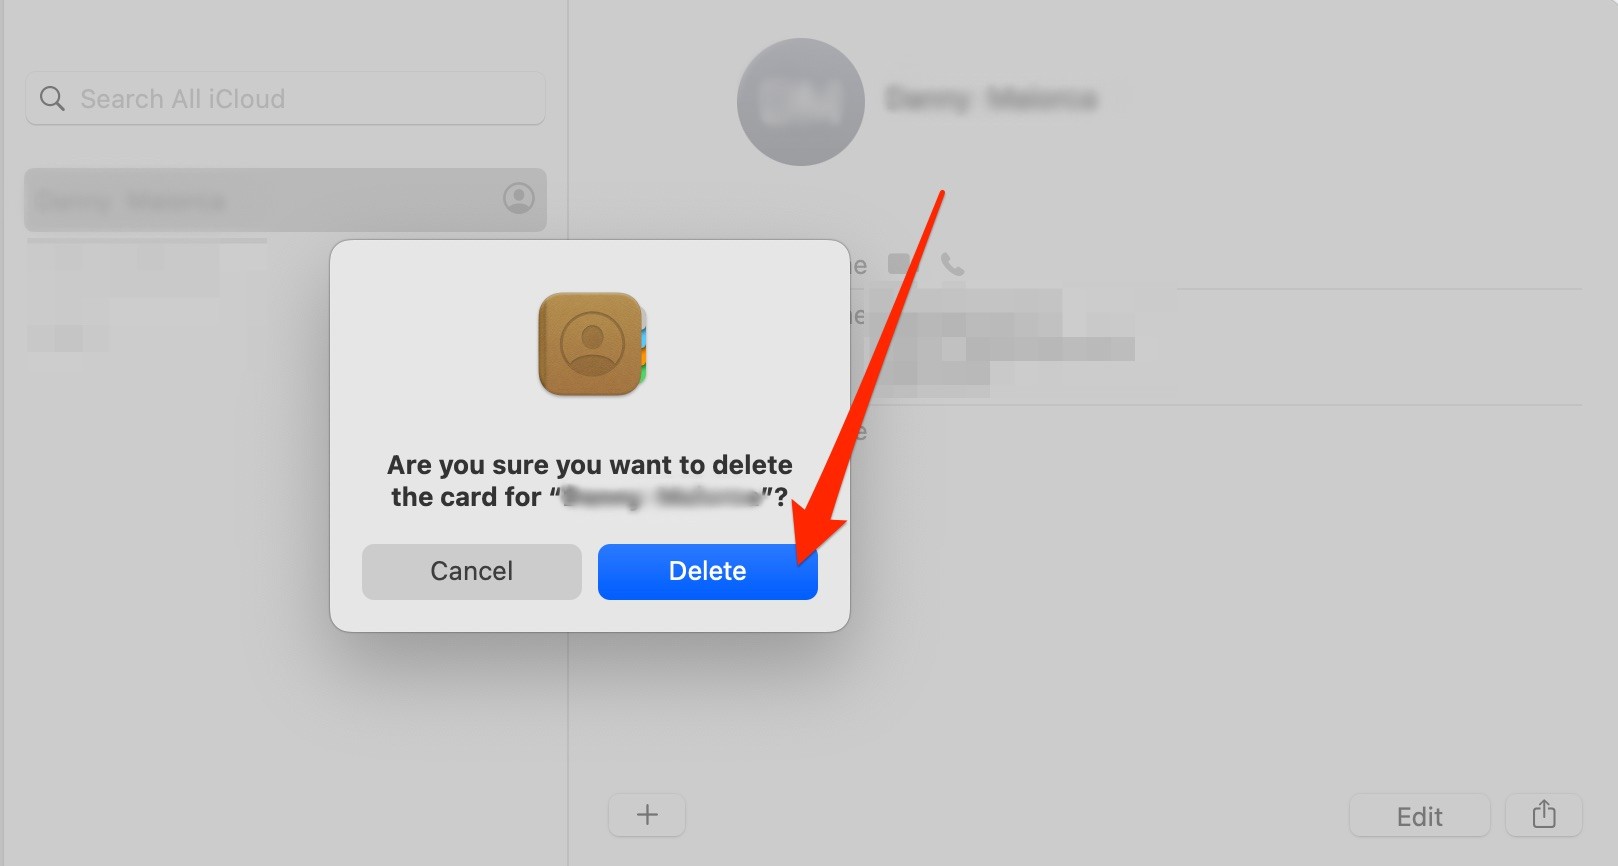
- Select Delete Card
- Press Delete when the pop-up window appears.

8. Clean your system junk
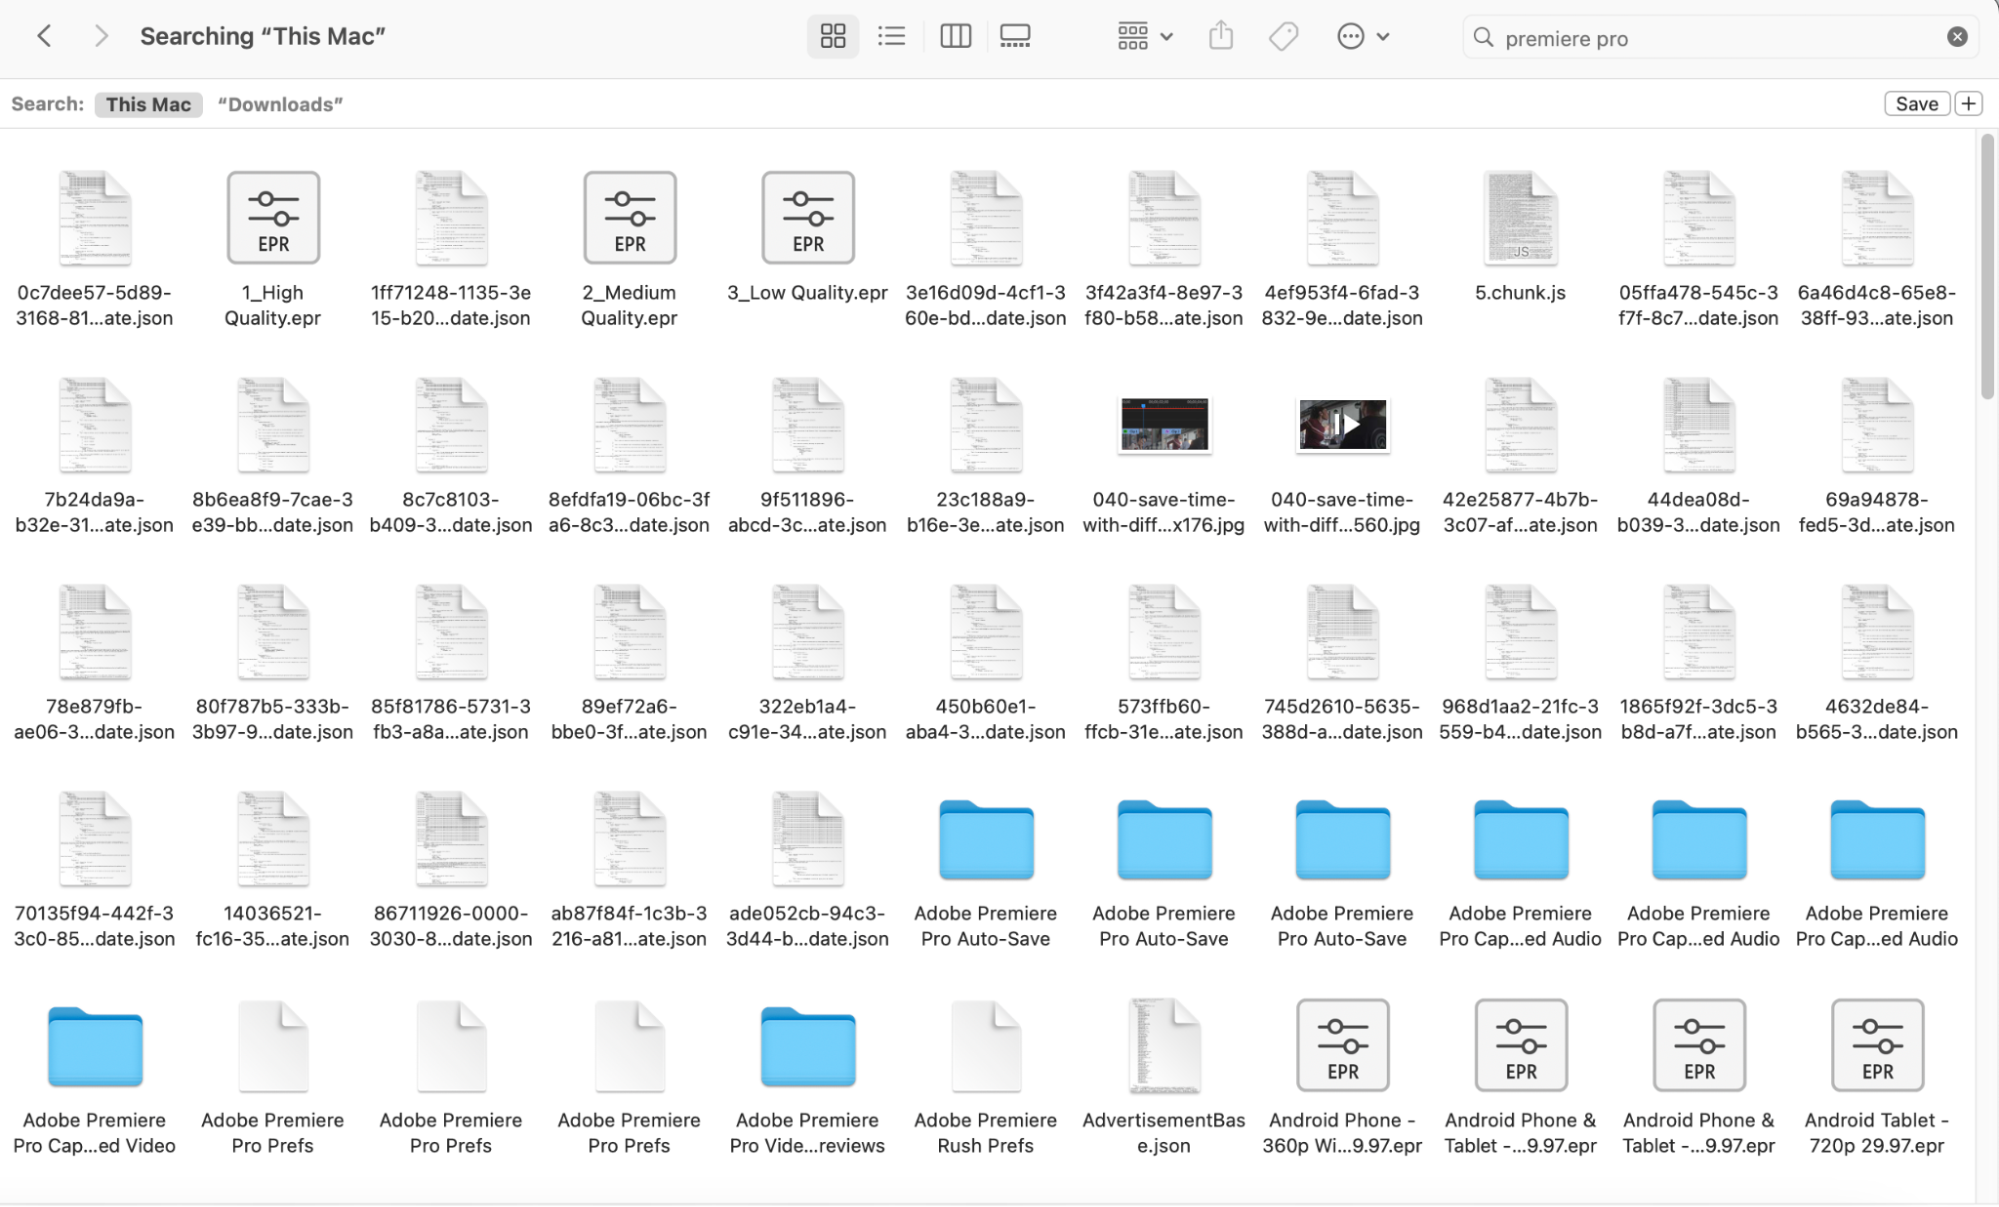
If you have junk from apps or programs that you’ve deleted, you can always clear these out with the Finder app.
- Open Finder and search for a term that’s applicable to you in the search bar
- When you see junk files you want to delete, drag and drop them to your Trash
- If needed, use Touch ID or enter your password to confirm your decision
- Empty your Trash folder to delete the junk files permanently.
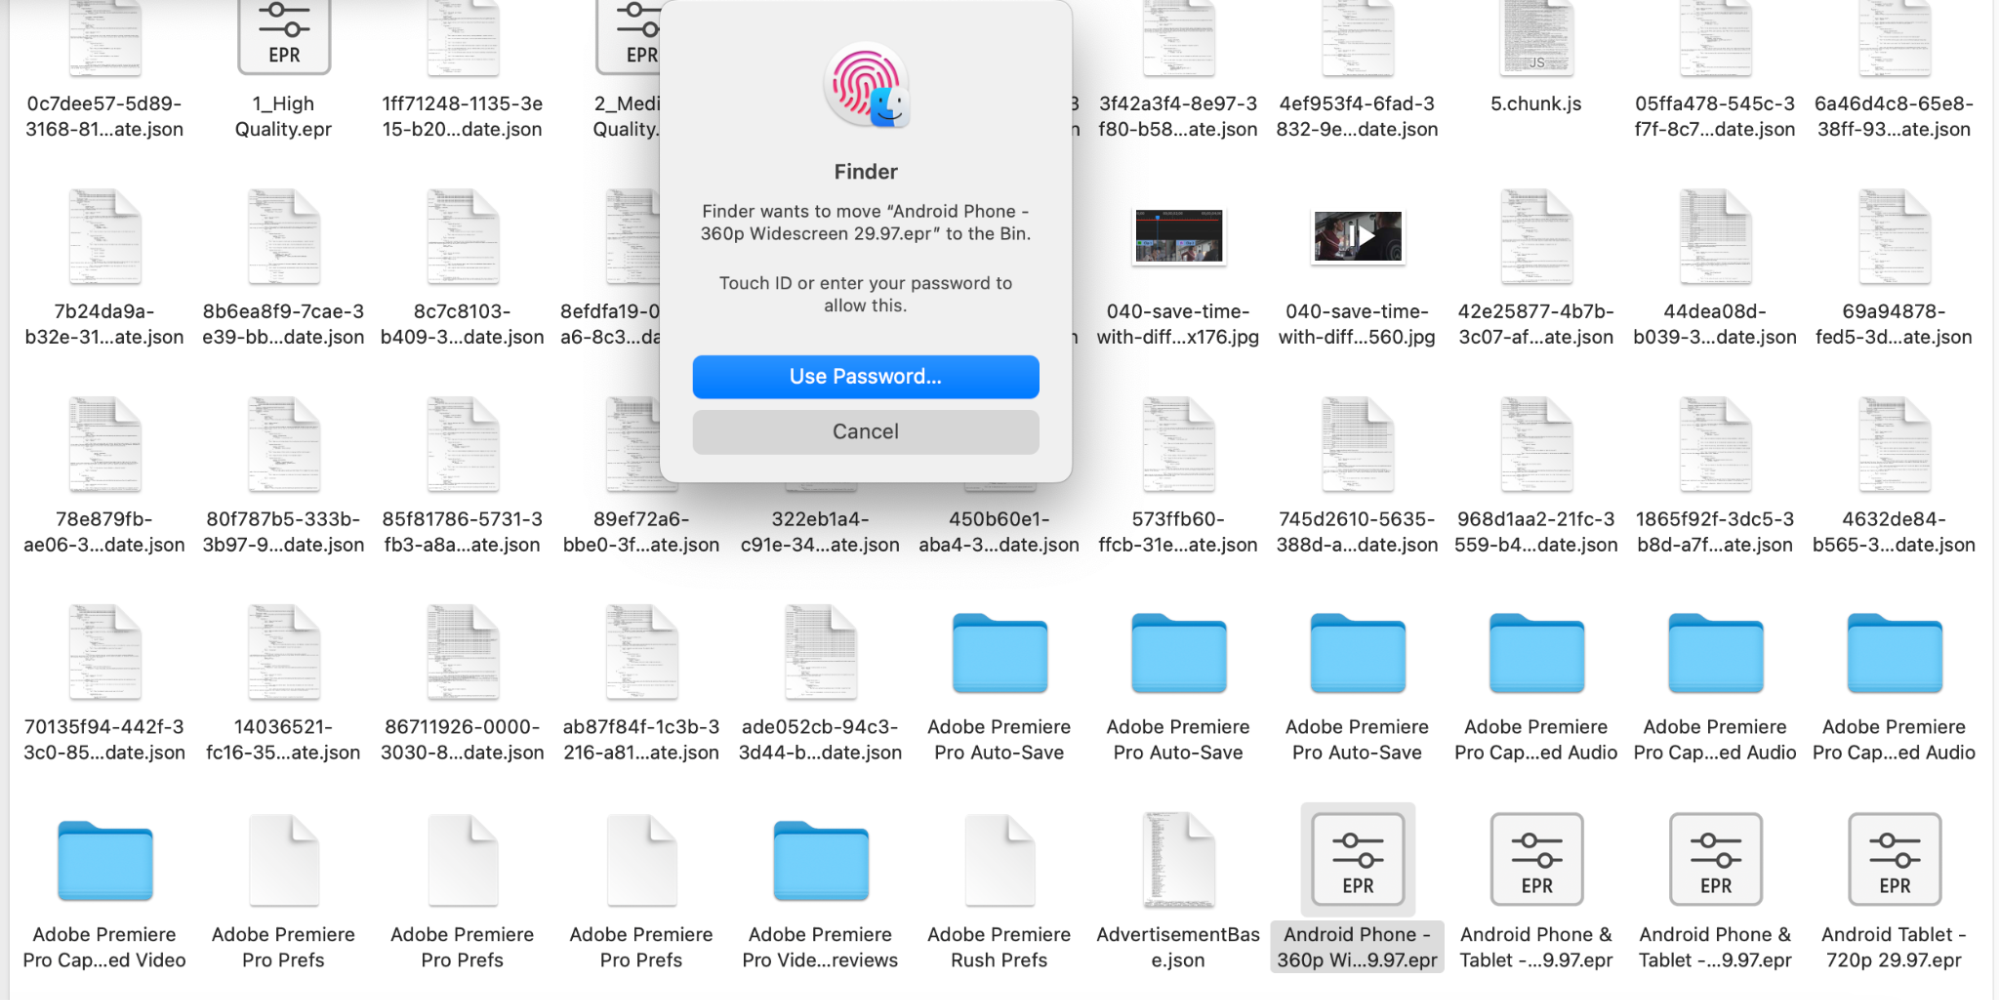
Though the traditional method works, MacKeeper’s Safe Cleanup will achieve the same result in less time. So, you may wish to consider using that program instead.
9. Tidy your login items
Having programs upon login is useful for getting quickly to work, but it can also become a bottleneck if you give too many apps this right.
Here’s how you can clean up your login item permissions:
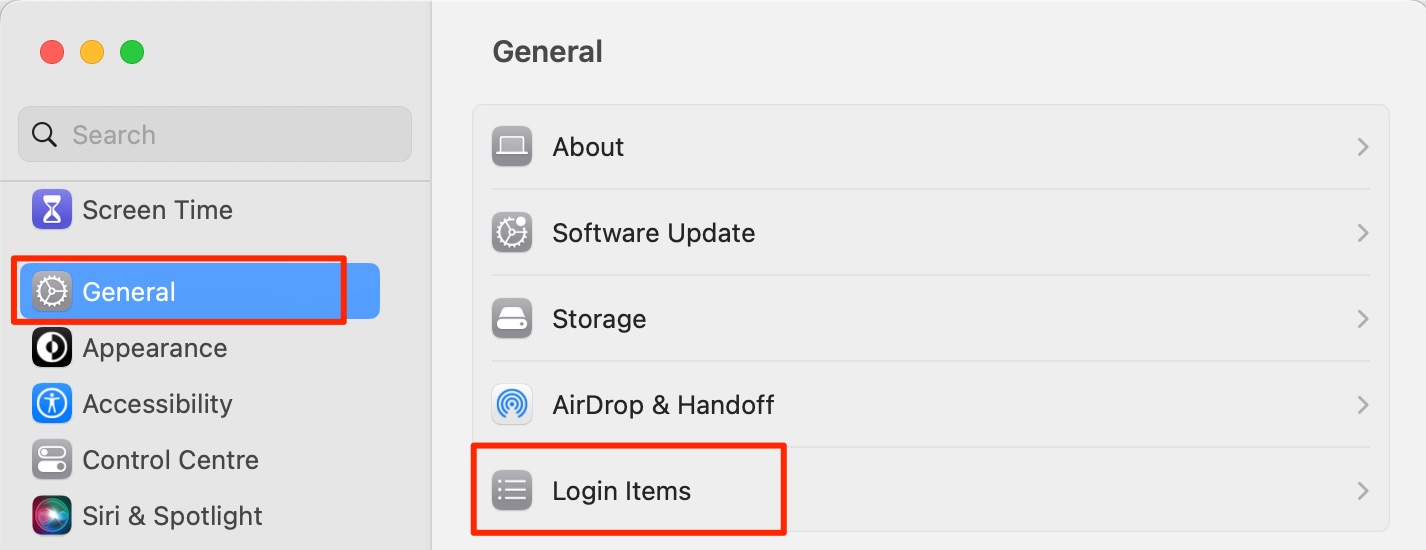
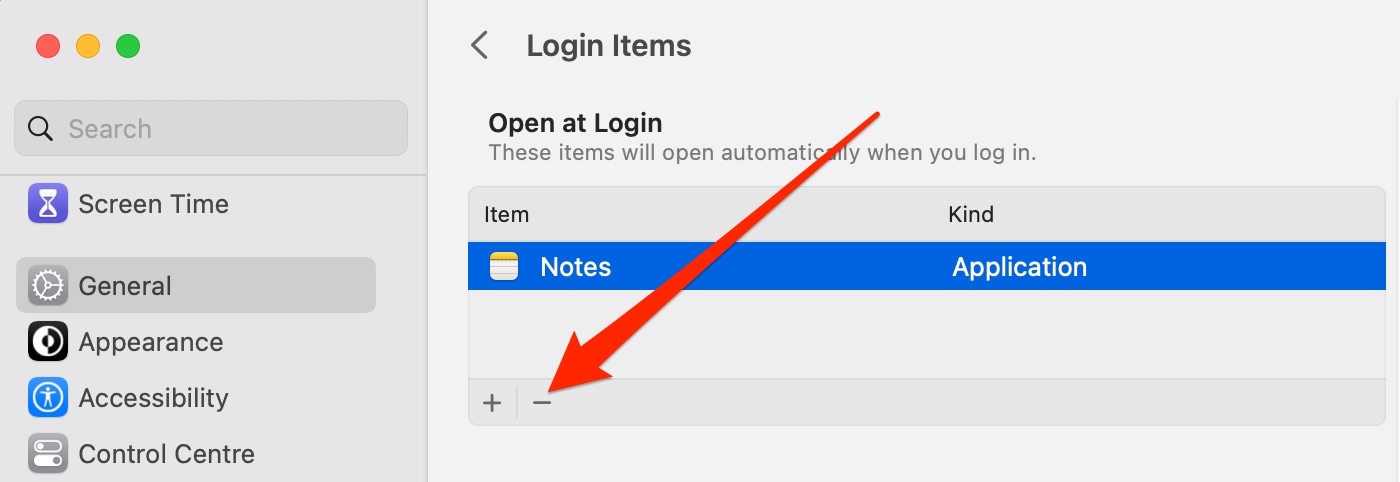
- Open System Settings and go to General > Login Items
- Select the app(s) you want to stop from opening at login and hit the - option.
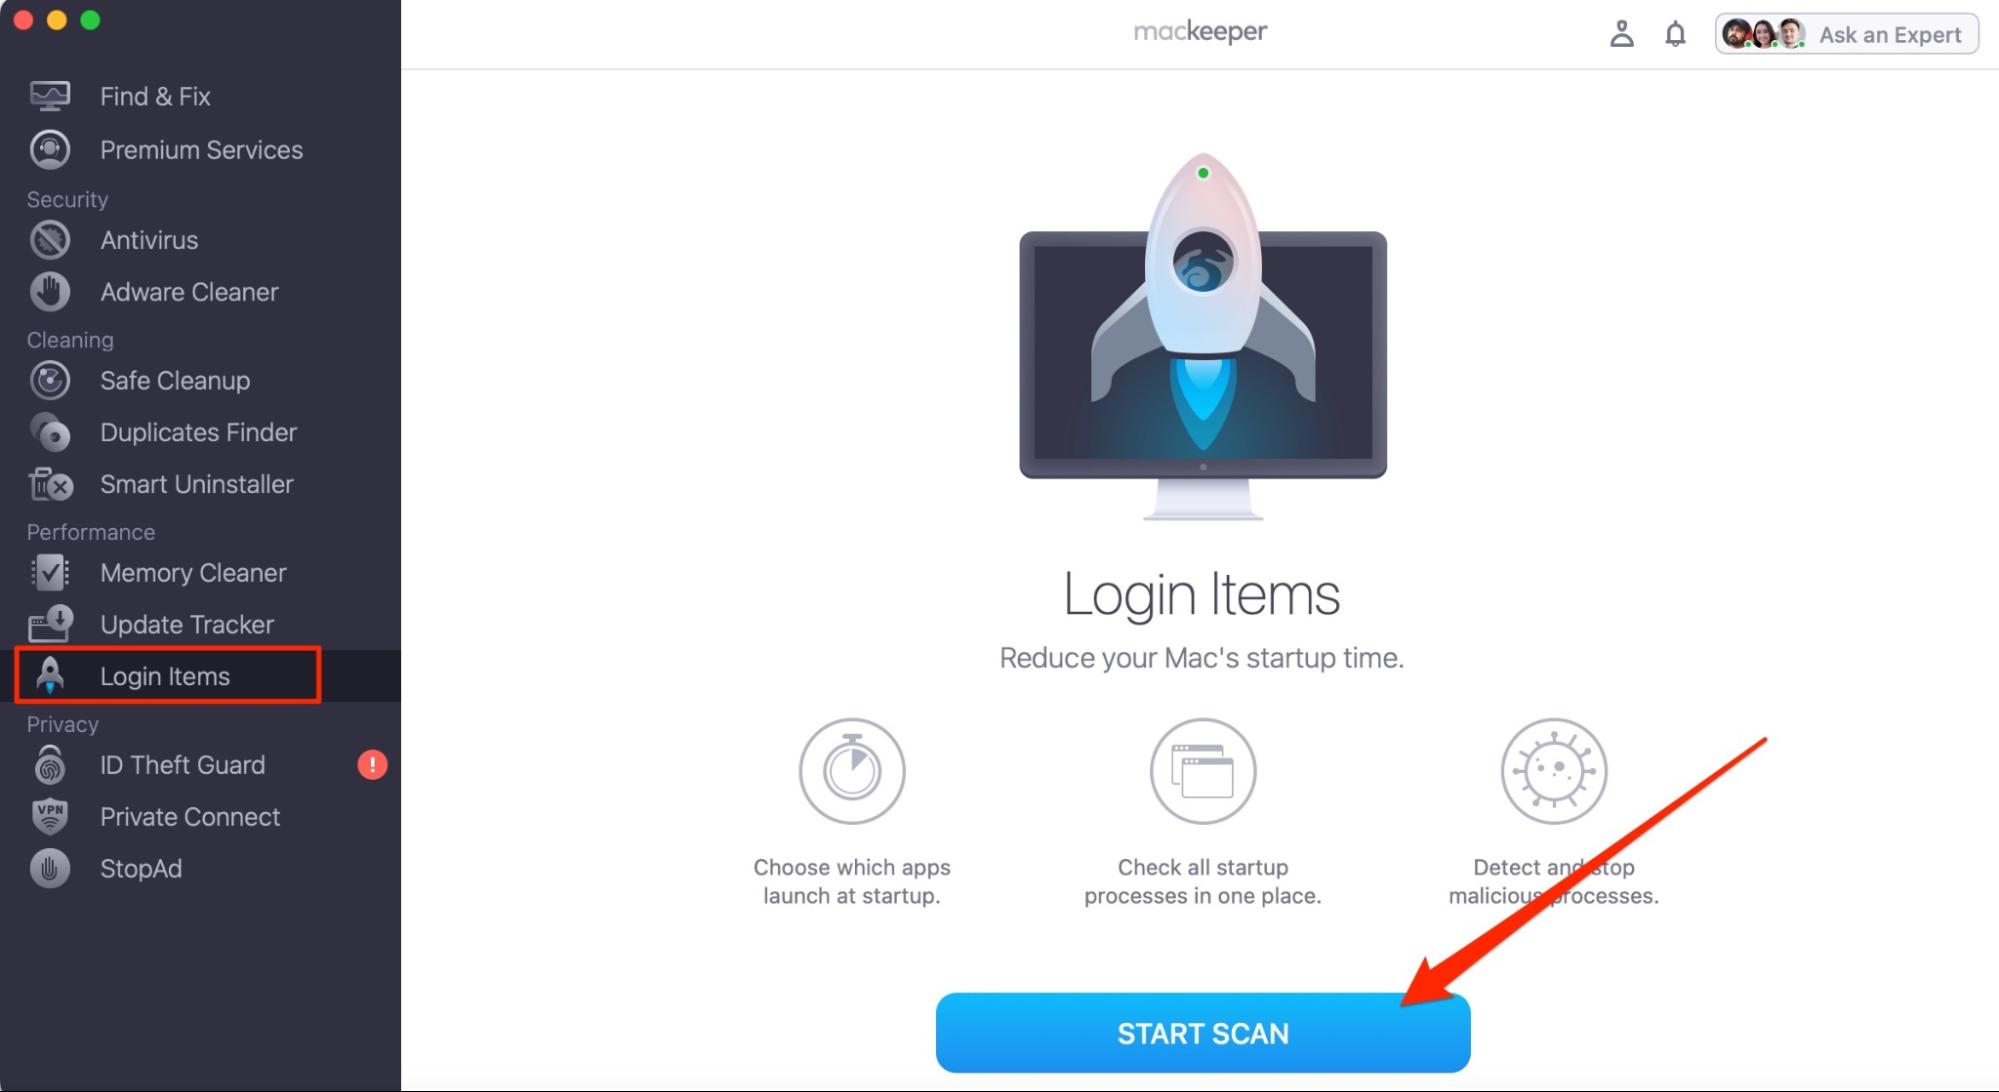
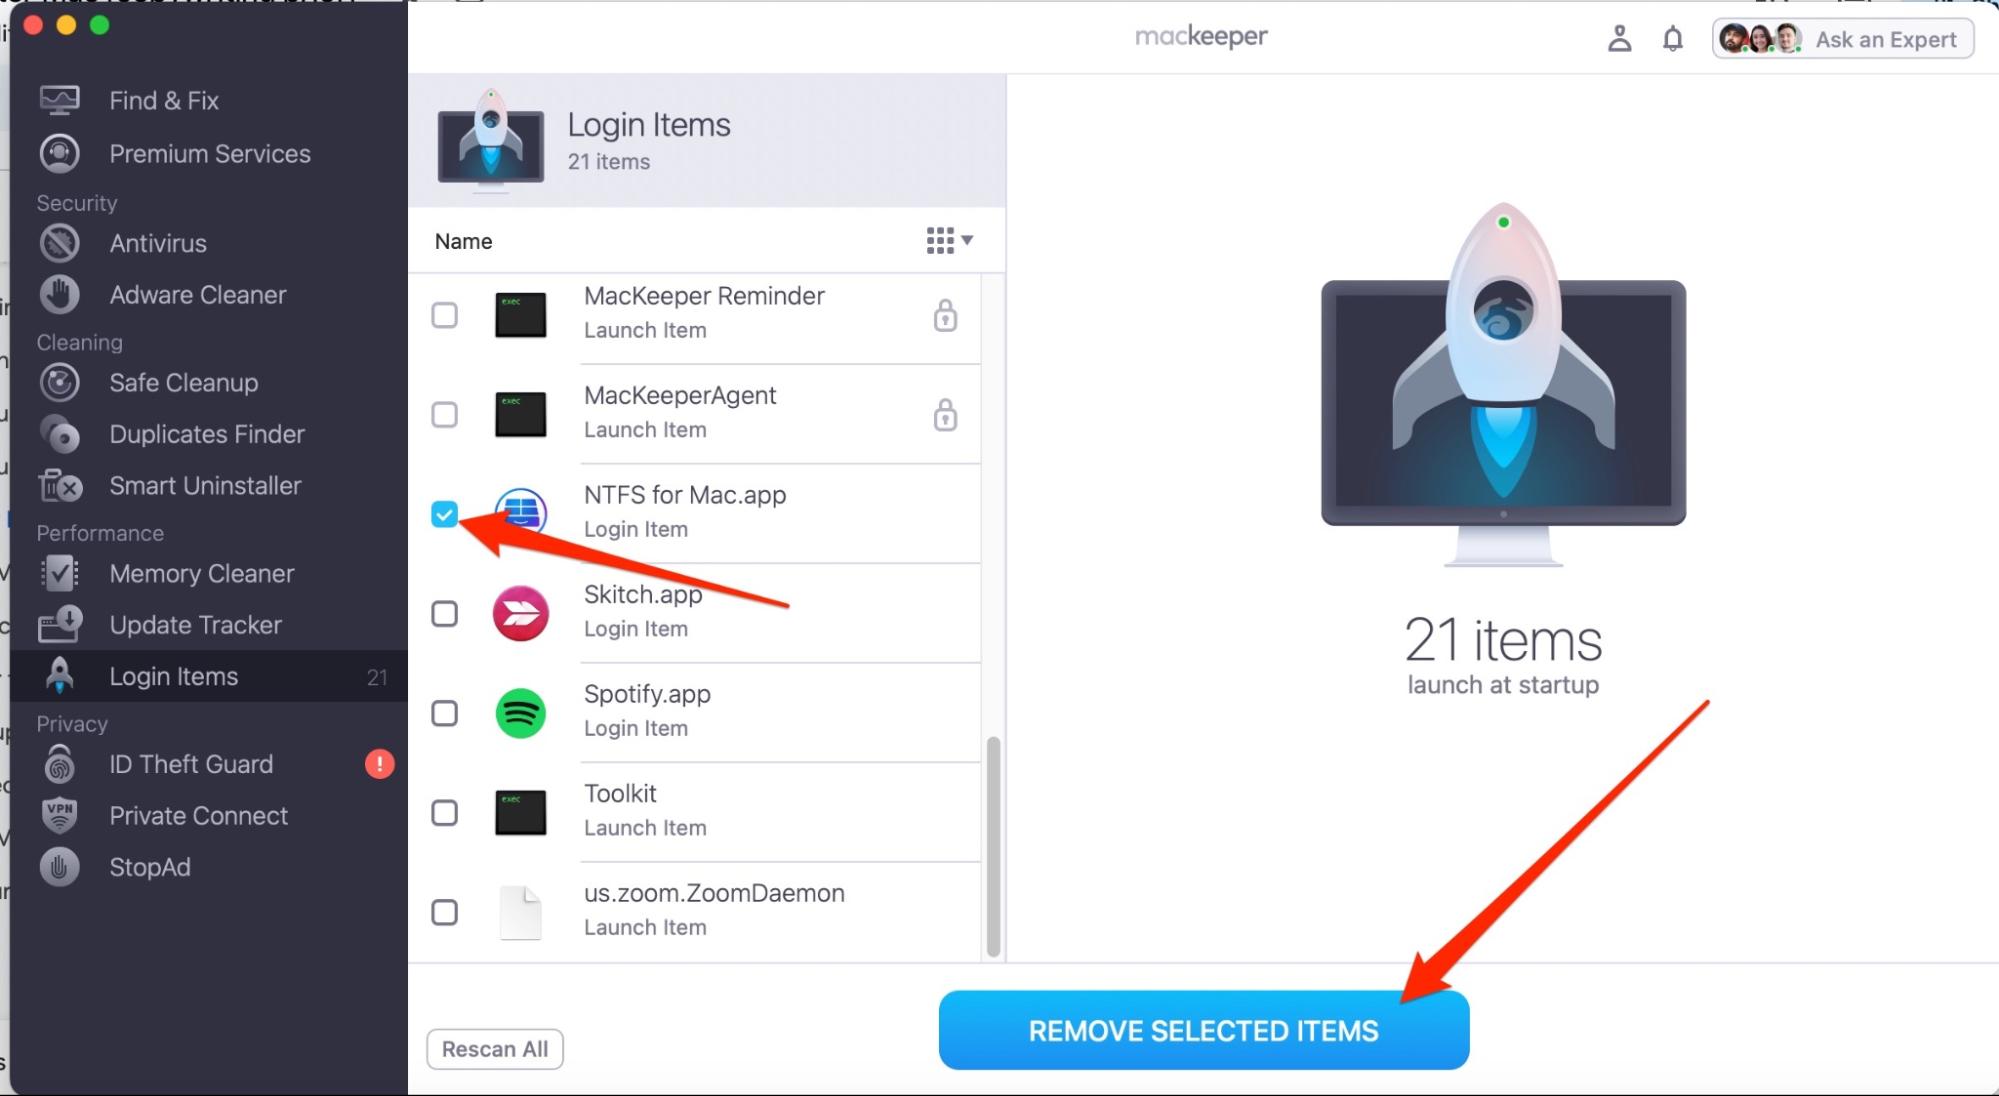
Alternatively, use MacKeeper’s app to clean your login items:
- Open MacKeeper and go to Performance > Login Items
- Click on Start Scan
- Tick the items you want to remove and select Remove Selected Items.
10. Clear Mac cache
Clearing caches can help free up space and ensure that programs that previously weren’t working will begin functioning at an optimal level again. If you want to use the traditional method, you can open Finder and follow the instructions outlined in this clear cache guide.
Alternatively, you can use MacKeeper’s Safe Cleanup and scan for caches that you may wish to remove. From there, you can opt to delete them in a quick, safe, and efficient manner.
11. Sort your files in stacks
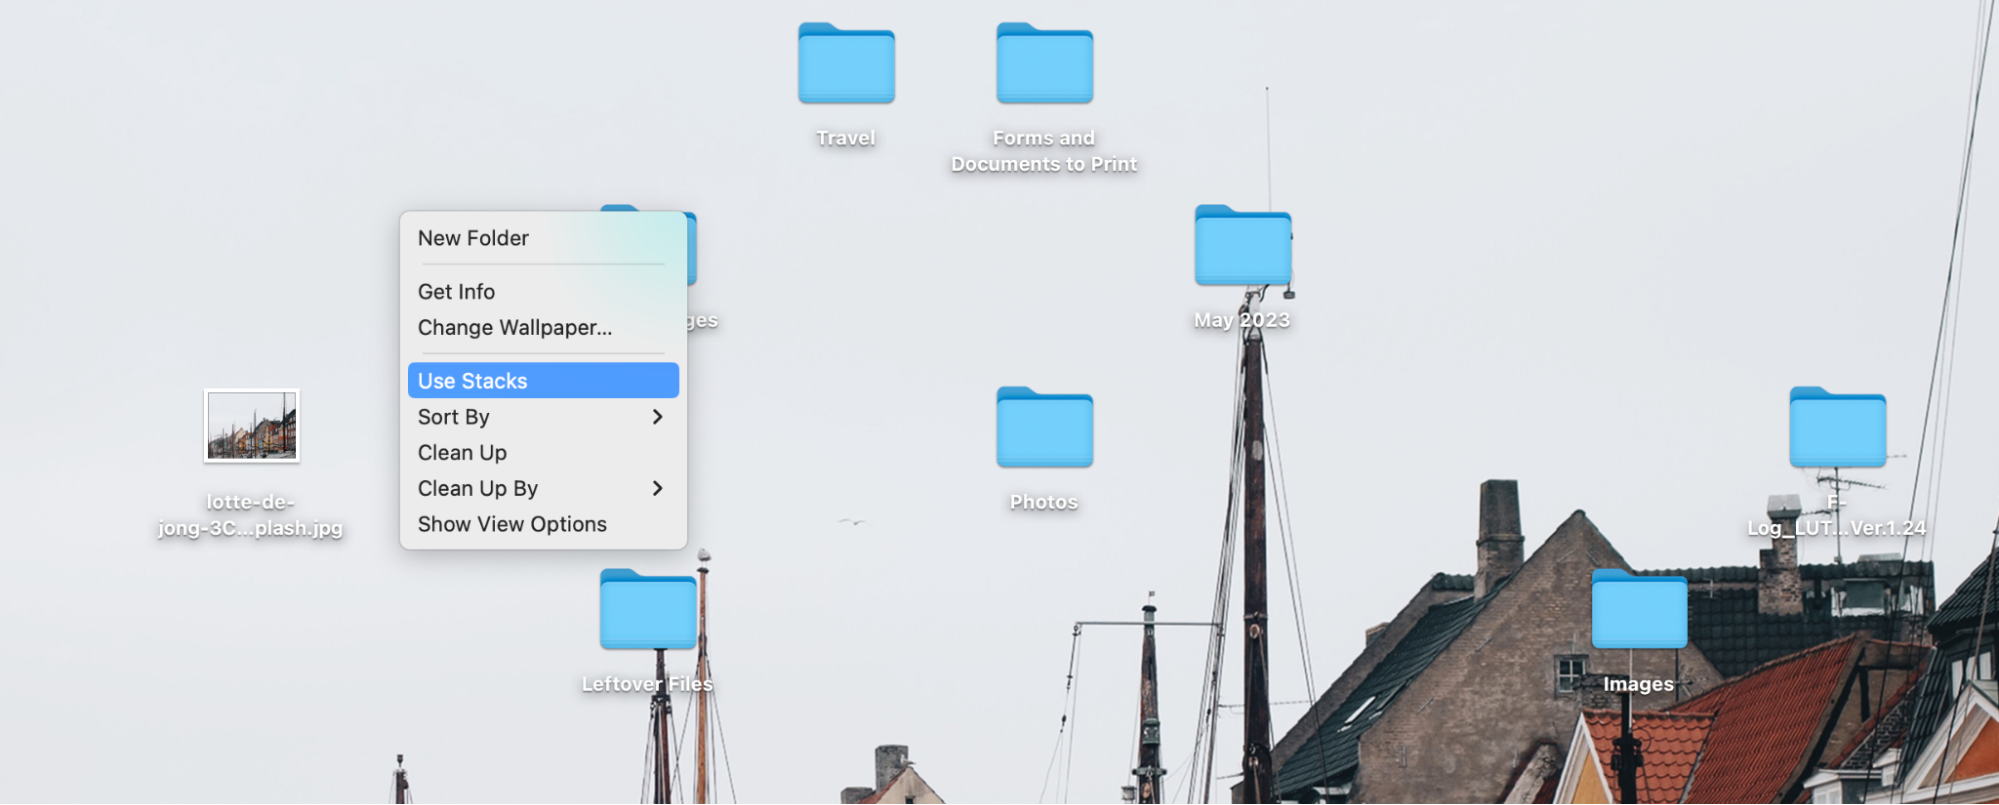
Creating stacks can help to keep files and folders more organized on your Mac desktop. All you need to do is click control + trackpad on your desktop, before selecting Use Stacks when you see the dropdown menu. You’ll then see your files appear as stacks on your device.

12. Delete duplicate files
If you know the name of your duplicate files, you can remove them in Finder.
- Open Finder
- Search for your file name(s) in the search bar
- Remove any duplicates you see.
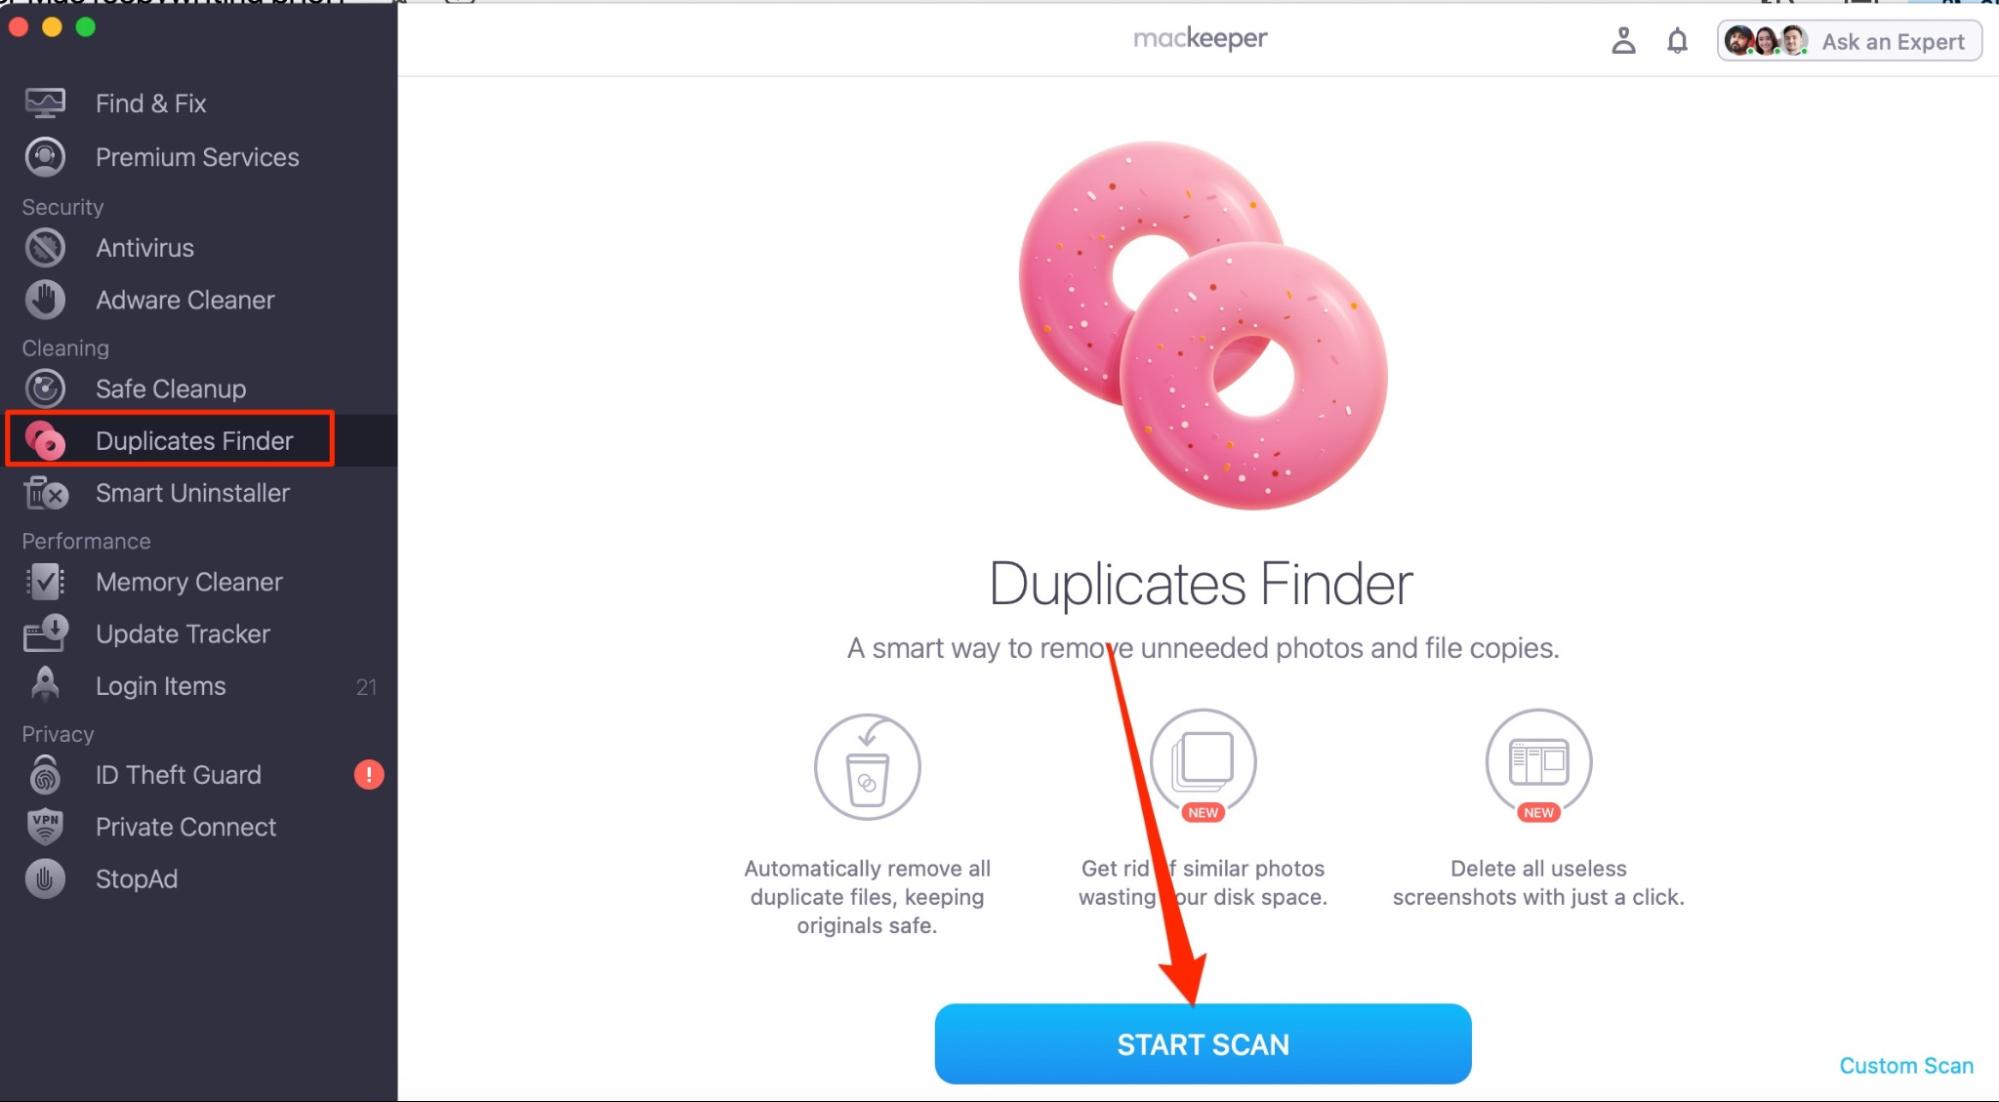
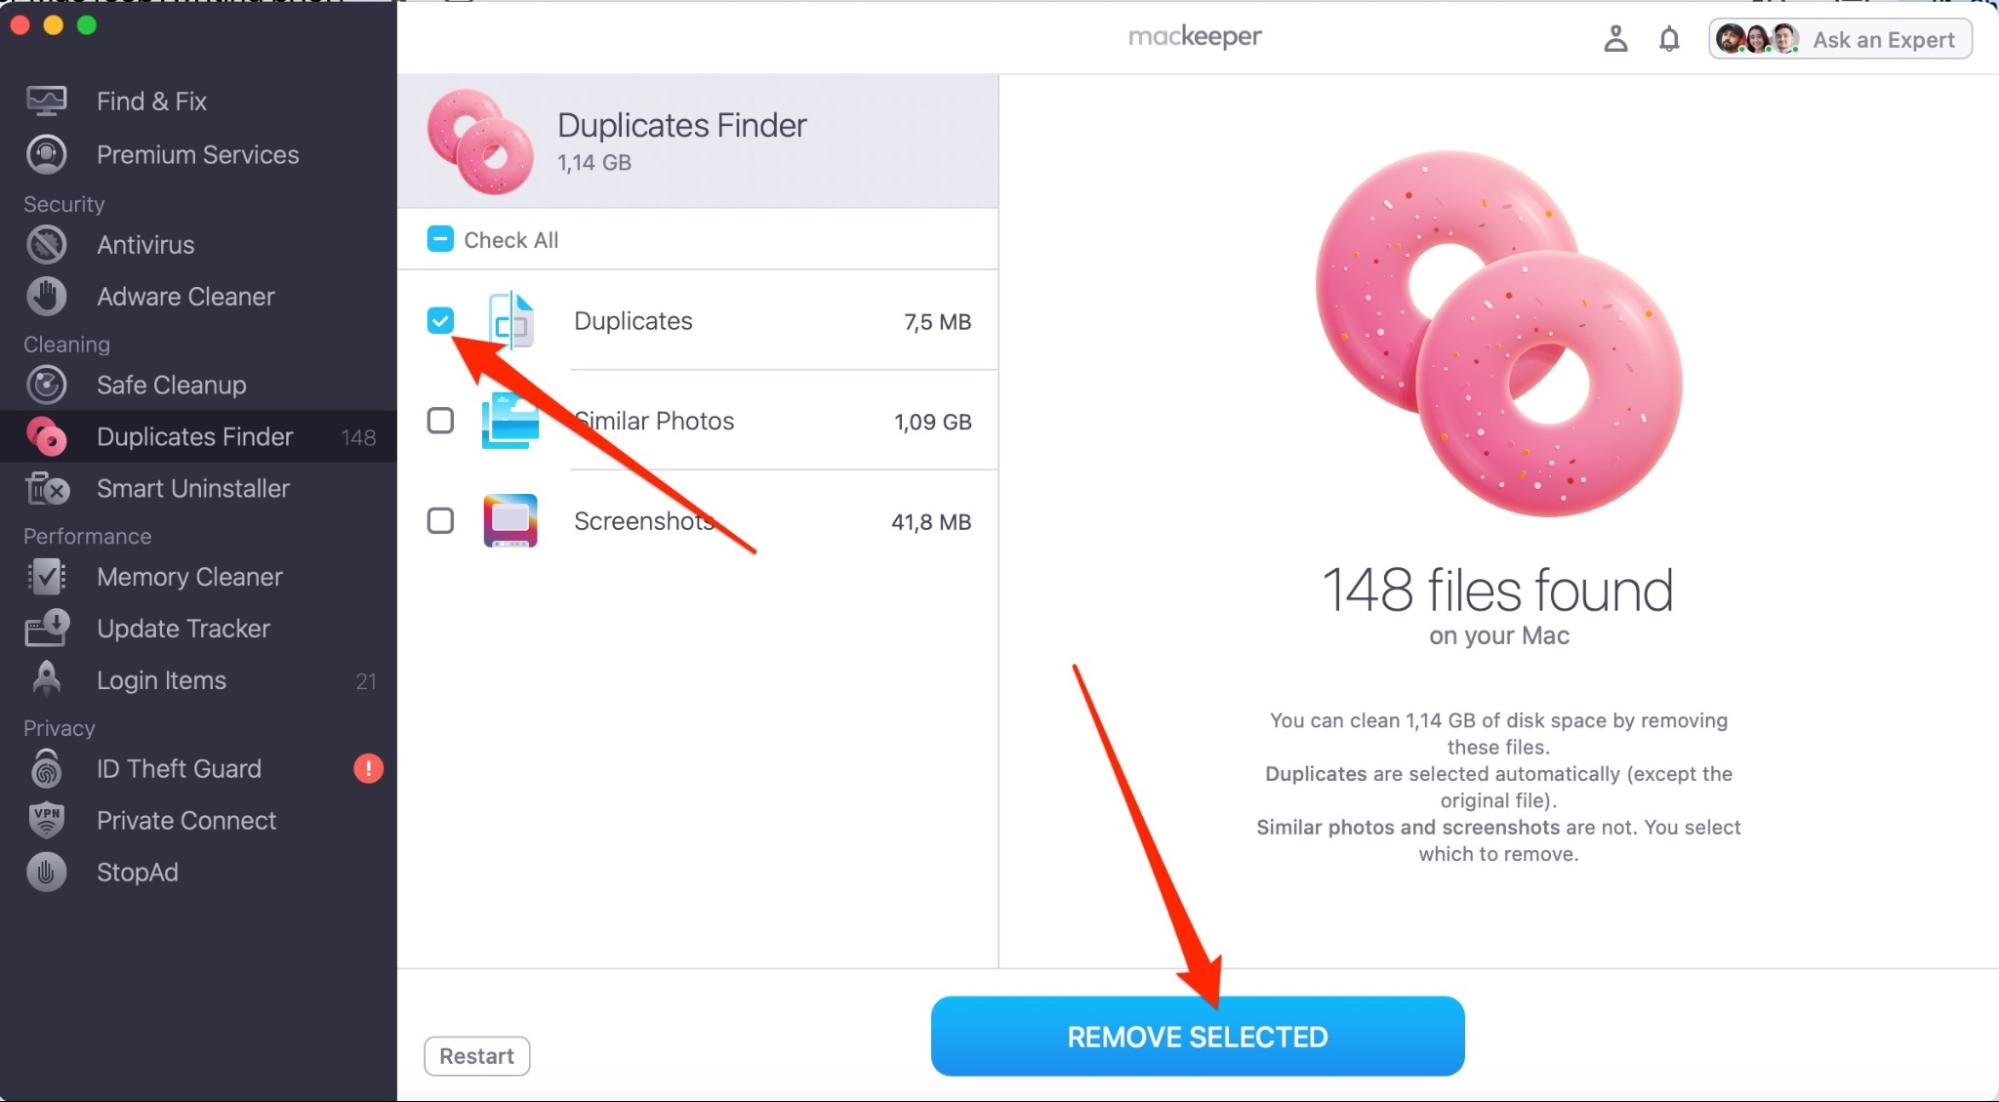
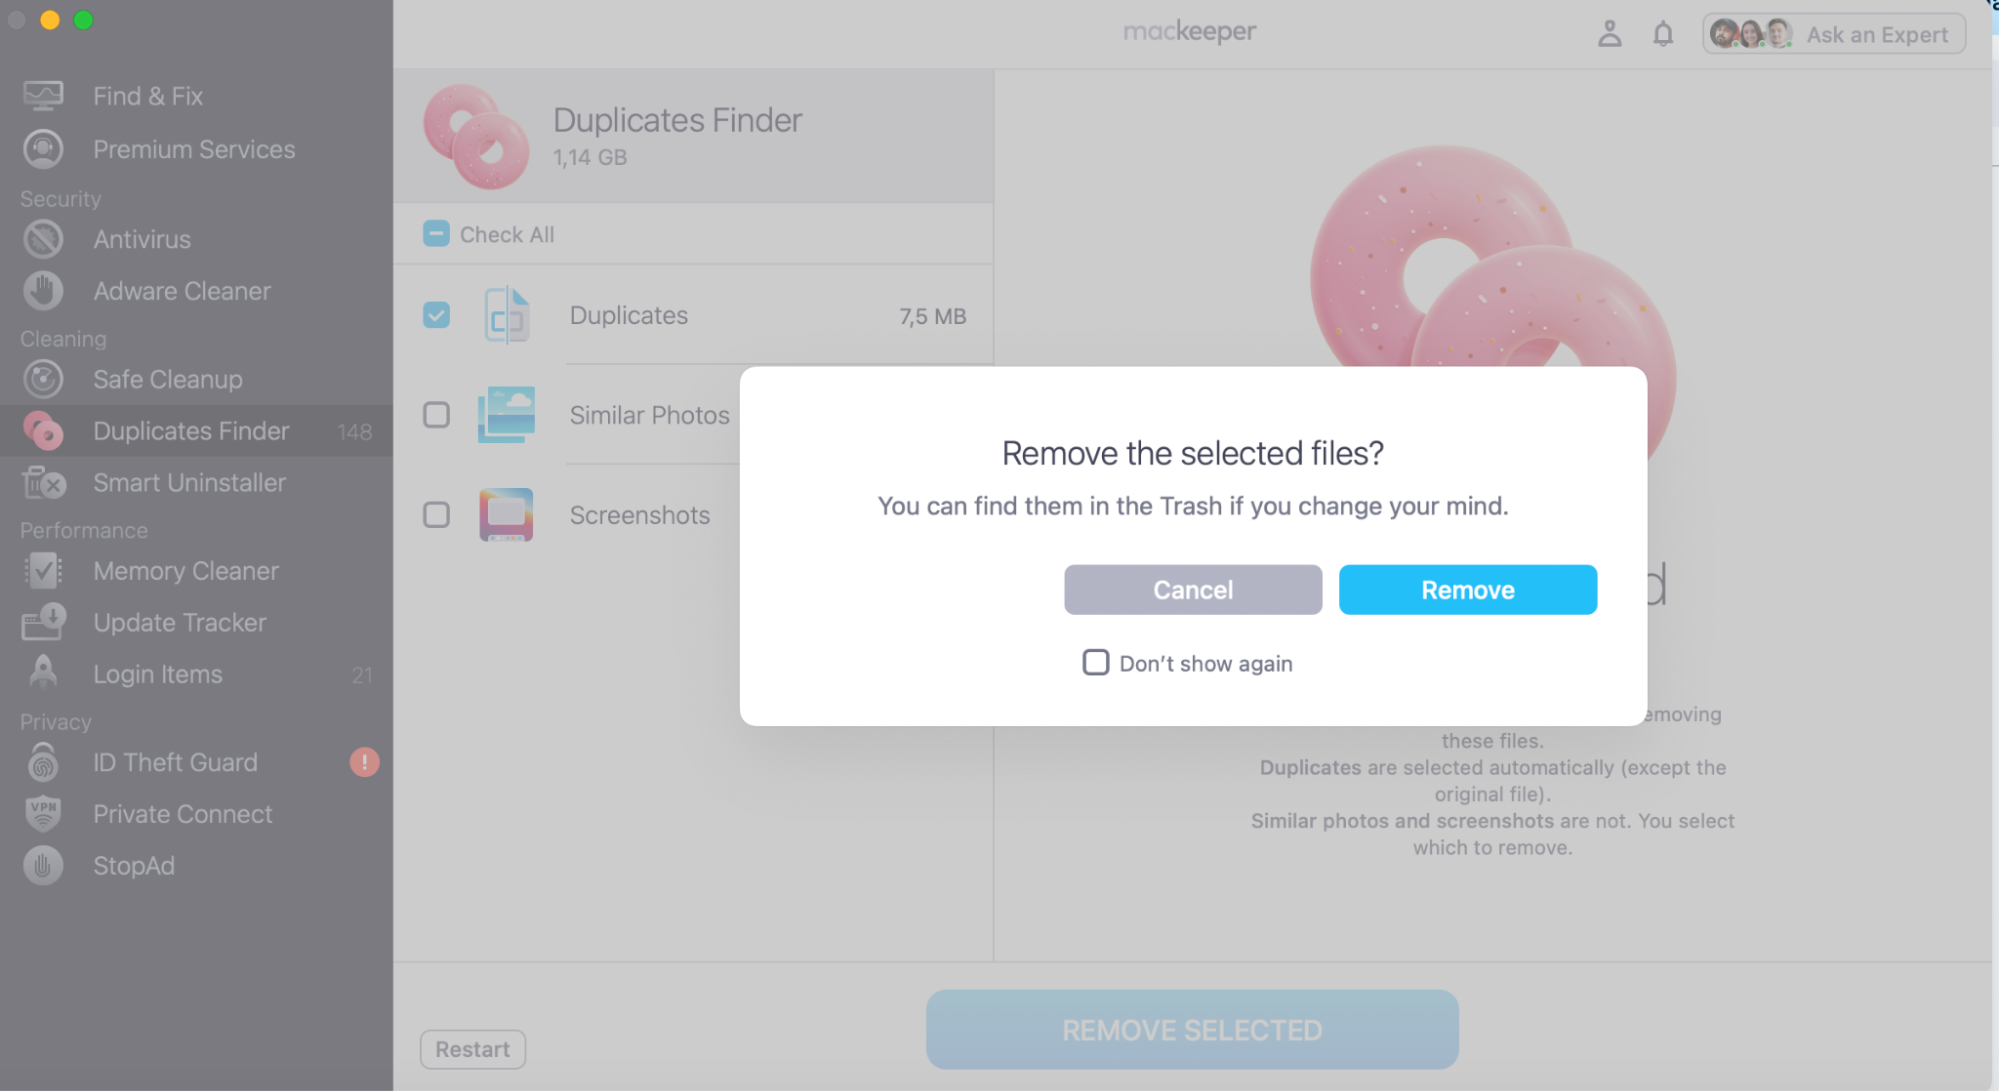
As an alternative method, I’d personally recommend using MacKeeper’s Duplicates Finder, which eliminates all of the annoying manual work associated with removing duplicates on your device.
- Go to Cleaning > Duplicates Finder and select Start Scan
- When the scan has completed, tick the box next to Duplicates
- Tap Remove Selected
- Click on Remove when the pop-up window asking to confirm your choice appears.
13. Use SpeedUp Mac software
SpeedUp Mac is a tool that lets you quickly declutter your computer and improve performance.
- Download SpeedUp Mac
- Select Scan after clicking on the Speed Up tab
- Tick the boxes you want to delete and tap CleanUp Now.
14. Delete DMG files
DMG files let developers create Mac apps without listing them on the App Store. But for the end user, you might not need them if you no longer use the app they were designed for.
You can easily remove DMG files from your Mac with the steps below:
- Open Finder on your Mac
- Search for the DMG file you want to delete
- Click on it by selecting control + trackpad
- Drag and drop the DMG file in your Trash folder
- Empty your Trash.
You can also use MacKeeper’s Smart Uninstaller to delete DMG files that you don’t know the names of.
Keep your Mac running better, for longer
Knowing how to declutter your Mac is crucial if you want to reduce the risk of needing to replace your computer every few years. You can use several third-party tools to automate much of the decluttering process, but the traditional methods will also work if you find them more convenient.
After decluttering your MacBook, you’ll find accessing files, apps, and documents that you need much easier. Moreover, you might notice an increase in your computer’s performance.
You can use MacKeeper’s Safe Cleanup solution to locate many of the files that might be cluttering your device and remove these efficiently.


