You can clear cache on your Mac by the following steps:
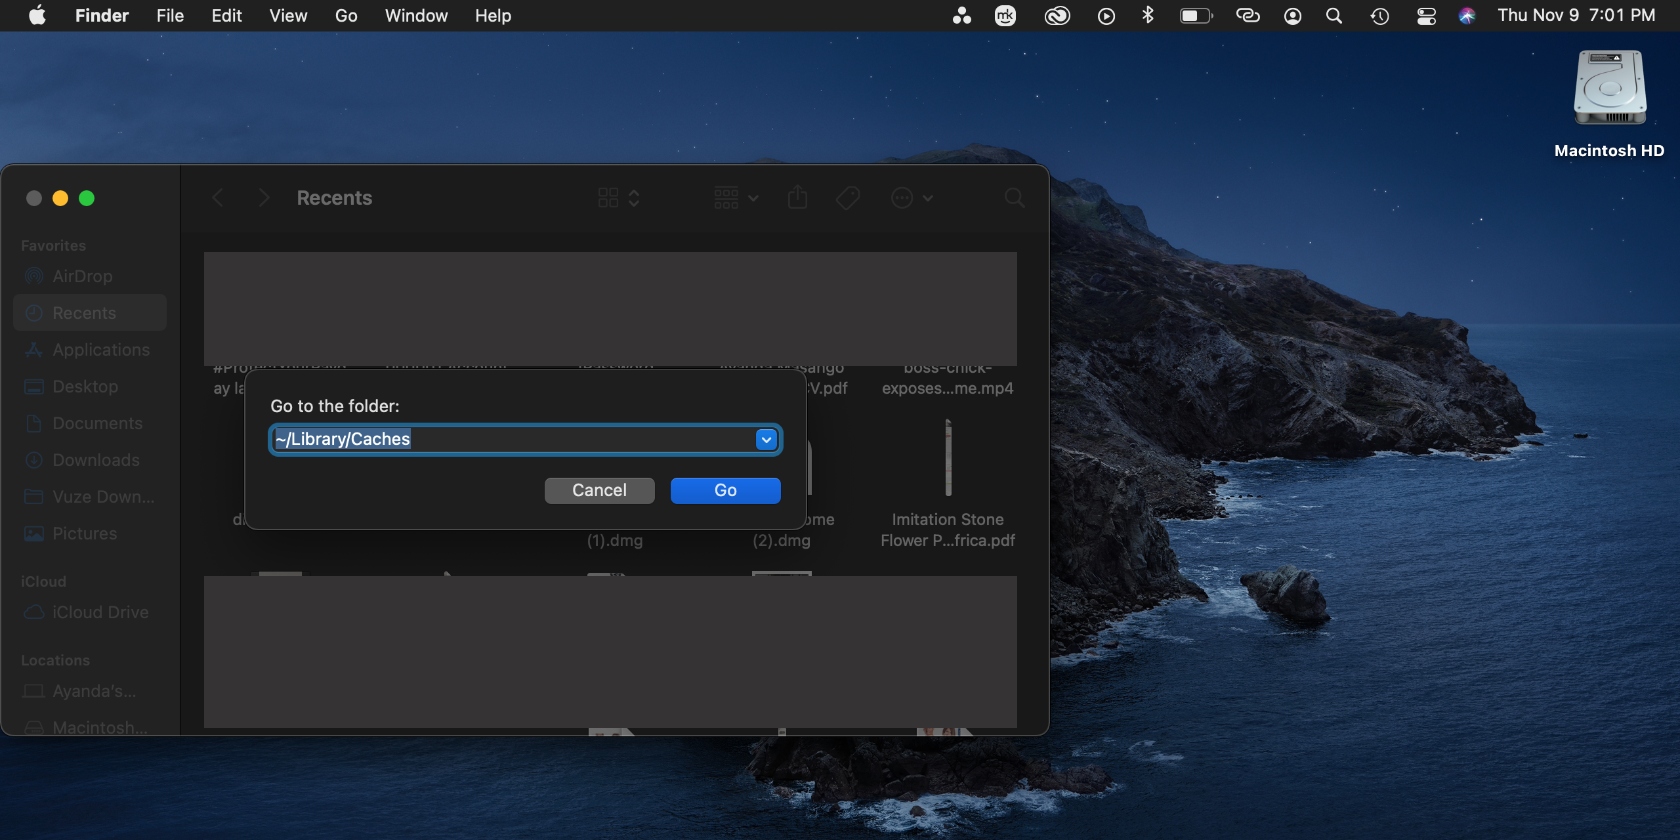
- Launch Finder and press the Shift + Command + G keys to bring up Go to Folder
- Enter the text ~/Library/Caches in the text box and hit Go
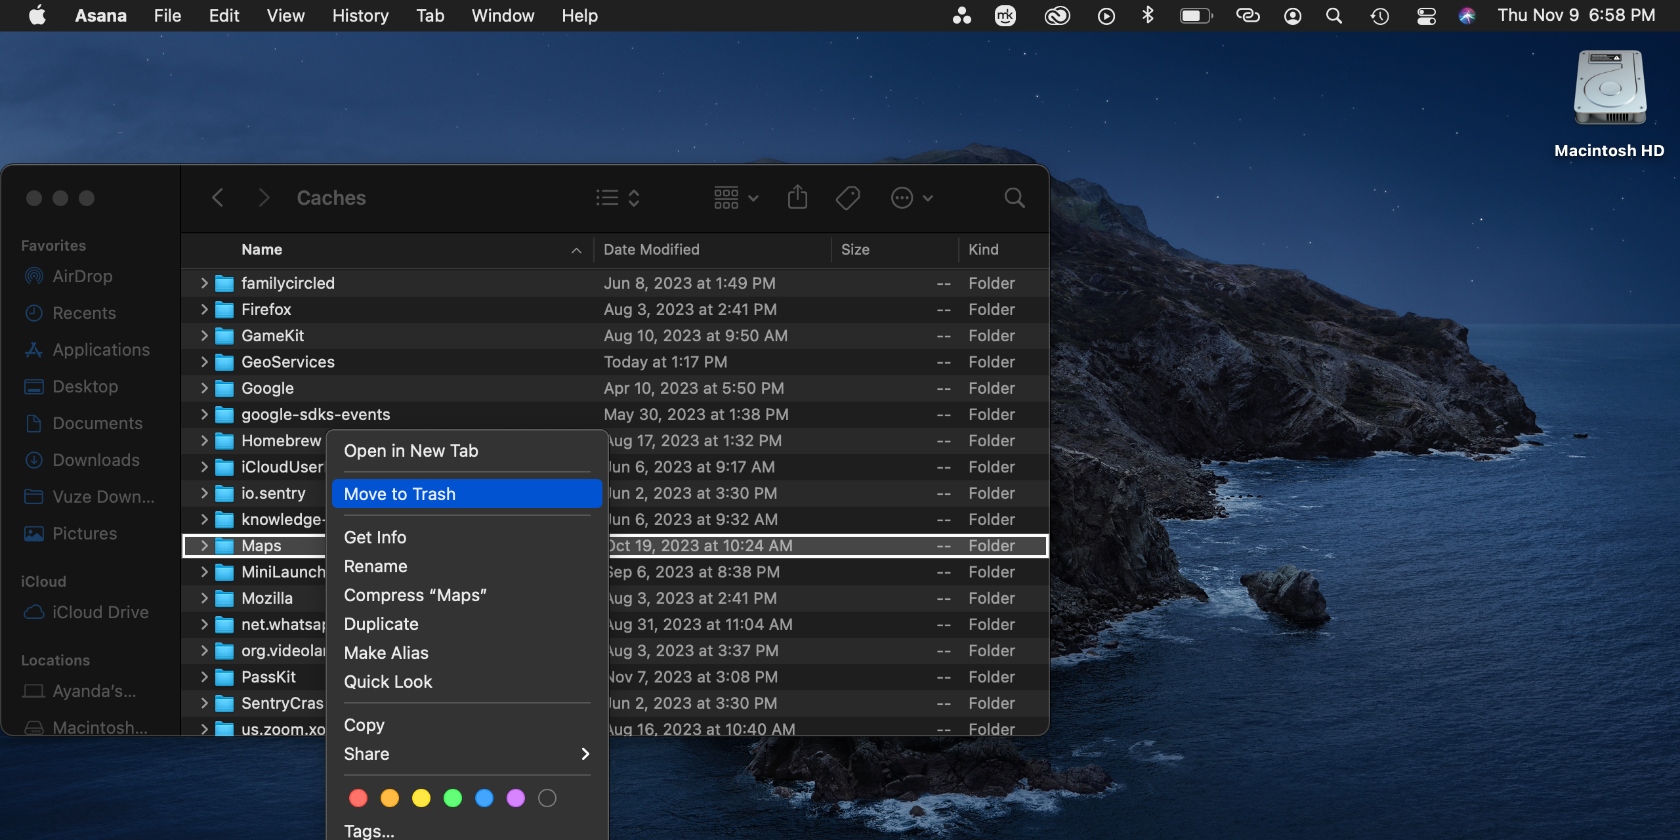
- Open the folder and drag the cache files to the Trash can.
Continue reading if you need more details on how to clear cache on Mac.
Before we start
Macs, like all computers, use caches for maintenance and performance purposes—from browsers to individual apps. But you need to clear cache from time to time to let your machine browse faster and reduce the load on websites.
To prevent your Mac from being overloaded and overheated, use dedicated cleaning software. MacKeeper’s Safe Cleanup tool is good for getting rid of junk files and clearing cache on Mac—both to optimize your laptop.
To use MacKeeper’s Safe Cleanup tool:
- Download MacKeeper on your MacBook Pro, MacBook Air, or iMac and select Safe Cleanup in the sidebar
- Click the Start Scan button and wait a few minutes while the tool checks your Mac
- When the scan is done, click Clean Junk Files and let MacKeeper work its magic.
In this article you will find the following:
What are caches on Mac?
In the computing world, cache (pronounced “cash”) is a temporary data storage location or a memory bank that fast tracks the retrieval of data. Namely, it allows your browser to load websites you've previously visited faster.
It achieves this by storing data in a hardware device that can be accessed fast (like random access memory). As a result, the cache eliminates the need to tap into the data’s core storage location, which speeds up the response time. That’s why clearing your Mac’s cache can slow down response times, but this measure is essential to help your computer perform more efficiently.
There are three main types of caches on your Mac:
Cache type | Function |
| System cache | This is the glue between the main memory and a processor. System cache is stored on your Mac’s system to help your device execute instructions quickly so that you can enjoy a fast and efficient experience. Otherwise, it would take a while to carry out tasks on your Mac |
| Browser cache | Every browser you use on your Mac manages cache files that store essential elements. These elements include JavaScript, HTML, cookies, CSS, and images that help the browser display websites. It’s what keeps your online shopping carts intact. |
| User cache | User cache includes app cache. Every app on your Mac has its own cache. Similar to browsers, these cache files improve the performance of apps by loading images, videos, and search history fast |
Do you need to clear cache on your Mac?
Caches are generally good for your Mac, but, in our experience, they can cause issues too. In such cases, you may need to delete your Mac’s cache. Below are the reasons why you should clear cache:
- If they grow too large, they can affect your Mac’s speed, particularly on an older machine
- They can also end up hogging disk space that could be put to better use
- Cached data may become corrupted, causing your Mac to behave unpredictably
- Cached data may contain private information that you don’t want other people to see.
If any of these things happen, then it can be a good idea to clear caches on your Mac.
What happens if I delete all cache files on Mac?
If cache files are so important for your Mac’s performance, you may wonder if anything bad would happen if you delete them. It’s good to be careful about deleting stuff from your Mac, but it’s generally safe to remove cached data from your MacBook. You shouldn’t run into any major issues if you delete cached files from system-level and user-level folders. Deleting cache isn’t permanent either.
However, our advice is to be cautious when deleting cached files in apps, as some developers store important files in the cache folders. Be wary of deleting cache files from apps you’re actively using, as you run the risk of deleting your work or progress.
If you're in any doubt, use a cleaning tool like MacKeeper. It checks which files are safe to delete, so you don't accidentally remove essential files.
If you do proceed, take note of the results of deleting cache files on a Mac device:
- Some site settings will be reset, so you may have to sign in to your online accounts again
- Websites will load much slower than you’re used to because their elements—including images, text, and video—will have to load from scratch again
- You’ll free up more space on your MacBook.
How to delete browser cache on MacBook
You may occasionally want to empty the browser cache on your Mac because it uses a lot of disk space when it’s unnecessary. Or you may wish to refresh the cache on your Mac to hide your online activity, protecting your privacy. Now, check how to do it in different web browsers.
How to clear browser cache in Safari
Safari speeds up your browsing experience by storing website data. This data builds up and clogs up your browser. Fortunately, it’s easy to clear cache on Mac Safari. Learn how to clear Safari cache on Mac. After clearing Safari cache, you’ll be signed out of some websites, and others will take a bit longer to load.
How to empty Chrome cache
Every time you seamlessly open a website you’ve visited before, it’s because of Chrome’s use of caches. If you do this often, you'll rack up a lot of cache.
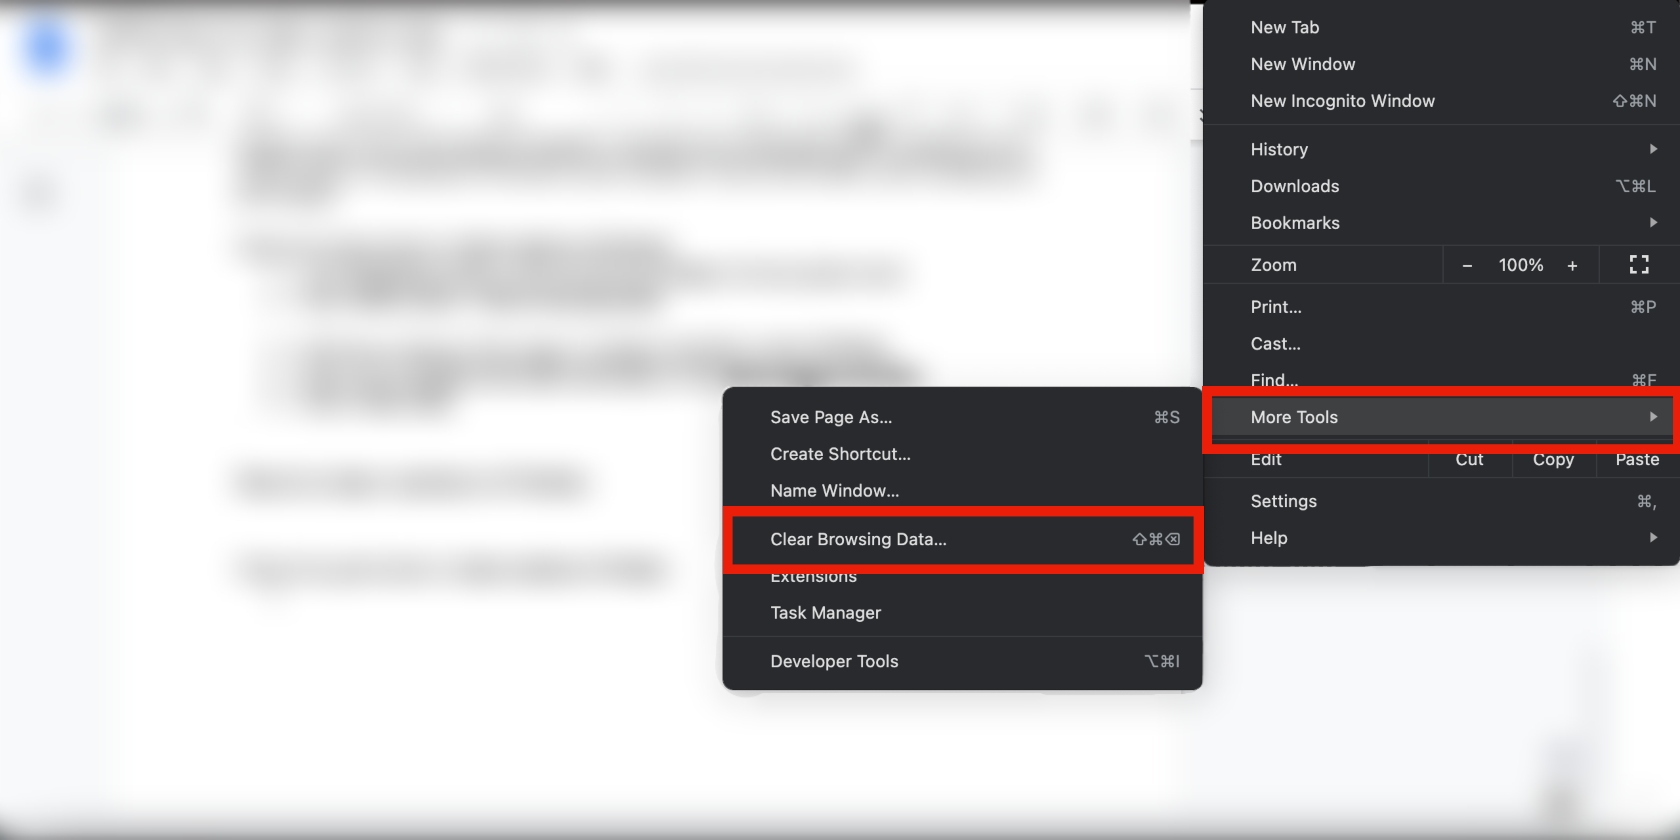
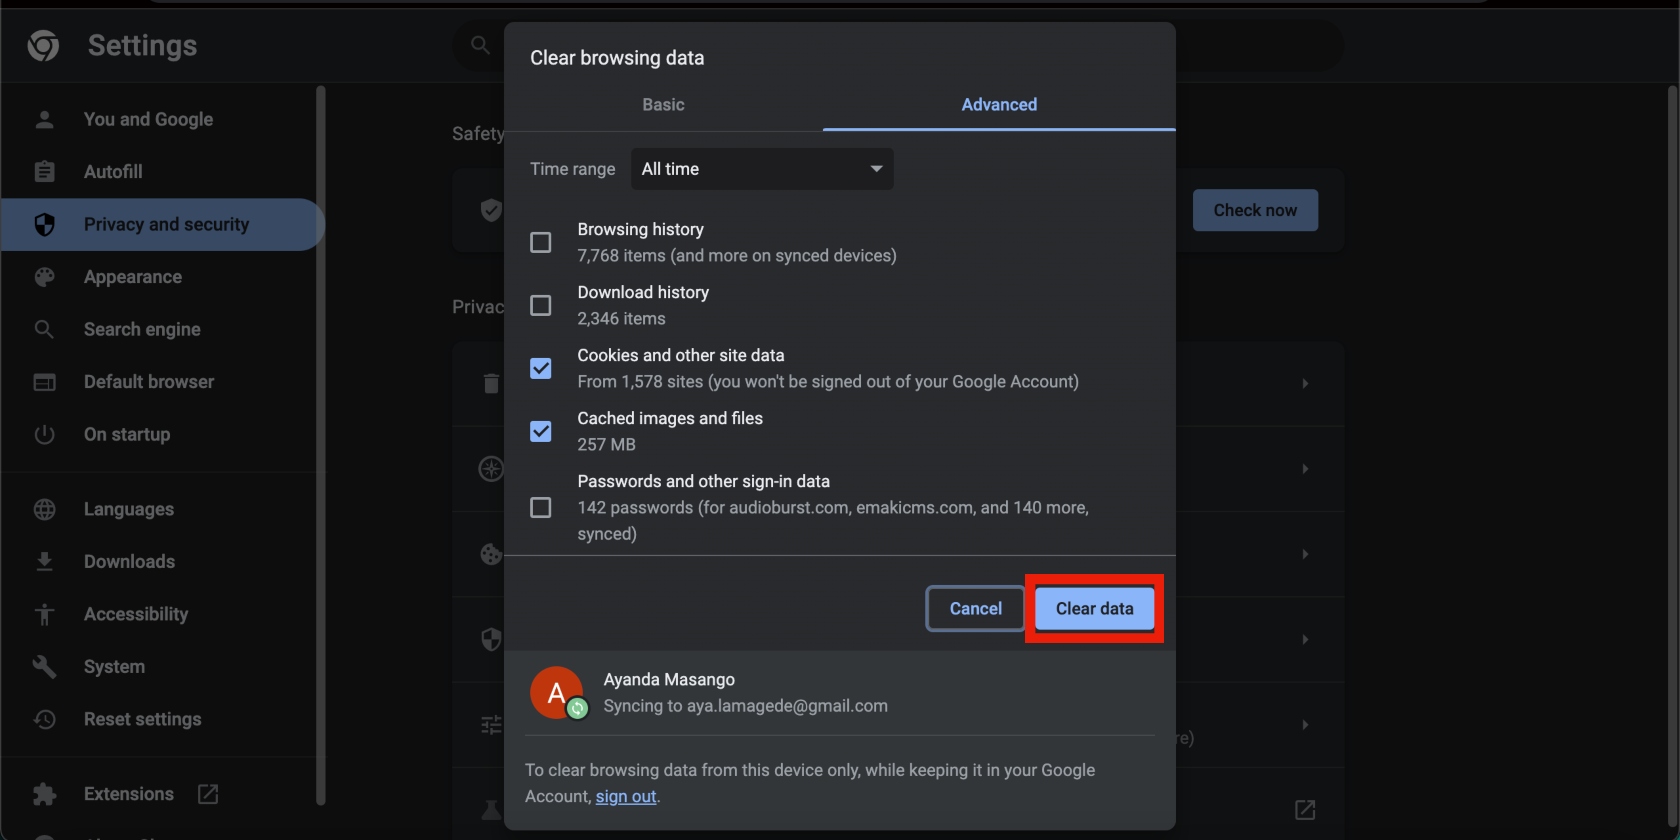
Follow the steps below to clear cache on Chrome:
- In the Chrome browser, click the three-dot menu in the top-right corner
- Select More tools > Clear browsing data
- Pick the Time range by clicking the drop-down arrow. Alternatively, choose All time to erase all cache on your MacBook device
- Select both Cookies and other site data and Cached images and files, and click the Clear data button at the bottom.
How to remove cache on Firefox
Mozilla Firefox, like Safari and Chrome, uses caches to offer you a seamless browsing experience. If you regularly use Firefox on your Mac, flush your cache to help refresh and decongest your browser and improve its performance.
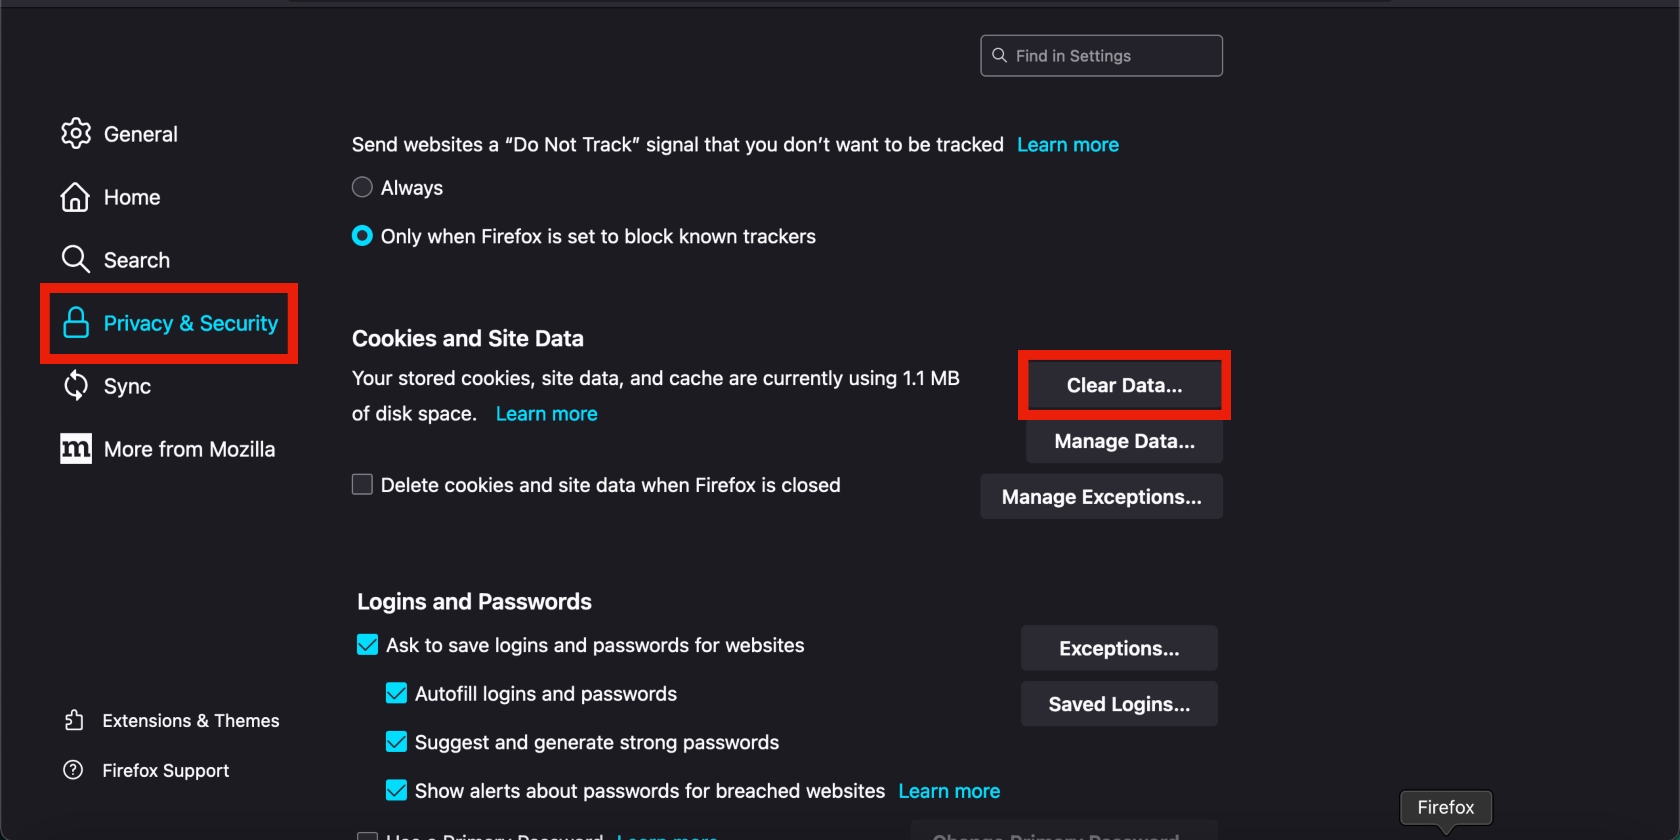
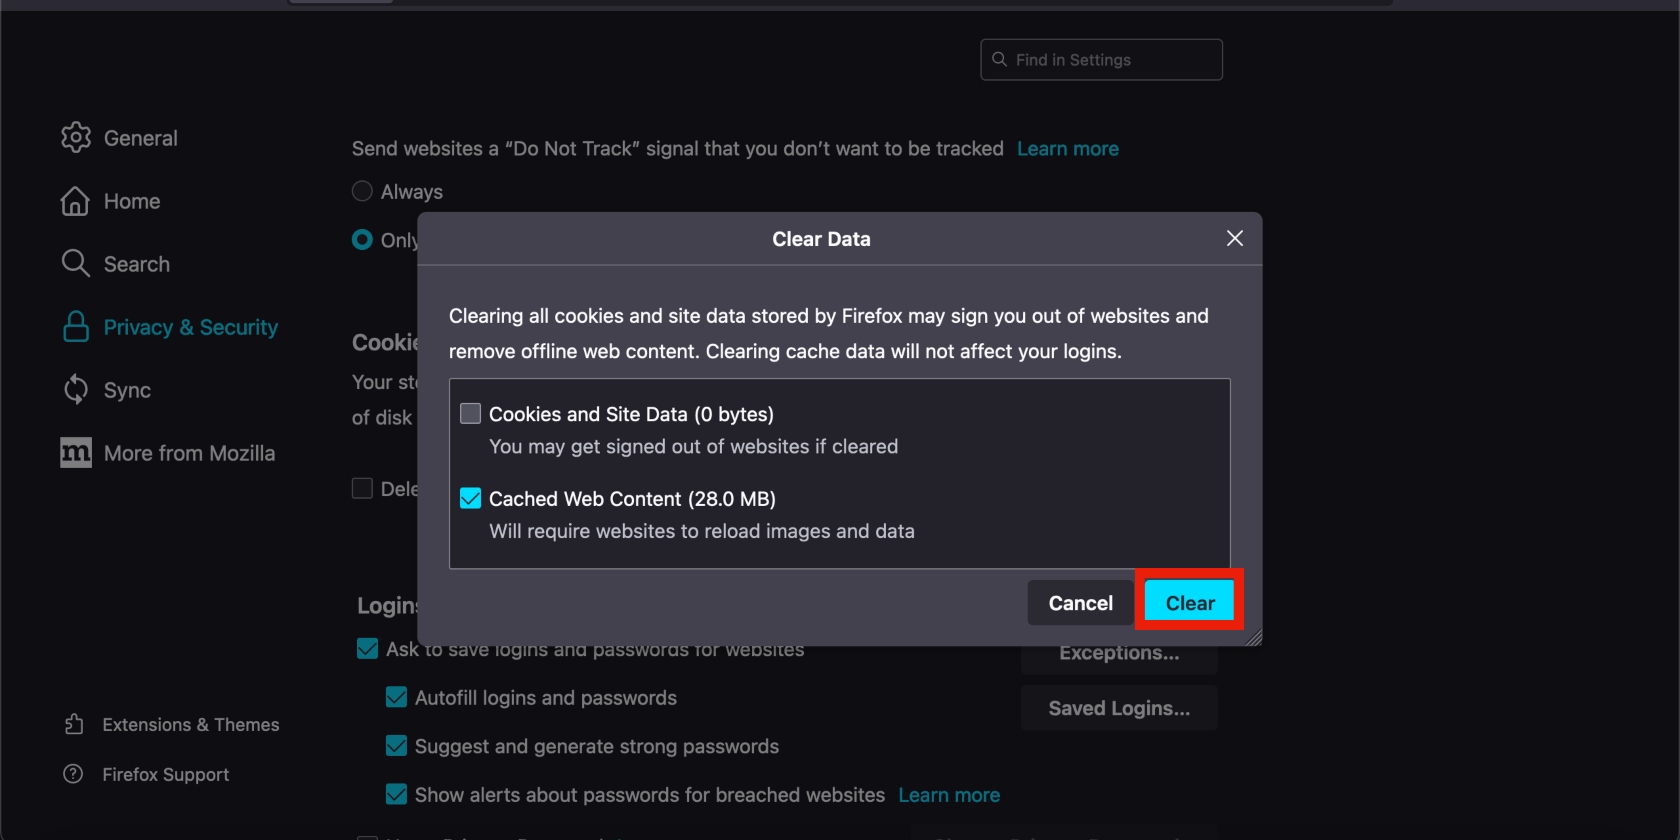
Follow the guide below to find the cache in Firefox on your Mac and clear it:
- In the Firefox browser, go to menu > Settings > Privacy & Security > Clear Data
- Deselect Cookies and Site Data (ensure Cached Web Content is selected) and select Clear.
How to delete system cache on Mac
Most Mac applications create temporary cache data. These files can range from tiny to quite large files, depending on what they’re for and what app created them. In any case, these files can clutter your disk space and slow down your Mac. For that reason, you might want to clear up the cache on your MacBook’s system now and then to stop them from building up.
Here’s how to delete your Mac’s system cache:
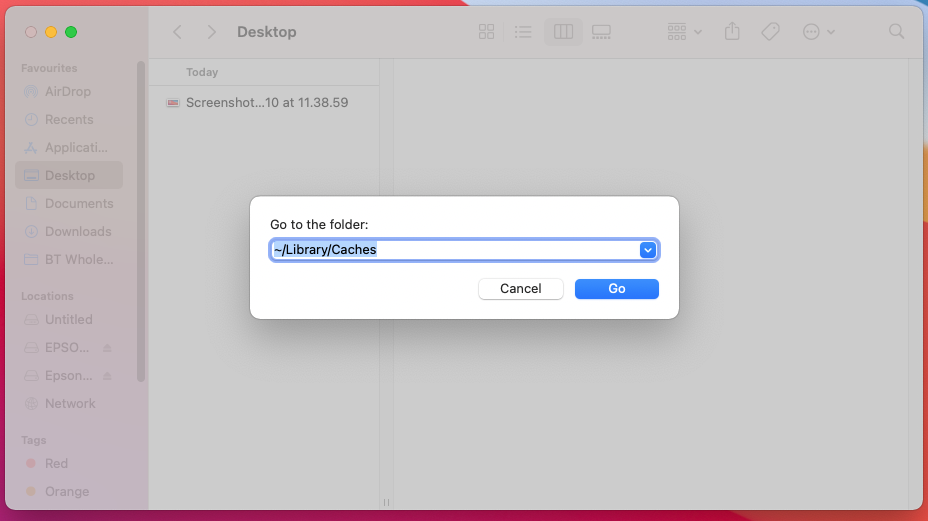
- In Finder, select Go > Go to Folder
- Enter ~/Library/Caches in the window that appears
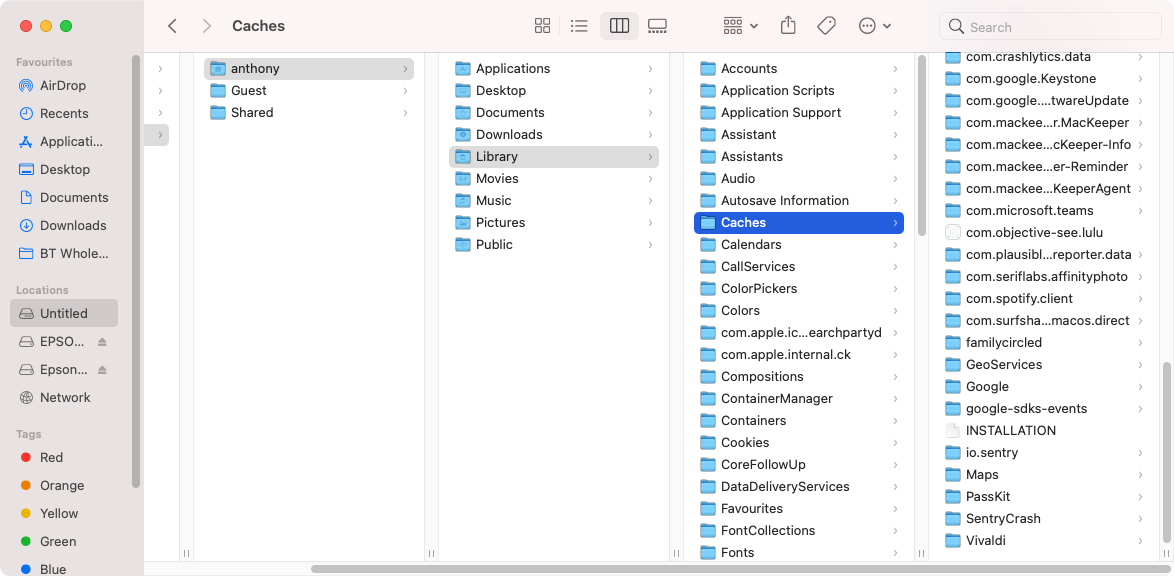
- Click Go, and you’ll be taken to your Caches folder
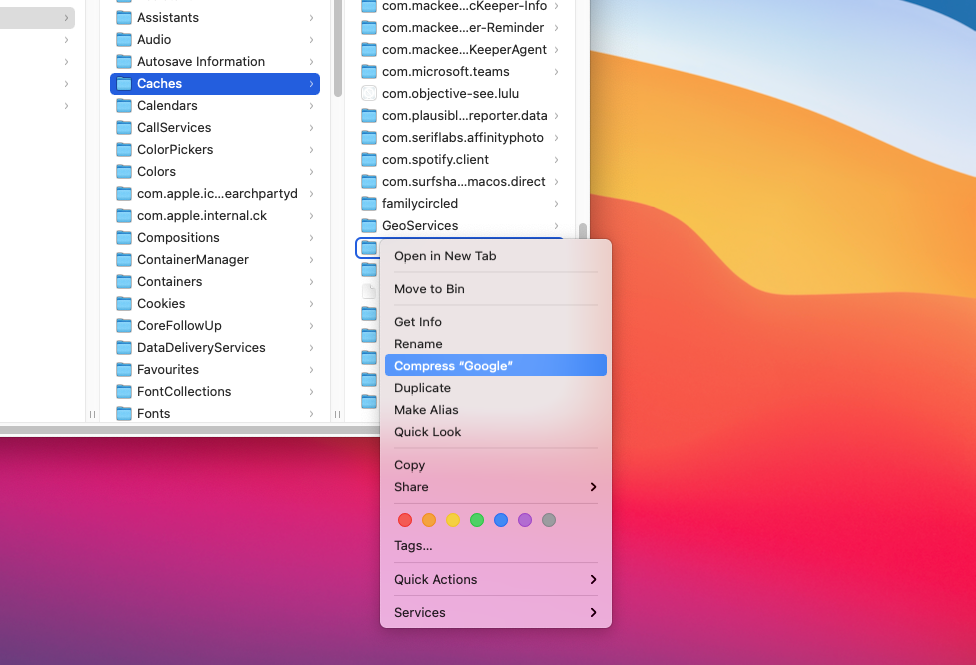
- In the cache folder, delete anything you don’t want.

Note from our experts:
There’s no use in holding onto cache files. Remove all the caches on your Mac in just a few clicks— download MacKeeper and try its Safe Cleanup.
How to clear app cache on Mac
Individual Mac apps may also have their own file caches. Depending on which app you’re talking about, these can potentially end up using a lot of disk space. Clearing these out can be a good way to delete cache on your Mac device and get back some storage.
Clearing up individual app caches is often straightforward:
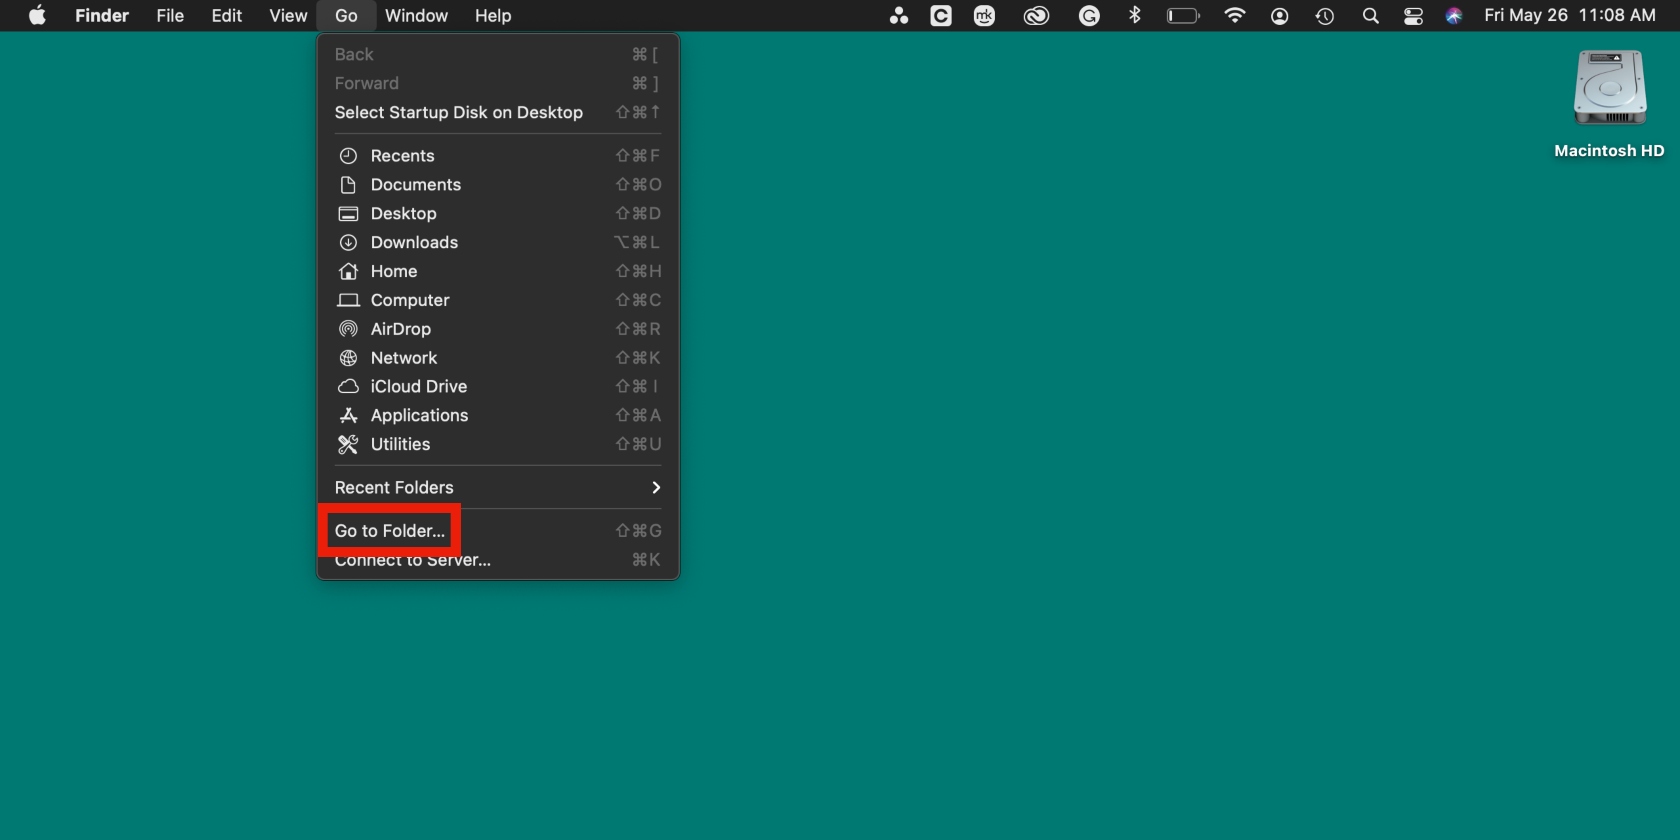
- In Finder, select Go > Go to Folder
- Enter ~/Library/Caches and click Go
- Look for files that include the name of the app you’re looking for, drag them to the Trash, and finish by emptying it.
How to empty cache on Mac with a shortcut
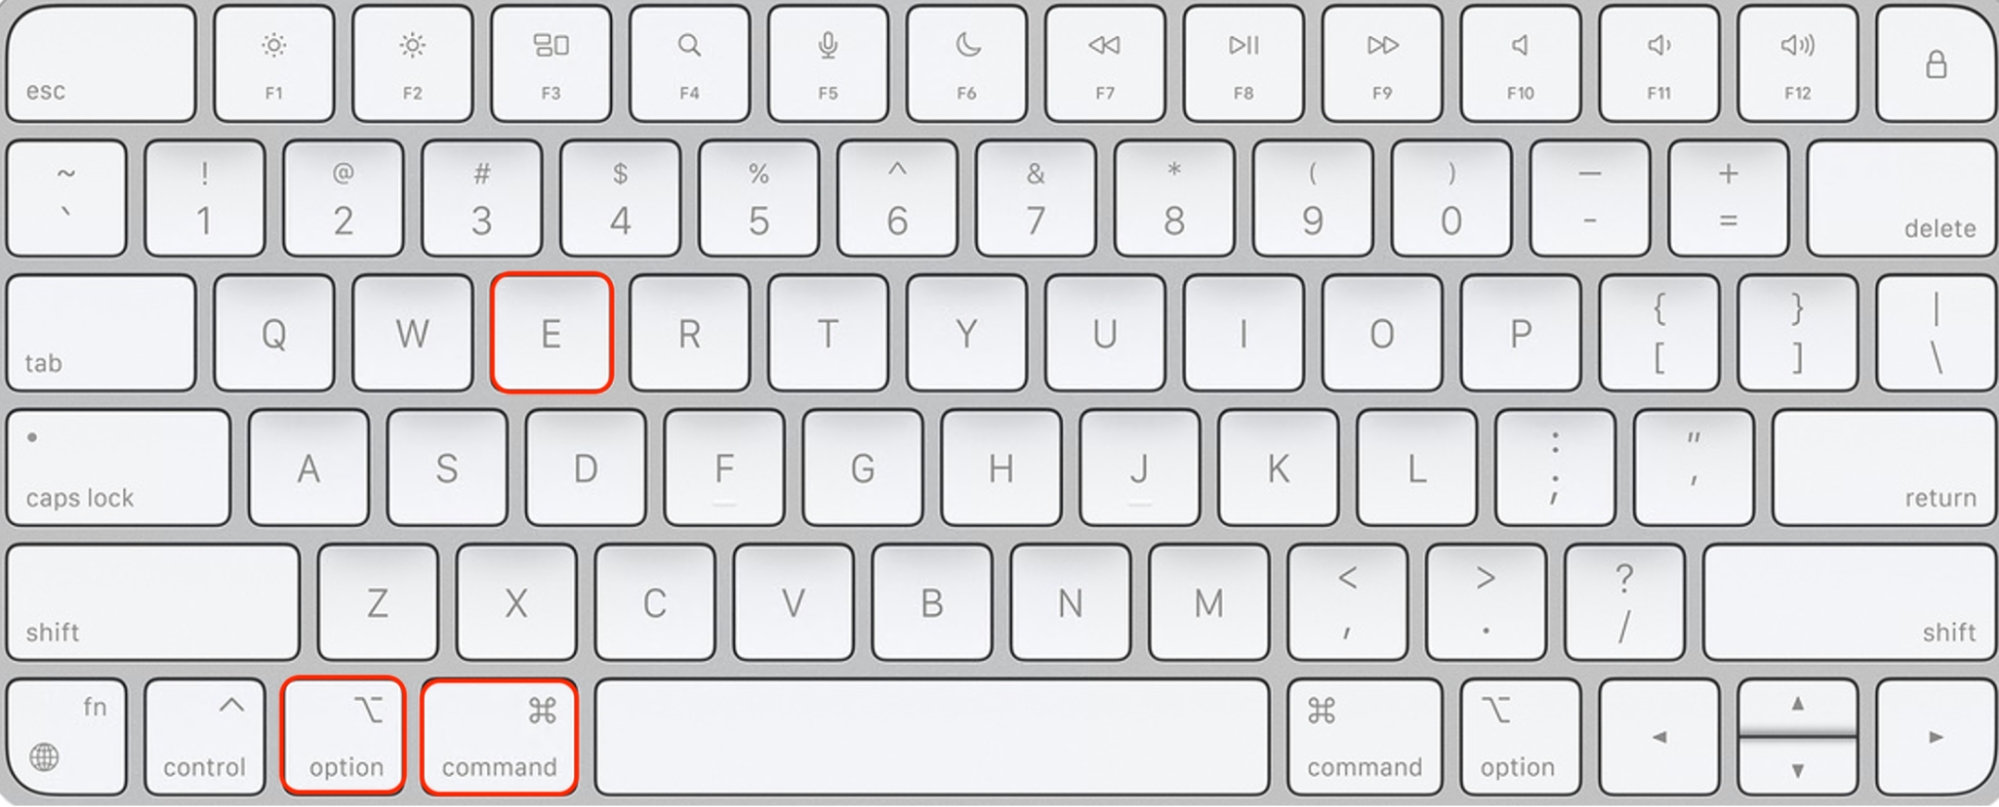
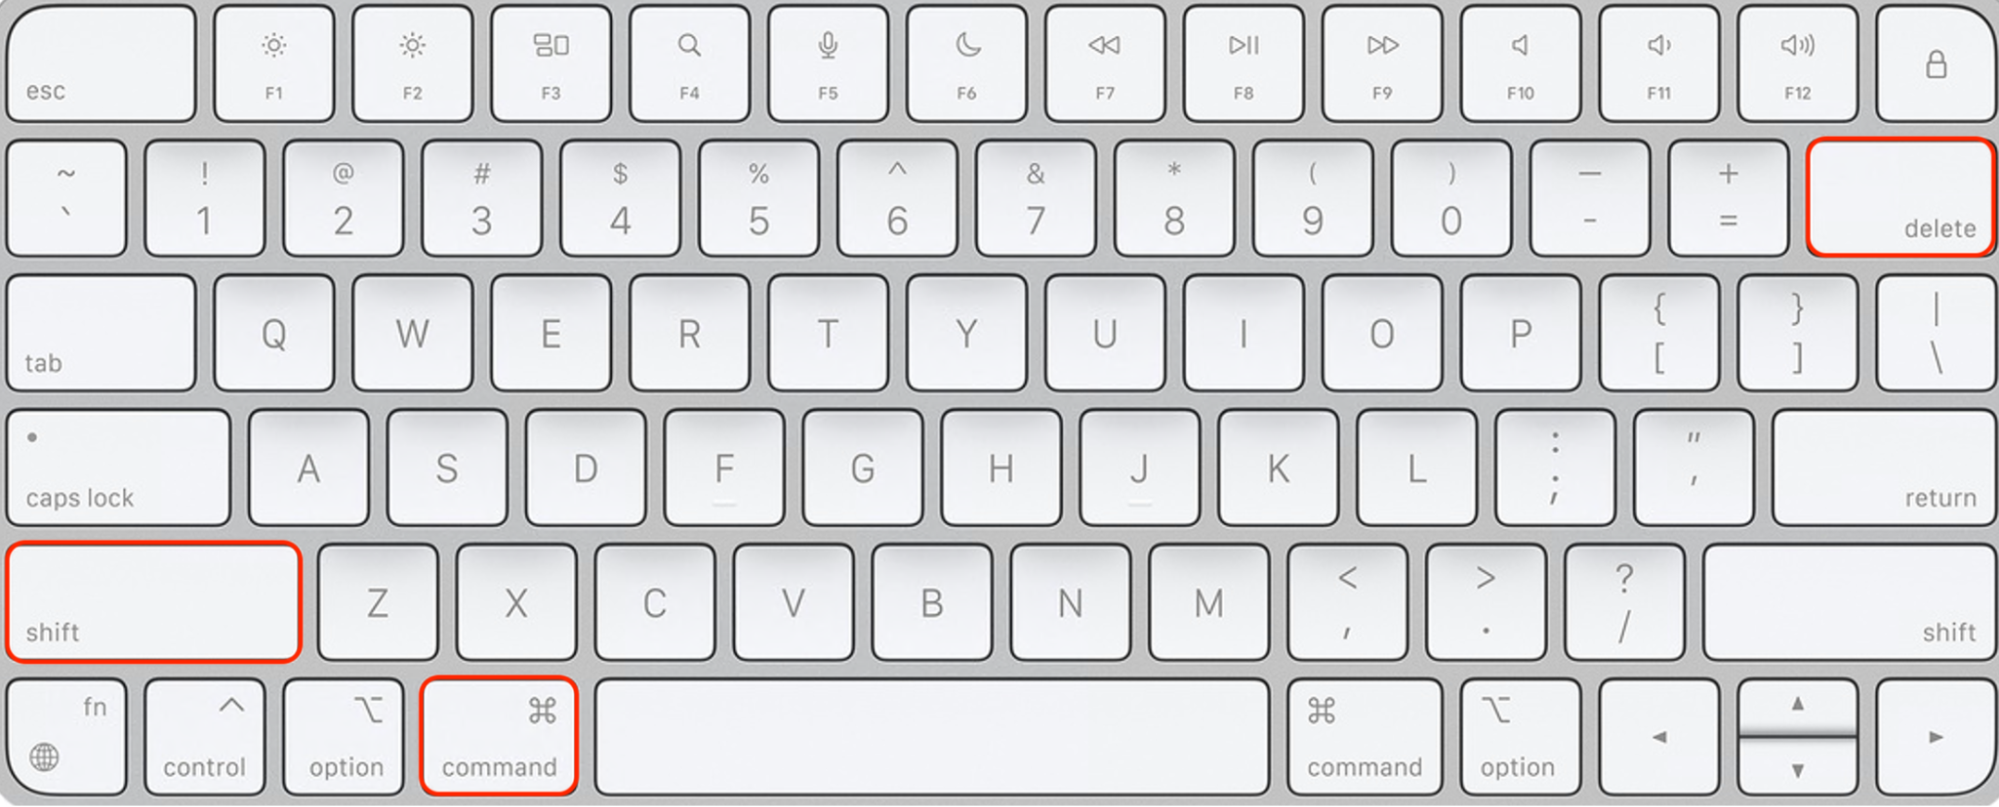
Deleting Mac cache doesn’t have to be a lengthy process, and you don’t even have to rope in an expert. MacBook devices allow you to clear browser cache using keyboard shortcuts to get the job done fast and easily. Here’s how:
- Hit Command + Option + E to automatically clear Safari cache on your MacBook
- Press Command + Shift + Delete to clear cache files on the Chrome browser on your Mac.
How to clear cache on Mac using Terminal
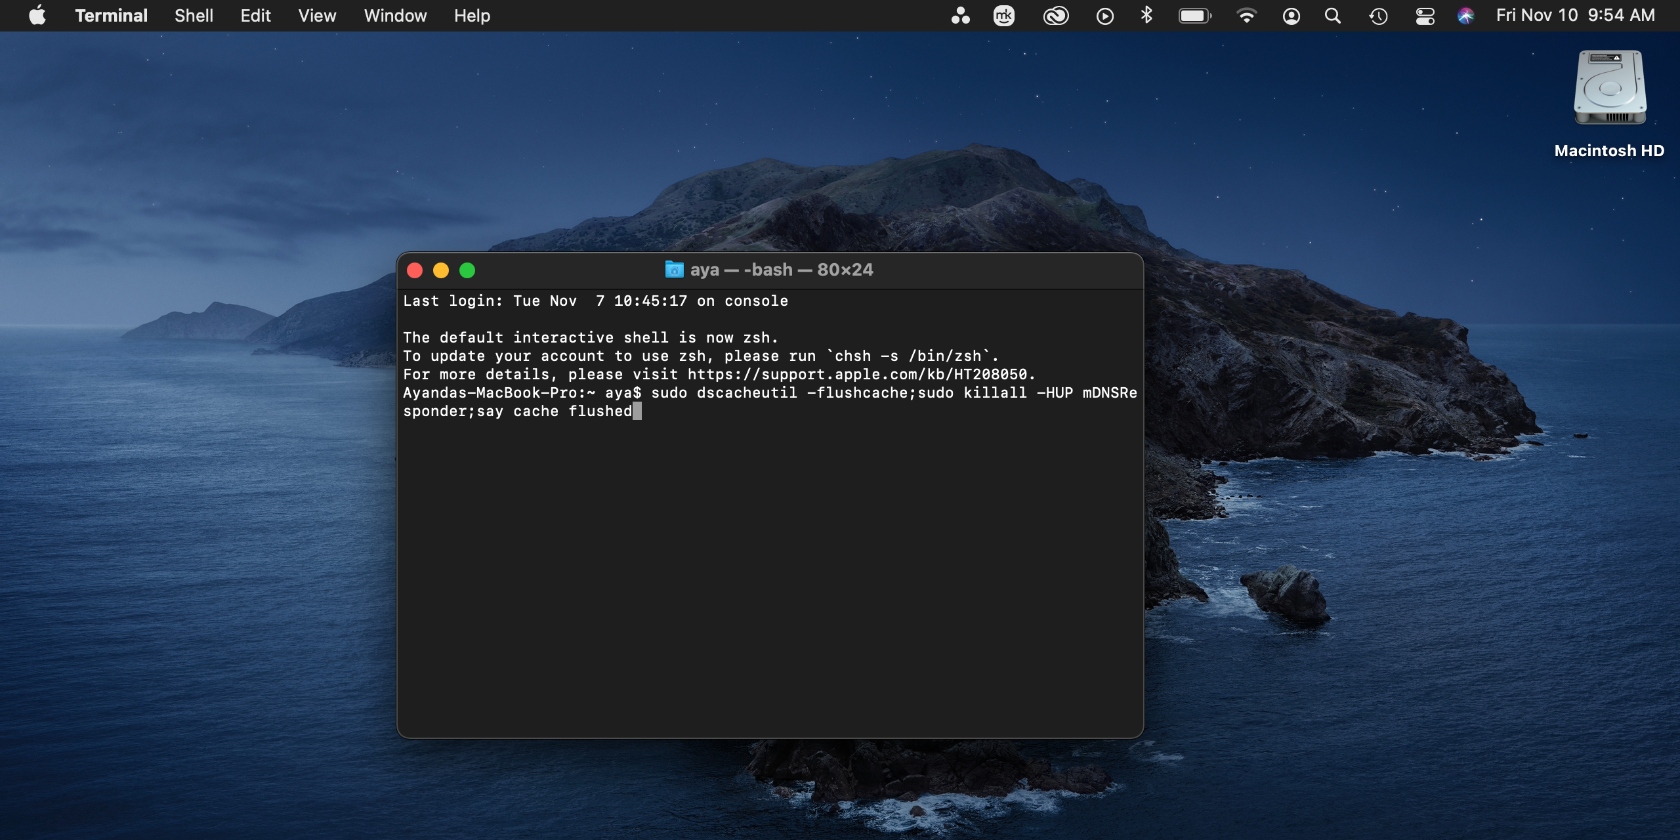
Another method of resetting your Mac’s cache is using a specific Terminal command line sudo dscacheutil -flushcache;sudo killall -HUP mDNSResponder;say cache flushed. This can be tricky if you don’t do it properly or haven’t done it before, so follow the steps below carefully:
- Start by opening Mac’s Terminal app by going to Finder > Applications > Utilities >Terminal or by hitting the Command + space bar keys on your Mac, entering the word “Terminal” in the search bar, and choosing Terminal from the list of results
- Type the command: sudo dscacheutil -flushcache;sudo killall -HUP mDNSResponder;say cache flushed
- Hit Enter (you may have to enter your administrator’s password).
Remove cache using a Mac cache cleaner
As we’ve already mentioned, it’s not difficult to reset the cache on your Mac, but there’s also a risk you might delete the wrong thing. Not to mention clearing everything manually is a fiddly, time-consuming process, especially if you have a lot of different apps and web browsers to think about.
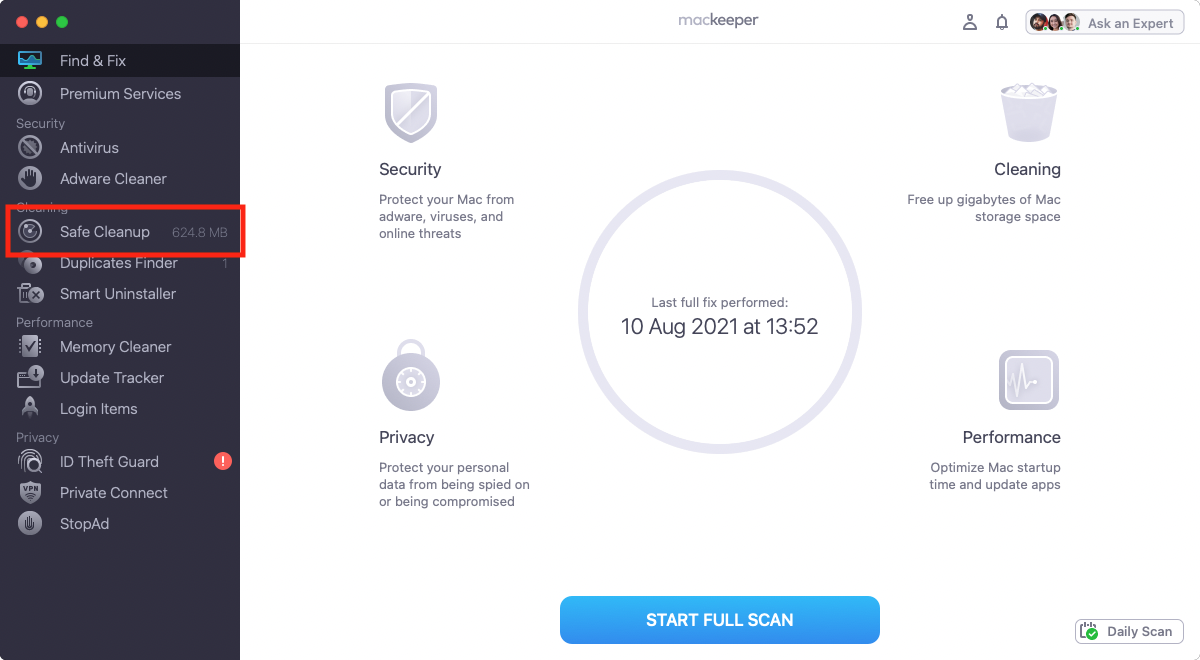
With MacKeeper, you can delete cached files from your Mac in just a few clicks:
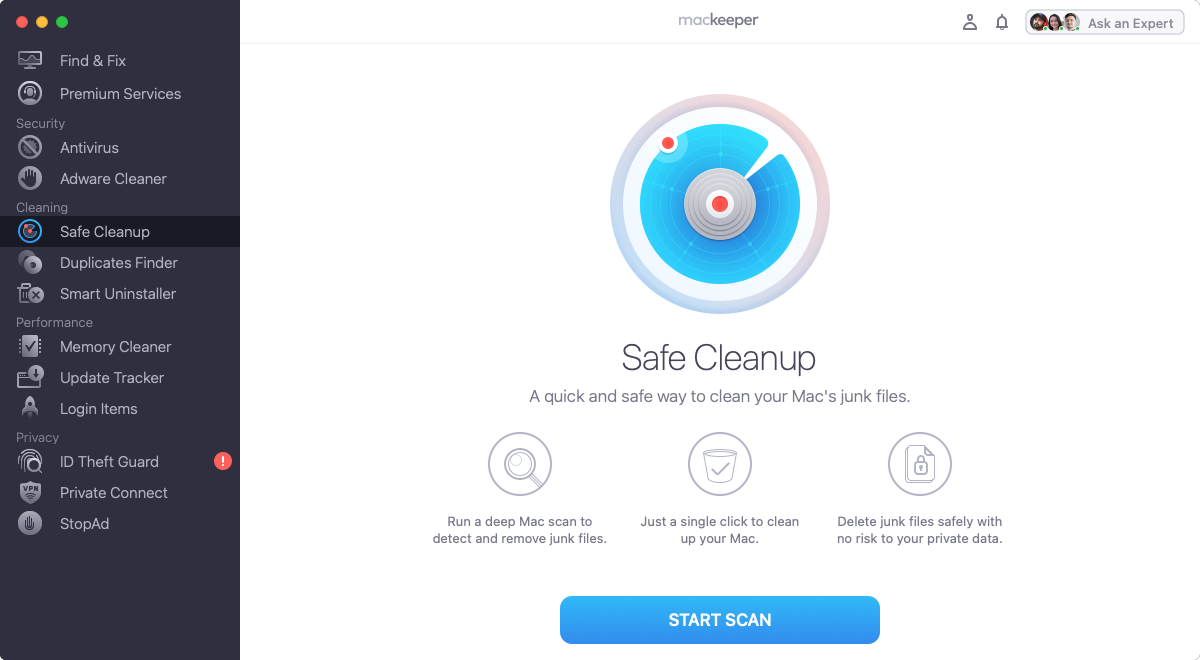
- In MacKeeper, select Safe Cleanup
- Click Start scan
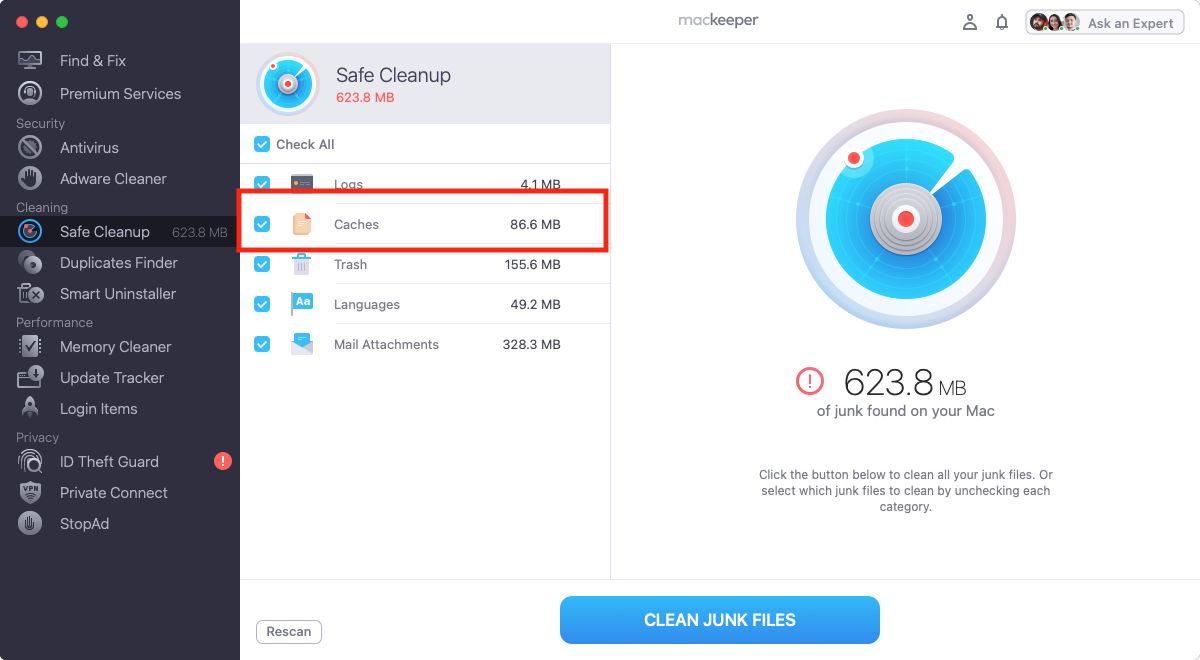
- When the scan is finished, click Caches to see different caches you can clean
- Review the results, select what you want to delete, then click Clean junk files.
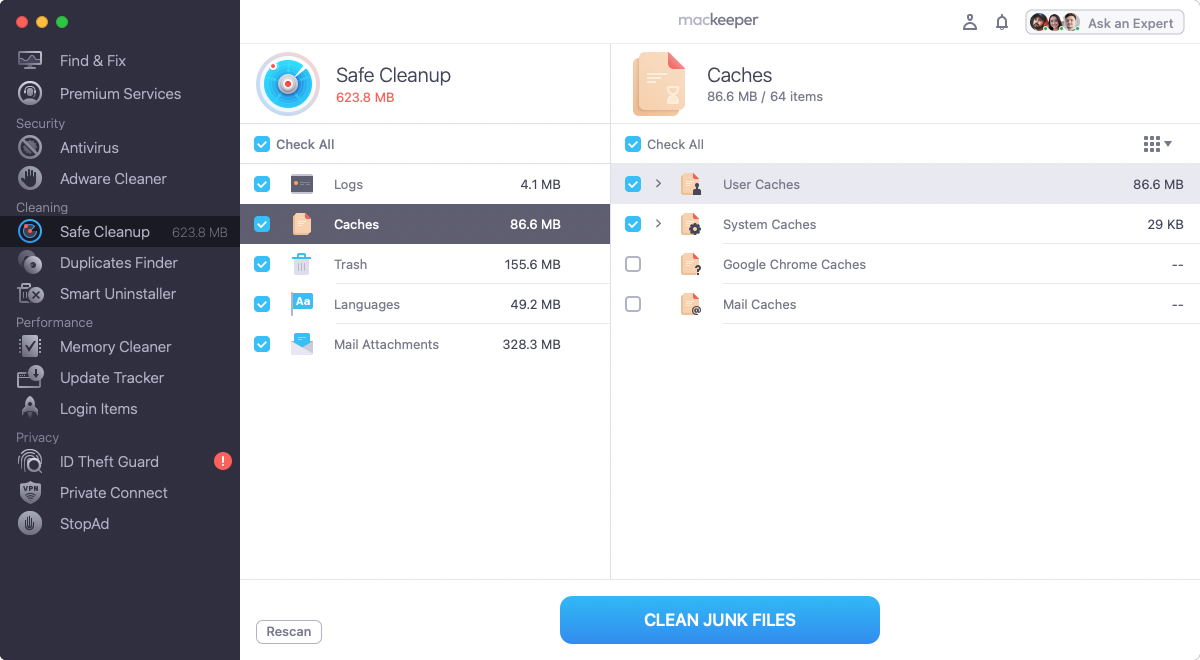
And that’s all it takes to clear out cached files from your Mac. Using a tool like MacKeeper’s Safe Cleanup means you can remove these temporary files without having to worry about deleting the wrong thing or making costly mistakes that could affect your Mac’s performance or compromise your privacy. But you can always do it manually too if you’re experienced, have the time, and are confident that you know what you’re doing.
Deleting cache on Mac is easy with MacKeeper
If you need to make room for other downloads on your Mac, clearing cache files is one way to do that. And what better way to do it than with MacKeeper’s Safe Cleanup tool, which does the heavy lifting for you? Deleting cache and maintaining your Mac doesn’t have to be a daunting process. Make it easier with MacKeeper.


