The average person has dozens of apps installed on their Mac device and only uses a handful of those apps daily. Juggling between multiple apps a day can be a job on its own and distracting, especially when trying to be productive. That’s where Mac widgets come in.
Widgets are a cool productivity hack that Mac users can leverage to watch their photos, keep up with the news, and more. In this article, we’ll demonstrate how to add and use them to save time while working on your Mac. We’ll also show you how to delete widgets on Mac if you need a break from them. Let’s get started.
A note from our experts:
Duplicate files. Junk files. Clutter. Unless you stay on top of your Mac maintenance, all of this can weigh down your device over time. Manually getting rid of it can be a hassle. Why not use a cleaning utility instead?
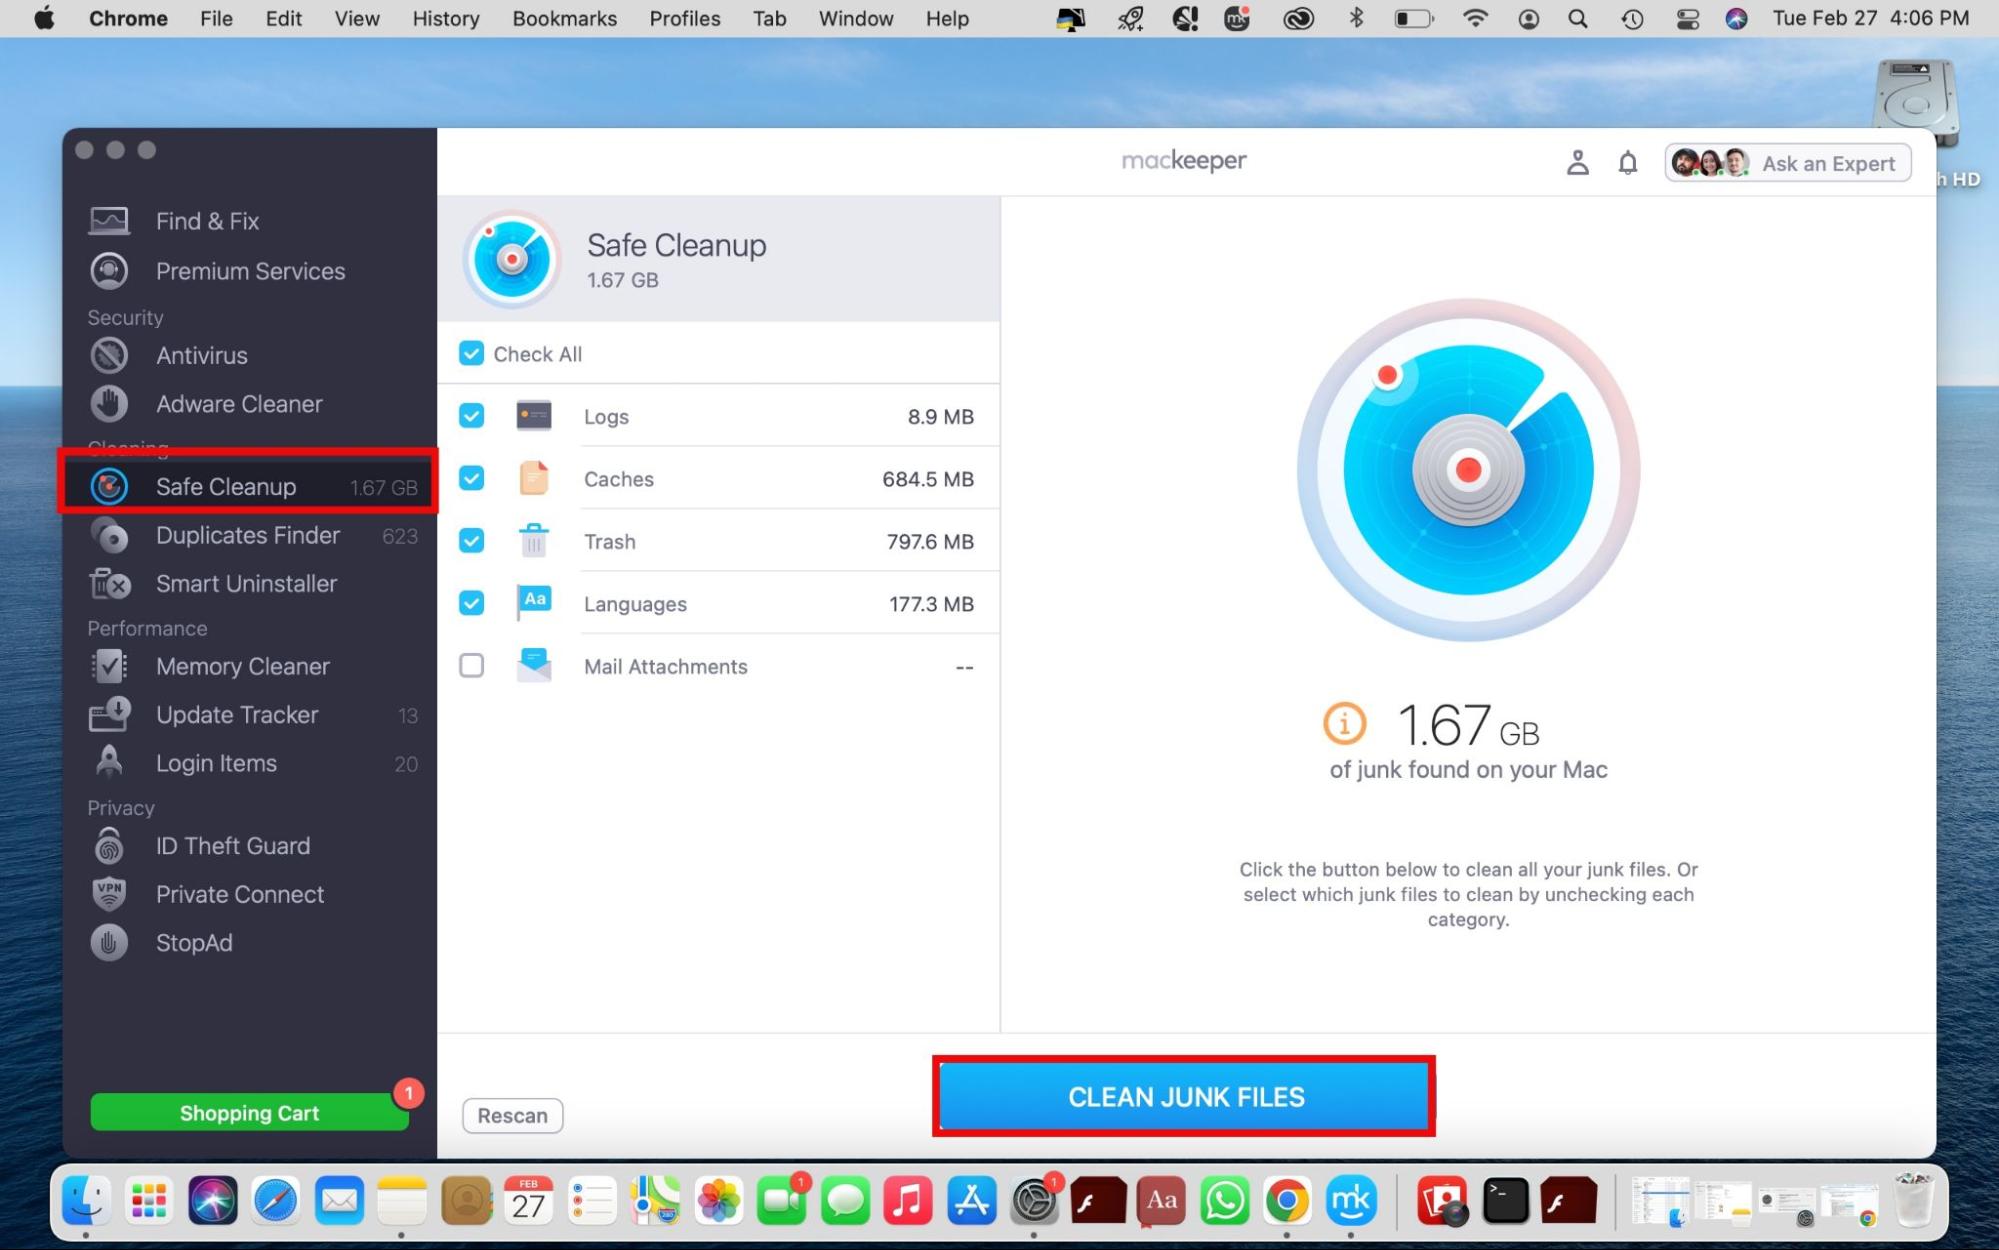
Here's how to use MacKeeper’s Safe Cleanup tool:
- Download MacKeeper on your MacBook Pro or Air device.
- Choose Safe Cleanup from the sidebar and select Start Scan.
- Hit the Clean Junk Files button after concluding the scan.
In this article you will find the following:
Can you have widgets on MacBook?
Yes. Adding widgets to your Mac desktop helps you customize your computer for convenience and stay productive by saving you time while working on something important. Widgets keep you updated by providing easy access to information in a fraction of the time it would take you to navigate back and forth between multiple apps, allowing you to view a desired widget quickly.
MacBook devices running macOS Sonoma and Sequoia can add widgets to the desktop and Notification Center, whereas previous macOS versions, such as Ventura, can only display widgets in the Notification Center. At the time of writing, OS X Sequoia is the latest macOS version available, succeeding Sonoma and Ventura. Sonoma vs Ventura: get acquainted with the differences between the two macOS versions.
Widgets are not new to MacBook devices. Apple introduced them with the launch of OS X 10.4 Tiger. At the time, enabling widgets removed all windows from the screen, enabling you to view the widgets in isolation at the top of the desktop. However, since the release of macOS Big Sur, widgets have been conveniently placed in the Notification Center. You can view widgets and notifications by opening the Notification Center and hiding them by clicking away.
Using your Mac’s storage mindfully forms part of your Mac’s maintenance. Consider cleaning your Mac’s disk before adding widgets. You can achieve this with MacKeeper’s Safe Cleanup tool, which lightens the load on your Mac’s disk by removing junk files.
Follow these steps to use it:
- Download MacKeeper and create an account.
- Click on Safe Cleanup > Start Scan > Clean Junk Files to initiate the cleanup process.
How to view widgets on Mac
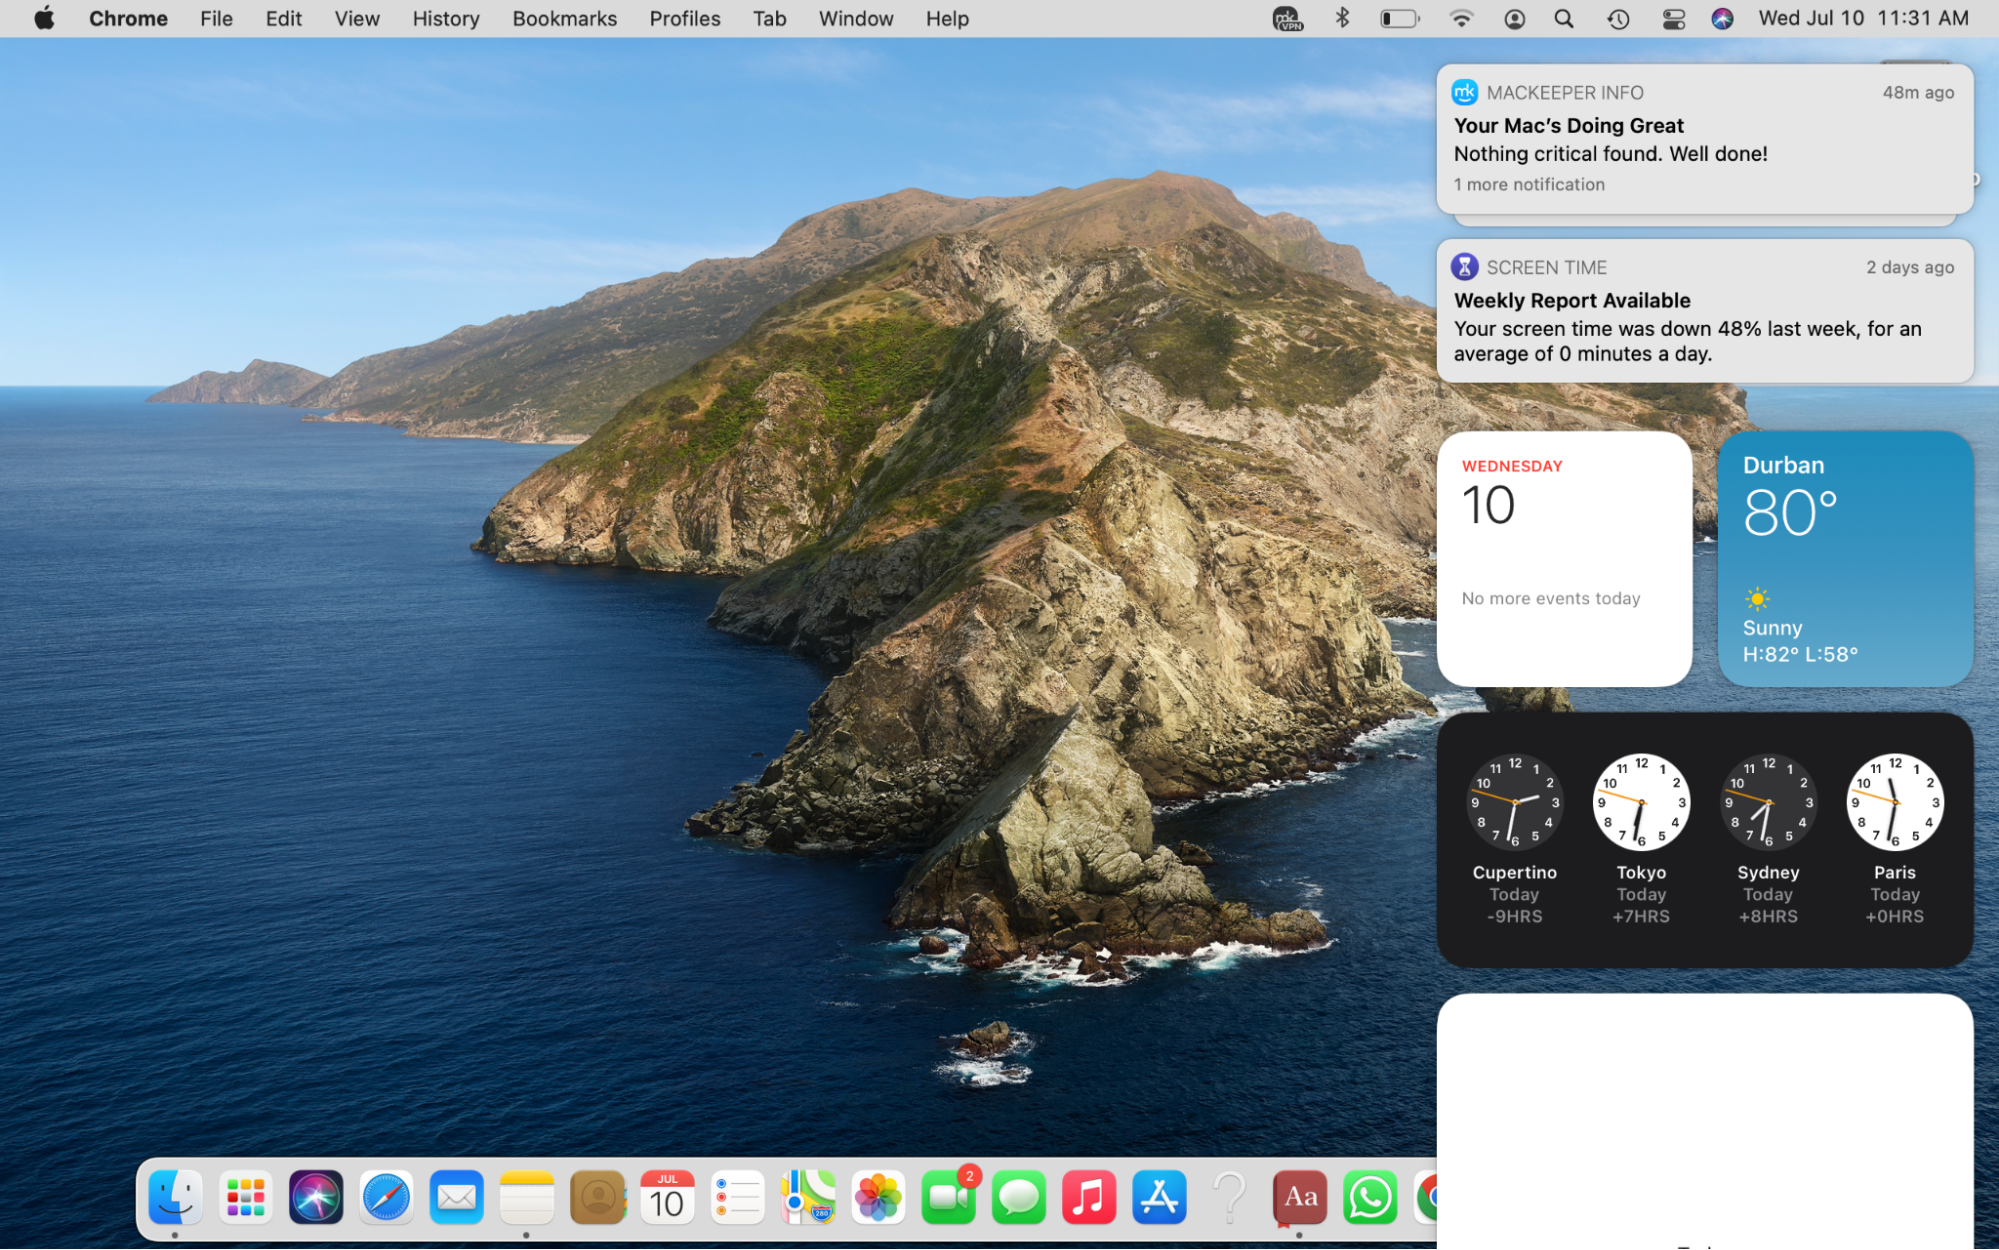
To view widgets on a Mac, click on the time in the top-right corner of the screen. The Notification Center should immediately appear on the screen's right side, displaying notifications at the top of the list and widgets further down.
A tip from the MacKeeper team:
You can also add widgets for third-party apps. For example, you can download an app to see CPU usage on Mac from the App Store and create a widget for it.
How to put widgets on Mac
You can add widgets to your Mac in various ways depending on your installed macOS version. Here’s how you can add widgets on Mac:
A note from the MacKeeper team: Starting with OS X Big Sur, you’ve been able to add and manage widgets from the Notification Center. However, OS X Sonoma and later allows you to add widgets to your desktop. Unlike in the Notification Center, desktop widgets remain visible, allowing you to access them on demand.
Let’s delve into each method of adding widgets to your Mac computer below.
1. Add widgets on the Mac desktop
Follow this approach to add widgets to your desktop on macOS Sonoma and Sequoia:
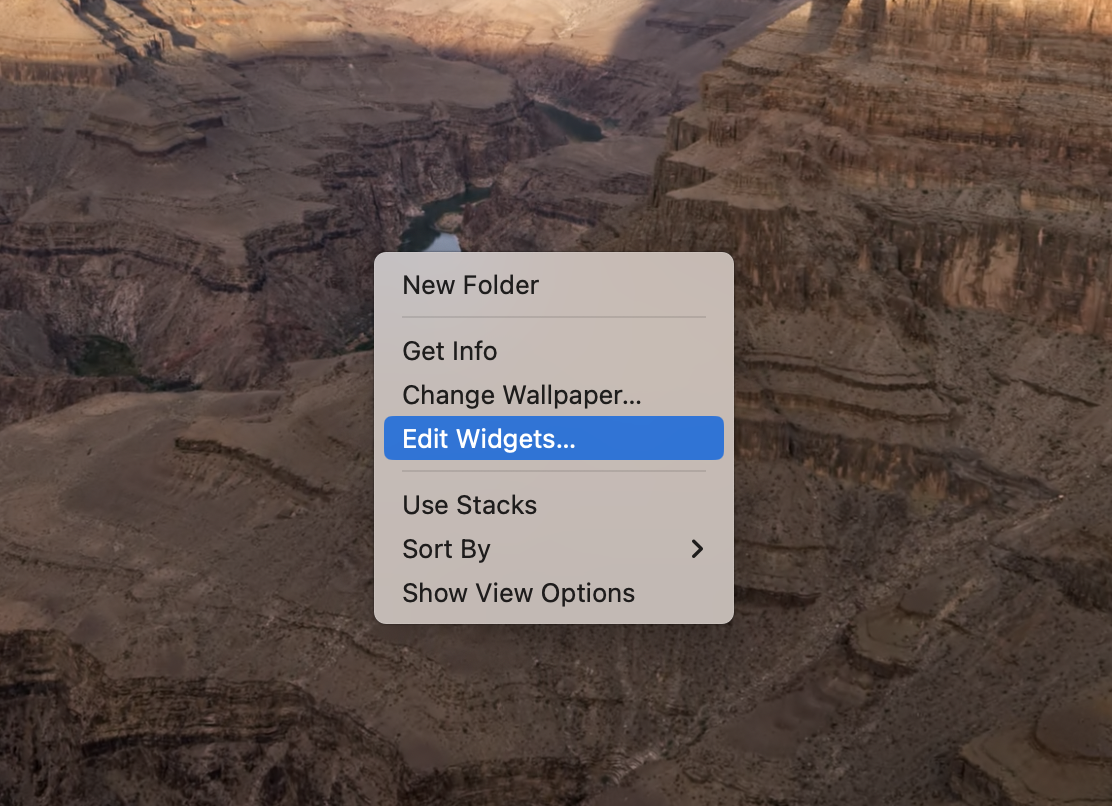
- Control-click on your desktop and select Edit Widgets.
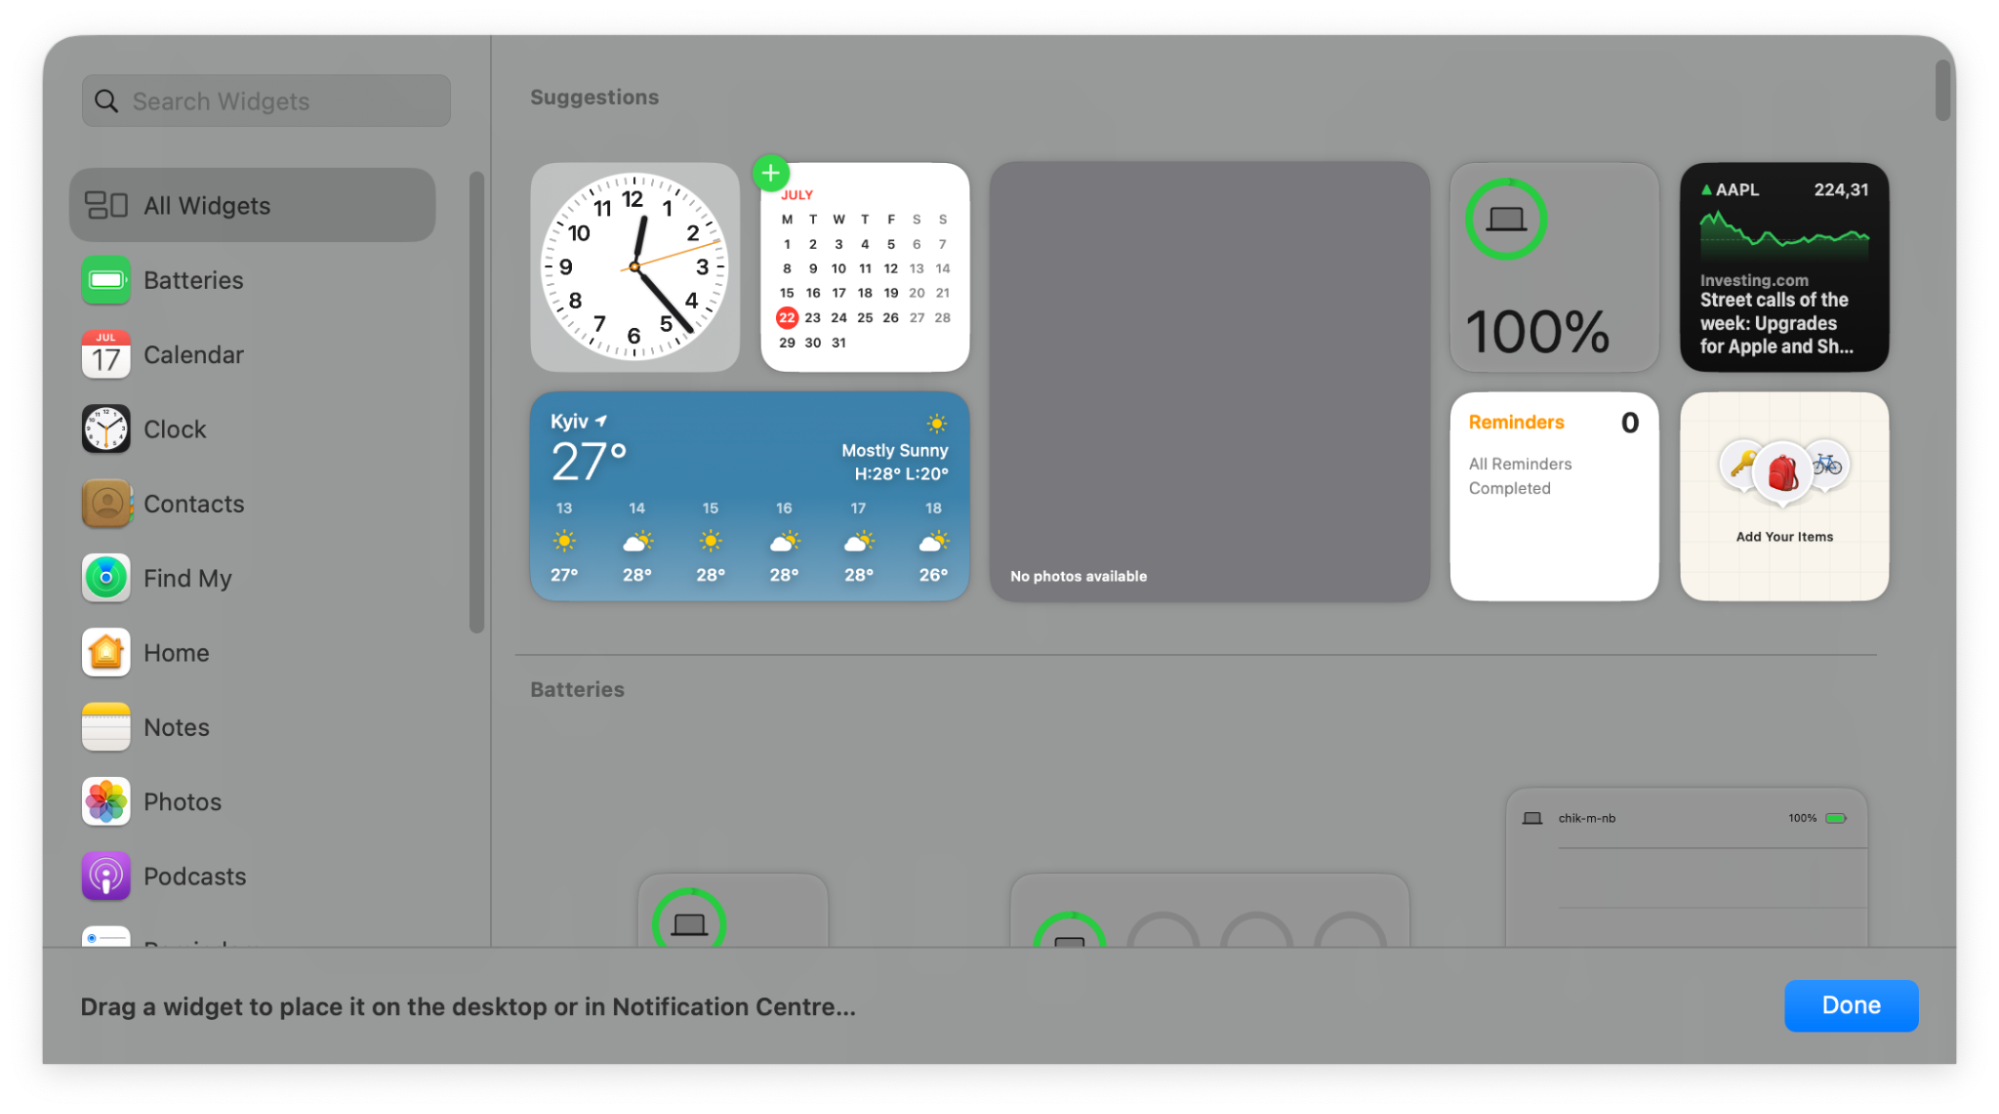
- Find your desired widget and click on it, add it by hitting the Add button, or drag it onto the desired spot on your desktop.
- Hit Done in the lower-right corner to close the widget gallery.
2. Put widgets on MacBook Notification Center
Follow these steps to add widgets to your Notification Center:
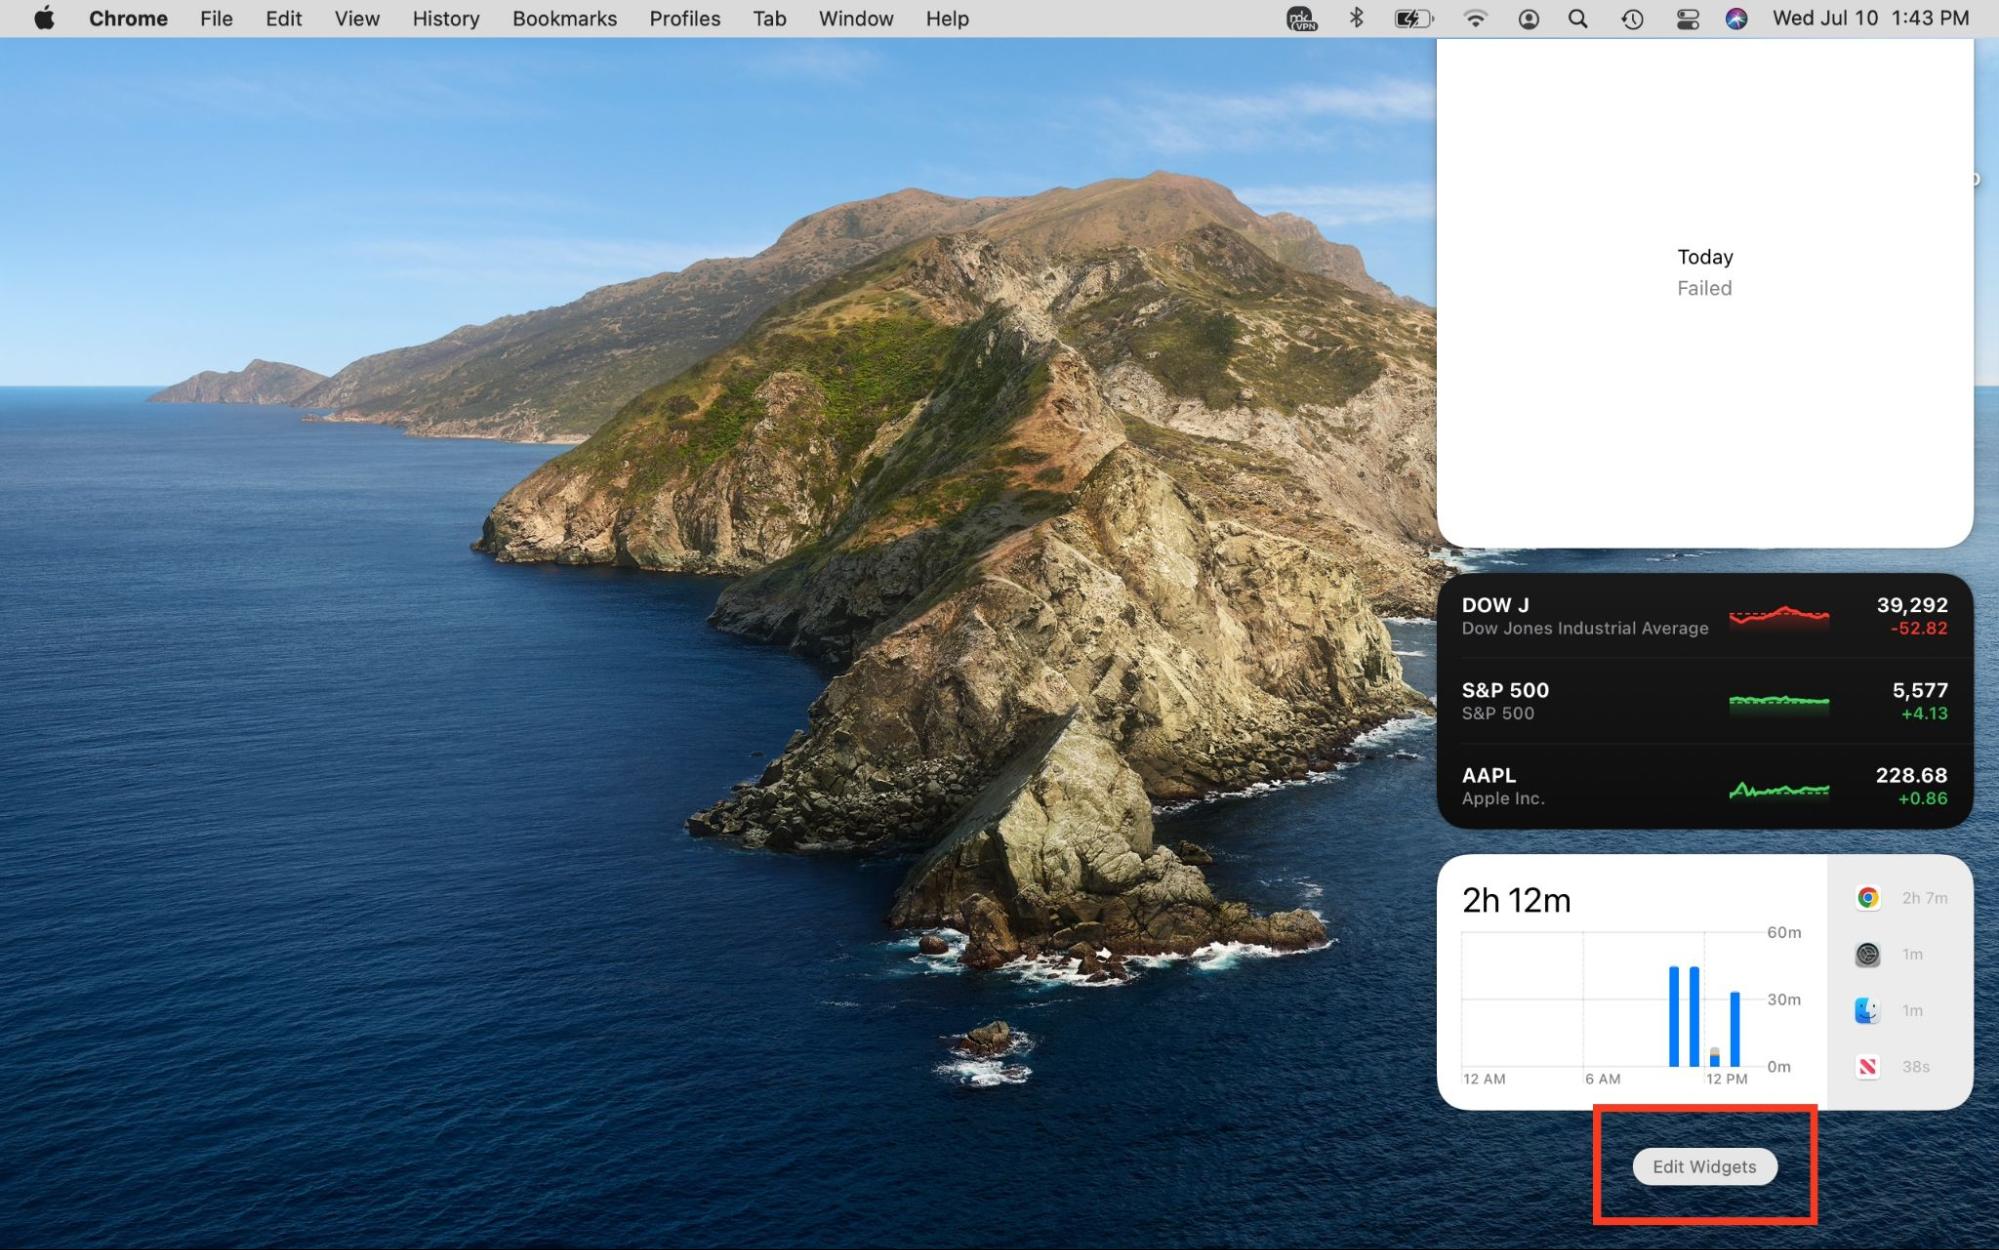
- Select the time > Edit Widgets at the bottom of the Notification Center.
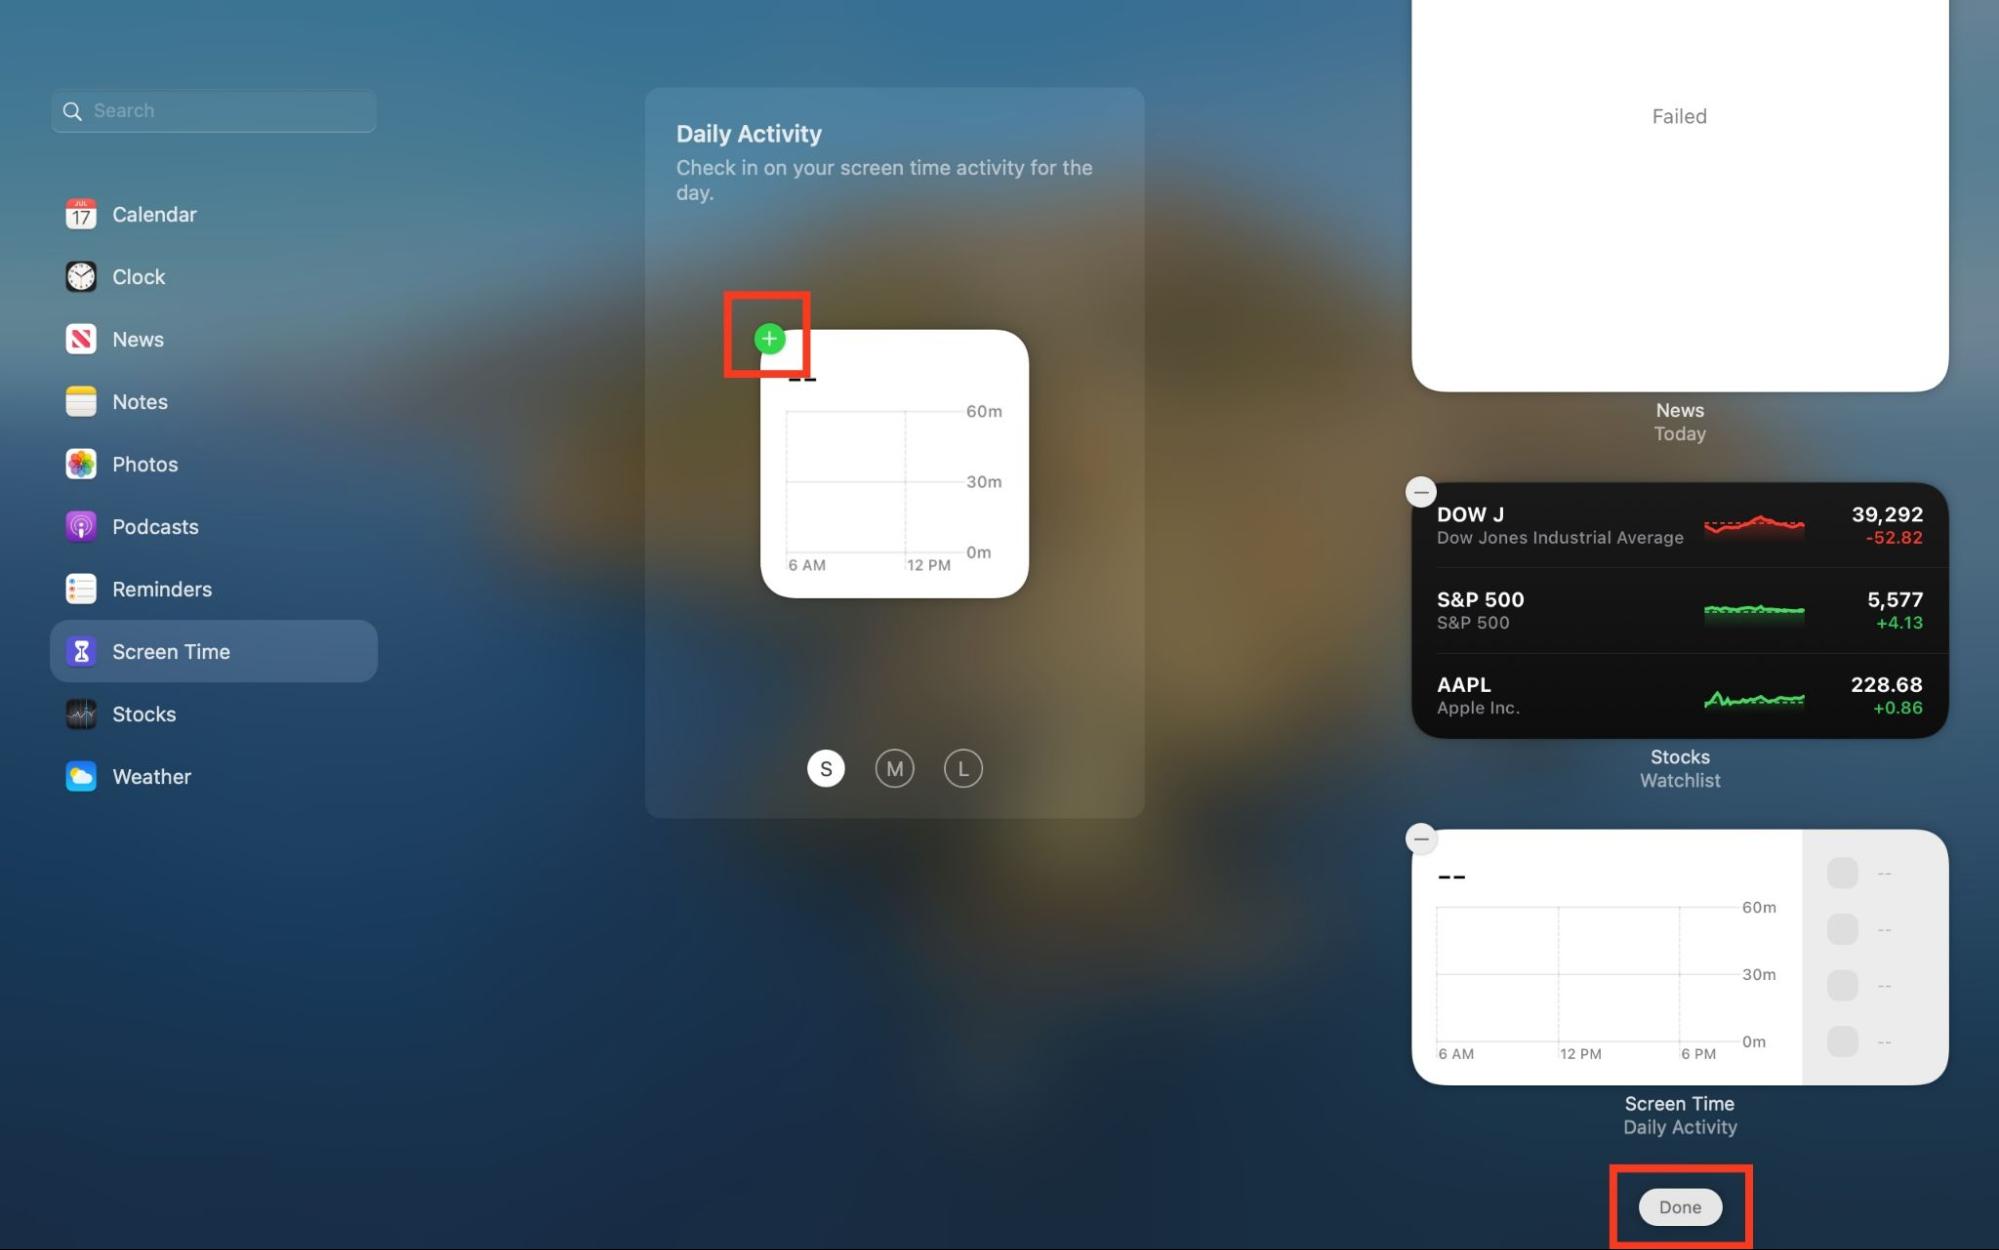
- Pick a widget category, hover over your desired widget, then click the green Add icon.
- Hit Done in the lower-right corner of the widget gallery.
3. Add iPhone widgets to Mac
Apple’s Continuity feature lets you use your iPhone widgets on macOS Sonoma and Sequoia. Here’s how to add them:
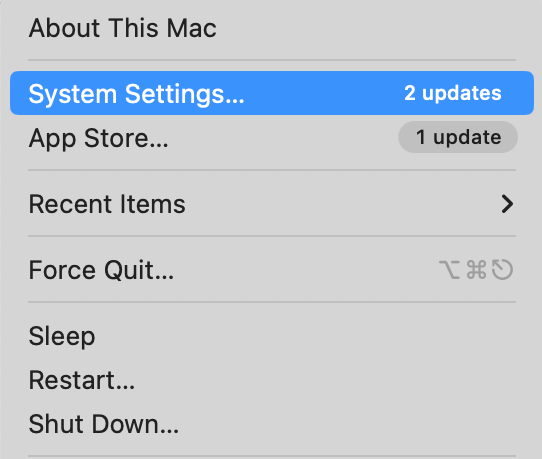
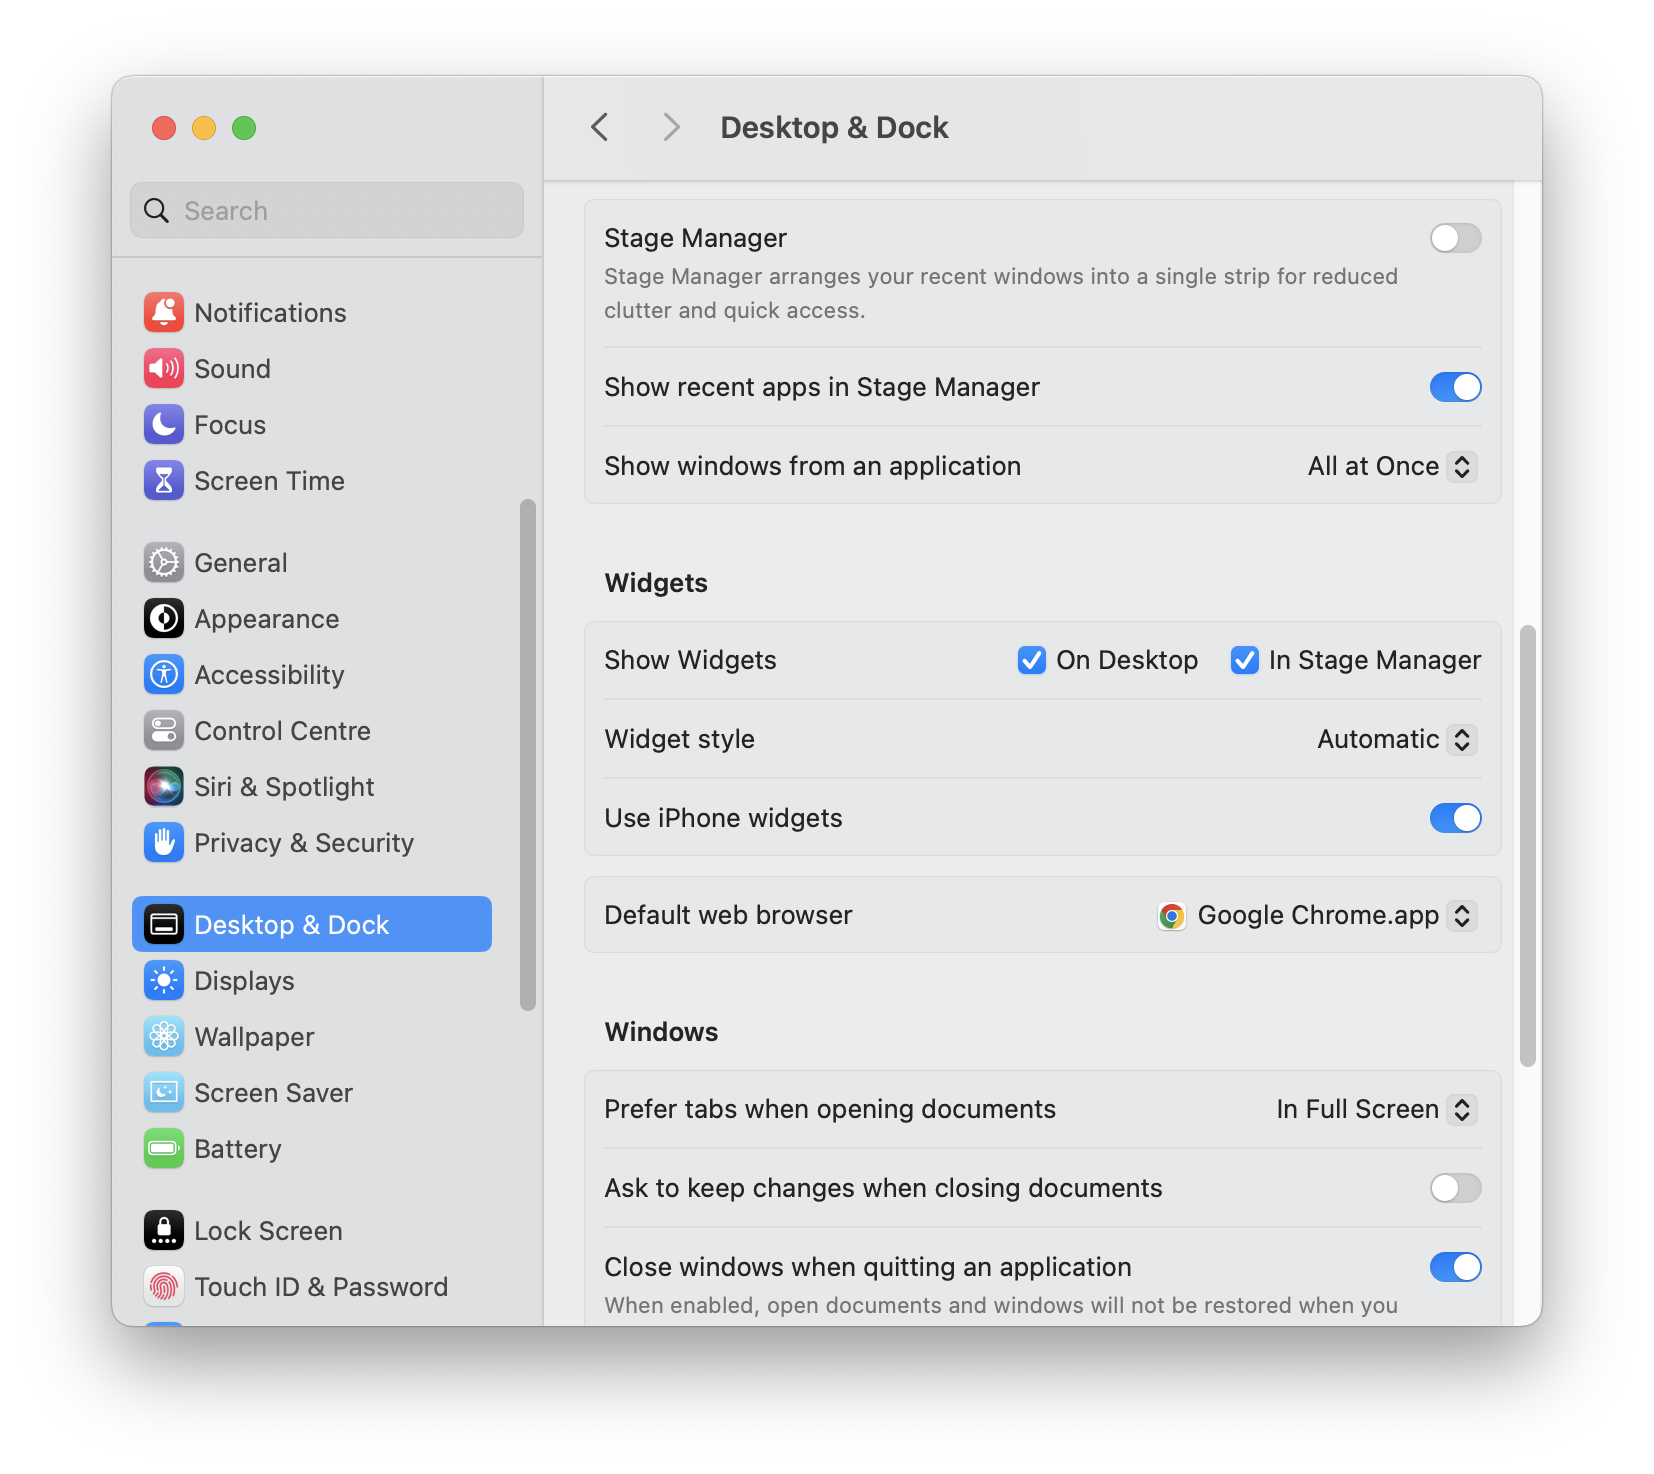
- Open System Settings via the Apple menu, then click Desktop & Dock.
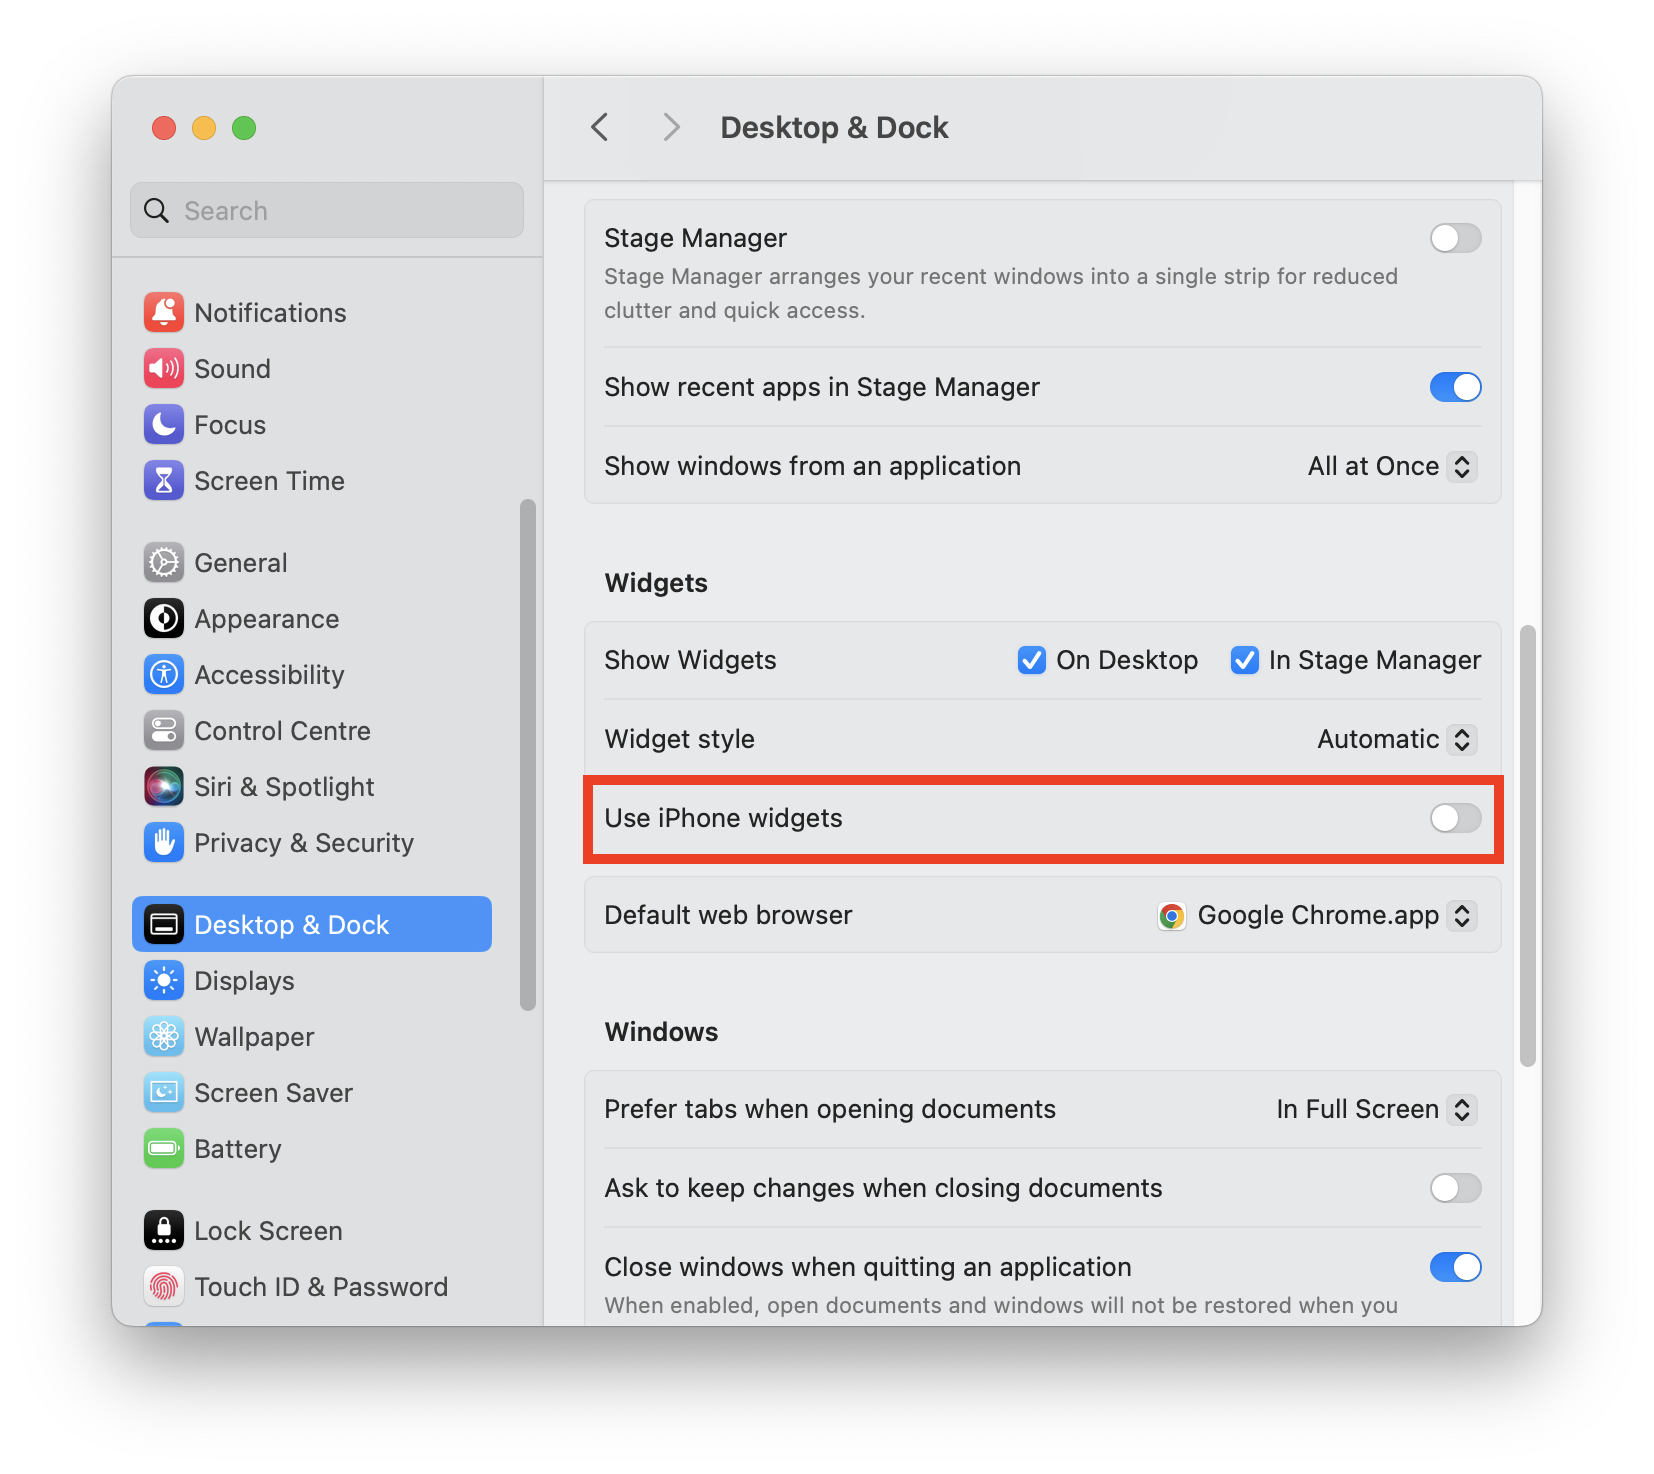
- Find the Widgets section towards the bottom of the page, then toggle the Use iPhone widgets setting on (it should change from gray to blue).
- You can now view and manage your iPhone widgets on your Mac laptop.
How to manage your widgets on macOS
Mac offers various methods to manage your widgets. Take the following approach to manage your favorite widgets by personalizing them to your preference on a Mac:
- Customize widgets on Mac
- Rearrange widgets on a MacBook device
- Change the size of an existing widget on your laptop
- Remove widgets from your device
No two users’ widgets or Notification Centers will look alike. Each user’s widgets reflect their needs, preferences, and priorities. Follow the in-depth guide below to personalize your widgets based on your unique needs and preferences.
1. Customize widgets
Customizing widgets allows you to view them the way you want. However, the customization options vary depending on the specific widget selected.
Here’s how to customize a MacBook widget:
- Open the Notification Center by clicking the time.
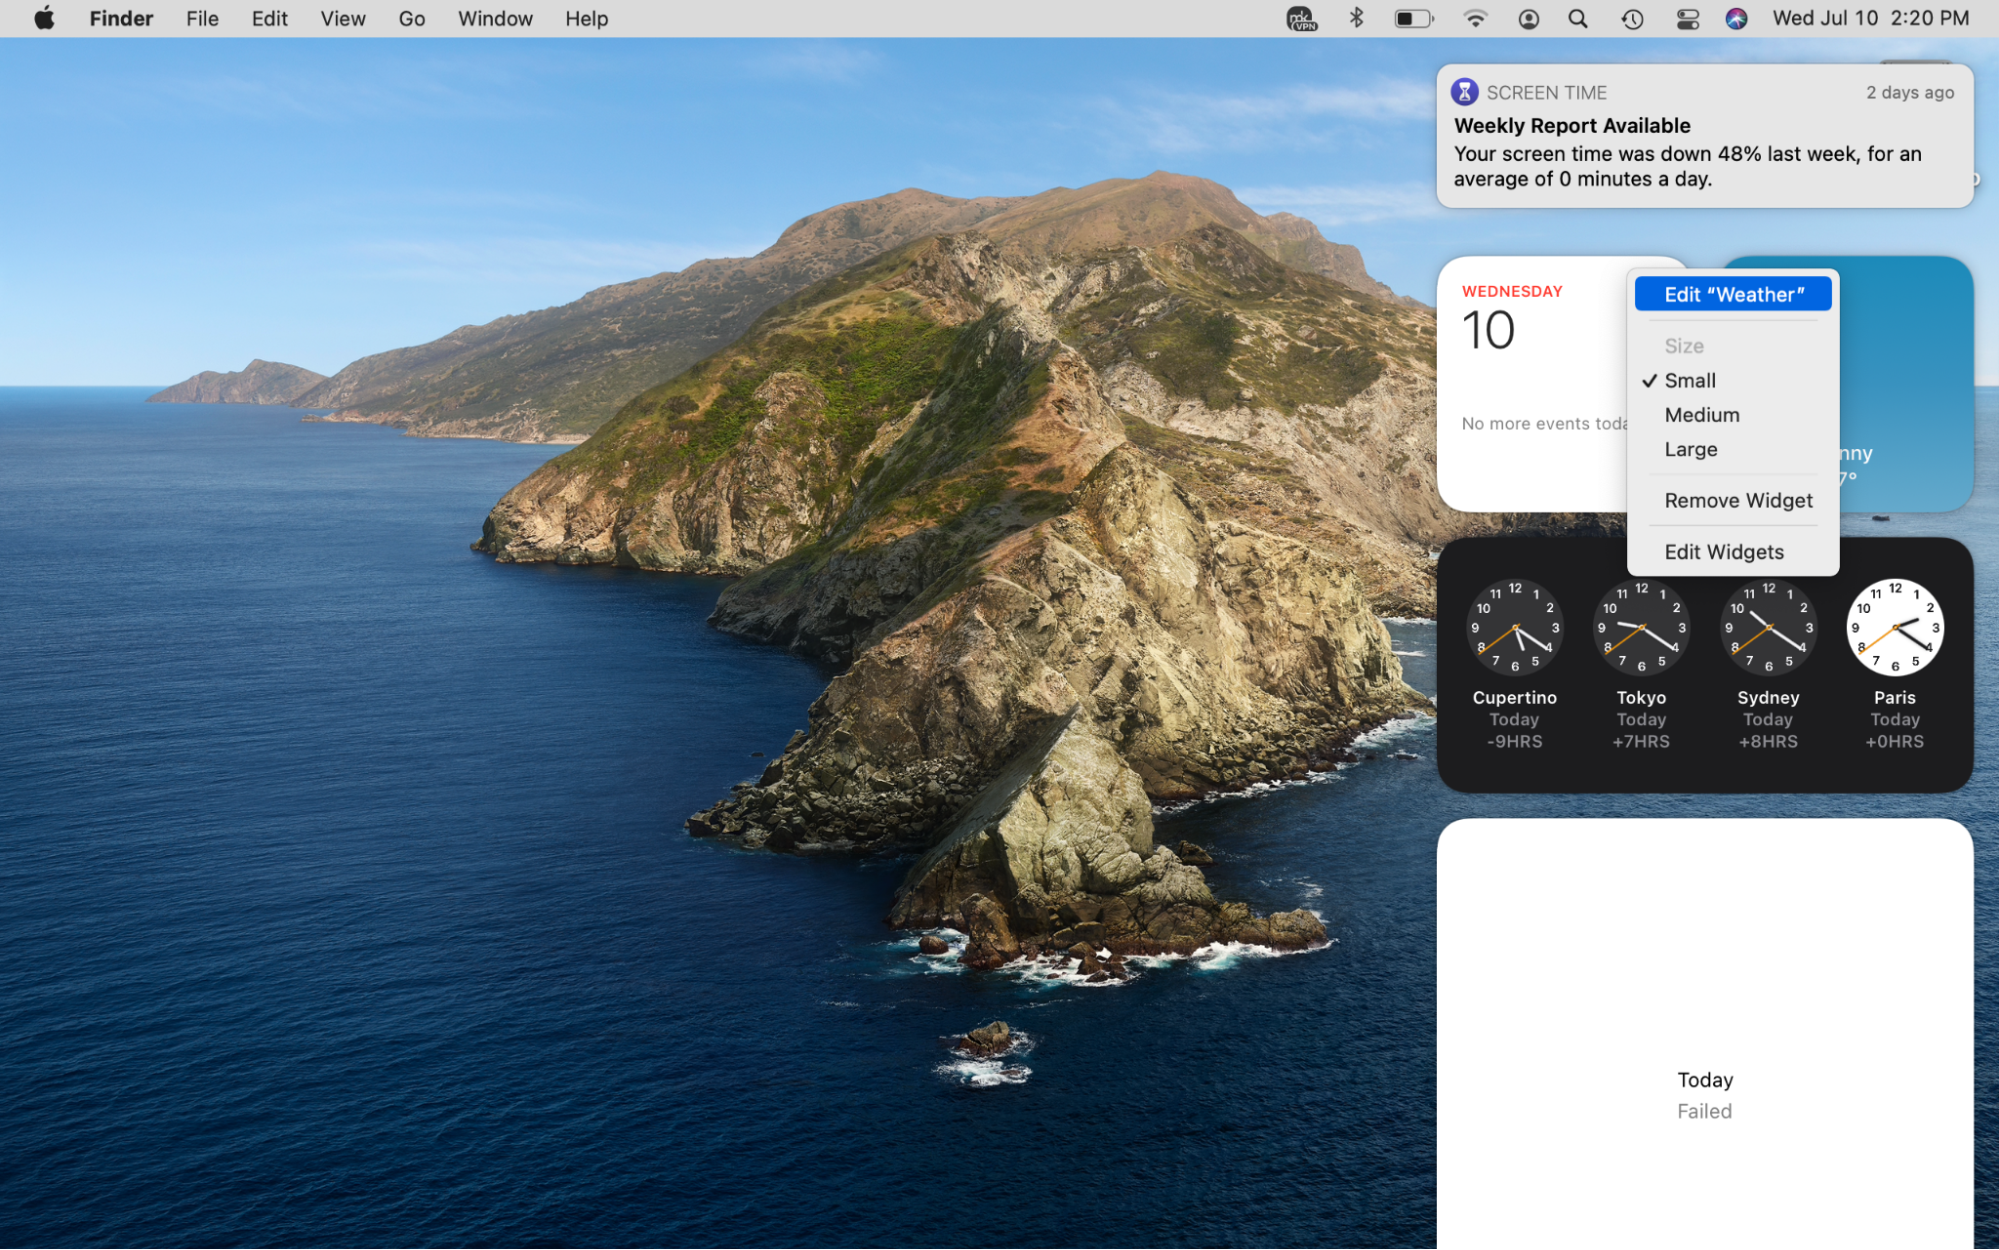
- Control-click on a widget and choose the first Edit option. For example, choose the Edit Weather option for the Weather widget.
- Edit your widget according to your preferences, such as moving information around. After finalizing your edits, click Done.
2. Rearrange widgets
Move widgets to different locations according to priority in the Notification Center. Here’s how:
- Click on the time in the top-right corner of your Mac’s screen.
- Find the widget you’d like to move.
- Drag it to the location you want to place it.
3. Change the size of an existing widget
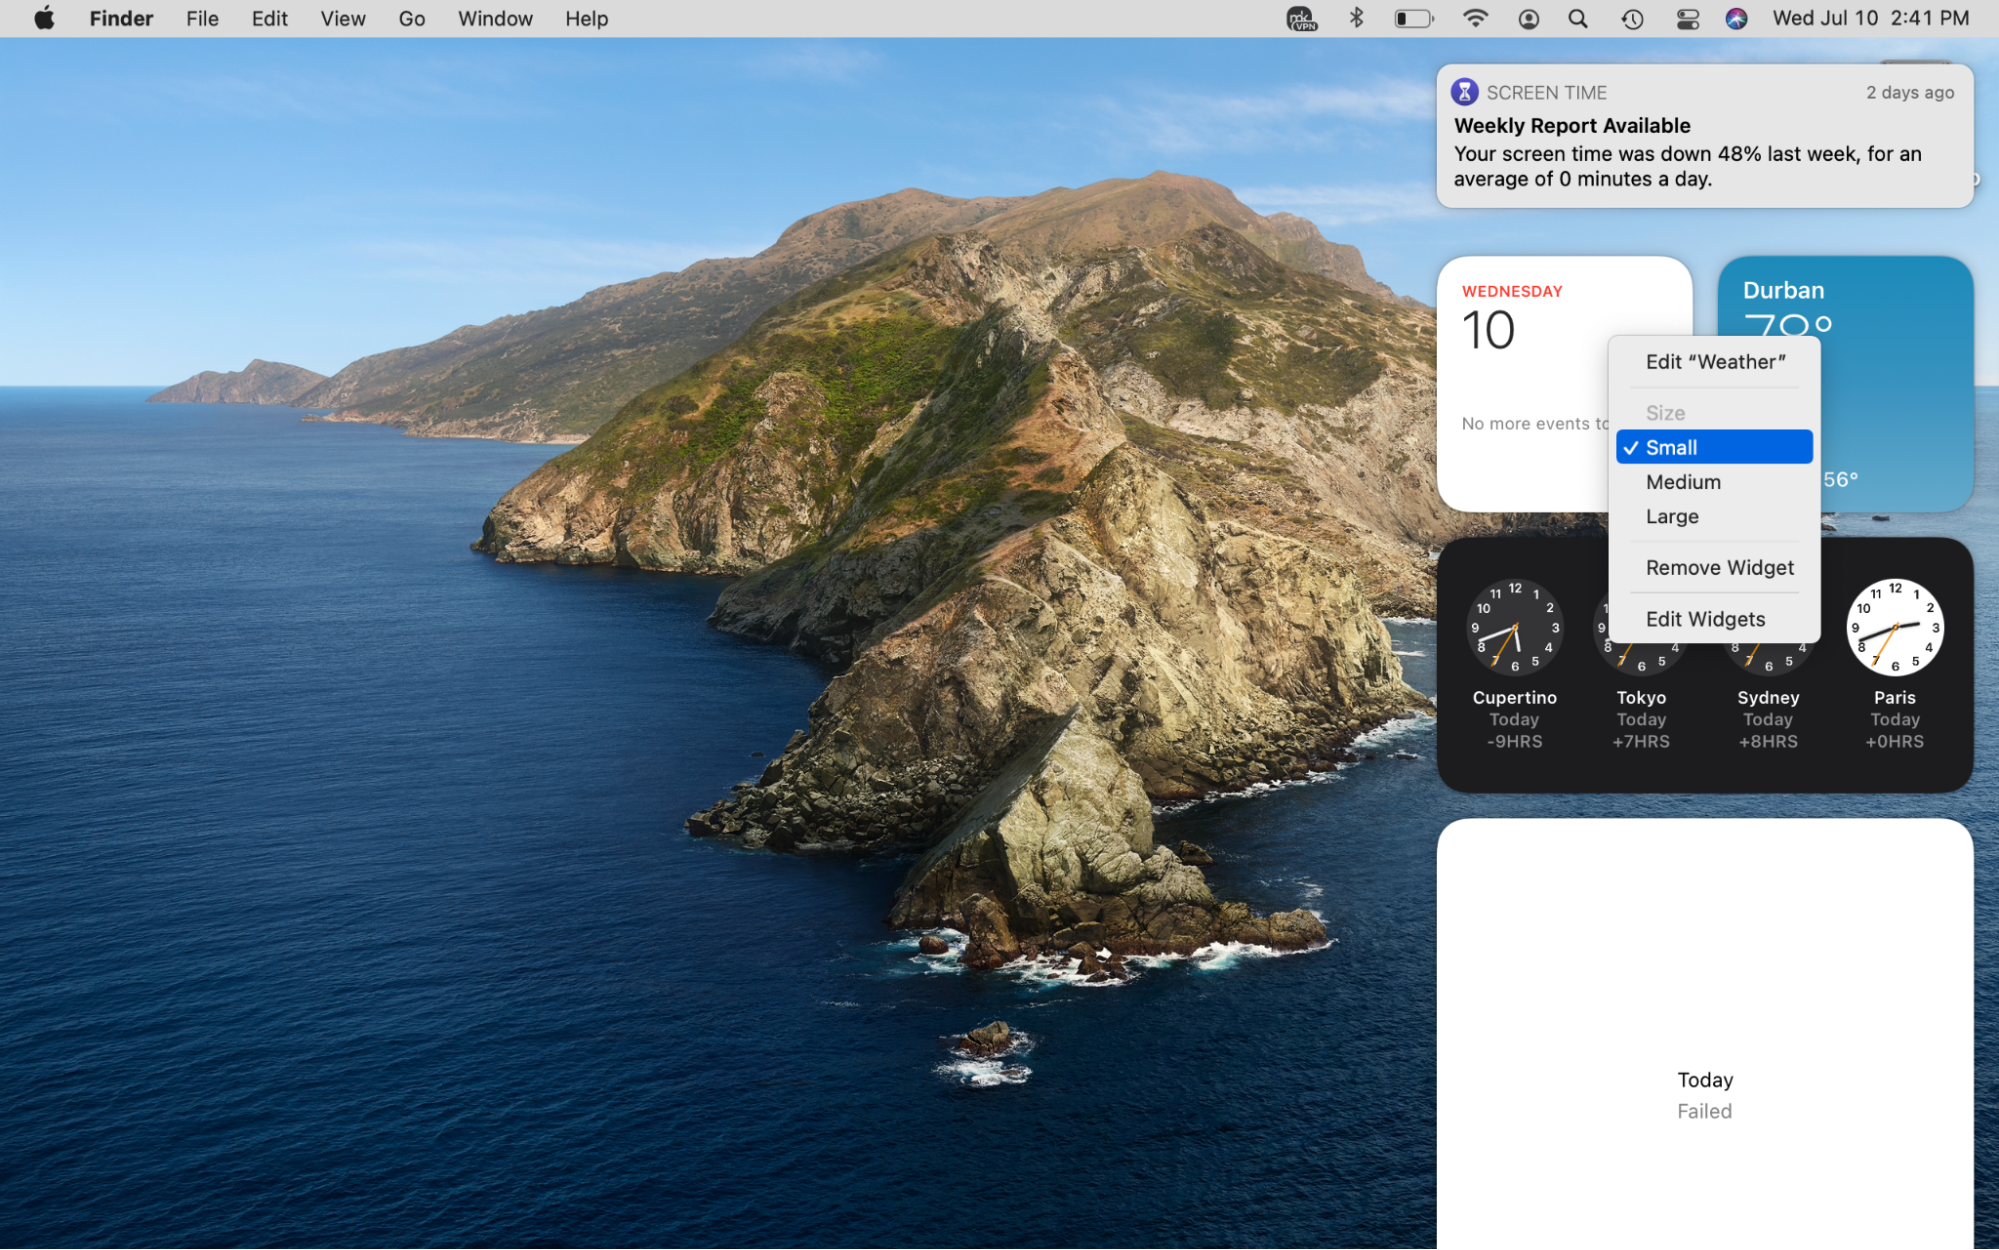
Widgets can be displayed in three sizes: small, medium, and large, giving them more or less prominence on the screen. Change the size of your widget like this:
- Control-click on a widget in the Notification Center.
- In the Size section of the shortcut menu, choose either Small, Medium, or Large.
4. Remove widgets from Mac
Your widget preferences can change over time. Here’s how to delete widgets you no longer need:
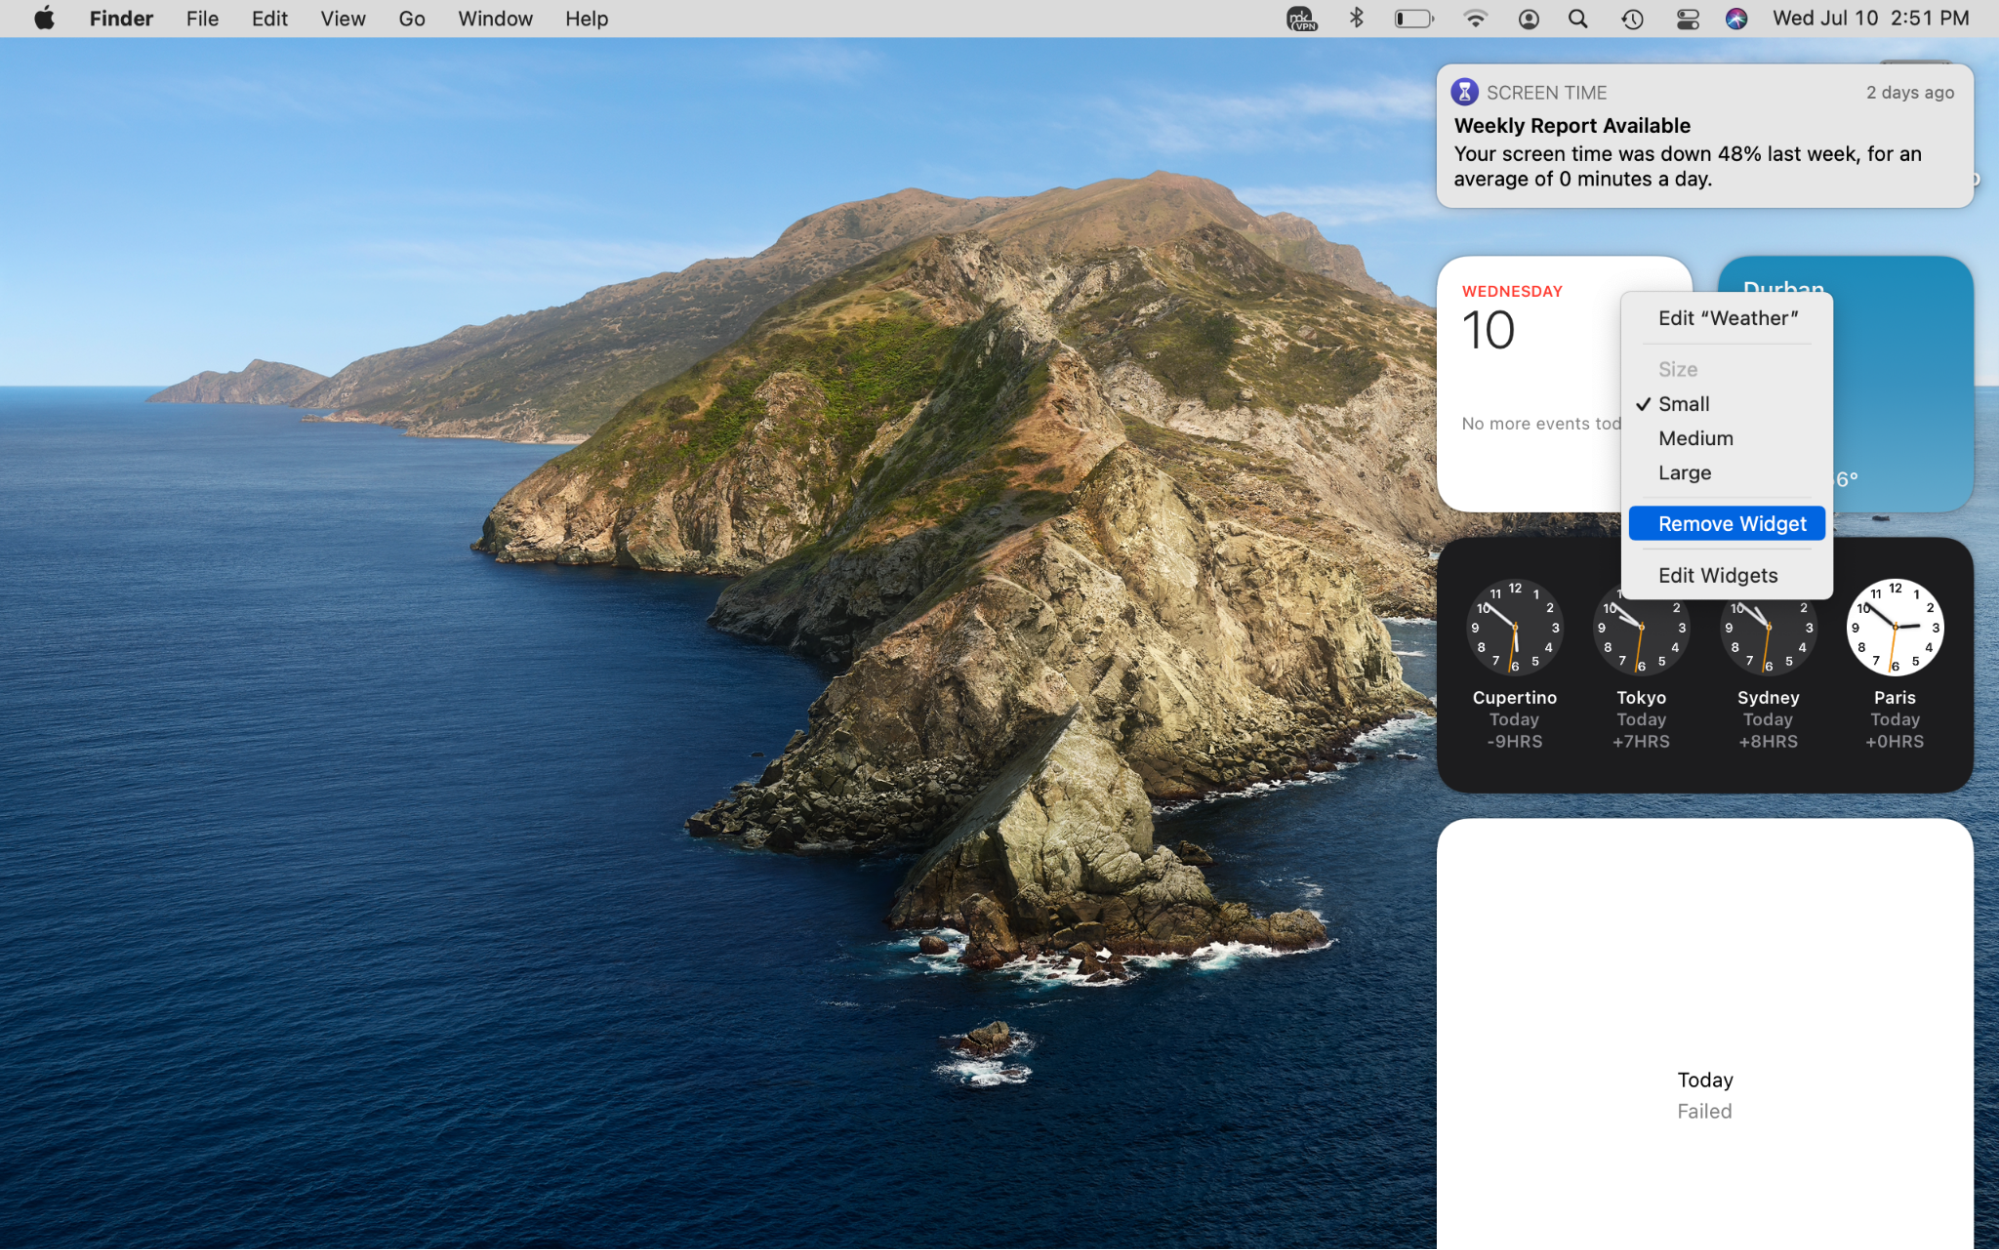
- Click the time in the top-right corner of your Mac’s screen.
- Look for the widget you want to get rid of, control-click on it, and select Remove Widget from the shortcut menu. Alternatively, select Edit Widgets at the bottom of the Notification Center and hit the minus (-) icon in the top-left corner of the widget to remove it.
Customize your desktop or Notification Center with Mac’s widgets
Using MacBook widgets offers a ton of benefits for busy individuals. The benefits include obtaining key information from your favorite apps at a glance, personalizing your Mac desktop, and saving valuable time to stay productive. Additionally, personalizing your Mac to your liking makes it more fun.
However, it can also result in a build-up of junk, ultimately slowing down your Mac if left unattended. Avoid this by maintaining your Mac with MacKeeper’s Safe Cleanup tool. It automates the process of freeing up clutter, speeding up your computer, and optimizing it so you can focus on staying productive.
