Video files take up more space on average than music, photos, documents, and almost any other type of file you might keep on your Mac. In an era of 4K screens and smartphone cameras, these file sizes allow us to enjoy impressive videos, but they also take up a lot of computer storage and can be difficult to share online.
Did you know?
If you’re running out of storage for more video files on your Mac, you can easily create more free space using the Safe Cleanup feature in MacKeeper.
- Open MacKeeper and select Safe Cleanup from the sidebar
- Click Start Scan
- Wait for the scan to complete, then click Clean Junk Files
This deletes unnecessary files on your Mac to create more free storage for large video files. All you need to do is download MacKeeper to try it.
In this article, we’ll show you how to compress video files on your Mac to make them smaller. This is useful if you need to share them over email, upload them to a website, or save space on your computer.
How to compress videos using pre-installed Mac apps
Your Mac comes with a couple of pre-installed apps you can use to compress videos: QuickTime and iMovie. Both of these apps are made by Apple and also offer a range of other features besides compression.
If you don’t have these apps on your Mac already, you can download them for free:
Before you can compress a video using these apps, you may need to export it from the app it is currently saved in, such as Photos. You can usually do this quite easily by dragging and dropping the video onto your Mac’s Desktop.
To demonstrate video compression, we started with a 15-second video clip that was 55MB.
Compressing videos using QuickTime Player
QuickTime is the default video player on your Mac. It’s a great option for quick and easy video compression, letting you choose between the following video resolutions:
- 480p
- 720p
- 1080p
- 4K
The lower video resolution you choose, the more compression is applied, resulting in a smaller video file size. The downside to QuickTime is that it doesn’t offer any other controls over the compression quality.
QuickTime allows you to compress MOV, MP4, and other common video file types. However, any videos you compress will be exported as MOV files.
Follow these steps to compress a video using QuickTime:
- Launch QuickTime Player
- Use the file browser to select the video you want to compress
- If desired, you can take this opportunity to trim the video by going to Edit > Trim
- From the menu bar, go to File > Export As
- Select the video resolution you want to export your file as
- Choose a file name and save location for the compressed video
- Select Greater Compatibility from the dropdown menu, which uses the more common H.264 compression codec
- Click Save and wait for the compression to complete
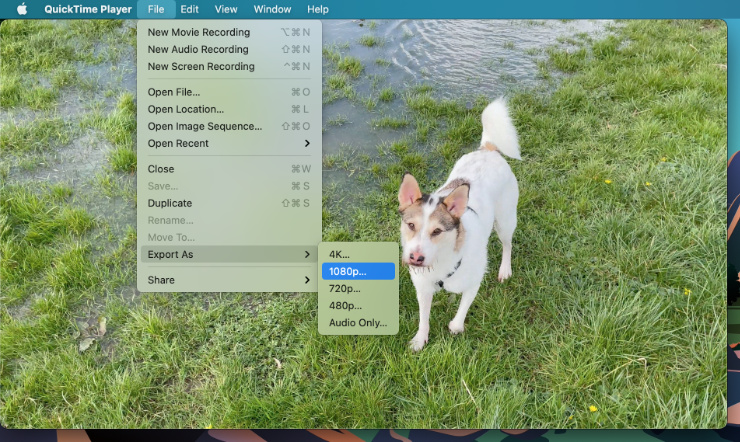
After using QuickTime to compress our test video at 1080p, it shrank from 55MB to 23MB.
Compressing videos using iMovie
If you want more options over the video compression quality than you get with QuickTime, you can use iMovie instead. This app is a brilliantly simple video editor that you can also use to cut together multiple clips, add effects, and apply filters to videos. If you want to use a lot of effects, you might need to make sure you’ve got one of the best Macs for video editing.
The benefit of using iMovie to compress your videos is that it allows you to choose the resolution, compression quality, and compression speed. It also predicts the final size of your compressed video and provides a preview before actually processing it.
Videos you export using iMovie will be in MP4 format.
To compress a video using iMovie:
- Launch iMovie and select the Media tab from the top of the window
- From the menu bar, go to File > Import Media
- Use the file browser to select your video, then click Import Selected
- If desired, you can take this opportunity to trim, crop, or apply effects to your video
- To compress the video, go to File > Share > File
- Use the various dropdown menus to choose your Resolution, Quality, and Compress speed
- Click Next to choose the filename and location of your compressed video
- Click Save to start the compression
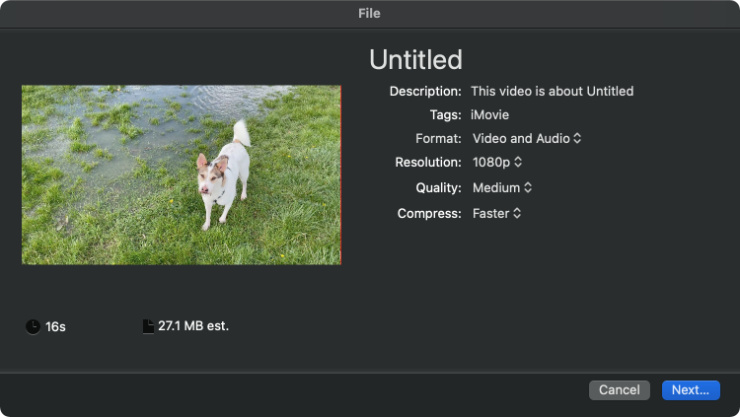
After using iMovie to compress our test video at medium quality and 1080p resolution, it shrank from 55Mb to 27MB. When we selected low quality, it shrank to 14MB.
When to use third-party apps to compress videos on Mac
Although the pre-installed apps on your Mac are pretty good for compressing videos, they don’t offer anywhere near as many options as you’ll get from third-party apps.
In most cases, you won’t need these options. But if you’re trying to compress a video in a very specific way – to make it a certain file size, resolution, format, or frame rate – you’ll probably need to turn to a third-party app.
Luckily there are plenty of third-party video compression apps to choose from. Here are our three favorite options.
HandBrake
HandBrake is one of the most popular open-source video transcoders around. It’s compatible with macOS, Windows, or Linux and will allow you to convert videos to a wide range of different formats.
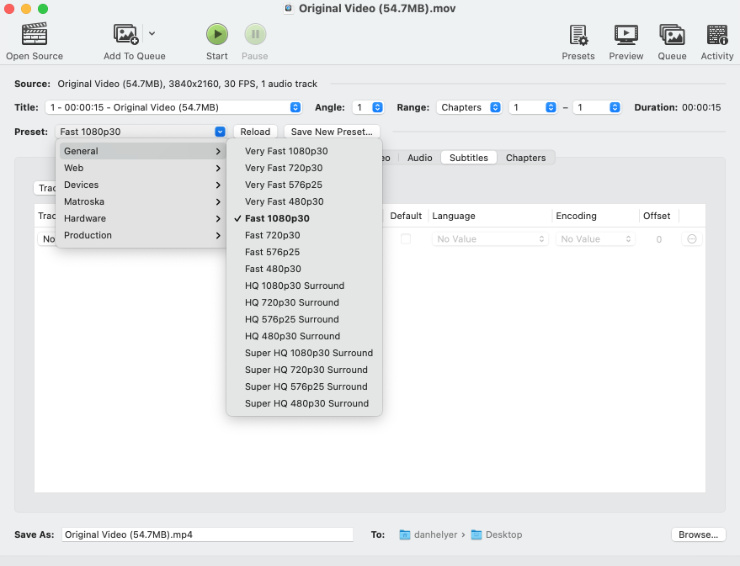
HandBrake offers a selection of video compression presets you can use to choose the best settings for different web videos, devices, productions, and more. You can also customize these settings to your liking by changing these options:
- Dimensions
- Filters
- Encoder
- Frame rate
- Subtitles
- And more
To compress a video with HandBrake, just open your video file and choose your compression preset, then click Start.
VLC
VLC is another hugely popular open-source app. Although VLC is mostly known as a media player capable of playing a wide range of video formats, you can also use it to compress various video files on your Mac.
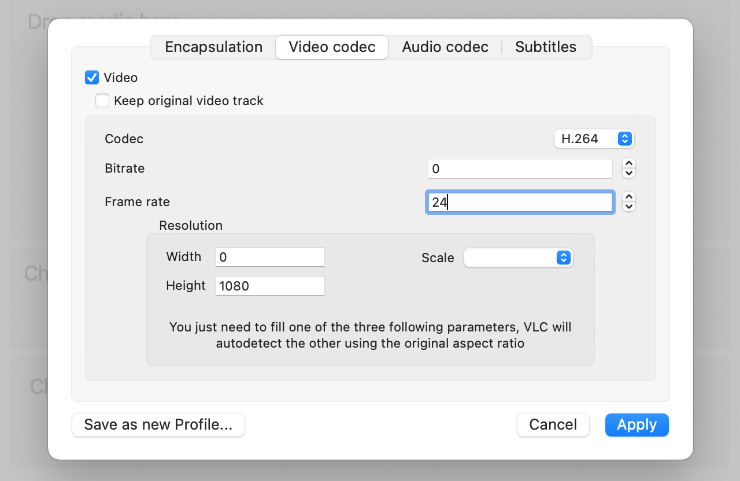
Since VLC is such a popular media player, there’s a chance you’ve already got it downloaded on your Mac, making it a great third-party option for video compression. It also lets you customize more compression settings than Apple’s apps, including the:
- Encoder
- Bitrate
- Frame rate
- Resolution
- Audio codec
- Subtitles
To compress a video, launch VLC and go to File > Convert/Stream from the menu bar. Then just select your video and choose the compression settings you want to apply.
VEED.io
Unlike all the other options we’ve mentioned in this guide, VEED.io is a web app you can use to compress your videos. This saves you the hassle of downloading yet another app on your Mac, then needing to get rid of all the leftover app files when you uninstall it.
To use VEED.io, just visit the website and click Upload Your Video to get started. Once your video is uploaded – which can take a while, depending on your internet speed – click the Export button.
From here, you can choose a Preset option to compress your video, or Switch to Advanced and choose the compression settings yourself. These settings allow you to change the resolution and compression quality to achieve different file sizes.
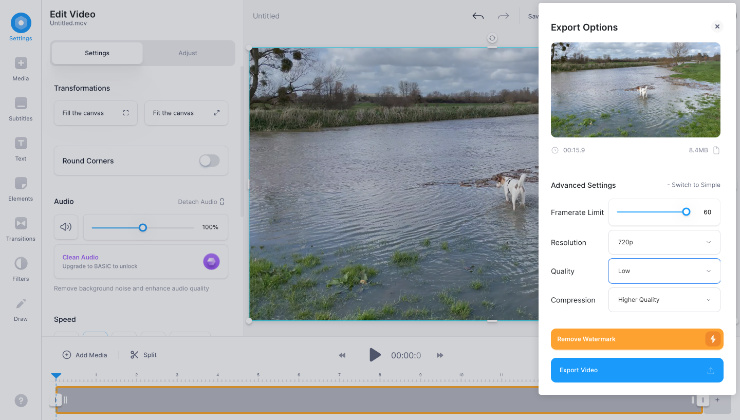
Unfortunately, any videos you compress or edit using VEED.io will have a watermark in the top-left corner. The only way to avoid this is to get a paid subscription to VEED.io.
FAQ
How does video compression work on a Mac?
Think of a video as a collection of still photographs and an accompanying audio file. Your Mac can compress it the same way it would compress each photo or audio file. Usually, this works by lowering the image and audio quality so that they don’t need as much data.
As a result, a compressed video usually looks less crisp than an uncompressed video. You might notice that gradients aren’t as smooth and edges look blurry. The more compression that is applied to a video, the lower the resulting quality will be, but also the smaller the file size will be.
Compressing a video is usually about finding the right balance between file size and video quality based on your particular needs.
How do you compress video files without losing quality?
If you need to compress a video file, but you can’t risk reducing the quality, you can use a form of lossless compression instead.
This typically involves creating a ZIP file to put your video inside of. You can do that by Control-clicking a file and clicking Compress in Finder.
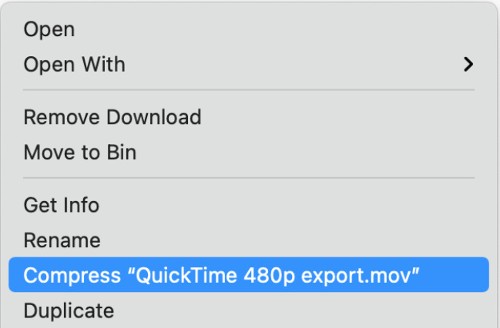
The downside to using lossless compression like this is that it won’t be able to reduce the file size as much as using standard forms of video compression, as we explained how to do above. The upside is that you won’t lost any video quality at all.
Is compression the only way to make a video smaller?
If you still need to make your video file smaller, but you don’t want to compress it any more, there are a few other options you can try instead.
The first is to trim the video down. If there are sections of the video – often at the beginning or the end – that you don’t need, then you can use a video editor to cut them out, reducing the file size.
The second option is to reduce the video size to a smaller format, such as 720p or 480p. This option is often presented when you choose to compress your video. If you don’t plan to play the video on a large screen, choosing a lower resolution is an excellent way to reduce the file size without a noticeable loss in quality.
That said, if you ever need to play the video on a large screen again, it might look much worse than it did before.
Read more:


