Having a MacBook or iMac computer doesn't mean you need to stop using Windows, as you can easily install Windows on your Mac with Boot Camp Assistant. Boot Camp Assistant is a freeware app that you can download onto your laptop to help you launch Windows.
The installation process can be a little overwhelming, especially if you’re a new Mac user and have no experience using the Boot Camp app. That's why this article is aimed to help you correctly dual-boot Windows on your chosen Apple device to ensure the software runs smoothly.
In this article you will find the following:
Before we start:
Making any significant OS changes on your Mac, like installing Windows requires a preparation step—freeing your system of any digital debris. Why? Too much clutter could affect how well a new program runs. You might now be wondering, how to thoroughly declutter your Mac, but not to worry—MacKeeper has the answer. Our Safe Cleanup tool looks deep for digital junk that can be removed to free up more space on your disk drive.
Here’s you to use MacKeepers Safe Cleanup tool to remove any unnecessary files:
- Download MacKeeper.
- Open the app, and click on the Safe Cleanup tool.
- Press Start Scan.
- Once the scan of your Mac is complete, you’ll be able to select the logs, cache and digital trash you want to permanently remove.
- All that’s left is to click the Clean Junk Files button to confirm the cleanup.
Can you run Windows on a Mac
Wondering if you can run Windows on a Mac? The answer is yes, and you can install Windows onto your Mac with Boot Camp Assistant. With the Boot Camp freeware, you can easily install the program onto any suitable Macintosh laptop or iMac computer.
That way, you, as a Mac user, can enjoy flexibility in their operating system. Having the option to use Windows also allows you to fully take advantage of its exclusive software features while still retaining the core functionalities of your MacBook.
Dual boot vs. virtualization
Dual Boot
When deciding how to install Windows on your Mac with Boot Camp Assistant, you might consider dual booting over virtualization. Dual boot splits your Mac into two, allowing you to install one operating system in each partition. However, you can still experience smooth performance with both your macOS and the Windows alternative.
However, to be able to use both systems, you’ll need to restart your Mac manually and choose between launching macOS or Windows each time on startup.
Virtualization
Virtualization, on the other hand, runs one OS within another, like an app. This allows you to use both simultaneously. This method will demand more of your laptop’s resources, including power and can potentially lead to reduced performance for both operating systems.
Important:
If you’re not sure which system to stick with between macOS vs Windows, we suggest checking out our relevant blog article. We compiled a full comparison of features, compatibility, and more to help you decide which system will better suit your needs and ensure you get the most out of your Mac.
What you need to install Windows on a Mac
To install Windows on a Mac, you'll need to ensure your Macintosh device is ready for the long and resource-demanding process.
Here are the preparation steps we'll cover in detail:
- Check for updates to macOS
- Confirm your macOS version and processor
- Disable FileVault
- Check for free space on the Windows partition
- Make sure that you have a free USB drive
1. Check for updates to macOS
Before installing Windows on your Mac, check for updates to macOS. Updating your device ensures your operating system is compatible with the latest hardware and software configurations required by Boot Camp Assistant. This preparation step will also stop you from running into any unexpected issues and give a smoother installation process.
Advice from our team: Not sure how to update macOS? Our supporting article has all the necessary steps to guide you. That way, you’ll be back to downloading Windows with fewer interruptions.
2. Confirm your macOS version and processor
Confirming your macOS version and processor is another crucial step to determine the compatibility of the Boot Camp app with your Mac. Different versions of macOS and processor types may have specific requirements as well as limitations when running Windows. That’s why we advise checking if your Mac meets the necessary specifications for a successful Windows installation. This will help you avoid any unsupported configurations that could affect Windows performance.
3. Disable FileVault
FileVault encrypts your macOS disk, which can also interfere when you’re trying to install Windows on your Mac with Boot Camp Assistant, as it stops Boot Camp from splitting your drive. Temporarily disabling FileVault can ensure that Boot Camp can modify the disk partitions, without any encryption barriers. However, it’s important to re-enable FileVault after the Windows installation to not put your device at risk.
4. Check for free space on the Windows partition
Checking for free space on the Windows partition ensures that there’s sufficient room for the operating system as well as any additional software you plan to install. Adequate space can prevent performance issues and allows Windows to function optimally on your Mac without storage limitations getting in the way.
5. Make sure that you have a free USB drive
A free USB drive is also necessary to create a bootable installation drive for Windows using Boot Camp freeware. This drive can be used to store the Windows installation files, facilitate the installation process, and save space on your SSD. Check the USB drive has at least 16GB of space and is formatted correctly before proceeding with the Windows installation.
How to install Windows on Mac via Boot Camp Assistant
Installing Windows on your Mac using Boot Camp Assistant involves several key steps to ensure a smooth setup. Here's an overview of what we'll cover in detail:
- Download the Windows 10 ISO File
- Start the Boot Camp Assistant
- Install Windows on your Mac
- Set up Windows on your Mac
- Create a Windows administrator account
- Set the default boot operating system
1. Download the Windows 10 ISO File
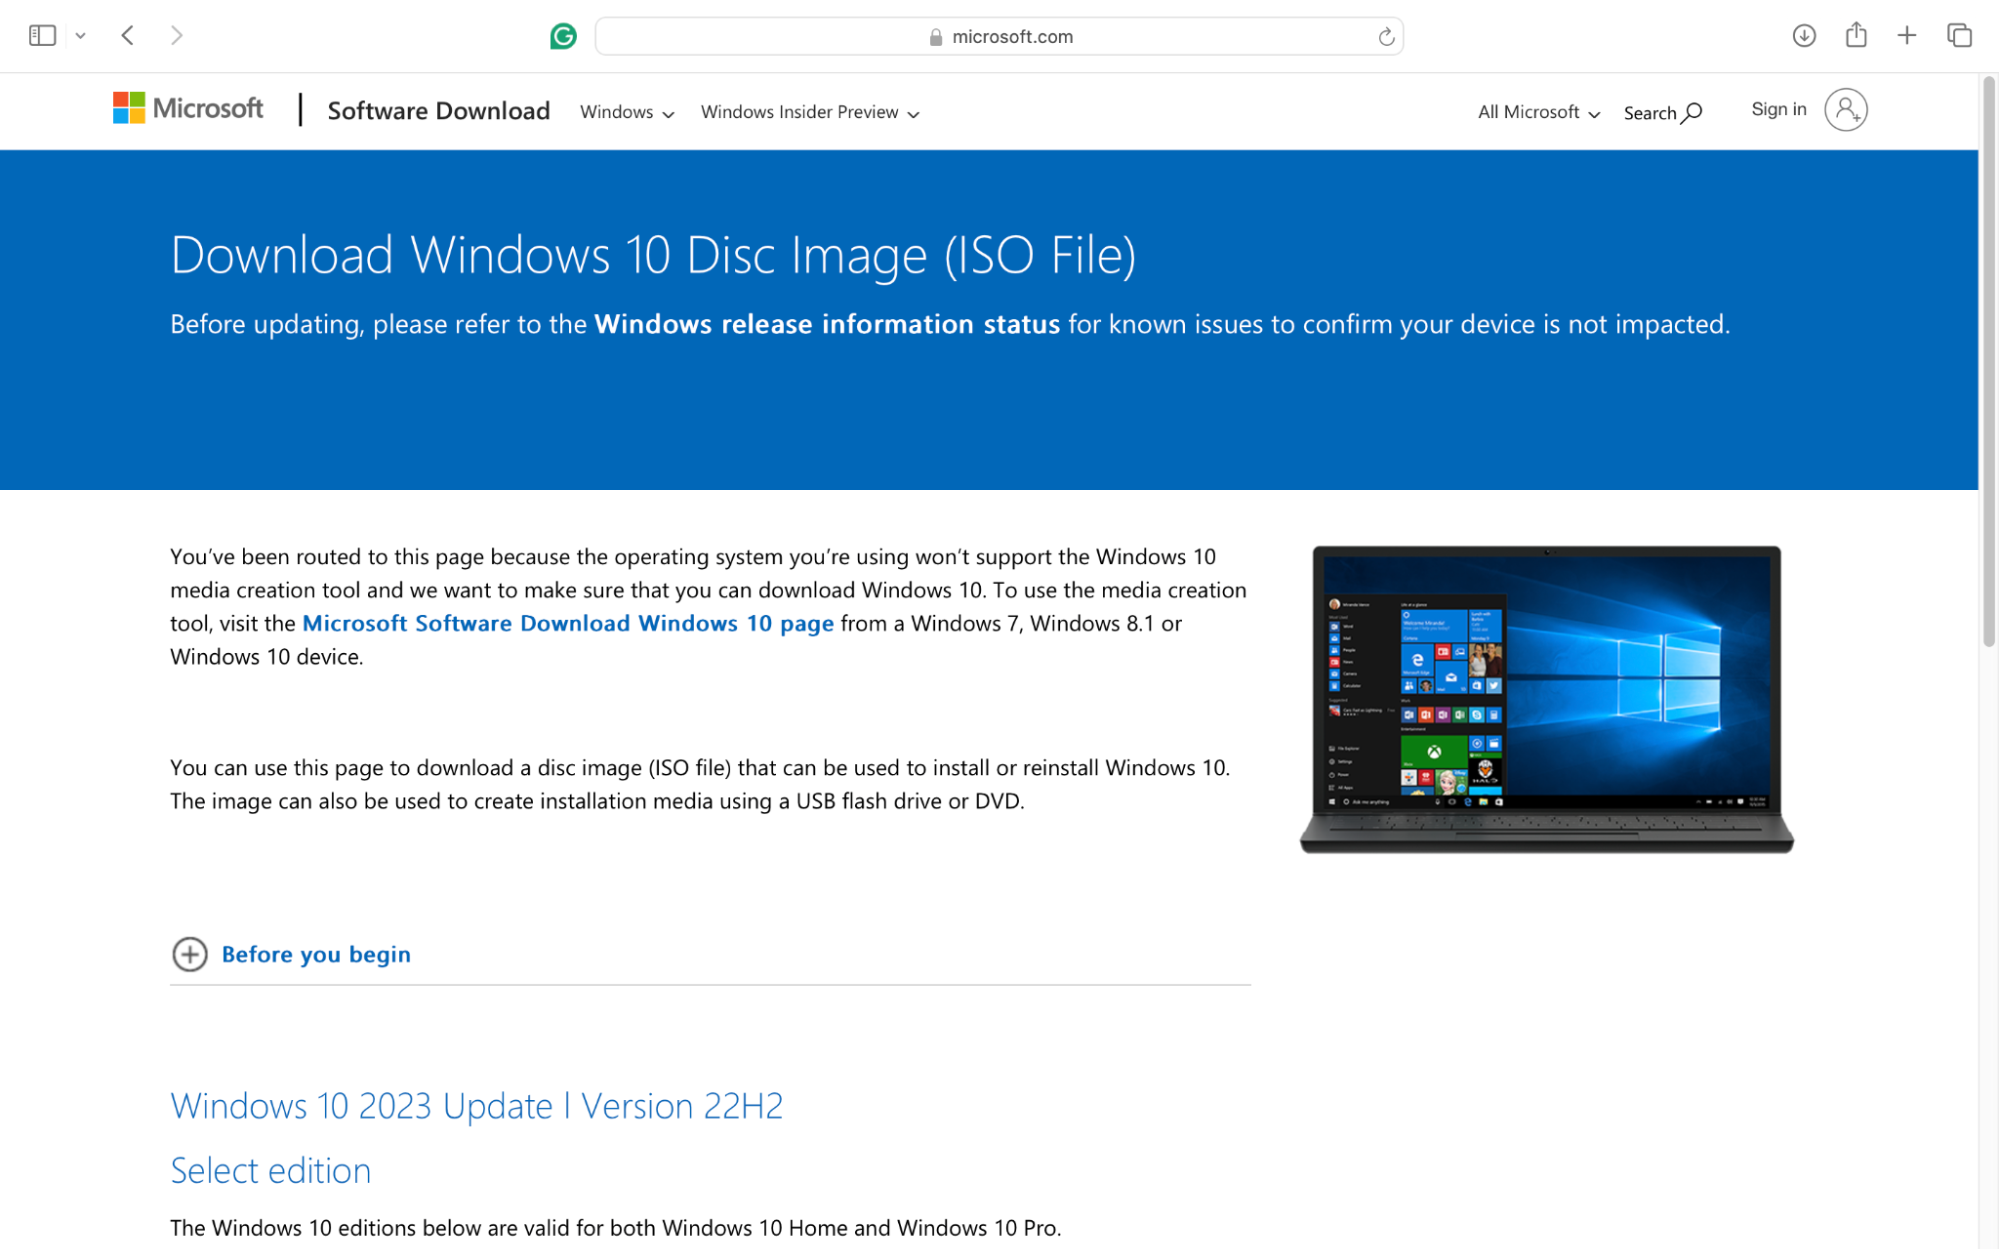
Before you begin installing Windows on your Mac, download the Windows 10 ISO disk image file. This file contains the necessary installation files for setting up Windows alongside macOS.
Here’s how to download the necessary Windows 10 ISO File on Mac:
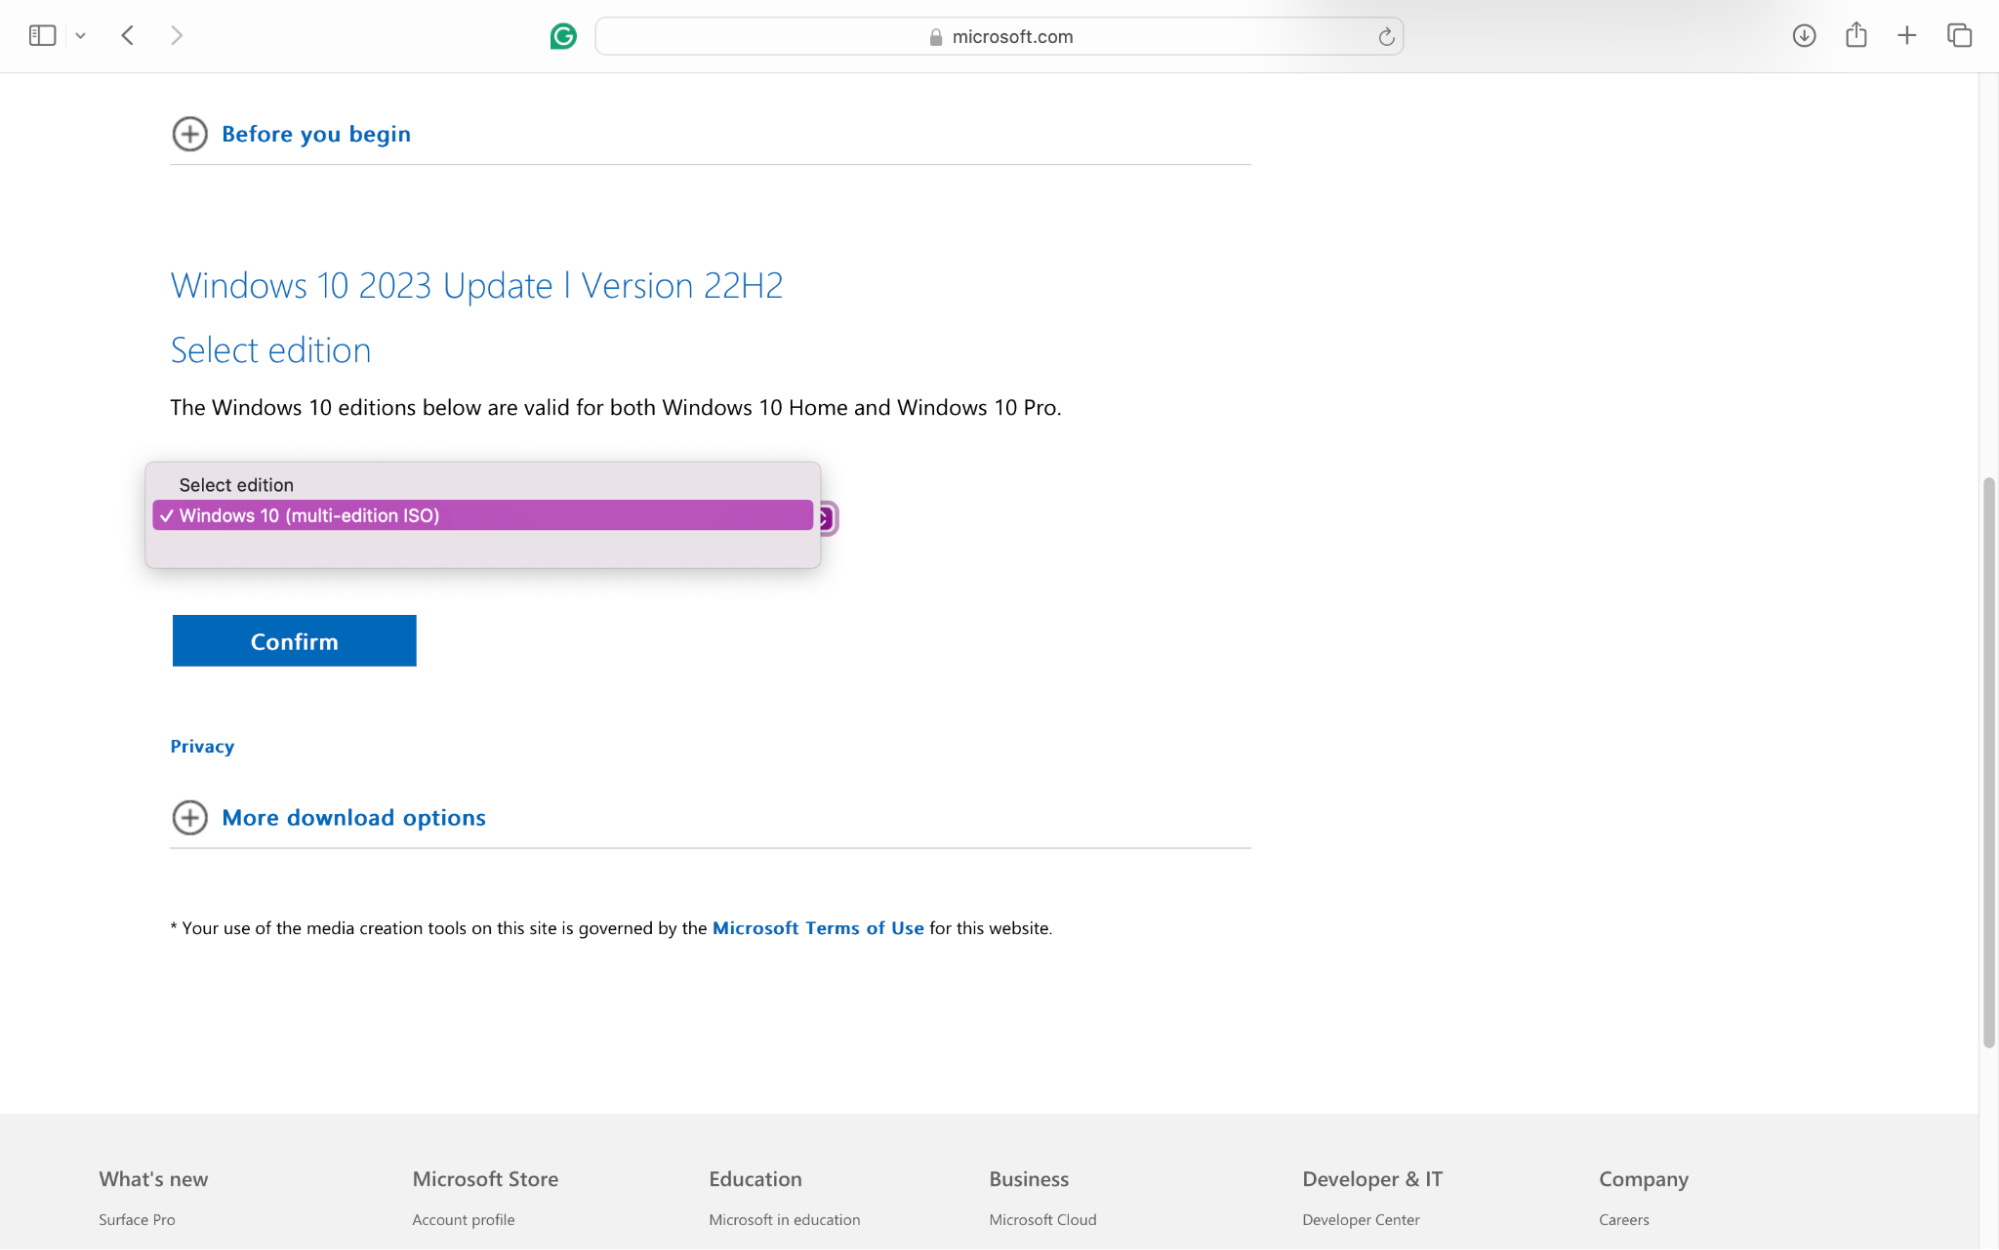
- Visit the official Microsoft website to find the download for Windows 10 ISO file.
- Select the edition and language you want to use. Make sure to choose the most recent Windows 10 (multi-edition) version for compatibility with Boot Camp.
- Download and save the file on your Mac where you can easily access it.
Note from our team:
If you already have Windows on an installation disc, follow this guide on Apple's website to create an ISO image from a Windows disc.
2. Start the Boot Camp Assistant
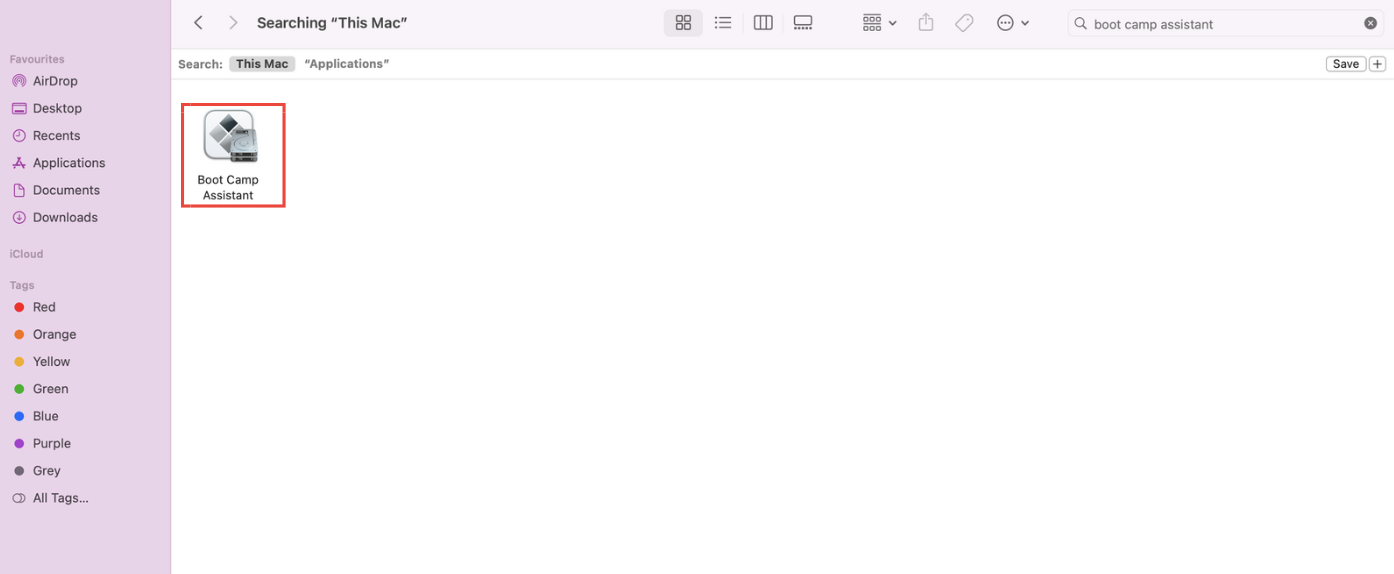
To install Windows 10 on your Mac, launch Boot Camp Assistant. This app will be pre-installed on your Mac, and it’s specifically designed to guide you through the process of installing Windows alongside macOS. However, you may first need to change your Mac's Secure Boot setting to Full Security if it's not already the default setting.
Once Full Security is allowed, follow the steps below to start Boot Camp Assistant:
- Open Finder, click on Boot Camp Assistant and press Continue.
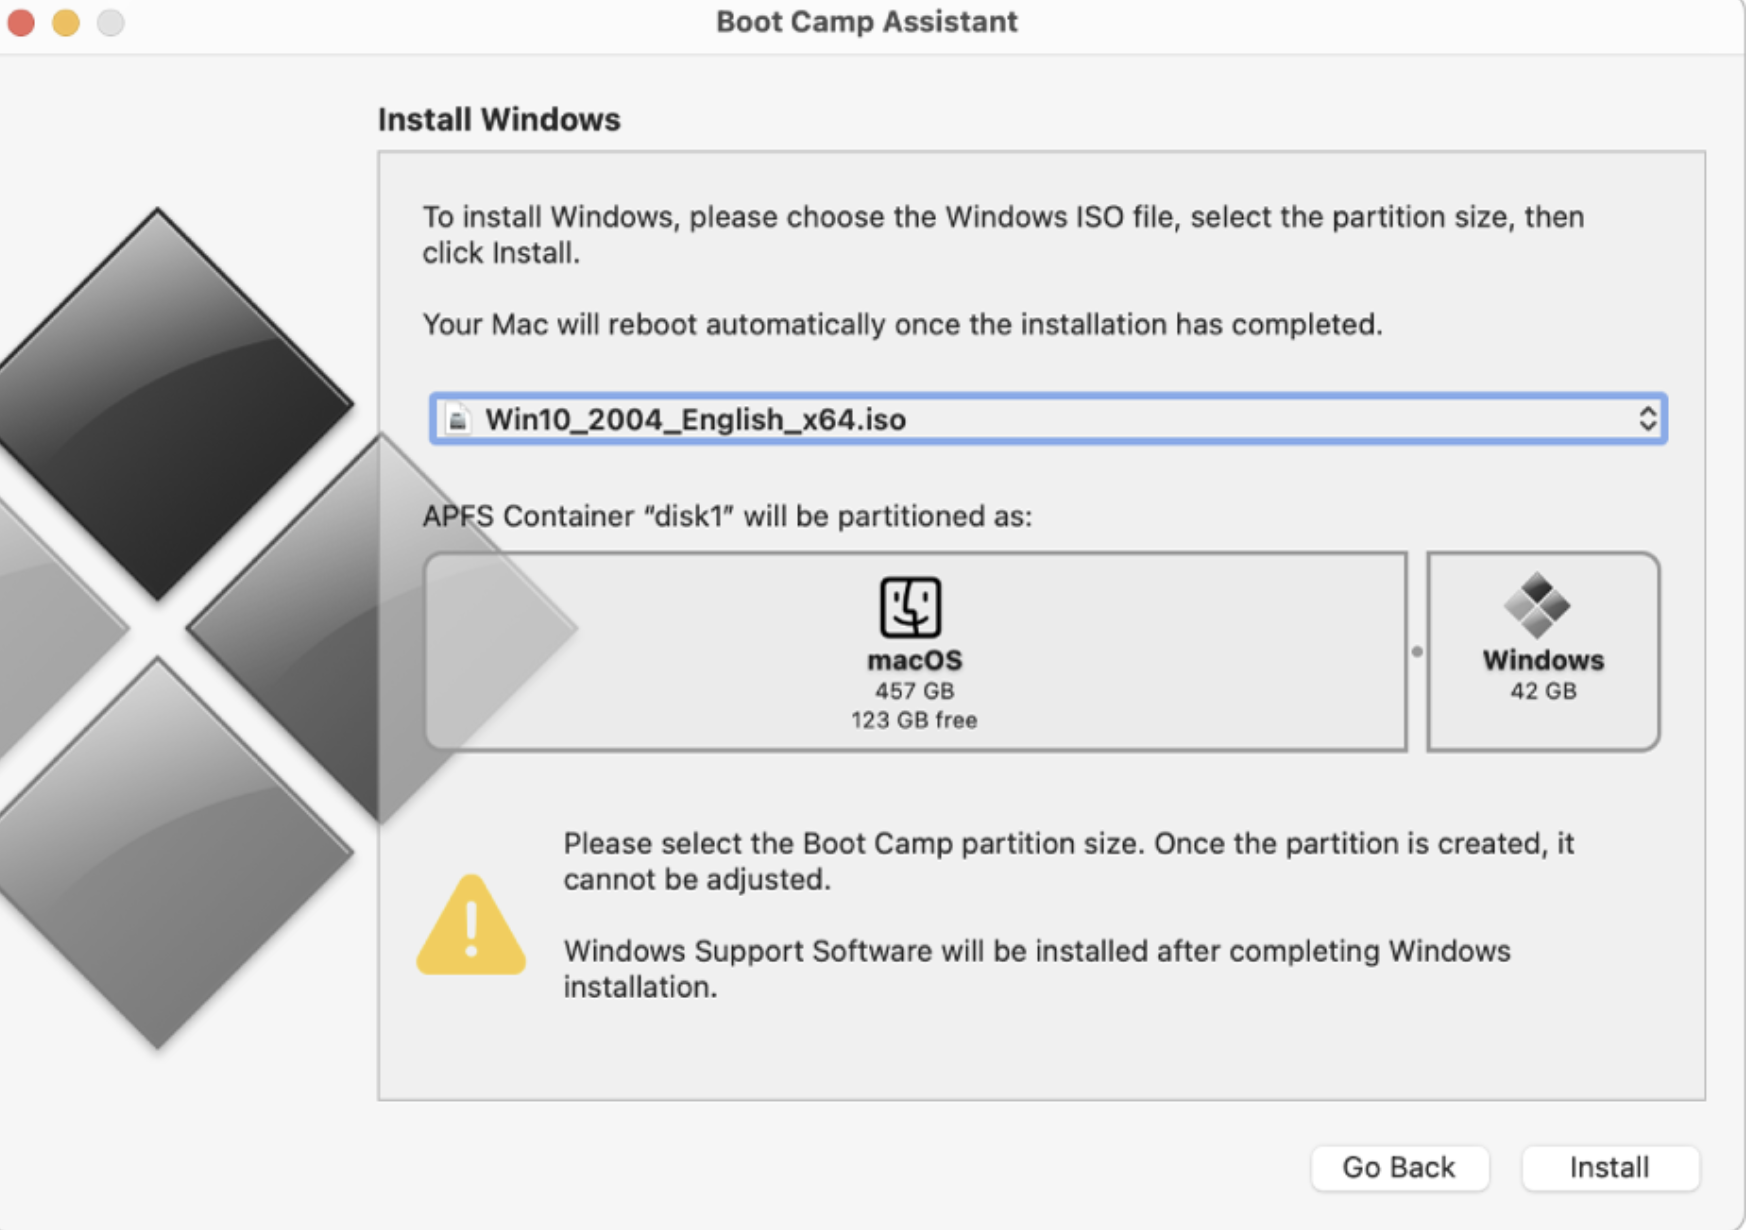
- Select Choose a Windows 10 ISO file, and upload the Windows 10 ISO file you downloaded. You’ll also need to choose the preferred size for your partition disk (the minimum size is 42GB).
- Then press the Install button. You’ll need to wait a few minutes for Boot Camp Assist to create the partition needed for splitting Windows from macOS.
- When the partition is finished, your Mac will need to Restart.
3. Install Windows on your Mac
Once you’ve installed Boot Camp onto your MacBook or iMac, your computer will need to reboot itself. When it does, you’ll notice the startup menu is different. This means the partition was successfully installed with Windows software, as you’ll see the blue Windows Logo.
Continue to install Windows on Mac with Bootcamp by following these steps:
- Follow the on-screen instructions to complete the Windows setup. You’ll be asked to select your language and local time region.
- If you have a product key for Windows, enter it when asked and click Next. If you don’t have one, you can continue the installation. This is where Windows will copy files, install features, and apply updates.
- Give the installation time to complete, and once it’s done, your Mac will restart.
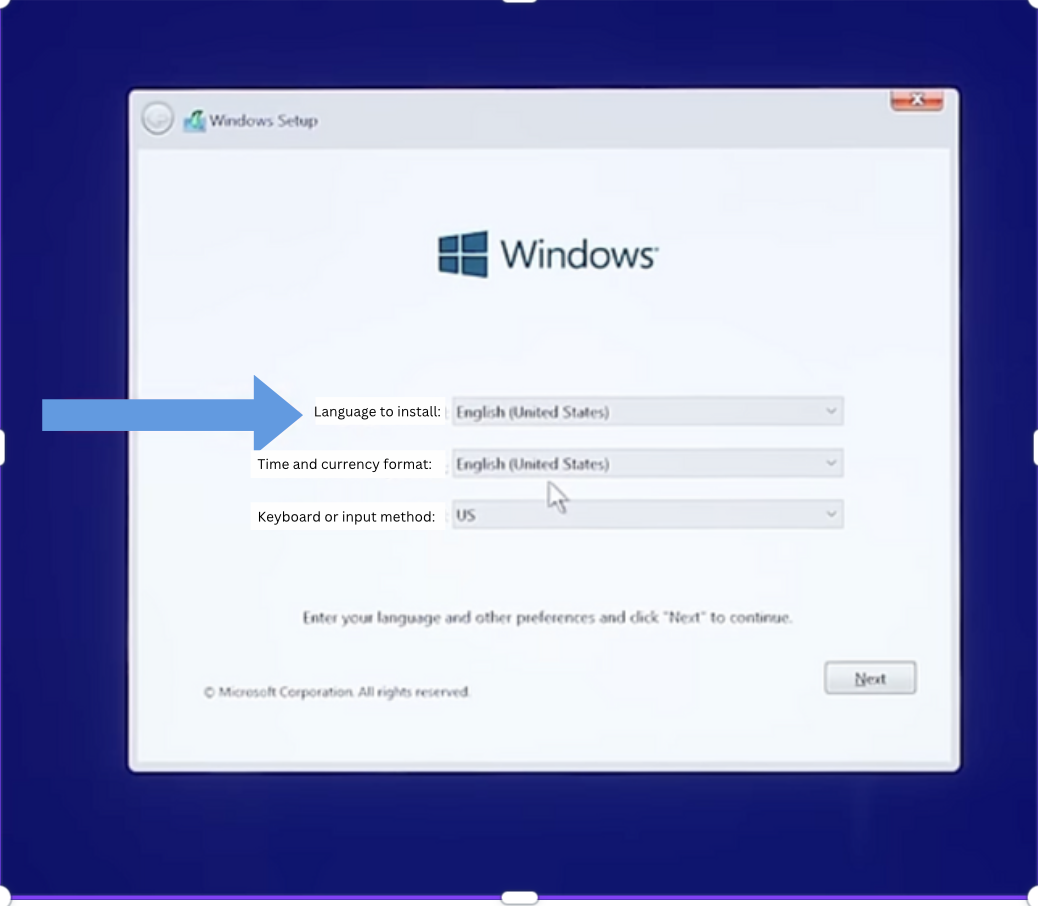
4. Set up Windows on your Mac
After your Mac has automatically restarted, upon startup, you’ll now be asked to finalize the setup of Windows. Here are the steps to help you with the final setup of Windows on Mac:
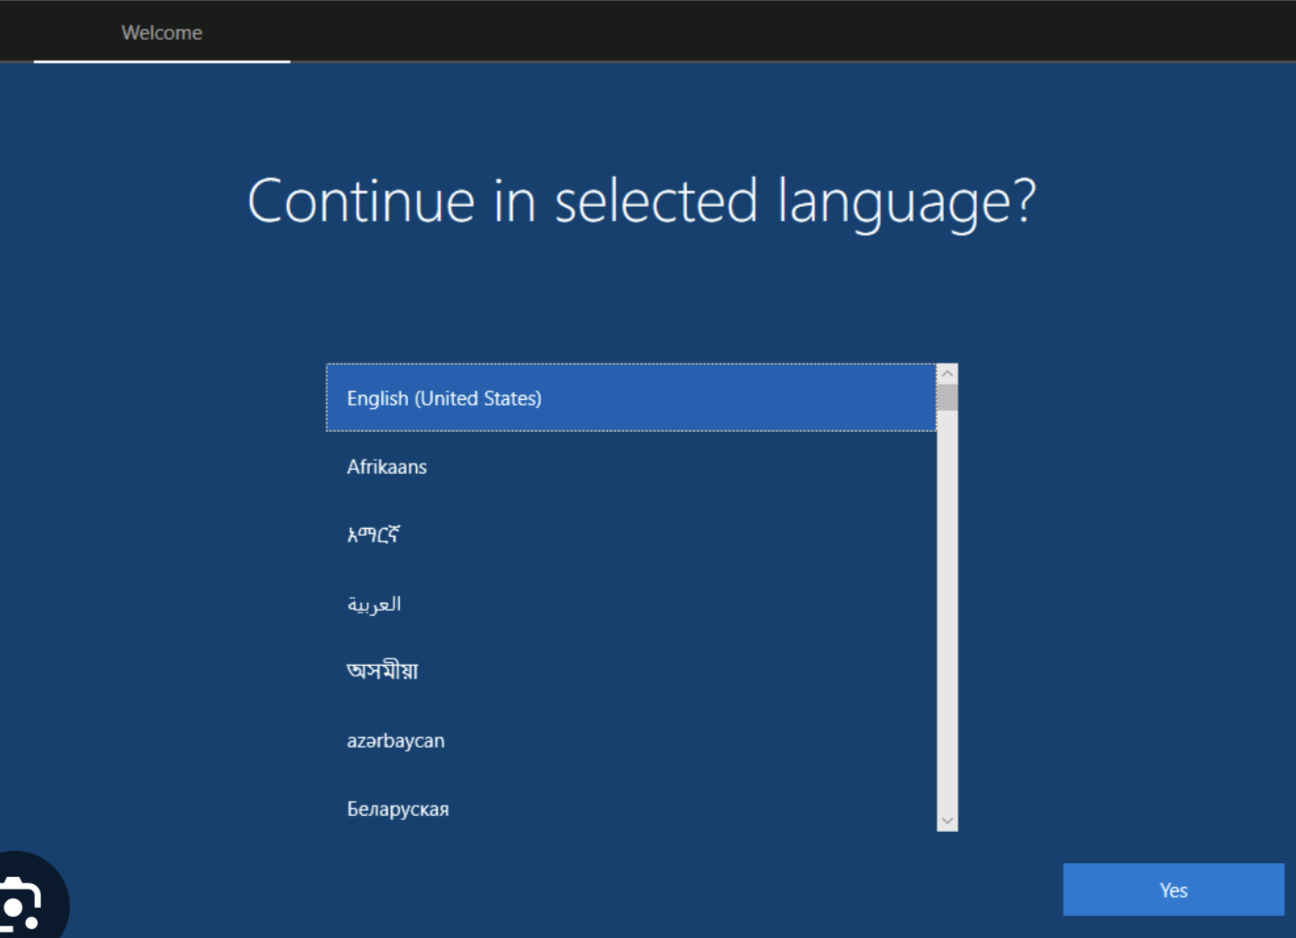
- After you select Windows at startup, you’ll be asked to choose your language, region, keyboard layout, and Wi-Fi to begin.
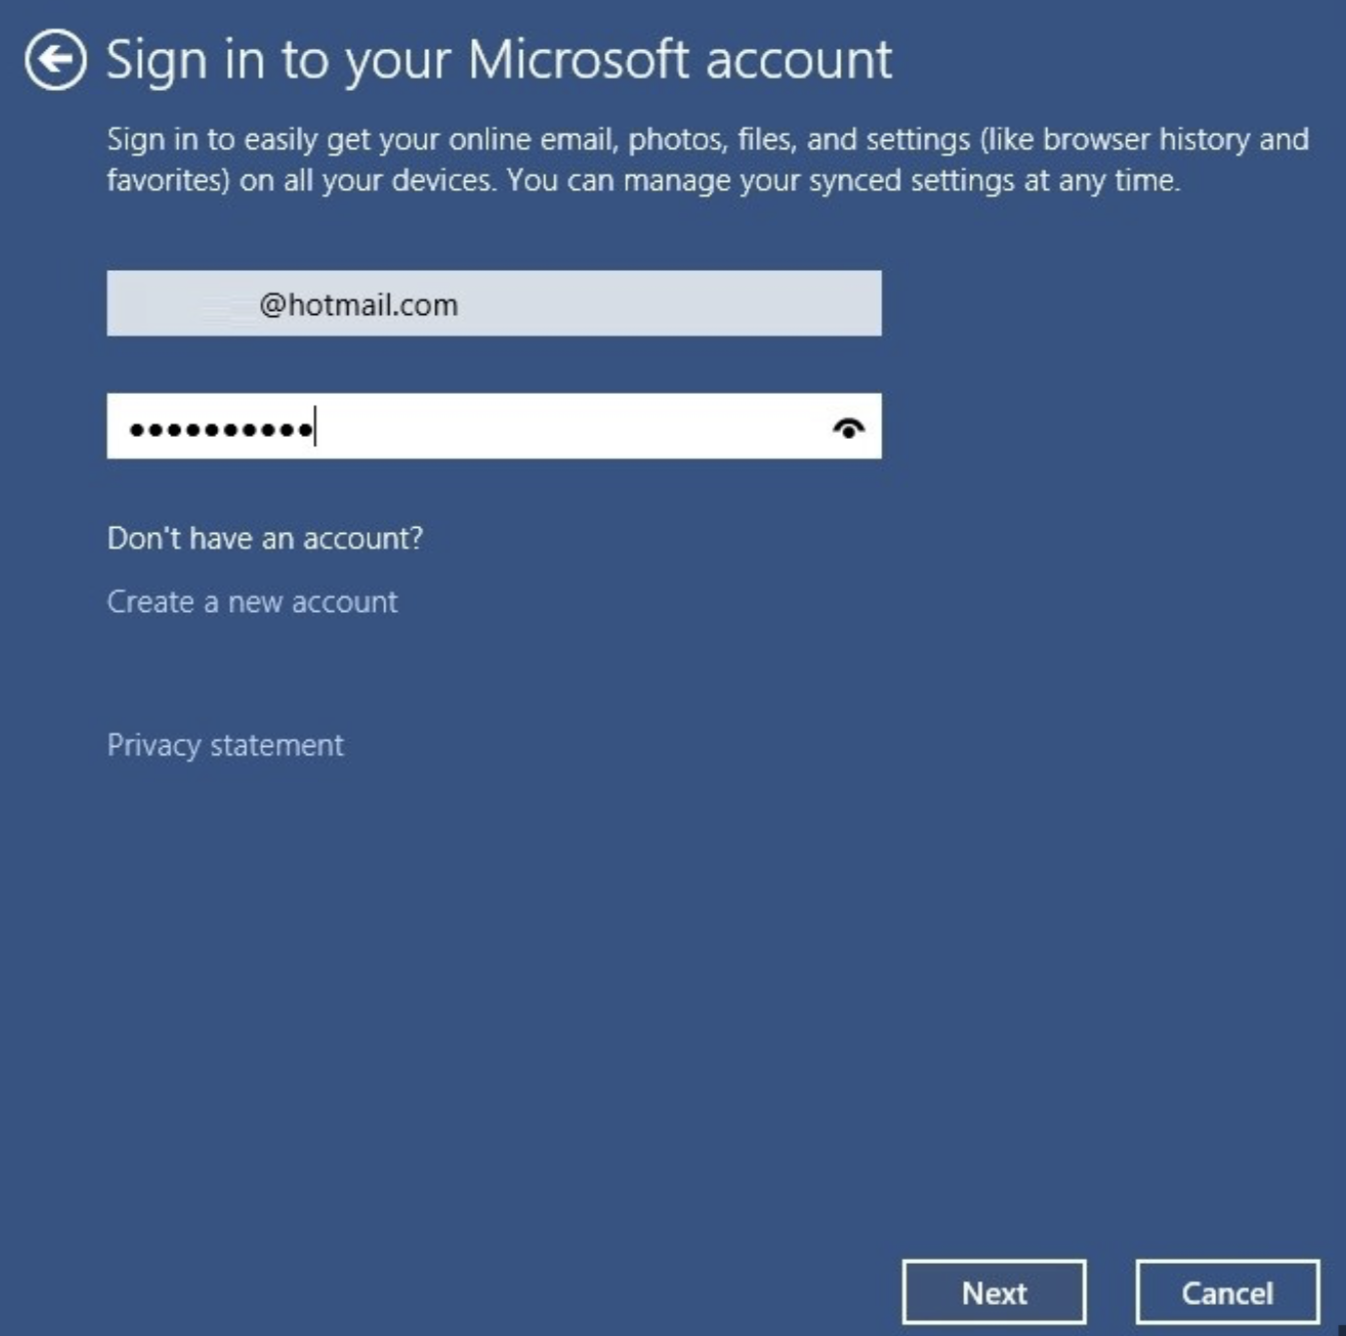
- Use your Microsoft account to log in or create one.
- Windows will then boot up on your Mac. You'll then be asked to set up a Password or PIN that you’ll need to enter each time you launch your Mac on Windows.
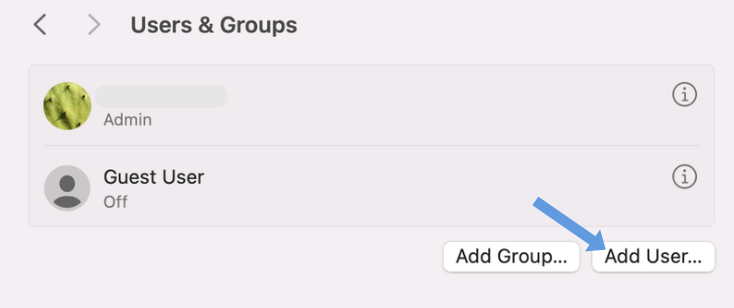
5. Create a Windows administrator account
Now that Windows has been successfully set up on your chosen MacBook or iMac computer, you can now create a Windows administrator account on your device. It’s better to manage the OS if your device is shared. Creating a Windows admin account can also allow you to have control over the device settings and the partition software.
Here’s how to create a Windows administrator account on your Mac:
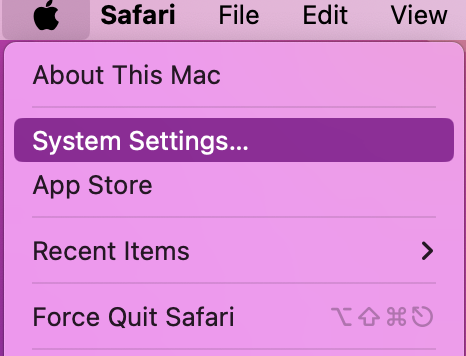
- Open System Settings.
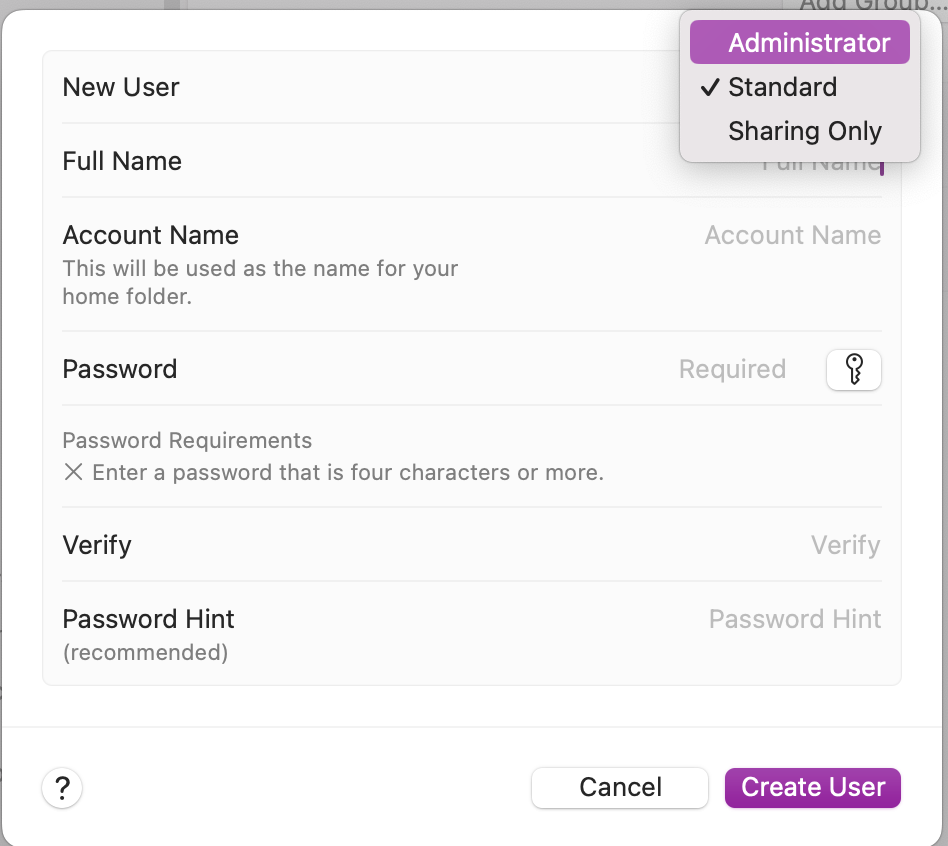
- Click on Users & Groups and the Add User button.
- Follow the prompts to create the account, make sure it’s an Administrator and press Create User.
6. Set the default boot operating system
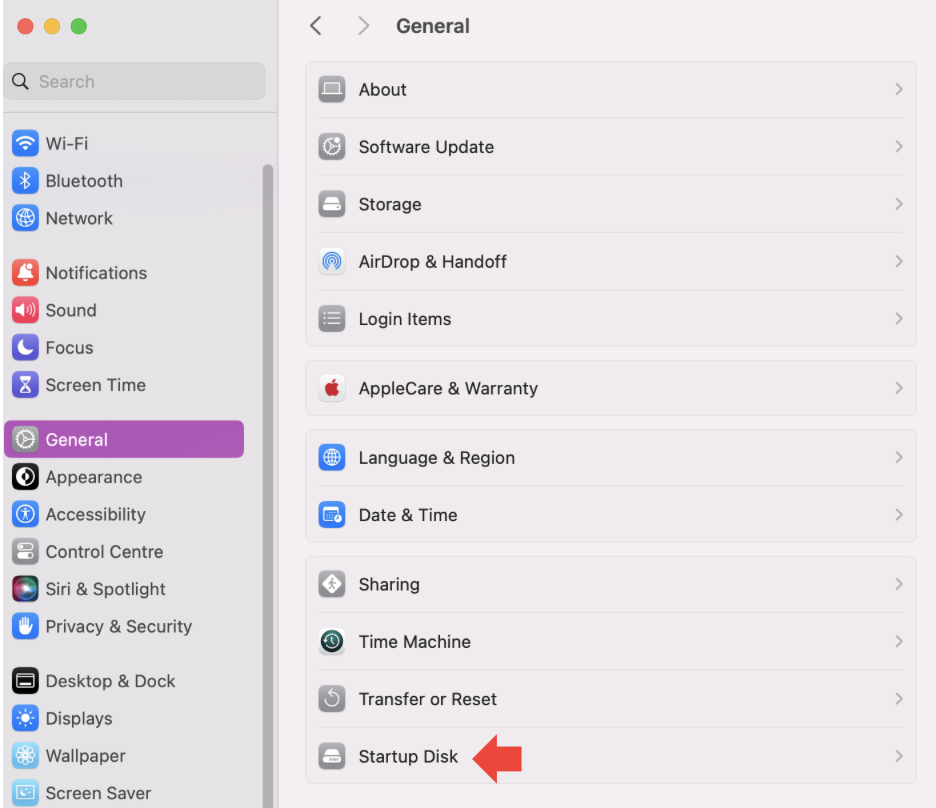
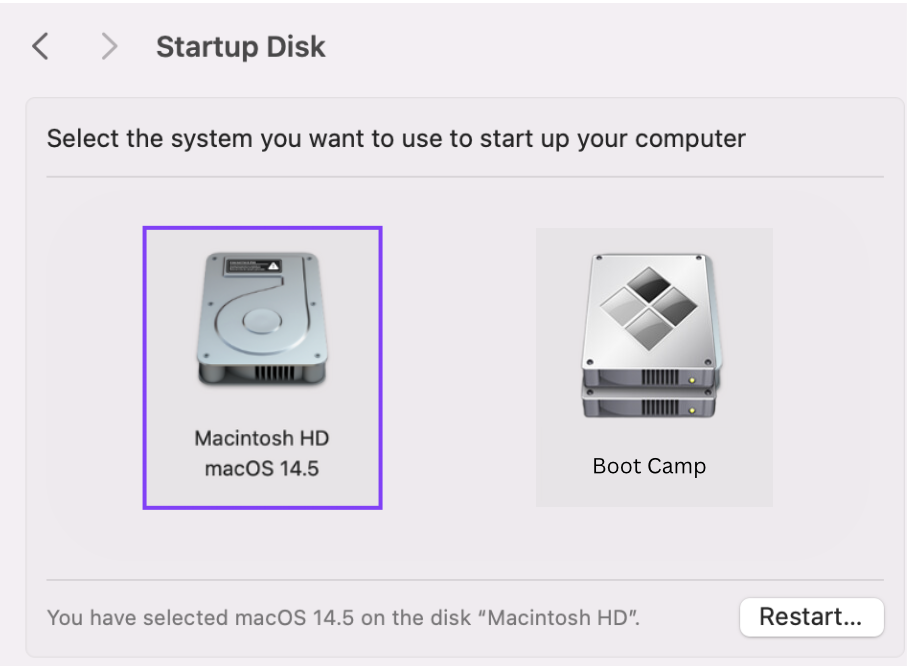
For the last part of this guide, we’ll show you how to set the default boot operating system when you power up your Mac. To set your preferred default boot operating system on Mac:
- Open System Settings, and click on General > Startup Disk.
- Select the disk with the Windows partition, then click Restart.
How to use Windows on a Mac
After using Bootcamp Assist to install Windows on Mac, your device will reboot and launch Windows when you turn it on. To ensure smooth performance, check that when you run a Windows program on your Mac, it functions just as it would on a Windows PC. Simply install your Windows-only programs or play video games on your Mac to get started.
How to switch from Windows to macOS
If you want to switch back to the default macOS version, all you need to do is restart your MacBook and hold the Option or Alt key while your Mac reboots. You should see a black screen that lets you choose to boot into Windows or macOS. Use the arrow keys and hit Return to choose the one you want. Restart your Mac like this every time you want to switch between macOS and Windows.
How to run Windows using a virtual machine on a Mac
Running Windows on a Mac using a virtual machine provides flexibility and convenience, as it means both operating systems can be used at the same time. Virtualization software like Parallels Desktop or a freeware option like VirtualBox creates a virtual environment where Windows can operate within macOS.
This method is perfect for users needing seamless integration without regularly rebooting their iMac or MacBook. By this, you can enjoy the features of both systems, saving you time and boosting productivity.
If you’ve installed a virtual machine but decided you want to go back to the default macOS, our blog article on how to remove Parallels Toolbox from Mac can help you.
Important:
If you’re looking for the best virtual machine for Mac, our piece has a detailed comparison of the most popular options to help you decide.
Maximize your Mac's potential with Windows
Putting Windows on Mac with Boot Camp is a relatively straightforward way of running Windows software on your MacBook or Apple computer. It allows you to enjoy a wider range of applications as well as games that might only run on Windows software. Furthermore, setting up a dual boot system allows you to choose to launch either macOS or Windows for optimal performance whilst still maintaining the core functions of your Mac.
Before installing any new operating system onto your Macintosh, prepare your device first. Checking for macOS updates and confirming you have enough space are essential steps before downloading a new operating system like Windows. To help ensure your MacBook is prepared, our MacKeeper’s Safe Cleanup tool can optimize your device by freeing up valuable SSD space. Save yourself from unexpected performance issues affecting your overall productivity.
FAQ
What is the best way to run Windows on a Mac?
The best way to run Windows on Mac is through dual boot systems or virtualization. Both methods enable smooth Windows operation on a Macintosh device, but each has its pros and cons. We recommend using Boot Camp Assistant to install Windows on your Mac, as it allows you to set up a dual boot system for free. This way, you can choose between running Windows or macOS at startup, optimizing your experience based on your needs.
Does Boot Camp make your Mac slower?
The Boot Camp app uses a dual boot system, meaning your Mac can run either Windows or macOS at one time. As a result, the app shouldn’t slow down your MacBook. However, if your Mac’s storage is almost full, it could impact performance. A great way to free up space would be to use a digital decluttering app like MacKeeper. The Safe Cleanup tool, in particular, can help you clean up digital junk on your SSD, therefore limiting the chances of any lagging when using Windows on your laptop.
Can I install Windows on a Mac without Boot Camp?
Yes, there are alternative ways for you to install Windows by using other software options. While Boot Camp is free and built into macOS, it only supports dual boot setups. If you prefer to run Windows and macOS simultaneously, you can use virtualization software like Parallels Desktop, but there’s a cost included to launch this software.


