In this article you will find the following:
Secure Empty Trash on macOS Ventura
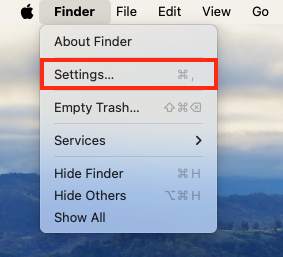
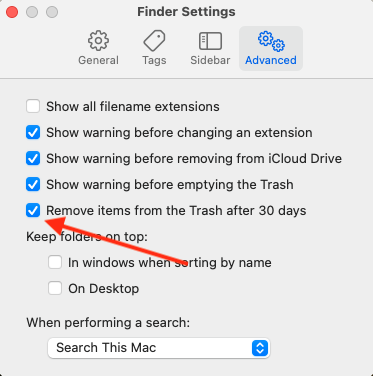
To automatically delete your Mac’s trash every 30 days, do this:
- Click Finder in the menu bar.
- Click Settings, then Advanced.
- Enable Remove items from the Trash after 30 days.
Worried that files deleted from your Mac could be recovered? You can secure empty trash in Mac Ventura to prevent data from being restored with special tools. Even though Apple has removed the Secure Empty Trash feature, there are other tricks and third-party solutions you can use instead. Read on to get to know them.
Before we begin
To secure empty trash in Ventura and remove other unwanted junk from your Mac, use MacKeeper's Safe Cleanup. It clears your trash contents, temporary files, and other redundant junk to quickly free up storage space.
Here’s how to get started:
- Download MacKeeper and install the app.
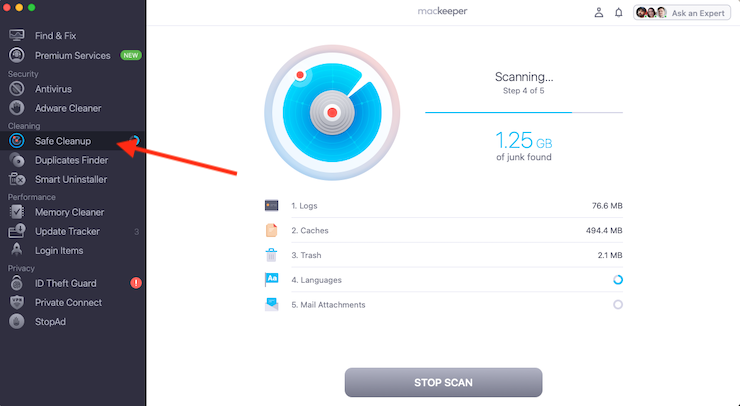
- When it opens, choose Safe Cleanup.
- Click the Start Scan button to find all unnecessary files.
- Ensure Trash is selected, then click Clean Junk Files.
What is Secure Empty Trash on Mac?
Secure Empty Trash is a feature built into macOS that completely removes unwanted data from your system, preventing it from being recovered with special tools. It’s particularly useful when you want to clear sensitive files and documents—usually before selling the computer.
However, Secure Empty Trash isn’t available in macOS Ventura because Apple removed it from all macOS versions starting with El Capitan. You can still delete trash in the normal way, but for more secure deletion, you’ll need another solution, such as MacKeeper’s Safe Cleanup.
Reasons to use Secure Empty Trash on macOS Ventura
There are many advantages to using Secure Empty Trash versus the usual method of removing unwanted data from Mac, including:
- The usual method doesn’t wipe data from your drive—it only removes index entries.
- Professional recovery tools can restore data that isn’t wiped securely.
- Secure Empty Trash doesn’t allow sensitive files and documents to be found.
How to Secure Empty Trash on macOS Ventura
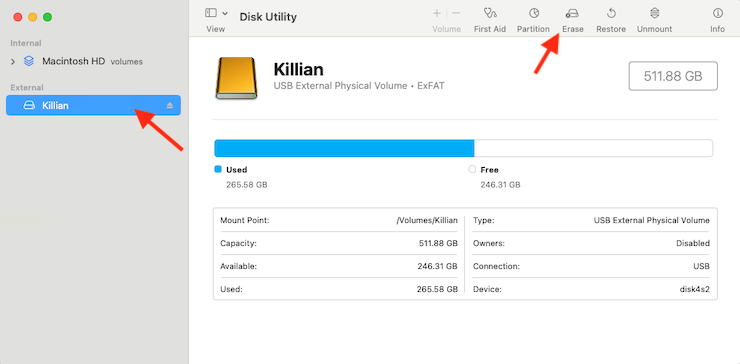
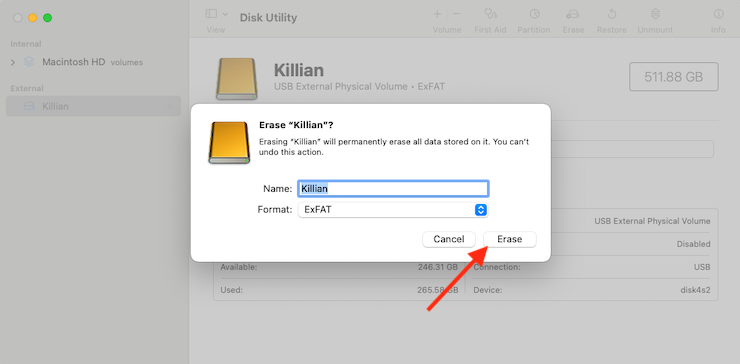
To erase an entire drive or disk partition on Mac, use Disk Utility:
- Open Disk Utility.
- Select the drive to erase.
- Click Erase, then select a format for the drive.
- If available, click Security Options.
- Use the slider to specify how many times the drive should be overwritten, then click OK.
- Click Erase.
There are a number of other ways to remove unwanted files from your Mac without erasing the entire drive—some of which are more secure than others. These include:
- Delete files from trash
- Empty trash can automatically
- Delete the trash via Terminal
- Secure empty trash in safe mode
- Securely erase free space
- Safe removal with Disk Utility
1. Delete files from trash
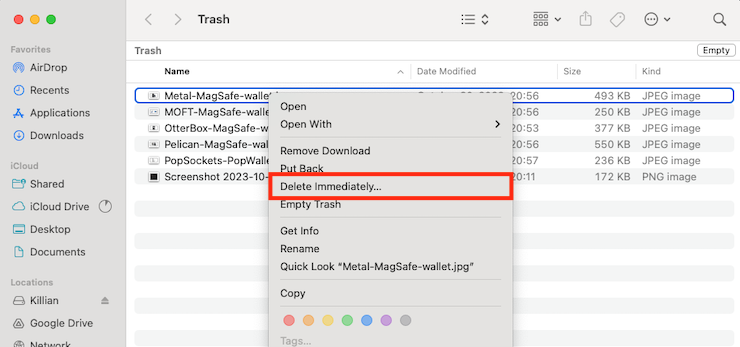
The simplest way to delete the trash on your Mac is to click the Empty button inside the trash folder, or you can delete individual files like so:
- Click the Trash icon in your Mac’s dock.
- Right-click the file you want to delete right away.
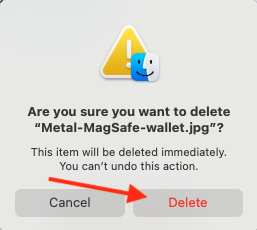
- Select Delete immediately.
- Click Delete in the popup window to confirm.
2. Empty trash automatically
If you don’t want to keep emptying your Mac’s trash can manually, you can set macOS to delete its contents automatically every 30 days. Here’s how:
- From your Mac’s desktop, click Finder in the menu bar.
- Click Settings, then click the Advanced tab.
- Enable Remove items from the Trash after 30 days.
You can also remove the contents of your Mac’s trash instantly by using MacKeeper’s Safe Cleanup tool:
- Open MacKeeper.
- Select the Safe Cleanup utility from the sidebar.
- Click Start Scan to find all unnecessary files on your system.
- Ensure the Trash option is selected, then click Clean Junk Files.
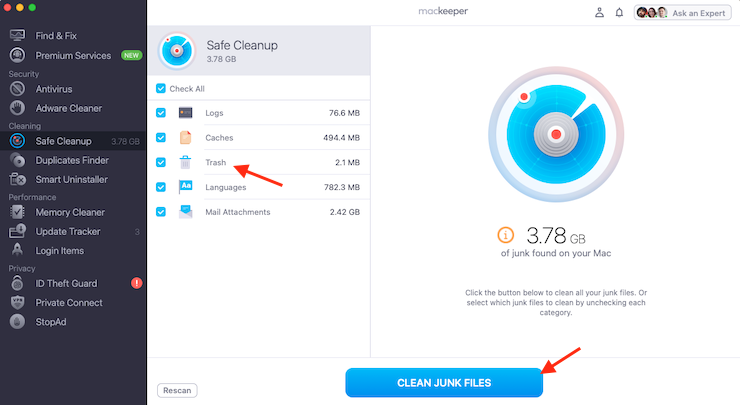
Note from our experts: One of the major advantages to using MacKeeper’s Safe Cleanup tool is that it doesn’t just remove files from your Mac’s trash can, but also hidden junk from your system. This includes temporary logs and caches, unused language packs, and old mail attachments.
3. Delete the trash via Terminal
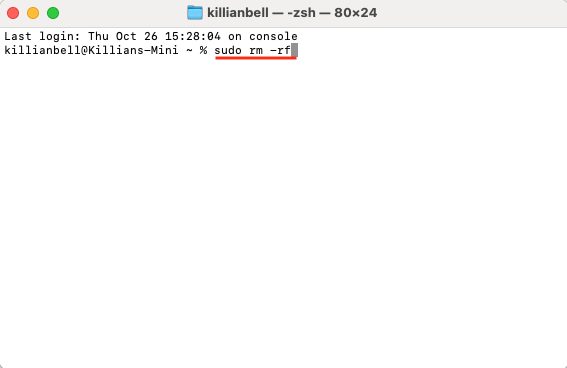
Here’s how to empty trash on Mac using a simple command in Terminal:
- Open Terminal on your Mac.
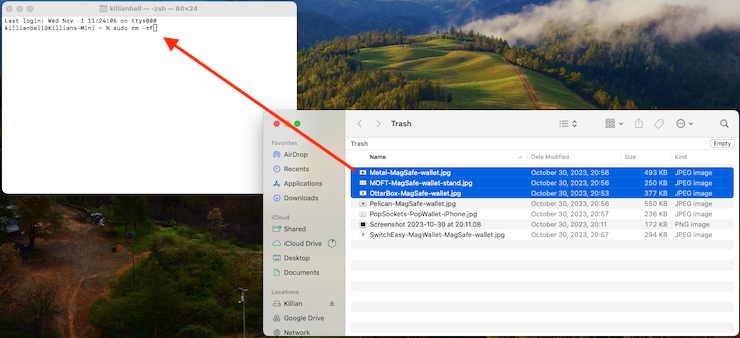
- Enter the sudo rm -rf command, then press Space.
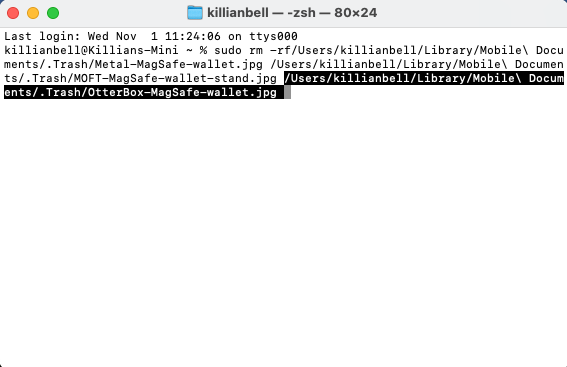
- Open the Trash then drag the files you want to delete into Terminal.
- Press Return.
- Enter your Mac’s password when prompted, then press Return again.
4. Secure empty trash in safe mode
When your Mac isn’t functioning correctly, erase the contents of your Mac’s trash can. To do it on an Intel Mac:
- Shut down your Mac.
- Turn on your machine, then immediately hold down the Shift key.
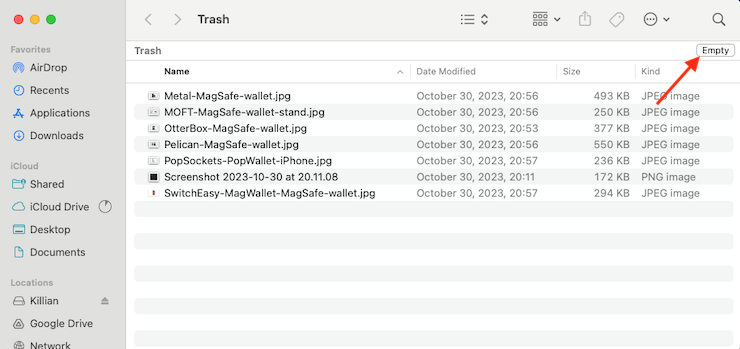
- Once inside safe mode, open the trash, then click Empty.
- Click Empty trash to confirm.
If you have a more modern Mac that uses an Apple M chip, the process is a little different. To empty the trash using safe mode on an Apple Silicon Mac, follow these steps:
- Shut down your Mac.
- Press and hold the power button until you see Loading startup options.
- Select your Mac’s primary drive.
- Press and hold the Shift key, then select Continue in Safe Mode.
- In safe mode, open trash, then click Empty.
- Click Empty Trash to confirm.

5. Securely erase free space
You can erase the free space on your Mac’s disk drive to prevent old files from being recovered.
- Open Disk Utility on your Mac.
- Select the hard drive you want to use in the sidebar.
- Click the Erase button, then select Erase Free Space.
- Use the slider to specify the level of security.
- Click Erase Free Space to confirm.
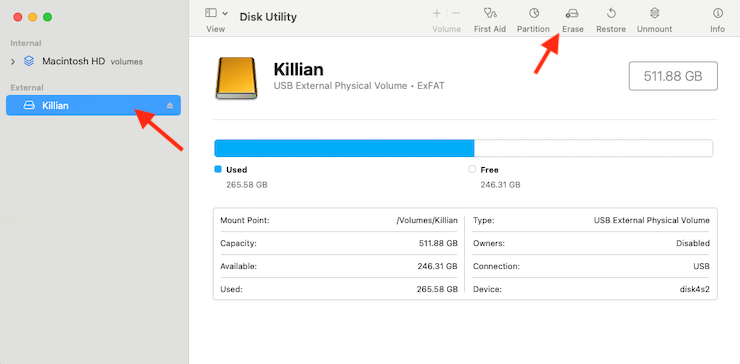
This option is only available on Macs with a spinning hard disk drive (HDD). You cannot use it on more modern machines with flash storage.
6. Safe removal with Disk Utility
If you’re giving away an old Mac or external storage drive, use Disk Utility to erase its contents so that data cannot be recovered:
- Open Disk Utility on your Mac.
- Select the drive you want to erase in the sidebar, then click Erase.
- Choose the format you want to use for the drive and name it.
- If available, select Security Options, or skip it.
- Choose how many times the drive should be overwritten, then click OK.
- Click Erase, then click Done.
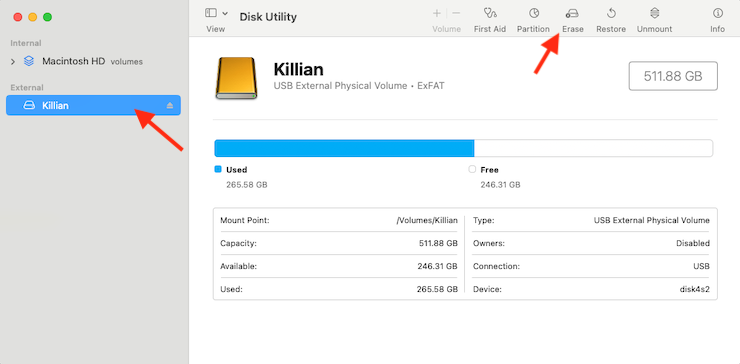
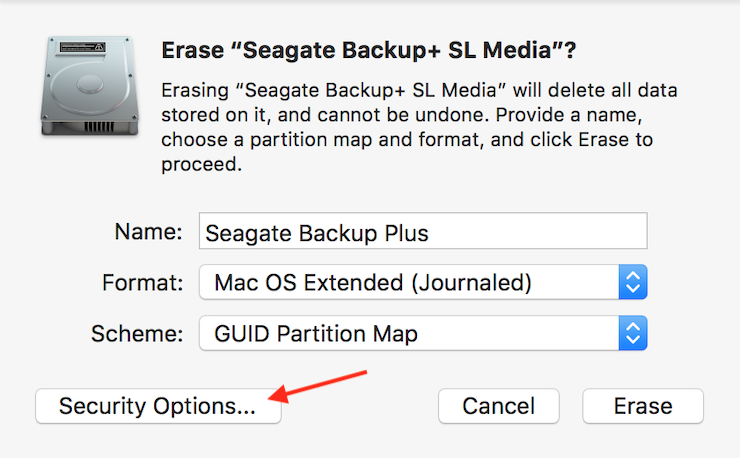
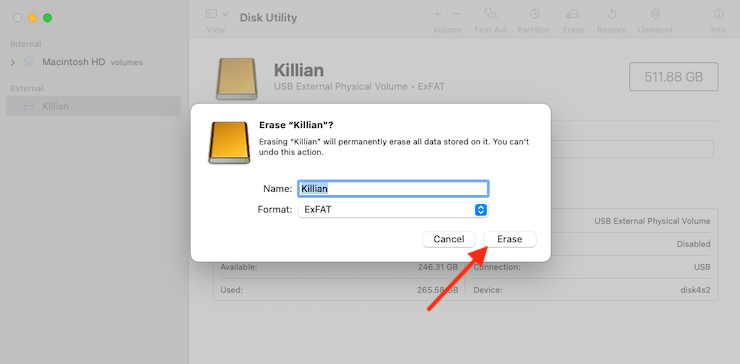
Be aware that the secure erase options on macOS only work on certain types of storage devices. If you don’t see the Security Options button, the drive you’re using isn’t supported.
Remove data from your Mac safely
When you’re looking at how to delete files on Mac, you have plenty of options. However, bear in mind that some are more secure than others. Emptying your Mac’s trash can using traditional methods allows files to be recovered by professional tools, but you can use features like Disk Utility to securely erase entire drives.
If you’re looking to quickly and safely free up storage space on your Mac, we insist on using MacKeeper’s Safe Cleanup utility to remove all files from your trash can, as well as other redundant junk hidden on your system. In just a couple of clicks, you’ll clear temporary logs and caches, unused language packs, and lots more.


