The Binarymove Mac virus is a browser hijacker that doubles as adware. It aims to promote products and services via annoying pop-ups, and it’ll also change your browser settings without permission.
It’s easy to think you have nothing to worry about with adware. At best, it’s just an annoying piece of software trying to push products to you—right?
Wrong.
Adware, such as the Binarymove Mac virus, can be worse than just pop-up ads. You’ll almost certainly experience a worse computer performance than previously, resulting in higher stress and lower productivity. Moreover, malware of this kind could leave your device open to worse attacks in the future.
Today, I’ll show you how to remove this virus. To ensure that you don’t download it again, I’ll also explain how it got onto your computer in the first place.
Before we start:
Even the most careful Mac user can accidentally download malware without realizing. Relying solely on your intuition may work in most cases, but it isn’t foolproof, and you can cause lots of needless anxiety for yourself. Using an excellent anti-fraud solution like MacKeeper’s Antivirus will make your digital life safer and allow you to check for viruses on Mac around the clock. After setting it up, you’ll be better protected from nasty viruses and other malicious attacks.
Here’s how to install MacKeeper and use the Antivirus tool:
- Download MacKeeper.
- In the app, go to Antivirus; it’s in the Security section.
- Select Launch Antivirus.
- Enter your Mac password and wait for your computer to enable the feature.
- Press Next to set up real-time protection. Then, when the option appears, select Enable.
- Select Open Preferences before unlocking its features.
- An option will ask you if you wish to let MacKeeper’s software load; tap Allow.
- Enable all options related to MacKeeper.
- Quit and reopen MacKeeper so that the changes can take effect.
In this article you will find the following:
What is a Binarymove virus on Mac
Binarymove is a browser hijacker normally downloaded by accident from a third-party website. After unknowingly downloading this malware, it changes your settings without permission. Your browser will then redirect you to product and service pages, and you’ll also see pop-up ads that try to tempt you to spend your money on these.
How Mac can get infected by Binarymove virus
Binarymove is almost always downloaded from third-party websites, and it usually appears in apps that Apple doesn’t approve. This typically occurs through software bundling, which is when you simultaneously download multiple apps. While software bundling isn’t dangerous itself, you should only do this with trusted brands.
What damage Binarymove can do to your Mac
Binarymove can cause significant damage to your Mac in the following ways:
- Data loss and identity theft
- Unwanted pop-up ads and slower browser and computer performance
- Redirects from legitimate websites to potentially dangerous ones
- The risk of more malware on your Mac
How to remove Binarymove virus from Mac
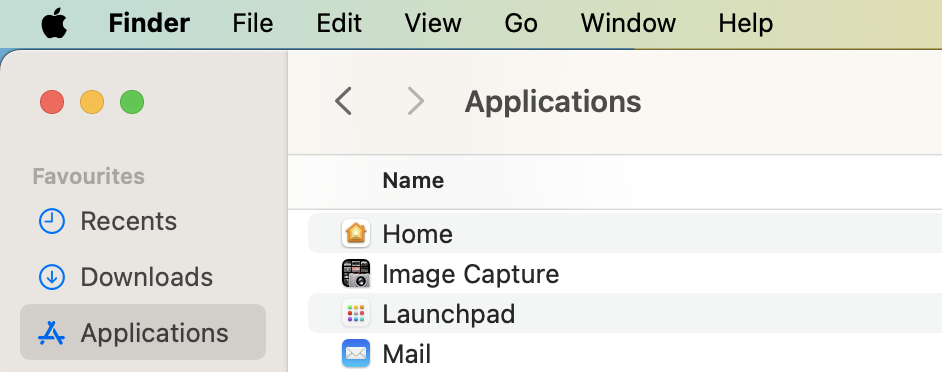
One way you can get rid of Binarymove from your computer is via Finder. Delete the program in the same way that you would with an ordinary app:
- Open the Finder app and select Applications.
- Look for Binarymove; type B on your keyboard to get there faster.
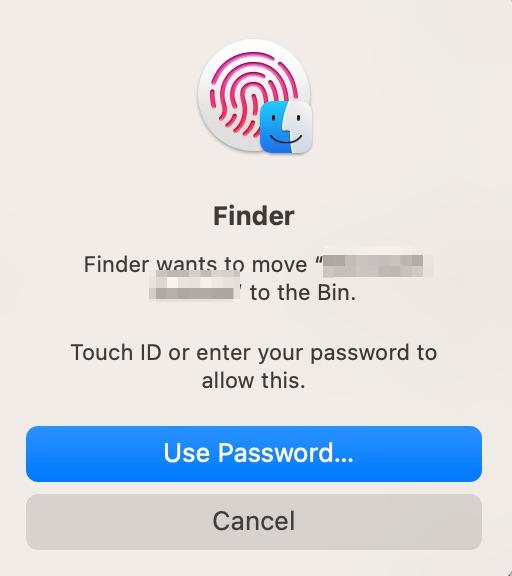
- Drag and drop Binarymove into your Trash folder.
- If needed, enter your password or use Touch ID.
- Empty your Trash folder and restart your Mac.

You should then do each of the following after getting rid of the virus to fully delete Binarymove from your Mac:
- Find and get rid of programs related to the Binarymove virus
- Remove the device profile
- Remove Binarymove from your browser extensions
- Get rid of the Binarymove virus with an antivirus program
1. Find and get rid of programs related to the Binarymove virus
Once you’ve removed the Binarymove app, you should delete all associated programs. This way, you’ll guarantee that the software can no longer cause harm to your computer. It’s possible to do this via your Login Items.
Start by removing Login Items associated with Binarymove:
- Navigate to Apple logo > System Settings on your MacBook. It doesn’t matter if you do this from the homepage or an app.
- Search for Login Items, click on the tab with this name, and go to the Open at Login section.
- If you see anything related to Binarymove or programs that look suspicious in general, highlight them and press the - button.


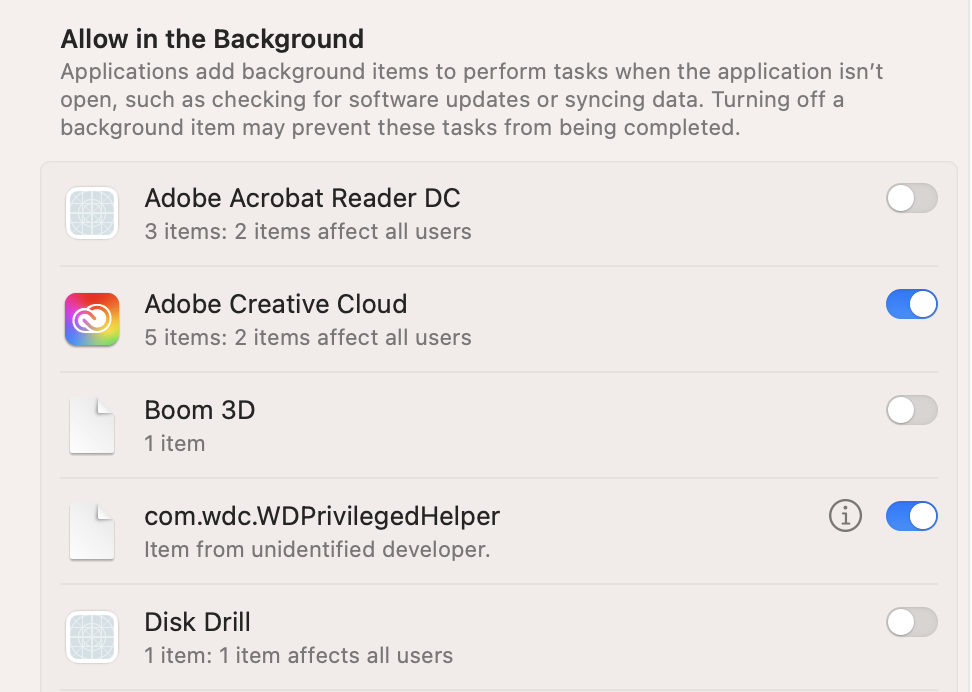
Once you’ve gotten rid of the Login Items appearing under Open at Login, disable anything you don’t want to allow in the background, like this:
- In System Settings > Login Items, scroll down to Allow in the Background.
- Toggle off any programs you don’t wish to have running in the background.
Note from our experts:
If you’re wondering how can Apple computers get viruses, it’s worth reading our relevant article to keep yourself safe. Plus, knowing the key virus vs. malware differences will also help you know what to look out for.
2. Remove the device profile
After clearing Binarymove programs, you must also remove the device profile. The profile name may differ from device to device, so you should use the same protocol as mentioned above—delete anything that you think looks potentially dangerous.
Here’s how to remove profiles from your Mac:
- Go to Apple logo > System Settings and select Profiles (you can also search for Profiles in the search bar).
- If you see any suspicious profiles, do exactly what you did when removing Login Items; highlight them and select the - icon.


3. Remove Binarymove virus from browser extensions
The next step to remove Binarymove from your Mac is to delete it from your browser extensions. The process will differ depending on if you use Chrome, Safari, Opera, or Firefox. I’ll show you how to get rid of extensions in each one.
3.1 Delete Binarymove virus from Safari
Many forms of common Mac malware, including Binarymove, infect Safari—but you can delete the associated browser extensions quite easily. Follow these instructions to achieve that result:
- Open Safari and go to Safari > Settings in the toolbar at the top.
- Go to the Extensions tab and remove any Binarymove-related extensions.


3.2 Get rid of Binarymove virus from Google Chrome
If Google Chrome is your browser of choice, you have to follow these steps instead. Even if you only have Chrome installed, but it isn’t your primary way to surf the internet, you should still check to see if Binarymove is there. Here’s what to do:
- Tap the jigsaw icon next to your URL bar.
- Select Manage Extensions.
- You’ll then see your full list of extensions. Click on Remove next to anything associated with Binarymove.


3.3 Remove Binarymove virus from Firefox
Follow these instructions to remove Binarymove from Firefox:
- Select the jigsaw icon (it looks very similar to Google Chrome and is in a near-identical position).
- Go to Manage extensions.
- Tap the three-dot icon and select Remove.


3.4 Delete the Binarymove virus from Opera
If you want to remove Binarymove in Opera, select Extensions > All and delete your browsers.

4. Get rid of Binarymove virus with an antivirus program
Antivirus programs can also get rid of Binarymove and other forms of malware. They also remove much of the manual work, meaning that you don’t need to worry about accidentally deleting something crucial to your computer’s functioning (like a profile).
In addition to its real-time monitoring capabilities, MacKeeper’s Antivirus solution can delete malicious software like Binarymove with single actions if it was already on your device pre-installation. Follow these steps to get rid of Binarymove and other viruses with MacKeeper’s Antivirus tool:
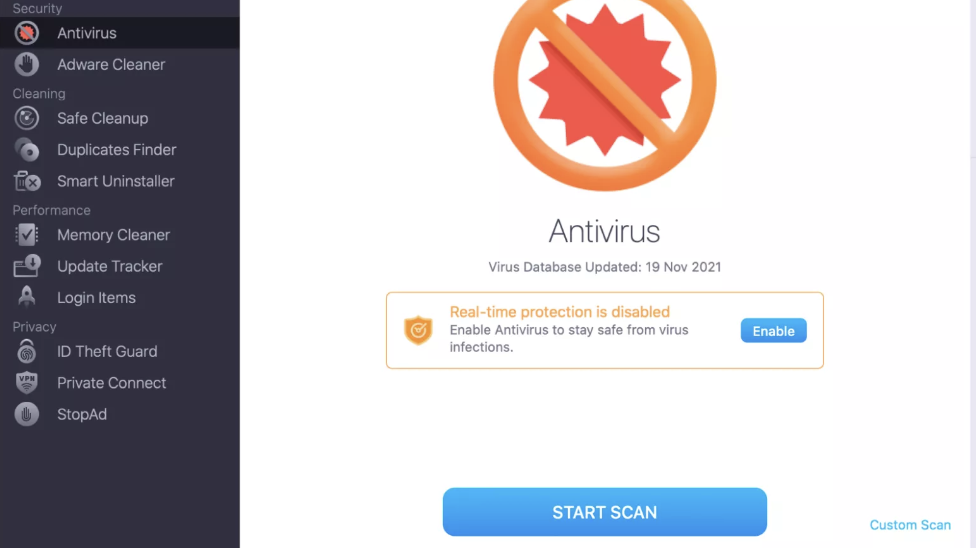
- Open MacKeeper and go to Security > Antivirus.
- Select the blue Start Scan button, which you’ll see at the bottom of your screen.
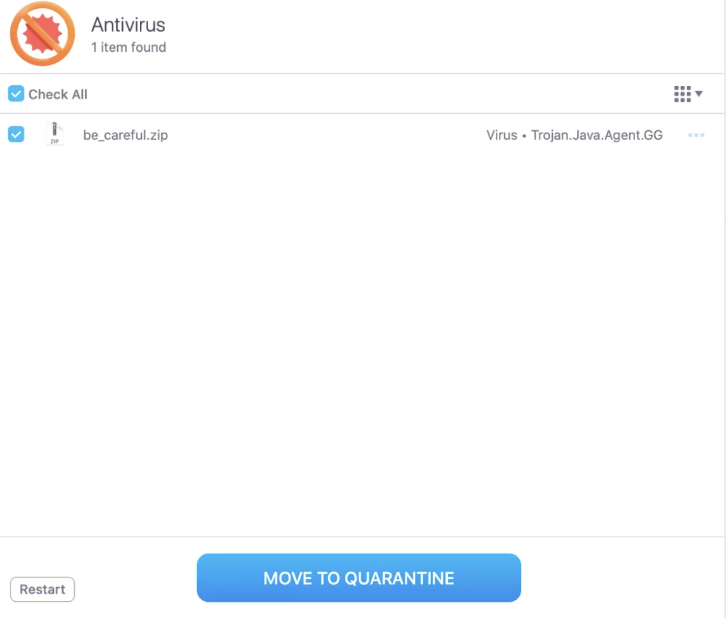
- Wait for MacKeeper to finalize the malware/virus scan. If it finds Binarymove (or another form of malware), it’ll appear in an “items found” list.
- Press Check All and select Move to Quarantine to stop Binarymove from causing further harm.
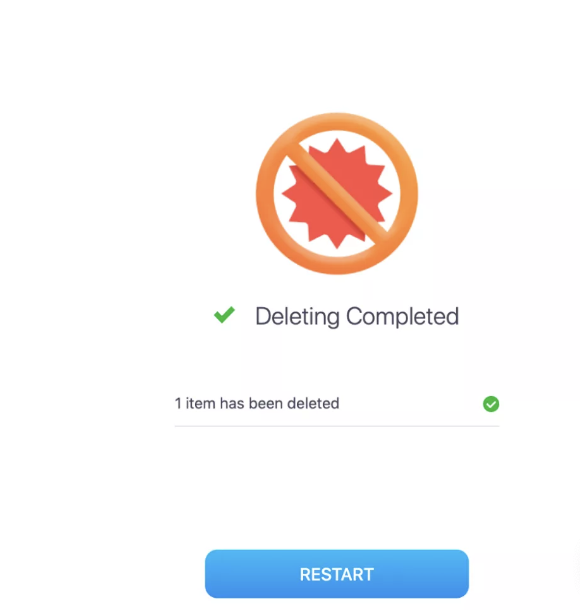
- Once the virus has been quarantined, you’ll see a Deleting Completed message. A blue Restart button will also be at the bottom of the window.
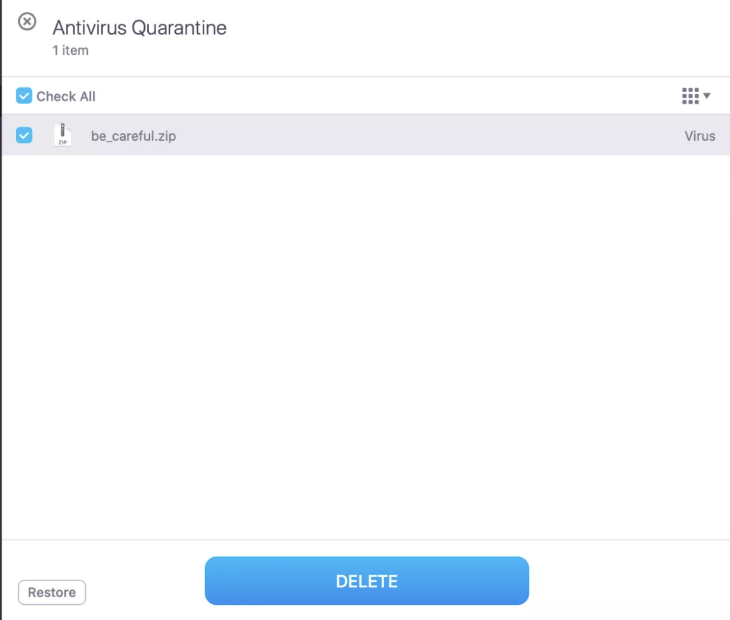
- When MacKeeper reopens, tap Delete to remove Binarymove altogether.
After MacKeeper has removed Binarymove, consider restarting your Mac to ensure that everything has been removed from your device.
Hint from our team:
If you don’t have antivirus software installed on your device, there are other ways to check for viruses on Mac. However, you should note that manually checking for viruses requires technical knowledge and is typically time-confusing. So, it’s much better to use ready-made software.
How to prevent installing a Binarymove virus on a Mac
Once you’ve removed Binarymove from your Mac, it’s best to prevent this from happening again. You can do each of the following:
- Use an antivirus program
- Update your software on time
- Don’t visit suspicious websites
- Turn on Rapid Security Response for your Mac
- Only click on attachments and links from people you trust
Let’s now cover each of these in more detail.
1. Use an antivirus program
The best way to stop Binarymove and other malware from attacking your Mac is by using. MacKeeper’s Antivirus. Our tool works well for several reasons. Besides keeping your device safe from malware, you can also use MacKeeper to perform numerous other actions (e.g. clearing duplicate files).
2. Update your software on time
Updating your macOS software is one of the best ways to ensure that unwanted programs don’t make their way onto your computer. You can set up automatic updates in addition to checking for existing updates now.
First, here’s how to look for an existing update:
- Go to Apple logo > System Settings > General.
- Select Software Update. Like some of the other tips mentioned in this guide, you can also search for this if necessary.
- Wait for an update to appear. You’ll see a message saying [macOS version is up to date] or something similar if there’s nothing new. However, if you do have an update, select Update Now.
- Wait for your software to download, and then double-check to see if all malware has been removed from your Mac.


You can then set up automatic updates so that your Mac software is always the latest version:
- Go to System Settings > General and select Software Update.
- At the top of the window is an information icon next to Automatic Updates. If you see that your updates are switched off, click on this.
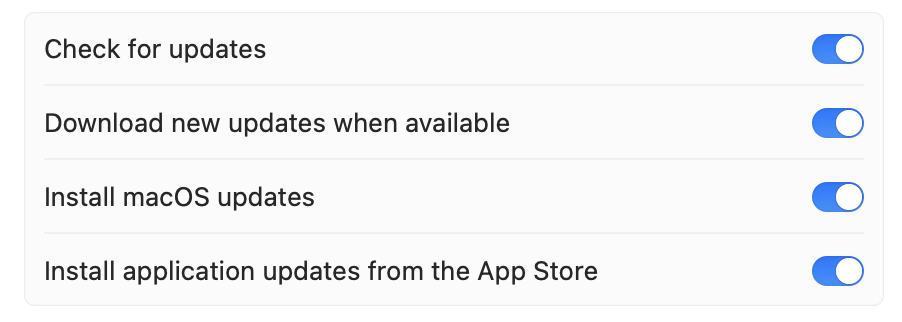
- Toggle on Install macOS updates, Install application updates from the App Store, and Download new updates when available. Then, select Done and close your System Settings.


3. Don't visit suspicious websites
Adware like Binarymove, along with other potentially unwanted programs (PUPs) and viruses, is normally downloaded by accident via suspicious websites. So, the best advice to stop them from going onto your device is by not visiting questionable sites.
Knowing which websites are suspicious and which ones aren’t is sometimes difficult. Sometimes, fake websites can trick people by making them think they’re on a legitimate site. For example, I once wanted to buy gym clothes from a brand I like, but I didn’t realize that the site wasn’t genuine until I reached the checkout page.
I suggest looking out for these red flags when visiting a website:
- An unsecured domain (i.e., it says http:// instead of https://)
- Signs that a website is trying to copy a genuine brand, such as poor logo quality and inconsistent design
- No privacy policy
- Spelling and grammatical errors
- You just have a bad gut feeling; this is normally right, so you should pay attention to it
Important:
You should also stick to official software versions and avoid downloading jailbroken software. Yes, it’s sometimes annoying to pay for these—but having malware damage your Mac and potentially lead to other threats is much worse.
4. Set up Rapid Security Response on your Mac
In 2023, Apple introduced a new feature called Rapid Security Response on macOS, iOS, and iPadOS. It’s designed to protect your Mac against viruses and other malicious attacks more quickly than the company would be able to release a software update.
You can enable Rapid Security Response via your System Settings, and it should take a few minutes at most. Here are the steps you should follow to set up Rapid Security Response:
- Navigate to Apple logo > System Settings and select General > Software Update.
- Click on the information icon next to Automatic Updates.
- Toggle on Install Security Responses and system files before selecting Done.

5. Only click on attachments and links from people you trust
Another way to increase your chances of not downloading malware is to be very careful when clicking on attachments and links, especially in emails. If you use iMessage on your Mac, you should also be careful. I’ve had people trying to disguise themselves as postal companies and government services in an attempt to steal my information.
Before clicking on any link, check the email address to ensure it’s correct and that you know the person. If you’re still in doubt, it’s a good idea to contact them and ask if they sent you something. That way, you’ll be certain that you aren’t potentially putting yourself at risk.
If you can confirm that a link or attachment isn’t suspicious, block the sender and report them.
Delete the Binarymove Mac virus and keep your software safe
Binarymove is one of the most irritating viruses that can infect your Mac, but you can keep yourself safe by practicing due diligence online. Besides, it’s wise to keep your device up to date by setting up automatic software updates. However, If you still discover Binarymove on your Apple computer, don’t forget to clear out your browser extensions, remove suspicious profiles, and delete Login Items.
You can get rid of Binarymove with MacKeeper’s Antivirus solution, which is also an ideal option for keeping your Mac protected around the clock. While you can use other antivirus solutions, many of them don’t have the all-in-one maintenance features that MacKeeper does—which is why it’s your best choice.


