Wondering how to add Dropbox to Finder on your Mac? In this guide, I’ll show you how to do it and make your cloud files easier to access and manage, even if you need to add the folder manually. You’ll also learn how to control your startup activities with MacKeeper’s Login Items.
You might expect to find Dropbox in the same place every time. However, its location depends on your macOS version, Dropbox configuration, and setup. This can be confusing when you first set up Dropbox or update the app.
The easiest place to start looking is the Finder sidebar. Depending on your Dropbox and Finder settings, it may be listed under Locations or Favorites. If you can’t find Dropbox in either section, it doesn’t mean you’ve lost your files, it simply means that the Dropbox folder is integrated with macOS differently. In this case, try to add Dropbox folder to Finder on Mac manually.
Keep in mind that there’s an important difference between older and newer Dropbox setups. Recent Dropbox versions may use the macOS CloudStorage area as part of their file management system. This can change where Dropbox files are stored on your Mac, especially when using online-only files.
If you notice that Dropbox is consuming too much storage space, try to clear Dropbox cache to safely remove unnecessary data.
Before you connect Dropbox with Finder
Before looking for Dropbox in Finder, check if the app is properly set up on your Mac. First, make sure the Dropbox app is installed and that you're signed in to an active Dropbox account. You also need a stable internet connection to connect your Mac to your account and start synchronization.
Another thing to check is macOS permissions. Depending on your operating system and Dropbox configurations, the app may ask for permission to access files, folders, or other parts of your system. These permissions allow Dropbox to run smoothly.
When the Dropbox app is installed, you’re signed in, and the initial requirements are completed, Dropbox appears automatically in Finder. You can find it under Locations or Favorites. If it doesn’t appear immediately, it isn’t a problem, as sometimes to add Dropbox to Finder may require additional permissions.
Also, we consider that it’s better to use the desktop Dropbox app rather than the web browser version. Opening your account through a web browser gives you access to your files online, but it doesn’t create the same Finder functionality.
If you’d like to reinstall Dropbox and fix the issues, learn how to uninstall Dropbox on Mac before setting it up again.
A note from our experts:
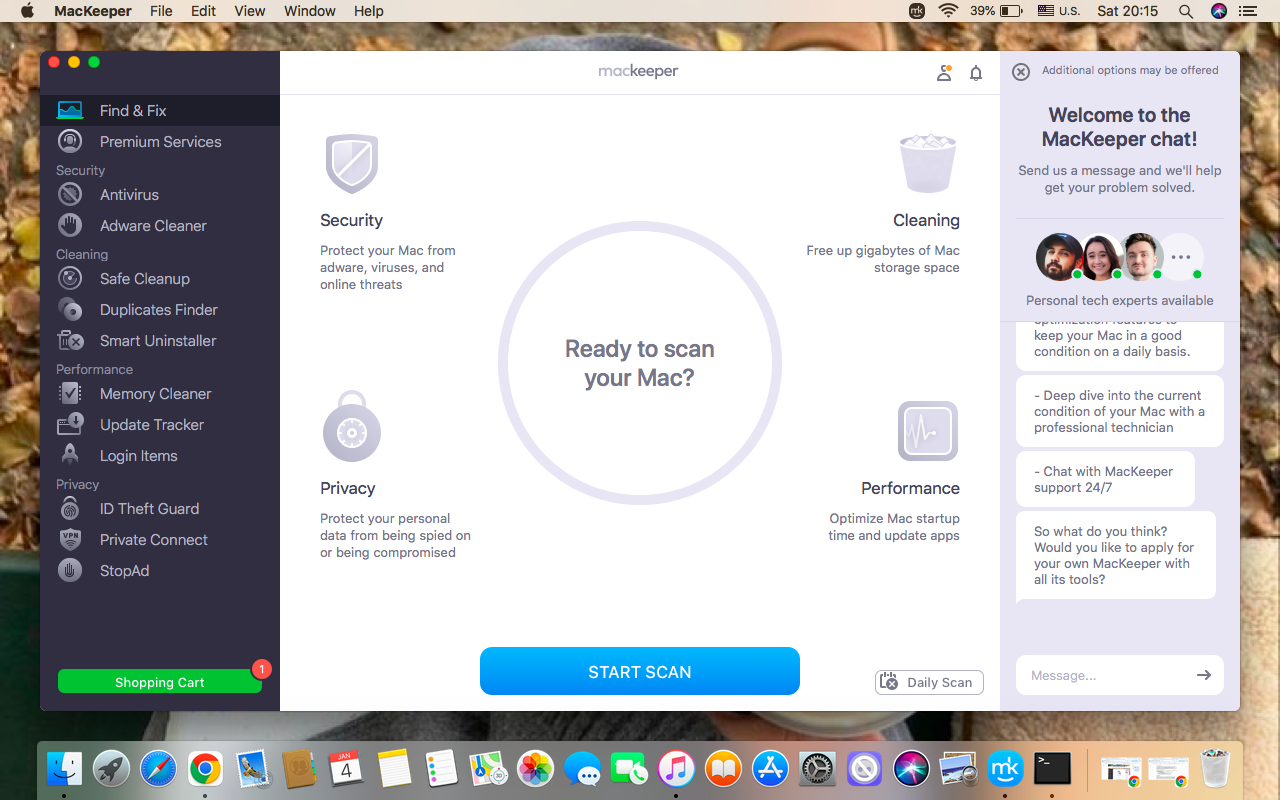
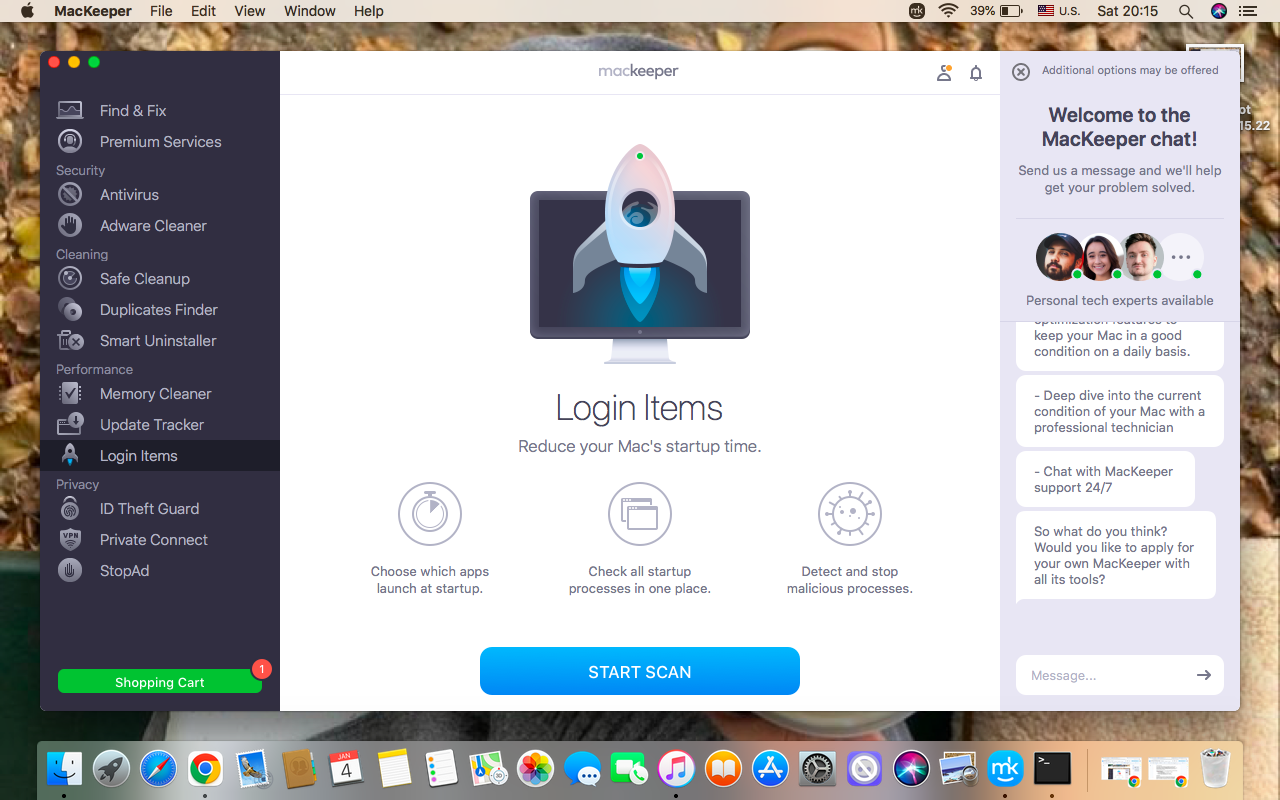
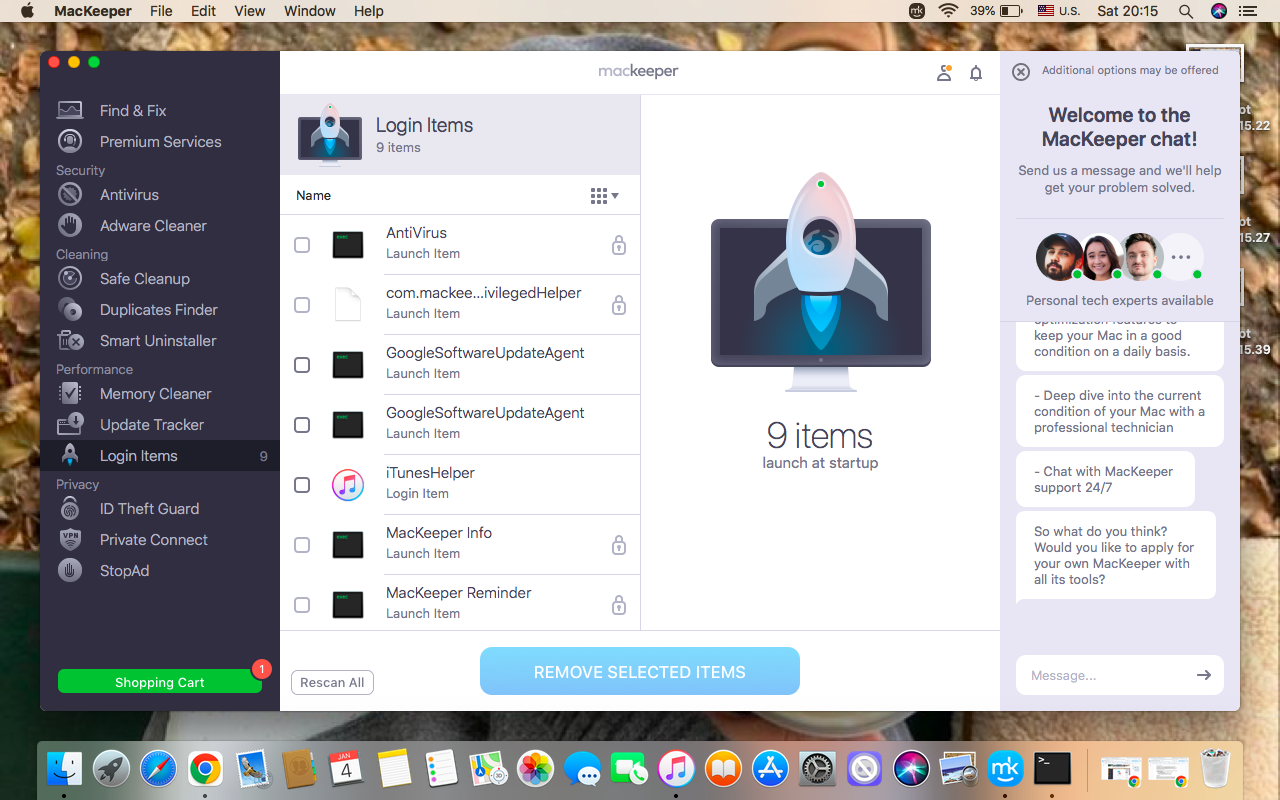
To get Dropbox in Finder on Mac is a wayt of keeping your Mac organized. Remember that when the Dropbox app is installed, it may need to run background processes automatically to synchronize your files and keep them up to date. However, Dropbox isn’t the only app that launches automatically when your Mac starts up. Too many startup apps slow down your Mac’s overall performance. Instead of searching for unnecessary startup programs and disabling them manually, I suggest you use MacKeeper’s Login Items to manage the apps that launch automatically and reduce the startup activity for your system.
Do the following to manage startup programs with MacKeeper’s Login Items:
It’s quite easy to install Dropbox in Finder. Below, I’ll show you several ways to add Dropbox to Finder, so you can choose the one that works best for you.
1. Install and sign in to Dropbox desktop app
The official Dropbox desktop app is the standard way to integrate Dropbox with Finder on your Mac. Unlike accessing Dropbox via a web browser, the desktop app connects your account to your Mac, making your Dropbox files available through Finder.
Here are the instructions on how to install and sign in to the Dropbox desktop app:
Download the Dropbox app from the official site > install the app on your Mac.
Launch Dropbox > sign in with your Dropbox account.
Complete the setup process, enabling the requested permissions > Dropbox will appear automatically.
2. Show Dropbox in Finder sidebar
Usually, after you install the Dropbox app and sign in, you don’t need to put Dropbox in Finder, as it’s added automatically. If you still can’t see it, check the Dropbox settings to make sure the Finder integration is enabled.
Follow these steps to show Dropbox in the Finder sidebar:
Launch the Dropbox app from the menu or Applications folder.
Open your account menu > choose Settings or Preferences.
Open the Sync option > check your Dropbox folder settings.
3. Add Dropbox folder to Finder manually
If Dropbox is installed and syncing is set up correctly, but the folder doesn’t appear in the Finder sidebar, you can add it manually. No need to reinstall the app or change the Dropbox settings.
Use our instructions below to add the Dropbox folder to Finder manually:
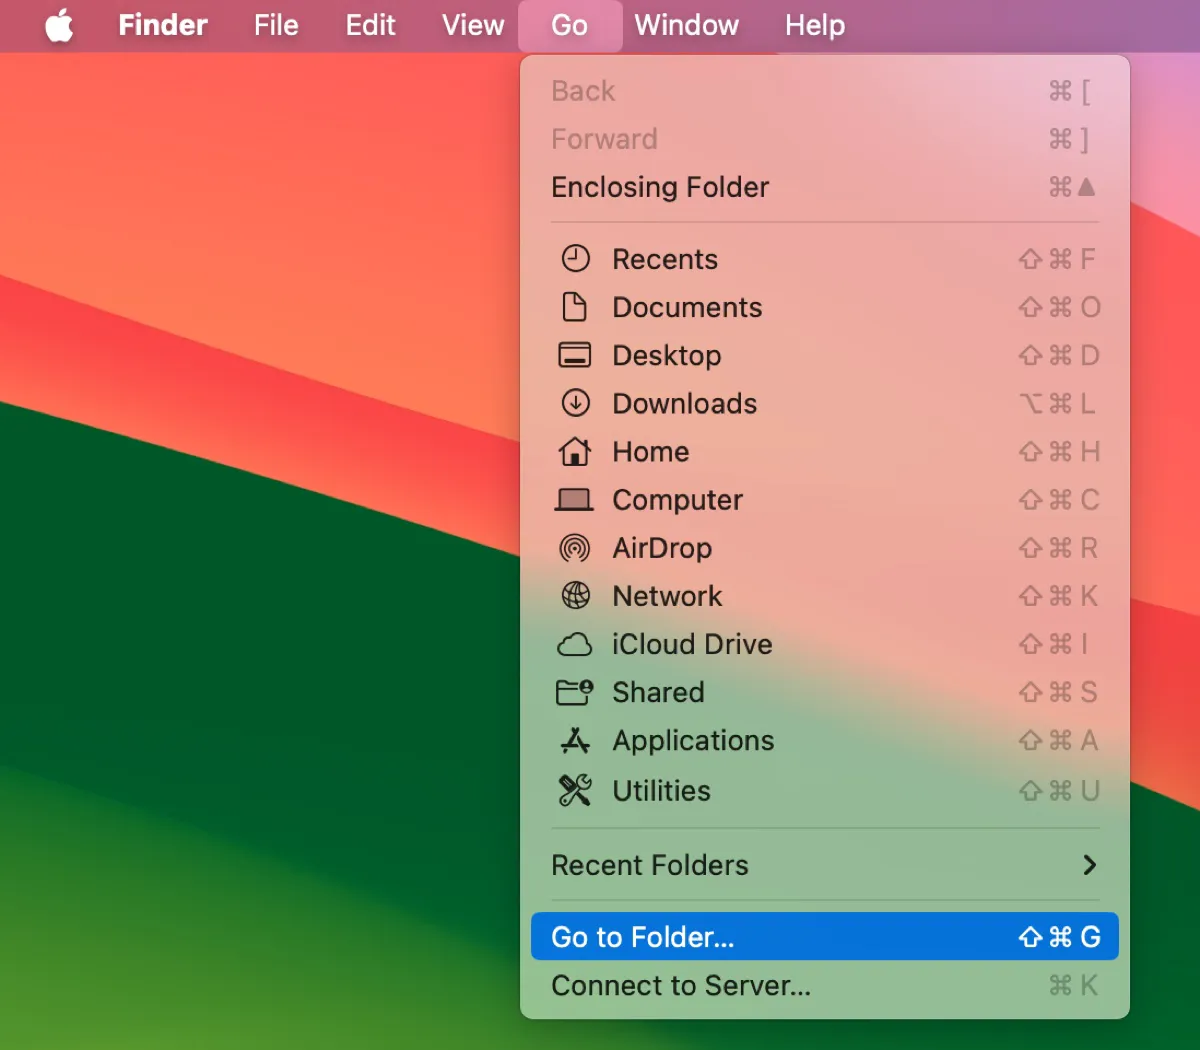
Open Finder > click Go on the top-left menu bar > select Go to Folder.
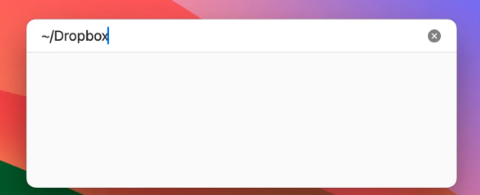
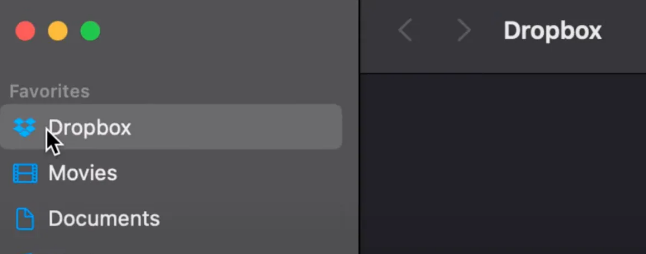
Enter the Dropbox folder path in the text box window > you’ll see the Dropbox folder in Finder > drag and drop it to the Finder sidebar.
Step 1. Finder > Go > Go to FolderStep 2. Enter the Dropbox path (~/Dropbox)Step 3. Drag and drop the folder to Finder
What to do if Dropbox is not showing in Finder?
If Dropbox is still not visible, even after the above methods, don’t panic, it doesn’t mean that your files are lost. The issue may be caused by the Dropbox app not running, incomplete setup, disabled Finder integration, or an incorrect Dropbox folder.
Try these simple fixes if Dropbox isn’t showing in Finder:
Make sure the Dropbox app is running.
Check Finder’s settings.
Check Dropbox’s settings and your macOS permissions.
Find the Dropbox folder manually.
Restart Dropbox and Finder.
Sometimes Dropbox is taking too much space, so if your Mac is running out of space, it may affect Dropbox synchronization. Checking available storage is also a useful troubleshooting step if Dropbox isn’t showing in Finder.
Conclusion
Dropbox can make everyday file management on your Mac much simpler, especially when it’s available directly in Finder. Install the Dropbox app, check your Finder settings, and add the folder manually if needed. If Dropbox remains missing, check permissions or restart Finder. For a smoother startup, MacKeeper’s Login Items can also help you review which apps launch automatically when you start your Mac.
We respect your privacy and
use cookies
for the best site experience.
Privacy Preferences Center
We use cookies along with other tools to give you the best possible experience while using the
MacKeeper website. Cookies are small text files that help the website load faster. The cookies we
use don’t contain any type of personal data meaning they never store information such as your
location, email address, or IP address.
Help us improve how you interact with our website by accepting the use of cookies. You can change
your privacy settings whenever you like.
Manage consent
All cookies
These cookies are strictly necessary for enabling basic website functionality (including page
navigation, form submission, language detection, post commenting), downloading and purchasing
software. The website might malfunction without these cookies.