Getting a file path on a Mac is easier than you think. But before diving into details, we’d like to remind you about the importance of safe file storage so that you can easily find everything you need. We believe it's a good idea to remove all unneeded data from your device regularly—and MacKeeper’s Safe Cleanup can do it in a couple of clicks.
A file path is a reference for a specific file on your MacBook device. Think of it as a map for locating a file within your system’s directory structure. File paths are named according to the location of files on your device. For example, a file in your Downloads folder will have the word ‘Downloads’ in the file path.
A note from our experts:
You can easily get a file path on a Mac after reading our guidelines. To keep your files in order, use MacKeeper’s Safe Cleanup. Our tool removes junk files in a few clicks to ensure your Mac runs at peak performance.
Here’s how to remove files with MacKeeper’s Safe Cleanup:
There are numerous ways to find a file path on your Mac. Here are the best methods you can try:
Display the path of a file in the Info window.
Show a file path on Mac context menu.
Find a file path from Terminal.
Copy the file path using Go to Folder.
Create a “copy path” service in Automator.
Get the file path in Spotlight.
1. Display the path of a file in the Info window
If you know which file you want to source later, you can find the whereabouts of it quite simply.
Follow these steps to display the path of a file in the info window:
Find the specific file.
Right-click the file.
Select Get Info.
Under Where you’ll find the location.
Step 1. Select Get InfoStep 2. Find the location under Where
2. Show a file path on Mac context menu
The context menu may be a quick solution to finding your file/folder.
Here’s how you show and copy a file path on Mac’s context menu:
Open Finder.
In the menu bar, select View.
Select Show Path Bar to locate the file path for your chosen file in the Finder window. Now, if you attempt to duplicate the text at the bottom, it doesn’t work.
To copy the path, hold the Control button and click on the selected file you wish to copy in Finder
Hit the Option key. In the Finder menu that appears after the first step, you’ll see Copy changed to Copy [ your file path name] as Pathname.
Select Copy.
3. Find a file path from Terminal
In Terminal, you can execute pretty much all functions, including finding files. With a bit of luck, this step will allow you to surface your file.
Here’s how to find a file path from Terminal:
Open Terminal.
Now, type in the sudo su command.
Hit Return on your keyboard.
Enter your Mac password.
Hit Return once more.
Enter the command: find / -name [filename]. Please note: you must know which file you're searching for. In the process above, swap the file name for [filename]).
Hit Enter. Terminal might take some time to finish the task. You’ll also see “operation not permitted” on a lot of what Finder returns; just ignore that.
Locate your desired file and select the file path.
Right-click the text to copy it.
4. Copy the file path using Go to Folder
A quick way of surfacing a file path is with the Go to Folder in Finder command.
Here’s how to copy the file path using the Go to Folder:
Launch Finder.
In Finder’s menu, click Go > Go to Folder.
Drag and drop your file onto the path field.
Step 1. Select Go > Go to FolderStep 2. Drag and drop your file onto the path field
5. Create a “copy path” service in Automator
Perhaps the most efficient way to copy a file path is with Automator. By adding the “Copy Path” action to the right-click menu, you can simply copy the file path to your clipboard.
Here’s how you can create a “Copy Path” service in Automator:
Go to Applications > Automator.
To create a new service, navigate to File > New Document > Quick Action from the dialog box.
Click Choose.
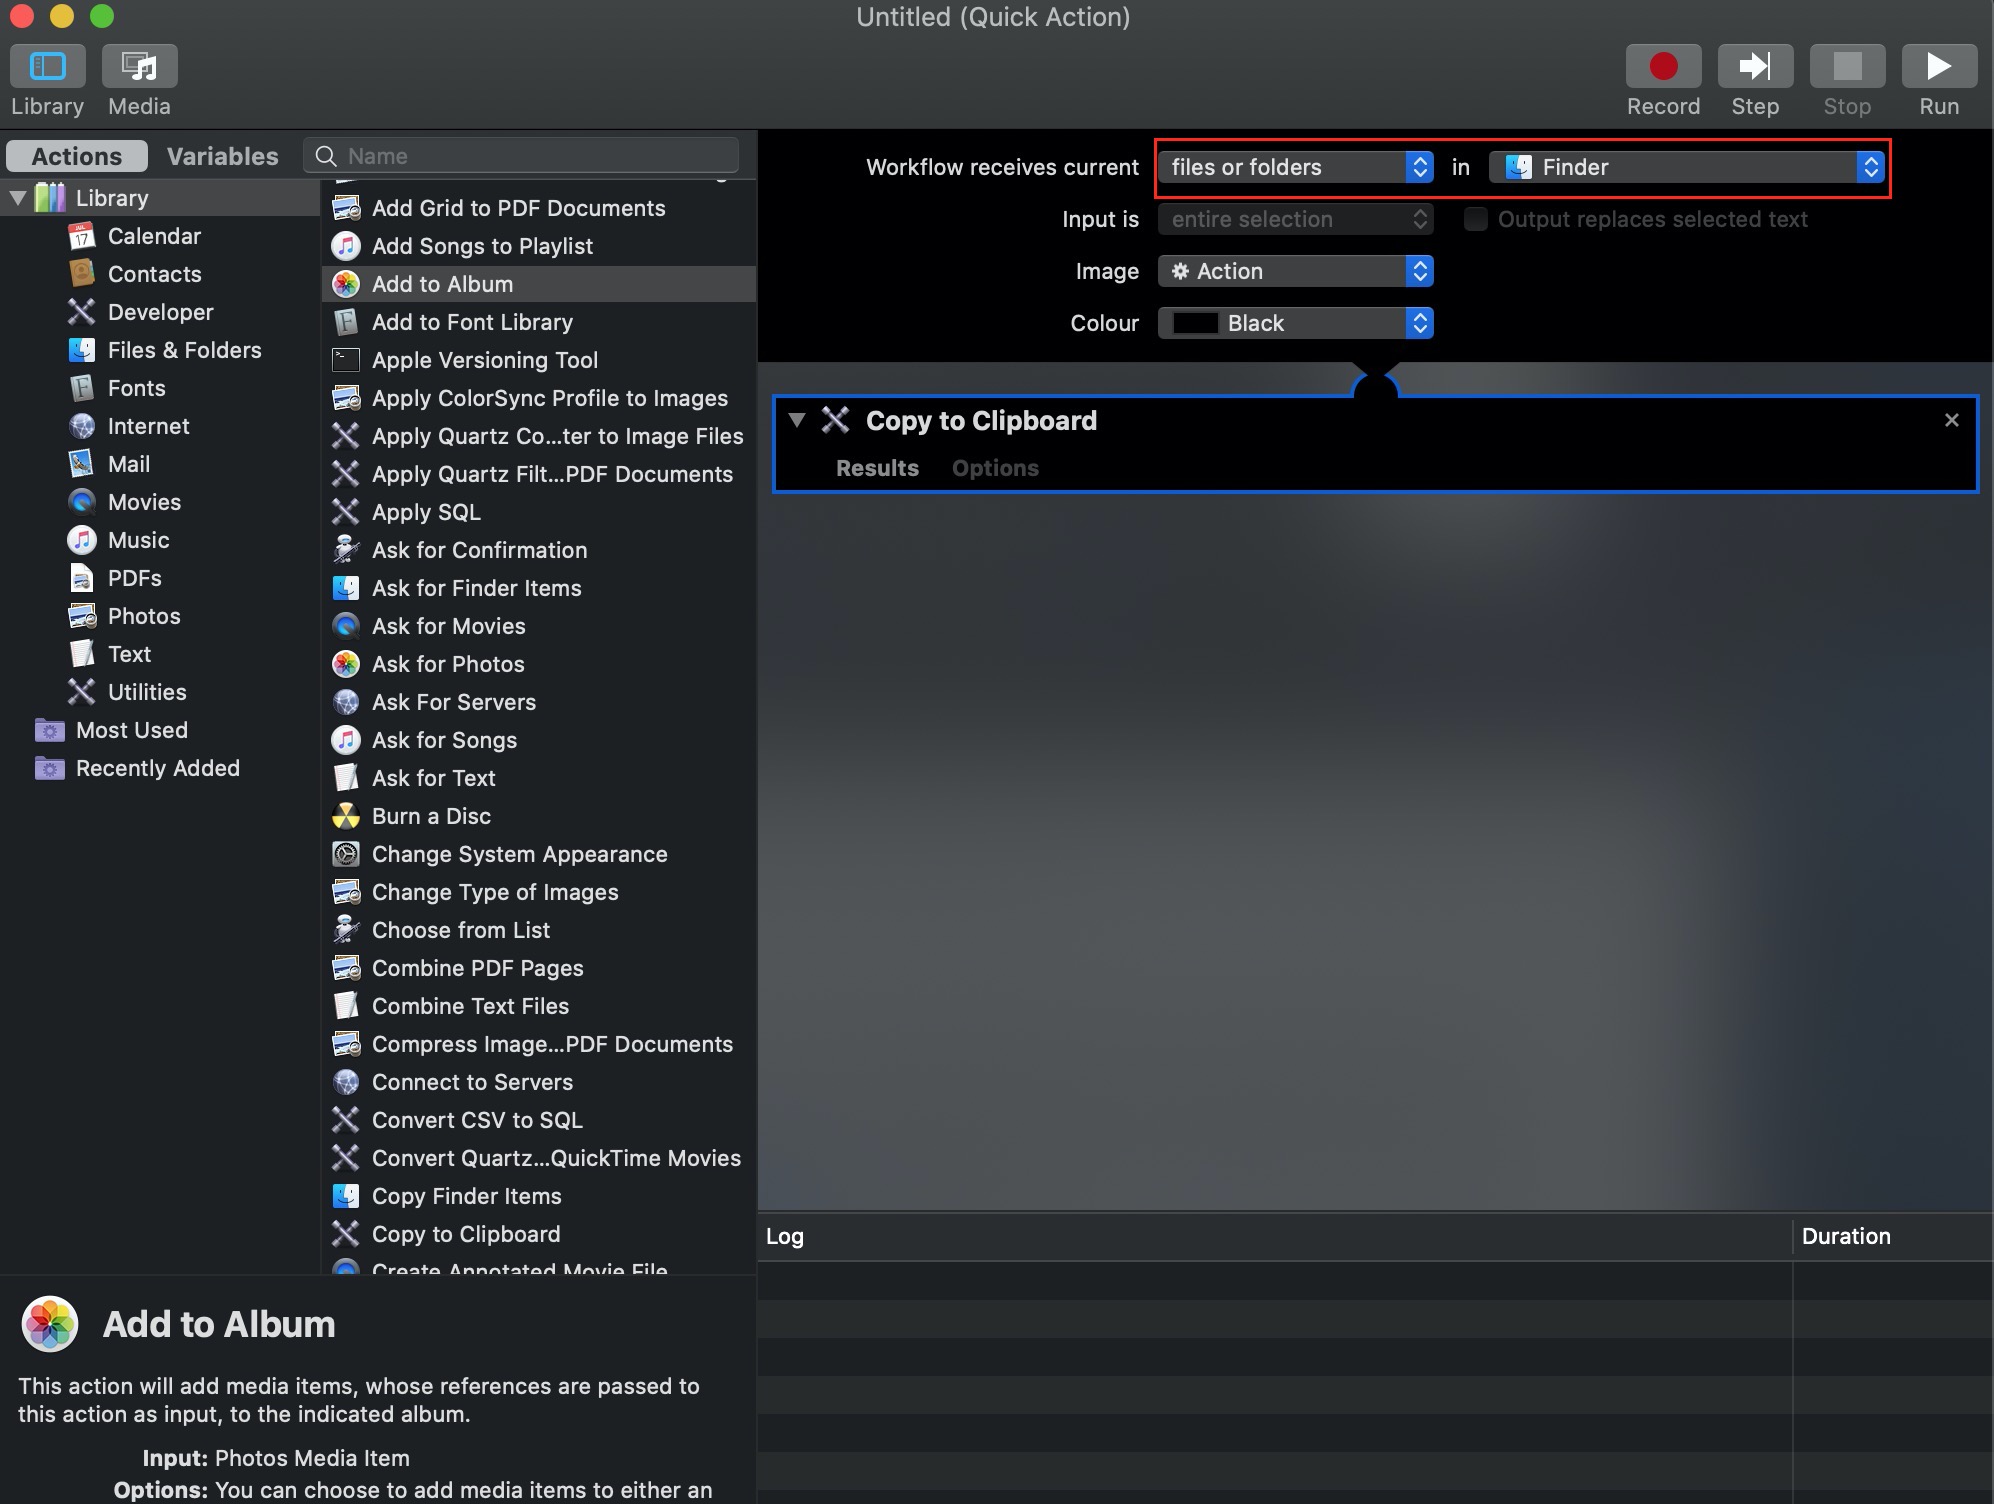
Under the Actions tab, look for “Copy to Clipboard,” and drag it to the right side of the panel.
Beside Workflow receives current, change it to files or folders, and beside it, change it to Finder.
Save the service name under something like “Copy File Path.” Now, exit Automator and open Finder. Right-click on any file—you’ll hopefully see the name of the new action.
After you select the file, it’ll be copied to the clipboard. You can then paste it anywhere you wish.
Step 1. Navigate to File > New Document > Quick ActionStep 2. Select files or folders in the Workflow receives current drop-down menuStep 3. Select COPYFILEPATH
6. Get the file path in Spotlight
Mac’s Spotlight offers a quick and efficient way to find files on your computer (or the web). Think of it as a shortcut to finding files and folders—rather than manually locating them via Finder or the desktop, you can quickly access them using Spotlight search. All you have to do is input your search terms, find the right option on the list of results, and select it.
Here’s how we find file paths using Spotlight on a Mac:
Locate the folder where your target file is located.
Use one hand to click and hold the file, and the other hand to press the Command + Spacebar keys on your Mac’s keyboard.
Using your first hand, drag and drop the file in the Spotlight search bar. This will immediately open the file path in the Spotlight search bar.
Now copy the file path and paste it where you want to use it.
Find and copy the file path on Mac easily
Locating files on your MacBook can feel like navigating a maze, especially when you have a lot of files saved. This is where file paths come in handy. They can help you access files within your Mac’s system directory structure. Use the tips in this guide to easily find your files using their file paths.
While you’re at it, why not make things easier for yourself by removing redundant files clogging up your Mac and making it difficult to locate important files and folders? Though you can manually delete junk files, MacKeeper’s Safe Cleanup simplifies the process by automating it.
We respect your privacy and
use cookies
for the best site experience.
Privacy Preferences Center
We use cookies along with other tools to give you the best possible experience while using the
MacKeeper website. Cookies are small text files that help the website load faster. The cookies we
use don’t contain any type of personal data meaning they never store information such as your
location, email address, or IP address.
Help us improve how you interact with our website by accepting the use of cookies. You can change
your privacy settings whenever you like.
Manage consent
All cookies
These cookies are strictly necessary for enabling basic website functionality (including page
navigation, form submission, language detection, post commenting), downloading and purchasing
software. The website might malfunction without these cookies.