In this article you will find the following:
Whether you’re a digital creator, a professional photographer, or a beginning designer, your digital (SD) cards must stay in tip-top shape for you to be both productive and successful.
Maybe it’s been a while since you’ve used your SD card, so you must format it before doing anything else. Or, maybe your reason is a bit different. Below are the instances when you’ll have to format a SD card:
- You want to gift it to someone else
- You’ve dug up your SD card to put it to good use again
- You keep getting errors on your SD card
- To keep it working optimally
- Your memory is full
- Before using it for a big project
- To reformat your SD card on Mac.
Before we begin
When working on an important project, interruptions and bumps in the road can be time-consuming and sometimes costly. Getting a virus on your MacBook Pro or MacBook Air could cause unwanted problems and delay your project timeline. That’s why it’s important to keep your Mac free of viruses and malware.
MacKeeper is an all-around cybersecurity app. Its Antivirus tool scans your device for viruses and malware in real time, all year round, which makes it difficult to hack. It also continues to run in the background without interrupting you as you work, so you can focus on being productive. Try it for yourself.
- Download MacKeeper on your Mac
- Select Antivirus in the left pane
- Click the Start Scan button
- Wait for MacKeeper to finish scanning your Mac. Once it’s done, you can either delete any malware found or move it to quarantine.
Whatever the reason for wanting to format your SanDisk, there are various ways to go about it. In this article, we’ll walk you through all the methods to clear your SD card on Mac. Let’s get started.
Using Disk Utility app
Before completely erasing your memory card on Mac, you’ll have to find it first. In this section, we’ll focus on Mac’s Disk Utility app. It’s part of the Mac's operating system, so it should already be on your Mac.
1. Go to Finder > Applications > Utilities > Disk Utility. Alternatively, you can find and open it via Mac’s Spotlight search
2. When Disk Utility is open, find your SD card on the left side of the screen and select it. If you’ve never formatted it before or if you haven’t given it a name, it’ll be named No Name or Untitled
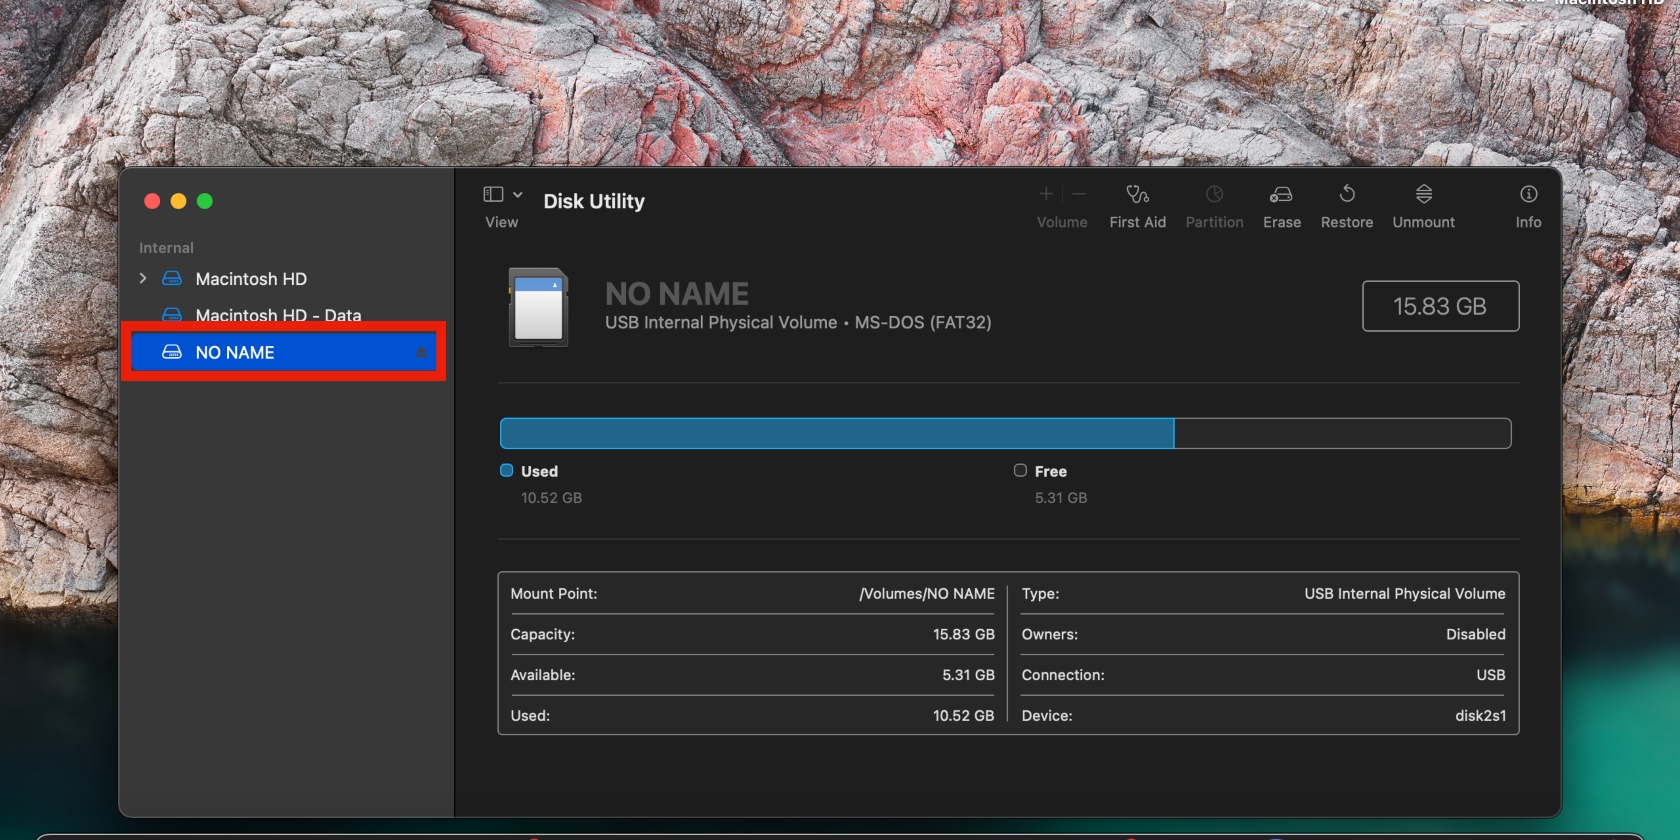
3. Make sure you’ve selected the right SD card by checking that the information on the screen matches up with what you know. For example, is the storage in line with that of the SD card you want to format? If it shows a different value, you’ve probably inserted the wrong SD card
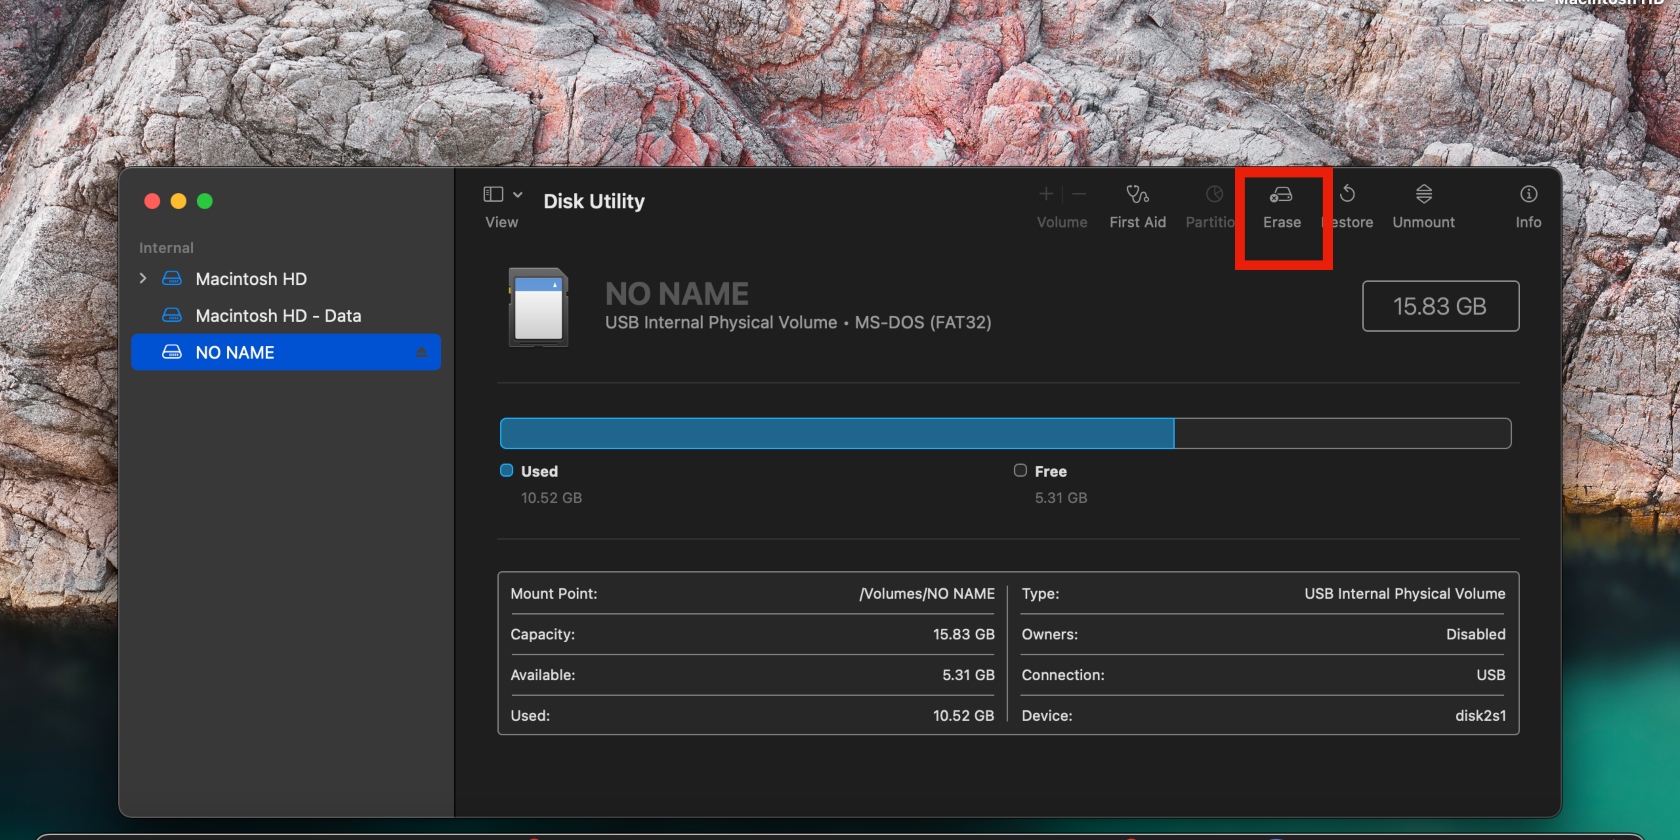
4. Once you’ve confirmed that you’ve got the right SD card, click the Erase button at the top of the screen
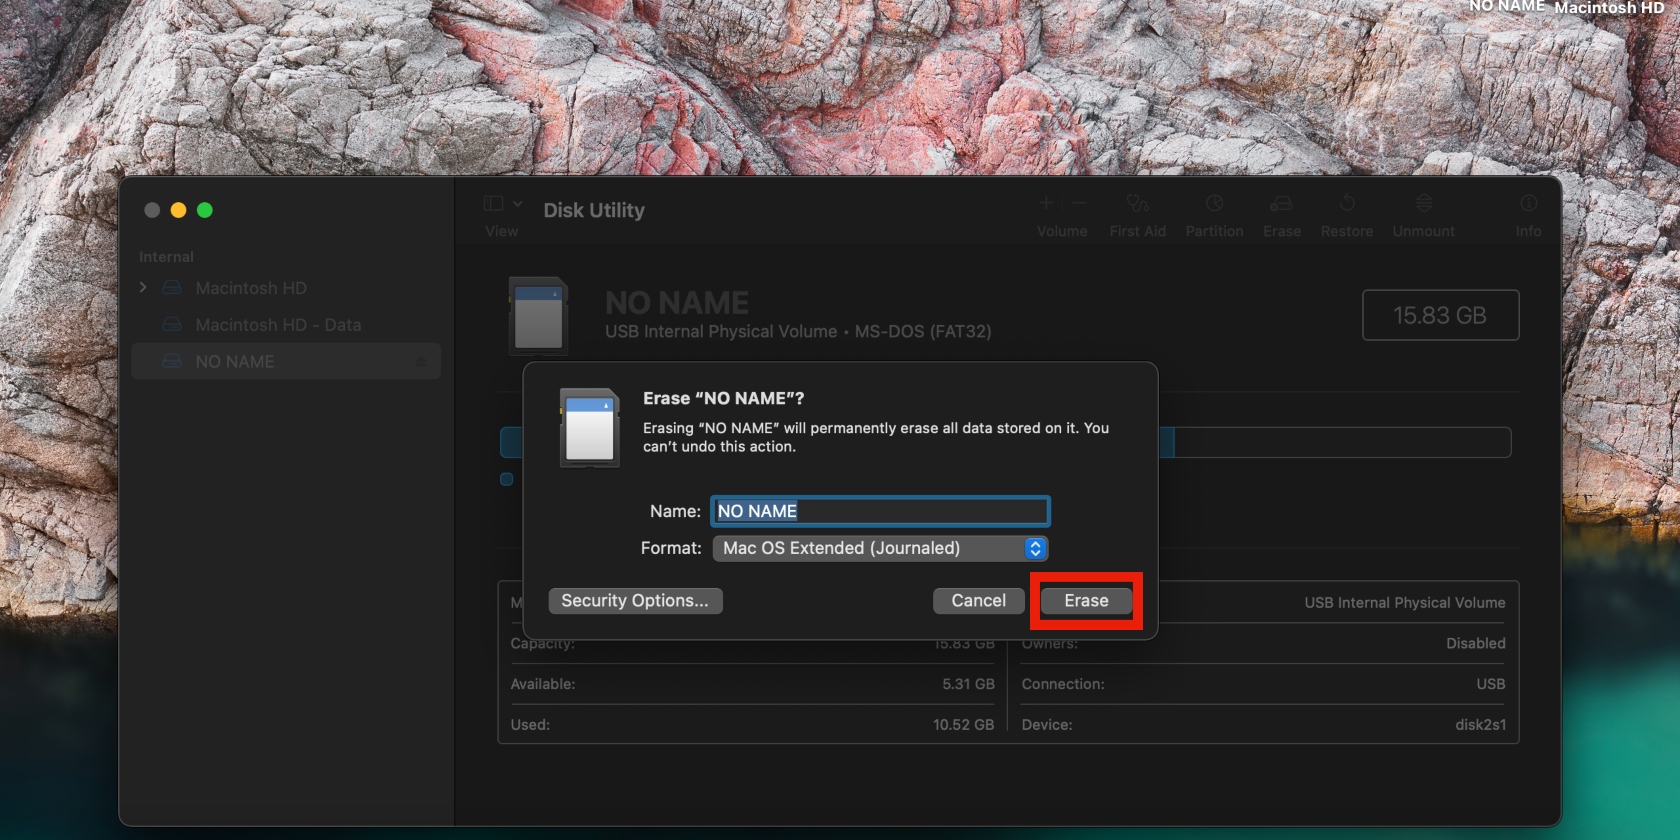
5. You’ll be asked to enter the Name of the SD card before it’s erased. You don’t have to do this; it just helps you identify your SD card on your Apple device. To rename your SD card, enter a short, simple name in the text box. Next is the Format field, which will already be populated. Use the drop-down arrow to choose the filesystem format (note that MacBook devices running OS X 10.6.6 or older won’t support exFat)
6. Once you’ve made your selection, click the Erase button and wait a few moments while your SD cleans. When it’s done clearing, you’ll be notified, and your SD card will be ready for use.
Want to view hidden files? Learn how to show hidden files on Mac.
Using SD Card Formatter
Your next option for formatting your SD card is using the SD Card Formatter app. This is a free app from the SD Association, which is responsible for SD card designs and controls.
So, if you’re worried about the risks of using a third-party app to tamper with your USB, you’re in good hands, as the app supports SD card specifications. The app is simple to use, and we’ll walk you through it.
Follow the steps below to use SD Card Formatter to reset your SD card on Mac:
- Download SD Card Formatter for Mac and open the app
- Starting at the top, use the arrows to select your SD card
- Select either Quick format (frees up space while maintaining the raw data) or Overwrite (wipes all the data permanently, leaving your SD card empty). Once that's done, click the Format button.
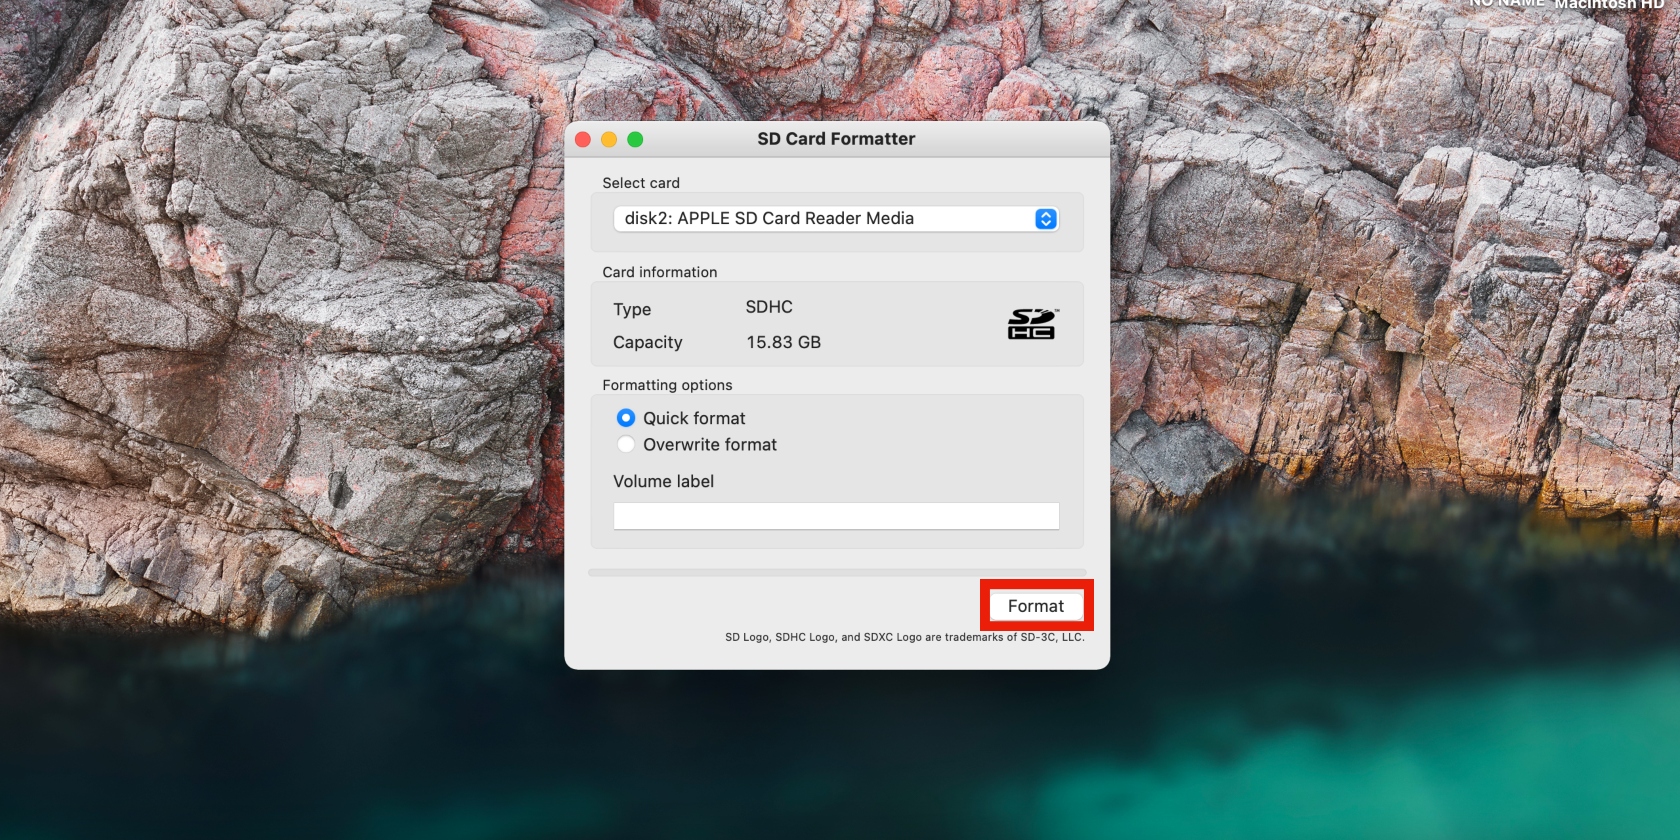
The SD Card Formatter app might be a quicker and more convenient option, as it’s straightforward, with just one screen. It only shows you SD card options, so you don’t accidentally erase the wrong drive.
Want to take your photography skills to the next level? Check out the best Mac apps for photo editing.
Using Terminal
Your final option for formatting your SD card is using command lines in Mac’s Terminal app. We know Terminal can be intimidating to some people, so we’ll guide you step by step to simplify the process. Just ensure you follow the instructions carefully to avoid making mistakes and possibly erasing the wrong SD card.
Make sure your SD card is inserted in your Mac and follow the steps below to format your SD card on Mac using Terminal.
1. Go to Finder > Applications > Utilities > Terminal
2. Type the command: diskutil list and hit Enter
3. You’ll see a list with the drives on your system. Identify your SD card (Hint: look for the disk with the storage size of your SD card. In the screenshot, the SD card is disk2 with 15.8GB storage)
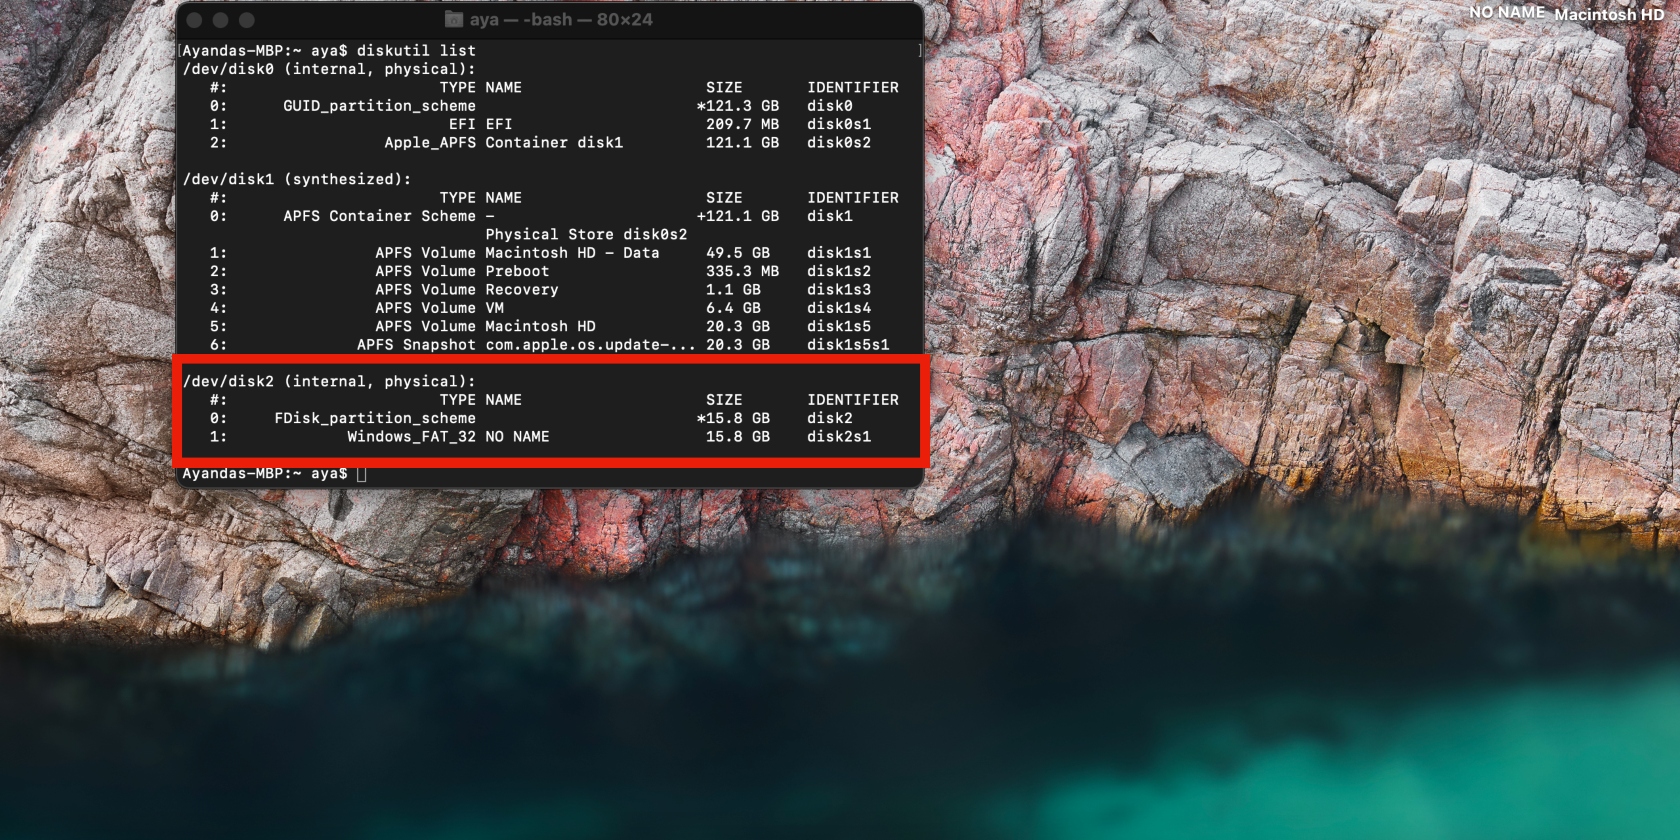
4. To format your SD card without changing the same file system, enter the command: diskutil reformat disk2 and hit Enter. To format the SD card and change the file system, enter the command: sudo diskutil eraseDisk FAT32 MBRFormat /dev/disk2 and press Enter
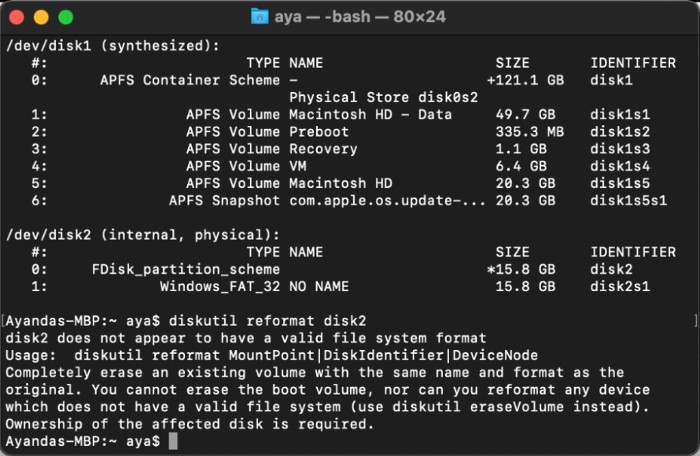
5. When the SD card is done formatting, you can confirm the process was successful by entering the command: diskutil list and pressing the Enter key.
Format your SD card safely on Mac
Working with hard drives can be tricky because a simple mistake can destroy your disk. But if you follow the methods from this article, you’ll safely and successfully format your micro SD card in Disk Utility, the SD Card Formatter app, or Terminal.
Whatever you do, never neglect to use effective antivirus software. MacKeeper’s Antivirus tool protects your Mac in real-time, all year, while you work. This saves you time, money, and the risk of having your Mac hacked and your personal information subsequently exposed.


