In this article you will find the following:
To uninstall DaisyDisk, open Launchpad and click and hold on the app until it starts to shake. Click on the cross button that appears, and your app will be removed.
Many Mac users enjoy using disk cleaning software as it helps simplify the process of taking care of more complex processes, such as deleting junk files and locating large data files. In this regard, DaisyDisk is a popular, paid disk cleaner that can help with finding big files but lacks any features to clear cache files or delete applications. For this reason, you might be looking to delete DaisyDisk in favor of a more feature-rich application, so stay tuned to find out how to delete the app properly.
Before we start:
In contrast to DaisyDisk, MacKeeper is a complete tool that not only allows you to identify and delete large files but also has tools for clearing junk files, removing unused applications, and much more.
Though many of you might find it difficult to know where to start when attempting to delete an app, MacKeeper is here to save the day. Its Smart Uninstaller streamlines this entire process. So, if you want to easily uninstall dust-gathering, useless apps, follow our quick start guide below:
- Download MacKeeper.
- Open MacKeeper, go to Smart Uninstaller, and hit Start Scan.
- Once the scan is complete, go to Applications and tick the apps you’d like to remove.
- Click Remove Selected to delete your selected applications.
Reasons for deleting DaisyDisk
DaisyDisk has been around for years, and though competent in helping users delete files, it’s very basic for a paid application. It lacks lots of the features that other software options on the market have. For example, MacKeeper also includes a Memory Cleaner and built-in privacy features such as Stop Ad and Private Connect VPN. That’s why, though DaisyDisk was once a popular tool for deleting files, users have reported many reasons to uninstall DaisyDisk:
- DaisyDisk is unintuitive and difficult to understand.
- The app may slow down your computer.
- You have to manually add folders in DaisyDisk, which can be difficult for some users.
- There isn’t an integrated smart uninstaller or safe cleanup feature.
- You might have decided to use a more complete application, such as MacKeeper.
Methods to uninstall DaisyDisk from Mac
There are multiple ways to remove DaisyDisk from your Mac: doing it using Finder, removing the app with Mac’s App Store, or using a third-party tool like MacKeeper’s Smart Uninstaller.
Get a quick transfer to the relevant guide below and maximize the additional disk storage gained when removing the unused app:
- Get rid of DaisyDisk using Finder
- Remove DaisyDisk from the Mac App Store
- Delete DaisyDisk via the in-built uninstaller
- Uninstall DaisyDisk using a third-party uninstaller
1. Get rid of DaisyDisk using Finder
Finder is a powerful file browser that comes with your Mac. It can be a bit overwhelming at times, as there are so many different files on your device, and locating the specific app you want to delete can be complicated. We’re here to help, though. So, if you want to delete DaisyDisk using Finder, follow our instructions:
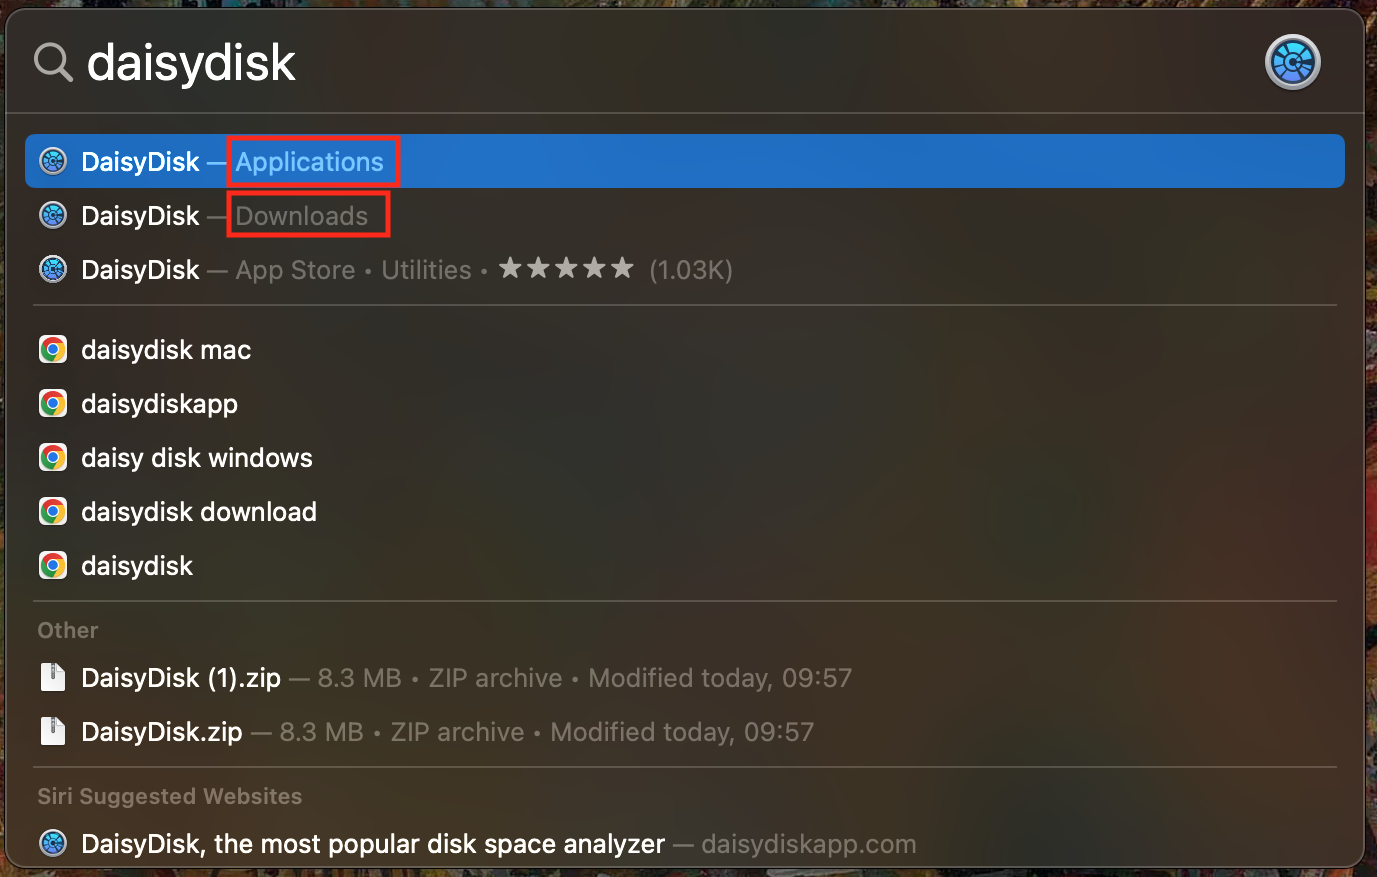
- To locate where DaisyDisk is located, open Spotlight Search by pressing cmd + spacebar.
- Type in DaisyDisk, and it’ll show you where it’s located (usually in your Applications or Downloads folder).
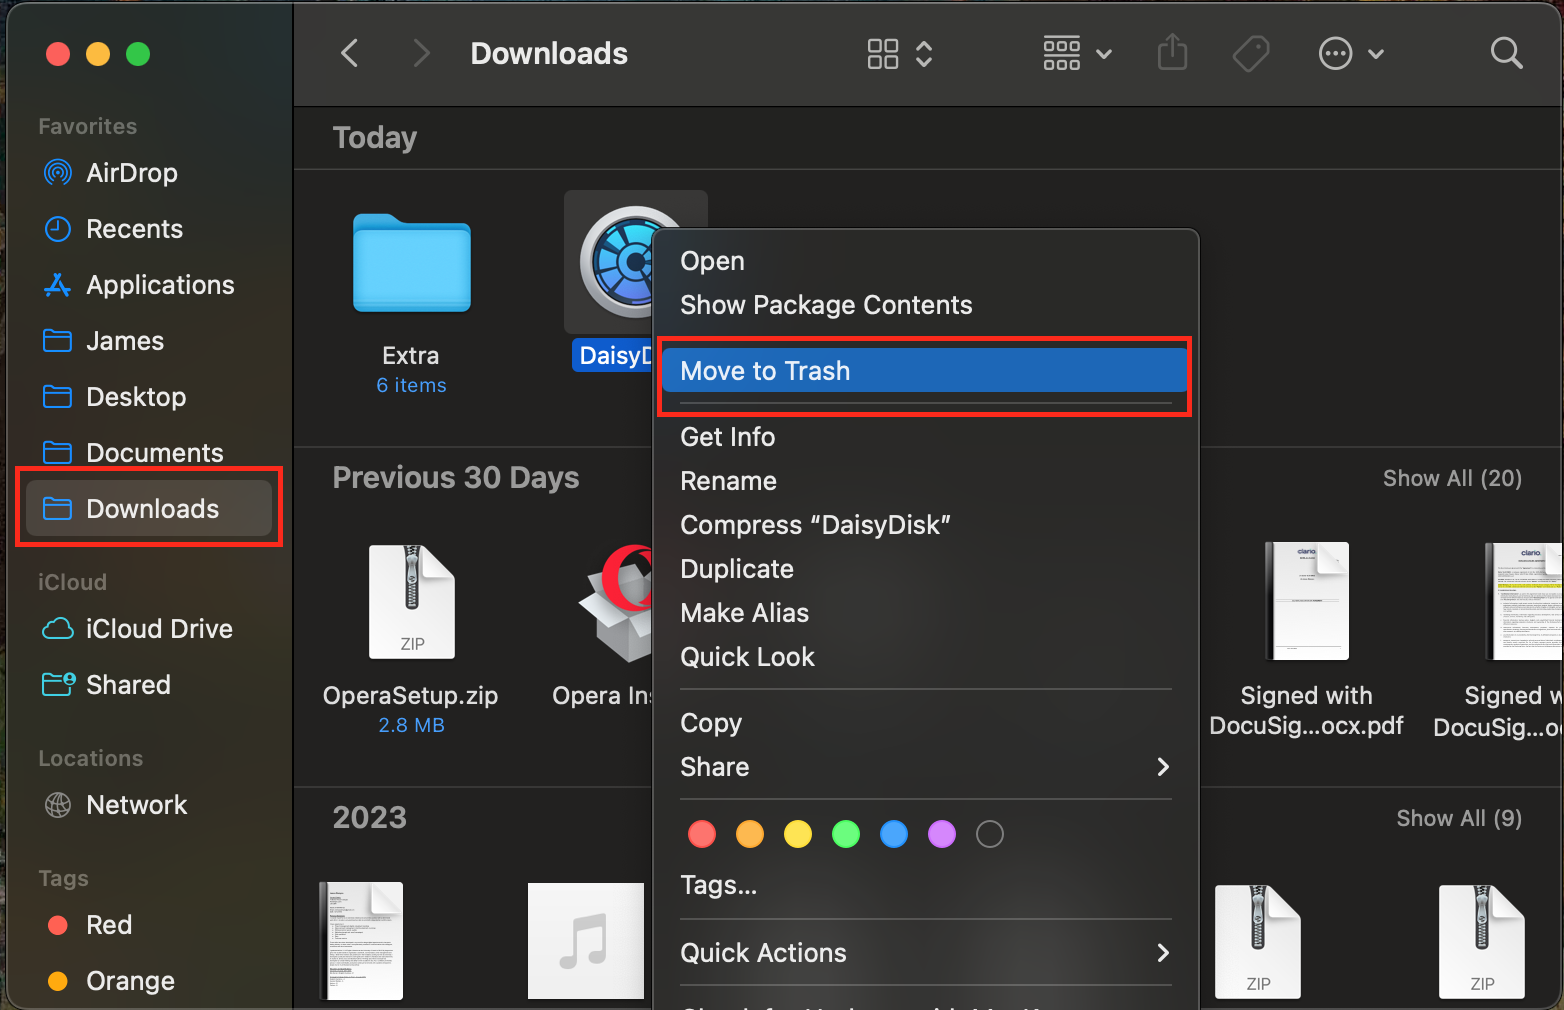
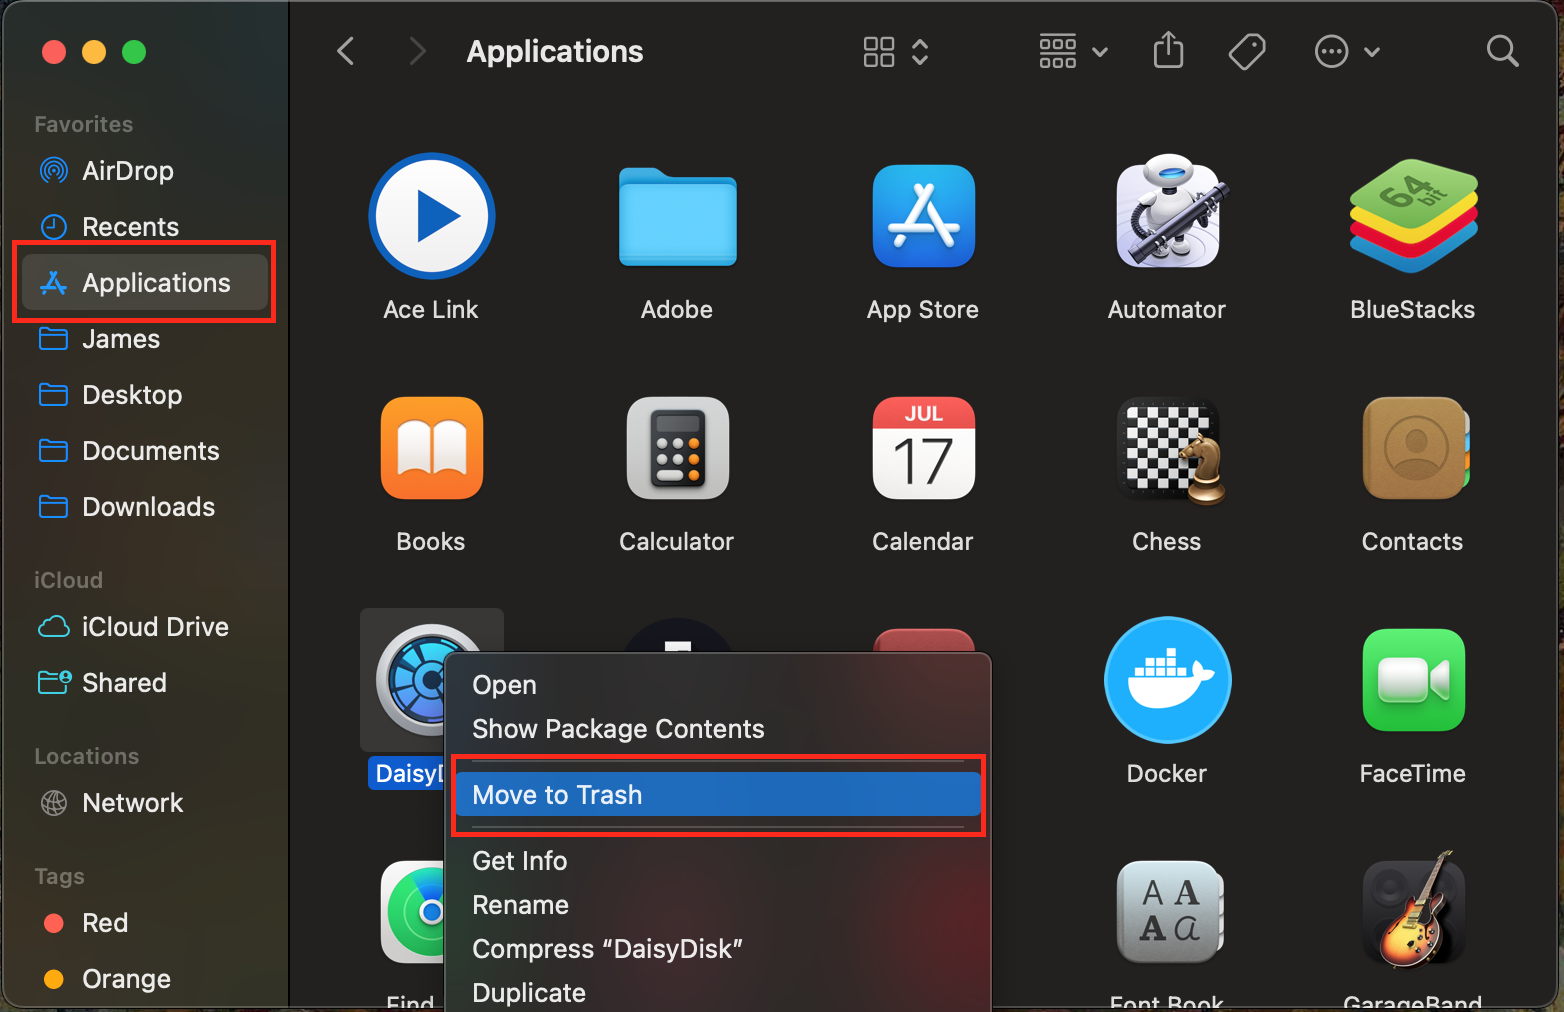
- Open Finder and navigate to the folder the DaisyDisk app is in.
- Right-click on the application, and select Move to Trash.
Hint from our experts:
Sometimes, when deleting an app manually, junk and cache files may not be deleted from your Mac. Thus, to remove software with all the leftovers, it’s better to choose to do it automatically with MacKeeper’s Smart Uninstaller.
2. Remove DaisyDisk from the Mac App Store
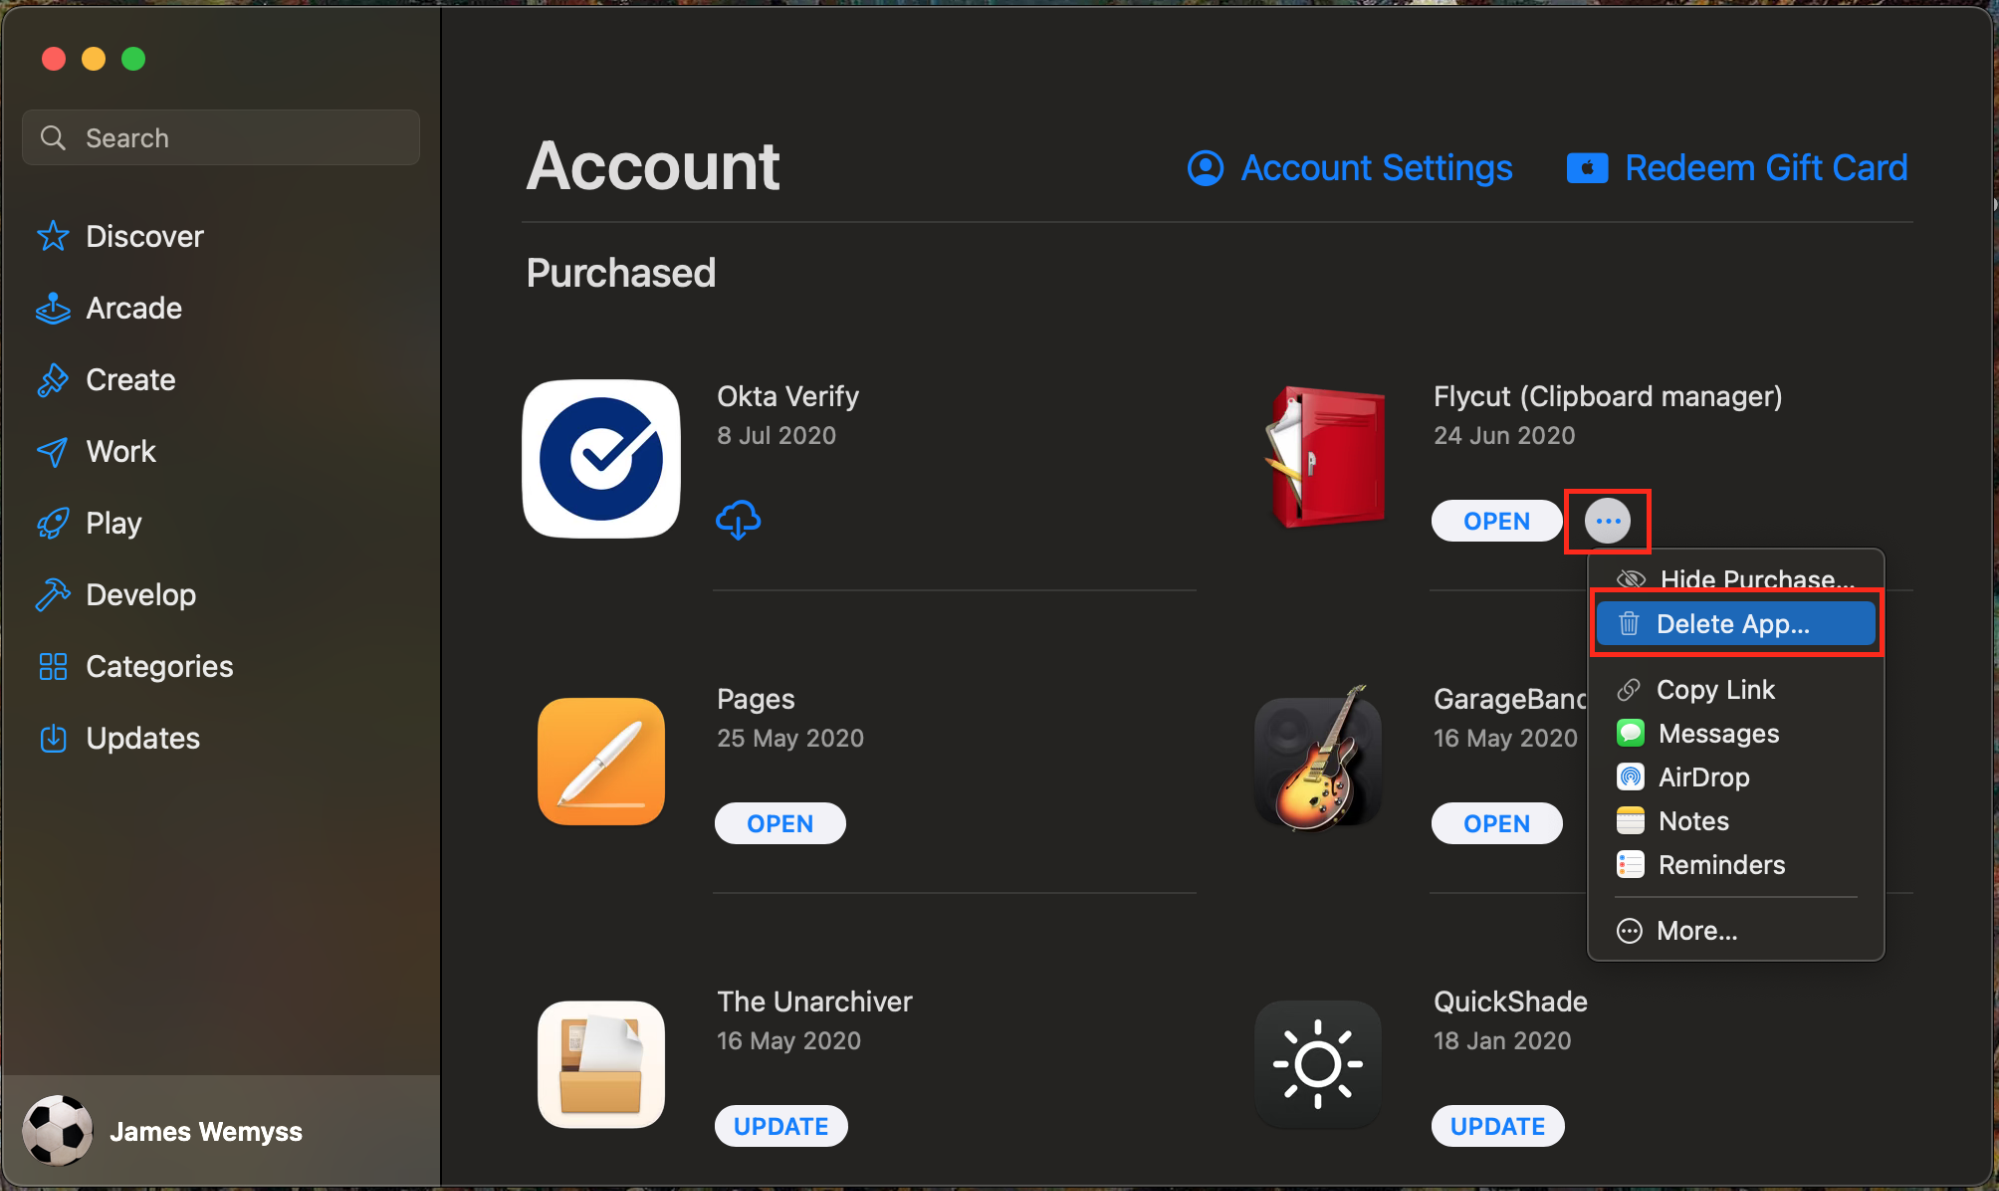
If you purchased DaisyDisk on the Mac App Store, you can uninstall it using the App Store itself. This process is useful if you intend to re-download an app in the future. As the app will be linked to your Apple ID, you will be able to reinstall it at any time. To uninstall DaisyDisk (or any App Store app), follow our steps below:
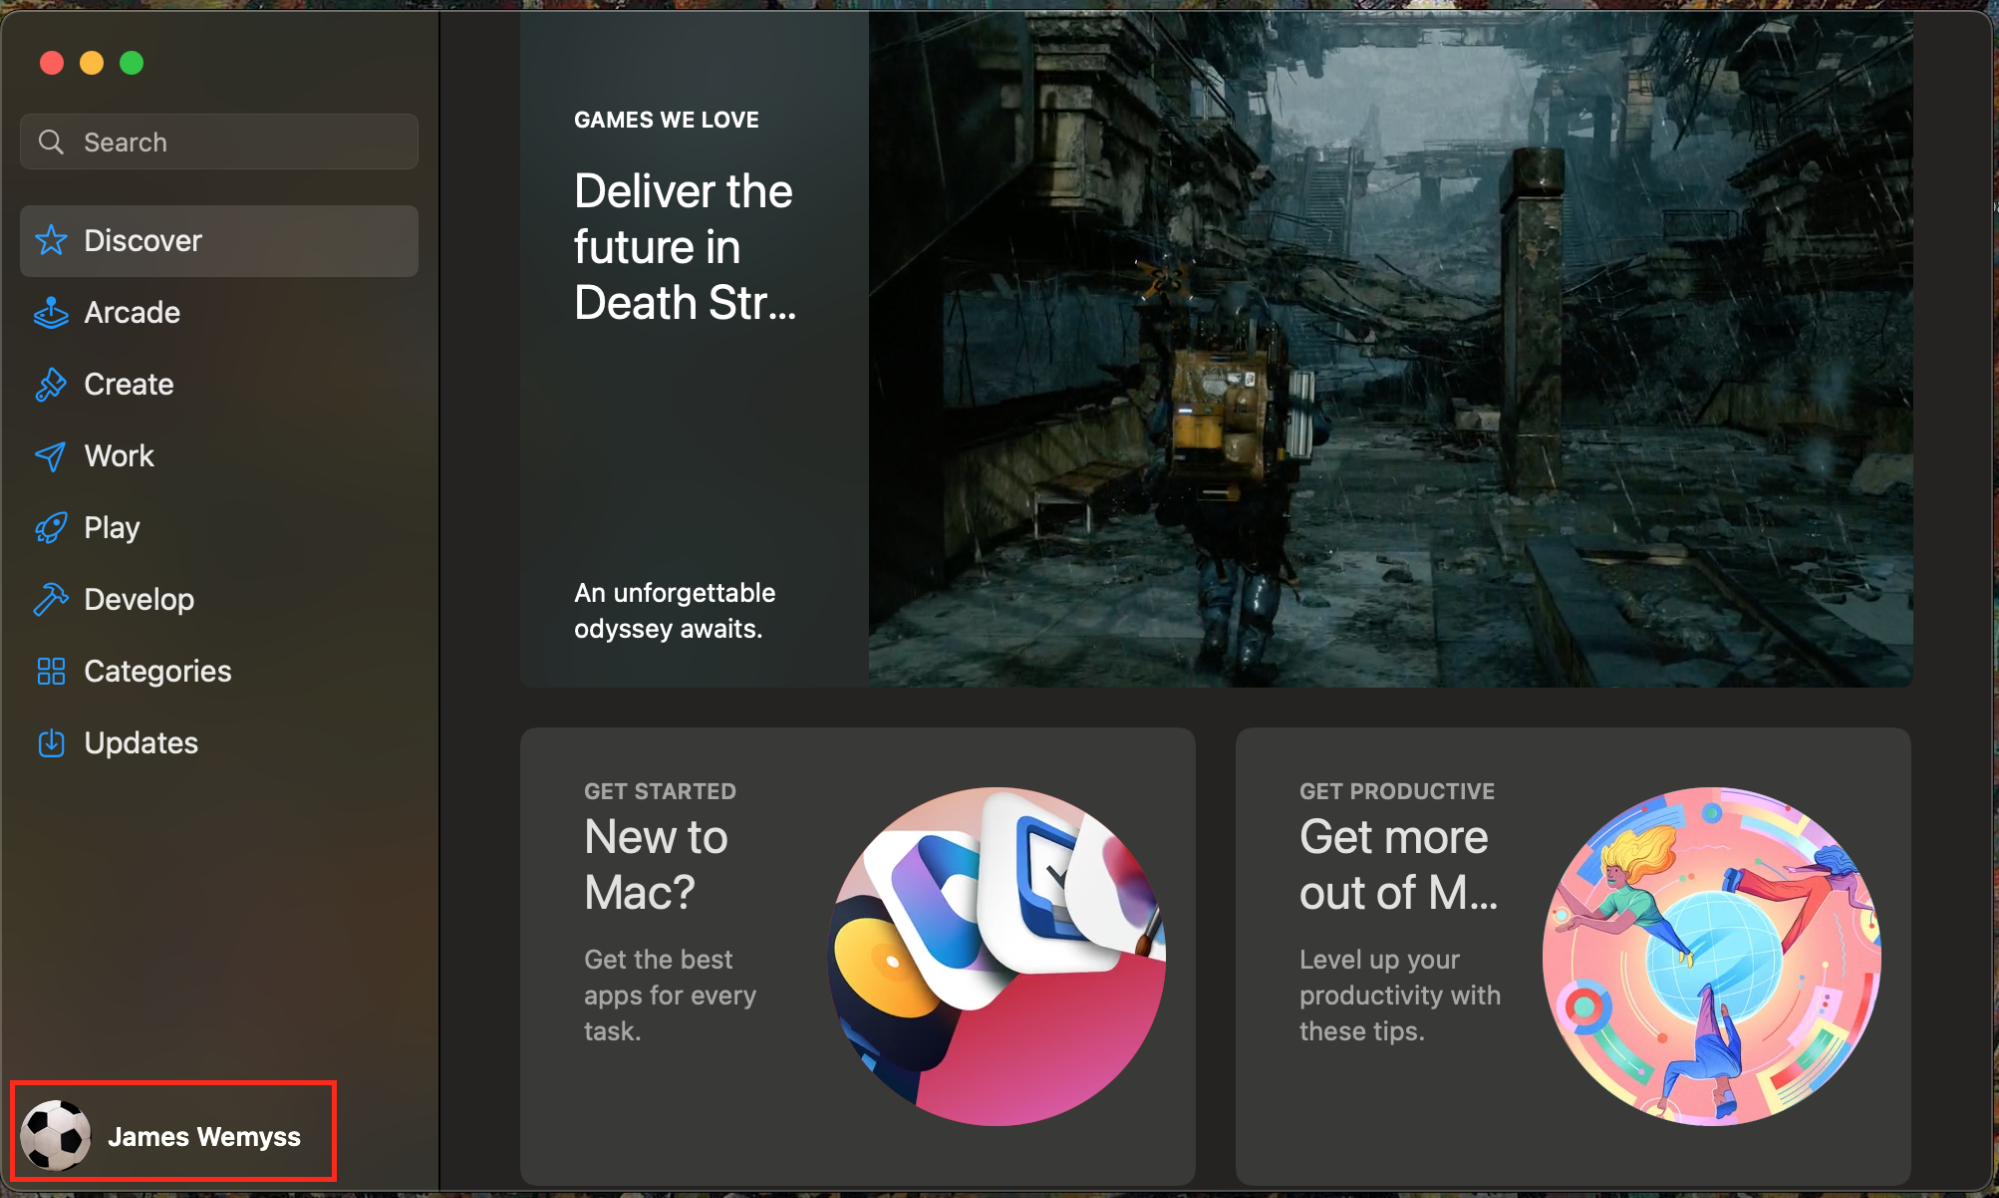
- Open the App Store and click on your username in the bottom left corner to display the Purchased page.
- Go to DaisyDisk in this list, and click the ‘…’ button next to the app.
- Select Delete App from the drop-down menu, and DaisyDisk will be uninstalled.
3. Delete DaisyDisk via the in-built uninstaller
Some Mac Apps provide their own in-built uninstaller, which will appear in your Launchpad. Though this is quite easy to use, in-built uninstallers often keep junk and cache files on your laptop and don’t perform a clean uninstall. We should warn you that DaisyDisk doesn’t have an in-built uninstaller, but this method is worth mentioning, even though we generally advise against it.
4. Uninstall DaisyDisk using a third-party uninstaller
If you want to perform a completely clean uninstallation of DaisyDisk to save valuable storage space, the best method is to use a third-party app. Third-party uninstaller software helps to streamline the entire process, making it easier than ever to uninstall anything. If you want to completely remove DaisyDisk, follow these instructions:
- Download MacKeeper.
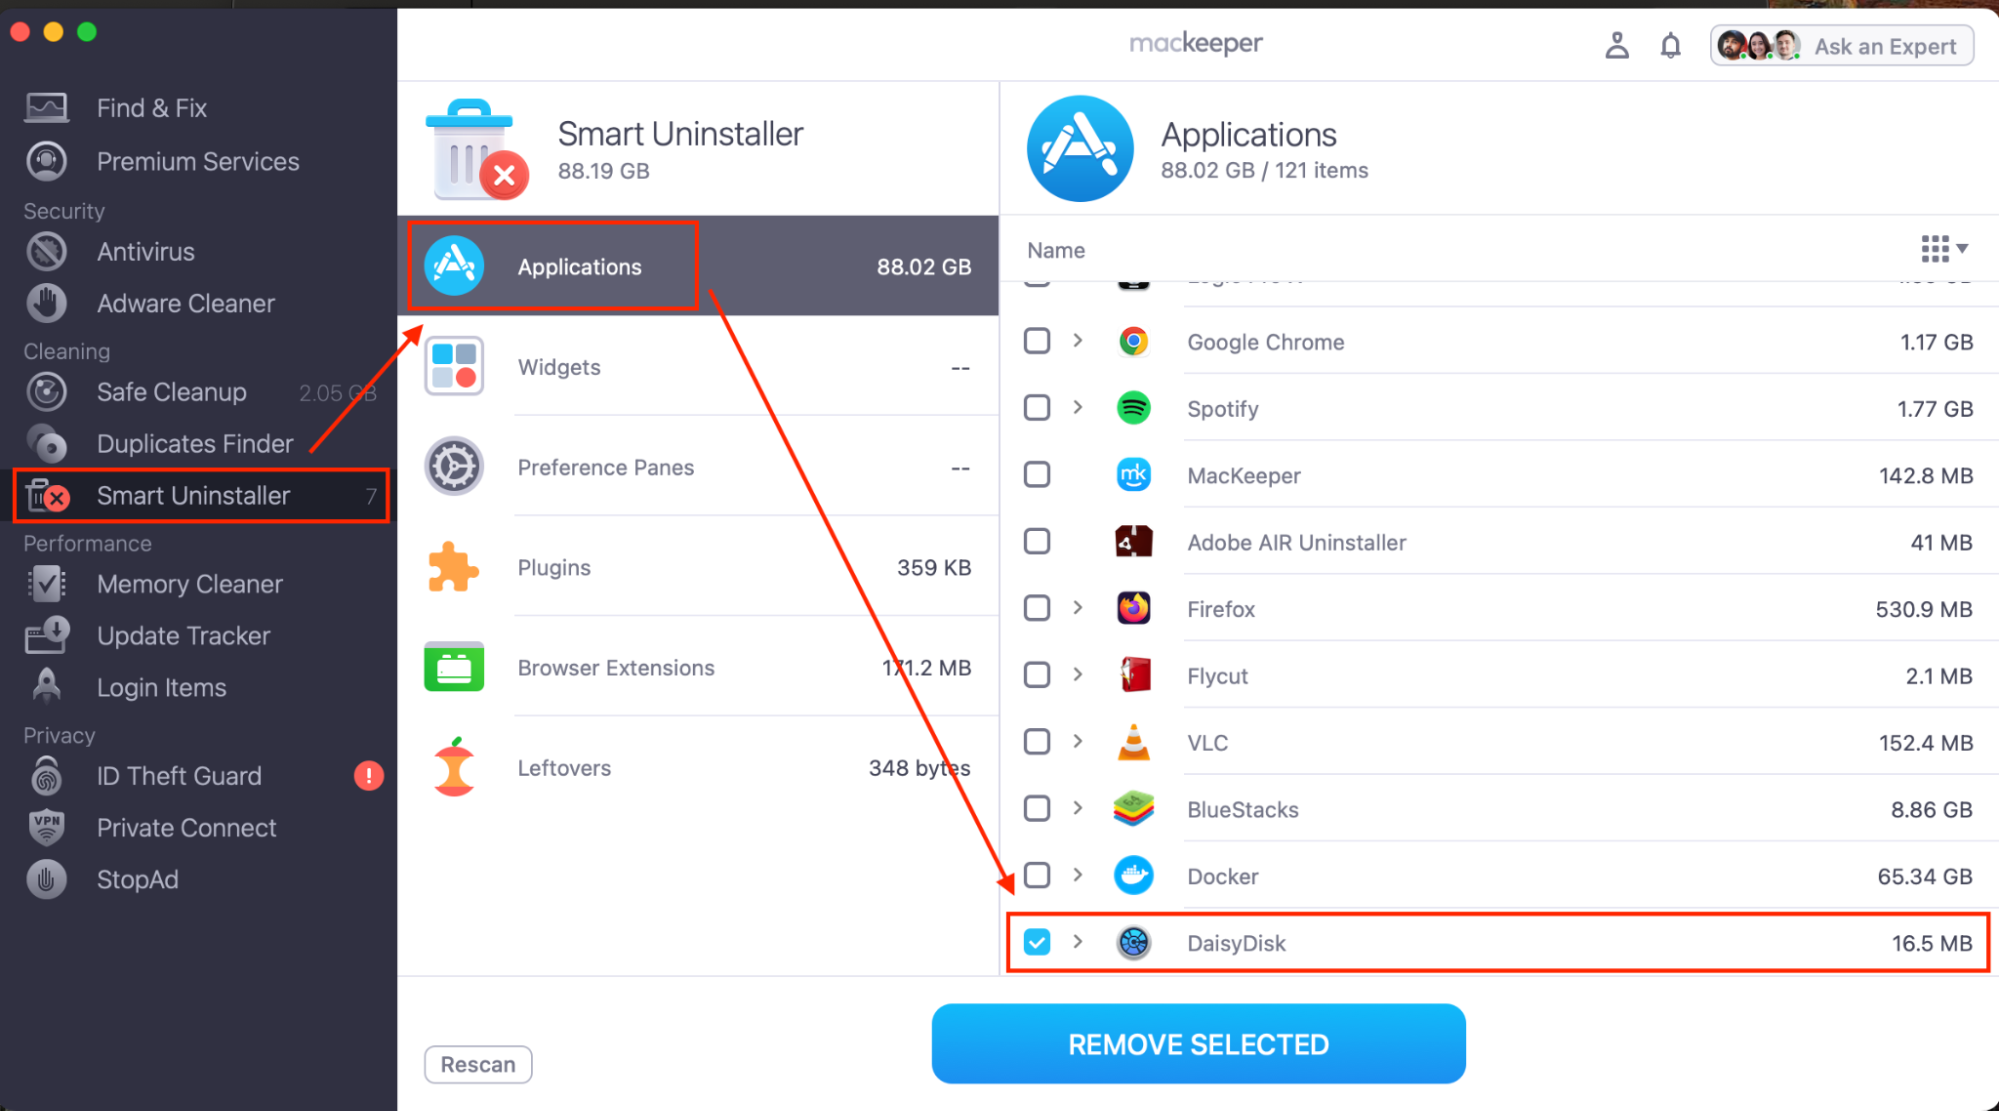
- Select Smart Uninstaller from the side menu.
- Press Start Scan to find all the apps currently installed on your Mac.
- Then, select Applications from the menu, and tick the box next to DaisyDisk and any other app you’d like to uninstall.
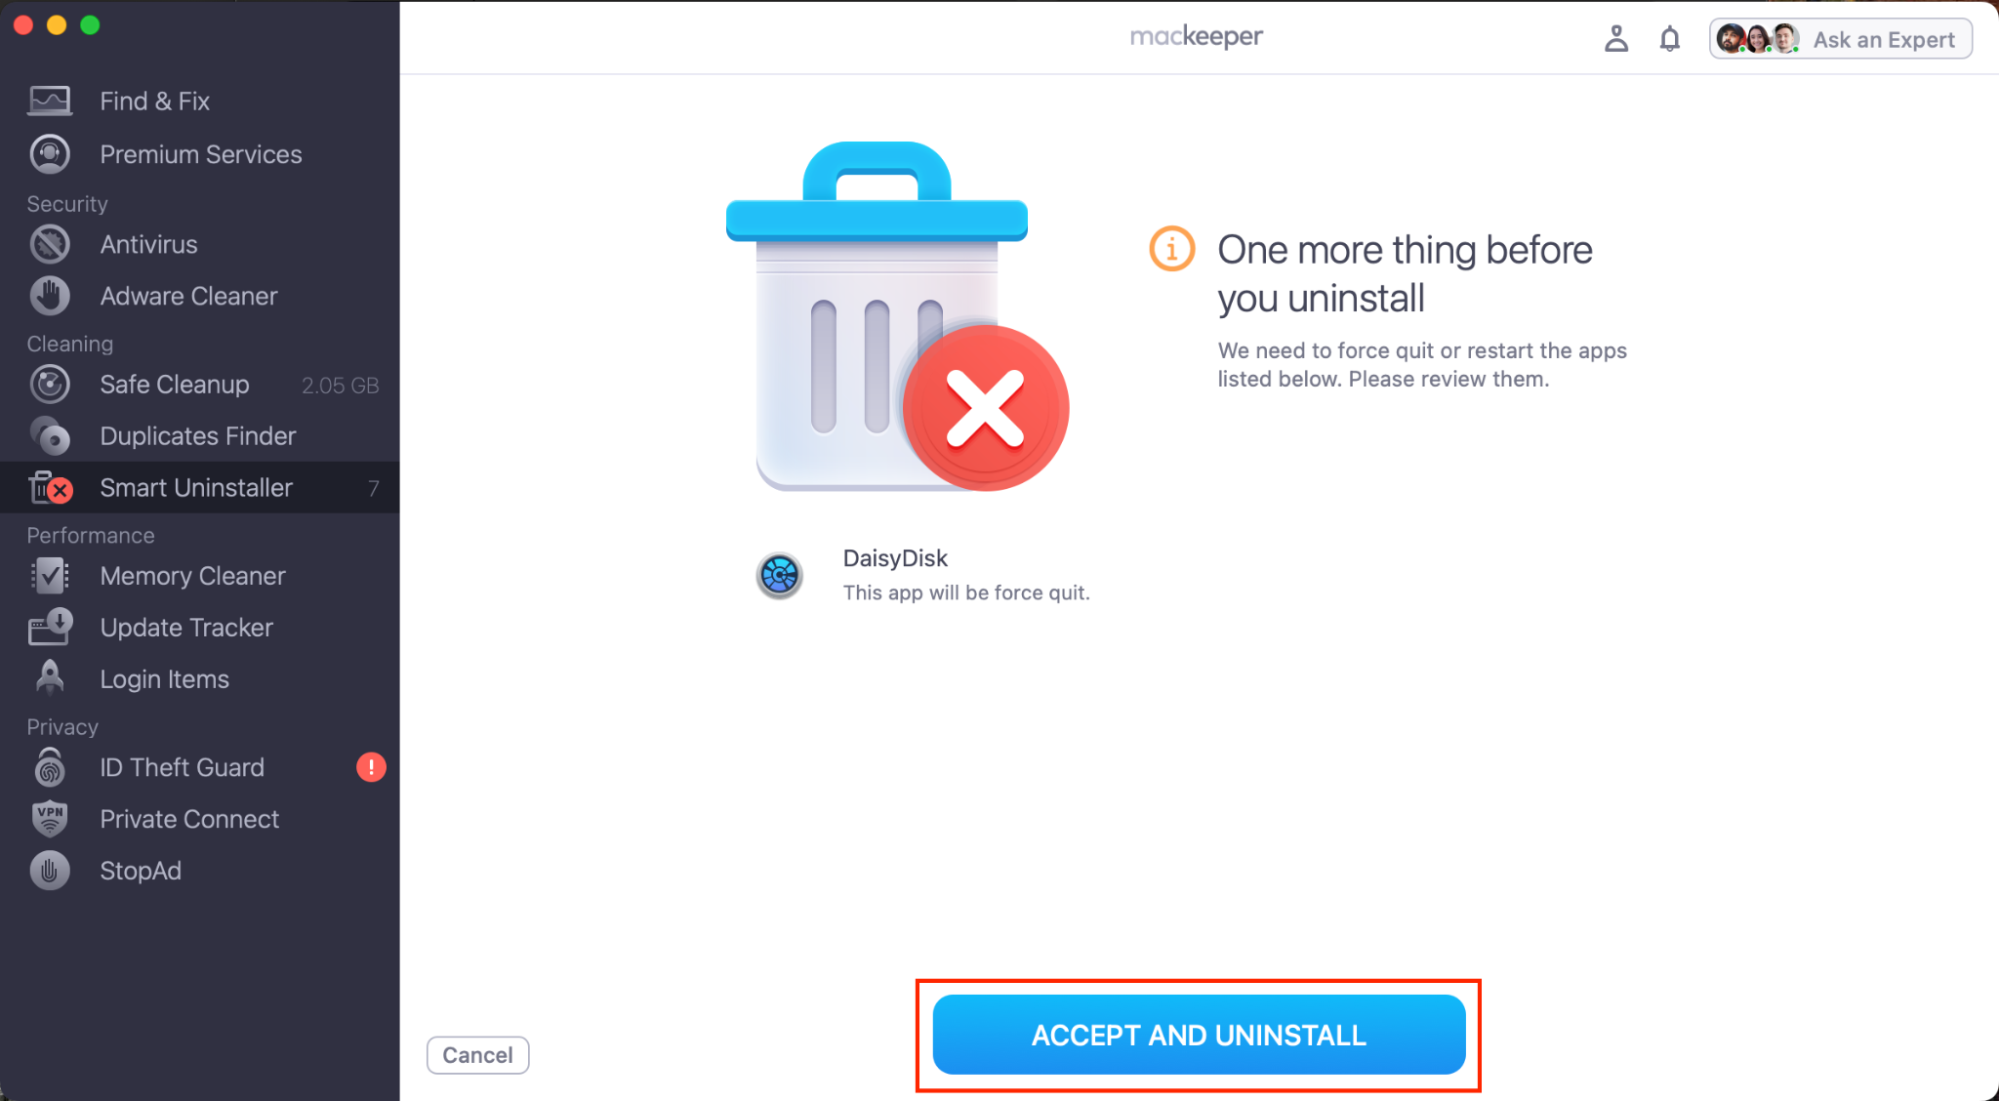
- Click Remove Selected, and DaisyDisk will be uninstalled.
Tip from our team:
MacKeeper isn’t only a great solution for removing apps—it also offers a whole host of additional features, such as Antivirus and Memory Cleaner, to help speed up your Mac.
Also, if you would like to know how to completely delete an app on Mac, MacKeeper’s Smart Uninstaller makes it easy to fully delete DaisyDisk and any other apps that you no longer use.
There’s a new app in town
By now, you should be an expert in how to uninstall DaisyDisk by various means. Also, you should be aware that using a third-party app is often the most efficient way to uninstall an app. MacKeeper will uninstall unnecessary apps but also has the storage management features of DaisyDisk. This means it can do everything DaisyDisk can and so much more.
Moreover, MacKeeper is a one-stop shop to get the absolute best out of your device, with cleaning, security, privacy and performance features built-in, helping you get the absolute best out of your Mac. It also offers 24/7 technical support, offering a live chat service with one of our experts to assist with any Mac issue you may be facing—till the moment the problem is solved.


