In this article you will find the following:
If you ever find iCloud not working on Mac, it can be extremely frustrating. As Apple’s online storage service, it’s linked not just with macOS but iOS too. So whether you have a MacBook Pro, iMac, MacBook Air, or iPhone, iCloud is an essential part of the experience.
iCloud works with a long list of Apple’s apps and features. For example, you can save photos, documents, passwords, messages, emails, and much more in the cloud. But if you can’t access iCloud, then you’ll be unable to access those features.
In this article, we’ll look at what to do if you can’t sign into iCloud on Mac.
Before we start
Most of the time, Macs run smoothly without any problems. But when issues do arise, they can be caused by a wide range of things, including corrupted files, malware, and incompatible add-ons. MacKeeper can help with all of these and more. It’s packed with useful features like Safe Cleanup, Smart Uninstaller, and real-time Antivirus. So if you’re having difficulty getting into your iCloud account, try MacKeeper and see how it can help you.
Why might this happen to you?
As an online service, you need an internet connection, a working computer, and your login details for iCloud to work. Often, the reason you can’t sign into iCloud on Mac is that something has gone wrong with one of these. But there are other reasons too, including problems with the service itself, which are out of your control.
If it happens to you, you might see an error message like “this Mac can’t connect to iCloud because of a problem with [your email address]”. This isn’t always the case, but either way, the methods to get rid of iCloud problems are often the same.
First things to try when you can’t connect to iCloud
A lot of the time, problems with iCloud will be caused by something simple. That’s good news, because it means the right fix is often simple too. Here are some of the first things you should try if you get an error connecting to iCloud or can’t open your iCloud services.
Disable iCloud features on your Mac
If iCloud isn’t working as you expect it to, it might help to disable parts of it. In your Mac’s iCloud settings, you can toggle various features on and off, such as iCloud Drive and iCloud Mail. And you choose whether or not to upload files, photos, passwords, and other data.
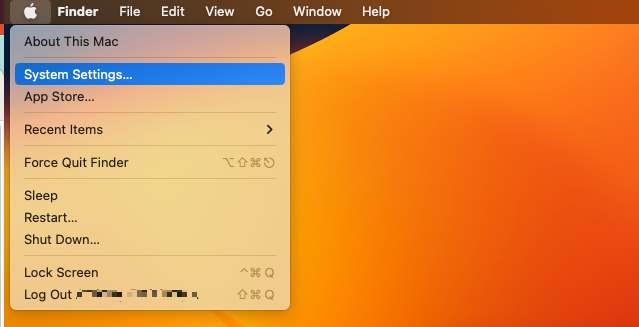
- Click on the Apple icon in the menu bar, and select System Settings
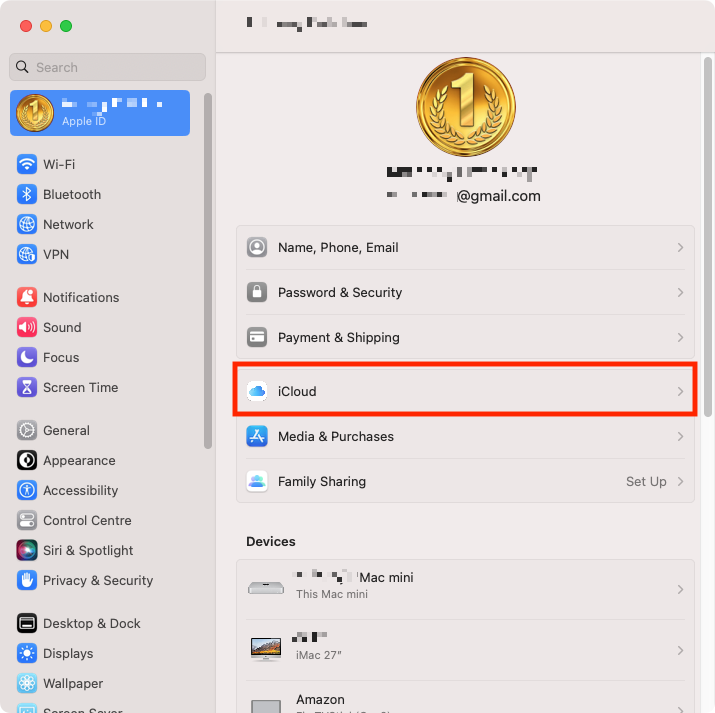
2. Select your Apple ID in the top left, and select iCloud
3. You can now turn off individual features of iCloud
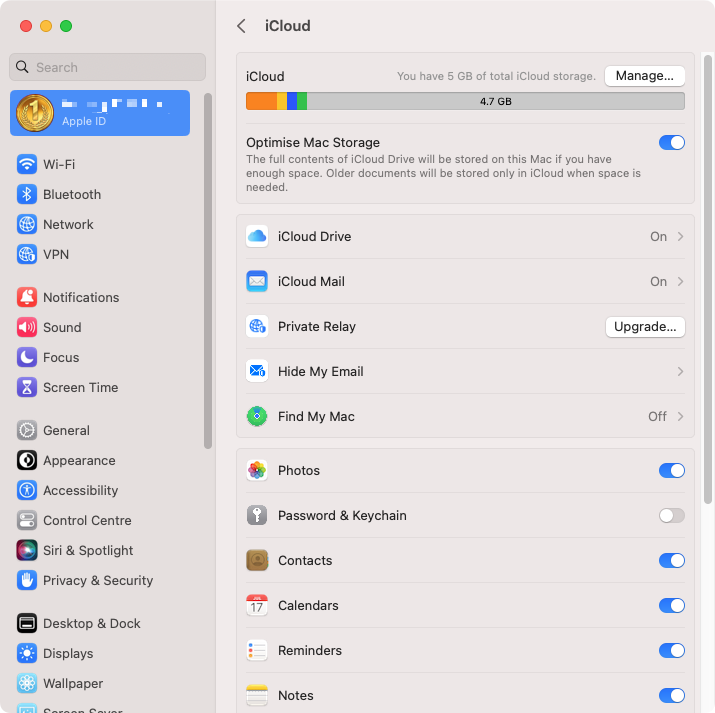
4. Try them on and off again, or disable features you don’t need, then see if iCloud lets you log in.
Look into Apple’s status page
When you’re struggling to connect to iCloud, it might not be caused by anything on your Mac. Instead, it could be because of a problem with Apple’s services. For example, they might have an issue at one of their data centers.
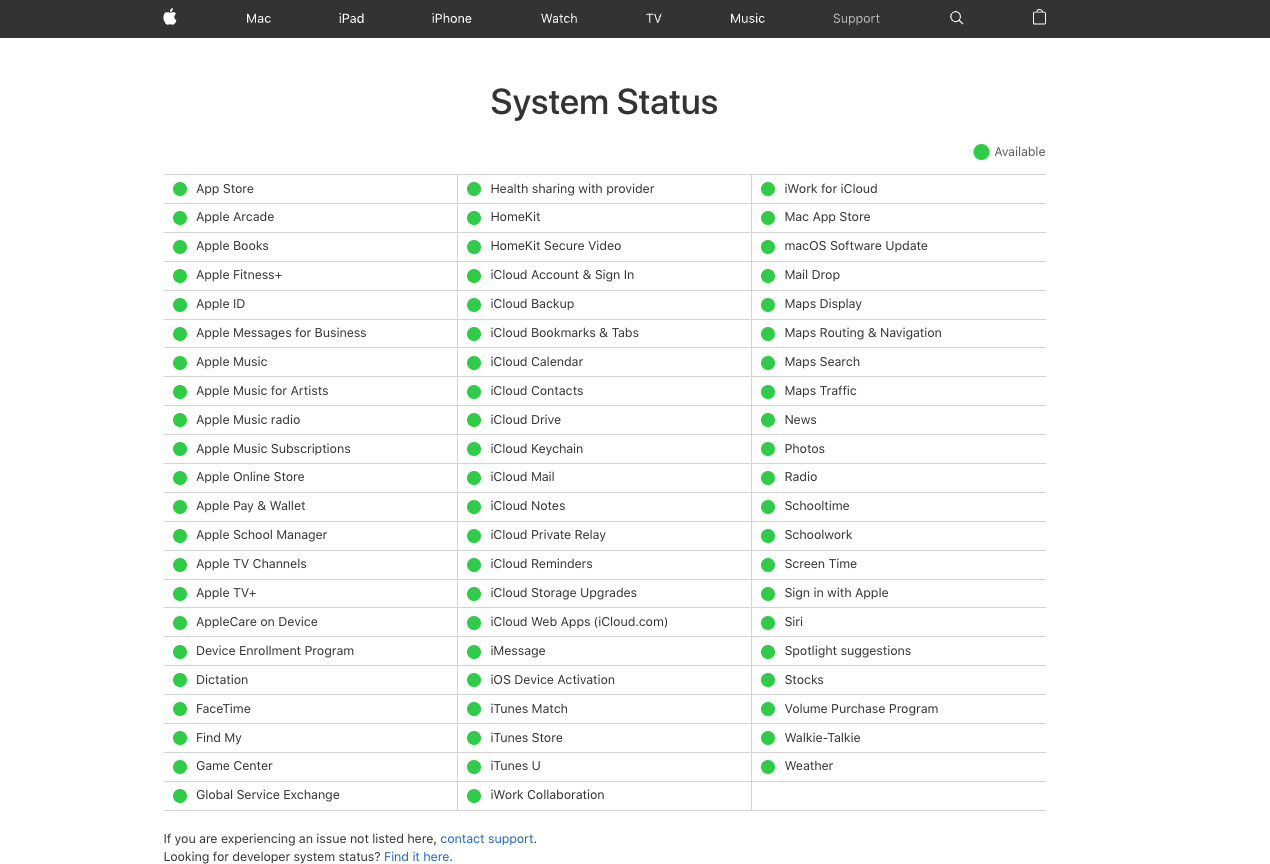
The good news is it’s easy to check if Apple is having problems. On Apple’s website, there’s a System Status page, which shows if there are issues with Apple's many services. If you see anything other than a green circle next to the iCloud services, that is likely why you can’t log in or you might see an unknown error popping up.
Examine your Apple ID details
To use iCloud, it’s essential that you use the correct login details. If you make a mistake with your email address or password, you won’t be able to sign into iCloud. And if you’re logged in, you should ensure you’re logged into the right account.
So if you think you might be in the wrong account, double-check your details.
- Go to System Settings, and click on the Apple ID in the top left
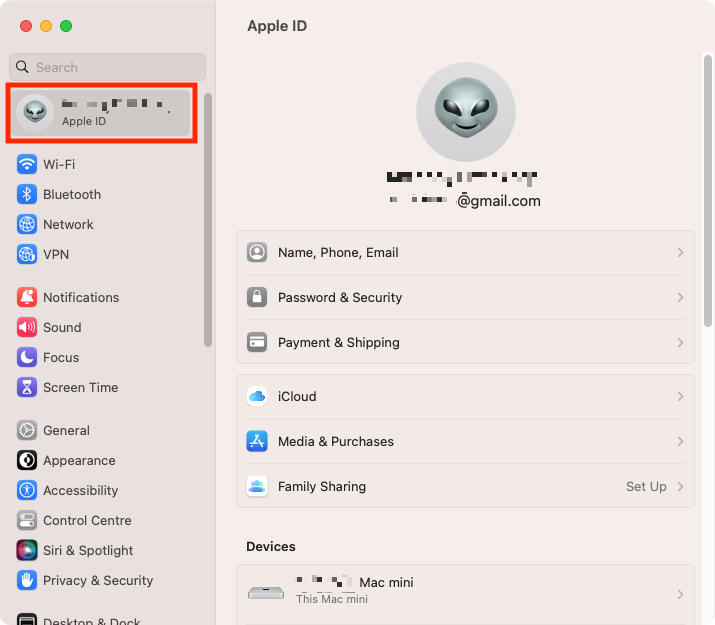
2. Check that the email address is right
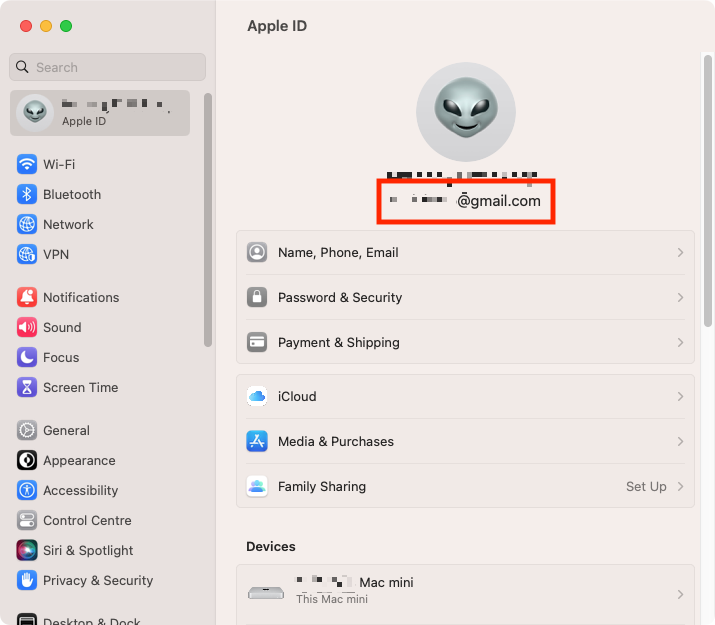
If you’re in the wrong account, you’ll need to sign out and sign in with the right one. Should you have any problems with your login details, you may need to perform an Apple ID password reset.
Sign in with a different Apple ID account
There are two reasons you might want to log into a different iCloud account. One reason would be you’re signed into the wrong one. Another reason is that you can test to see if your difficulty signing in is restricted to one account. You might find that a different Apple ID account doesn’t have the same problem as your main one.
Here’s how to sign out of your account and sign into a new one:
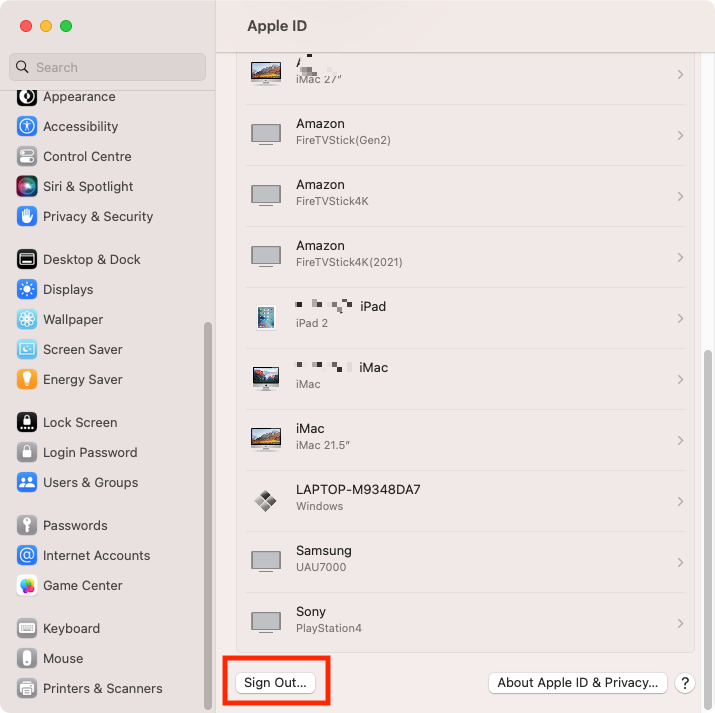
- Open System Settings, and open the Apple ID section
- Scroll down, and click the Sign Out button
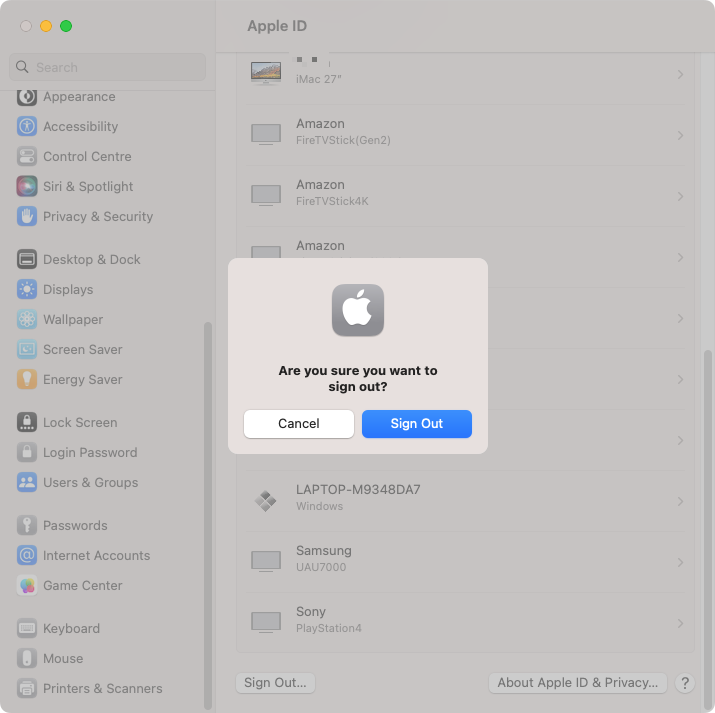
3. In the popup, click Sign Out
4. Enter the login details for your other Apple ID account, and click Next
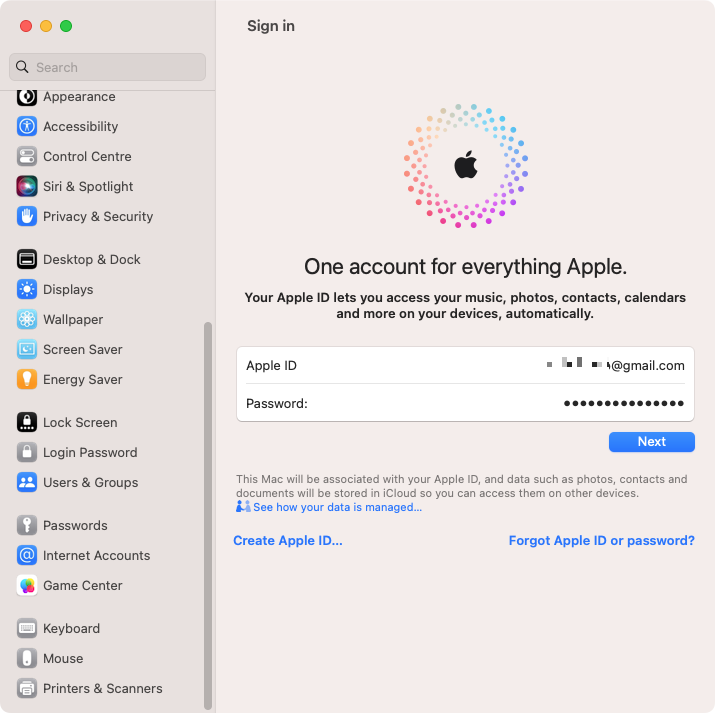
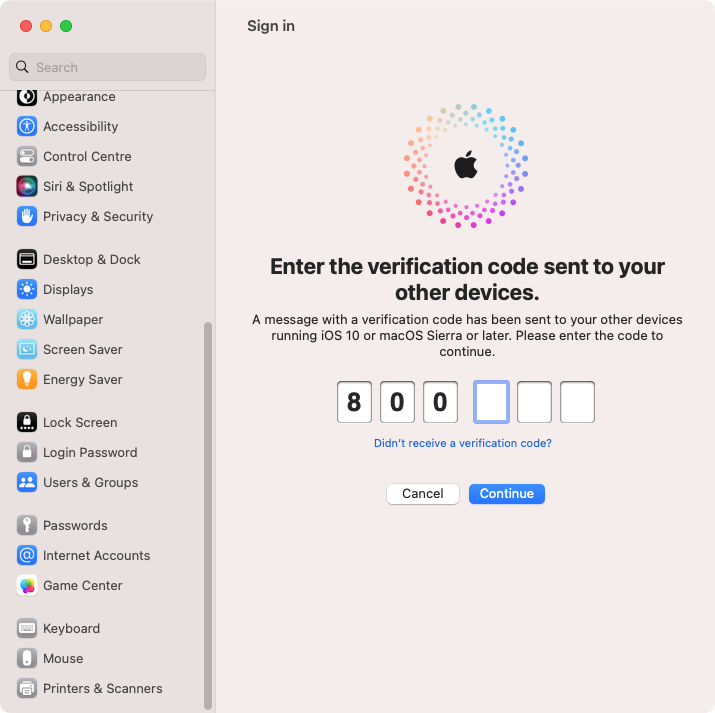
5. Enter the verification code sent to your other Apple devices, and click Continue
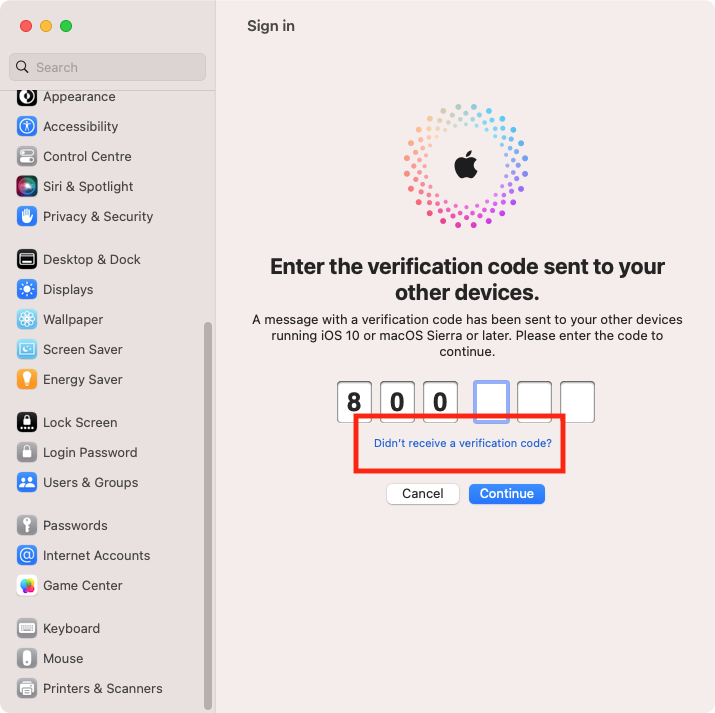
6. If you didn’t get a code or don’t have any other Apple devices, click Didn’t receive a verification code?
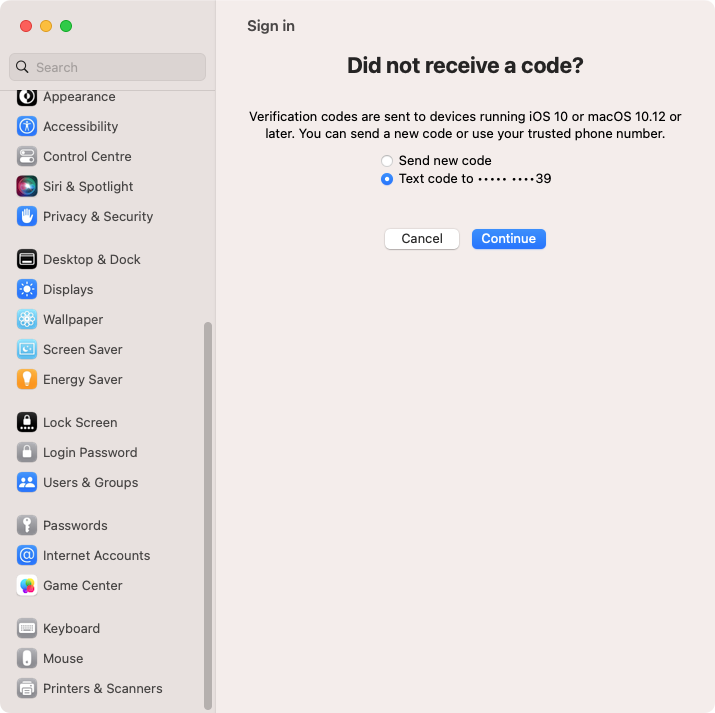
7. You can then choose to get a code sent to you via text message instead.
If iCloud works properly after signing into a different account, then the problem is probably caused by an issue at the account level. You may need to contact Apple to get help with this.
Switch your Mac’s date and time to automatic
The wrong date and time on your Mac can lead to unpredictable behavior. It might even stop your iCloud account from working properly. The solution is easy — set your Mac’s date and time automatically, and make sure it’s set to the right time zone too. Here’s how:
- Open System Settings, and select General > Date & Time
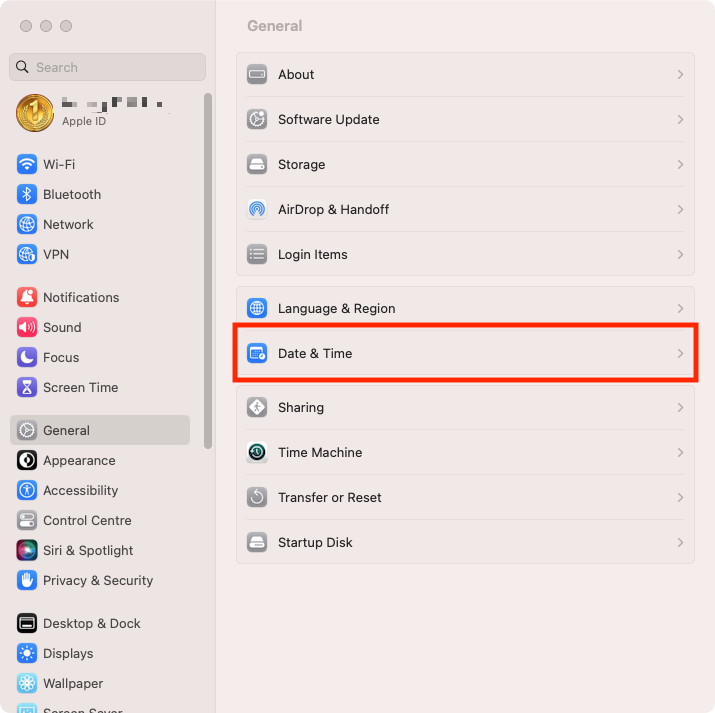
2. If it’s already on, click the toggle next to Set time and date automatically
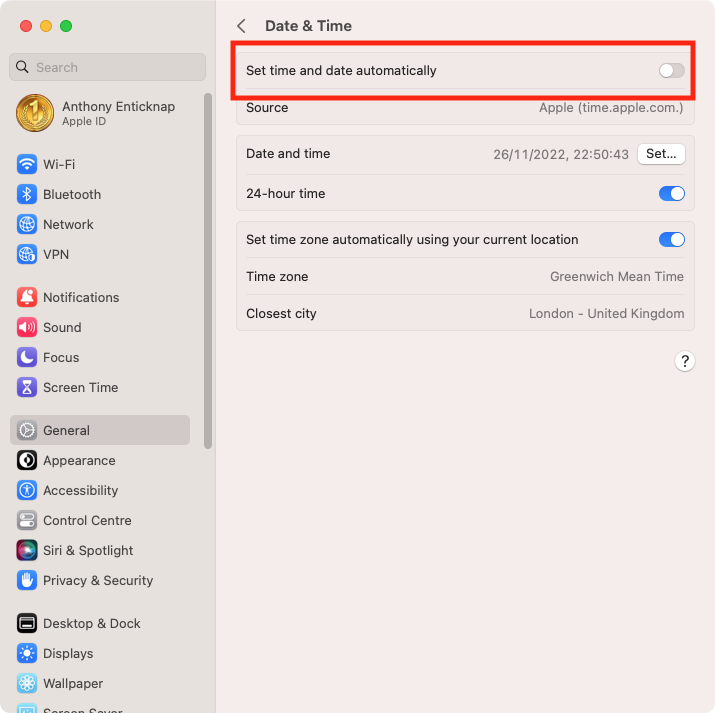
3. Also, make sure to turn on Set time zone automatically using your current location
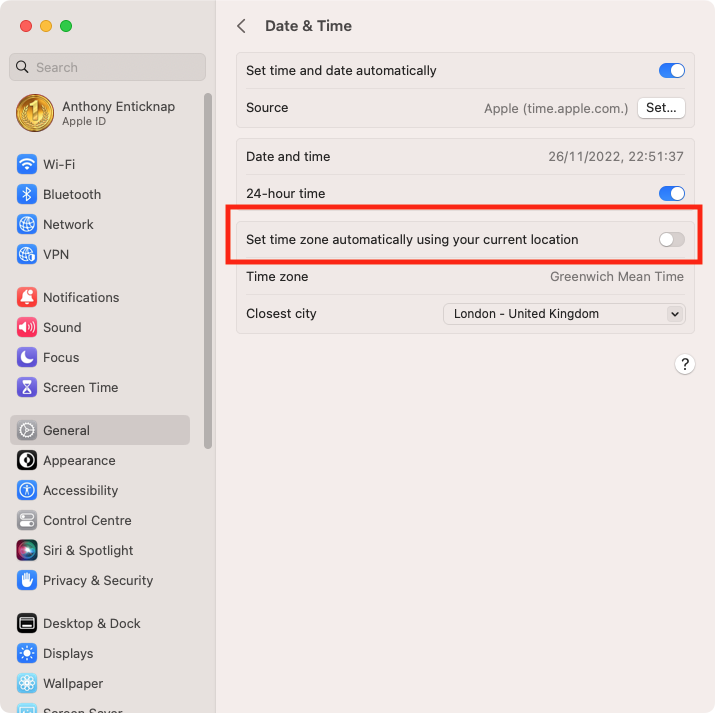
Now, try using iCloud again, and see if it connects as expected.
Restart your Mac
It may seem obvious, but you may need to restart your Mac to get iCloud working. It’s as simple as this:
- Click the Apple icon in your menu bar, and select Restart
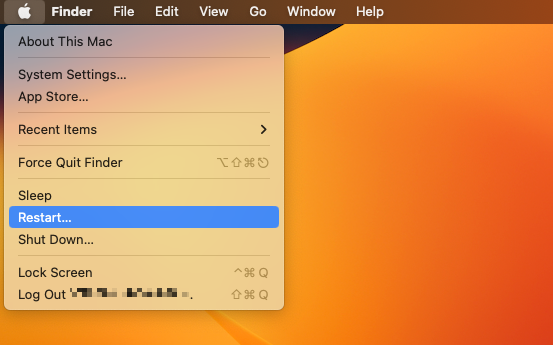
2. Click Restart
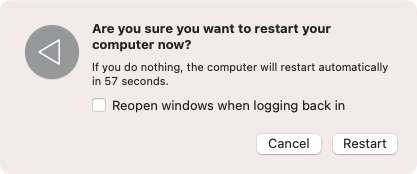
When your Mac has restarted, give iCloud another go. With any luck, it’ll be working as expected.
Advanced fixes for iCloud login problems
So far, we’ve only looked at the most basic of fixes. These are simple things you should check or try if you’re having problems connecting to iCloud. If you’re lucky, one of them will be all you need.
But if you try them all and they don’t work, you might be wondering “Why won’t iCloud just let me in?” Well, before you lose your temper and throw your trusty old Mac into the nearest trash can, try out these more advanced fixes.
Clean out cache files and other redundant data
macOS and many of the apps that run on it use file caches to improve their performance, which work by storing frequently accessed data in temporary storage. Corrupted cache files, however, can sometimes lead to problems, which may include iCloud problems.
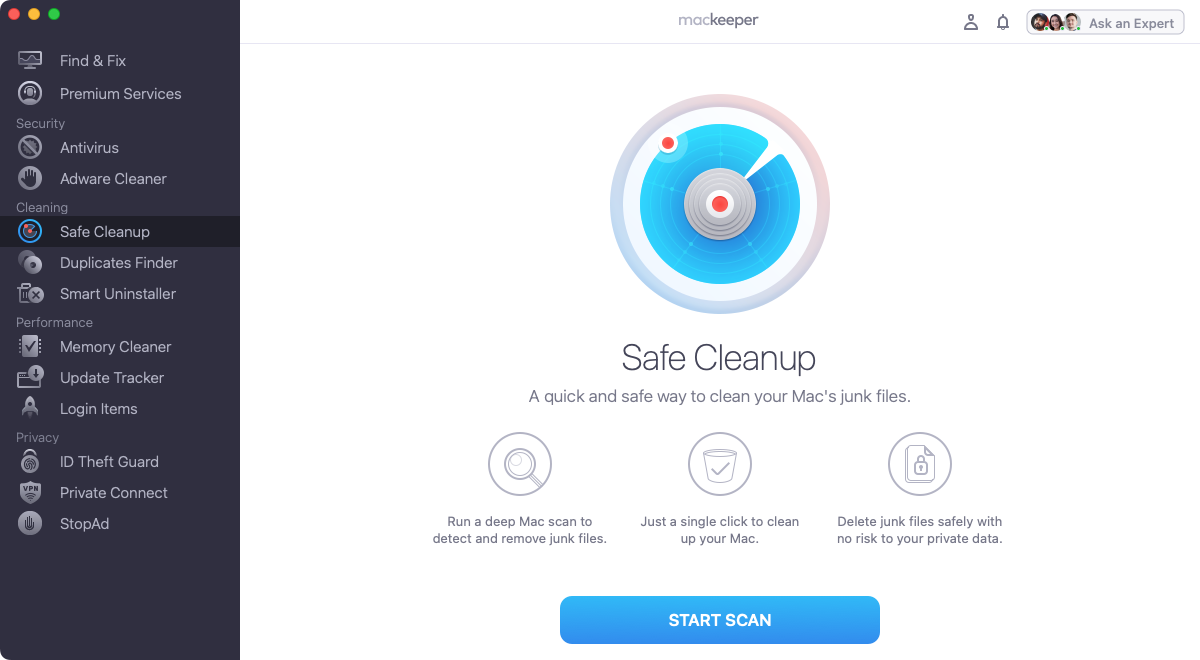
Clearing out cache files can help, and they’ll automatically regenerate as needed. You can do this manually, but it’s a time-consuming and confusing task. With MacKeeper, you can scan for cache files across your Mac and then remove them with a couple of clicks.
- In MacKeeper, select Safe Cleanup, and click Start scan
2. When the scan is finished, review the results
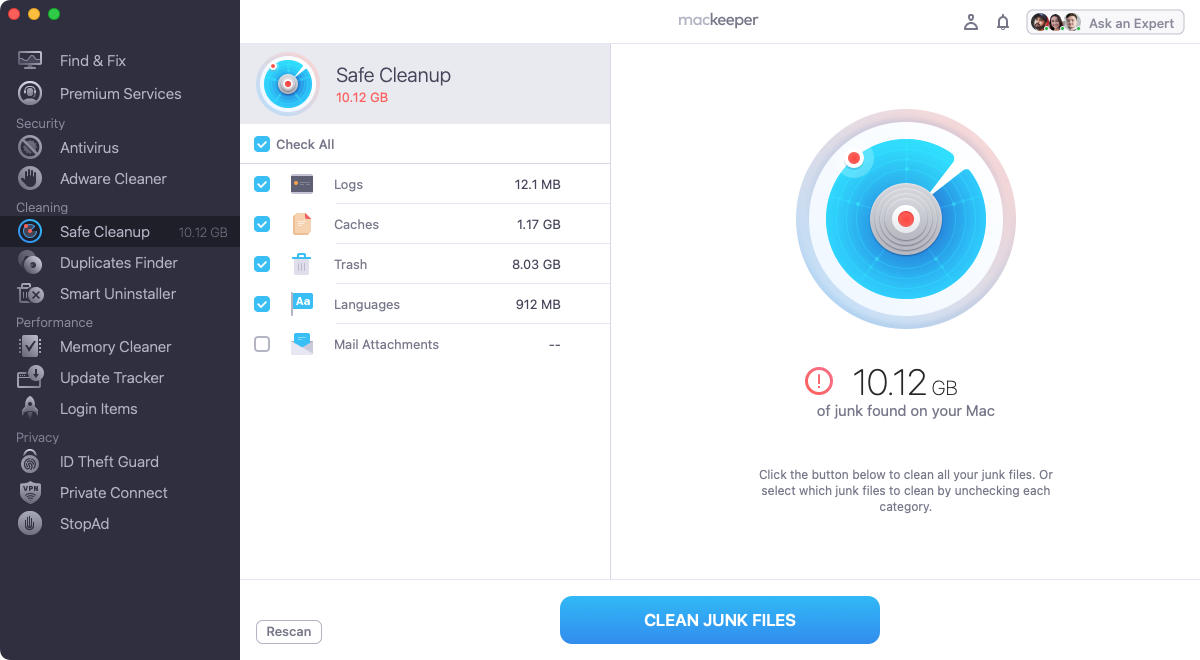
3. If you select a category of data, you can drill down for more information
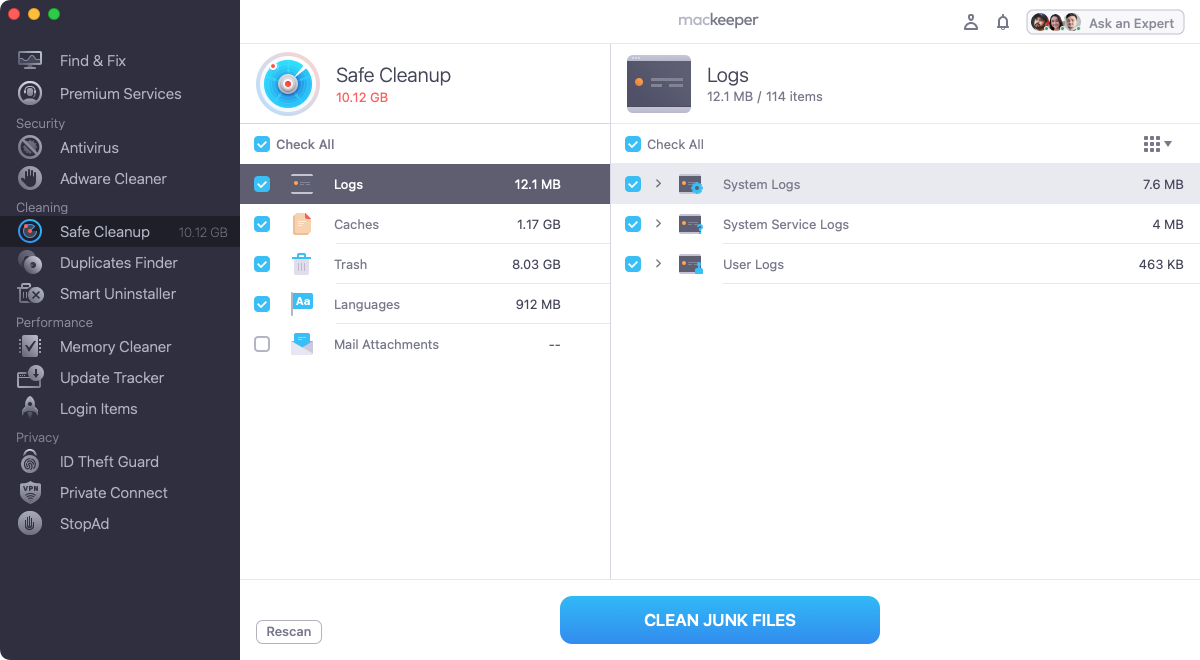
4. Select what you want to remove, then click Clean junk files.
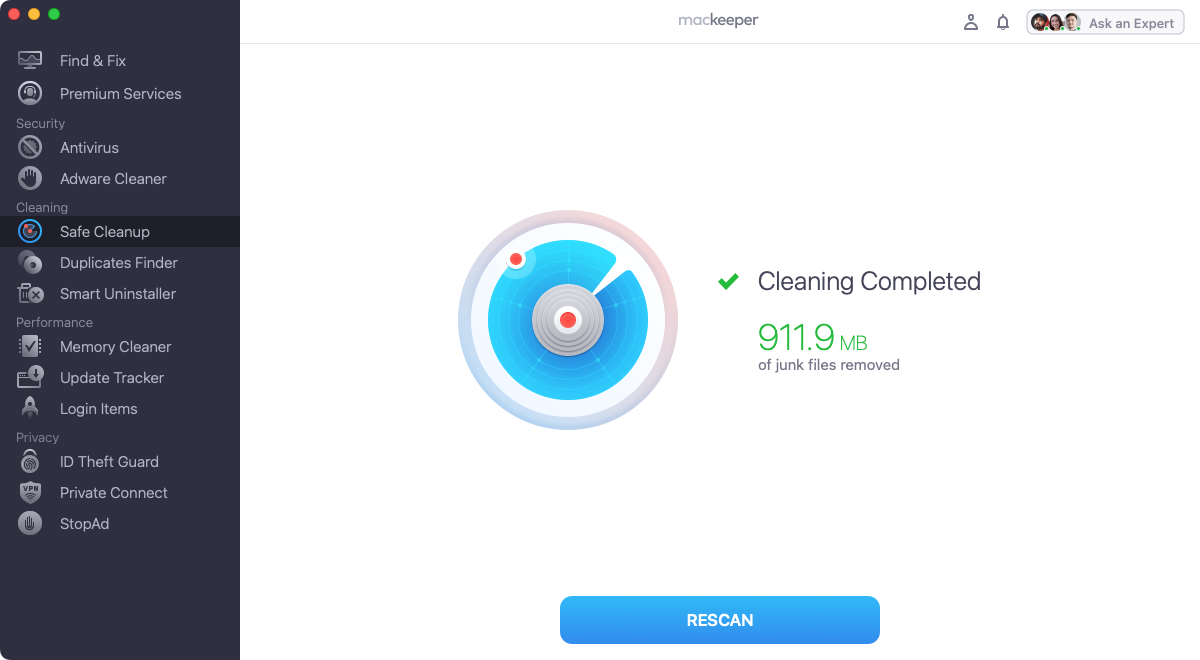
Now restart your Mac, and see if iCloud is working when you log back in.
Remove iCloud settings from your Library folder
macOS stores a variety of information in its Library folders. This includes settings and preferences for apps and services, including iCloud. By finding and removing certain files and folders, you can reset preferences for iCloud and related apps. That may be enough to get iCloud up and running again.
If you choose to delete anything in your Library folder, create a backup first using Time Machine. Or instead of deleting files and folders, move them to your desktop temporarily, so you can put them back if you need to later.
- In Finder, select Go > Go to Folder from the menu bar
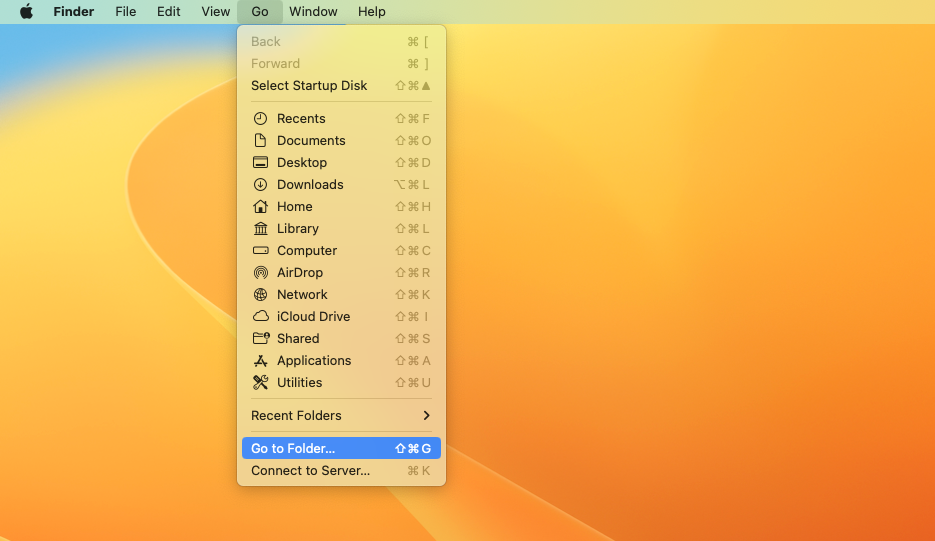
2. Type ~/Library/Application Support/iCloud/Accounts, and press Enter
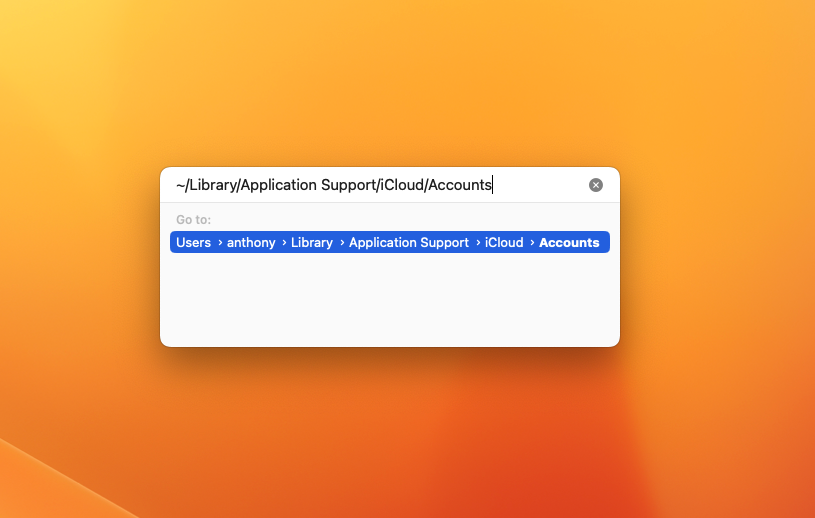
3. Now delete or relocate any files you see.
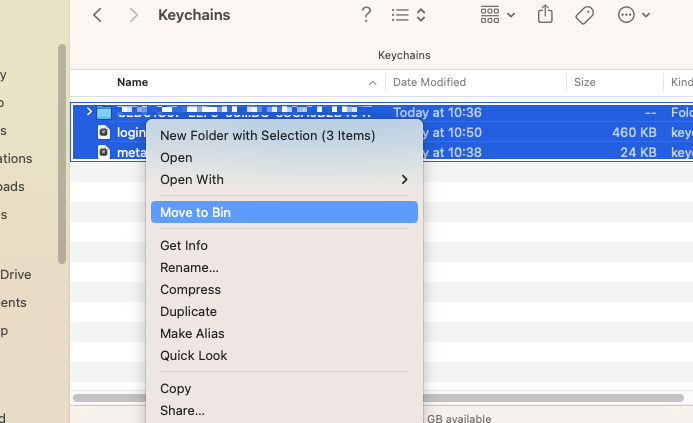
Restart your Mac, and try logging back into iCloud.
Delete or relocate Keychain files
Keychain is the password management system that comes built into every Mac. It stores all kinds of security data, including usernames, passwords, encryption certificates, and more. If anything goes wrong with these files, it could potentially stop you being able to sign into iCloud.
Dig into your Library folder, and you can delete your Keychain files in one go, which could fix your problems.
- Click a Finder window or your macOS desktop, then select Go > Go to Folder from the menu bar
- Type ~/Library/Keychains, and press Enter
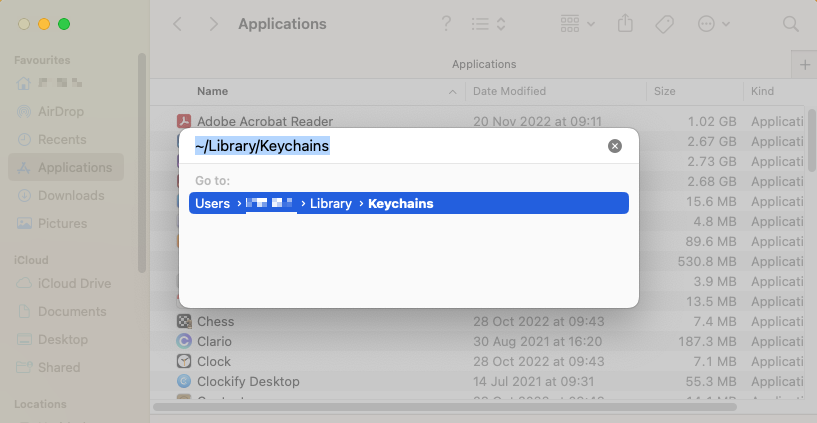
3. Delete or relocate the contents of this folder.
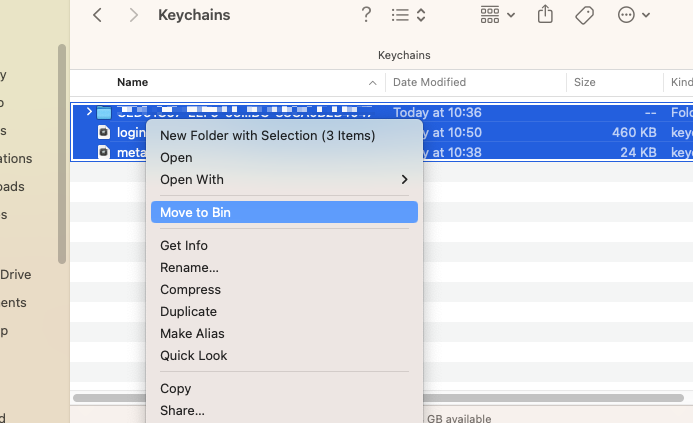
Again, restart your Mac and see if your iCloud problem has been fixed.
Reinstall macOS
You probably already know how to access iCloud on Mac, but there are other ways to log into your iCloud account, such as through the icloud.com website or another Apple device.
If your iCloud is working properly through these other means, then it’s likely that your Mac is the cause of your problems. That’s why reinstalling macOS can help. It’s basically a fresh start, putting everything back to how it was when you first bought your Mac.
You should think of reinstalling macOS as the nuclear option, though. You’ll lose anything that is stored on your Mac, including documents, photos, apps, and more. So before you even think about going ahead with a reinstall, make a backup of anything that you want to keep. Don’t worry about apps, because you’ll need to reinstall those anyway.
Suppose you’re able to log into iCloud from another device or a web browser. Then you may find all your important files are already stored there, meaning you don’t need to back them up somewhere else. For example, check out our guide on how to access iCloud photos on Mac, and follow the instructions on “How to access iCloud Photos in a browser.”
The macOS reinstallation process differs depending on the age of your Mac and the version of macOS you’re running. For full instructions, check out our step-by-step guide to factory resetting your Mac.
Keep your iCloud secure
If you use iCloud, then it’s likely to be filled with your personal data, including photos, documents, passwords, and more. Although Apple protects iCloud accounts, it’s not infallible, as famous iCloud leaks have proven. It’s vital that you do your part too, by making sure your Mac is clean and free from malware.
Were a hacker able to get access to your iCloud account, they could not only steal all your data, they could change the password too, locking you out.
With MacKeeper, you can protect your Mac with antivirus, ID theft protection, a VPN, and more. This makes it a good way to protect your Mac and your iCloud attack from cyber threats. Check it out for free today.


