Although Zoom launched in 2013, it became a widely-popular video conferencing platform during the pandemic. It allowed us to stay connected with family, friends, and coworkers.
When you’re reliant on Zoom and something goes wrong, it can be frustrating to say the least. Maybe you have a Zoom Meeting with a client or a video call with a loved one, and you accidentally find your Macbook camera not working. Whatever the issue, we’ve put together detailed steps if your camera isn’t working.
BEFORE WE START
A cause of your Zoom camera not working on Mac is bugged applications. MacKeeper’s Smart Uninstaller tool helps you safely remove apps and junk so they can efficiently run when you reinstall.
Here’s how you use MacKeeper’s Smart Uninstaller tool:
- Download MacKeeper.
- Open MacKeeper > select Smart Uninstaller.
- Click Start Scan.
- Select the app you’d like to uninstall.
- Choose Remove Selected > Remove.
- Now, your chosen application has been removed safely.
In this article you will find the following:
Why is my Mac camera not working on Zoom?
There are many possibilities why your Mac camera isn’t working on Zoom. For example, you must check if any apps are using your webcam, as your Mac webcam only works with one application at a time. Say you’re using FaceTime concurrently, you’ll have to close this app to use your camera on Zoom successfully.
You could've skipped the option to give Zoom access by accident. If you don’t grant Zoom the necessary permissions, your camera won’t work.
Perhaps you have a corrupted or outdated version of Zoom. It can cause all types of problems, including your Mac webcam not working. To fix this, you must update or remove and reinstall Zoom.
As there are plenty of reasons why your camera isn’t working with Zoom, these detailed steps will cover ways to resolve this issue and how to prevent it from happening again.
How to solve the ‘Mac camera not working on Zoom’ dilemma
Check your Zoom settings
Incorrect Zoom settings could be the root cause of your webcam not working. For instance, the settings could be that your video doesn’t show every time you’re in a meeting. It's an easy fix, so check if you’re using the right camera and all the settings are correct.
Here’s how you check Zoom settings:
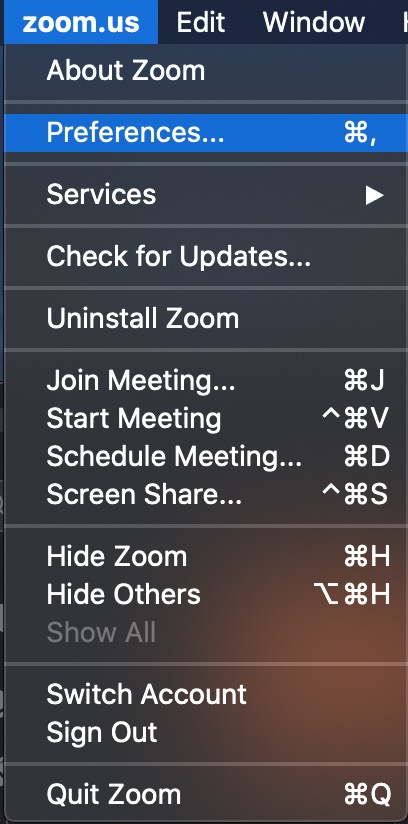
- Open the Zoom app > in the top corner click zoom.us > select Preferences.
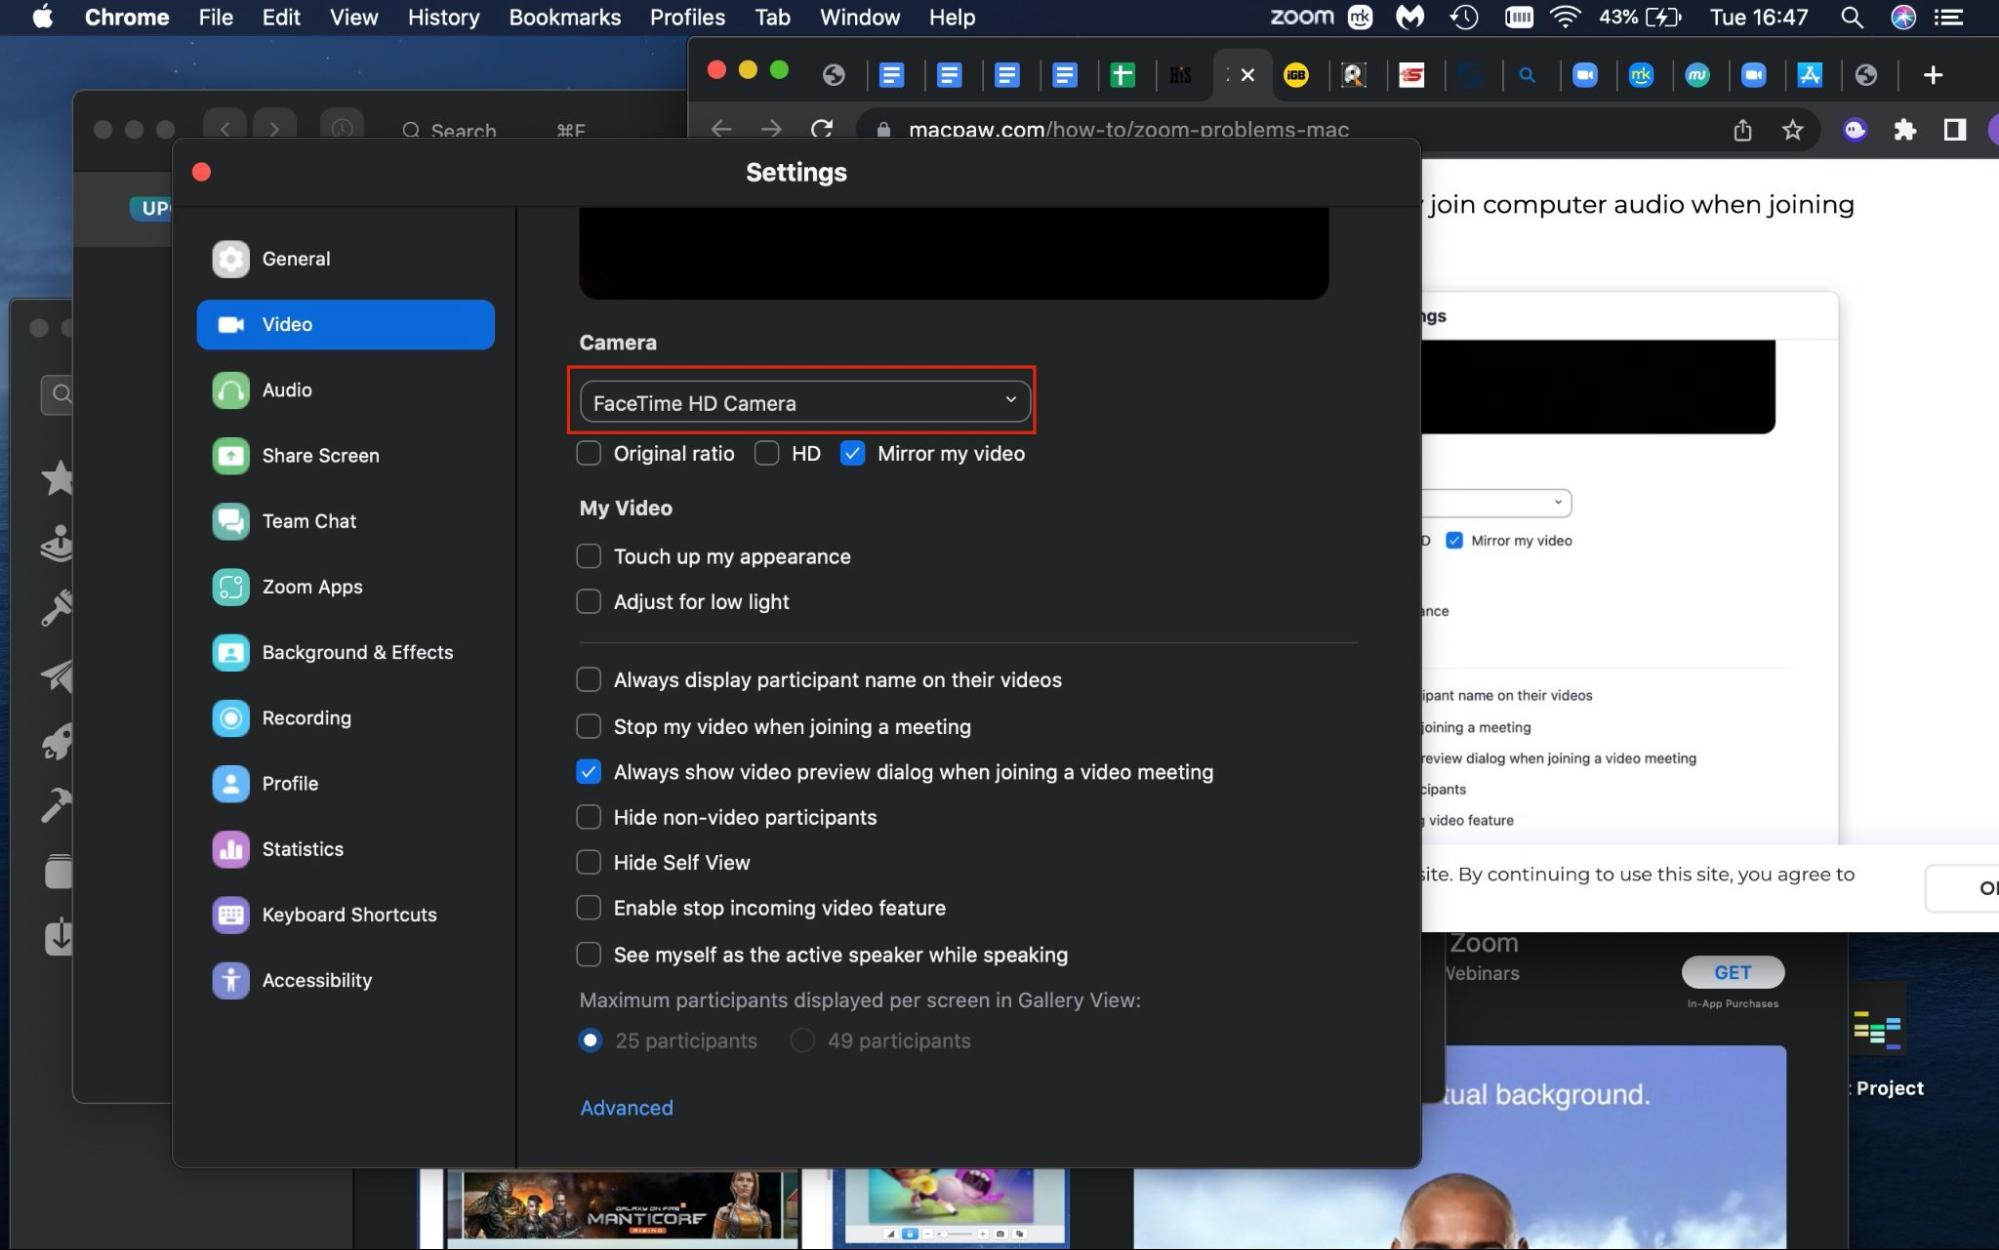
- Click Video, make sure the right camera is selected and ‘Stop my video when joining a meeting’ isn’t.
If you still have issues with Zoom, continue to the next tip.
Grant Zoom the necessary permissions
To ensure your camera works with the video conferencing platform, you should provide Zoom with the necessary permissions. Otherwise, your Macbook webcam won’t have a right to run.
Here’s how you grant Zoom the necessary permissions:
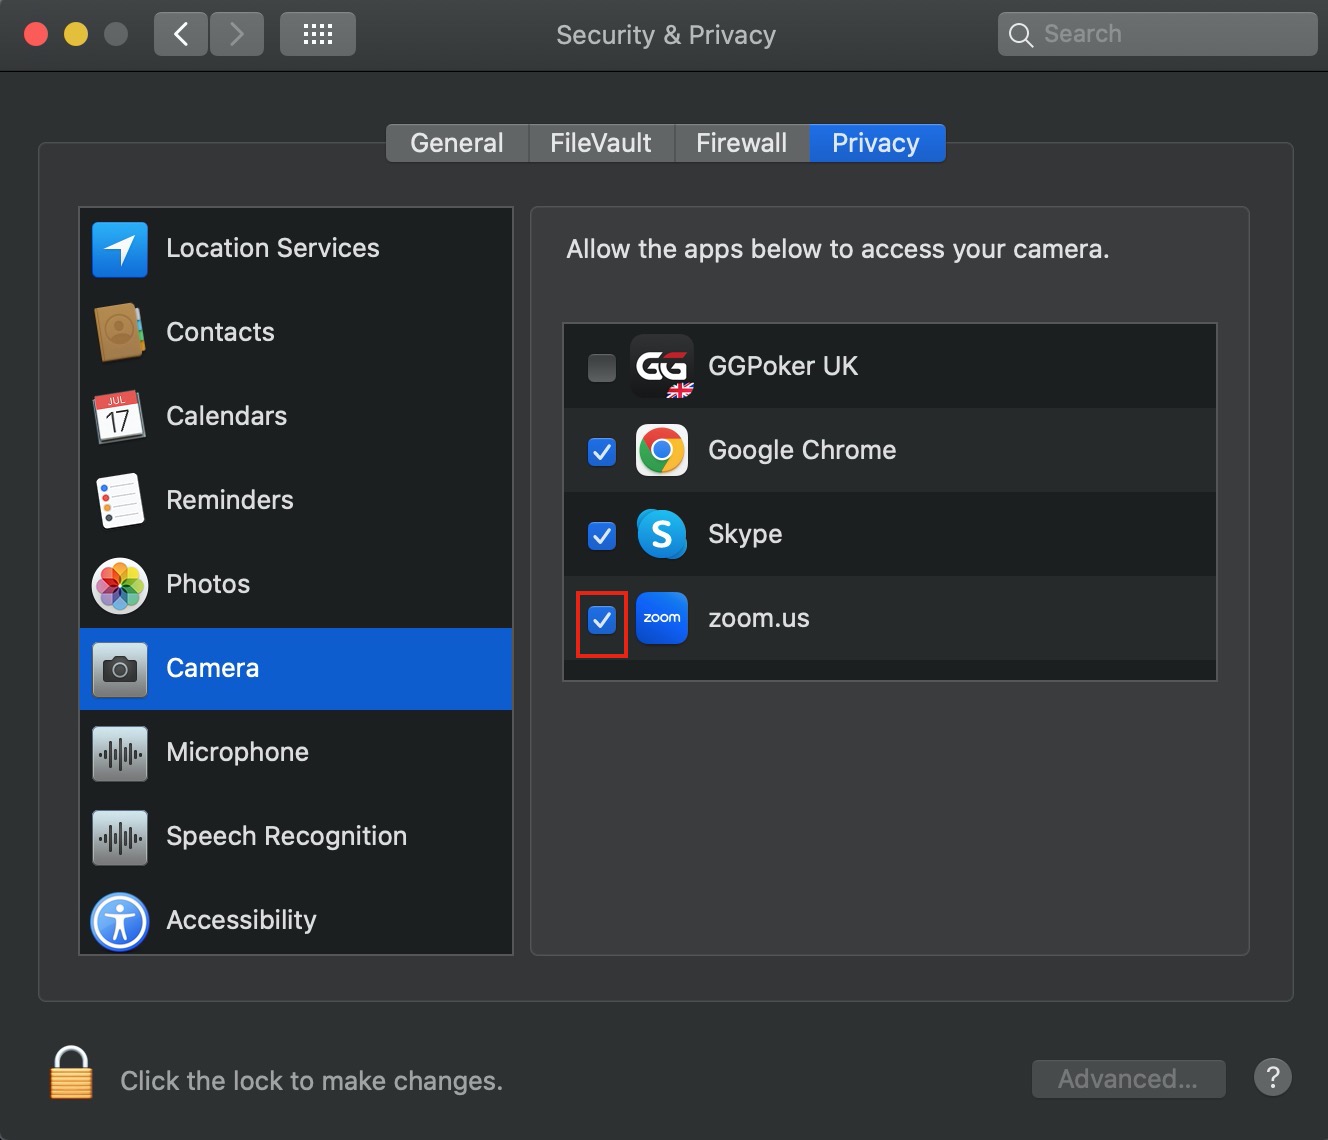
- Click the Apple logo in the top left > select System Preferences.
- Choose Security & Privacy and make sure you’re in the Privacy tab.
- Click Camera from the sidebar > ensure zoom.us is selected by clicking the box to the left.
- Click the Lock and authenticate with your password.
If the problem persists, It’s a brilliant idea to upgrade Zoom with MacKeeper’s Update Tracker.
Upgrade Zoom on your Mac with MacKeeper’s Update Tracker
It might be that your camera isn’t working on Zoom due to you using an outdated version. An upgrade checking tool is a safe way to scan and execute updates promptly.
Here’s how you check for a Zoom upgrade with MacKeeper’s Update Tracker:
- Download MacKeeper.
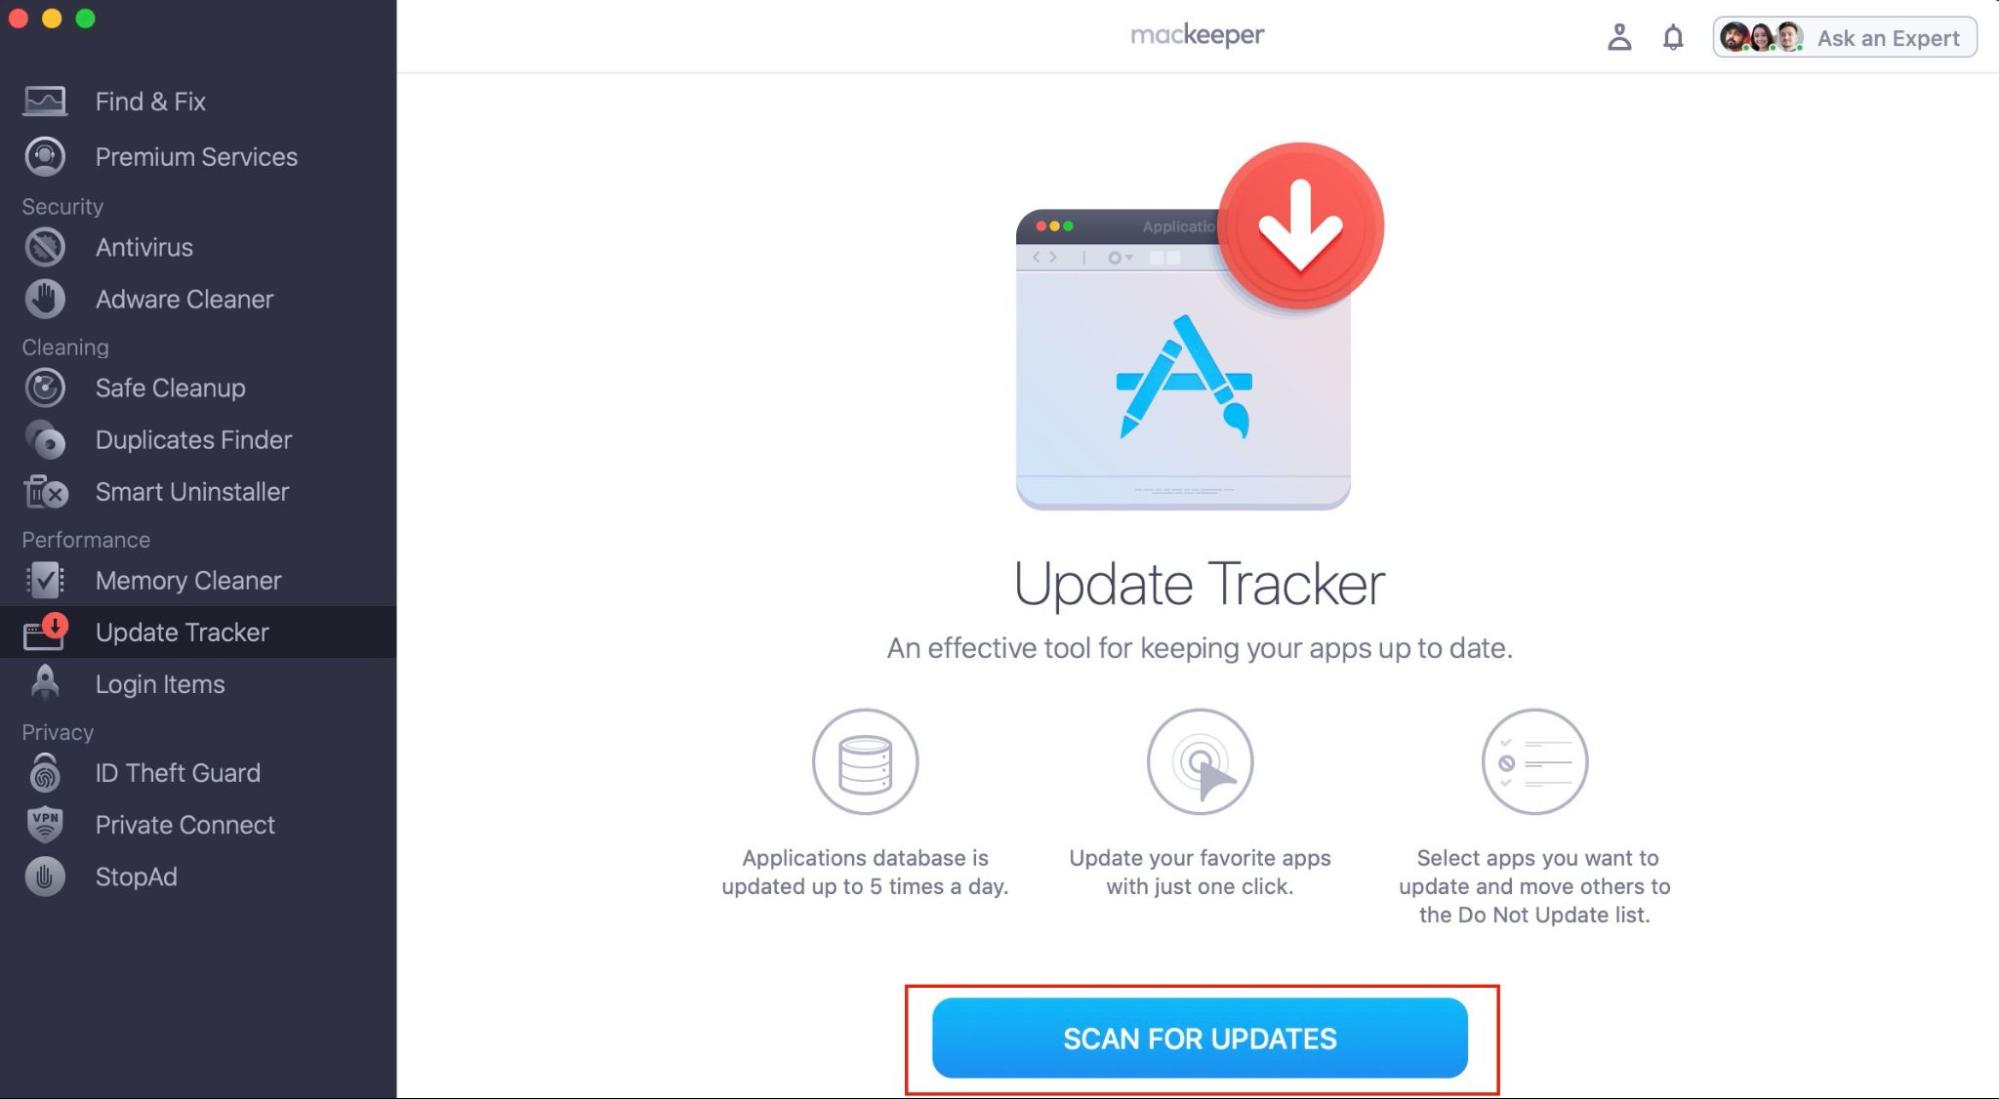
- Open MacKeeper > select Update Tracker from the sidebar.
- Click Scan For Updates.
- When the scan is complete, Zoom will appear if it requires an update.
- Select Update All.
- Now, your update has completed.
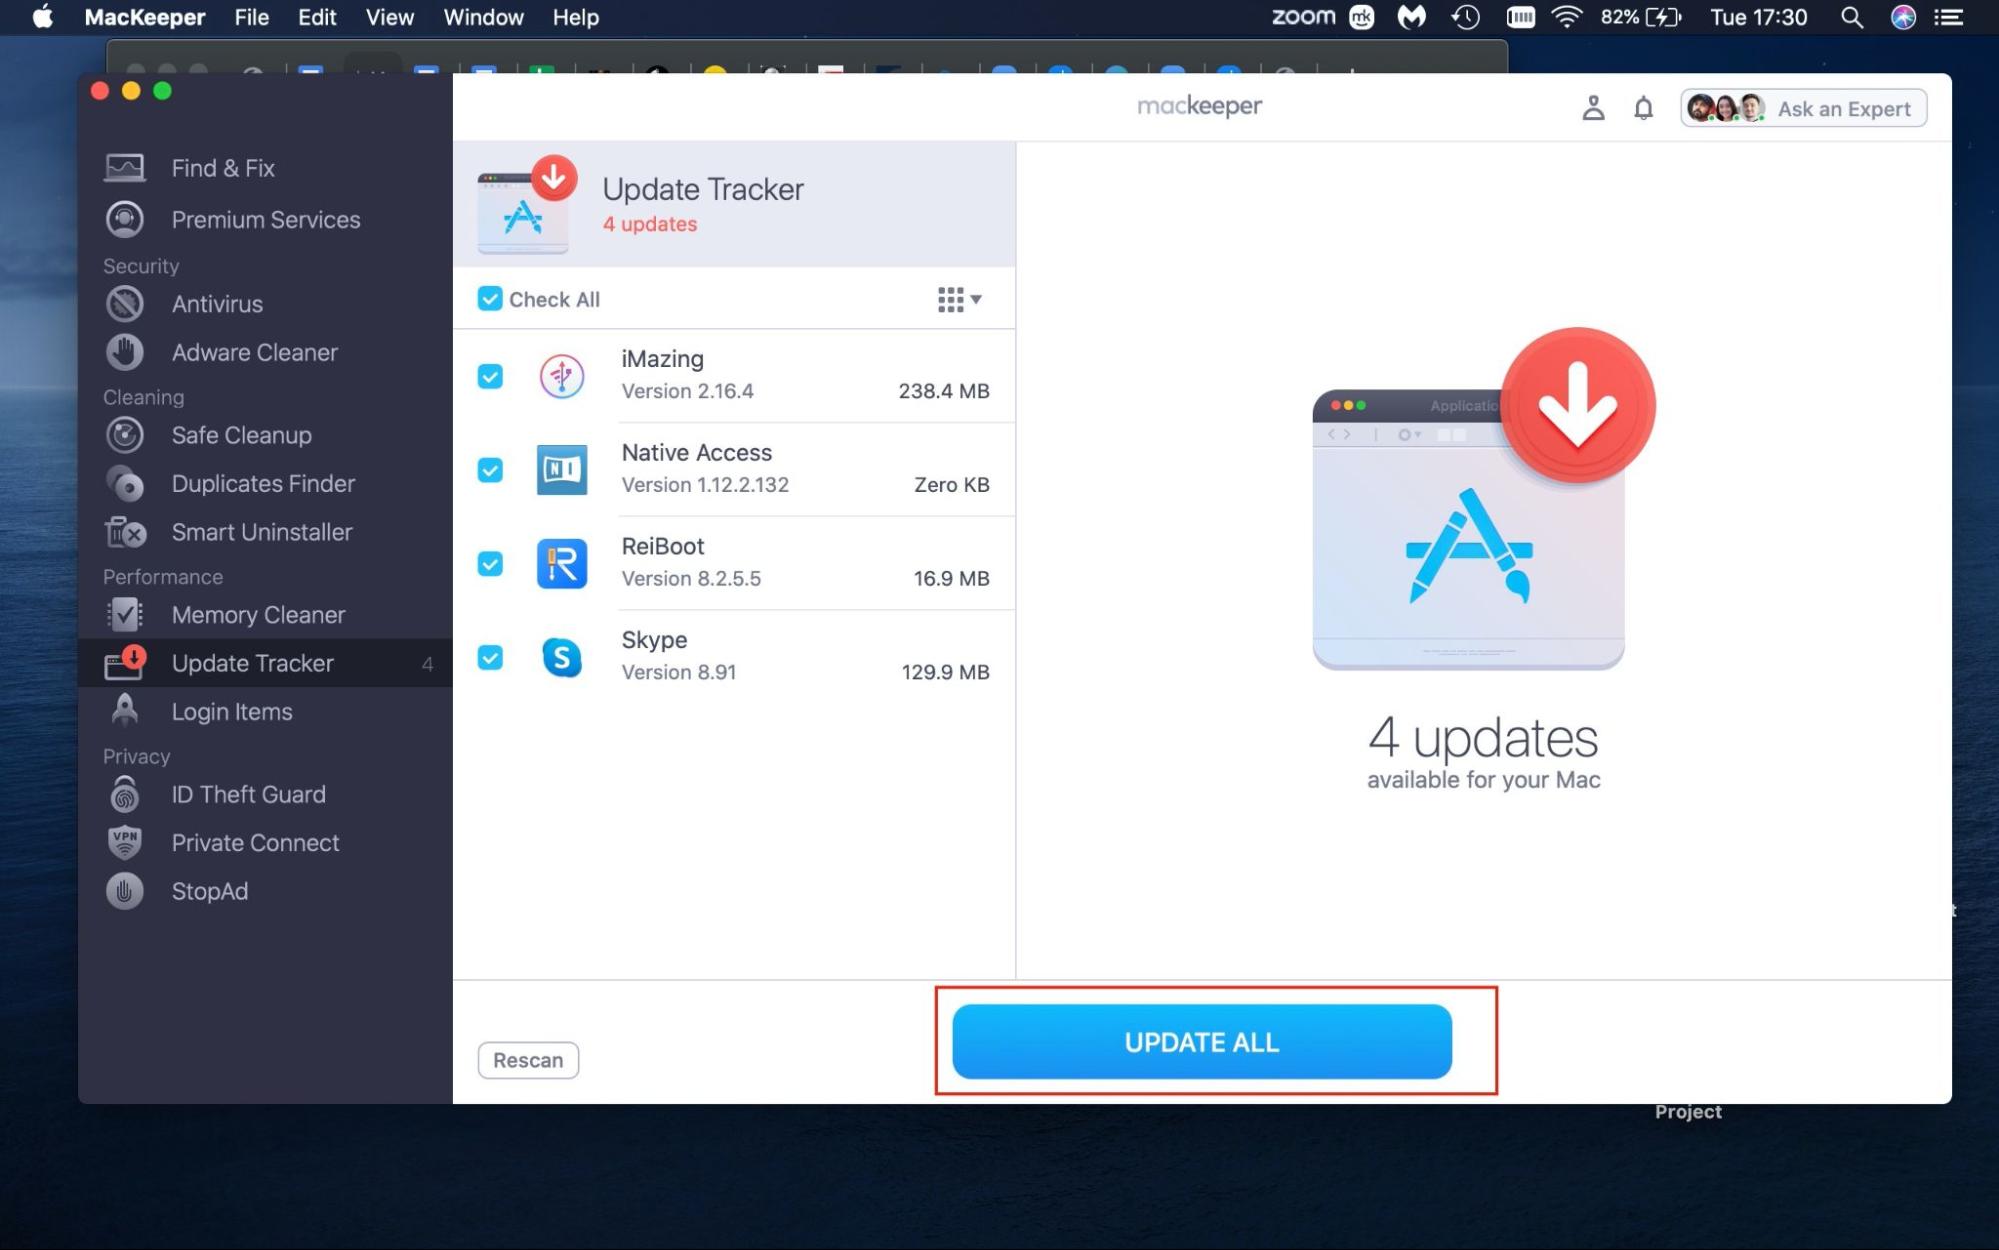
Sometimes, this problem is fixed by simply updating it. In case it turns out not enough to solve the problem, check the following potential solution.
Troubleshoot your Mac camera
The answer to this problem could be that your Mac’s camera itself isn’t working. To troubleshoot your Mac’s camera you can open Photobooth and check if your camera is working there, then proceed to check FaceTime for the same. If both the Photobooth and Facetime camera are not working on Mac, your camera is at fault, and it's not Zoom. You can contact Apple Support if your webcam doesn’t work at all.
Reinstall Zoom with MacKeeper’s Smart Uninstaller
Sometimes, there are complications when installing apps. If you’re still experiencing this issue and your webcam isn’t detected, the problem may be the application alone. If so, you must uninstall and reinstall the programme.
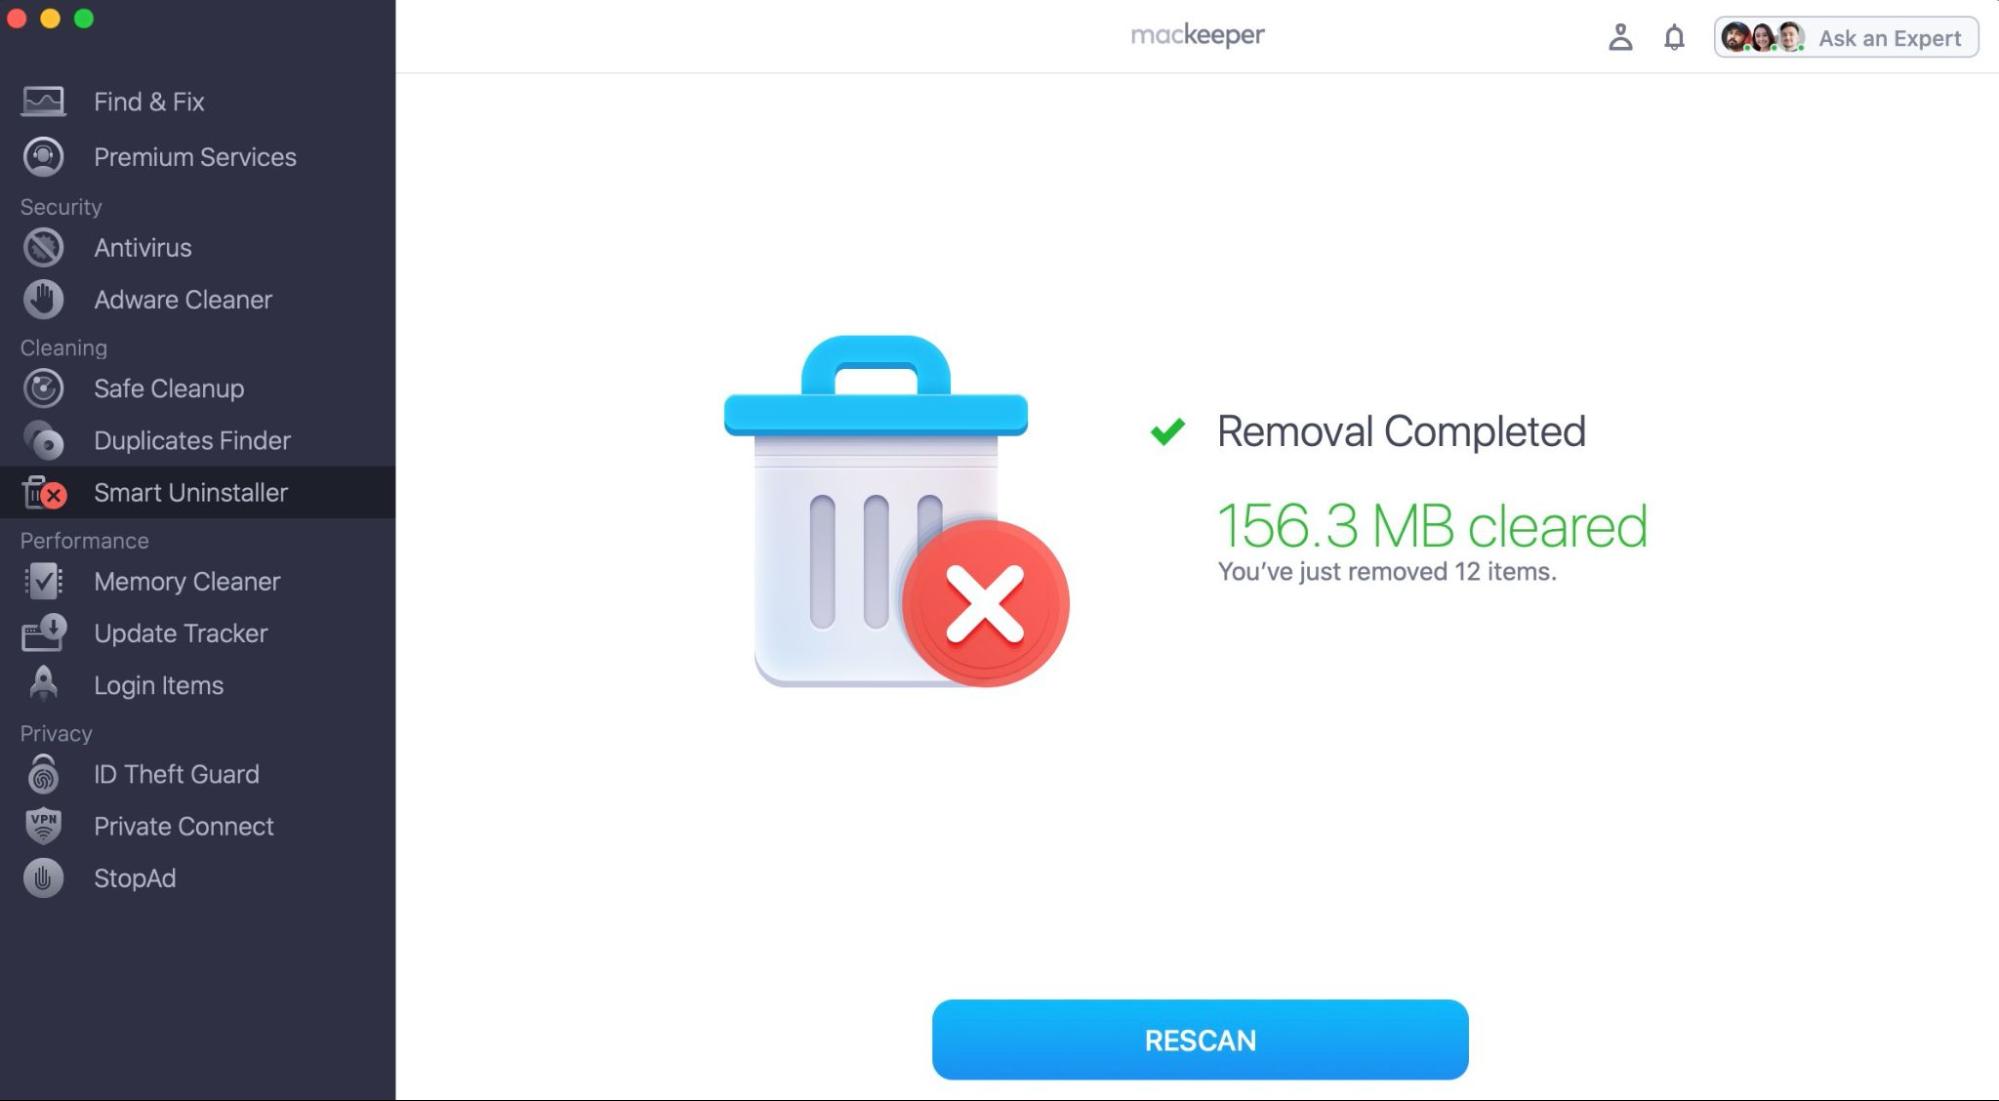
Here’s how you do this with MacKeeper’s Smart Uninstaller Tool:
- Download MacKeeper.
- Open MacKeeper and select Smart Uninstaller.
- Click Start Scan.
- Select Applications, then find zoom.us and Click the box to the left.
- Click Remove Selected.
- Select Remove.
- Zoom is now successfully removed.
- Proceed to reinstall the latest version of Zoom.
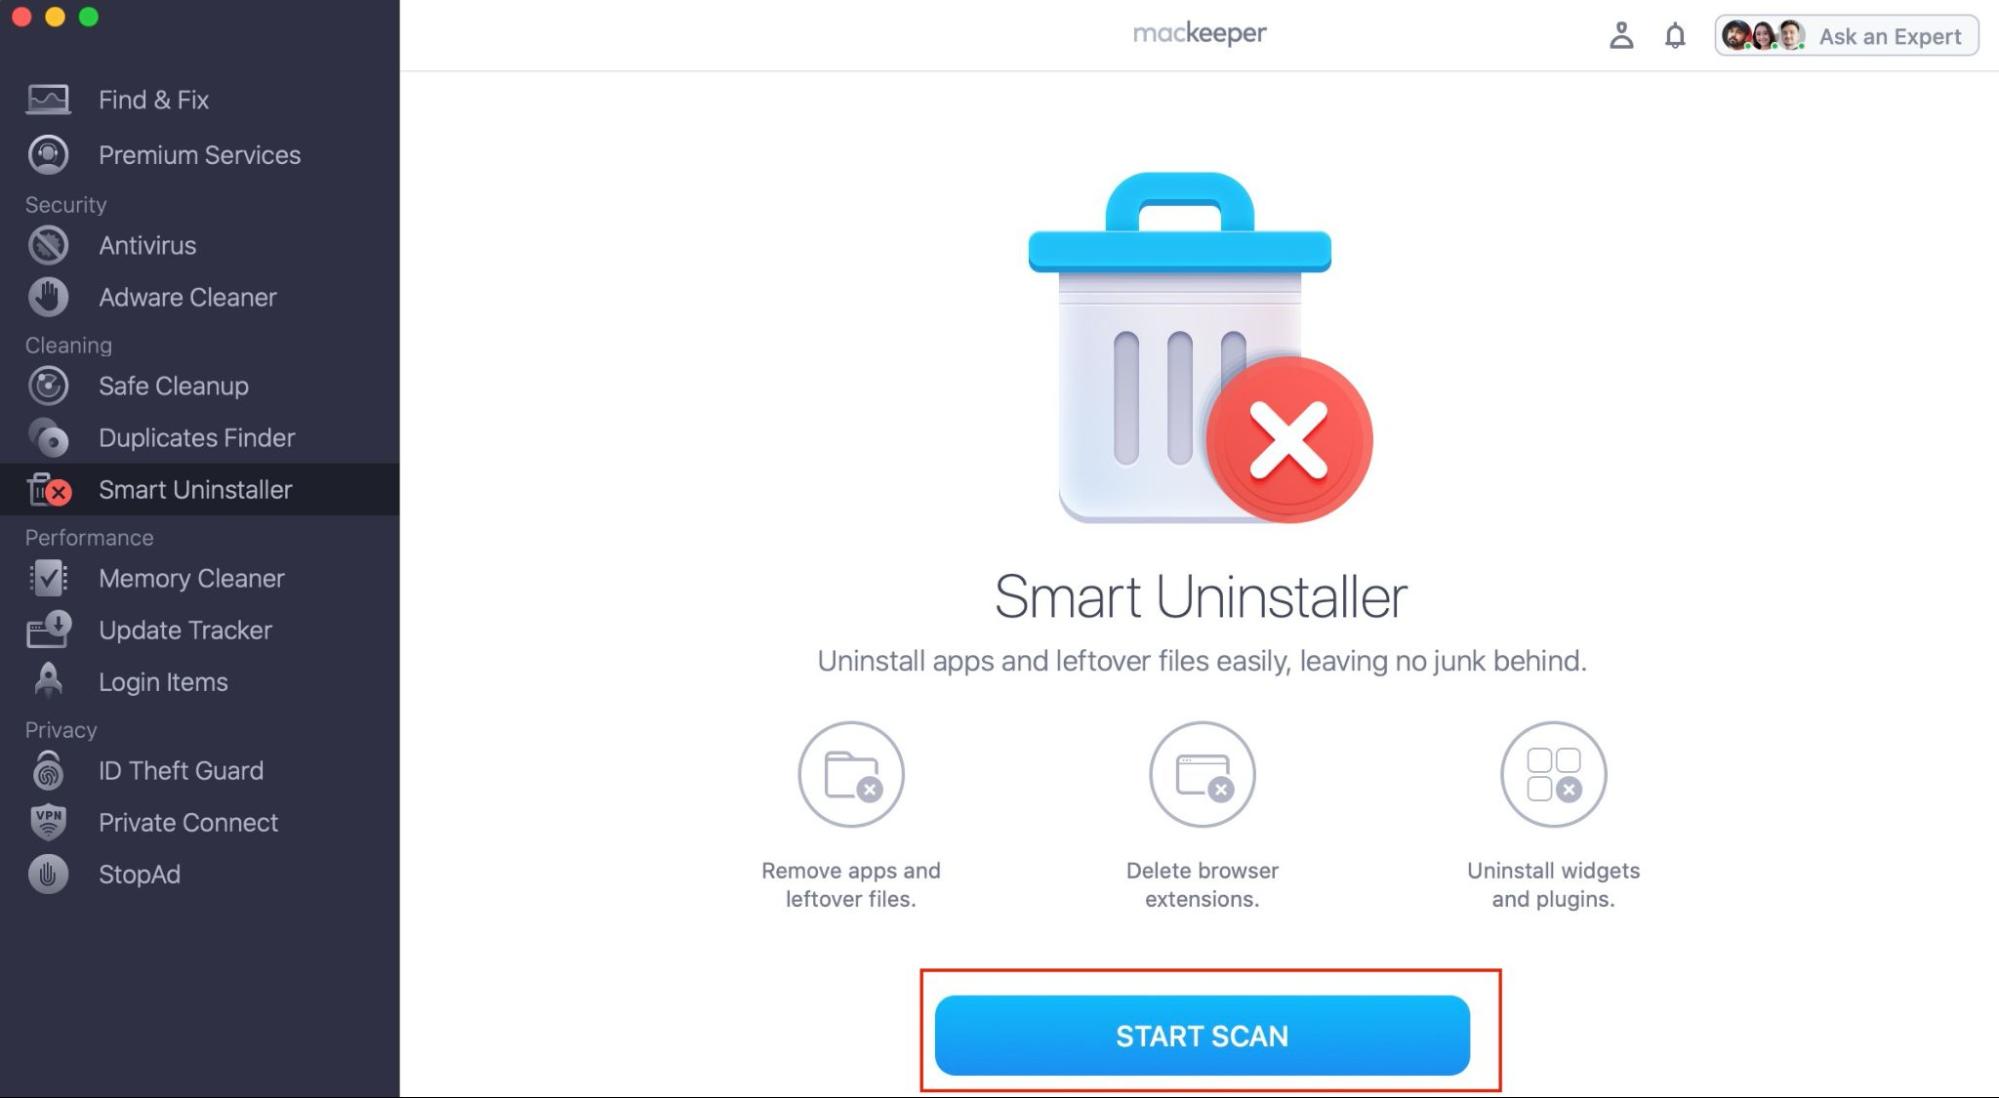
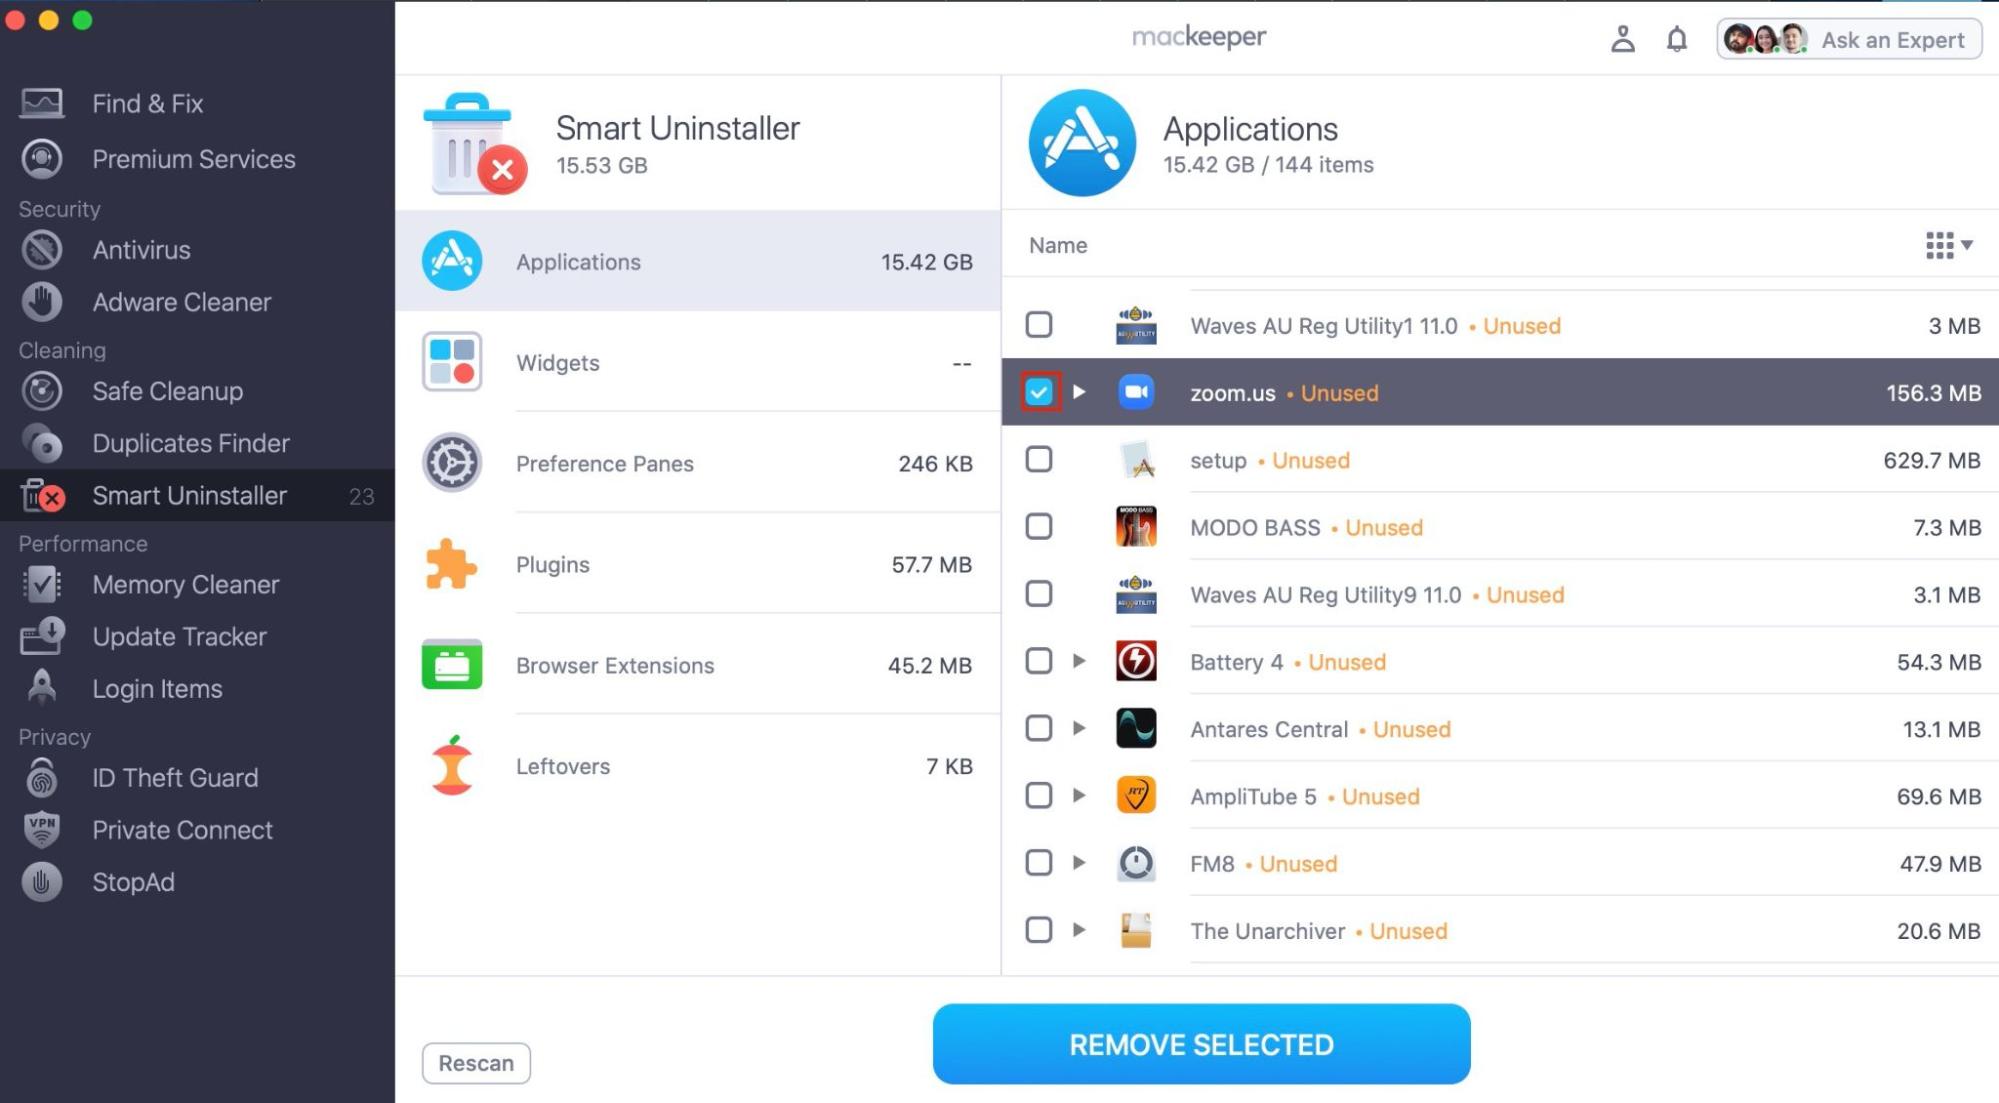
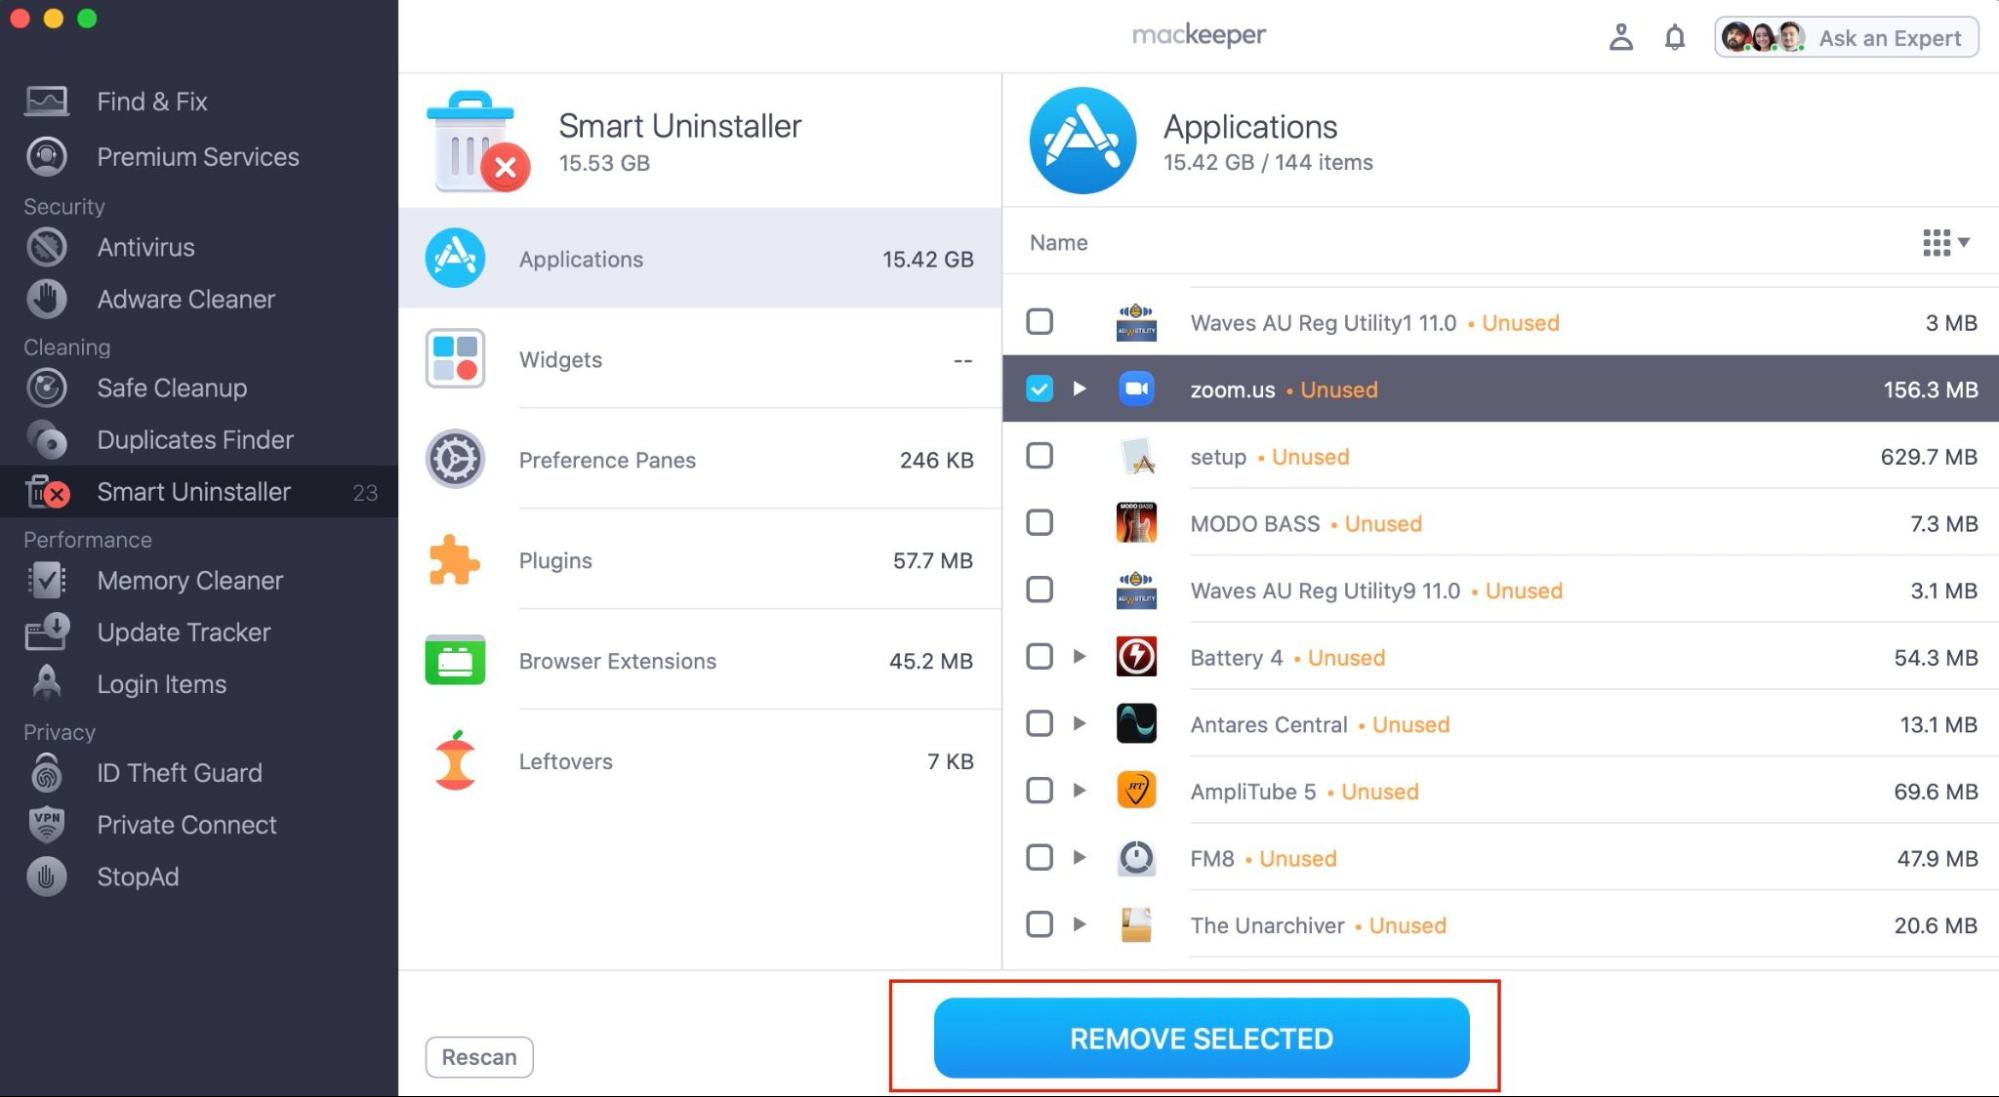

Hopefully, that step has resolved your problem. If it’s still occurring, continue to the next step.
Free virtual memory & RAM on your device
In some cases, if your RAM is at its capacity, it can cause applications not to work in the correct function. Other apps may be using a lot more memory than you think. To be on the safe side, here’s how you free virtual memory & RAM on your Mac.
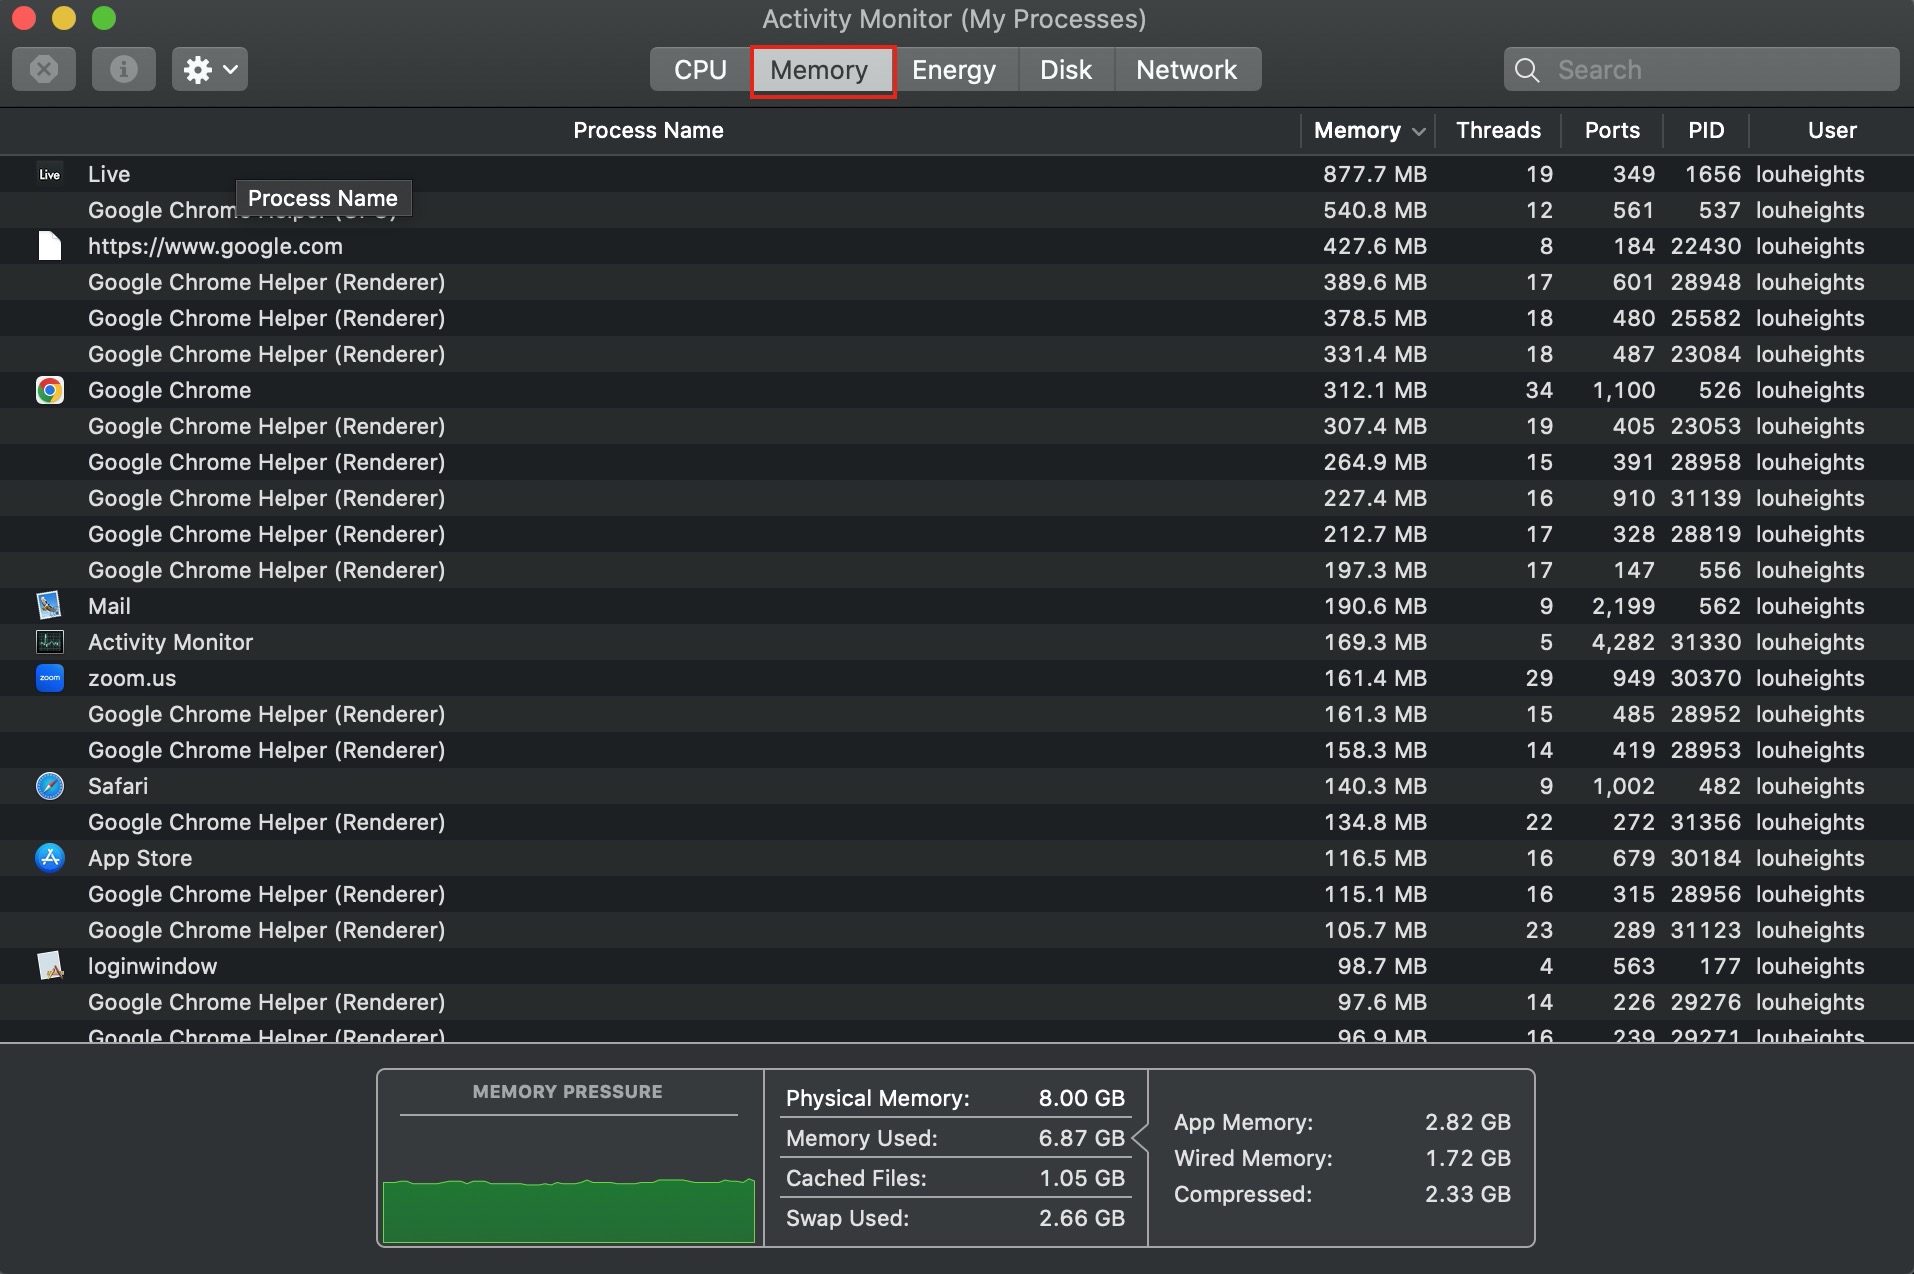
- Open Activity Monitor.
- Select the Memory tab.
- Click the Memory column to filter the memory usage. Then you’ll be able to see which app is holding up your RAM.
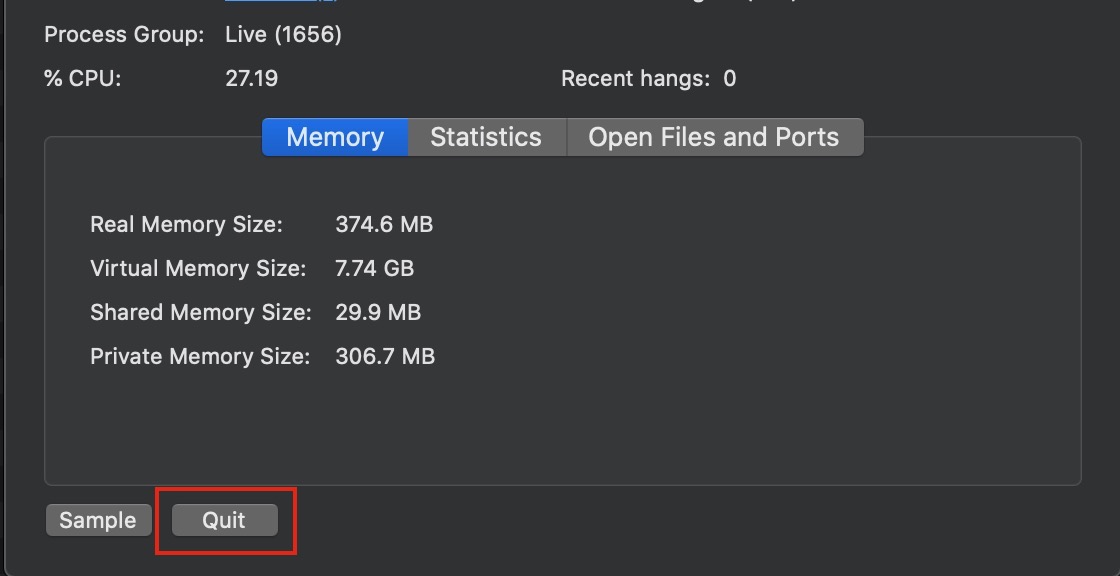
- When you’ve chosen the app, click it and select Information (i). It’ll give you insight into how much memory is currently being used, and in which process.
- Select Quit to shut down the app.
- Select Quit, or if this app is frozen, click Force Quit.

Once you’ve quit the apps that were hogging your memory, boot up Zoom and see if this issue is still happening. If so, let’s have a look at some other solutions.
Still no luck? Have a go at these tips
Exit apps that are using your camera or microphone
If you're seeing a black screen instead of yourself, chances are an app such as Skype or Discord is running at the same time. You must ensure all apps that use your Mac’s camera or microphone are closed completely. Otherwise, it’ll cause interference with Zoom.
Stop time-consuming processes that slow your Mac down
There are many reasons why your Mac camera isn’t working on Zoom, but if it’s down to your Mac running slowly, there are some further steps to take.
Clear desktop clutter
You might not think so, but accumulating too much desktop clutter can cause your Mac to run slowly. Each desktop icon is rendered separately, so an abundance of scattered files across your background could be the culprit. Good thing you can use Stacks, a built-in Mac feature that organizes your desktop into folder groups.
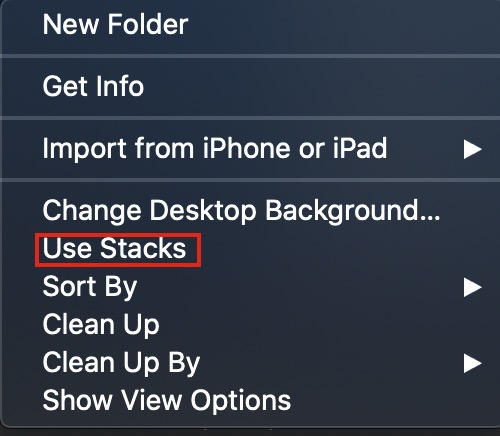
Here’s how you can clear your desktop with Stacks:
- Go to your desktop > Right Click on the background.
- Select Use Stacks.
Clear caches
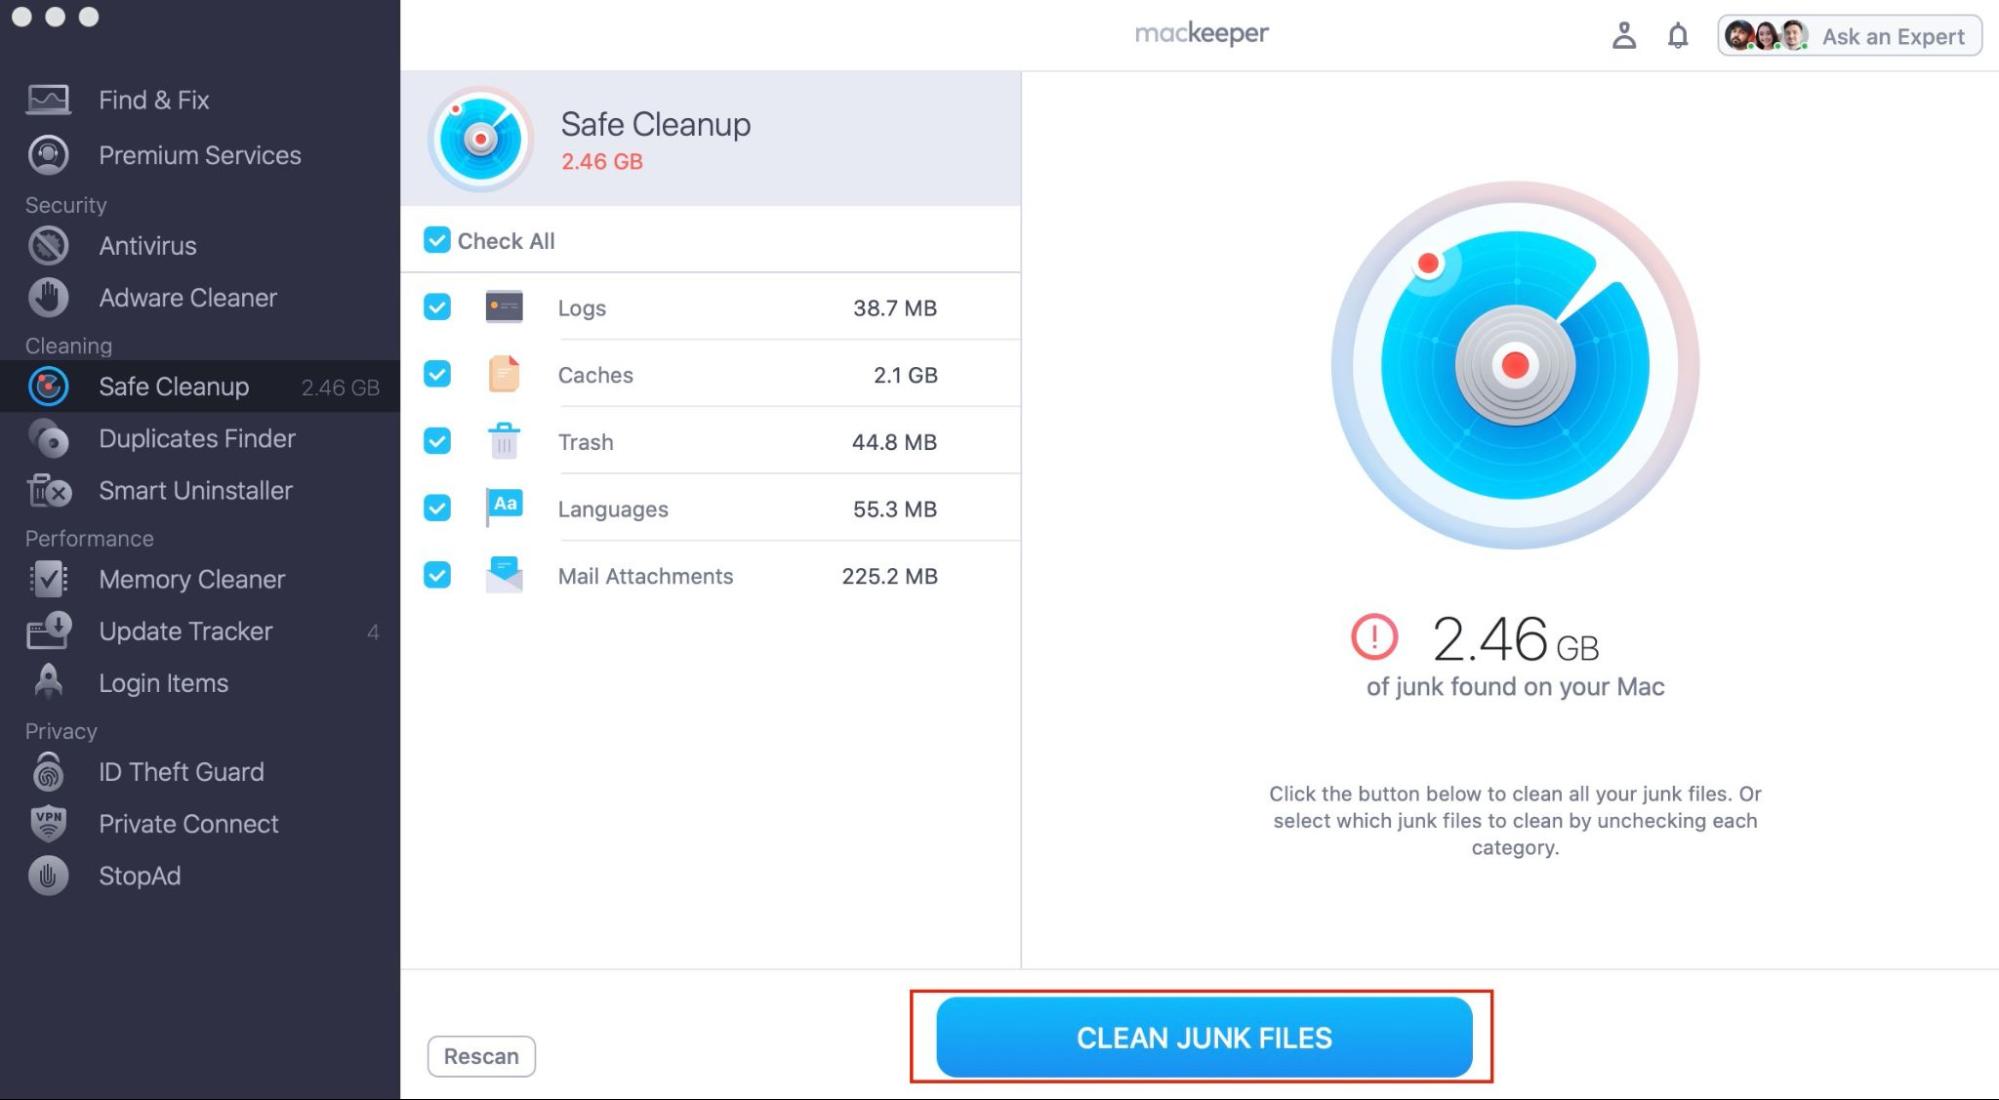
Caches can build up on multiple applications, and the next thing you know it's the cause of your Mac running poorly. You can either manually clear caches or use a third-party app. We advise using MacKeepers SafeCleanup, which automatically removes junk files and caches safely.
Here’s how you clear caches with MacKeepers SafeCleanup:
- Download MacKeeper.
- Open MacKeeper and select Safe Cleanup.
- Select Scan.
- Click Clean Junk Files.
- Click Empty Trash or Skip Trash.
- Now, your junk files are deleted. Click Rescan to scan again.
Restart your Mac
On occasion, this issue is fixed by simply restarting your Macbook. When rebooting your Mac, you might have seen that it gains gigabytes. It's because of the temporary files which systematically get cleared on the startup.
In case you didn’t know how to restart your Macbook:
- Click the Apple logo in the top left.
- Select Restart.
Once this is complete, start Zoom and see if your video is working. If not, proceed to the final step.
Turn off Firewall
In certain instances, turning off the firewall can help Zoom work to its fullest, as it can cause interruptions.
Here’s how to turn off Firewall:
- Open System Preferences > Select Security & Privacy.
- Click Firewall.
- Select Turn Off Firewall > Close Lock To Save Changes.
Once this is complete, restart your Mac and fire up Zoom. Check if your camera is working. If it’s not, proceed to the next step.
Have a look at Zoom’s server status
It’s a rarity, but it could be that your end is running fine, and the root of the problem is on Zoom's side. Thus, it’s crucial to see what’s happening on Zoom’s end. On Zoom’s Status Page, you’ll be able to see what is and what isn’t operational. If the trouble is from their end, you’ll have to check the site regularly to see when it’s fixed. It could take some time.
Reviving your Zoom camera is now easy, right?
Those detailed steps would’ve helped you identify the issue and resolve it. In the instance it didn’t work, you can think about contacting the Zoom Support team directly.
Most of the time, Zoom works brilliantly. That’s why it’s a part of so many of our lives. However, issues such as the Zoom video camera not working are a real pain in the butt, especially when you’re dependent on the platform for an important Zoom meeting.
We’ve covered today your Zoom issues can be fixed by simply reinstalling the app or freeing up memory. And with the help of handy third-party apps like MacKeeper, you can ensure your Mac runs smoothly with no risk to your device.


