In this article you will find the following:
Having a MacBook connected to Wi-Fi but no internet can cause a huge drop in productivity. And considering how important the internet is for many people these days, not having Wi-Fi on your MacBook can also result in other problems—such as finding it harder to keep in touch with friends and family.
Wi-Fi on but no internet on Mac is one of the most common issues that users encounter, but there are several solutions to get rid of it. In this guide, I’ll reveal why your device is connected to the Wi-Fi but doesn’t have any internet. More importantly, you’ll learn how to fix everything.
Before we begin
Caches are one of the most common reasons why internet connections stop working on MacBooks, and clearing these out can help you set everything up again. MacKeeper’s Safe Cleanup tool helps you clean caches that can hinder your device’s connectivity, and you can also use the service to remove junk files and more.
Here’s how you can clear caches with MacKeeper’s Safe Cleanup tool:
- Download MacKeeper
- Go to Cleaning > Safe Cleanup in the toolbar on the left
- Select Start Scan. When the scan has completed, tick the box next to Caches
- Click on Clean Junk Files. Your device will then start working on removing your caches.
Why is my Mac connected to Wi-Fi but no internet?
Mac connected to Wi-Fi but is not working can happen for a whole host of reasons. Here are some of the main ones:
- Technical faults: In many cases, your Wi-Fi not working is because of an issue with your internet provider. Sometimes, connections can drop in certain areas; how long it lasts often depends on each individual circumstance.
- Mac software: Glitches in macOS can cause your Wi-Fi to connect but allow you onto the internet. This can happen with both outdated software and new updates that haven’t yet been fully indexed.
- Coverage: In some houses and apartments, the internet will work better than it does in other parts of the building. This could be due to several reasons, such as thicker walls.
- Problems with your router: Wi-Fi says connected but no internet on Mac can also be caused by hardware issues with your router. For example, you might not have updated the firmware or you could have dropped it at some point.
You can check if your MacBook is properly connected to the Wi-Fi by running wireless diagnostics on Mac.
How to fix a Mac connected to Wi-Fi but no Internet?
With some of the main reasons why Mac is offline but connected to Wi-Fi now covered, let’s look at how you can actually solve the problem. I’ll cover the following in the remainder of this guide:
- Restart MacBook and router
- Forget Wi-Fi network then reconnect
- Turn off VPN or security software
- Factory reset router
- Make sure the router and DNS number are identical
- Setup date, time, and location
- Update macOS on MacBook
- Stop mDNSResponder from running
- Change Mac’s Domain Name System (DNS)
- Disconnect all USB accessories
- Prioritize Network
- Renew the DHCP lease in network preferences
- Create a new network location
- Clean up usernames and profiles
- Reset network preferences
Below are the solutions in more detail.
Restart MacBook and router
Restarting your MacBook and router will reset your connection and, as a result, should move any difficulties that were stopping your Wi-Fi from working properly.
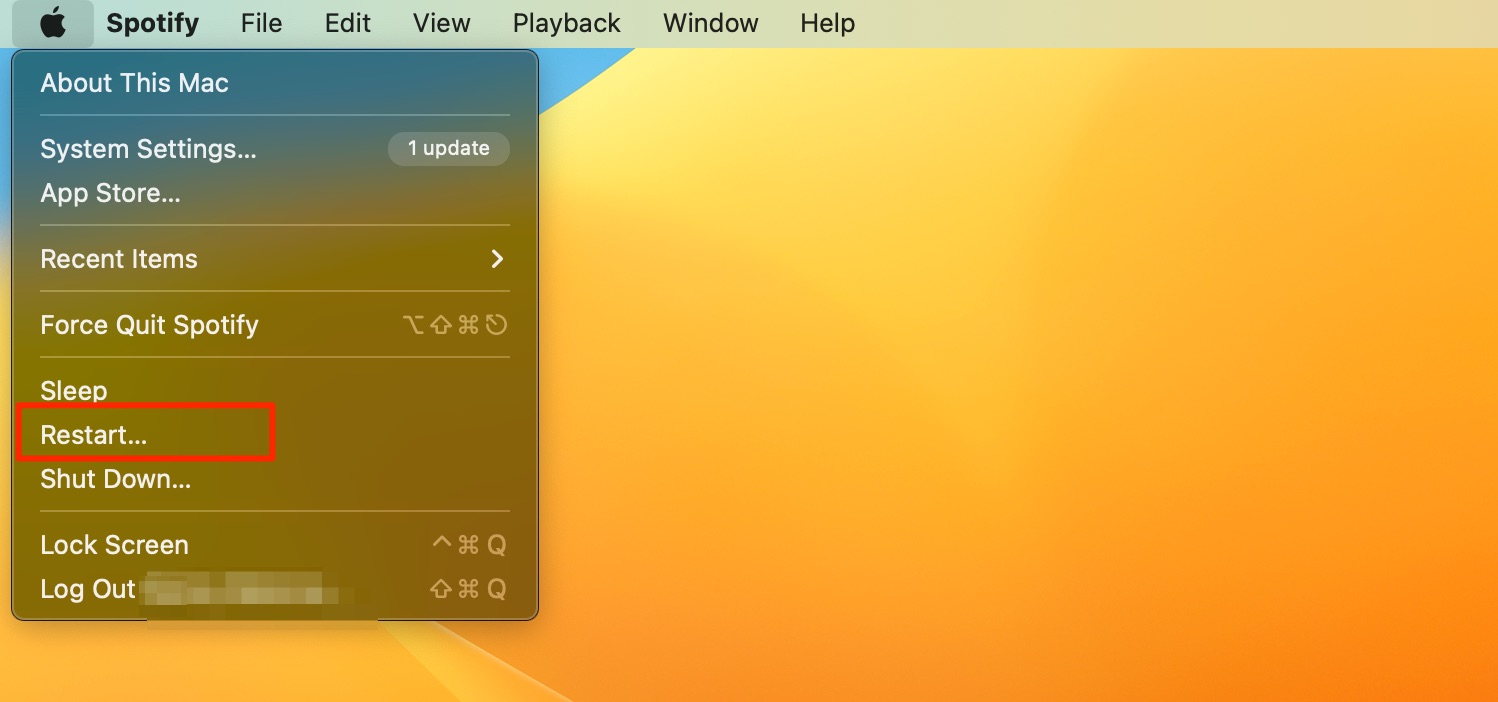
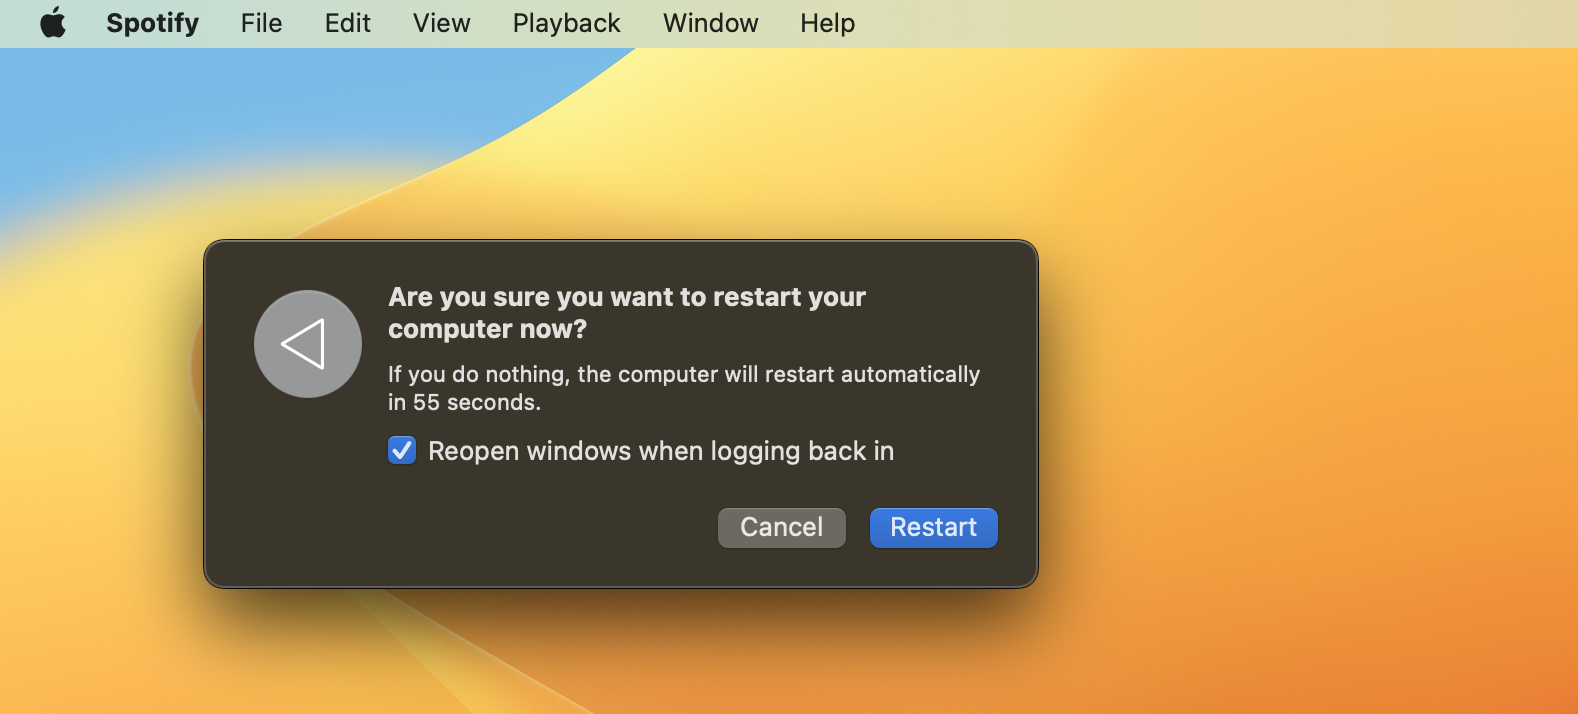
How to restart MacBook
- Go to Apple logo > Restart
- When the pop-up window appears, click on Restart again
- Wait for your computer to turn off and on again, before signing in on the main start-up page.
How to restart router
- Unplug your router from the wall socket
- Turn the power button off
- Wait around 30 seconds
- Plug your router back into the wall and turn the button back on
- Wait for the lights to turn on. You should see the internet one either turn green or switch on.
Besides reconfiguring your Wi-Fi, you can learn how to increase download speed on Mac in several other ways.
Forget Wi-Fi network then reconnect
Forgetting your Wi-Fi and reconnecting can help to clear any glitches that were causing the network to not connect on your Mac.
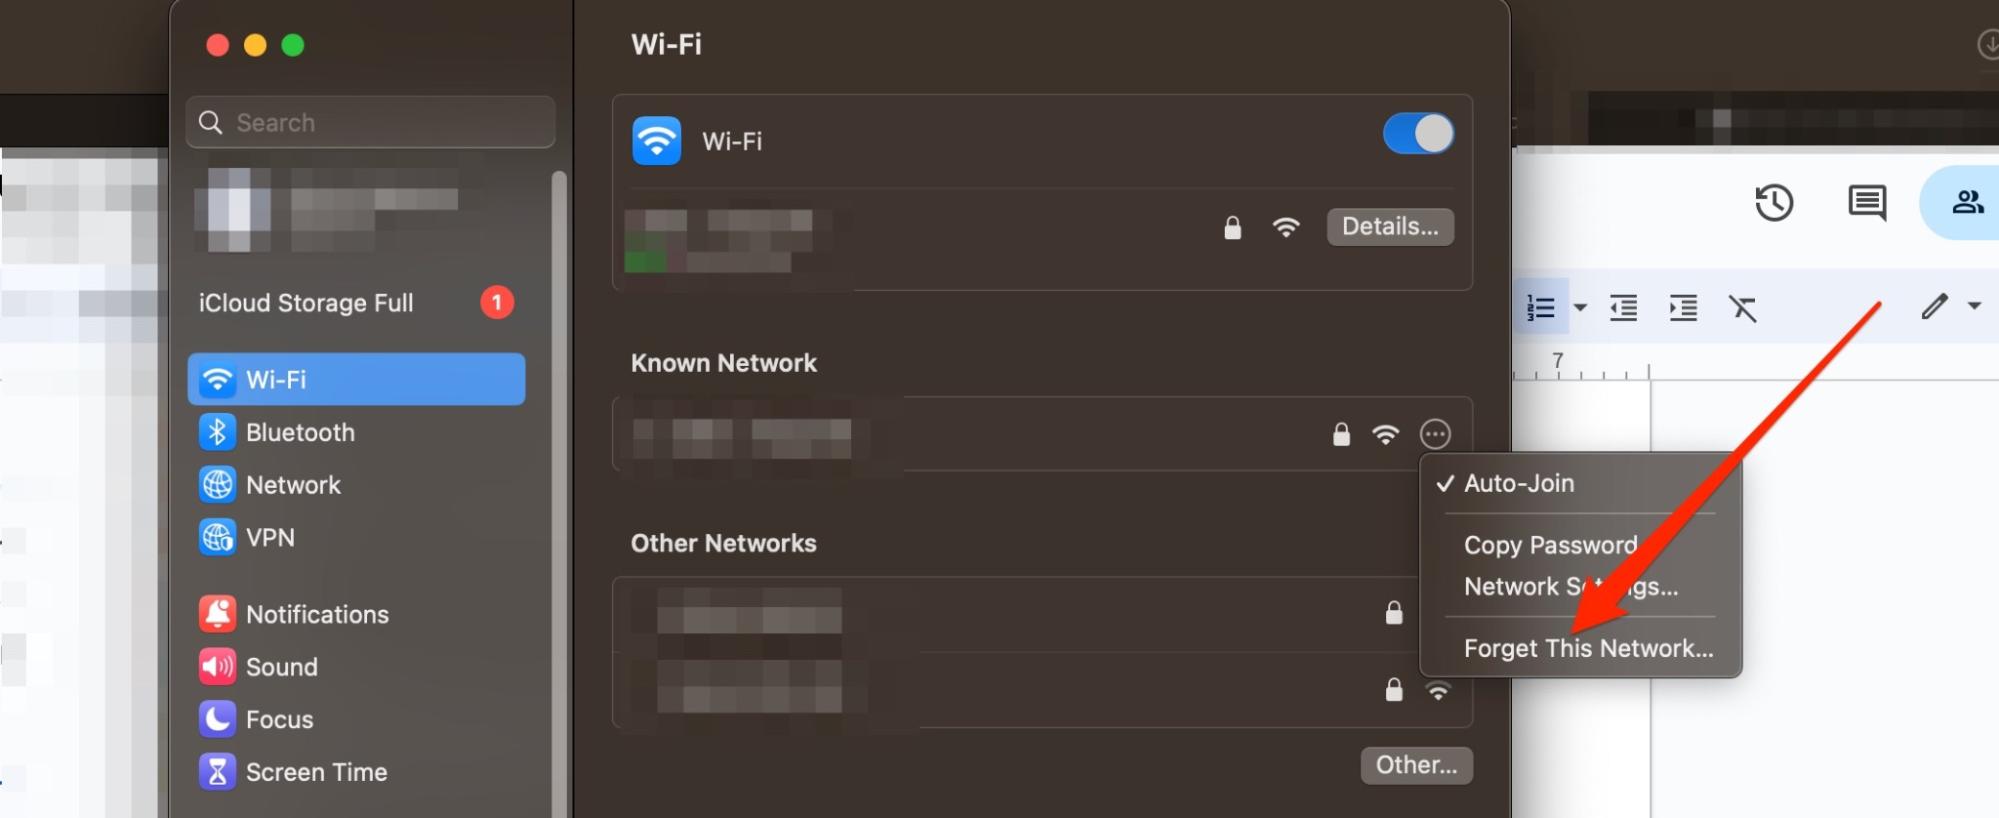
To forget your Wi-Fi network:
- Open System Settings and go to Wi-Fi
- Click on the three dots next to your Wi-Fi connection
- Select Forget Network
- Tap the Remove button when it appears.
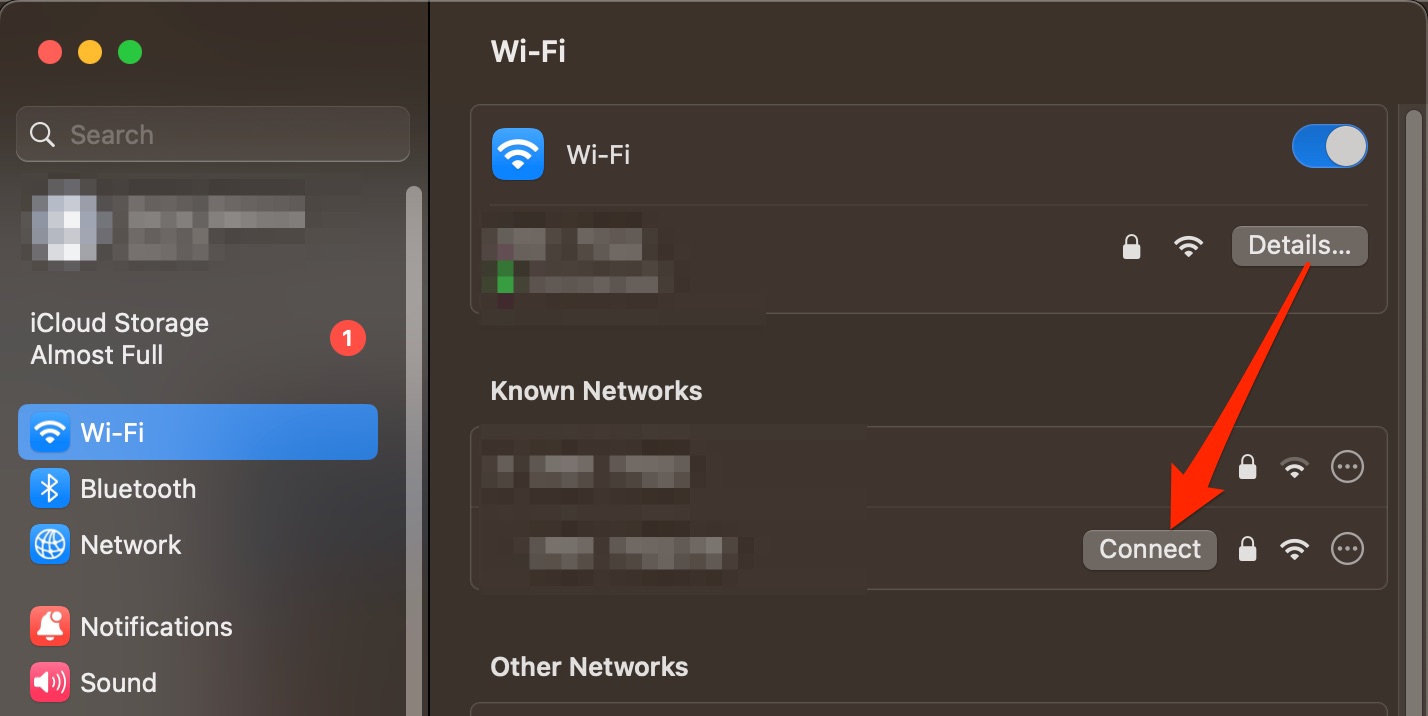
To reconnect to it:
- In System Settings > Wi-Fi, look for your preferred internet connection
- Hover over it and click on Connect
- Enter the network’s sign-in details and select OK.
Turn off VPN or security software
VPNs and security software can sometimes block your Wi-Fi from working properly, and turning them off can help you connect to your network.
Here’s how to turn off your Mac’s VPN:
- Go to System Settings > VPN
- Toggle your VPN provider off.
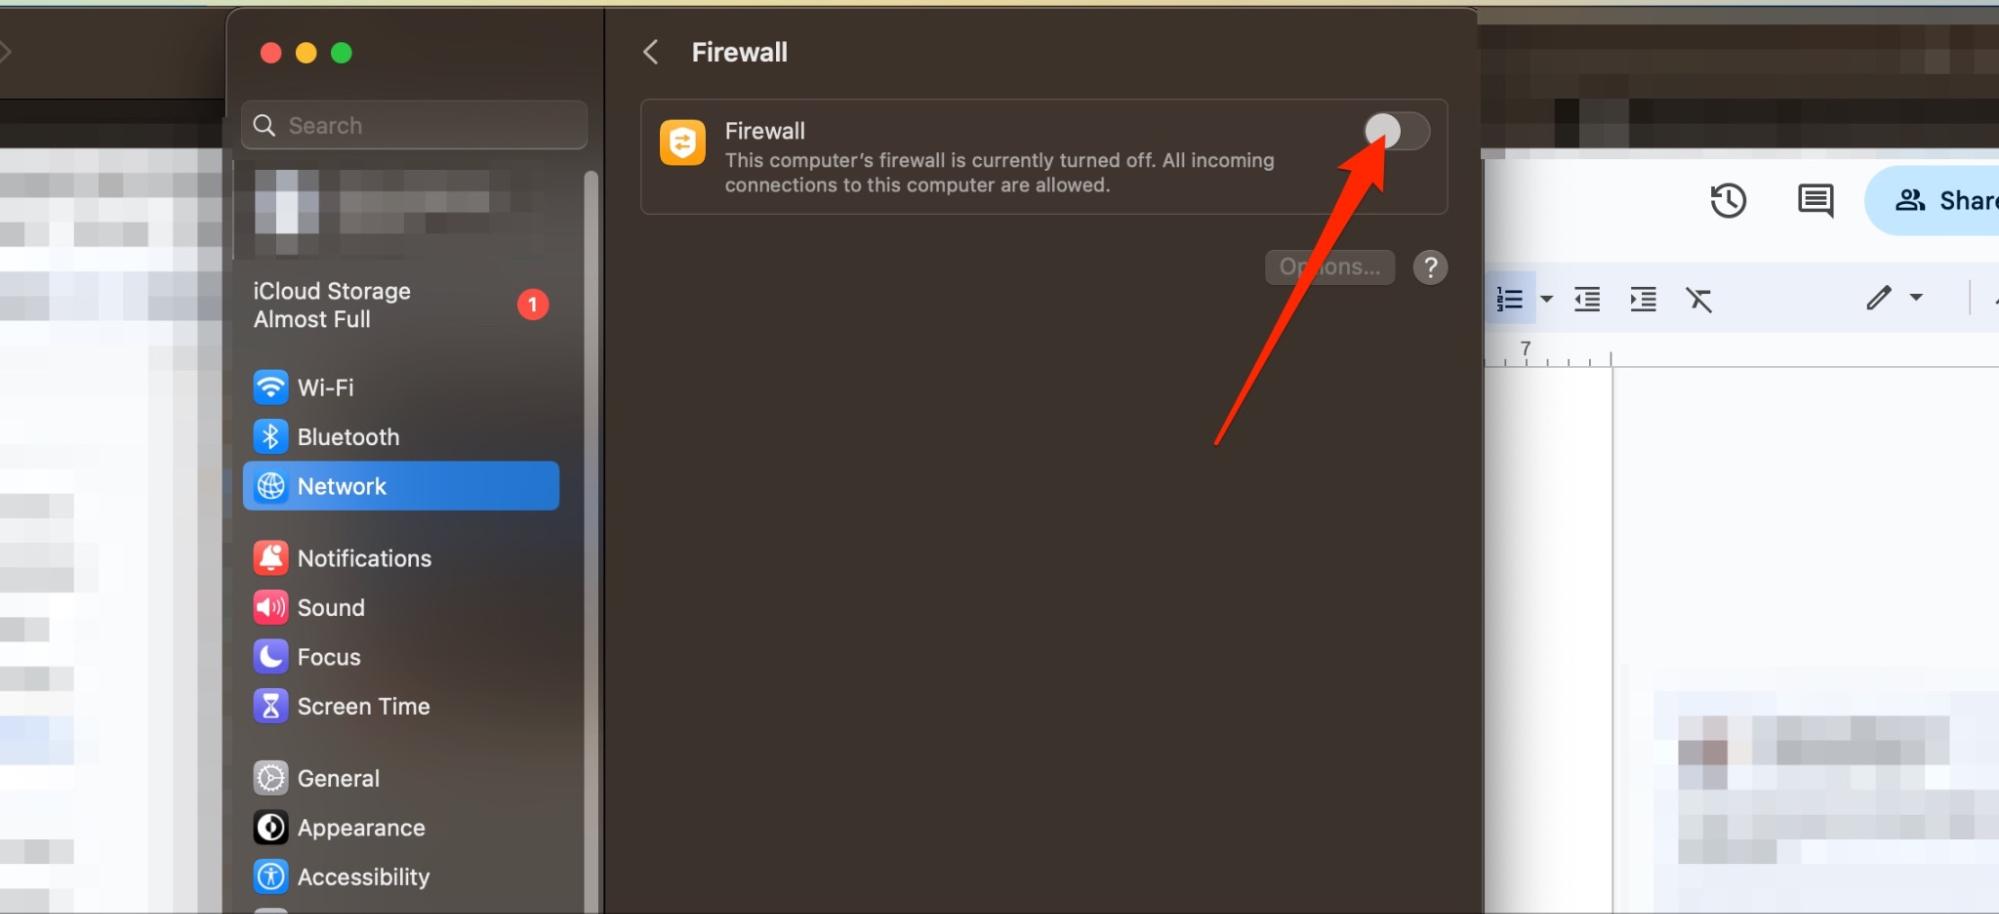
If you’ve activated a firewall, you can follow these steps to switch it off and allow your connection to work again.
- In System Settings, go to Network > Firewall
- Toggle Firewall off.
Factory reset router
Factory resetting your router can remove any caches and other discrepancies that were stopping your device from connecting properly. How you reset the box depends on your provider, but you’ll often need to get a thin object and push the reset button.
Once you’ve done that, hold onto the button for around 30-60 seconds. Your router will switch itself back on, and discrepancies that were stopping you from connecting to the internet should now have been removed.
Make sure the router and DNS number are identical
Ensuring that your DNS and router numbers are identical will allow you to confirm whether the issue with your Wi-Fi lies somewhere else. You’ll need to go to your router’s administrative page to check in that instance, and the process will differ from manufacturer to manufacturer.
To check your Wi-Fi DNS servers, follow these instructions:
- Go to System Settings > Wi-Fi and click on your internet connection
- Select DNS from the list on the left-hand side. Here, you’ll find your DNS numbers.
Setup date, time, and location
Setting up your time and location can ensure that your Mac doesn’t think you’re trying to access the network remotely, which could result in it thinking that the connection is under threat.
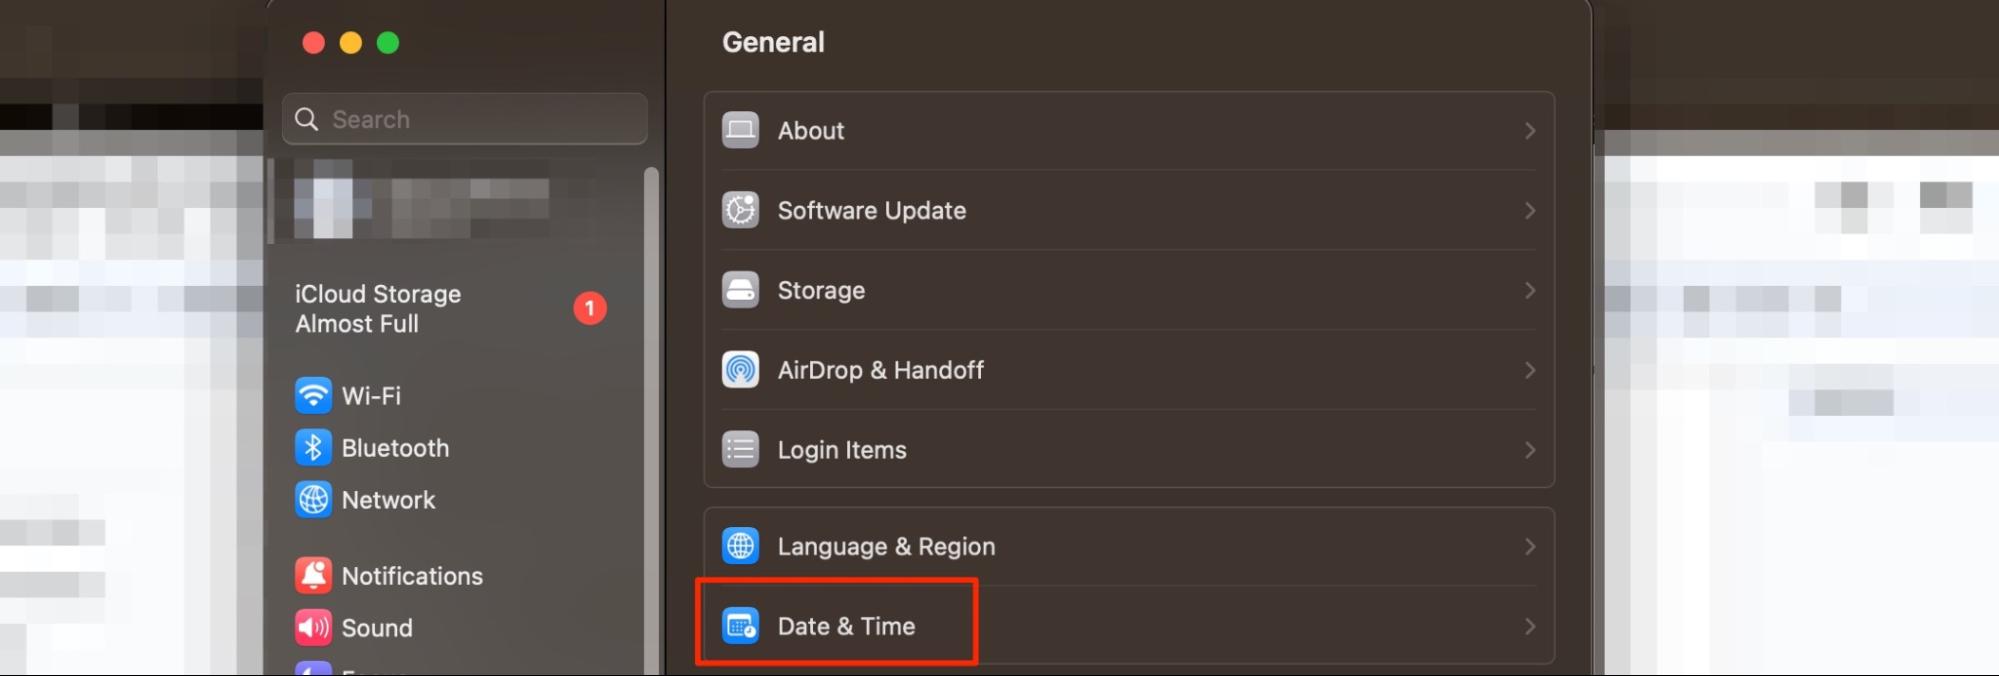
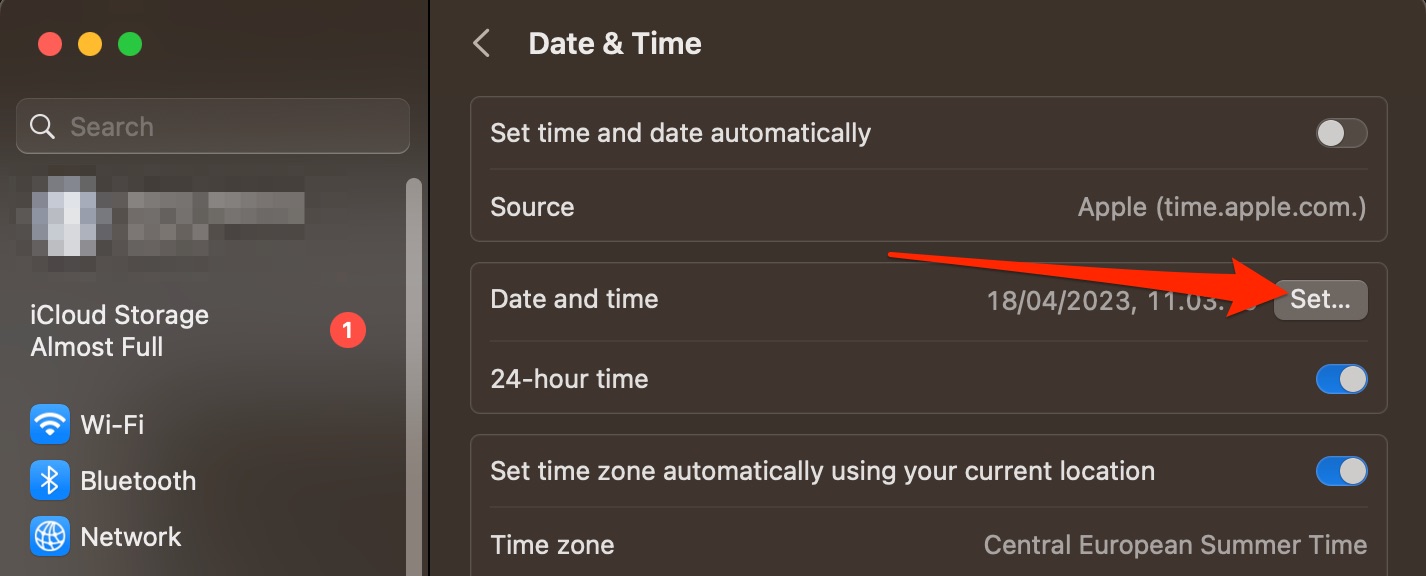
- Go to System Settings > General > Date & Time
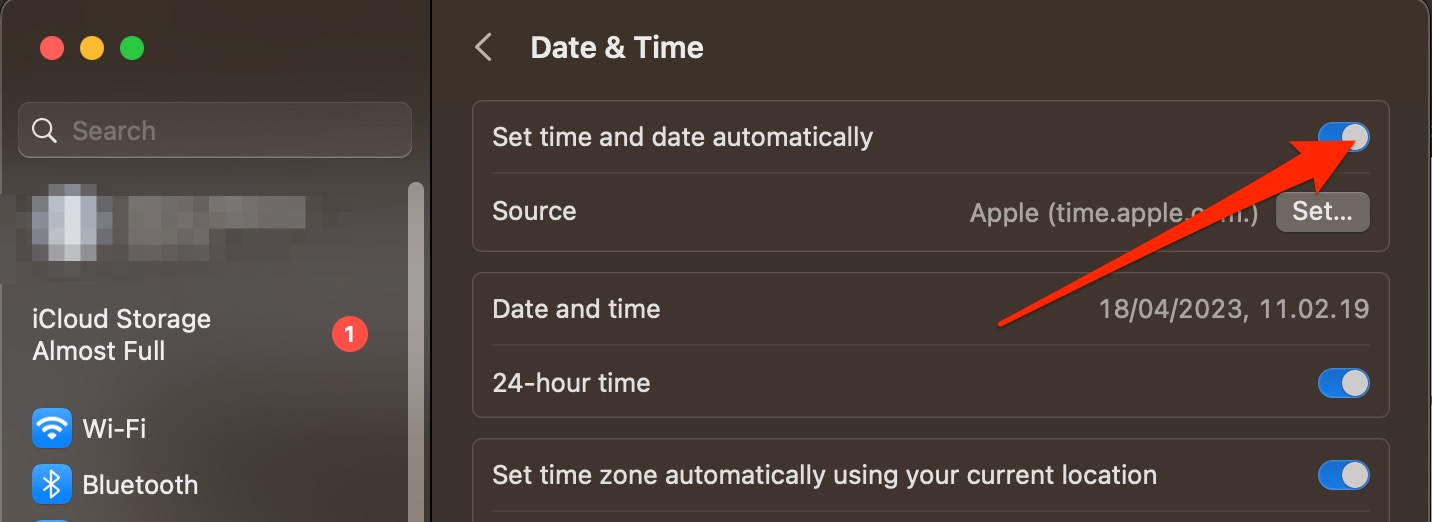
- Toggle Set time and date automatically off
- Enter your password or use Touch ID
- Click on Set next to Date and time
- Change your date and time settings.
Update macOS on MacBook
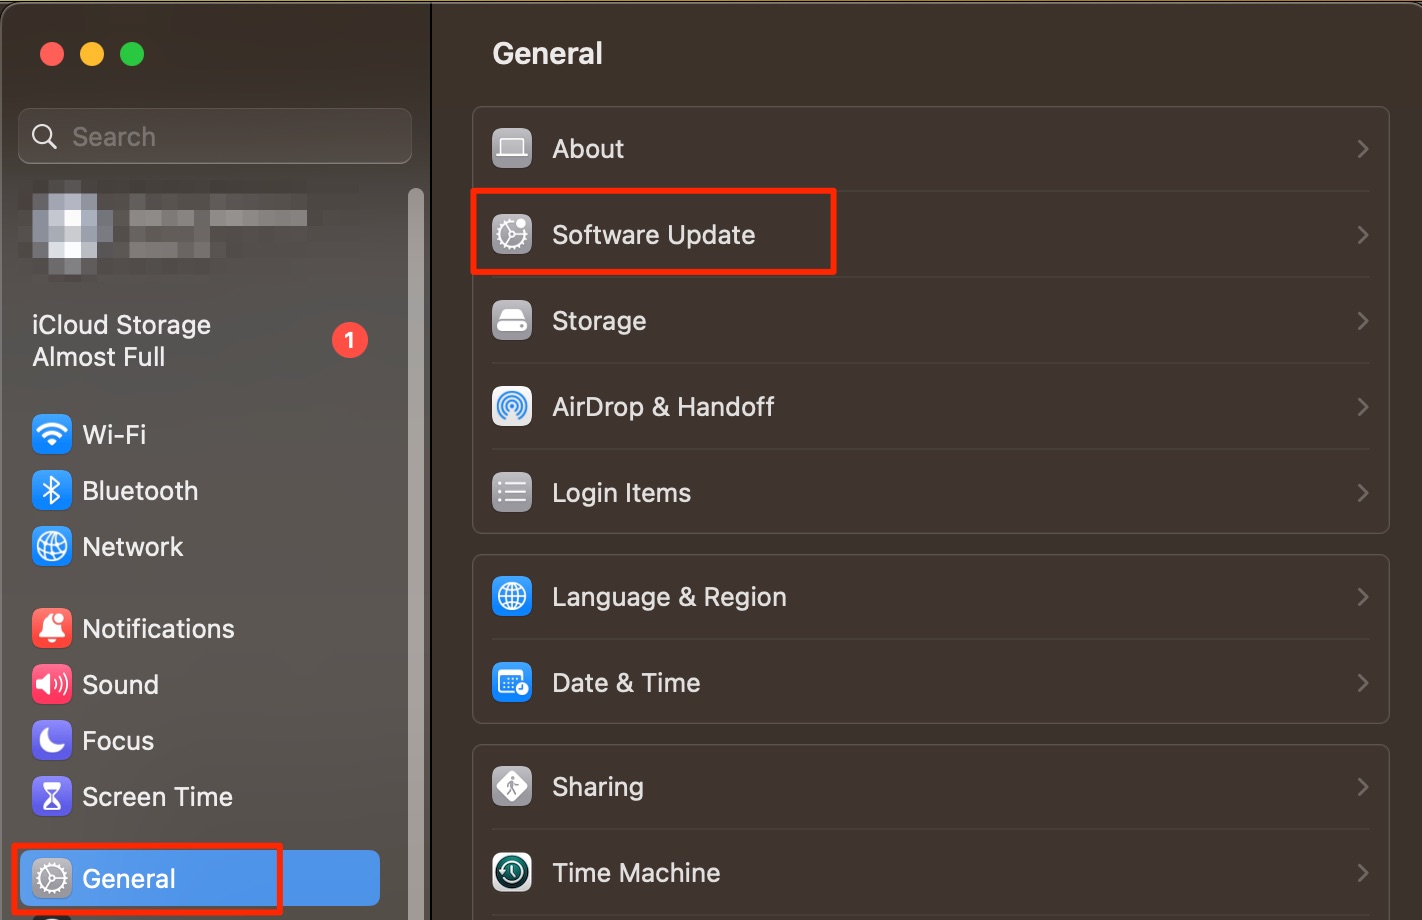
Wi-Fi on but no internet on Mac? Try updating your computer software to fix possible patchiness that you might otherwise be experiencing.
- In System Settings > General, click on Software Update
- Tap Update Now if your Mac shows new software to install
- Click on Agree when you see the Apple terms and conditions appear
- Wait for your Mac to install your software. Your device will probably restart more than once during the process.
Stop mDNSResponder from running
mDNSResponder normally doesn't cause problems, but it can—in some cases—stop your Wi-Fi network from connecting properly on your Mac.
- Open Activity Monitor and choose mDNSResponder
- Hit Force Quit when the pop-up menu appears on your device.
Change Mac’s Domain Name System (DNS)
Changing your Mac DNS can help ensure that all of the information you see is correct, which will allow your device to sign into your network properly.
- Go to System Settings > Wi-Fi and click on your preferred network
- Select DNS
- Click on the + button and enter your new DNS settings.
Disconnect all USB accessories
Disconnecting your USB accessories can help your Wi-Fi connect as your device doesn’t need to focus on performing so many actions at once. However, you shouldn’t unplug anything before you’ve safely ejected your device.
You can eject your hard drives and whatnot by clicking control + your trackpad at the same time on the respective icon. Select Eject and wait for your computer to do the rest.
Prioritize network
Prioritizing a network will help your Mac determine what it should connect to at first.
- Open System Settings and go to Network
- Click on the three dots at the bottom of your screen
- Choose Set Service Order
- Drag your networks in the order that you want to prioritize them.
Renew the DHCP lease in network preferences
Renewing your DHCP lease will ensure that your IP address is up-to-date.
- Go to System Settings > Network and click on the network you want to renew
- Select Details > TCP/IP
- Tap Renew DHCP Lease > OK.
Create a new network location
Making a new location for your network can help simplify connecting to the Wi-Fi for your computer.
- In the Network section of System Settings, click on the three dots icon
- Select Edit Locations
- Tap the + icon
- Enter your network location’s new name
- Hit Done once everything looks good to you.
Clean up usernames and profiles
Removing usernames and profiles that are no longer needed on your Mac can help keep your device more organized and stop settings from clashing with one another.
- Go to System Settings > Privacy & Security > Profiles
- Select the profile you want to remove and tap the - button.
Reset network preferences
Resetting your network preferences is an ideal choice if you’re still encountering challenges with your Wi-Fi not connecting on your Mac.
- In System Settings > Wi-Fi, scroll to the bottom and select Advanced
- Under Known Networks, tap the three dots icon
- Select Remove From List
- Tap Remove when you see the dropdown menu.
Now reconnect to your Mac Wi-Fi
Having your Wi-Fi not connected is infuriating, especially when you’ve got important work to do. Luckily, you can try several steps to solve the problem—some of which are simpler to grasp than others. Having read this guide, you should have a good understanding of why your Mac won’t connect to the internet, along with what you can do to fix the problem.
You can start by clearing your cache, and MacKeeper’s Safe Cleanup tool makes it easy for you to do precisely that.


