In this article you will find the following:
A slow internet connection on Mac can be frustrating, causing delays in web browsing, apps taking ages to load, video calls freezing and disconnecting repetitively, and online streaming nearly impossible to enjoy. In these instances, troubleshooting is essential to improve internet speed on Mac across all different macOS versions.
Diagnosing connectivity issues specific to each macOS version, from El Capitan to the latest M2, is crucial for resolving slow internet on Mac. Whether it's testing Monterey's connectivity or troubleshooting browser slowness on older versions, tailored solutions are essential to speed up internet on Mac effectively.
Before we start
A cluttered device often leads to a slow internet connection on Mac, as a result of accumulated downloads and files. Performing a manual cleanup of this digital clutter might not remove the deeply hidden files, thus prolonging the issue of a slower browsing experience.
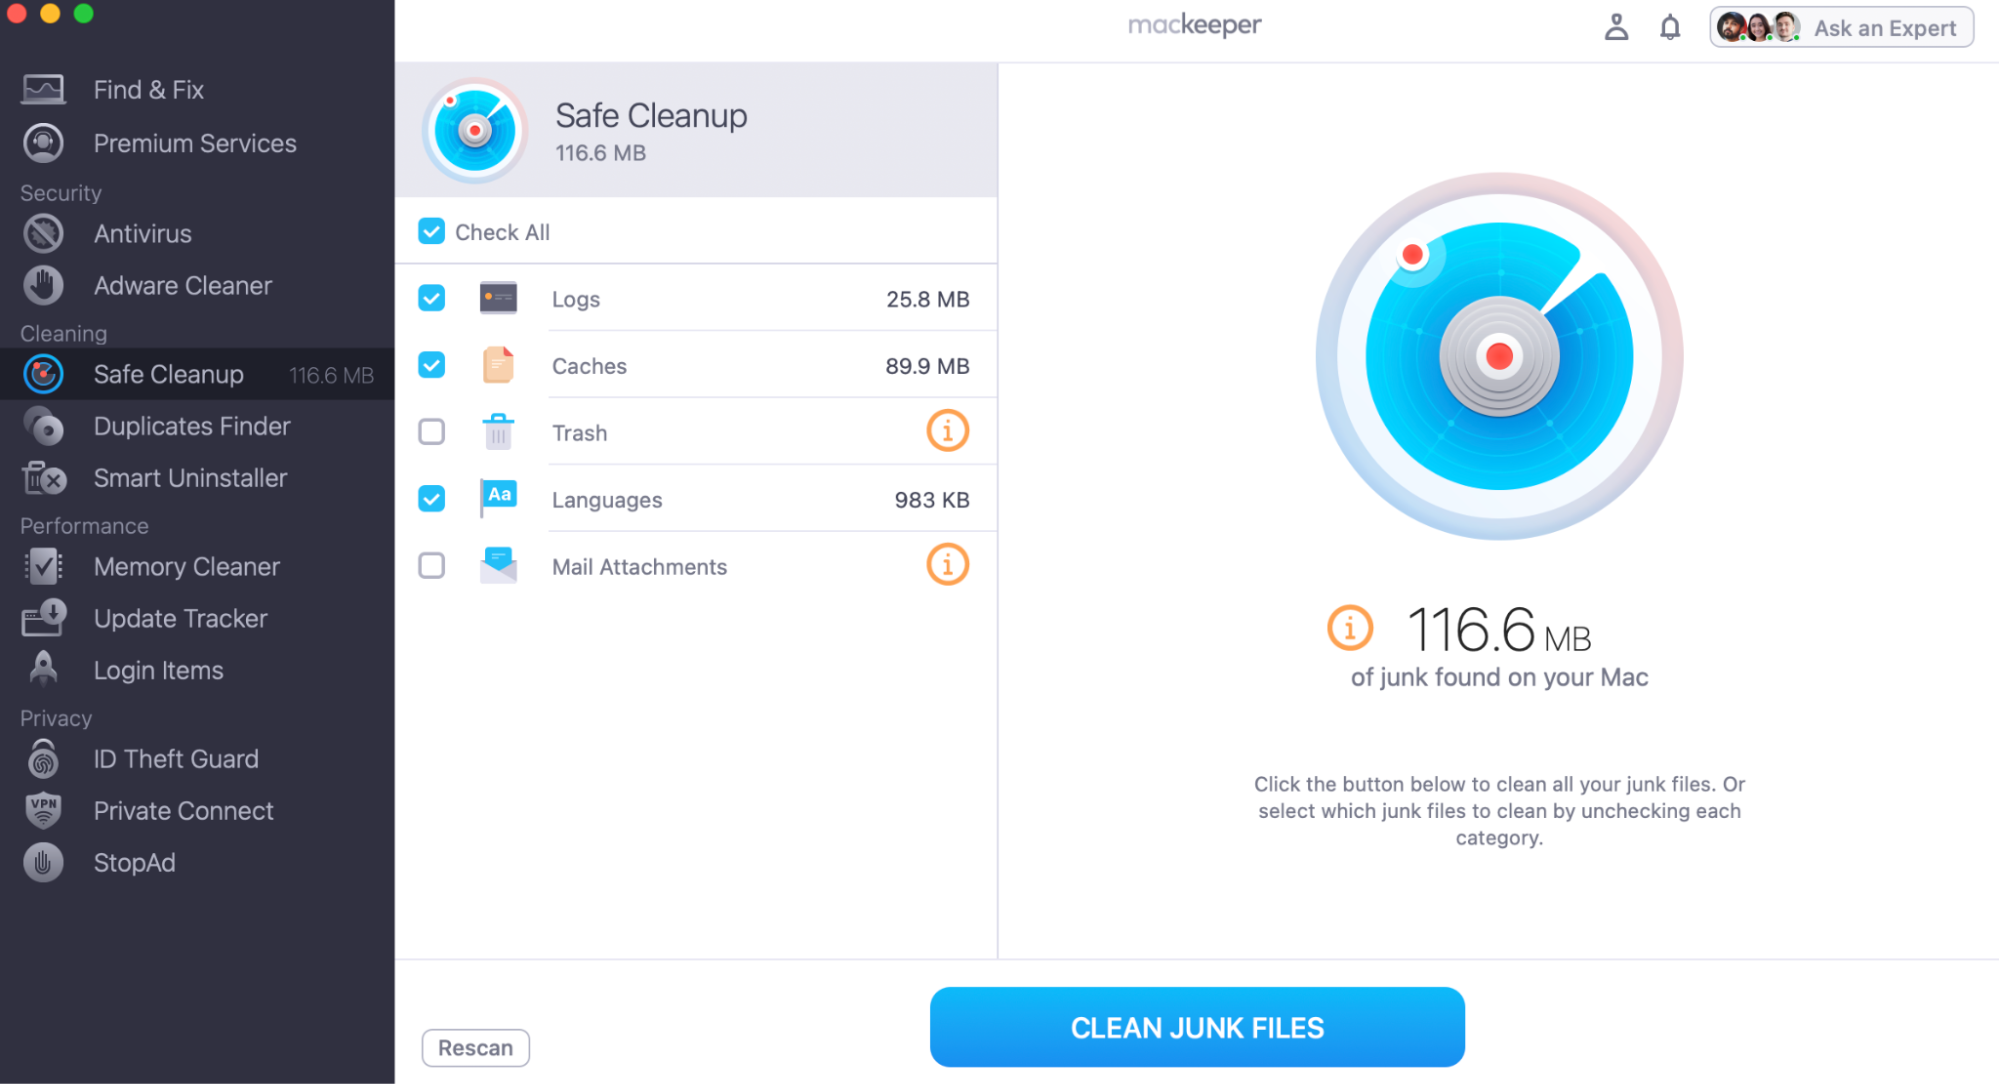
MacKeeper’s Safe Cleanup can swiftly address these issues as it’s able to thoroughly remove all hard-to-find logs, caches, and junk files. Use it as your reliable, go-to fix to optimize your device in your attempt to make internet faster on Mac.
Here’s how to use MacKeeper’s Safe Cleanup:
- Download MacKeeper
- Launch the app, choose Safe Cleanup and click Start Scan
- After the scan is complete, review the results and select the junk you want to delete
- Then click on Clean Junk Files.
With our tips, you can swiftly restore smooth performance to your Mac, and this is just the beginning. Our article will provide solutions you can use to help improve the overall speed of your internet connection.
Why is your Mac internet so slow?
Experiencing slow internet on your Mac can be attributed to various factors.
Here are some common factors that can cause such a nuisance:
- Outdated firmware
- Older Monterey or El Capitan versions
- Not-updated software on your Mac
- Malware and related malicious activity
- A weak or dropped Wi-Fi connection
- Too many background apps running simultaneously
- DNS configuration problems.
Fear not, as several solutions exist to help you restore your Mac’s internet speed to steady, and we're here to guide you through each one.
How to check internet speed on Mac
Diagnosing a problem relating to slow internet on Mac begins with testing your connection speed. Reliable services like Fast.com and Speedtest.net allow you to check your internet speed.
To monitor your internet speed on Apple computer:
- Open Safari or your preferred web browser and access Fast.com or Speedtest.net
- Allow the site to generate a detailed connectivity report including your current download and upload speed
- If the reported speeds are significantly below your advertised speed, it’ll indicate a slow connection.

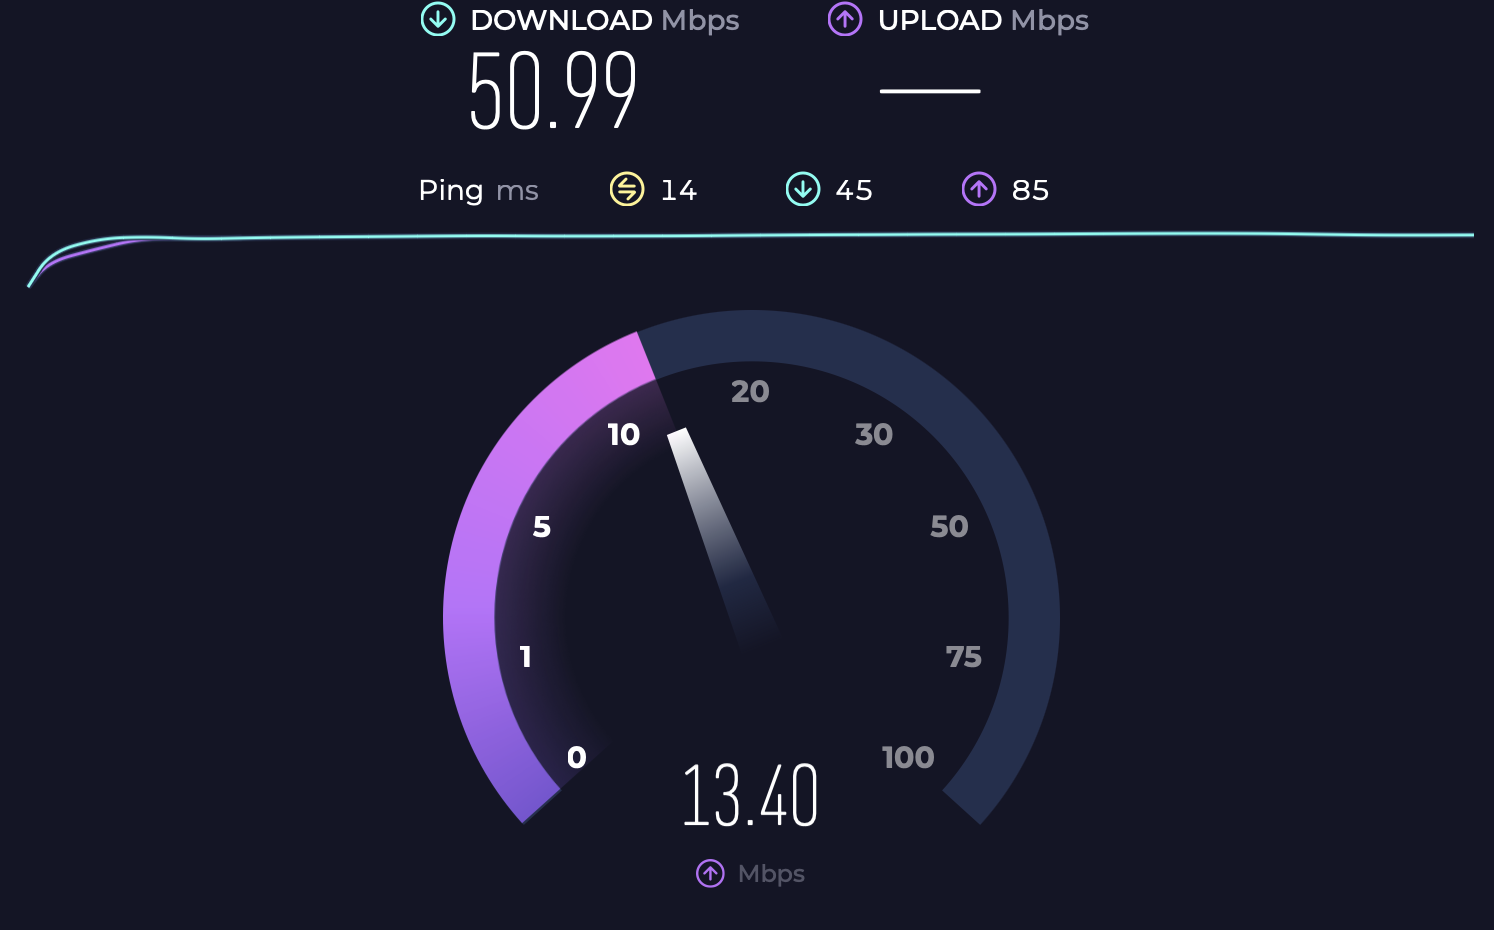
After accessing a speed connection site, the detailed report will help you monitor your download and upload speeds. Ensure the indicated speed meets your expectations.
Your Safari is slow? Check the solutions below to help you speed things up.
How to speed up internet connection on Mac
Is your speed test showing you that you have slow internet on Mac? If so, consider these strategies for speeding up internet connection:
- Restart your Mac and router
- Turn off your VPN
- Update your browser and macOS
- Optimise, clean, and reset your browser
- Quit unnecessary apps and browser tabs
- Switch to another web browser
- Reset Wi-Fi settings
- Use an Ethernet cable instead of Wi-Fi
- Use a faster Internet line or ISP
- Scan for malware
- Reduce the frequency at which Time Capsule is backed up
- Clean up your Mac to boost the overall performance.
1. Restart your Mac and router
Rebooting your Mac and Wi-Fi router can resolve various connectivity issues in a bid to help improve internet speed on Mac. If you're experiencing a slower internet connection on your Mac compared to other devices using the same Wi-Fi network, restarting both your laptop and router might fix this inconvenience.
Here’s how to restart both your Mac and your Wi-Fi router:
- Click the Apple logo on the menu bar and select Restart from the dropdown menu
- Unplug your Wi-Fi router from the power source, wait for a few seconds, and plug it back into the power source.
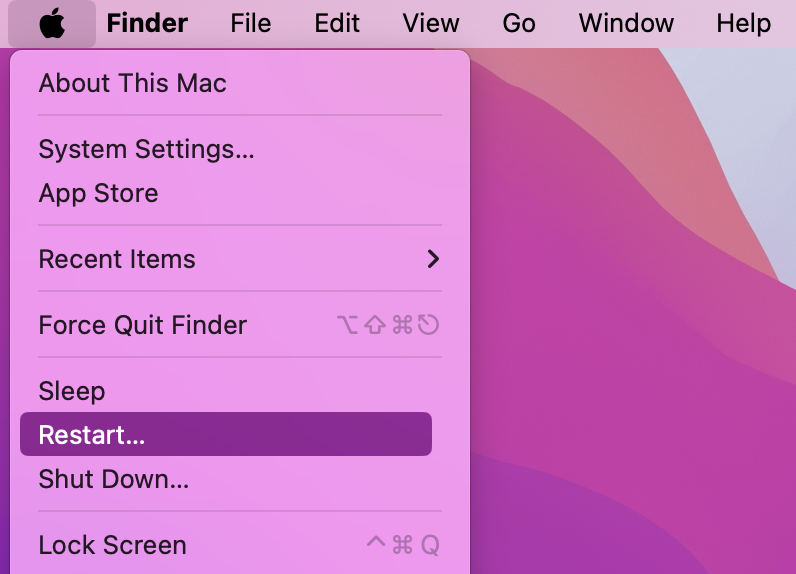
Make sure all your applications are closed and no background processes are running before restarting your Mac or Wi-Fi router. This way, you can allow for a full system reset to improve the effectiveness of this troubleshooting solution.
2. Turn off your VPN
Disabling your VPN can sometimes resolve issues associated with a slow internet connection on Mac, such as slower browsing or connectivity troubles.
Here’s how to turn off your VPN:
- Toggle your Dock to find and click on System Settings
- Then choose Network settings
- Toggle the VPN switch to Off to disable the VPN connection
- If you’re using a VPN from an app similar to MacKeeper, then open the app, locate the VPN Private Connect and turn it off.

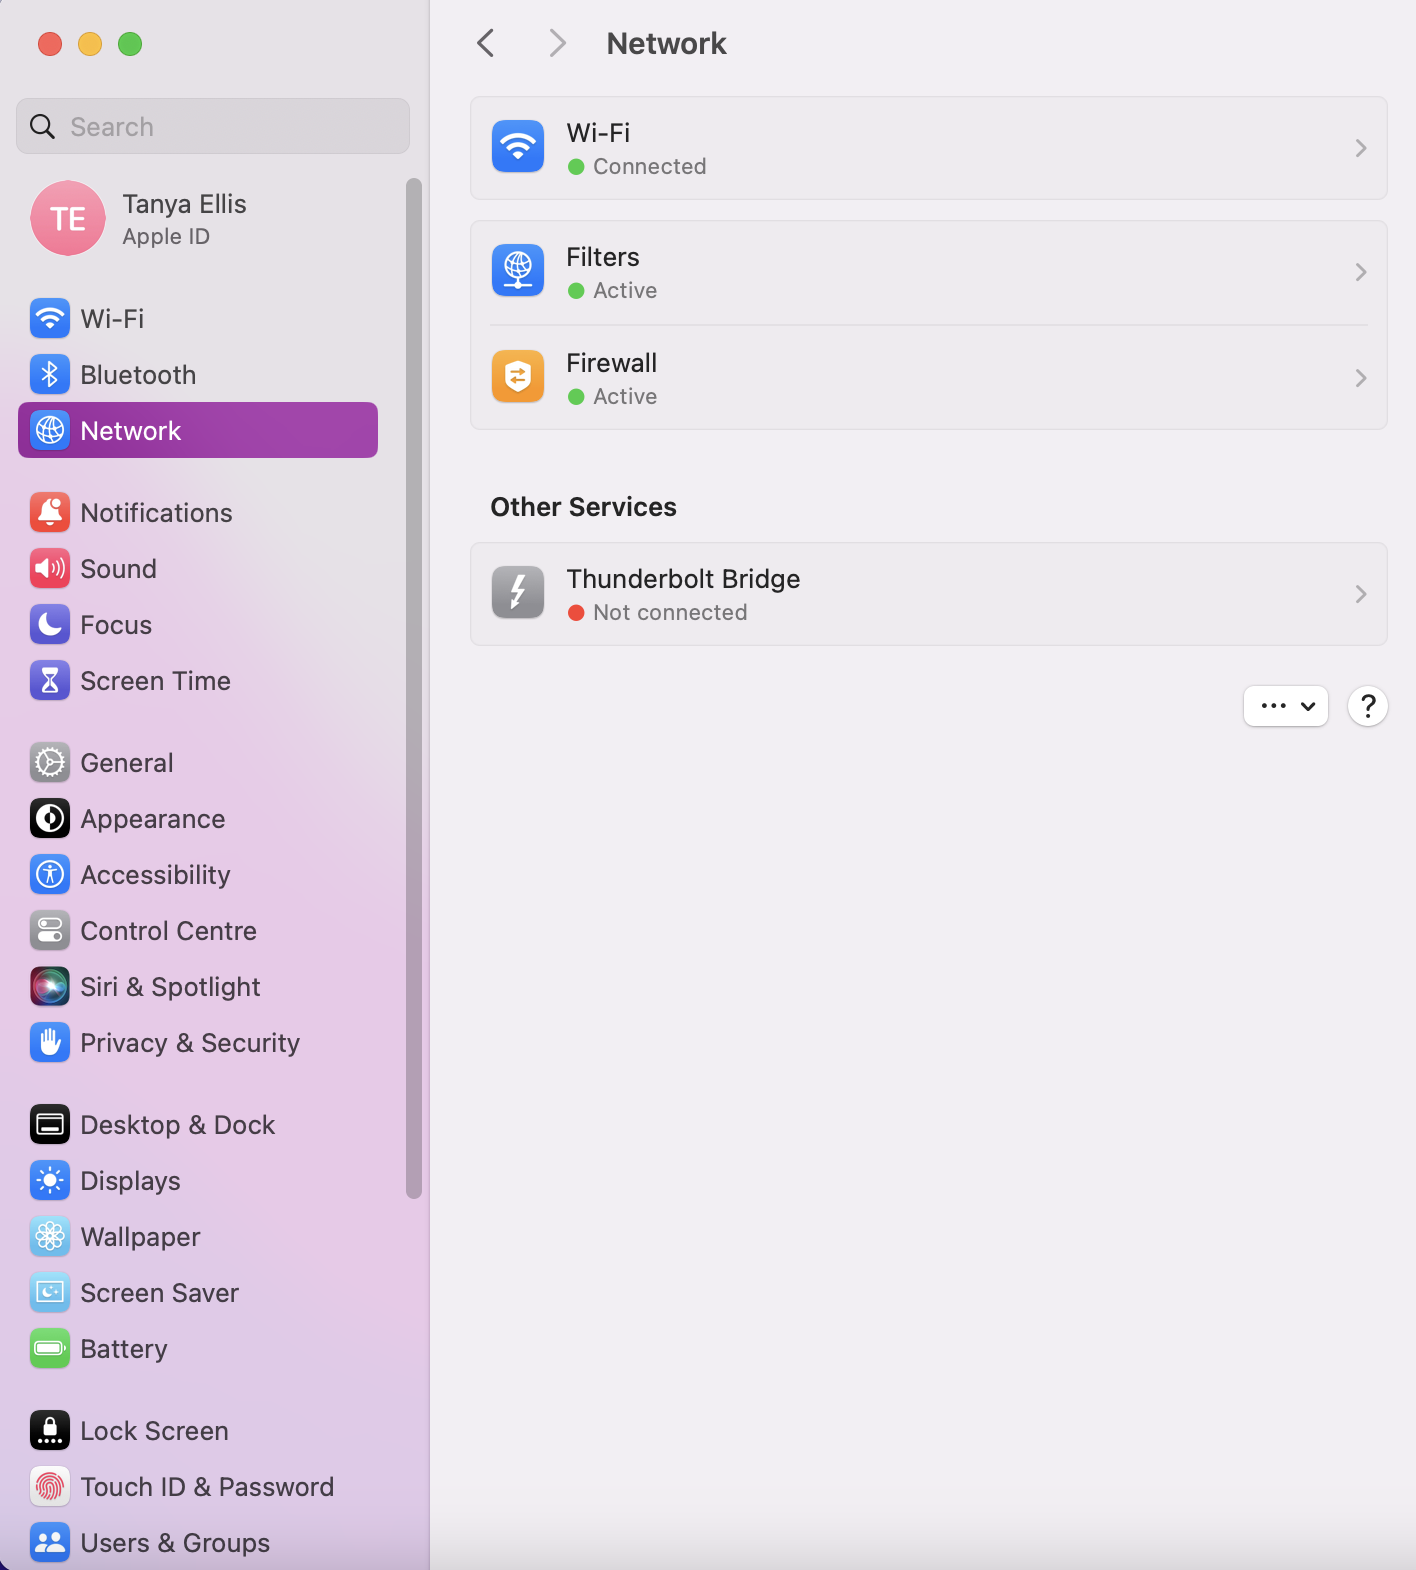
Ensuring your VPN is turned off can significantly impact your Mac's internet speed. Once disabled, recheck your connection to check for any improvements in speed and connectivity.
3. Update your browser and macOS
Making sure your browser and macOS are both up-to-date is crucial should you want to improve internet speed on Mac. Below we’ve provided the necessary steps to help you update the Safari browser to ensure smoother browsing experience on your Mac:
- Open App Store
- Click on your profile icon in the bottom-left corner of the App Store window
- Look for available updates
- If there’s an update available for Safari, it’ll be listed here, and you’ll be able to select the option to Update Safari.

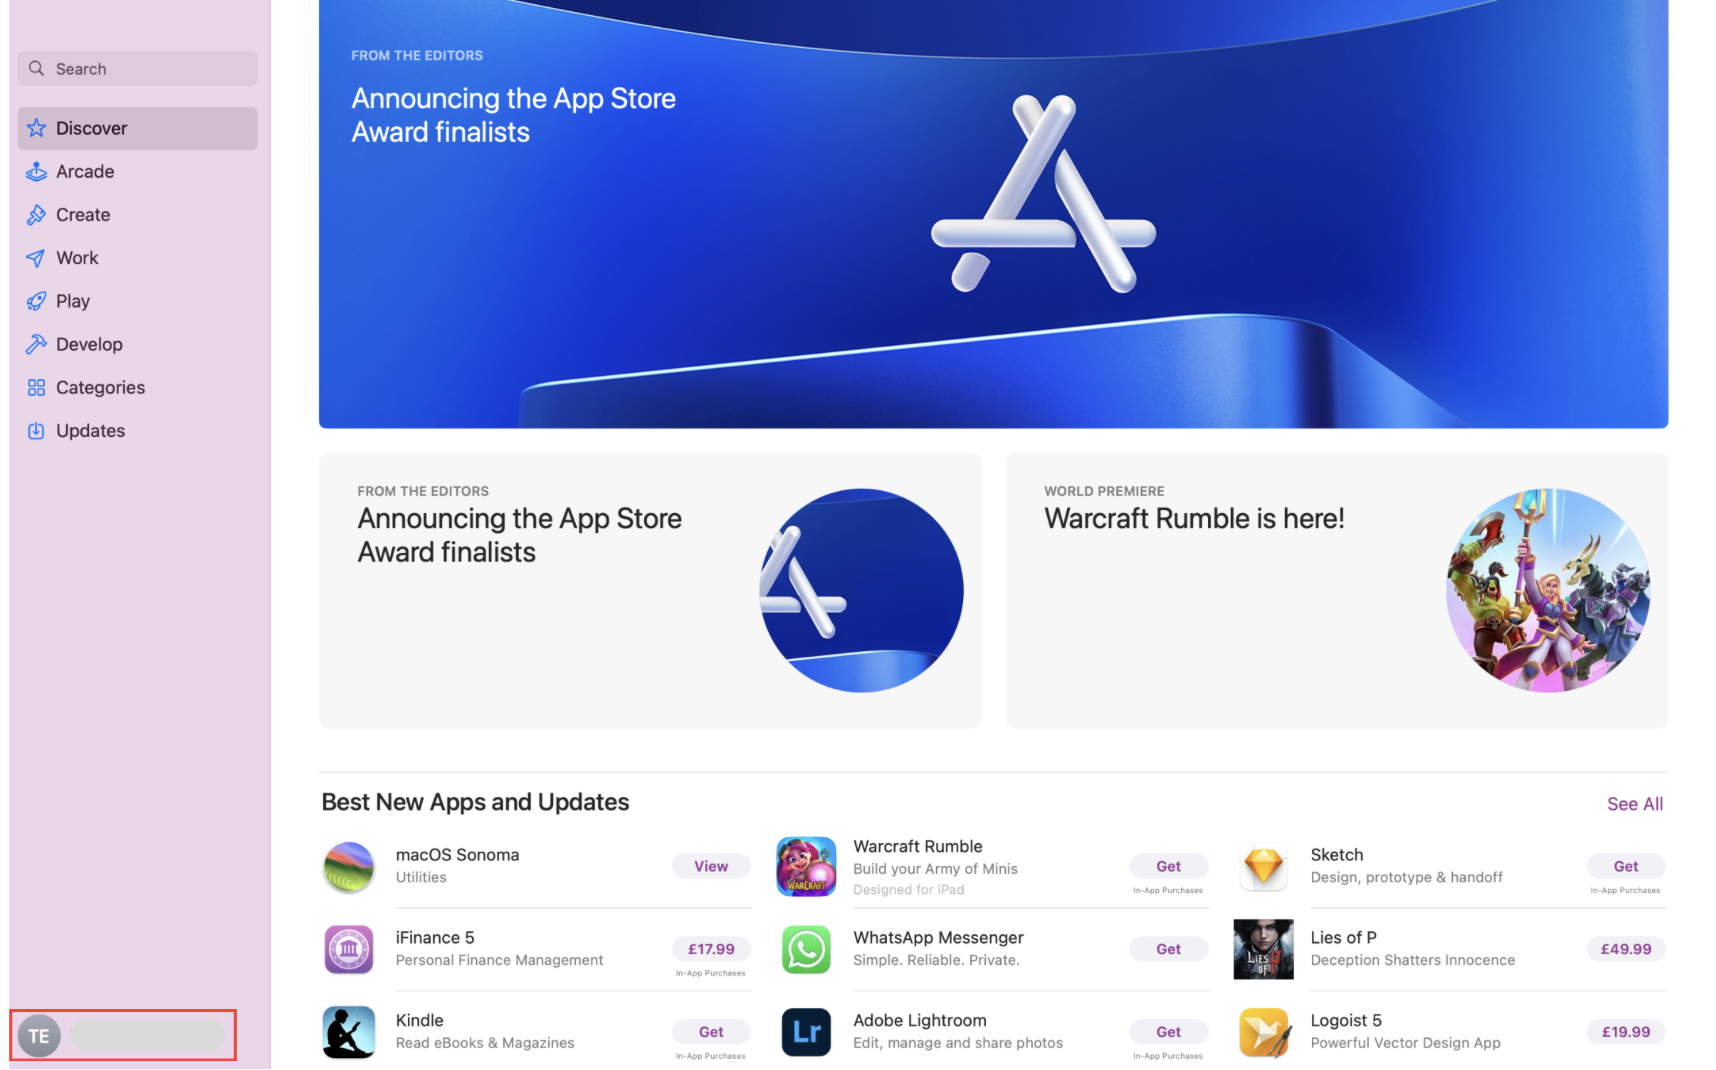
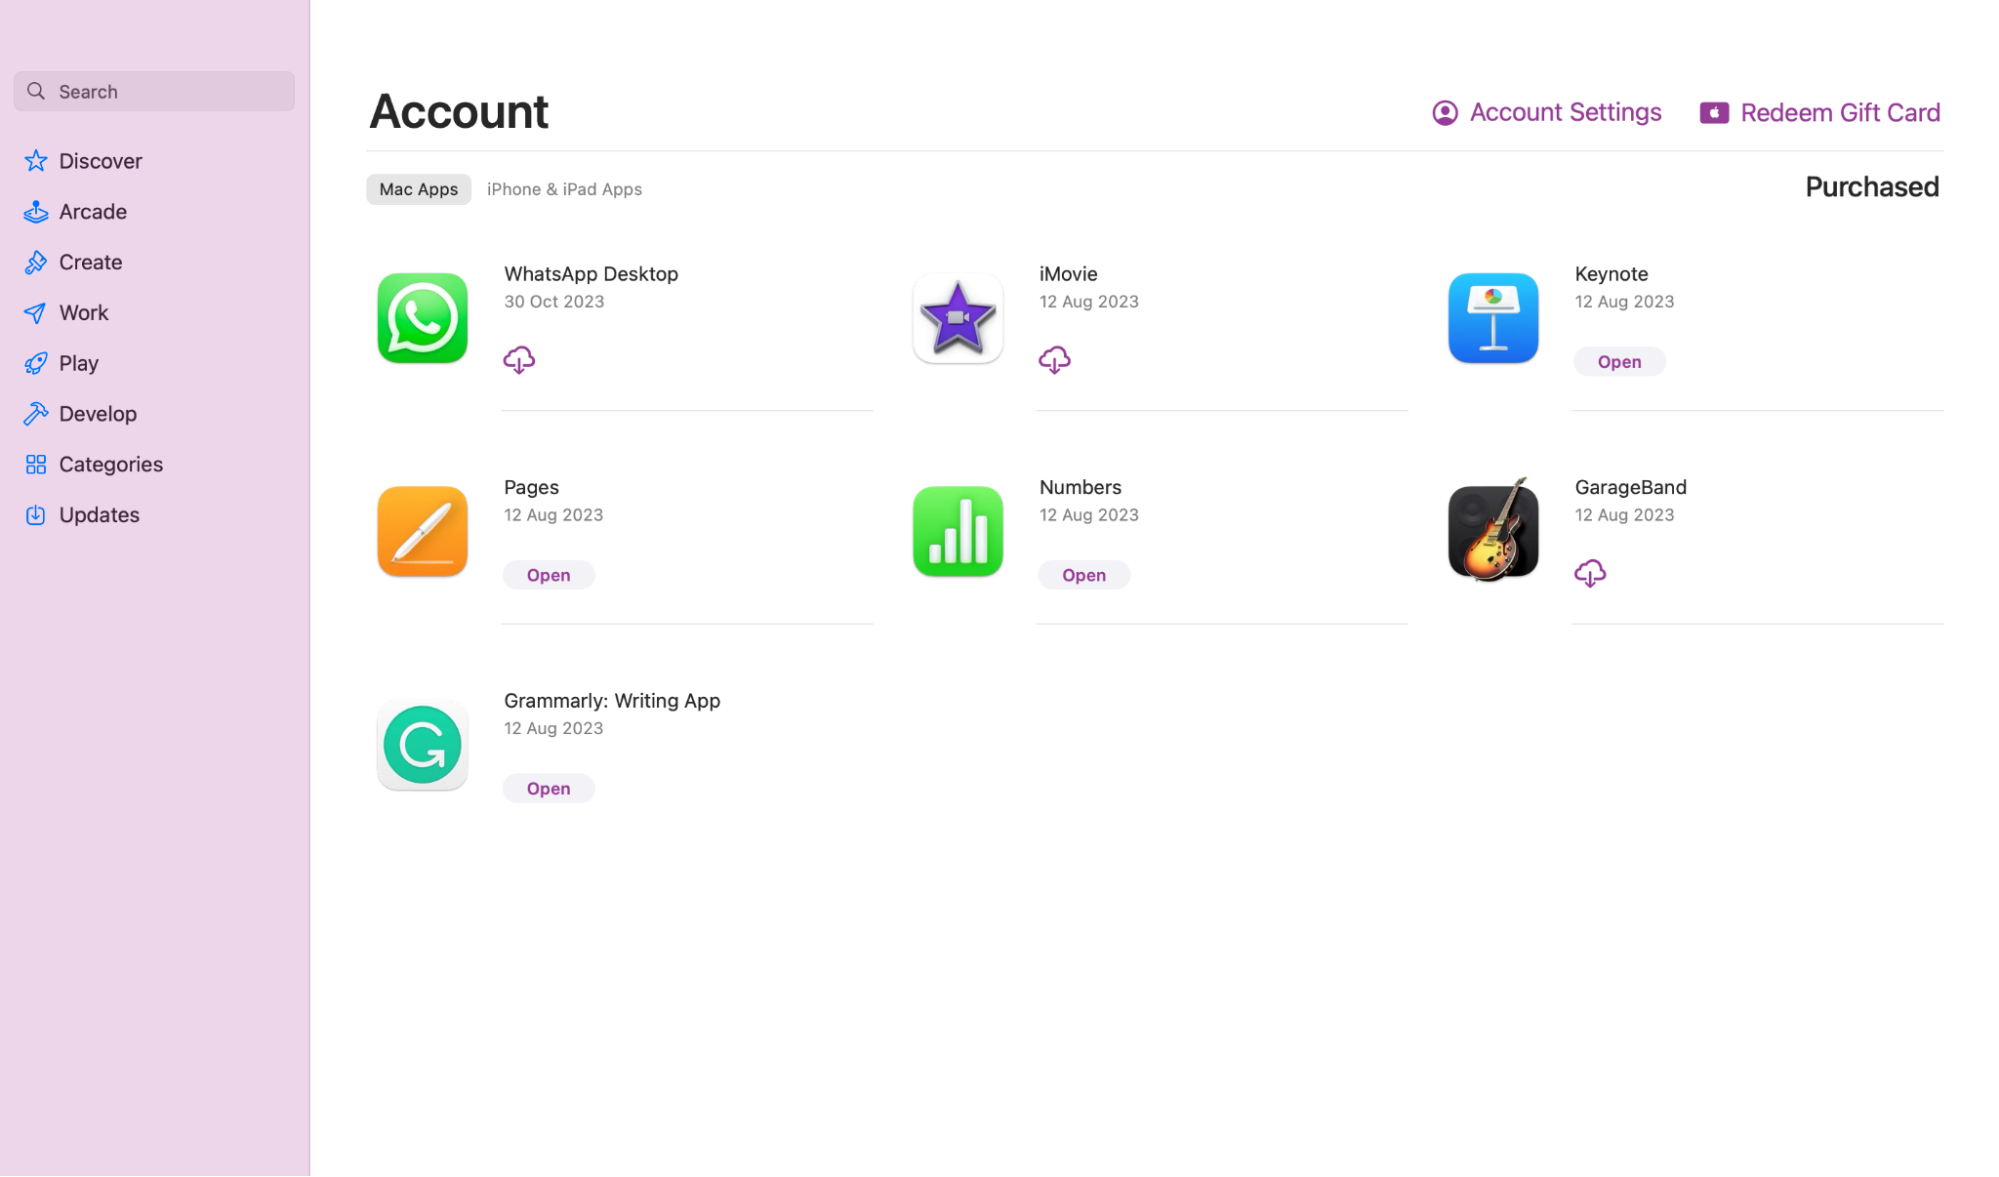
Furthermore, it’s not just crucial to regularly update your browser but also your macOS to improve connection issues. Maintaining an up-to-date MacOS can also significantly improve your overall system performance.
To check for available macOS updates, follow these steps:
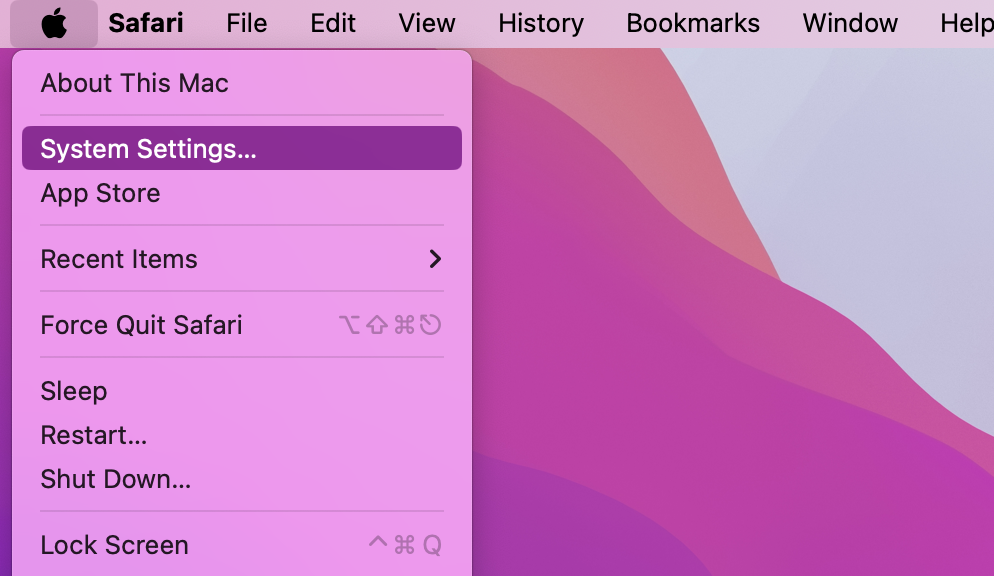
- Click on the Apple logo and select System Settings
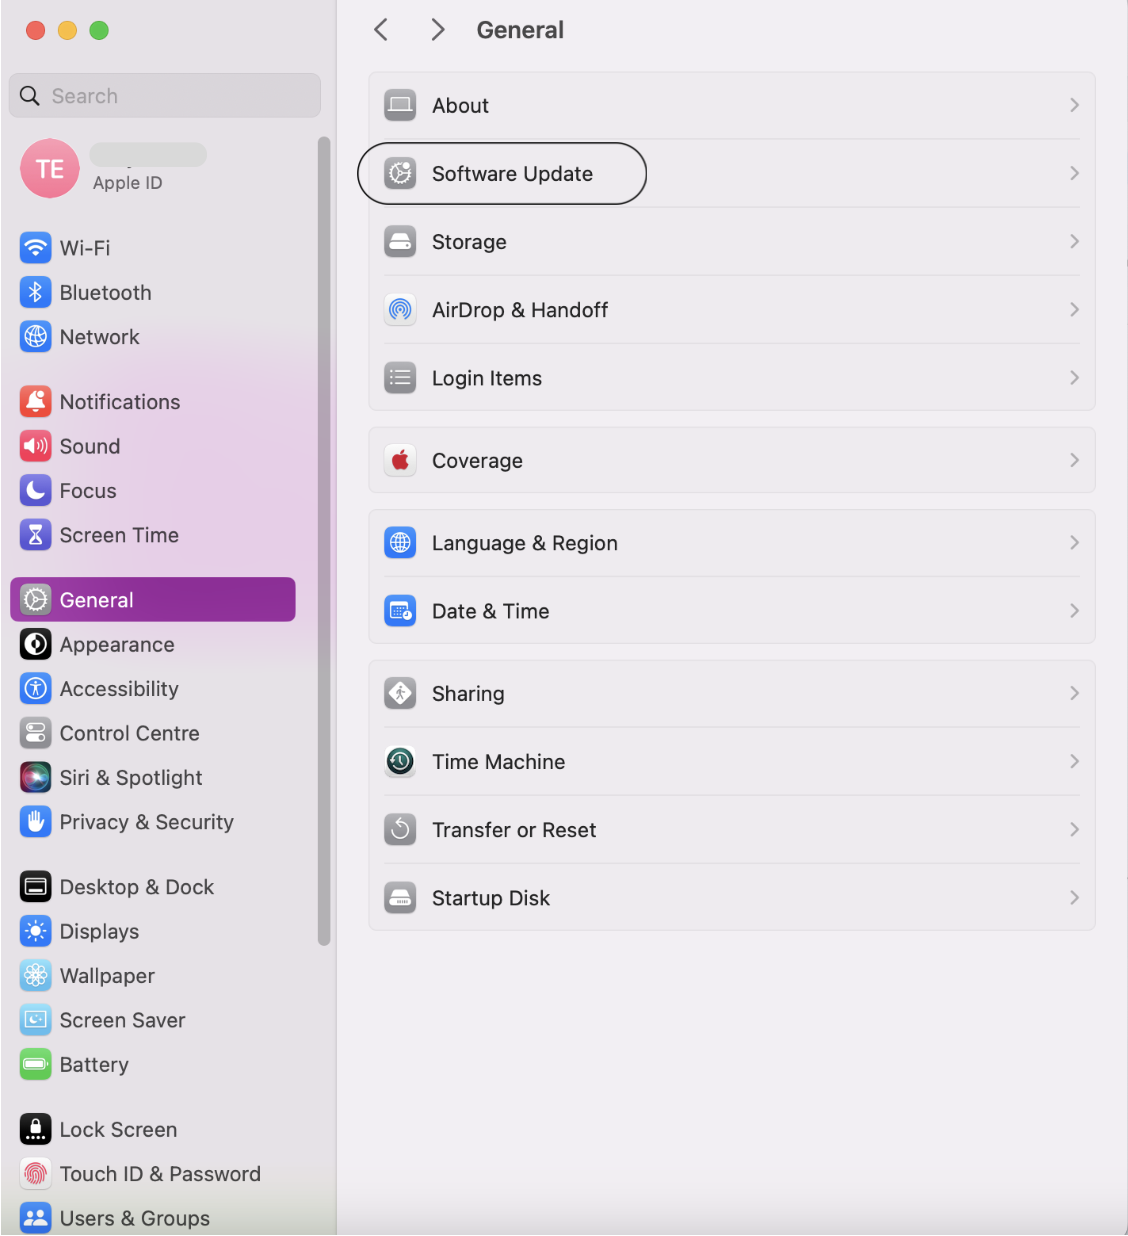
- Go to General and click on Software Updates
- macOS will automatically check for any available updates. If updates are available, click the Update Now button
- Follow the on-screen instructions to complete the update process.
4. Optimize, clean, and reset your browser
You can improve internet speed on your Mac by regularly cleaning Chrome, Mozilla, and Opera junk. We recommend you clean and reset your browser monthly.
Here’s how to clean and reset your browser:
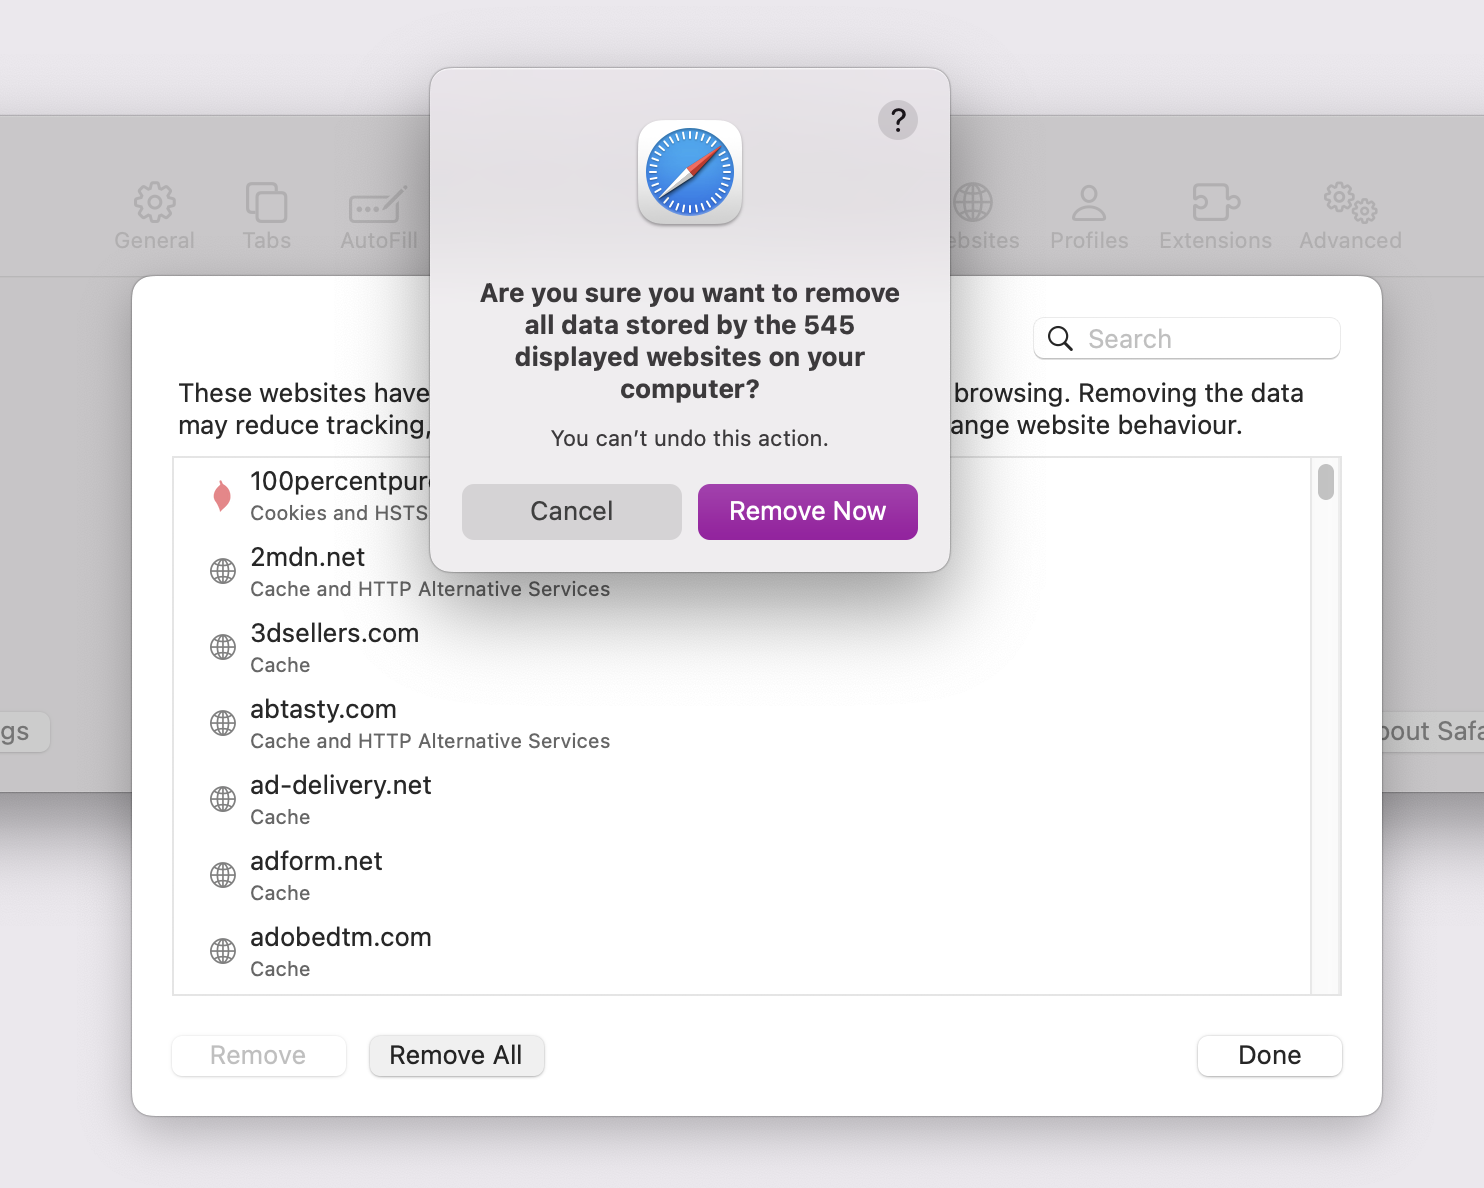
- Clear cache: Open the Safari app icon, then click on Safari at the top of the screen > Settings > Privacy > Manage Website Data > Remove All > Remove now > Done
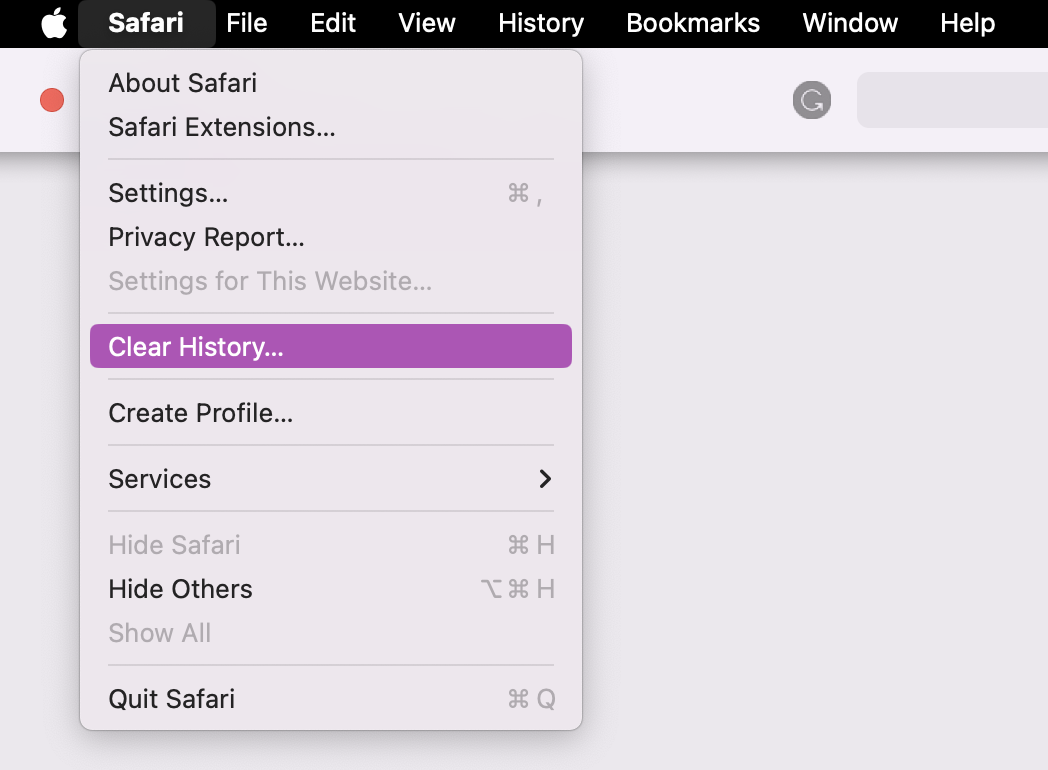
- Clear History: Click on the Safari app icon > Safari > Clear History. Click on the arrows and select the option you’re comfortable with, then click Clear History
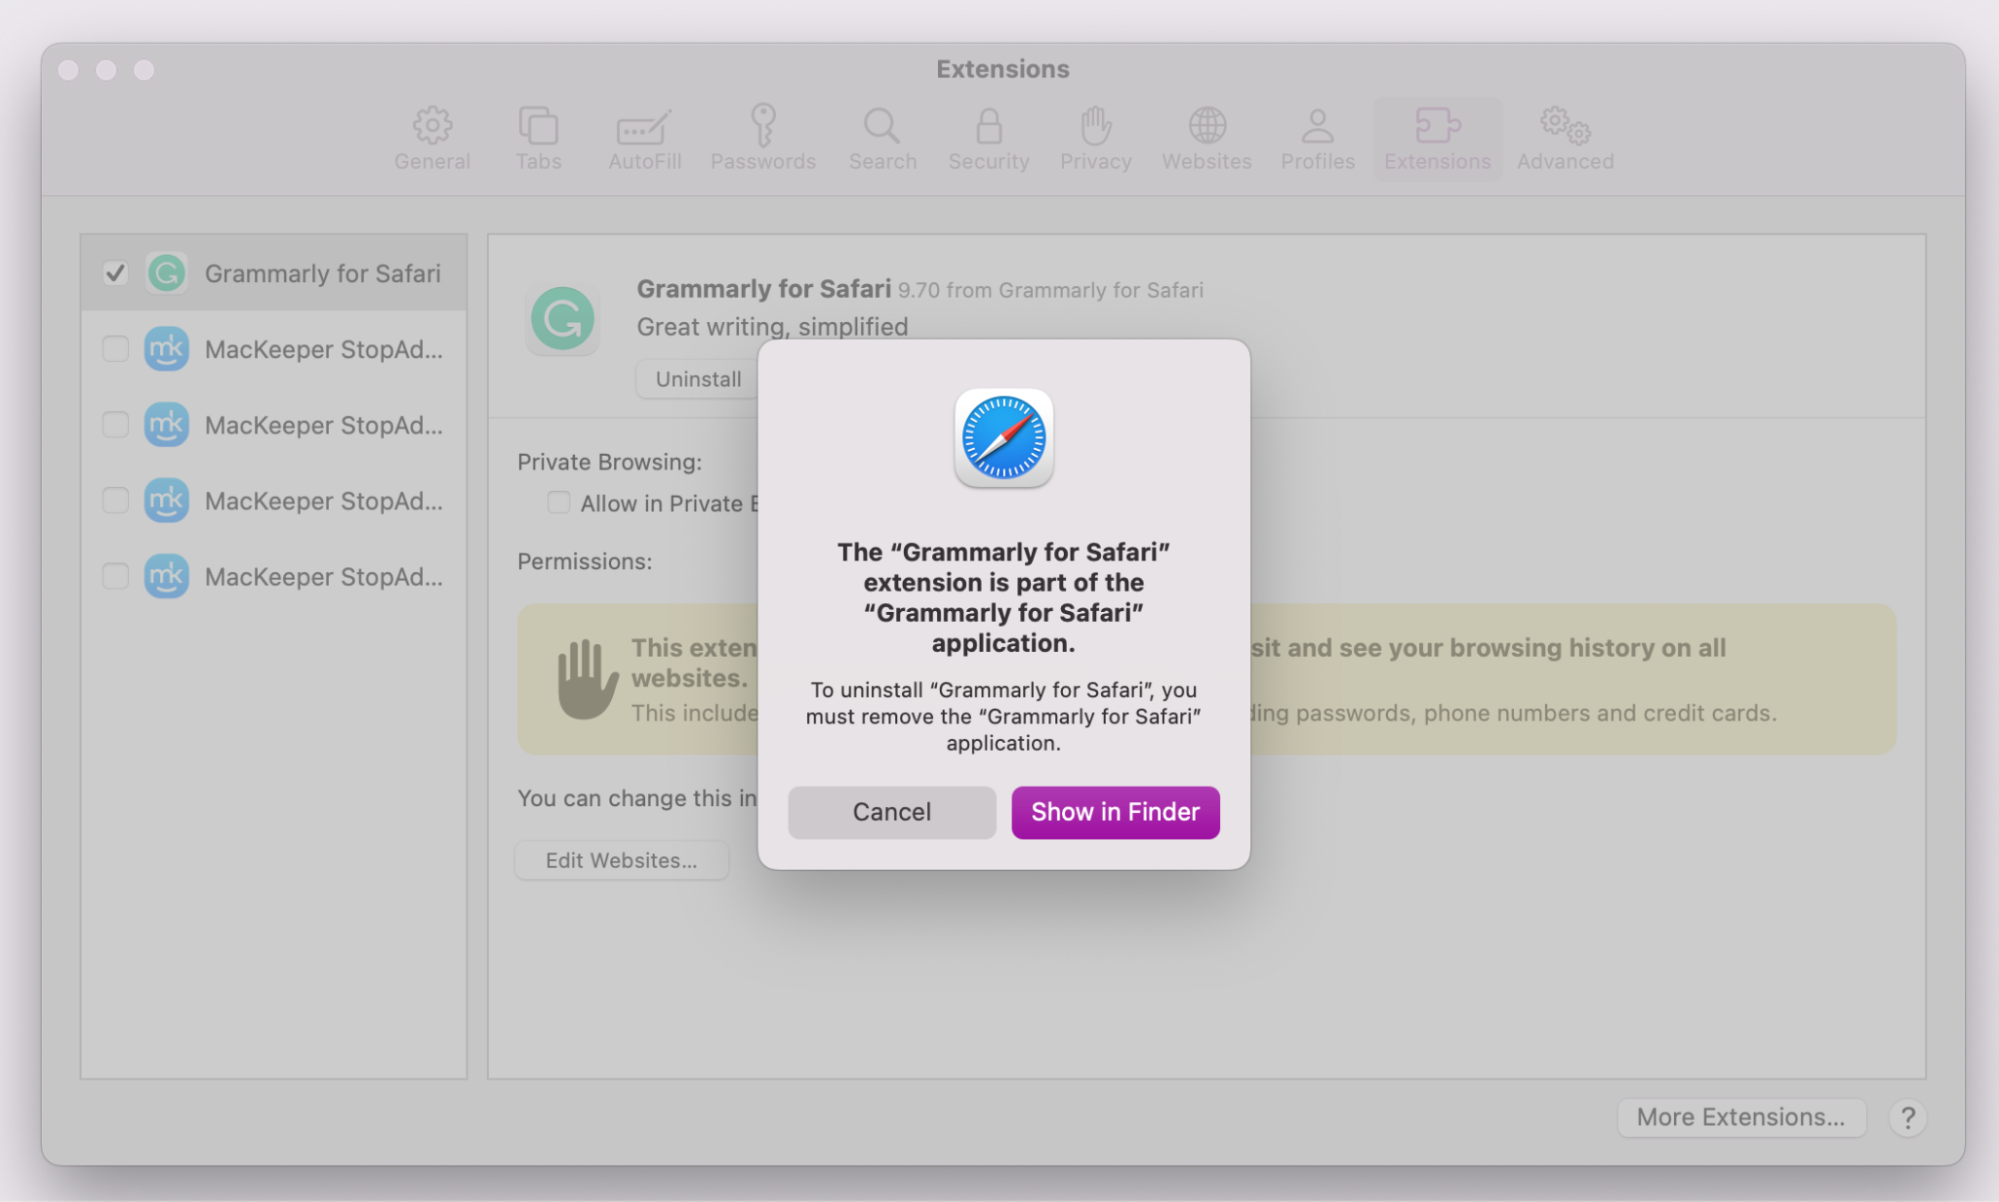
- Uninstall extensions: while Safari is open, click on Safari > Settings > Extensions. Check the box next to the extension you want to remove, then click the Uninstall button.
Note from our experts:
For a more streamlined browsing experience with minimal interruptions, allow MacKeeper's Stop Ad to do all the heavy lifting. This tool blocks intrusive ads effortlessly, ensuring a smoother and more secure browsing journey. Download MacKeeper now to enjoy a hassle-free browsing experience.
5. Quit unnecessary apps and browser tabs
Having too many unnecessary apps running and numerous browser tabs all open at once could be the culprit behind your slow internet on Mac. Our experts advise focusing on essential apps and tabs and closing them when not in use only to improve your internet speed on Mac.
Here’s how to quit unnecessary apps and browser tabs on your Mac:
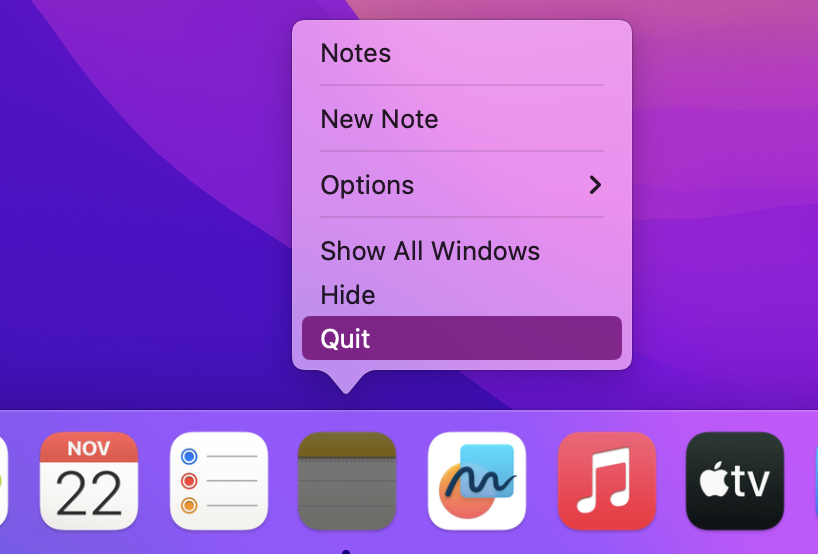
- Quit apps: Right-click on the app you want to quit and click Quit. In app, you can also use the shortcut Command + Q
- Quit browser tabs: Hover over the tab you want to close and click the X button. With the tab open, you can also use the shortcut Command + W.

6. Switch to another web browser
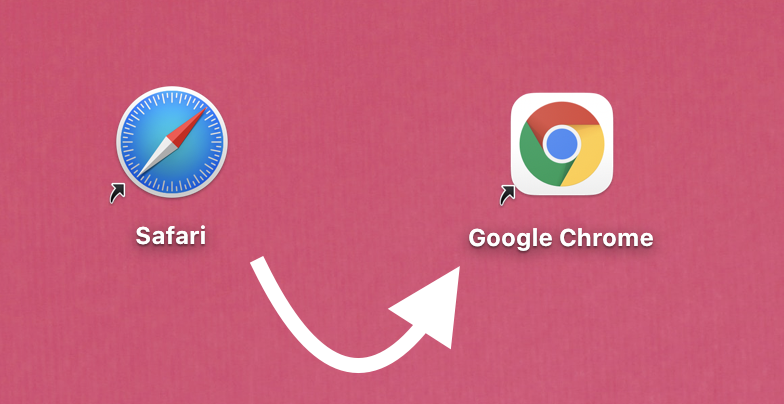
If you're experiencing sudden delays when attempting to access web pages, slow downloads, or incessant buffering, it might not be due to your internet speed but could mean your web browser is malfunctioning. To fix these browsing issues effectively, start by clearing the browser cache and history.
If you continue to face difficulties accessing websites or encounter prolonged loading times, consider switching to an alternate browser—check the best internet browsers for Mac.
If you’re trying to download multiple files at once, this is likely to contribute to your slow internet connection on Mac. Try pausing files in your download queue and download them individually to help speed up internet connection.
7. Reset Wi-Fi settings
If your network speed persists as slow, despite trying our recommended solutions, resetting your Mac’s Wi-Fi settings might fix this issue. You’ll need to re-enter your passwords after resetting your Wi-Fi, so if you can’t remember them, check out our tutorial on how to find a Wi-Fi password on a Mac before you proceed.
Method 1: Reset Wi-Fi settings from System Preferences
This is one of the easiest ways to reset your device’s network settings to help speed up internet on Mac.
Here’s how to reset your Wi-Fi from System Settings:
- Open System Settings and click on Network
- Select Wi-Fi on the left sidebar and click the minus (—) icon in the bottom-left corner
- Click Apply to continue. This will remove the Wi-Fi interface and disconnect your Mac from any active wireless connection
- Wait for a few seconds and click the plus (+) icon
- Click the Interface drop-down button and select Wi-Fi
- Click Create to continue
- Click Apply to save the change.
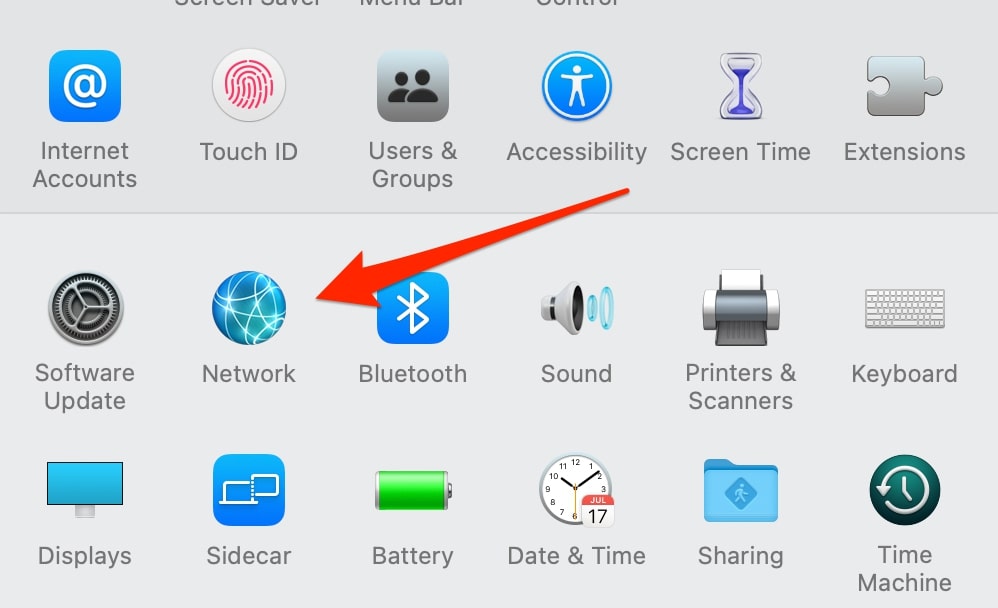
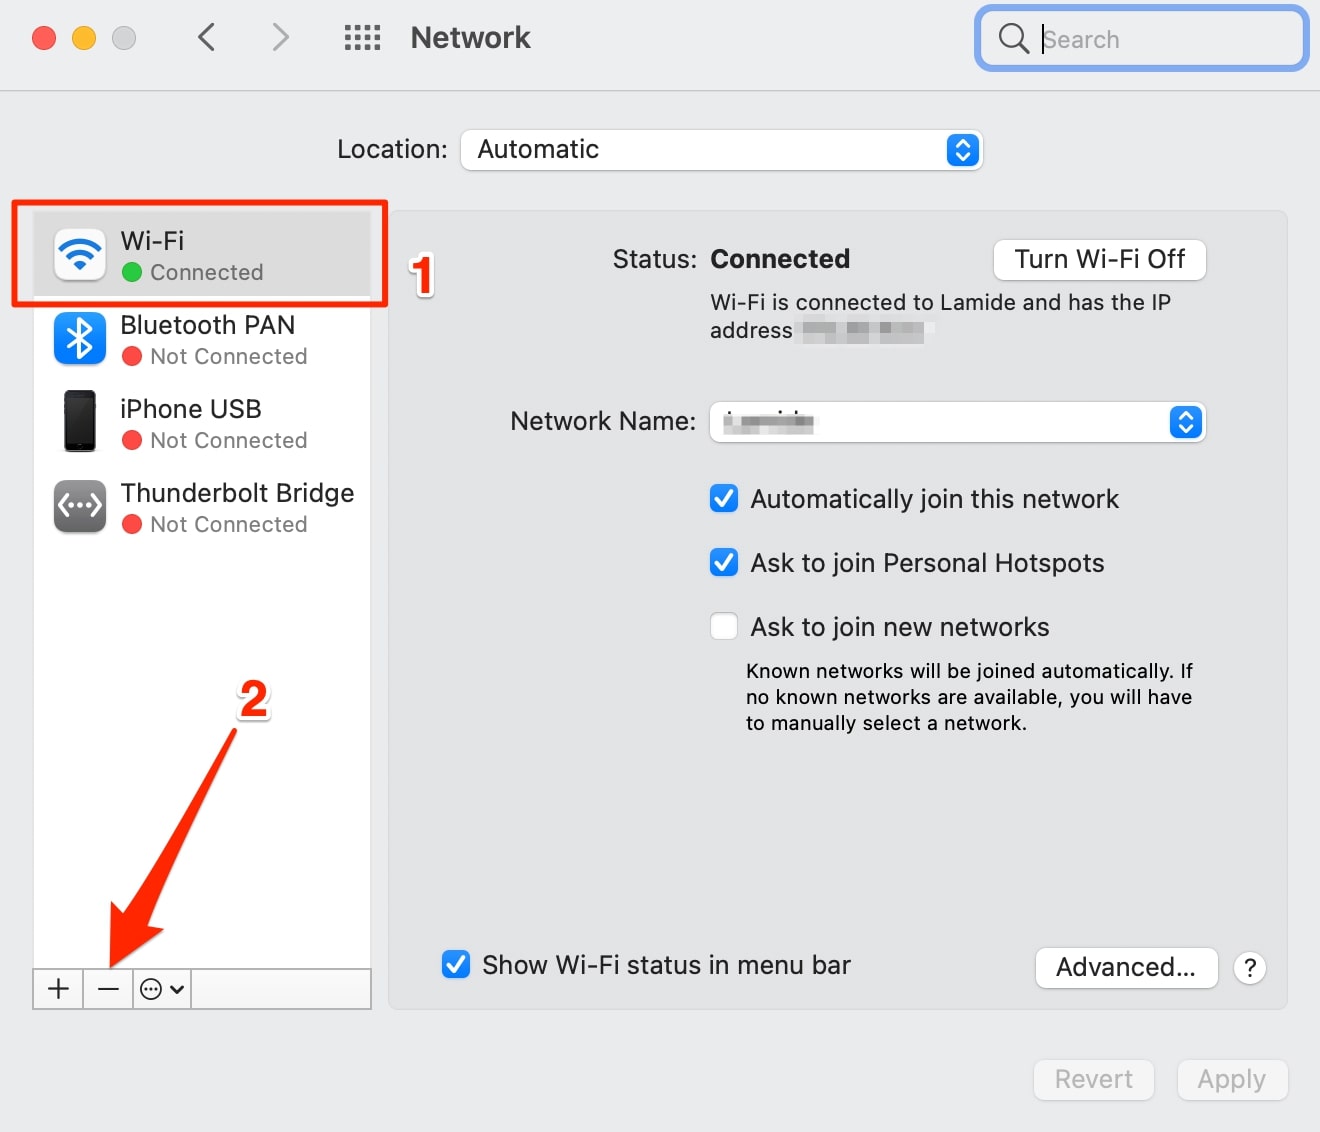
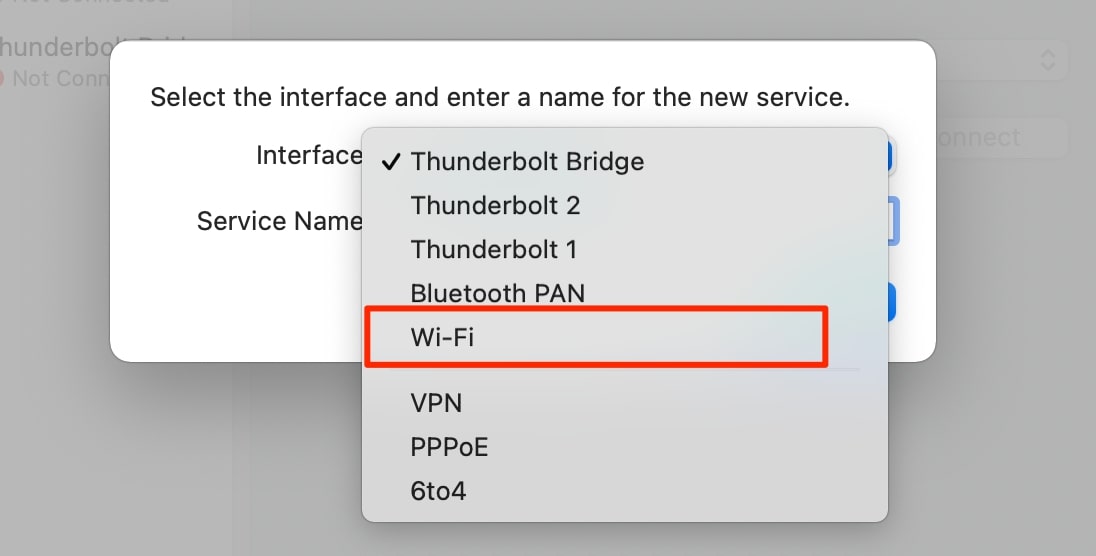
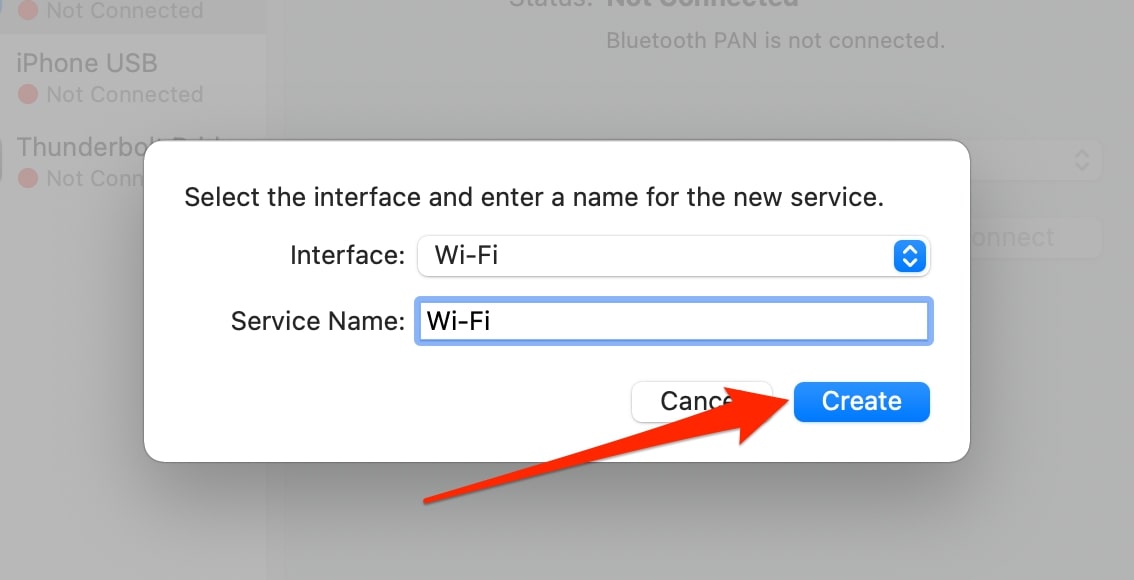
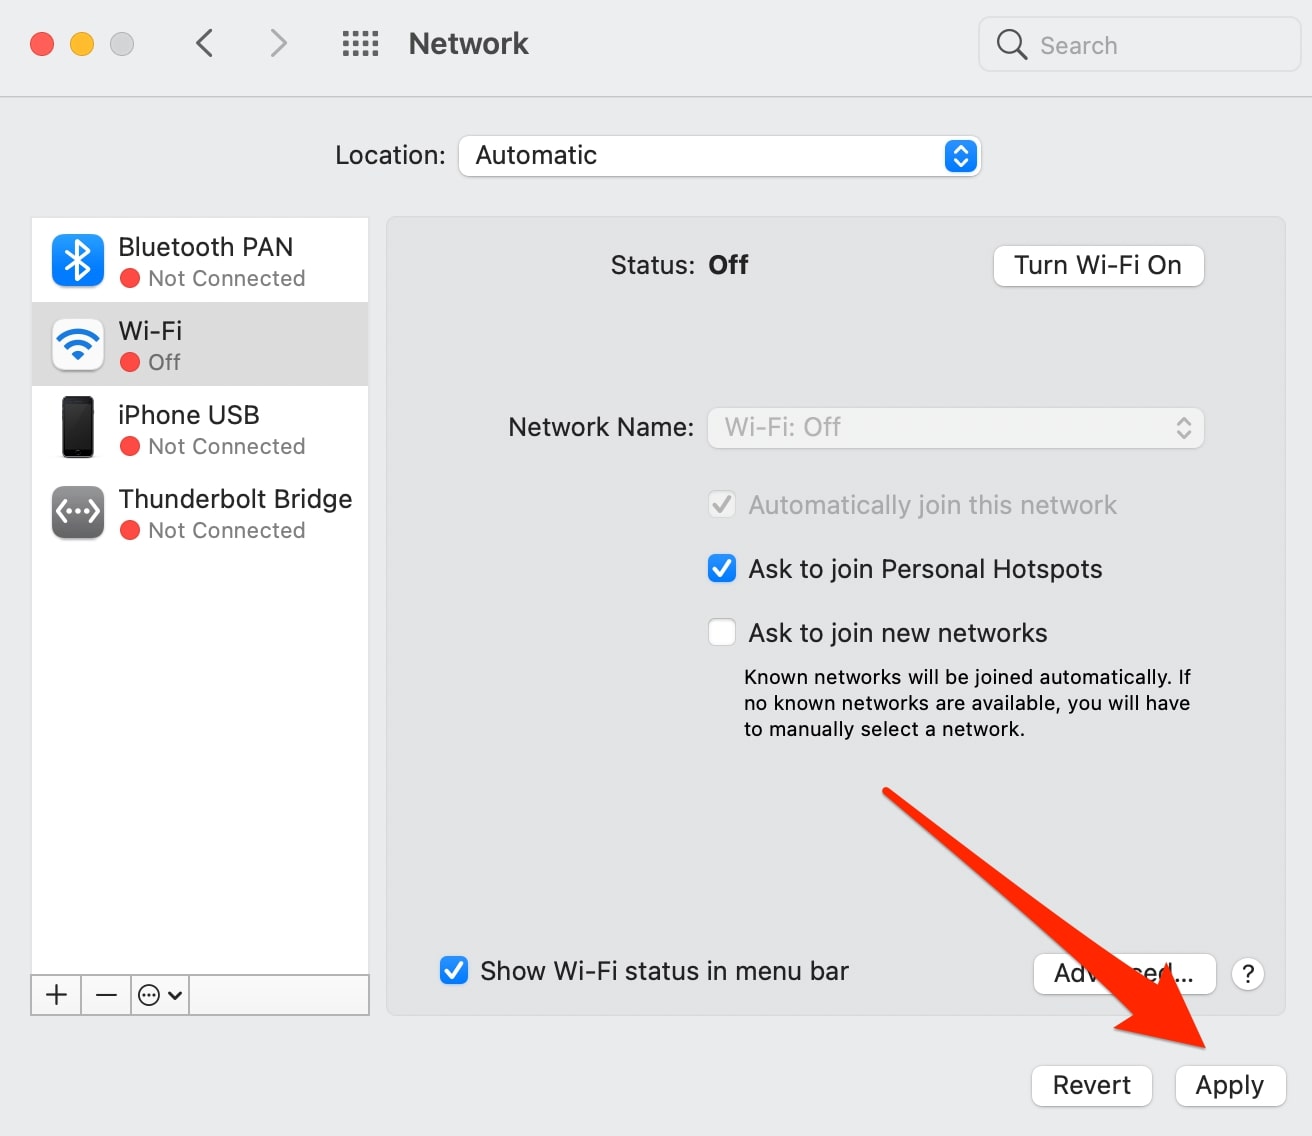
To turn on your Mac’s Wi-Fi, reconnect to your chosen network and test the connection speed.
Method 2: Delete your Mac’s network configuration files
Sometimes, Wi-Fi connectivity issues stem from corrupted network configuration files on your Mac. Here’s how to remove configuration files to restore a stable internet connection:
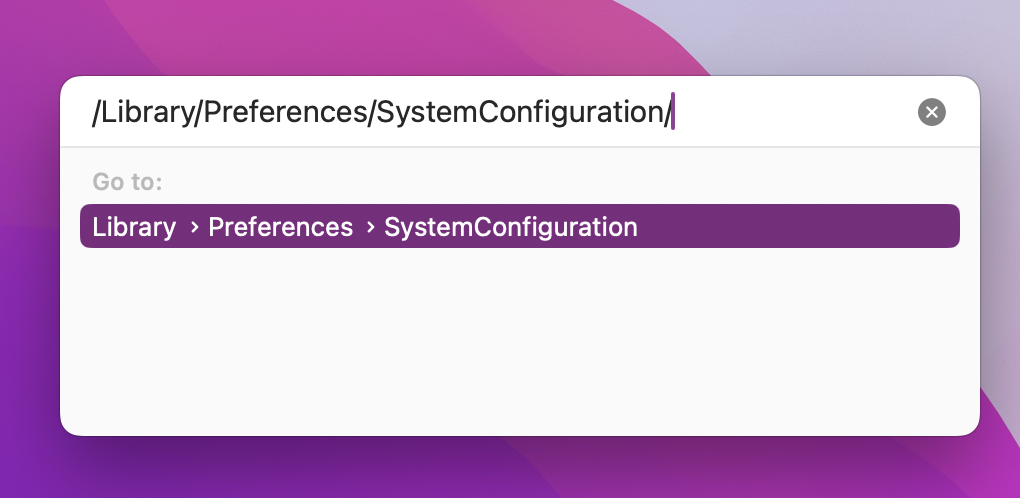
- Click anywhere on your Mac’s desktop and press Command + Shift + G to launch the Go to Folder dialogue box
- Paste the path in the box and click Go: /Library/Preferences/SystemConfiguration/
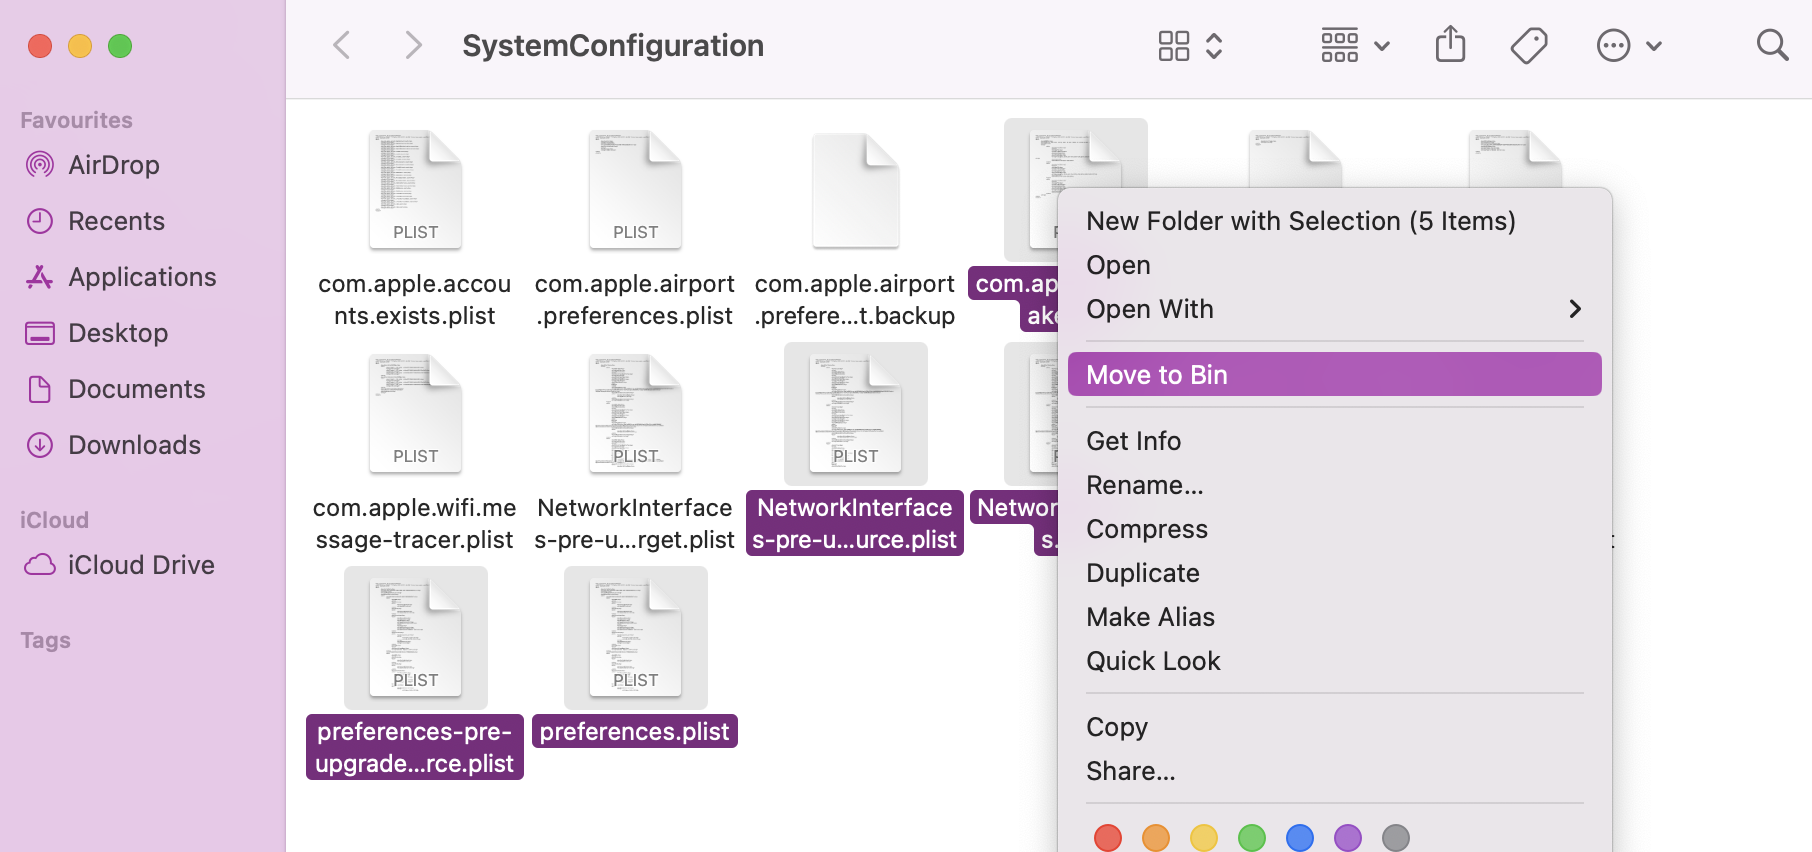
- Locate the following files and move them to the Bin:
- NetworkInterfaces.plist
- preferences.plist
- com.apple.wifi.message-tracer.plist
- com.apple.airport.preferences.plist
- com.apple.network.eapolclient.configuration.plist
- Reboot your computer. macOS will create new preference plist files when your Mac comes back on.
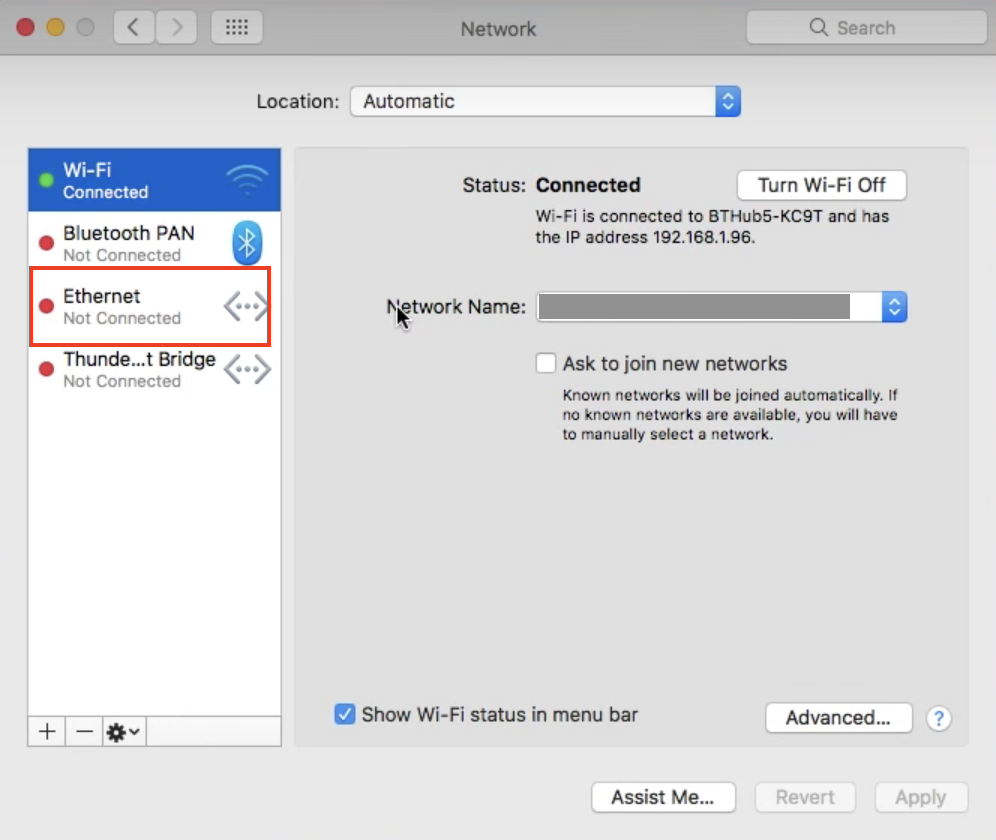
8. Use an Ethernet cable instead of Wi-Fi
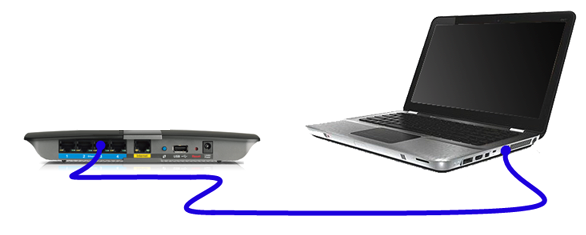
An Ethernet (or wired) connection is generally faster and more stable than Wi-Fi. So, if your Wi-Fi is running slowly, try a direct connection with your router using an Ethernet cable to optimize the network quality.
Here’s how to set up an Ethernet connection:
- Connect one end of the Ethernet cable to your Mac’s port and the other end directly into your network router
- Then go to System Settings > Network. From here you should be able to see that your Ether adapter has a network connection and connect
- Now close your Network settings and open a browser to check your connection.
9. Use a faster Internet line or ISP
Faster Internet comes at a cost. If you do any of the following, you’ll need a fast internet service provider (ISP) to:
- Enhance productivity for work-from-home scenarios
- Enable seamless streaming and downloads of high-resolution content
- Support online gaming platforms without lags, like Twitch
- Accommodate multiple devices simultaneously connected to the internet.
Upgrading to a faster internet line or switching to a more capable ISP can be done by contacting various providers to compare plans and speeds available in your area. You’ll be able to select a package that suits your usage and budget.
A faster internet connection isn't solely about speed; it's about efficiently meeting your online demands, whether for work, streaming, gaming, or multi-device connections. Lower Mbps connections suffice for basic internet use, while higher Mbps are preferable for bandwidth-intensive activities. To enjoy a fast internet connection, a higher-speed plan is essential.
Learn more on how to increase download speed on Mac with our expert tips, ensuring a smoother and faster browsing experience.
10. Scan for malware
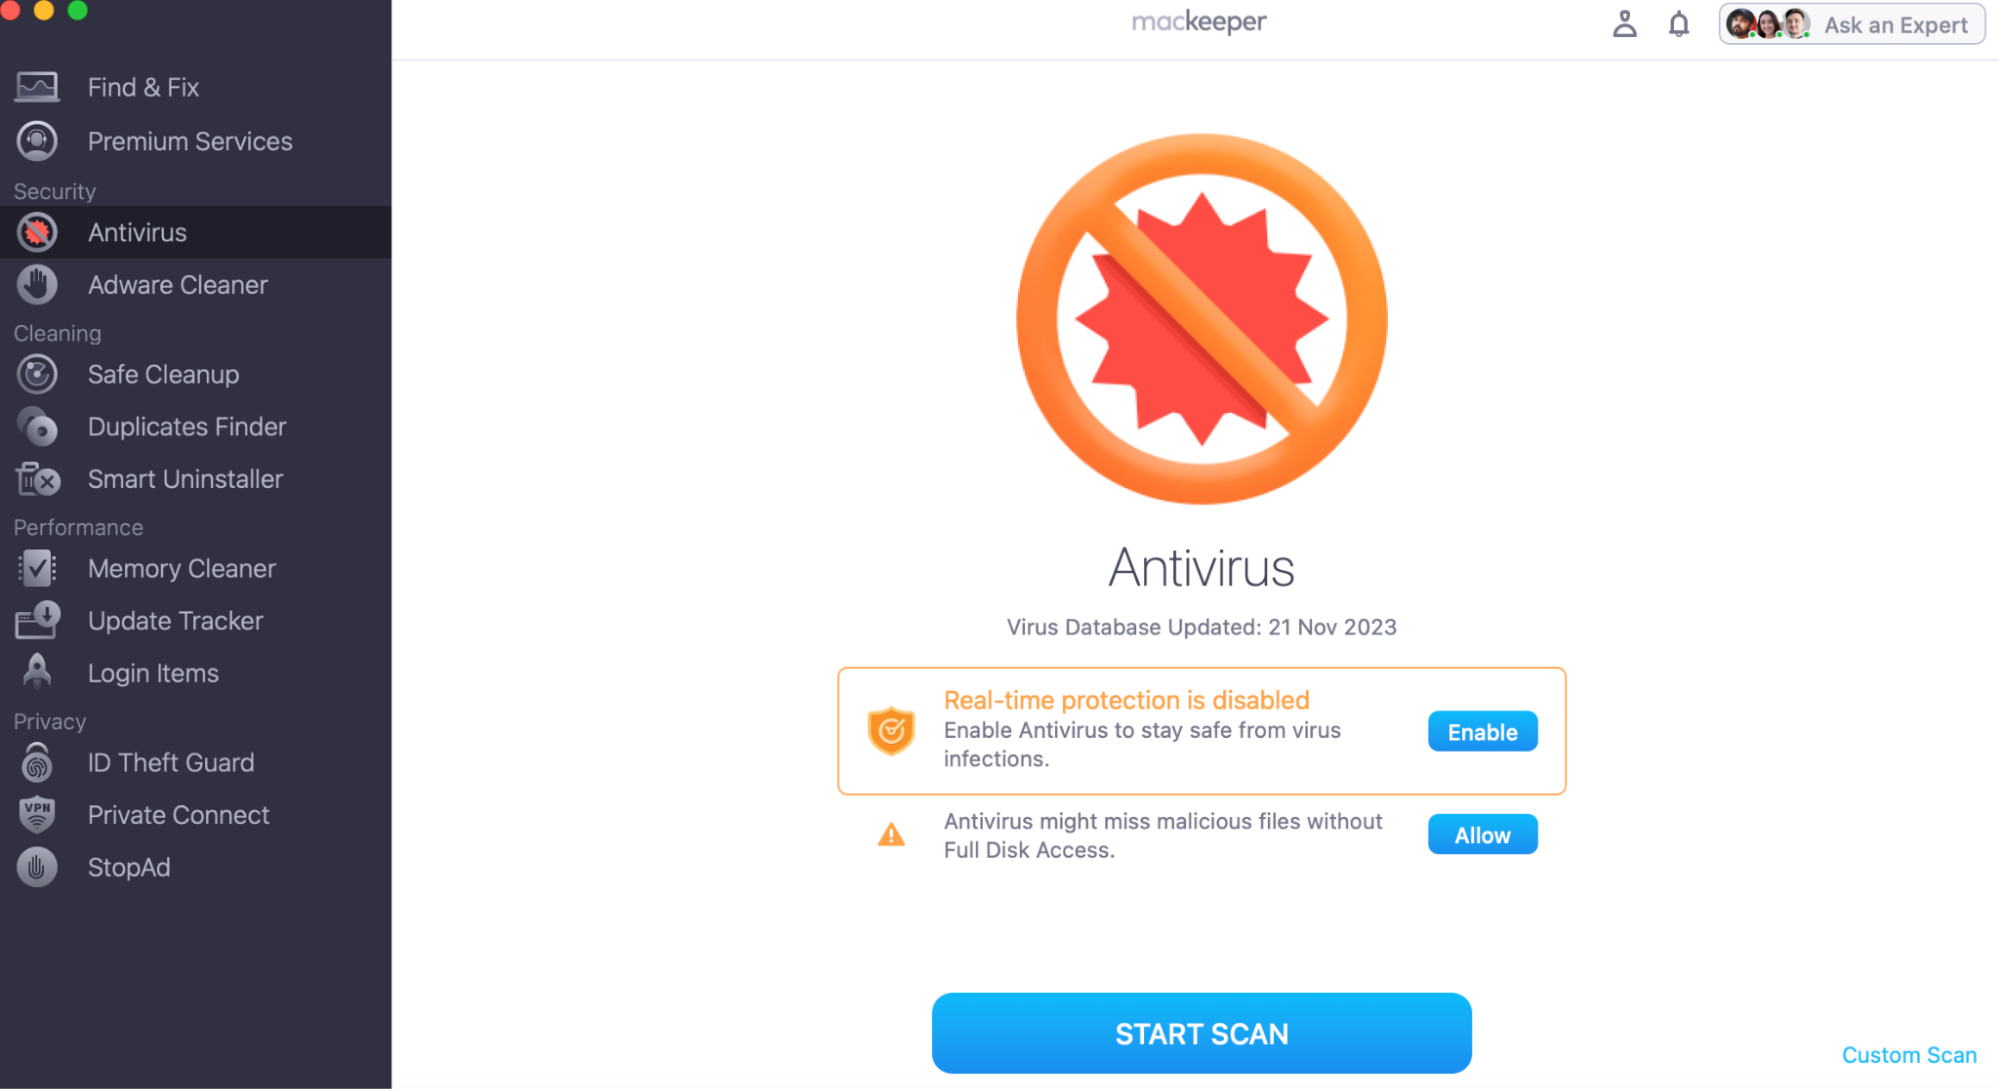
To ensure a smooth and uninterrupted internet experience, you need to regularly scan for malware on your Mac. MacKeeper’s Antivirus offers a reliable way to detect and eliminate all potential threats affecting your system’s performance. Here’s how to use it:
- Open MacKeeper and navigate to the Antivirus tool
- Click Start Scan
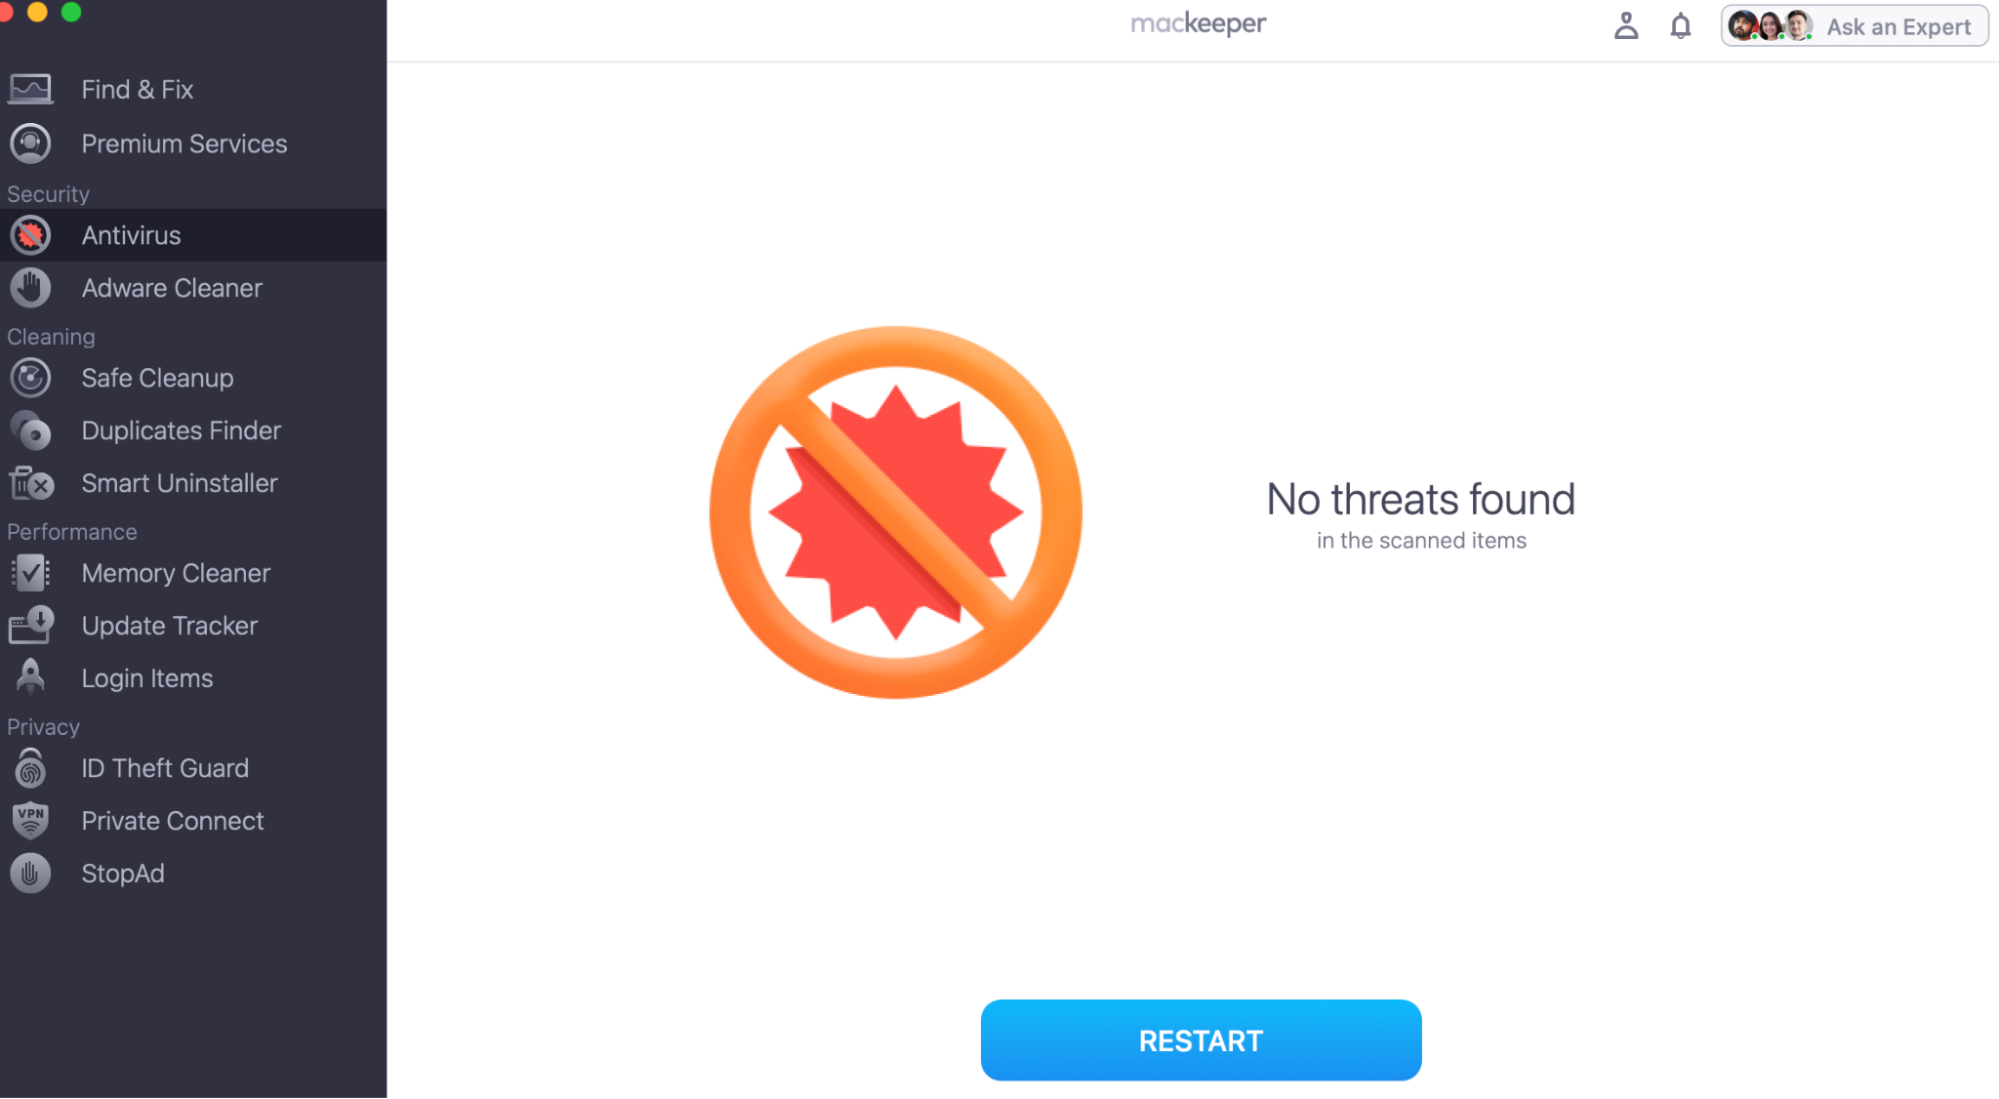
- Allow the antivirus to analyze your system for any malware or potential threats.
- Review the scan results and follow the prompts to remove any found malware or infected files. Once completed, restart your Mac to initiate changes.
11. Reduce the frequency at which Time Capsule is backed up
Time Machine, Mac’s automatic backup feature, regularly utilizes Time Capsule for backups by default, potentially affecting Wi-Fi bandwidth. If Time Capsule backs up large files, it might slow the internet connection on Mac. To fix this, consider adjusting the backup frequency to a two-hour interval.
Here’s how to change Time Capsules backup frequency:
- Go to Finder > Applications > Utilities > Terminal
- Type the command: defaults write /System/Library/LaunchDaemons/com.apple.backupd-auto StartInterval -int <7200> on a new line and hit the Enter key.

It’s worth noting that time intervals are expressed in seconds, so 7,200 seconds will cause Time Machine to back up your files every two hours.
12. Clean up your Mac to boost the overall performance
Is your Mac still feeling sluggish and slow? Often, a cluttered system leads to slow internet on Mac. That’s why our team recommends regularly cleaning your device to improve MacBook’s performance.
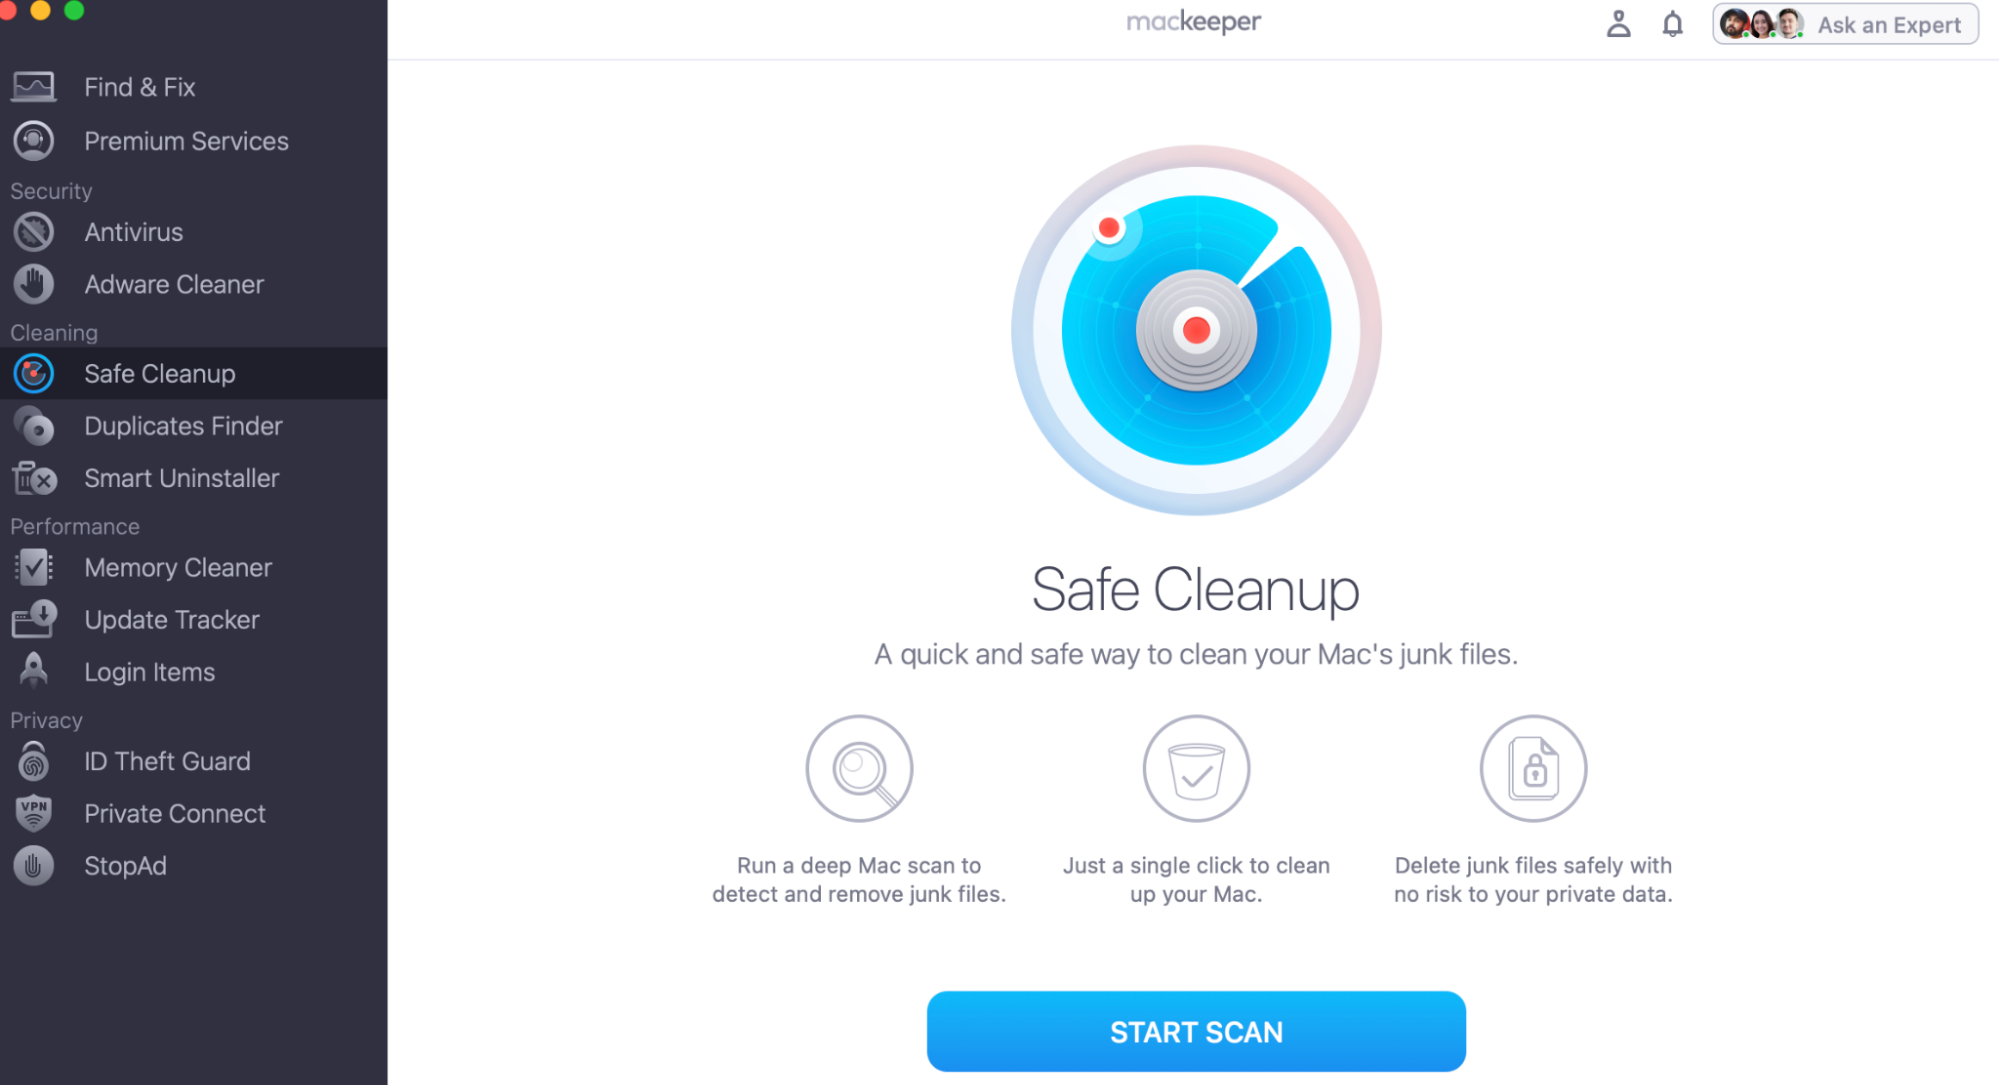
If you’d like some assistance with this, then our MacKeeper Safe Cleanup tool can do the job efficiently and within minutes.
- Open MacKeeper on your Mac
- Select Safe Cleanup in the left pane
- Now click the Start Scan button and wait a few minutes while MacKeeper scans your device.
To learn more on how to clear system storage on Mac, check out our guide to help you enhance your device's efficiency.
Fast internet or nothing
We’re confident that one of the solutions in this guide will resolve your Mac running slow. If the problem persists, consider contacting Mackeeper’s Premium Services for an advanced system tune-up. Our support team will help you diagnose and fix any persistent internet problems your Mac might encounter, ensuring you get the best browsing experience.
Additionally, MacKeeper’s Safe Cleanup is highly recommended to clear up your device. By eliminating unnecessary clutter and potential internet-slowing factors, our tool will raise your chance of avoiding future slowdowns.


