According to Statista, users at over 2 million companies worldwide use Office 365, including more than 1.3 million businesses in the US alone. In other words, Microsoft apps like Word, Excel, and PowerPoint have become essential tools for many workers, and it can be incredibly frustrating when they suddenly break.
If you use Office 365 on a Mac, you may have run into the common “Your account doesn’t allow editing on a Mac” error at some point. It prevents you from making changes to an Office document, and therefore disrupts your workflow. Fortunately, there are some simple ways you can fix it, which we’ll look at here.
Before we begin:
Office 365 may stop working on your Mac because of corrupt cache files, or a lack of free storage space. To quickly fix both of these issues, you can use MacKeeper’s Safe Cleanup, which removes old and unnecessary junk—including bad cache files—from your system in just a few clicks.
Here’s how to use our tool:
- Download MacKeeper and install it.
- When the app opens, select Safe Cleanup in the sidebar.
- Click Start Scan to weed out all the junk on your computer.
- Select the files you want to remove, then click Clean Junk Files to delete them.
In this article you will find the following:
Why does the message “Your account doesn’t allow editing on a Mac” appear?
If Microsoft 365 doesn’t allow editing on a Mac, it could be due to several factors. In many instances, you mightn’t have the right license, which could indicate your subscription has expired. If you’ve already purchased an Office 365 license, it could be that you simply need to verify or activate it.
Sometimes, you might not be able to edit documents for reasons unrelated to your subscription. For example, many errors can occur because of corrupt cache files, or issues that have arisen within the Office applications themselves, which means they need to be reset.
Ways to fix “Your account doesn’t allow editing on a Mac” error in Office 365
When your account can view documents but it doesn't allow editing on a Mac, it’s certainly annoying, but you don’t have to let it slow you down for long. The “Your account doesn’t allow editing on a Mac” error can be eliminated in many easy ways, including:
- Log out your Office 365 account and log back in
- Verify your Office 365 license
- Activate Office
- Update Office 365 applications
- Clear caches, logs, and other junk
- Reset Microsoft Word to its default state
- Uninstall and reinstall Office 365
1. Log out your Office 365 account and log back in
Because license errors are often the reason why Microsoft Word keeps crashing on Mac, and why you can’t edit Office documents, simply logging out of your account and then logging back in can be enough to fix the problem. Try this:
- Open an Office 365 app. For our example, we’ll use Microsoft Word.
- Click on your avatar on the left-hand toolbar, then select Sign Out.
- Click Sign out again when prompted to continue.
- Once you’re signed out, click the Sign in button in the top-left corner.
- Enter your Microsoft account details to sign in again.
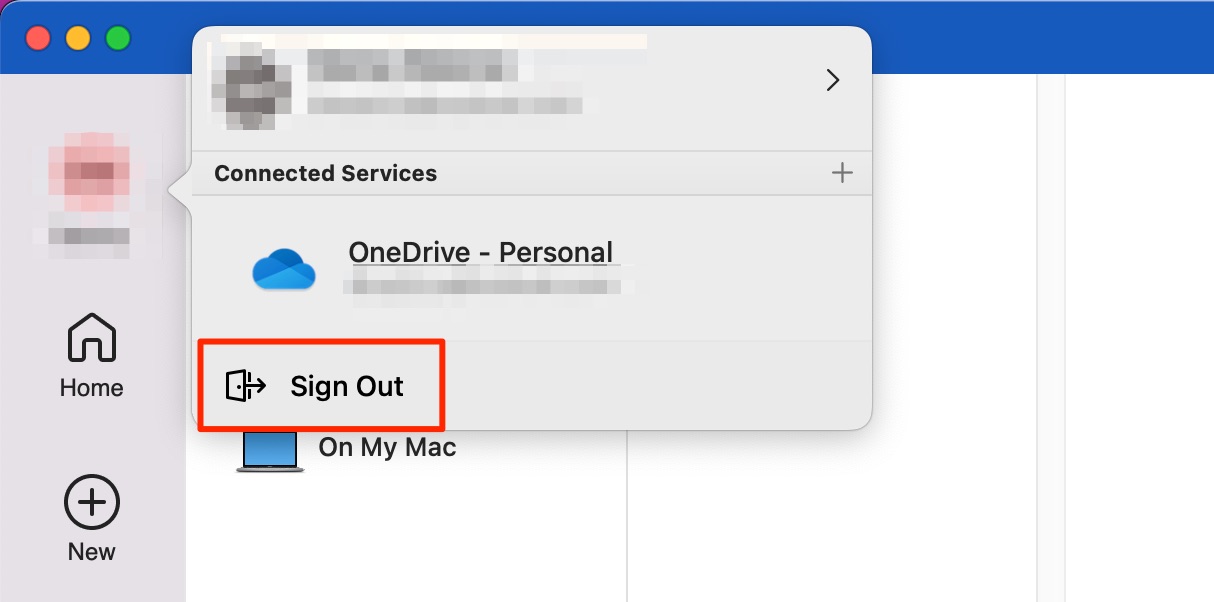
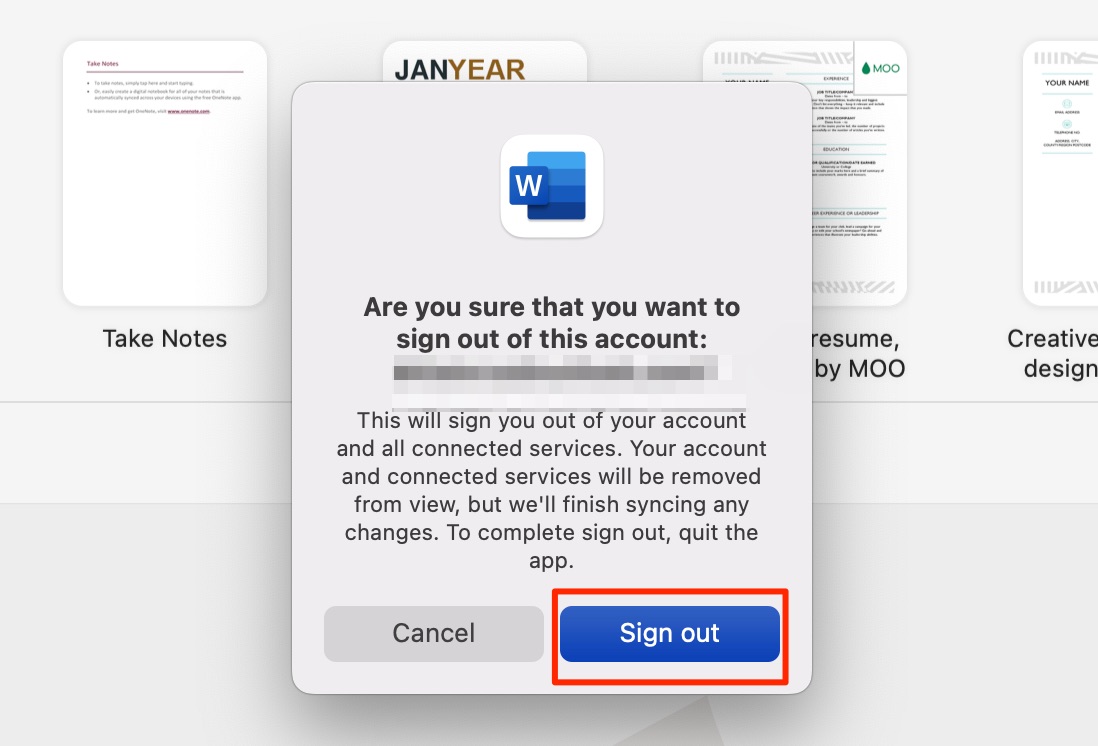
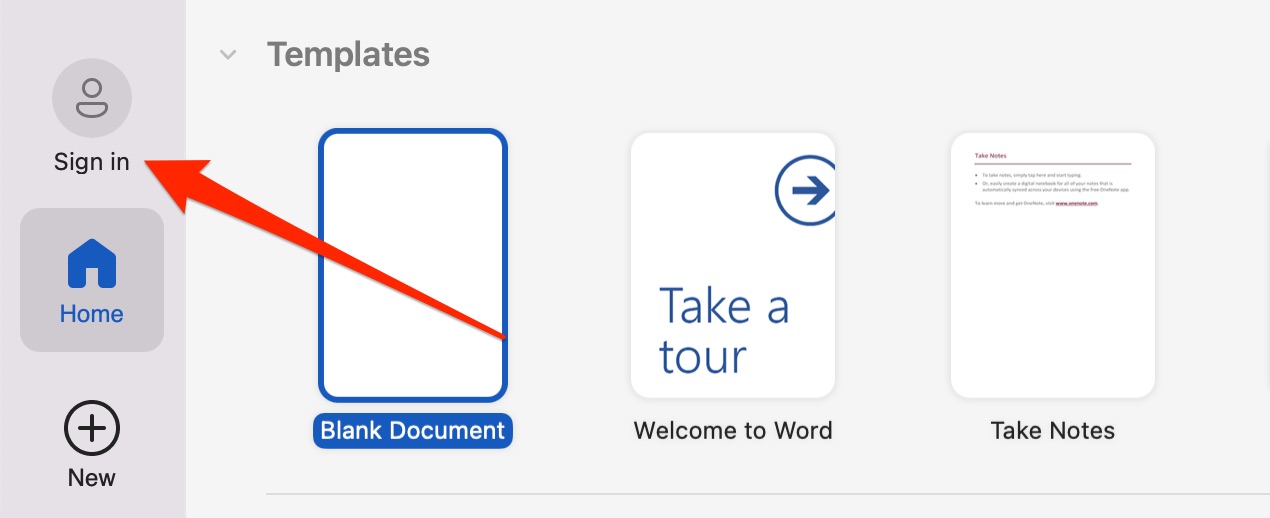
This process forces Microsoft 365 to check your license again. Assuming you have a valid license, this should solve any subscription problems that have occurred.
2. Verify your Office 365 license
If you’re unsure whether your Office 365 subscription is still active, verify your license on the Microsoft website like so:
- Go to office.com and sign into your account.
- Click on your profile picture or logo in the top right-hand corner and select My Microsoft account.
- Under the Subscriptions section, find your plan.
- You can select Manage if you need to make changes to it.
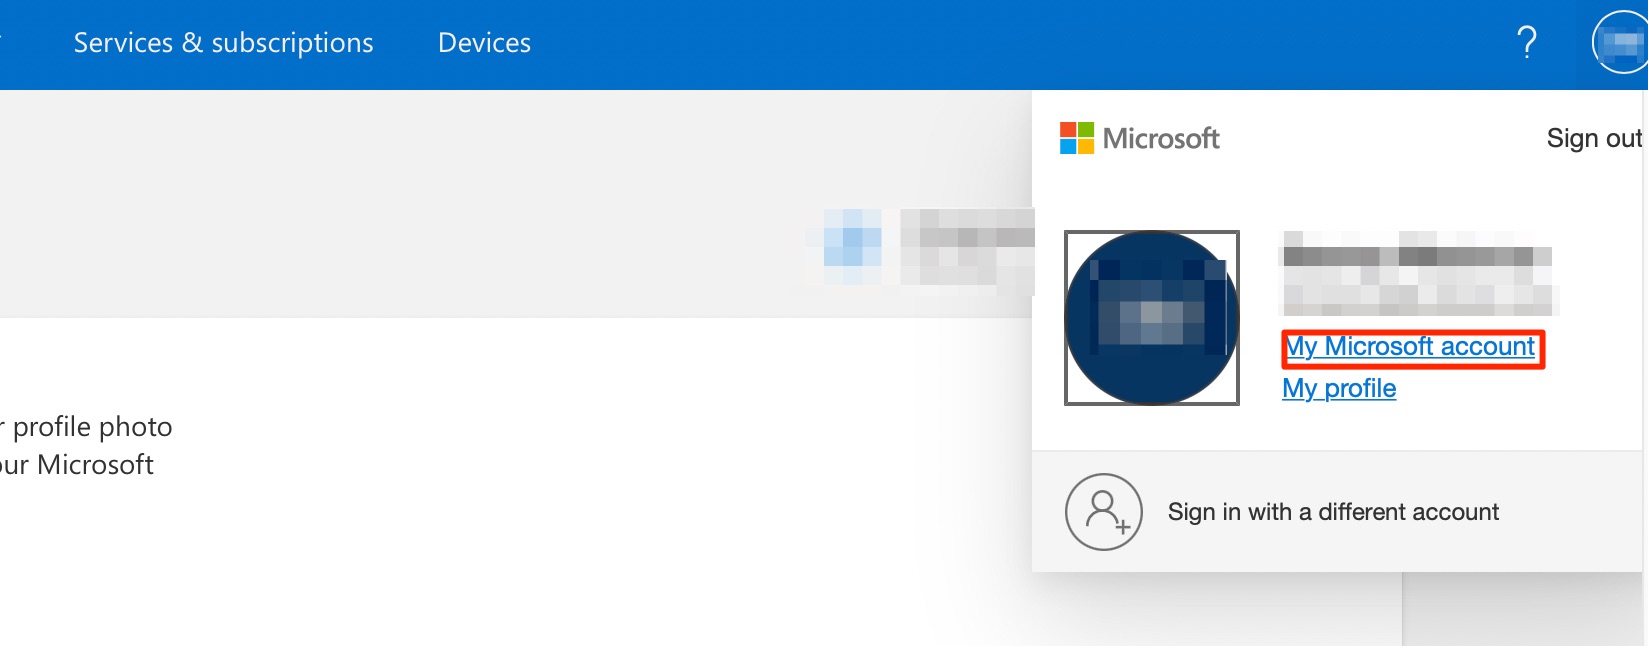

A hint from us: If you don’t see an active Office 365 subscription here, you’ll need to renew or purchase a new plan. Without an active license, Office 365 doesn’t allow editing on a Mac. You’ll be able to open documents in Word, Excel, and PowerPoint, but you won’t have permission to edit them.
3. Activate Office
You can buy Office 365 plans from another supplier, and doing so is often less expensive. But before you use Microsoft’s apps, you’ll need to activate your plan. Follow these steps:
- Go to office.com/setup and click Get started.
- Sign in with your Microsoft account.
- Type the product key when asked to do so, then click Next to proceed.

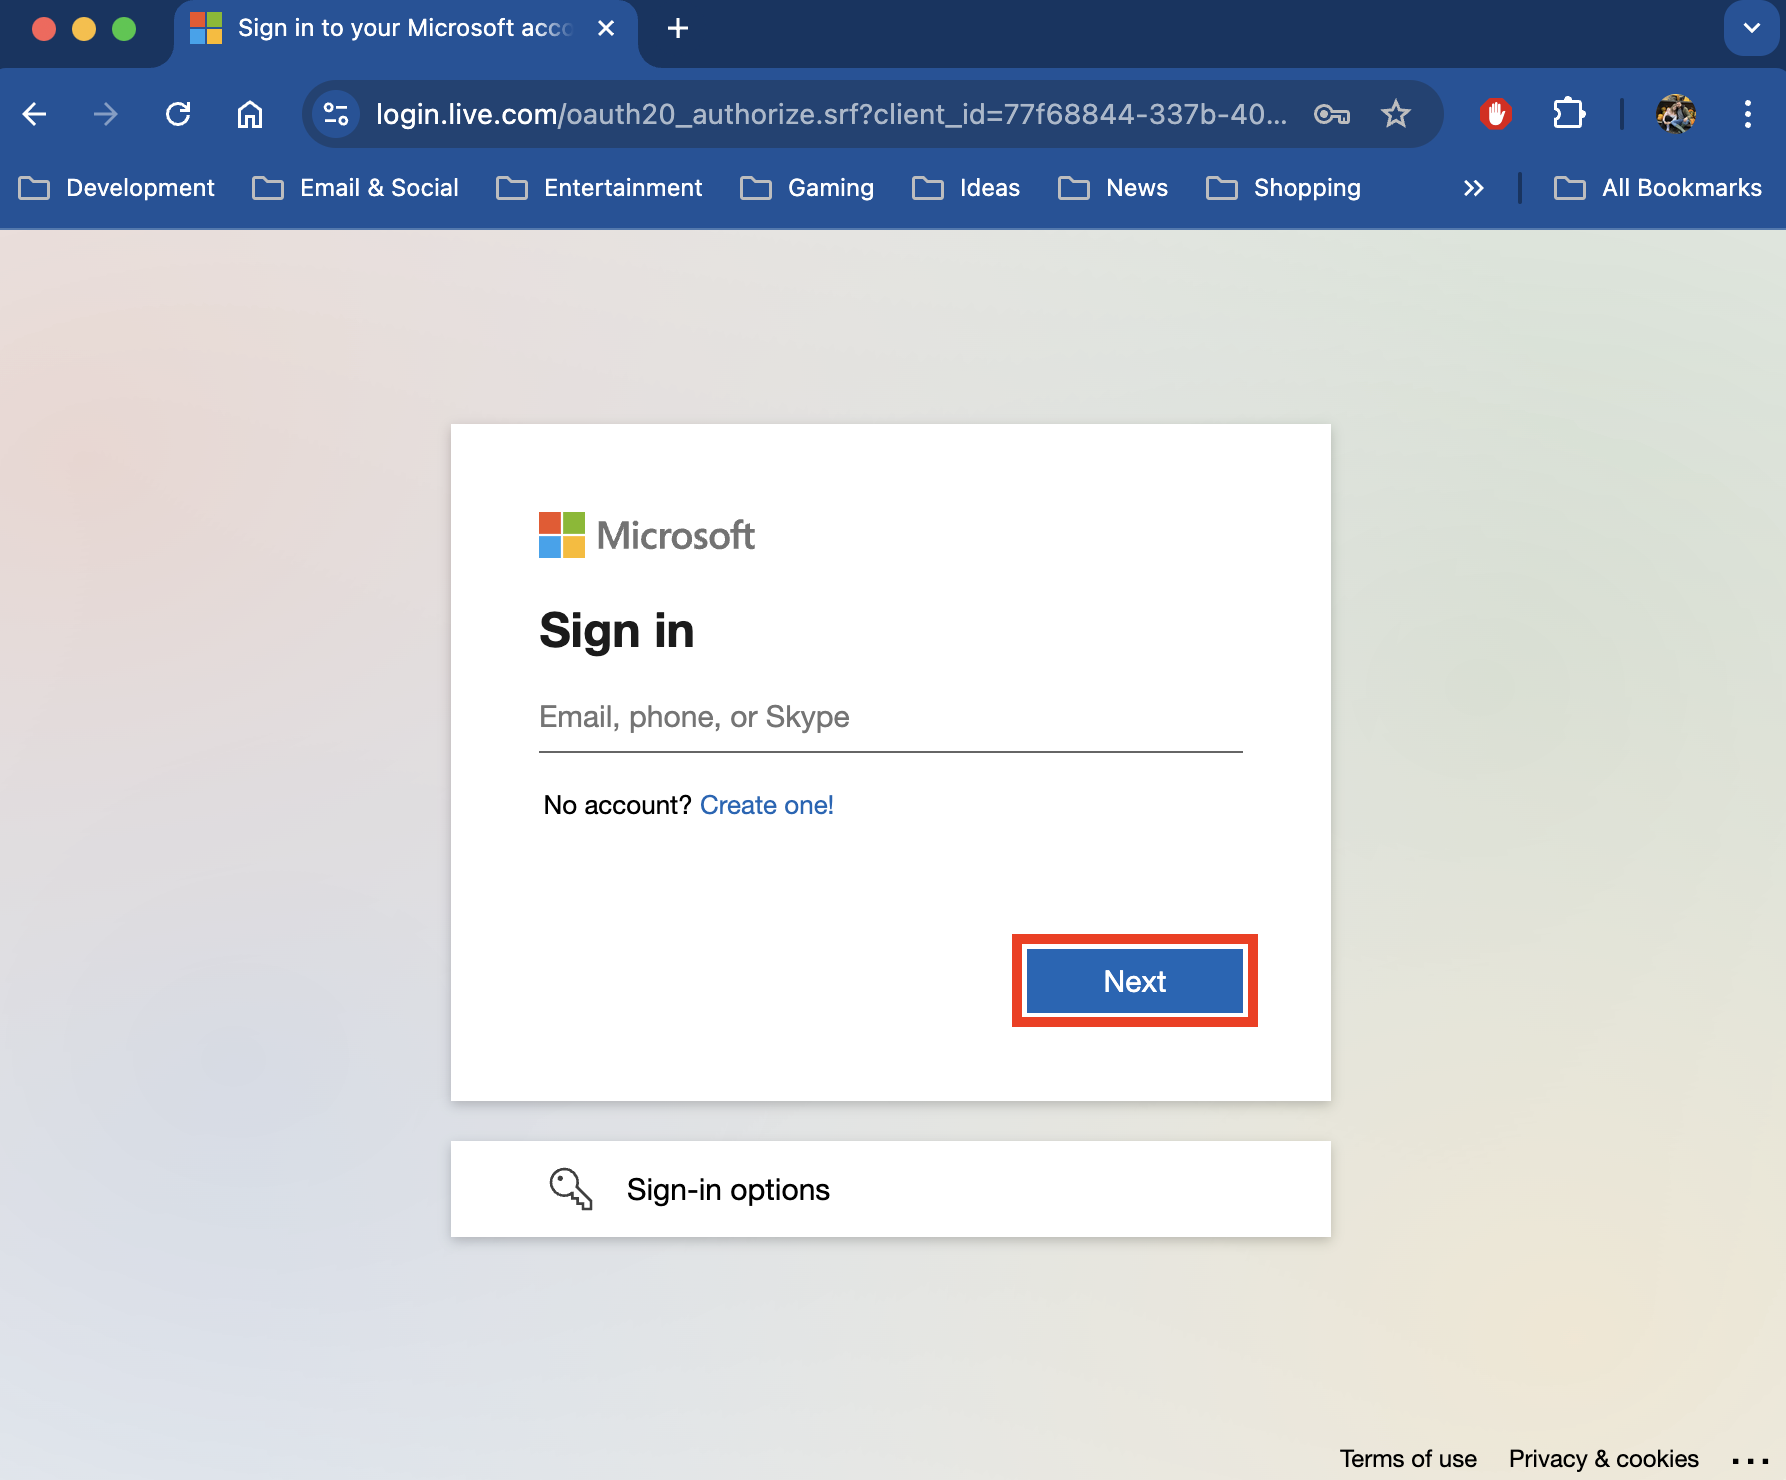
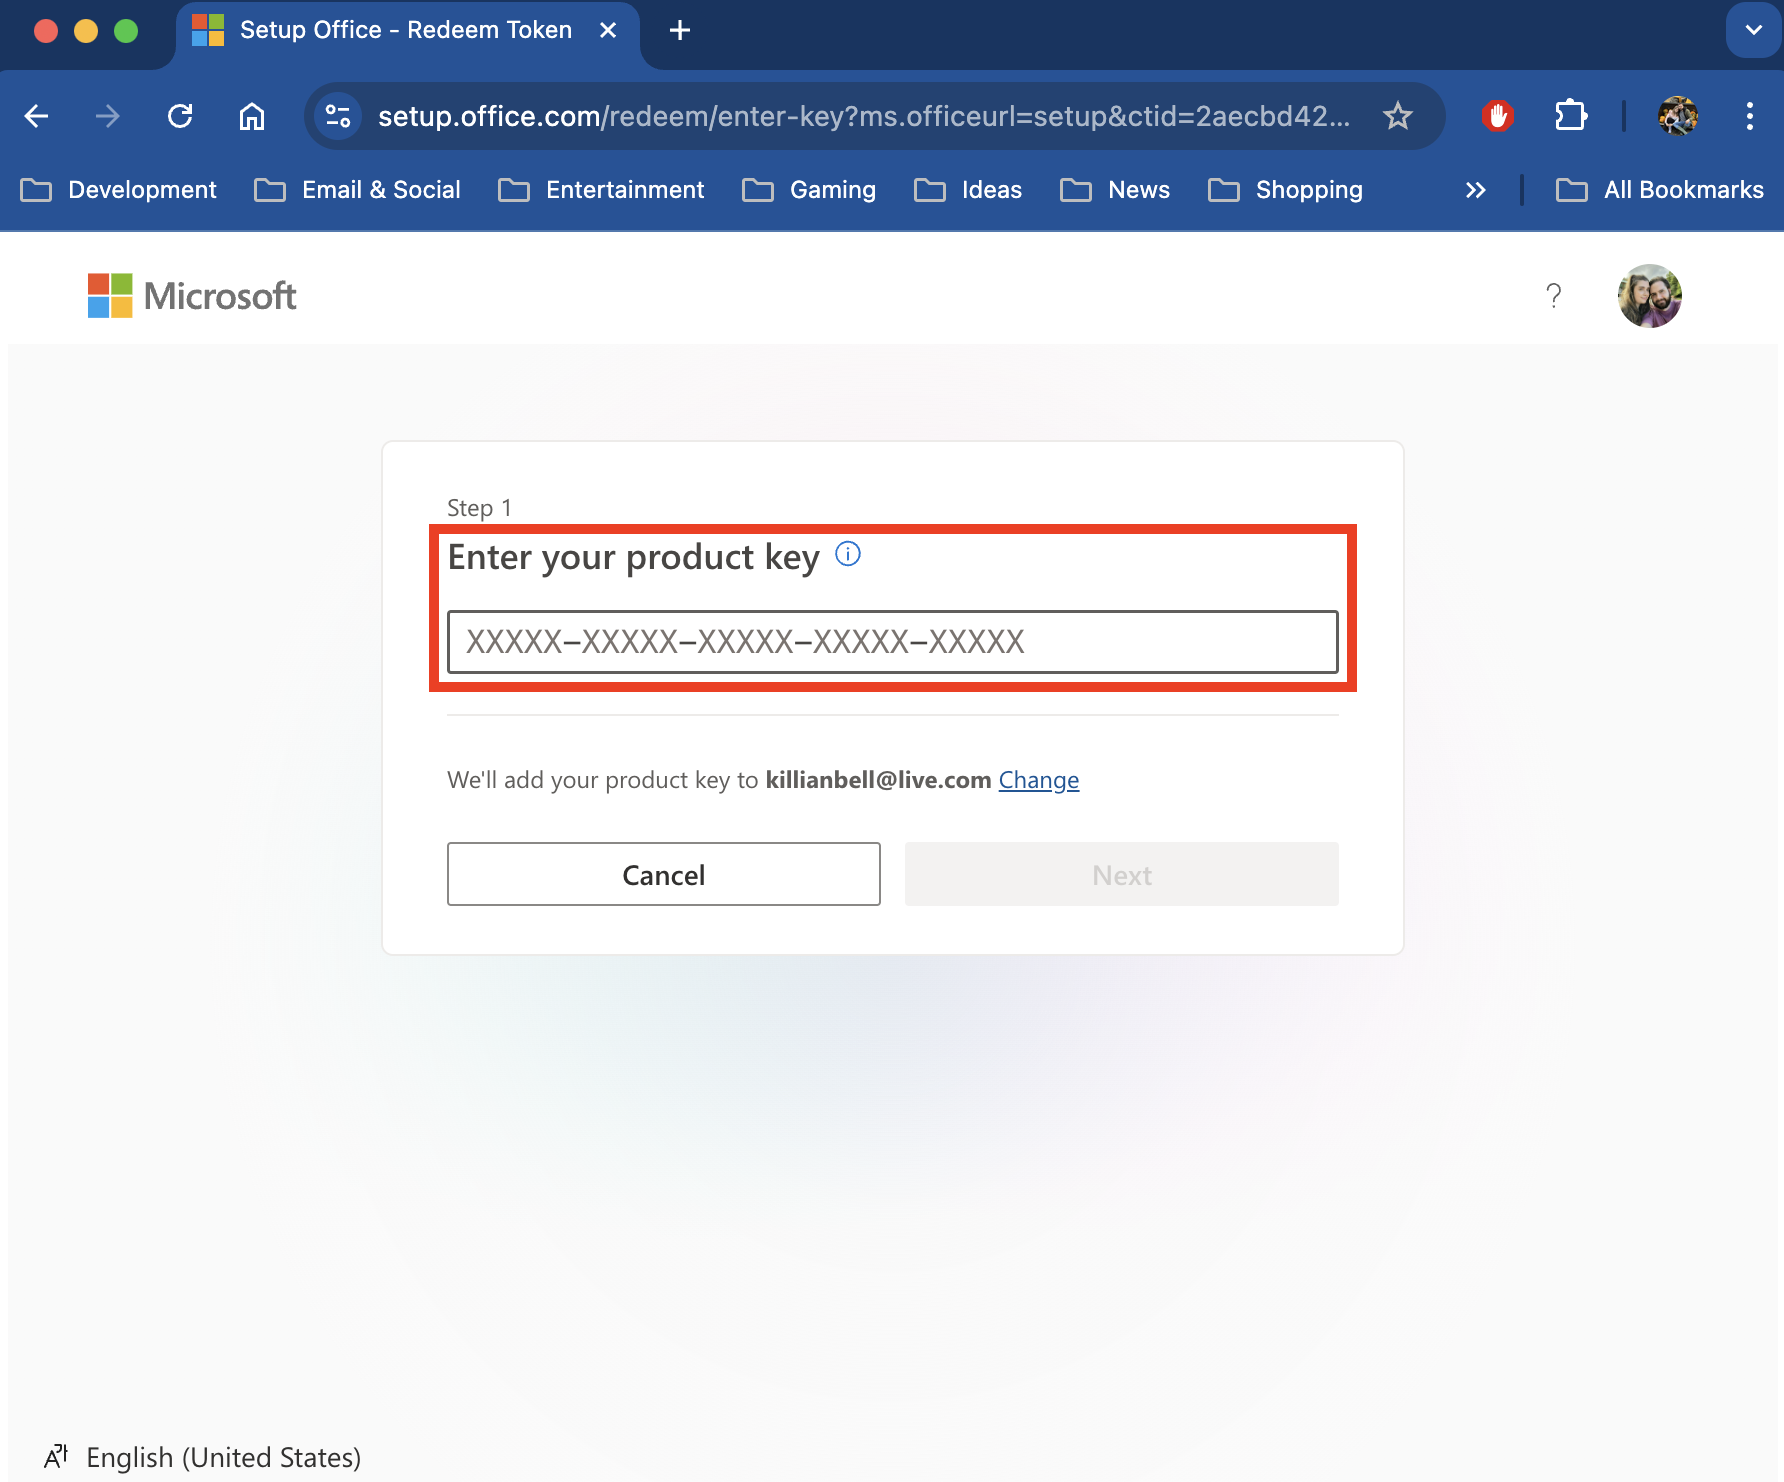
Once you’ve completed the final activation steps shown on the screen, your Office 365 plan should be active. Sign into the same Microsoft account inside an Office app on your Mac to unlock full editing access.
A tip from our team:
If you only need to make minor changes to a document, or you plan to use Office temporarily, you may not want to purchase an Office 365 license. Sadly, there’s no free Microsoft Word for Mac, but you may be able to enjoy a trial if you haven’t already. You can also use Word for free in your browser.
4. Update Office 365 applications
Office applications can be unstable on Mac when they become outdated. This is especially true if you’ve installed macOS updates, but you’re running older versions of Word, Excel, and PowerPoint that haven’t been optimized. Below, we’ll explain how to update them.
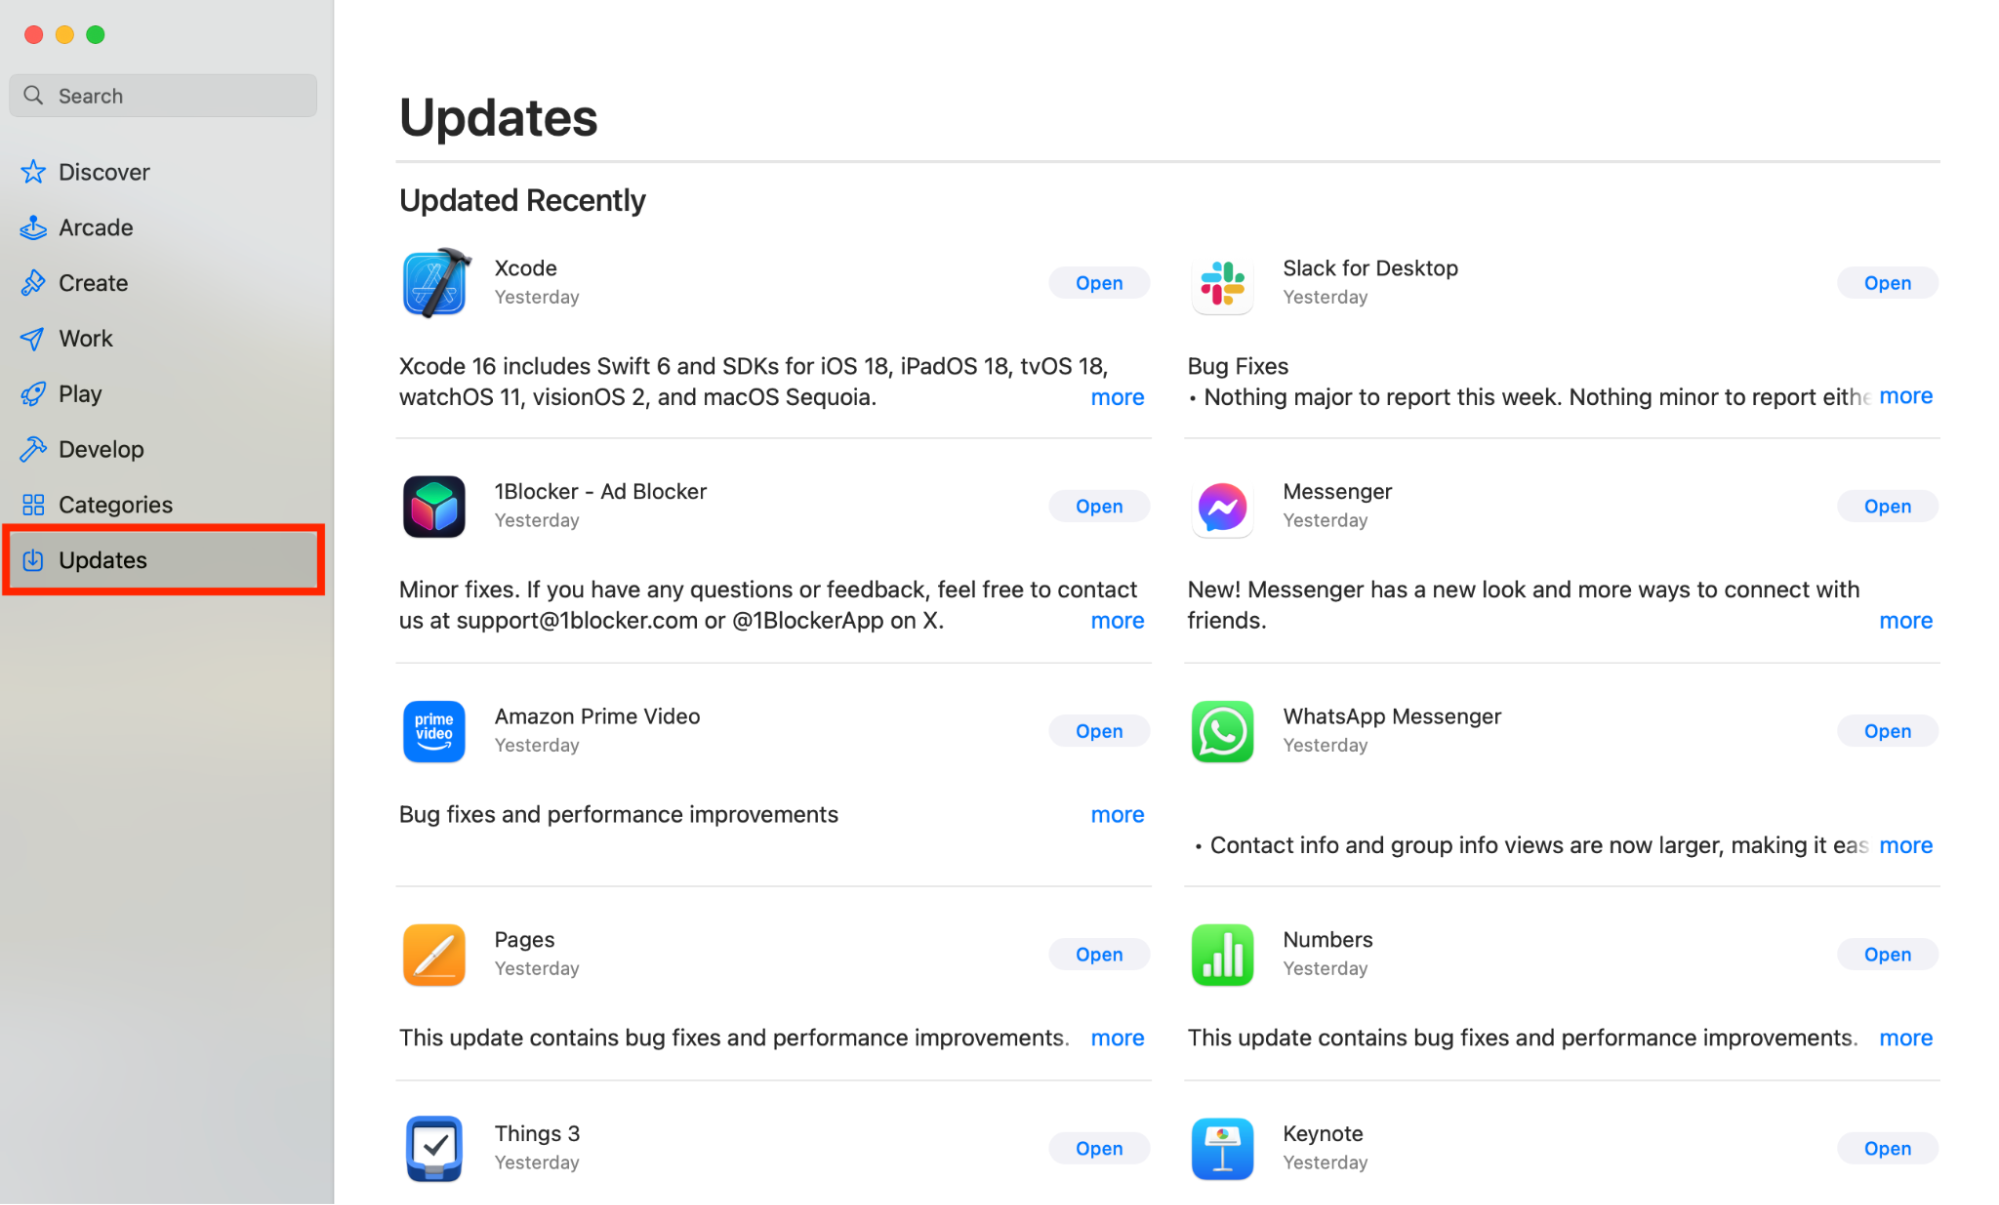
If you downloaded Office apps from the App Store:
- Open the App Store on your Mac, then click Updates in the sidebar.
- Download any updates that are available for Office apps.

If you downloaded Office apps from Microsoft:
- Office apps downloaded directly from Microsoft come with the Microsoft AutoUpdate tool, which makes installing new app releases easy. To run it, first open an Office app, then select Help > Check for Updates in the menu bar.
- AutoUpdate will search for the latest Office releases. Once it’s done, click the Update All button to install them.


5. Clear caches, logs, and other junk
A common reason why you’re unable to edit Word documents on Mac is that your Office apps have been broken by corrupt caches, logs, or other system junk. A lack of free space also causes stability issues. Use MacKeeper Safe Cleanup to put things right:
- Open MacKeeper, then select Safe Cleanup in the sidebar.
- Click Start Scan to find all system junk.
- Select the files you want to remove, making sure you select Caches and Logs. We also recommend selecting other file types to free up space.
- Click Clean Junk Files to delete all the data from your Mac.
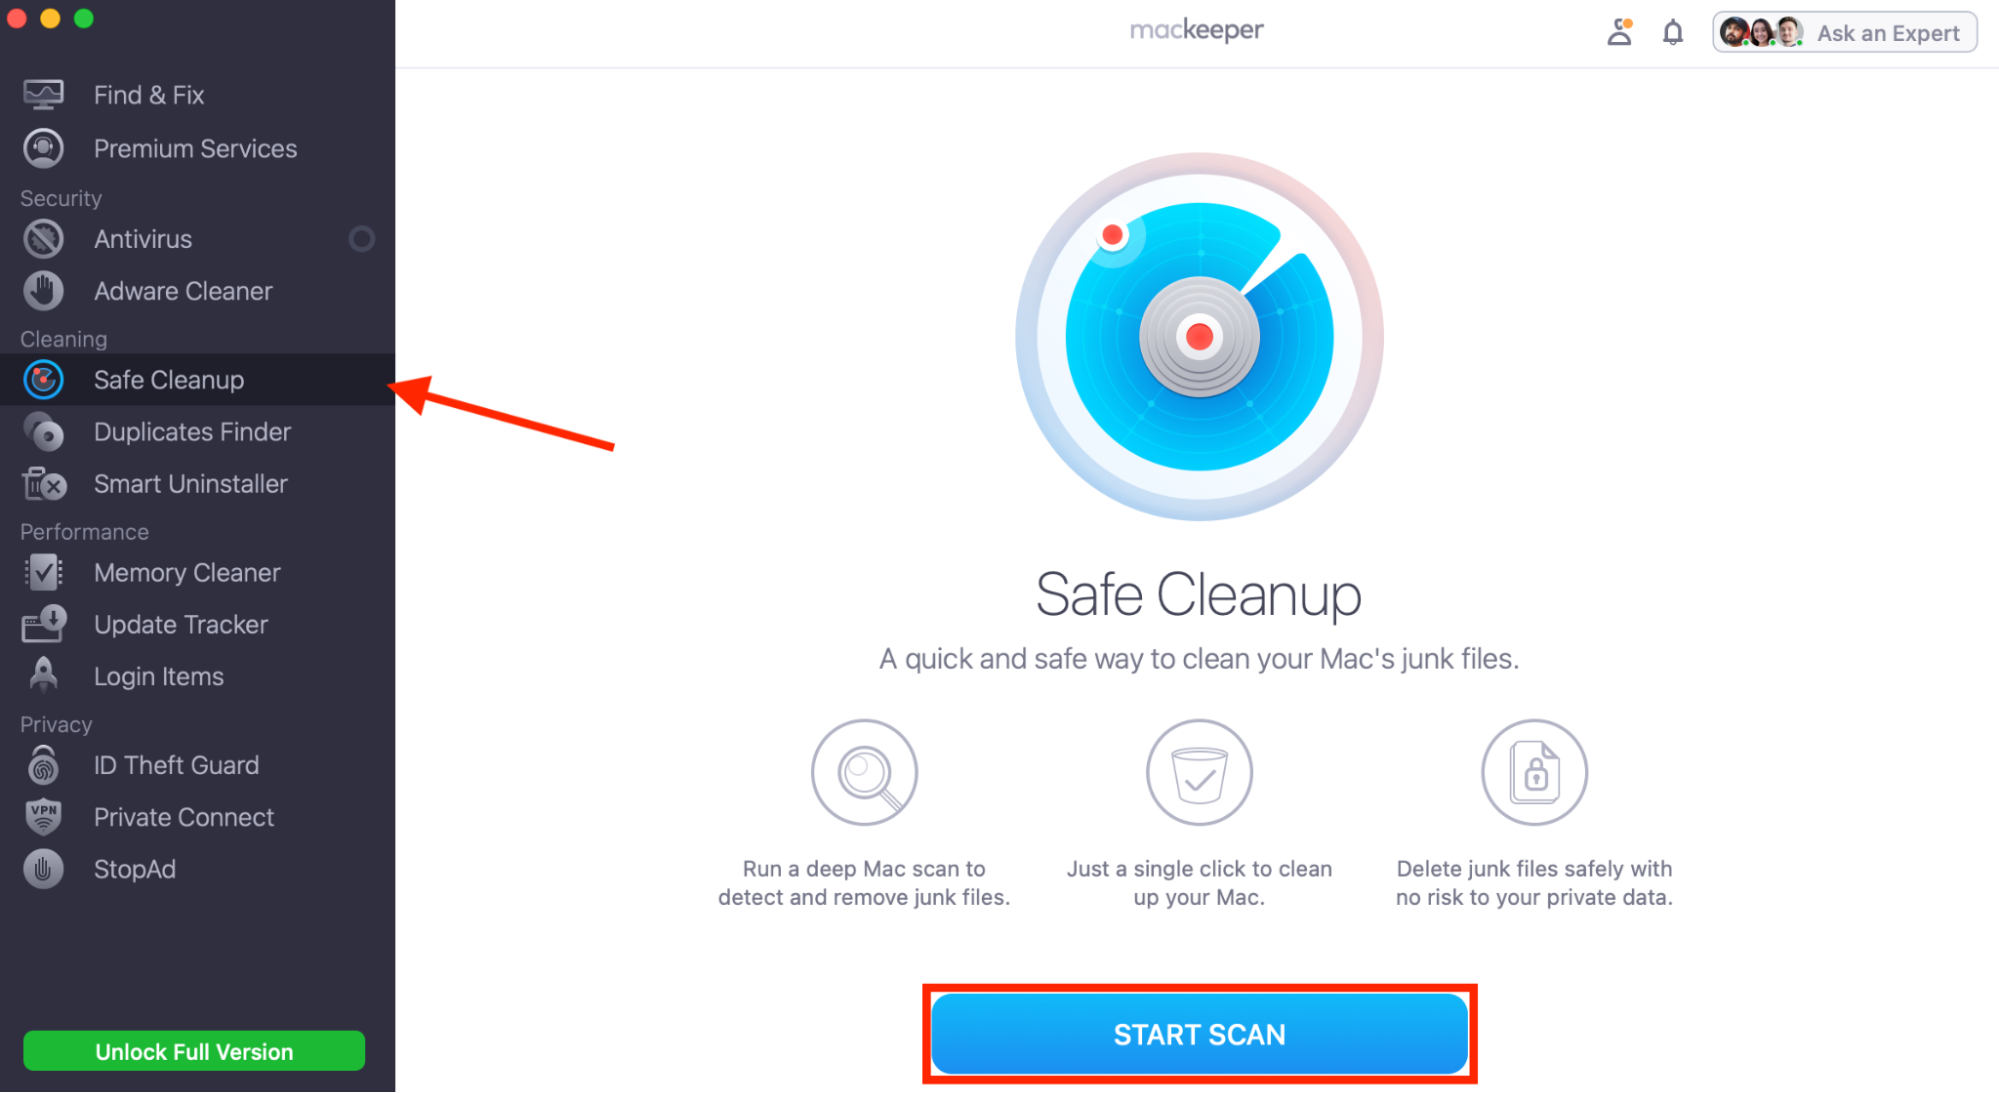
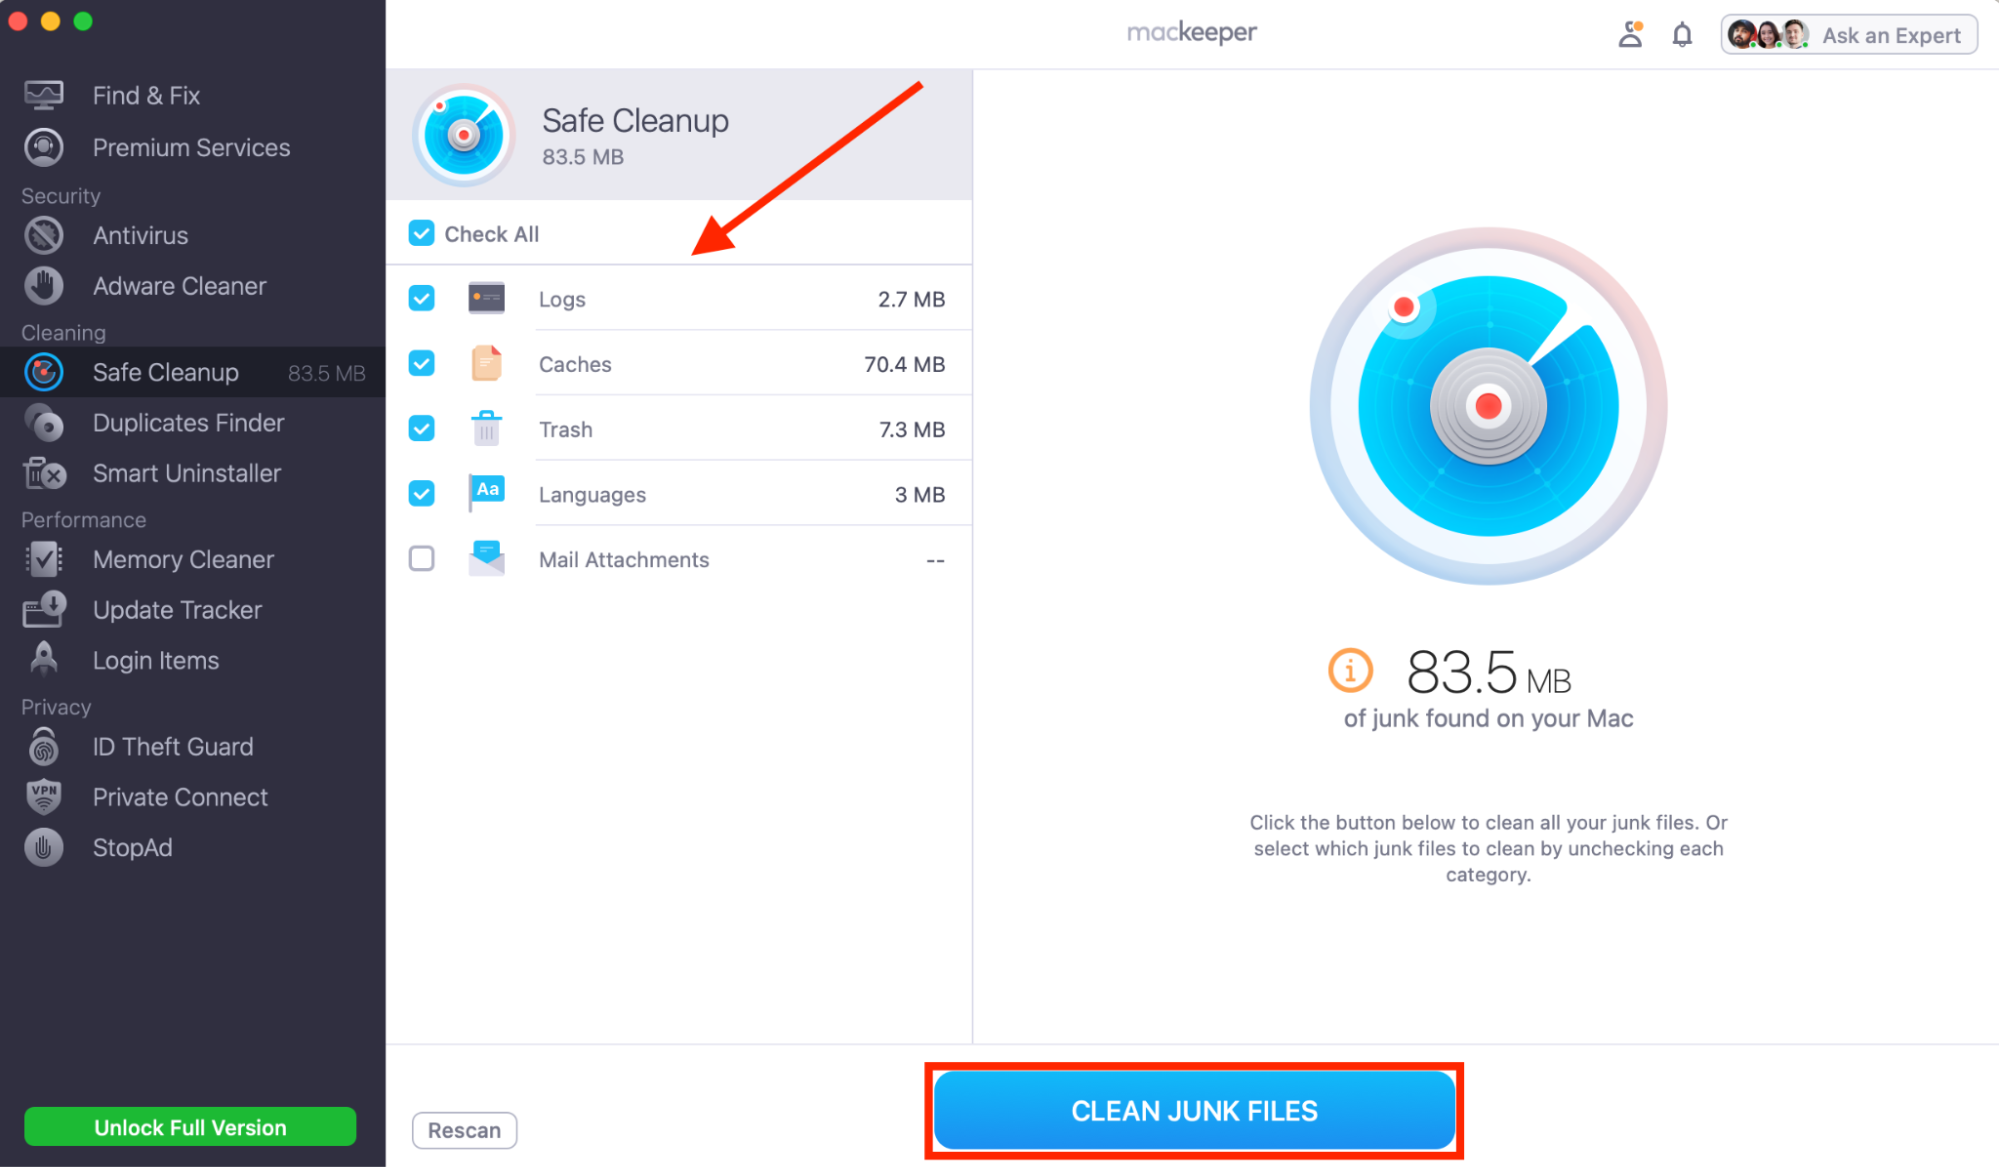
It’s possible to manually delete caches and logs on Mac, but this requires digging around in system folders that are difficult to find. From our experience, it’s also very easy to delete critical files when you try cleaning your Mac manually, whereas Safe Cleanup only removes unnecessary data.
6. Reset Microsoft Word to its default state
If you’ve recently changed your settings in Word, you may have accidentally activated or deactivated a feature that’s now preventing it from working as intended. Unfortunately, there’s no Reset function, so you’ll need to delete the preferences file manually:
- Close Microsoft Word and any other Office apps you have running.
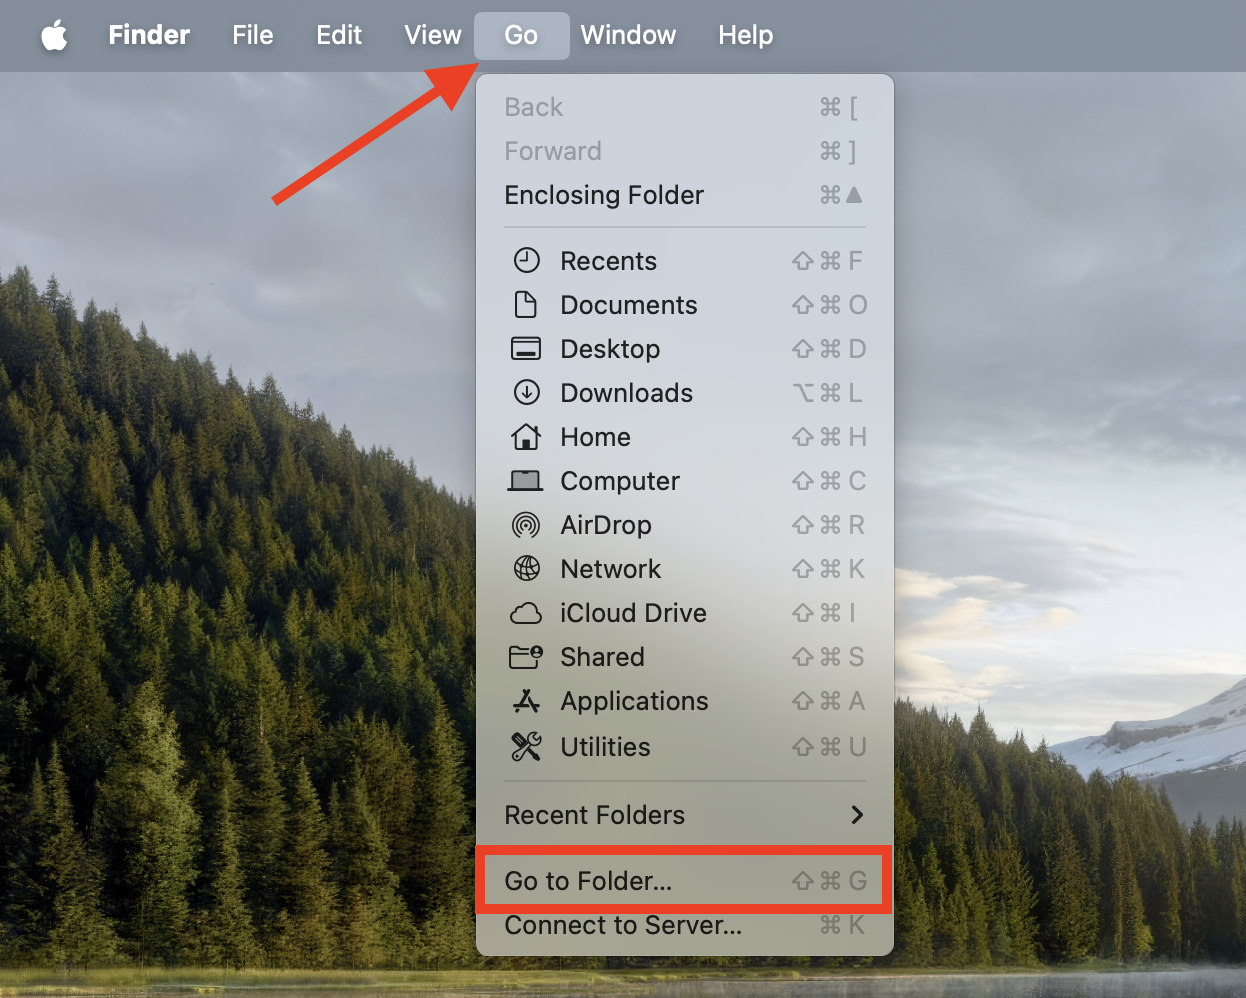
- Open Finder, then click Go > Go to Folder in the menu bar.
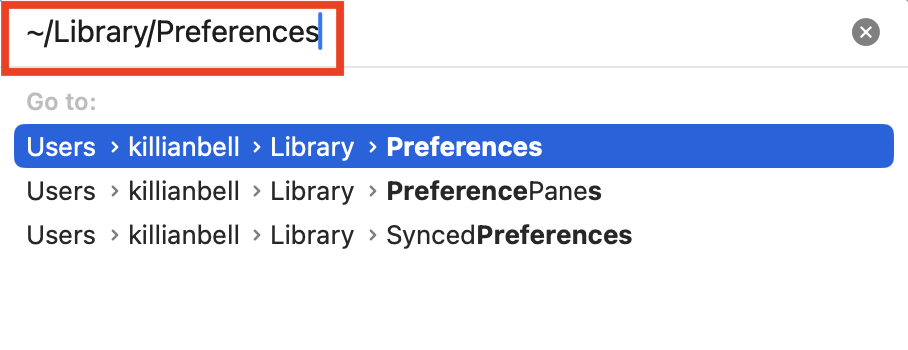
- Enter ~/Library/Preferences, then hit enter.
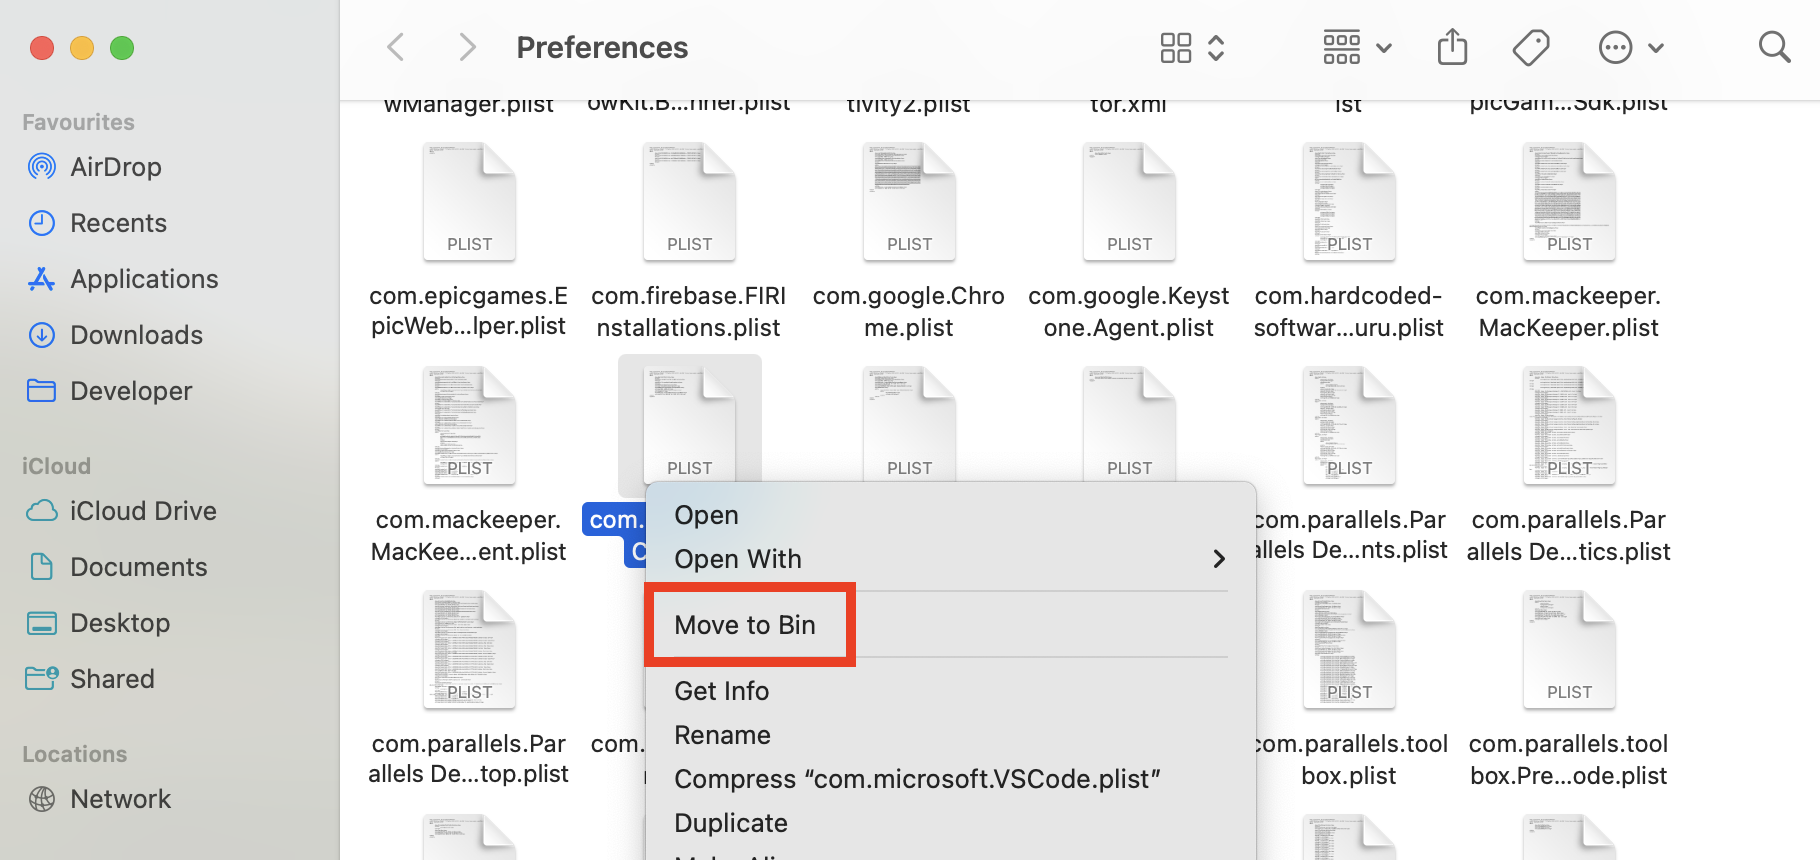
- Locate and delete the com.microsoft.Word.plist.
- Reopen Word, and it’ll rebuild a fresh preferences file.
You can follow the same process for other Office apps to reset their settings. This will obviously restore each program to its default state, so you may need to adjust things later to restore any preferences that you really need.
7. Uninstall and reinstall Office 365
If you’ve tried all the solutions above, and you’re still seeing errors inside your Office apps, it’s time to uninstall and reinstall Office 365. Let’s look at how to uninstall Microsoft 365 on Mac before downloading the programs again:
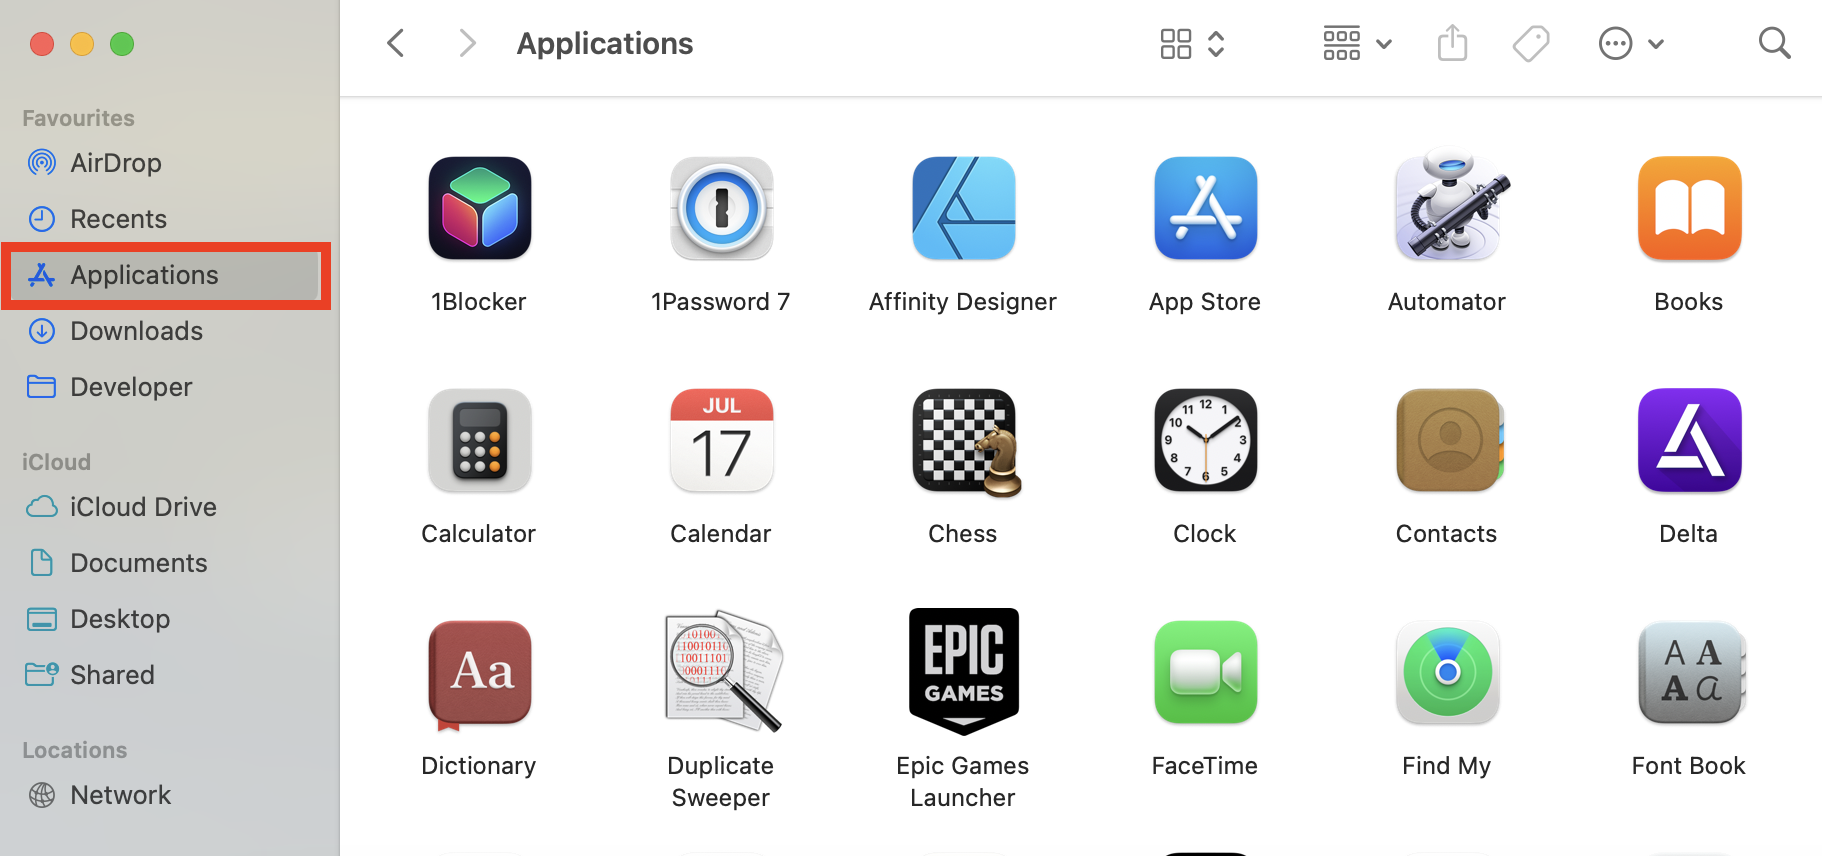
- Open Finder, then select Applications in the sidebar.
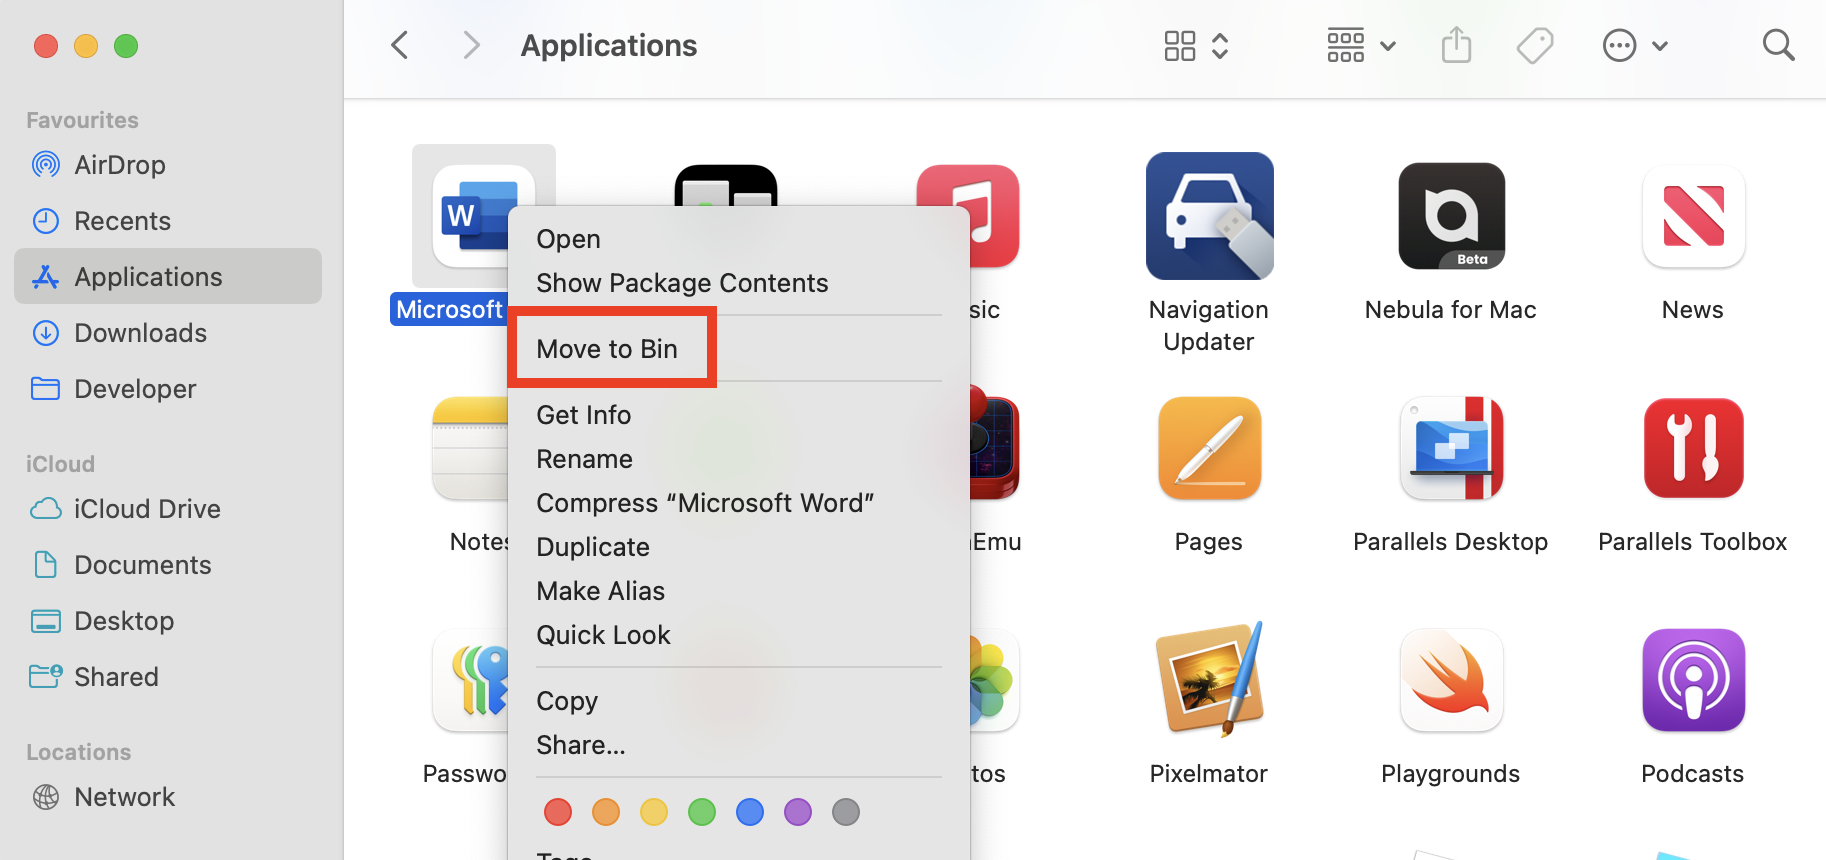
- Right-click an Office app you want to uninstall, then select Move to Bin. Repeat this process for all Office apps.
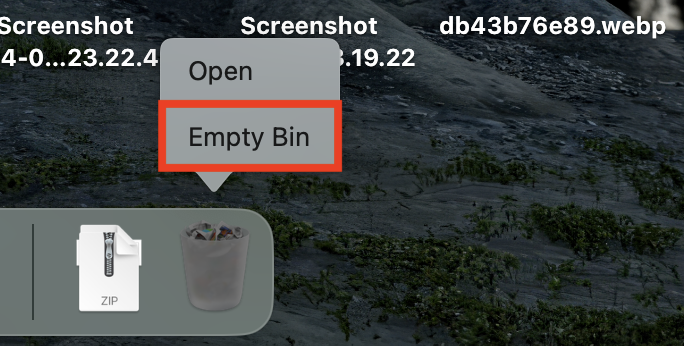
- Right-click the Trash icon in your Mac’s dock, then select Empty Bin to finish uninstalling all your Microsoft programs.
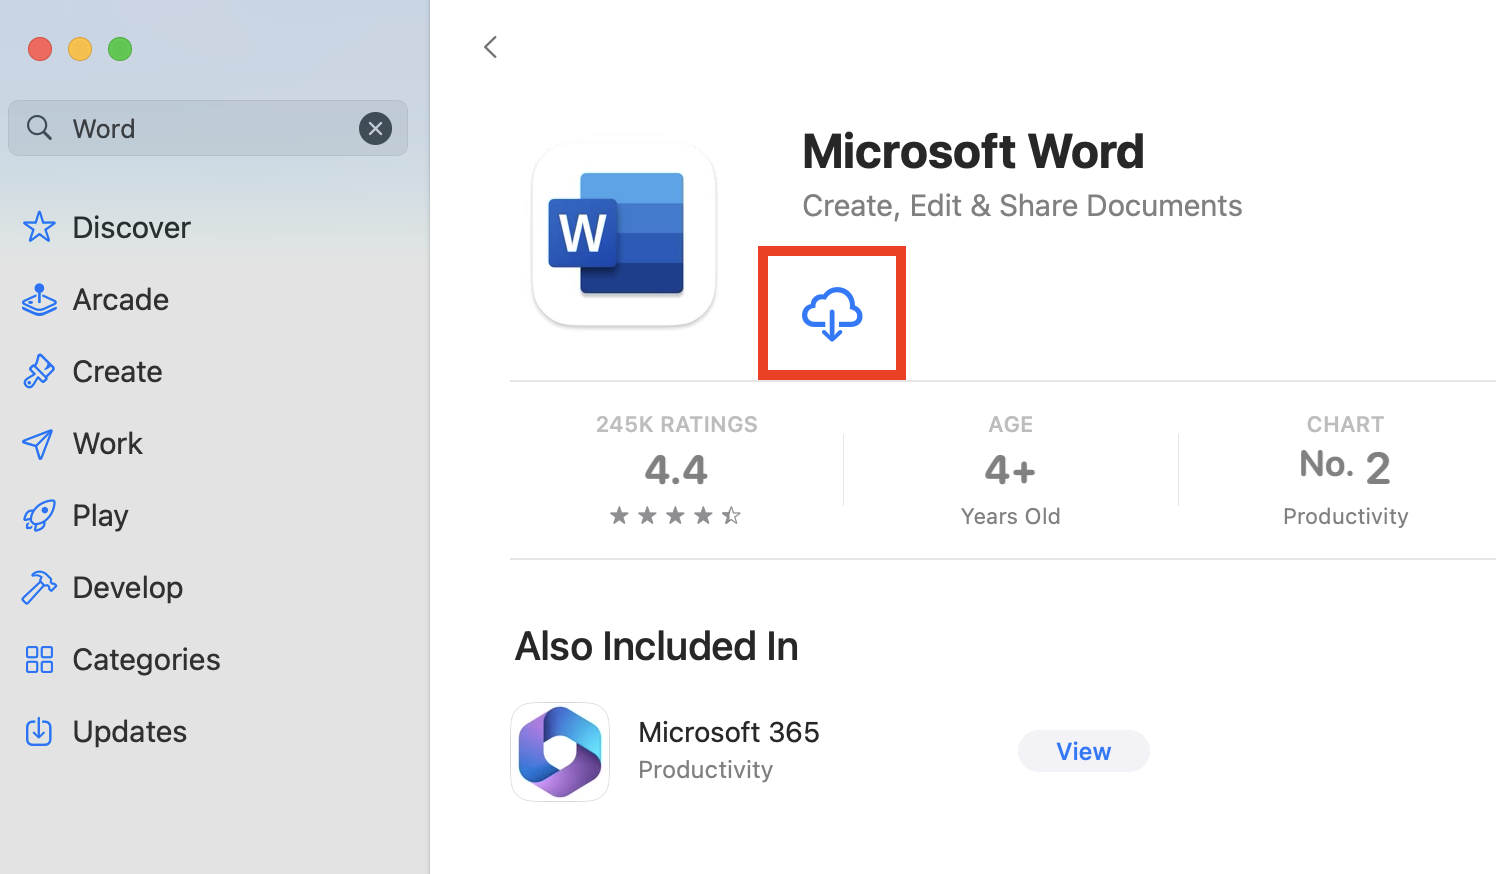
- Redownload and reinstall the Office apps you need from the App Store, or from the Microsoft website.
Reinstalling Office apps ensures any corrupted data is cleared and replaced by fresh app packages. This should fix all issues. However, we must note that you’ll need admin rights to uninstall Microsoft apps, so if you’re using a managed Mac, ask your employer, school, or other provider for help.
Office 365 view only is irritating, but also fixable
We know how frustrating it can be when Office 365 apps stop working properly on Mac—especially when you have work to do. However, in most cases, they’re easy to fix by simply logging into your account, clearing old cache files, or by reinstalling Word, Excel, and PowerPoint.
The quickest and most effective way to clear potentially corrupt Office cache files that can cause stability issues is with MacKeeper’s Safe Cleanup. Our handy utility removes all unnecessary junk from your Mac, not only fixing apps that have become unstable, but also freeing up space.


