In this article you will find the following:
Your Apple ID is the gateway to many services on your iPhone, iPad, or Mac: App Store, FaceTime, iCloud, and more. Thus, having your Apple ID hacked is one of the worst things that can happen to your device.
An Apple ID security breach on Apple's servers is one potential contributor to your ID getting hacked. But if someone is trying to sign in to your Apple ID, it could also be due to not having strong enough protectors—such as two-factor authentication. Malware that goes unidentified can also result in a hack.
Today, I'll show you how to know if your Apple ID has been hacked. Together, we'll also look at how your Apple ID can get hacked—along with the steps you can take to prevent the issue from reoccurring.
Before we start
One of the best ways to stop your Apple ID from getting hacked is to use antivirus software. MacKeeper's Antivirus tool detects over 99% of known online threats, including spyware. When you have the feature activated, you can rest easy knowing that your device is working round-the-clock to keep you safe.
To use MacKeeper's Antivirus solution:
- Download MacKeeper
- Go to Security > Antivirus
- Select Launch Antivirus
- After antivirus is switched on, hit Next
- Select the Enable button next to Real-time protection is disabled
- Tap Open Preferences and tick all boxes related to MacKeeper.
What is your Apple ID?
Your Apple ID is an email address and password that allows you to use your Apple devices more coherently. When you sign in from your iPhone, iPad, or Mac, your settings will sync across each of them. You can find Apple ID details for your account by going to Settings (iPhone/iPad) or System Settings (Mac).
Apple ID lets you use each of the following:
- iCloud: iCloud lets you store photos, notes, and other data online. You can sign in from your Apple device, along with icloud.apple.com
- Apple Music: Apple Music lets you stream your favorite artists and create playlists for multiple moods. You need an Apple Music subscription to use the service
- App Store: You'll go to the App Store to download almost all iPhone and iPad apps, plus many for your Mac. Your Apple ID is necessary for managing purchases, downloading apps, and much more
- FaceTime and iMessage: FaceTime lets you have video and audio calls with loved ones across the world for free, and you can keep in touch via iMessage texts as well. The sender and recipient both need Apple IDs to use these services
- Apple-native apps: Tools like Apple Notes and Apple Calendar require an Apple ID for syncing with iCloud.
How can Apple ID get hacked?
Hackers can access your Apple ID in numerous scenarios. I'll highlight the two most popular cases below.
- Weak passwords: Having an easy-to-guess password will make your Apple ID much easier to hack. Some hackers will also try brute force attacks where they guess your password multiple times
- Malware: Malware could get onto your device if you click a suspicious link, and outdated software can also result in viruses infecting your device. Some malware gives remote access to your device.
How do you know if your Apple ID has been hacked?
Several indicators are worth looking at when you for check if Apple ID has been hacked.
- Apple ID password stops working
- Device is locked or was put into "Lost Mode"
- Notification that email or phone number has changed
- Files, apps, photos, or messages that you don't recognize are stored in your iCloud
- Email from Apple about signing into your account on a new device
- Notification that your password has been changed
- Receipts or confirmations of unfamiliar charges from the App Store or iTunes.
Let's now go over how to know if someone is trying to sign into your Apple ID in more detail.
Apple ID password stops working
If you've entered your password multiple times, and you know that it was previously correct, your account has almost certainly been hacked. The only real exception is if Apple's servers aren't working.
Device is locked or was put into "Lost Mode"
After 10 sign-in attempts, Apple will lock some users' smartphones or computers to prevent malicious behavior. If your device was previously working fine but is now locked or in Lost Mode, you should contact Apple's support team to unlock Apple ID and change your details.
Notification that email or phone number has changed
Unless you change your personal details, you shouldn't receive notifications about your email or phone number changing on your device. So, if you do, it's a huge red flag that someone's hacked your account.
Files, apps, photos, or messages that you don't recognize are stored in your iCloud
You'll sometimes see files like screenshots that you might not initially recognize stored in iCloud. But if you've clicked on these and still don't know where they came from, someone else is probably using your account. In these situations, you might want to delete Apple ID to prevent further damage.
Email from Apple about signing into your account on a new device
New device sign-in emails are another clear sign that a hacker is using your Apple ID. When you log in yourself, you'll know the location and for which device you did these. So, if you notice a strange location, take action to avoid the Apple ID hack from becoming worse.
Notification that your password has been changed
Another obvious Apple ID hack sign is if you haven't changed your password but receive a notification saying that someone else has. Change your password again immediately if this happens.
Receipts or confirmations of unfamiliar charges from the App Store or iTunes
Your App Store payment details are often associated with your Apple ID. Unfortunately, hackers might take advantage of your stored credit card information to purchase subscriptions and apps. If you see that someone else has paid for items with your bank card, your account has probably been hacked.
What to do if Apple ID is hacked?
If you've encountered any of the challenges listed in the previous section, I'll help you mitigate the amount of damage that a hacker can cause.
- Try signing into your Apple ID
- Regain control of your account
- Change your Apple ID password
- Check all your data
- Look for signs of identity theft
- Set up two-factor authentication (2FA) on your Apple ID
- Remove unrecognized devices from your Apple ID
- Make sure your Apple ID is secure
- Consider signing up for a digital security solution.
Don’t waste a moment longer—plunge into each method’s details and find a safe solution for you.
Try signing into your Apple ID
You can sign into your Apple ID on an iPhone or iPad by opening the Settings app and doing the following:
- Go to the Apple ID section at the top of the screen
- Select Sign In
- Enter your Apple ID login details
- Complete any verification processes that you're asked to do.
On a Mac:
- Go to System Settings > Apple ID
- Choose the Sign In option
- Enter your Apple ID sign-in details and complete your required verification.
Regain control of your account
Try to regain control of your account ASAP by changing your Apple ID and enabling two-factor authentication, both of which I'll discuss in some of the upcoming sections. You should also remove any subscriptions that have been purchased on the App Store.
Change your Apple ID password
Changing your Apple ID password is paramount if you've been hacked.
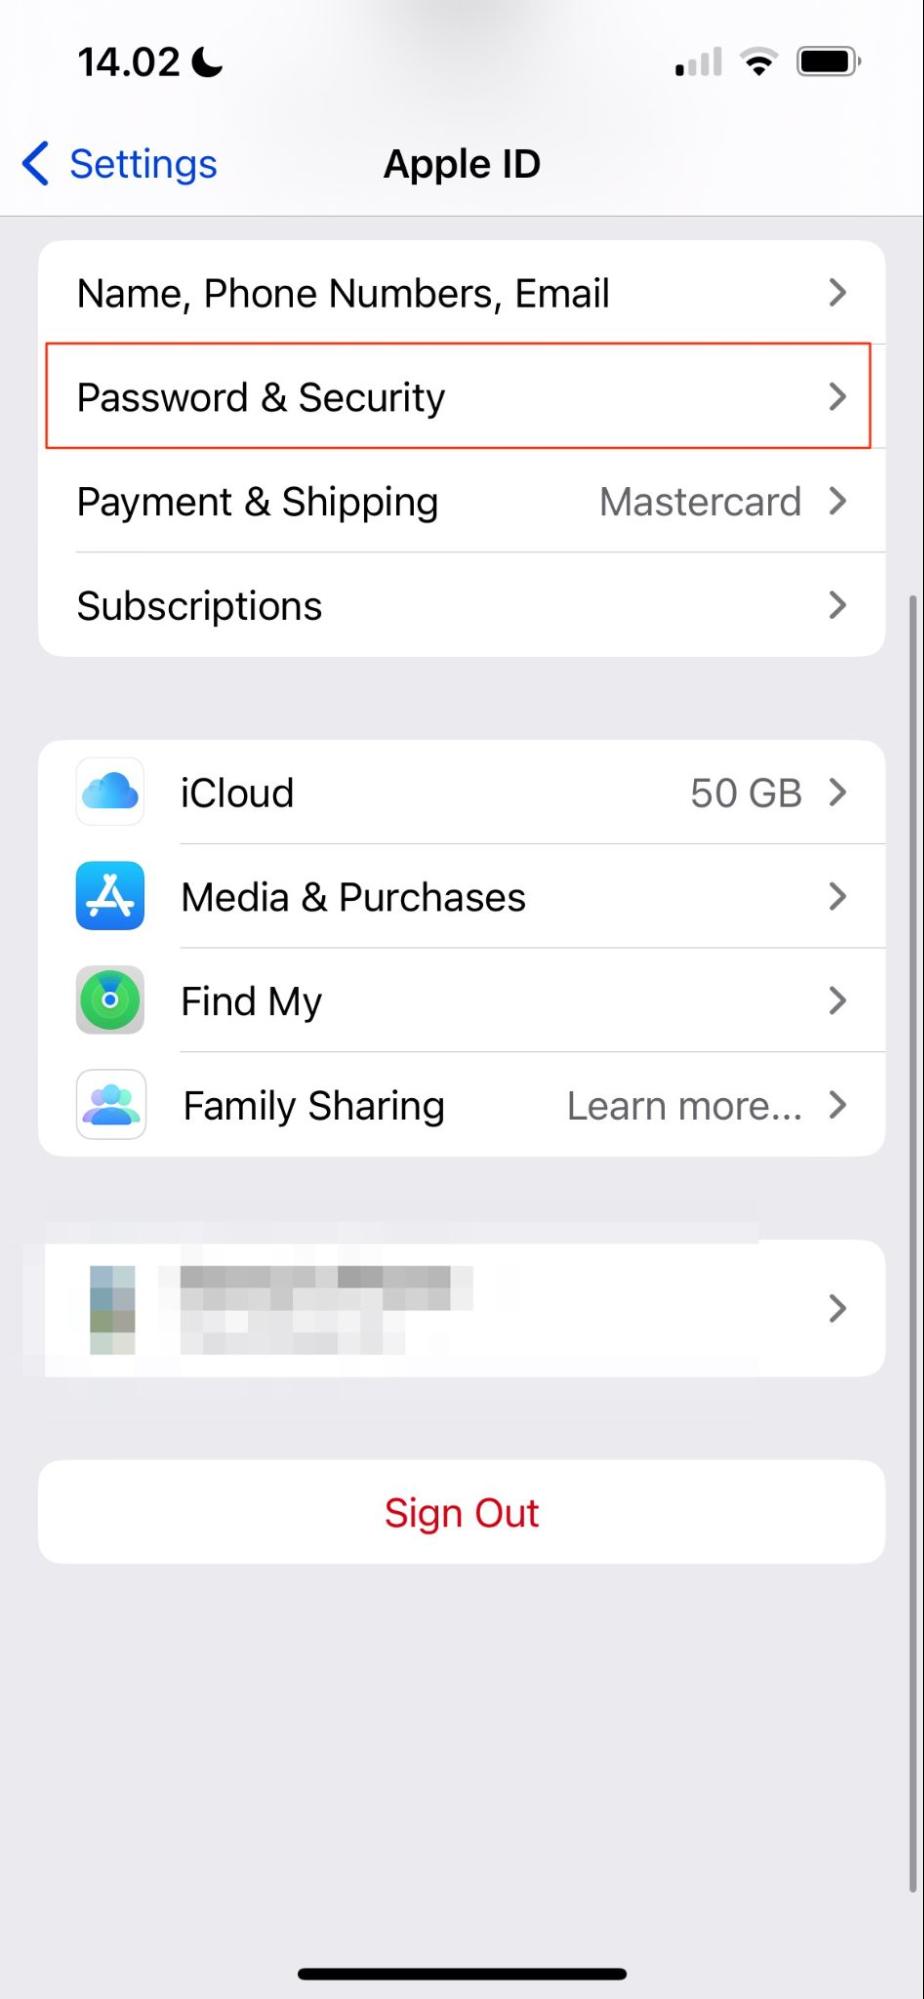
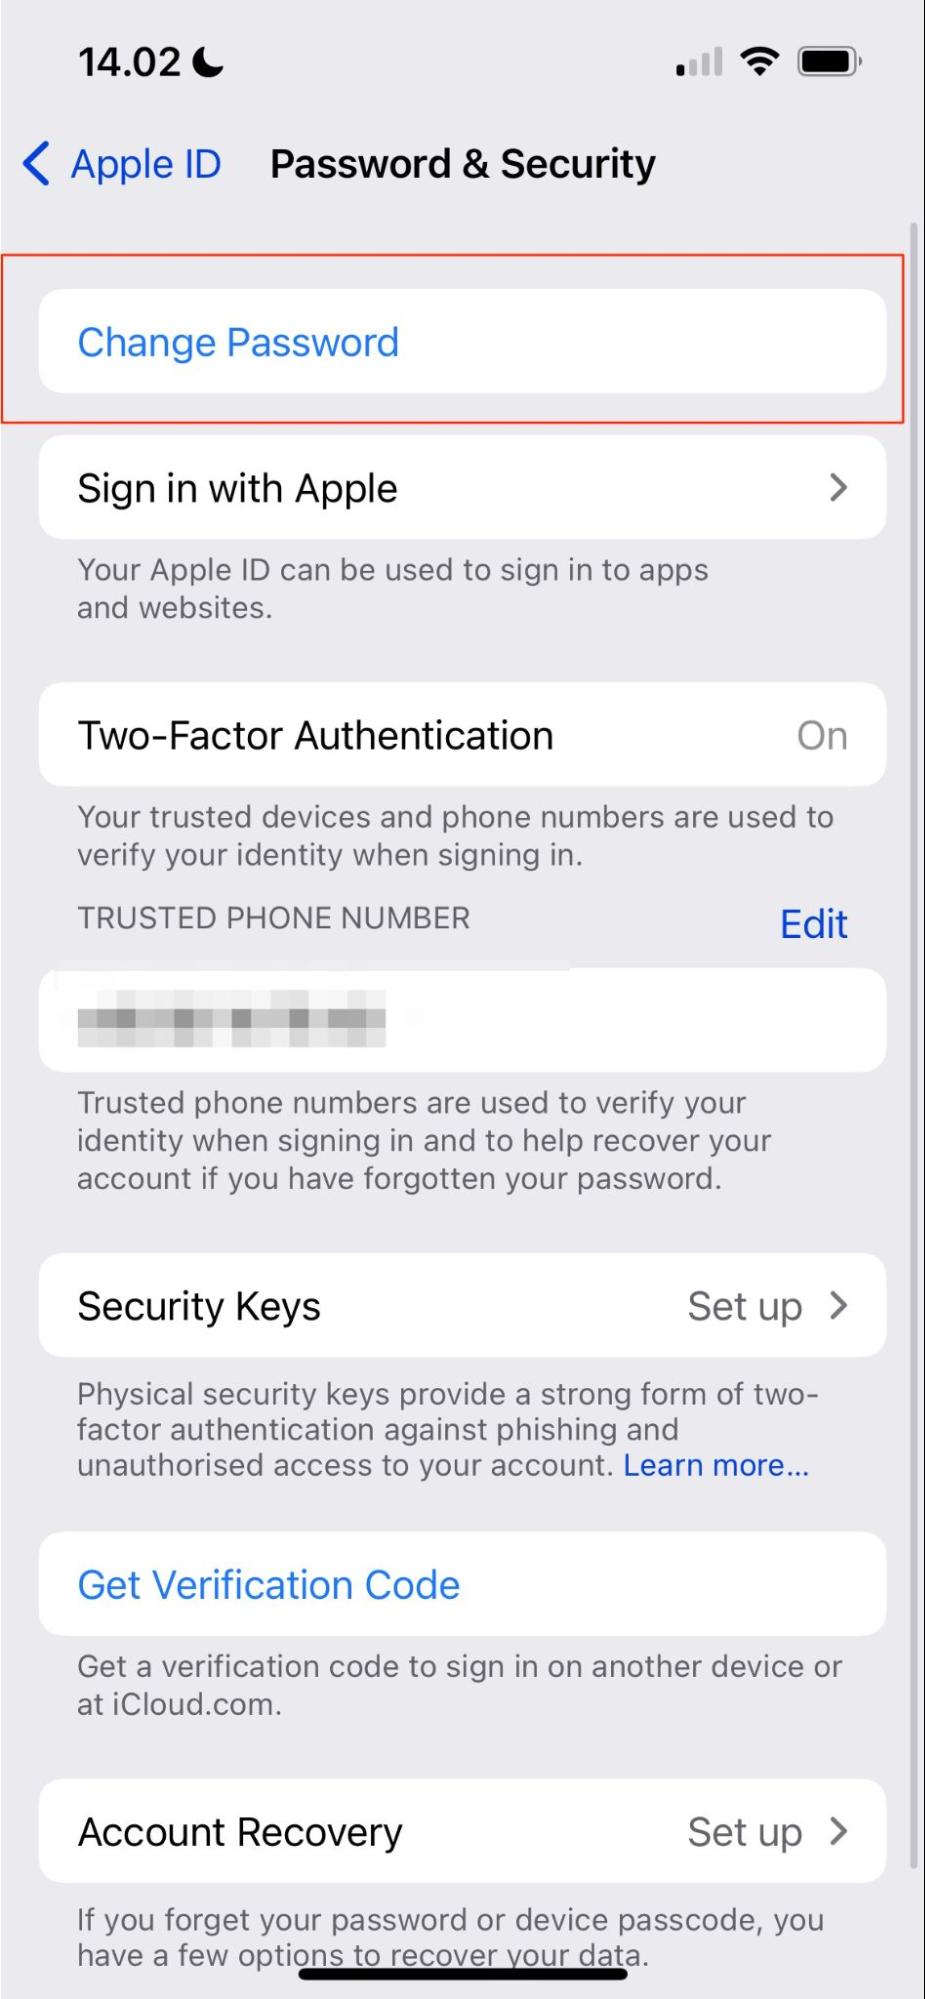
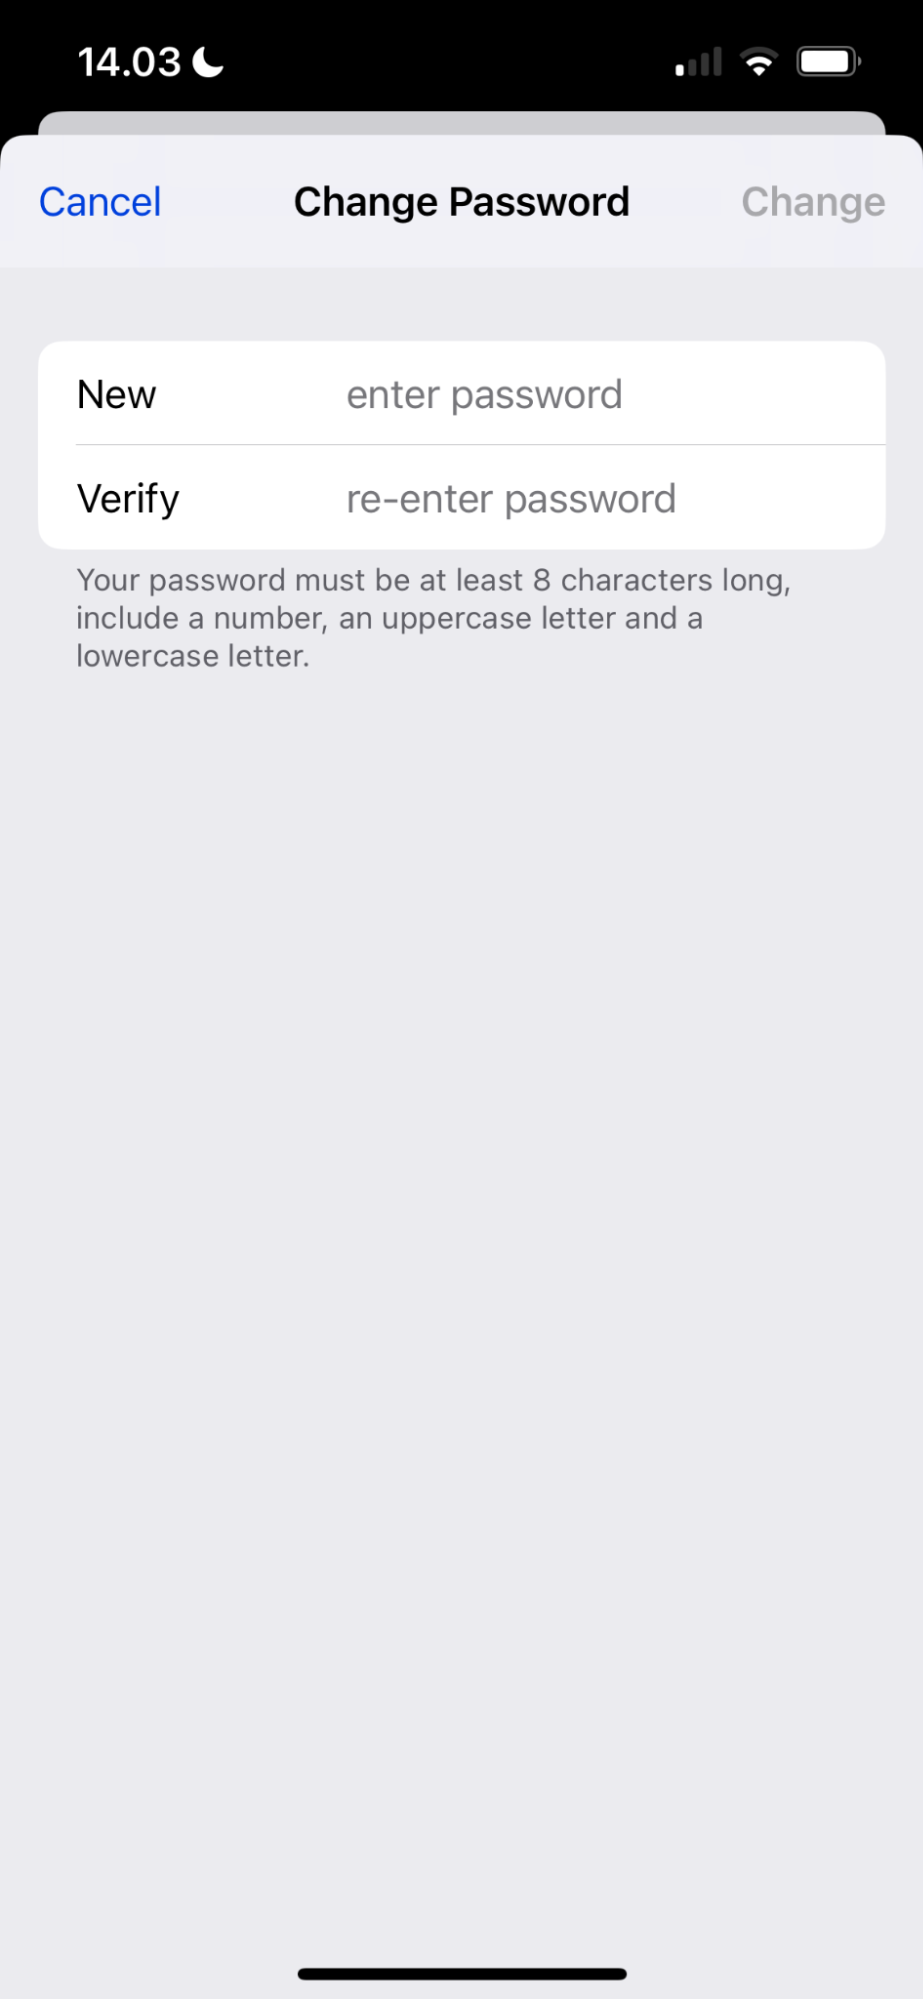
On your iPhone or iPad:
- Go to Apple ID > Password & Security
- Select Change Password
- Enter your iPhone passcode when prompted
- Type your new password and verify it before tapping Change.
On a Mac:
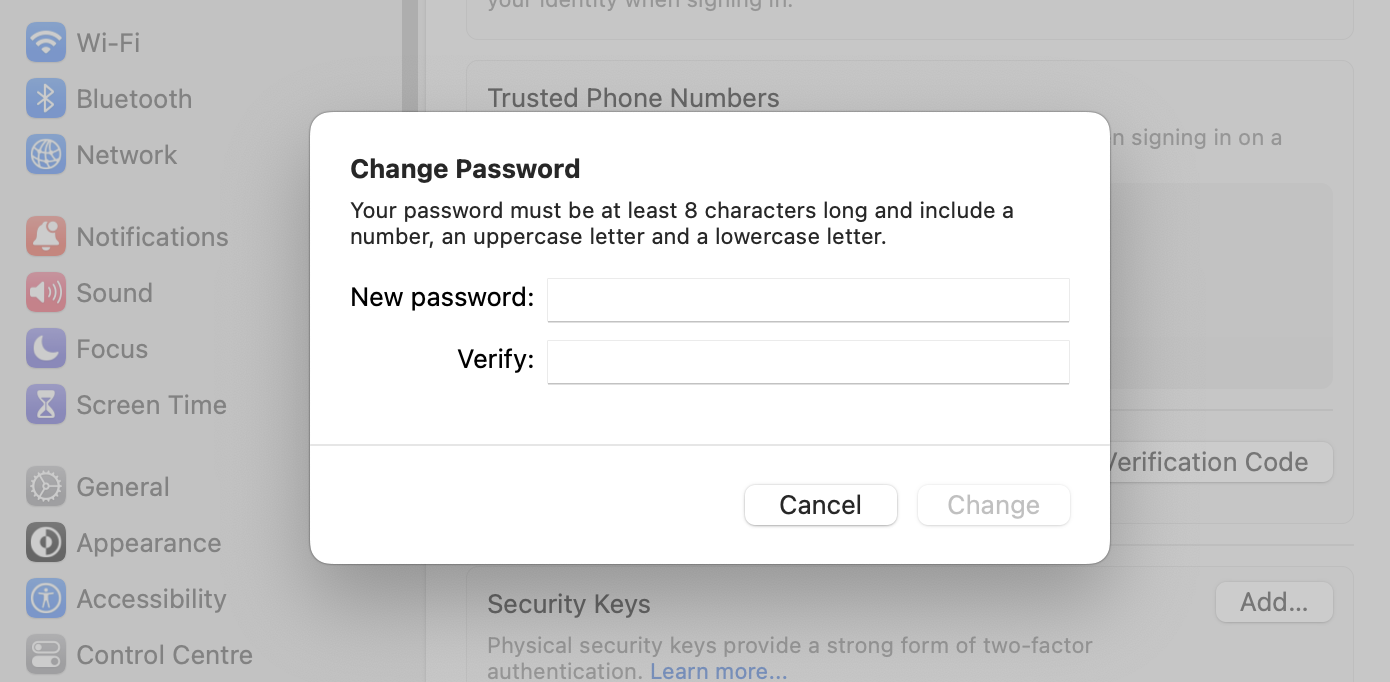
- Go to System Settings > Apple ID > Password & Security
- Tap Change Password and enter your Mac password
- Enter and verify your new login details before tapping Change.


Check all your data
After gaining control of your account, follow these steps:
- Check your messages, social media accounts, and anywhere that you're signed into
- If you see anything that looks suspicious, delete it and explain what happened to the recipient
- Delete any photos, videos, and notes that aren't yours too.
Look for signs of identity theft
You should also check to see if the hacker has committed identity theft. One way to do this is by checking your banking statements, and you should sign into your mobile bank app to check.
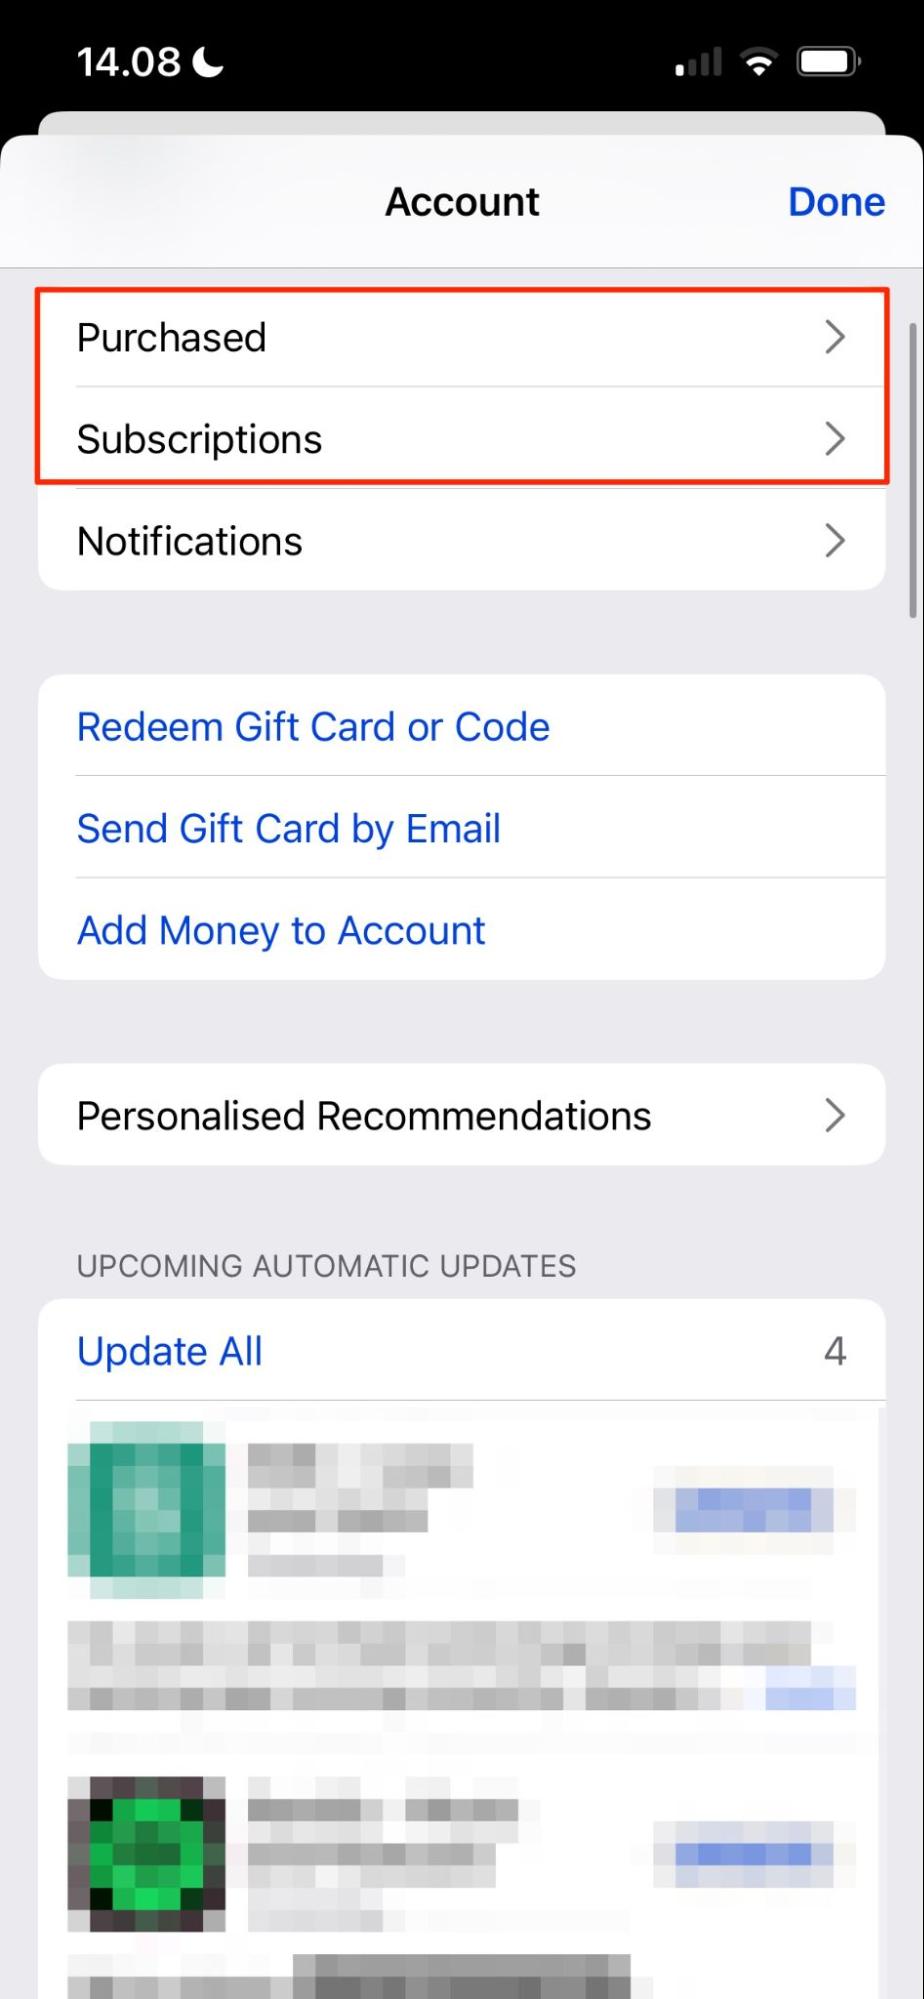
It's also worth looking for and canceling subscriptions that aren't yours on the App Store:
- Click on the profile picture icon in the top right
- Go to the Purchases and Subscriptions tabs
- Remove any apps and subscriptions that aren't yours.

Set up two-factor authentication (2FA) on your Apple ID
Setting up two-factor authentication will send a verification code to a trusted device whenever you try to sign in somewhere new. As such, hackers can't get back into your account.
Here's how to set up 2FA on iOS and iPad:
- Go to Settings > Apple ID
- Click on Password & Security
- If you haven't turned on 2FA, start the process by selecting Turn On Two-Factor Authentication
- Set up 2FA on your device.
Note from our expert:
On a Mac, the only difference is that you'll go to System Settings instead of the Settings app. Afterward, the process is identical.
Remove unrecognized devices from your Apple ID
Hackers might add their devices to your Apple ID, and you should remove these immediately to revoke control. You can remove your current device from an iPhone, Mac, or iPad, but you'll need to log into the Apple ID website to delete external ones.
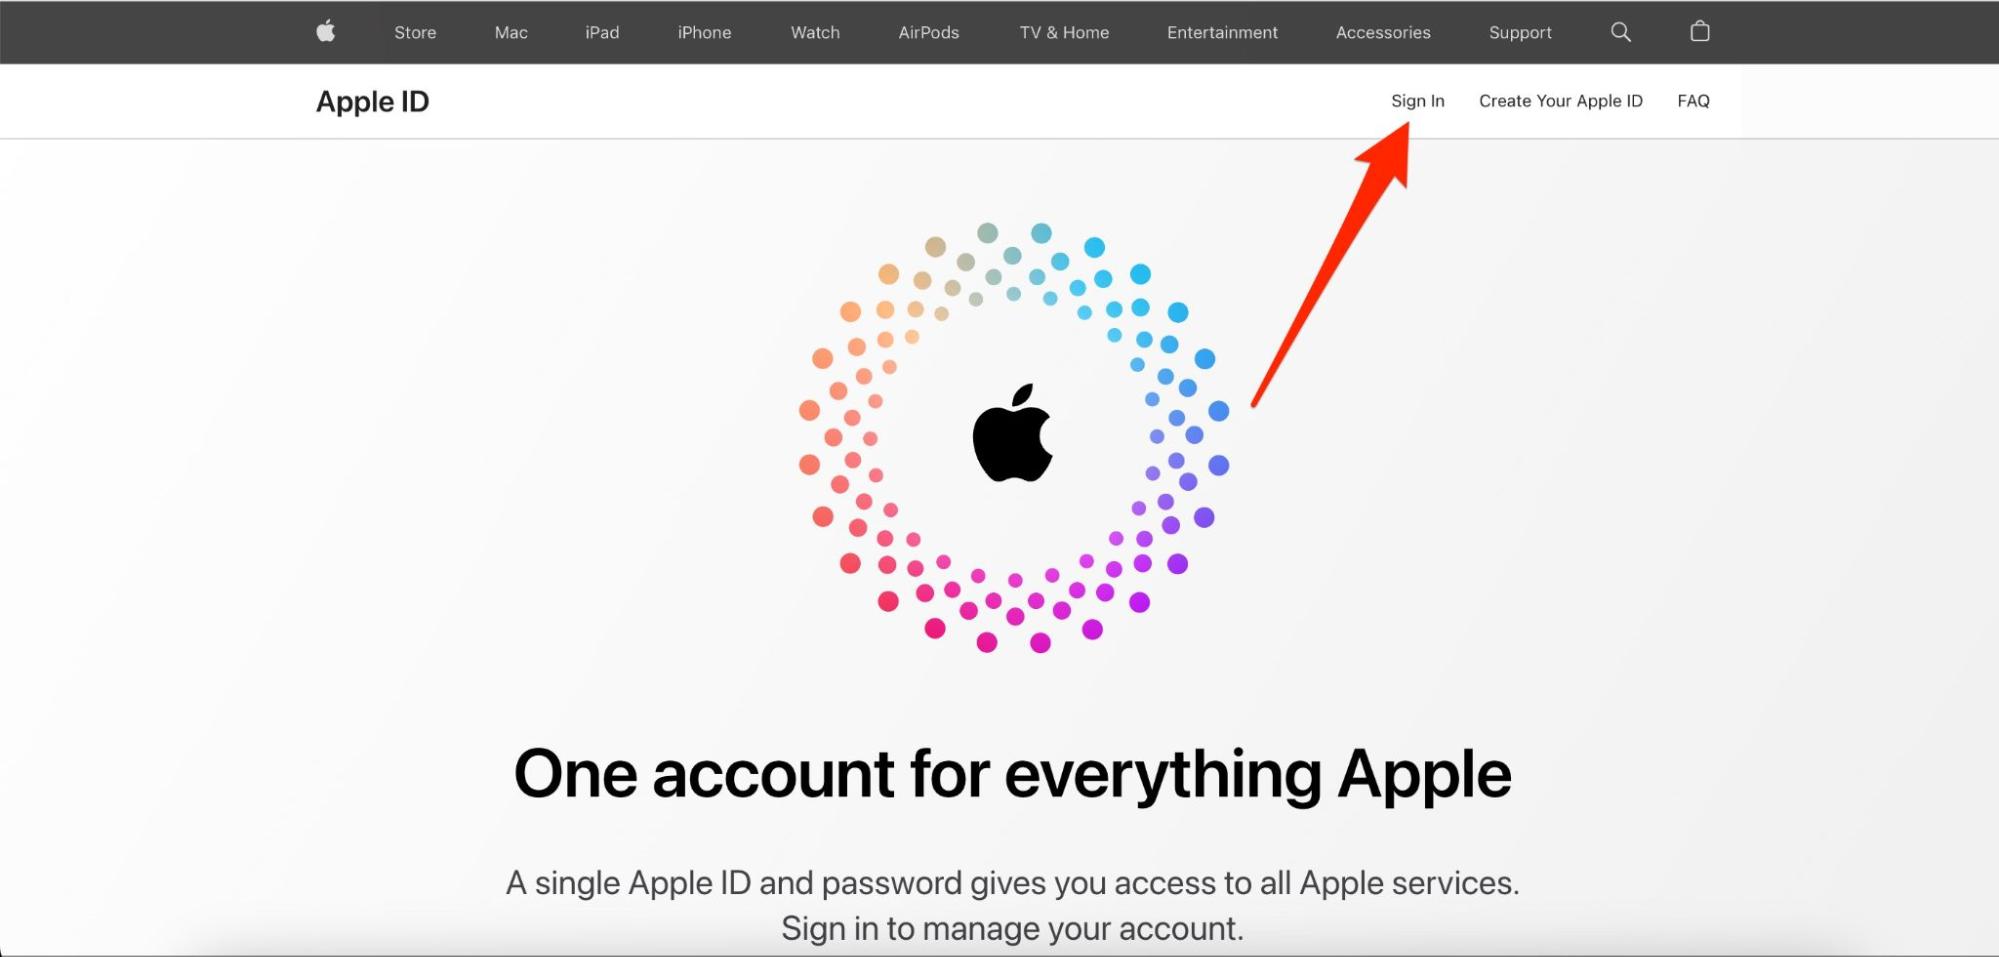
- Go to appleid.apple.com and select Sign In
- Log into your Apple ID account and complete any 2FA requests if asked
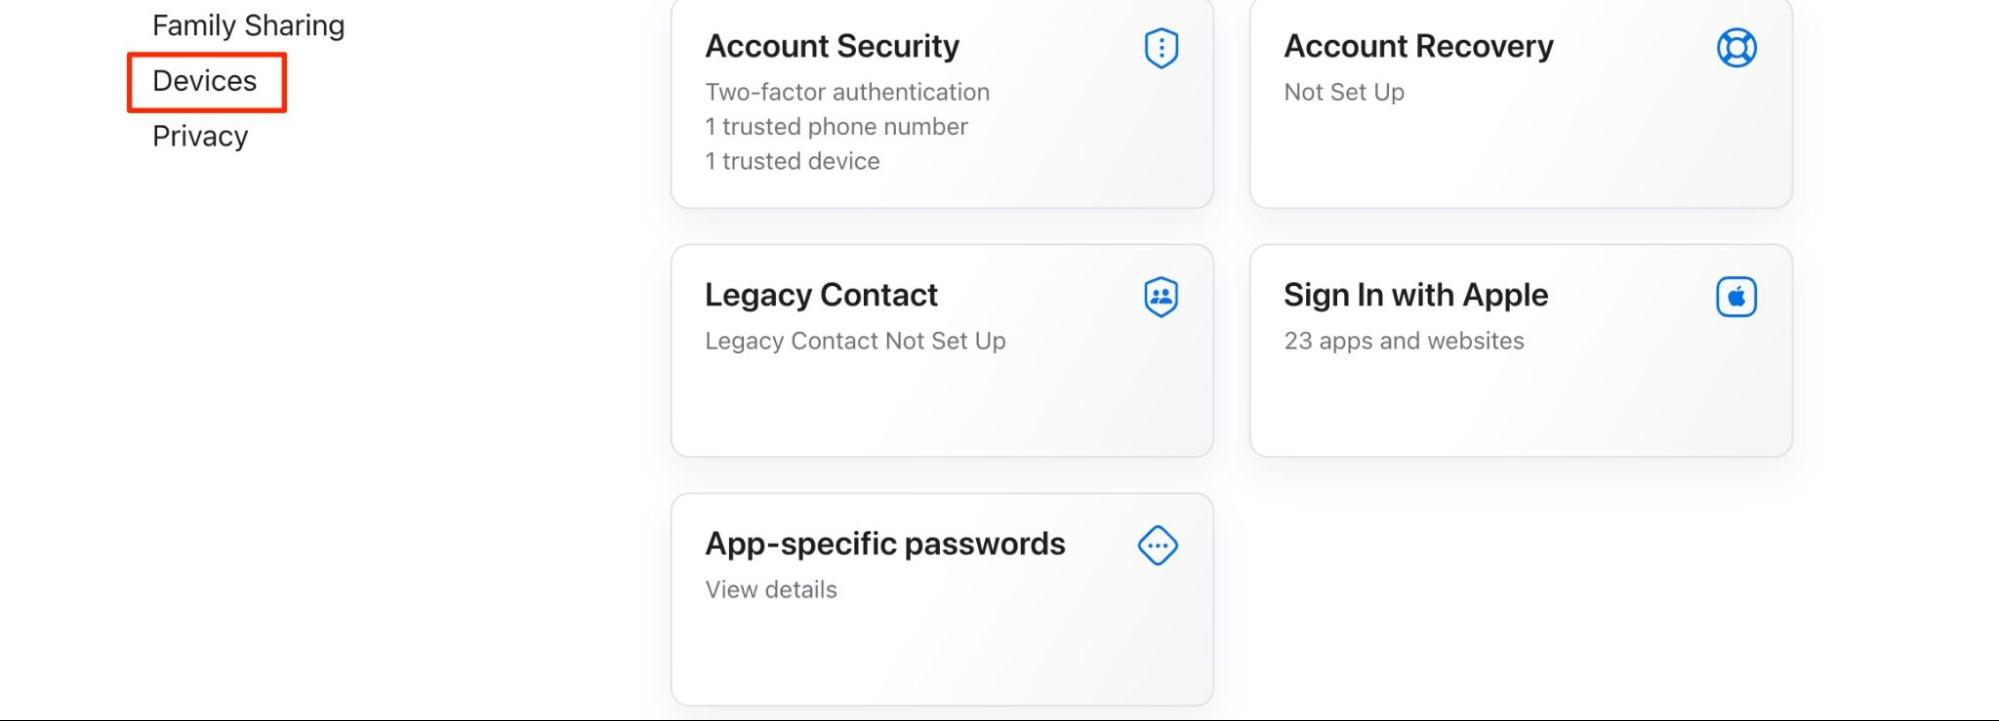
- Click on Devices
- Select each unrecognized device. Then, scroll down and select Remove from Account.
Make sure your Apple ID is secure
After changing your sign-in details, you should ensure that your Apple ID has the highest level of security possible. Setting up Security Keys is a good idea if you purchase the associated external device for it, and so is strengthening your Account Recovery settings.
I'll go into further detail about making sure that your Apple ID is secure in the final part of this guide—read it till the end.
Consider signing up for a digital security solution
You can stop external threats on your Mac by using an antivirus program, such as Mackeeper's Antivirus tool. On your iPhone and iPad, I recommend signing up for a VPN provider—which will encrypt all of your data.
How to secure your Apple ID?
Let's now make sure that you don't encounter the same difficulties again in the future.
- Use unique, strong passwords
- Don't share your Apple ID
- Set up two-factor authentication
- Verify that the website is genuine and your session is secure
- Use antivirus software
- Remember to sign out when your session is complete
- Keep software up to date
- Consider local backups
- Don't respond to messages from unknown senders
- Turn on advanced data protection.
As a summarization of my guide, I’d like to share a few top tips to secure your Apple ID for the long run—check them out.
Use unique, strong passwords
I know, I know—it's the same advice you've received for decades. But choosing a unique and difficult-to-guess password is paramount to maximizing your Apple ID security. Use a mixture of uppercase and lowercase letters, plus numbers and symbols. Never use the same password that you have for another website.
Don't share your Apple ID
Unless someone needs to reach out to you on FaceTime or iMessage, no one needs to know your Apple ID. And under absolutely no circumstances should you share your password with others.
Set up two-factor authentication
I’ve already discussed setting up 2FA in the previous part of this guide, but I can't stress enough how important it is. Even if a hacker correctly guesses your password, 2FA can stop them from gaining control of your Apple ID. Moreover, you'll know when someone else is trying to access your account.
Verify that the website is genuine and your session is secure
You can verify that a website is legitimate by the padlock symbol that features next to the URL. But even then, you should look out for irresponsive pages, poor grammar, and a lack of certification.
Use antivirus software
Antivirus software will check for potential hacks in the background, meaning that you can perform your other tasks as usual. I recommend MacKeeper's Antivirus solution as it's a one-and-done setup.
Remember to sign out when your session is complete
One of the most common reasons why users get hacked in general is because they haven't signed out of their computers. Always switch your computer off, or at the very least, lock your screen. Logging individually out of your accounts is also a good idea.
Keep software up to date
You should also ensure that your macOS and iOS/iPadOS software are always updated. On an iPhone or iPad, go to Settings > General > Software Update > Download and Install—before agreeing to Apple's licensing agreement. On your Mac, go to System Settings and follow the same remaining processes.
Consider local backups
Backing up to iCloud is handy for transferring files between your accounts, but you should also use an external hard drive to keep everything safe in case someone else hacks your account. That way, you can restore everything more easily.
Don't respond to messages from unknown senders
You might sometimes receive messages on iMessage and WhatsApp from people you don't know. These may seem well-spirited, but I strongly advise that you don't respond. Never, ever click on suspicious links, either.
Turn on advanced data protection
iCloud has a feature called Advanced Data Protection.
To turn on Advanced Data Protection:
- Go to Settings (iPhone/iPad) or System Settings (Mac) > Apple ID > iCloud Advanced Data Protection
- Tap Turn On Advanced Data Protection (iPhone and iPad)/Turn On (Mac)
- Continue with the instructions mentioned on your screen to switch the feature on.
Before you use Advanced Data Protection, you must update your software on every Apple device where you have the same Apple ID.
Don't think that your Apple ID is immune from hacking
Your Apple ID is just as prone to hacking as any other digital system, and you shouldn't take the problem lightly. If a hacker gains entry to your account, they could steal your identity and destroy your relationships. Preventing the problem with advanced security and 2FA, along with strong passwords, is a good starting point.
You also have the option to stop prying eyes with MacKeeper's Antivirus solution, which will provide round-the-clock coverage. And if your Apple ID is compromised, make sure that you stop the fire from spreading ASAP.


