Want to turn off Apple Intelligence on macOS and free up room on your Mac? MacKeeper’s Safe Cleanup clears out trash, caches, and junk files in one click—without touching your personal files—so your Mac feels fast and clean again. Clear that clutter first, then decide which AI features you want to keep.
This guide applies to versions of macOS prior to 27, as significant changes may occur with the release of new versions.
What is Apple Intelligence on Mac?
Apple Intelligence is Apple’s built-in AI system for the Mac, iPhone, and iPad. It weaves generative AI into everyday tasks, so your Macintosh can perform helpful little jobs—writing, creating, and organizing—without any extra apps. It needs macOS Sequoia and a compatible Apple Silicon Mac, and it’s available in a growing list of regions and languages. Here’s what it can do.
Writing tools that rewrite, proofread, and summarize text
Image generation that lets you generate custom pictures and Genmoji
Notification and email summaries that shrink long messages into short recaps
Photo cleanup that removes unwanted objects from your images
Siri integrations that make requests feel more natural
If you want to see how each Apple Intelligence tool behaves on macOS before you decide what to keep, we’ve broken every feature down in plain language.
Why switch off Apple Intelligence on your MacBook?
Apple Intelligence is handy, yet it isn’t for everyone. When my own MacBook started lagging after a macOS update, switching a few of these features off made a real difference. Here are the common reasons people decide to switch off Apple Intelligence on Mac.
It uses memory and system resources, which slows down an older Mac
It takes up storage space for the AI models macOS downloads
Some people want more privacy and less data sent to outside services
The summaries and suggestions simply aren’t useful for how they work
If your Macintosh has started to feel sluggish, turning these features off is one simple way to boost Mac performance and free up memory for the apps you rely on every day. Trimming its background usage also nudges your Mac’s everyday efficiency in the right direction, especially on machines with less RAM.
A note from our experts:
We all have our own reasons for turning off Apple Intelligence on our Macs. However, if the reason is slow MacBook performance or a lack of storage, there’s another solution. First, delete all unnecessary files using the Safe Cleanup feature in MacKeeper.
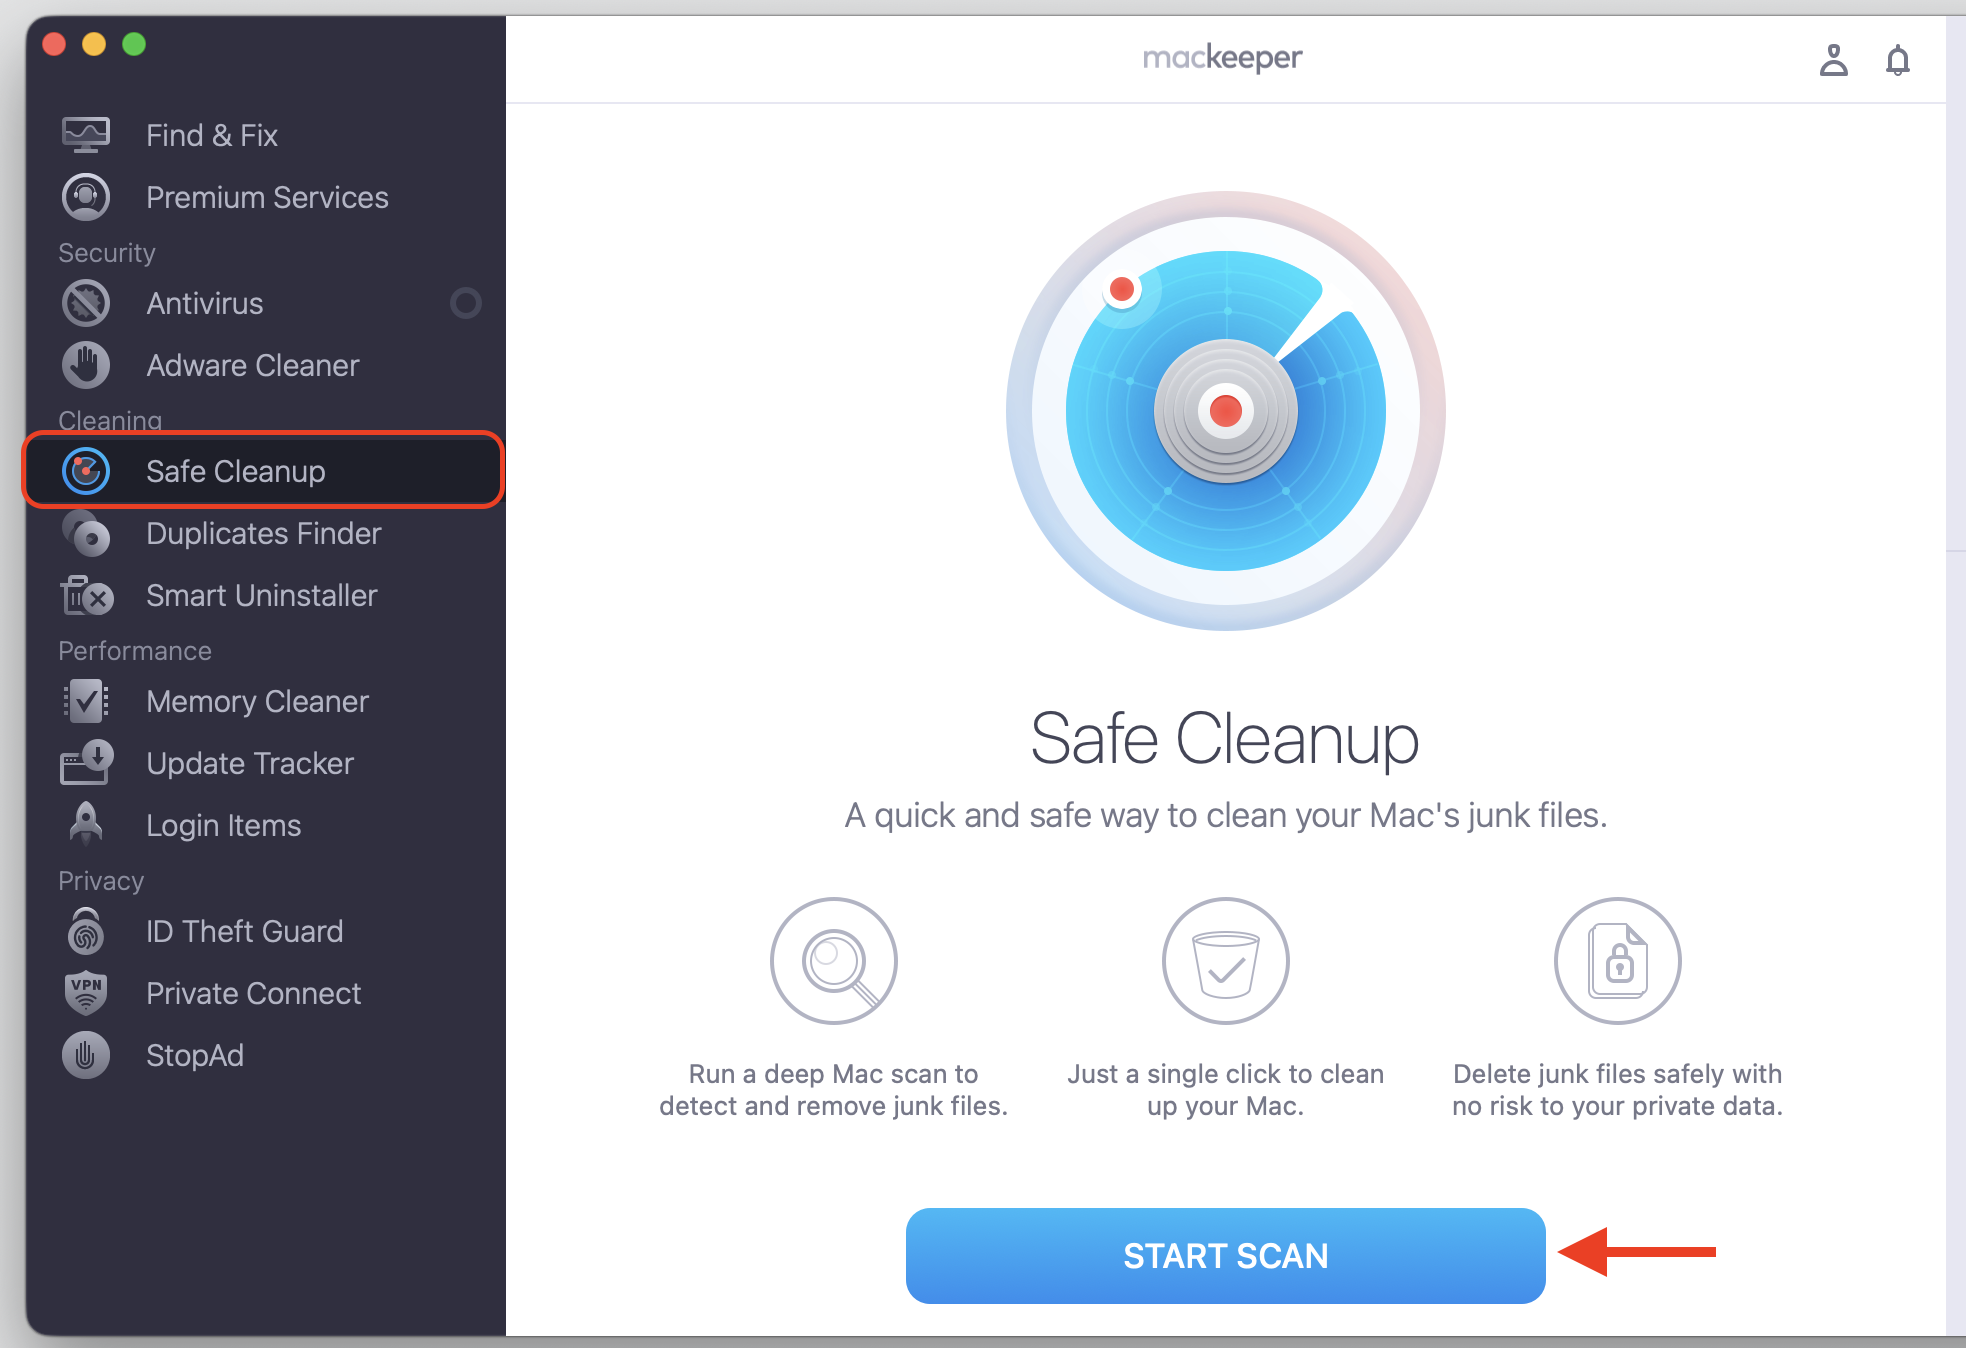
Click Safe Cleanup, followed by the Start Scan button.
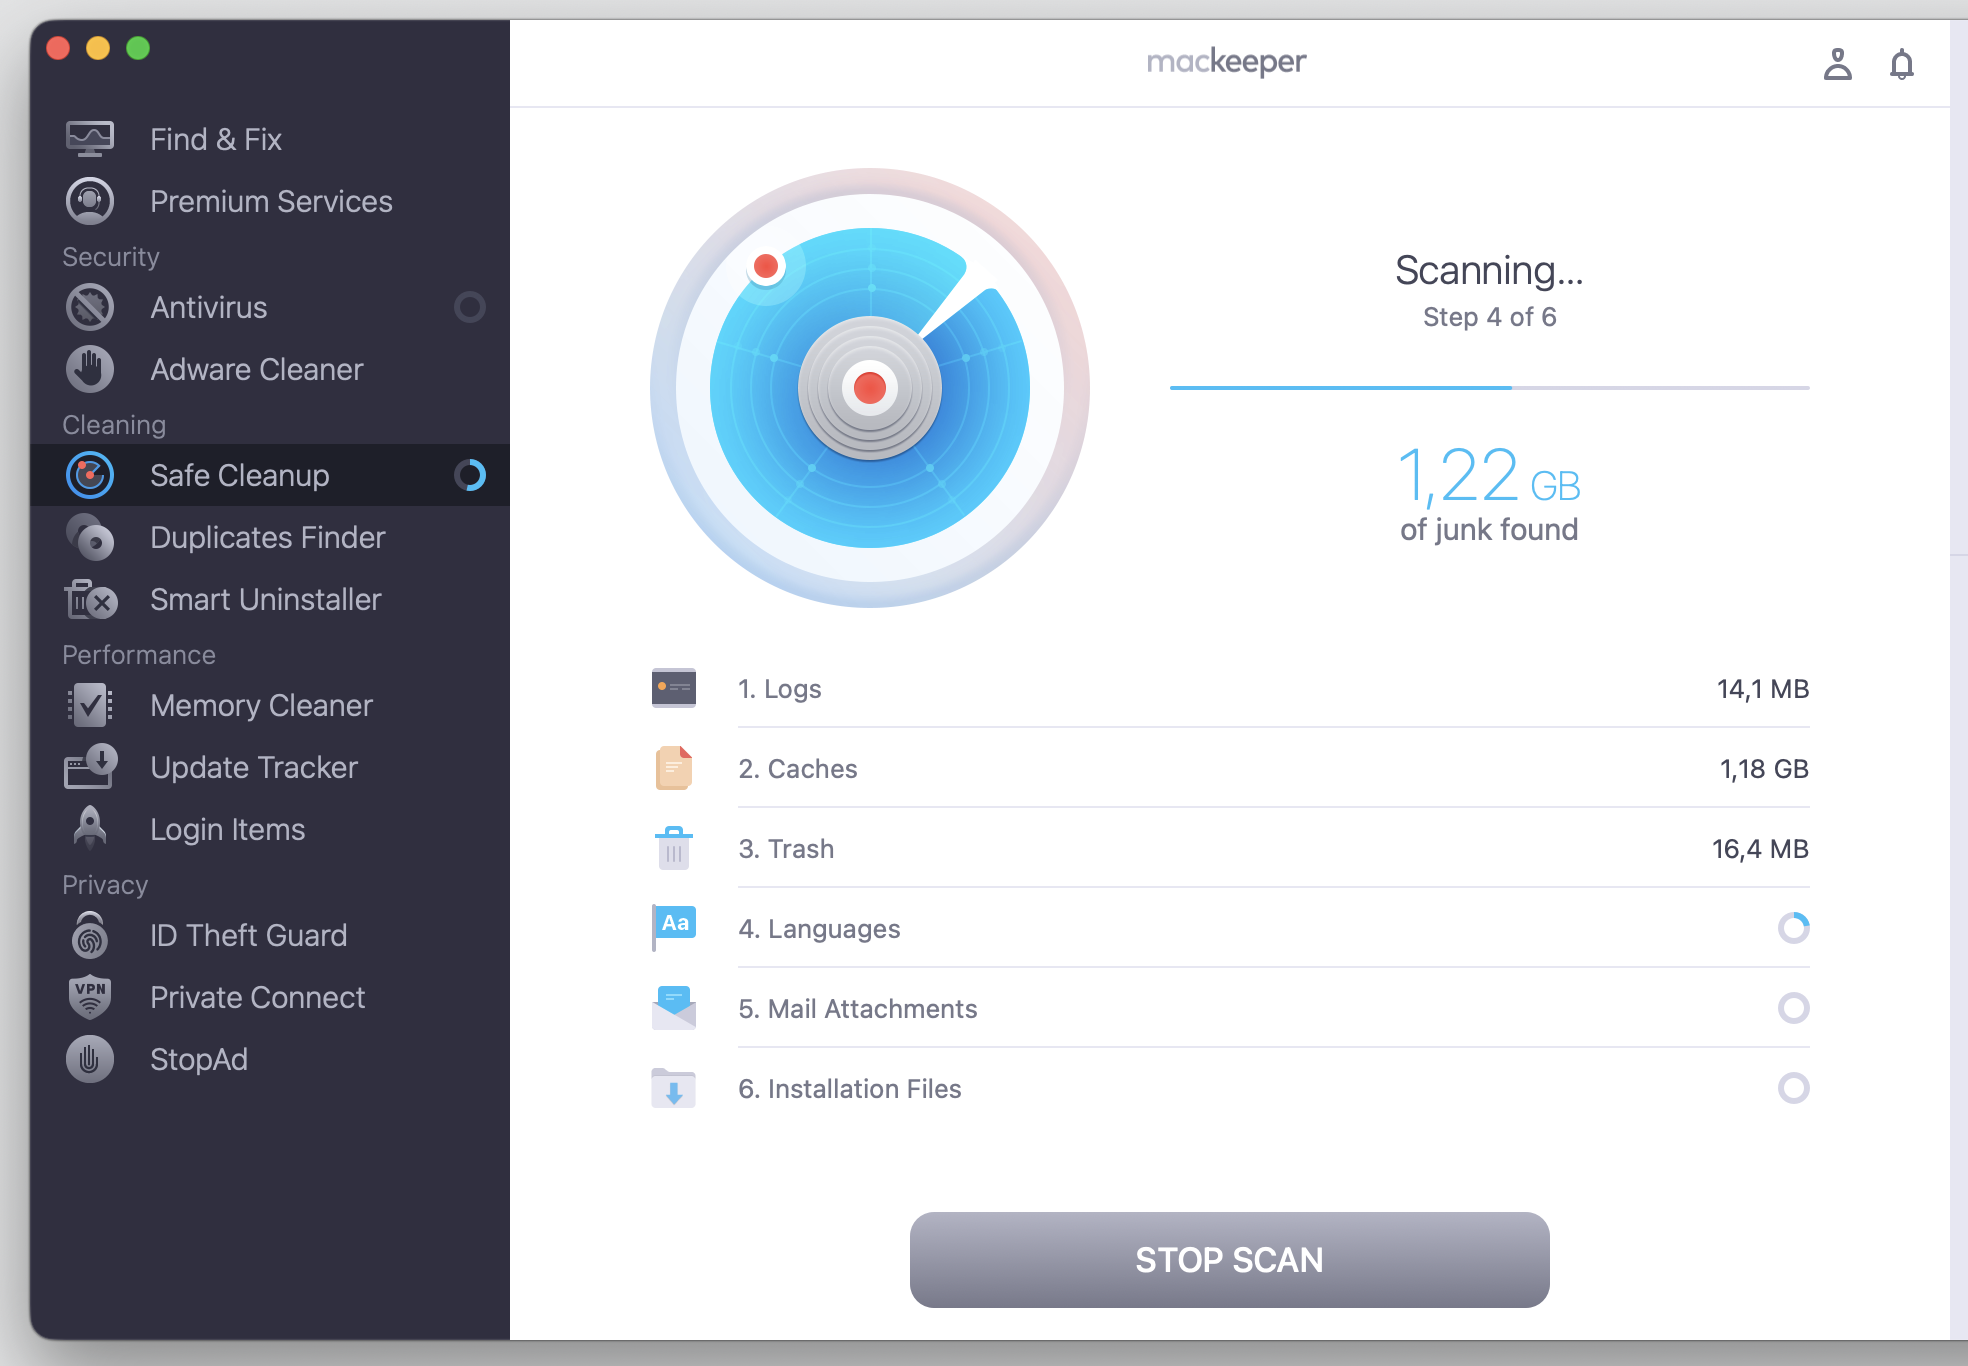
Review the results.
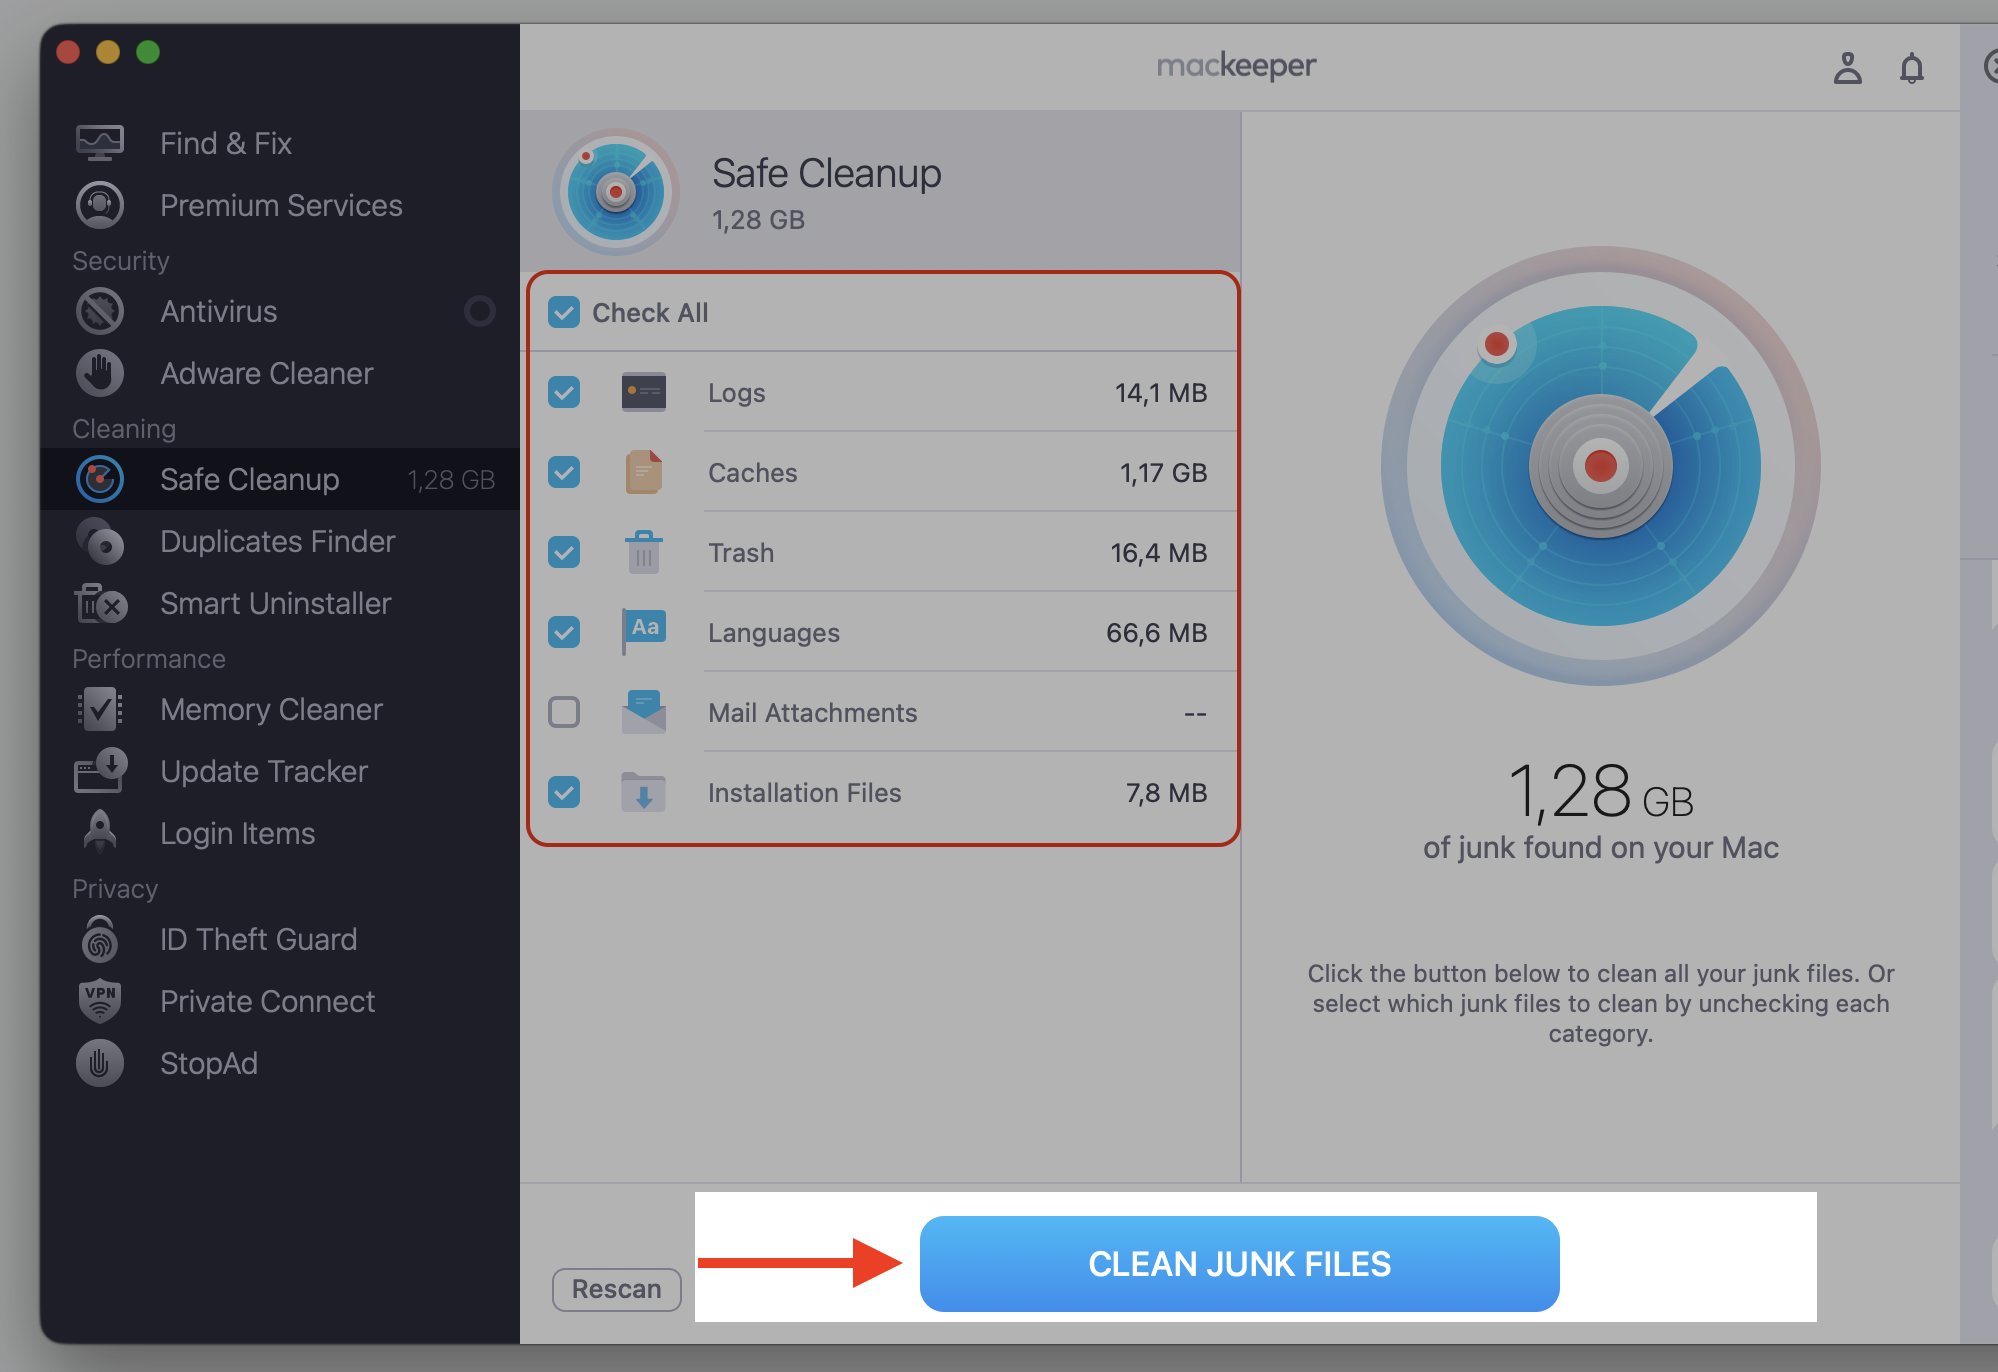
Tick the boxes for the files you don't need anymore and click Clean Junk Files.
Step 1. Go to MacKeeper > Safe Cleanup and Start ScanStep 2. Wait until the scan is finishedStep 3. Proceed with Clean Junk Files
How to disable Apple Intelligence on Mac?
macOS gives you full control here. You can disable Apple Intelligence on MacBook in one move, or keep the parts you like and switch off the rest. None of these changes are permanent, so feel free to experiment until things feel right. We’ll walk you through the system-wide option first, then the smaller, targeted controls.
Read through our five methods below and pick the one that fits your needs.
1. Disable Apple Intelligence completely in System Settings
This is the quickest route when you want everything off at once, and it’s the one we reach for first. You can open System Preferences on Mac and flip a single toggle to switch the whole suite off.
Here’s how to shut it all down in a few clicks:
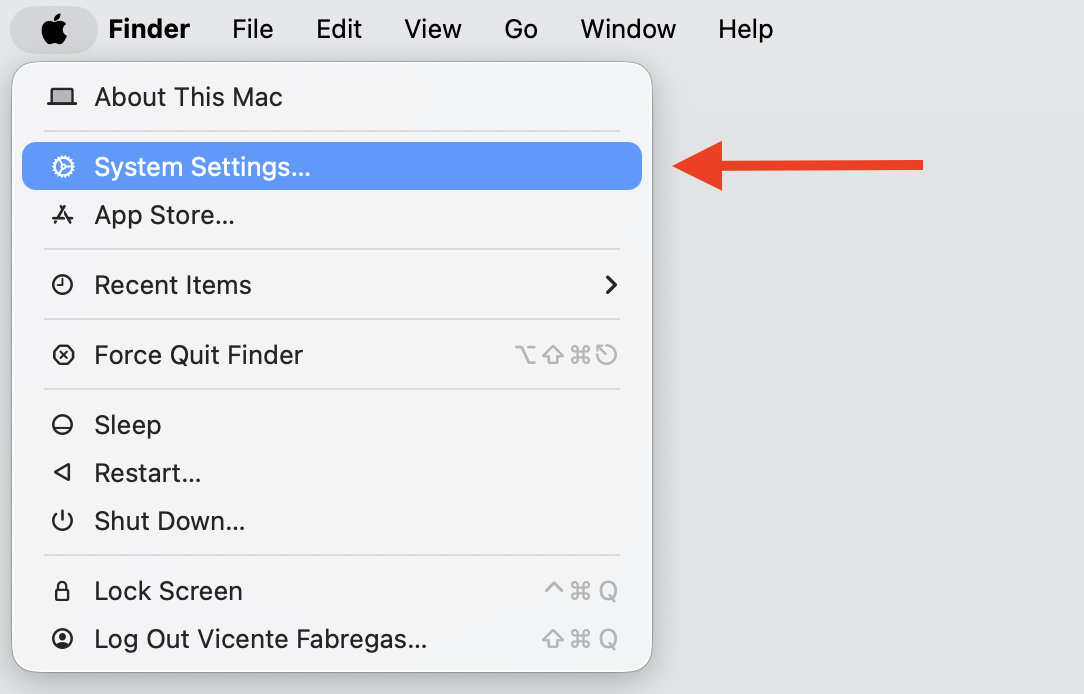
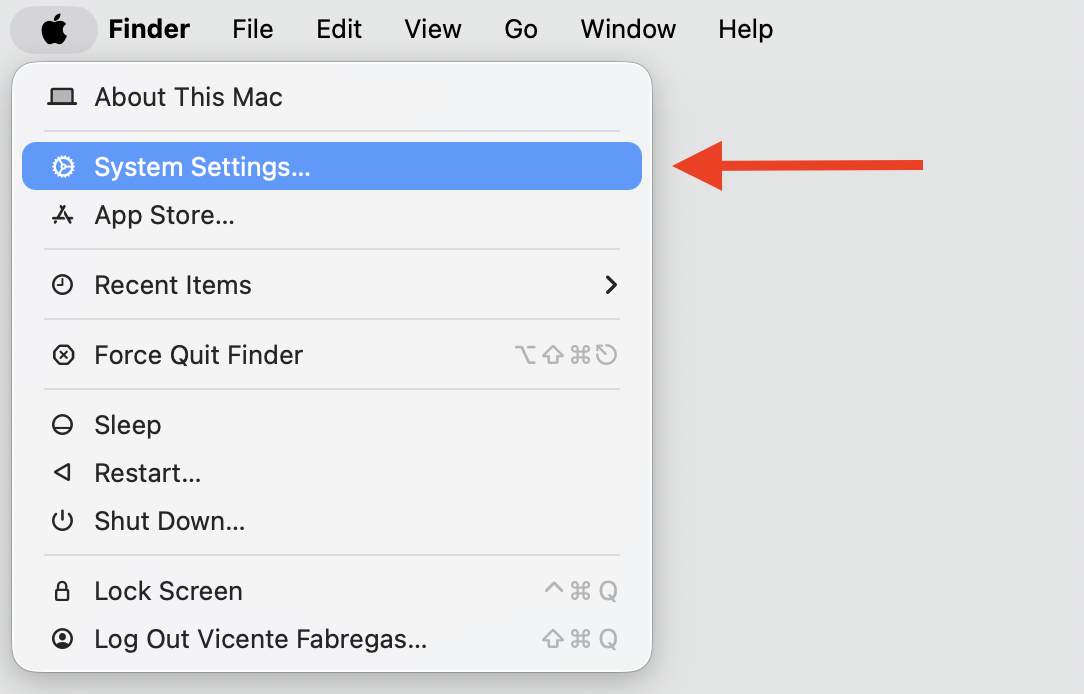
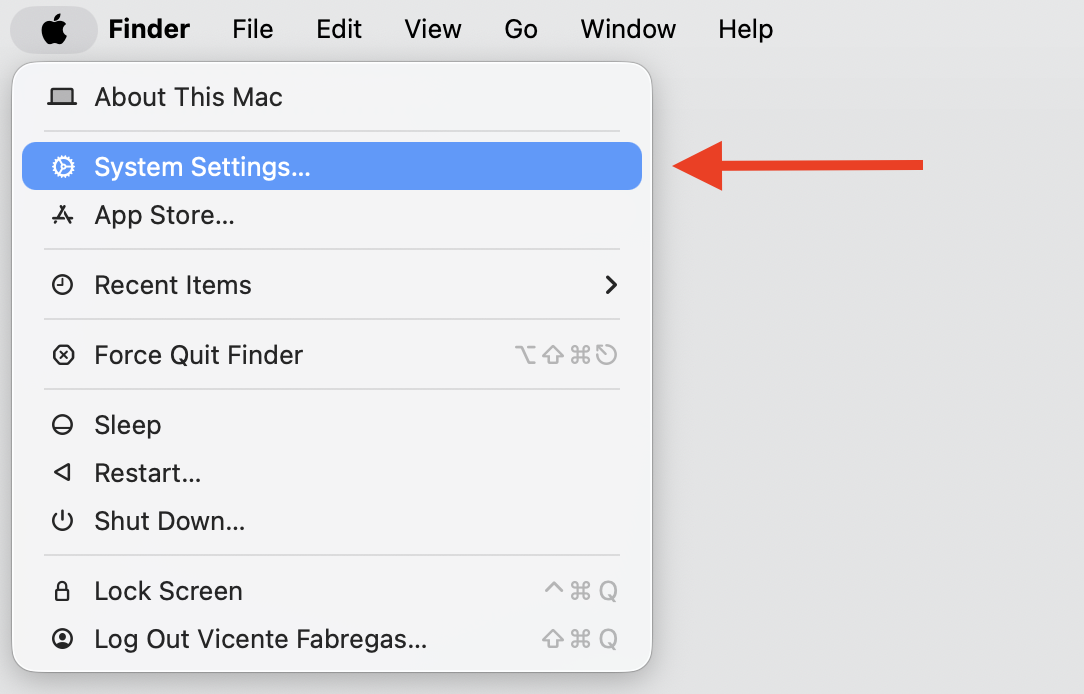
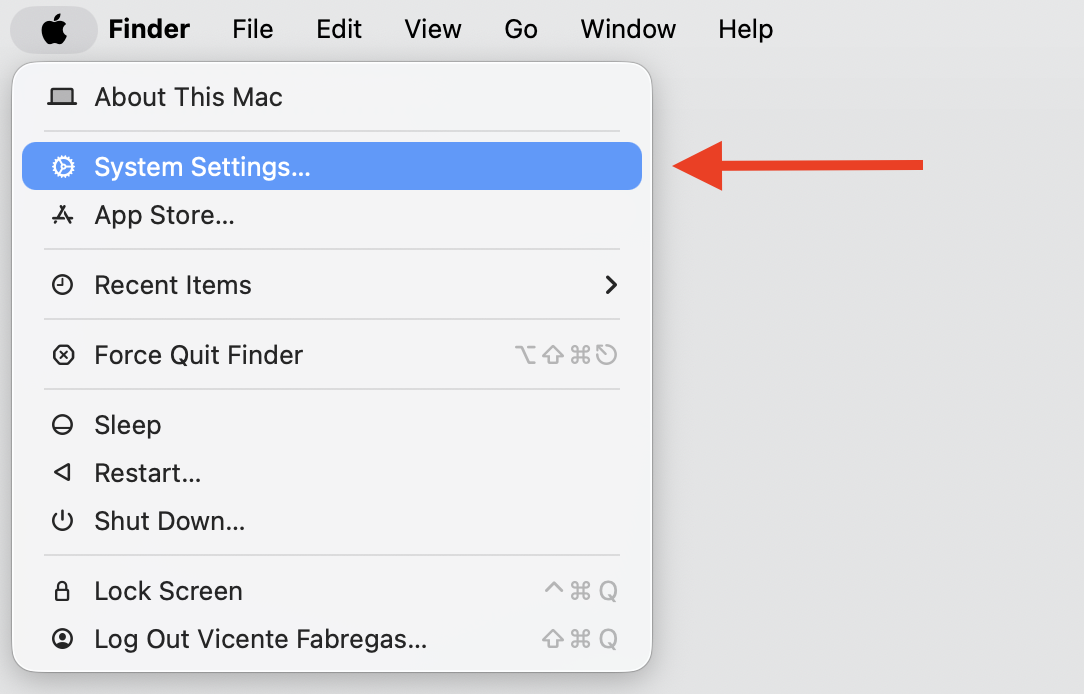
Click the Apple menu and choose System Settings.
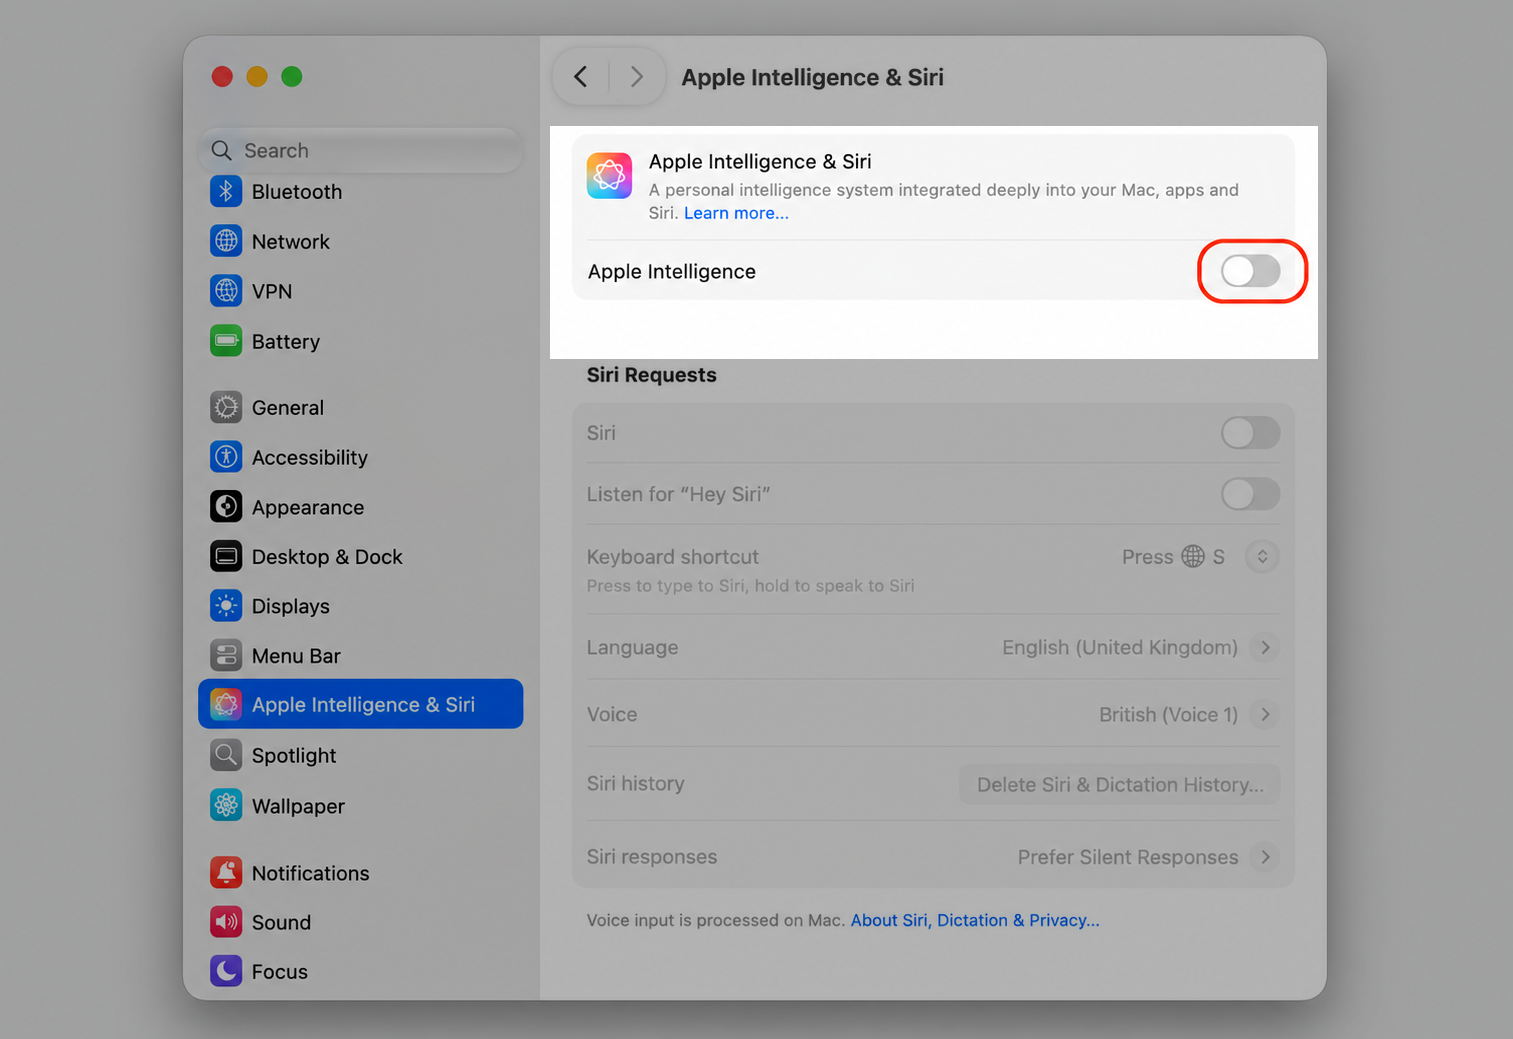
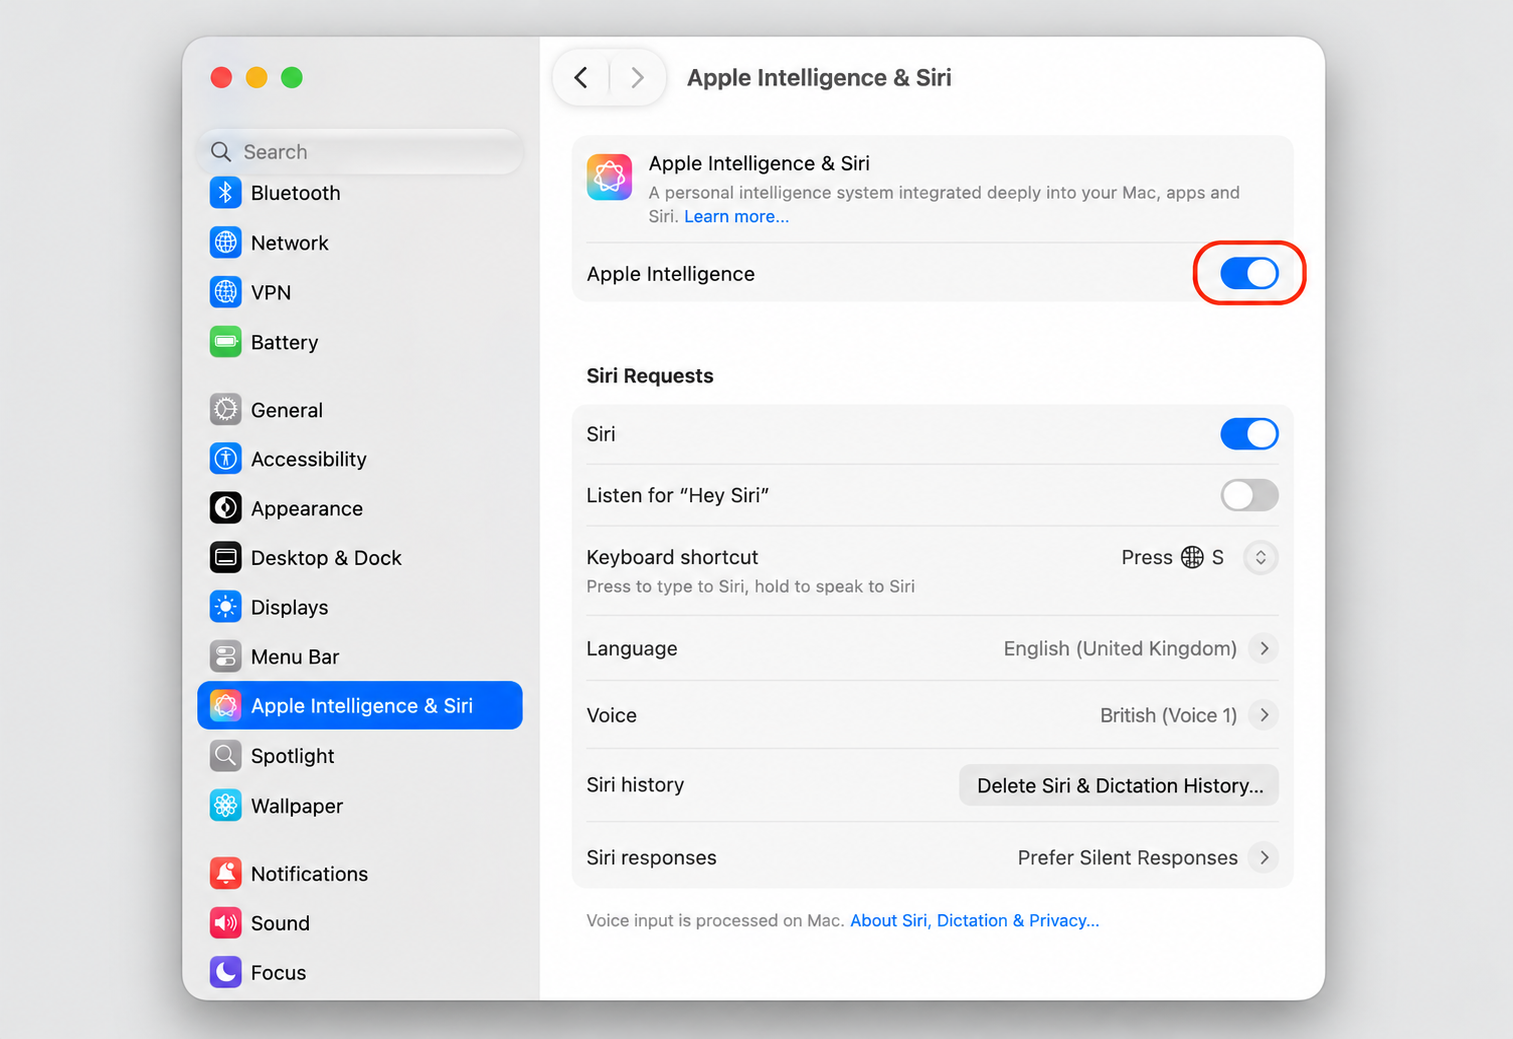
In the sidebar, select Apple Intelligence & Siri.
Toggle off Apple Intelligence at the top of the panel.
Step 1. Go to Apple Menu> System Settings…Step 2. Select Apple Intelligence from the Apple Intelligence & Siri section, and toggle it off
2. Restrict specific AI features using Screen Time
Prefer to keep Apple Intelligence on while blocking a few tools? Screen Time lets you switch off image generation, writing features, or extensions one by one—it’s our pick when you want a lighter touch.
We suggest these steps to block only the pieces you don’t want:
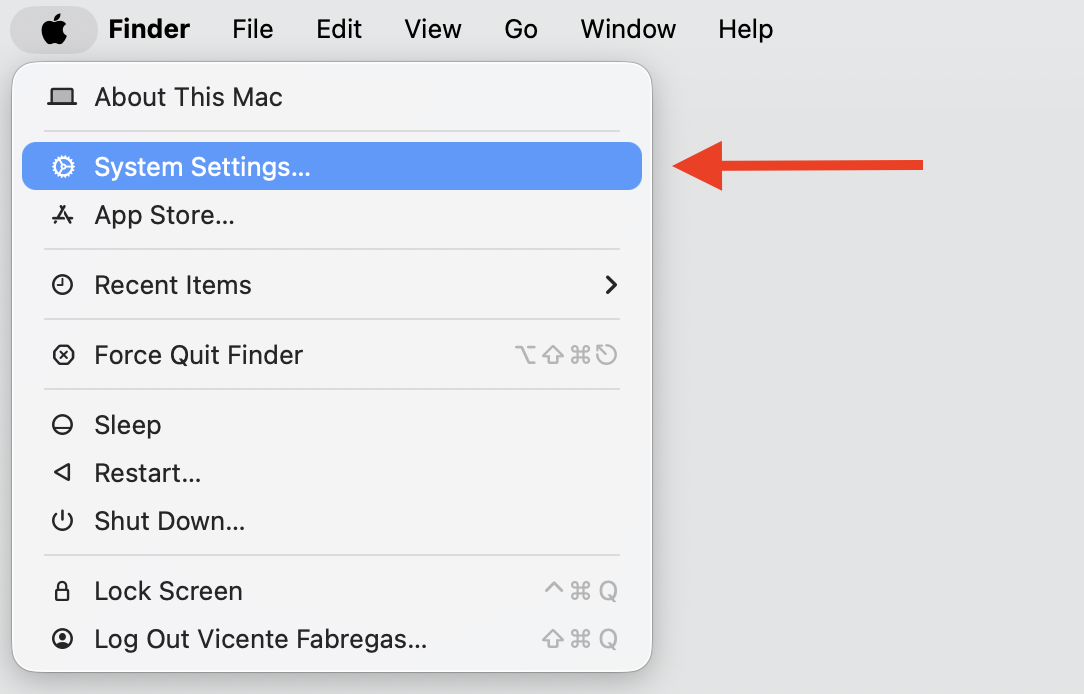
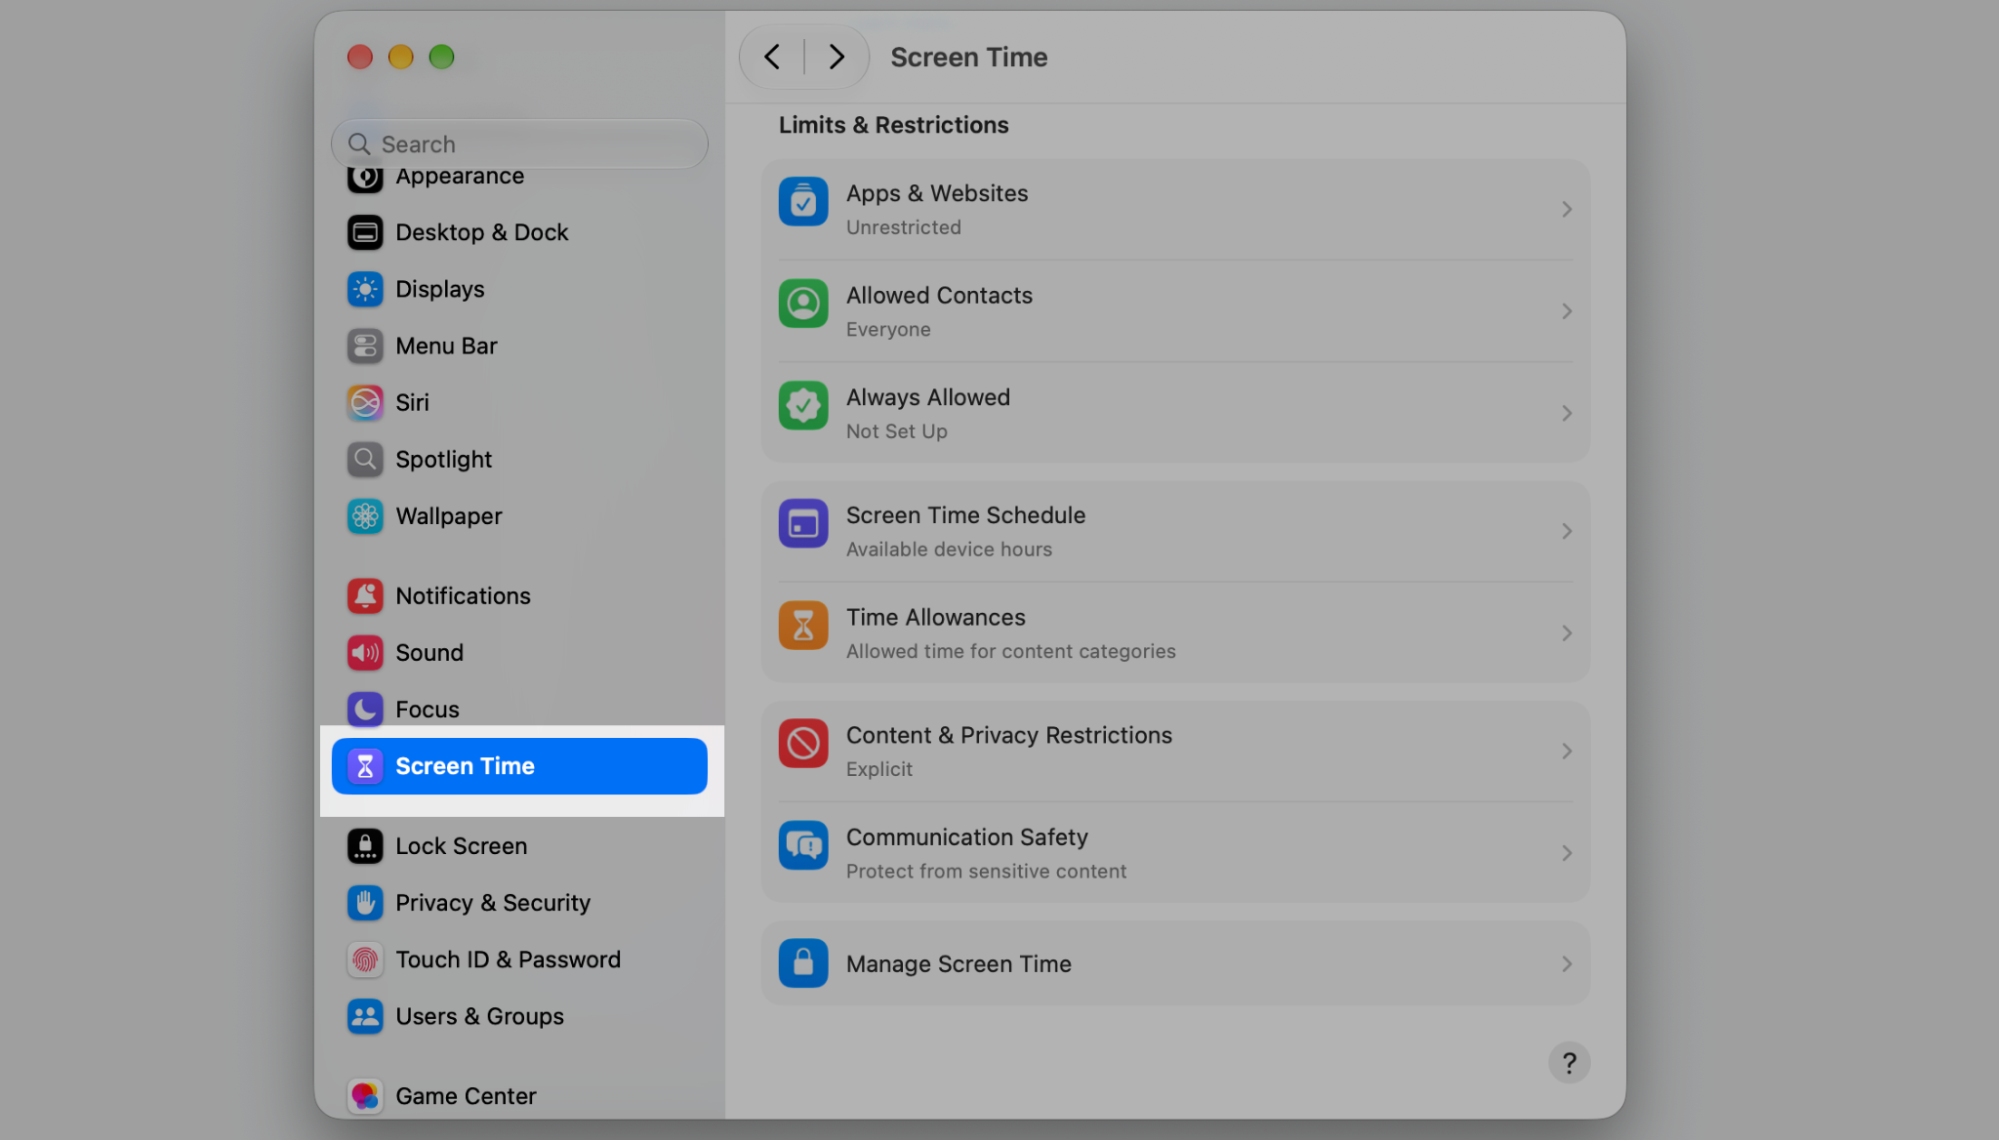
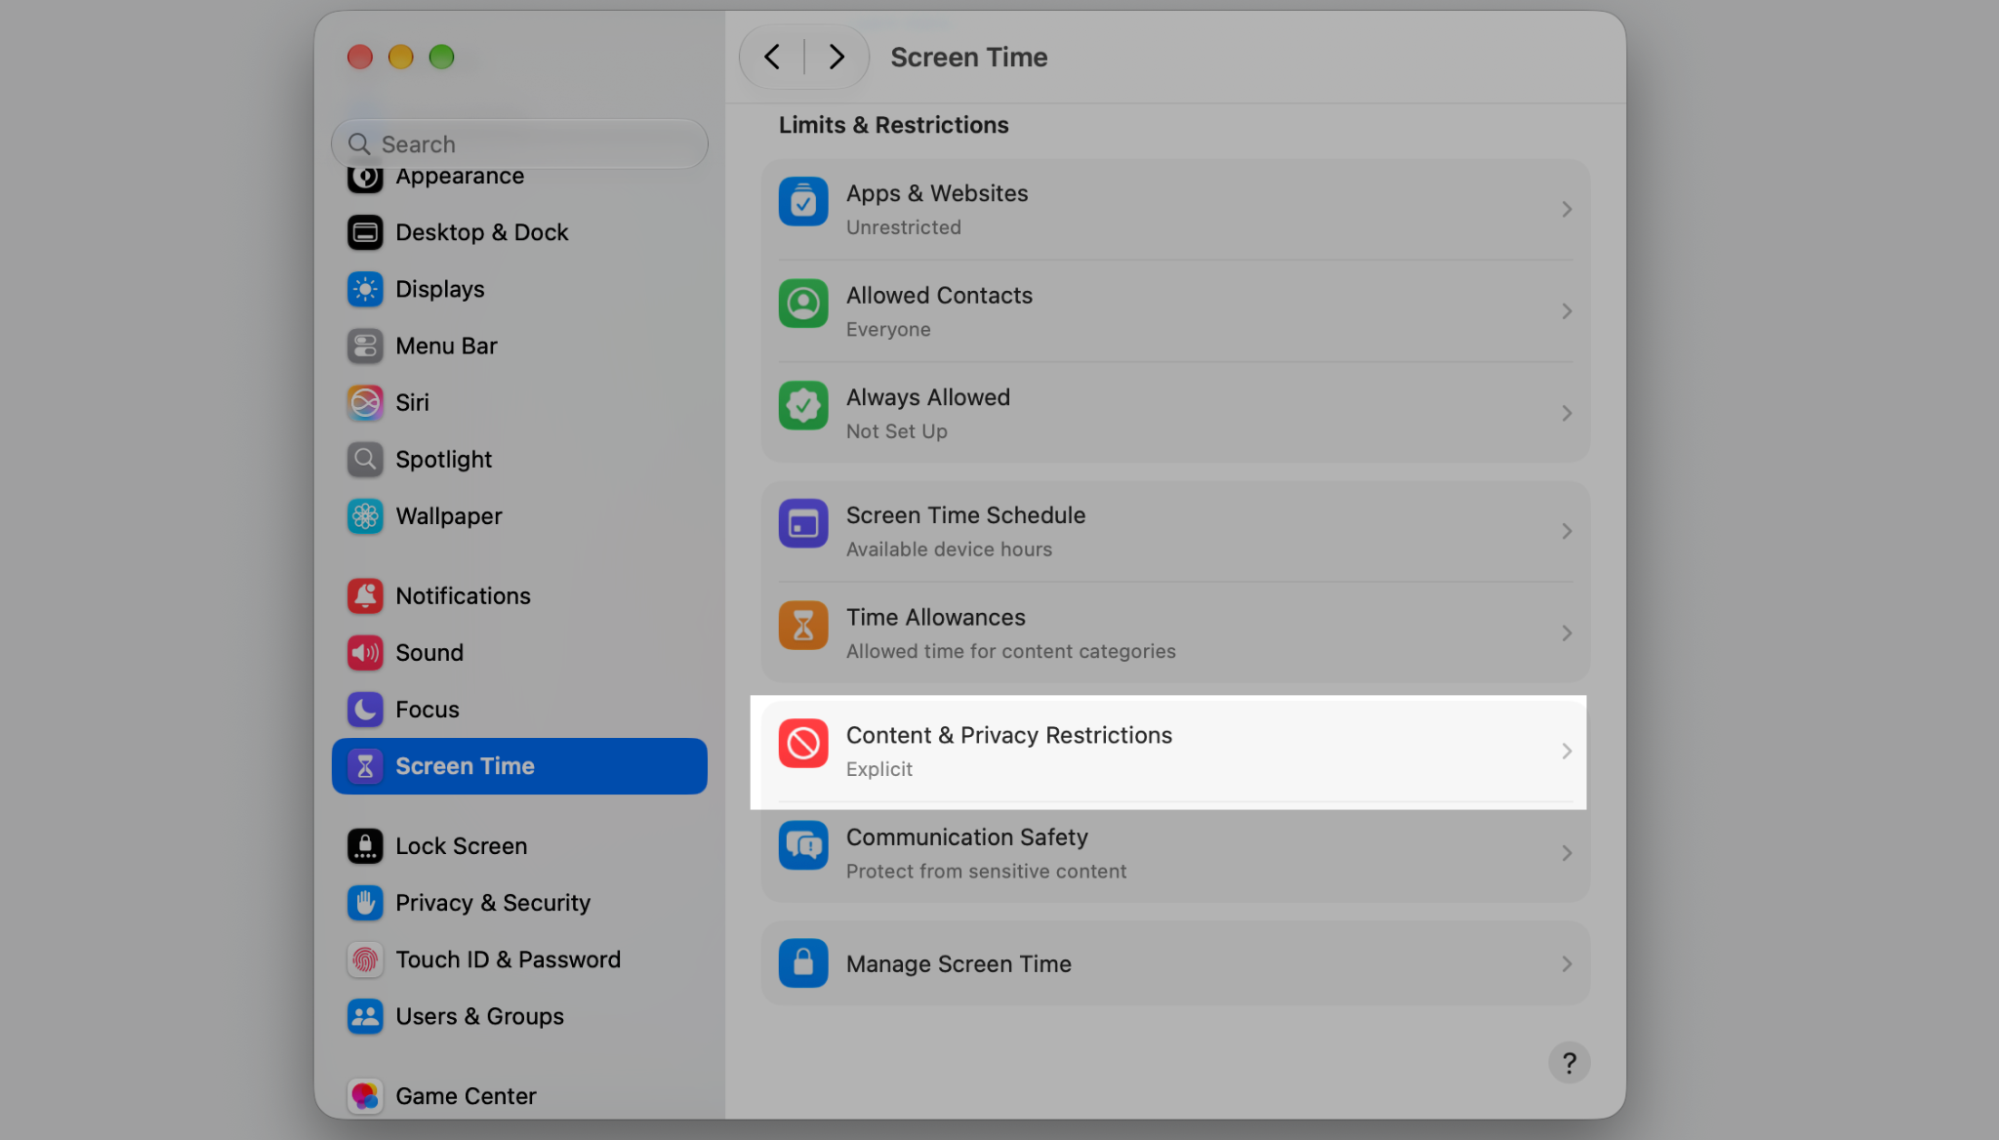
Open System Settings and click Screen Time in the sidebar.
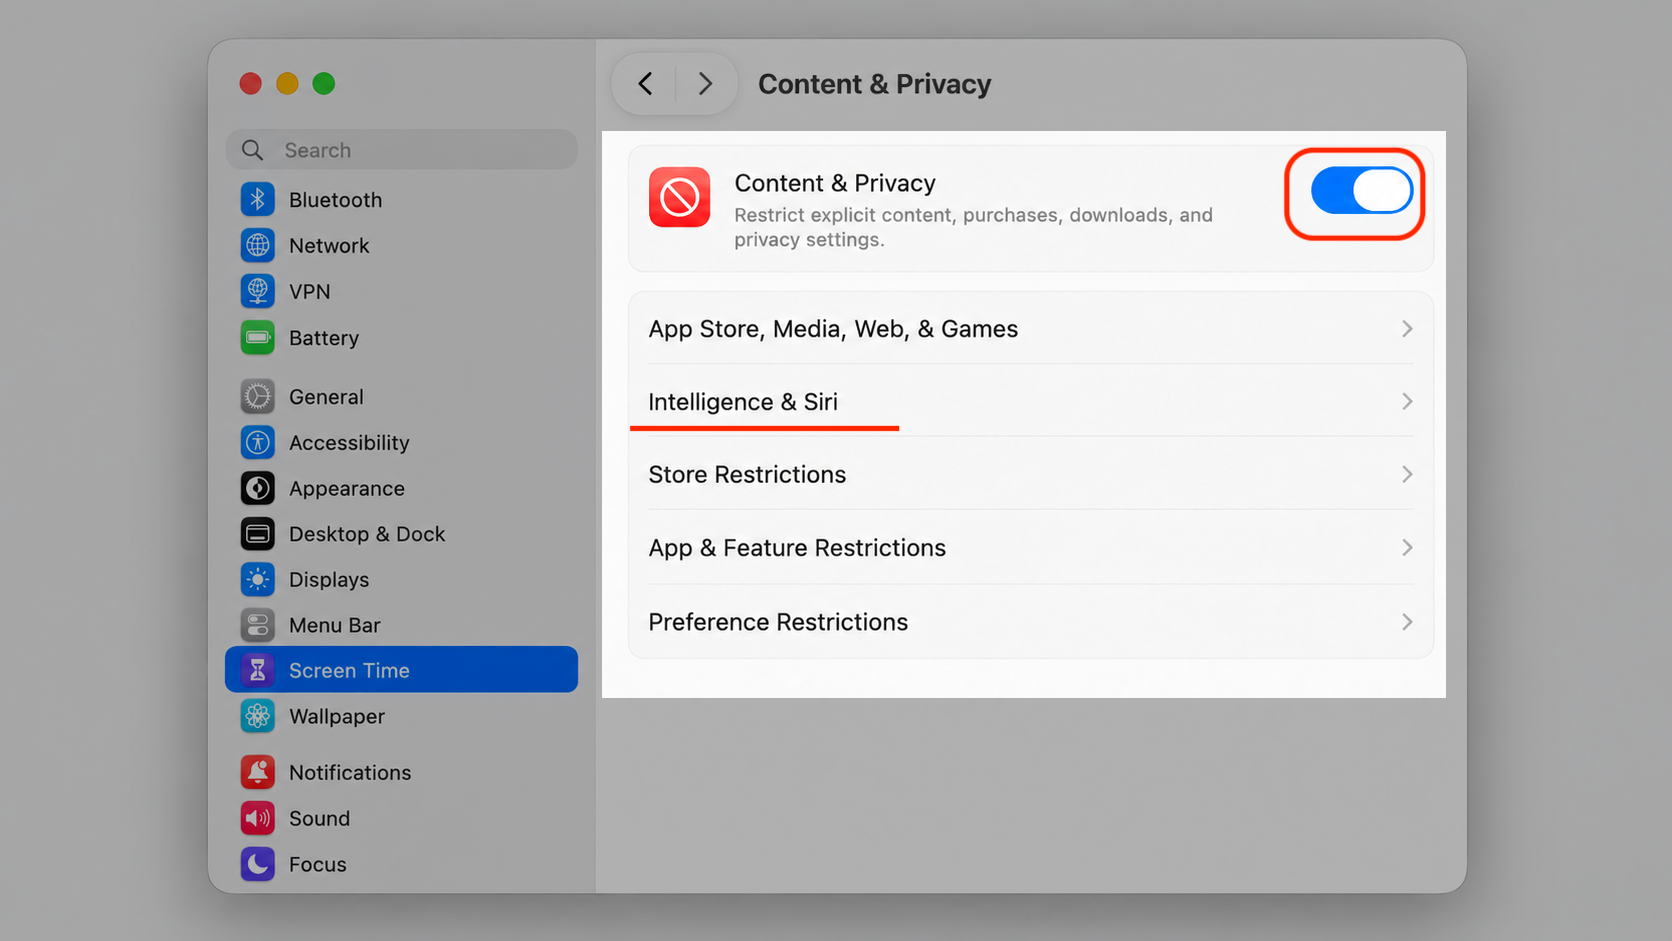
Select Content & Privacy, then turn on Content & Privacy Restrictions.
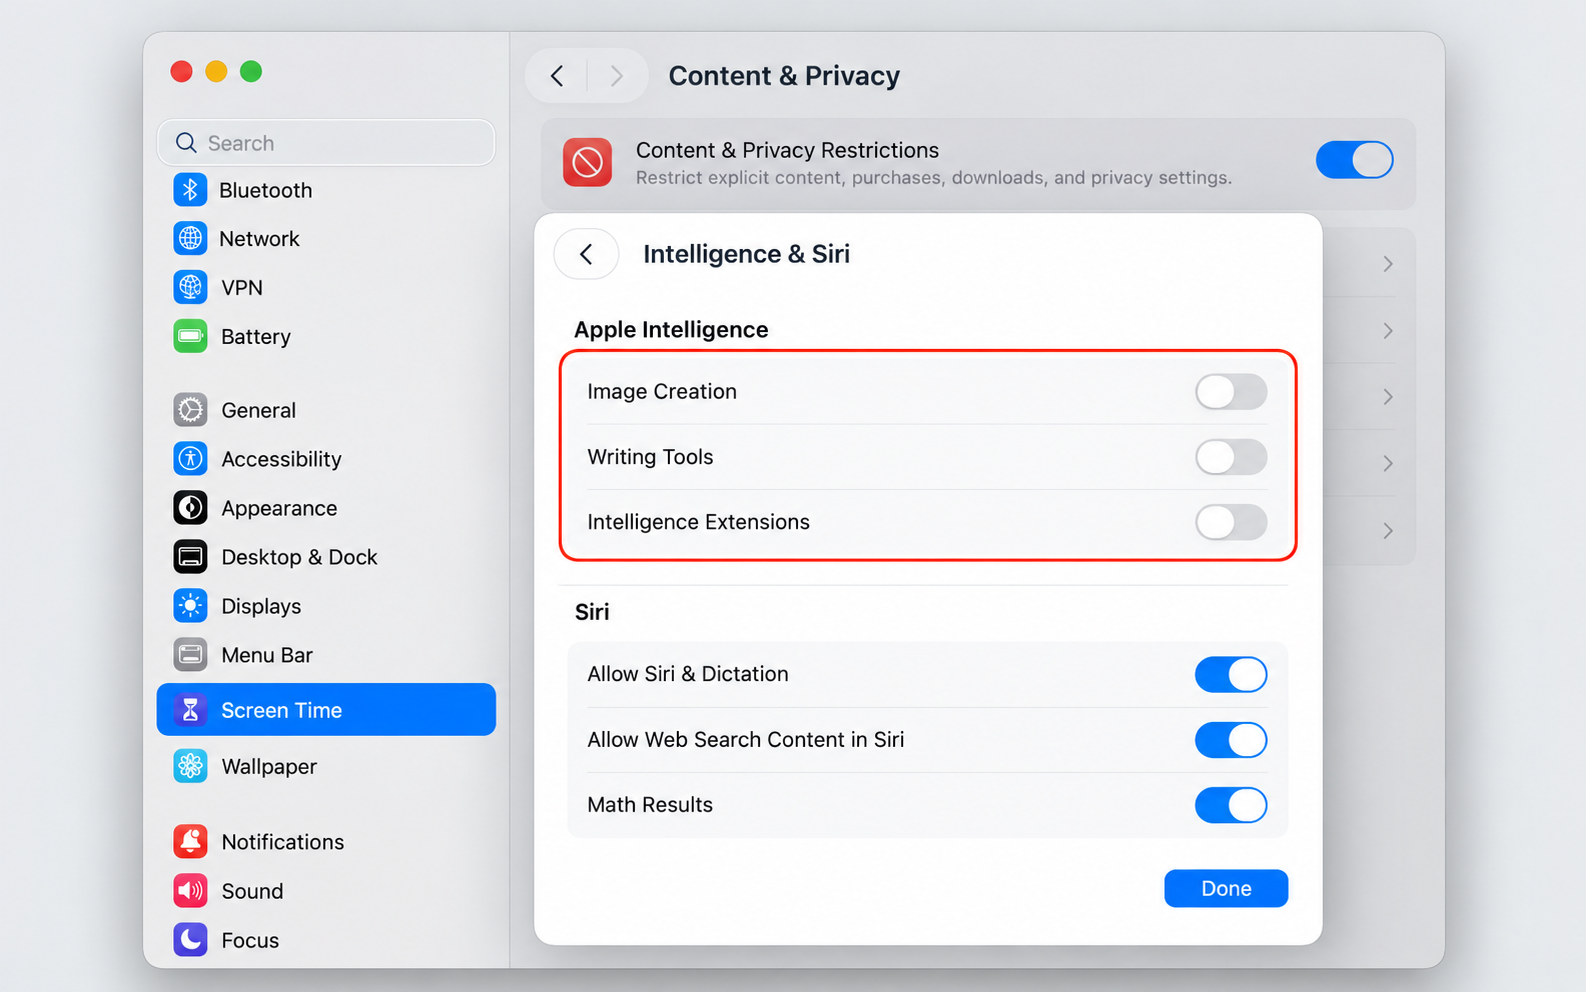
Click Intelligence & Siri to see the available controls.
Turn off items such as Image Creation, Writing Tools, or ChatGPT Extensions.
Step 1. Go to Apple Logo > System Settings…Step 2. Click Screen Time in the sidebarStep 3. Select Content & Privacy RestrictionsStep 4. Turn on Content & Privacy Restrictions and select Intelligence & Siri to see the available controlsStep 5. Turn off items such as Image Creation, Writing Tools, or ChatGPT Extensions
3. Turn off ChatGPT integration for Siri
Siri can hand tricky questions to ChatGPT, an outside AI service. If, like me, you’d rather keep those requests on your Mac, you can cut that link.
Follow along to disconnect ChatGPT:
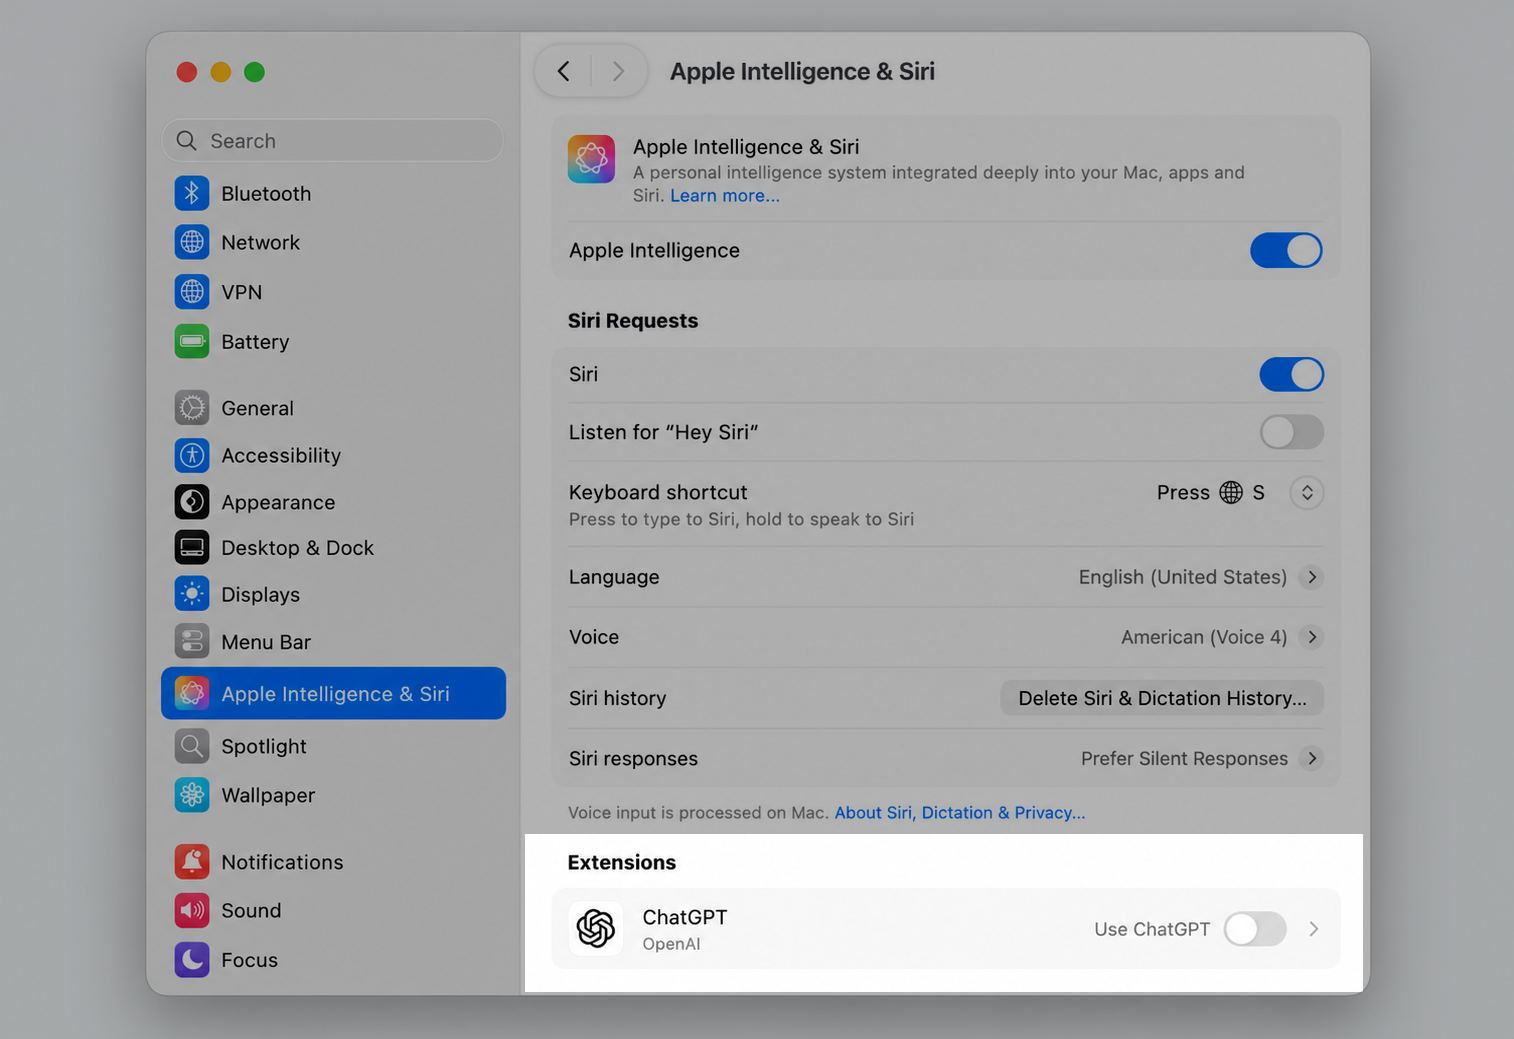
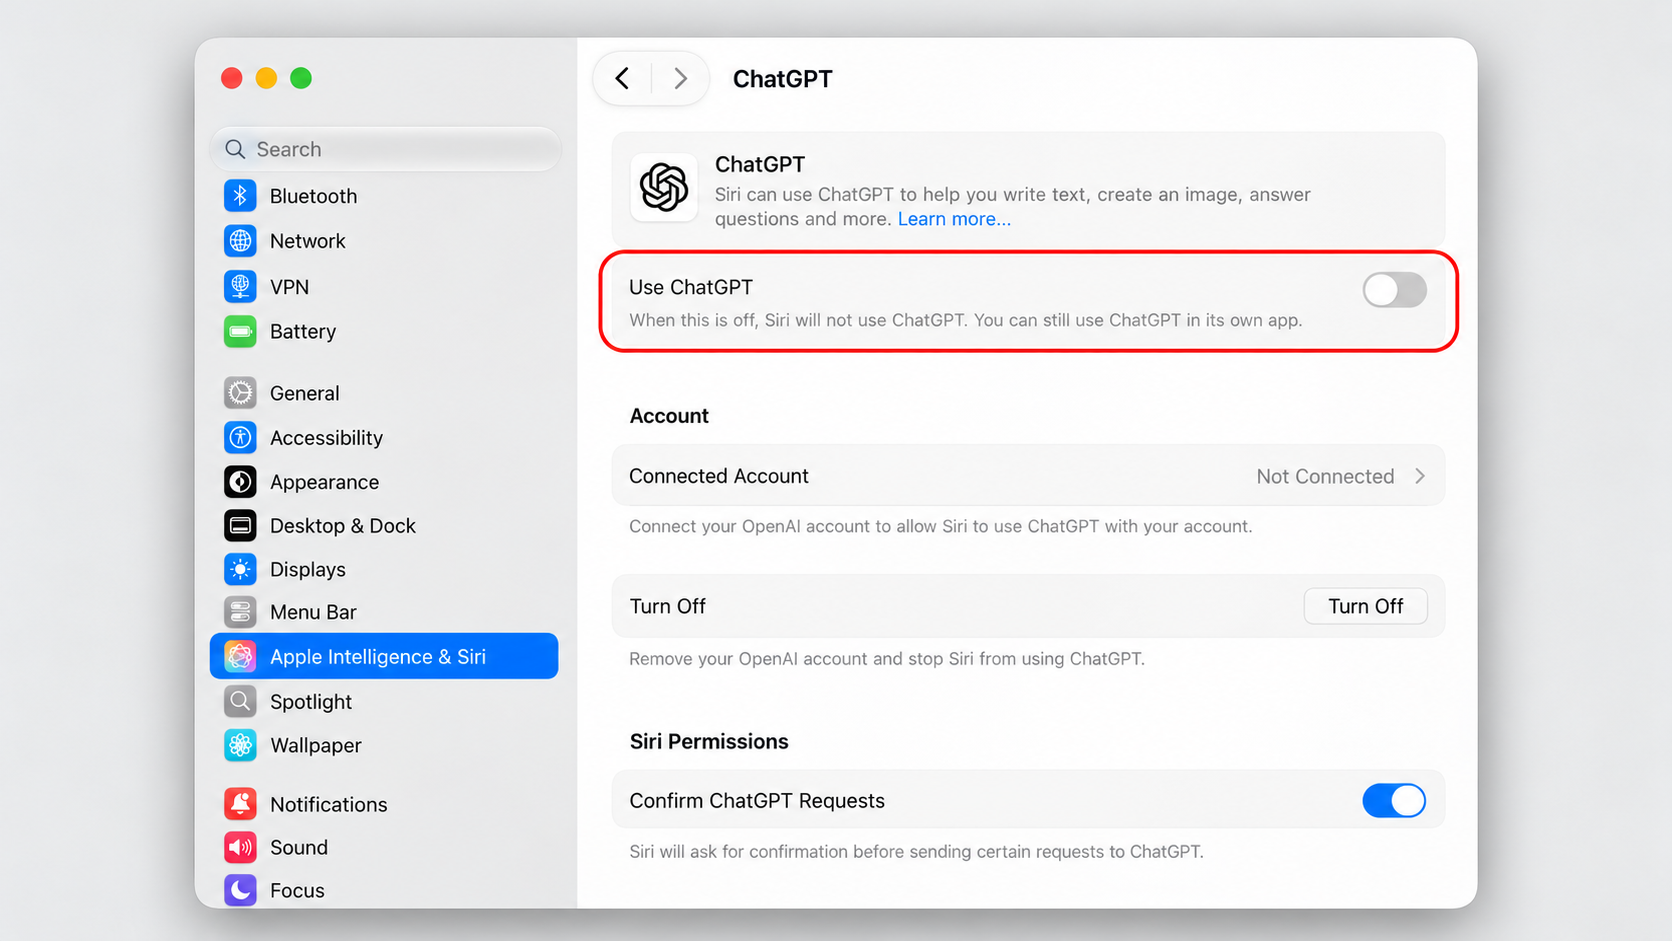
Go to System Settings > Apple Intelligence & Siri.
Scroll down to the ChatGPT section under extensions.
Toggle off Use ChatGPT, or click Turn Off to remove the connection.
Step 1. Go to Apple Logo > System Settings…Step 2. Scroll down to the ChatGPT section under ExtensionsStep 3. Toggle off Use ChatGPT
4. Stop specific apps from feeding data into Apple Intelligence
Apple Intelligence learns from how you use certain apps to make its suggestions. We can limit that app by app whenever we want a little more privacy.
Set your per-app limits like this:
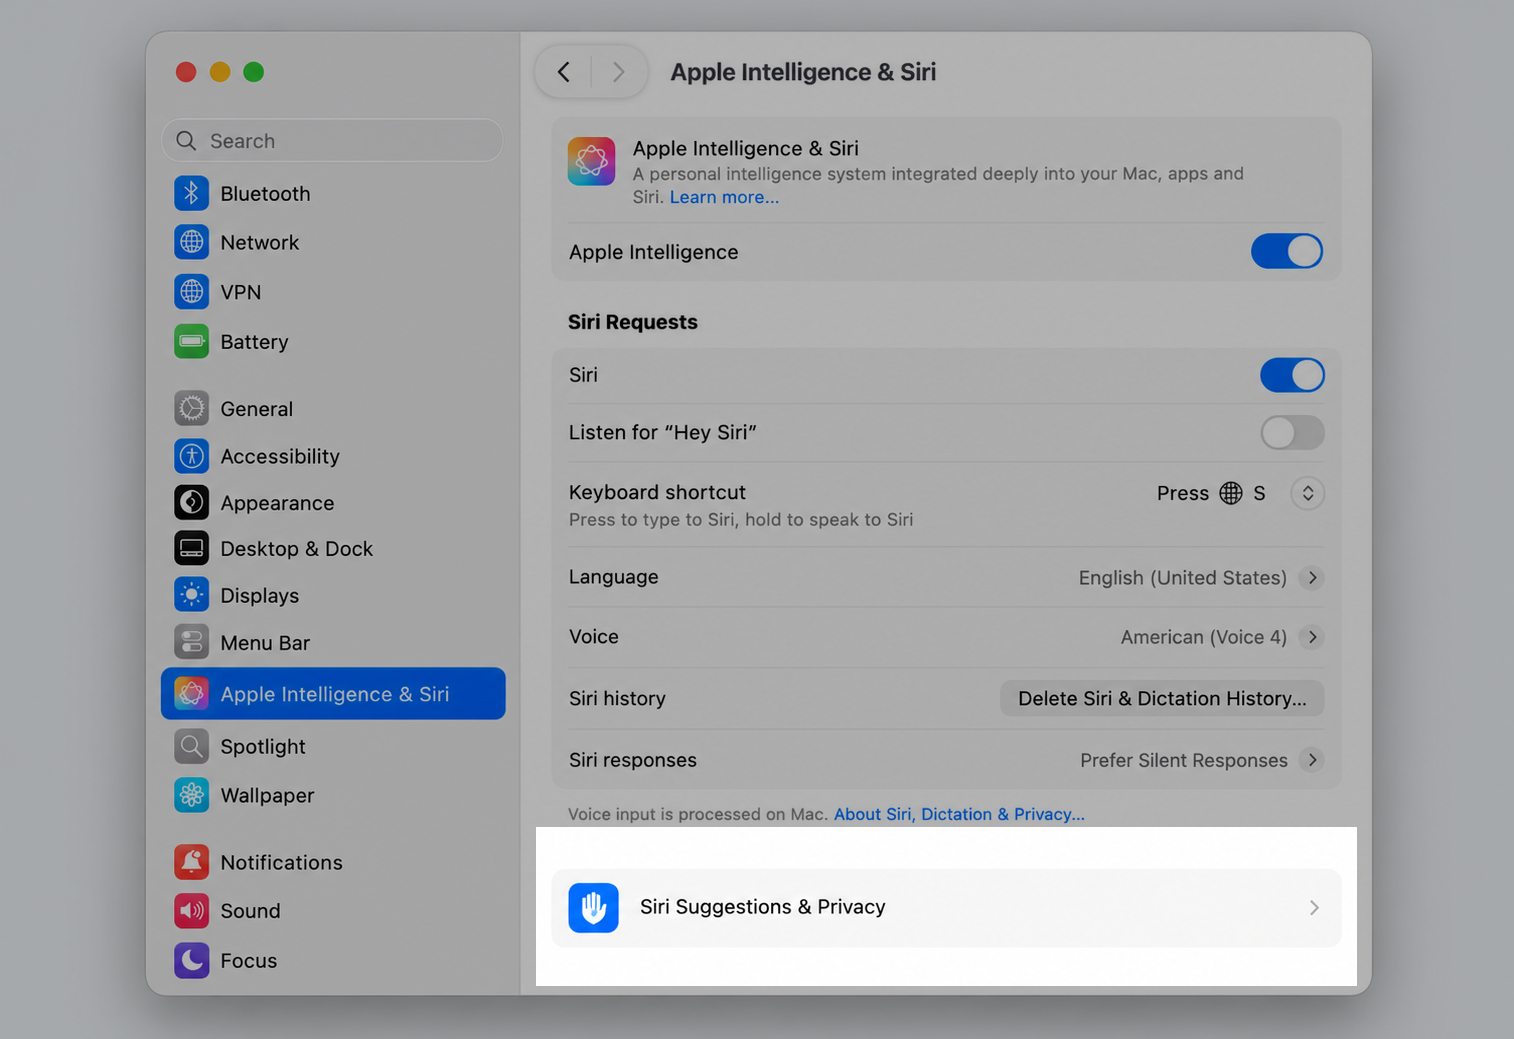
Open System Settings > Apple Intelligence & Siri.
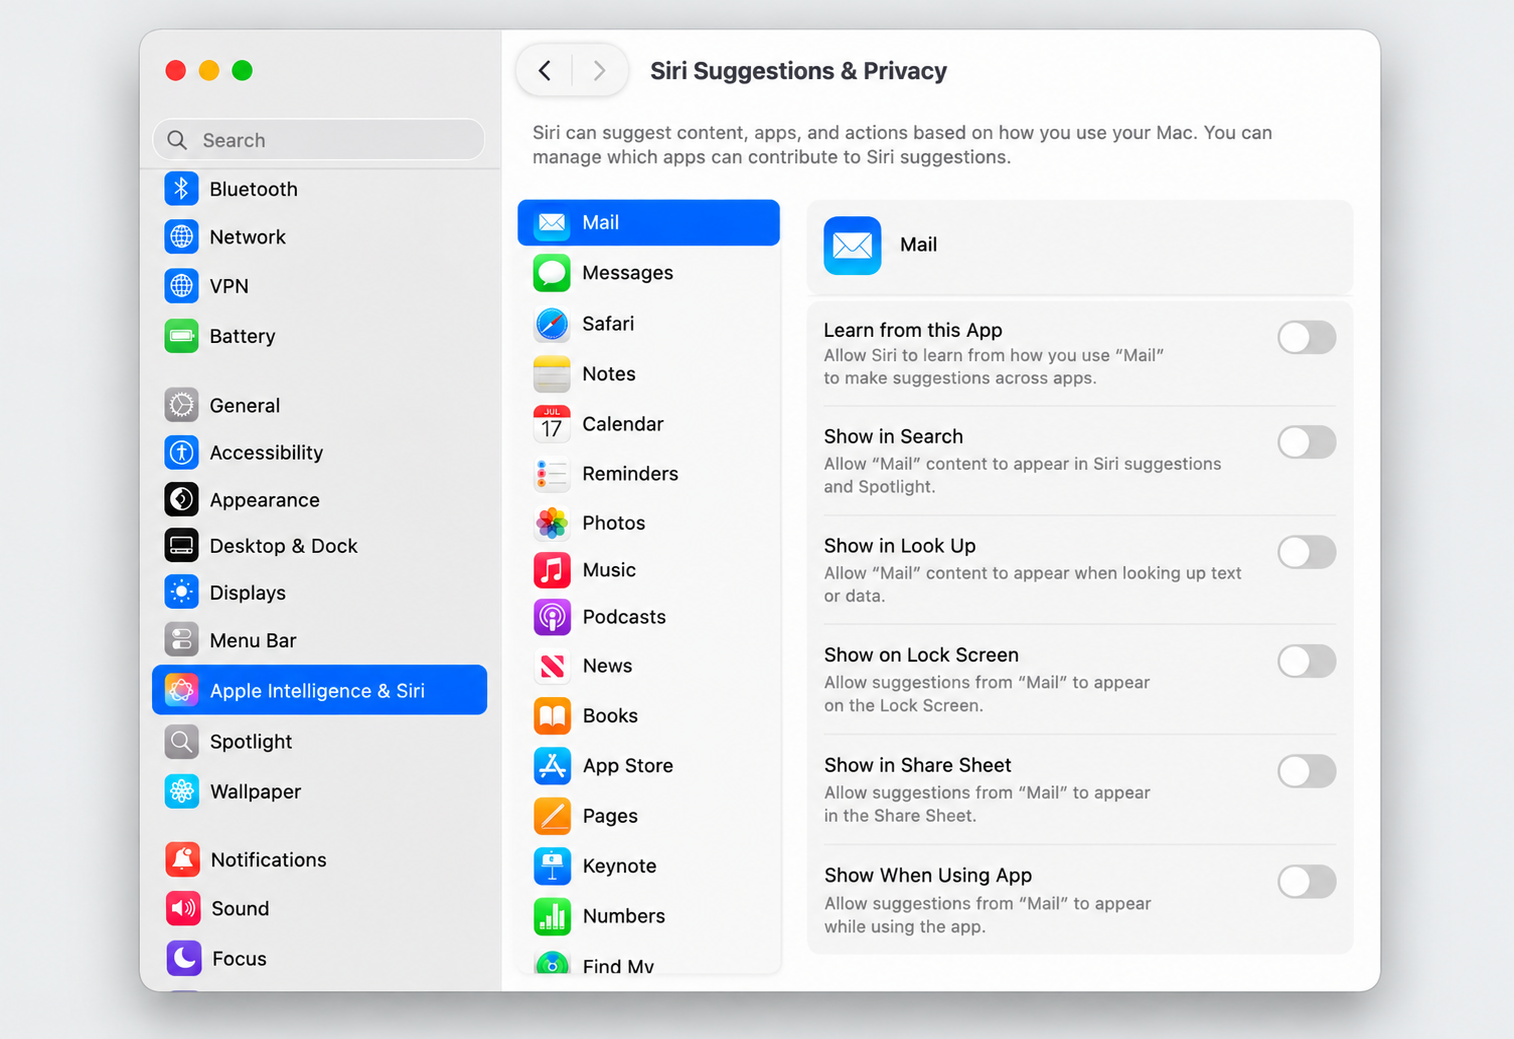
Click Siri Suggestions & Privacy.
Select the app you want to limit from the list.
Turn off Learn from this App and any related suggestion toggles.
Step 1. Go to Apple Logo > System Settings…Step 2. Go to Apple Intelligence & Siri > Siri Suggestions & PrivacyStep 3. Select the app you want to limit from the list and turn off Learn from this App and any related suggestion toggles
How to turn Apple Intelligence back on?
Changed your mind? You can re-enable everything just as easily:
Return to System Settings > Apple Intelligence & Siri.
Toggle Apple Intelligence back on.
Wait a moment while macOS downloads the models again.
Your earlier settings stay in place, so you can switch features on one at a time whenever a new update rolls out.
Step 1. Go to Apple Logo > System Settings…Step 2. Toggle Apple Intelligence back on
Conclusion
Apple Intelligence brings some genuinely useful tools to the Mac, yet you’re never locked in. macOS lets you turn off Apple Intelligence on macOS entirely, or fine-tune each feature to match the way you work. And if you ever want the tools back, they’re a single toggle away. Whichever route you pick, you stay in charge of what runs on your Mac.
If your Mac has started slowing down and running low on space, clearing out the clutter helps just as much as switching off AI features. MacKeeper’s Safe Cleanup removes trash, caches, and junk files in one click—leaving your personal files untouched and your Mac running more efficiently. Run it whenever the clutter builds up, and keep your Mac clean and fast.
We respect your privacy and
use cookies
for the best site experience.
Privacy Preferences Center
We use cookies along with other tools to give you the best possible experience while using the
MacKeeper website. Cookies are small text files that help the website load faster. The cookies we
use don’t contain any type of personal data meaning they never store information such as your
location, email address, or IP address.
Help us improve how you interact with our website by accepting the use of cookies. You can change
your privacy settings whenever you like.
Manage consent
All cookies
These cookies are strictly necessary for enabling basic website functionality (including page
navigation, form submission, language detection, post commenting), downloading and purchasing
software. The website might malfunction without these cookies.