Is CGPDFService on Mac heating up your device and draining your battery? This background process handles PDF tasks, but it can spike and slow everything down. MacKeeper’s Memory Cleaner frees up memory by quitting useless processes and stopping memory-draining apps. Try it below to keep your Mac calm and quick.
CGPDFService is a legitimate, native macOS background process that’s part of Apple’s Core Graphics framework. Its main job is quietly reading your PDF files—parsing their metadata and extracting the text inside.
This is what lets Spotlight index your documents, so you can find them in system-wide searches. Normally, the CGPDFService process on Mac runs in the background without you ever noticing it. In fact, the CGPDFService macOS process has quietly shipped with Apple’s operating system for years.
So it’s not malware, and it’s not something Apple slipped in by mistake. It’s a normal part of how your Mac keeps your files searchable and easy to reach.
The trouble starts when CGPDFService meets huge document libraries, mounted network drives, or corrupted files. When that happens, macOS spawns several runaway copies of the process at once. The result is high CPU usage by CGPDFService, memory leaks, and a Mac that heats up far more than it should.
Why is CGPDFService using high CPU and memory?
So why does one small process suddenly hog your resources? Below, we’ll walk through the common triggers behind runaway CGPDFService instances, so you know exactly what you’re dealing with.
Spotlight tries to index thousands of PDFs simultaneously, which overwhelms the process.
A corrupted or unreadable PDF causes CGPDFService to enter an endless parsing loop.
Connected external storage or mounted network drives hold large PDF archives that keep the scanner busy.
macOS instantly respawns the process when you try to force-quit it in Activity Monitor.
Background re-indexing spikes after a major macOS update or a fresh startup, which can cause short bursts of instability.
A note from our experts:
If your Mac often runs low on memory during these spikes, a clean RAM can give it more headroom to handle heavy indexing without grinding to a halt. To handle this task more efficiently, we recommend using the dedicated solution, MacKeeper’s Memory Cleaner. With its help, you’ll identify and stop the hidden energy-consuming processes safely.
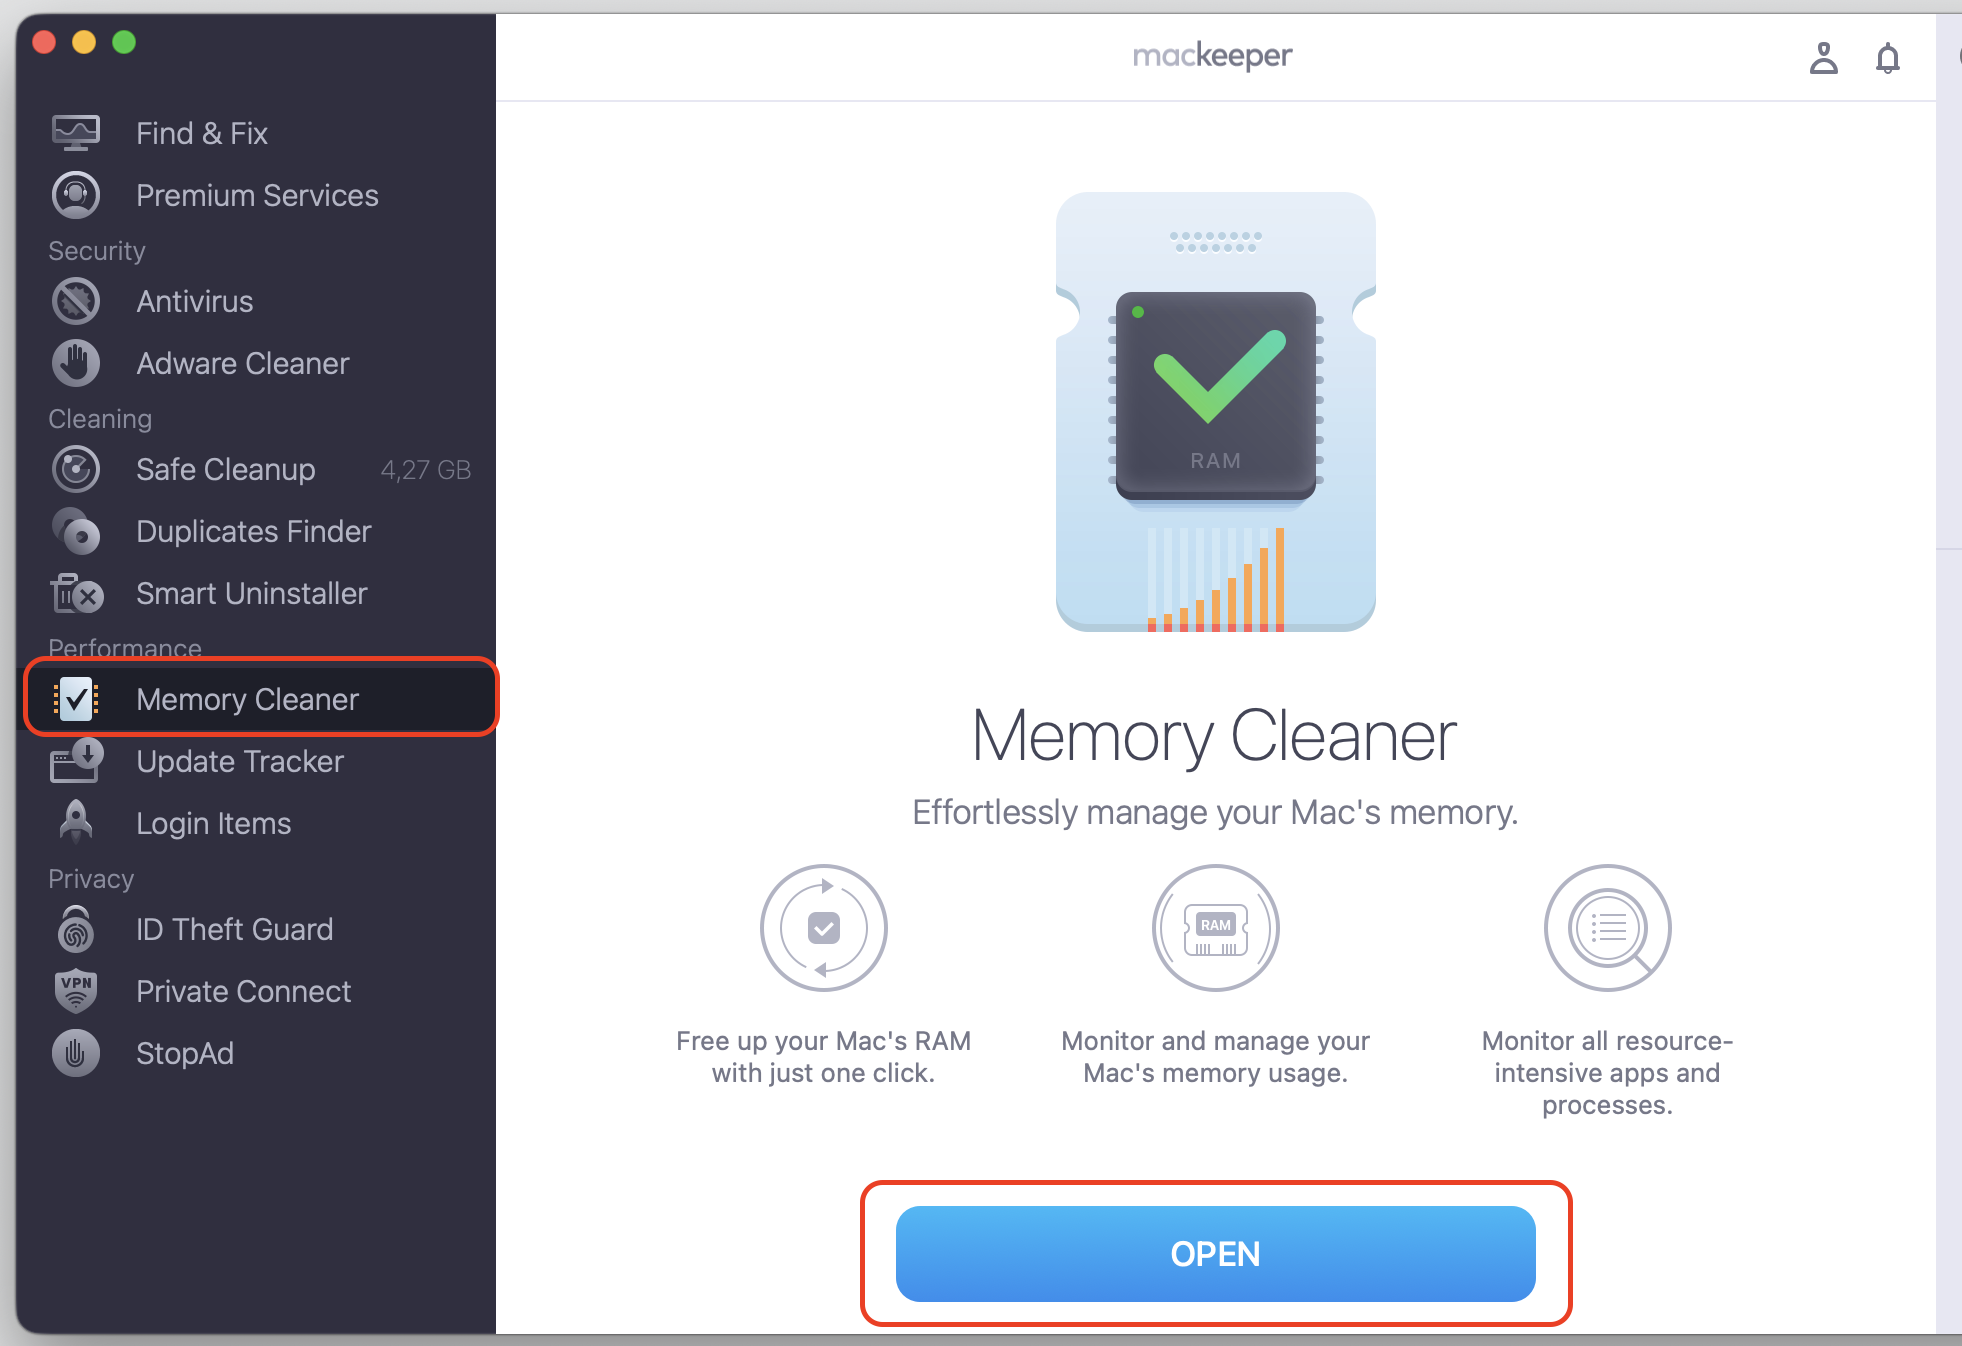
Run MacKeeper, select Memory Cleaner, then click Open.
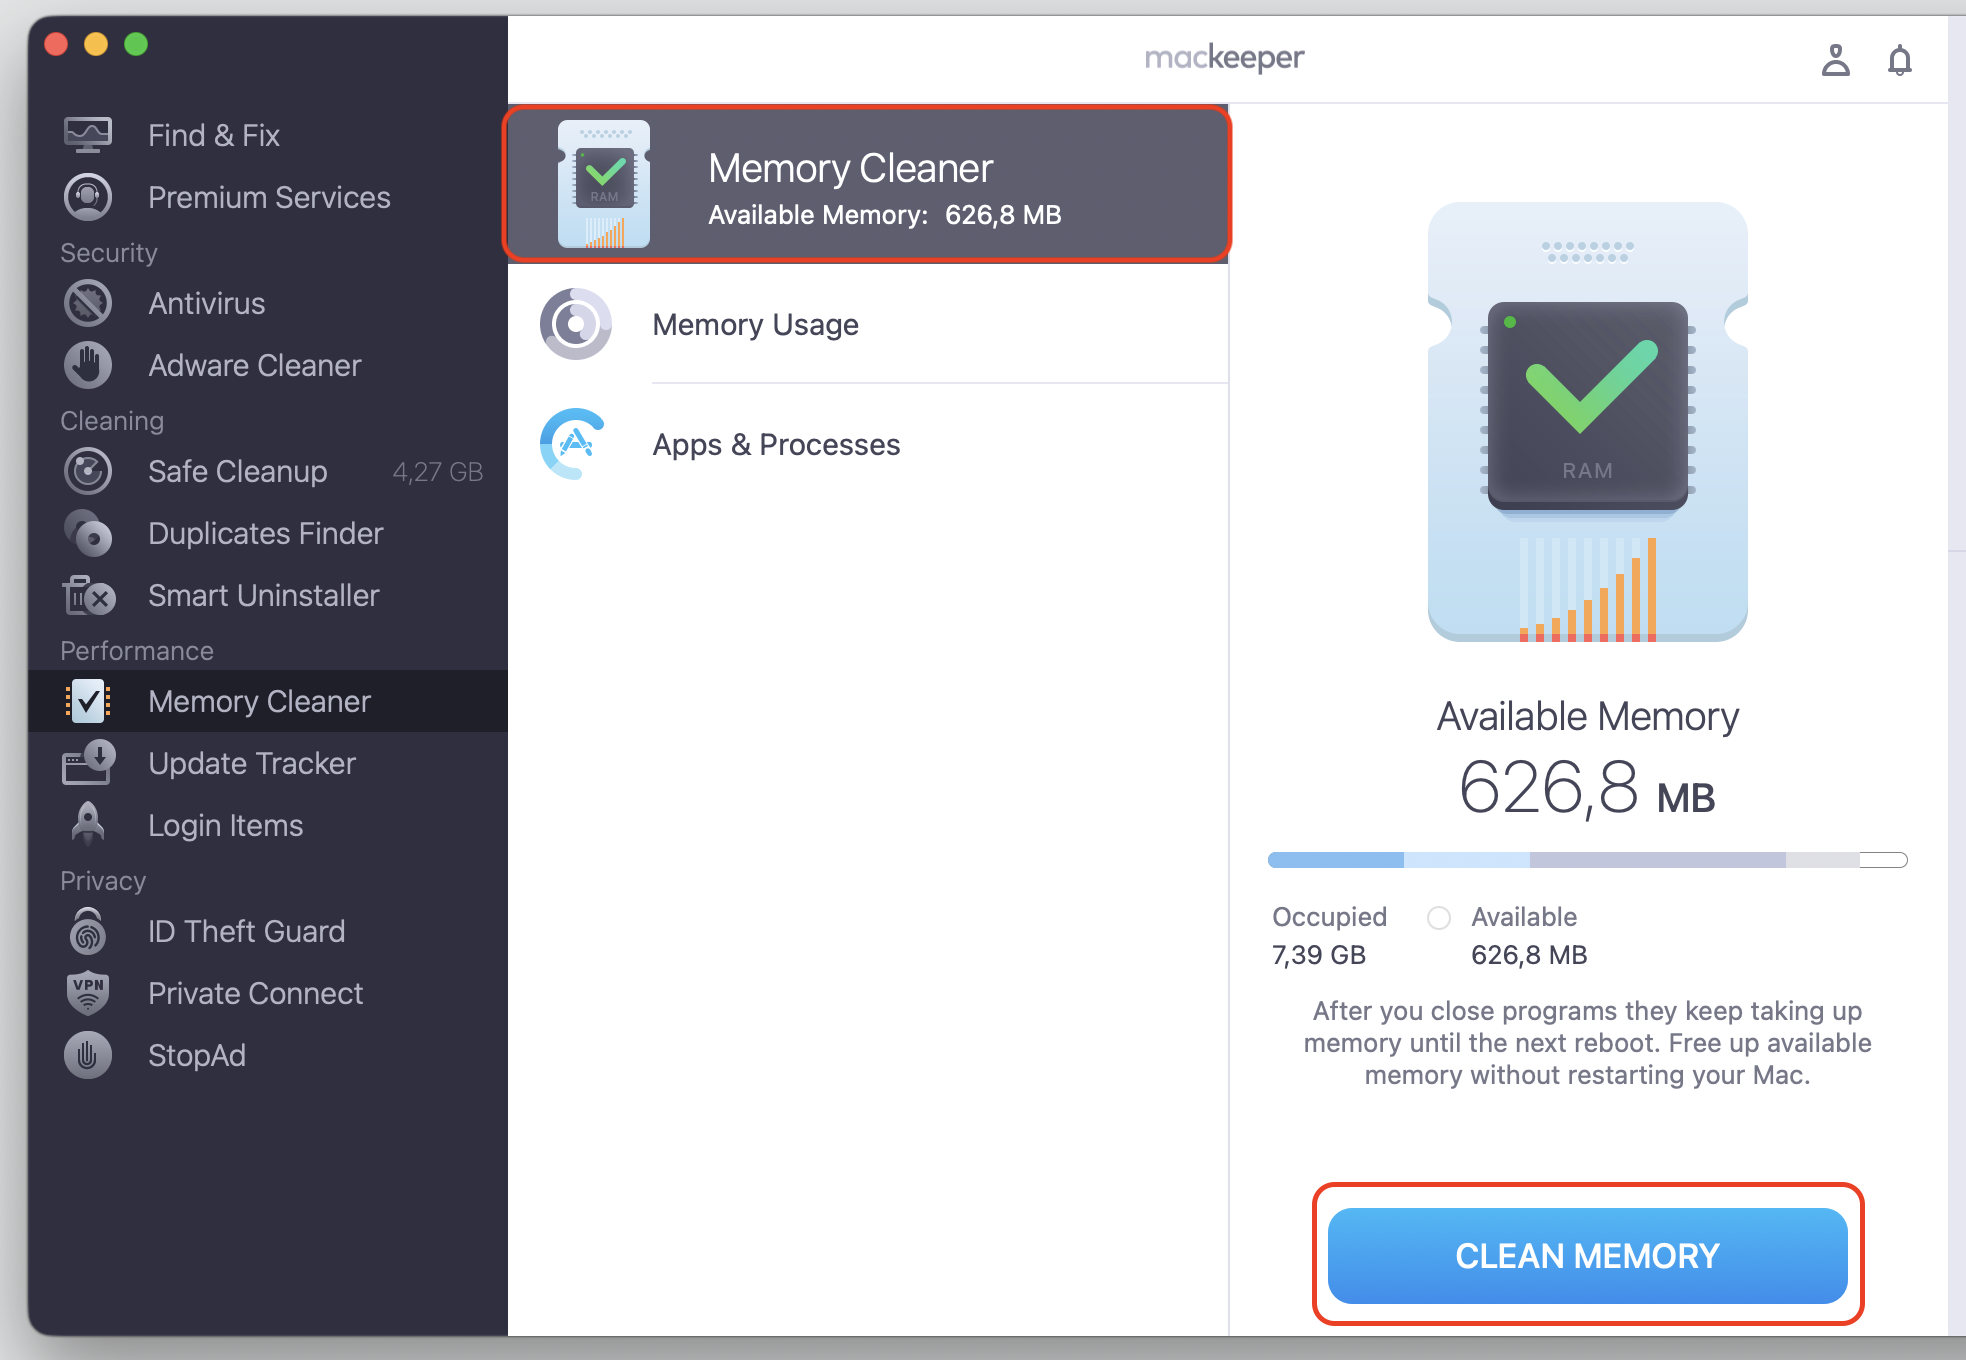
Wait for the RAM usage report to finish, then click Clean Memory.
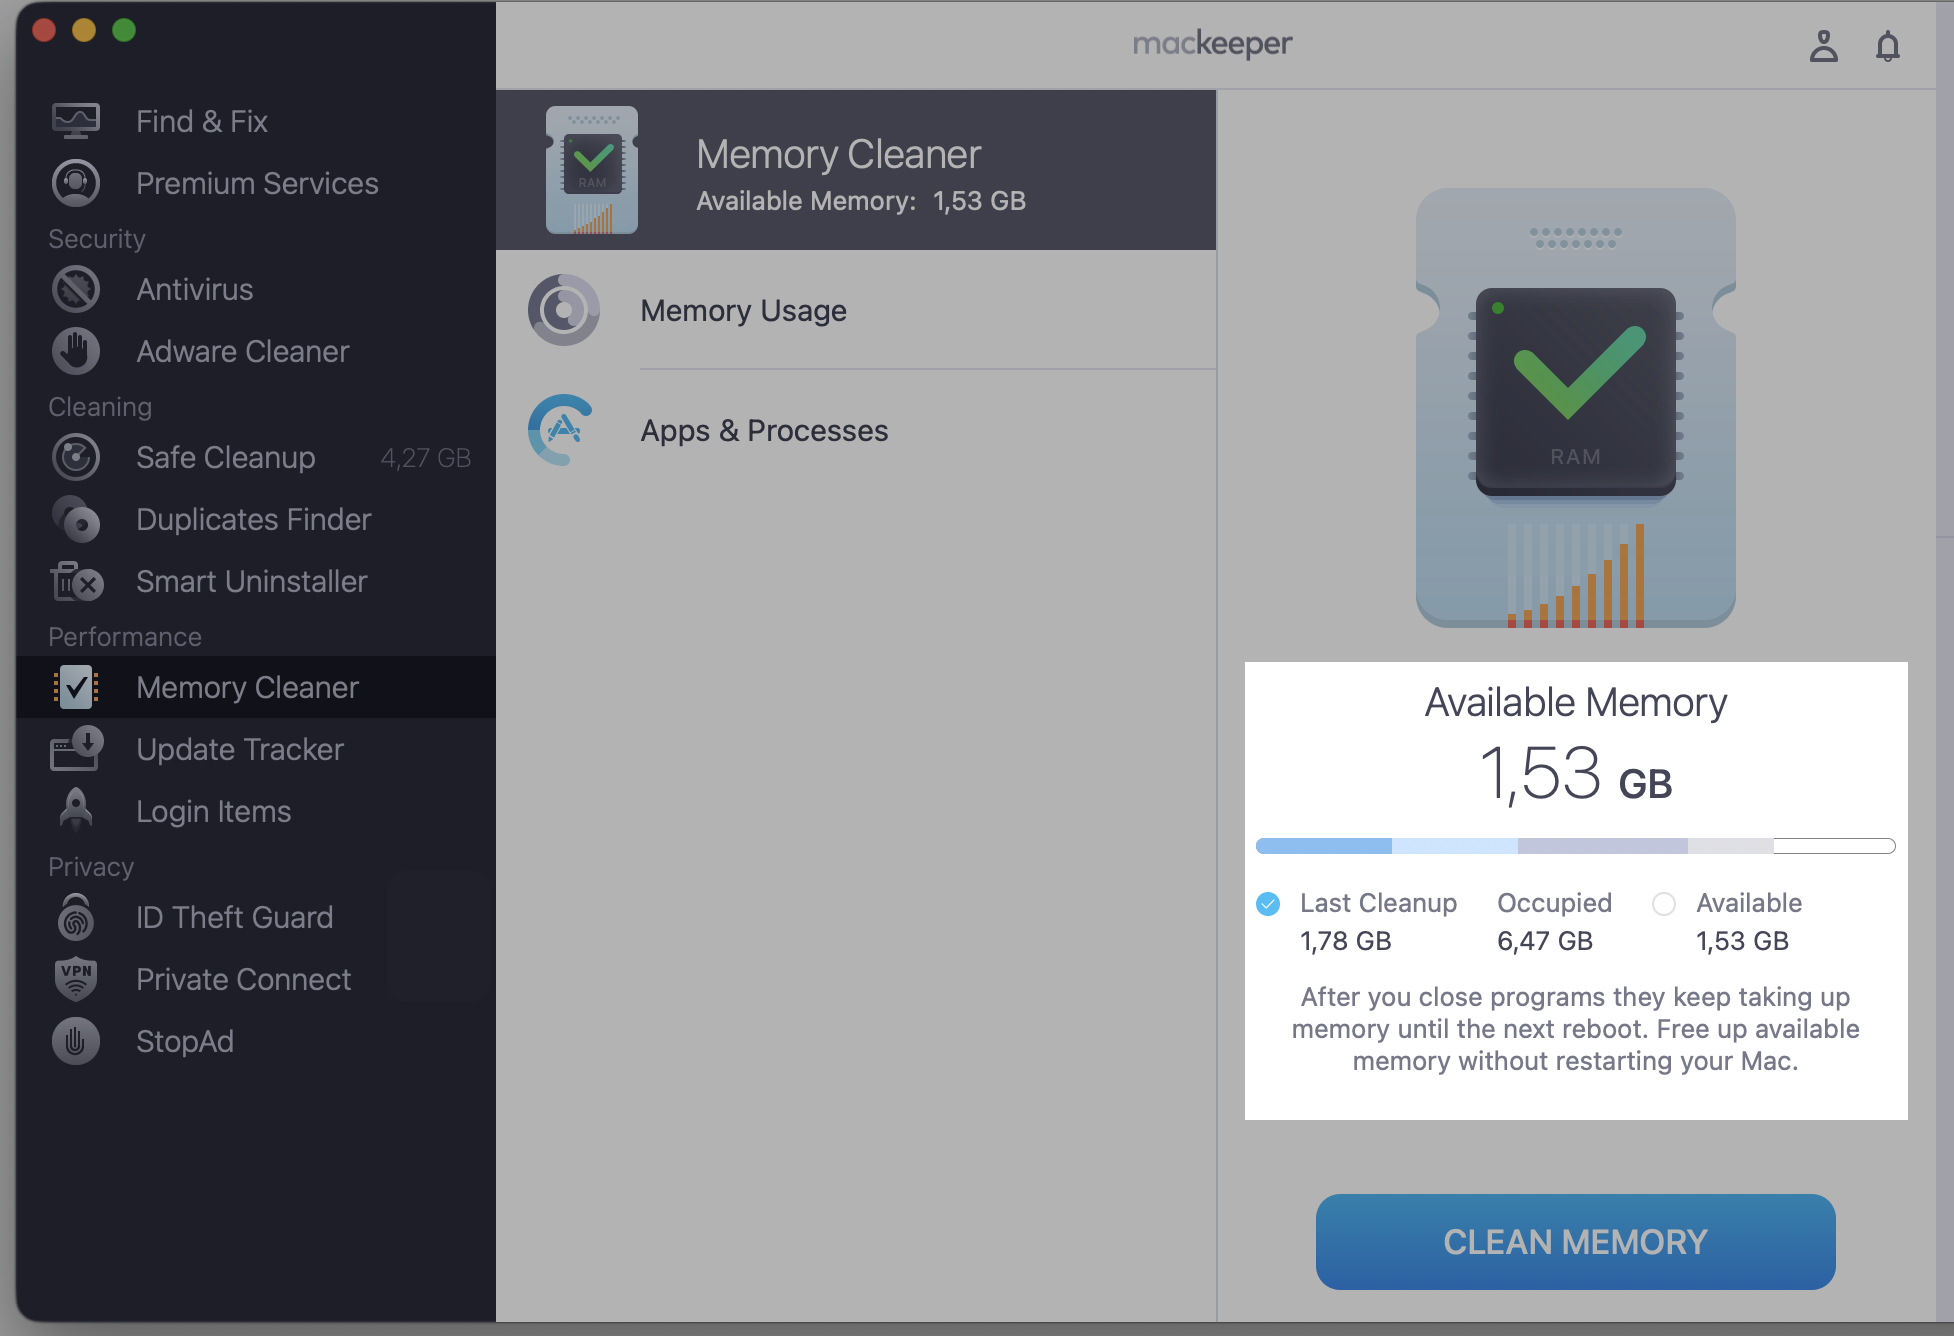
Check the available memory on your laptop again.
Step 1. Go to MacKeeper > Memory Cleaner and select OpenStep 2. Select the Memory Cleaner section, then click Clean MemoryStep 3. Check the available memory now
How to fix CGPDFService high CPU usage on Mac?
The good news is you can calm CGPDFService down yourself, without any technical background. Since macOS treats it as a stop process the moment you force-quit it, simply killing it in Activity Monitor won’t help for long. Instead, let’s work through six simple methods, starting with the quickest. Read through our steps below before you reach for more advanced options.
1. Restart your Mac
A restart clears frozen background tasks and gives your Mac a clean slate. In our experience, taking a moment to restart MacBook often settles the process on its own before you try anything else.
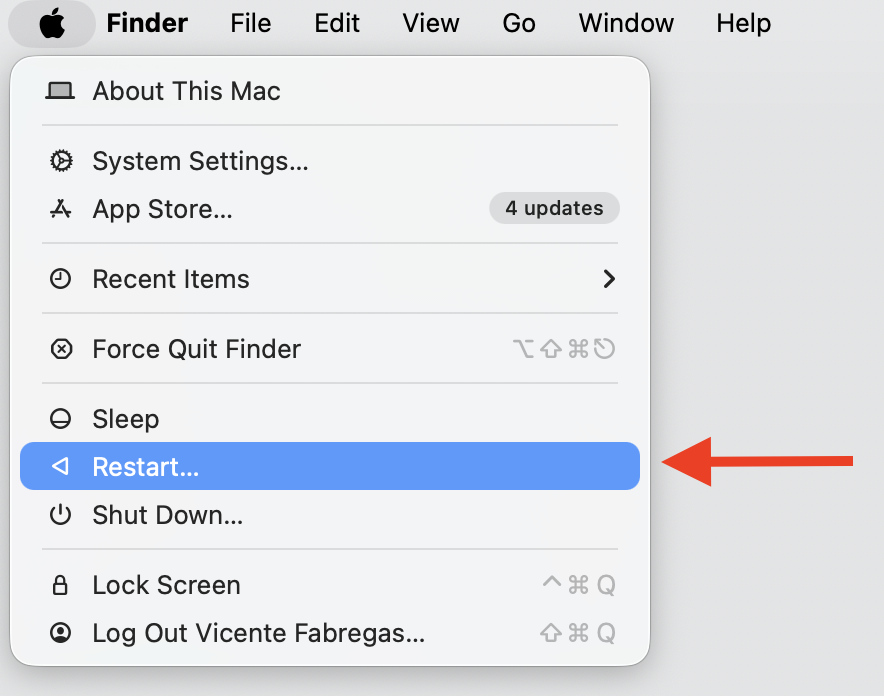
Restart in a few taps:
Click the Apple menu in the top-left corner of your screen.
Select Restart from the drop-down list.
Wait for your Mac to reboot, then check whether CGPDFService has settled.
Restart your Mac from Apple Menu
2. Turn off PDF search results
If you’re using macOS Sequoia and older, we can teach you how to tell Spotlight skip reading PDFs in your results. This method disables PDF content from showing up when you search, which eases the load on the process right away.
Turn it off like this:
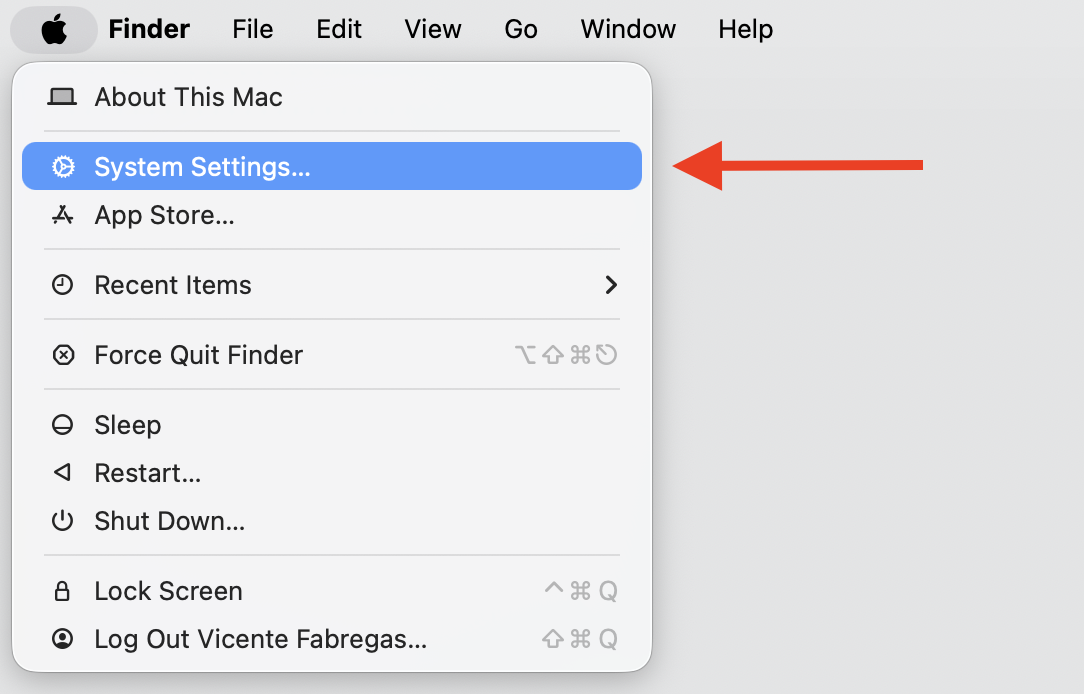
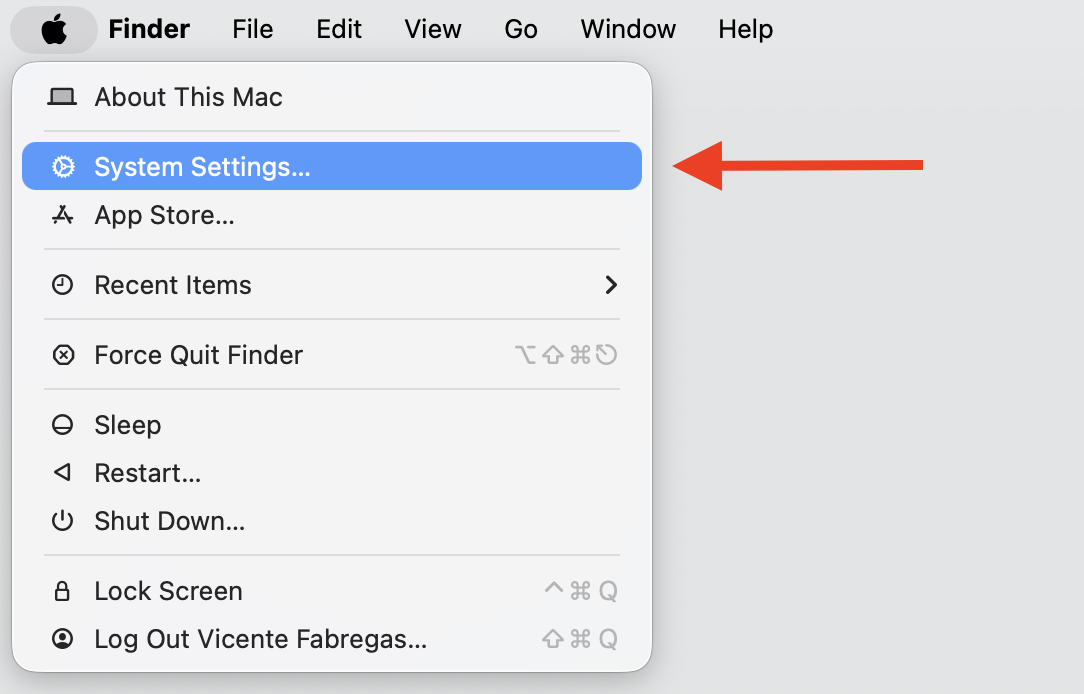
Open the Apple menu and choose System Settings.
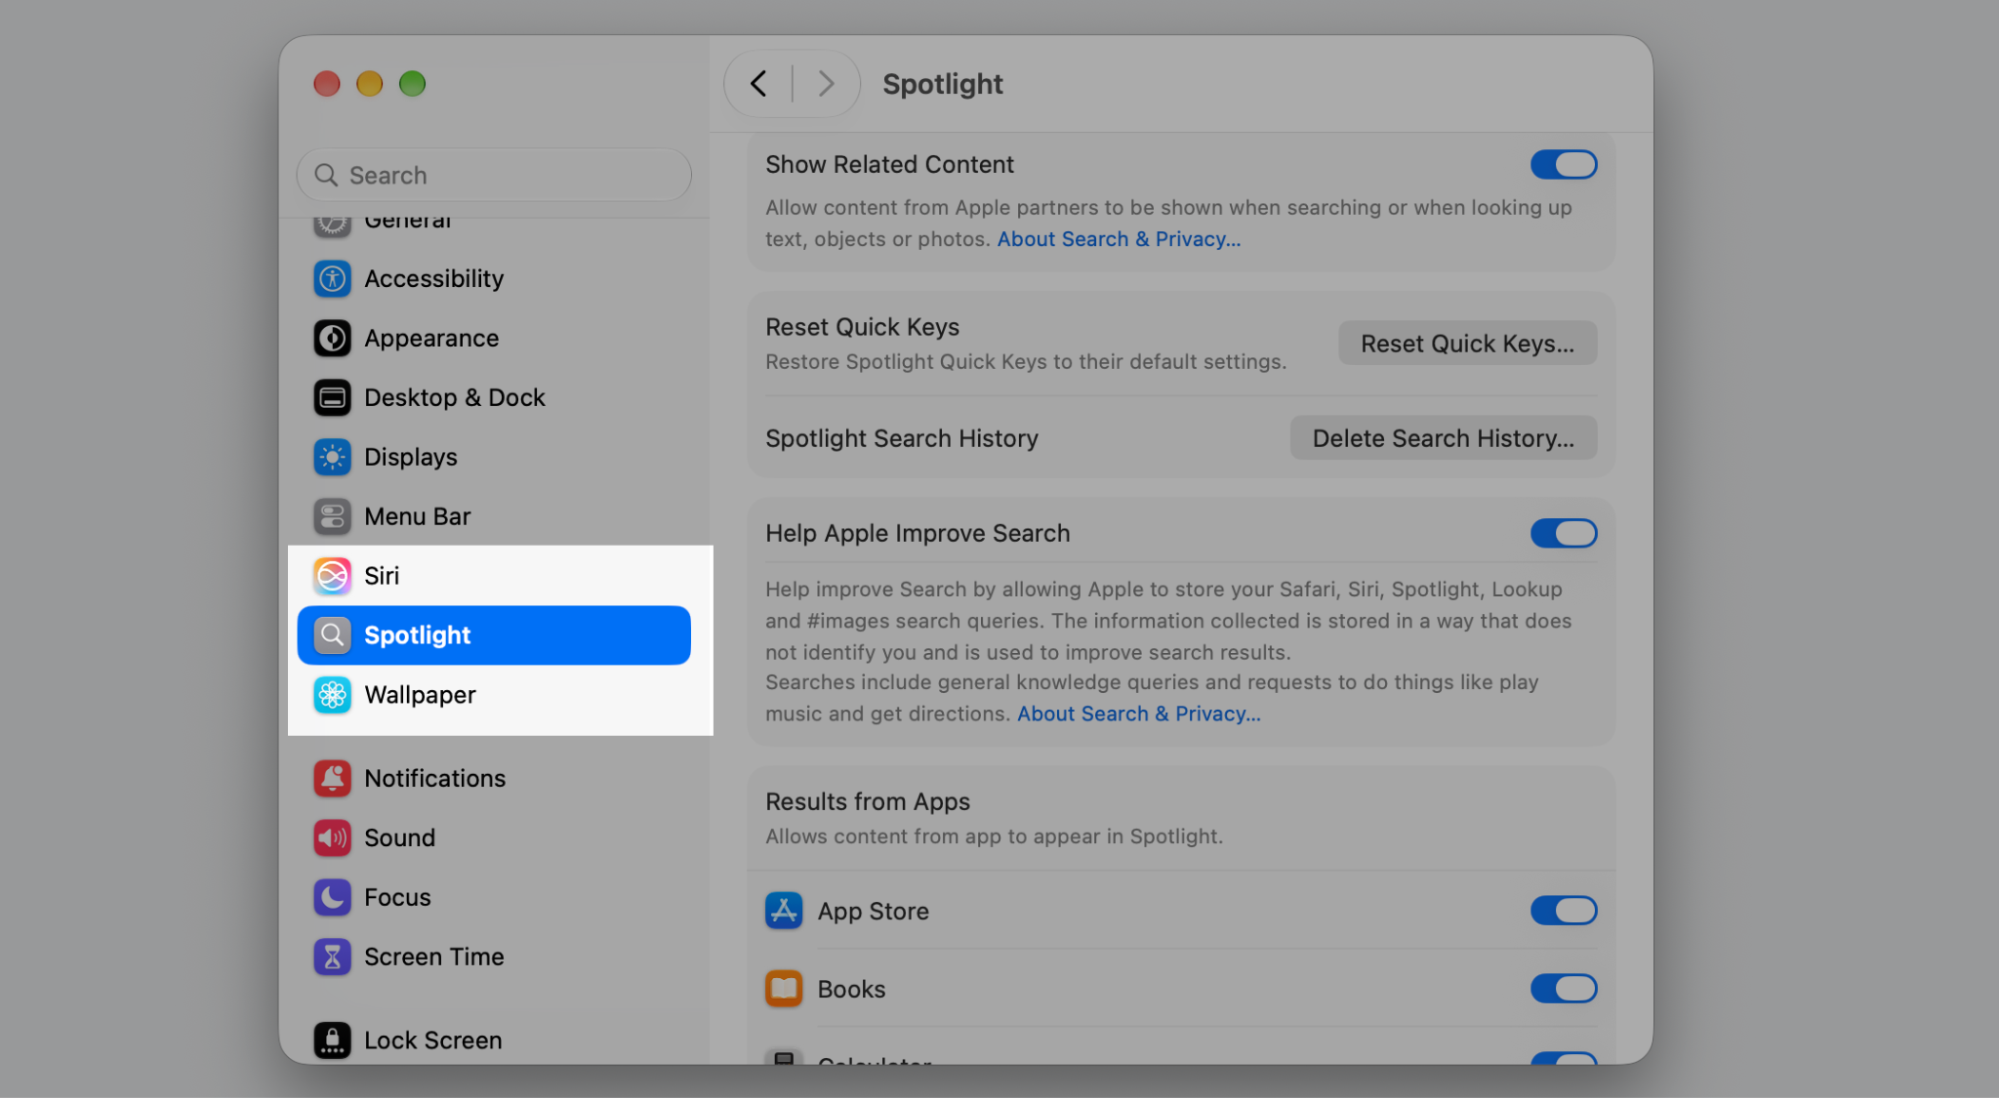
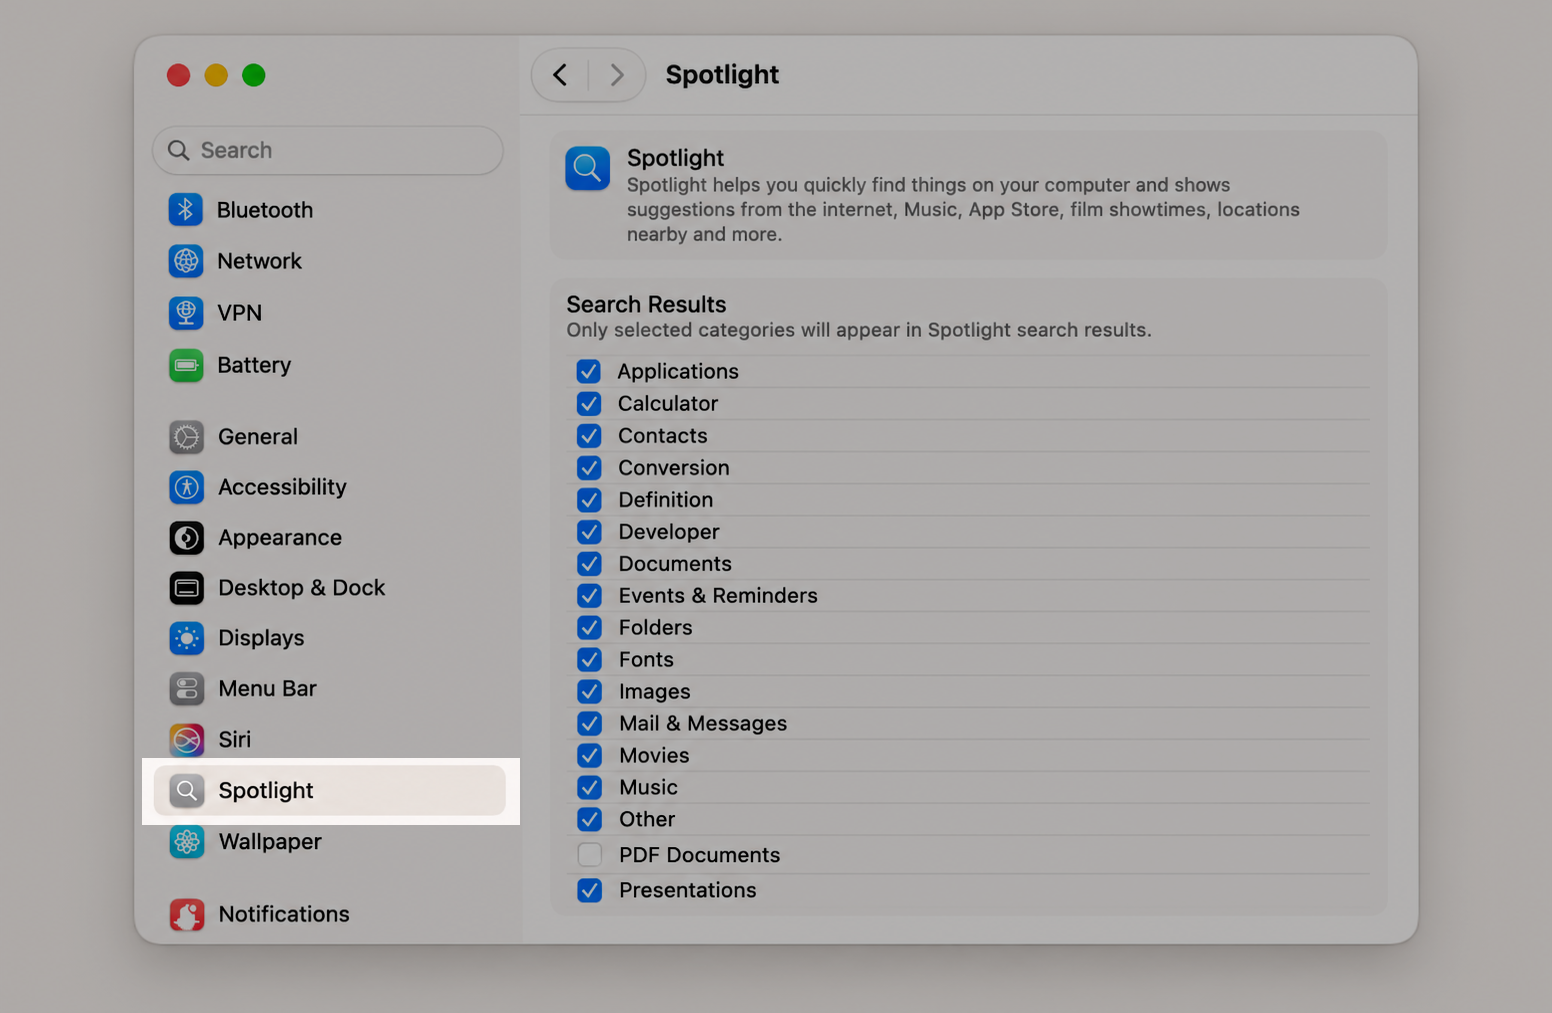
Click Spotlight in the sidebar.
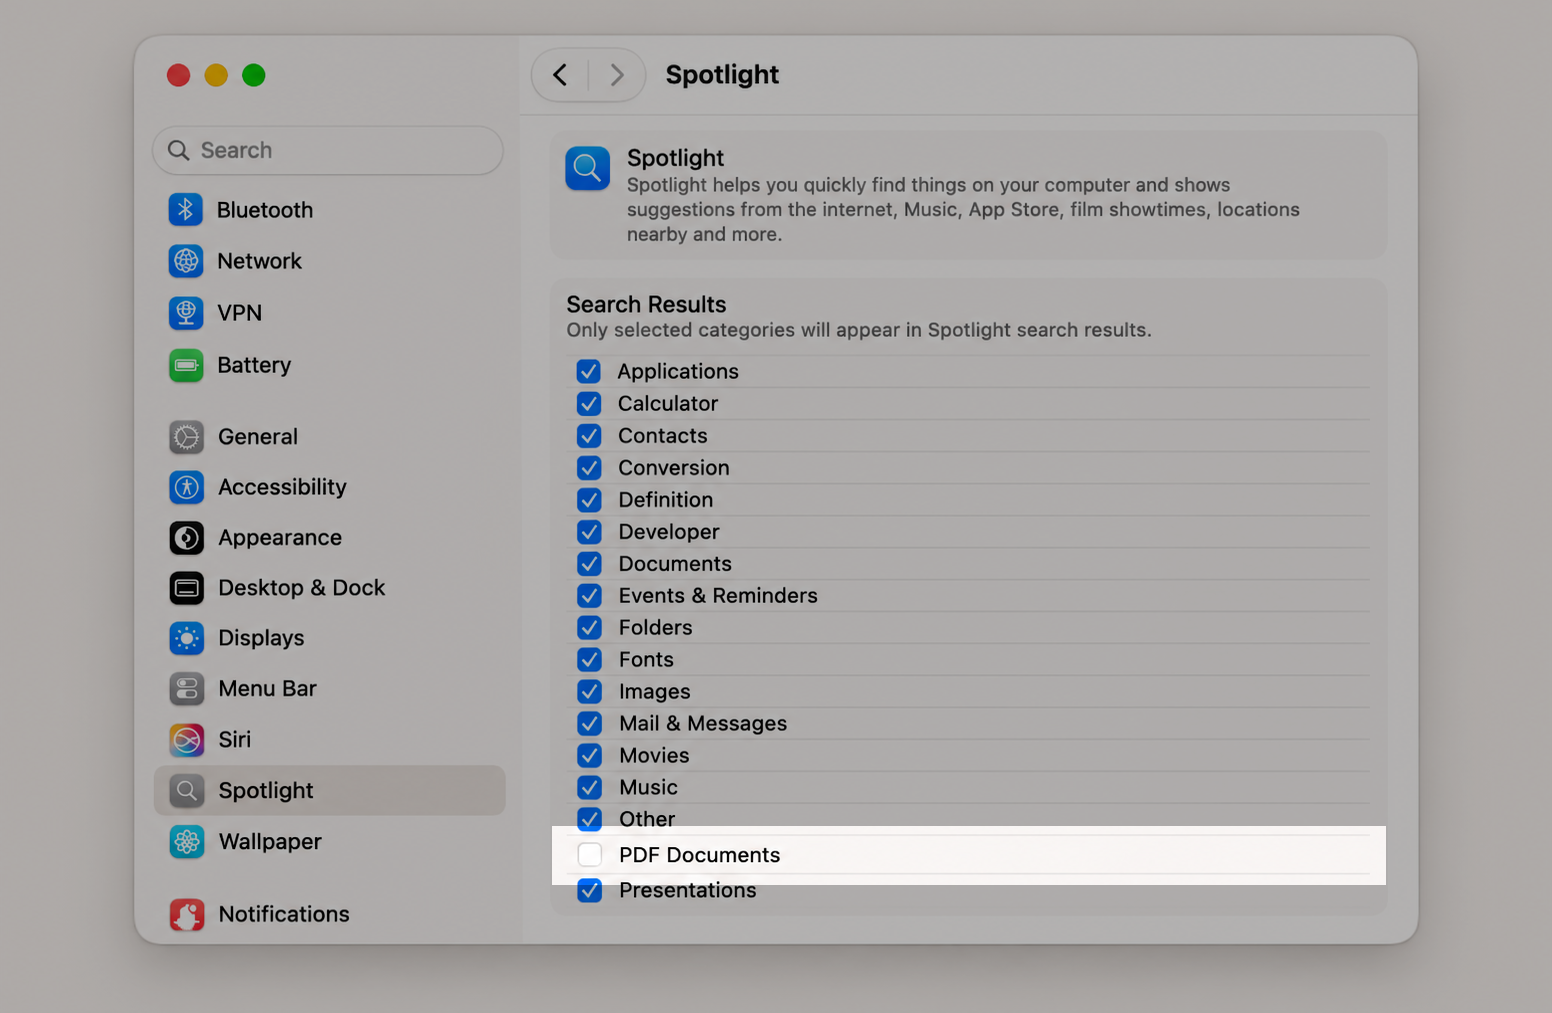
In the search results list, deselect PDF Documents so it’s no longer included.
Quit System Settings to save your choice.
Step 1. Go to Apple Menu > System SettingsStep 2. Select Spotlight from the sidebar menuStep 3. Deselect PDF Documents in the Search Results list
3. Stop Spotlight from scanning PDF folders
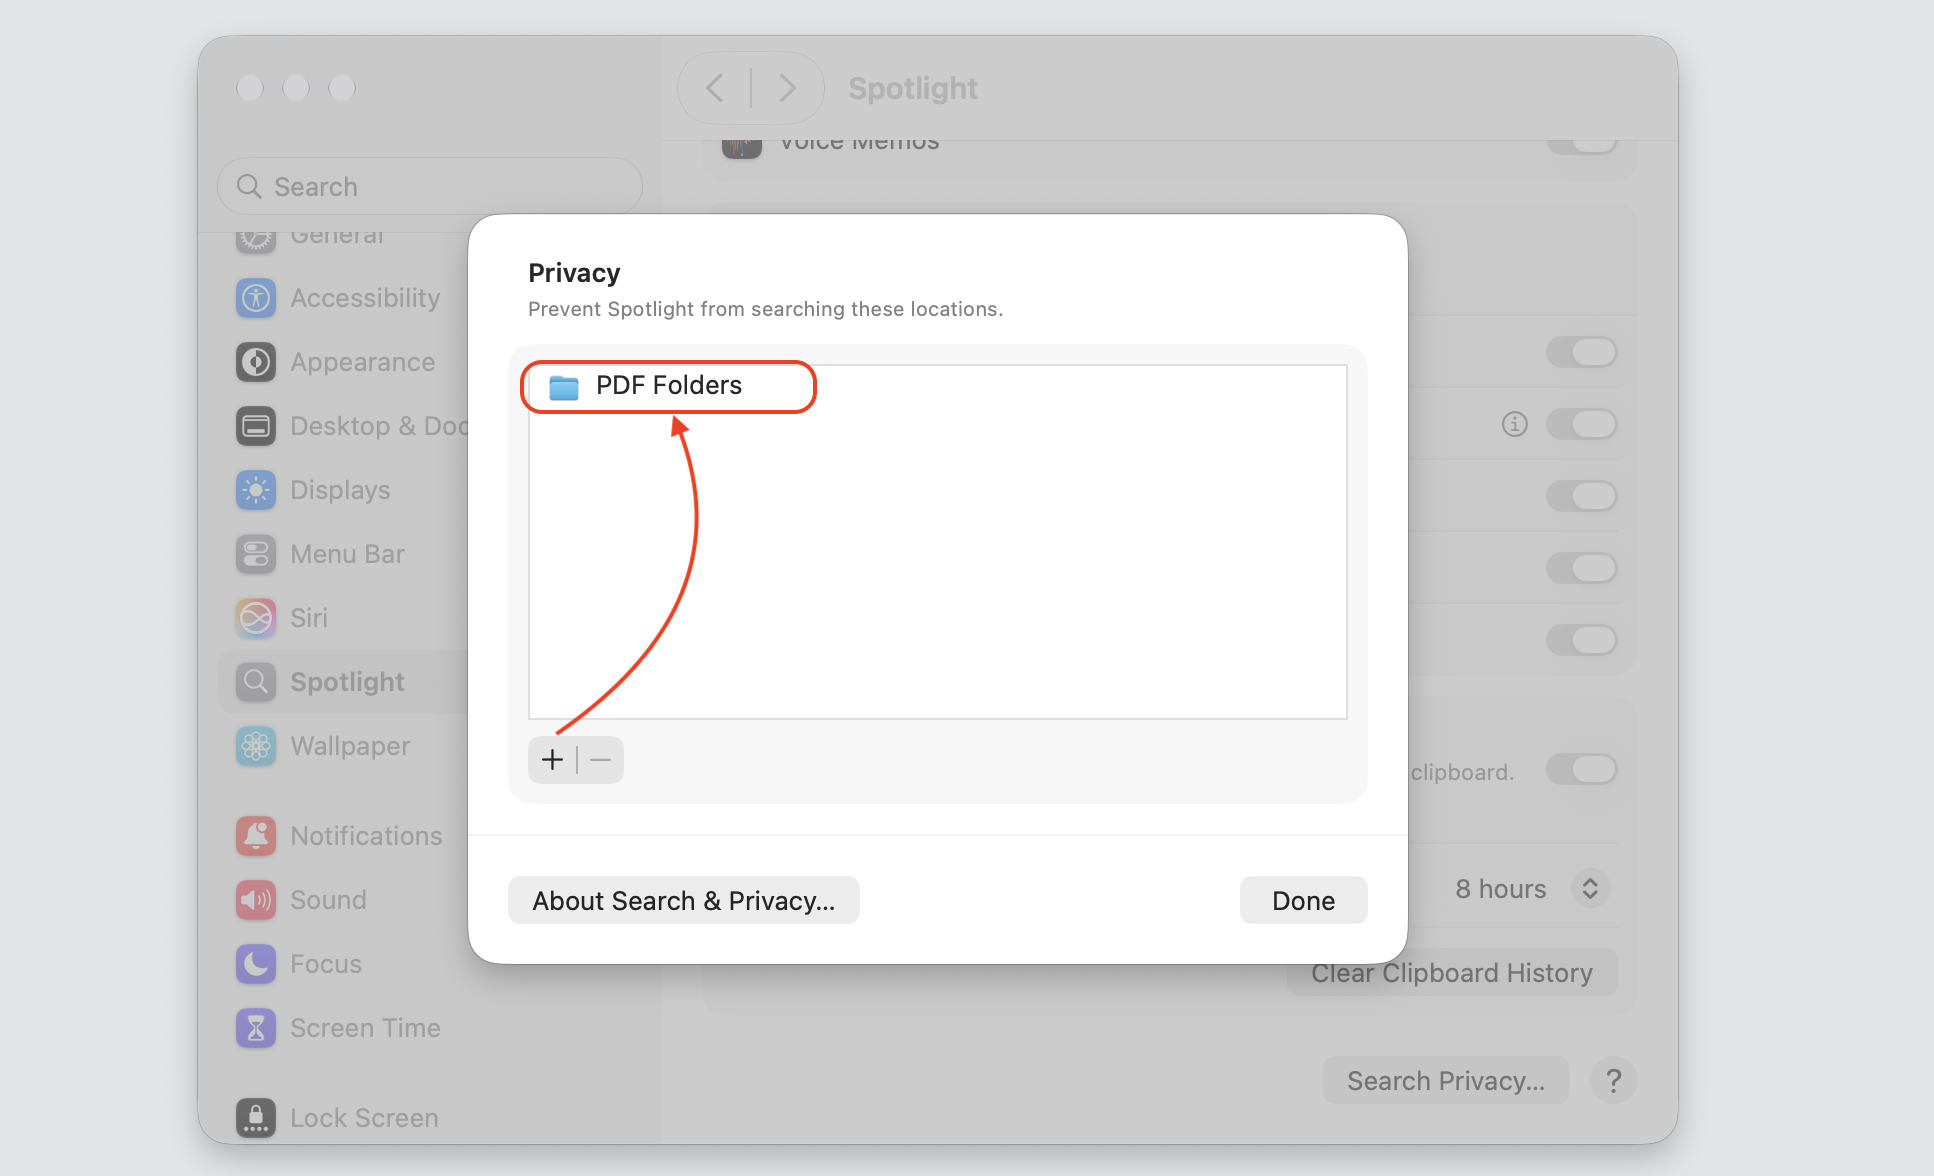
We can also point Spotlight away from the folders that cause the most work if you’re using macOS Tahoe 26 or newer. By adding your heaviest PDF folders to the privacy list, you disable Spotlight from scanning them at all.
Add your folders in a few clicks:
Go to Apple menu ▸ System Settings ▸ Spotlight.
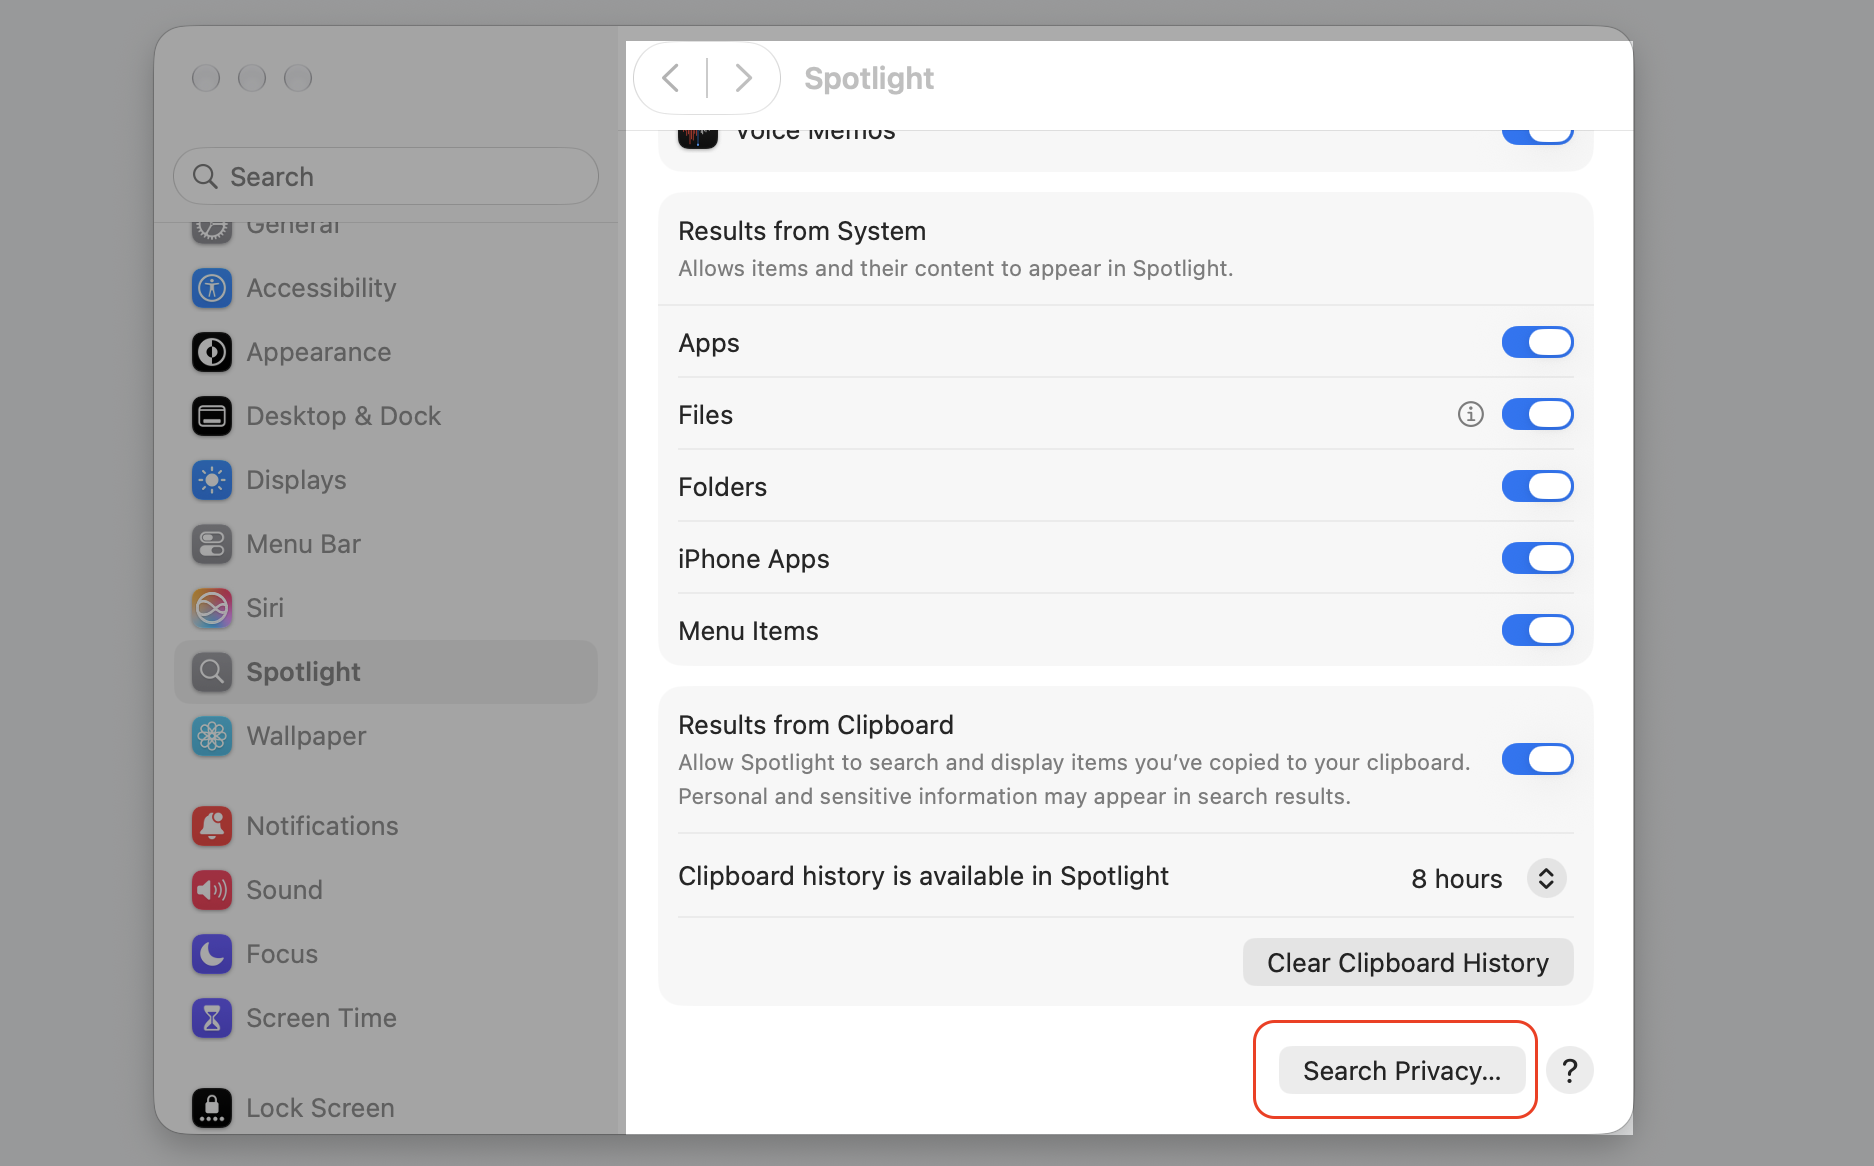
Click Search Privacy at the bottom of the window.
Click the Add button (the plus sign), then select the folders or external drives containing PDFs.
Select Done to confirm, then quit System Settings.
Step 1. Go to Apple Menu > System SettingsStep 2. Select Spotlight from the sidebar menuStep 3. Go to the Search Privacy optionStep 4. Click the + button and select the folder containing your PDF files
4. Find and remove broken PDF files
A single corrupted PDF can keep the scanner stuck in a loop, so it’s worth hunting down any problematic files. When we want a faster sweep, MacKeeper’s Safe Cleanup can remove junk files across your Mac in one click.
Clear the broken ones out:
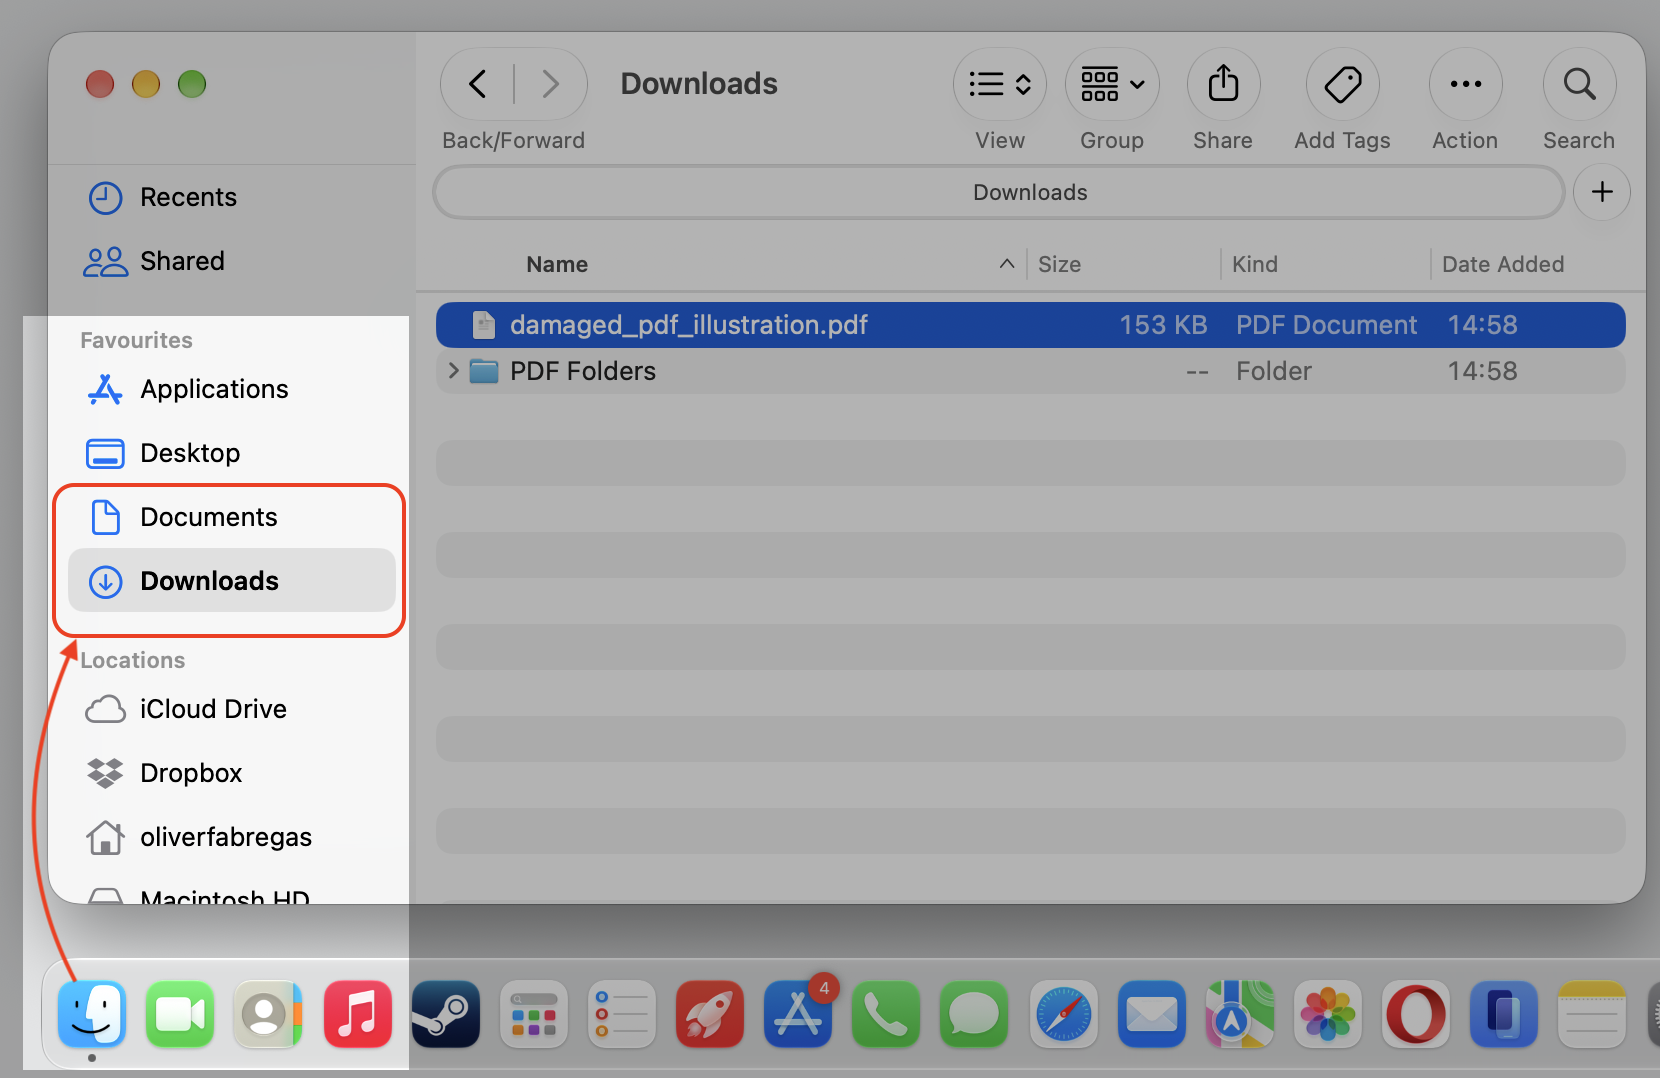
Open Finder and visit your Downloads and Documents folders.
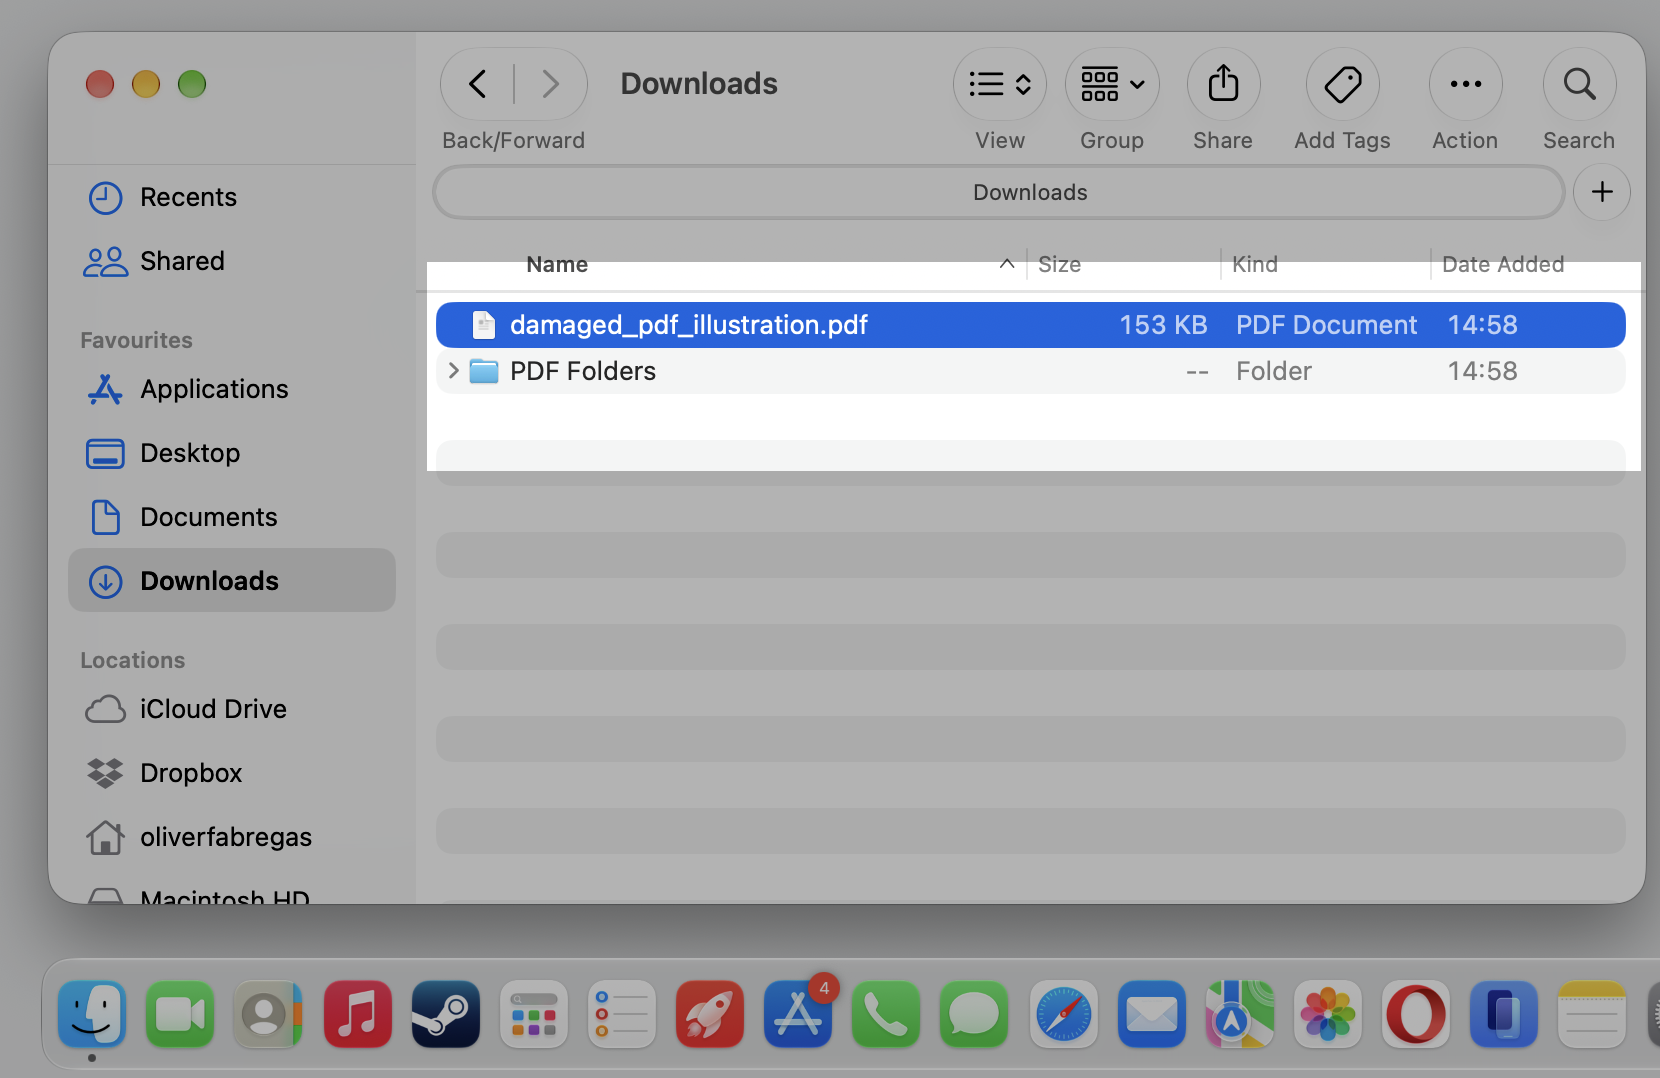
Try opening any PDF you don’t recognize to see whether it loads.
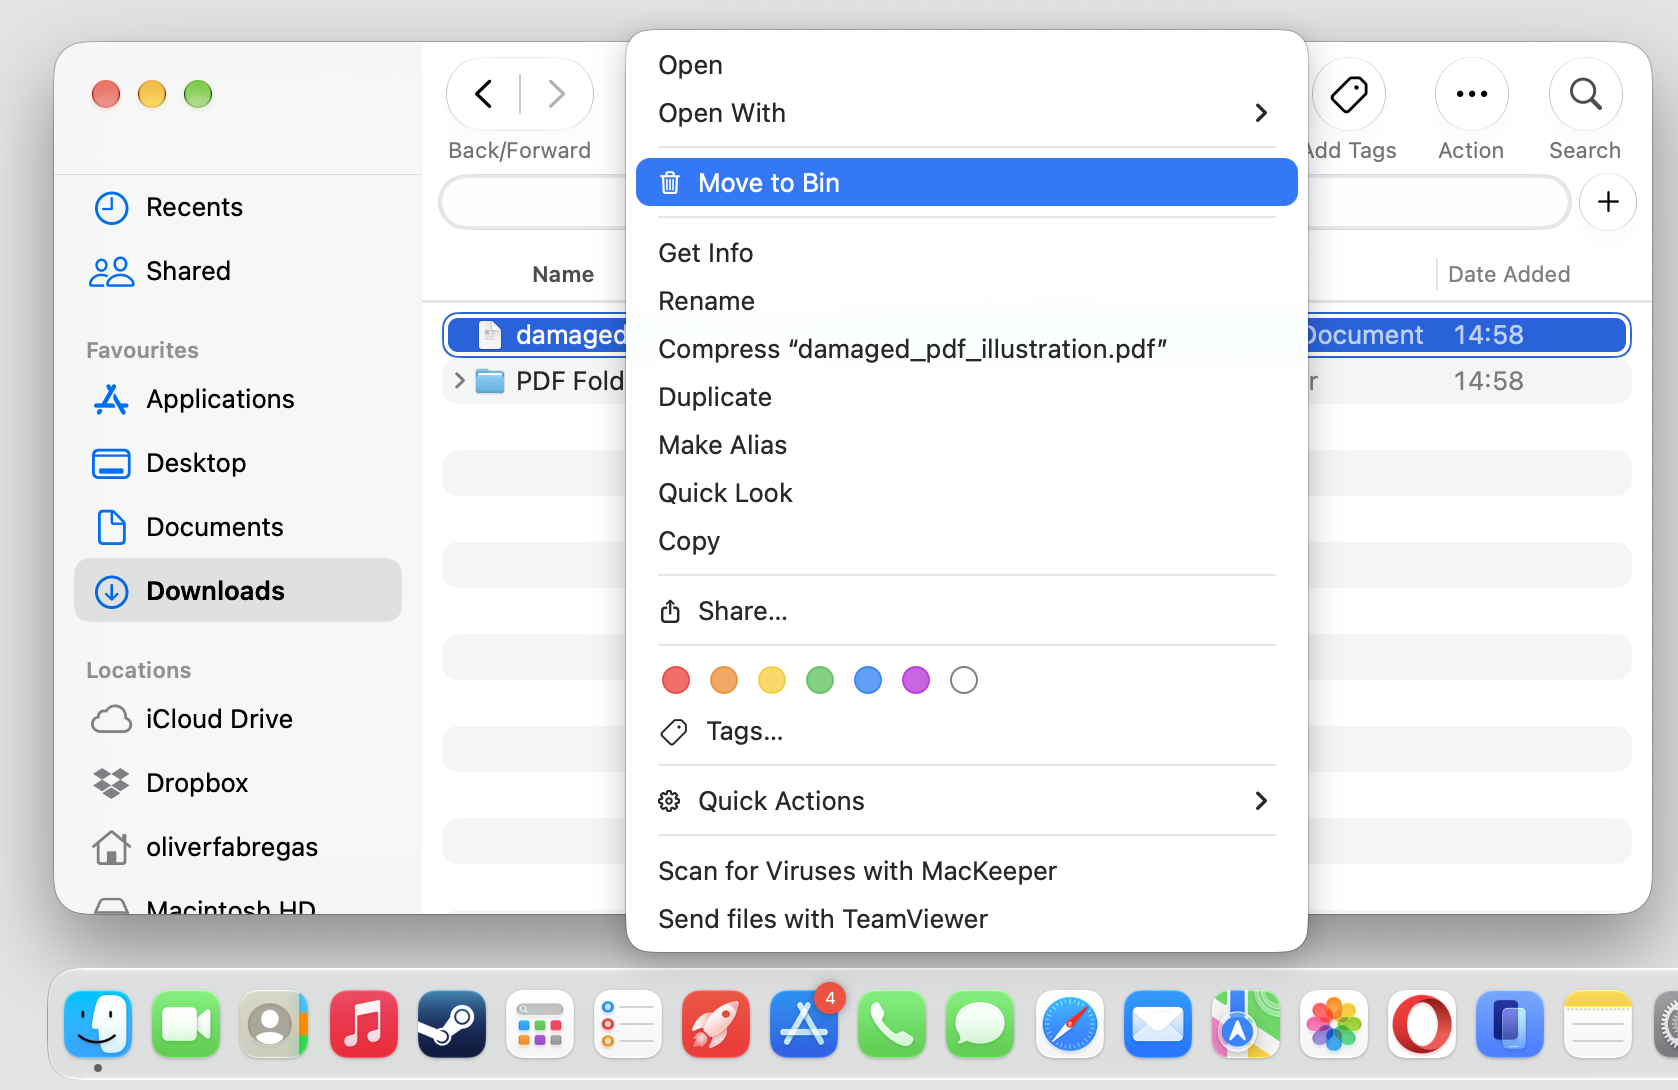
Drag each unreadable or damaged file by Control-clicking it and choosing Move to Bin.
Empty Bin to remove them for good.
Step 1. Go to Finder and visit your Downloads and Documents foldersStep 2. Try to open any PDF you don’t recognize to see whether it loadsStep 3. Move to Bin with control-click any PDF you don’t recognizeStep 4. Empty Bin
5. Start your Mac in Safe Mode
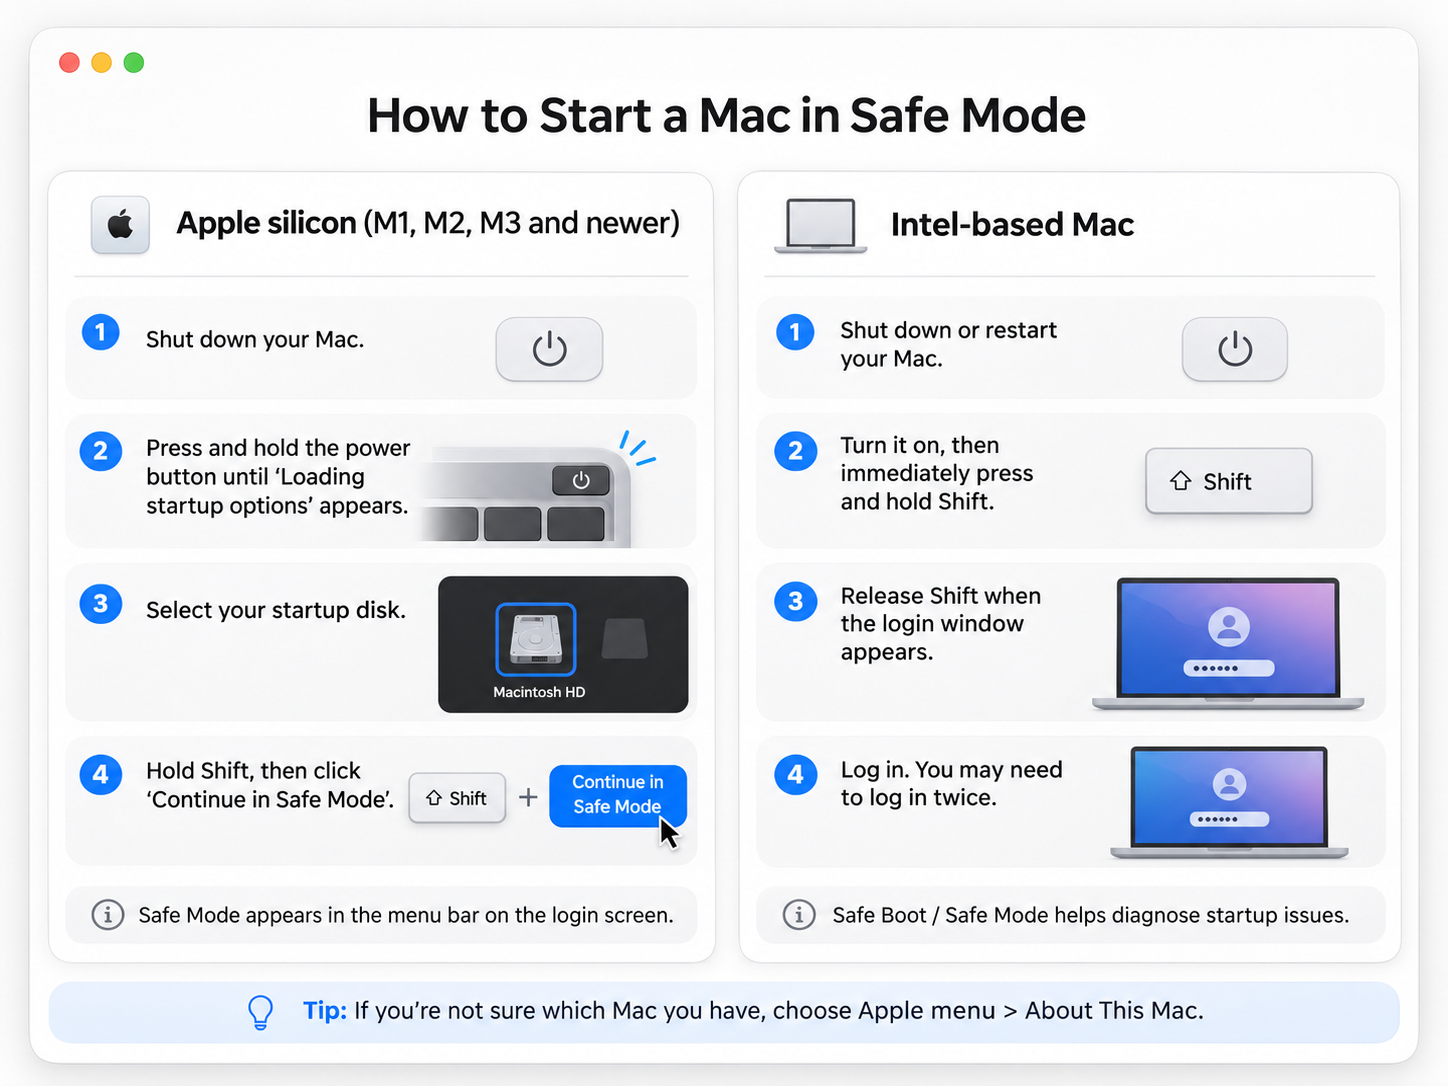
When your Mac freezes before you can even open Settings, Safe Mode gives you a calmer workspace. It loads only the essentials at startup and pauses non-essential background tasks, which cuts down on instability while we make changes. To reach it, we boot Mac in Safe Mode—the method below covers an Apple silicon Macintosh.
Boot into Safe Mode this way:
Shut down your Mac from the Apple menu.
Press and hold the Power button until Loading startup options appears.
Select your startup disk, hold the Shift key, then click Continue in Safe Mode.
Log in to finish—you may need to sign in twice.
Boot your Mac into Safe Mode and check if the problem still persists
6. Reset Spotlight search
If Spotlight’s index itself is corrupted, rebuilding it clears out the stuck data that keeps CGPDFService busy. We can do this with a single Terminal command that tells macOS to start indexing from scratch.
Rebuild the index like so:
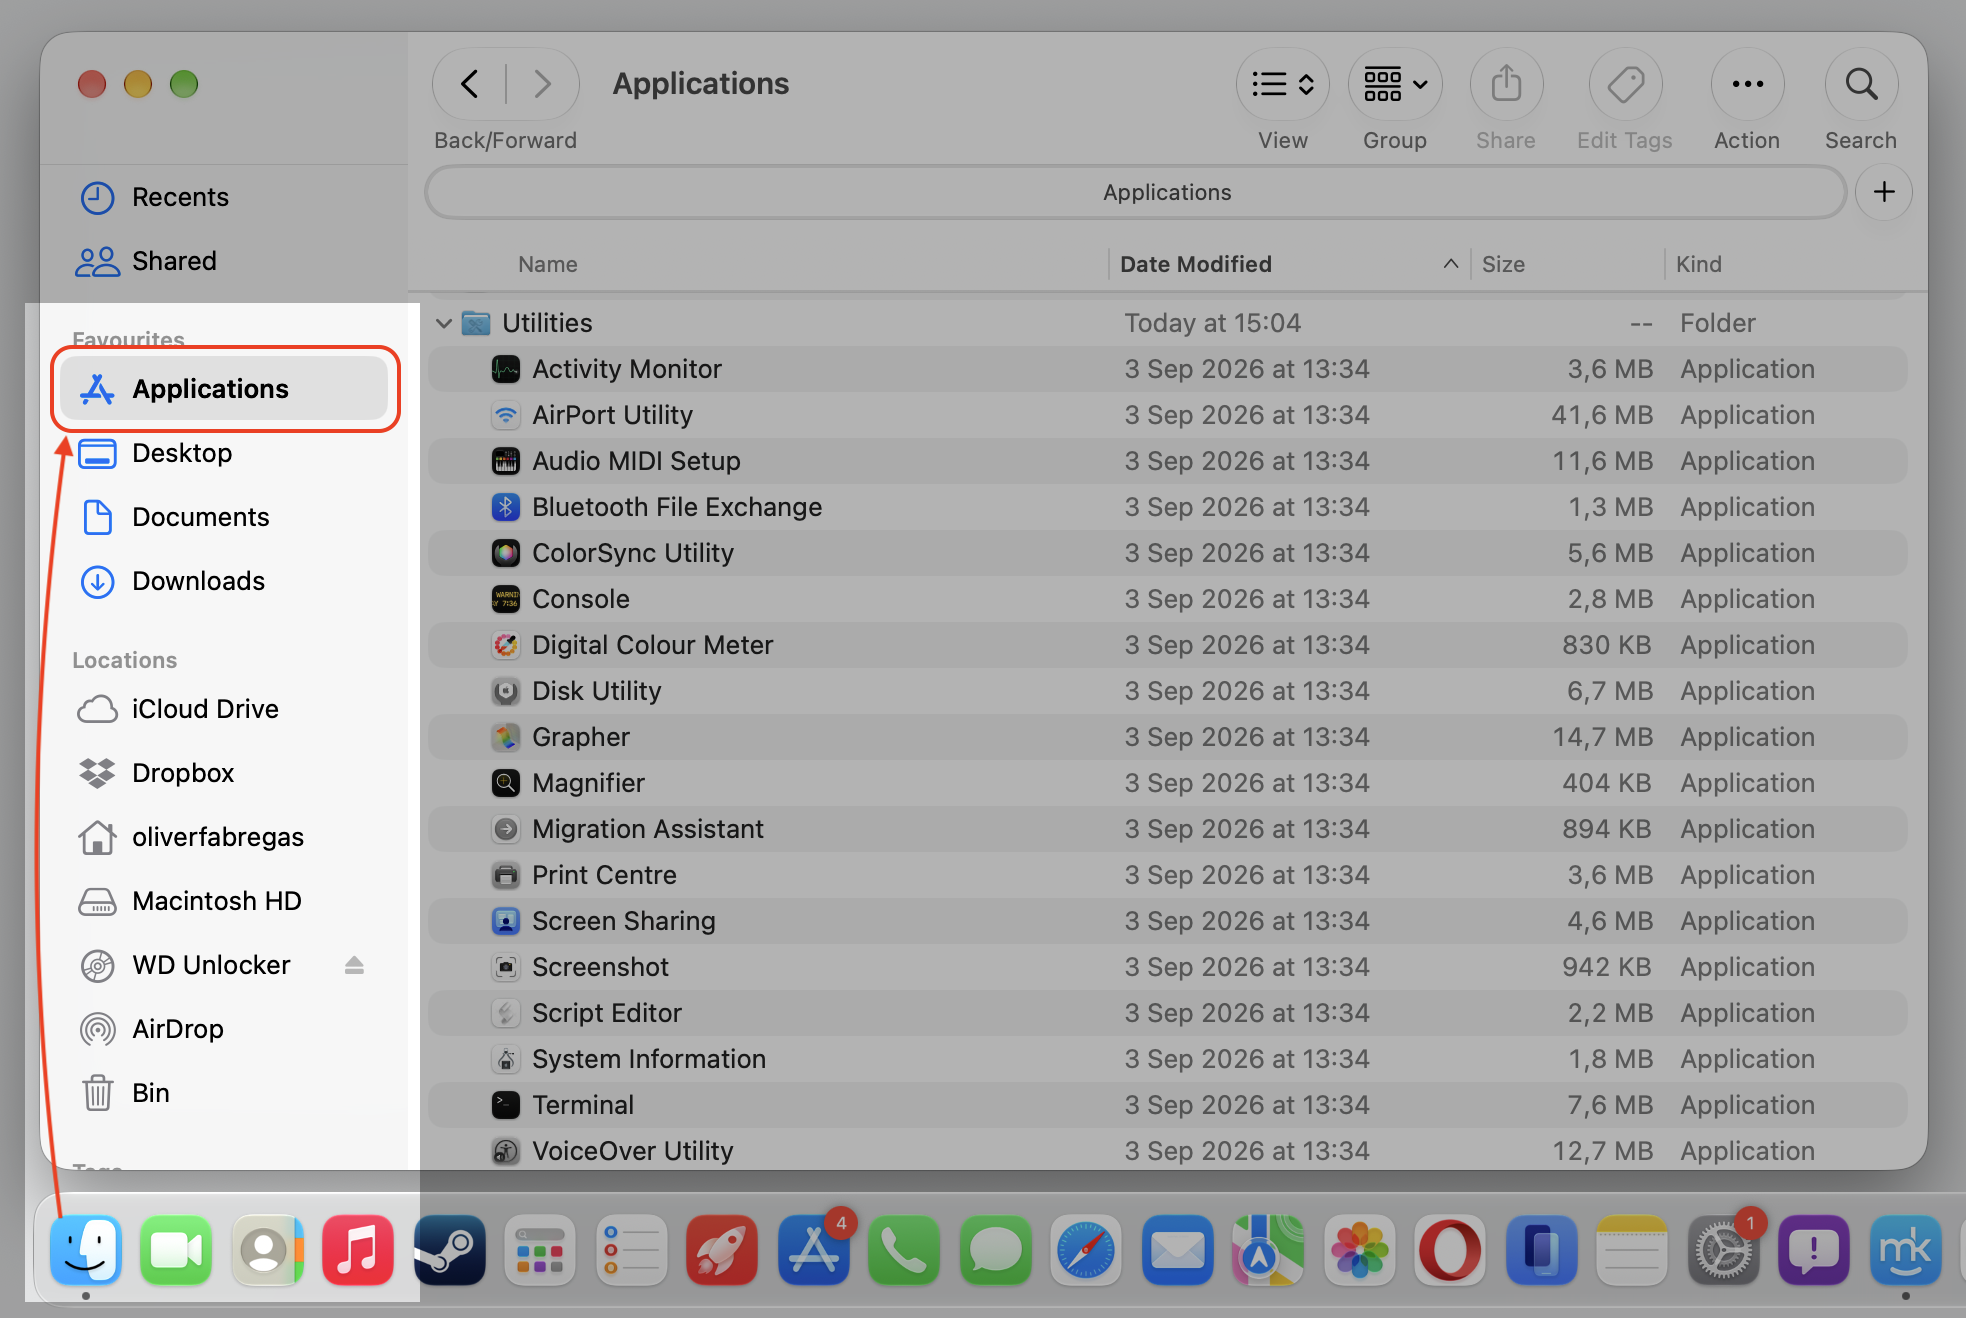
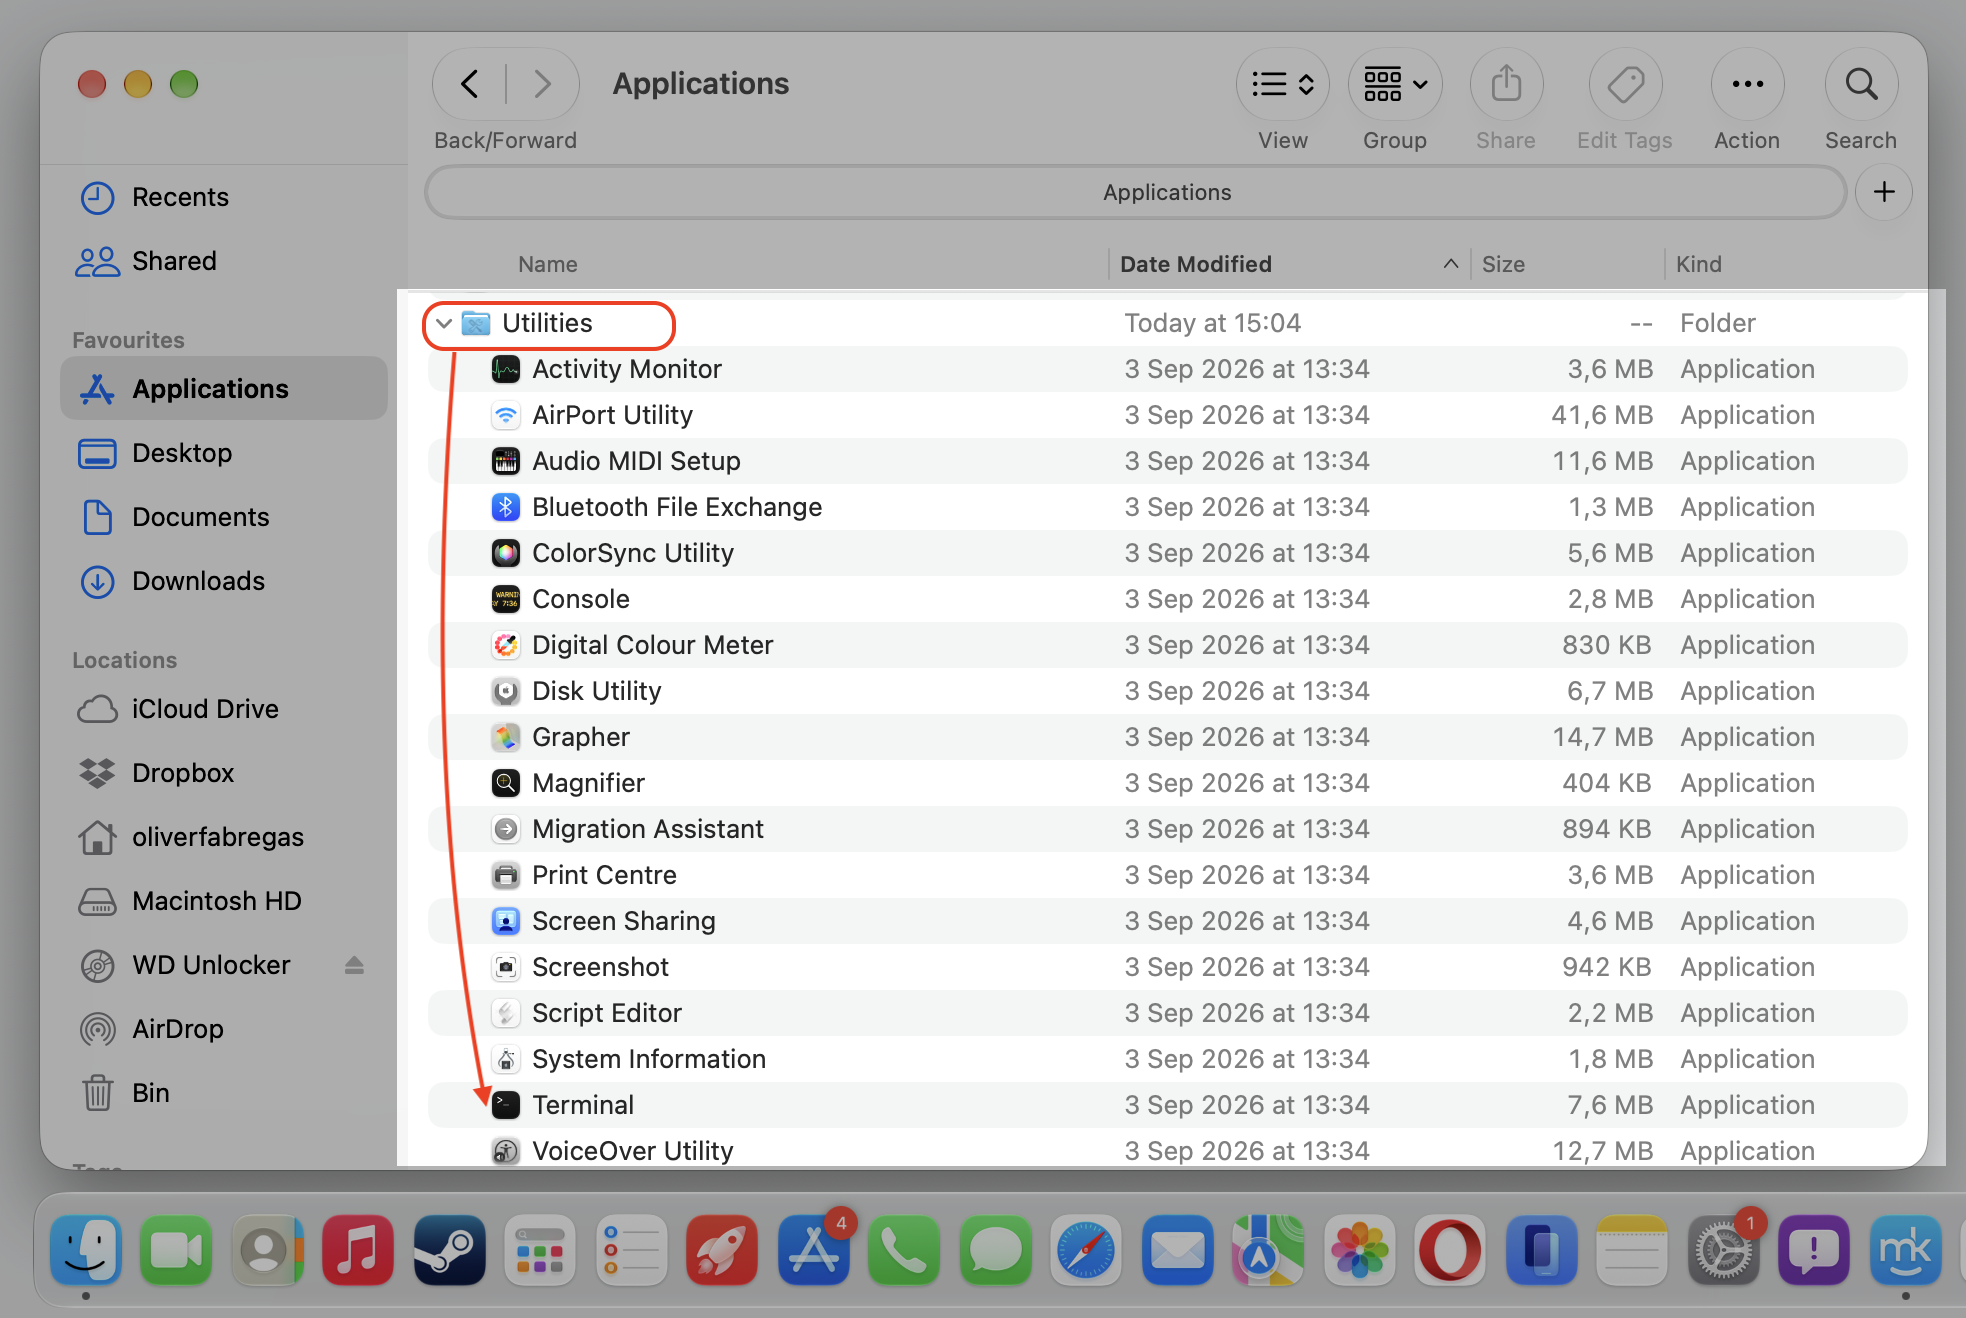
Open Terminal from Applications ▸ Utilities.
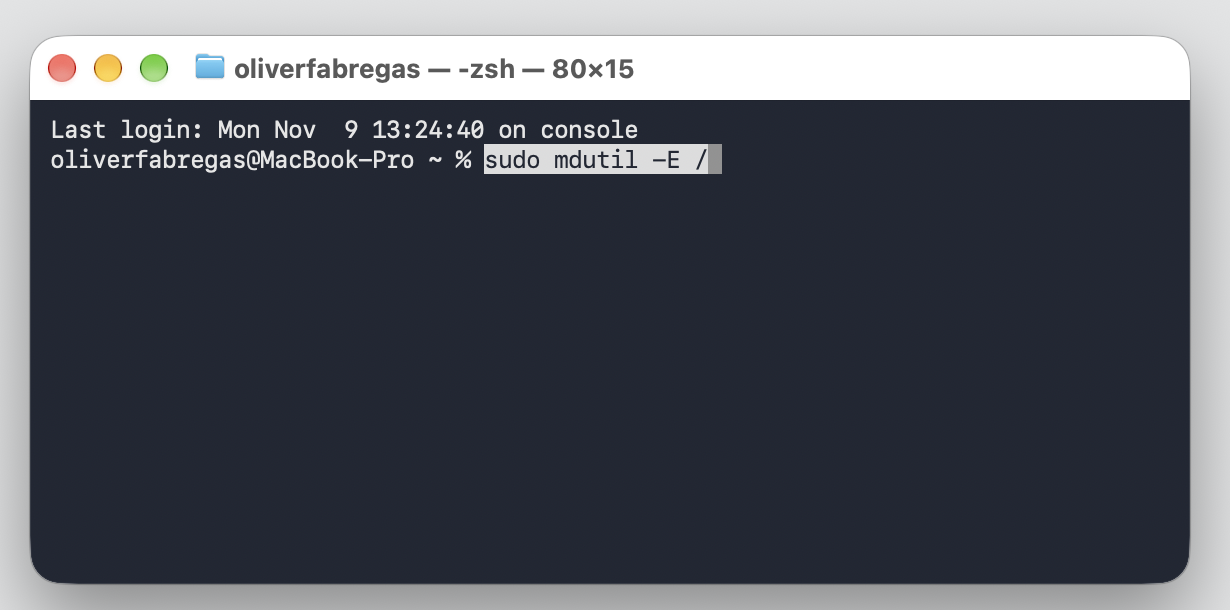
Type sudo mdutil -E / and press Return.
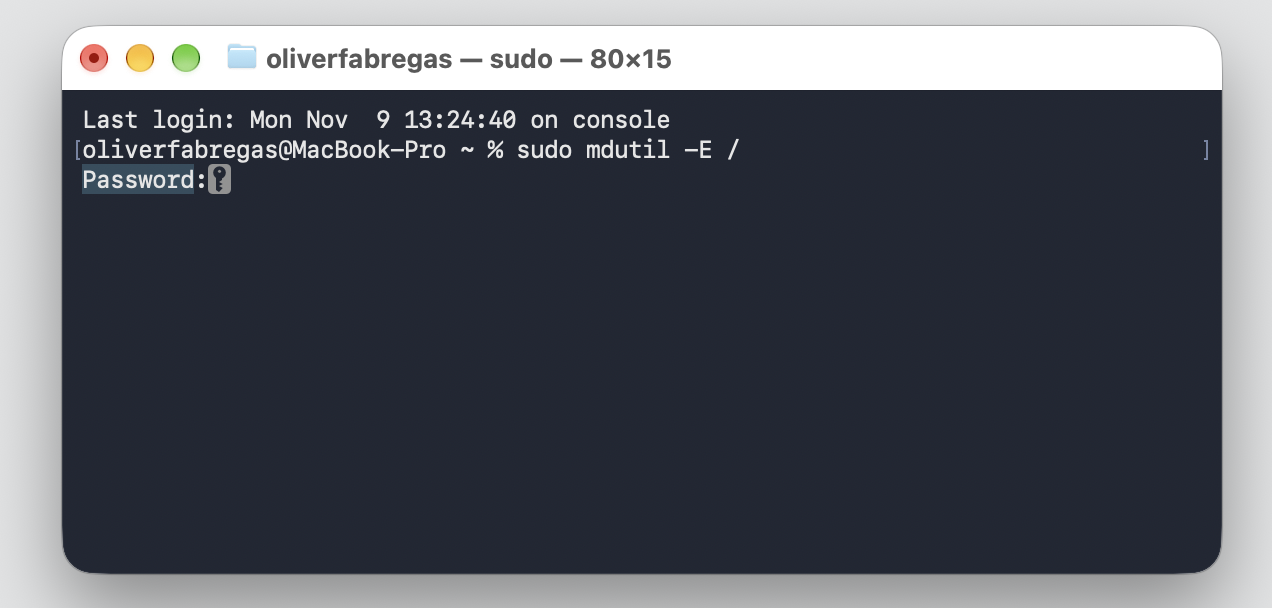
Enter your admin password when prompted, then press Return again.
Give macOS time to rebuild the index—cleaner search results will follow once it finishes.
Step 1. Go to Finder > ApplicationsStep 2. Open the Utilities folder and select TerminalStep 3. Type sudo mdutil -E / and press ReturnStep 4. Enter your administrator password and press Return
Conclusion
At its core, CGPDFService high CPU usage comes down to one thing—Spotlight trying to index too many PDFs at once. It’s a normal process doing its job, just under too much load.
Once you exclude your PDF archives from Spotlight’s Search Privacy, reset the search index, and keep your Mac decluttered, the CGPDFService process on Mac settles back into the background where it belongs. That means less overheating, less lag, and a Mac that stays cool under pressure.
If you’d rather not track down every heavy process by hand, MacKeeper’s Memory Cleaner does the work for you—quitting useless processes and stopping memory-draining apps, so your Mac has room to run. Try it today and enjoy a calmer, quicker Macintosh experience.
We respect your privacy and
use cookies
for the best site experience.
Privacy Preferences Center
We use cookies along with other tools to give you the best possible experience while using the
MacKeeper website. Cookies are small text files that help the website load faster. The cookies we
use don’t contain any type of personal data meaning they never store information such as your
location, email address, or IP address.
Help us improve how you interact with our website by accepting the use of cookies. You can change
your privacy settings whenever you like.
Manage consent
All cookies
These cookies are strictly necessary for enabling basic website functionality (including page
navigation, form submission, language detection, post commenting), downloading and purchasing
software. The website might malfunction without these cookies.