In this article you will find the following:
Although Macs have always included security features, Apple has had to up its cybersecurity game in recent years. With models like the MacBook Air and MacBook Pro gaining popularity, Macs have become a much bigger target for hackers and malware creators.
The huge growth in Mac malware means it’s vital for users to take security seriously. Your Mac needs antivirus, but you should also understand and use your built-in Mac security features.
In this piece, we’ll look at some of the most useful security features of macOS. For detailed advice on getting your machine locked up tight, check our other guide to Mac security settings.
Before we start
The security features built into macOS will only take you so far. For maximum protection, use MacKeeper’s Antivirus. It gives you real-time and on-demand protection, keeping your Mac clear of the latest threats. Here’s how to run an on-demand scan:
- In MacKeeper, select Antivirus from the sidebar
- Click Start Scan
- When the scan is finished, select anything suspicious, and click Move to Quarantine.
On top of this, MacKeeper offers a wide range of optimization and privacy protection tools. Check it out today, and see what it can do for you.
What are the security features of macOS?
Macs offer all kinds of security features, because there are many different types of threats. Some malware, for example, might sit quietly on your Mac, collecting information and sending it to hackers. But other malware might be more visible, taking over your computer and making it unusable.
Because the threat landscape is broad, macOS and OS X include a few kinds of protection:
- Privacy protection: Control who can see your Mac, your activity, and your data
- Data protection: Choose who can access and change your files
- Network protection: Keep your computer safe when it’s online or connected to a local network
- Password protection: Use password protection to keep unauthorized users off your machine
- App protection: Prevent apps and other processes from making changes without permission.
Which Mac OS X security features you have depends on the version of your operating system. Older ones like Catalina may be quite different from new ones like Monterey and Ventura.
8 most useful Mac security features
There are many security features built into macOS, but here are eight we think are particularly useful:
- Screen auto-lock
- FileVault encryption
- Mac firewall
- Find My Mac
- System Integrity Protection
- Firmware password
- Apple ID two-factor authentication
- Gatekeeper and runtime protection.
Screen auto-lock
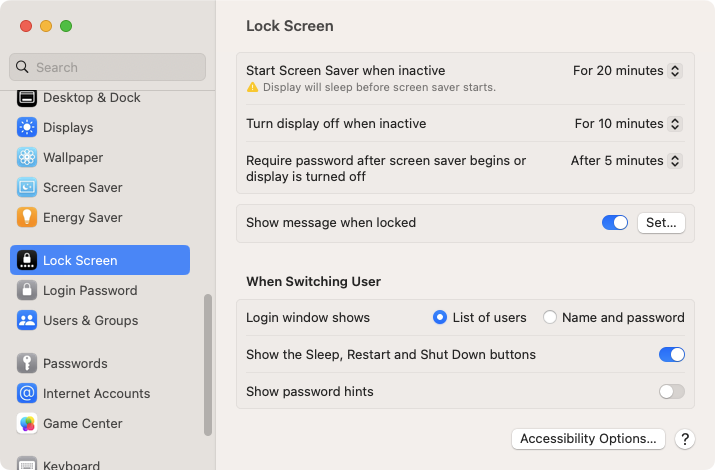
Lock Screen is a fundamental security feature that everyone should use. By default, your Mac will lock the screen after a period of inactivity, which can be tweaked in System Settings. To start using your Mac again, you need to enter your password.
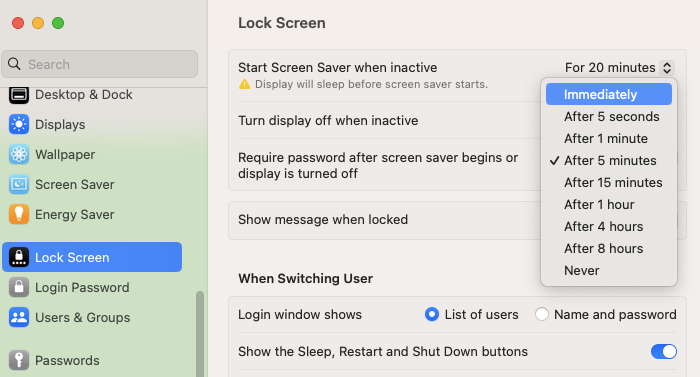
Normally, your screensaver will kick in, then after a set amount of time, the screen will lock. For extra security, you make macOS lock your screen as soon as the screensaver appears.
- Open System Settings, and select Lock Screen
- Use the dropdown menu next to Require password after screensaver begins or display is turned off, and select Immediately
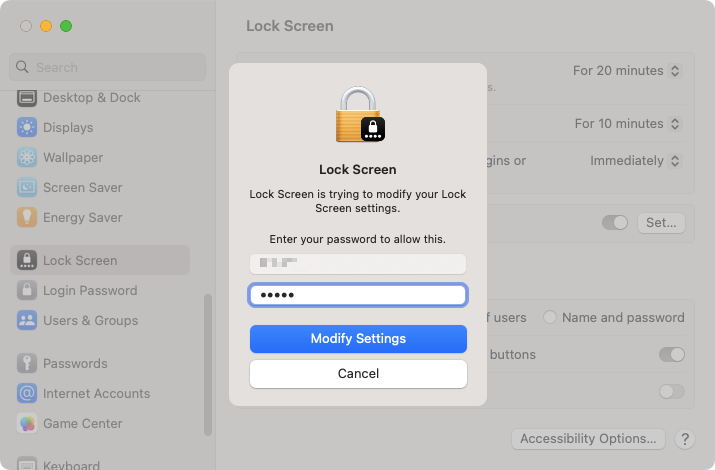
- Enter your password, and click Modify Settings.
FileVault encryption
FileVault is an encryption tool, which makes your data unreadable to anyone who doesn’t have the decryption key. That means even if someone got access to your Mac, they wouldn’t be able to open your files.
Here’s how to set up FileVault:
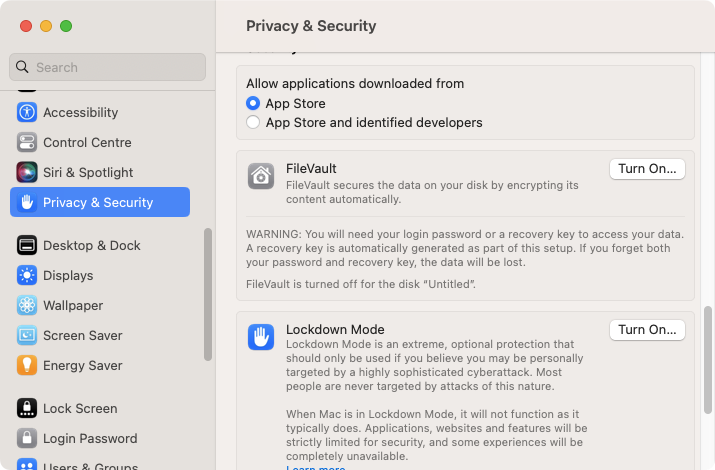
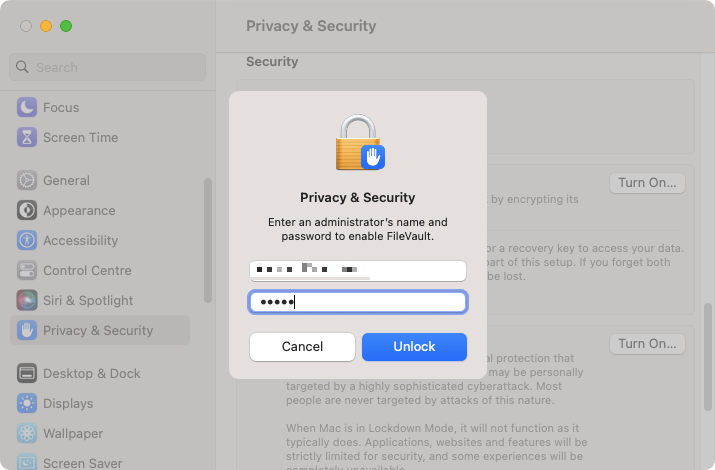
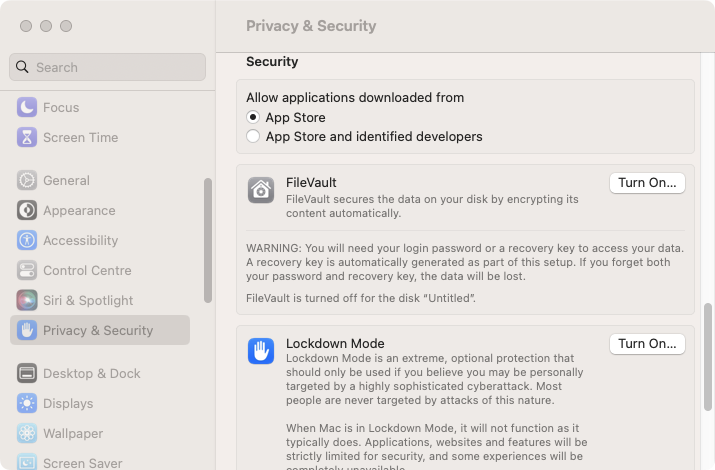
- In System Settings, select Privacy & Security, then scroll down to the FileVault section, and click Turn On
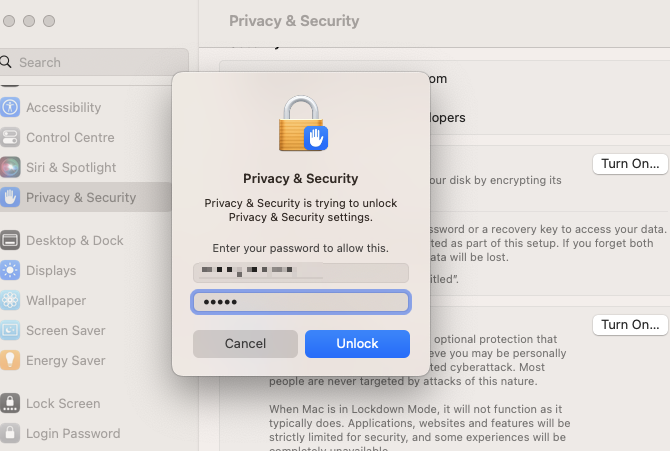
- Enter your password, and click Unlock
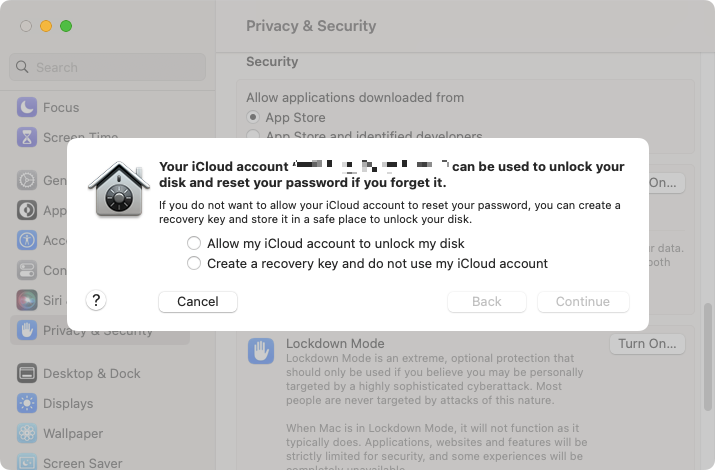
- In case you forget your password, you can unlock your data with your iCloud account or a unique recovery key. Make your choice, and click Continue
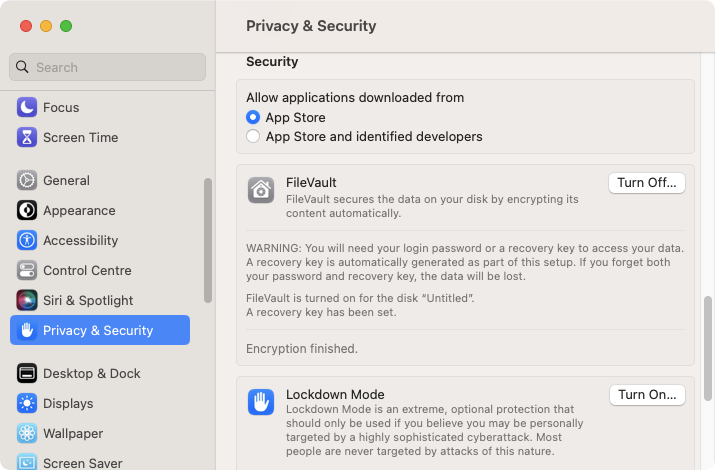
- FileVault will encrypt your data, and you’ll see Encryption finished in your System Settings.
Mac firewall
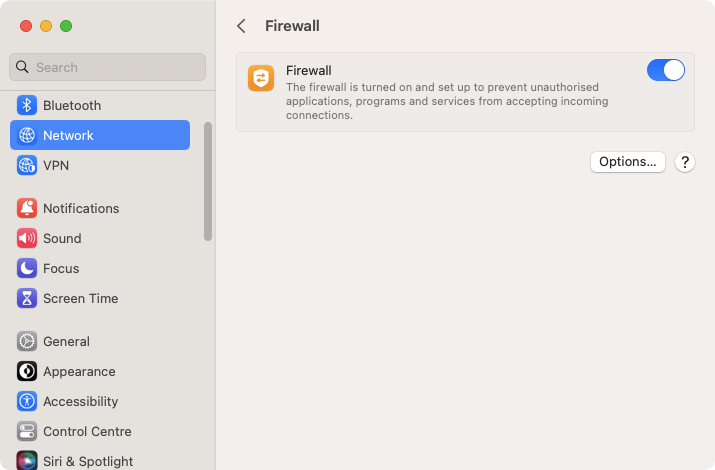
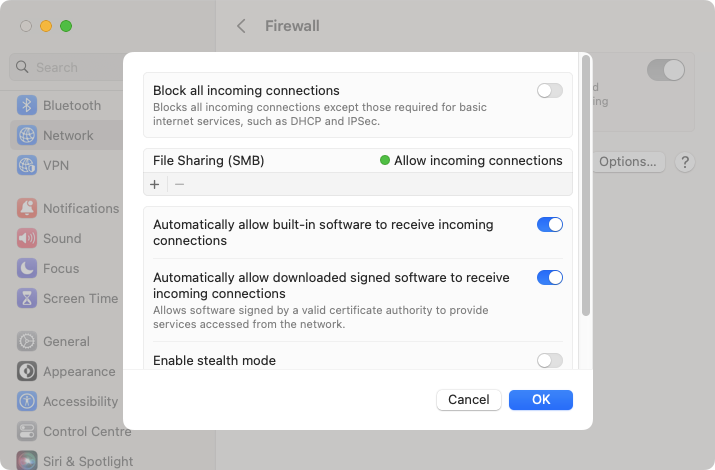
The macOS firewall lets you limit incoming connections to your Mac. This protects you from authorized connections, like hackers spying on you to steal your data or passwords.
Turning on the Mac firewall is easy:
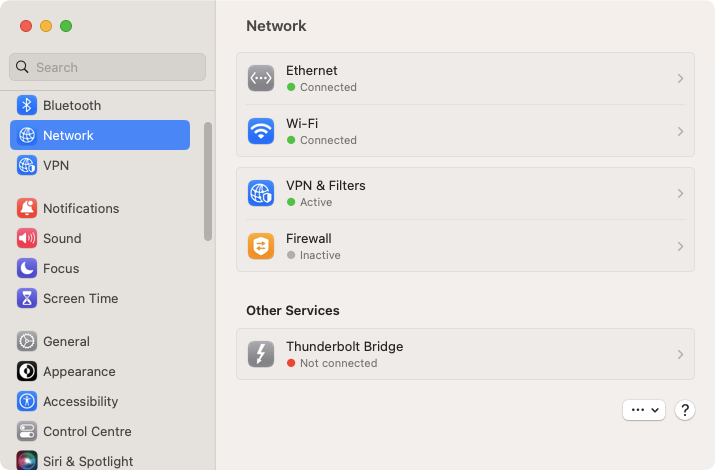
- Open System Settings, and select Network in the sidebar, then Firewall
- Use the toggle to turn on the firewall
- To tweak the firewall, click Options. Now change the settings to get the firewall set up to your liking.
Note from our experts:
In older versions of macOS, you’ll find the firewall under Privacy & Security.
Find My Mac
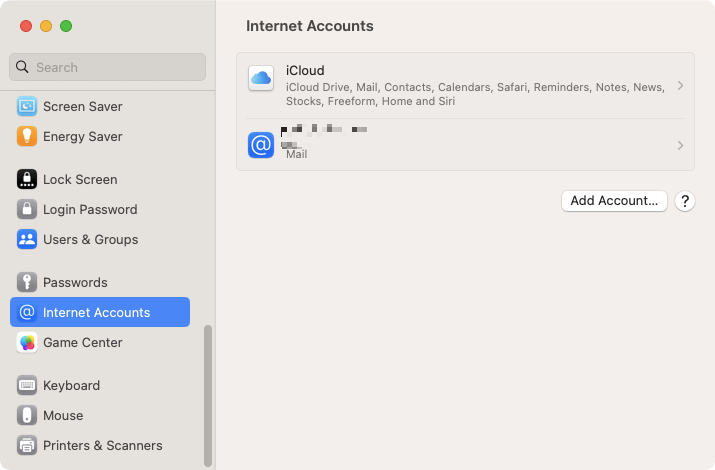
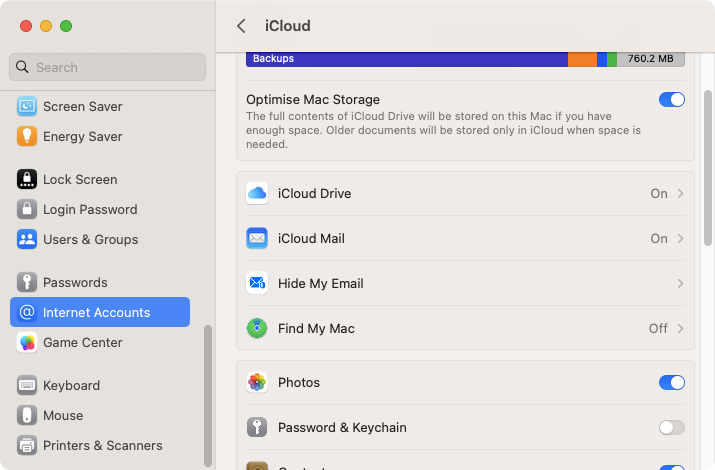
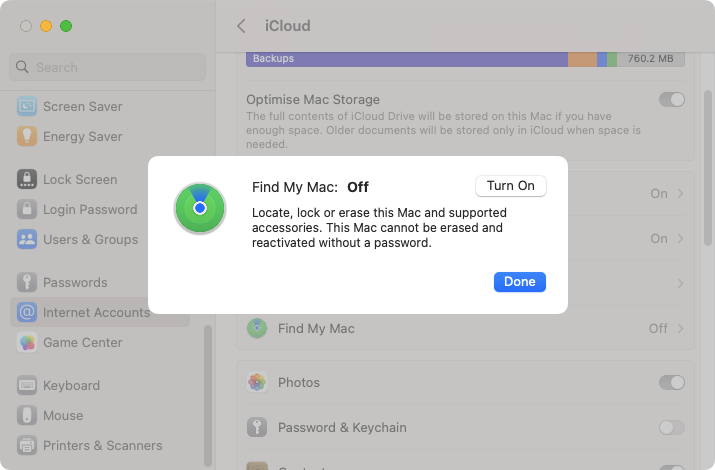
Like any laptop, MacBooks are vulnerable to theft. Fortunately, Macs include the Find My Mac feature, which lets you track where your Mac is. You can even remotely lock it and wipe its data.
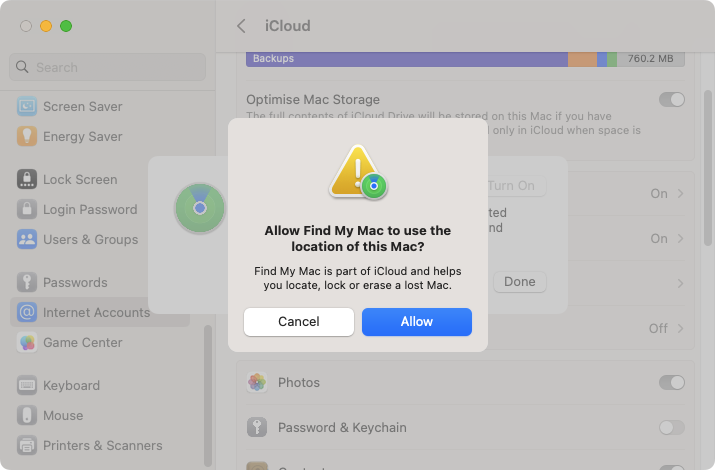
Follow these steps to set up Find My Mac:
- In System Settings, choose Internet Accounts in the sidebar, and click iCloud
- Click Find My Mac
- Click Turn On
- Click Allow > Done.
System Integrity Protection
Unlike other macOS security features, System Integrity Protection (SIP) doesn’t need setting up. Running automatically, SIP protects your whole system from unauthorized changes. This limits the damage hackers can do if they access your Mac.
Software developers can temporarily disable SIP when testing their apps, but regular users should leave it to do its thing in the background.
Firmware password
If you own an Intel Mac, you can set up a firmware password. Anyone who doesn’t have this password can only start your Mac from the main startup disk. That implies, for example, they can’t get into Recovery mode or boot from an external drive.
Why is this feature only for Intel Macs? Because FileVault has been upgraded in Apple Silicon Macs, so firmware passwords aren’t needed.
To turn on your firmware password, follow these steps:
- Start your Intel Mac in Recovery mode
- When you see the utilities window, select Utilities from the menu bar, and then Startup Security Utility or Firmware Password Utility
- Click Turn On Firmware Password
- Enter a password, then click Set Password, then restart your Mac.
Of course, you need to remember this password, otherwise you won’t be able to use your Mac properly.
Apple ID two-factor authentication
Two-factor authentication (2FA) prevents unauthorized access to your Apple ID account. Even if someone has your username and password, they can’t log into your account—not without a second authentication factor. With an Apple account, that second factor is a code, which can be sent to your phone via a text message or which will appear on your other Apple devices.
When you try to log into your account from a new device or browser, 2FA will kick in. You can then add devices and browsers to your trusted list, so you don’t have to enter the 2FA codes again on them.
By default, any new Apple ID will have two-factor authentication enabled, and it can’t be turned off.
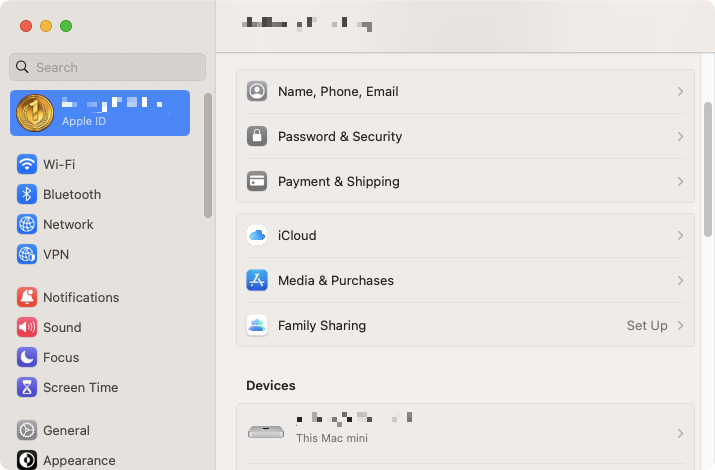
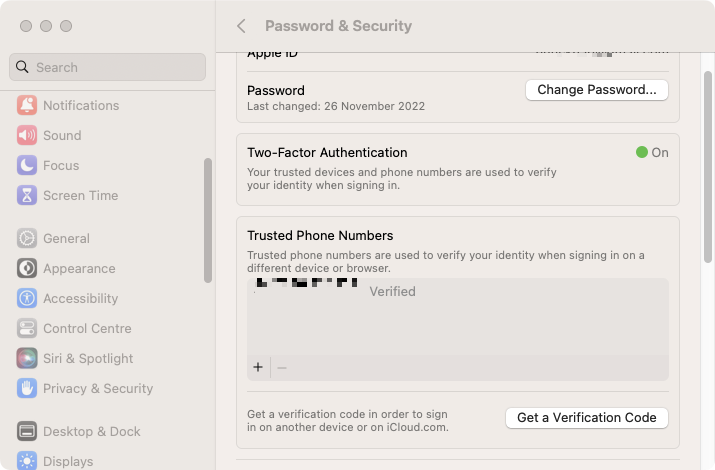
Here’s how to check 2FA is working on your Mac:
- In System Settings, select your Apple ID, then Password & Security
- In the Two-Factor Authentication section, you should see a green dot and the word On
- If it’s not on, click Turn On, and follow the prompts.
Gatekeeper and runtime protection
As its name suggests, Gatekeeper essentially decides what’s allowed in. In practice, you can’t install and run apps that aren’t from the Mac App Store. macOS lets you get around Gatekeeper by right-clicking apps and selecting Open, but these extra steps mean you’re less likely to be affected by rogue apps.
If you want to make Gatekeeper a little less restrictive, you can set it to allow apps from “identified developers” as well as the App Store:
- Go to System Settings > Privacy & Security. Scroll down, to Allow applications downloaded from, and select App Store and identified developers
- Enter your password, and press Enter.
The best security is multi-layered
Getting to know the macOS security features is a good idea, but you need to do more if you want to keep your Mac and your data safe. That’s especially true when there are viruses like OSX.Bundlore, which can bypass security features.
A multi-layered approach to security is best. Use the built-in macOS security, but you also need to follow basic security tips like this:
- Never share your passwords
- Use strong passwords, and don’t reuse them across different sites
- Don’t open email attachments from people you don’t know
- Avoid piracy sites and other unsavory sites
- If an email gives a link to log into an account, don’t use it—visit the site manually and log in
- Keep your Mac and apps up to date.
And, of course, make sure you have a reliable antivirus solution installed. Among the best antivirus for Mac, MacKeeper offers everything you need to stay safe, including real-time proactive protection and on-demand scans. Combined with your Mac’s built-in security and our basic security tips, MacKeeper’s Antivirus will give you a solid chance of staying malware-free.


