In this article you will find the following:
If you're frustrated with the lack of sound in your QuickTime screen recordings, you're not alone. Whether you use QuickTime for tutorials, webinars, gaming, or business presentations, the absence of sound can affect the quality of your recordings.
But don't worry, we're here to help. Our team will provide you with simple and practical steps to resolve this issue. So, if you're eager to get audio on your QuickTime screen recordings, keep reading for our valuable insights and easy fixes.
BEFORE WE START
Does your QuickTime player screen record no audio? You might be experiencing this issue due to a bugging or non-updated app. If so, MacKeeper's Update Tracker could be an ideal solution. With our powerful tool, you'll receive real-time notifications about necessary updates, so your system is optimized and secure.
The best part? You're in charge. MacKeeper's Update Tracker only lets you decide which apps to update regularly.
Here’s how to stay informed with major updates using MacKeeper's Update Tracker:
- Download MacKeeper
- Launch MacKeeper and select Update Tracker in the left pane
- Click Scan
- After the scan is complete, select Update All.
Why does QuickTime recording have no sound?
With QuickTime recording, capturing audio relies heavily on the functionality of your microphone. However, if your Mac's microphone is working correctly, but you still encounter no sound in your recordings, several potential reasons may be at play:
- QuickTime screen recorder may not have the necessary permissions to access your Mac's microphone
- You might not have selected an audio source for the recording
- The microphone may not be set as the sound input device
- The sound input volume might be too low
- Recording sound from a video may result in the headphone's speaker being selected as the sound output device
- The speaker volume could be too low for the microphone to capture when recording audio from a video.
Note from our team:
Determining the exact reason for the lack of sound in QuickTime recordings can be complicated. Thus, the best approach is to try different methods one-by-one to effectively troubleshoot the issue.
How to get sound on QuickTime screen recording
When recording your screen with QuickTime, you may encounter an issue where the sound is not being captured. Thankfully, our experts gathered the effective steps you can take to resolve this problem. After following our advice, the chances your QuickTime screen recordings include the audio you desire go higher.
Now explore our solutions in a more detail:
- Check microphone settings
- Check QuickTime settings
- Change sound input settings
- Update QuickTime
- Update drivers.
1. Check microphone settings
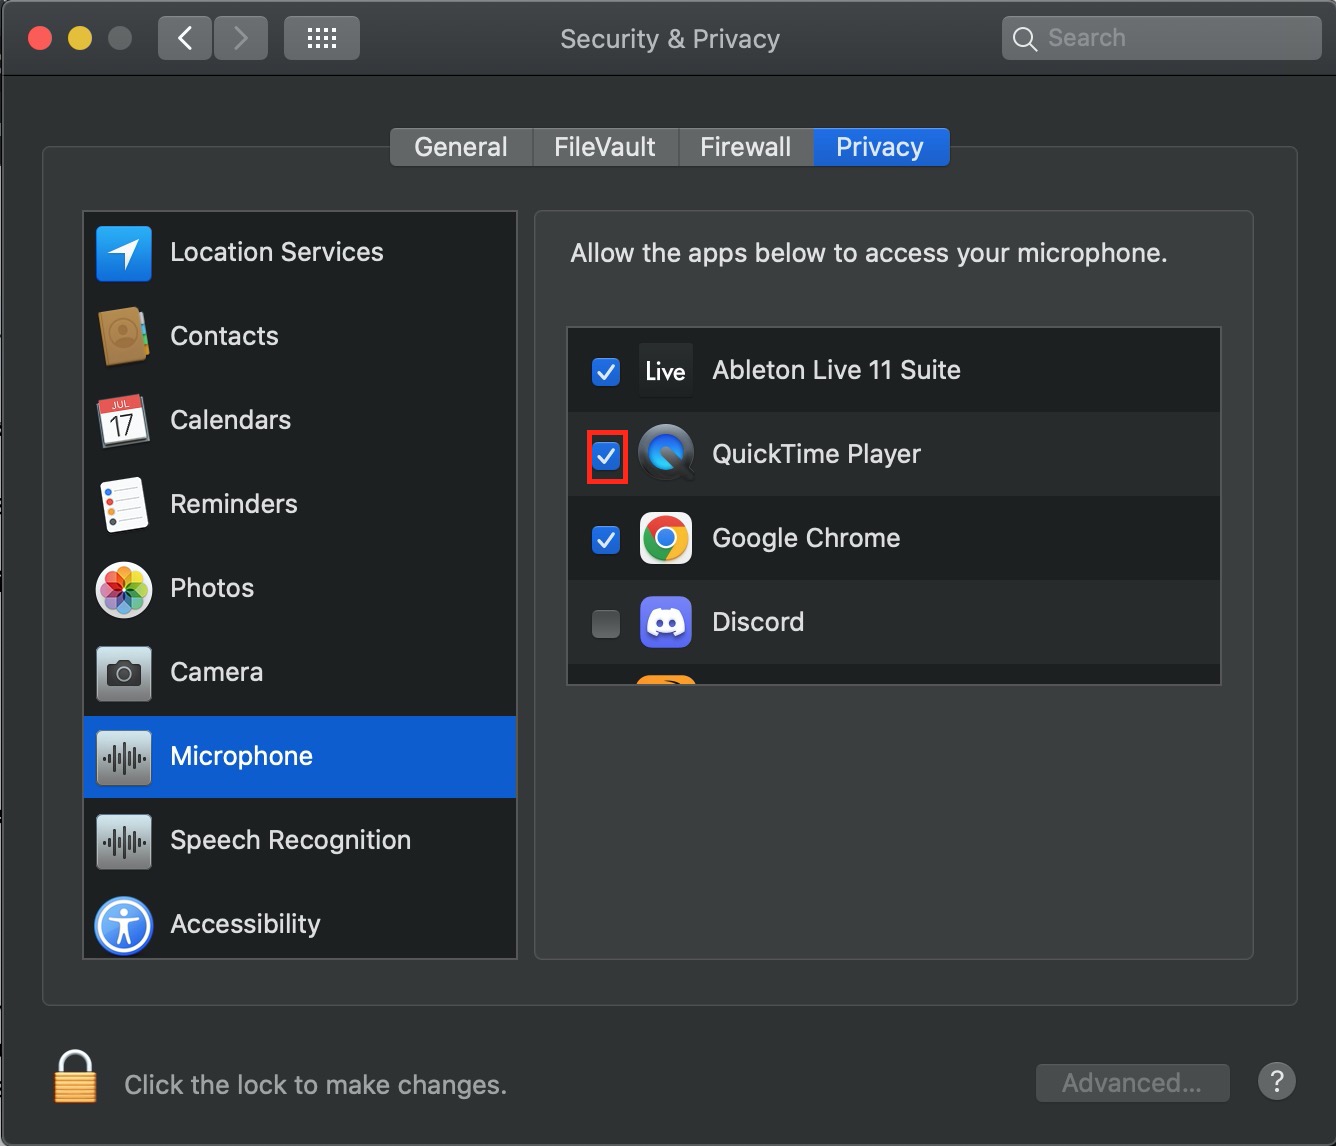
Now that your Mac's built-in microphone is ready for a successful screen recording with QuickTime, check and adjust the microphone settings. The microphone settings determine whether QuickTime has permission to access your Mac's built-in microphone. Fortunately, the process of granting this permission is straightforward and user-friendly.
Follow the steps below to check and adjust your microphone settings:
- Open System Preferences
- Go to Security & Privacy
- Click on the Privacy tab
- Select the Microphone option
- Make sure QuickTime has permission to access the microphone.
2. Check QuickTime settings
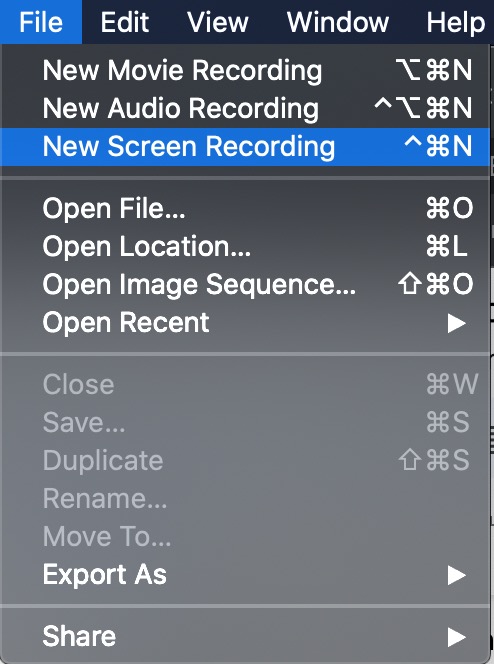
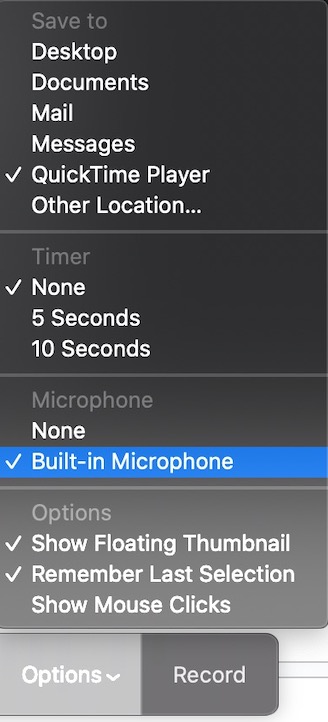
If you have no sound in your QuickTime screen recordings, we highly recommend you to review the microphone settings within the app. This way, you’’ll check if the correct microphone is selected as the input device in QuickTime, allowing you to record audio from the desired source.
Here’s how to inspect QuickTime Settings:
- Launch QuickTime select New Screen Recording
- Click on Options and select the appropriate mic, such as built-in microphone.
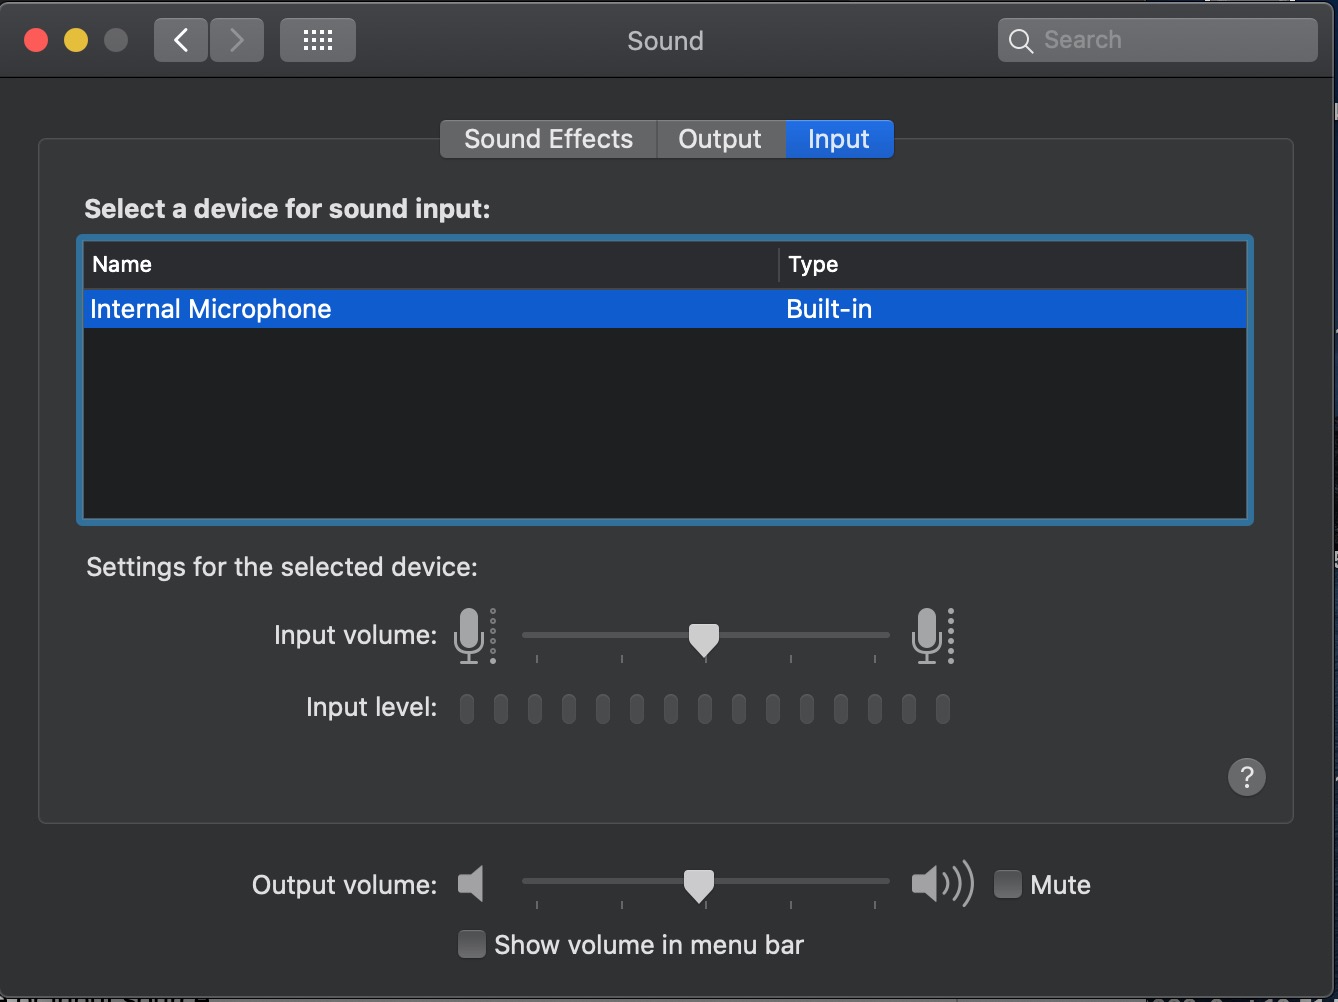
3. Change sound input settings
Another helpful step is adjusting the sound input settings in System Preferences. This simple tweak allows you to choose the right audio source for your recordings. Hopefully, this method will do the trick, if the previous haven’t.
Experimenting with different audio input options can help you find the best configuration for your recordings. So, take your time to feel the difference.
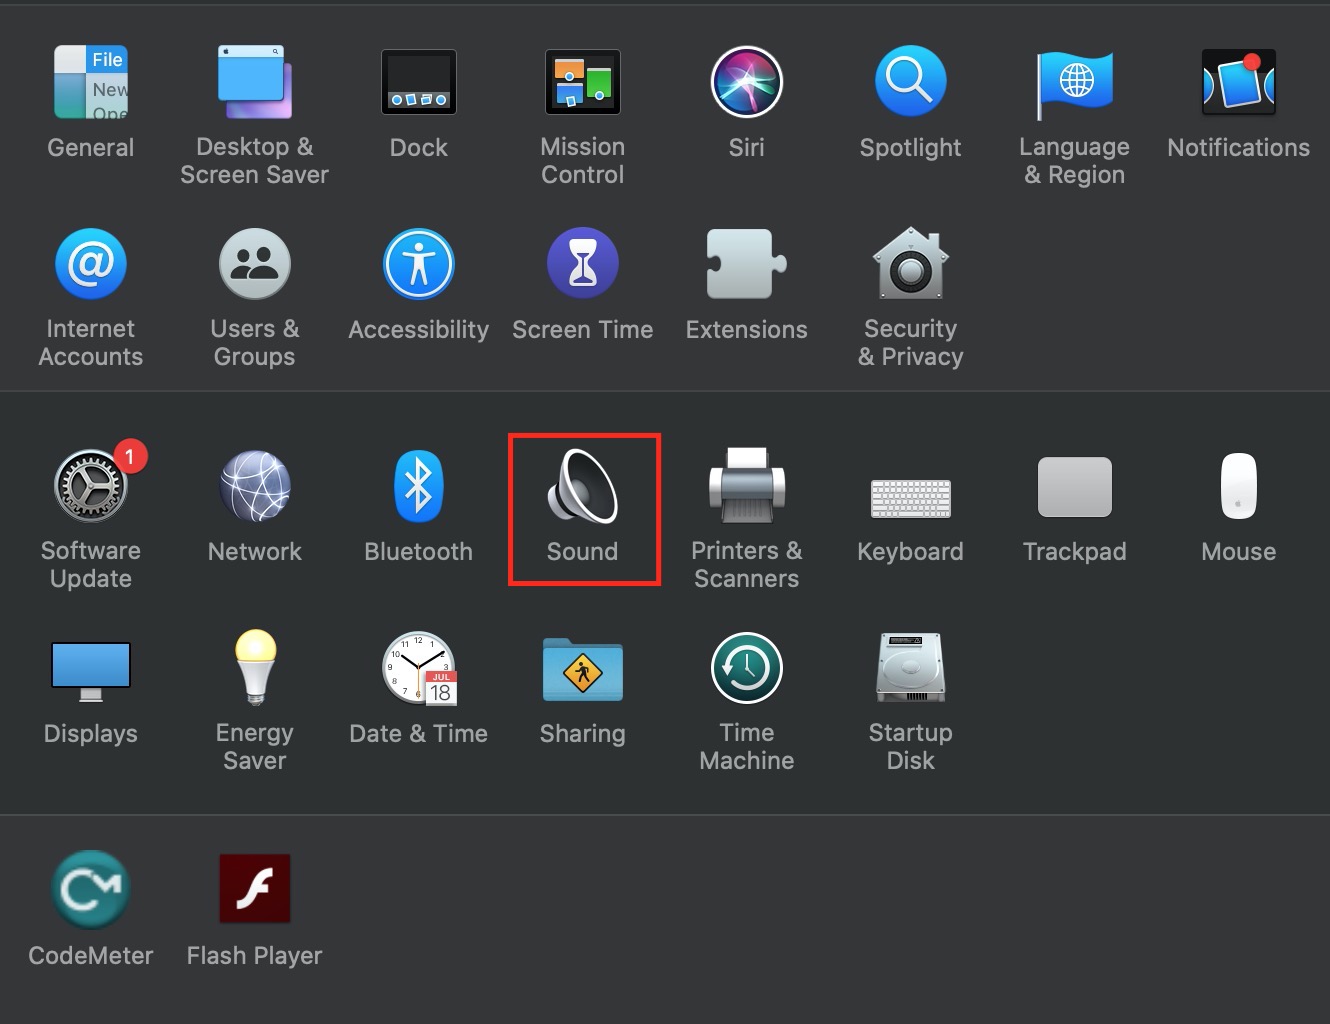
Follow these easy steps to adjust sound input settings:
- Open System Preferences by clicking on the Apple logo
- Locate and select the Sound icon
- Choose the Input tab
- Select the desired microphone or input source
- Make any necessary adjustments to the settings
- Ensure the input volume is properly adjusted for optimal audio capture.
4. Update QuickTime
With any application, we recommend keeping it up to date by installing the latest version. QuickTime is no exception, and updating the application can often resolve various issues, including sound-related problems. On occasion, an outdated version may be the culprit behind no sound in your QuickTime screen recording.
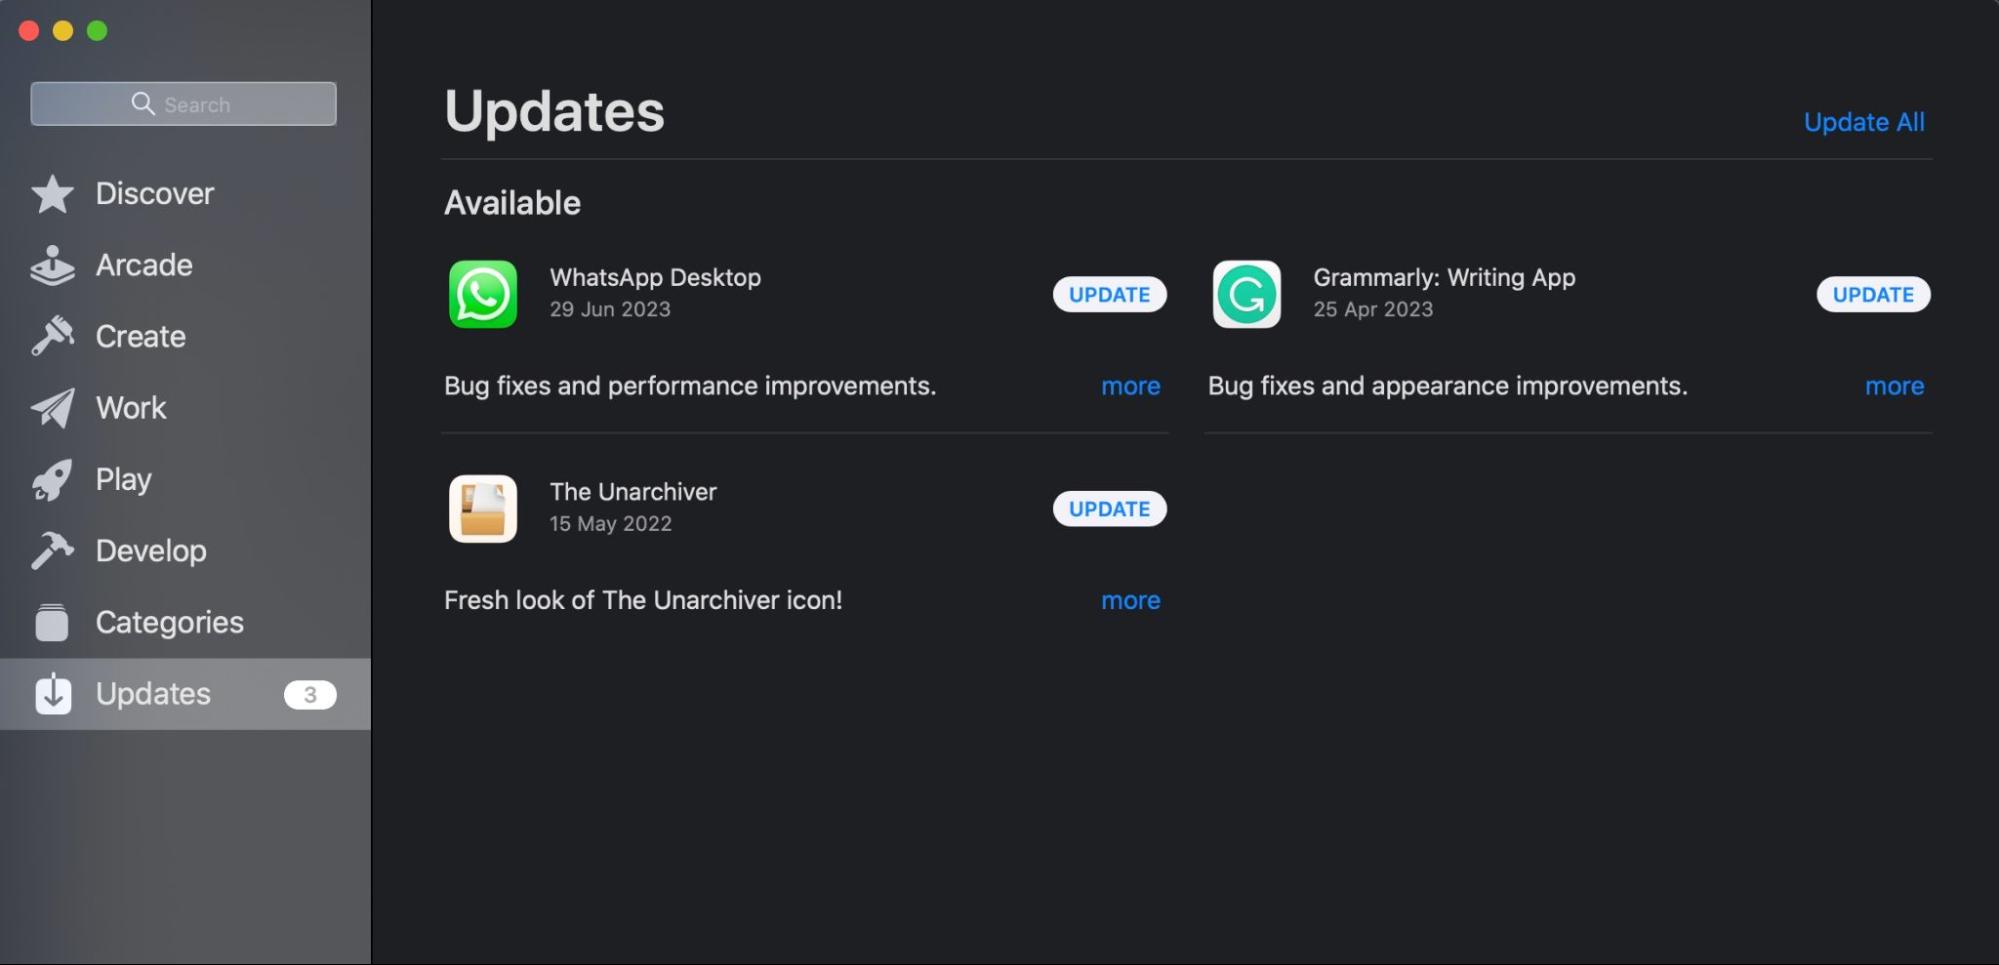
Here's how to upgrade QuickTime:
- Navigate to the App Store
- Click Updates in the left pane
- If there are any available QuickTime player updates, it’ll show here.
5. Update drivers
Aside from updating QuickTime, it's also wise to consider the drivers on your system. Outdated or incompatible drivers can often be the reason behind audio problems in QuickTime, as they act as a link between your hardware and software.
On the contrary, by keeping your drivers up to date, including any third-party ones, you can improve compatibility, address bugs, and boost overall performance. This may be the key to resolving the audio issue you're experiencing now.
Most of the time, simply updating your Mac to the latest macOS software will update your drivers.
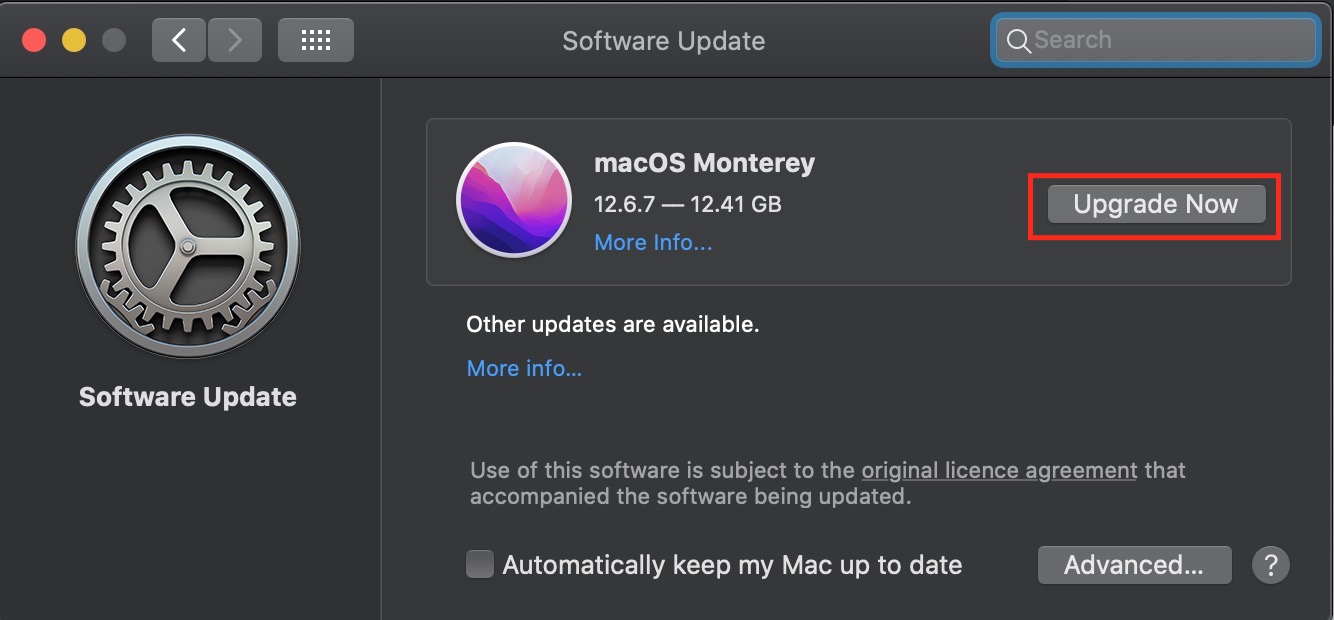
Here's how to update drivers on your Mac:
- Go to System Preferences
- Click Software Update
- If there is an available update, select Update Now.
Harmonizing your QuickTime experience
Troubleshooting sound issues in QuickTime screen recording is a piece of cake. We’ve covered the list of solutions that should help you, including checking microphone settings, reviewing the correct input device is selected, updating QuickTime, and considering driver updates if necessary. However, if all these steps fail to resolve the problem, it may be worth exploring alternative software solutions.
One such alternative is MacKeeper's Update Tracker, which can efficiently inform you about necessary updates in real time. With its user-friendly interface and customizable update management, our tool allows you to stay on top of essential software updates. Plus, by giving you the final say in which apps should be updated, you get full control over your system's update process.
For further expert help with Mac-related topics, feel free to explore our articles on how to record audio on Mac, how to record video on Mac, and resolving issues with videos not playing on Mac. Catch the valuable tips and easy-to-follow instructions to help you make the most of your Mac.


