In this article you will find the following:
The days of using Ethernet cables to connect to the internet are, for many computer users, long gone. Considering how essential Wi-Fi is for both productivity and entertainment-related needs, encountering the MacBook Wi-Fi no hardware installed error is critical and should be addressed instantly.
You'll often notice the above message when you're trying to connect your device to a network, but that isn't possible. While this error can take a while to fix, you often have several solutions—and I'll walk you through some of the most effective ones today.
Besides learning the Mac no Wi-Fi hardware installed solutions, I'll also reveal why you're suffering from these discrepancies in the first place. By understanding both sides of the coin, you'll be in a better position to stop the problem from reoccurring in the future.
Before we start
Keeping energy-consuming processes on your Mac can hinder your computer's ability to function at its maximum capability. Regularly stopping processes that can stop your Wi-Fi and other important aspects from working is crucial. One efficient solution is MacKeeper's Memory Cleaner, which allows you to quit the most energy-consuming and unwanted processes with minimum manual input.
To use the MacKeeper’s Memory Cleaner solution:
- Download MacKeeper
- Go to Performance > Memory Cleaner
- Click on the Open button at the bottom of the main window
- Tap Clean Memory within Memory Usage. To stop an app or process, go to Apps & Processes and hit the x icon > Quit.
Why does my Mac say no Wi-Fi hardware is installed?
Before I show you the solutions to fixing the Wi-Fi no hardware installed error, let's look at why you're experiencing this problem in the first place.
Below is a list of reasons that can explain why you've encountered this difficulty on your Mac.
- Wi-Fi not configured properly: You might see this error because your preferred Wi-Fi network doesn't have the correct settings. In those circumstances, you won't be able to use the connection in the way that you'd prefer to
- Problems with some of your Mac's internal drives: In other instances, you might have glitches with the internal drives on your Mac. This is typically an issue on older Macs, where you sometimes need to reset certain drives (I'll discuss it later)
- Glitches with your Mac: Your Mac could sometimes run into problems operating properly, but these are often easy to solve. All you need to do is turn your device off and then on again
- Issues with your saved Wi-Fi connections: Saved Wi-Fi connections may not work as you'd want them to, especially if you haven't updated the details in a long time. You're better off forgetting and reconnecting to the network in such cases
- Problems with your Wi-Fi adapter: Your Wi-Fi adapter can also cause the Wi-Fi not installed error. Normally, it's because you haven't updated your router's firmware.
How to fix the "Wi-Fi no hardware installed" error?
Okay, so you've now got a better understanding of why you see the message related to your MacBook not connecting to Wi-Fi. Now that we've covered those bases, I'll show you how to fix the error. Together, we'll go through each of the following:
- Restart your Mac
- Reset SMC on your Mac
- Reset PRAM or NVRAM
- Delete system configuration files
- Run some Mac maintenance
- Forget saved networks
- Check for hardware faults.
Check out each step in more detail by following along with the subsections below.
1. Restart your Mac
The easiest place to start for getting your Mac Wi-Fi to reconnect properly is by turning your Mac off and on again. Doing so can help remove glitches that may cause certain functions not to operate at their maximum potential.
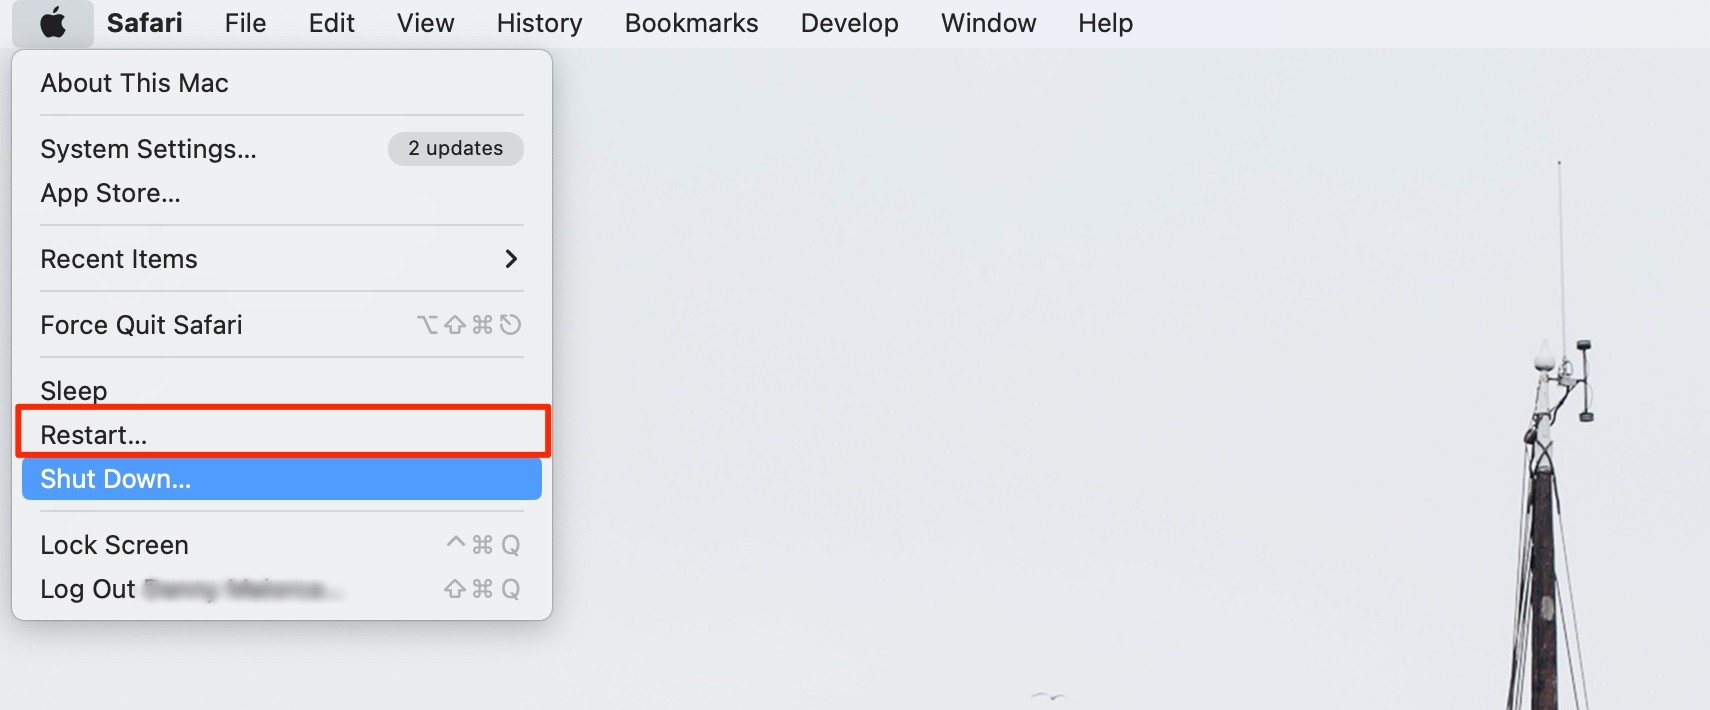
- Click on the Apple logo in the top left-hand corner
- Select Restart when the dropdown menu appears
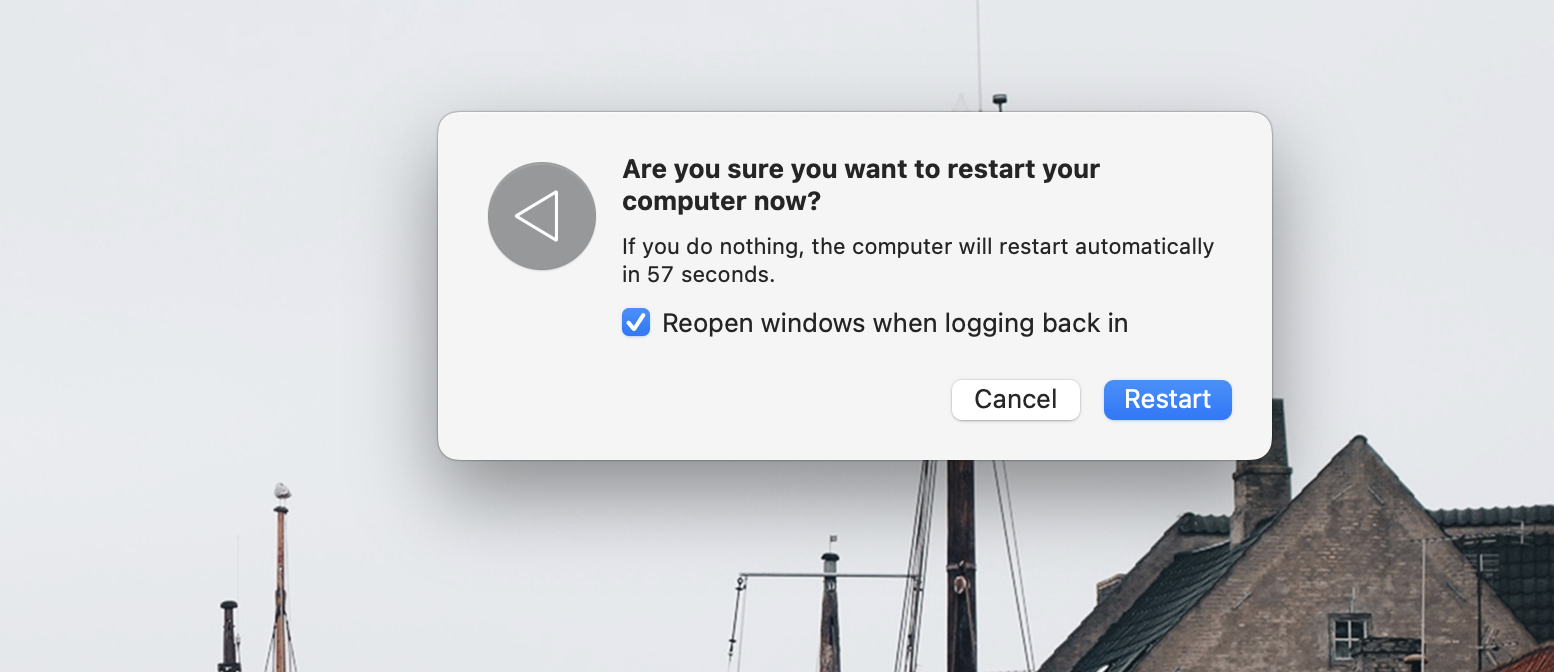
- Tap on the blue Restart button when you see the pop-up window
- Wait for your Mac to turn off and on again
- When you reach the login screen, enter your Mac password. Then, check to see if your Wi-Fi is working as it should again.
If you're asked to enter your Wi-Fi login details at some stage, knowing how to find Wi-Fi password on Mac is a good idea.
2. Reset SMC on your Mac
Resetting the System Management Controller (SMC) could potentially help fix the Wi-Fi hardware not installed problem by clearing possible glitches, even though it's typically associated with power and battery capabilities.
Mac users with an Apple Silicon chip don't need to follow a complicated process. Instead, turn your device off and on again using the steps I mentioned in the previous section.
Reset SMC for T2 security chip laptop
How you reset the SMC on other Macs depends on whether you have a T2 security chip. If you have a laptop with this chip, follow these instructions:
- Turn off your Mac
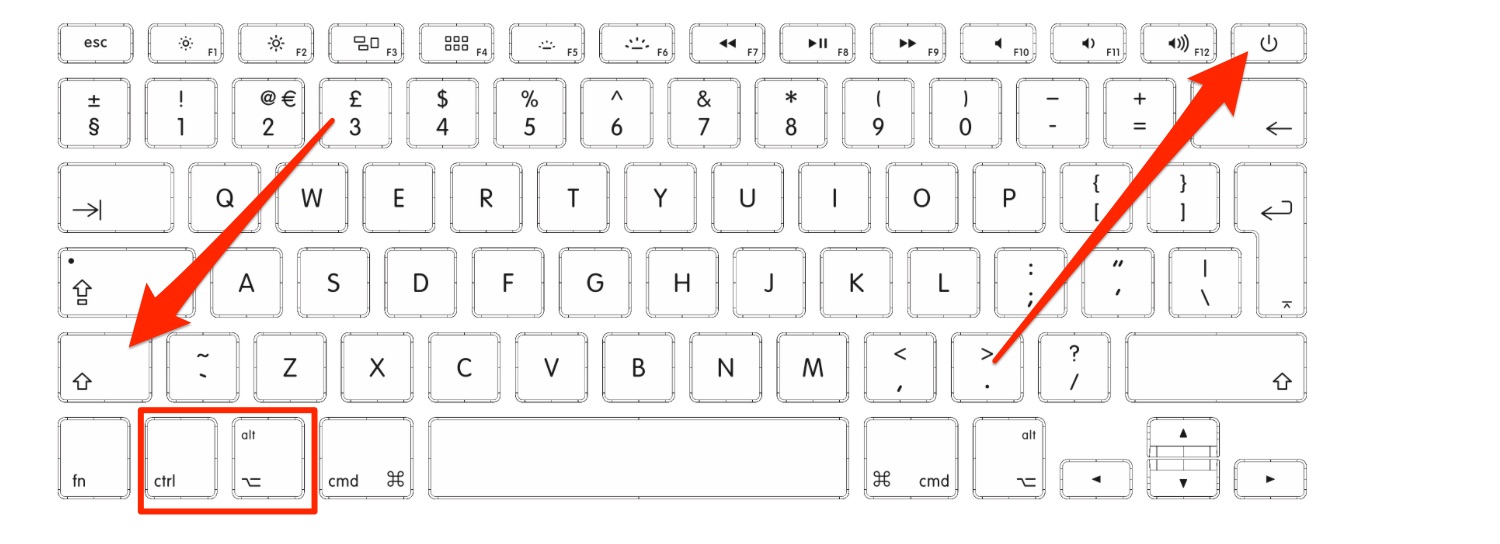
- Hold Control, Alt, and Shift simultaneously for seven seconds
- Hold on to the power button and the three buttons mentioned previously for another seven seconds
- Turn on your Mac again.
Non-T2 or Apple Silicon laptops
To reset the SMC on a MacBook without an Apple Silicon or T2 chip, follow these steps:
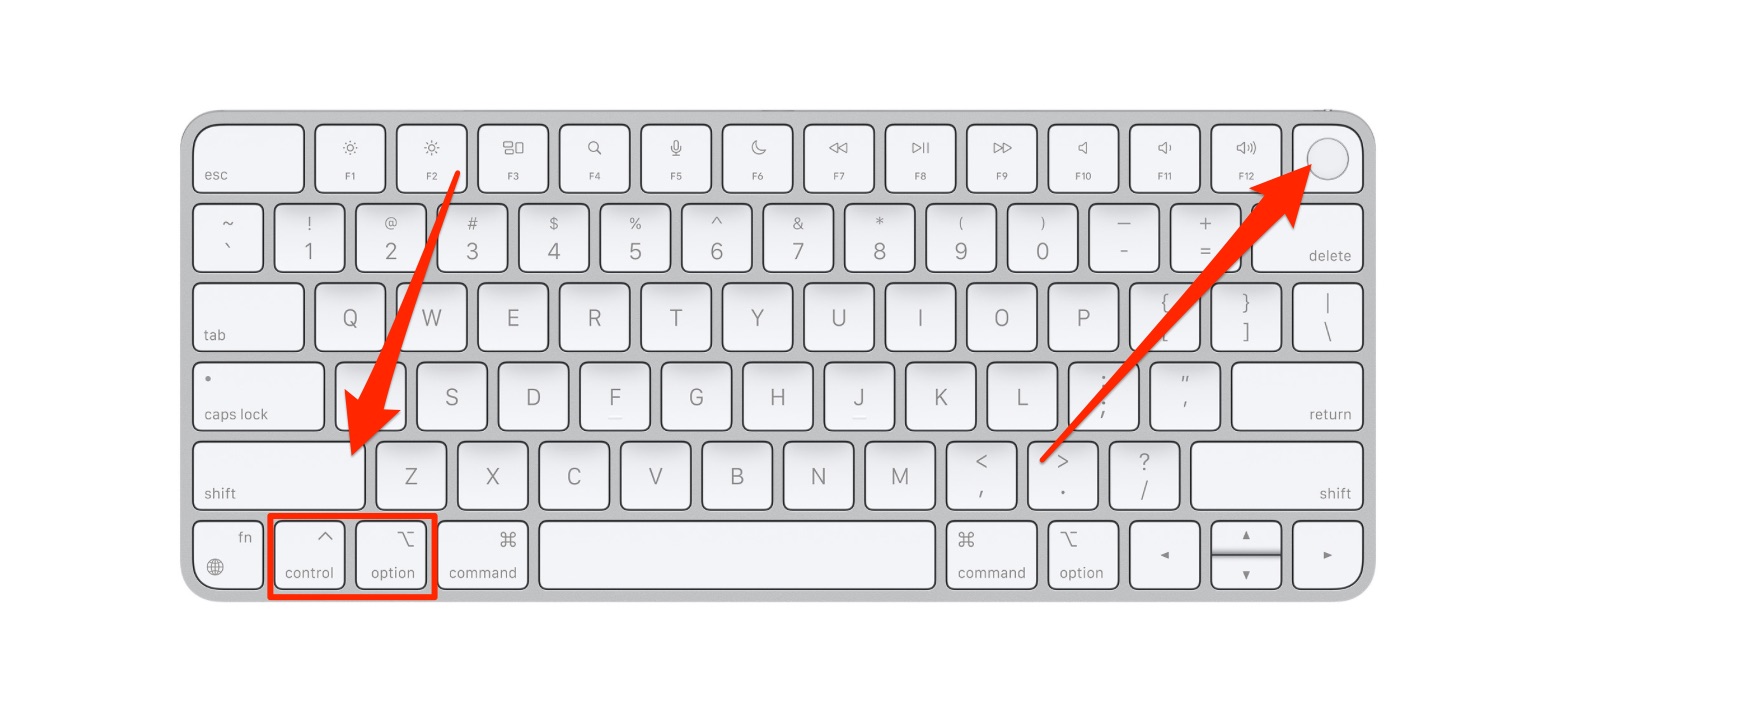
- Press Control, Shift, the power button, and Option for 10 seconds
- Turn your Mac back on after letting go of every button.
Reset SMC for Mac computers
Desktop Macs have a slightly different process:
- You'll need to turn off your Mac and unplug it from your wall for 15 seconds
- After plugging your device back in, wait five seconds and turn on your computer again.
The above steps apply whether your Mac desktop computer has a T2 security chip or not.
3. Reset PRAM or NVRAM
The PRAM/NVRAM controls functionalities like the volume of your Mac speakers and other system settings. Apple Silicon Macs don’t have this feature, so you don’t need to worry about resetting it if your device runs on that particular chip.
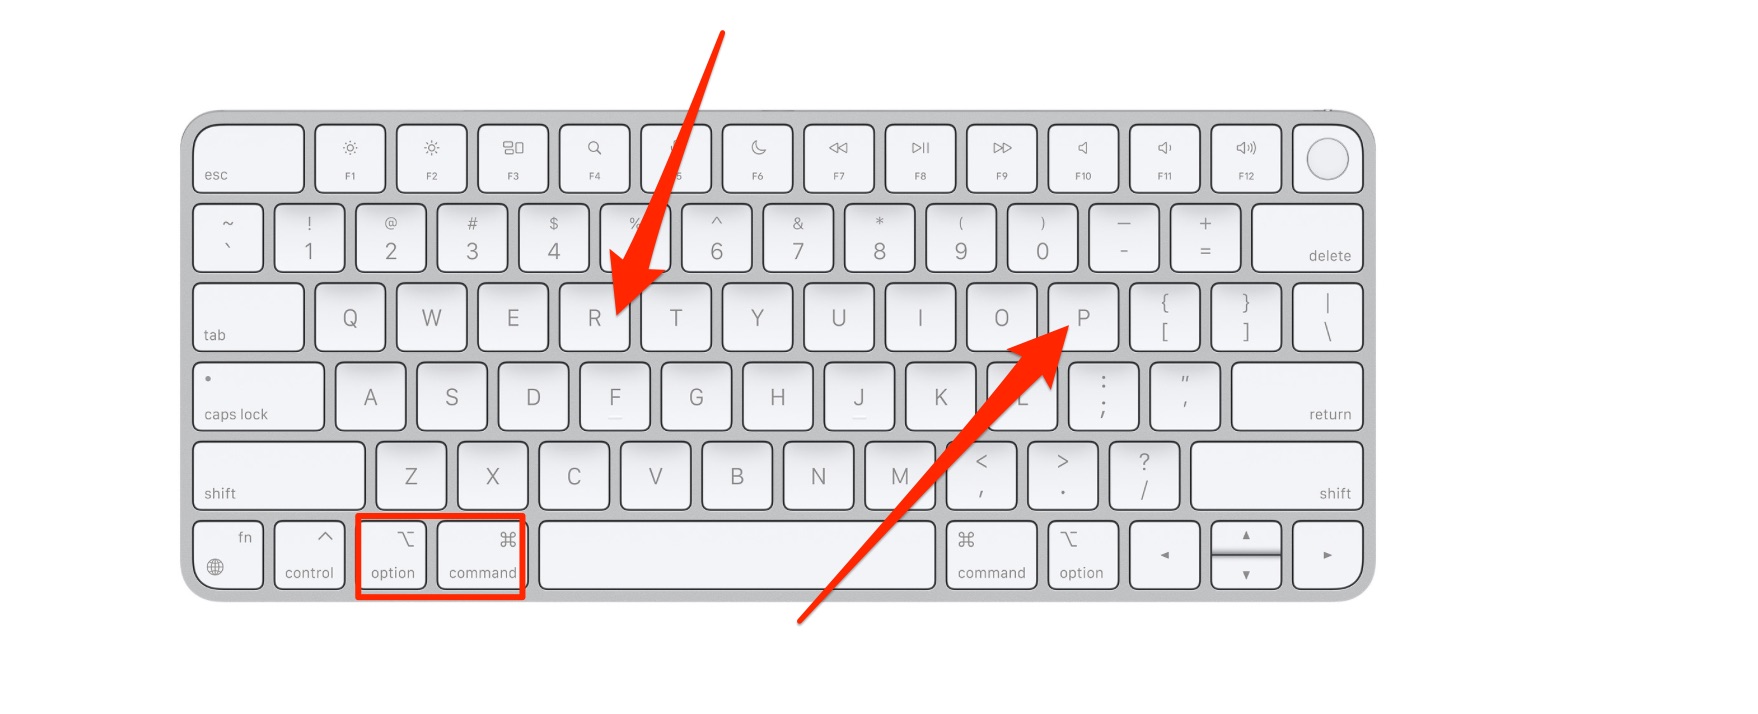
For Mac users with an Intel chip, I’ve got the other instructions:
- Turn your Mac off
- Hold Option, Command, P, and R for 20 seconds
- Wait for your Mac to switch on again
- Enter your login credentials when you’re back on the main sign-in screen.
4. Delete System Configuration files
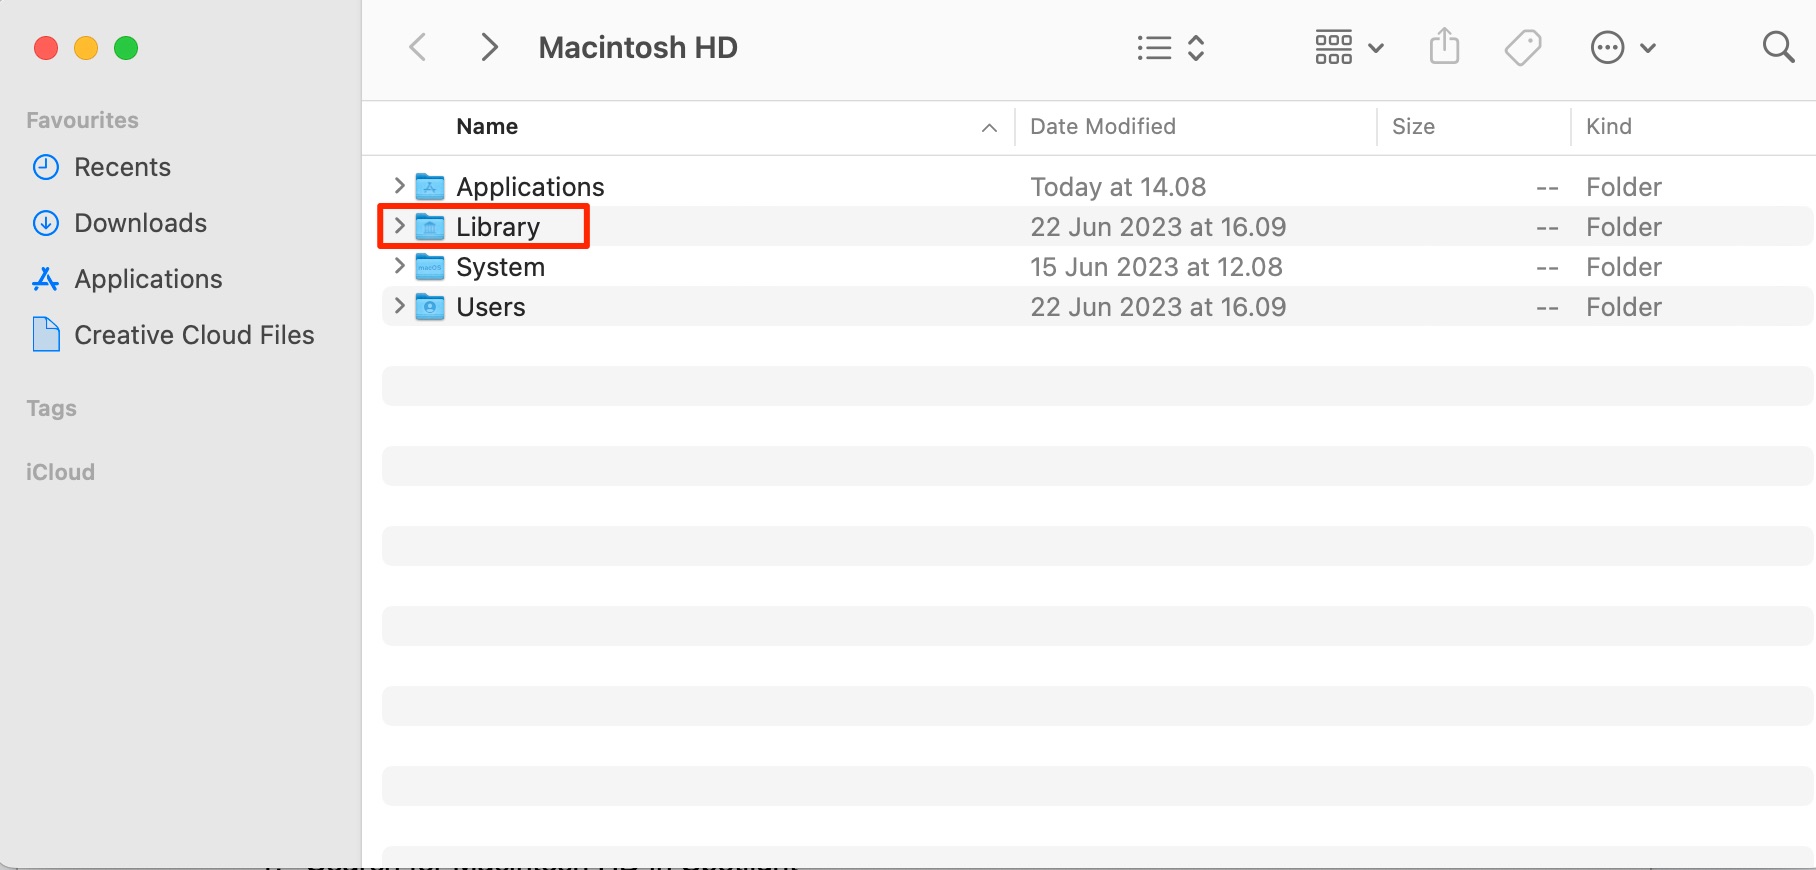
Deleting your Mac System Configuration files can help reset any things that are causing your Mac to not pick up your Wi-Fi connection properly. I must warn you to be careful when removing this folder, however, as you can stop other functions on your Mac from running as effectively.
- Search for Macintosh HD in Spotlight
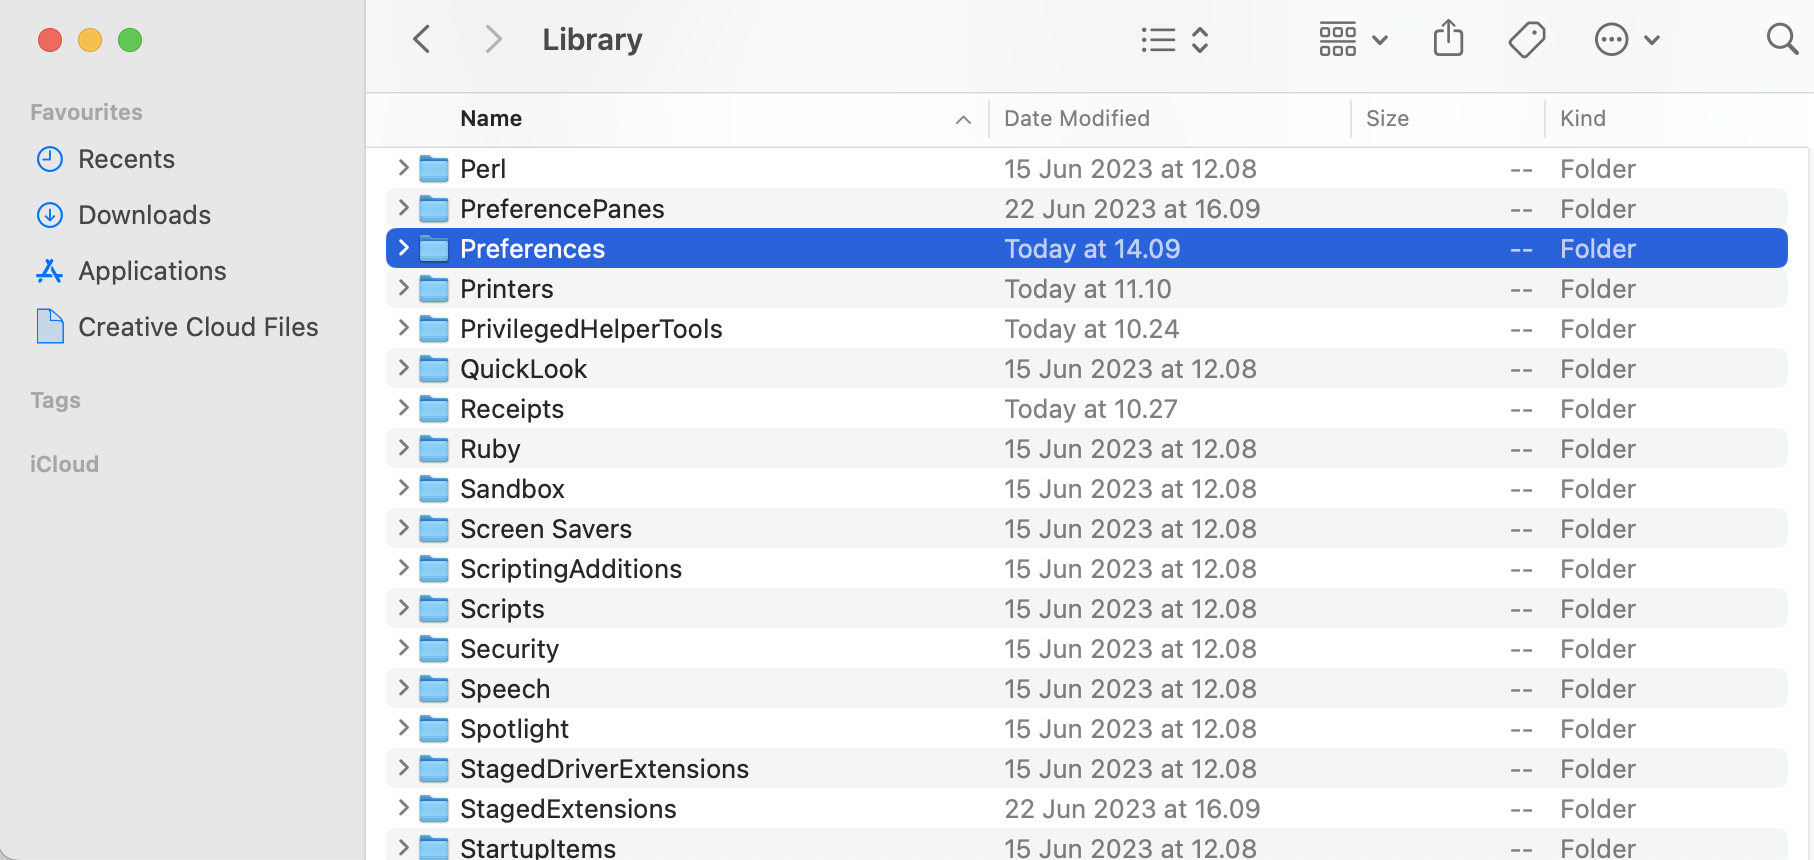
- Go to Library > Preferences
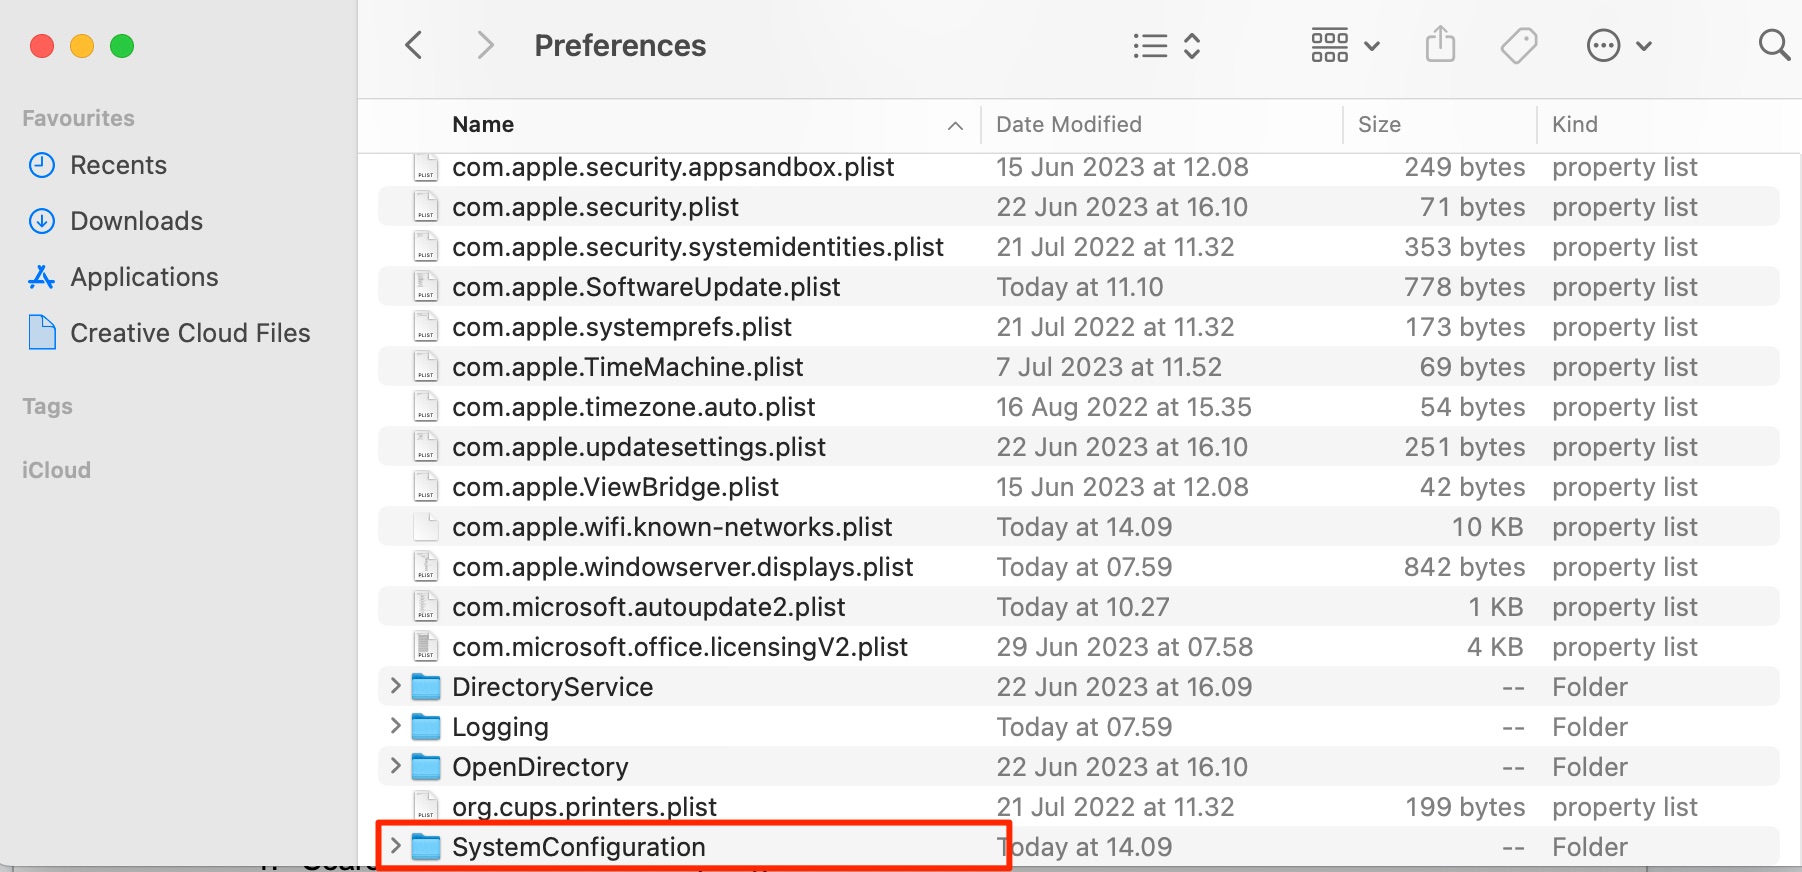
- Look for SystemConfiguration
- Drag and drop the file to your Trash, before emptying your Trash folder
- Restart your Mac.
5. Run some Mac maintenance
You can also try running a Mac maintenance script to delete files and folders that could impact how your device operates. As a result, you might be able to use your Wi-Fi again after doing so.
Here’s how to run maintenance scripts on your Mac:
- Open the Terminal on your Mac
- Type in the Terminal: sudo periodic daily weekly monthly
- Hit the Enter key and, when asked, enter your Mac password
- Tap the Enter key again.

6. Forget saved network connections
Whether you see a Wi-Fi privacy warning or the no hardware installed error, forgetting and reconnecting to saved network connections can ensure that your Mac is able to use the internet properly once more.
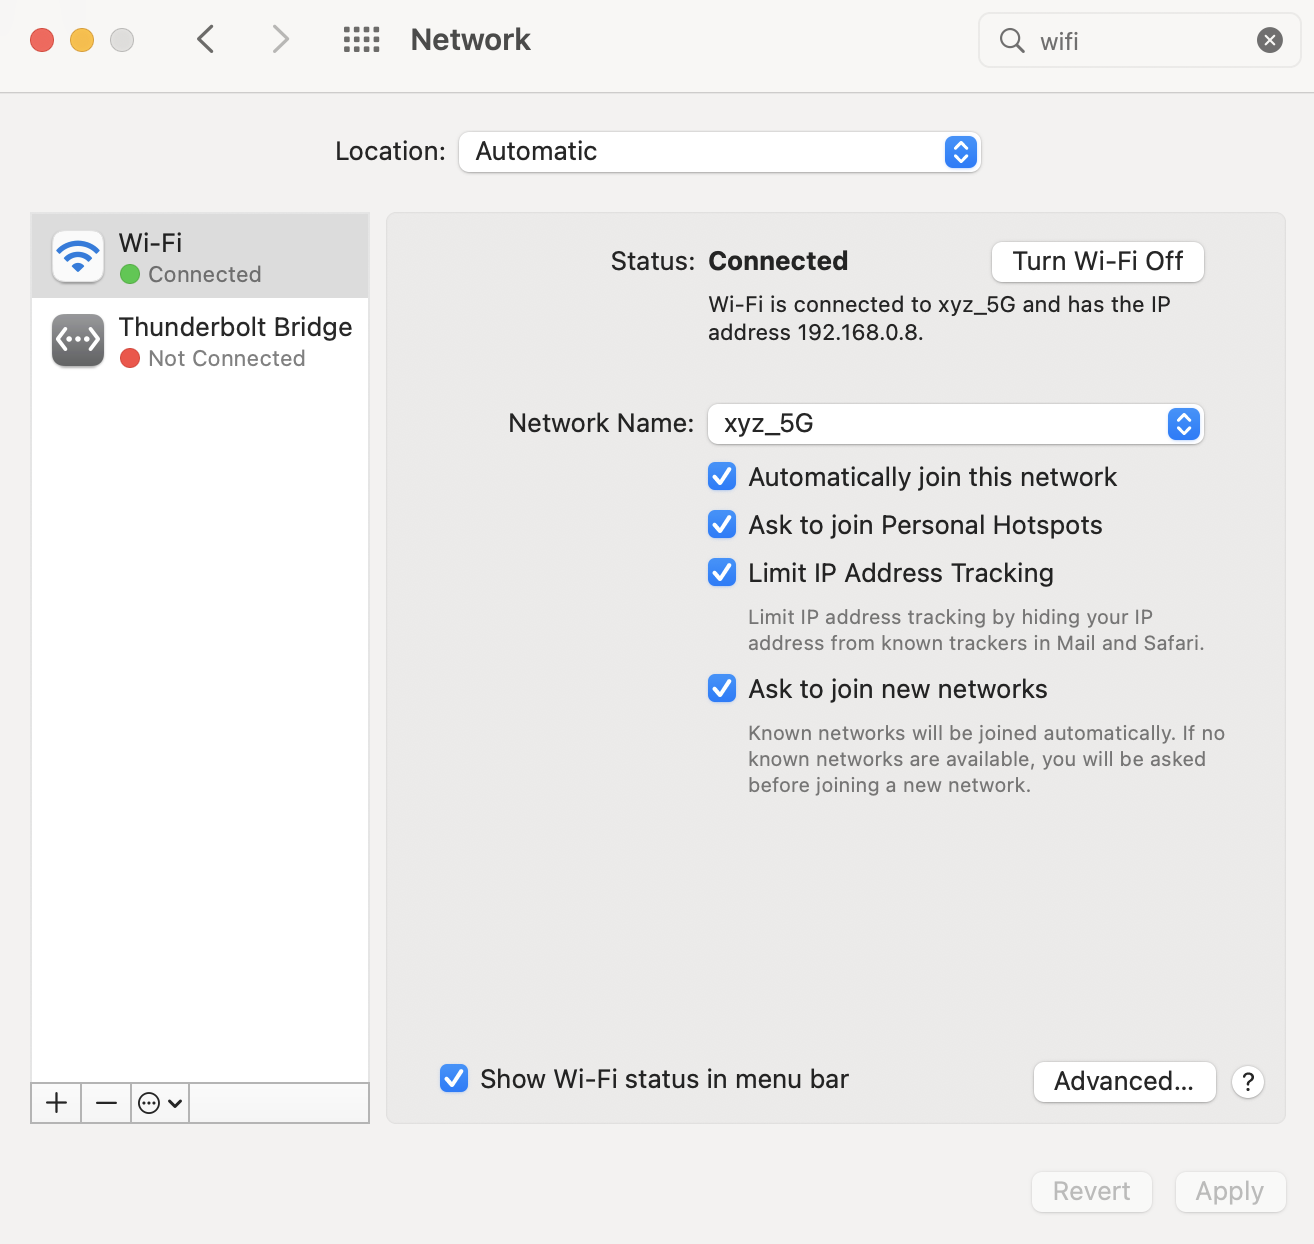
- Open System Settings and go to Wi-Fi (you can either go to Apple logo > System Settings or type the app name in Spotlight)
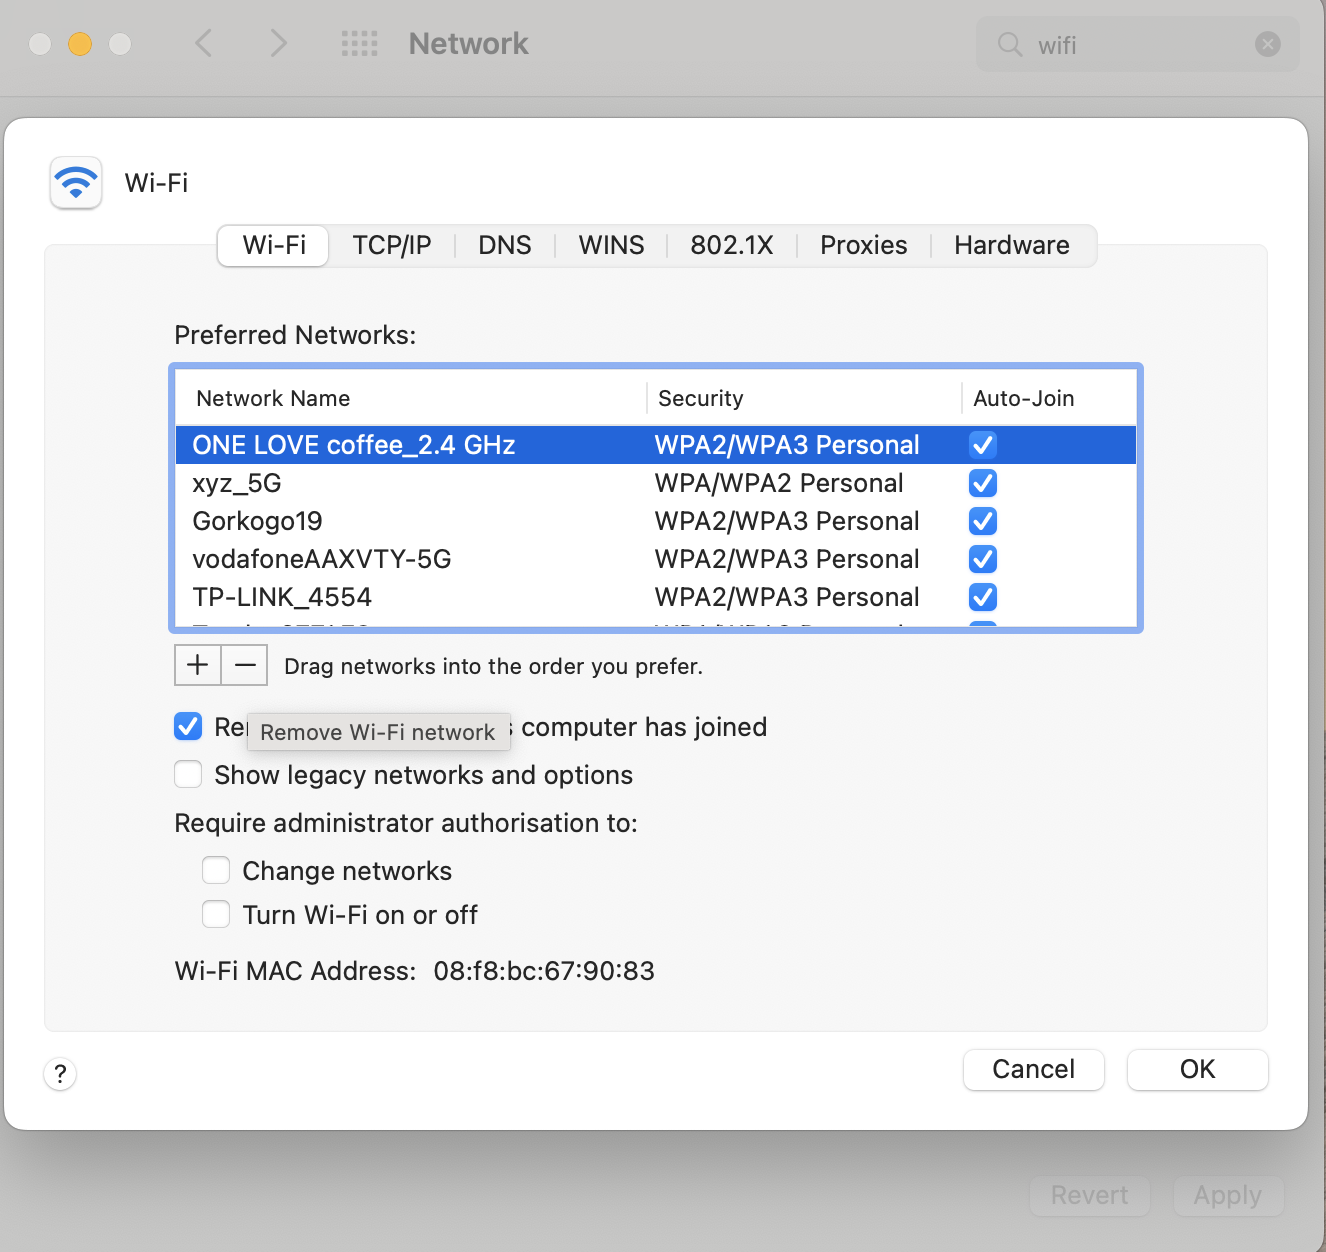
- Scroll down to Advanced and click on that button
- Select the Wi-Fi network you want to remove and hit the - button
- Confirm your choice
- Click on OK and go back to the main screen
- Under Other Networks, choose the Wi-Fi network you’d like to connect to
- Enter the password and reconnect.
7. Check for hardware faults
Checking for hardware faults with your Mac can help determine whether the problem lies with your computer, or whether you need to contact your network provider. Running a diagnostic depends on whether you have an Intel or Apple Silicon Mac.
If you have an Apple Silicon Mac:
- Hold the Touch ID/standby button until your startup options appear
- Press Command + D and wait for the diagnosis results to return.
For Intel users:
- Turn on your Mac and hold D until you either have to pick a language or see a loading bar
- Wait for the results of your Mac’s diagnostics.
Stop the Wi-Fi no hardware installed error from hindering your macOS workflow
Having your Mac show the message that no hardware is installed for your Wi-Fi is infuriating at best. Ideally, you don’t need to spend a huge amount of time fixing this issue—but you’ve got plenty of options if you ever need to take a closer look. Now that you’ve read my guide, you should have the Wi-Fi no hardware installed fix.
I recommend starting with simpler potential solutions, such as restarting your Mac and resetting certain hardware settings (if your Mac allows you to). If neither of those works, you can run maintenance commands and forget Wi-Fi networks.
Keeping your Mac cleaned up with the MacKeeper’s Memory Cleaner can also eliminate energy-consuming processes that might lead to the no Wi-Fi hardware problem.


