In this article you will find the following:
Does Bing open when you search on Google? Or does your browser’s homepage always redirect to Microsoft's search engine? If you're positive you didn't make the change yourself, then chances are your Mac has been infected with a Microsoft Bing redirect virus.
In this article, we'll get you acquainted with the best ways on how to get rid of Microsoft Bing redirect virus from your Mac (Safari, Google Chrome, Mozilla Firefox, and Opera). A lot of the steps in our guide can also be applied to other browsers, such as Brave and Microsoft Edge, with some fairly minor adjustments.
Ready to get your browser back under your control? Follow us to find out more about what the Bing redirect virus means and how to remove it from your trusty Mac.
Why does Google redirect to Bing on Mac?
If your Mac’s web browser automatically redirects to Bing when you start it, it could just be an innocent mistake. You might have accidentally changed your browser’s homepage. If that's the case, then you can simply go into your browser’s settings and change it back.
Meanwhile, you should be suspicious when your homepage changes back to Bing or when Google redirects to Bing. Then, it’s likely been infected with a browser hijacker—similar to Search Baron. This is malware that takes over your browser and controls its behavior. This will often serve the malware creators in some way, including:
- Generating advertising revenue
- Directing you to more malware
- Stealing your data using phishing pages
What is the Bing redirect virus?
A Bing redirect virus can be any potentially unwanted program (PUP), malicious browser extension, or Mac configuration profile that modifies—or hijacks—your browser's settings without asking for permission.
Browser hijackers piggyback on legitimate applications and "free" downloads or trick you into installing them with fake warnings, offers, and advertisements.
For example, Mac Auto Fixer and The Easy Way Pro are known Bing redirect viruses that mislead users by claiming to fix your Mac or improve search results. They merely use Bing or something that looks like it to appear legitimate.
For more information about malware, check out our guide devoted to the question do Mac computers get viruses?
Is Bing redirection actually a virus?
The presence of a browser hijacker doesn't necessarily mean you're dealing with a computer "virus" since it doesn't replicate itself. However, it still poses a significant risk to your privacy and security.
For example, browser hijackers steal personal data such as your IP address and browsing history, annoy you with sponsored results and upgrade notifications, and raise the odds of downloading even more harmful software. For example, a browser hijacker might put spyware on your Mac.
How Bing redirect was installed on your Mac
Like all malware, there are many ways to get the Bing redirect malware on your Mac. Here are some possible routes of infection:
- Infected email attachments—these will most likely be from people you don’t know.
- Infected web pages—you may have reached these from links in emails, rogue ads, or other web pages).
- Rogue browser extensions—these could be from official extension stores or third-party sites.
- Infected apps—this is particularly common in pirated software.
A note from our experts:
Here’s how to run a scan your Mac with Antivirus:
- Download MacKeeper and run it, then select Antivirus.
- Click Start Scan.
- When the scan is done, select anything suspicious and click Delete. Click Delete again.
In just a few clicks, your Mac will be free of malware and ready for action. Give it a go today and see for yourself.
How to get rid of Microsoft Bing on Mac
The Bing redirect virus can infect any browser on your Mac, and removal typically consists of multiple steps. Here's how to remove Bing from Mac:
1. Attempt to change search engine and homepage
It's a good idea to begin by rolling back any changes to your web browser's search engine and homepage. Typically, browser hijackers prevent you from performing manual modifications, which lets you determine if you're dealing with a Bing redirect virus or just an accidental change to your browser settings.
1.1 Change search engine and homepage in Safari
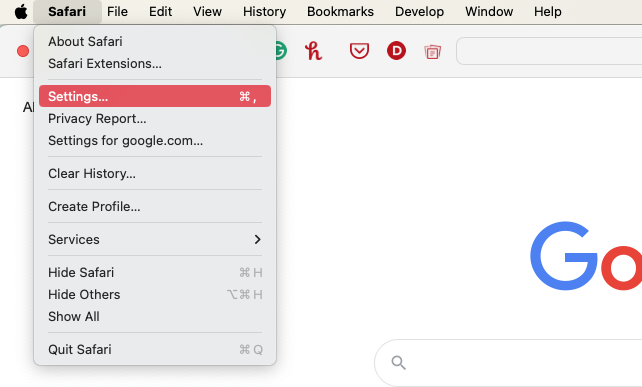
If you need to remove Bing from Safari, you need to modify its homepage as well as search engine suggestions. Here are the instructions for you:
- Open Safari and select Safari > Preferences on the menu bar.
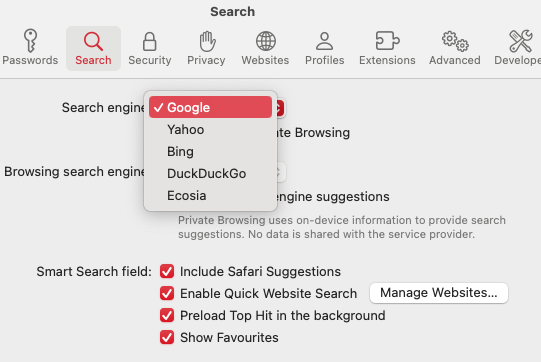
- In the Search tab, open the drop-down menu next to Search engine and select your preferred search engine.
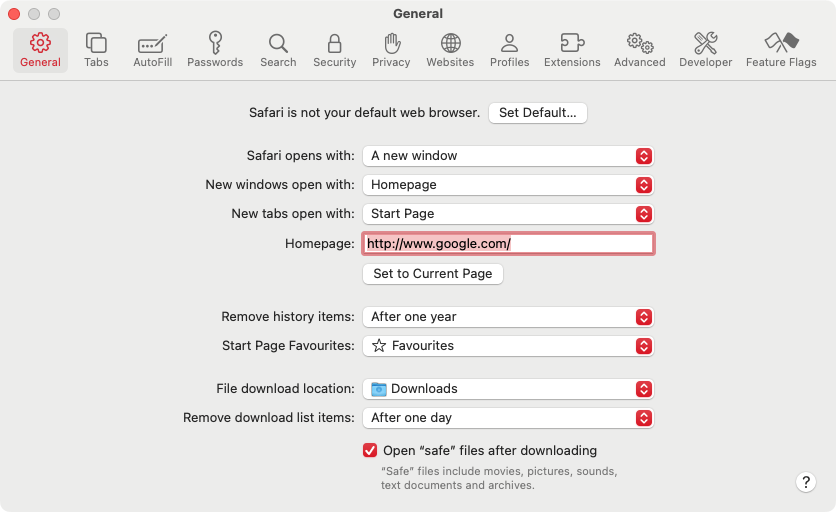
- Switch to the General tab. If you see Bing.com or a strange URL within the Homepage field, replace or delete it.
1.2 Setting up the search engine and homepage in Chrome
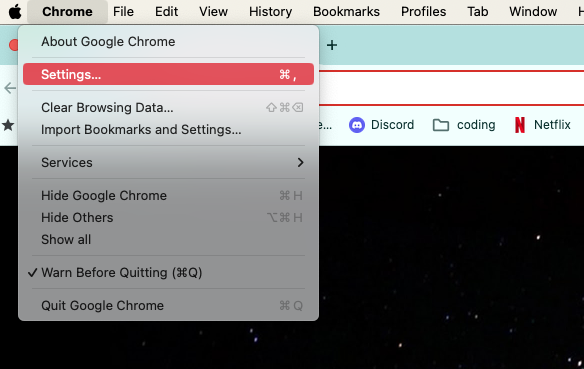
You can do the same in Chrome settings. Follow the list of steps to change it all in Chrome:
- Open the Chrome menu and select Settings.
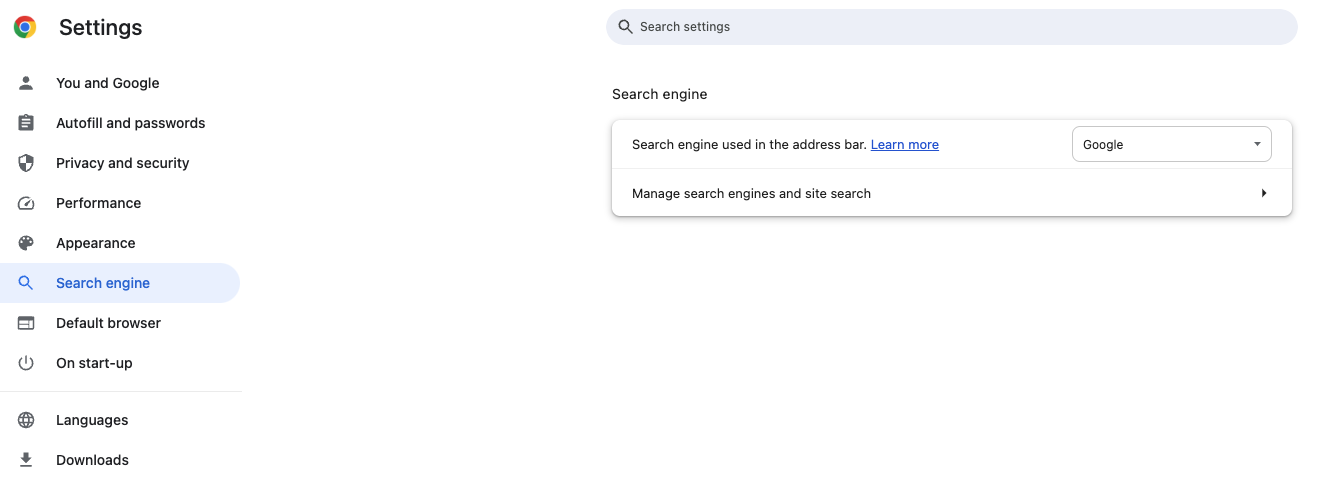
- Select Search engine in the sidebar. Open the drop-down menu next to Search engine used in the address bar and set a different search engine.
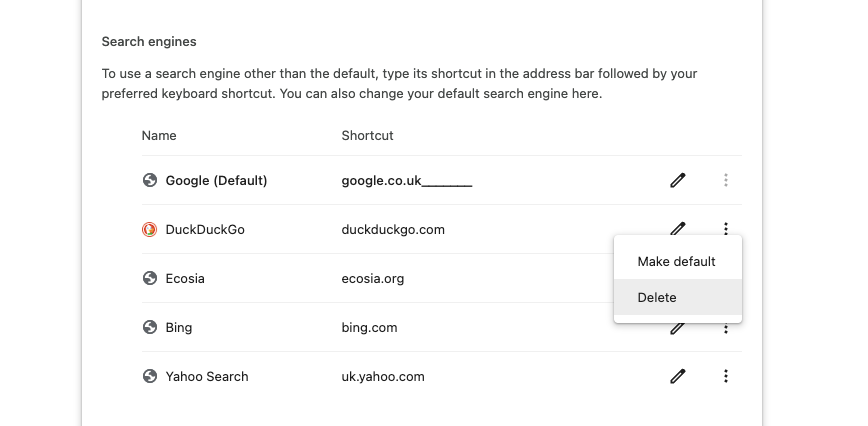
- If you notice a suspicious search engine within the drop-down list in the step above, select the Manage search engines and site search option, select the More icon (three dots) next to the item, and select Delete.
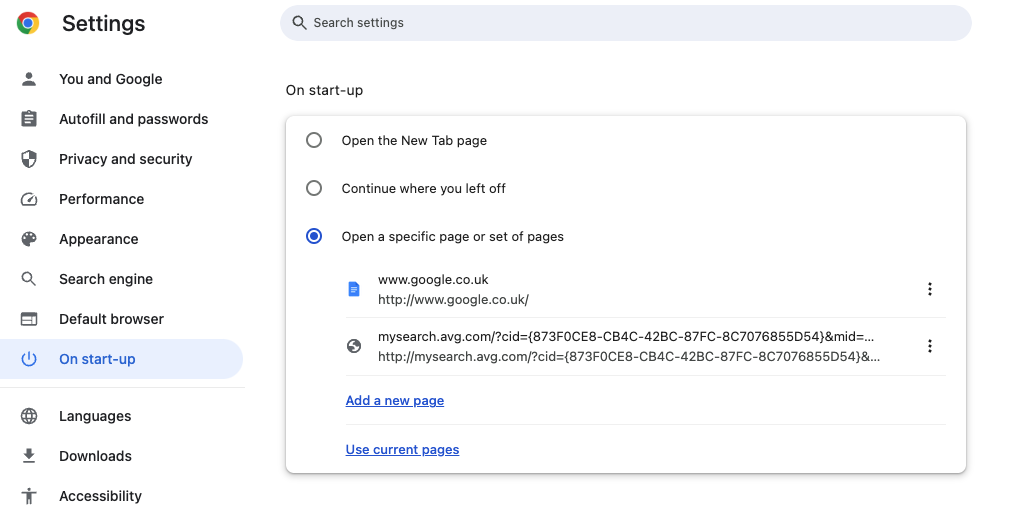
- Switch to the On Startup side tab. Delete or replace any unwanted addresses if the Open a specific page or set of pages option is active.
1.3 Manage search engine and homepage in Firefox
The easiest way to change the Firefox homepage and search engine consists of the following steps:
- Open the Firefox menu and select Settings.
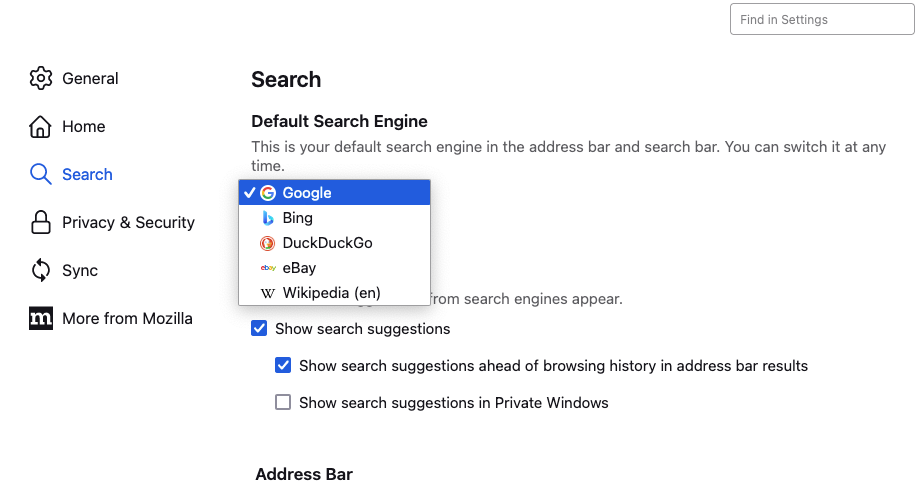
- Switch to the Search tab. Open the drop-down menu under Default Search Engine and pick your preferred search engine.
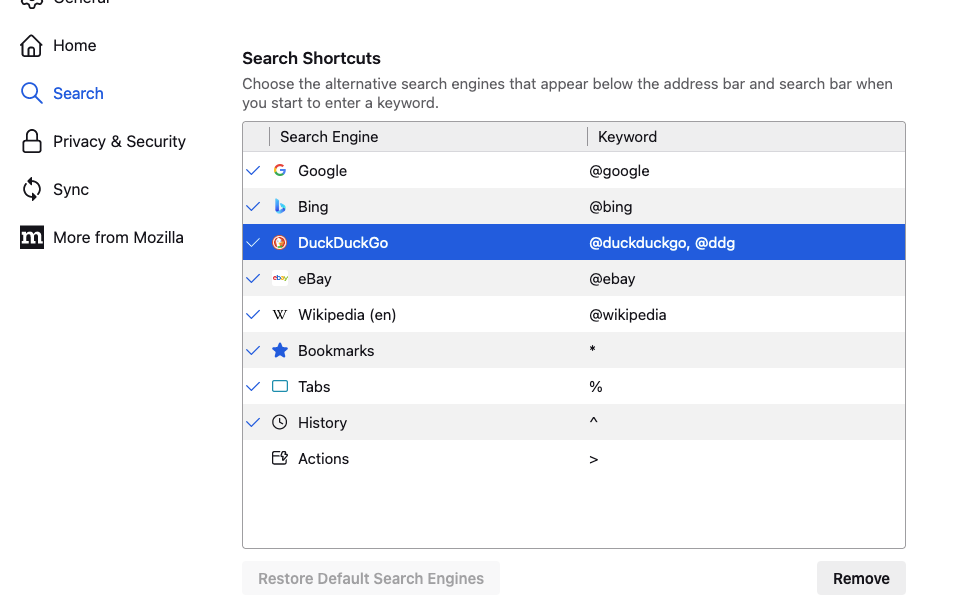
- If you notice an unfamiliar search engine, scroll down to the Search Shortcuts section, highlight the item, and select Remove.
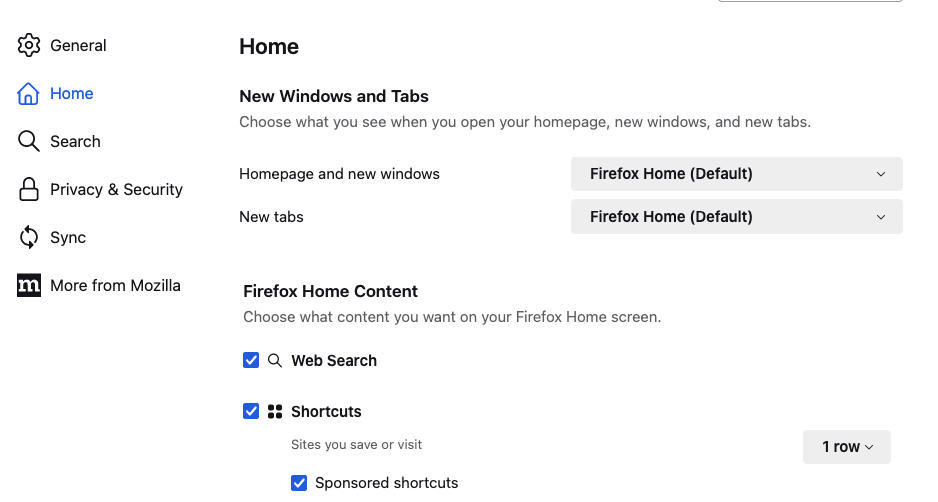
- Switch to the Home tab. Delete or replace any unusual URLs if the Homepage and new windows option is active.

1.4 Adjust the search engine and homepage in Opera
Similar to other browsers, you can easily change Opera’s homepage settings. Simply do the following:
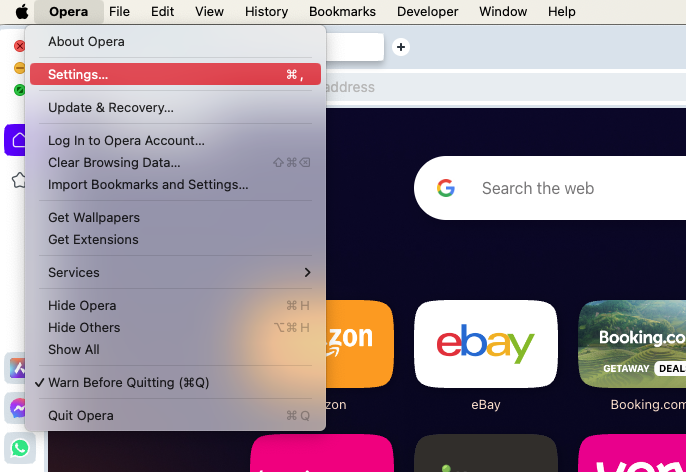
- Select Opera > Settings from the menu bar.
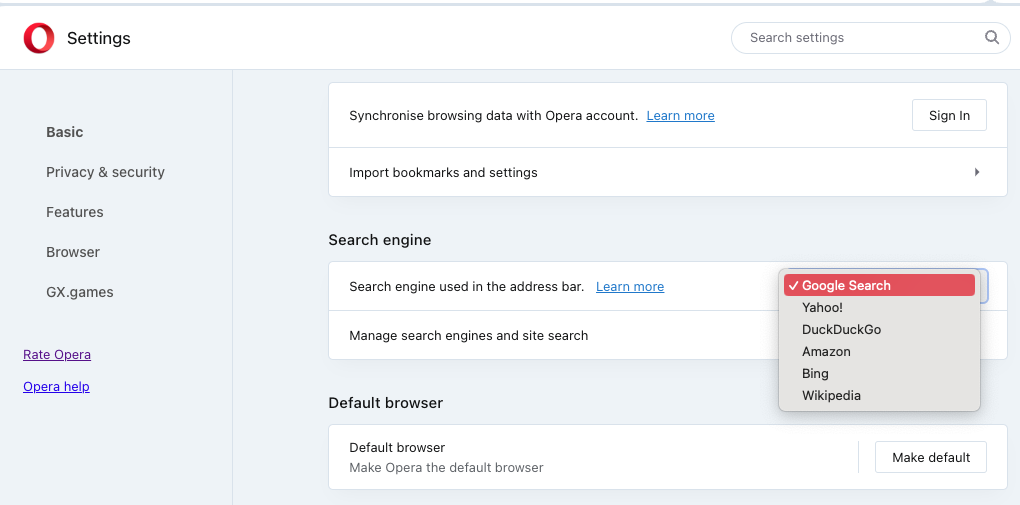
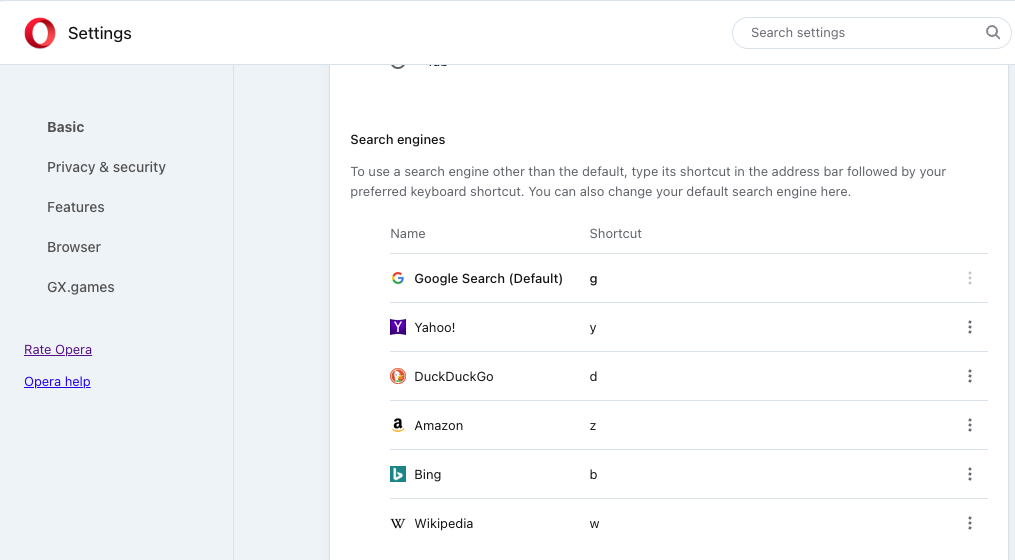
- Click Basic in the sidebar and scroll down to Search engine. Use the dropdown menu to choose your preferred search provider.
- If you see any search engines that seem suspicious, click Manage search engines and site search. Click the three dots next to a search engine and remove it. Note—you can’t remove the default search engines.
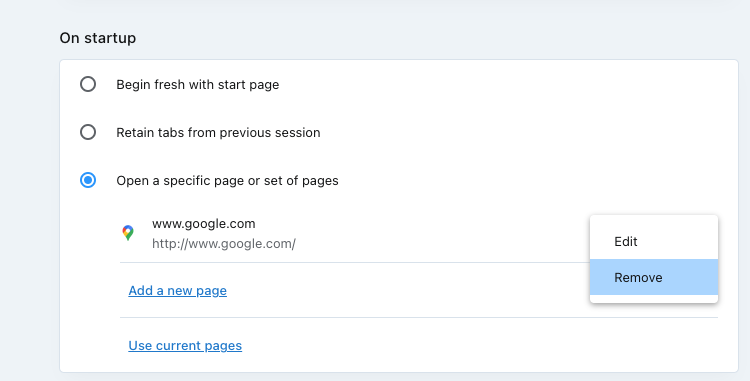
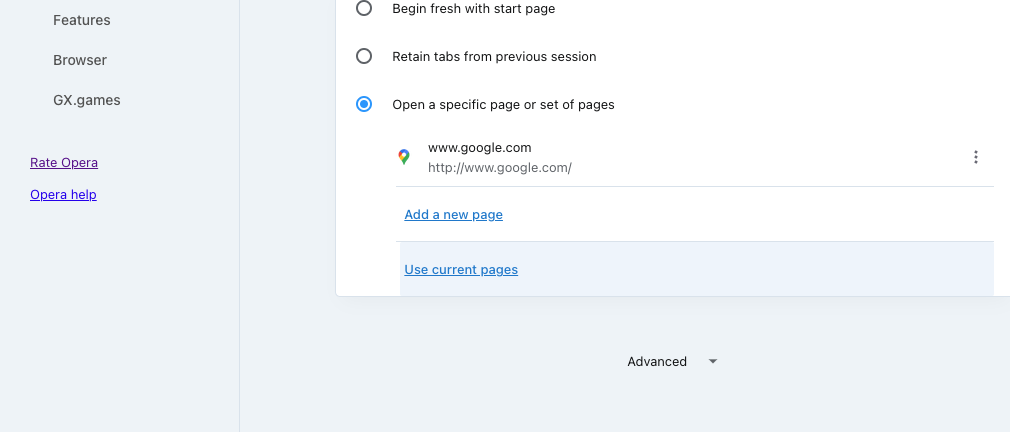
- Back in the Basic section, scroll down to On startup. If Open a specific page or set of pages is selected, remove any pages that you don’t want.
2. Stop malicious processes in Activity Monitor
You must attempt to remove the Bing redirect virus from your Mac if you have trouble changing your web browser's search engine or homepage. To make it easier to delete PUPs, extensions, login items, etc., you must first stop any suspicious background programs or processes via the Activity Monitor. Here’s how:
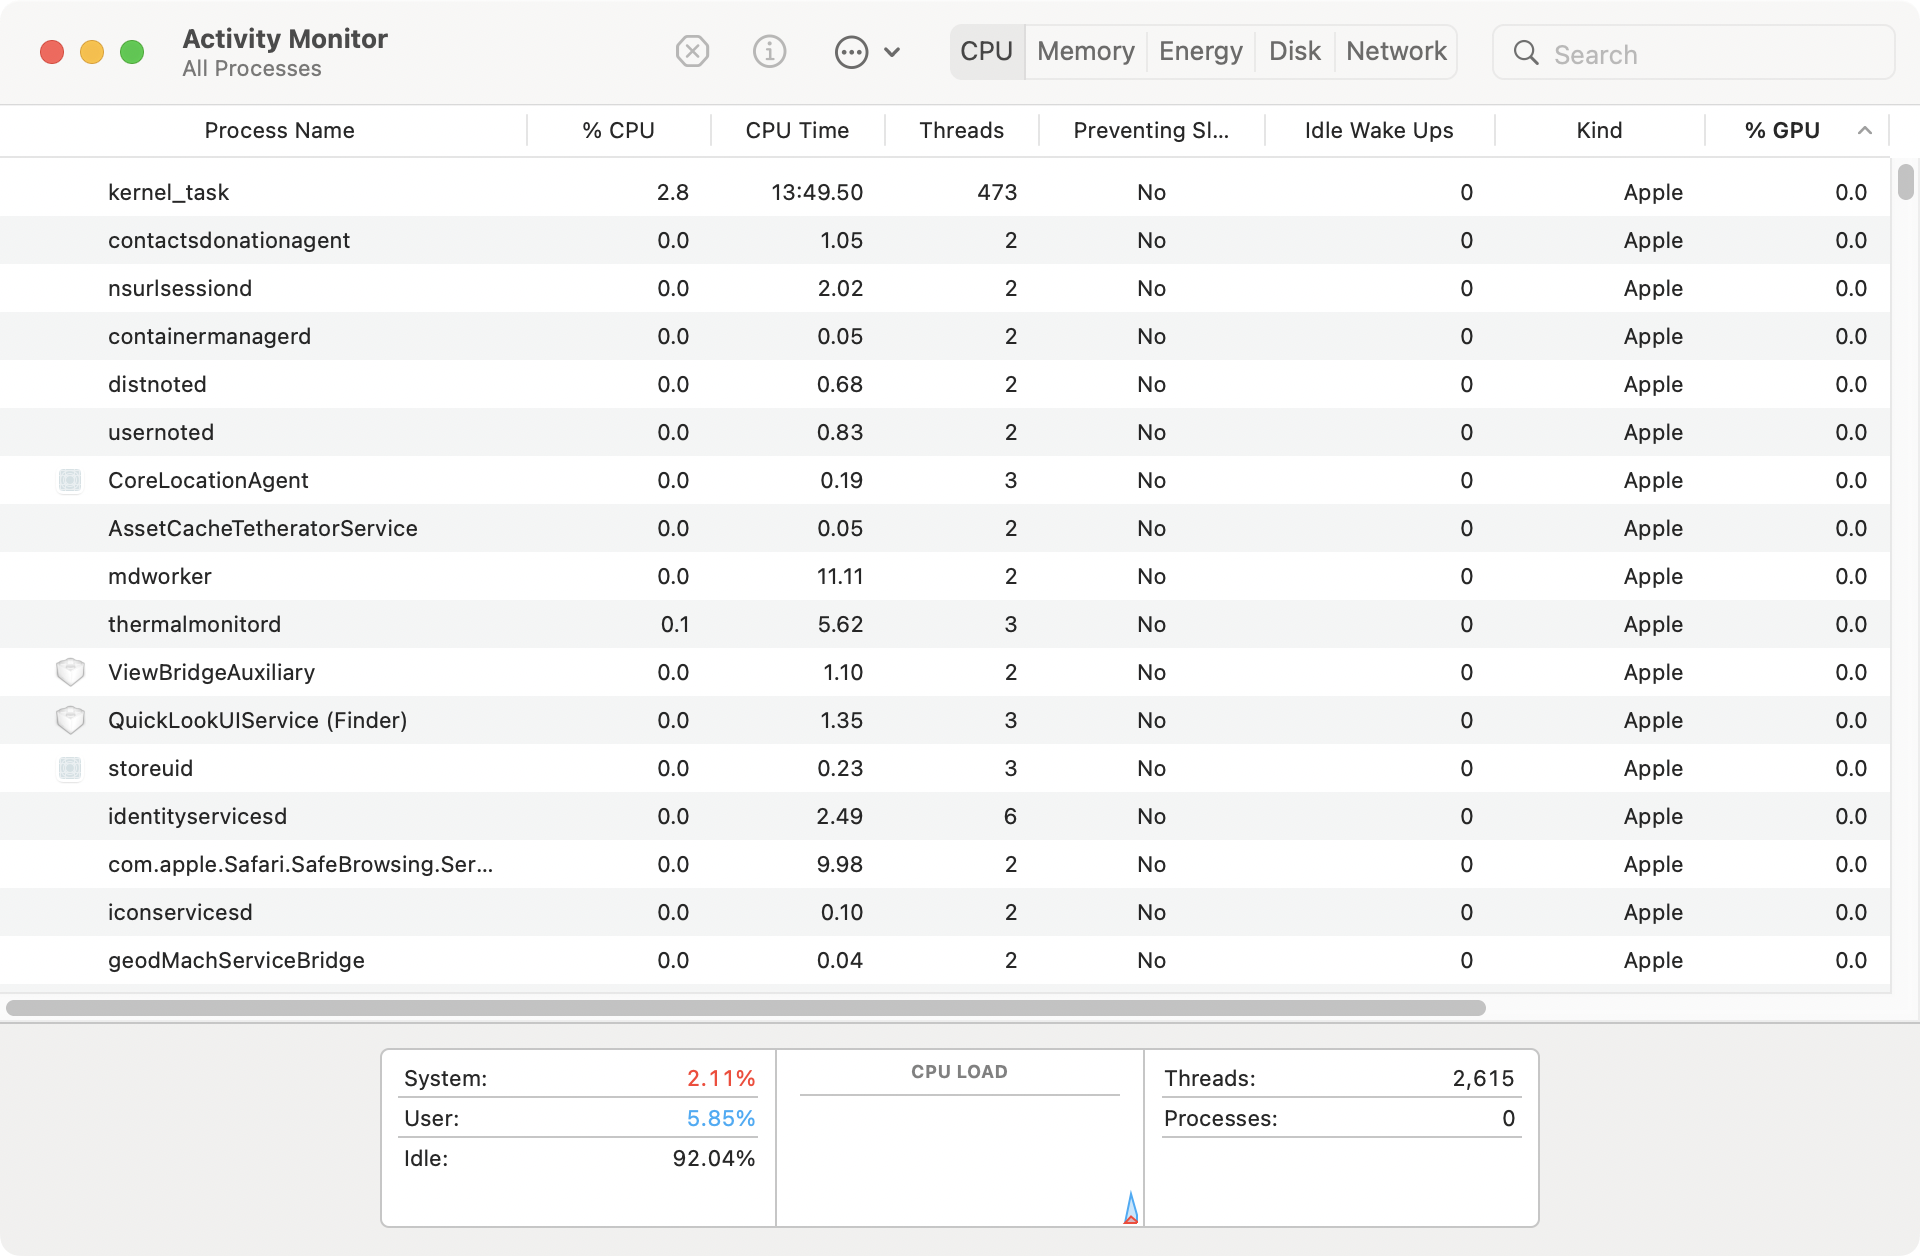
- Open Activity Monitor from Applications > Utilities. Look under the Process Name column for anything unusual, such as a sketchy program you installed recently. Malicious processes also consume system resources, so you can also try filtering your Mac's activity using the %CPU column.
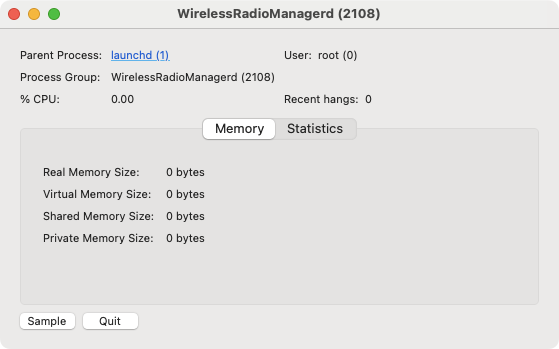
- Double-click the process you want to shut down and select Quit. Or highlight it and select the Stop button at the top of the Activity Monitor screen.
3. Remove bad login items from Mac startup
Malicious items that hijack your browser usually launch alongside the operating system when you turn on your Mac. Therefore, it’s a good idea to check for any bad login items in your user account and then remove them.
3.1 Remove login items in System Settings
You can remove some login items easily in your Mac’s System Settings. Just follow these steps:
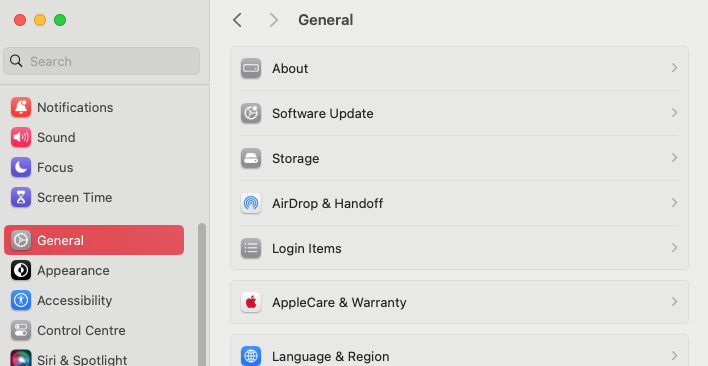
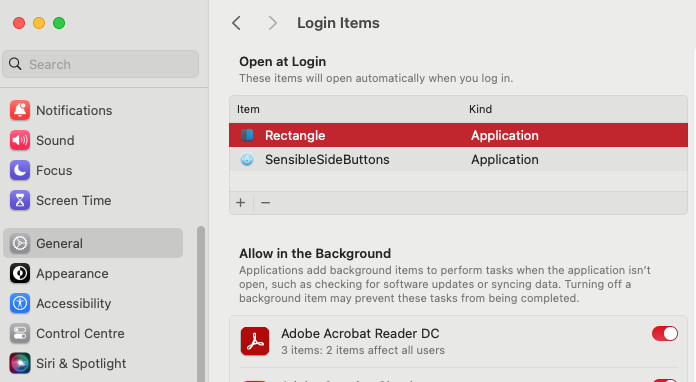
- Open System Settings. You can get to these at any time by clicking the Apple logo in your Mac’s menu bar. Go to General > Login Items.
- Highlight any suspicious login items. Select the Minus button to remove them.
3.2 Remove LaunchAgents and LaunchDaemons
Removing login items in System Settings is only the first step in preventing malware from launching when macOS does. Some browser hijackers also launch themselves as agents and daemons at Mac startup, running in the background. You can stop that by removing the relevant property list (PLIST) files:
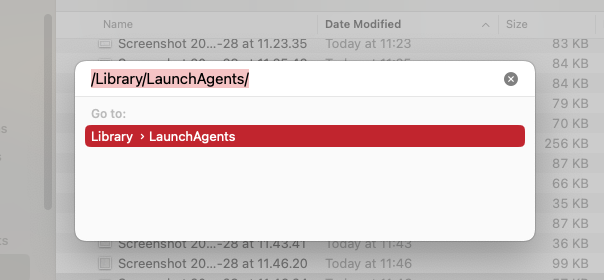
- In Finder, go to your menu bar, and select Go > Go to Folder.
- Go to /Library/LaunchAgents.
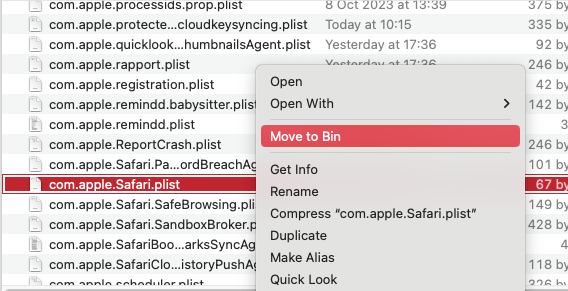
- Locate and move anything that looks like it might be linked to the Bing redirect virus into the Trash. Empty your Trash to permanently delete the files. Repeat these steps with /Library/LaunchDaemons.

4. Remove harmful extensions from your browser
The next step is locating, disabling, and removing any harmful extensions from your web browser. Bad extensions can affect your browser’s performance and may be responsible for redirecting you to Bing.
4.1 Delete malicious extensions from Safari
If you’re tired of annoying extensions in your Safari browser, go ahead to delete them. Follow our instructions below:
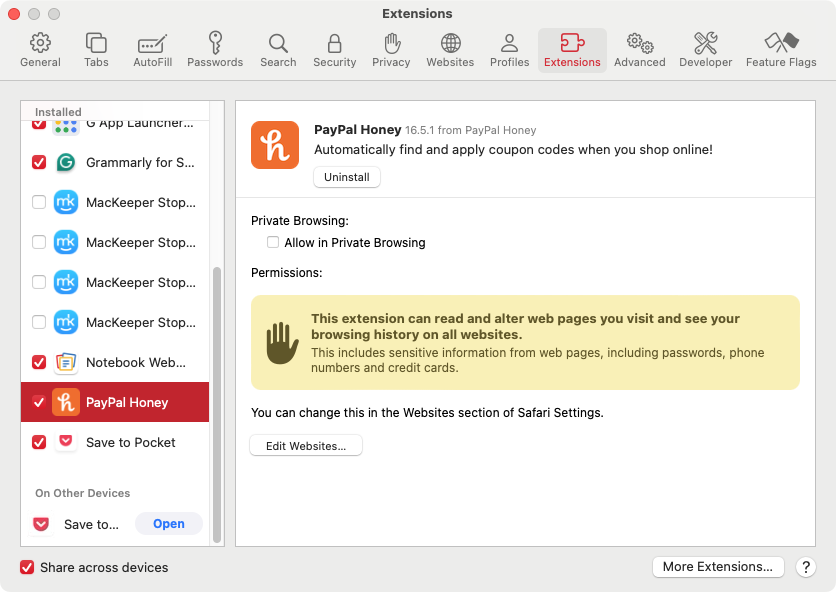
- Open Safari's Settings pane and switch to the Extensions tab. Clear the box next to an extension to disable it.
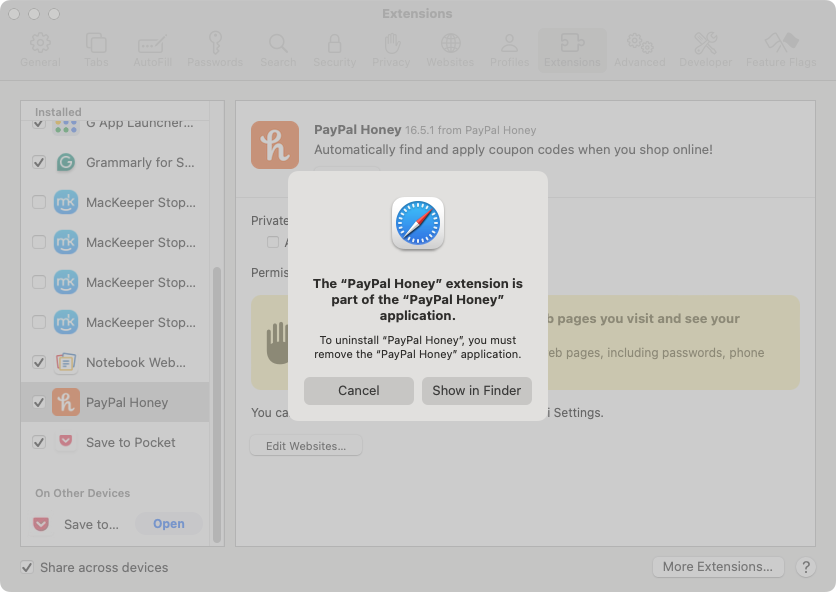
- Select the Uninstall button within the extension's details section. Click Show in Finder, then delete the extension.
4.2 Get rid of suspicious extensions from Google Chrome
Chrome is no exception, and you should be careful with the harmful extensions it may be hosting. Remove them in just three steps:
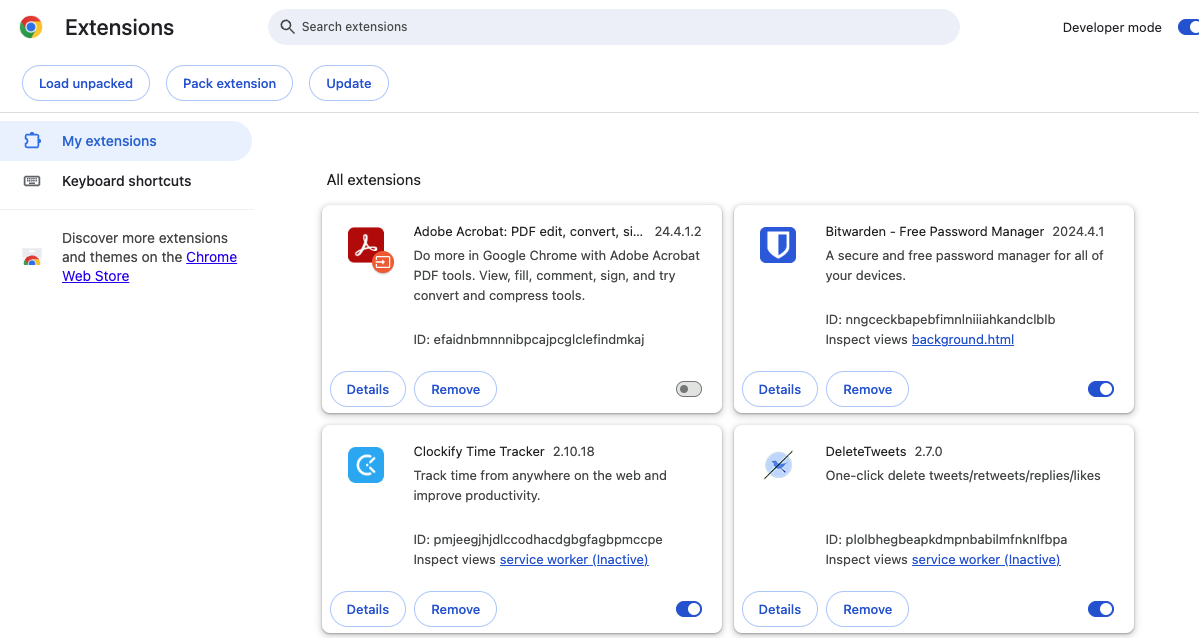
- Open the Chrome Settings menu, and select Extensions from the sidebar. Turn off the switch next to an extension to disable it.
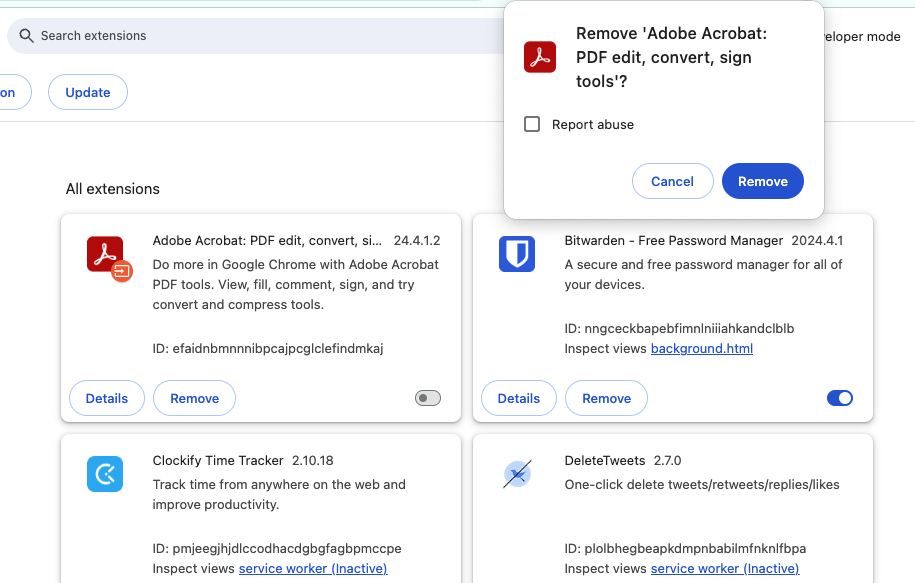
- To delete the extension completely, click Delete. This will open a pop-up dialog. Click Delete again.
4.3 Remove extensions related to Bing redirect from Firefox
You already know the gist of the problem, and this time, we’ll go through removing harmful extensions in Firefox. Just do as follows:
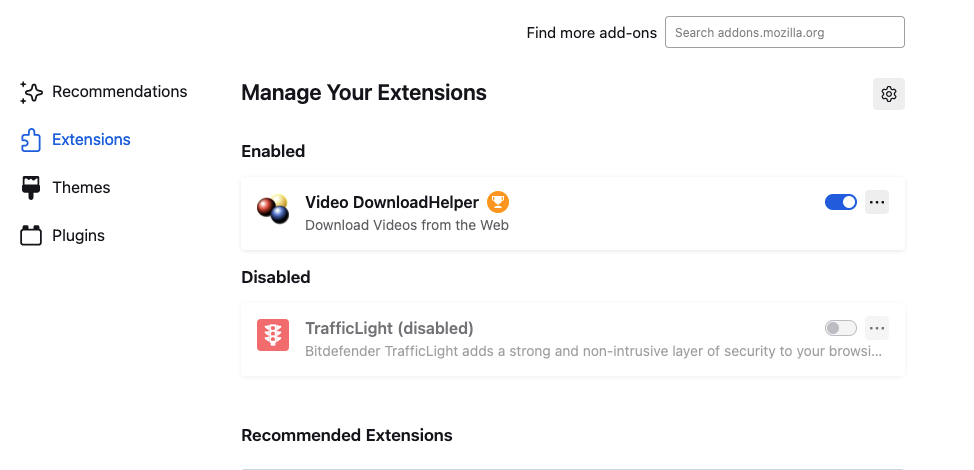
- Open the Firefox Settings menu, and select Extensions & Themes in the sidebar. Use the switches next to any harmful extensions to disable them.
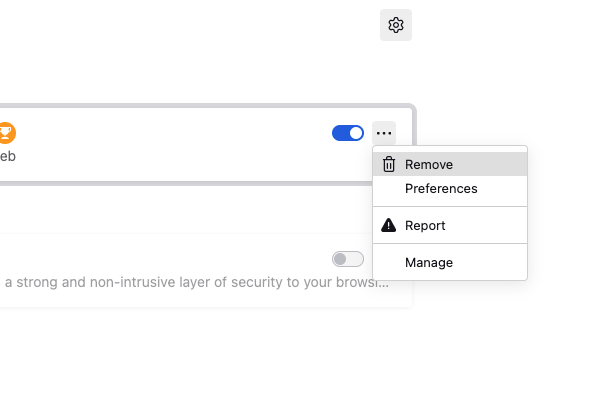
- Select the three dots next to an extension and select Remove to delete it from Firefox.
4.4 Erase malicious extensions from Opera
Just like other browsers, Opera can be affected by rogue extensions. You can manage add-ons like this:
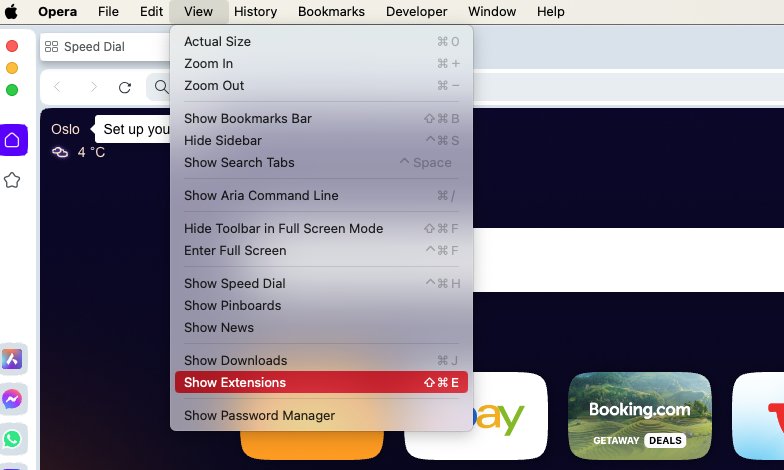
- In the menu bar, select View > Show Extensions.
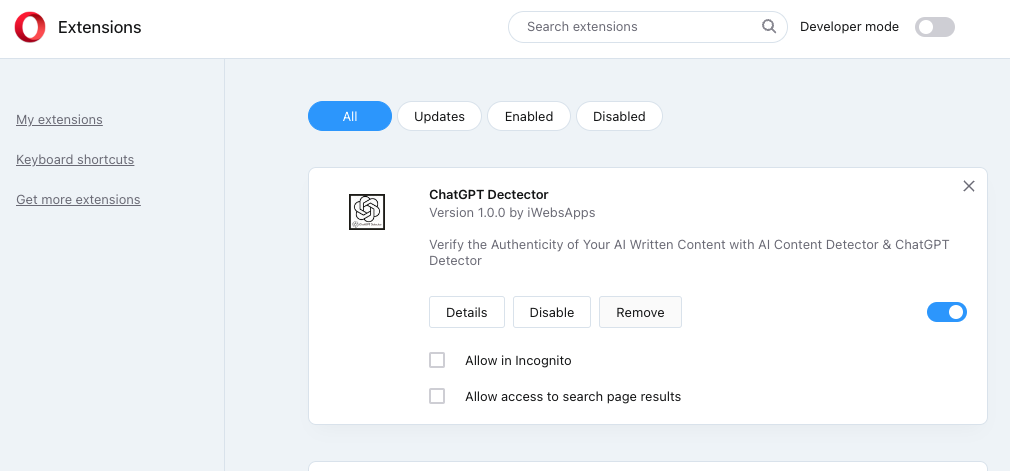
- To disable an extension, click Disable or use the switch next to it.
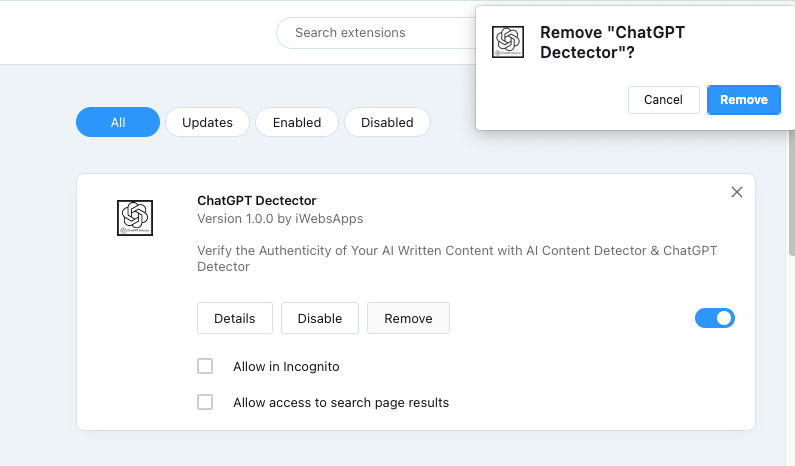
- To completely uninstall an extension from Opera, click Remove, then Remove again.
5. Uninstall bad or recently installed apps
Sometimes malware like the Bing redirect virus will install apps on your Mac. Deleting this is a vital step in regaining control of your computer. You can save time and effort by using MacKeeper’s Smart Uninstaller, which will delete apps quickly and thoroughly. Here’s how to use MacKeeper to delete apps, including those that may be hijacking your browser:
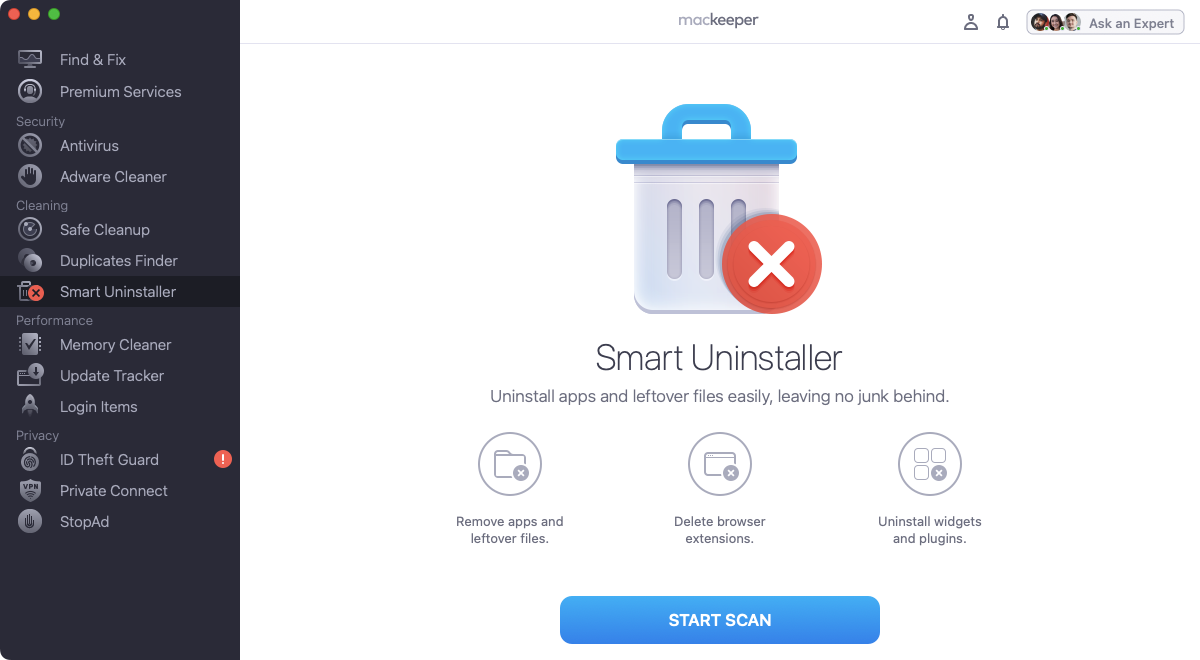
- Open MacKeeper and select Smart Uninstaller. Click Start Scan.
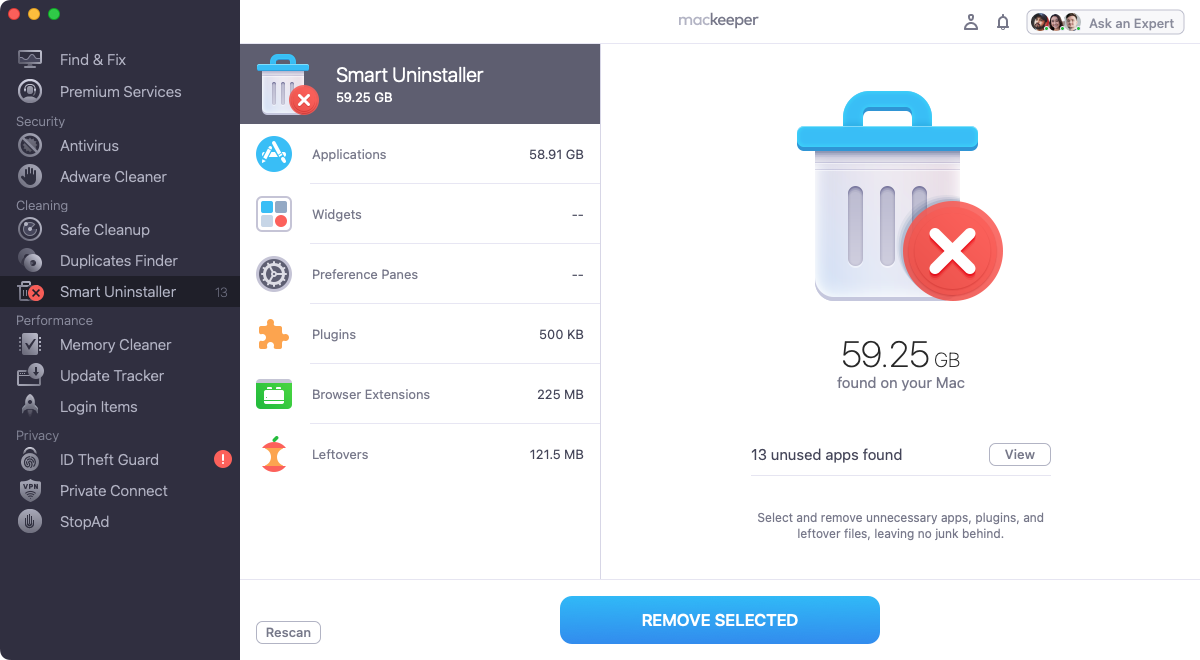
- When the scan is done, MacKeeper will show you several different categories it can handle. For our purposes here, you should select Applications.
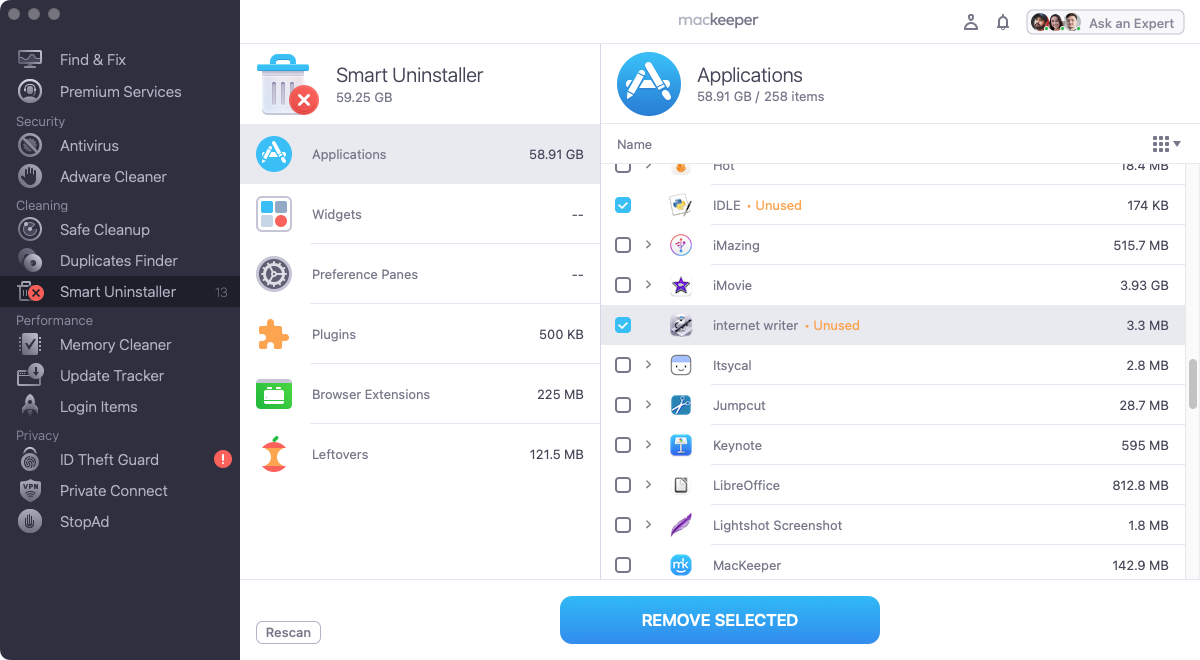
- Select the apps you want to delete and click Remove Selected. In the pop-up that appears, click Remove to confirm the removal of these apps.
6. Remove malicious Mac configuration profiles
Malicious configuration profiles not only modify your browser preferences but also other settings in macOS. To delete them, take these steps:
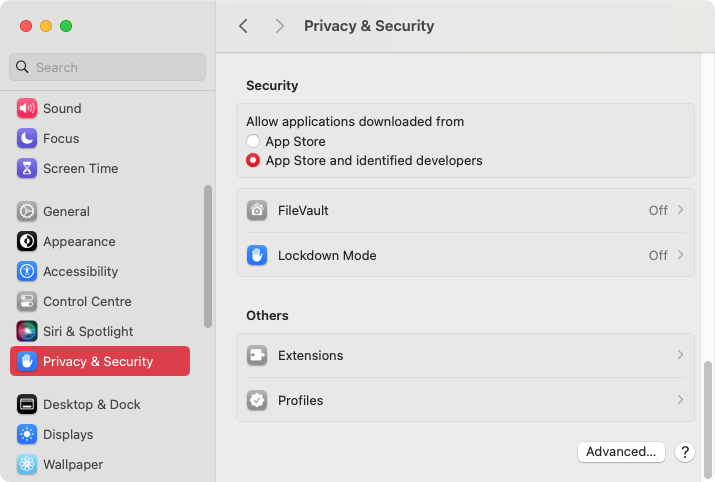
- Open System Settings, and go to Privacy & Security > Profiles. You will not see this option if you don’t have any configuration profiles on your Mac.
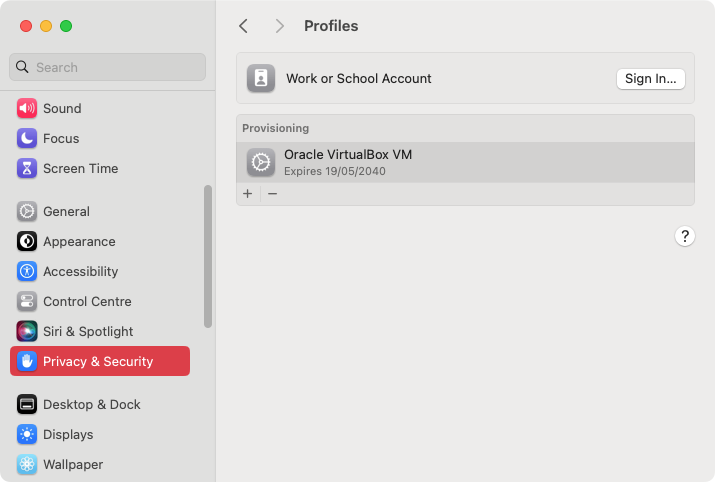
- Highlight any unusual profiles and select the Minus icon.
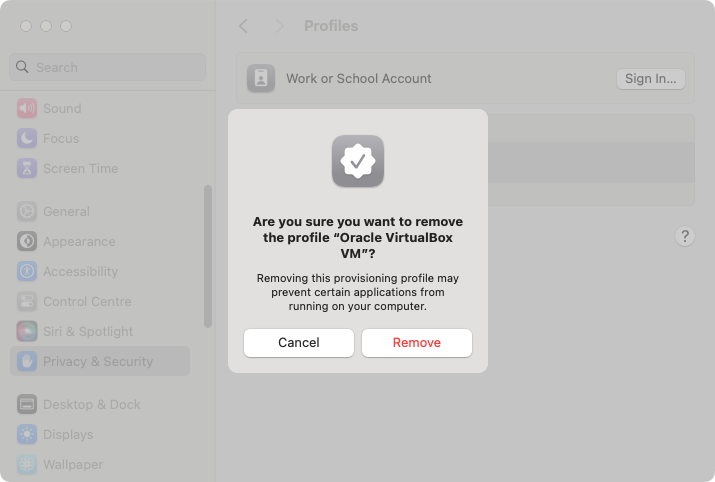
- In the pop-up, click Remove to delete the profiles permanently.
7. Find and delete Bing redirect files on Mac
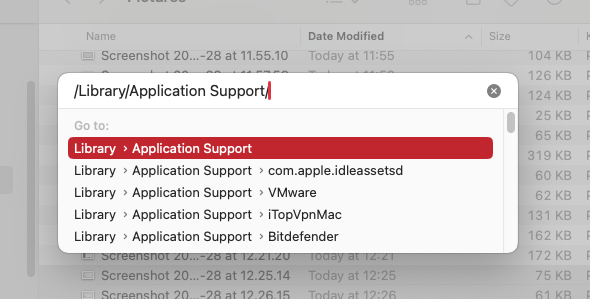
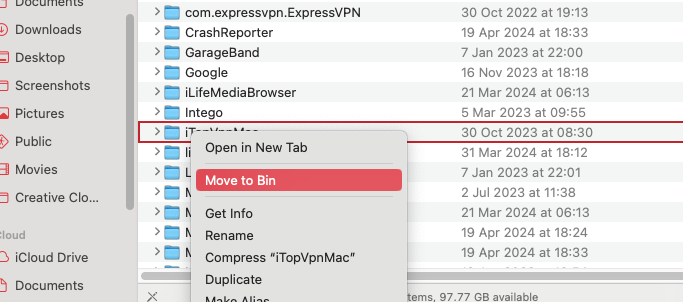
Some apps don’t appear in your Applications folder, so you should also check your Mac's Application Support directory. You may find the app that’s redirecting your browser hiding away in this folder:
- Open Finder and select Go > Go to Folder in the menu bar. Type in /Library/Application Support/ and press Enter.
- Locate and move anything unusual to the Trash. Empty your Trash afterward to complete the process.
8. Reset your browser to factory defaults
If none of the fixes above help, you’ll need to reset your browser on Mac. That will deactivate all extensions, clear the browser cache, and revert all changes to factory defaults. You won’t lose your bookmarks and passwords. After resetting, you should reactivate the extensions you want, delete anything suspicious, and reconfigure your browsing preferences.
8.1 Reset Safari to factory settings
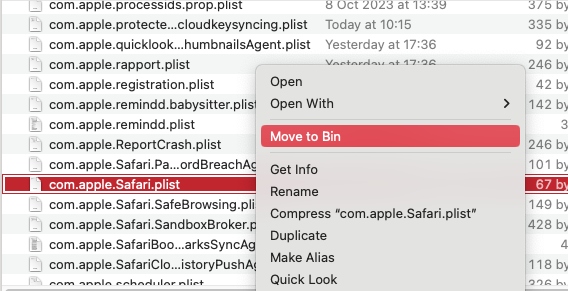
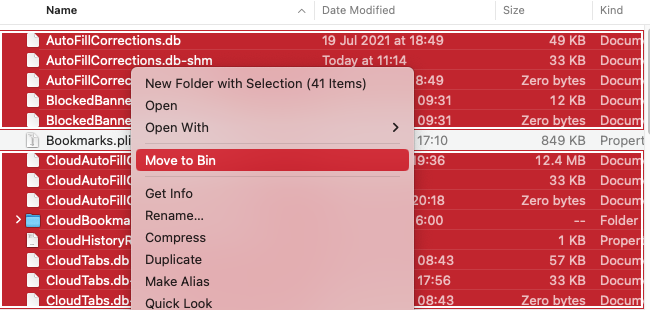
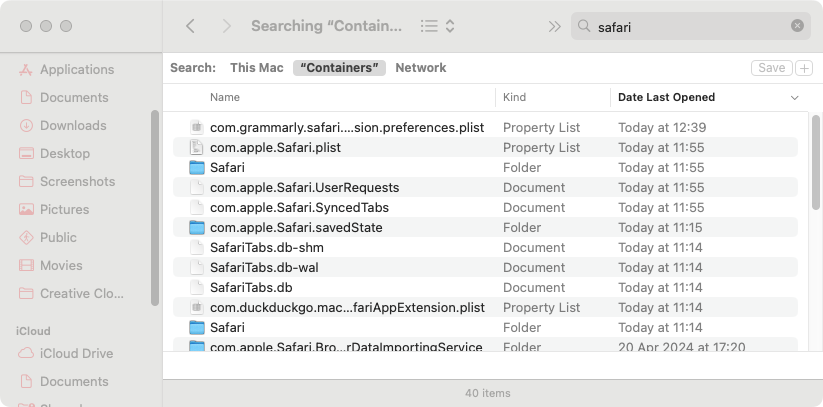
If Safari is your primary browser, you’ll need to find and delete its preference files. Follow the steps below to reset Safari to its factory settings:
- Quit Safari, then use Go to Folder in Finder to visit the ~/Library/Preferences/ directory. Delete the com.apple.Safari.plist file.
- Next, go to ~/Library/Safari/, and delete everything inside the directory except the Bookmarks.plist file.
- Finally, go to ~/Library/Containers/, search for Safari in this folder, and delete everything you find.
8.2 Factory Reset Chrome browser
In case you use Chrome on a daily basis, start the resetting process right now. It’s easy if you follow these steps:
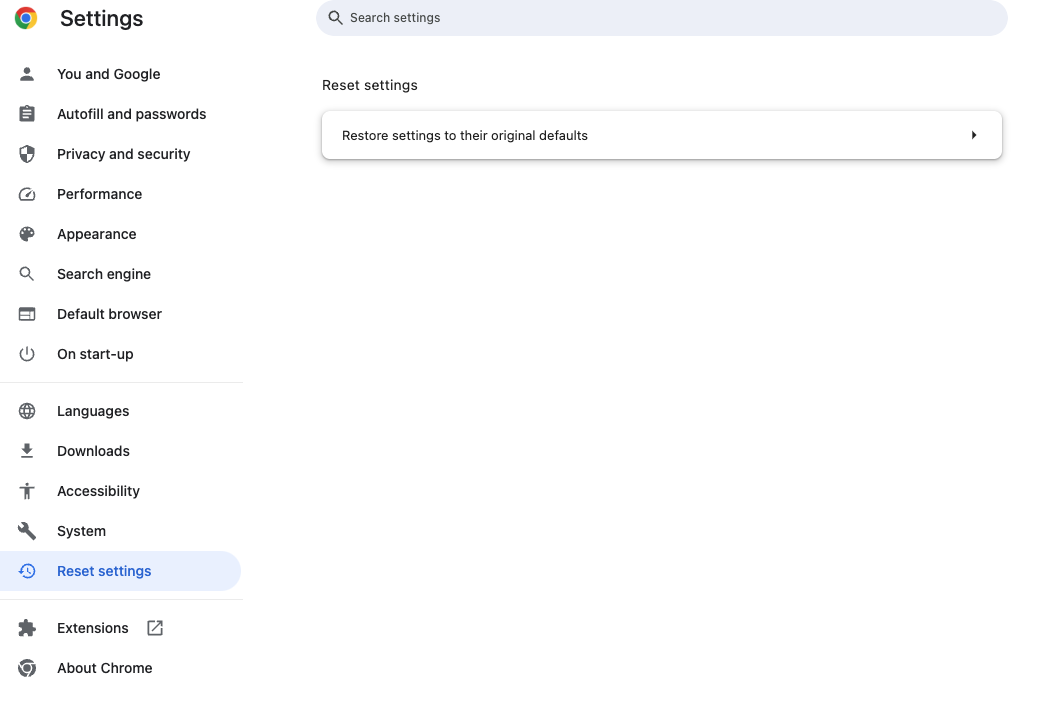
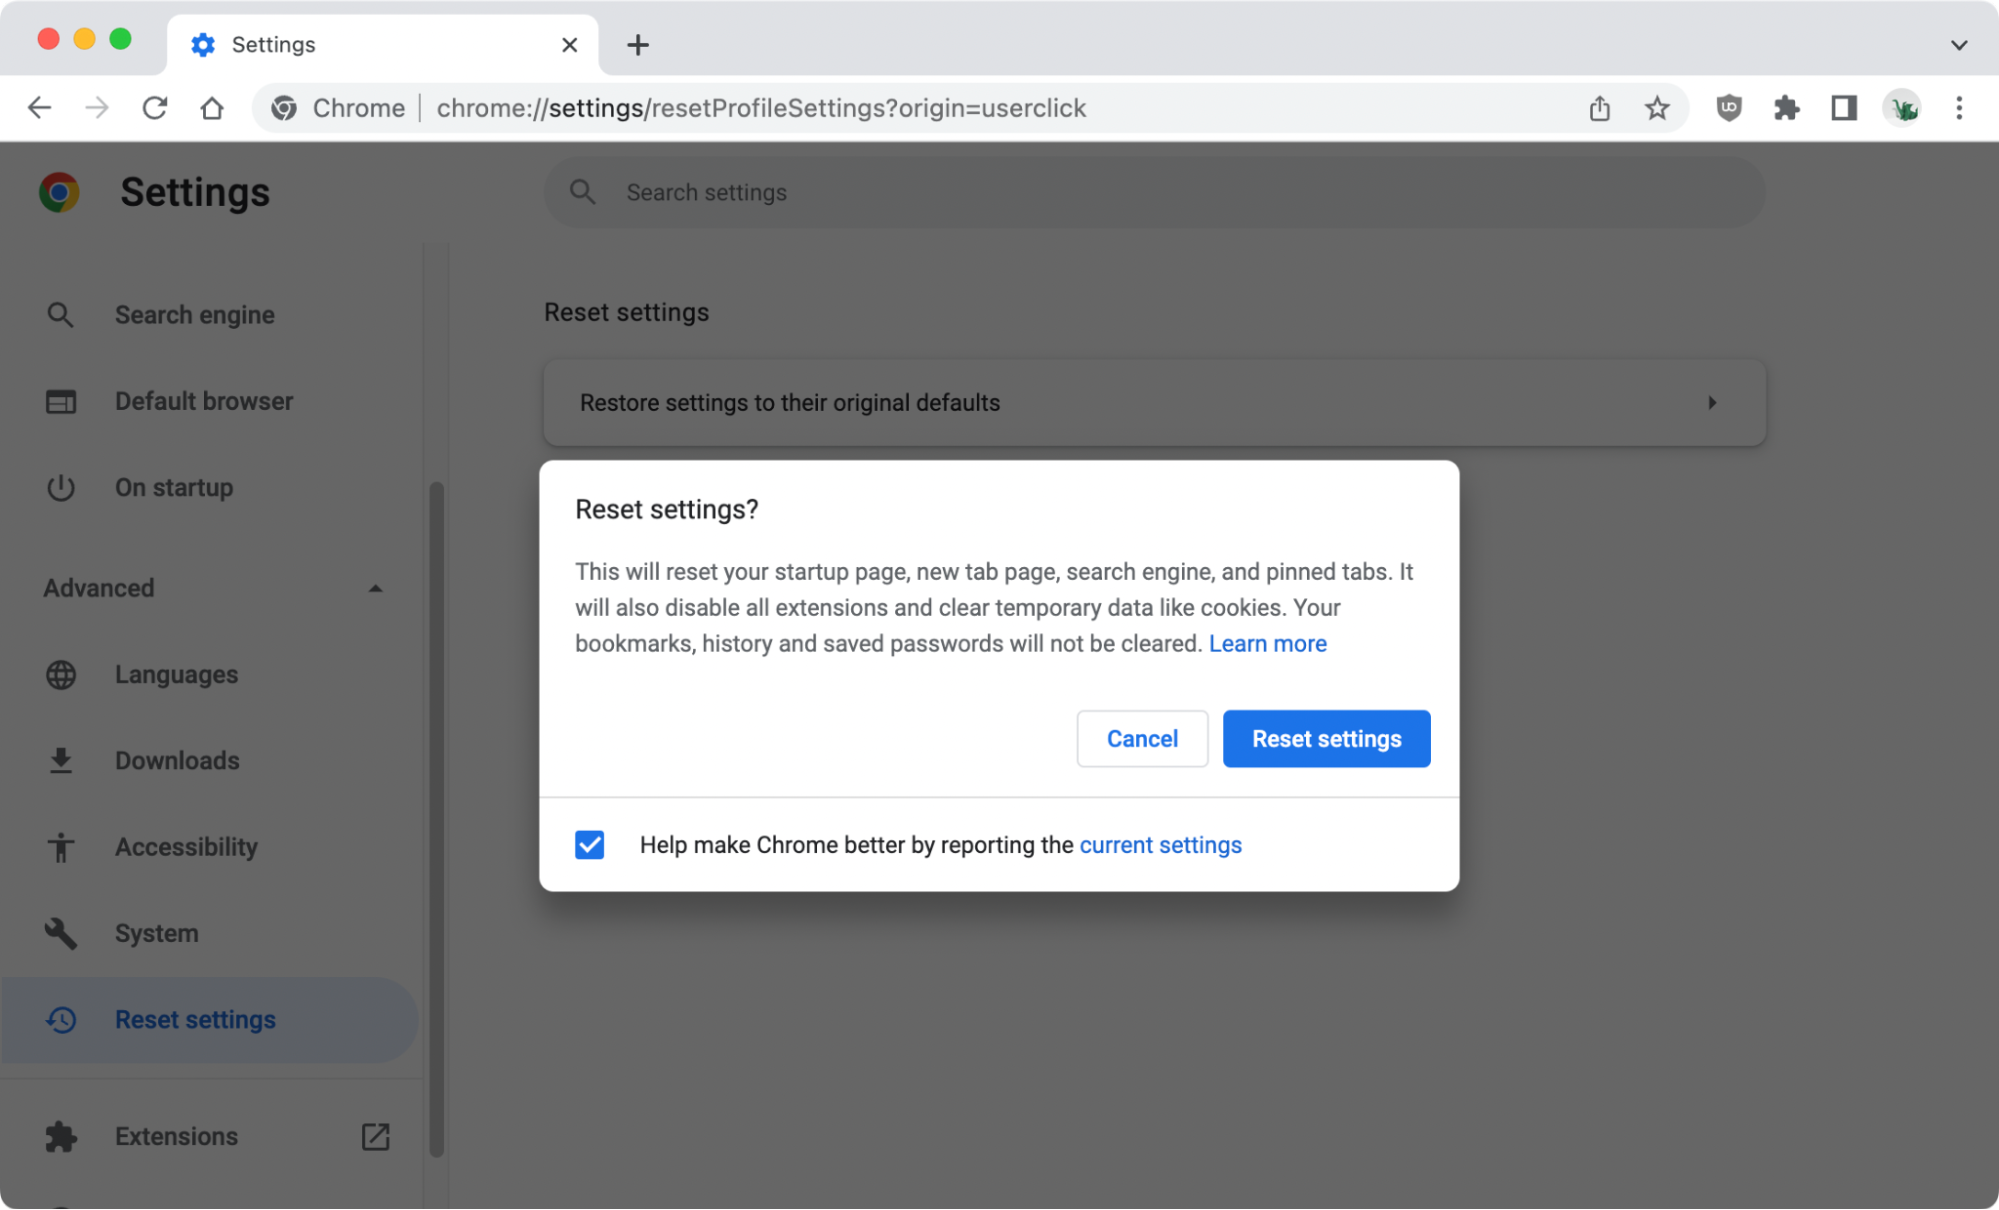
- In Chrome's Settings menu, select Reset settings in the sidebar. Click Reset settings to their original defaults.
- Click Reset settings. Your Chrome browser will now be returned to its default state.
8.3 Restoring Firefox to factory settings
The nuances of turning your Firefox back to factory settings are the following:
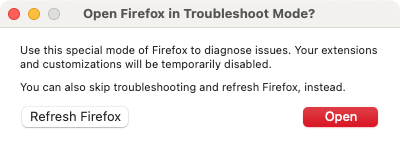
- Quit Firefox. Hold down Opt and relaunch Firefox.
- Select Refresh Firefox, then Refresh Firefox again to reset Firefox to its default settings.

8.3 Factory reset Opera
Using Opera? Then follow these steps to reset your browser to its original settings:
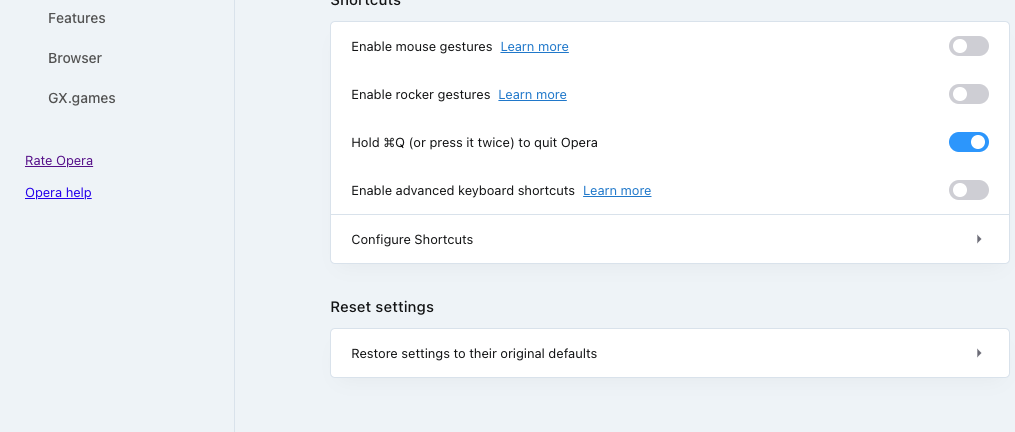
- Go to Opera’s Settings page, and scroll down to the Advanced section. You may need to click it to open it up.
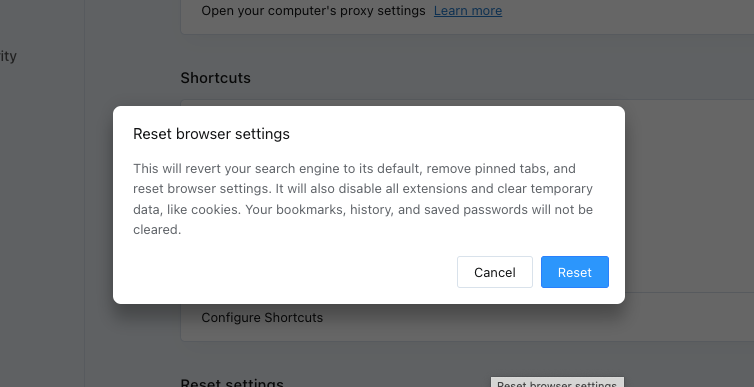
- Scroll down again to Reset settings, and click Restore settings to their original defaults.
- Click Reset.
9. Remove Bing redirect virus from Mac with an antivirus app
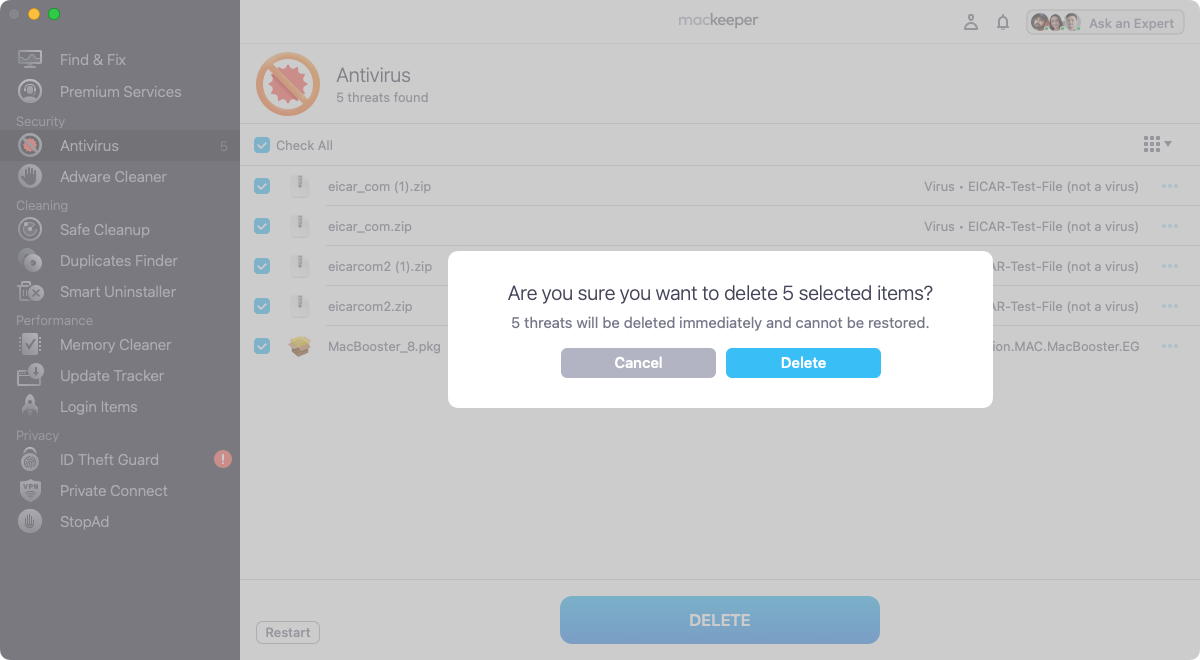
If you cannot remove the Bing redirect virus from your Mac, use MacKeeper to remove all traces of the browser hijacker. Here’s how:
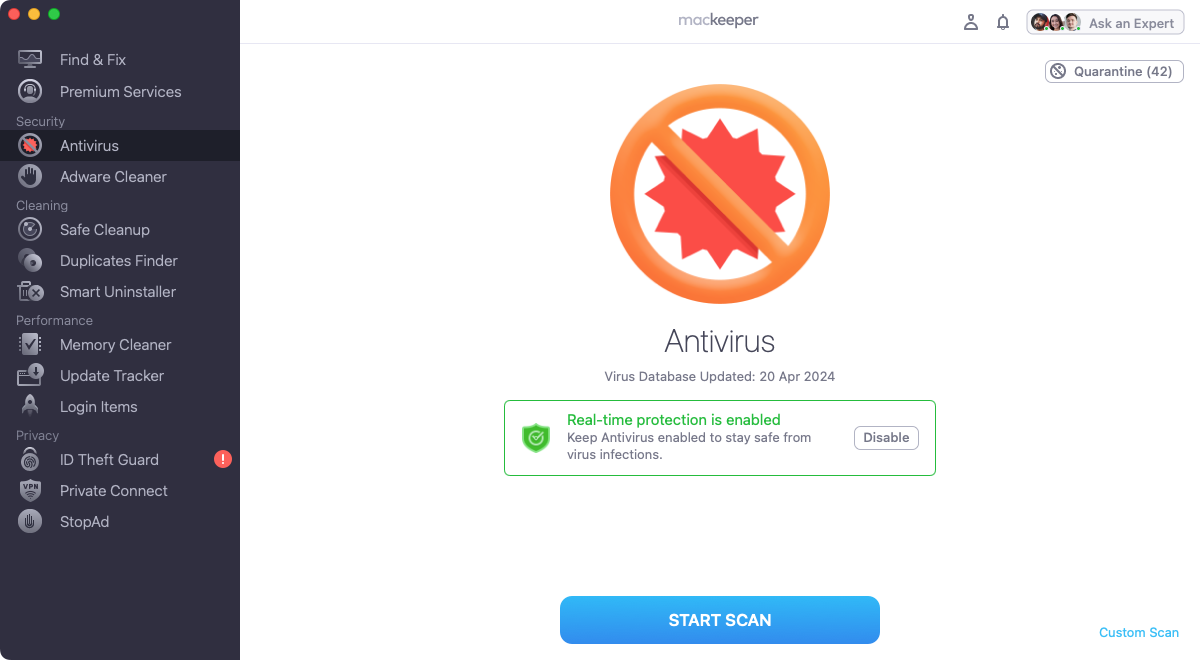
- In MacKeeper, select Antivirus in the sidebar. Click Start Scan.
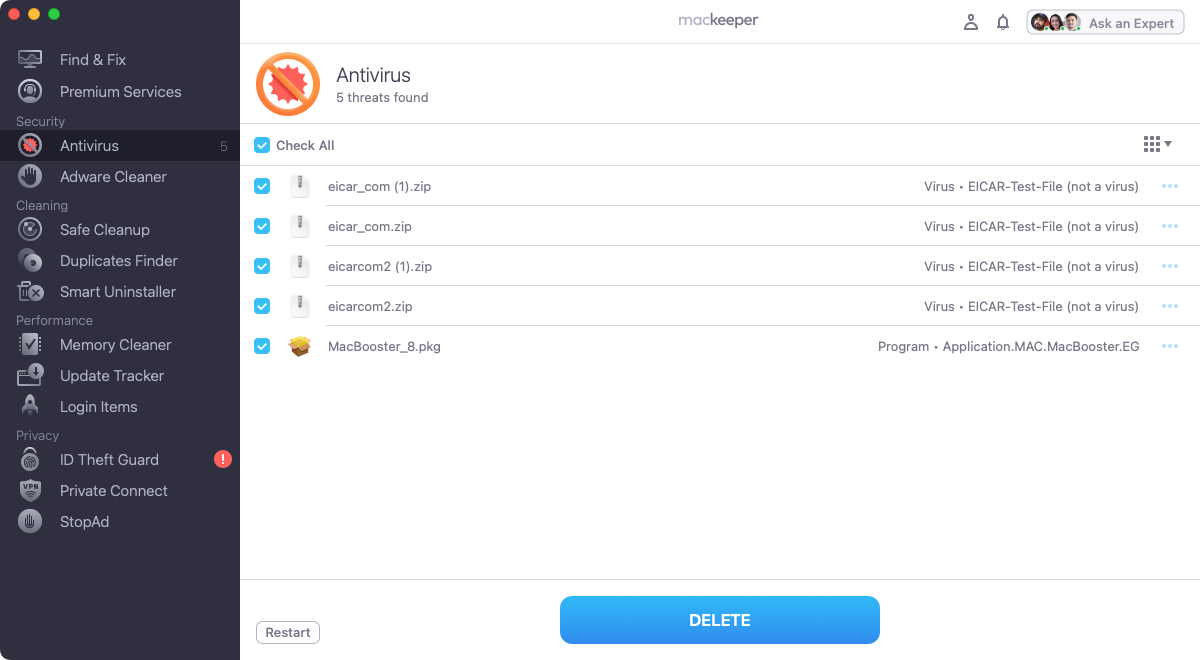
- When the scan is finished, select what you want to get rid of, and click Delete.
- Click the Delete button to confirm.
What you can do to avoid the Bing redirect virus on your Mac
A Bing redirect virus is tricky to remove but not impossible. Of course, it’s even better if you can prevent this malware from ever getting on your Mac in the first place. Here are a few tips to keep your Mac clear:
- Only download stuff from trustworthy sources, paying extra attention while installing programs. Even apps that look legit may be Trojans hiding a very nasty surprise.
- Avoid interactions with fake banner notifications and site alerts. These will often pop up on low-quality websites, but you might also find them on websites that have been taken over by hackers.
- Consider using a content-blocking extension or anti-malware software for additional protection. MacKeeper can help do both.
- Be careful about installing web browser extensions. If you are going to install them, stick to the official add-on stores for each browser.
- Never open attachments or links in emails if you don’t recognize the sender. These can easily lead to malware, infecting your system with viruses and browser hijackers.
Keeping on top of your cybersecurity
Although the Bing browser hijacker isn’t technically a virus, it’s malware, and it has the ability to direct to infected web pages—and that’s when you’ll end up with a virus on your Mac. For that reason, you should also protect your system with antivirus, whether it’s an iMac, Mac mini, or MacBook Air.
MacKeeper is the ideal choice. As well as offering on-demand scans, it offers real-time protection, which means it’s constantly monitoring your Mac to make sure there are no infections. Combine it with all the tips in this guide, and you can prevent Bing hijacking Google Search on your Mac.


