In this article you will find the following:
Though Mac is generally associated with your smooth user experience, some apps—we call them Mac performance inhibitors—can ruin this effect. They're running behind the scenes and therefore slowing your Mac down. Microsoft AutoUpdate is one such app. It interrupts your workflow and productivity, and you’ve probably confirmed this by checking Activity Monitor. So, we recommend that you stop the app from auto-updating.
Here’s why you’d want to block Microsoft AutoUpdate from running on your Mac:
- It slows down your Mac and causes it to freeze
- You prefer to update Microsoft manually as needed and according to your own schedule
- The updates can be unexpected and, therefore, annoying
- The program interrupts you while using your Mac, even when there are no updates to be implemented—yes, even while streaming or watching something on your device
- Although it runs in the background, the pop-up notifications can be frustrating
- It uses up too much CPU.
Before we start
App updates are essential. They provide a host of advantages, like adding new features, closing security loopholes, and keeping the apps running smoothly and efficiently. The more updates an app implements, the better. It also protects you from ending up with viruses and malware, which could compromise your privacy by exposing your personal information.
But keeping up with app updates can be hard, especially considering the average person has multiple apps installed on their computer. Fortunately, you don’t have to worry about that. We recommend MacKeeper’s Update Tracker as an excellent method to stay on top of any software updates. It allows you to choose which apps you’d like to update, which saves space on your Mac and prevents your software from interrupting your workflow with random updates.
Here's how to use MacKeeper’s Update Tracker:
- Download MacKeeper on your MacBook Pro or MacBook Air device
- Look for Update Tracker and select it. You’ll find it in the performance section
- Once that’s done, hit the Scan for Updates button. When the scan is complete, MacKeeper will tell you how many updates are available and have them pre-selected for your convenience. Click Update.
Fortunately, Microsoft AutoUpdate can be stopped. Of course, this comes with ramifications you should be aware of, like missing out on important app updates, new features, and slower Microsoft apps. If you’re prepared for that to happen, read on. We’ll show you how to do it.
Disable Microsoft AutoUpdate on Mac
Microsoft AutoUpdate usually works like a charm, but it can, in some cases, cause some issues. While it works in the background without interruption, sometimes it may ask you to shut down apps during updates or cease to work when downloading something in the midst of switching networks. In such cases, Microsoft AutoUpdate can be disabled.
Follow the steps below to turn off Microsoft AutoUpdate on your Mac.
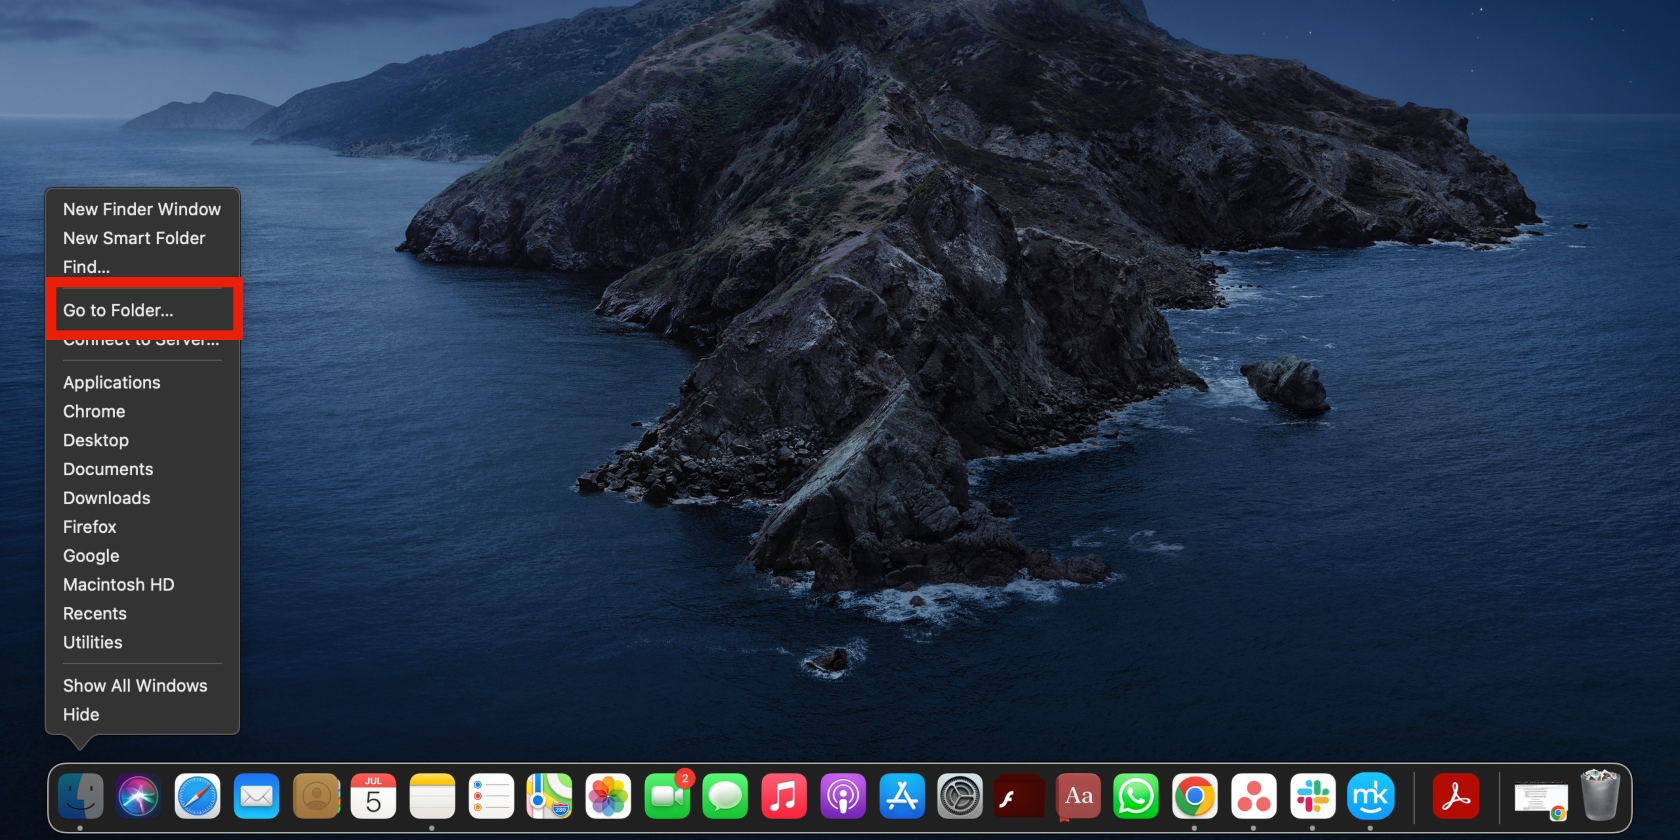
- Navigate to the Dock on your Mac, right-click on Finder, and choose the Go to Folder option on the list
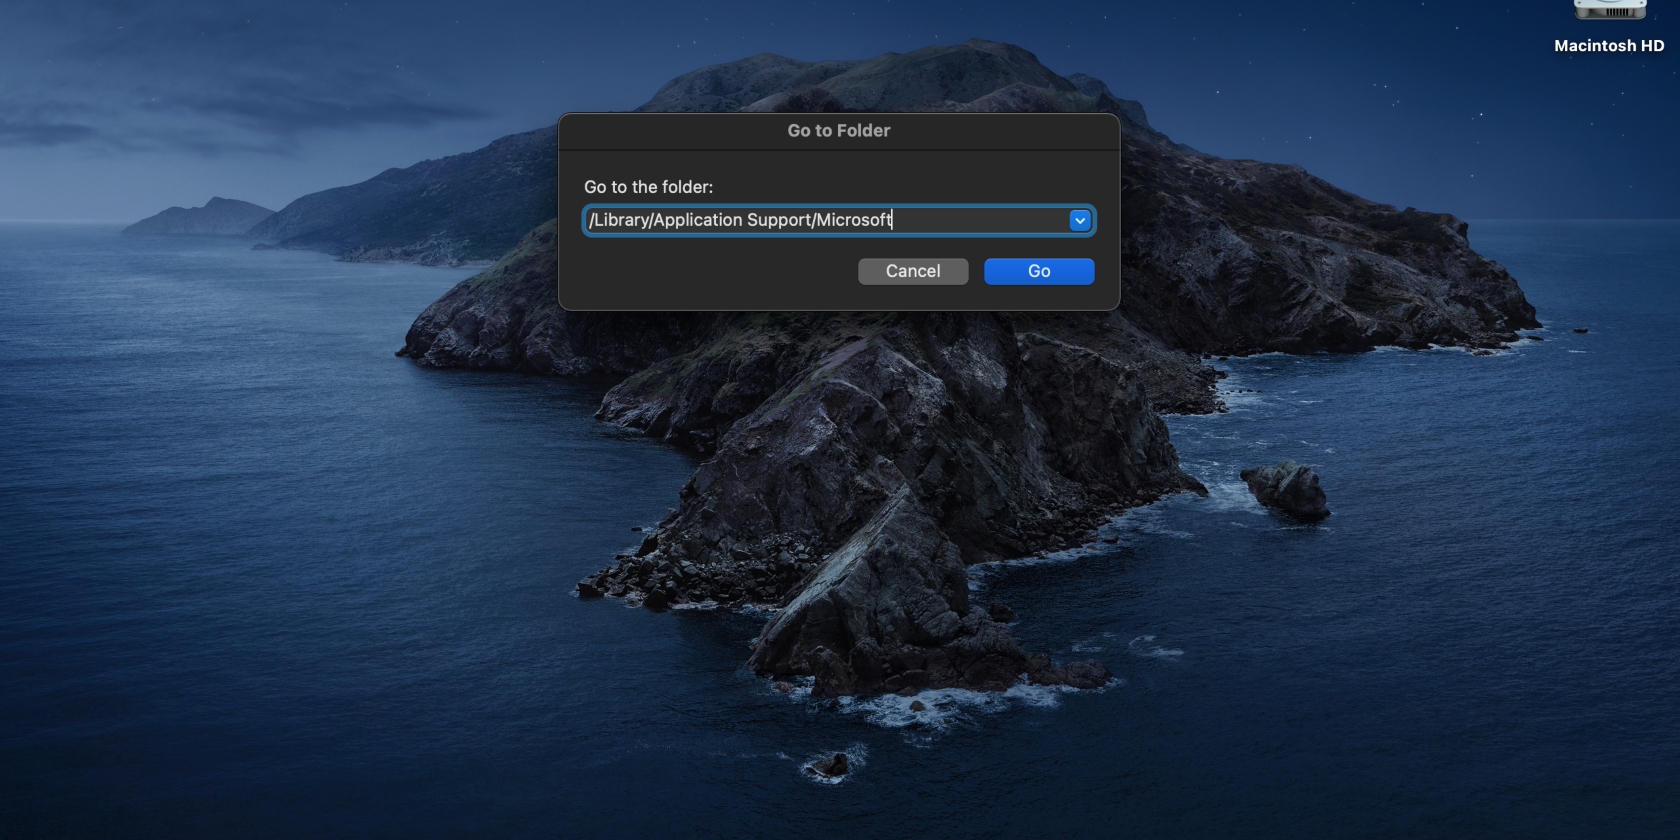
- Type in the path /Library/Application Support/Microsoft and hit the Go button on the pop-up window
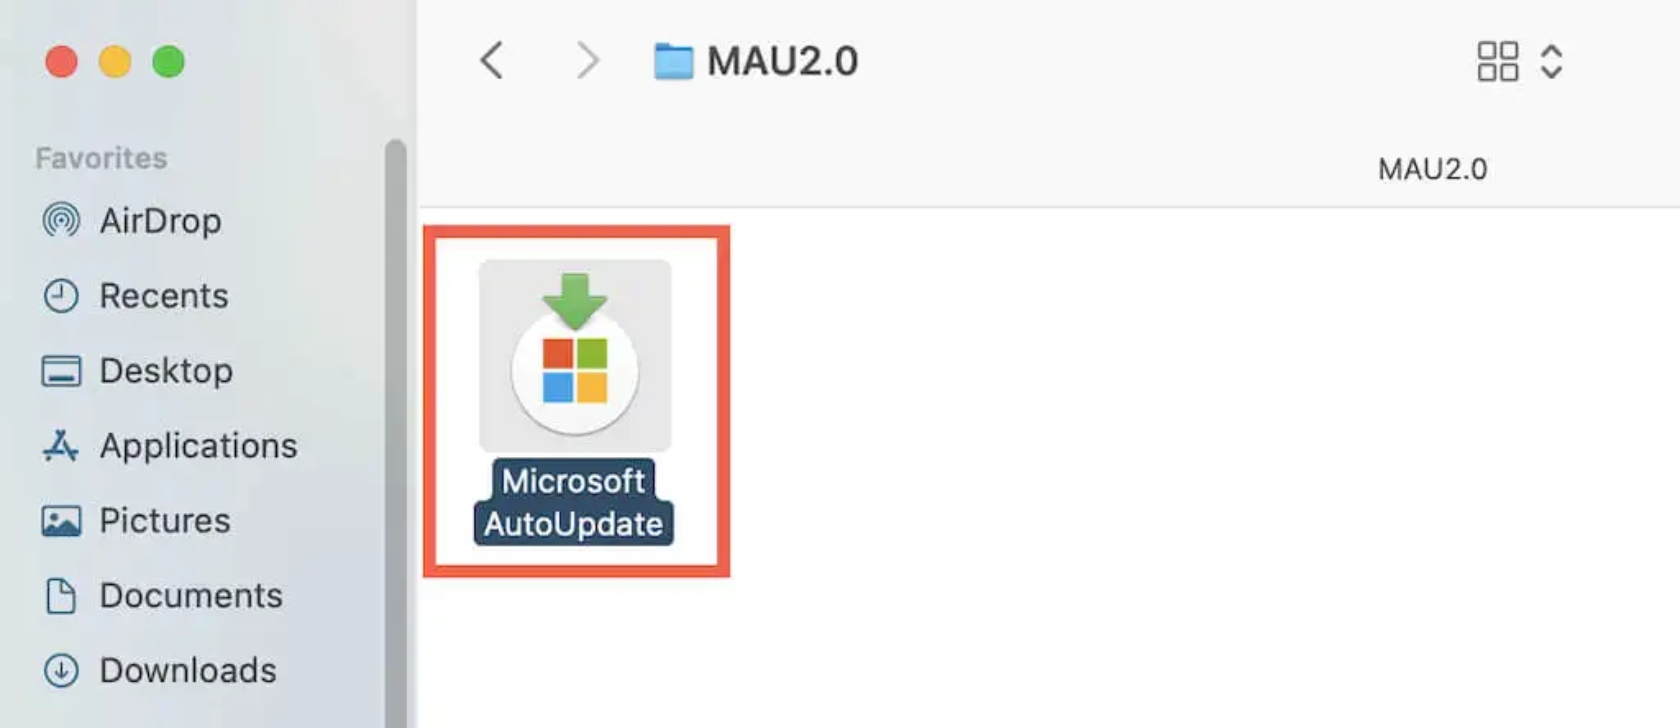
- Find and open the folder beginning with “MAU” and open the file named Microsoft AutoUpdate
- If the box next to Automatically keep Microsoft Apps up to date is checked, click on it to remove the check and disable this option, and then click Turn Off.

Note from our experts:
If you remove Microsoft AutoUpdate from your Mac, you should be prepared to update Microsoft apps yourself. It’s a great option if you prefer to have more control over Microsoft app updates.
So, what happens when you need to update your Microsoft apps in the future? It’s simple; just update them in Microsoft AutoUpdate. Here’s how:
- Go to Microsoft AutoUpdate and click Check for Updates
- Find the app you want to update, and hit the Update button next to it. Alternatively, you can select Update All to update any other Microsoft apps with updates available to save time.
You can also look for the option to update individual apps within the apps, which typically allow you to look for available updates. Find the Menu bar in a specific app, select Help, and click Check for Updates.
If you change your mind about disabling automatic updates for Microsoft apps, you can easily enable them again. Follow the steps in the section above to go to Microsoft AutoUpdate and enable Automatically keep Microsoft Apps up to date.
Disable notifications for Microsoft AutoUpdate
Microsoft AutoUpdate notifications can make you want to pull your hair out. This is especially true when the notifications continuously pop up non-stop while you’re busy working, doing something important, or watching something interesting.
In such cases, especially when you want to focus and remain uninterrupted for a short while, we recommend you disable notifications for Microsoft AutoUpdate.
Here’s how to block Microsoft AutoUpdate messages:
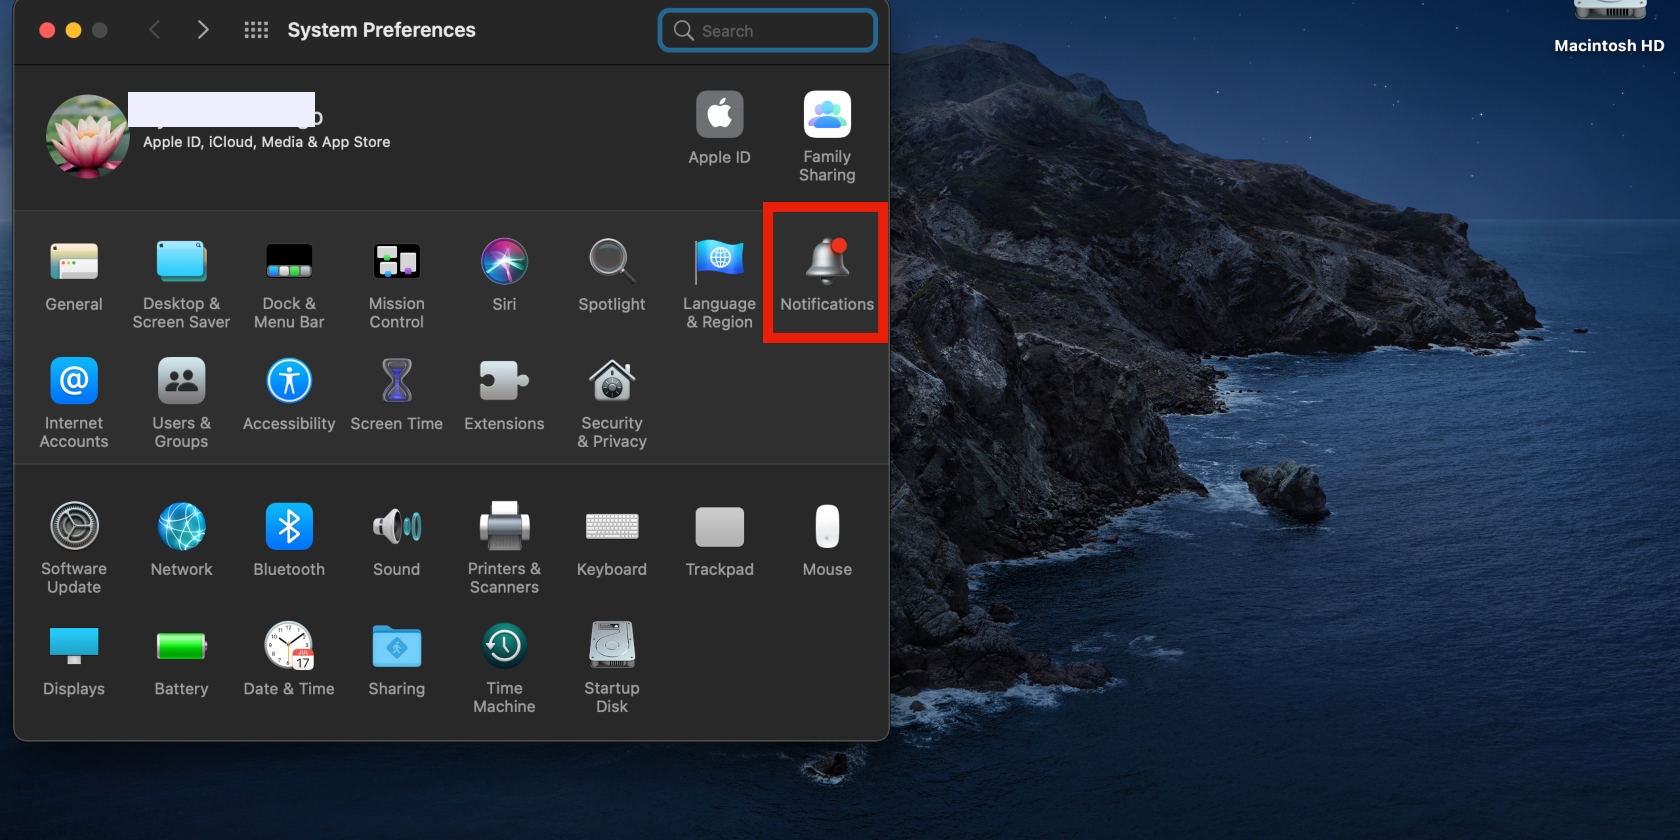
- Click on the Apple menu at the top of your laptop and select System Preferences > Notifications
- Toggle Microsoft Update Assistant off.
When you want to receive notifications from Microsoft AutoUpdate again, follow the steps listed above, toggle Allow Notifications on, and you’re good to go.
Microsoft AutoUpdate can remove older features with new updates, which isn’t ideal and may prompt you to go back to using an older version. But this issue isn’t limited to Microsoft AutoUpdate; other apps installed on your Mac can experience this, too. Learn how to uninstall an update on Mac.
Remove Microsoft AutoUpdate on Mac
In the previous section, we took you through the process of disabling Microsoft AutoUpdate and gave you an alternative to prevent the program from interrupting you while you’re busy. But maybe you’re better off deleting Microsoft apps because you don’t need them or rarely use them. In this case, your best option is to delete Microsoft AutoUpdate on Mac.
Here’s how:
- Double-click on Finder and select Go to Folder on the list
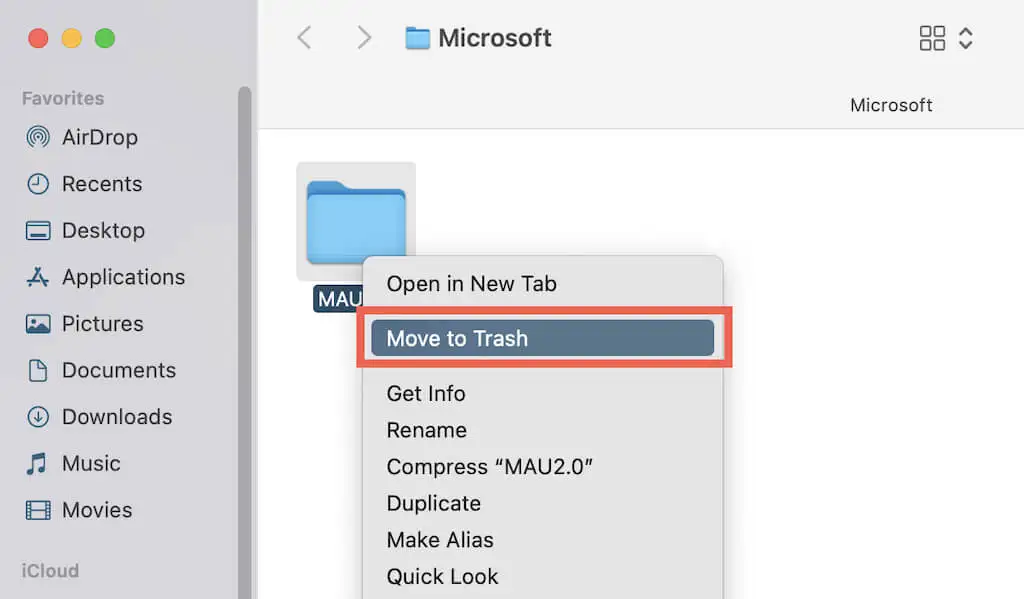
- Type in the path /Library/Application Support/Microsoft and hit the Enter key on your keyboard
- Look for the folder beginning with “MAU” and drag it to the Trash can. You may be prompted to enter your password
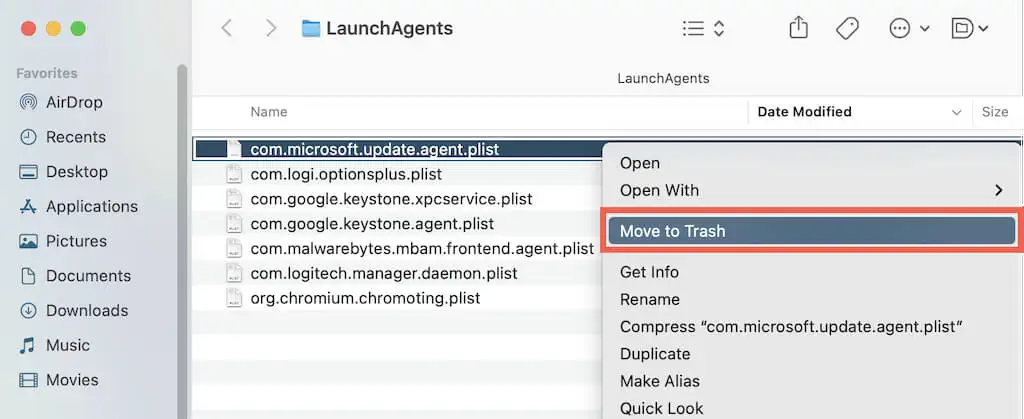
- Go back to the Go to Folder text box, enter the path /Library/LaunchAgents/ this time around, and hit the Enter key
- Find the plist file named Com.microsoft.update.agent.plist and drag it to Trash
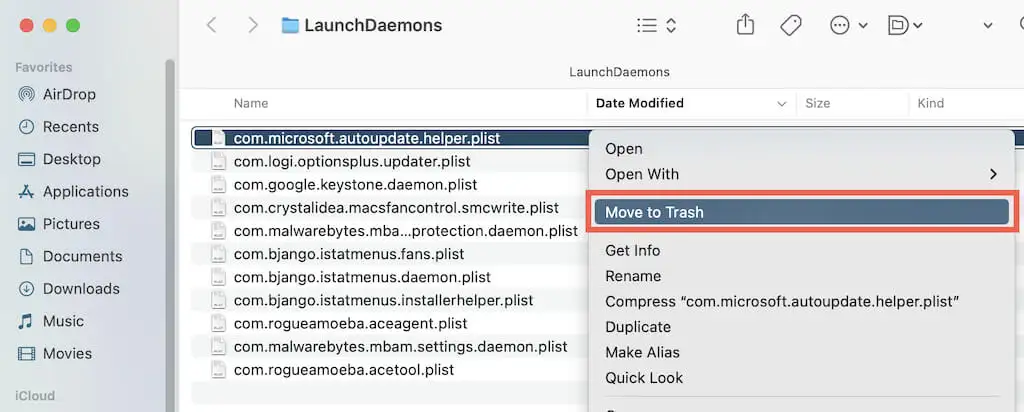
- Go back to Go to Folder again, enter the path /Library/LaunchDaemons/, and move it to Trash
- Finally, find the file named com.microsoft.autoupdate.helper and drag it to the Trash can.


Are you experiencing issues with other apps on your Apple device? Learn how to delete apps on Mac to help rectify the problems. Have you changed your mind about deleting Microsoft AutoUpdate? No problem. Simply download and install it from the Microsoft website.
What is Microsoft AutoUpdate?
Microsoft AutoUpdate is a program that maintains Microsoft apps. As the name suggests, it implements automatic updates for Microsoft apps on your behalf. Users don’t always update apps on time, so Microsoft AutoUpdate can be helpful.
These Microsoft apps include the following:
- OneNote
- Teams
- Microsoft Word
- Microsoft Edge
- Microsoft Office
- Outlook
- OneDrive
- PowerPoint
- Edge
- Excel.
The program is responsible for keeping these apps updated to maintain a good user experience. After all, Microsoft is a big tech firm, and there’s a reason why so many people use its apps—the user experience. That’s why you spot new features when you launch Microsoft apps from time to time, even though you didn’t update yourself. Microsoft AutoUpdate adds those features regularly.
Microsoft AutoUpdate lets you know it’s checked for updates and notifies you whether it updated an app or didn’t perform an update. That means you'll get interrupted regardless. (Yikes!) Because it’s constantly running behind the scenes, it uses up a lot of resources on your Mac (your Mac’s CPU), as you may have seen in the Activity Monitor.
Developers and companies are continuously improving their apps and services, and they implement these changes through app updates. So, what do app updates achieve?
- They keep apps in good working condition and performing smoothly
- They fix any bugs in the apps and patch security loopholes to protect you from hackers and cybercriminals
- App updates also add new features to apps, which gives you a better app experience that is on par with the developer’s standards.
Not everyone appreciates automatic app updates. Some people prefer a more hands-on approach, especially if they don’t mind setting aside time to update their Mac apps.
Do you want to give it a shot, but aren’t sure how to go about it? Read up on how to update macOS to get started.
Why Microsoft AutoUpdate keeps popping up on Mac
Microsoft AutoUpdate is designed to work in the background while you go about your day, but sometimes it continuously pops up on your Mac. This is an issue experienced by multiple Microsoft AutoUpdate on a Mac.
Here’s why it happens:
- You have a Microsoft app on your Mac
- Microsoft AutoUpdate has checked for updates and is notifying you of the results
- Microsoft AutoUpdate has found available updates or fixed bugs
- Microsoft AutoUpdate has not updated any apps.
Update your apps proactively
Microsoft is a safe and trusted company, and so are its apps. You can use Microsoft AutoUpdate with the peace of mind that comes from knowing its security is intact. However, automatic updates aren’t for everyone. They can be annoying and disruptive, and they can sometimes slow down your Mac. You may also make this decision out of preference—to update apps at your convenience.
For these reasons, you may want to either disable or uninstall Microsoft AutoUpdate from your Mac. Disabling the updates works well as a temporary fix to avoid being disturbed when you’re busy or want to get stuck in and get productive for a few hours. Deleting Microsoft AutoUpdate is the better option if you no longer want to deal with app updates, especially if you don’t use Microsoft apps as often as you used to or don’t need them for work.
Regardless of the decision you make, our team advises taking a more effective approach to managing app updates on your MacBook device. MacKeeper’s Update Tracker can help you achieve that—it alerts you about updates and sets them in motion at the click of a button. This is the best option because you can bundle your updates instead of implementing them one by one—all in one place.


