Updating your macOS may be a stressful task, especially if you’re not a tech-savvy user. But that’s okay—you shouldn’t have to be a PRO at everything! Instead, take advantage of MacKeeper's Premium Services—our experts are excited to help with almost any tech issue you may encounter.
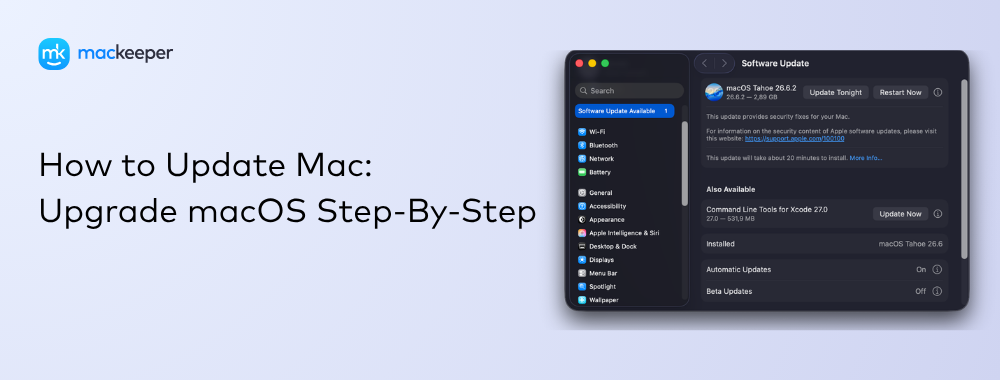
How to update macOS? Update your Mac’s software via System Preferences (or System Settings) and the App Store. If your Mac has any new major or minor updates, it will list them on the screen, so you can install them.
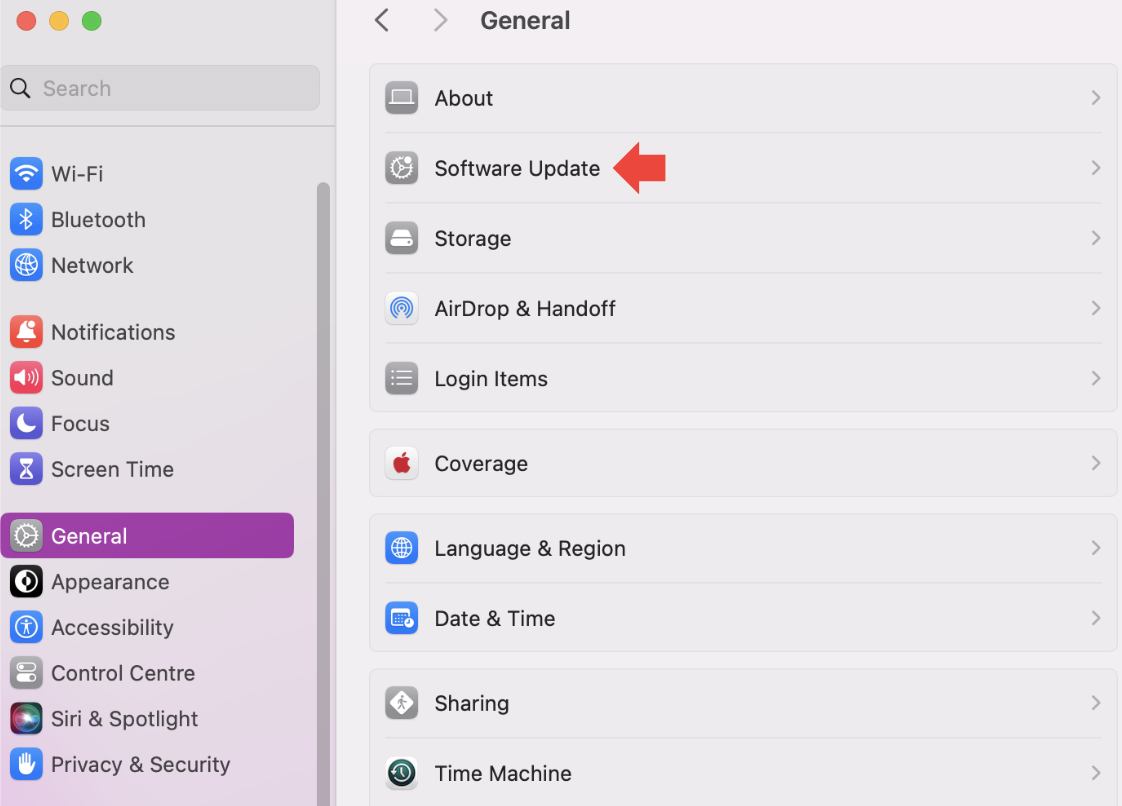
Check for updates via System Settings. Open the Apple menu and select System Preferences or System Settings, depending on your Mac model. Now, click on General, followed by Software Update, and wait for the scan to complete. If any updates are available, select Update Now to install them.
Update Mac via App Store. Open the App Store by selecting its icon in the Dock. Click on Updates in the left sidebar. Your Mac will list available updates on the screen. Conversely, it will let you know if there are no updates available.
Prepare for updates. The most important step before installing new updates is backing up your files to avoid losing them. You should also check your device’s compatibility and ensure you have enough storage space for the new macOS update.
Update installed apps. Look for new app update releases in System Preferences or System Settings. They’re just as important as macOS updates, as they ensure you get access to new features and bug fixes to keep your apps safe and working smoothly.
Set up automatic updates. Open the Apple Menu and click on System Preferences (or System Settings). Select General on newer Mac models and choose the Software Update option. Enable the Automatically keep my Mac up to date option.
Troubleshoot update issues. Check Apple's System status to see which Apple services are experiencing system issues. Repair your disk in Disk Utility in Recovery Mode or restart your Mac in Safe Mode to address software conflicts. You can also reset NVRAM/SMC. If all else fails, you still have the option to reinstall macOS.
A note from our experts:
Once you have decided to update your Mac to a later macOS version. But where to start? Start with MacKeeper’s Premium services, our experts will give you recommendations on any Mac-related issue.
Enter your question and wait for the recommendation on solving it.
Step 1. MacKeeper > Premium Services > Chat NowStep 2. Start a chat and wait for the recommendations
How to update your Mac
The easiest way to install a Mac update:
Open System Settings
Click on General
Go to Software Update to check for updates and install them if available.
Before you dive in, though, it helps to understand how the update process works. macOS updates typically encompass multiple stages, including checking for available updates, selecting the preferred update method, and then executing the update installation itself. Both pre- and post-updating steps need to be considered before updating Mac to the latest OS, and we’ll get you through each of them in the next sections.
To update your Mac, we recommend following these steps:
Check compatibility
Backup your data
Close all apps and save your documents
Check for the latest macOS update in System Settings
Install the most recent macOS release
Update your apps
Set up automatic updates
Troubleshoot any update issues
Resolve software compatibility issues
Optimize your Mac for the best performance
Prepare for macOS update
Before you update Mac, it's important to get ready for it to ensure a smooth and secure process.
Check macOS version and compatibility
Before you update Mac, check which macOS version you're running now and whether your machine is on Apple's supported list. From our experience, this one step saves people from installing an older release and having to update all over again a week later. Fortunately, it takes under a minute.
Follow these two checks before you go any further:
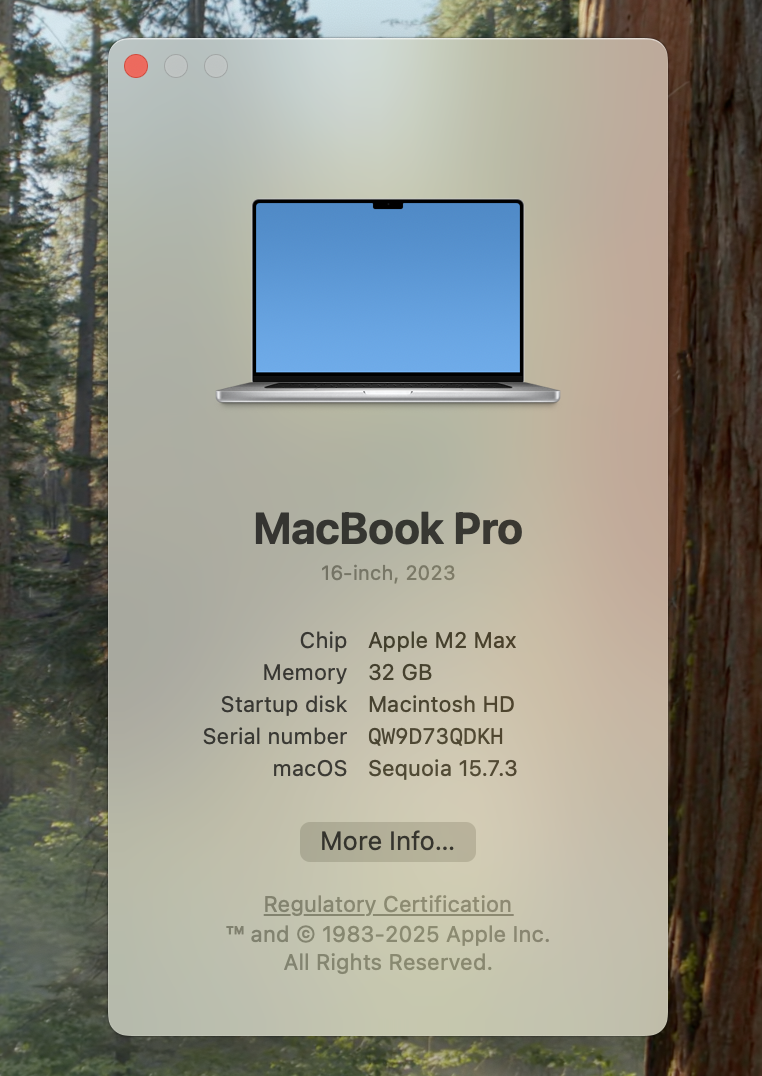
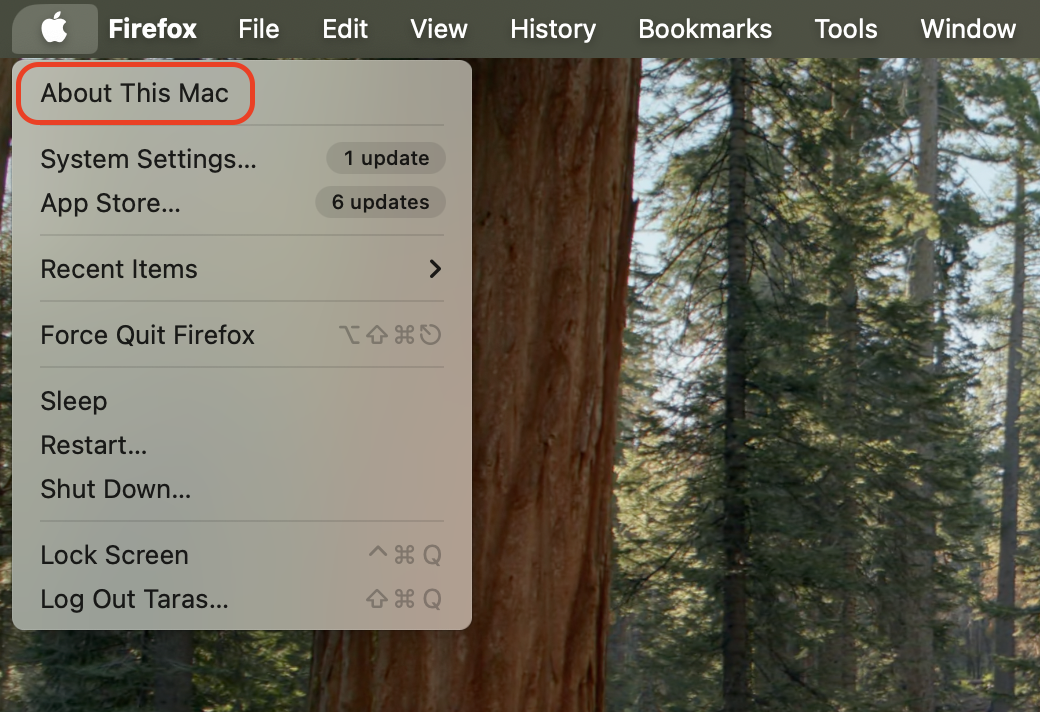
Open the Apple menu and select About This Mac to see your current macOS version and your Mac model.
Visit Apple's official macOS page and confirm your model appears among the supported devices for the release you want.
Open the Apple menu and select About This Mac to see your current macOS version
Back up your data with Time Machine
Creating a backup of your hard drive can help reduce the risk of potential data loss during the update process. Not only that, it never hurts to have duplicate copies of all your important files. Backing up your data on Mac can be a very simple process, made easier should you decide to use Time Machine to help you.
Time Machine can simplify the backup process on your Mac. In just a few simple steps, you can ensure all your important files are securely backed up, providing a safety net during updates or unexpected data loss.
Here’s how you can use Time Machine for comprehensive backups:
Connect an external drive compatible with Time Machine.
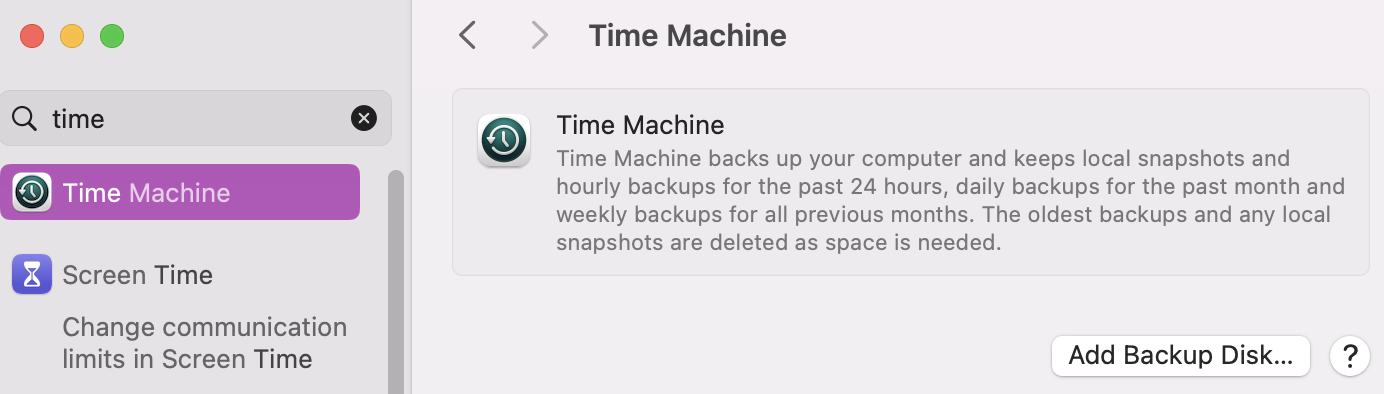
Open System Settings > General > Time Machine.
Click Select Backup Disk and choose the connected drive.
Time Machine will automatically start backing up your Mac.
Step 1. With an external drive connected, open the Time MachineStep 2. Click Select Backup Disk
Connect to the power source
Updating macOS can deplete your Mac’s battery, especially as it typically takes a while. Therefore, keeping your Mac connected to a power source is essential to prevent its battery from dying, which could stop the update before it’s completed.
Check available disk space
A full drive is the single most common reason updates stall, as our support team sees week after week. We recommend keeping at least 25GB free before you start, since your Mac needs room for the installer and the unpacked system files.
Here's how to see what you have left:
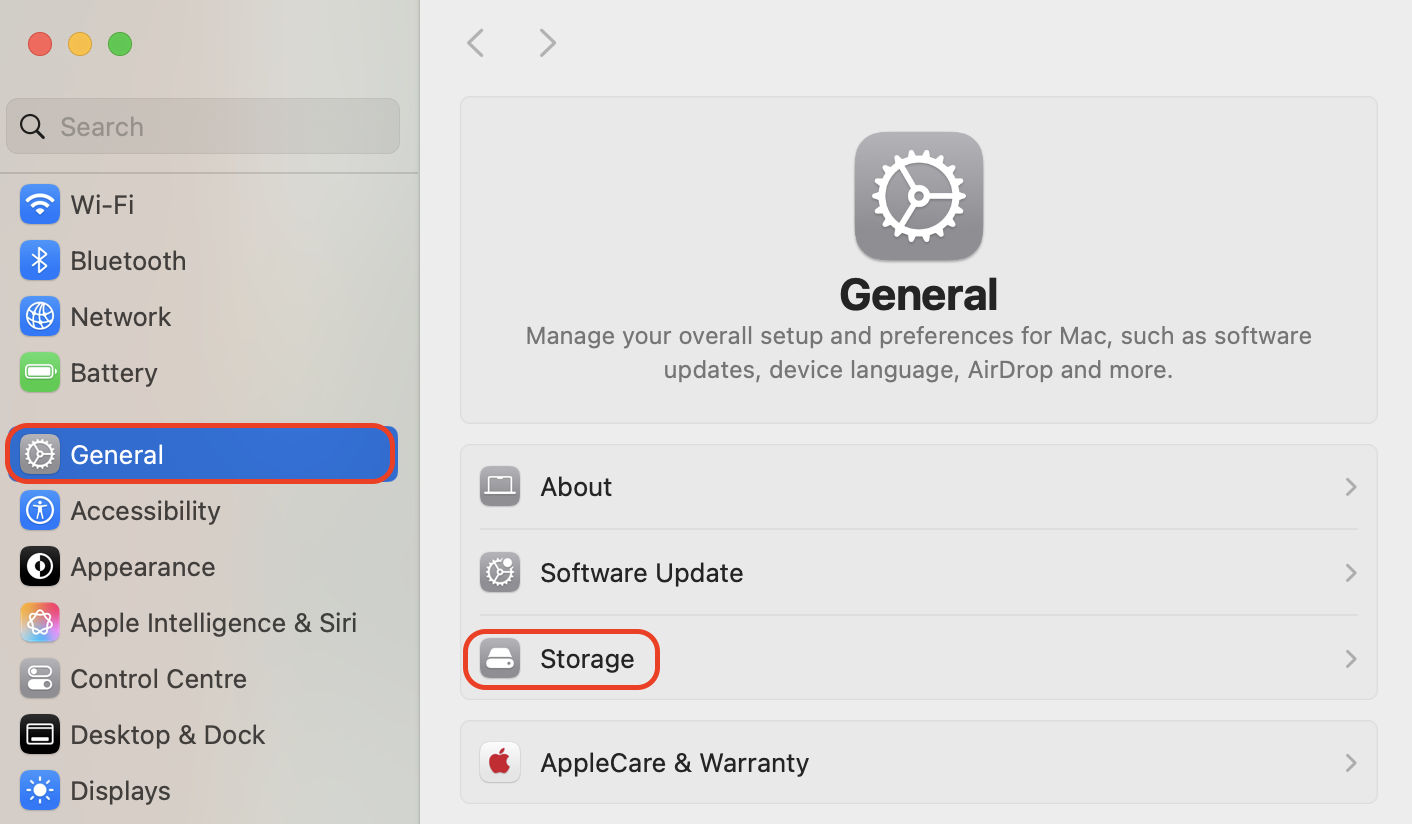
Go to System Settings > General > Storage.
Review the bar chart and use Recommendations to offload files you no longer need.
Go to System Settings > General > Storage to review your free space
Ensure a stable internet connection
If you want your macOS installation to complete without disturbance, having a strong internet connection is just as important as connecting your device to a power source. This is because update files are often quite large, and the installation process requires continuous data transfer to operate smoothly.
Close applications and save documents
Closing applications frees up system resources and prevents potential conflicts during the update. Additionally, saving documents safeguards against any unexpected data loss or unsaved changes, ensuring a smooth transition through the update process.
Here’s how to close unnecessary applications:
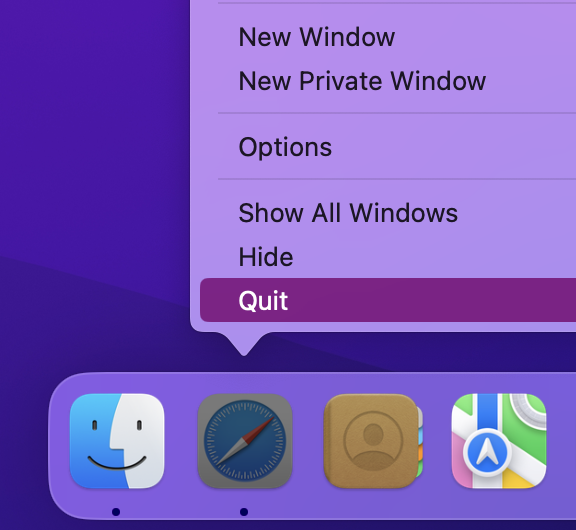
Right-click on any open applications and select Quit.
Or use the keyboard shortcut Command + Q to close the application immediately.
Step 1. Right-click on open apps and select QuitStep 2. Shortcut Command+Q with an open App, automatically quits
Here’s how to ensure you save all ongoing work:
In each application, locate the File menu and select Save or use the keyboard shortcut (Command + S).
For applications with auto-save functionality (common in many modern applications like Google Docs), ensure that the auto-save feature is activated.
Step 1. Go to File and select Save or use the keyboard shortcut Command + SStep 2. Ensure the Auto-Save function is activated
Update macOS—Check for macOS updates in System Settings
Regularly checking for macOS updates is essential to ensure your system remains up-to-date with the latest improvements and security patches. This can be done by checking for any pending Software Updates via System Settings. Here, your Mac will check for any available updates and automatically install any available updates.
Initiating the update process and entering the administrator password
Checking for macOS in your System Settings is the first step in initiating the update process on your Mac. Here’s how you do it:
Click on the Apple menu, then select System Settings.
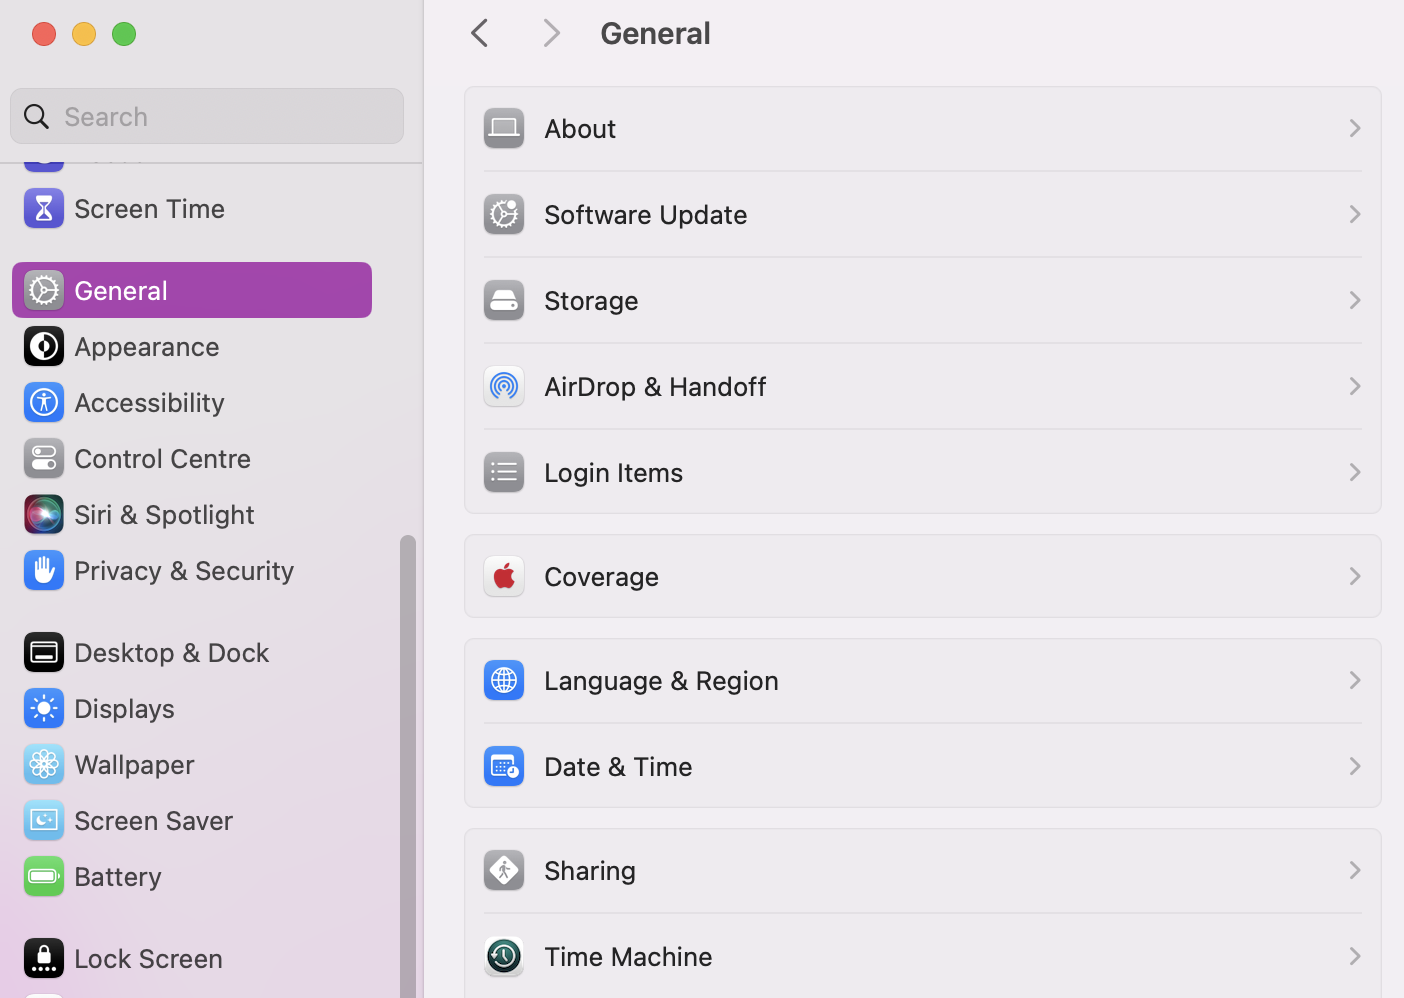
Select General > Software Update.
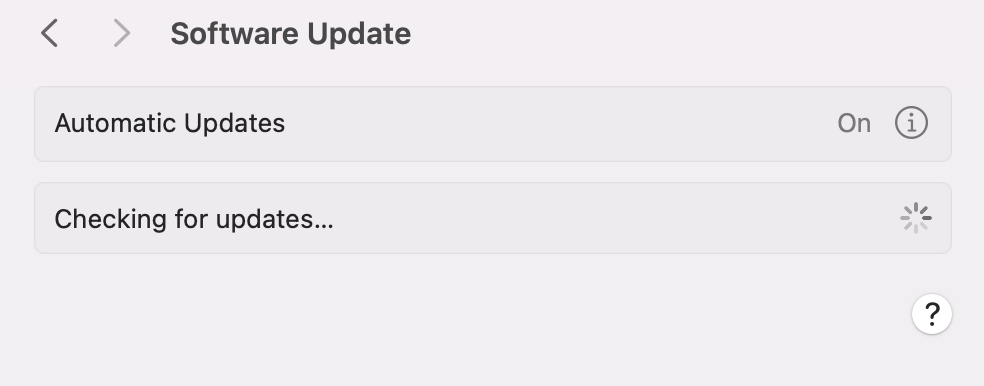
Click on Check for Updates to allow your Mac to scan for available updates.
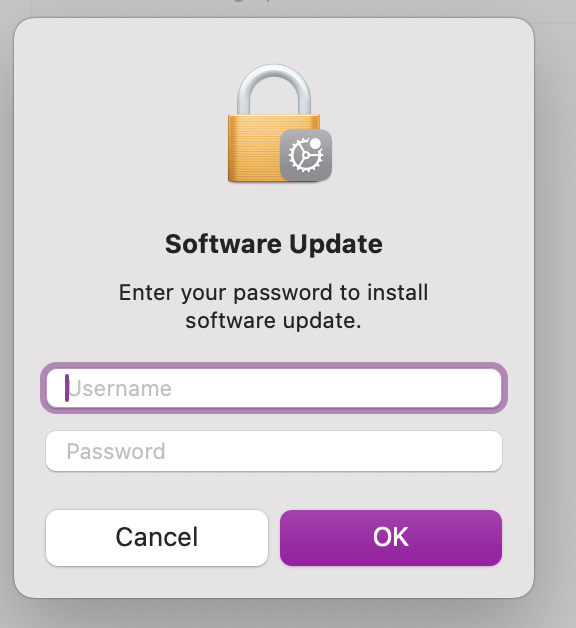
If updates are available, the system may prompt you to enter the administrator password to proceed with the installation.
Step 1. Go to System Settings > General > Software UpdateStep 2. Allow Mac to Check for updatesStep 3. Enter the admin password to begin the process
Update installed apps
Ensuring you update Mac apps is crucial for optimal performance. It can be a tiresome task to regularly check all of your installed apps are up-to-date, and it’s a good idea to consider batch updating them simultaneously. Making it a habit to update software on MacBook ensures you’re always running the latest features and fixes.
Updating all apps simultaneously
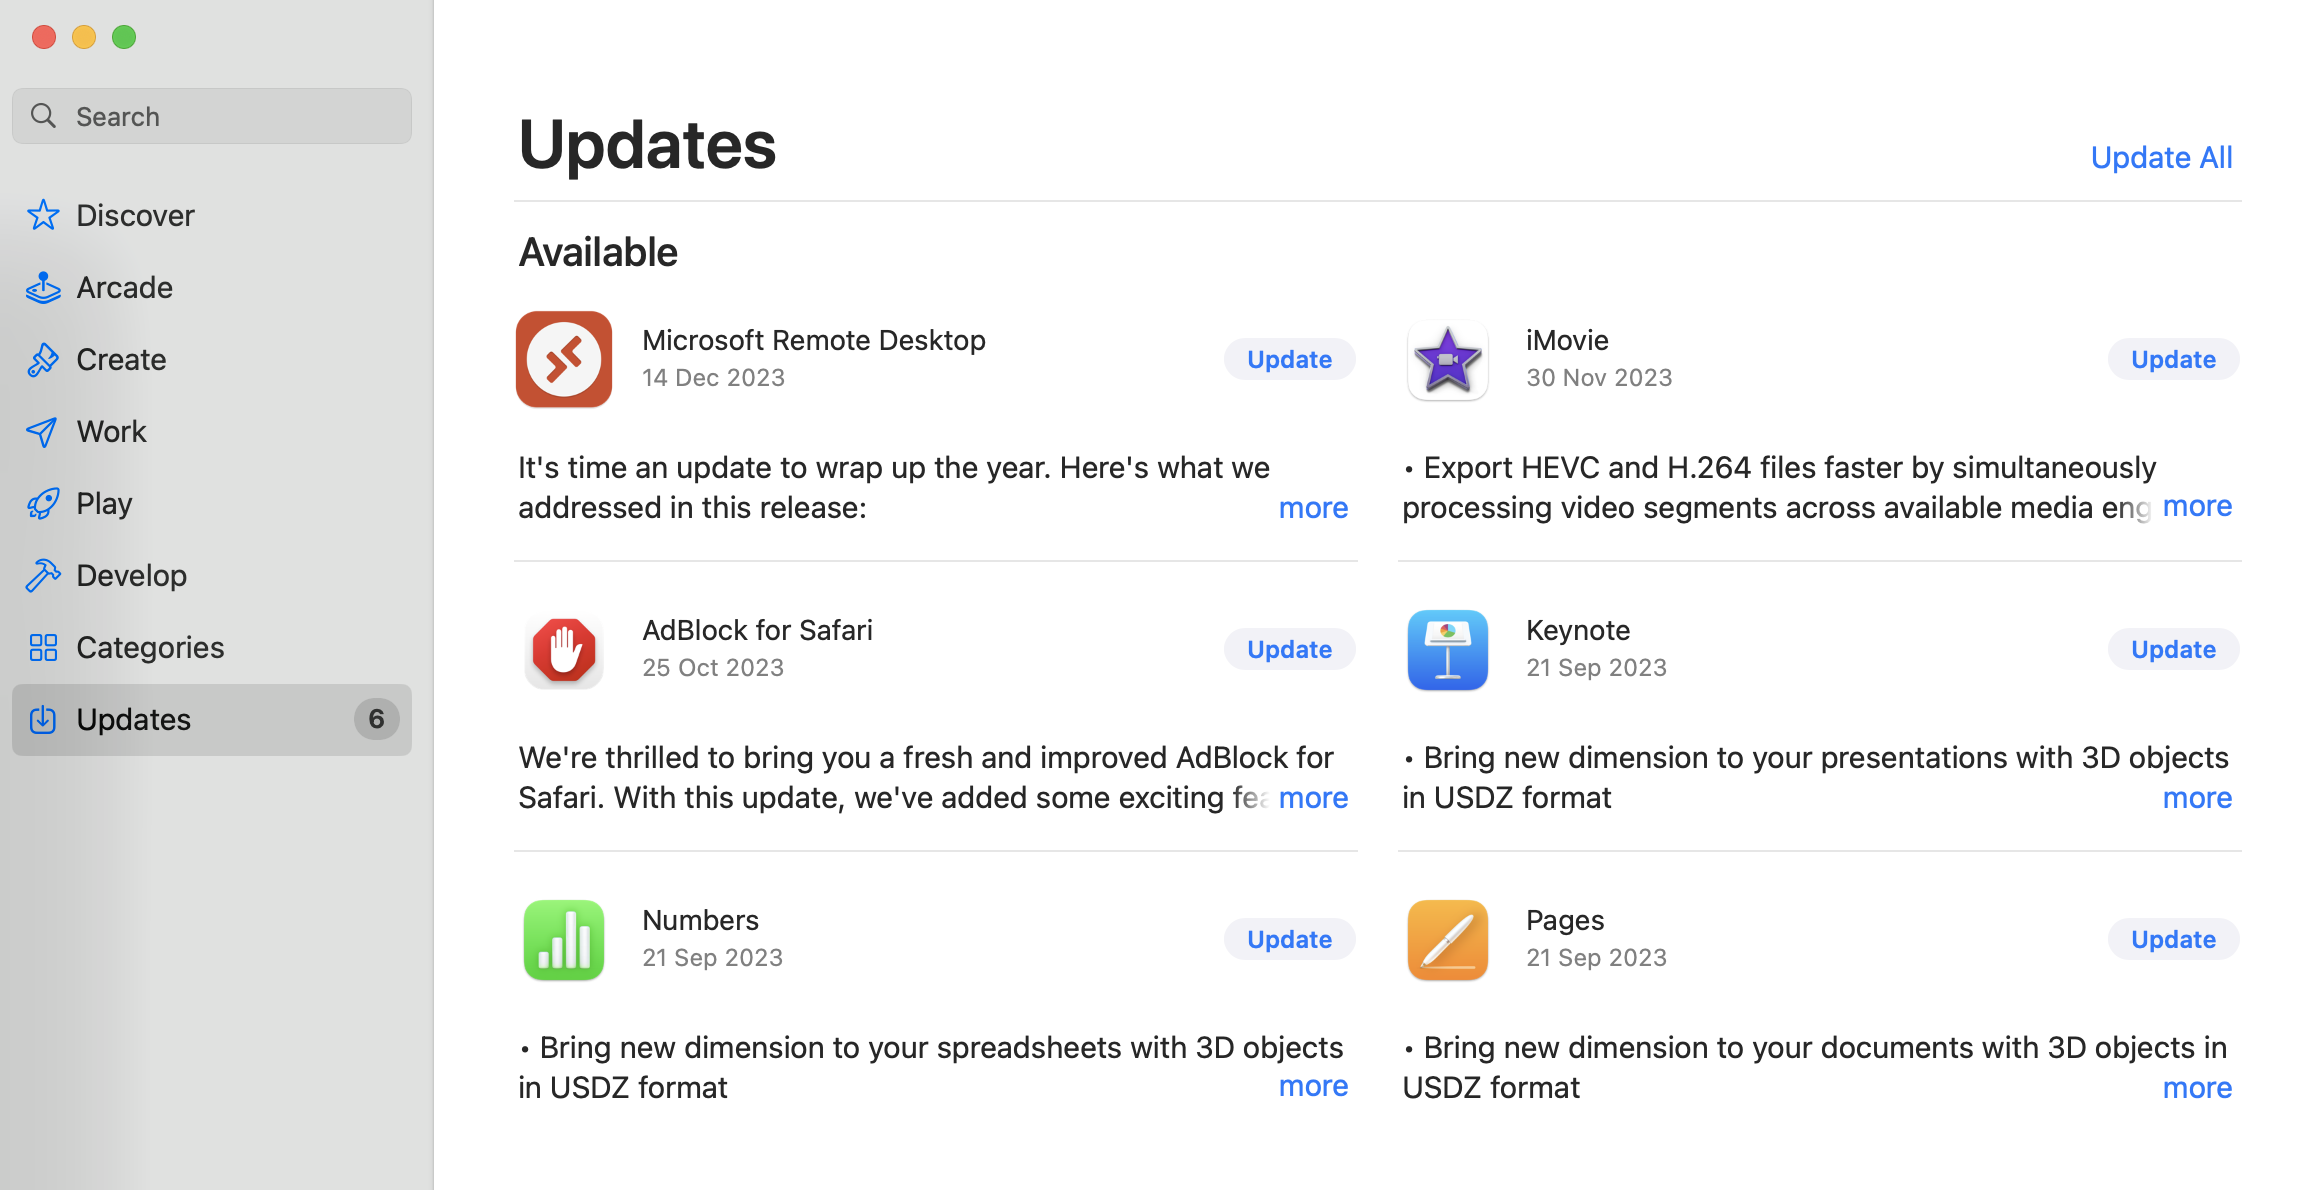
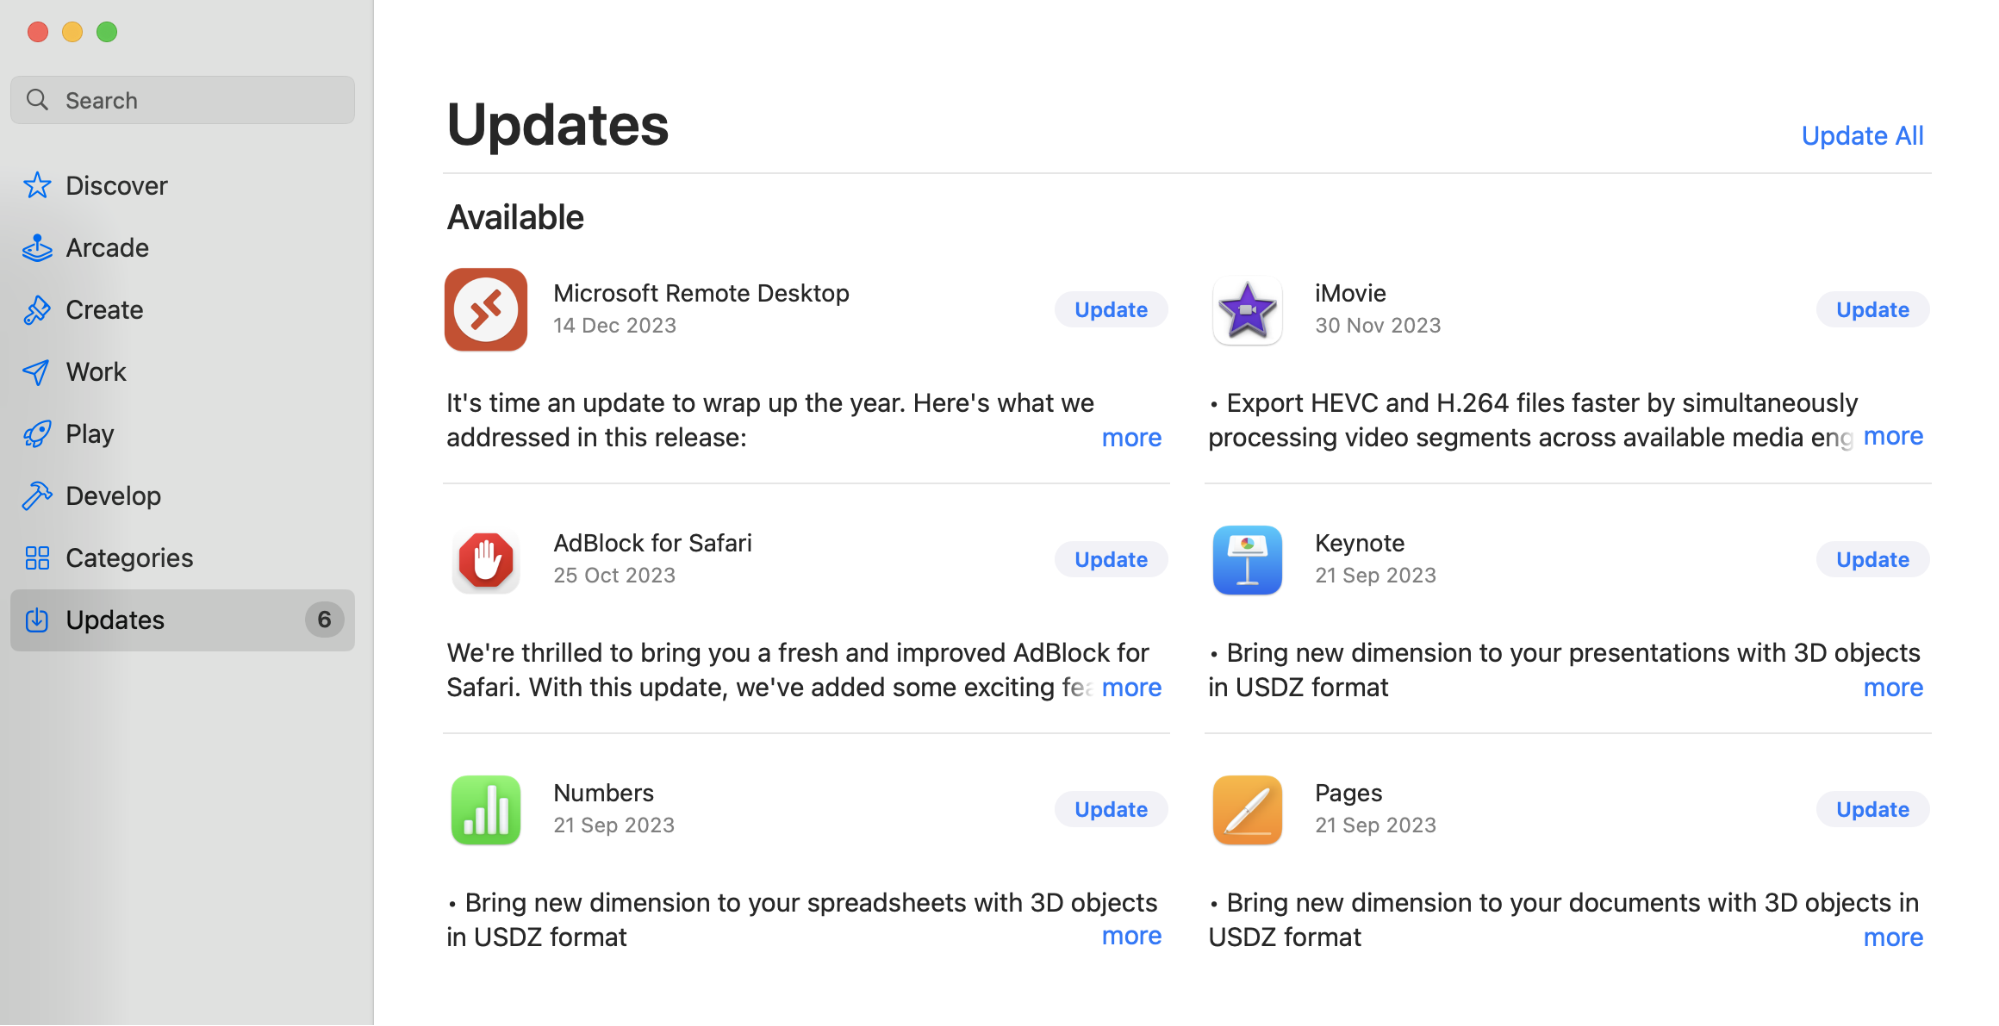
Here’s how to allow for all apps to update simultaneously via the App Store:
Launch the App Store on your Mac.
Navigate to the Updates tab.
Click Update All to install available updates for all your installed applications.
Step 1. Open the App Store and go to the Updates tabStep 2. Click Update All to install all available updates
Set up automatic updates
Automatic system updates offer a convenient way to keep all your Mac's software current and up to date without any manual effort required. This ensures enhanced security and performance effortlessly.
Enabling automatic updates
Automatic updates for your Mac system ensure that your laptop stays current with the latest software enhancements and security fixes without manual oversight.
To enable automatic updates, you can follow these steps:
Click on the Apple menu in the top-left corner of your screen and select System Settings.
Within System Settings, click on General > Software Update.
Check that the box next to Automatic Updates is turned on to enable automatic system updates for macOS.
Benefits of automatic updates—Understanding the convenience and advantages
Automatic updates provide not just convenience but a host of advantages. Here are some of the benefits of enabling automatic updates on Mac:
Enhanced security: Swift delivery of all essential patches to fortify your Mac against any cyber or software vulnerabilities.
Effortless management: Automated process, which means saving your time typically spent on manual checks and installations.
Improved performance: Integration of the latest features and optimizations for a seamless and efficient Mac experience.
How to install macOS Tahoe?
macOS Tahoe 26 is Apple's current release, and installing it works the same way as any other upgrade. As our tests show, the download runs largest on the first major upgrade, so give it time and keep your Mac plugged in.
Install Tahoe on a supported Mac in four steps:
Back up your files with Time Machine.
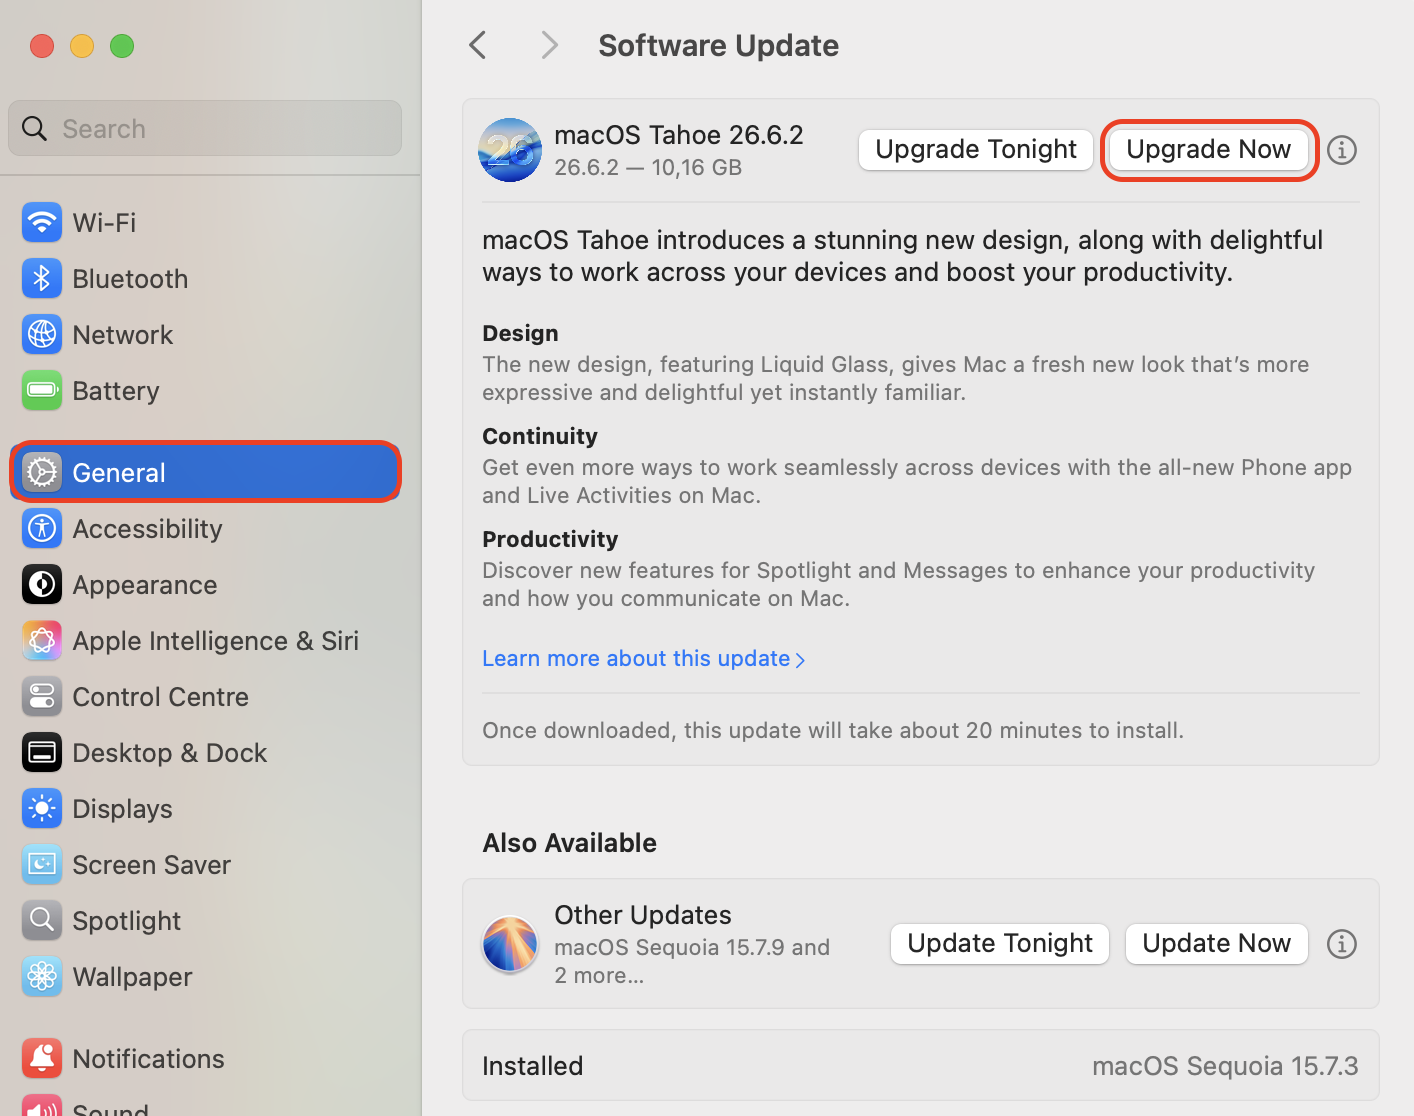
Open System Settings > General > Software Update.
Click Upgrade Now next to macOS Tahoe 26.
Enter your administrator password and let your Mac restart on its own.
Open System Settings > General > Software Update and click Upgrade Now
Troubleshoot Mac update issues
When encountering issues with updates, navigating through troubleshooting steps can alleviate many common problems. Understanding compatibility, resolving software conflicts, and optimizing your Mac post-update all play pivotal roles in ensuring a smooth update experience.
Let us guide you through the following troubleshooting measures:
Dealing with update errors
Common macOS update issues and solutions
Resolving software compatibility issues
Optimizing your Mac after updates
Tweaks and maintenance post-update for performance
Dealing with update errors
Encountering update errors can be frustrating, but in most cases, it’s relatively easy to overcome them. If you run into issues trying to install a macOS update, follow these tips to help you identify the source of the error and eliminate it:
Double-check that your Mac is compatible with the macOS version you’re trying to install, as we’ve outlined below. Updates will fail if you attempt to install them on incompatible hardware.
Ensure you have a stable internet connection, as it’s common for errors to stem from connectivity issues.
Restarting your device can resolve minor glitches that might be hindering the update process.
Insufficient storage space can impede updates. You may need to clear unnecessary files or apps to free up space.
If an error code accompanies the update failure, searching for specific error code information online can provide insights into potential solutions.
Common macOS update issues and solutions
It’s common to encounter some issues when you install a new macOS update. Depending on the device you’re using, these can range from installation failures, software incompatibility, decreased performance, and general system instabilities. We recommend familiarizing yourself with these things before you update your MacBook Pro, Air, or iMac, so that you’ll know what to expect, as well as the fixes you’ll need to overcome any problems.
Here are some common solutions to macOS update issues:
If an update fails to install, restart your Mac and attempt the installation again. Ensure a stable internet connection and sufficient free space on your device.
If your Mac exhibits instability after an update, try resetting the NVRAM. To do this, restart your Mac and hold down Command + Option + P + R keys until you hear the startup sound for the second time.
Some apps might face compatibility issues post-update. Check for available app updates in the App Store or visit the app developer's website for compatibility information and updates.
If you’re unable to resolve macOS update issues using the tips above, seek official support on Apple's support forums or by contacting MacKeeper’s Premium Services within our app.
Step 1. Restart your MacStep 2. Reset your NVRAMStep 3. Check for app updates in the App Store
Resolving software compatibility issues
As a rule, software compatibility problems can arise after updating macOS. Resolving these issues involves ensuring that your essential applications are updated and compatible with the latest macOS version.
Here’s how to resolve software compatibility issues:
Check app updates: Open the App Store and navigate to the Updates tab. Here, you can check for available updates for your essential applications, as updating apps to their latest versions often includes compatibility improvements for the current macOS version.
Visit app developer websites: If there are persistent compatibility issues with specific apps, visit the respective app developer's website. Look for information or updates specifically addressing compatibility with the latest macOS version.
Consider alternative software: In some cases, if essential apps aren’t updated or supported for the latest macOS, consider finding alternative software that is compatible with the current macOS version.
Optimizing your Mac after updates
Optimizing your Mac after updates is as important as making sure you’ve prepared your device post-updates by checking compatibility, available disk space, and creating backups of files. These actions can help your Mac get ready to install the latest macOS updates. However, the post-update optimization is equally important.
Here’s how you can optimize your Mac after updates:
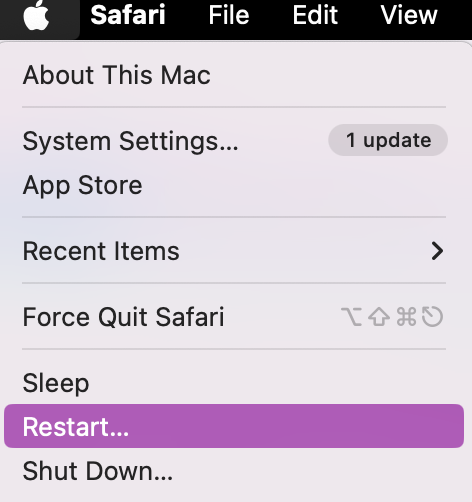
Click on Apple Icon and select Restart your Mac after an update to clear temporary caches and refresh system processes.
Go to System Settings > General > Software Update to ensure your Mac has installed all available system updates.
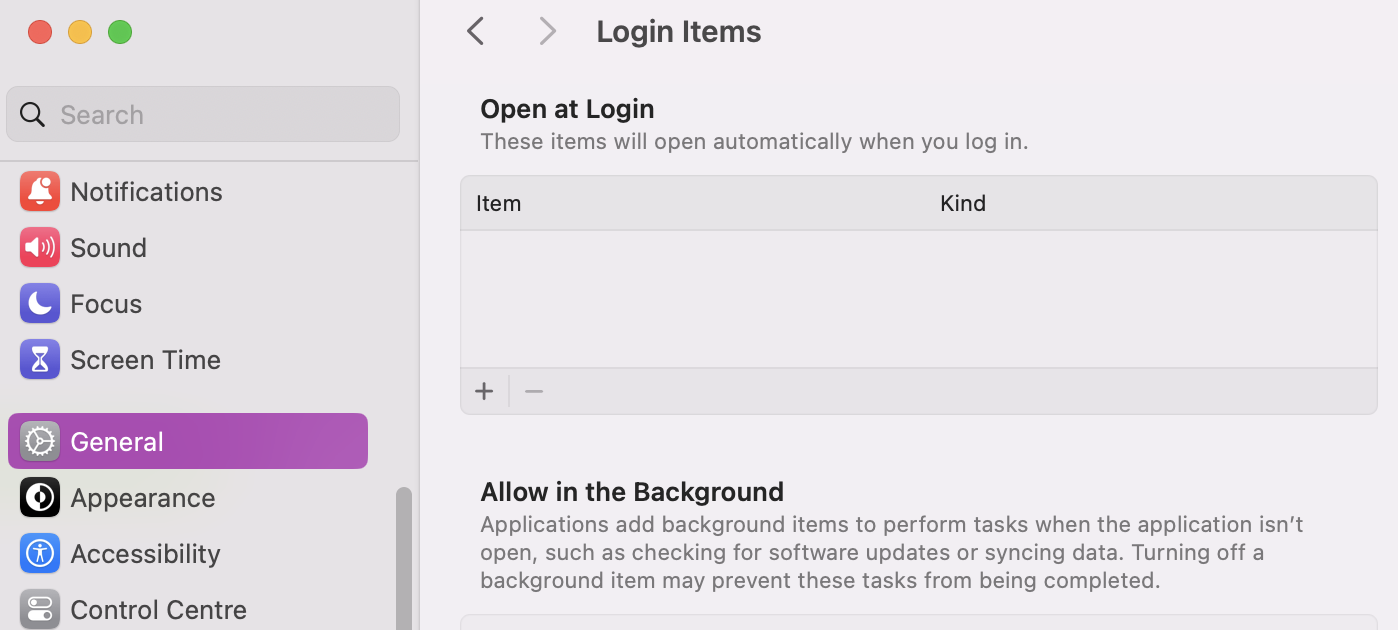
Go to System Settings > General > Login Items and remove items you don’t need at startup to prevent slowing your Mac’s boot down.
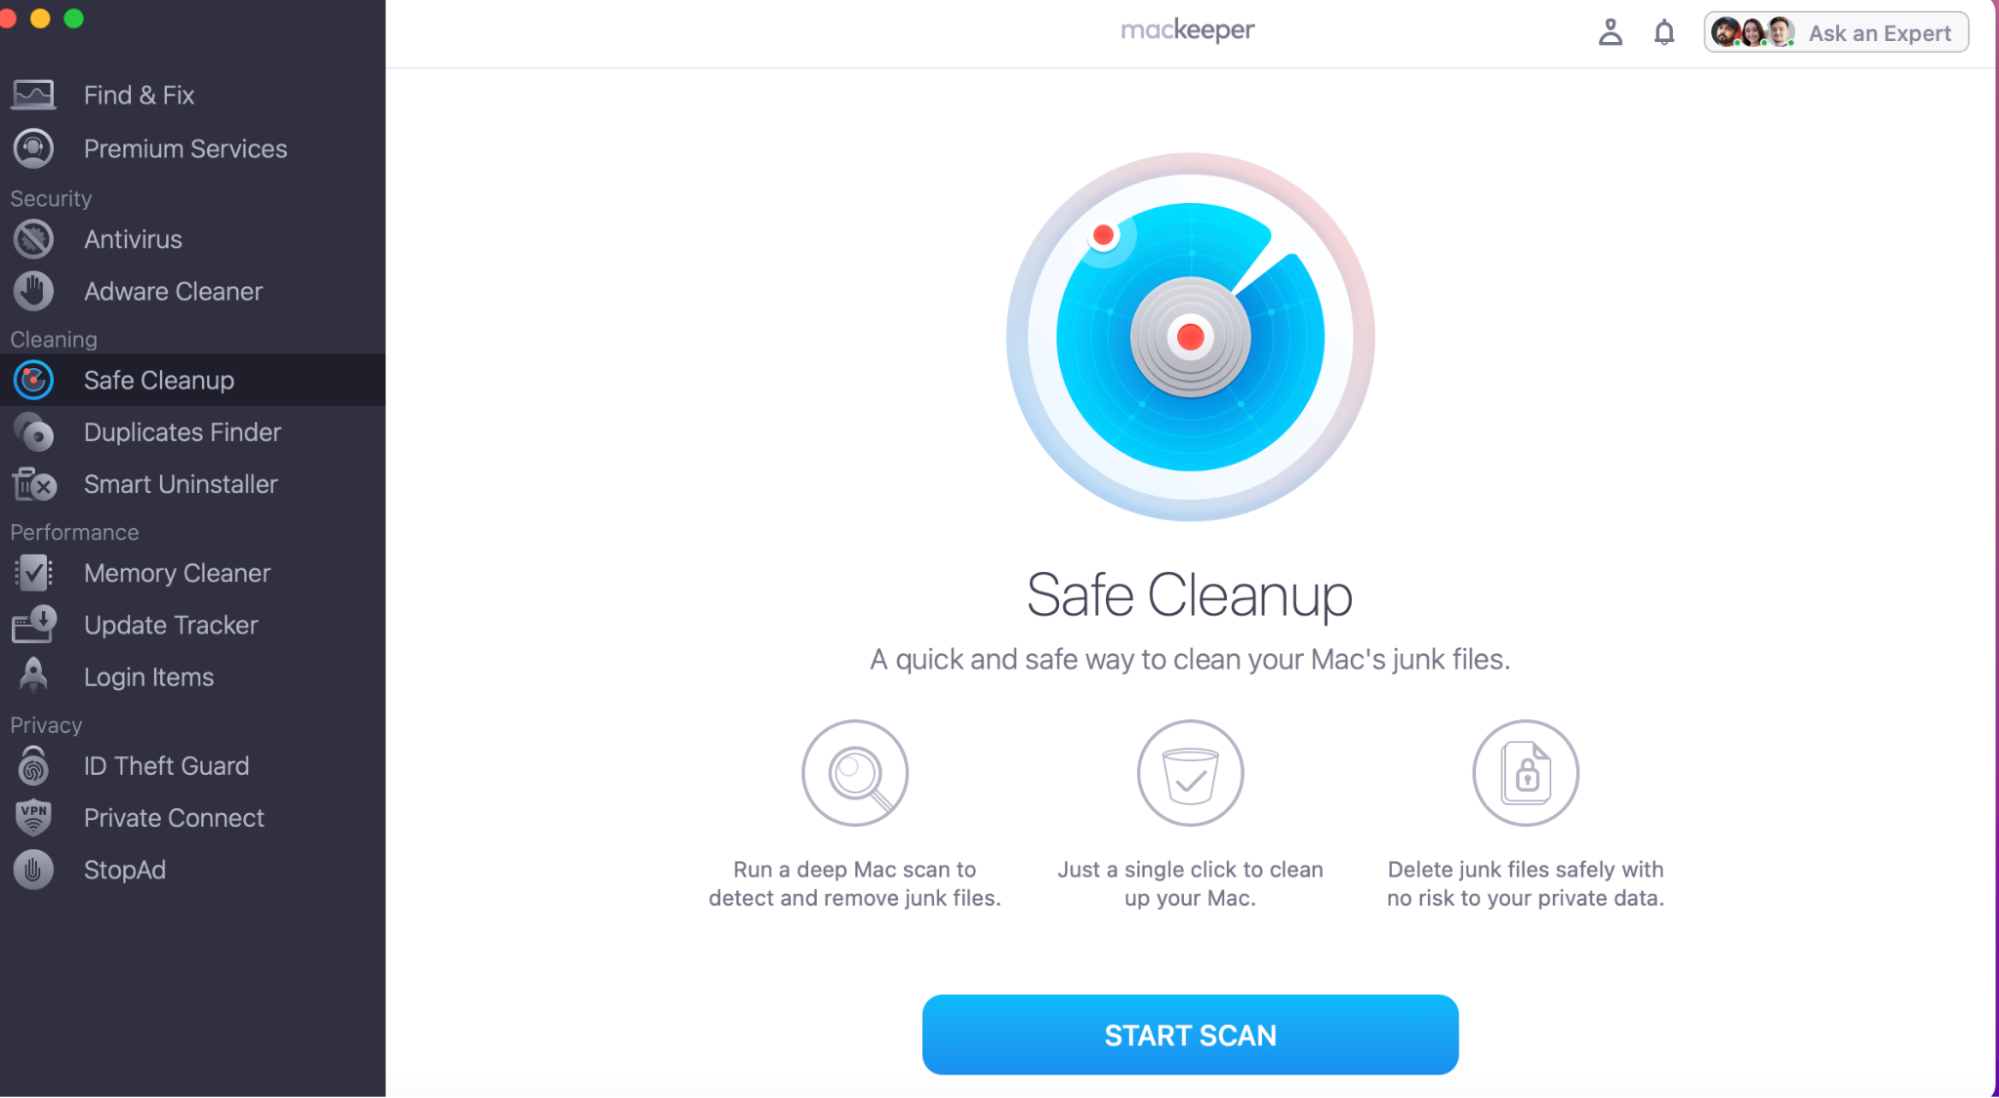
Use third-party tools or manual methods to clear cache and temporary files, like MacKeeper’s Safe Cleanup or manual cache clearing in browsers, to help free up space and optimize performance.
Check your Mac's storage is adequate (ideally, around 15% of your total storage) for better system performance post-update.
Step 1. Remove unnecessary Login items to speed up Mac’s boot post-updateStep 2. Clean cache and junk files with third-party apps like MacKeeper
Tweaks and maintenance post-update for performance
Post-update, implementing specific tweaks and conducting maintenance tasks can significantly boost your Mac's performance. These actions involve adjusting settings and performing routine upkeep to ensure optimal functionality.
Here are the tweaks and maintenance tasks we recommend post-update to optimize Mac performance:
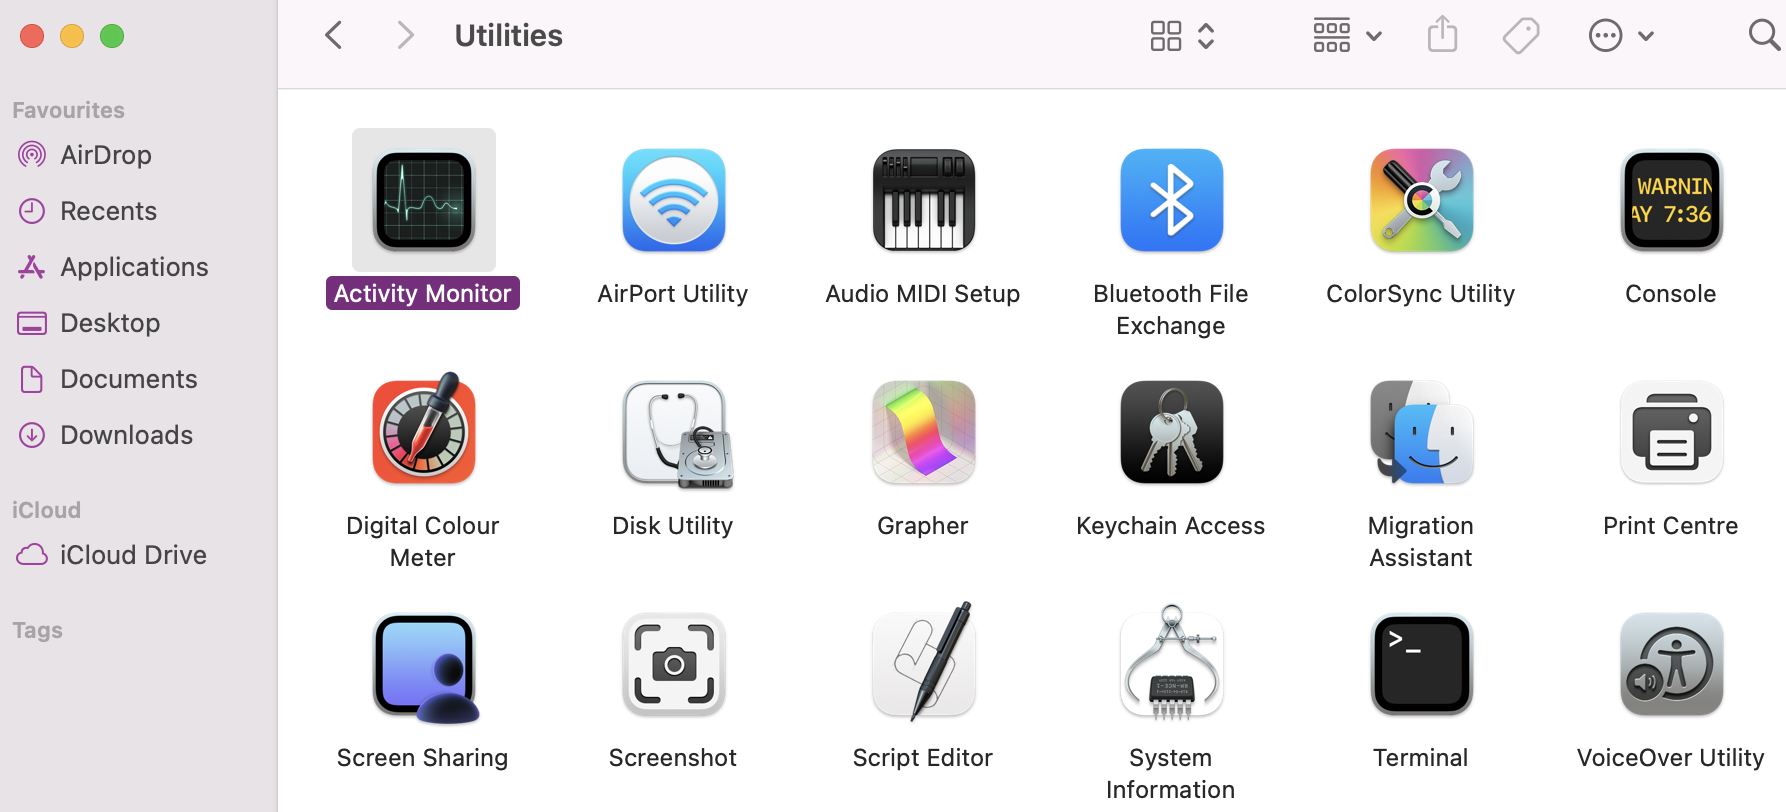
In Finder, go to Applications > Utilities > Activity Monitor to manage processes running in the background. It’ll show you which apps or processes consume significant CPU or memory resources.
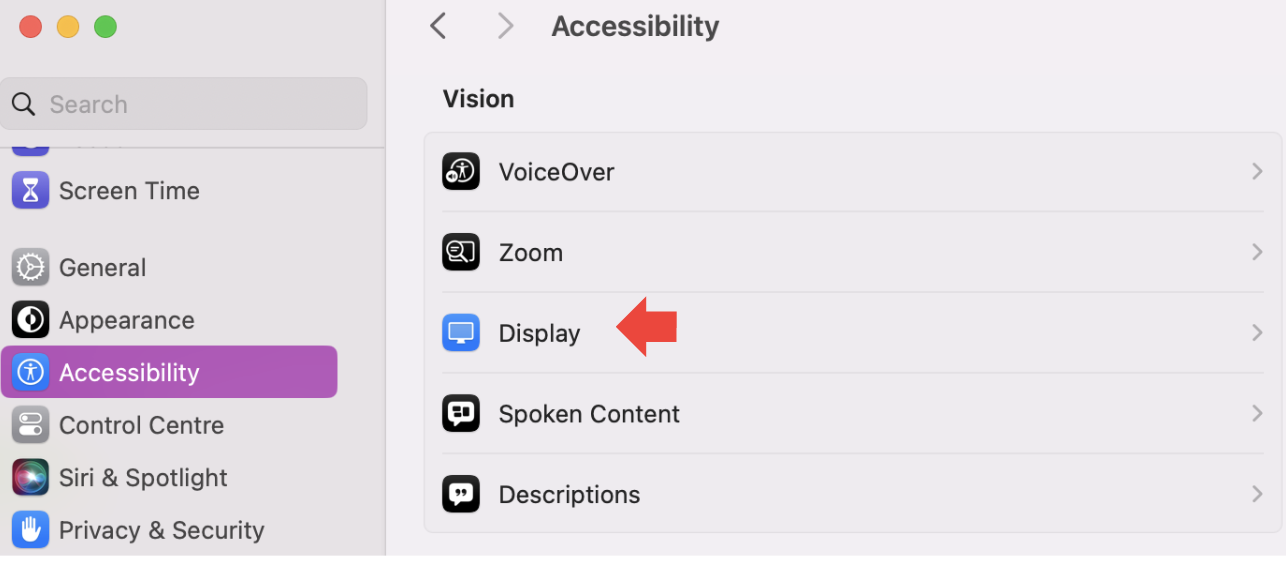
Minimize visual effects and animations by adjusting settings in System Settings > Accessibility > Display. Reducing these effects can enhance system responsiveness, especially on older Macs.
Organize your desktop and avoid cluttering it with numerous files. Storing excessive items on the desktop can slow down system performance.
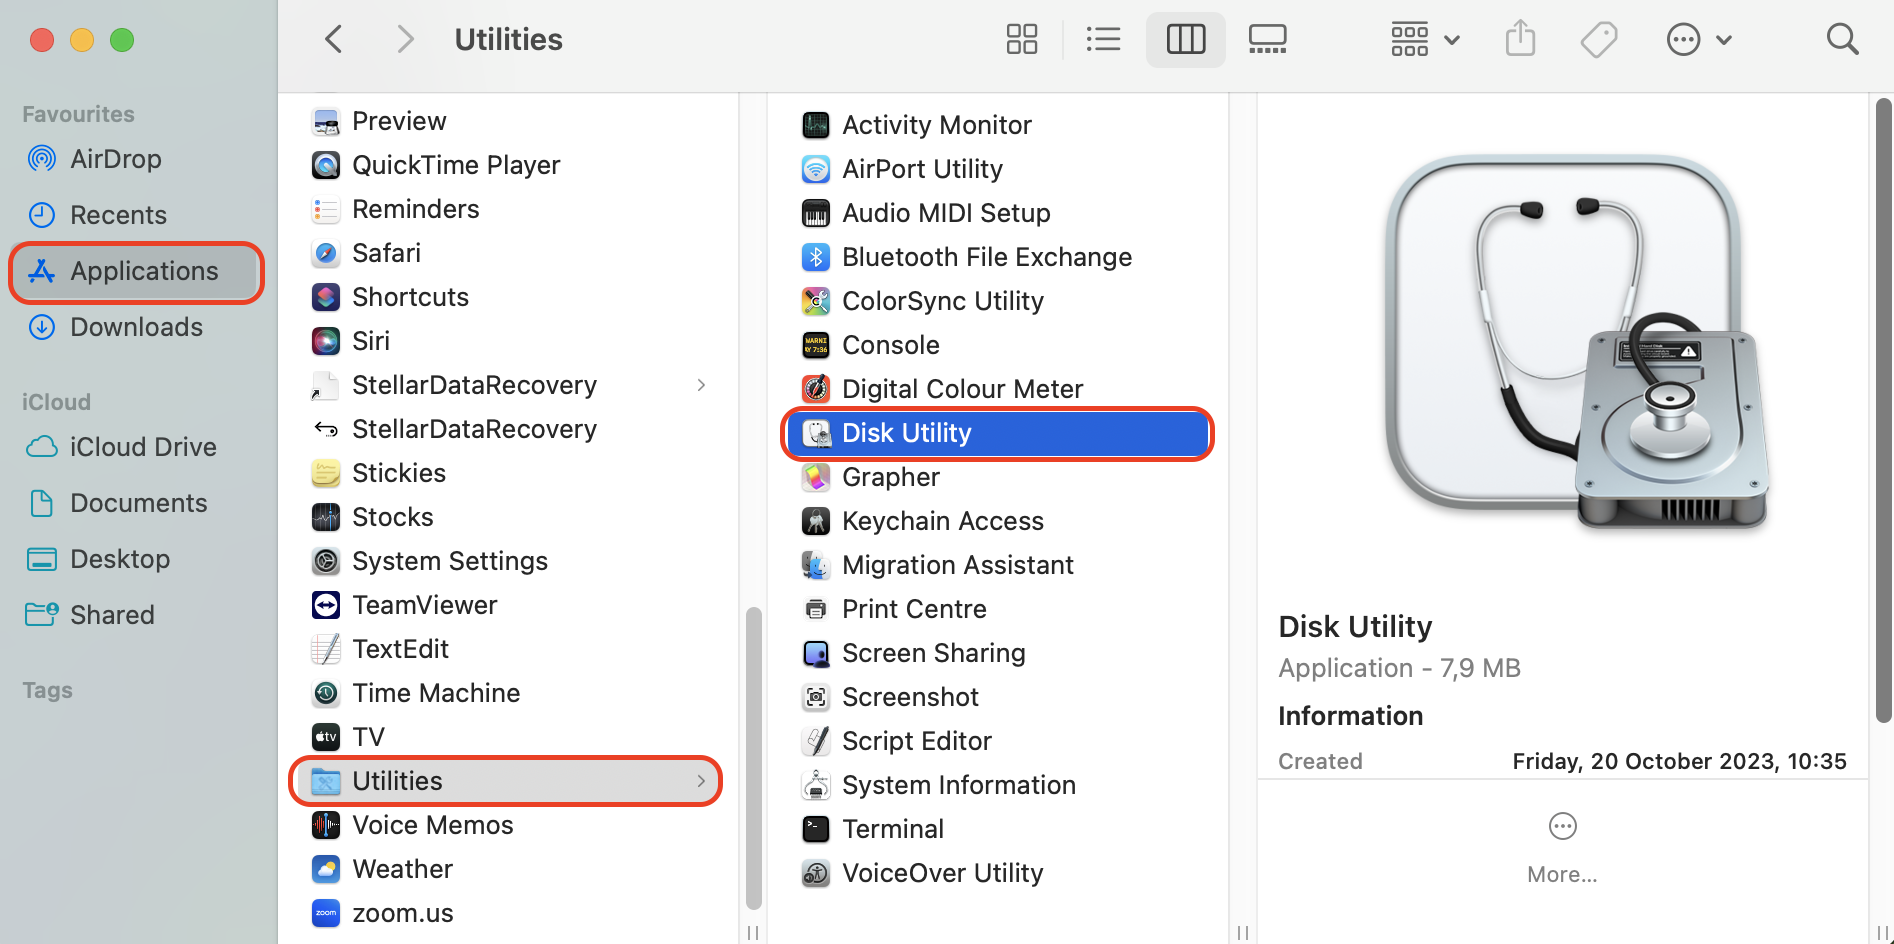
In Finder, go to Applications > Utilities > Disk Utility to run First Aid on your disk. This process checks for and repairs disk errors, optimizing overall system performance.
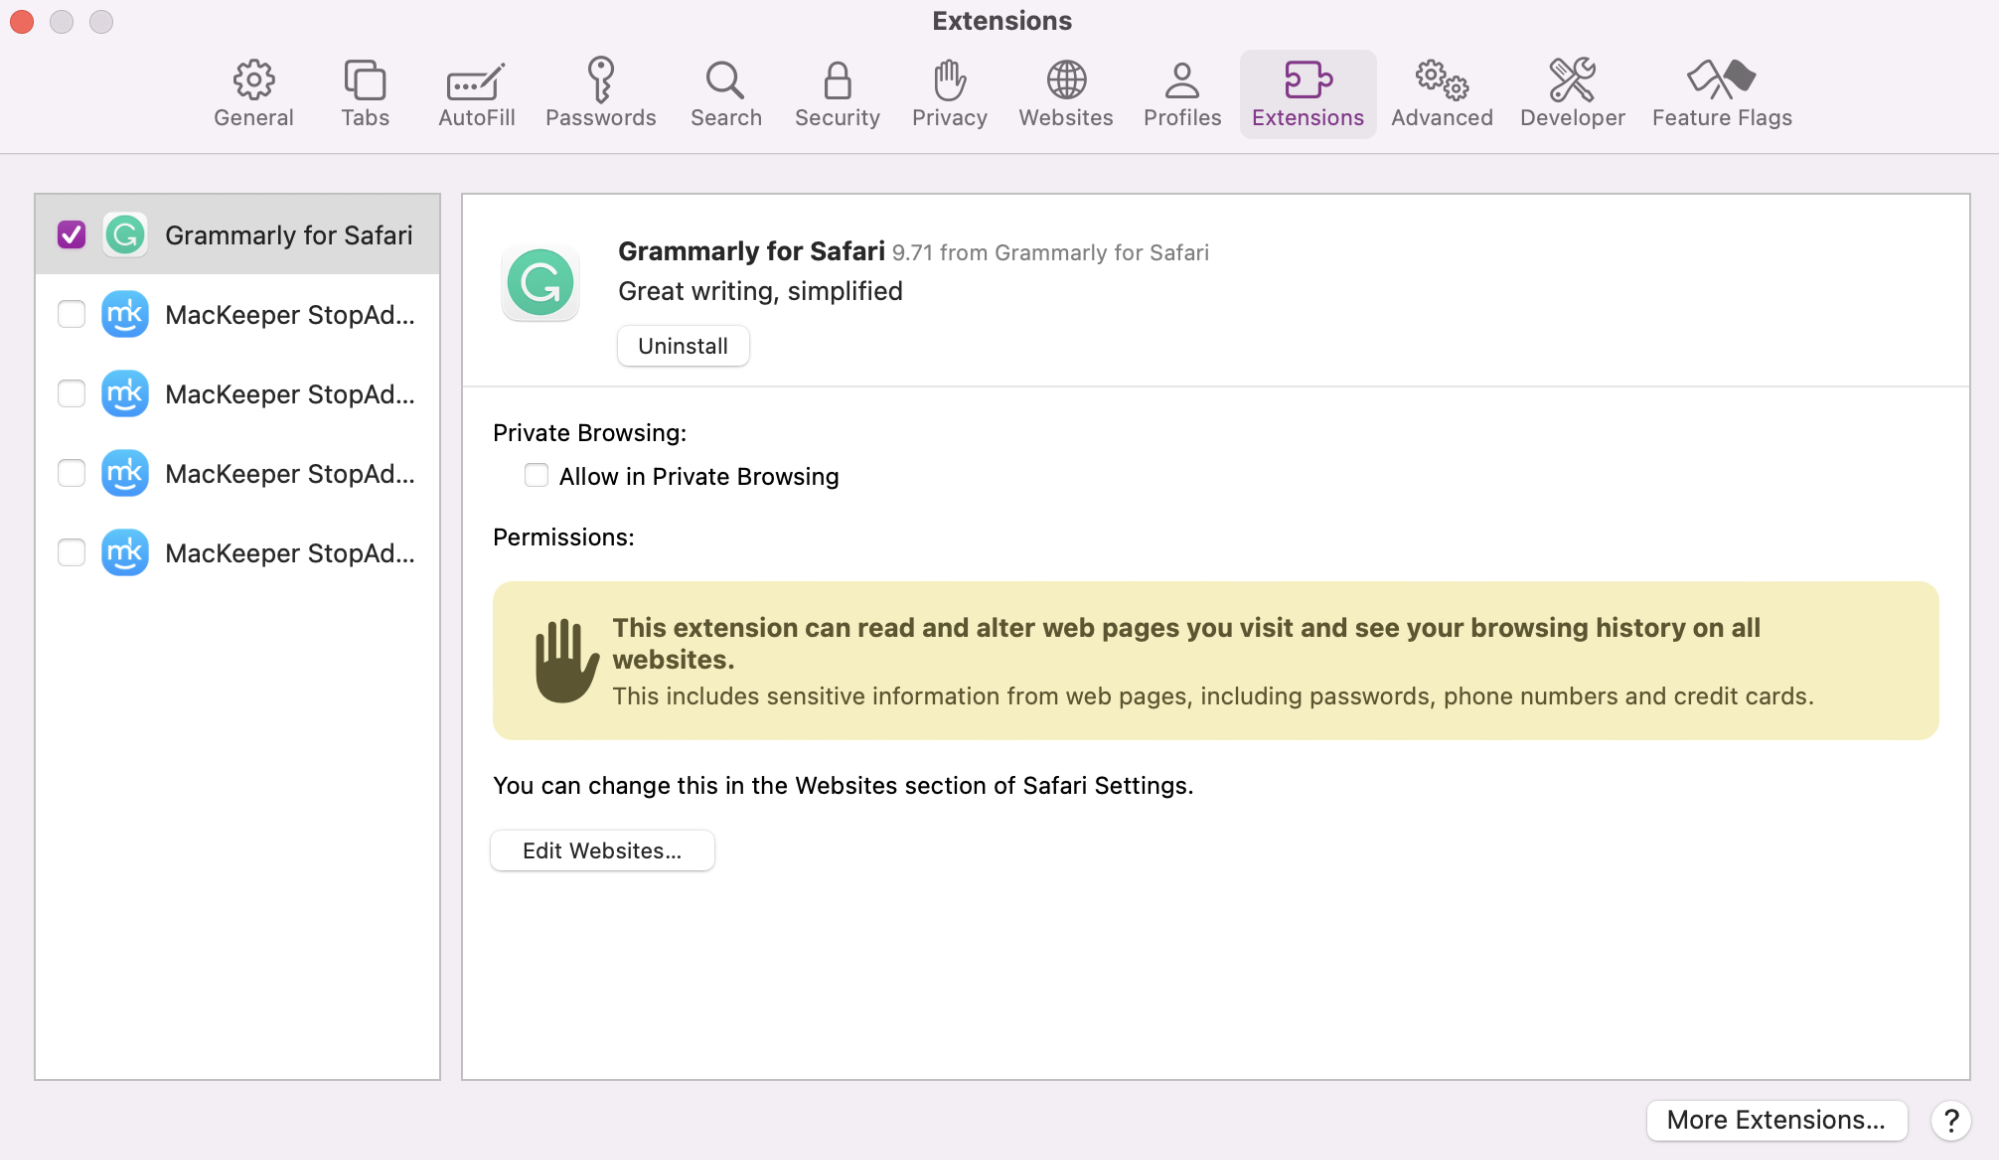
If you use or plan to update Mac Safari or other browsers, consider resetting their settings or clearing caches to improve browsing performance.
Step 1. Use Activity Monitor to manage apps using significant CPU or memoryStep 2. Minimize visual effects to enhance system responsivenessStep 3. Run First Aid on your disk with Disk UtilityStep 4. Rest or clear cache from your preferred browser
Should you update your Mac?
Yes, our team of experts strongly recommends you keep your Mac running with the latest software updates. With each update Mac addresses new features to the operating system, as well as fixes potential vulnerabilities, thus contributing to a more efficient and secure Mac experience.
Not only does this get you access to the newest features, but it also means your Mac is protected against software bugs or security breaches. That said, you should only update your Mac if you know the software will be compatible. We advise you to always back up Mac laptop files that you rely on first as a precaution.
How to find MacBook model before Mac update?
Model year alone won't always tell you whether an update will install—two MacBooks from the same year can sit on opposite sides of Apple's list. To identify yours, open the Apple menu and choose About This Mac. The window shows the exact model name, screen size, year, and chip. Note the port count too, since a 13-inch MacBook Pro (2020) with four Thunderbolt 3 ports is supported by Tahoe while the two-port version isn't.
Click the Apple menu in the top-left corner and choose About This Mac to identify your MacBook model
Why can't I update macOS on my Mac?
There are several reasons you might be unable to update your Mac. However, in our experience, the most common reason is a lack of storage space. Your Mac needs to have enough free space to download the new update files before it can install them. However, we advise you to always back up on external hard drive your important files and data first.
Aim to keep 15–20GB of free storage on your Mac for installing updates. Check out this guide if you need help clearing free space on your Mac.
How do I update my Mac when it says no update?
If Software Update insists you're up to date when you know a newer release exists, your Mac usually isn't eligible for it.
Work through these causes in order:
Compatibility. Your model may have reached its final supported macOS version.
Beta enrollment. Check Software Update > the ⓘ next to Beta Updates and switch it off if you're on a beta channel you no longer want.
Managed devices. Work or school Macs often have updates deferred by an administrator.
Temporary glitch. Restart your Mac, reconnect to Wi-Fi, and check again.
What is the latest version of macOS?
At the time of updating our guide, Apple’s latest software version for the Mac is macOS Tahoe 26, released on September 15, 2025. However, Apple regularly releases new patch updates to improve efficiency and patch software bugs, so the exact numbers are likely to change pretty regularly.
Is my Mac too old to update?
Yes, your Mac can be too old to update. Over time, Apple stops releasing macOS updates for its oldest computers to avoid performance issues. Usually, the Mac that is about 7 to 10 years old can't get updates anymore. This results in outdated hardware that can no longer keep up with the software. So if you can’t update your Mac, despite having plenty of free space to do so, your Mac may be too old for this version of macOS.
Every Intel MacBook Air has now dropped off the list, along with all MacBook Pro models from 2018 and earlier, the 13-inch MacBook Pro (2019), the two-port 13-inch MacBook Pro (2020), and the 12-inch MacBook. In practice, only the 16-inch MacBook Pro (2019) and the four-port 13-inch MacBook Pro (2020) still qualify among Intel laptops. Worth knowing: Tahoe is the last macOS to support Intel hardware at all, so if you're on one of those two, this is the end of the line.
We respect your privacy and
use cookies
for the best site experience.
Privacy Preferences Center
We use cookies along with other tools to give you the best possible experience while using the
MacKeeper website. Cookies are small text files that help the website load faster. The cookies we
use don’t contain any type of personal data meaning they never store information such as your
location, email address, or IP address.
Help us improve how you interact with our website by accepting the use of cookies. You can change
your privacy settings whenever you like.
Manage consent
All cookies
These cookies are strictly necessary for enabling basic website functionality (including page
navigation, form submission, language detection, post commenting), downloading and purchasing
software. The website might malfunction without these cookies.