Your Mac runs many critical processes in the background to make everything work. But if you don’t regularly maintain the operating system, some of these processes can spin out of control and negatively impact performance. One such process that might slow things down is WindowServer.
In this troubleshooting guide, you'll figure out what WindowServer is, why it's taking up CPU and memory, and what you can do to reduce WindowServer activity on Mac.
Before we start…
An unoptimized Mac is the main reason why processes like WindowServer could misbehave. MacKeeper is an Apple-notarized maintenance utility for macOS devices that can quickly eliminate problems behind performance issues, such as corrupt cached data, junk files, and adware. It also comes with an award-winning Antivirus to keep you safe from malware attacks, a login items manager to prevent slowdowns at startup, and a VPN to protect your online activity.
Here's how you can speed up your Mac with MacKeeper:
- Install MacKeeper and open it.
- Select the Start Full Scan button.
- Follow the recommendations in the scan report to optimize macOS.
In this article you will find the following:
What is WindowServer on Mac
WindowServer is the system process in macOS that renders what you see on your Mac's desktop. It's always running in the background, but the amount of processing power and memory it uses constantly changes depending on the activity on your screen.
Open an application, drag a window around, or interact with a user element, and WindowServer's CPU usage can briefly spike as it redraws the screen. Do nothing, and the process will hum along at around 10-20%.
WindowServer also requires a fair amount of memory to run—about 10% of the total RAM—and will gradually increase this amount as you work with multiple applications.
Unless you're working with a graphically demanding program like Final Cut Pro or Adobe Photoshop, WindowServer shouldn't always use a lot of system resources. Persistently high WindowServer CPU and memory usage indicates an issue with macOS.
How to check how much CPU your Mac's WindowServer uses
By now, you‘re probably curious about just how much CPU your Mac’s WindowServer uses. Thankfully, there's an easy way to check CPU usage on Mac.
Here's how to check if WindowServer is taking up CPU on your Mac:
- Go to Finder > Applications.
- Double-click on the Utilities folder.
- Open Activity Monitor.
- Now click on the CPU tab.
- Look for WindowServer on the list and check the percentage of CPU it's currently using.
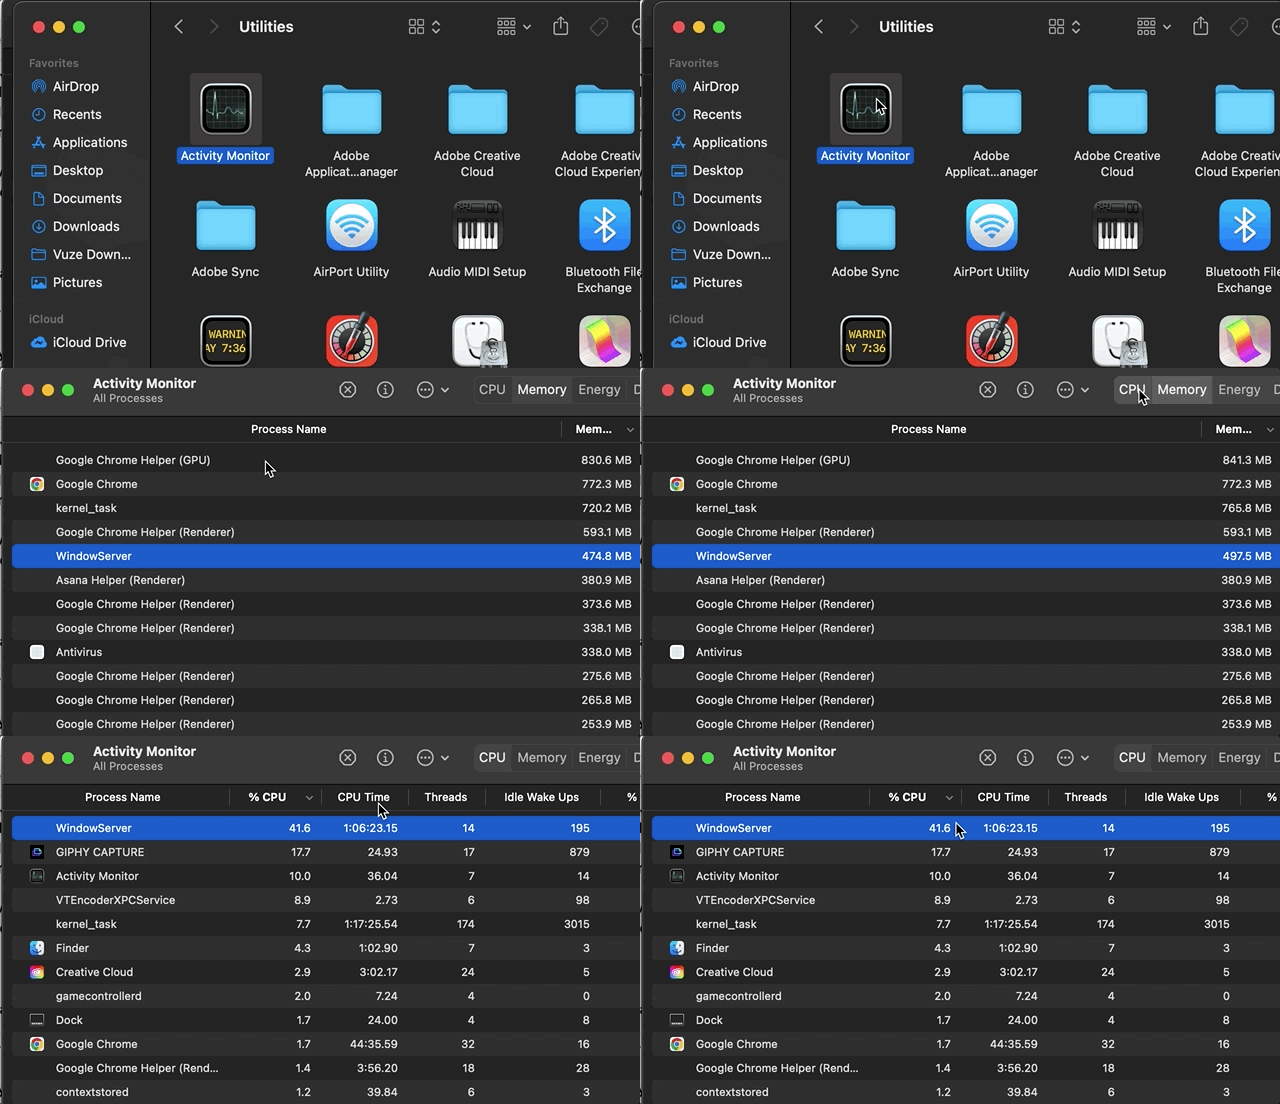
Note from our team: Anything under 60% is fine. However, if WindowServer is taking up more than that, it’s using more CPU cycles than it should. You need to consider reducing that usage.
Why does WindowServer use so much CPU
It's not unusual for WindowServer to occasionally increase CPU usage and memory when a lot happens on your Mac's screen. However, if the process always takes up system resources and causes the operating system and apps to slow down, there could be underlying problems.
Reasons for WindowsServer using so much CPU and memory include:
- Unexpected glitches in the system software and applications
- Too many files and folders on the desktop area
- Corrupt application and system caches
- Multiple desktops in Mission Control
- Multiple applications running on top of one another
- Resource-heavy visual effects like app transparency and motion
- Running an outdated or unstable version of macOS
Good to know:
Kernel_task is another process that frequently appears at the top of the CPU tab in the Activity Monitor. Learn more about kernel_task on Mac.
How to reduce your Mac's WindowServer CPU usage
We now know that multiple factors can increase your Mac’s WindowServer CPU usage. Therefore, it goes without saying that if you want your Mac to perform optimally, you must troubleshoot high WindowServer memory and CPU usage. Here’s how you can do that:
1. Restart your Mac
The quickest and simplest way to reduce your Mac’s WindowServer CPU usage is by restarting your device. This often solves a lot of problems and saves you time and energy. And you can do it in a few clicks, too.
Here's how to reduce WindowServer on Mac with a system reboot:
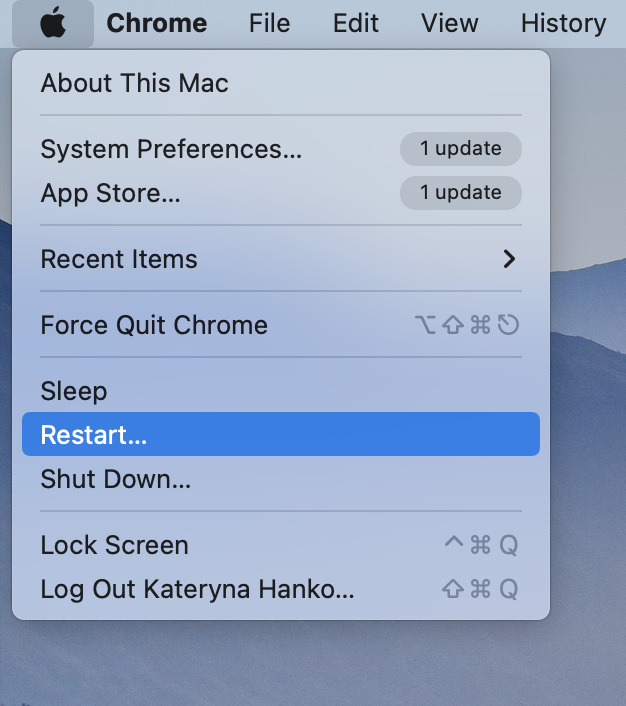
- Click on the Apple icon in the top-left corner of the screen
- Scroll down and select Restart.
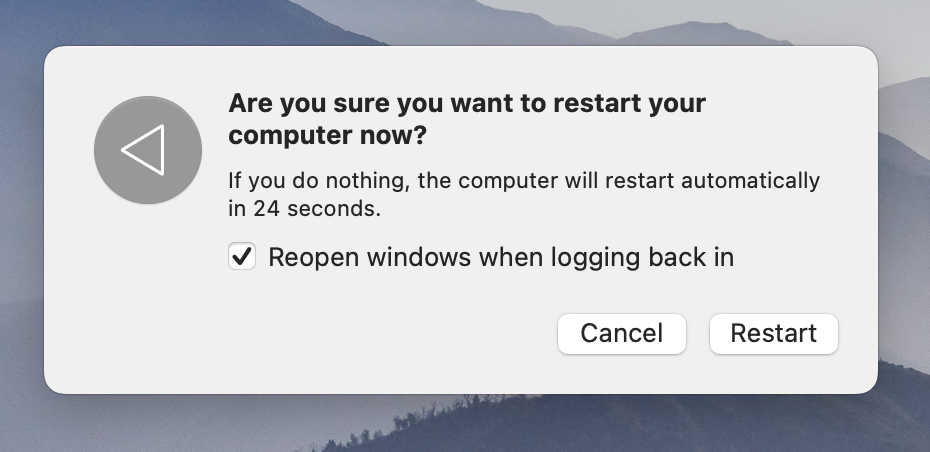
- Uncheck the box next to Reopen windows when logging back in and select Restart.
Pro tip:
Have trouble restarting your Mac? Learn how to force shut down a Mac that won’t turn off.
2. Declutter your desktop
A Mac desktop area littered with files and folders could glitch the WindowServer process into using more and more CPU and RAM. Consider moving the items into a separate location—such as your Documents folder—in Finder. If the problem goes away, you can gradually add them back.
Corrupt application caches and temporary system data also cause problems with processes like WindowServer. Removing these files can be difficult without breaking something, but that's where MacKeeper's Safe Cleanup can help.
Here's how to quickly remove cached app data and junk files with MacKeeper:
- Open MacKeeper.
- Select Safe Cleanup on the sidebar and choose Start Scan.
- Check the boxes next to Logs and Caches and select Clean Junk Files.


3. Minimize the number of desktops in Mission Control
Although Mission Control helps you organize your Mac's activity in separate virtual desktops, too many can strain the WindowServer process. Reduce the number of Mission Control desktops and check if that makes a difference.
Here's how to reduce the number of desktops in Mission Control:
- Swipe up with three fingers on the touchpad to open Mission Control. If you use an iMac or Mac mini, press Mission Control (F3) on your keyboard's top row.
- Hover the cursor over a desktop thumbnail at the top of the Mission Control screen and select X to close it.
- Repeat for other desktops you don't need—try to keep the number to three or less.

4. Close windows you aren't using
The more applications you open on your Mac, the more system resources WindowServer requires to display them. Make it a habit to close windows you aren't using or quit unnecessary programs altogether—Control-click an app icon on the Dock and choose Quit.
Programs that freeze or crash can also result in high WindowServer CPU and RAM usage—try shutting them down using the Force Quit Applications dialog.
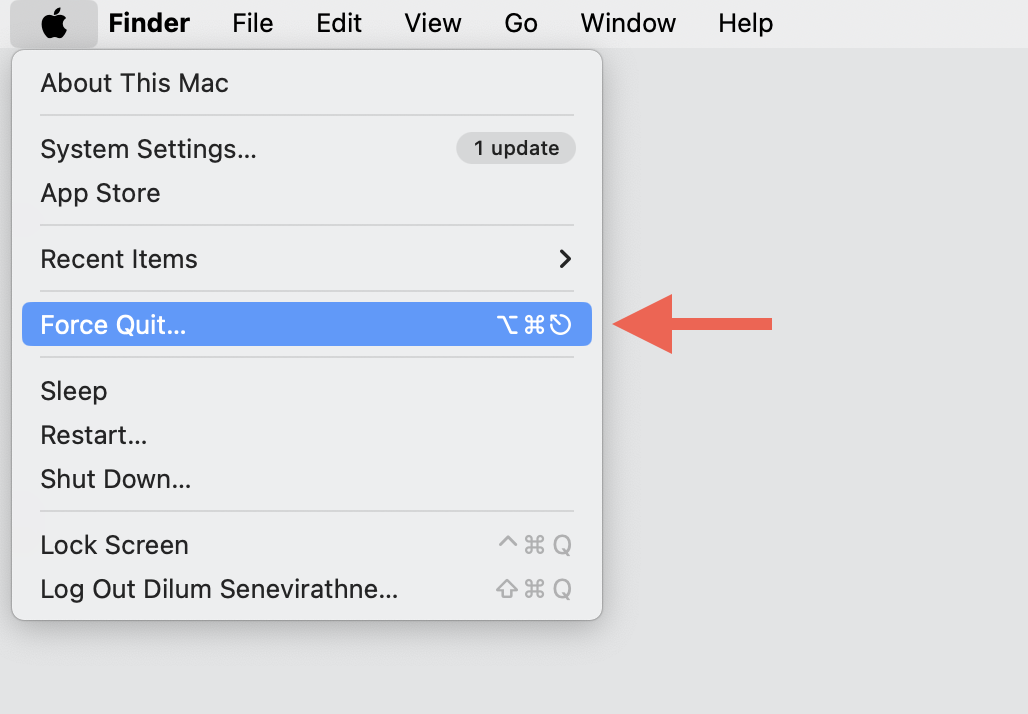
Here's how to force-quit apps and stop WindowServer on Mac using RAM:
- Open the Apple menu and select Force Quit.
- Highlight an application you'd like to close.
- Select Force Quit to confirm.
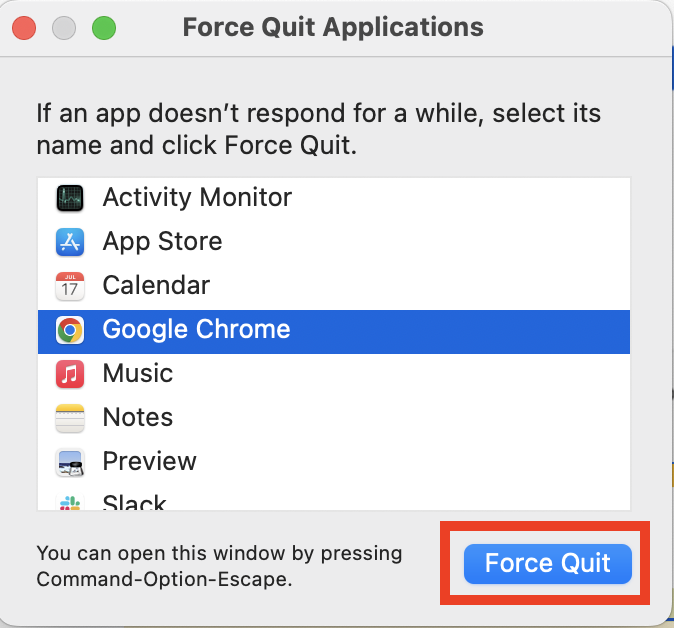
If you have trouble force-quitting problematic apps, learning how to kill background processes on Mac might be helpful.
5. Disable visual effects
Your Mac uses transparency and motion effects to enhance how the desktop, apps, and animations look, but at the cost of CPU and memory. Disable these visual effects if macOS WindowServer high memory usage issues persist.
Here's how to disable visual effects if WindowServer is taking up CPU and RAM:
- Open the Apple menu and select System Settings. If you use a Mac running macOS Big Sur, Monterey, or an older version, select System Preferences.
- Go to Accessibility > Display.
- Activate the Reduce Transparency and Reduce Motion options.
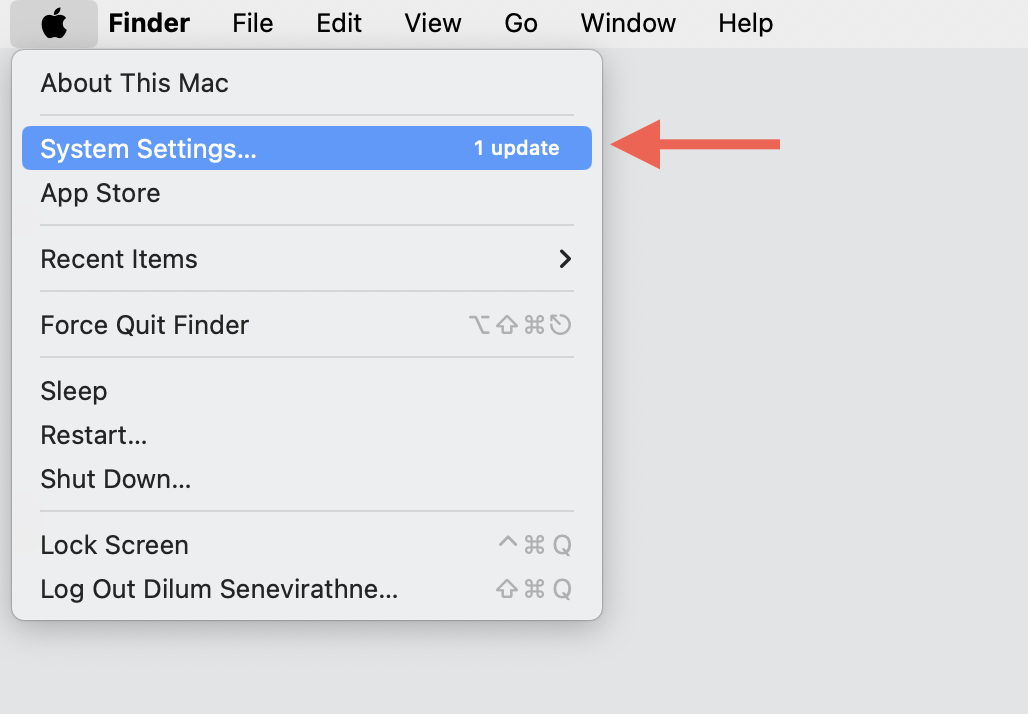
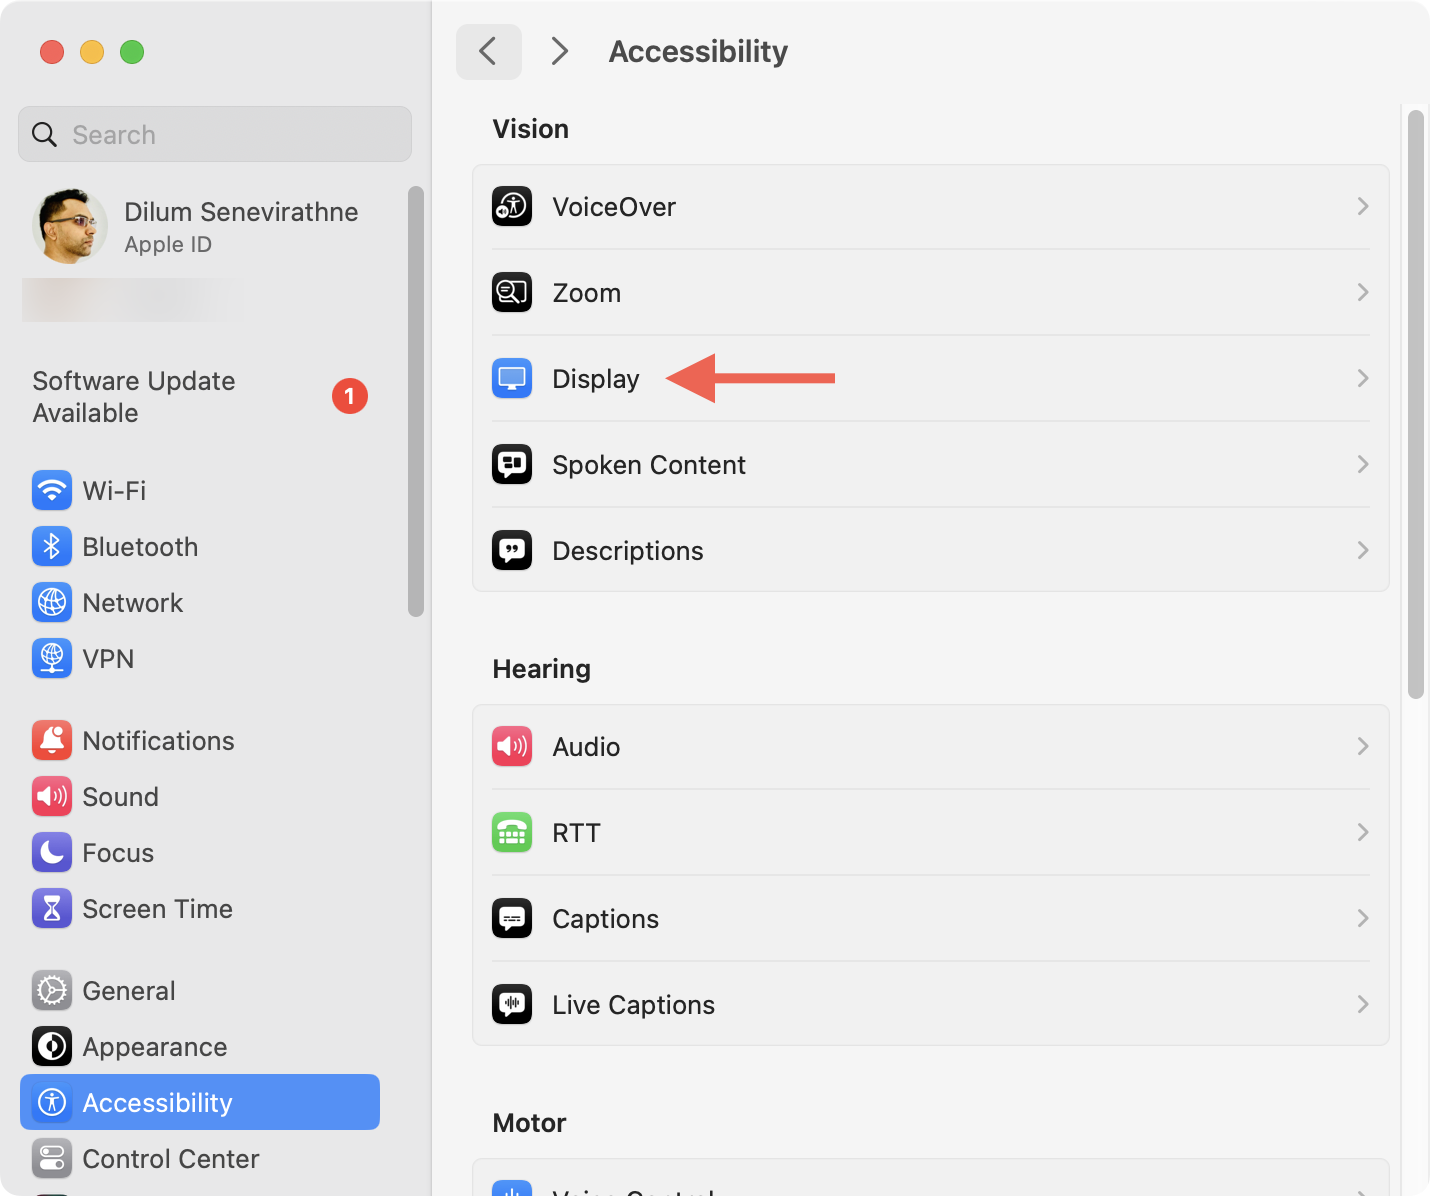
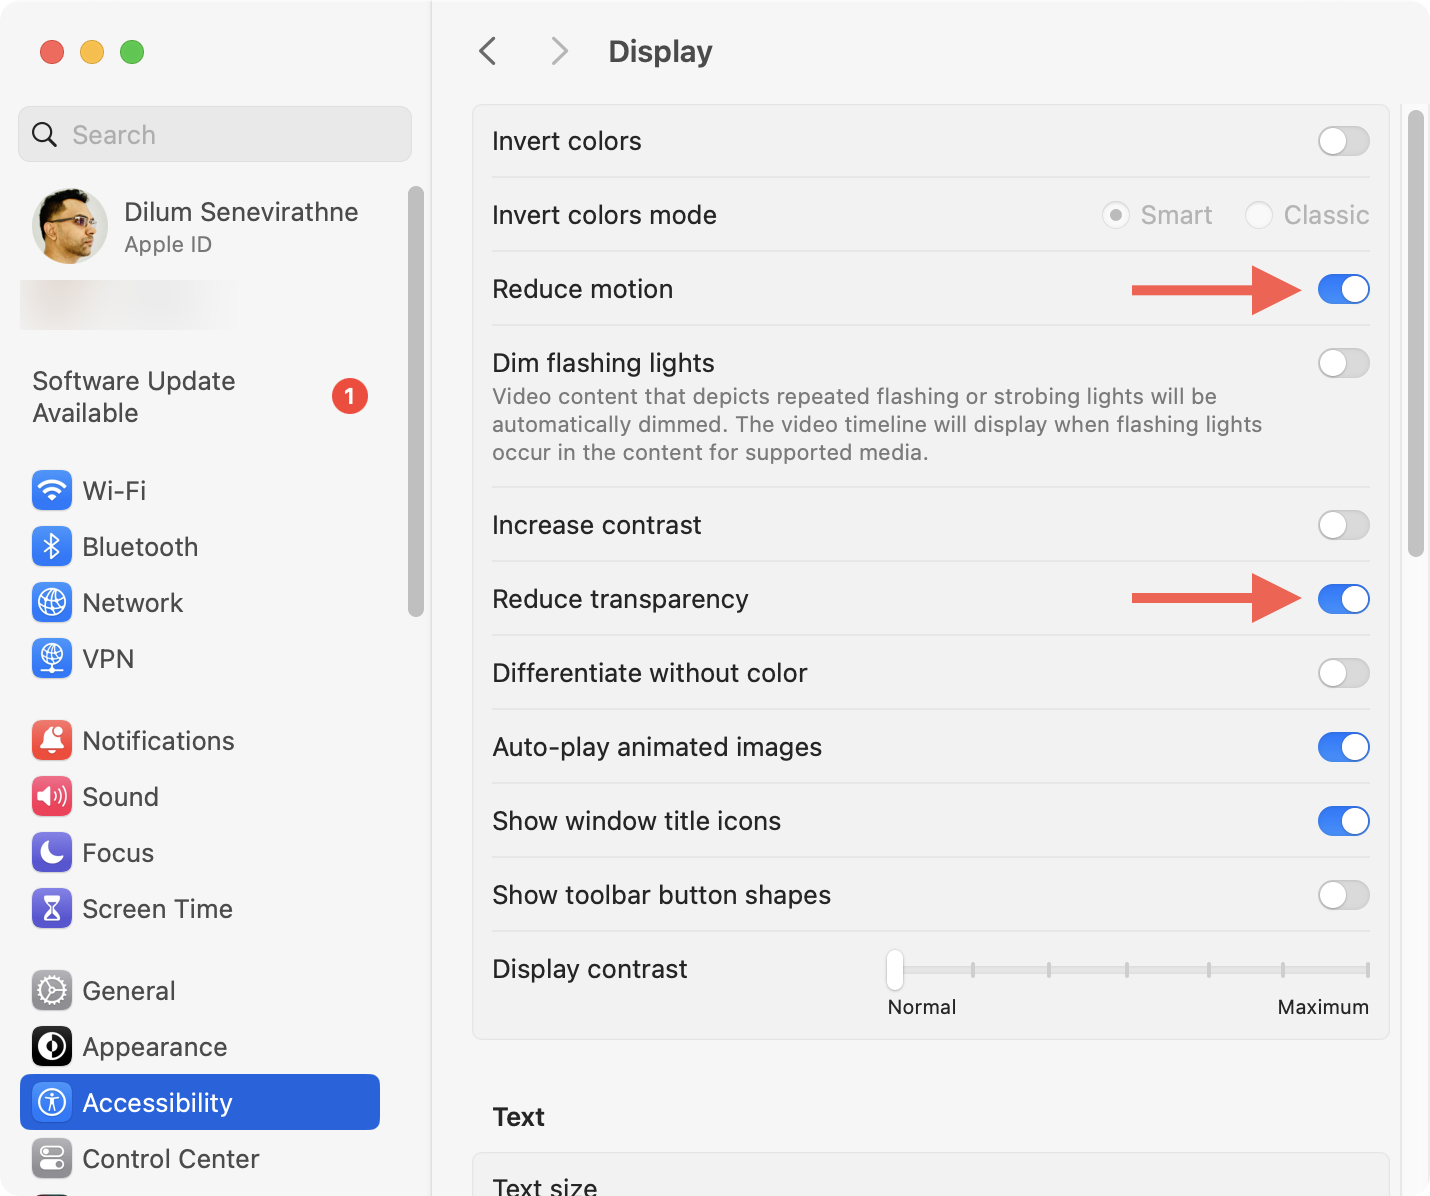
6. Turn off ProMotion
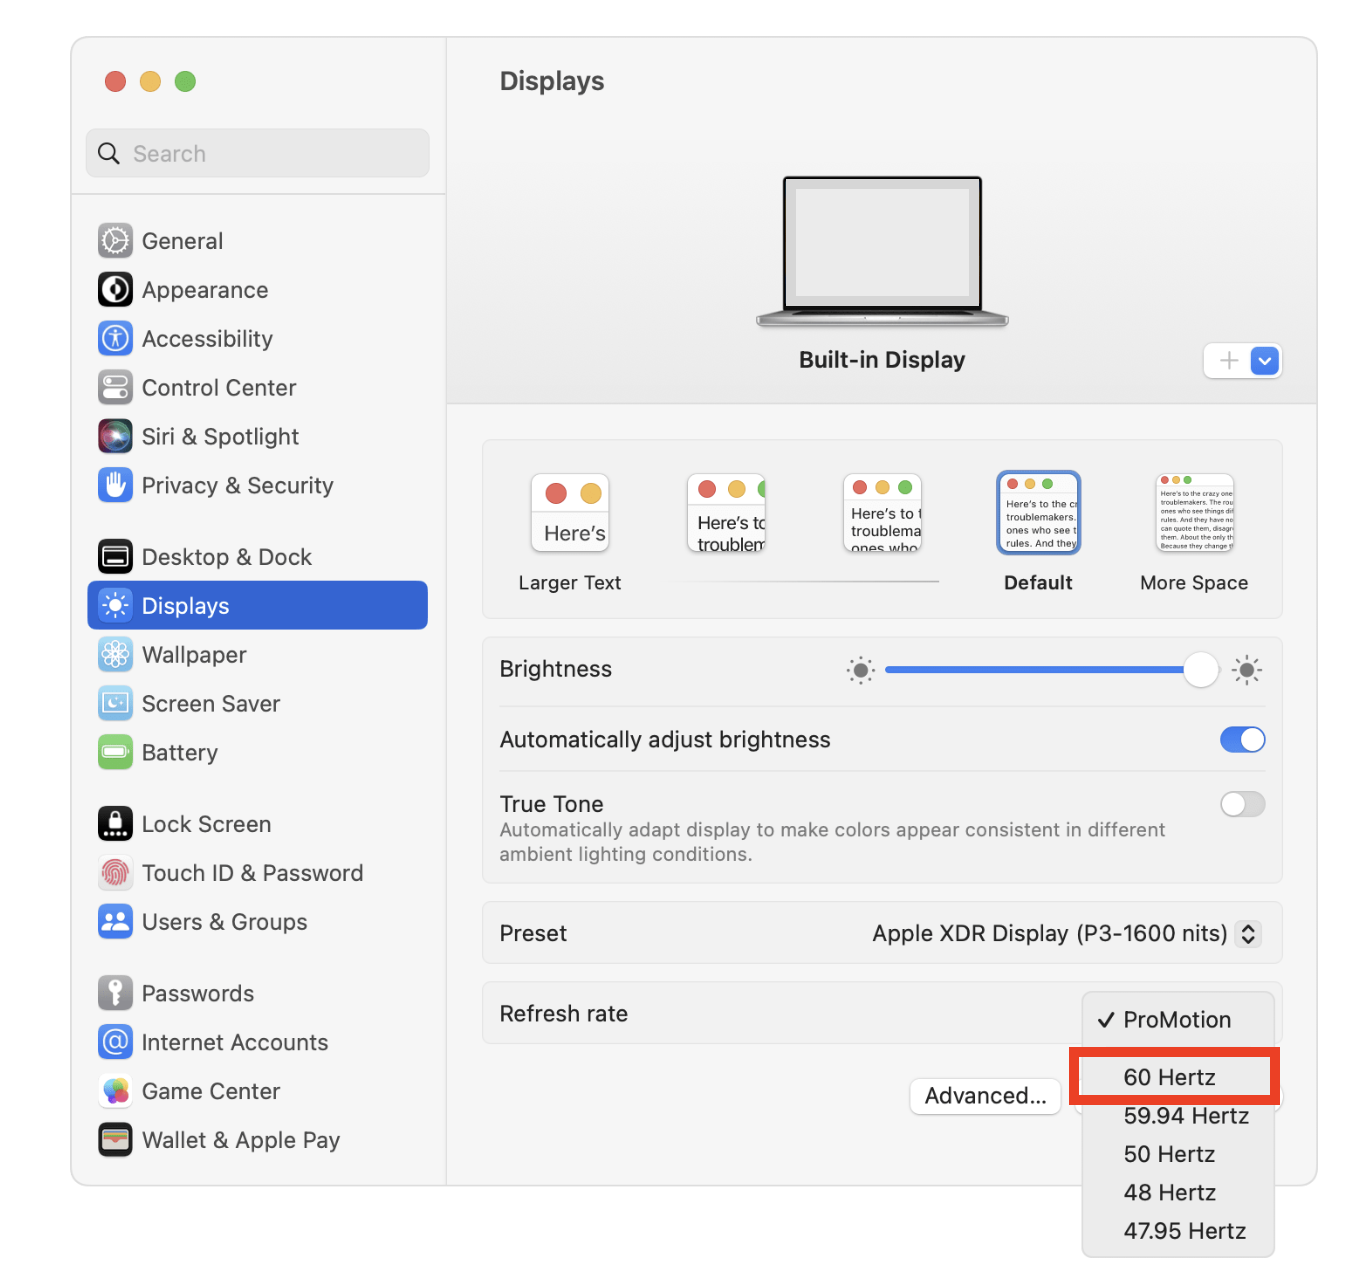
Apple Silicon Macbook Pro models come with a feature called ProMotion that increases the display's refresh rate to 120 hertz. However, it also increases the amount of CPU and RAM that WindowServer uses. Turn off ProMotion and see if that helps.
Here's how to disable ProMotion on your M1, M2, or M3 MacBook Pro:
- Open the System Settings app.
- Select Displays on the sidebar
- Open the pull-down menu next to Refresh rate and select 60 Hertz.
7. Disable Spaces for multiple displays
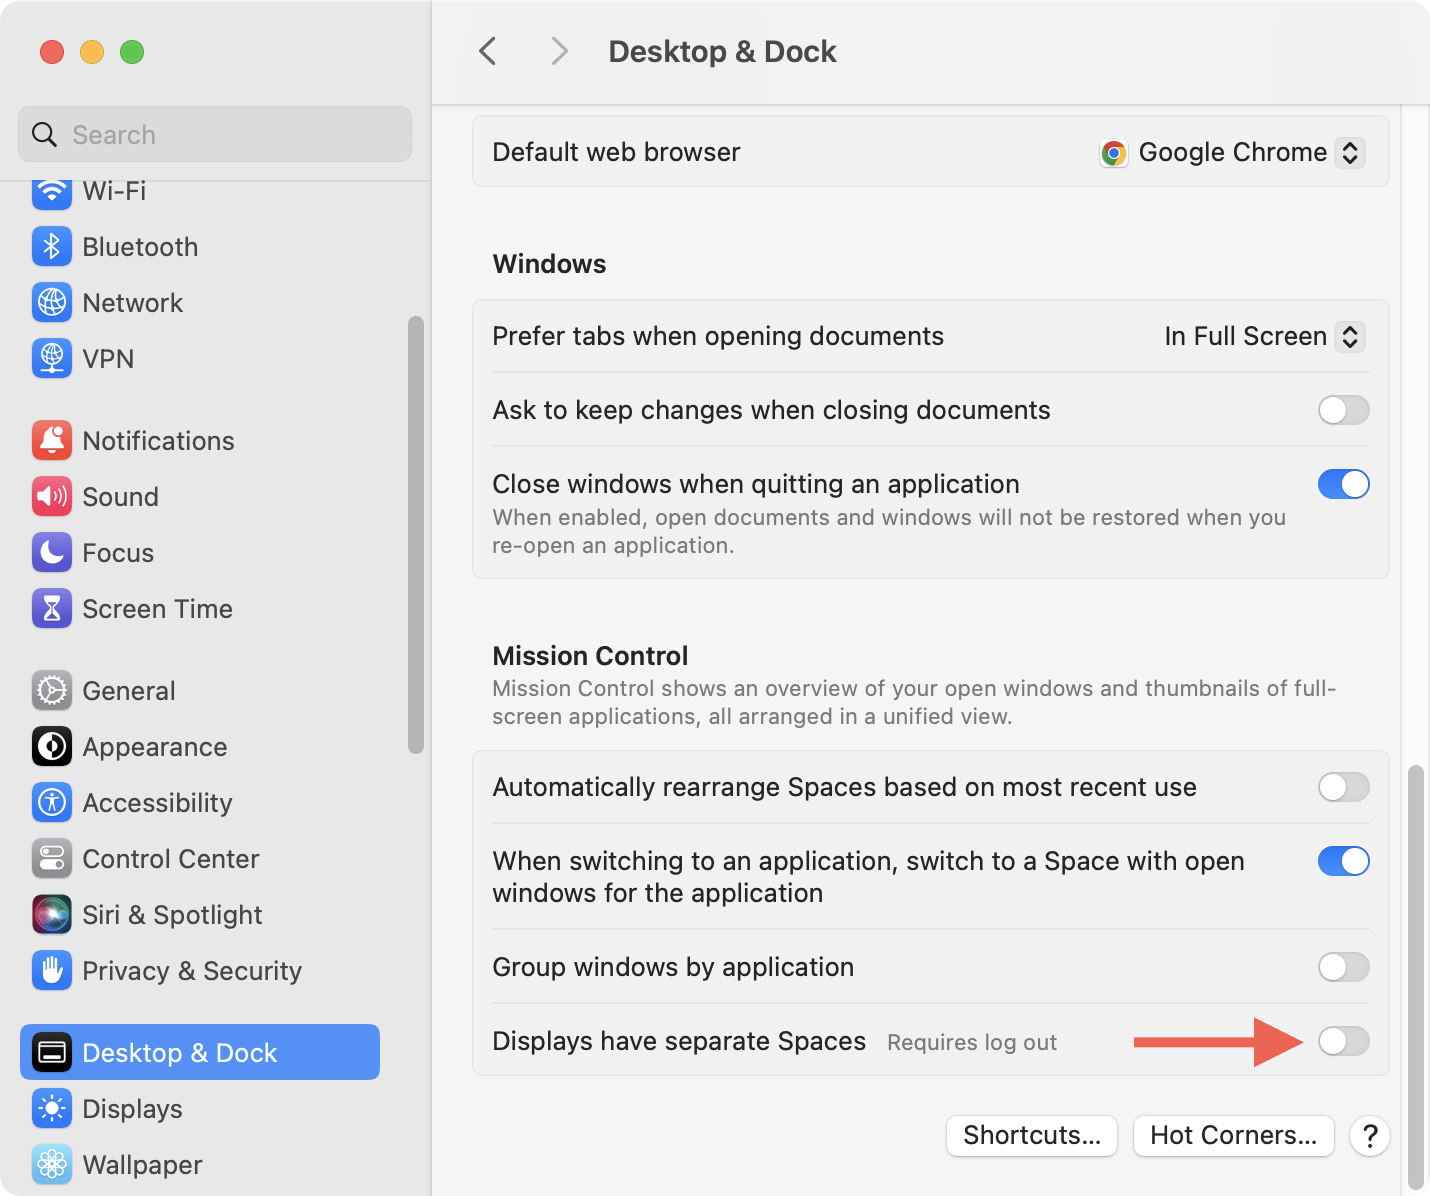
If your Mac has multiple displays, using separate Spaces can tax the CPU and RAM. Turn off Spaces if that doesn't affect your workflow.
Here's how to disable Spaces and reduce WindowServer on Mac:
- Open System Settings and go to Desktop & Dock. On older macOS versions, go to System Preferences > Mission Control.
- Turn off the Displays have separate Spaces option.
- Restart your Mac.
8. Update to the latest macOS
Running an older version of macOS can cause many issues on your Mac, including performance issues and, more importantly, a risk to your privacy. Many times, you don’t realize you haven’t updated it until your device starts running slowly.
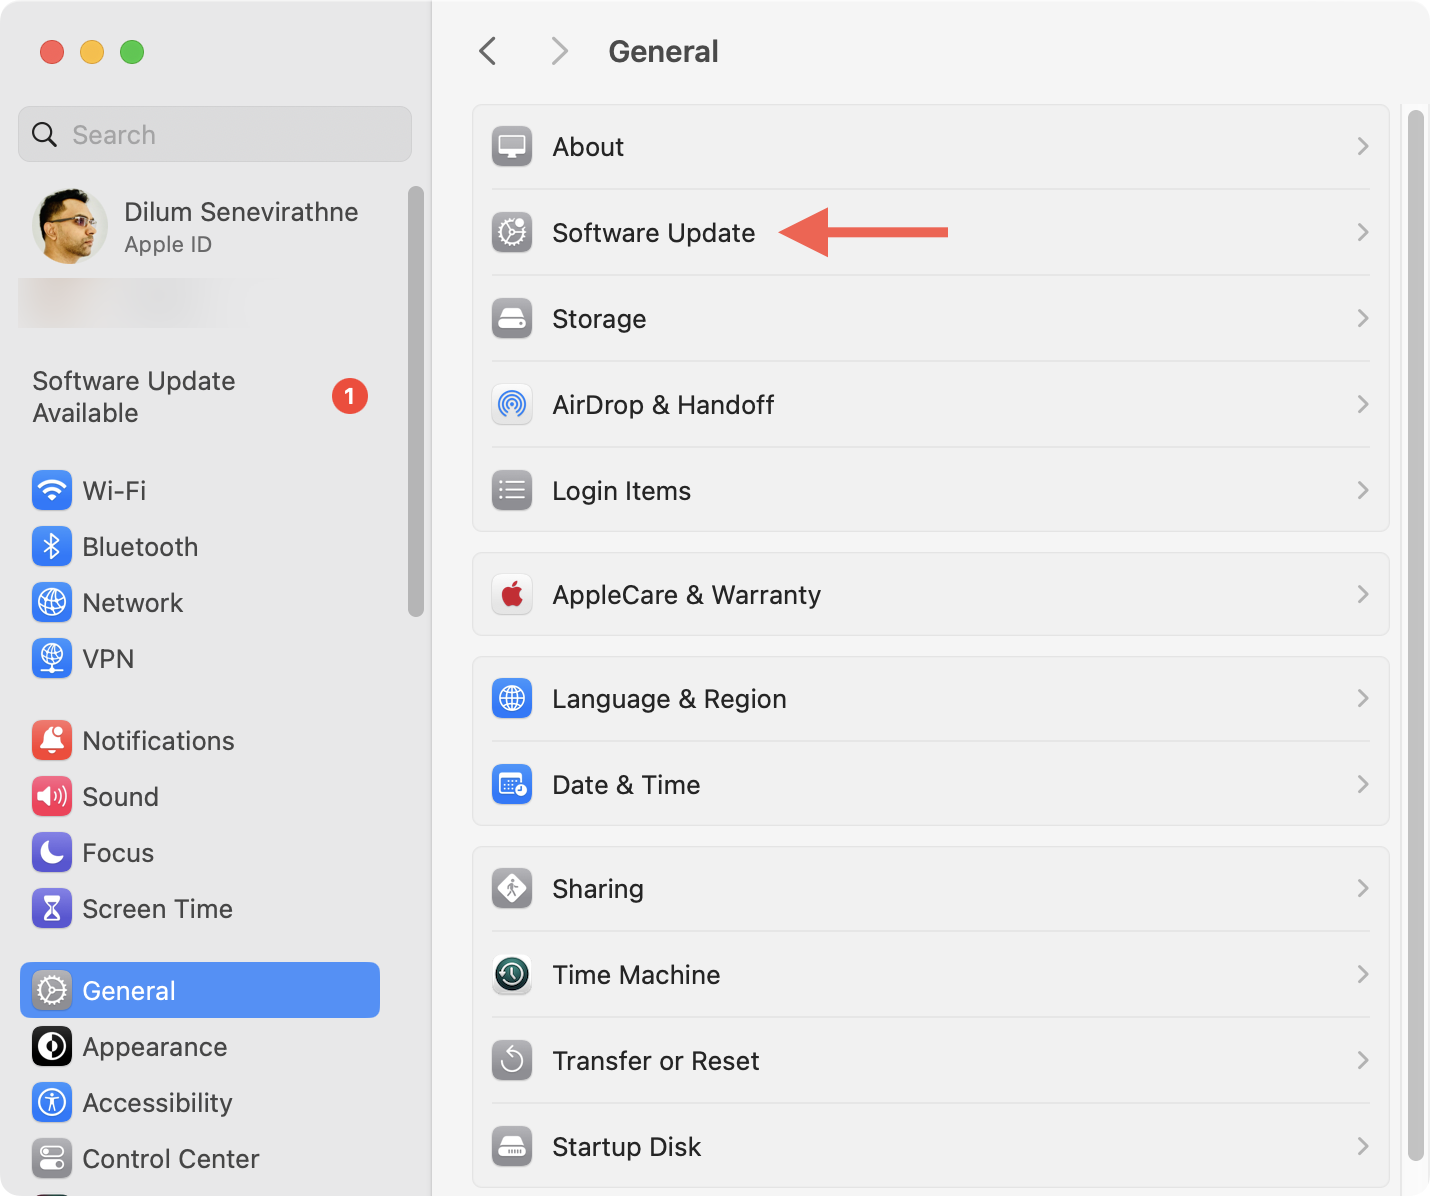
It’s easy to update macOS. Follow the steps below to get started:
- Click on the Apple icon in the top-left corner of your Mac.
- Select System Settings or System Preferences.
- Go to General > Software Update. In System Preferences, you should find the option to update your Mac in the main area.
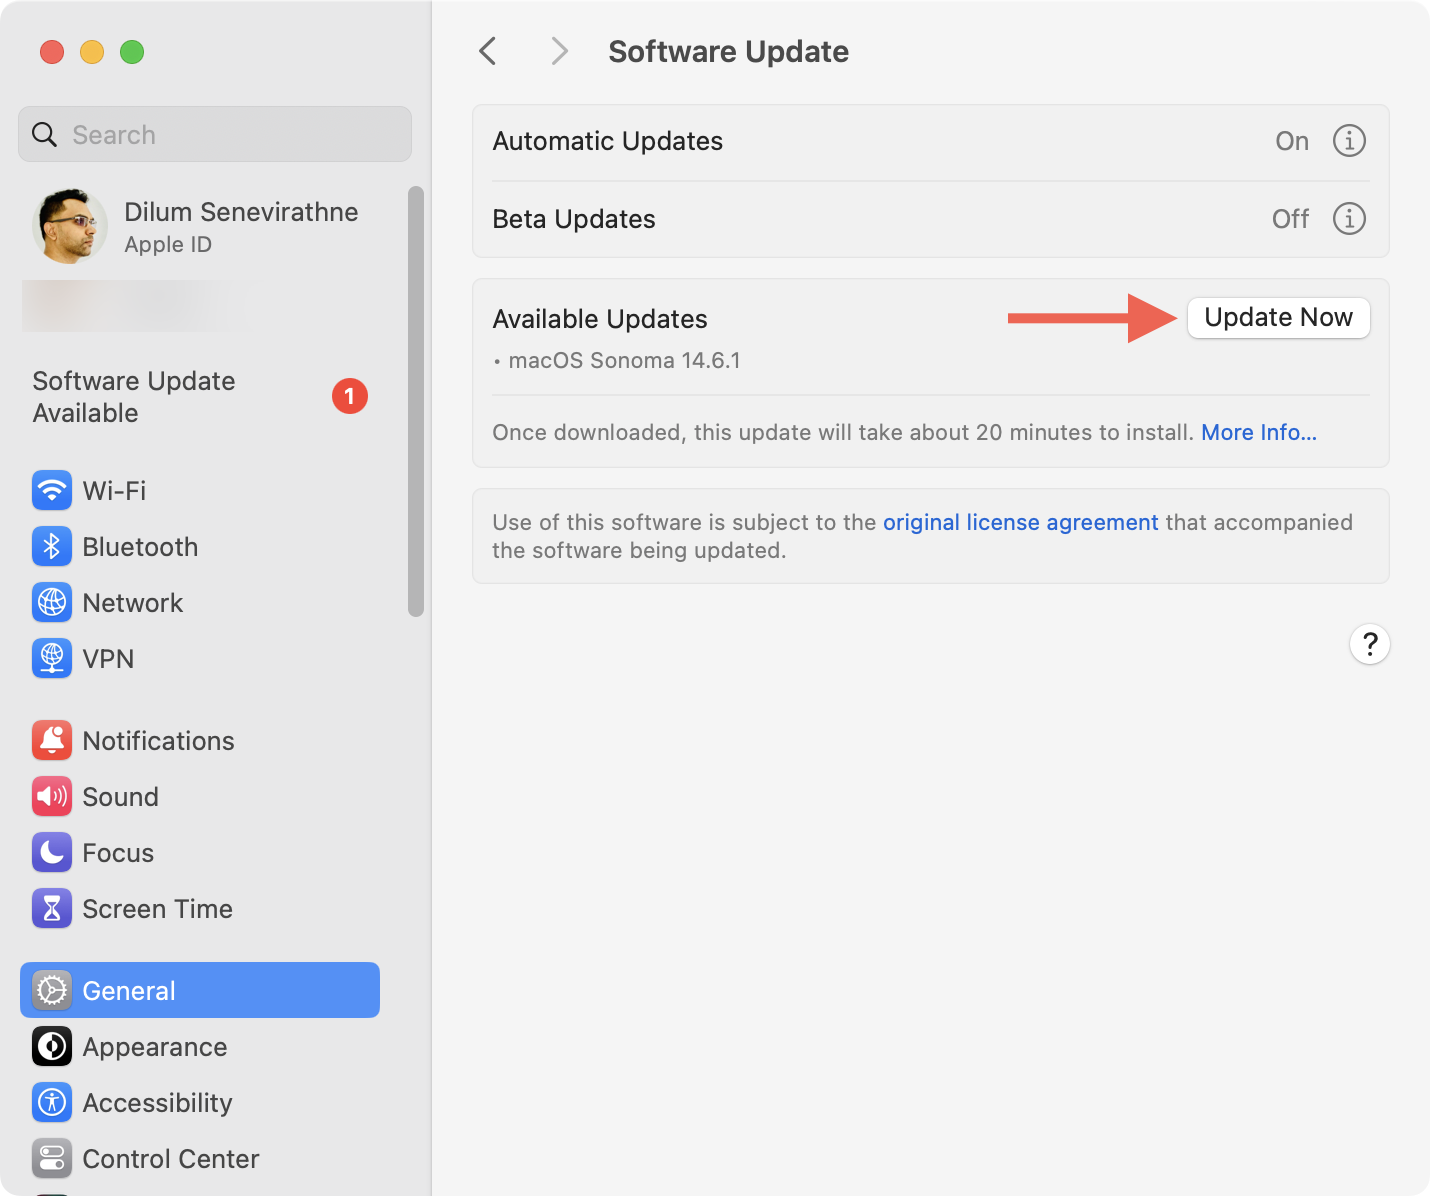
- Enable the Automatic Updates or Automatically keep my Mac up to date option to ensure you don’t miss any updates in the future.
- Now click on Update Now to update macOS.
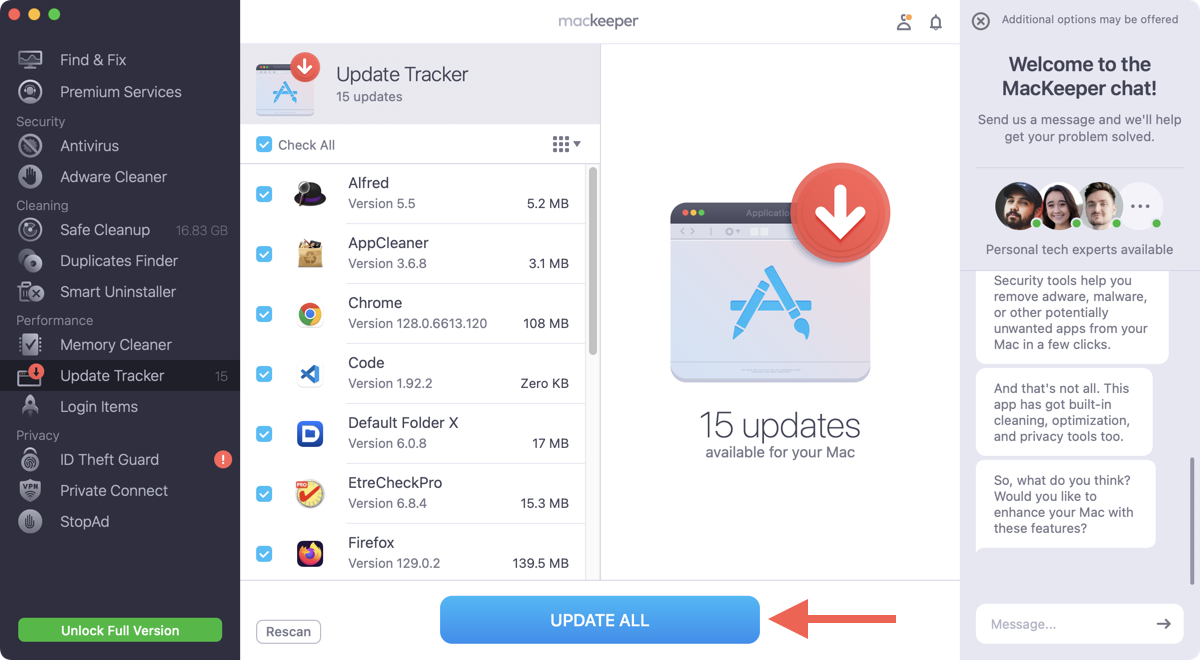
Running newer versions of apps on your Mac can also reduce potential conflicts with system processes. Since manually checking for app updates can be time-consuming, use MacKeeper's Update Tracker to speed things up.
Here's how to update apps on your Mac with MacKeeper:
- Open MacKeeper.
- Select Update Tracker on the sidebar.
- Check the apps you want to update and select Update All.

It is incredibly important to be updating your Mac operating system and installed apps every once in a while. This way, you can take advantage of the new security patches and always stay safe. MacKeeper will help you make this process autonomous.
Help your Mac work optimally again
If your Mac is running sluggishly, use the Activity Monitor to confirm that WindowServer is the process behind the slowdowns. Actions like restarting the device, trashing corrupt app caches, and updating the operating system should then stop WindowServer on Mac from using RAM and CPU. MacKeeper can also restore your Mac to its usual state quickly, help you keep macOS working optimally, and minimize similar problems going forward.


