In this article you will find the following:
If your Mac is running slower than usual, or you have applications that have frozen and refuse to quit, you may be dealing with some problematic processes. Fortunately, it’s not difficult to kill a running process on Mac and free up resources, like processing power and memory, so that your system runs more smoothly.
In this guide, we’ll show you how to see all running processes, how to identify any that might be causing issues, and how to end a process on Mac in just a few clicks. We’ll also look at some third-party tools that can help you maintain a responsive Mac at all times.
Before we start
You can stop problematic processes on Mac by using MacKeeper’s Memory Cleaner tool. In addition to safely freeing up RAM and improving the performance of your Mac, it can also quit programs that are stuck or not performing as intended. Here’s how:
- Open MacKeeper and select Memory Cleaner.
- Click Open to start the tool.
- Select Clean Memory to free up RAM.
- To kill an active process, select Apps & Processes, then find your problematic app.
- Click the X alongside the app to stop it, then select Quit.
What is a process on Mac?
Processes are essentially programs or apps that are running on your Mac. Every piece of software has at least one, and some, such as a web browser or antivirus software, may use several of them. Not all processes are tied to apps that you can see—some may be powering hidden background tasks—but all take up system resources, including CPU power and RAM.
Occasionally, processes on Mac can become frozen or may suffer from other issues that cause them to take up more resources than they normally would. When this happens, your system can become slow or unresponsive until the problem process has been stopped. But don’t worry—there are a number of fairly simple ways to force kill a process on Mac and free up system power.
Use Activity Monitor to kill running processes on Mac
One of the most effective ways to kill a background process on Mac is with Activity Monitor, which displays a list of all running processes and which resources they’re using in real time. It displays processor (CPU), memory (RAM), and storage usage. It also allows you to monitor which apps are consuming the most energy and which are sending and receiving data through your network.
When your Mac is running slower than usual, and you’re not sure why, it’s a good idea to open Activity Monitor to see a list of all running processes. You can then sort the list by CPU, RAM, power usage, and more to identify which processes may be acting abnormally and need to be ended.
1. Open Activity Monitor
Start by opening Activity Monitor like so:
- Open Finder on your Mac, then click Applications in the sidebar.
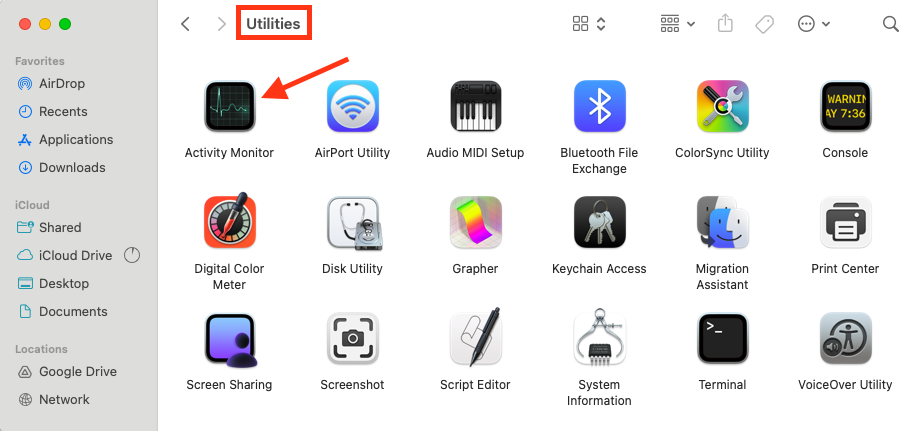
- Open the Utilities folder.
- Double-click Activity Monitor to open it.
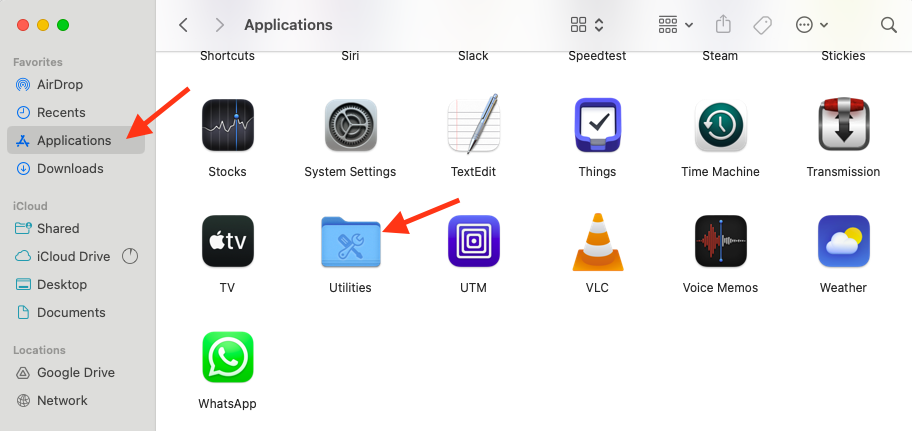
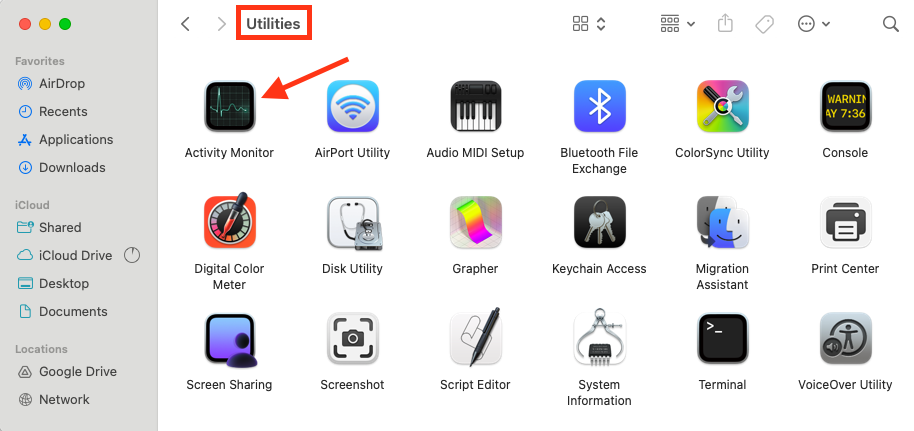
Alternatively, you can open Activity Monitor from Spotlight Search by pressing Command+Space on your keyboard and then searching “Activity Monitor.” When the app opens, you will be immediately greeted by a list of all current processes on your computer.
2. View and filter tasks
Next, find out which processes might be slowing down your machine by following these steps:
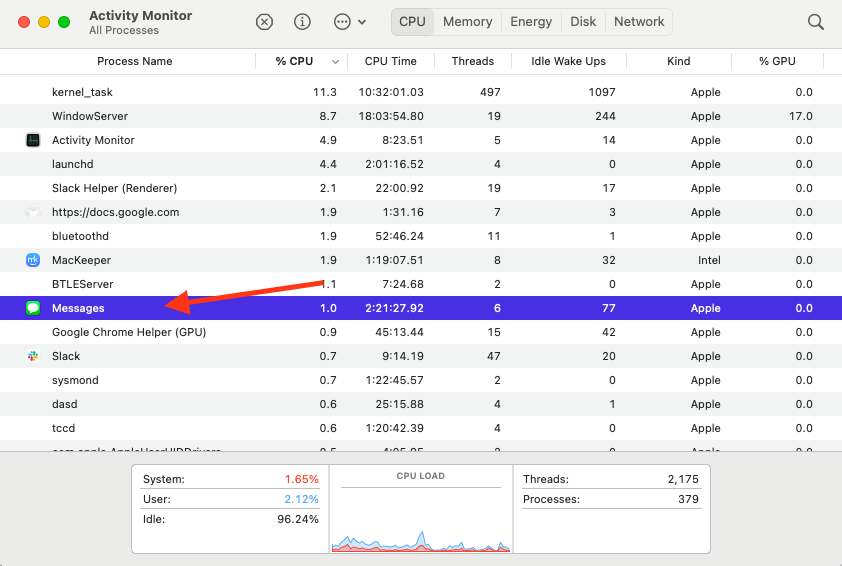
- Click the CPU tab at the top of the Activity Monitor window.
- In the list of processes below, click the % CPU column header to sort all processes by CPU usage. Those using the most processing power will appear at the top of the list.
- To check which apps are using up the most RAM, click the Memory tab.
- Click the Memory header in the list of processes to sort all processes by RAM usage.
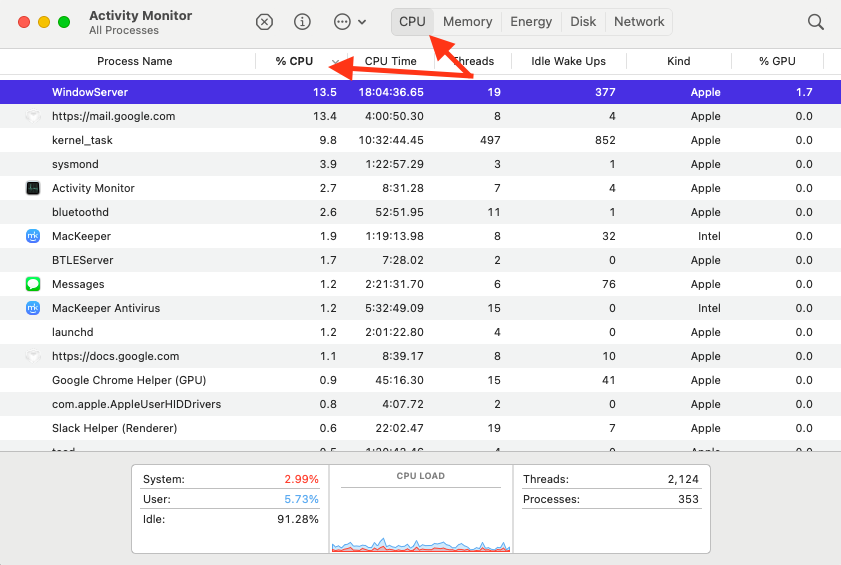
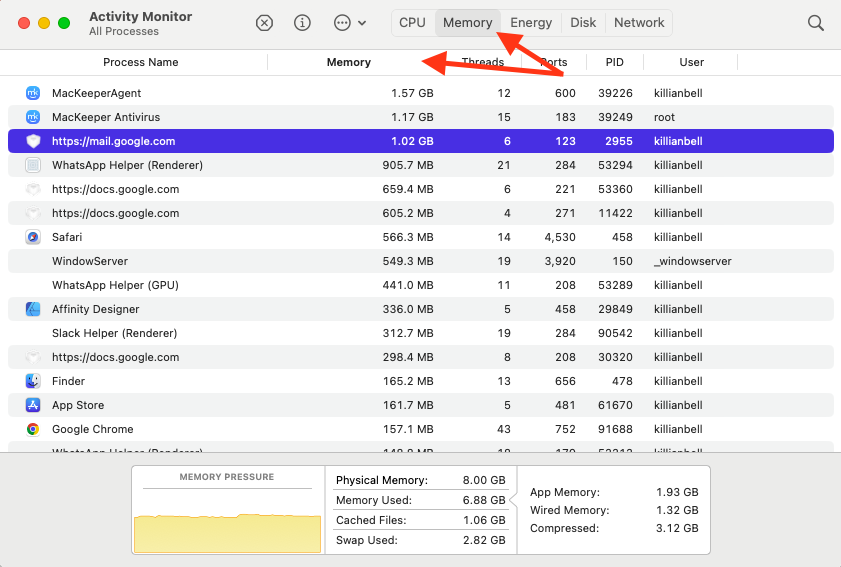
This is a great way to find out what’s using up your system memory so that you can free up RAM on Mac.
3. Eliminate problematic processes
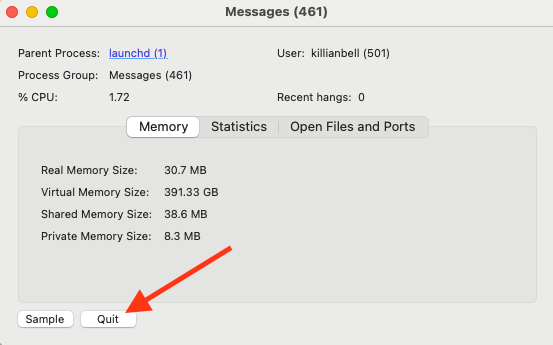
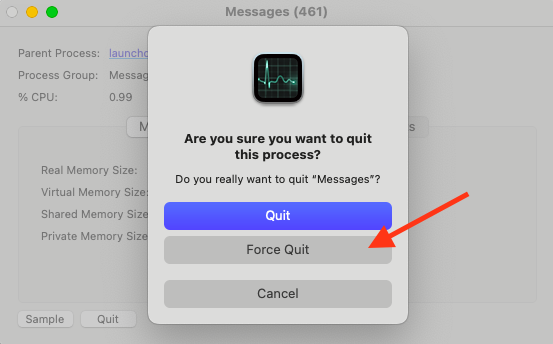
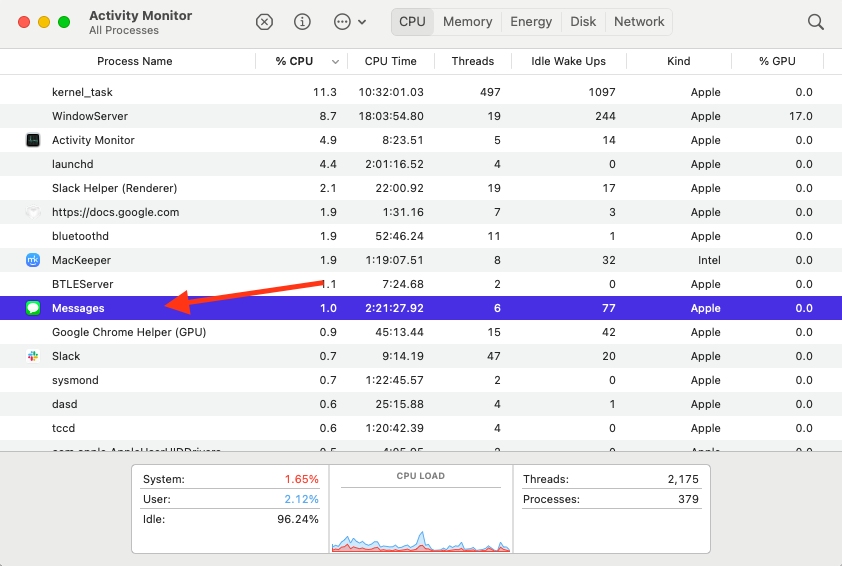
Now, to stop a process that is consuming too many resources or not operating as it should, follow these steps:
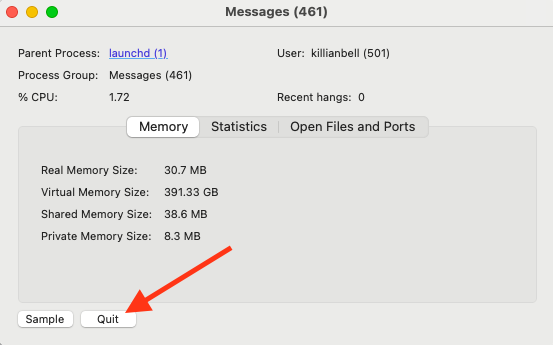
- Double-click the process you wish to end.
- In the popup window that appears on your desktop, click the Quit button.
- Confirm this action by clicking Quit again when prompted.
It’s very important that you do not kill processes and tasks that you are unfamiliar with inside Activity Monitor. You may inadvertently close something that macOS relies on, which could cause your system to become unstable or frozen entirely. If you don’t feel comfortable using Activity Monitor, you may want to use a third-party tool to help you maintain system resources.
How to close processes using Terminal
If you’re the kind of user who likes to get things done with Mac Terminal, you’ll be pleased to know you can kill processes there as well. It’s not quite as simple as Activity Monitor, but it’s certainly effective.
1. Launch Terminal
First, launch Terminal like so:
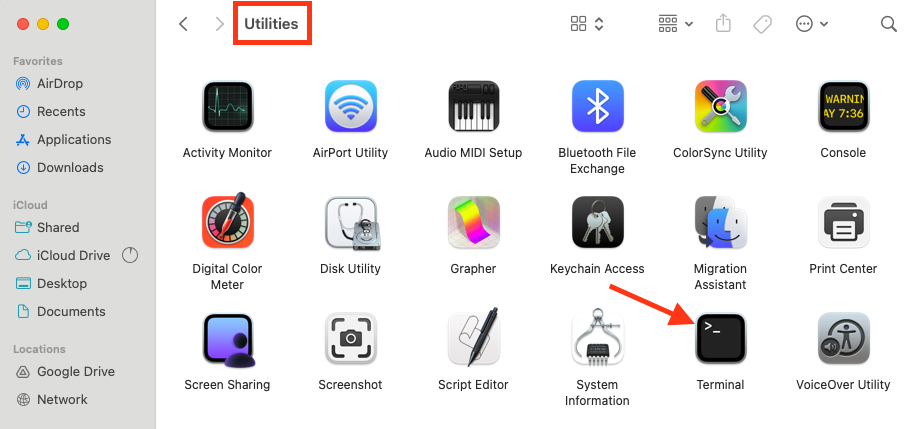
- Open Finder on your MacBook, then select Applications.
- Open the Utilities folder.
- Double-click Terminal to open it.
2. Type top and press Return
To view a list of all running processes in the Terminal, follow these steps:
- Type top into Terminal.
- Press the Return key.

3. Identify the process
Next, you’ll need to identify the process you want to stop. Carefully follow these steps:
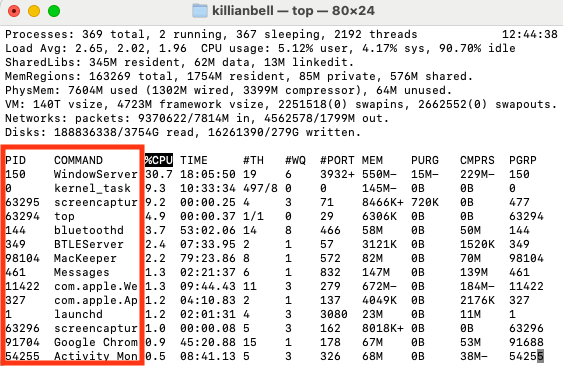
- Find the process you want to stop by looking for its name in the Command column.
- Make a note of the process’ PID number in the PID column.
4. Terminate the process
Finally, to kill the process in Terminal, do this:
- Type the kill -9 command, followed by the process’ PID number.
- Press the Return key.

The problematic process will not be forced to close.
How to force close an unresponsive program
When you want to know how to force quit on Mac because an app isn’t functioning properly, there are several methods you can use, including:
1. Force exit through the Apple menu
One of the quickest ways to force quit an app is through the Apple menu at the top of your Mac’s screen. Simply follow these steps:
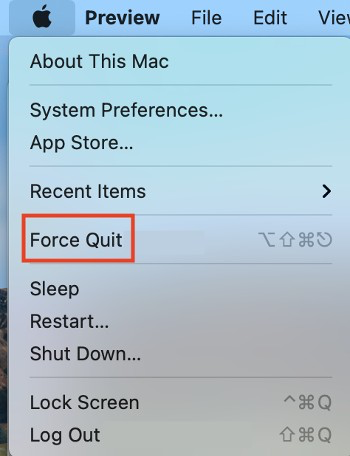
- Click the Apple logo in your Mac’s menu bar.
- Click Force Quit.
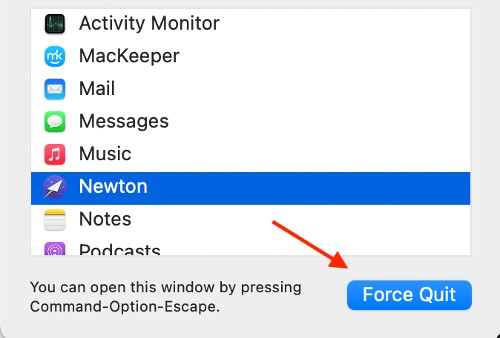
- Select the application that has frozen, then click the Force Quit button to end the task.
- Confirm this action by clicking Force Quit again when prompted.
This process is the same for macOS Catalina, Monterey, Ventura, Sonoma, and other versions of OSX.
2. Force a shutdown using Activity Monitor
To force quit an app using Activity Monitor, you can do this:
- Launch Activity Monitor from within the Applications > Utilities folder in Finder.
- Find the app you want to force close in the list of running processes, then select it. If the app is difficult to find, click the Process Name column to sort everything alphabetically.
- Click the X button at the top of the Activity Monitor window.
- Click Force Quit to confirm.
3. With a keyboard shortcut
An even quicker way to access the Force Quit feature on Mac is with a keyboard shortcut:
- Press the Command+Option+Escape keys on your keyboard to open the Force Quit feature.
- Select the app you want to close, then click the Force Quit button.
- Click Force Quit again to confirm.
Fix program crashes with Spindump
If you have an app that continues to crash unexpectedly or encounters other issues on Mac, you may be able to diagnose it and fix it using Spindump. Spindump is a debugging tool built into macOS that can help you identify issues with your software. It does this by taking snapshots of your app before it crashes so that you can see what’s causing the problem. Here’s how to use it:
- First, launch the app you’re having issues with so that it’s active.
- Next, open Finder, then go to Applications > Utilities and launch Activity Monitor.
- Select your problematic app within the list of processes in Activity Monitor. You can click the Process Name column to sort everything alphabetically if you have trouble finding the app.
- In the Activity Monitor toolbar, click the icon with three dots inside a circle.
- Select Spindump.
- Enter your Mac’s password if prompted.
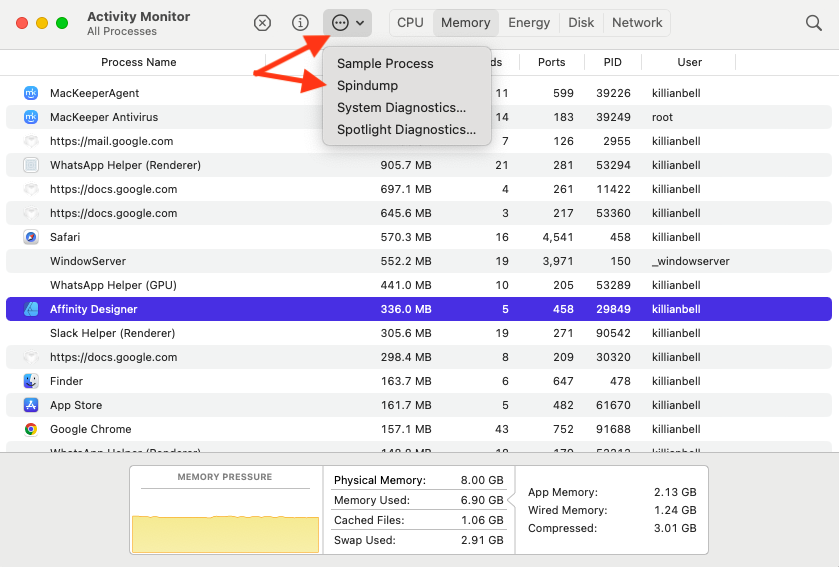
Spindump will now watch the app you’ve chosen. When the app crashes, Spindump will capture a snapshot that details what the app was doing as the crash occurred. This information could help you diagnose the problem and eliminate it.
It’s important to disable Spindump by closing its window once you have the information you need. Otherwise, it will continue to run in the background and, over time, use up more and more of your Mac’s resources.
Use third-party tools to kill processes safely
With a tool like Memory Cleaner, which is baked into MacKeeper, you can quickly and easily free up RAM without having to worry about ending a task that could make your Mac unstable. MacKeeper can also safely kill processes, help you free up storage space, and identify and remove malware—all of which can make a sluggish Mac feel a lot snappier.
To use MacKeeper Memory Cleaner to free up RAM, follow these steps:
- Open MacKeeper.
- Select Memory Cleaner in the sidebar, then click Open.
- Click the Clean Memory button to instantly free up RAM.
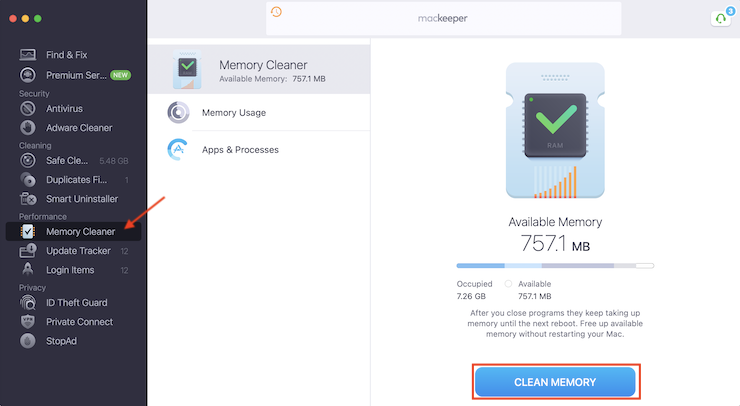
You can click Memory Usage to see more detailed RAM stats or select Apps & Processes to identify which tasks are using up the most memory automatically. You can kill a process by clicking the X button that appears alongside its name. MacKeeper won’t let you quit certain tasks that your Mac relies on to operate properly, so there’s no need to worry about breaking anything or making your system unstable.
How to prevent problematic processes on Mac
If it seems like you have to use the Mac stop process frequently to kill problematic apps, it could be a sign of a bigger problem with your Mac or your software. It might be time to look at some of the tricks you can use to avoid unstable processes in the first place, such as:
1. Track the running processes
By using Activity Monitor to track running processes, as we outlined above, you’ll be able to identify which ones are hogging system resources unnecessarily or not functioning correctly. Once you have this information, it will be easier to target the problematic software and find a fix.
Try this:
- Open Activity Monitor.
- First, click the CPU tab, then select the % CPU column to sort all processes by CPU usage.
- Keep an eye on the numbers in the % CPU column, and which apps they relate to.
- Next, click the Memory tab and select the Memory column to sort all processes by RAM usage.
- Again, keep an eye on the numbers in the Memory column, and the specific apps they relate to.
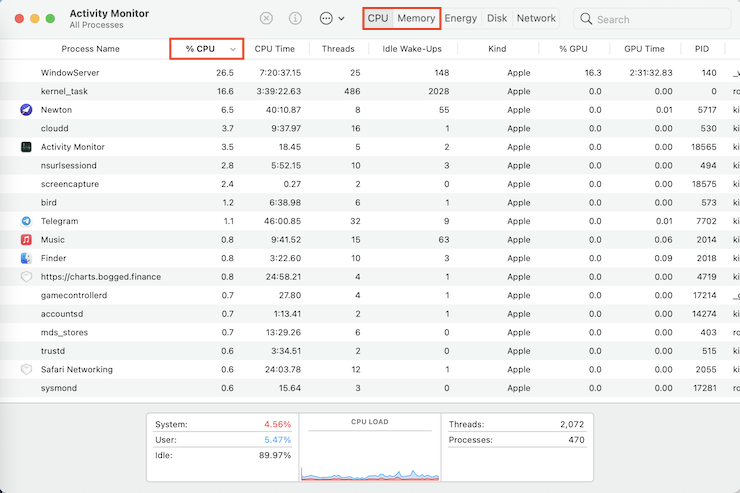
Any apps using excessive CPU power or RAM unnecessarily could be a problem. You should expect high usage when performing intensive tasks, like processing video files or playing games. But things like word processors, message apps, and video players shouldn’t require a lot of power.
Instead of just killing processes after they become a problem, you can use the information you’ve gathered from Activity Monitor to take steps to eliminate the issue. This might include:
- Uninstalling and reinstalling unstable software.
- Finding an alternative app that’s more stable. For instance, Chrome is known to be a resource hog, so switching to a more efficient browser can help.
- Contacting the app’s developer to report the issues you’re having and ask for a fix.
2. Keep your programs up to date
Another key step in ensuring that your software is stable is keeping your programs up to date. Most modern apps get regular updates to fix bugs, improve performance, and increase security. If you ignore these releases for too long, you end up running older, less optimized versions of the app that may not be as strong or as secure.
Depending on where you got your software from, the update process will vary. Apps installed from the App Store on Mac are easy to update—simply go to the Updates section in the App Store and download the newest releases. Other apps may have a built-in updater, or you may have to manually download and install the latest version of your software from the developer’s official website.
3. Update macOS on time
Just like third-party apps, macOS must be updated to ensure the best performance, too. More recent versions of macOS are known for being somewhat unstable or buggy upon their initial release, so ensuring you install the latest updates over time is important. Here’s how you can update your Mac:
- Open System Settings.
- Click General, then select Software Update.
- If a new update appears, click the Update Now button to download and install it.
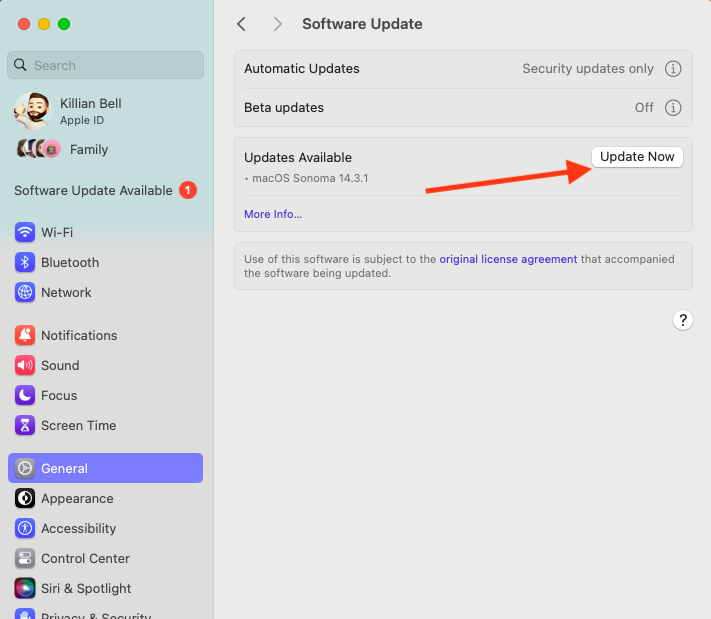
Your Mac will need to restart to complete a software update, so be sure to save your work before you begin installing it. It’s also worth noting that macOS updates can take a little while, so it’s best to perform them when you don’t need to use your laptop for at least 20-30 minutes.
Conclusion
There’s no need to suffer with unstable Mac software. With a few simple steps and the help of built-in tools like Activity Monitor, it’s easy to kill problematic processes that are eating up system resources or have crashed completely. You can also avoid unstable software by keeping your Mac and its apps up to date.
If you’re worried about killing processes because you don’t know what they do, you can use a third-party app like MacKeeper to safely take care of this for you. MacKeeper’s Memory Cleaner tool frees up RAM to make your Mac faster, and it can close apps and processes without making your Mac unstable.


