Whether you're in an important Zoom meeting or using dictation, a blocked microphone can quickly stall your productivity. Disabled system permissions or background processes are common culprits for slowing down your system's responsiveness. Try MacKeeper’s Login Items feature to instantly disable resource-heavy startup apps, speed up your Mac, and prevent background processes from interfering with active applications.
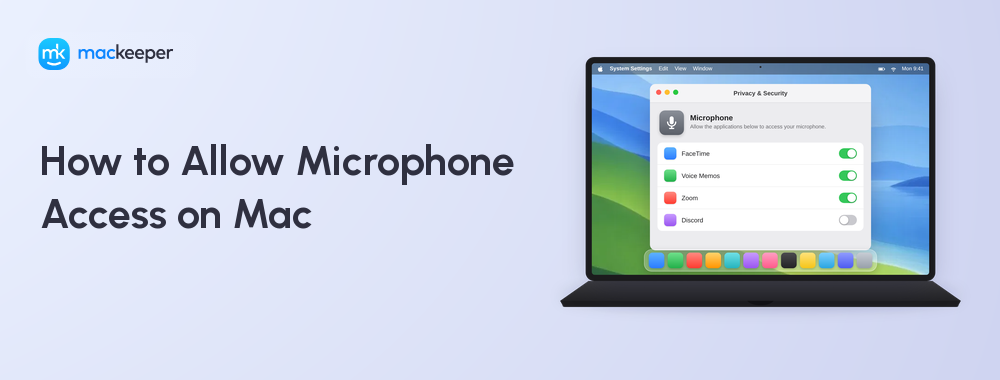
Apple uses a strict, built-in security system to stop apps from recording you without your knowledge. macOS acts as a gatekeeper, blocking all audio access until you explicitly allow an app to use the microphone on Mac.
Microphone access works through a chain of three controls:
The Mac security system: When you open an app, macOS triggers a pop-up. Until you click Allow, the operating system feeds the app total silence.
The browser: If you use a website like Google Meet, you must first grant permission to your browser (like Chrome or Safari) in your Mac's System Settings. Then, you must click Allow on the website's own pop-up.
In-app settings: Even with full system approval, individual apps and websites have their own internal mute buttons and input settings that can block your voice.
Every link in this chain must be turned on for your microphone to work.
A note from our experts:
Fixing microphone permissions solves the audio issue, but communication apps like Zoom, Teams, and Discord often slip into your startup list, draining system resources and causing permission glitches when you try to use your mic. Using MacKeeper’s Login Items lets you filter out and close these resource-heavy programs to preserve your device’s processing power for your active apps, ensuring a smooth, lag-free connection every time you jump on a call.
Worried about downloading third-party software on your Mac? MacKeeper is notarized by Apple, giving you peace of mind that you’d be using a safe and malware-free solution you can trust.
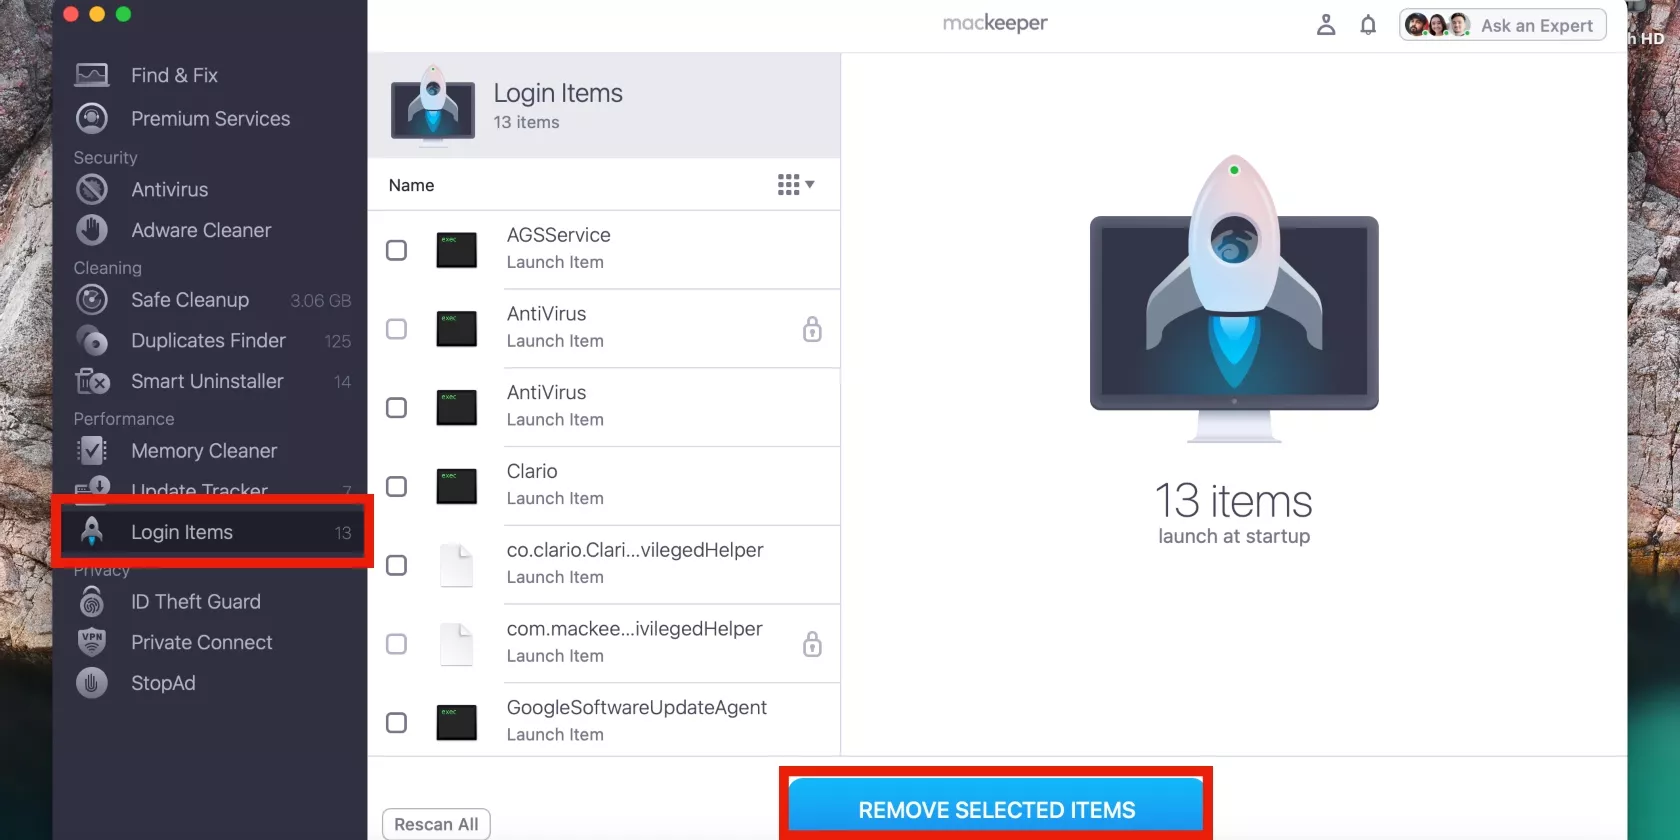
To use MacKeeper’s Login Items tool:
Download MacKeeper and install it on your Apple MacBook Pro or MacBook Air device.
Select the Login Items tool from the sidebar and choose the items you want to stop.
Now, select Remove Selected Items at the bottom of the window.
How to give access to the microphone on Mac?
When we find our microphone not working when trying to join a call or record audio, the issue is usually a simple case of blocked permissions. macOS uses a strict security system that prevents applications from accessing our microphone until we explicitly grant them permission. Fortunately, we can easily resolve this by adjusting a few toggles in our system settings, and so can you.
Get microphone access when prompted
When we open an application that requires audio input for the first time, macOS will automatically trigger a pop-up prompt asking for permission to access our microphone.
To respond, we simply click Allow on the prompt to grant immediate access. Clicking Don't Allow will permanently mute that app. The app will not ask for permission again, and we’ll need to manually enable it in system settings.
Enable microphone access in System Settings
To provide microphone access for an app if you previously denied access or skipped a prompt:
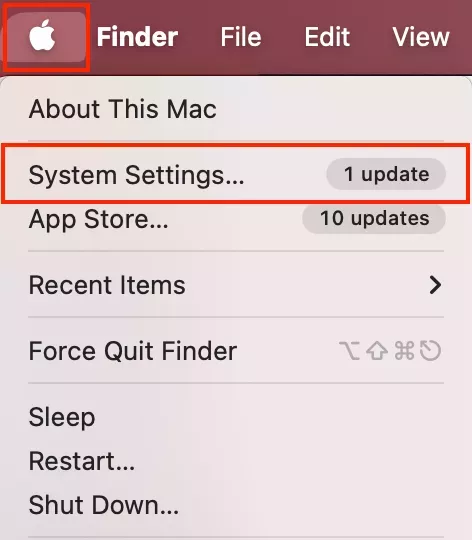
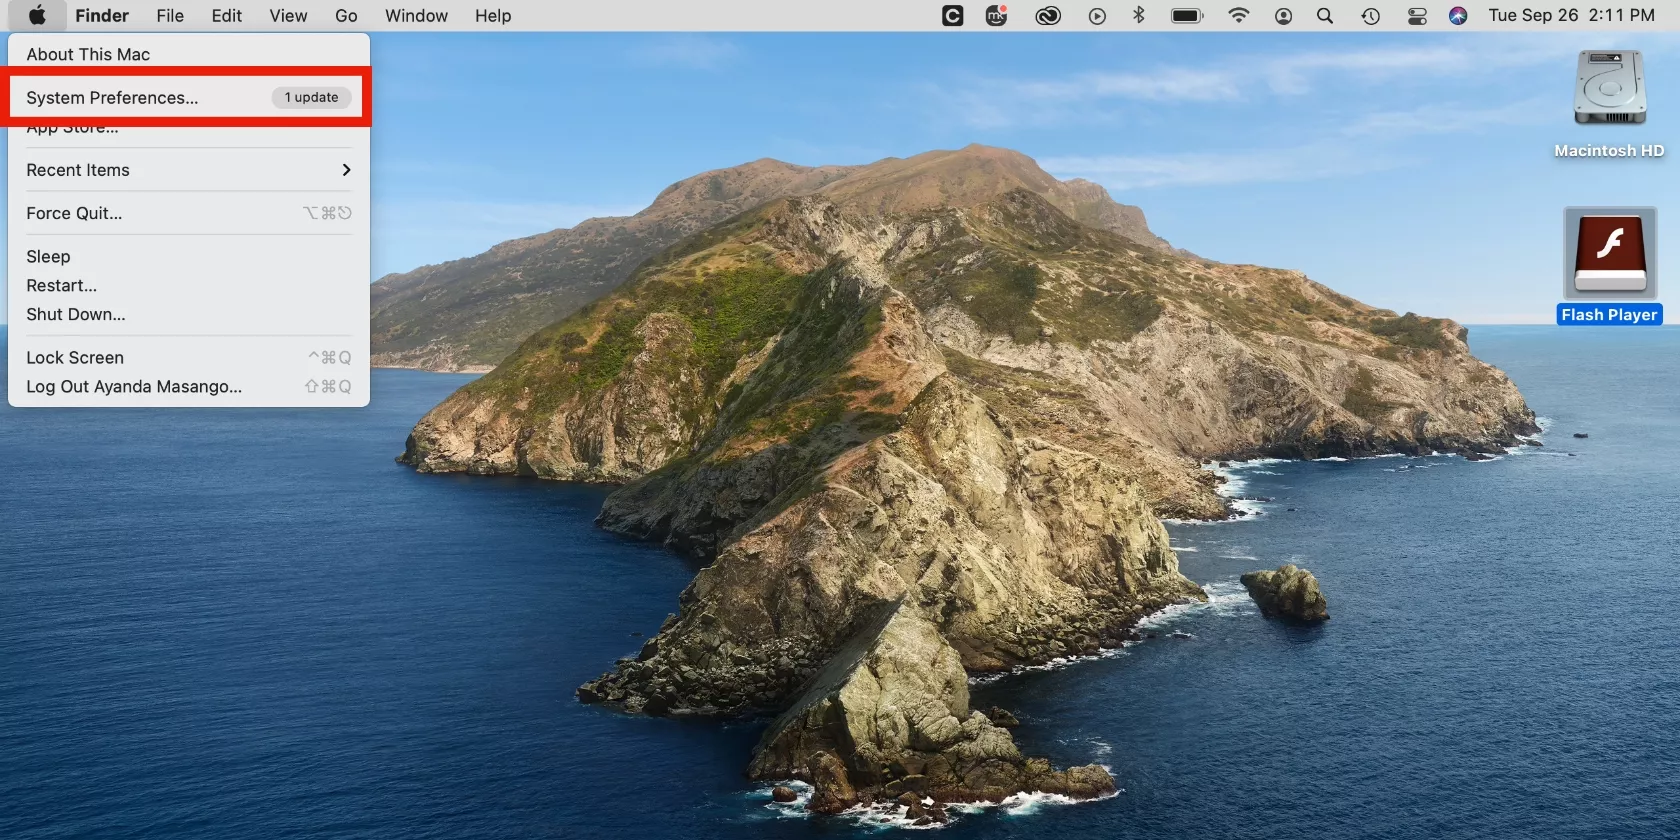
Click the Apple menu and choose System Settings or System Preferences, depending on your macOS version.
Select the Privacy & Security or Security & Privacy option.
Click on Microphone to view a list of apps that have requested access.
Next, toggle on or select next to the application you want to use and then relaunch the app.
Step 1. Select System Settings from the Apple menuStep 2. Select Security & Privacy
Give microphone access in older macOS versions
When we’re using an older version of macOS (such as macOS Monterey or earlier), the interface looks slightly different. Instead of System Settings, the permissions are housed in System Preferences.
To enable microphone access on Mac in older macOS versions:
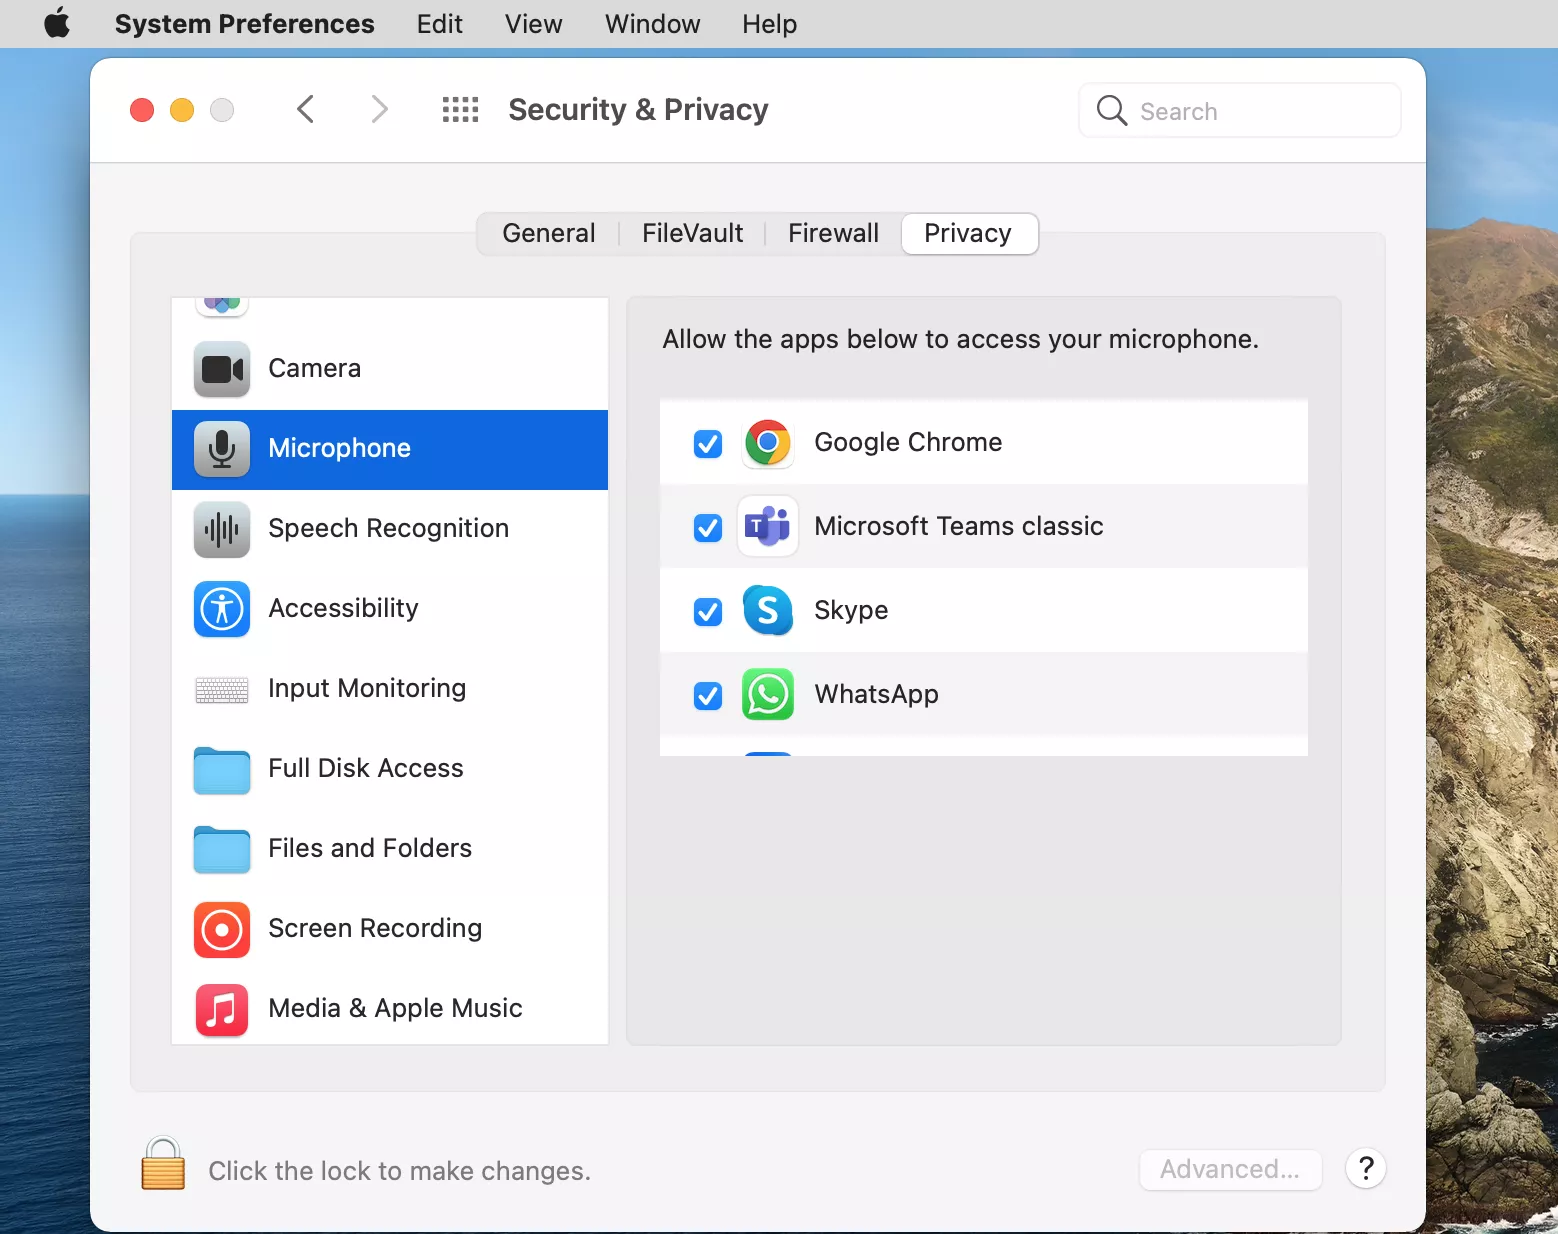
In System Preferences, select Security & Privacy.
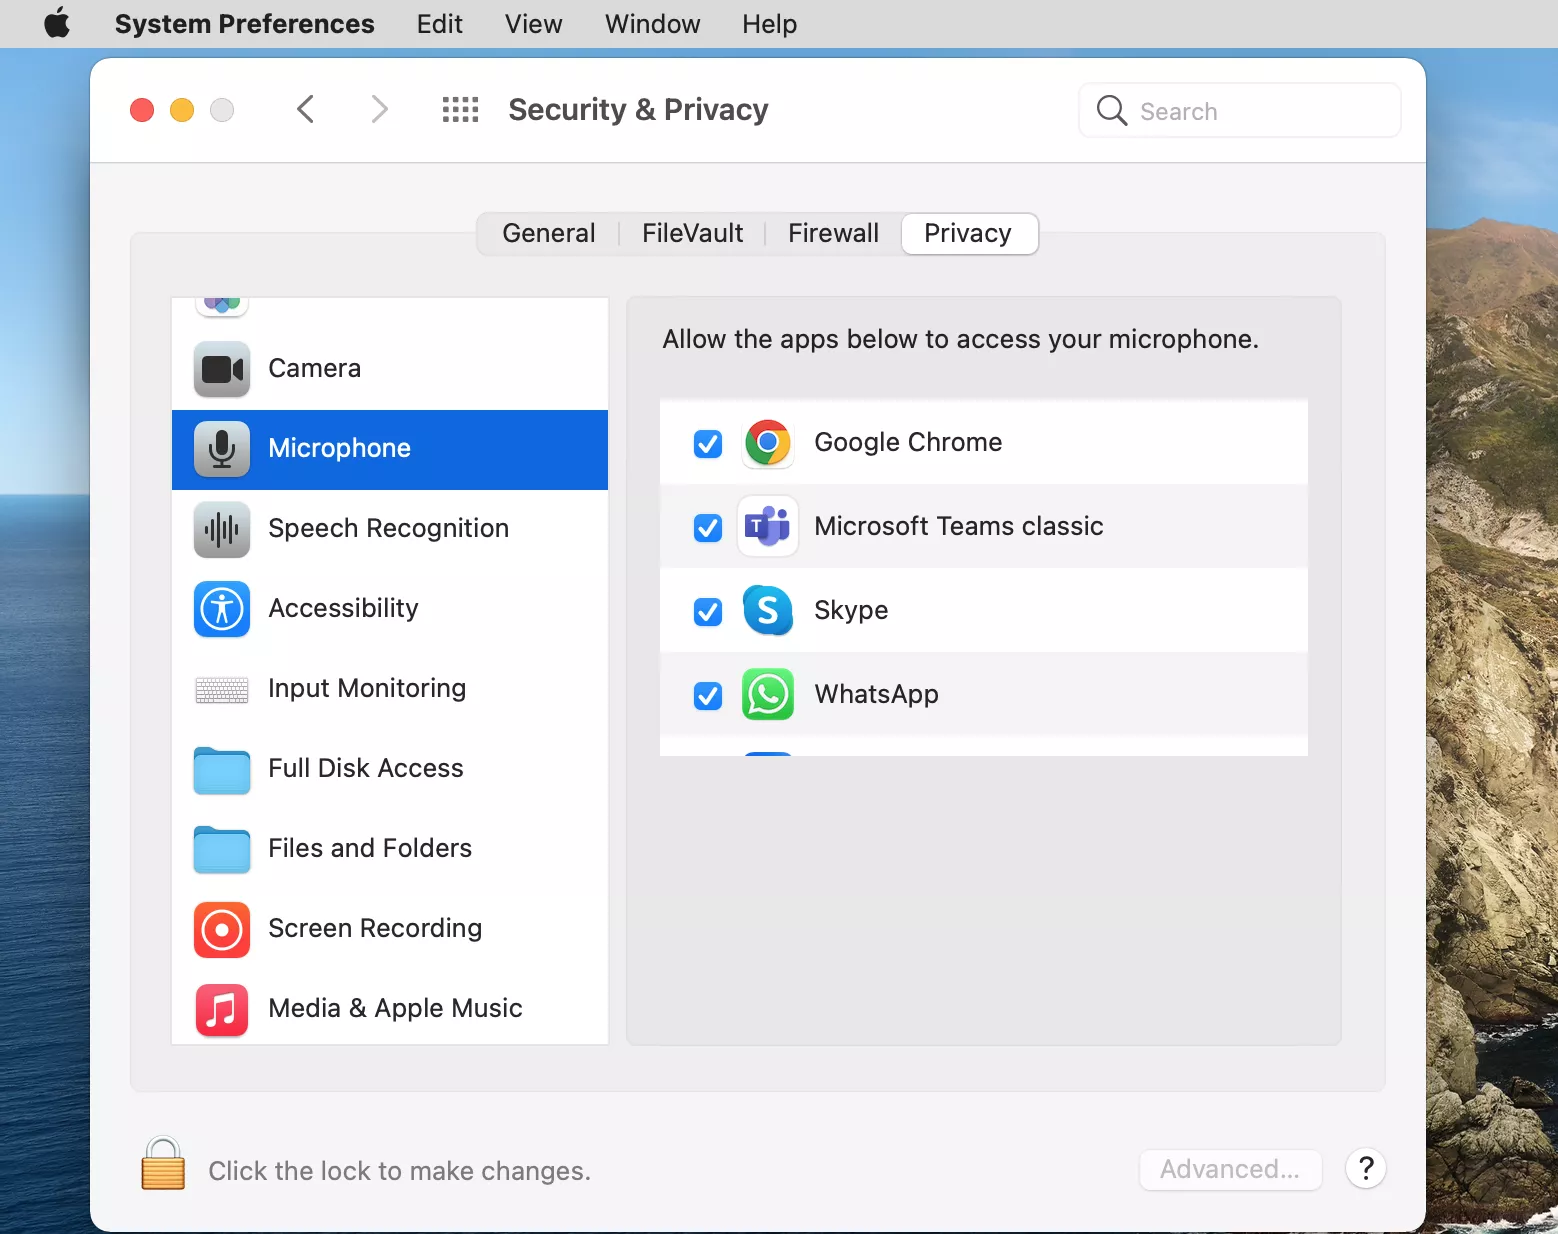
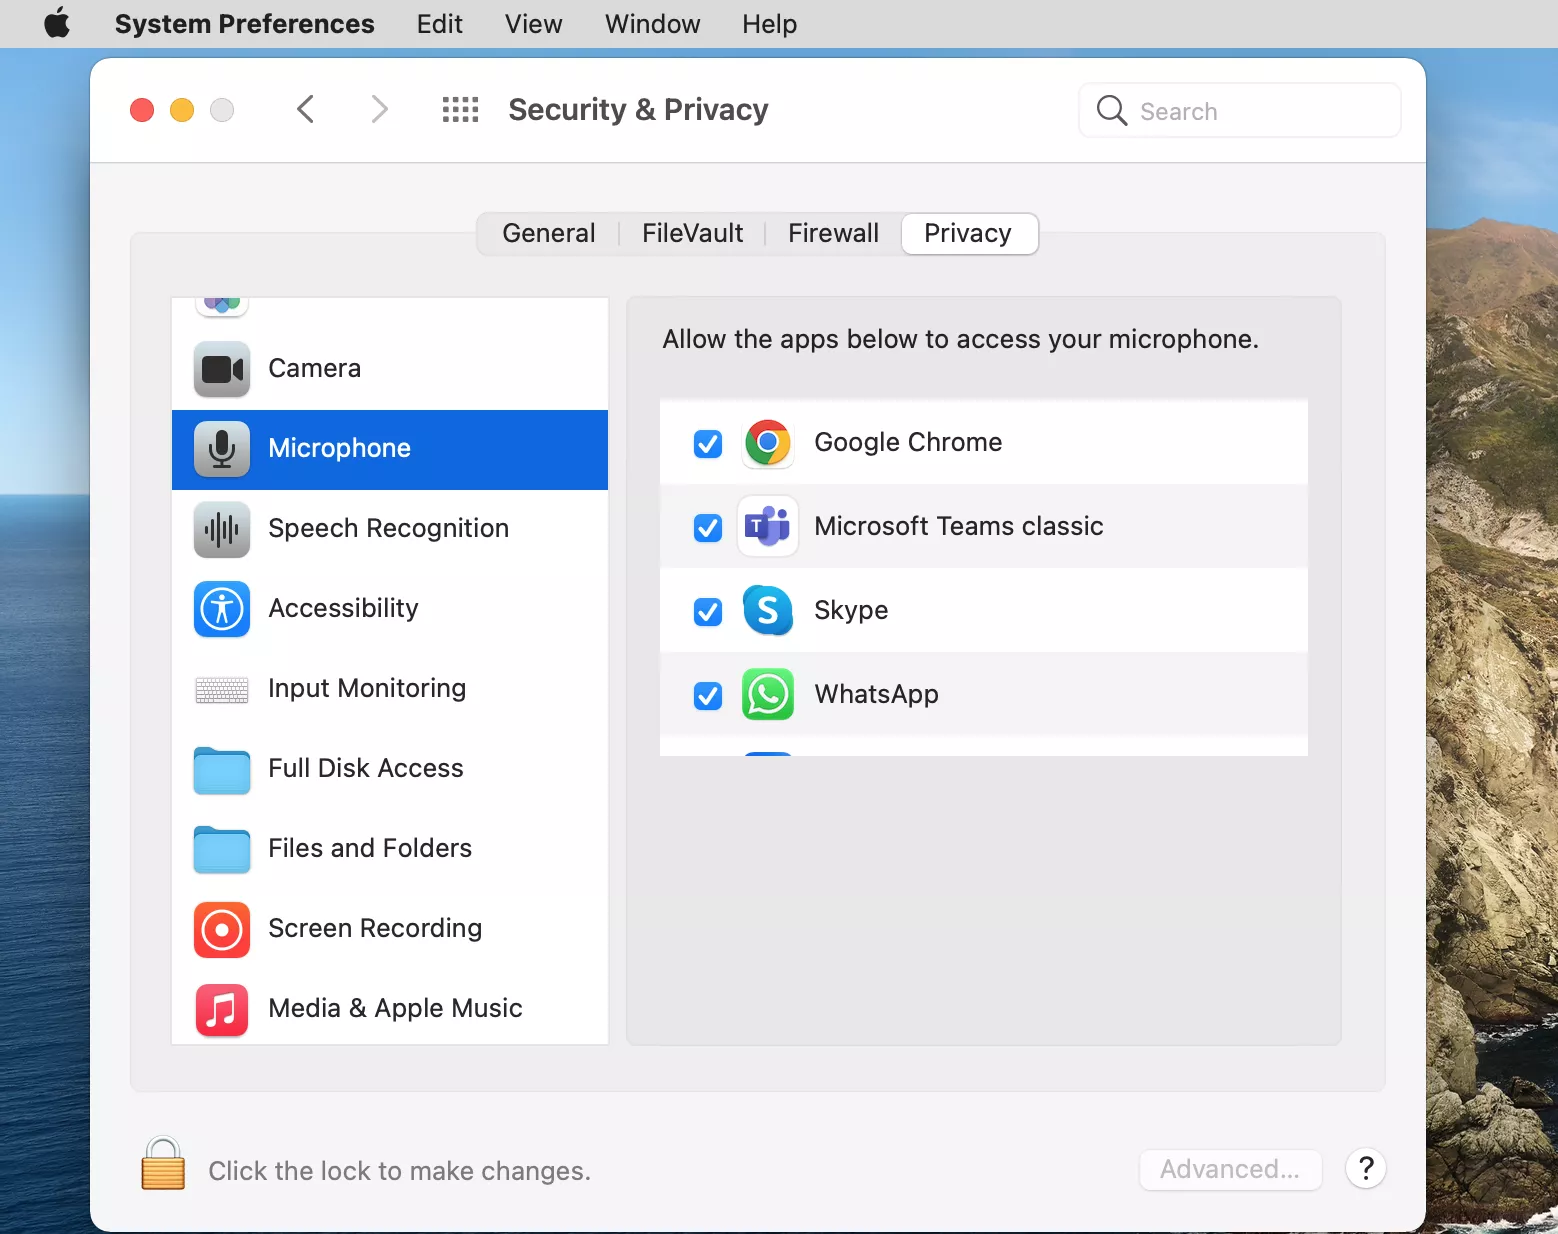
Click the Privacy tab at the top, followed by Microphone in the left sidebar, and check the box next to your app. Note that you may be prompted to enter your password before you can make changes.
Step 1. Click on System Preferences > Security & PrivacyStep 2. Click Privacy > Microphone and give apps access
How to let microphone access for a specific app?
To record audio on a Mac using third-party software, we first ensure that macOS actively grants permission to that specific application. We can review and manage these permissions for all communication, recording, gaming, and creative apps in one central location. However, we may still need to open the app's internal menu to select our preferred microphone hardware.
How to give mic access on Mac for a specific app:
In Privacy settings, click on Microphone to view a list of apps that have requested access.
Enable access for the application you want to use and then relaunch the app.
How to allow microphone access in the browser?
Before a website can use our audio, the web browser must first secure system-level permission from macOS; otherwise, no website loaded inside it will be able to capture our voice. Additionally, we often find that microphone controls sit right alongside options to allow Safari to access camera or screen recording privileges within our browser's central privacy panel.
Follow these steps to grant microphone permission to your browser and manage its internal controls:
Open Microphone settings via System Settings.
Grant access to your browser (for example, Safari, Chrome, or Firefox).
How to allow websites to use the microphone on Macintosh?
Websites can’t access our microphone directly—they require a dual-layer approval. First, our web browser must have permission from macOS, and second, the specific website must get permission from our browser. We can easily allow, block, or reset these website-level choices at any time through our browser's address bar or preferences.
Here’s how to grant website microphone access across major browsers:
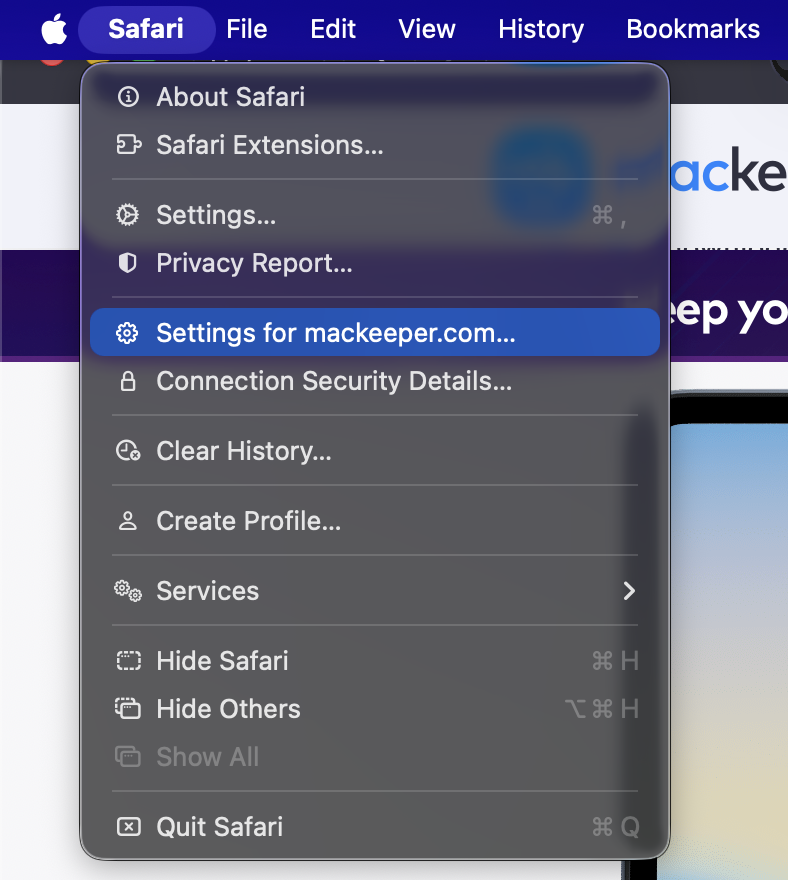
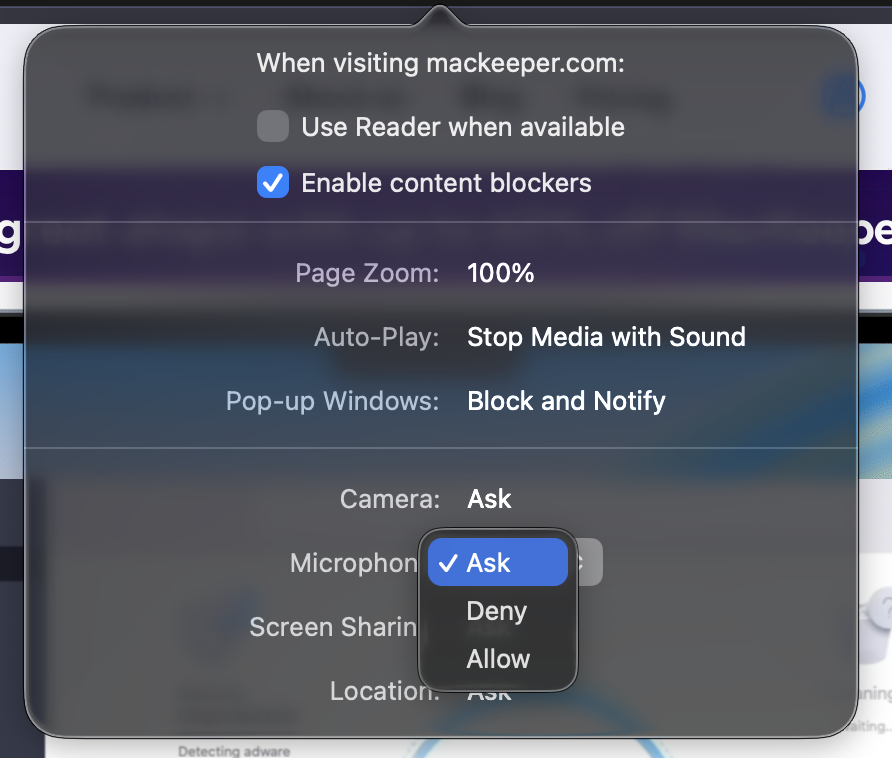
For Safari, open a website in the browser, click Safari in the top menu bar > Settings for > Allow.
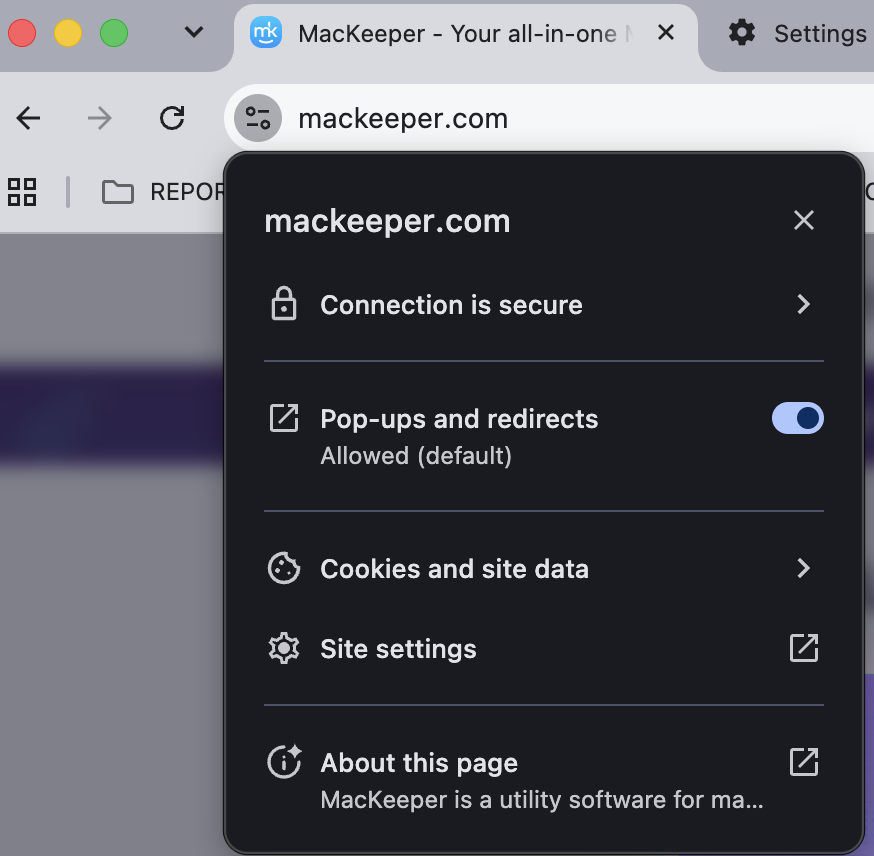
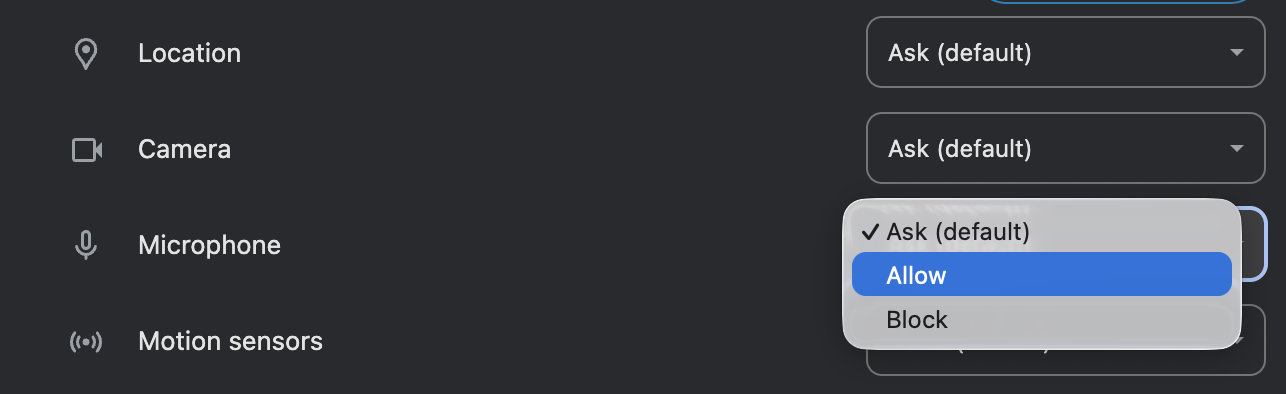
For Google Chrome, open a website in the browser, click the lock icon (or settings icon) next to the URL address > enable Microphone.
Step 1. For Safari, open a website in the browser, click Safari in the top menu bar > Settings for Step 2. Find the Microphone section and choose AllowStep 1. For Google Chrome, open a website in the browser, click the lock icon (or settings icon) next to the URL addressStep 2. In the Microphone section, choose the Allow option
How to check which apps can use your microphone?
We review the permission list through system settings, which displays every app that has ever requested microphone access. From this central menu, we can identify active permissions, spot unfamiliar applications, and instantly grant or revoke access using simple toggle switches.
Here are the step-by-step instructions to check and manage your microphone permissions:
Open Microphone settings.
You’ll now see a comprehensive list of all applications that have requested microphoaccess. Simply click the toggle next to any app to instantly change its permission state:
Blue toggle (on): The app currently has permission to use your microphone.
Grey toggle (off): The app is blocked from accessing your microphone.
How to change or revoke microphone access?
Controlling microphone permissions protects our privacy by stopping apps and websites from listening when they shouldn't. While some complex tools need broader rights like full disk access, standard apps are easy to manage. We can instantly turn off audio access anytime through our system or browser settings.
Microphone access often depends on several overlapping permission layers across your Mac. If your audio isn't working or you want to lock down your privacy, always check your macOS settings first, followed by the specific application, browser, website, and your selected audio input device.
If apps are acting up or launching with unwanted permissions, managing your Mac's startup processes can help. MacKeeper’s Login Items feature is a helpful solution that lets you easily audit and control exactly what software opens in the background. You can use MacKeeper to clean up your startup processes and take full control of your Mac’s privacy today.
We respect your privacy and
use cookies
for the best site experience.
Privacy Preferences Center
We use cookies along with other tools to give you the best possible experience while using the
MacKeeper website. Cookies are small text files that help the website load faster. The cookies we
use don’t contain any type of personal data meaning they never store information such as your
location, email address, or IP address.
Help us improve how you interact with our website by accepting the use of cookies. You can change
your privacy settings whenever you like.
Manage consent
All cookies
These cookies are strictly necessary for enabling basic website functionality (including page
navigation, form submission, language detection, post commenting), downloading and purchasing
software. The website might malfunction without these cookies.