Regularly cleaning caches saves valuable disk space and helps your Mac run faster. Here’s how to clear cache on macOS Ventura:
- Press the Shift + Command + G keys in Finder, opening Go to Folder.
- Now, enter the following ~/Library/Caches and press Go.
- Find the folder of the app cache you’d like to delete and move these files to your Trash.
Continue to read article if you want to learn in more detail how to clear cache on Mac.
Before we start:
Macs, like sports cars, are beautiful, luxurious machines—and like cars, MacBooks often require a tune-up to keep them refreshed and running at their best.
Cache files are often considered unnecessary junk files, and sadly, these unwanted files are often hard to locate, and inexperienced users may find themselves accidentally deleting the wrong data.
To avoid accidentally deleting important files, the safest way to clear cache on Mac is to use MacKeeper’s Safe Cleanup. MacKeeper will do all the hard work and locate junk files automatically, saving you both time and storage space.
To use MacKeeper’s Safe Cleanup tool:
- Download MacKeeper here and install it.
- Select Safe Cleanup in the sidebar menu.
- Click Start Scan to locate the junk files on your Mac.
- Choose the files you want to remove, then click Clean Junk Files.
In this article you will find the following:
What is cache on macOS Ventura
Caches are temporary files on your Mac that are used to speed up your applications. They do this by saving handy bits of data to your laptop (such as the images on a frequently visited website), resulting in faster load times. In this guide, we’ll show you how to clear the three main types of caches: system, browser, and application.
Is it good to clear the cache on Mac Ventura?
Though cache files are useful in speeding up your laptop, they can also take up lots of storage space. After examining the key ways to free up space on macOS Ventura, we should say that if your disk space is too full, your laptop will experience crashes and significant slowdowns in performance.
Because cache files automatically regenerate, there’s no risk of losing any important data, should you delete them. Often, these cache files can build up from apps or websites you no longer frequently use. Thus, getting into the habit of deleting them every once in a while is a great way to get some valuable storage space back on your MacBook.
How to clear system cache on macOS Ventura
System caches are used to improve the general performance of your Mac, connecting your main memory to your processor. There are two main ways to clear your system cache on macOS Ventura:
1. With Finder
To remove individual system cache files in Finder:
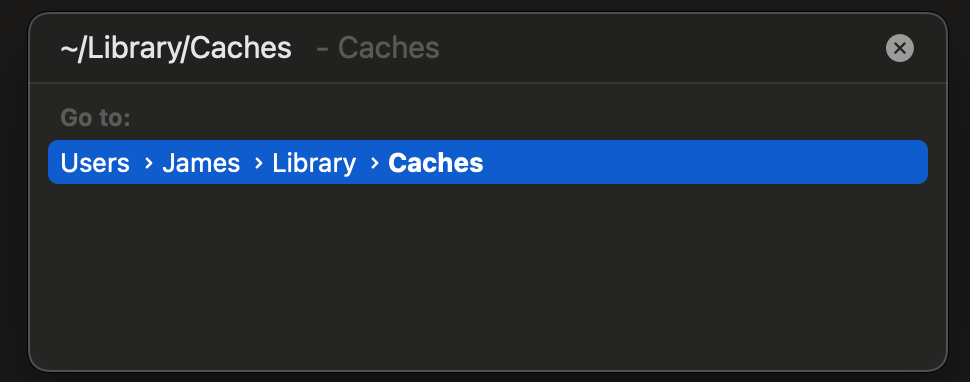
- Open Finder and press the Shift + Command + G keys. This will display the Go to Folder window.
- In Go to Folder, enter the following text ~/Library/Caches and hit Go.
- Select the cache folders you’d like to delete, then right-click, and click Move to Trash.

2. Cleaner app
The Finder method of clearing your system cache on macOS Ventura is useful when removing specific cache files. However, it can be difficult to see which cache folders are taking up the most space, and some people find this process to be quite tricky and time-consuming. Fortunately, you can easily speed up and automate this process using MacKeeper’s Safe Cleanup feature.
Follow our instructions to clean up your cache in seconds:
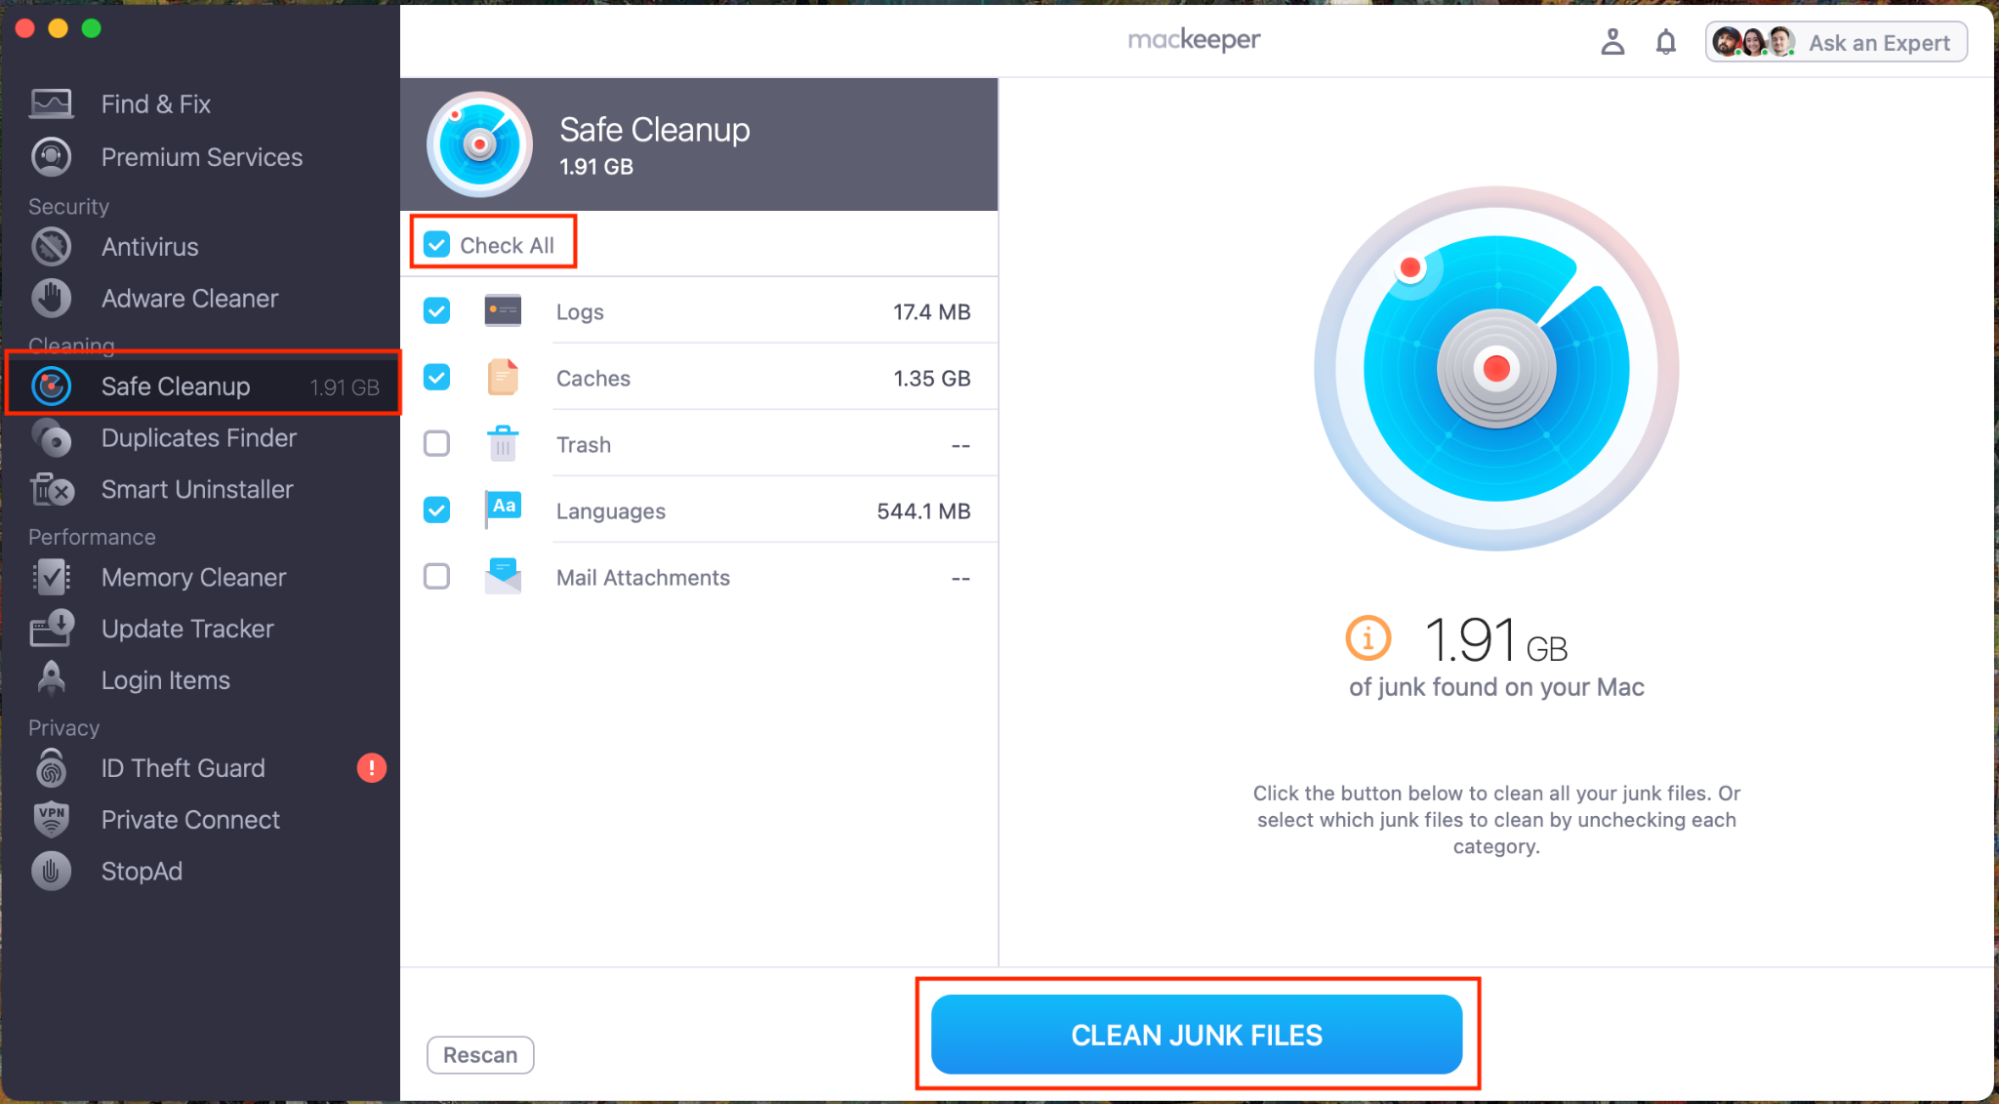
- Download MacKeeper, open it, and go to Safe Cleanup in the sidebar.
- Tick the Caches box, or for a complete safe cleanup, tick the Select All box.
- Click on Clean Junk Files, and MacKeeper will automatically clear your system cache.
Aside from just being a macOS Ventura cache cleaner, MacKeeper can also help to keep you safe online. It has a built-in antivirus, which can keep you protected from ransomware and other computer viruses, and it also includes a VPN which will protect your identity as you surf the web.
How to clear browser cache on Mac Ventura
Do you ever look at your applications and notice that your web browser takes up lots more disk space than it should? This is because web browsers automatically create caches of website assets such as HTML code, cookies, and images. If your web pages are taking a while to load, check out our guide on how to fix slow internet.
Though browser caches are great for faster web browsing, it’s good practice to clear these occasionally. Each browser requires slightly different steps to get there:
- Clear cache on Safari
- Delete cache on Google Chrome
- Clean cache on Mozilla Firefox
- Erase cache on Opera
1. Clear cache on Safari
Safari is the default web browser that comes pre-installed on your iMac or MacBook. It’s well known for being lightweight and easy to use, but for some reason, Apple hides Safari’s cache cleaner in a developer menu.
To easily clear Safari’s cache whenever you like:
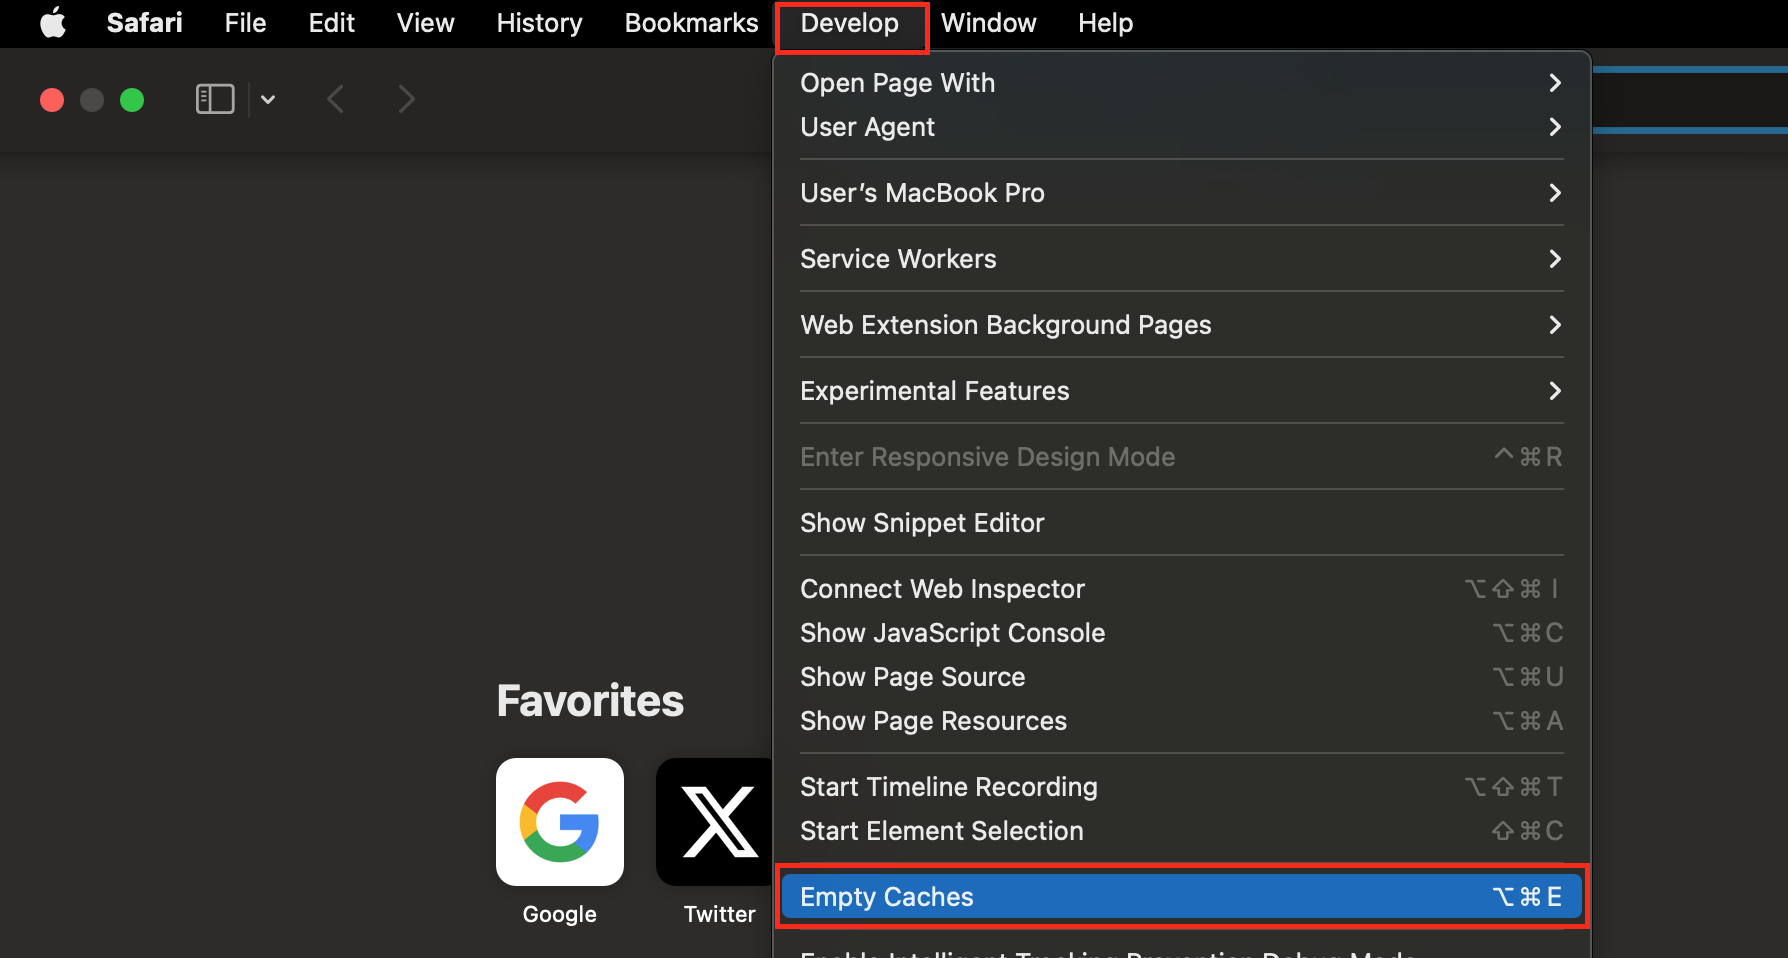
- Open Safari, and click on Safari > Preferences in the toolbar.
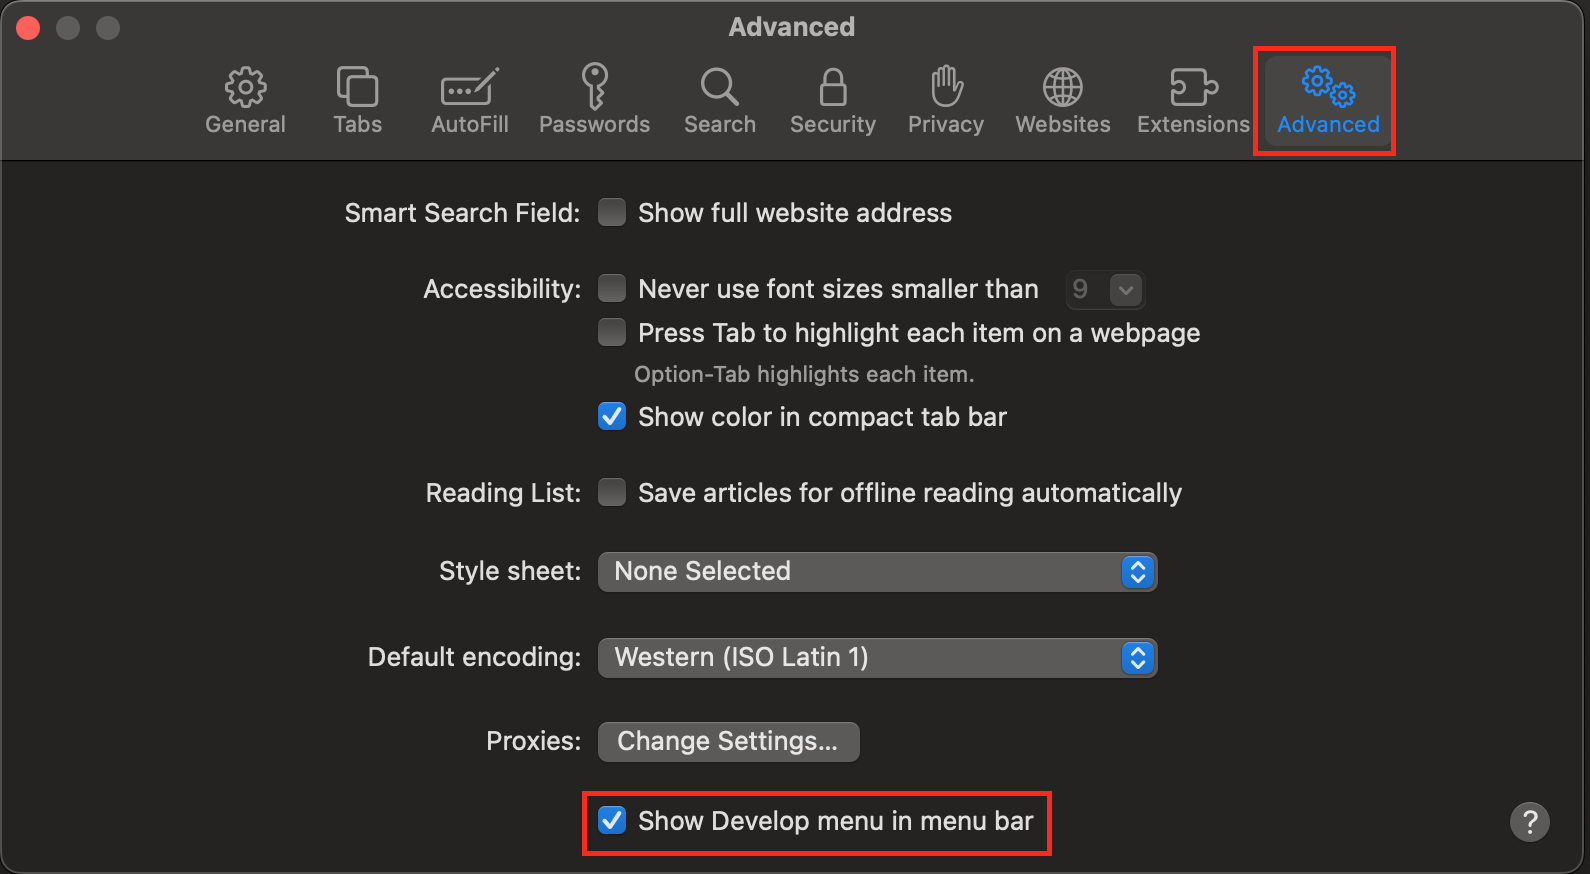
- Click on the Advanced tab and tick Show Develop menu in menu bar.
- Go to the new Develop tab and select Empty Caches from the drop-down menu
2. Delete cache on Google Chrome
Google Chrome is a popular web browser that works seamlessly with Google services such as Gmail and Docs. Meantime, it’s also infamous for being one of the most resource-intensive web browsers on the market. Namely, it keeps every web page open in a tab, instead of keeping unused ones paused in the background, accumulating lots of caches.
Find out how to erase cache files in Chrome:
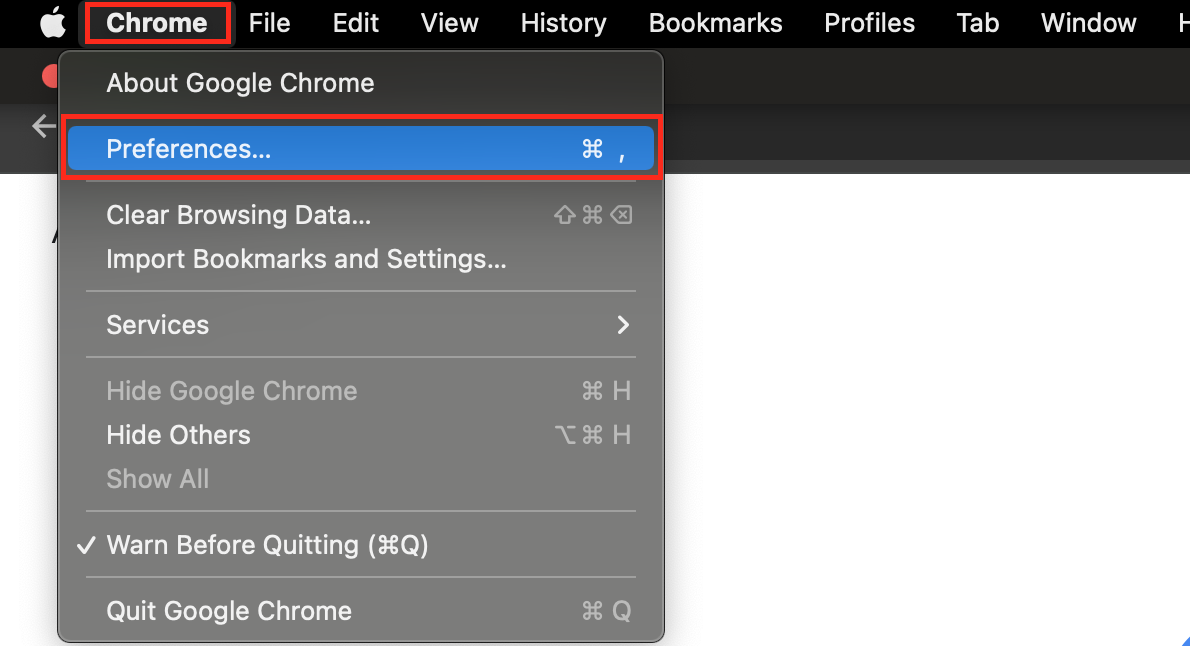
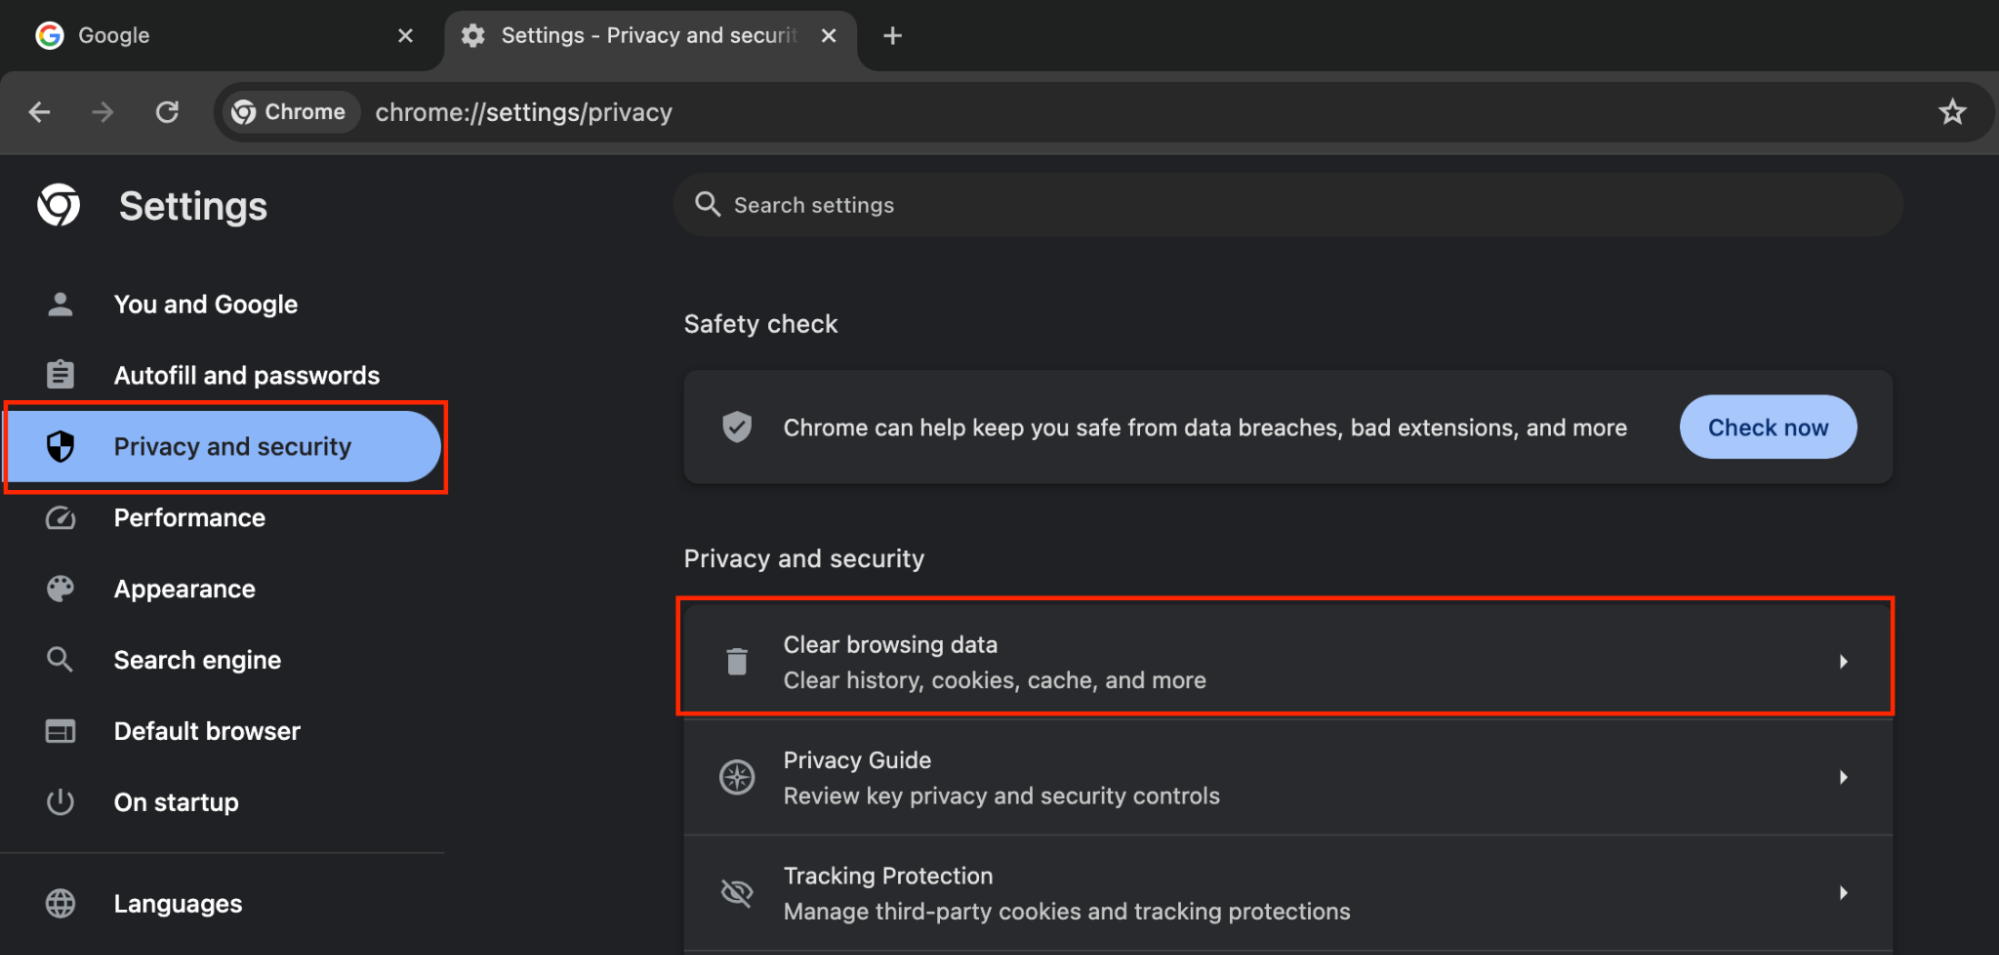
- In Google Chrome, go to the Chrome menu in your top menu, and select Clear Browsing Data.
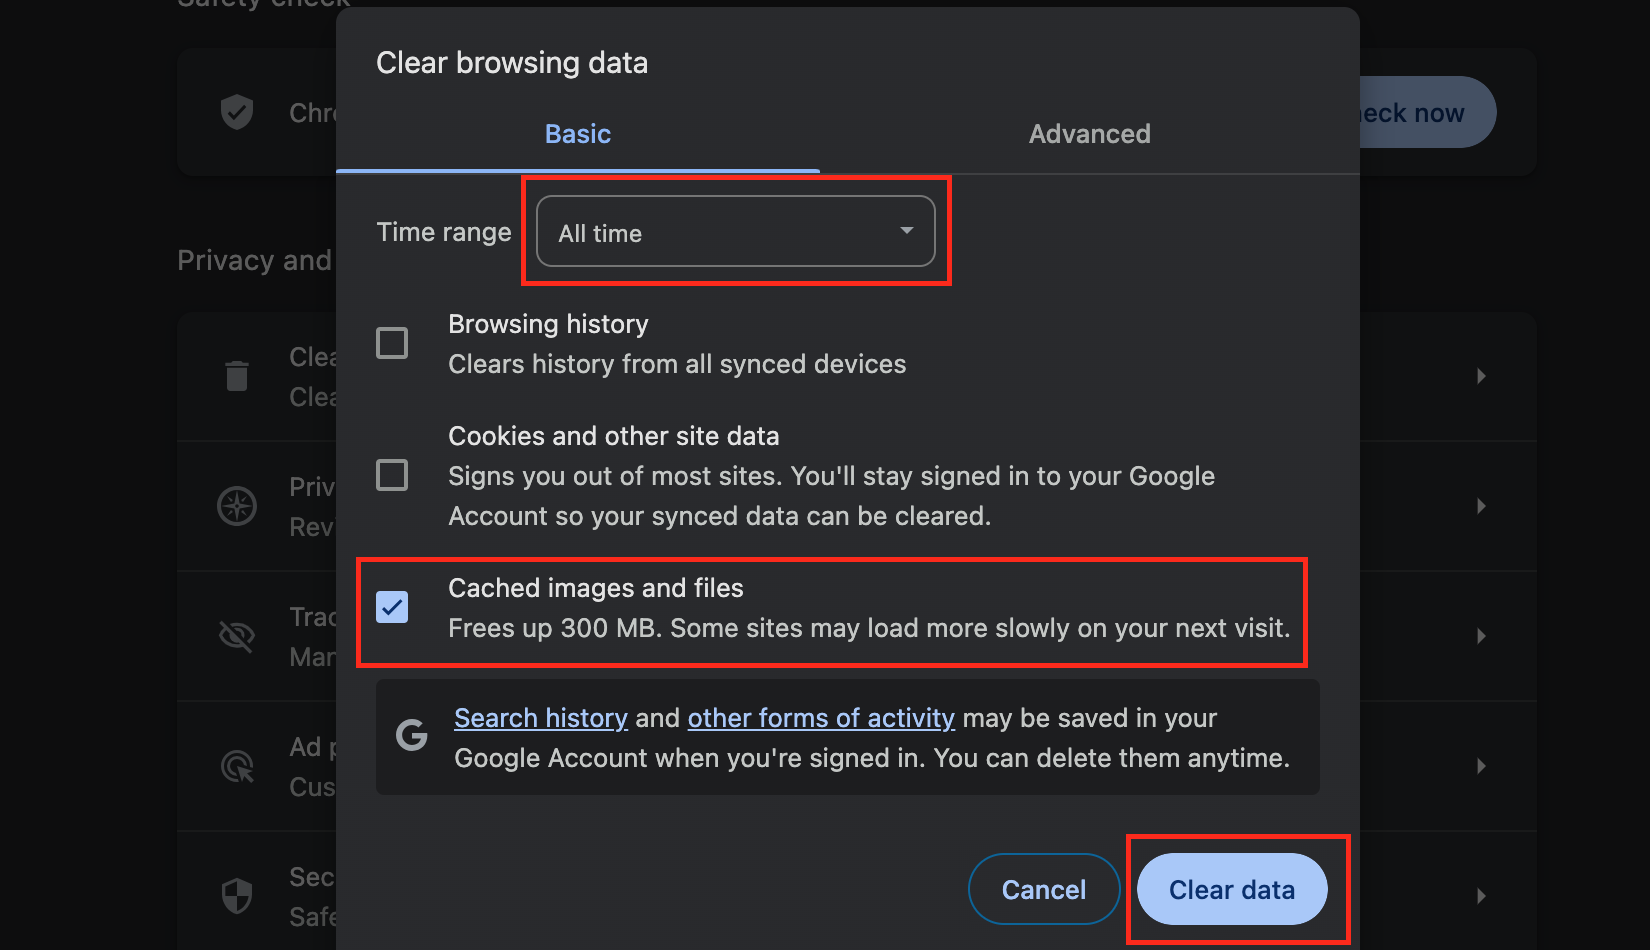
- In the Time range section, select All time.
- Tick only the Cached images and files box, and click Clear data.
3. Clean cache on Mozilla Firefox
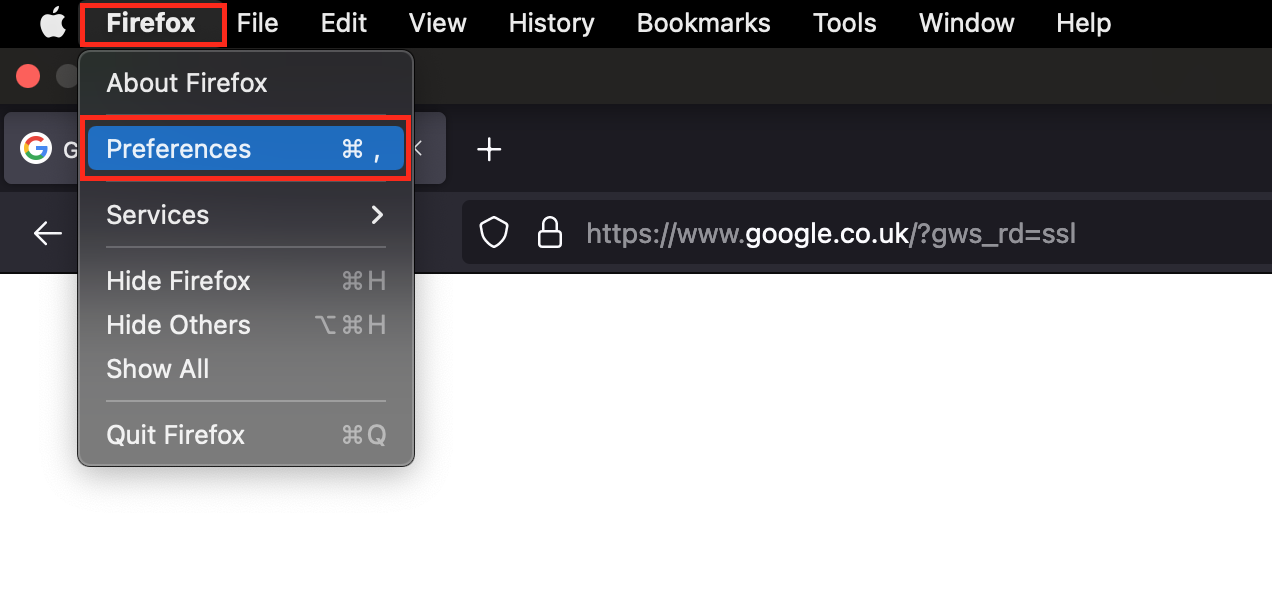
Mozilla Firefox has been around for almost two decades now, and it’s well-loved by its loyal fans due to its open-source software and its best-in-class security features. To find out more about protecting your Mac, see our guide on macOS security. Otherwise, erase cache files in Firefox:
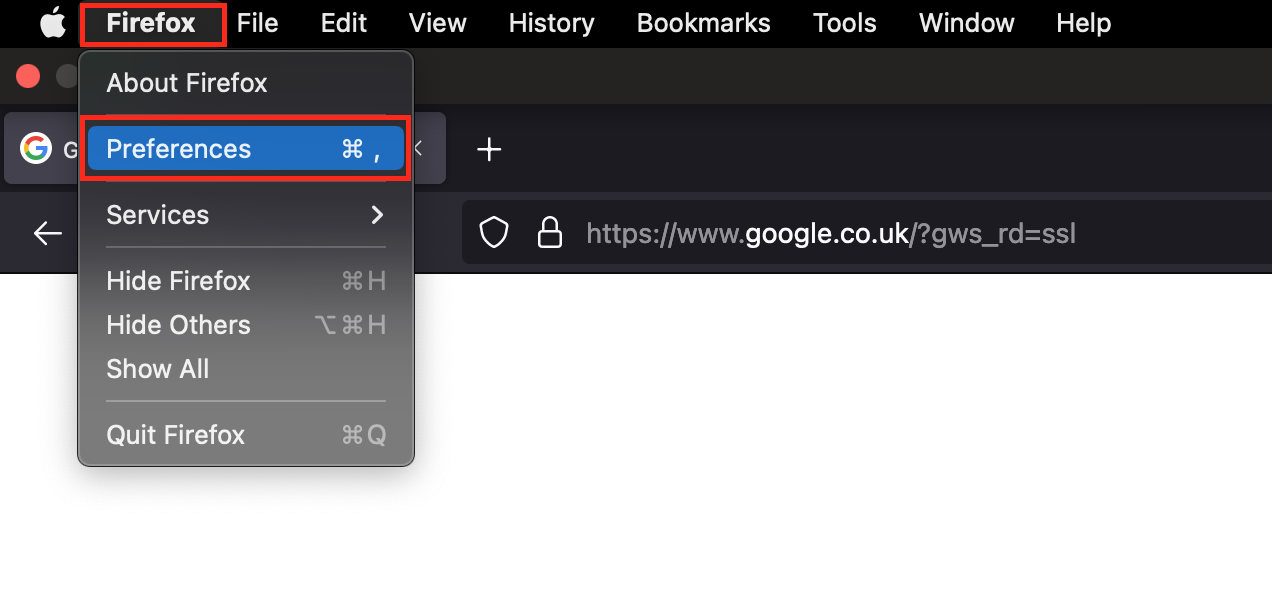
- In Mozilla Firefox, go to the Firefox menu in your top menu, and select Preferences.
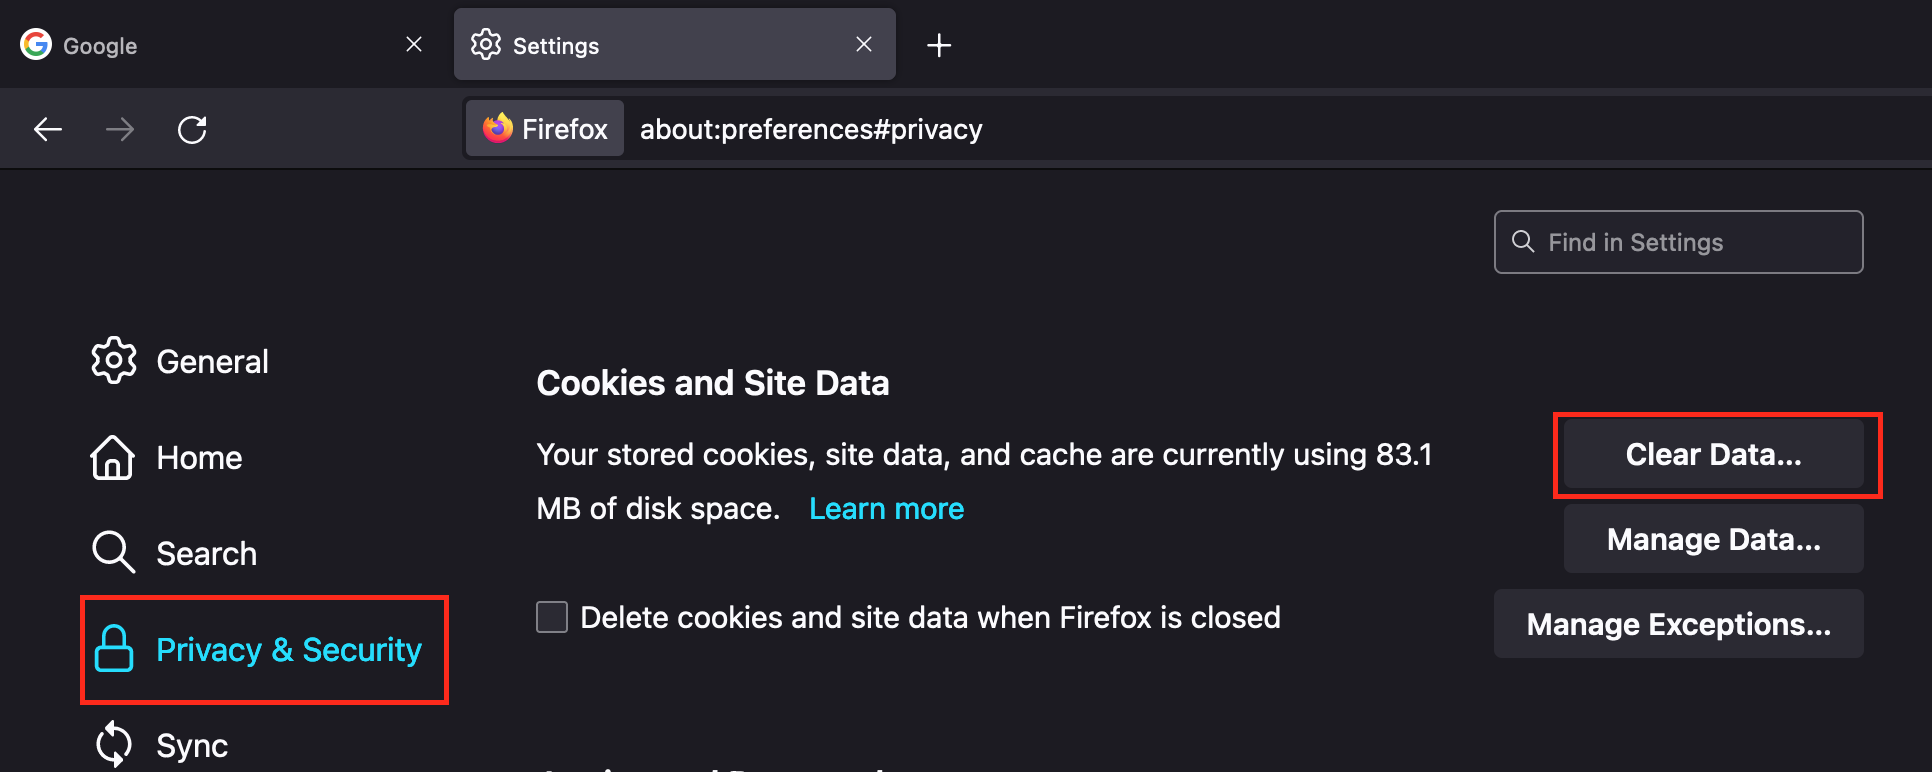
- Select the Privacy and Security option from the sidebar,
- Scroll down to the Cookies and site data section, and click Clear data.
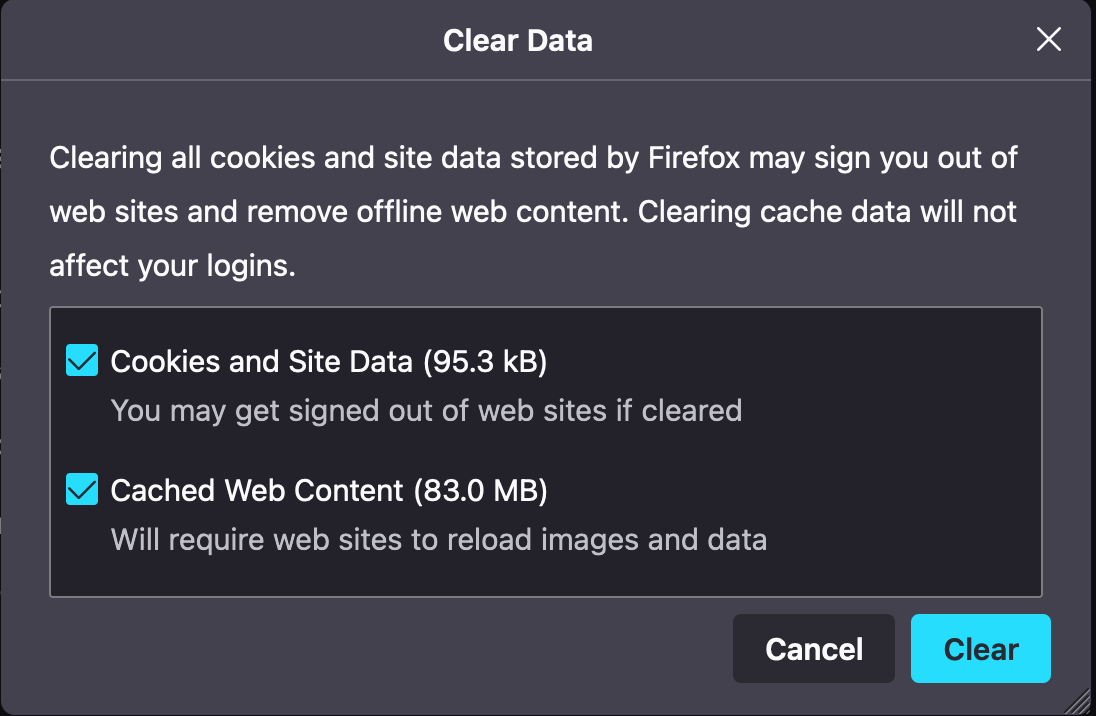
- Ensure the Cached web content box is ticked, and then select Clear.
4. Erase cache on Opera
Since the 1990s, Opera has been the web browser of choice for many people. It continually evolves with our changing needs and offers unique features with tracker blocking and AI tools built in.
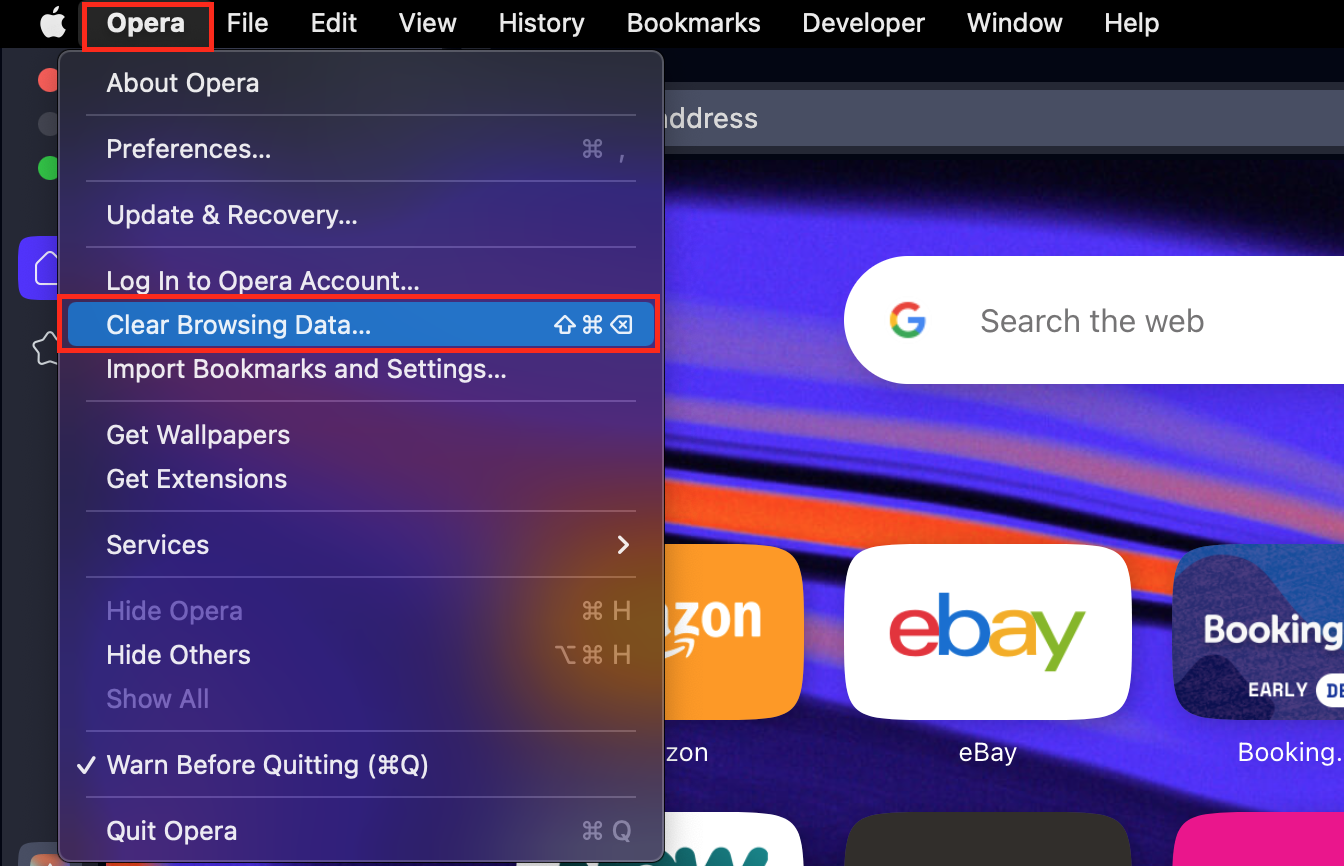
To purge your cache files in Opera, see our guide below:
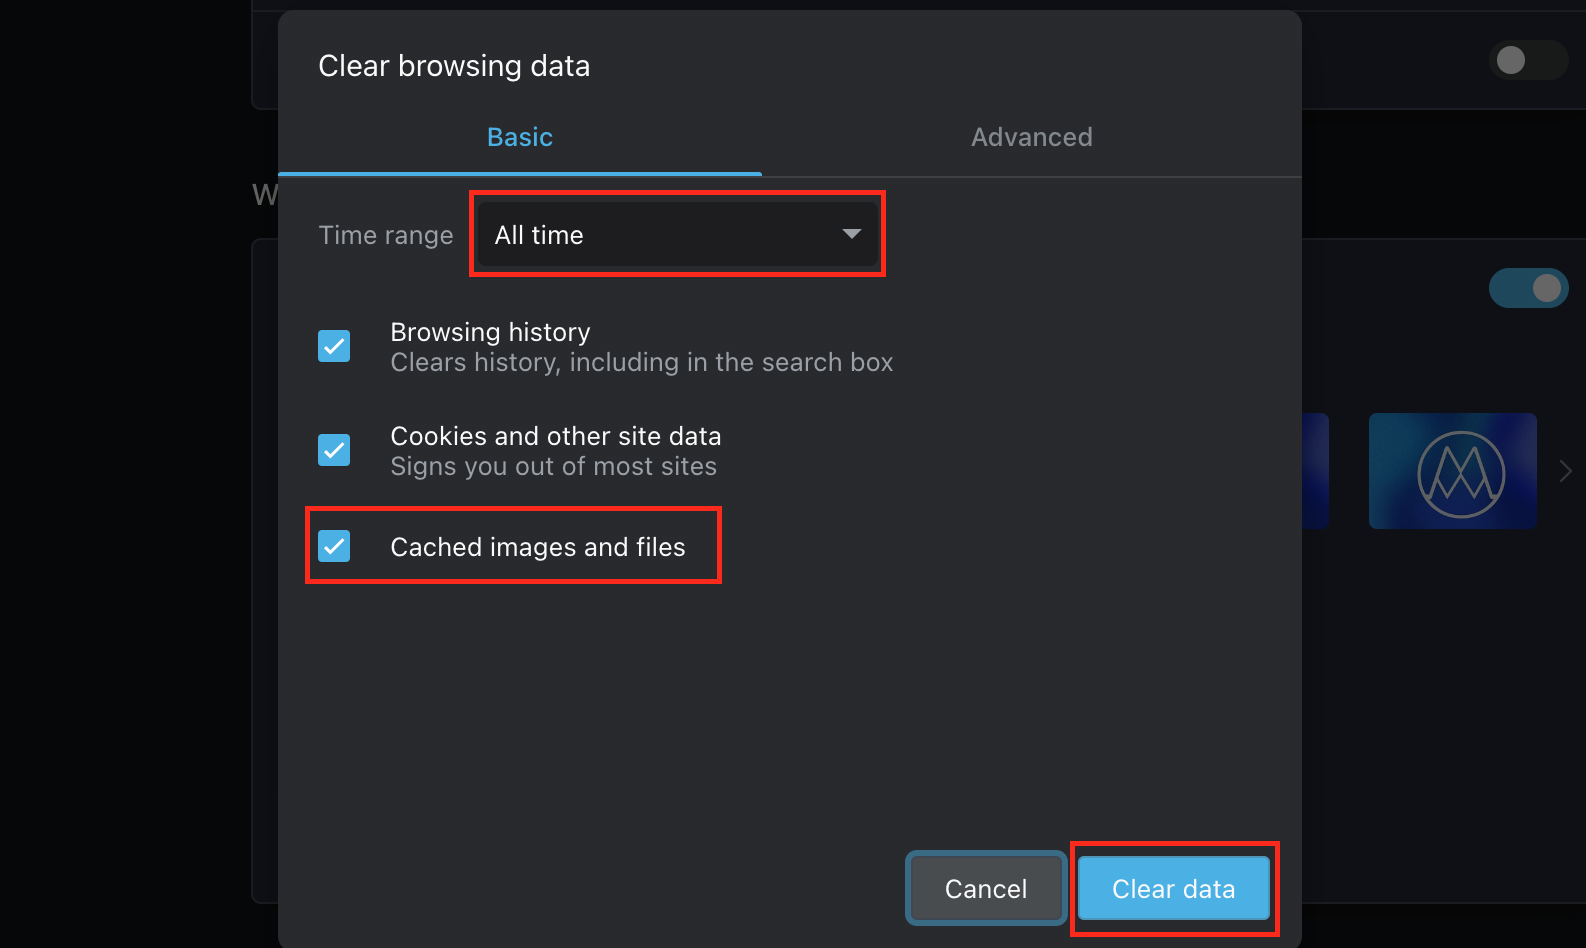
- In Opera, go to the Opera menu in your top menu, and select Clear Browsing Data.
- In the Time range section, select All time.
- Tick only the Cached images and files box, and click Clear data.
How to delete application cache on macOS Ventura
Caches are also used in your Mac applications to make them load faster and provide a smoother experience. However, if caches aren’t cleared over a long period of time, they can slowly fill your storage disk with unnecessary junk—meaning you've got less space for important files.
Eliminate app caches in just a few steps:
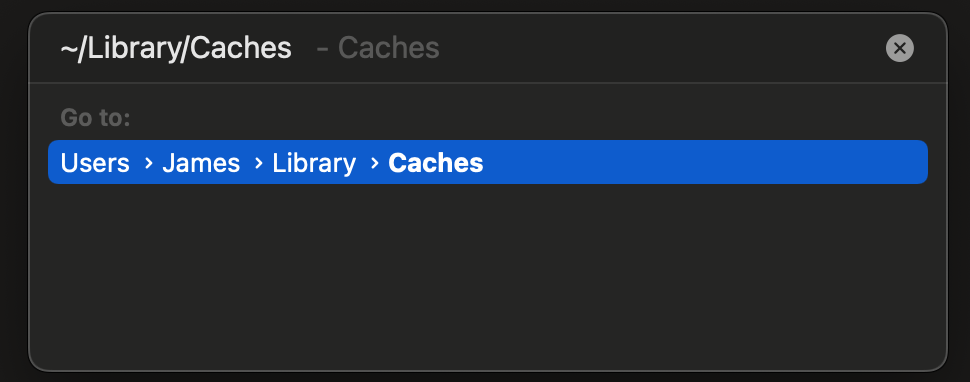
- Go to Finder and press the Shift + Command + G keys, which will open Go to Folder.
- In Go to Folder, enter the following text ~/Library/Caches and hit Go.
- Locate the folder of the app cache you’d like to delete and drag and drop this folder in the Trash can in your dock.

Streamline the cache-clearing process
For inexperienced Mac users, clearing caches requires taking in lots of new information if you want to clear your caches manually. The easiest method to clear your junk files is to use MacKeeper’s Safe Cleanup feature, which will take care of this entire process for you, all while speeding up your Mac and protecting your privacy.
Allowing MacKeeper to do all the hard work will save you not only time but also valuable storage space. So, try our app, put the kettle on, and relax while our app does the heavy lifting for you. Happy cleaning!


