You can easily convert MOV to MP4 on Mac using free apps. Video files take up a lot of storage on Mac, so if you’re working with a lot of them, you’ll likely need to free up some space at some point. You can do this using MacKeeper's Safe Cleanup tool.
Do you have an MOV video file that needs to be converted to MP4? You can easily make MOV to MP4 on Mac with these steps:
Open the video in Apple’s free iMovie app available from the App Store.
Choose Share from the File menu.
Change the export setting to MP4.
Give your file a name, and then export it.
MOV is an older video file format that has a number of disadvantages when compared to MP4. Not only do MOV video files tend to be larger than their MP4 counterparts, but they’re also not compatible with many modern players and devices. Most video streaming platforms also recommend the use of MP4 instead of MOV because they use less bandwidth and are easier to stream. With that being the case, it’s a good idea to convert MOV files to MP4 files before storing or sharing them.
In this guide, we’ll explain a number of ways you can convert MOV to MP4 on Mac, and look at how you can free up storage space for video files using MacKeeper’s Safe Cleanup feature.
MOV
MP4
Compatibility
Not supported by many modern video players and devices
Supported by almost all modern video players and devices
File size
Larger than MP4
Smaller than MOV
Video quality
Slightly higher than MP4
Slightly lower than MOV
Codec
MPEG-4
MPEG-4
A note from our experts:
Before converting videos to MP4, it’s better to free up some space. Start by removing junk files. Mackeeper’s Safe Cleanup helps you to cope with this challenge. Our tool removes caches, logs and mail attachments in a few clicks.
QuickTime is a media player built into macOS that lets you play and convert video files in a wide range of formats. To convert an MOV file to M4A:
Open a video in QuickTime.
Select File, then choose Export As.
Pick Audio Only before saving.
Pros
Cons
Pre-installed on every Mac
Basic compared to other video players
Free to use
Only available on Mac
Offers several quality options
MOV to M4A conversion is ‘audio only’
Our tip: You can use QuickTime for your MOV conversions since it’s free to use and comes pre-installed on every Mac, but it has some big limitations. First, it cannot export to MP4, but it can export to M4A, which uses the same codec. Secondly, it can only export to M4A if you use the Audio Only export option. So, bear this in mind.
If you’re happy with M4A and you only need audio, these are the steps to follow:
Open QuickTime.
Click File in the menu bar, then select Open File.
Find and open the MOV file you want to convert.
Click File in the menu bar, then select Export As.
Select the Audio Only option.
Give your file a name, then click Save.
Step 1. Open File tab > Export As > Audio OnlyStep 2. Give it a name > Save
Change MOV to MP4 files with Terminal
Terminal is another application that’s free to use and pre-installed on every Mac. It has advantages over QuickTime, such as the ability to convert MOV to MP4 rather than M4A, but it’s a command line interface that’s more complicated to use. Moreover, it’s not quite as simple to use as an application with a graphical user interface (GUI).
Pros
Cons
Free to use and pre-installed on every Mac
Can be complicated to set up and use
Supports a wide range of file formats
Uses command line prompts, not a GUI
Fast and lightweight
If you don’t mind that, here are the steps to convert an MOV file to MP4 in Terminal:
Go to the FFmpeg downloads page to access a multimedia framework that gives Terminal the ability to convert media file formats.
Click the Static builds for macOS 64-bit option.
Click the green download button that reads ffmpeg and the latest version number.
Click Allow if your browser asks you to confirm the download.
Double-click the FFmpeg file in your Downloads folder to unpack it.
Open Finder then click Go in the menu bar.
Click Go to Folder, then enter /usr/local.
Create a new folder named bin, then drag and drop the FFmpeg executable inside it.
Run the ffmpeg executable. Your Mac may tell you that the file cannot run because it is from an unidentified developer. If this happens, go into System Settings, click Privacy & Security, then click Open Anyway.
Wait for the installation process to complete inside Terminal.
Close and then reopen Terminal to start a new session.
Type the following command: ffmpeg -i input.mov output.mp4, replacing input.mov and output.mp4 with the actual names and file paths of your video files, like in the screenshot below.
Hit Enter.
Terminal will now work its magic and change your MOV file to MP4. Once the process is complete, you should be able to find the MP4 in the location you entered in step nine.
Step 1. Choose the Static builds for macOS 64-bit optionStep 2. Run the FFmpeg executable fileStep 3. In System Settings, click Privacy & Security then Open AnywayStep 4. Enter the FFmpeg command from above to start video conversion
Make MOV to MP4 on Mac with iMovie
You can easily save MOV as MP4 on Mac by importing the video into iMovie:
Click the Share icon in the top-right corner of the window.
Select Export File.
When it’s done, select your desired video quality and click Next.
Now give your file a name and export it.
Pros
Cons
Free to download on modern Mac models
Not as lightweight as other methods
Can easily choose video quality
Limited number of output options
Can edit and trim video as well as convert it
iMovie is free to download from the App Store on modern Macs. Here are more detailed instructions on how to use iMovie to change MOV to MP4 on Mac:
Open iMovie.
Click Create New and then select Movie to start a new project.
Click File in the menu bar, then select Import Media.
Find and select your MOV video file.
Drag and drop your video file onto the timeline section.
Click the Share button in the top-right corner of the window.
Select Export File.
Select your desired quality and compression settings, then click Next.
Give your file a name, and then save it. It will be saved in the MP4 format.
Step 1. Click Create New, then select MovieStep 2. To import your MOV file, click File, then Import MediaStep 3. Drag and drop your video onto the timelineStep 4. Click the Share button in the top-right cornerStep 5. Choose your video quality then click Next before saving
Use third-party MOV to MP4 converters
If Terminal is too complex and iMovie seems like overkill for simple file conversion, you’ll be pleased to know there are a wide range of third-party tools for Mac that can convert MOV videos to MP4. Check out a few of the most popular options recommended by our experts, including web-based tools:
FreeConvert
Movavi
VLC
CloudConvert
Animaker
HandBrake
1. FreeConvert
FreeConvert is an online video converter that works in your web browser, so there’s no need to download and install anything. Simply follow these steps:
Click the Choose Files button, then find and select your MOV file.
Click Upload.
Ensure the output option is MP4, then click Convert.
After uploading your MOV file, click Convert
Pros
Cons
Free to use
1GB file limit with the free version
Can convert a wide range of file formats
Can be a little slow at times
Accessible on almost any deviced
2. Movavi
Movavi is an app built specifically for video conversion, so it does its job effectively. With over 200 presets to choose from, you’ll find all the quality and format options you need.
To convert MOV to MP4 on Mac with Movavi, follow these steps:
If your browser asks you to confirm the download, click Allow.
Double-click the Movavi file in your Downloads folder to open it.
Double-click the Movavi icon in the installation window to proceed.
Follow the installation process and wait for Movavi to start.
Enter your name and email address to sign up for the Movavi newsletter.
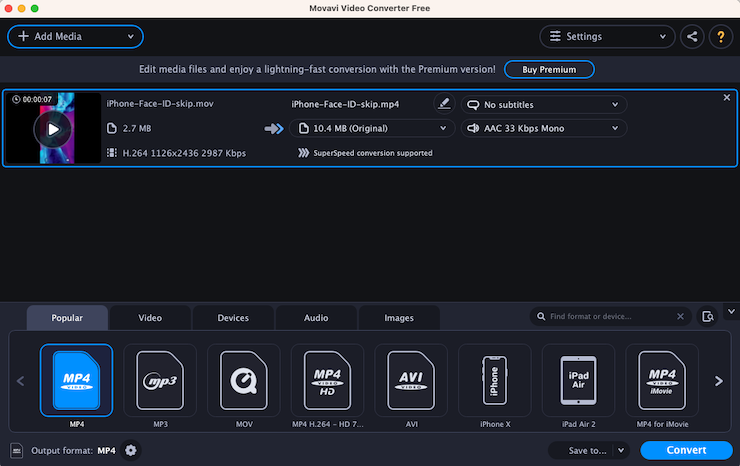
Click the Add Media button, then click Add Video.
Give Movavi access to your folders if prompted, then find and select your MOV file.
Ensure the MP4 preset is selected, then click Convert.
Select the MP4 preset, then click Convert
Pros
Cons
Plenty of quality and format options
Cannot use without signing up for newsletter
Fast
You have to pay for the pro version for videos with no watermark
Free to try
Limited editing features if you don’t pay
3. VLC
VLC is one of the most popular freeware media players on all platforms, and it just so happens to be a great MOV to MP4 converter on Mac as well. To use it, follow these steps:
If your browser asks you to confirm the download, click Allow.
Double-click the VLC file in your Downloads folder to open it.
Drag the VLC icon to the Applications folder shortcut.
Open VLC from your Applications folder.
Click File in the menu bar, then select Convert / Stream.
Click Openmedia, then find and select your MOV file.
Ensure MP4 is selected in the Profile section, then click Save as File.
Choose an output location, then click Save.
After importing your MOV, click Save to convert it
Pros
Cons
Open-source and free to download
Can be a little complicated for new users
Lightweight and simple to use
Plenty of video formats to choose from
Also plays almost all audio and video files
4. CloudConvert
CloudConvert is another online video converter, similar to FreeConvert. That means there’s no need to download and install anything to use it. Simply follow these steps:
Upload your MOV file, select MP4, then click Convert
Pros
Cons
Free to use
Not ideal if you prefer native, local tools
Can convert a wide range of video formats
Can choose resolution, quality, and more
Promises not to sell your data
5. Animaker
Animaker is another online tool, but it’s a little different to the others in that it offers a wide range of video editing, animation, and other creative tools.
To convert video files with Animaker, follow these steps:
If your browser asks you to confirm the download, click Allow.
Double-click the HandBrake file in your Downloads folder to open it.
Drag the HandBrake app into your Applications folder.
Run HandBrake from your Applications folder.
Find and select the MOV file you want to convert, then click Open.
Ensure MP4 is selected next to Format.
Click the green Start button at the top of the window.
Select the MP4 format, then click Start
Pros
Cons
Open-source and free to download
Can feel a little dated
Lightweight
Can be complicated for new users
Fast
Lots of formats and quality options to choose from
What is the difference between MOV and MP4 files?
MOV and MP4 are both video file formats that are encoded using the same MPEG-4 codec. However, there are some differences between them. MOV, created by Apple, tends to offer higher quality video but larger file sizes, while MP4 files are smaller but more compressed. A lot of modern devices aren’t compatible with MOV, while MP4 is widely supported.
MOV
MP4
File extension
.mov
.mp4
Formats for video encoding
MPEG-2, MPEG-4, Apple ProRes, Apple Pixlet, and more
MPEG-2, MPEG-4, Dirac, VC-1, and more
Formats for audio encoding
AAC, MP3, Apple Lossless, and more
AAC, AC-3, MP3, Apple Lossless, and more
Platform support
Predominantly macOS, iOS, and iPadOS
Almost all operating systems, including Android
Which video format is best?
Both MOV and MP4 have their advantages over one another, so choosing between the two—or deciding which is best for you—depends on how your video files are going to be used. For instance, in a professional environment, MOV is almost always preferred because of its higher video quality, but MOV files tend to take up more space.
For casual video editing on non-Apple platforms, and for sharing videos in particular, MP4 is usually the better choice. It’s not only widely supported by every platform and operating system, but it almost always means smaller file sizes that are easier to store, share, and stream. However, even MP4 files can take up a ton of space if you’re storing a lot of them.
Hence, if you need to free up some storage space on your Mac, check out MacKeeper’s Safe Cleanup feature. It scans your system to find all kinds of hidden junk that you don’t need to hold onto—such as log files, caches, and mail attachments. Plus, it allows you to delete them all in one click. You may also want to see our guides on how to compress video on Mac and how to convert HEIC to JPG on Mac. They’ll also help you free up some space on your Apple computer by reducing the size of your files.
We respect your privacy and
use cookies
for the best site experience.
Privacy Preferences Center
We use cookies along with other tools to give you the best possible experience while using the
MacKeeper website. Cookies are small text files that help the website load faster. The cookies we
use don’t contain any type of personal data meaning they never store information such as your
location, email address, or IP address.
Help us improve how you interact with our website by accepting the use of cookies. You can change
your privacy settings whenever you like.
Manage consent
All cookies
These cookies are strictly necessary for enabling basic website functionality (including page
navigation, form submission, language detection, post commenting), downloading and purchasing
software. The website might malfunction without these cookies.