In this article you will find the following:
You might notice that your Mac has several HEIC files when transferring photos from your iPhone. Besides often being hard to open, these files are also not particularly useful when sharing your images elsewhere. Fortunately, it’s very easy to convert HEIC to JPG on Mac.
In addition to being simple, it’s completely free to turn HEIC to JPG on Mac devices. In fact, you’ll find many of the features within macOS and not require an extra download. Today, we’ll show you how to switch HEIC to JPG on Mac. You’ll also learn how to stop your pictures from saving as HEIC files in the first place.
Before we start:
Once you’ve converted your files, you may find duplicates that can eat up your memory. Deleting these on your own is time-consuming, but MacKeeper’s Duplicates Finder will help you keep on top of the problem. Plus, it’s very easy to use—see it yourself below:
- Download MacKeeper.
- Select Duplicates Finder from MacKeeper’s menu.
- Click Start Scan.
- Select any files you want to remove.
- Click Remove Selected.
What is a HEIC?
HEIC is an image format built to be more efficient than existing file types. It stands for High-Efficiency Image Container, and it’s a variation of HEIF (High-Efficiency Image File Format). Apple released HEIC file formats with iOS 9 in 2015.
HEIC files are, on average, half the size of JPGs and offer better quality. HEIF and HEIC are also found in macOS versions from High Sierra (OS X 10.13) right up to Sonoma 14.
When you have to change HEIC to JPG on Mac
HEIC files are helpful to transfer your content to different Apple devices, and they’ll consume less space than ordinary JPG photos would. However, you should change from HEIC to JPG whenever you need to use your images outside the Apple ecosystem. For example, you should use JPG if you want to share your images on Facebook, Instagram, or any other social media network.
It’s also a worthwhile idea to make HEIC to JPG on Mac when you need to share your pictures with people who don’t have Apple devices. HEIC doesn’t really work across Android and Windows, so others might encounter difficulties accessing what you send them if you don’t convert to JPG.
HEIC is also incompatible with iOS devices running on software below iOS 9. Therefore, you need to convert to JPG if sending your pictures to an older iPhone.
Note from our experts:
To save yourself from having too many pointless files on your Mac, learn how to delete duplicate photos on Mac. You can use Finder, the Photos app, and many other methods.
How to convert HEIC to JPG in Preview on Mac
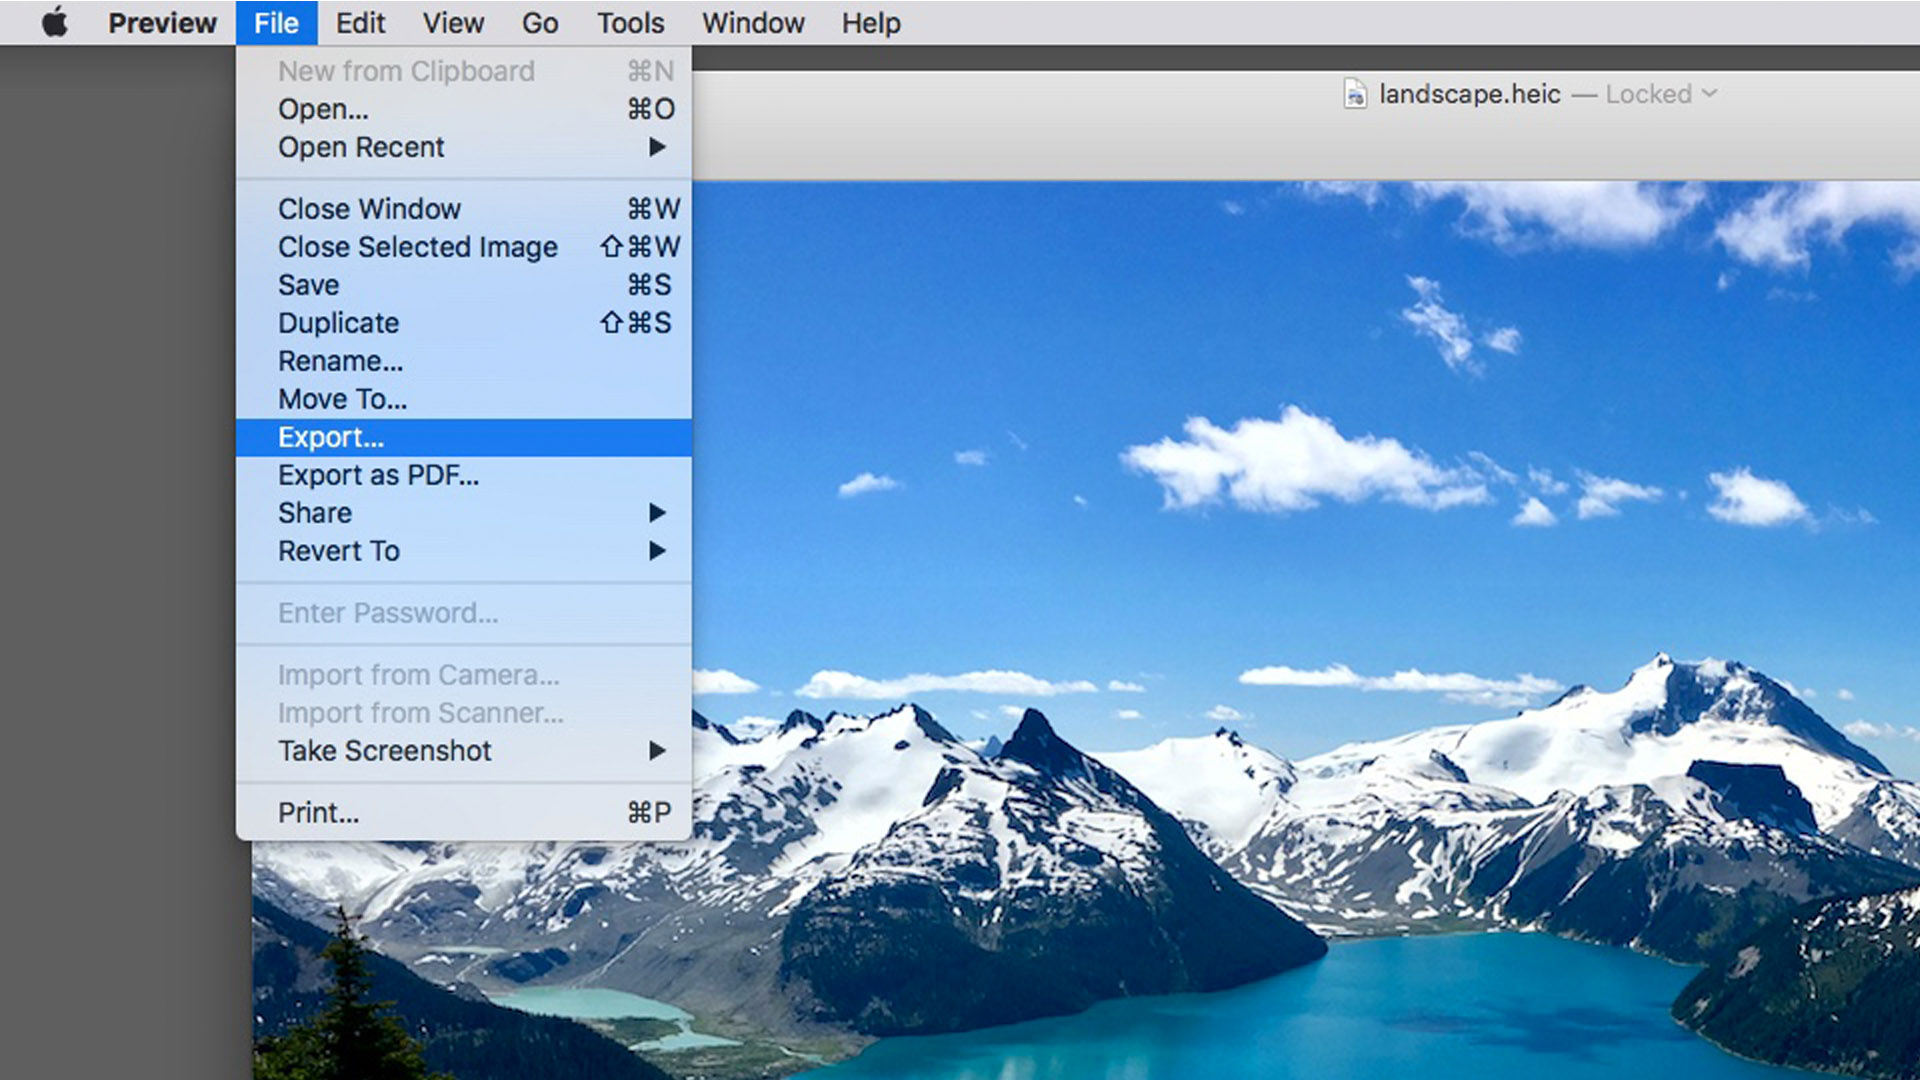
The easiest way to turn a HEIC file into a JPG file on a Mac is to use the built-in Preview app. It’s completely free to use and available with new and old versions of macOS. Here’s how:
- Open your HEIC file in Preview.
- In the top menu, select File > Export.
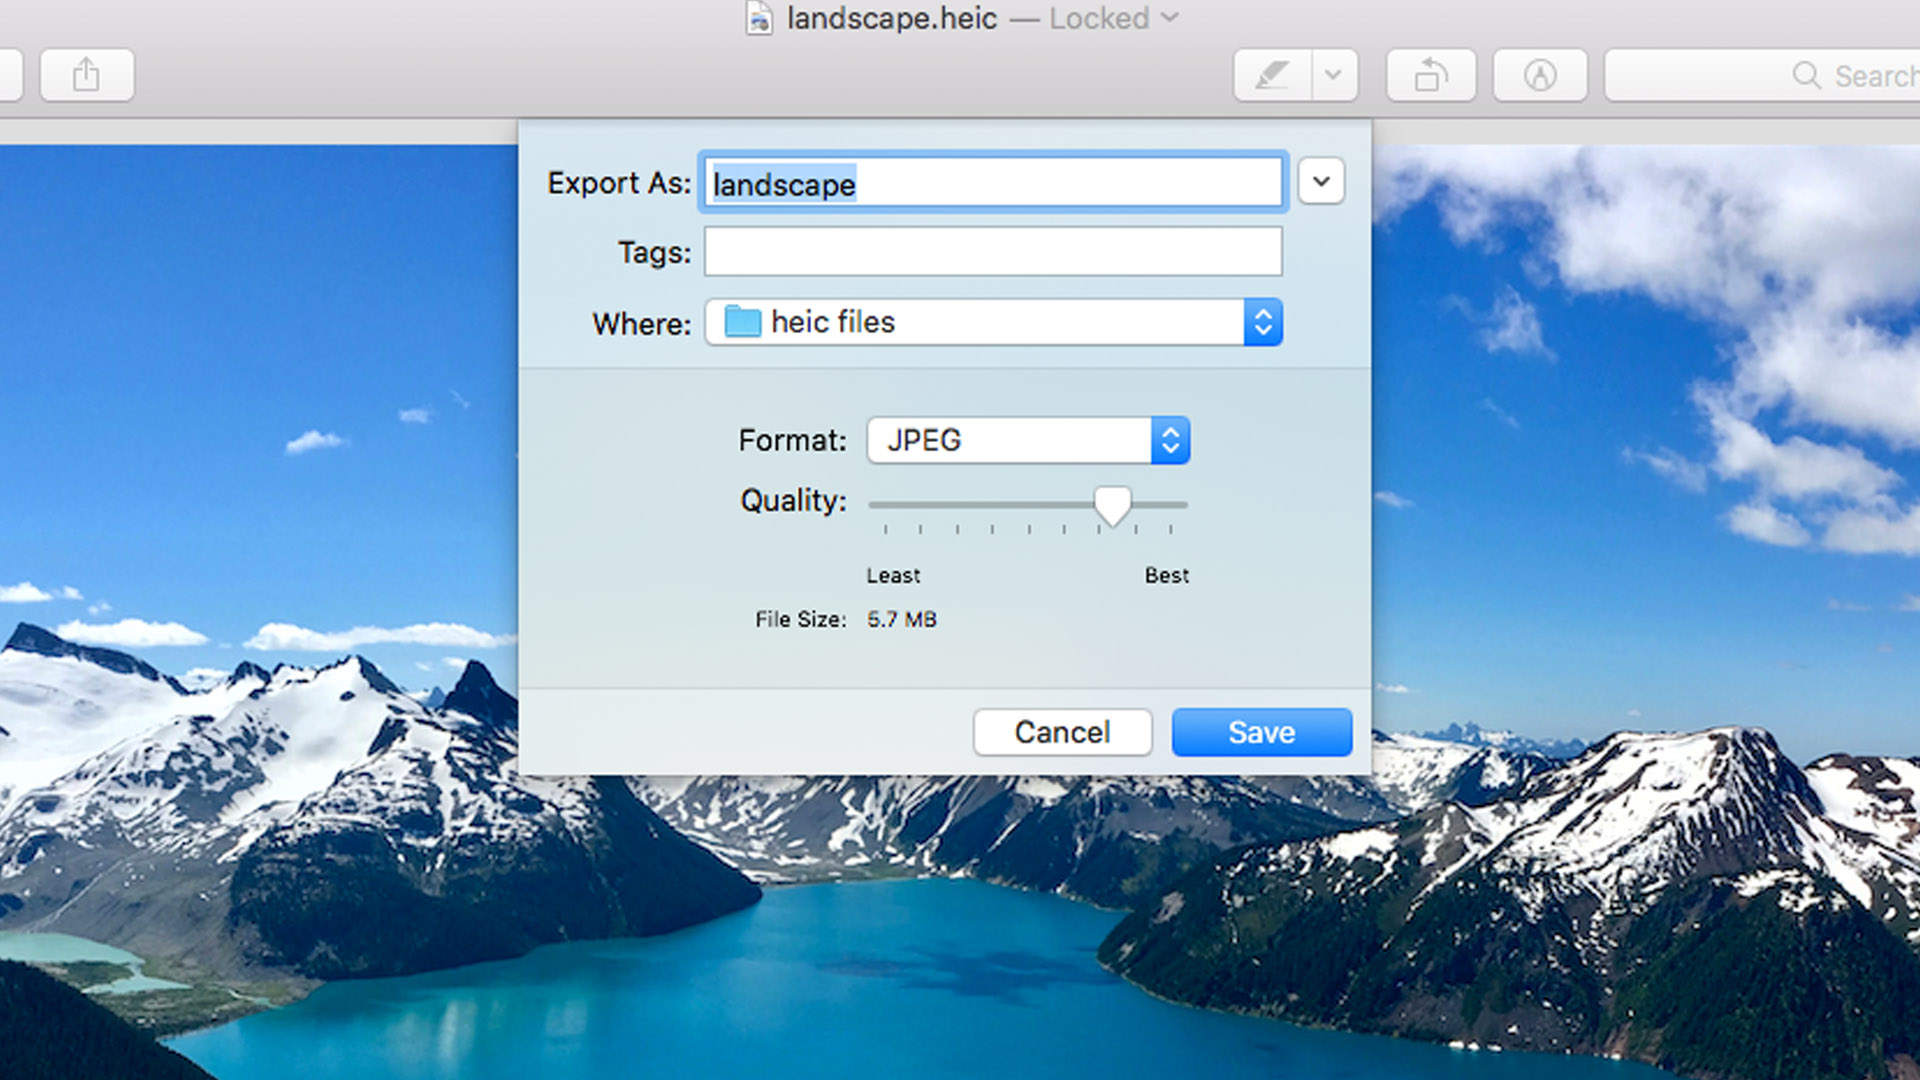
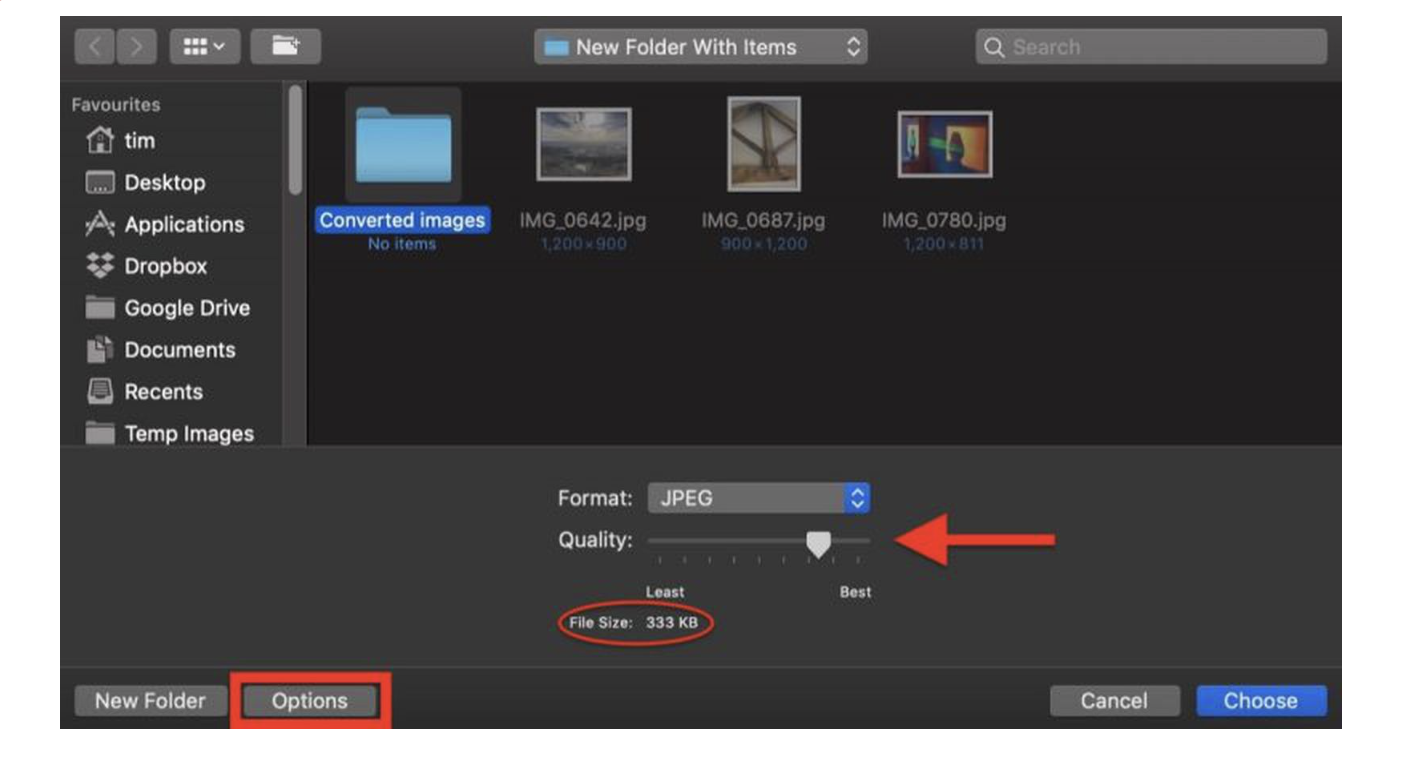
- From the Format dropdown menu, choose JPEG. Use the Quality slider to set the compression level. The higher the quality, the greater the file size.
- Rename your new file if you want to, and set a file location using the Where dropdown menu. Click Save. A new JPG version of your photo has now been created.
How to automatically switch HEIC to JPG on Mac
While you can manually transfer HEIC to JPG on Mac, you should also think about using the more automatic versions. You have two main options, and both will save you a lot of time. Below are both of these methods in more detail:
1. Photos
Apple’s Photos app enables you to manage all your pictures in one place. It can also be used to convert HEIC files to JPGs. Here’s what to do:
- Start by importing your HEIC images into Photos as usual. You can also drag images into the Photos app.
- Select the images you want to convert, and simply click and drag them into any Finder window. They’ll automatically be converted to JPGs. You can do this with single images, or you can convert multiple HEIC files to JPG at once.
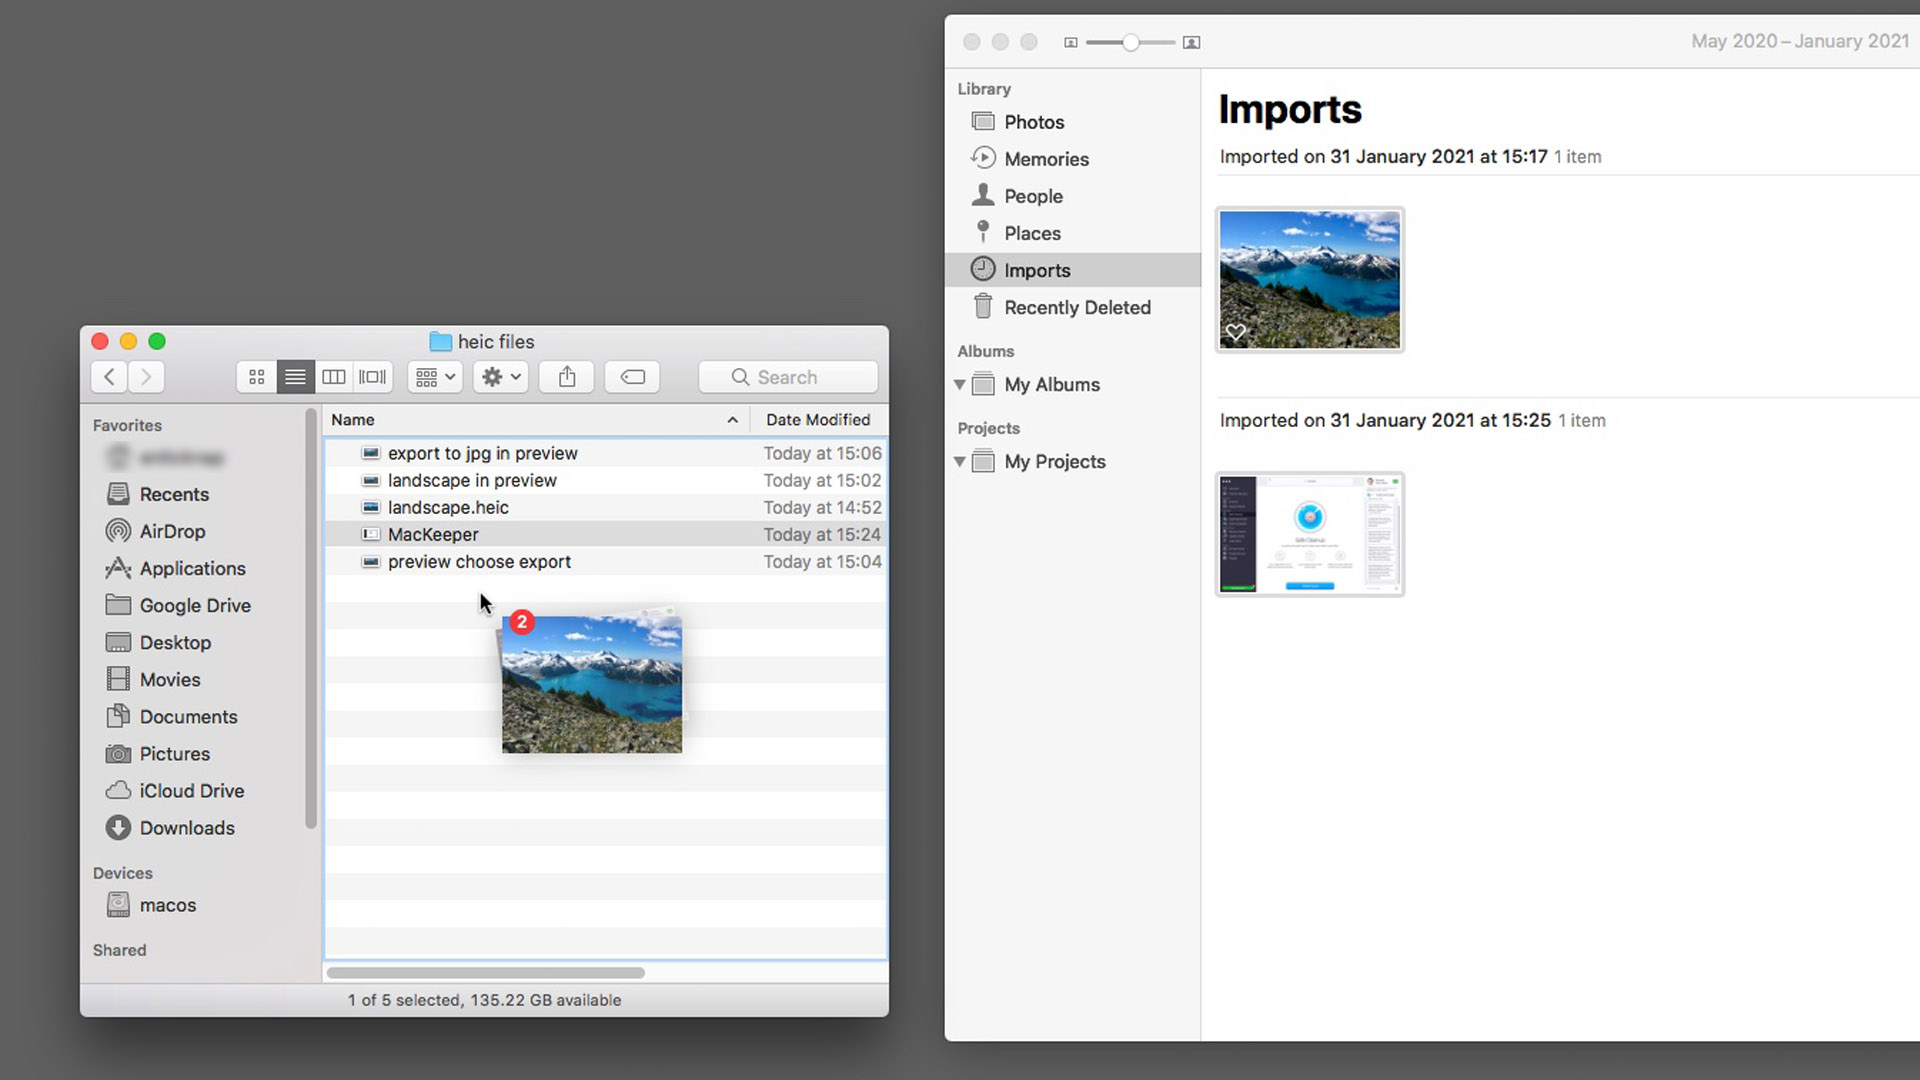
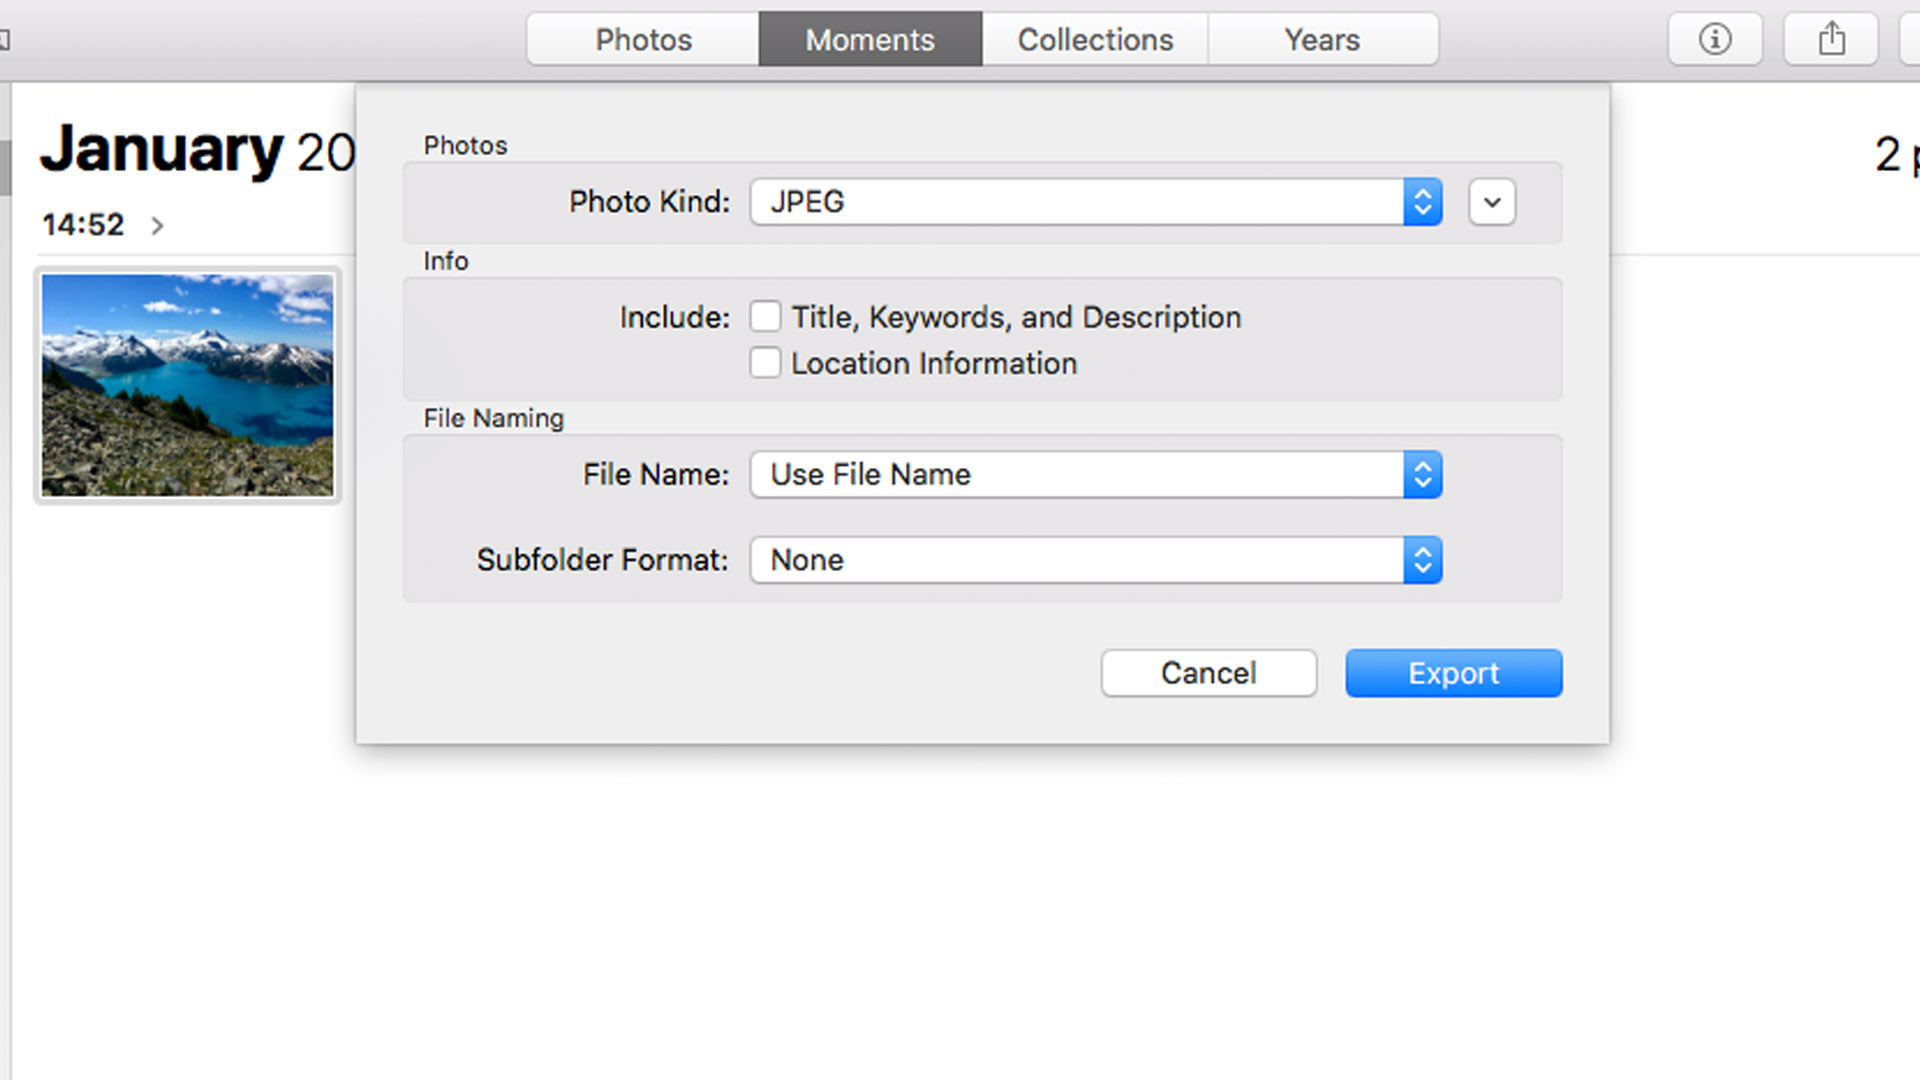
If you want more options, select your images as before, but this time from the menu, choose File > Export > Export Photos. Now, you can define other formats and your naming convention. You can also define your subfolder format.
2. Automator
Automator is a built-in macOS app that automates actions, so you don’t have to keep doing them manually. This handy productivity tool can also be used to convert HEIC files to JPG format. Here’s how:
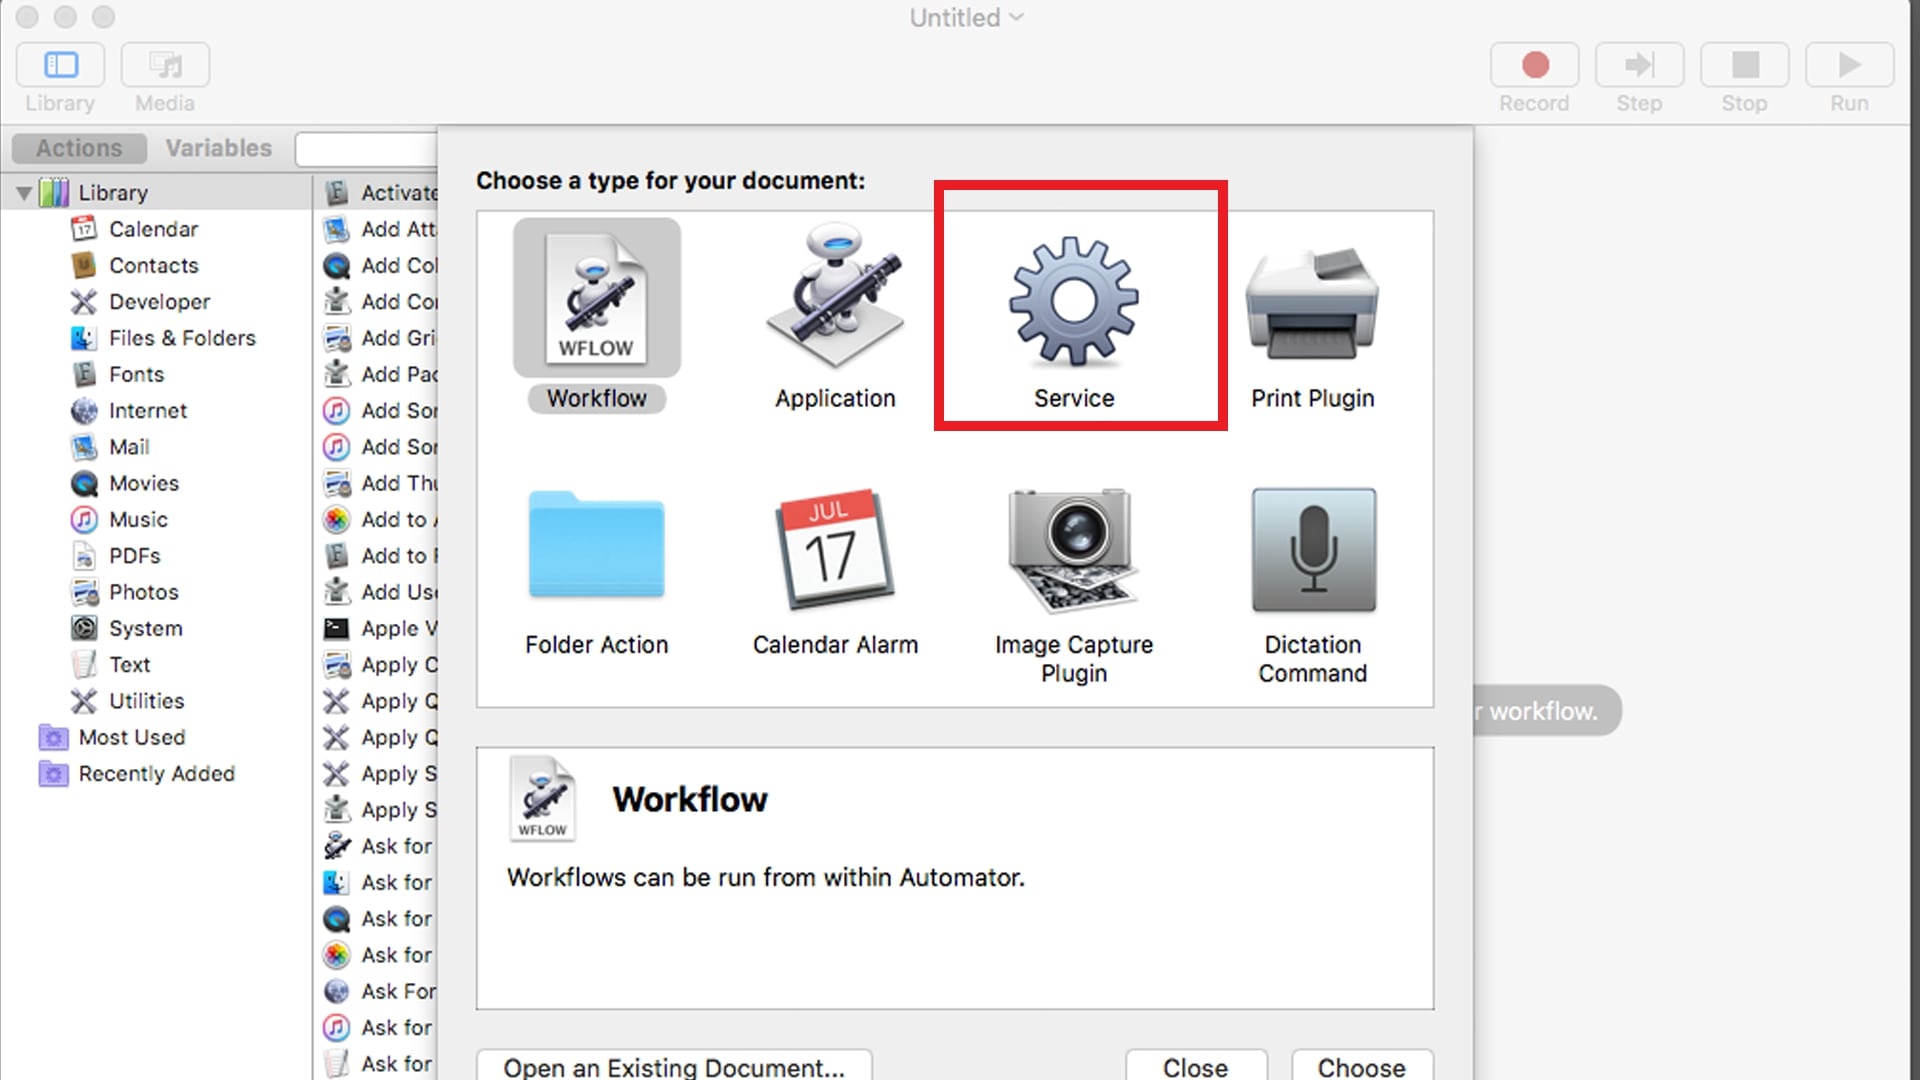
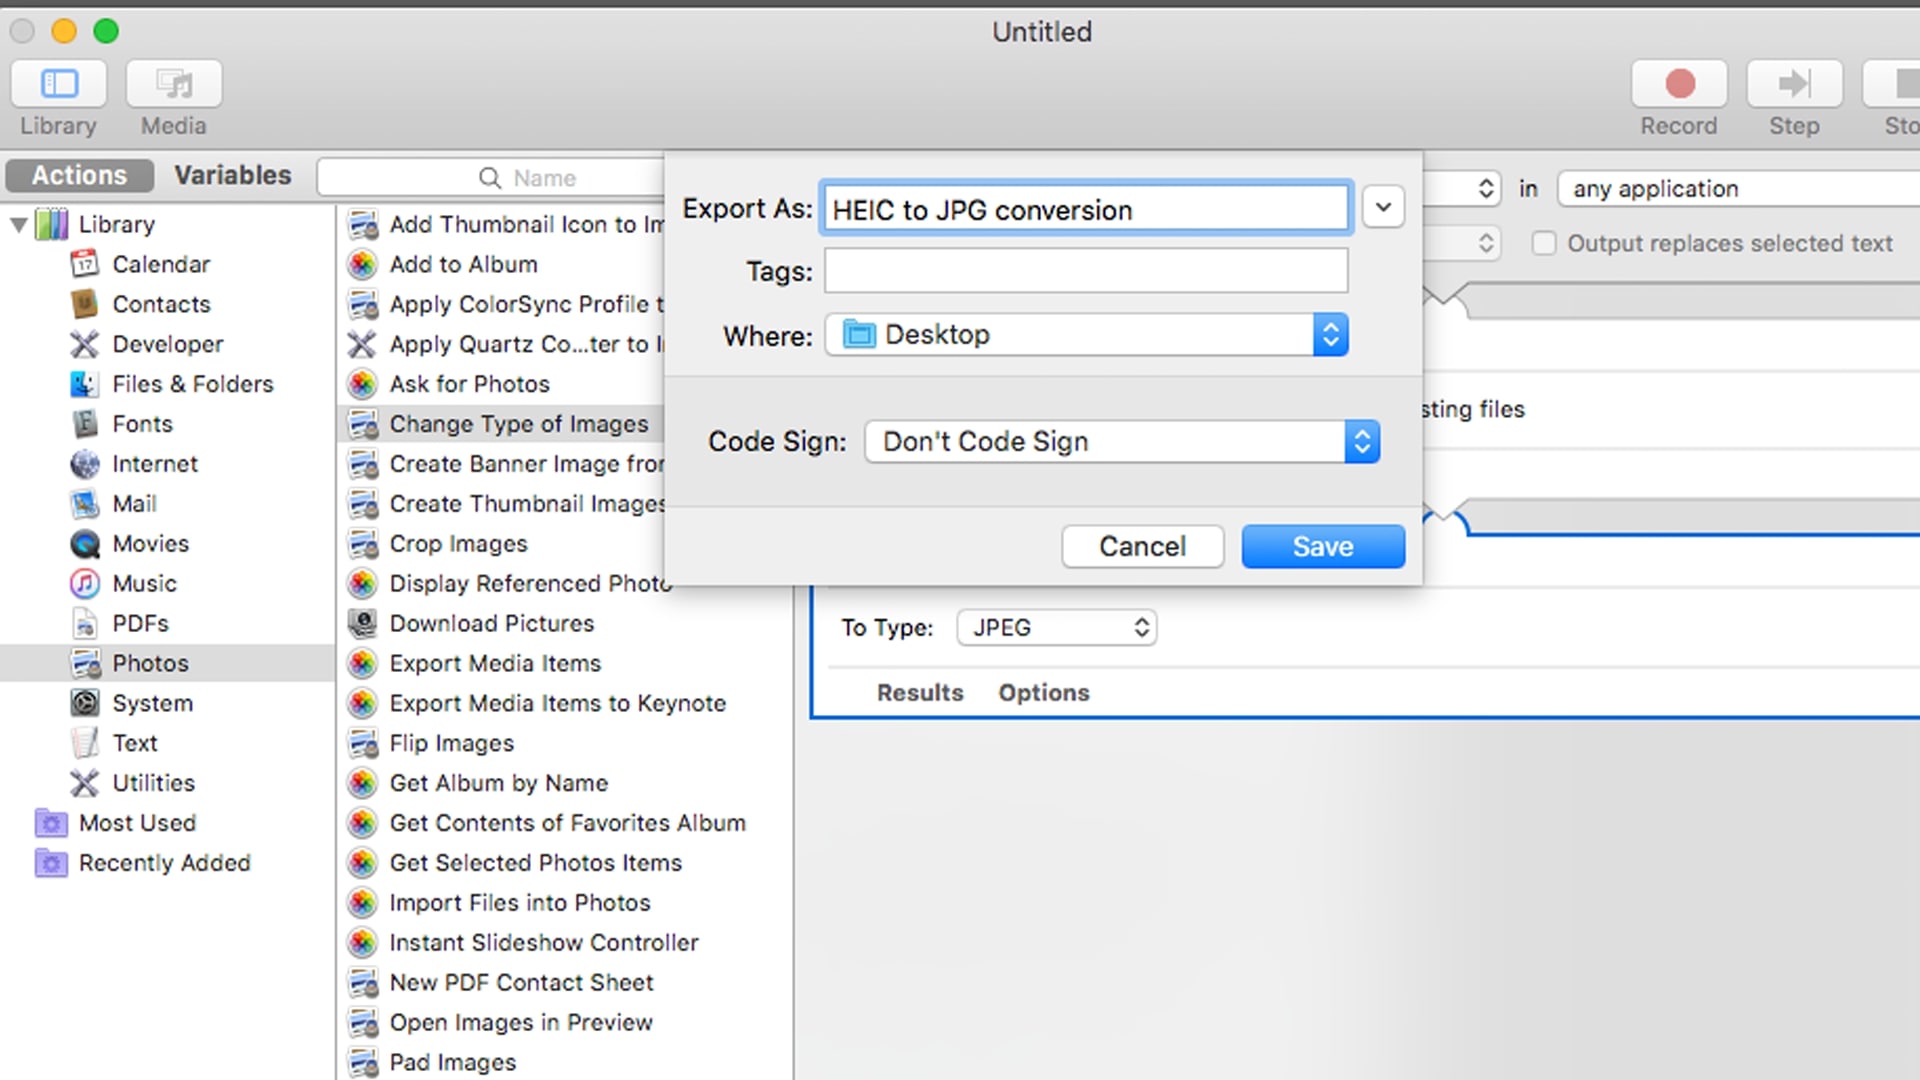
- To use Automator, start by opening it from the Applications folder in Finder. Depending on which version of macOS you’re running, you now need to select either Quick Action or Service, which is the cog icon. Click Choose.
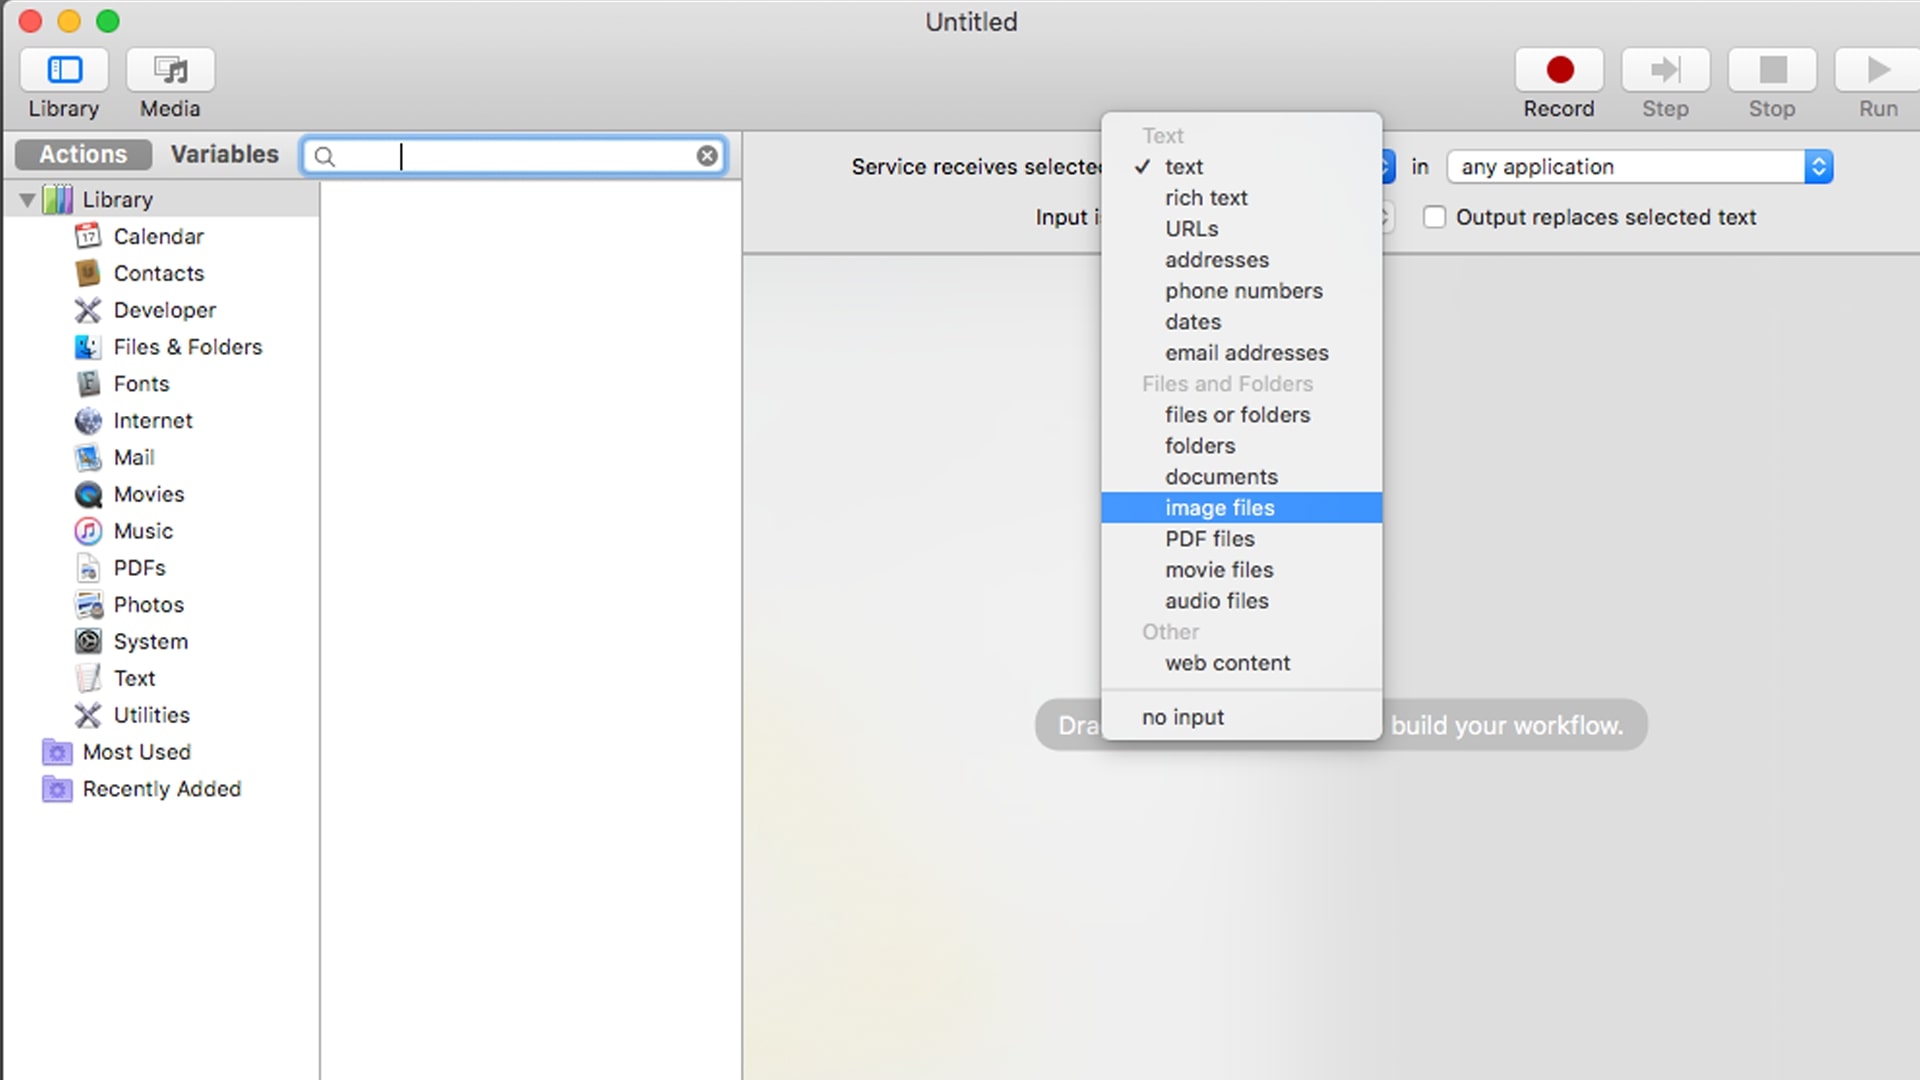
- On the right-hand side, you’ll see some dropdown menus. Find the one that says Workflow receives current or Service receives selected. Choose Image.
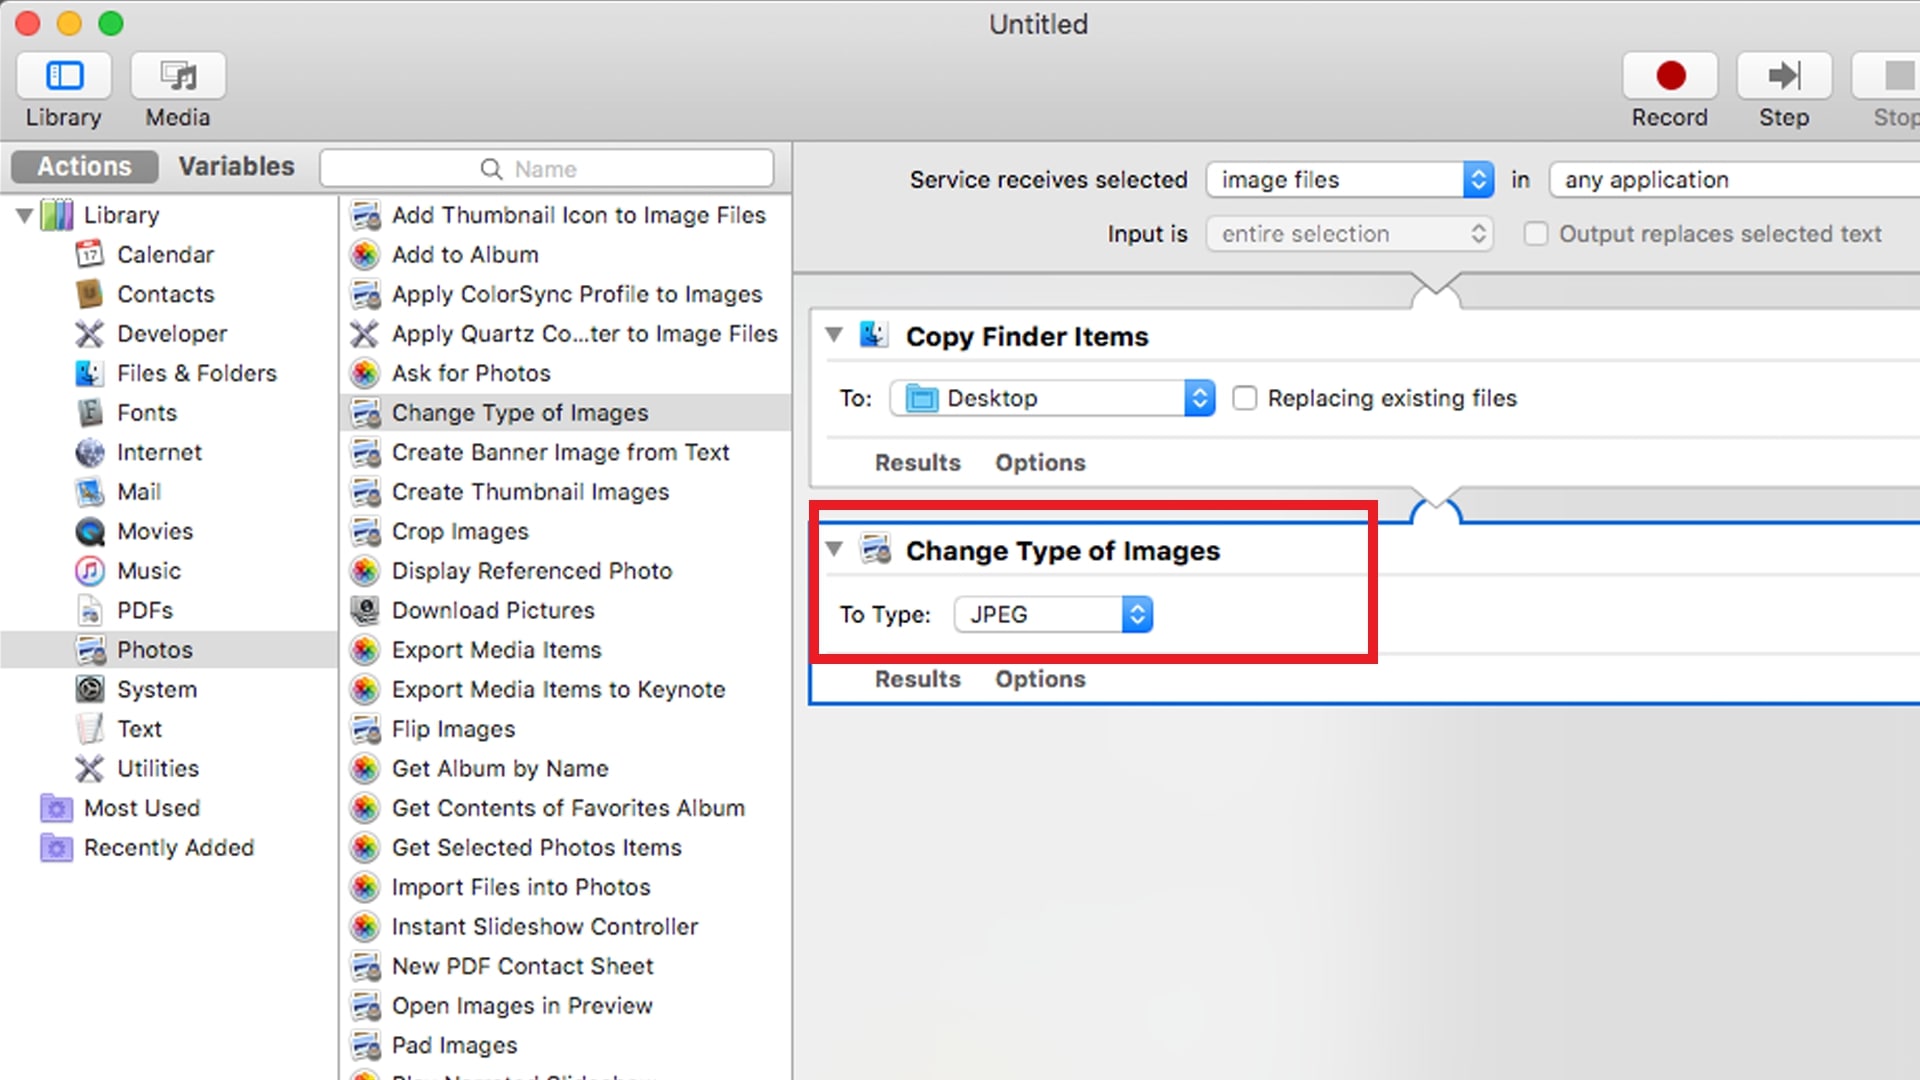
- On the left side of Automator from the Actions list, select Library > Photos and drag Change Type of Images into the gray area on the right. You might get a message about whether you want your HEIC files to be replaced by your JPG or kept alongside them. Make a choice to proceed.
- If it isn’t done already, set the new image format as JPG under Change Type of Images.
- Now it’s time to export your script. Go to File > Export. Give your script a name, such as ‘HEIC to JPG conversion,’ and click Save. For the sake of convenience, we suggest saving it to your desktop.
- Find your HEIC to JPG script and double-click it. You’ll be asked whether you want to install it. Click Install and then Done.
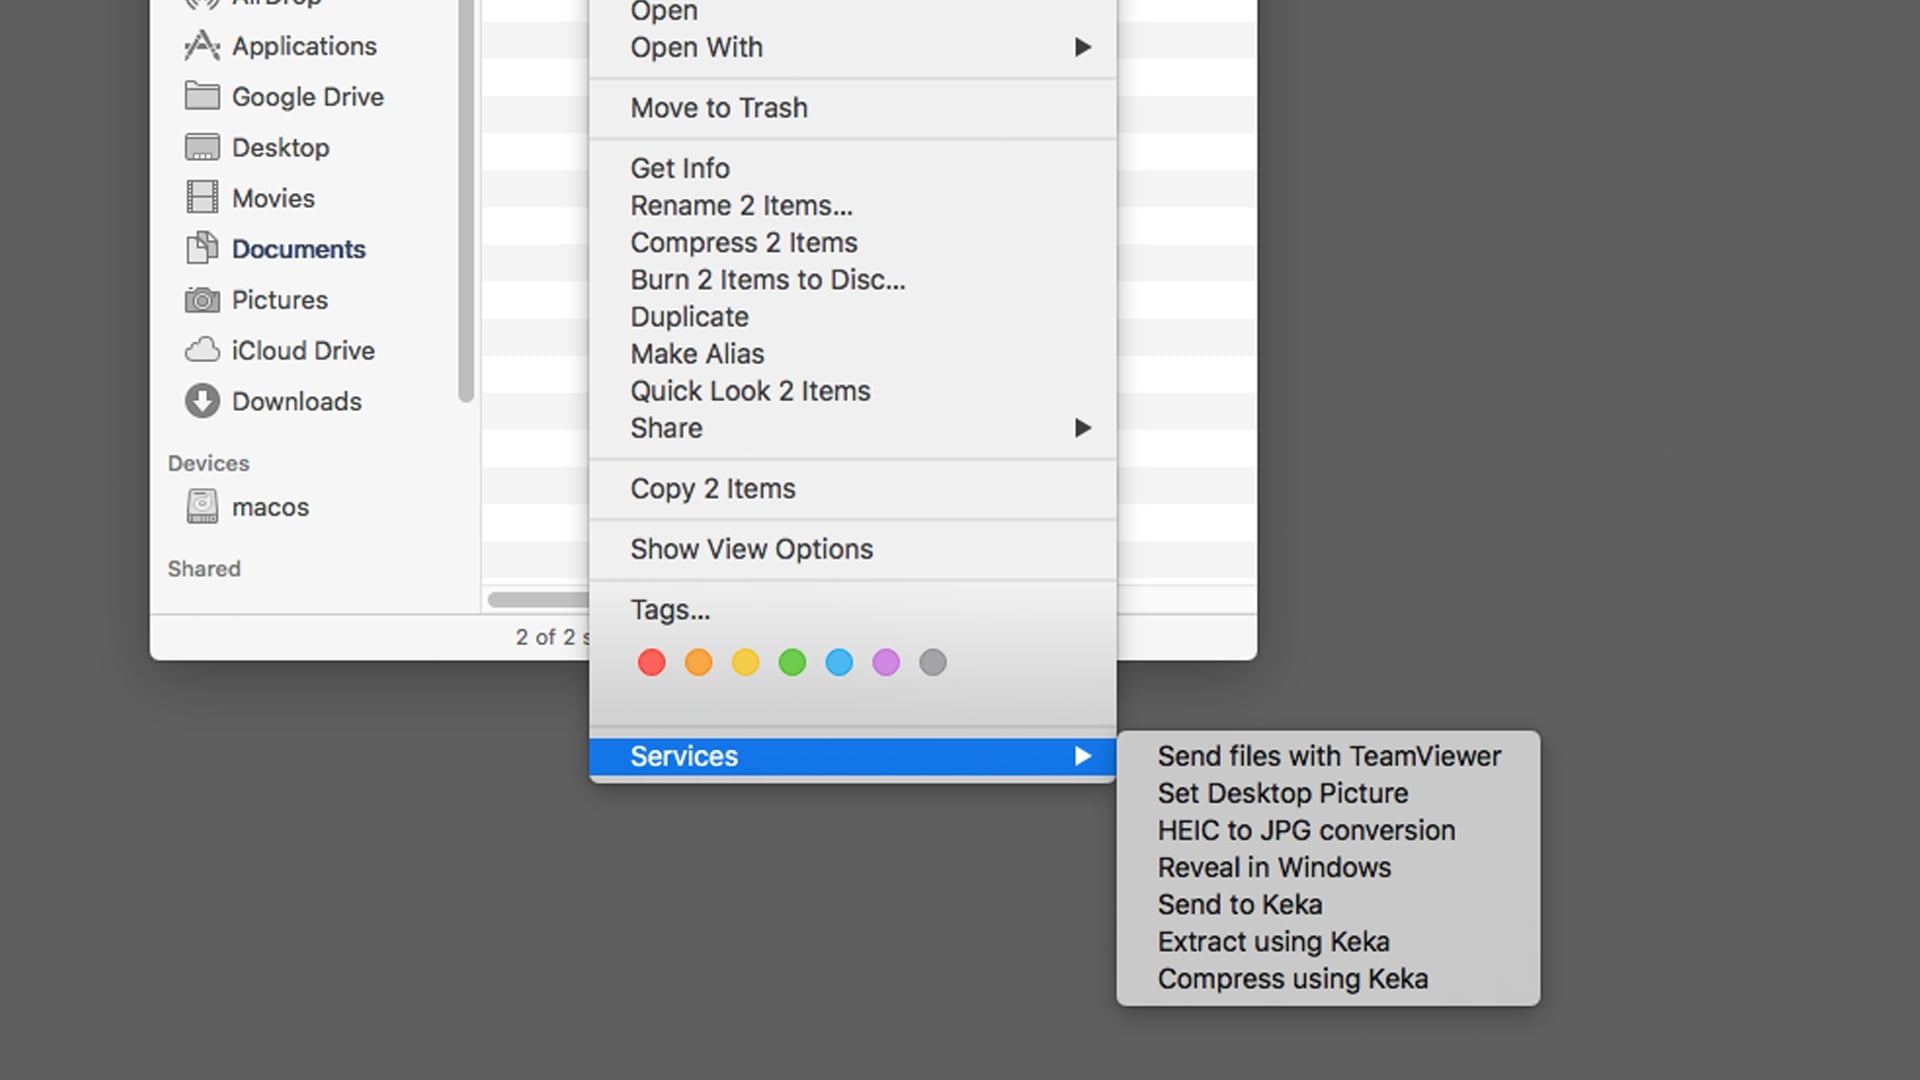
- From now on, you can convert HEIC images to JPG right from Finder. Select some HEIC files, right-click them, and from the context menu, choose Quick Actions or Services. You should see your HEIC conversion script listed.
- Select it, and it’ll automatically run through the steps you defined and convert your images. You can do this with single images, or you can even batch-convert HEIC to JPG if you want.
Hint from our team:
In addition to converting HEIC files to JPG on your Mac, you can also change all kinds of audio files. For example, you can convert M4A to MP3 on Mac. Similarly, you can change video to audio—such as being able to convert MOV to MP4.
Use third-party apps to make HEIC to JPG on old macOS versions
If you have an older version of macOS, you should still have no problems saving HEIC as JPG on Mac. But unlike new users, you might have to rely on third-party apps to convert your files.
A simple “HEIC to JPG converter” search in Google will reveal plenty of websites that can do the job for you. You can also find HEIC converters in the App Store that will translate these files. If your Mac runs High Sierra or any newer version, these third-party tools aren’t necessary, but for older Macs, they might be the best way to turn HEIC files into JPGs.
A word of caution on using third-party tools
Be careful with online HEIC converters. They’re often packed with ads, and some may even host malware (it’s a good idea to run regular virus checks on your Mac anyway).
Furthermore, uploading your photos to these converters means you’re probably sharing them with whoever owns these sites. Therefore, you think twice before using any of these tools.
How to batch convert HEIC to JPG on Mac
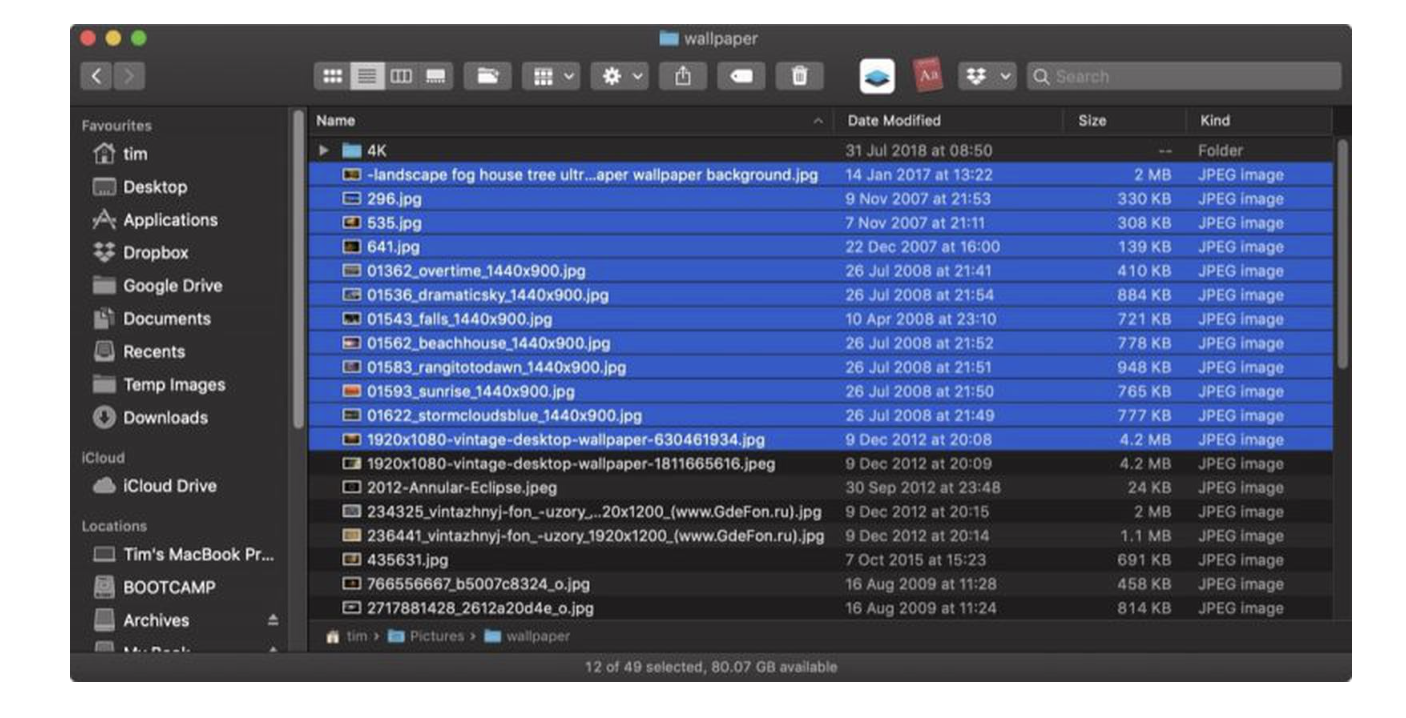
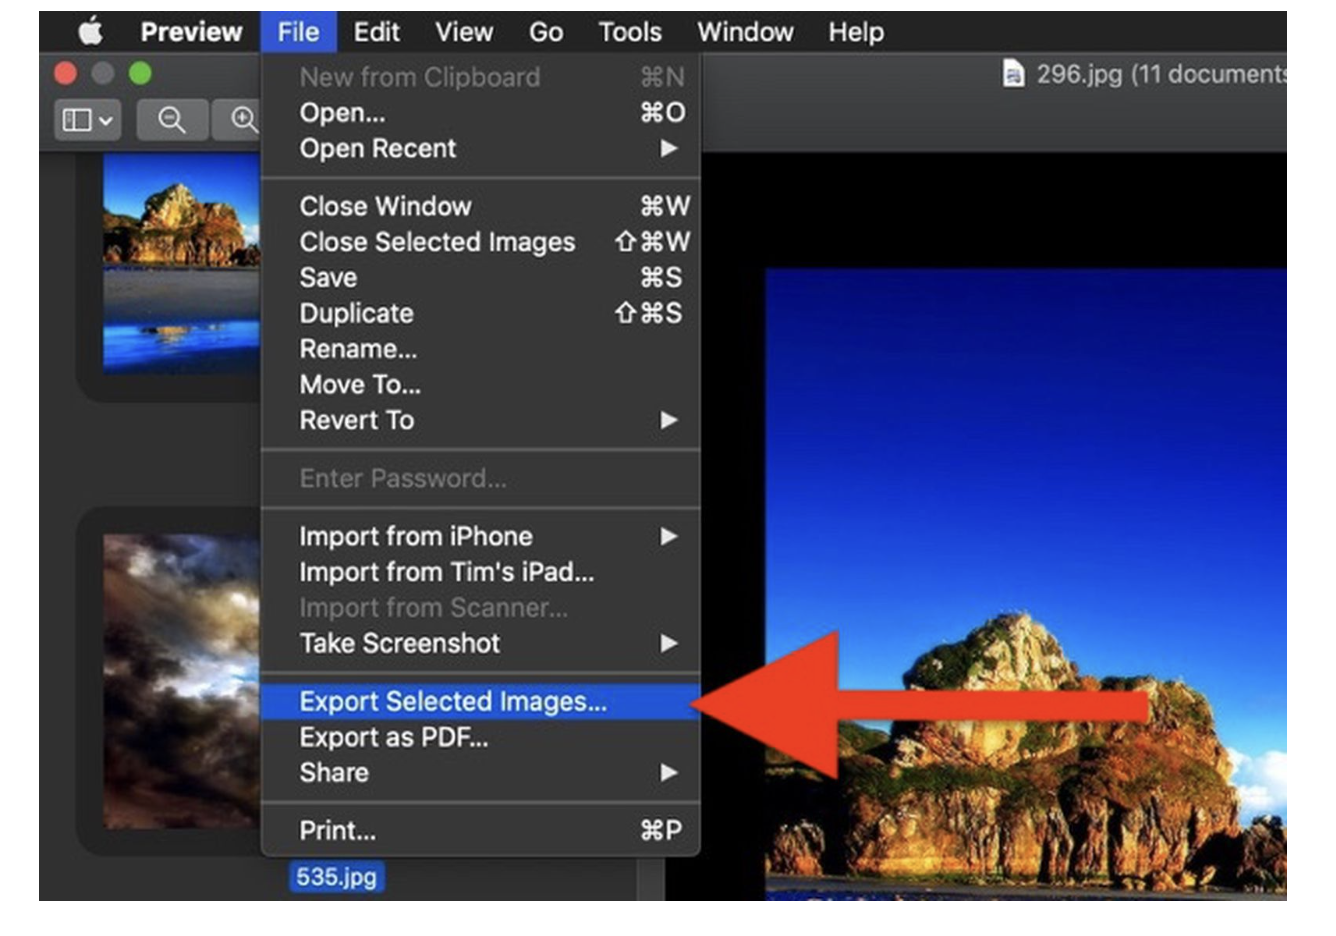
Manually converting every picture from HEIC to JPG is time-consuming, but thankfully, you can actually edit your photos in bulk. The Finder app is the easiest place to do this, and here’s what you need to do:
- Highlight all the HEIC files that you want to convert into JPG after opening Finder.
- Press control + click and select Open With > Preview.
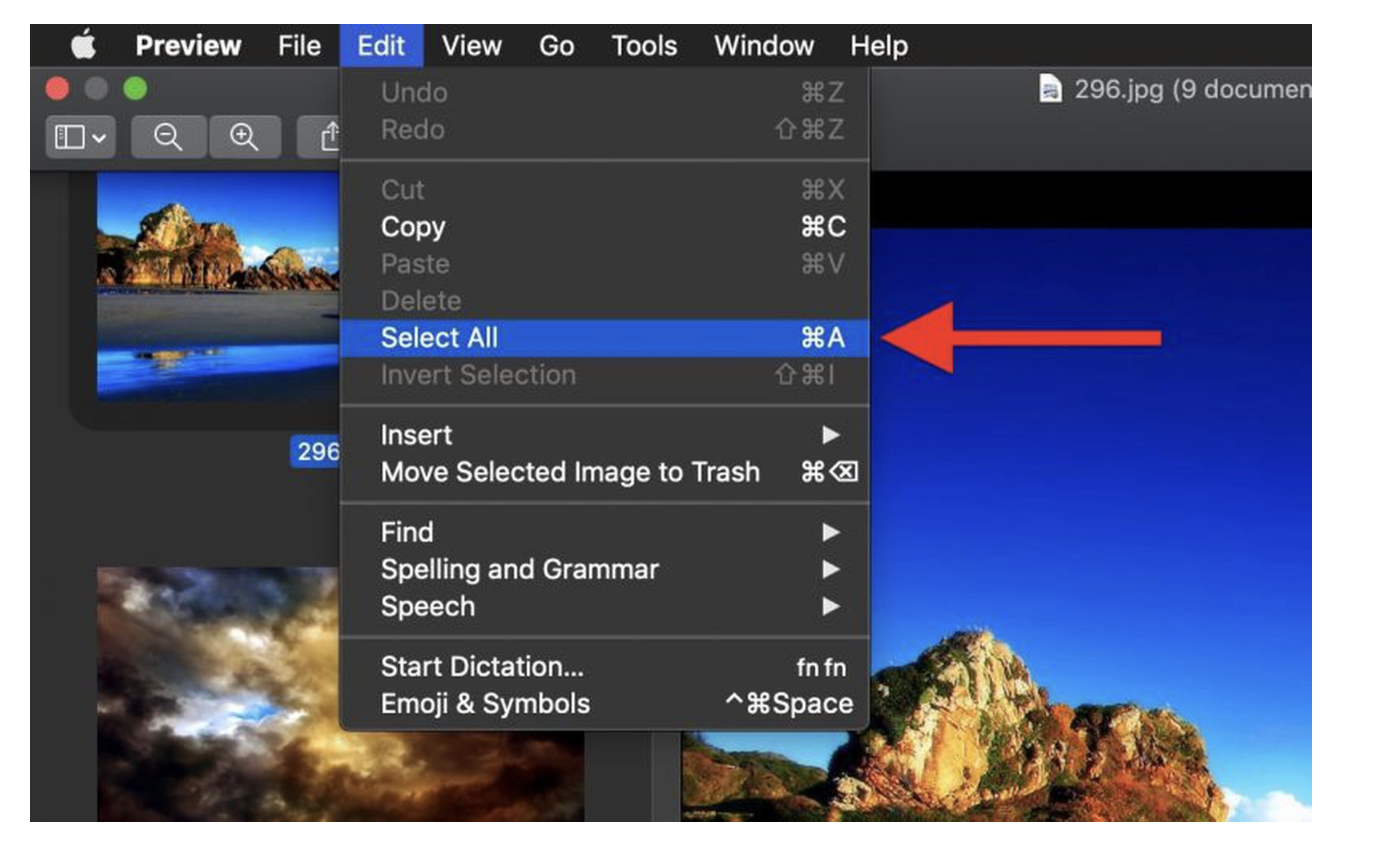
- In Preview, choose Edit > Select All.
- Pick File > Export Selected Images.
- Select Options and save your images as JPEG. Change the quality slider and click on Choose when you’re ready to export.
- Wait for your Mac to export your HEIC files as JPG.
How to save photos in JPG without converting
Did you know that you can automatically save your iPhone pictures as JPG without needing to convert them? All you have to do is go to your Settings app. Remember, however, that JPGs will consume more space on your phone (and your Mac when you transport them).
To save photos in JPG without converting from HEIC:
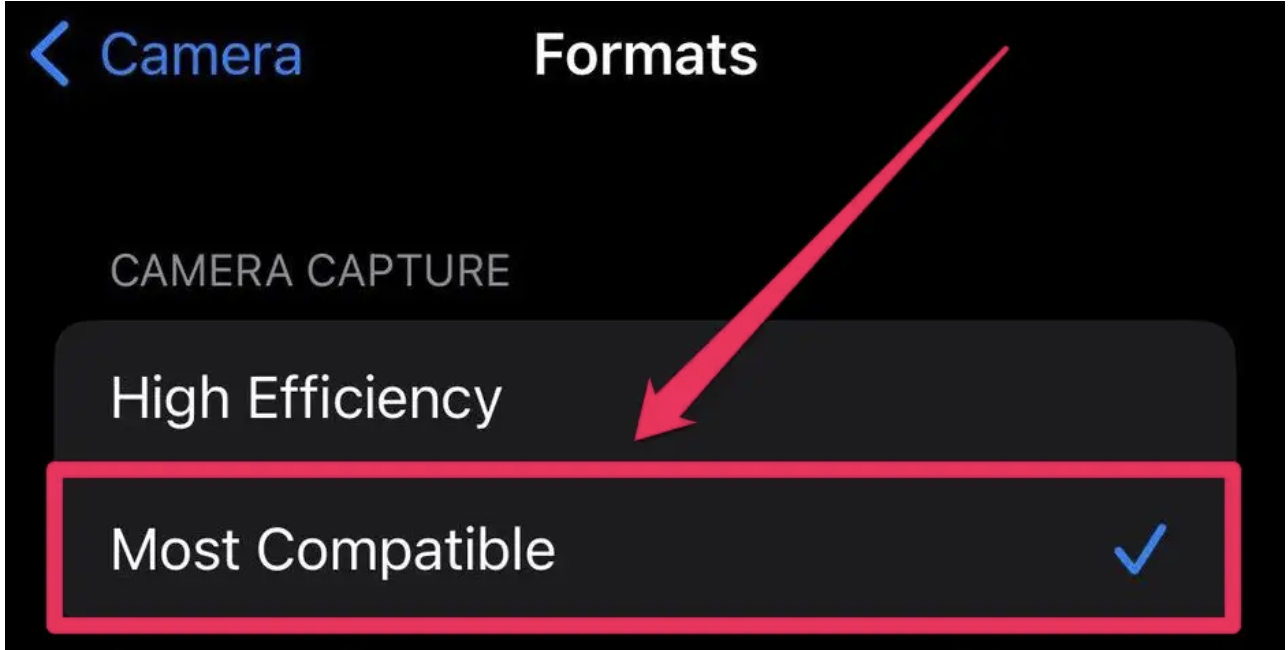
- Go to Settings > Camera Formats.
- Change to Most Compatible.
The easiest ways to convert HEIC to JPG on Mac
In most cases, HEIC offers too many advantages to ignore. Photos take up less space but look better. However, you miss out on compatibility with older devices and many websites.
Thankfully, converting HEIC to JPG is fairly easy whether you’re using a Mac, an iPhone, or both. In most cases, you won’t even notice there’s been a change.
So yes, you should use HEIC instead of JPG. And if you ever need to delete duplicate files that arise from this, use MacKeeper’s Duplicate Finder to save time.


