In this article you will find the following:
Finder was introduced with the first-ever Mac in January 1984, and it’s vital for deleting apps, clearing caches, launching apps, and many other functions. Considering how crucial it’s for ensuring optimal Mac performance, it’s a huge problem if Finder won’t open.
You may experience problems with Finder not working on Mac for several reasons. For example, junk files could cause your device to run less efficiently and subsequently result in Finder not performing at its highest level. The good news, however, is that you can solve Finder not launching and similar problems in multiple ways.
Keep reading to learn how to fix the Mac Finder unresponsive issue with us. We’ll share several methods, and you’ll hopefully solve the problem by the end of this article.
Before we start
Junk files can easily build up on your Mac and slow it down. In such cases, you could experience problems with Finder not responding. Running MacKeeper’s Safe Cleanup feature could help to search for and remove all unneeded data from your Mac.
Here’s how to turn it into practice:
- Download MacKeeper.
- In MacKeeper, select Cleaning > Safe Cleanup from the left-hand menu.
- Click the Start Scan button.
- When the scan is finished, look through the results and select what you want to delete.
- Click Clean Junk Files.
Why is Finder not working on your Mac
It’s common for Finder to glitch after a macOS update. However, other issues—like not having enough space on your Mac and system errors—are also potential contributors. You may similarly encounter Finder not launching or responding because of external devices.
Below are the reasons why Finder isn’t working on your Mac that we’ll explore further:
- Not enough space on your Mac
- Your Mac is running out of memory
- Temporary crashes in Finder
- System errors
- Conflicts with third-party apps
- Problematic external devices
1. Not enough space on your Mac
If you don’t regularly maintain the files and folders on your Mac, you’ll inevitably run out of space at some point. Besides the annoyance of not being able to download new programs and files, your device has to perform more tasks with limited capacity. This, as a result, can have a direct knock-on effect on native apps like Finder.
2. Your Mac is running out of memory
Maybe your Mac memory isn’t full, but it’s not far away. Unfortunately, your device still needs to use more energy to operate normally. Because of this, you may still notice that the Finder frozen on Mac issue arises multiple times.
3. Temporary crashes in Finder
Finder may temporarily crash if you ask the app to do too many things at once, such as trying to delete apps and back up your iPhone or iPad simultaneously. You can avoid this problem by only focusing on one thing at a time.
4. System errors
You might see several forms of macOS system errors, such as applications quitting unexpectedly and unsupported app types. Many system malfunctions that impact Finder relate to not having enough space on your device or apps not performing as they should.
5. Conflicts with third-party apps
You sometimes have no choice but to download third-party apps for your Mac. Nonetheless, it’s important that a) you download them from reputable sources (i.e. the company website) and b) regularly update them. If your apps are no longer up to date, you may encounter problems that cause Finder to no longer work as it should. Conflicts with third-party apps could also result in the MacBook keeps freezing issue.
6. Problematic external devices
External hard drives might cause problems with Finder if you haven’t formatted them correctly. You may also encounter issues if there’s an incompatibility between your hard drive’s performance capabilities and what you’re able to do with your Mac.
What to do when Finder isn’t responding on Mac
You can do several things if you’re dealing with the Mac Finder unresponsive problem—from restarting the app to more complex solutions—such as using Activity Finder.
Here’s a list of tricks to solve the Finder not responding problem:
- Restart Finder
- Terminate the Finder process in Activity Monitor
- Restart your Mac
- Sign out and sign back into your Mac
- Check and free up storage space
- Close unneeded programs
- Prevent third-party apps from running in the background
- Remove corrupted Finder preferences file
- Unplug recently-connected peripherals
- Disable iCloud Drive Sync
- Restart Mac in Safe Mode
- Make sure SPotlight is Indexed
- Wait while Finder re-indexes your files
- Update or downgrade macOS
- Reset Mac to factory settings
1. Restart Finder
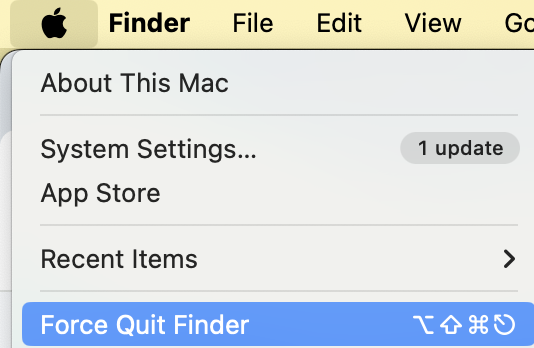
If Finder doesn’t open when you try to launch it, you understandably get frustrated. You can try a fairly easy move to fix it—force quitting. Here’s how:
- Click on the Finder app.
- Go to the Apple logo and press option + shift on your keyboard.
- Tap Force Quit Finder.
- Wait for the app to close and reopen.

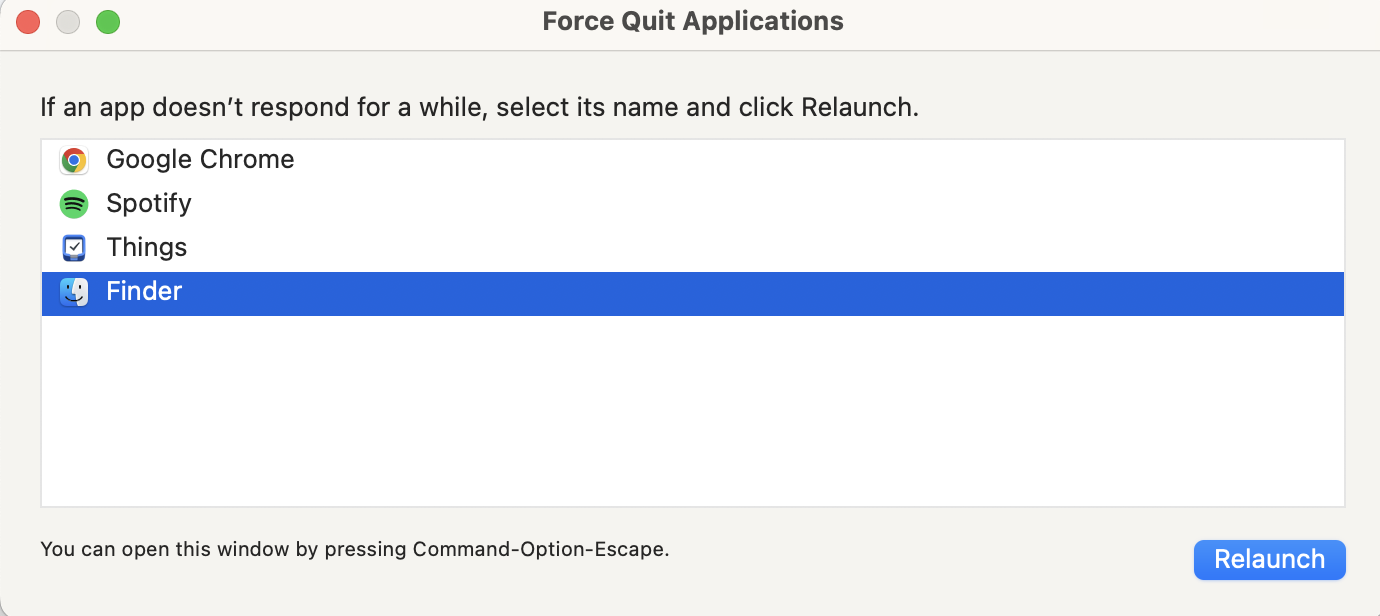
If you can’t use Finder, use these steps instead:
- Go to Apple logo > Force Quit (DON’T press option + shift).
- Highlight Finder.
- Select Relaunch in the window’s bottom right-hand corner.
2. Terminate the Finder process in Activity Monitor
If restarting Finder didn’t work, you can try terminating the process via Activity Monitor. Follow these steps:
- Tap the magnifying glass icon in your Mac toolbar to open Spotlight.
- Type Activity Monitor into the search bar and select the app when it appears in the results.
- In the search bar in the top right corner of the window, type in Finder.
- Select all the processes with that name (Command + A) and quit them by clicking on the cross symbol in the top left corner.


Note from our experts:
If you experience problems with Preview not working on Mac, you can also try using Activity Monitor to terminate the process.
3. Restart your Mac
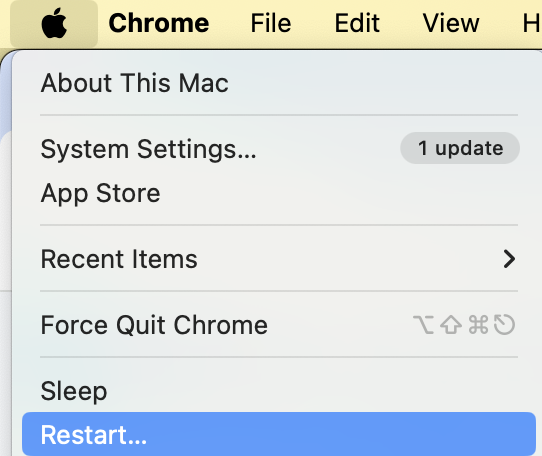
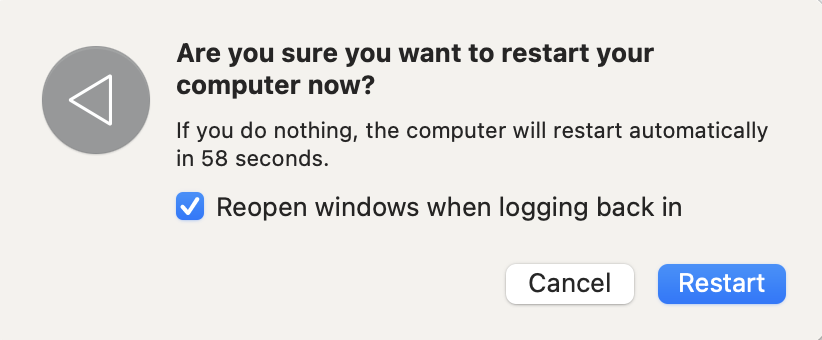
If you repeatedly encounter the Finder not launching issue on your device, restarting your Mac is a good idea. To do that:
- Go to Apple logo > Restart.
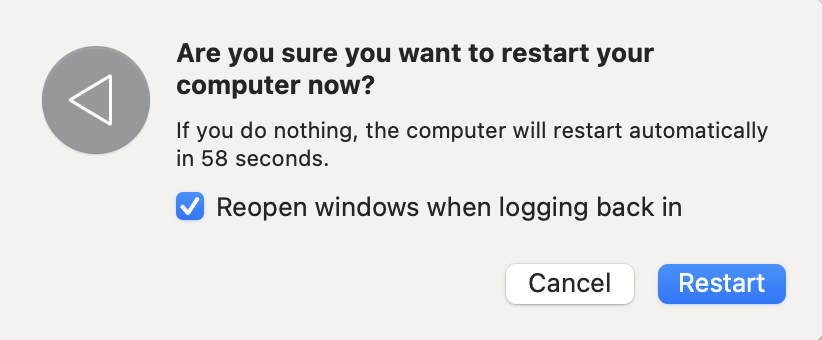
- Select Restart when you see the pop-up window.
- Wait for your Mac to turn off and restart before entering your Mac password and trying to use Finder again as normal.
If you encounter problems where your Mac keeps shutting down, restarting your device can also help you solve that particular issue.
4. Sign out and sign back into your Mac
Signing out and back into your Mac can help you remove software-related glitches that may stop your device from performing at an optimal level. Before signing out, save anything you’re working on, as this process will close all the apps currently open on your computer.
To sign out and back into your Mac:
- Go to Apple logo > Log Out [Your Name].
- Select Log Out when the pop-up window shows up on your screen.
- Wait for your Mac to log out. Then, sign back into your account.
![Sign out of your Mac by going to Apple logo > Log Out [Your Name]. Note that this will close all of your apps, so save any work you're currently doing beforehand. Sign out of your Mac by going to Apple logo > Log Out [Your Name]. Note that this will close all of your apps, so save any work you're currently doing beforehand.](https://static-cdn.mackeeper.com/mk-blog-upload/images/new_8c2d729d4e.png)
5. Check and free up storage space
Freeing up space on your Mac means that your device no longer needs to perform multiple actions. As a result, you should hopefully fix any issues you’re having with Finder.
Follow these steps to free up storage space on your Mac:
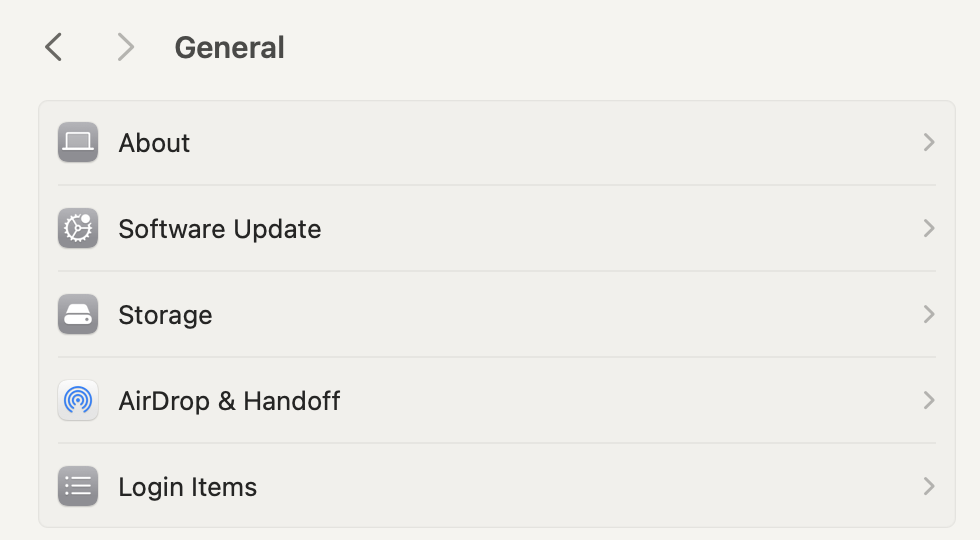
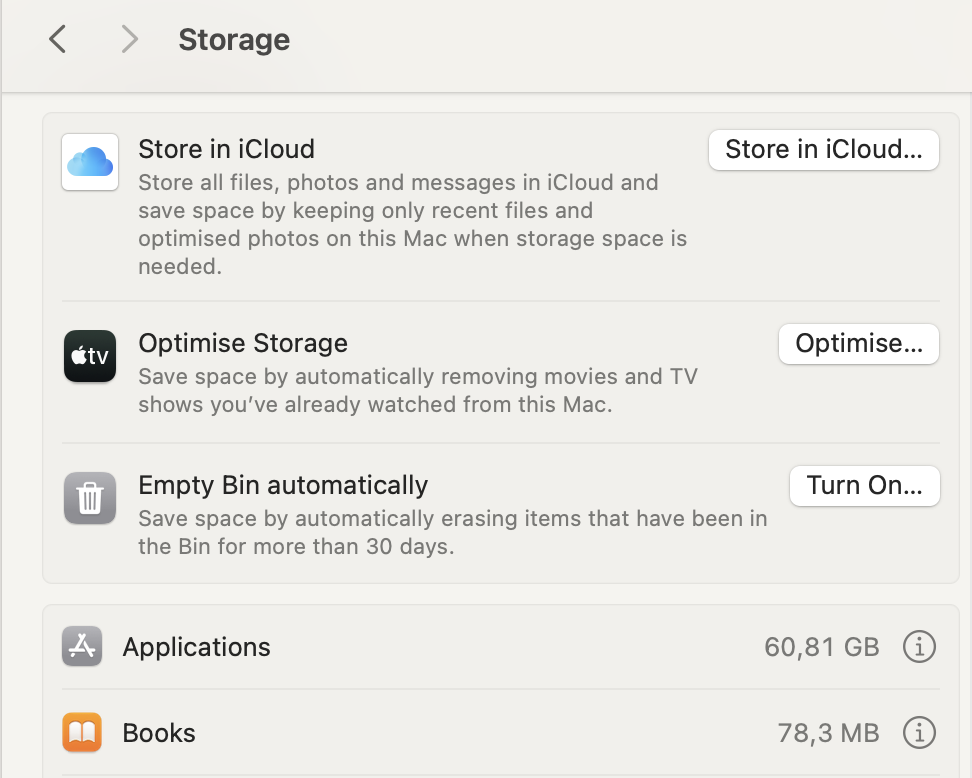
- Go to System Settings > General > Storage.
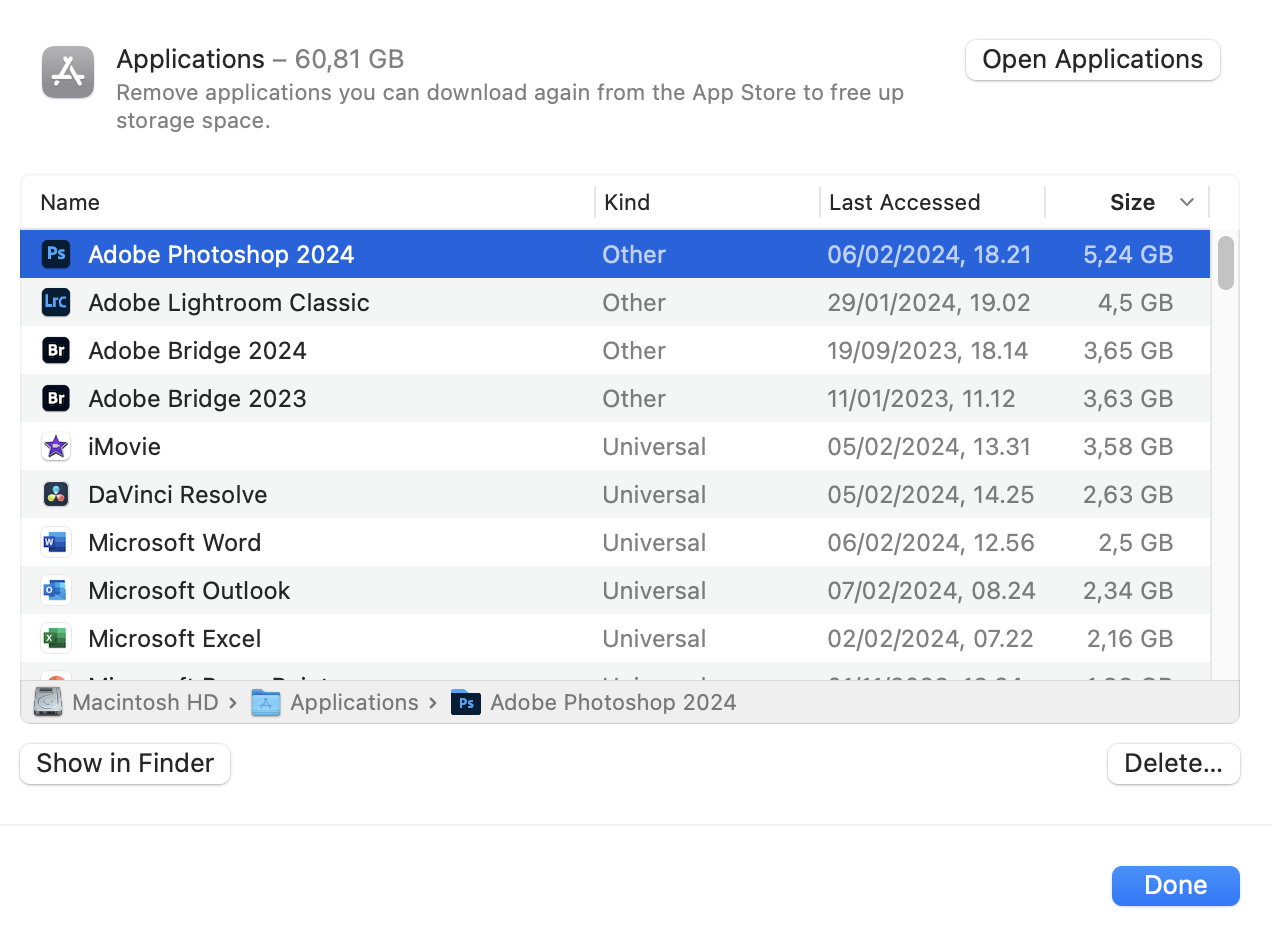
- Sift through the different processes to delete any documents, apps, or other files you no longer need. Select the information icon to do this.
- Highlight what you want to remove and select Delete. Then, confirm your decision.
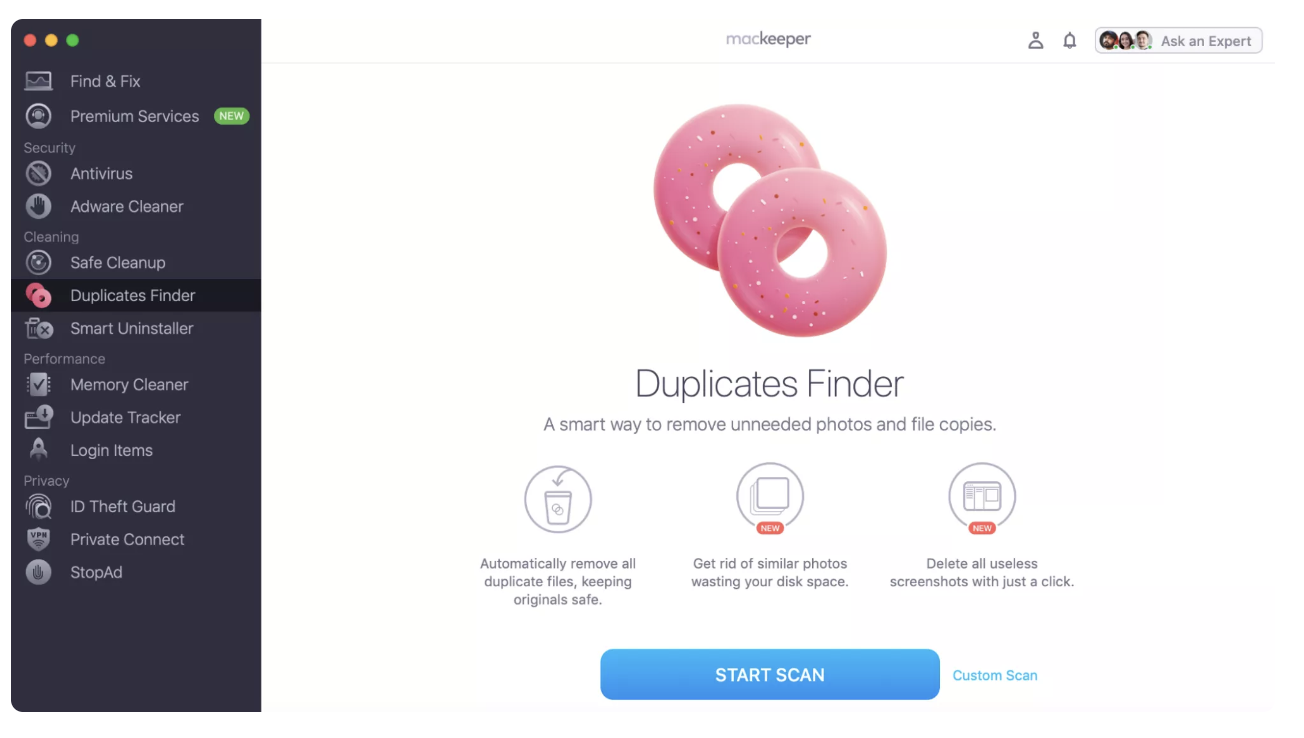
As a better solution, use MacKeeper’s Duplicates Finder to remove unnecessary files that repeat on your Mac. Doing so will free up space in a more streamlined way. Here’s how:
- Open MacKeeper and go to Cleaning > Duplicates Finder.
- Select Start Scan.
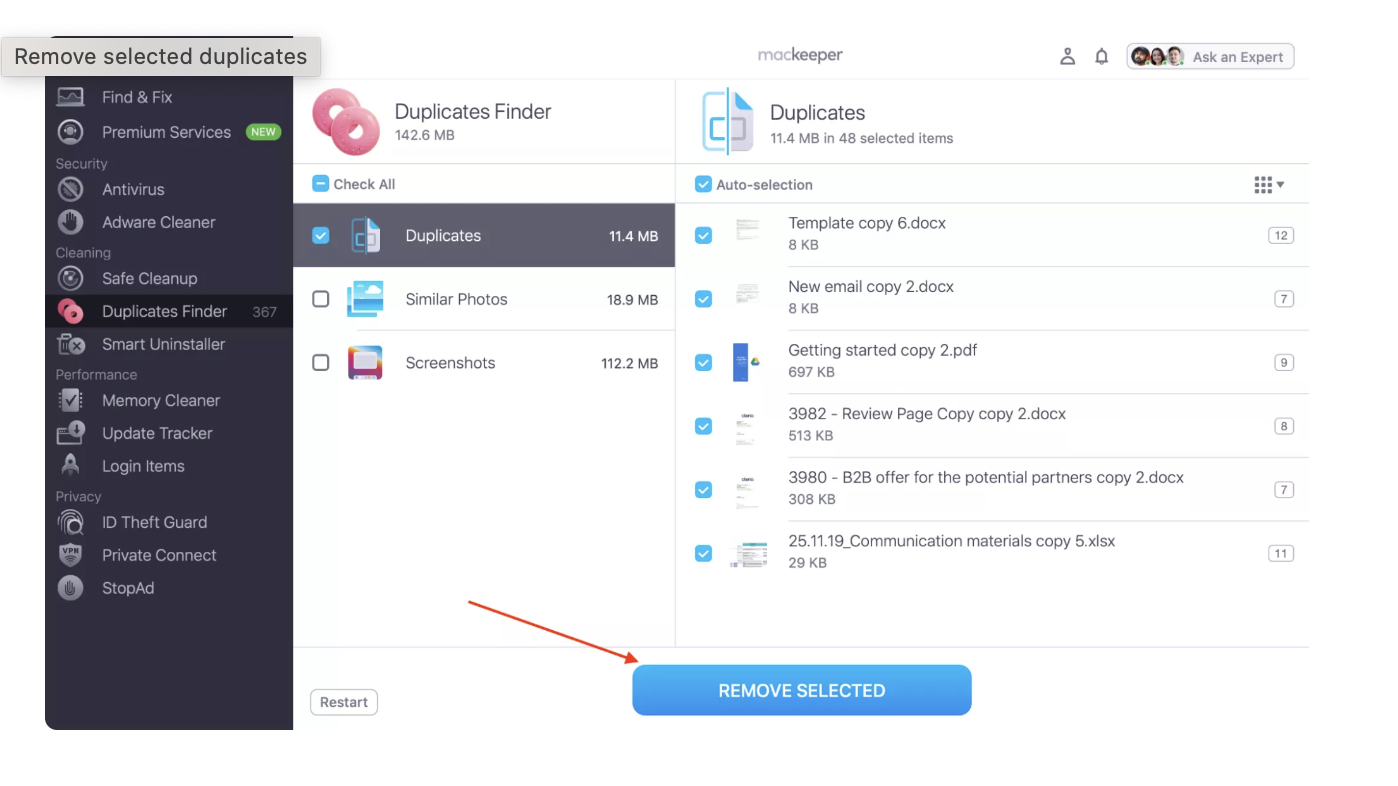
- Tick the box next to Duplicates and any others that you’d like to remove.
- Tap Remove Selected.
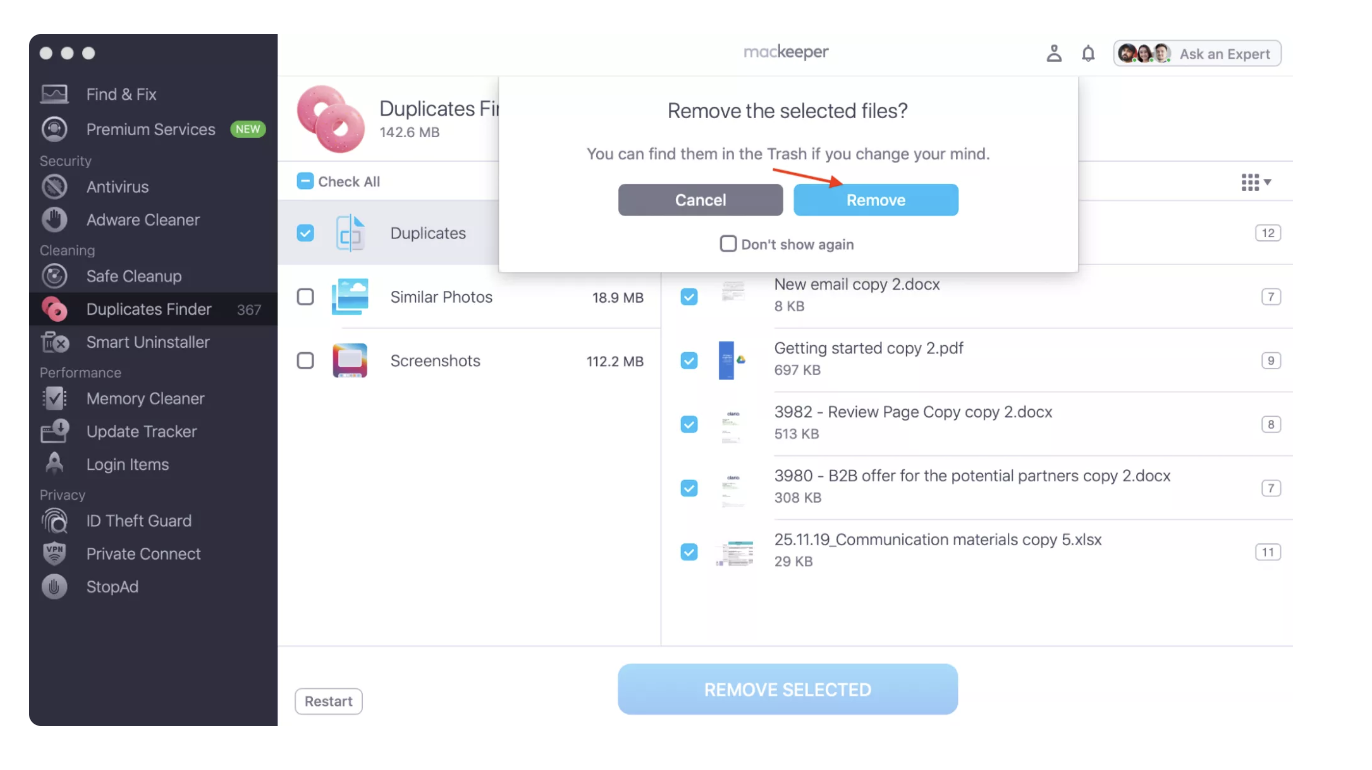
- Select Remove again when the pop-up window appears.
6. Close unneeded programs
Closing unneeded programs will ensure that your Mac can run Finder and other apps more effectively. To do that:
- Press control + trackpad on the app you want to close.
- Tap Quit.

7. Prevent third-party apps from running in the background
Third-party apps can sometimes cause conflicts on your device that stop Finder from running as it should. Thankfully, you can easily prevent programs from running in the background by following these steps:
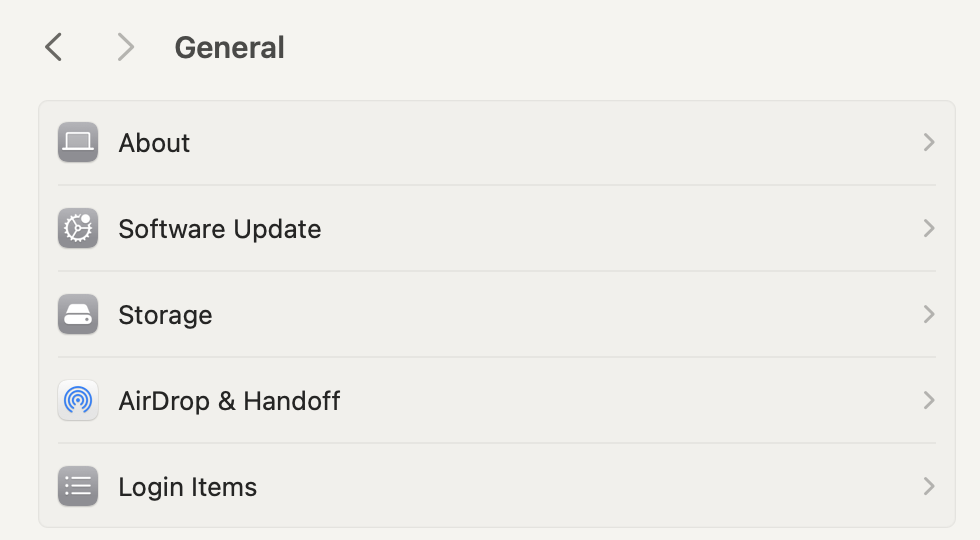
- Go to System Settings > General > Login Items.
- Start by selecting the programs you don’t want to run in the background at the top and tapping the - button.
- Disable more apps and programs from running in the background by scrolling down and turning the toggle off next to every app and process you want to stop.
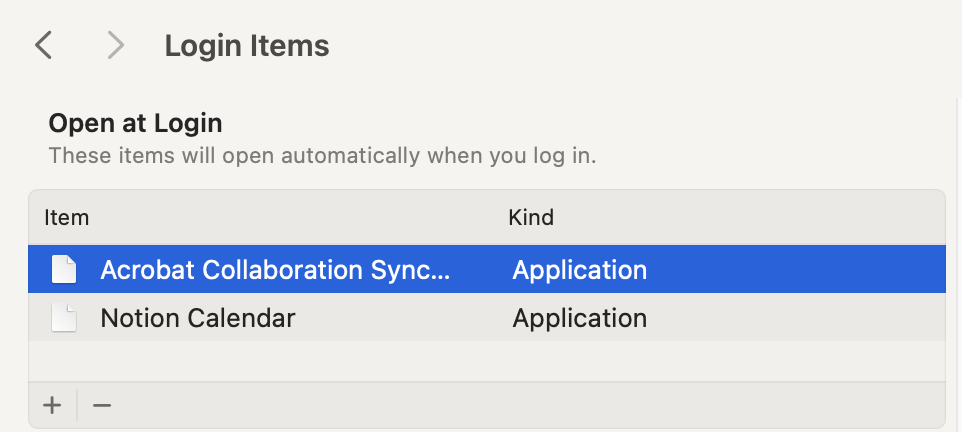
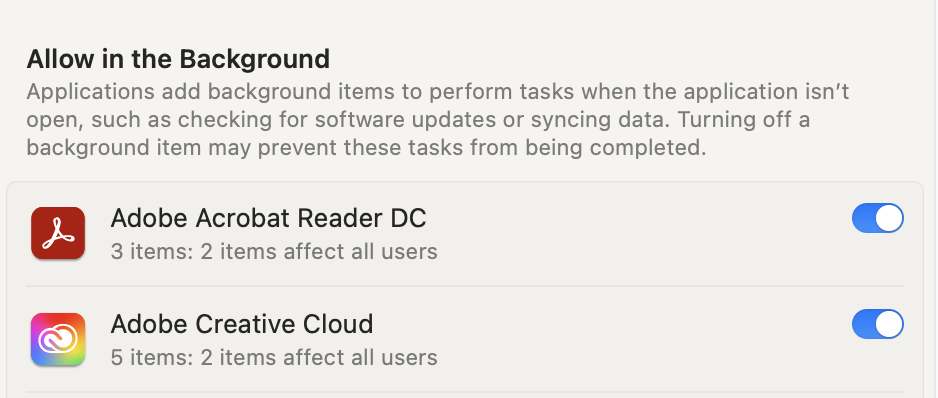
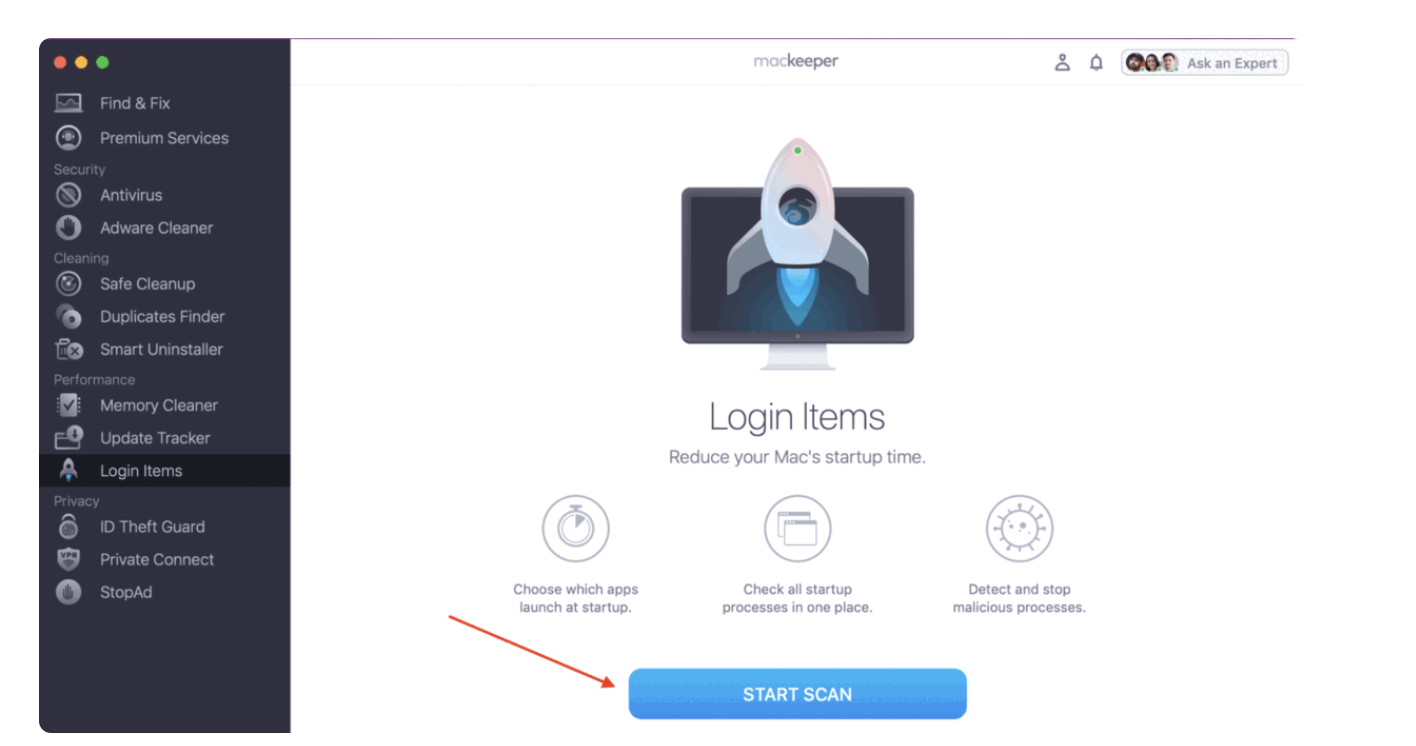
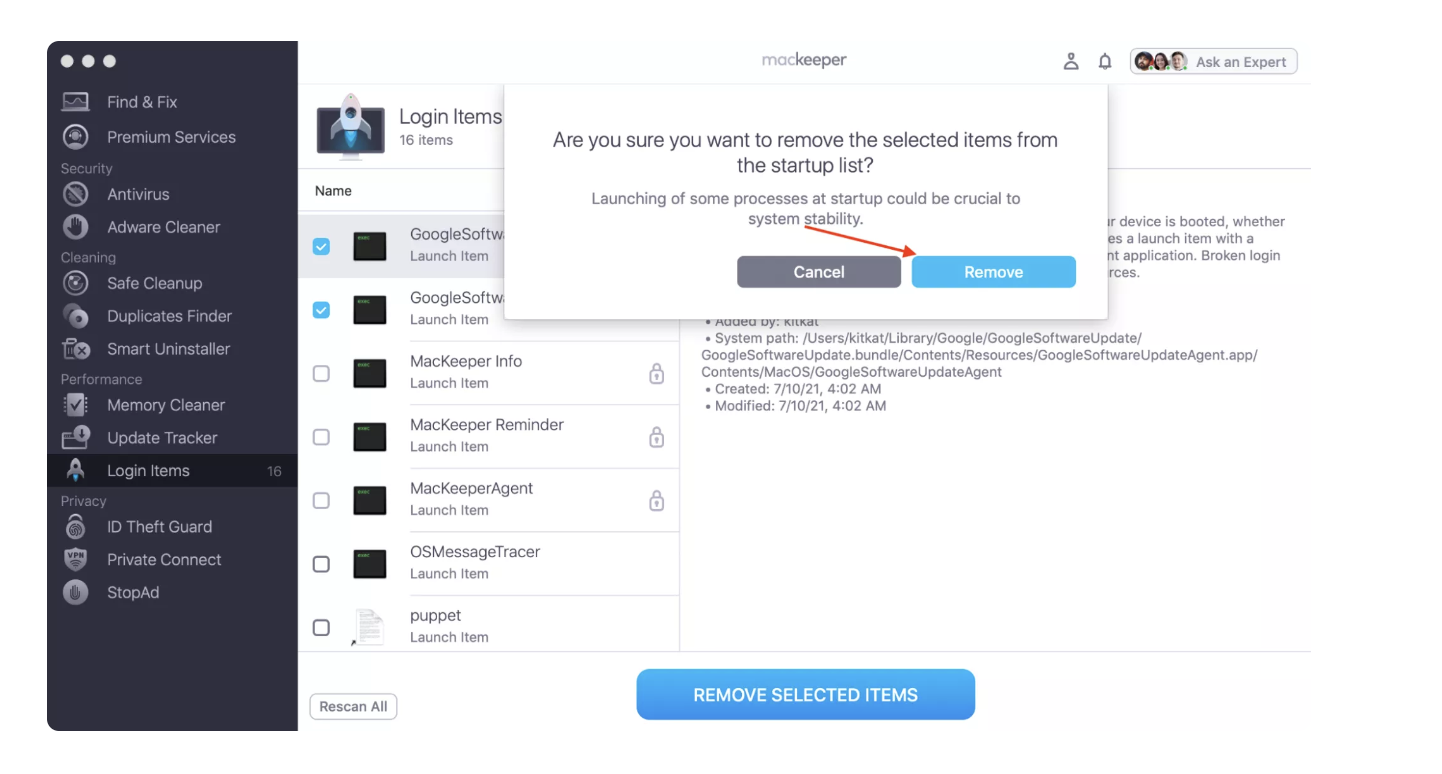
As an alternative to the Login Items feature in System Settings, you can use MacKeeper’s Login Items tool to stop apps, caches, and more:
- In MacKeeper, go to Performance > Login Items > Start Scan.
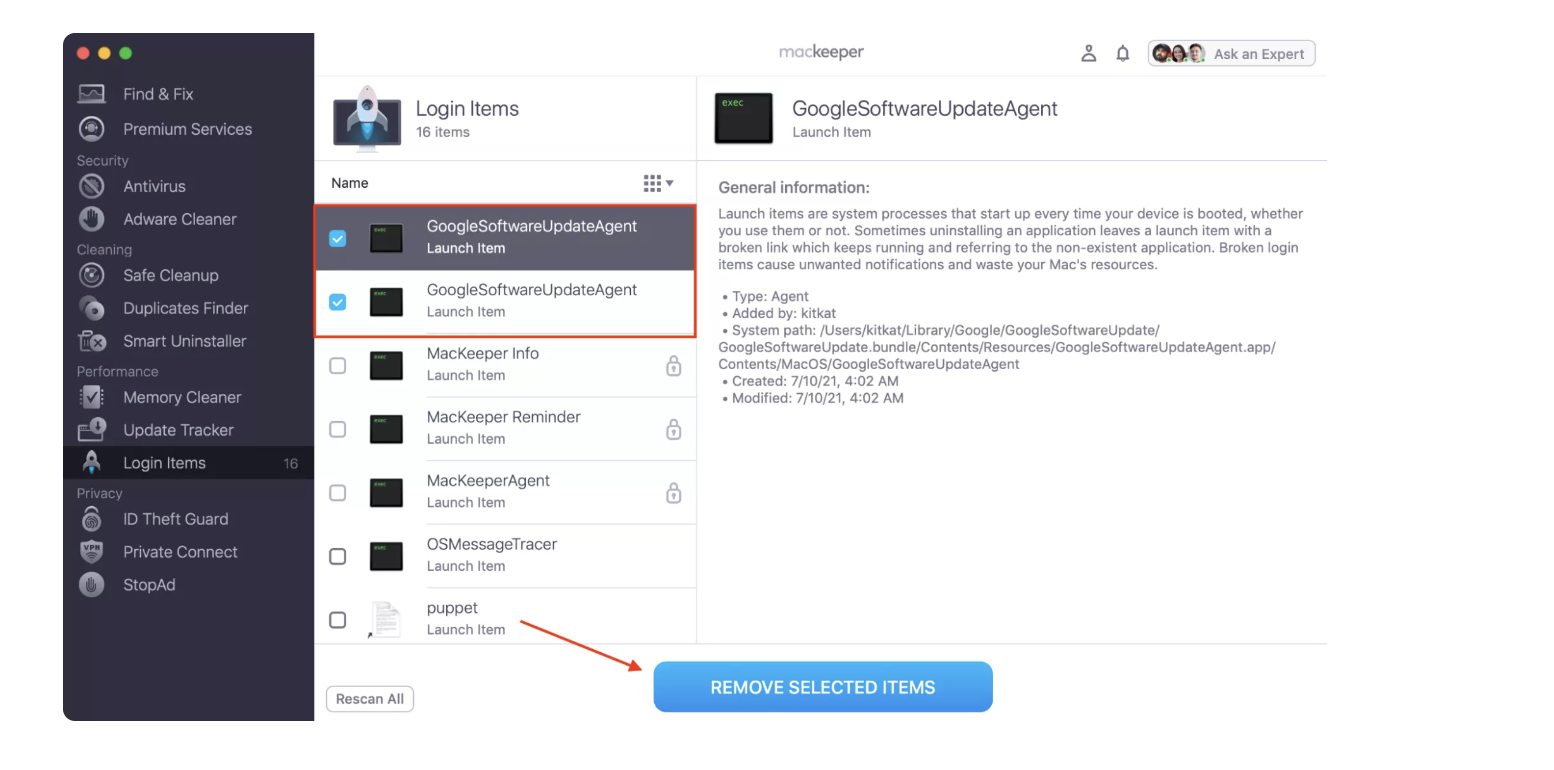
- When the list of login items appears, tick the boxes next to each process that you don’t want to run upon startup.
- Tap Remove Selected Items when you’re happy with your choices.
- When the pop-up window appears, tap Remove.
8. Remove corrupted Finder preferences file
If Finder doesn't relaunch, even though you’ve tried every one of the three ways, it’s likely that you have a corrupted preference file. Normally, you would use Finder itself to delete such files and reset preferences. But because the UI isn’t responding, you’ll need to resort to the Terminal command line.
- Open Spotlight and look for Terminal.
- Open the Terminal app.
- Copy and paste the following command in the command line: rm ~/Library/Preferences/com.apple.finder.plist. This will move the .plist file from the hidden library folder into the Trash.
- Restart the Mac and try launching Finder again.


9. Unplug recently connected peripherals
If you suspect that a recently connected external hard drive is causing issues with the Finder app on your Mac, you should disconnect peripheral devices from your Mac safely to avoid the risk of corrupting the drive or losing your files. Do it this way:
- Go to your desktop and find the device.
- Press control + trackpad to highlight the external drive.
- Select Eject [Peripheral Device Name].
![Disconnecting a peripheral device might solve Finder not working on Mac. However, you need to safely eject the drive as you could otherwise corrupt your files. Select the device via command + trackpad and press Eject [Device Name]. Disconnecting a peripheral device might solve Finder not working on Mac. However, you need to safely eject the drive as you could otherwise corrupt your files. Select the device via command + trackpad and press Eject [Device Name].](https://static-cdn.mackeeper.com/mk-blog-upload/images/new_7a3a9a29bd.png)
10. Disable iCloud Drive Sync
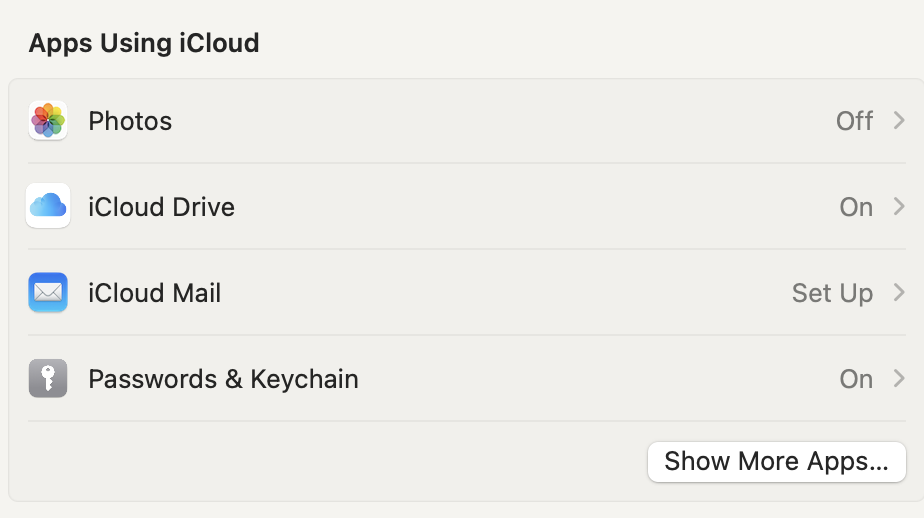
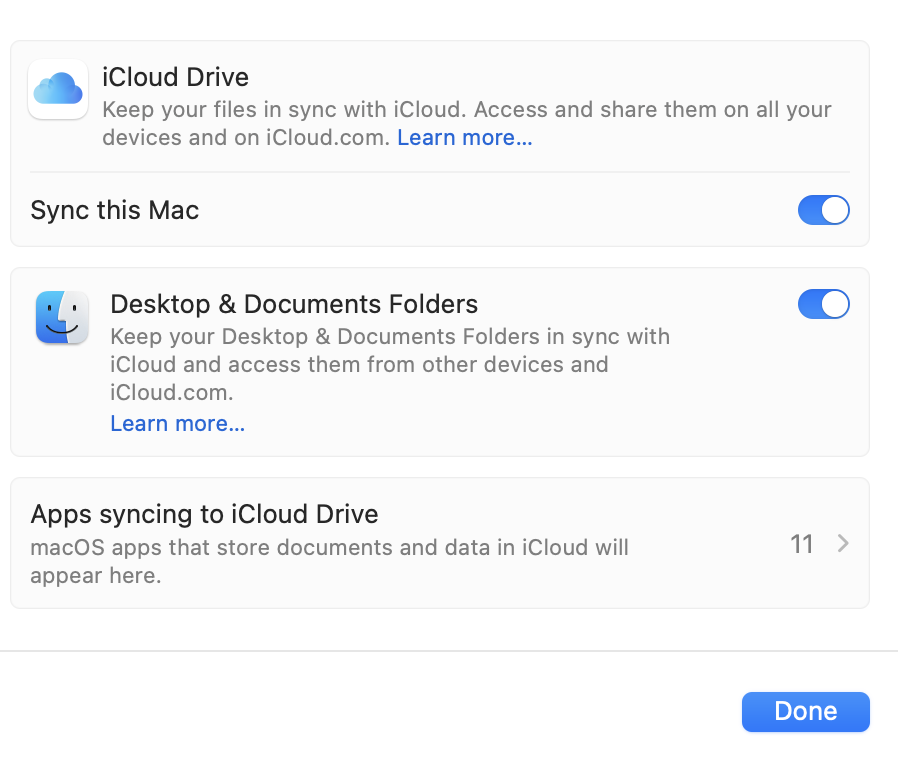
iCloud is useful for backing up your files and folders, but having synchronization across your devices can also result in Finder not working properly. Thankfully, it’s quite easy to disable iCloud Drive syncing:
- Go to Settings and select your Apple ID name at the top of the left-hand toolbar.
- Under Apps Using iCloud, choose iCloud Drive.
- Toggle off Sync this Mac and press Done when you’re finished.
11. Restart Mac in Safe Mode
If Finder quits unexpectedly whenever you try to use it, the first thing to do is restart your computer. If that doesn’t solve the problem, boot the Mac in Safe Mode:
- Restart the Mac.
- Hold down the Shift key as soon as it starts booting.
- You can release the Shift key when you see the login window. Then, just log in normally and see if the issue persists in Safe Mode. You will distinguish it from the regular boot by the Safe Boot indicator in the top right corner of the screen.

12. Make sure Spotlight is indexed
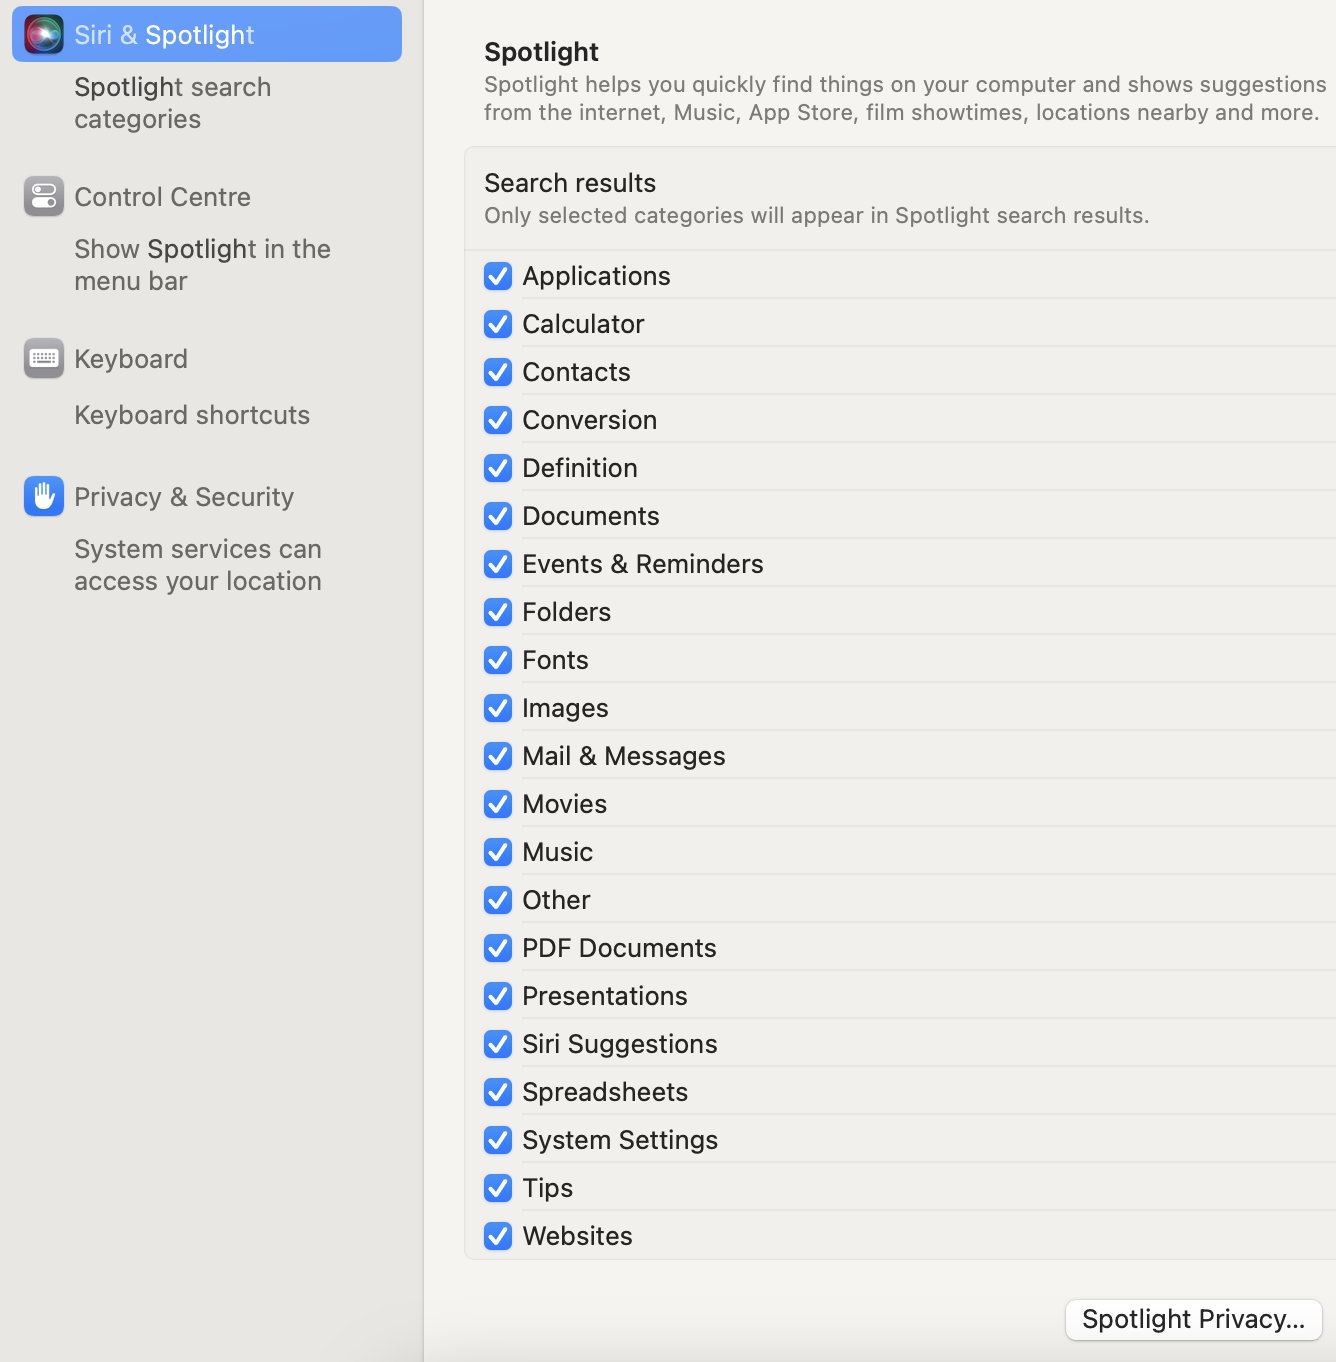
The process of reindexing Spotlight makes the tool register every file on your disk all over again. This is useful if, for some reason, you can’t find your documents via Finder or the Spotlight Search. It takes just a few steps:
- Click on the Apple logo.
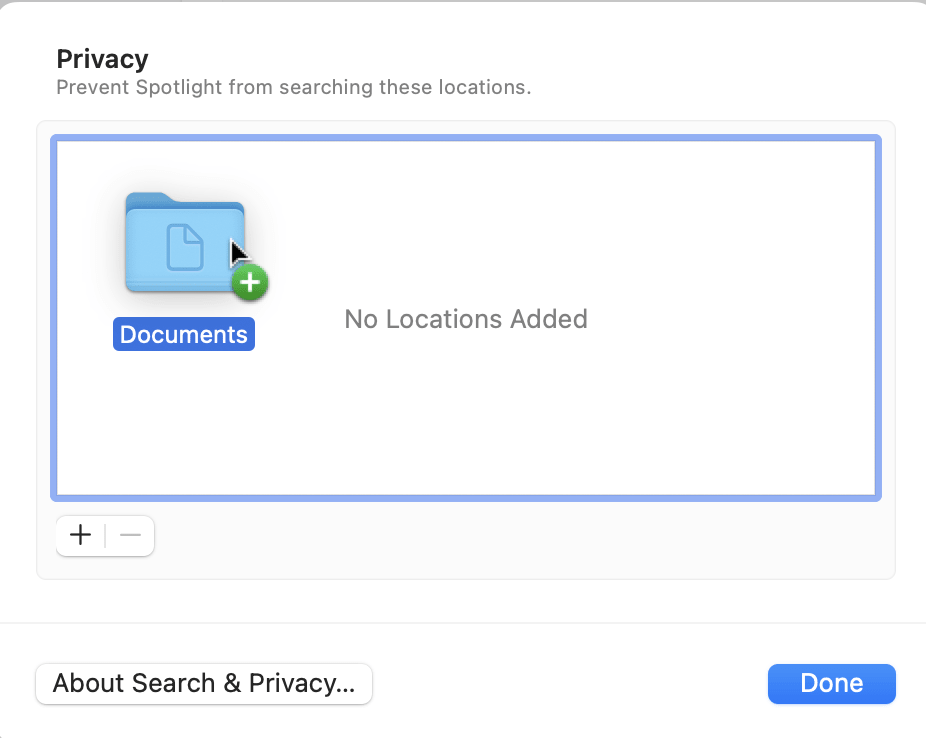
- Select System Settings > Siri & Spotlight > Spotlight Privacy.
- Open Finder.
- Drag the folder of your internal disk to the list of locations that Spotlight can’t search in the System Settings window. Alternatively, use the plus button to add the required folder.
- The disk will appear in the list. Select it and click on the minus button to remove it.
- Quit System Settings and Finder, and wait for Spotlight to reindex.
13. Wait while Finder re-indexes your files
After you’ve rebuilt your Spotlight index (if needed), you can wait for Finder to re-index your files. In the meantime, you can close all other apps and processes to ensure that the process is as efficient as possible.
14. Update or downgrade macOS
If you’re still having problems with Finder (e.g. Finder won’t relaunch) after trying all the previous steps, try either upgrading or downgrading your macOS software. Start by updating your software, as this is better for ensuring that your device stays secure, along with optimizing your performance.
To update your macOS software:
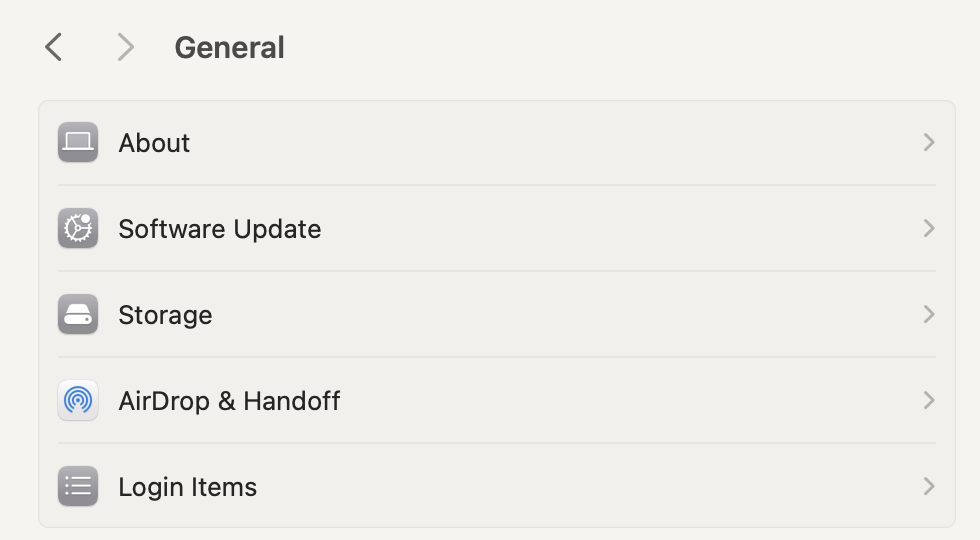
- Go to System Settings > General and select Software Update.
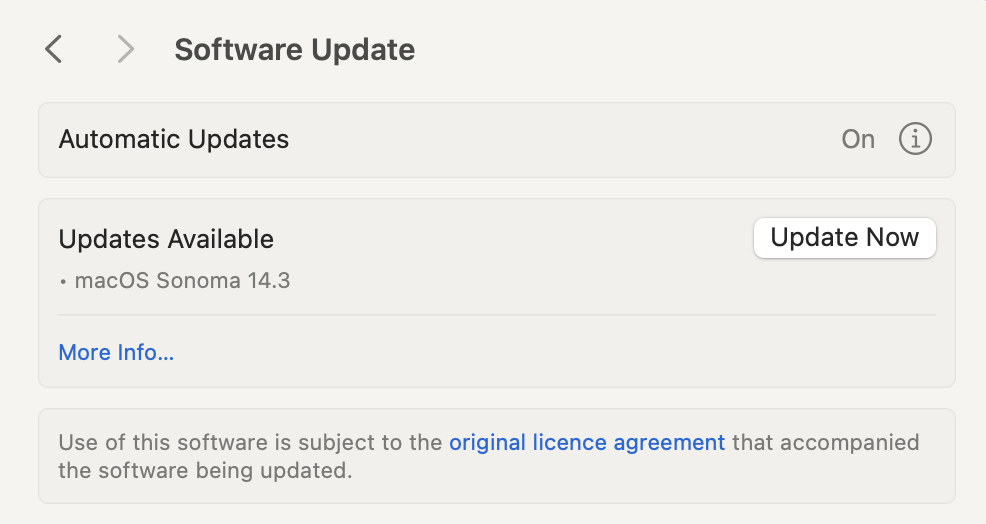
- Wait for your Mac to find any possible software updates.
- If your Mac finds a software update, select Update Now.
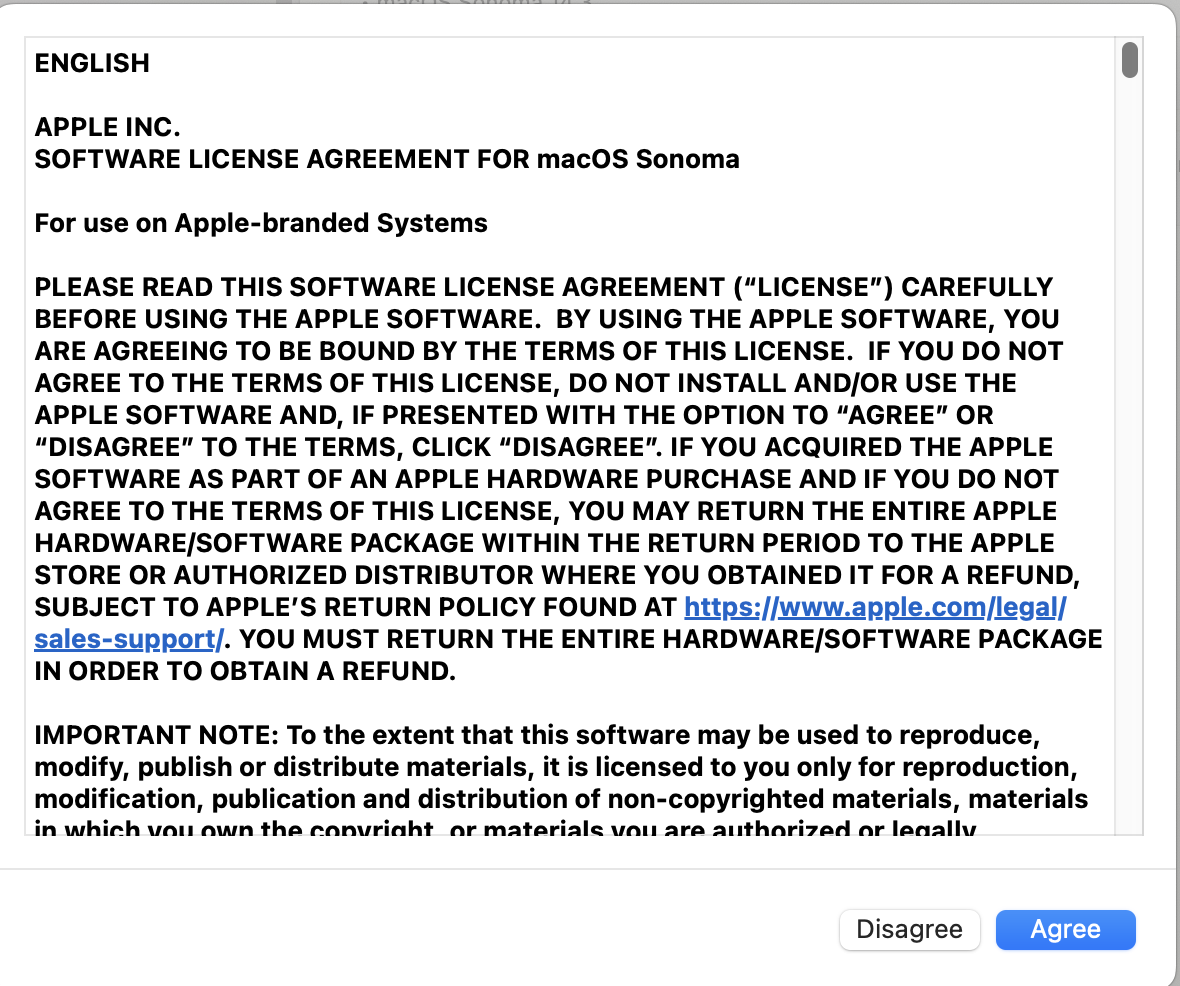
- Tap Agree when Apple’s licensing agreement shows up on your screen. Then, wait for your Mac to download the software.
If your software is up to date and the issues with Finder persist, you can try downgrading your macOS. However, this is a very complicated process—so it should be a next-to-last resort. Nonetheless, these are the steps if you feel like downgrading macOS is necessary:
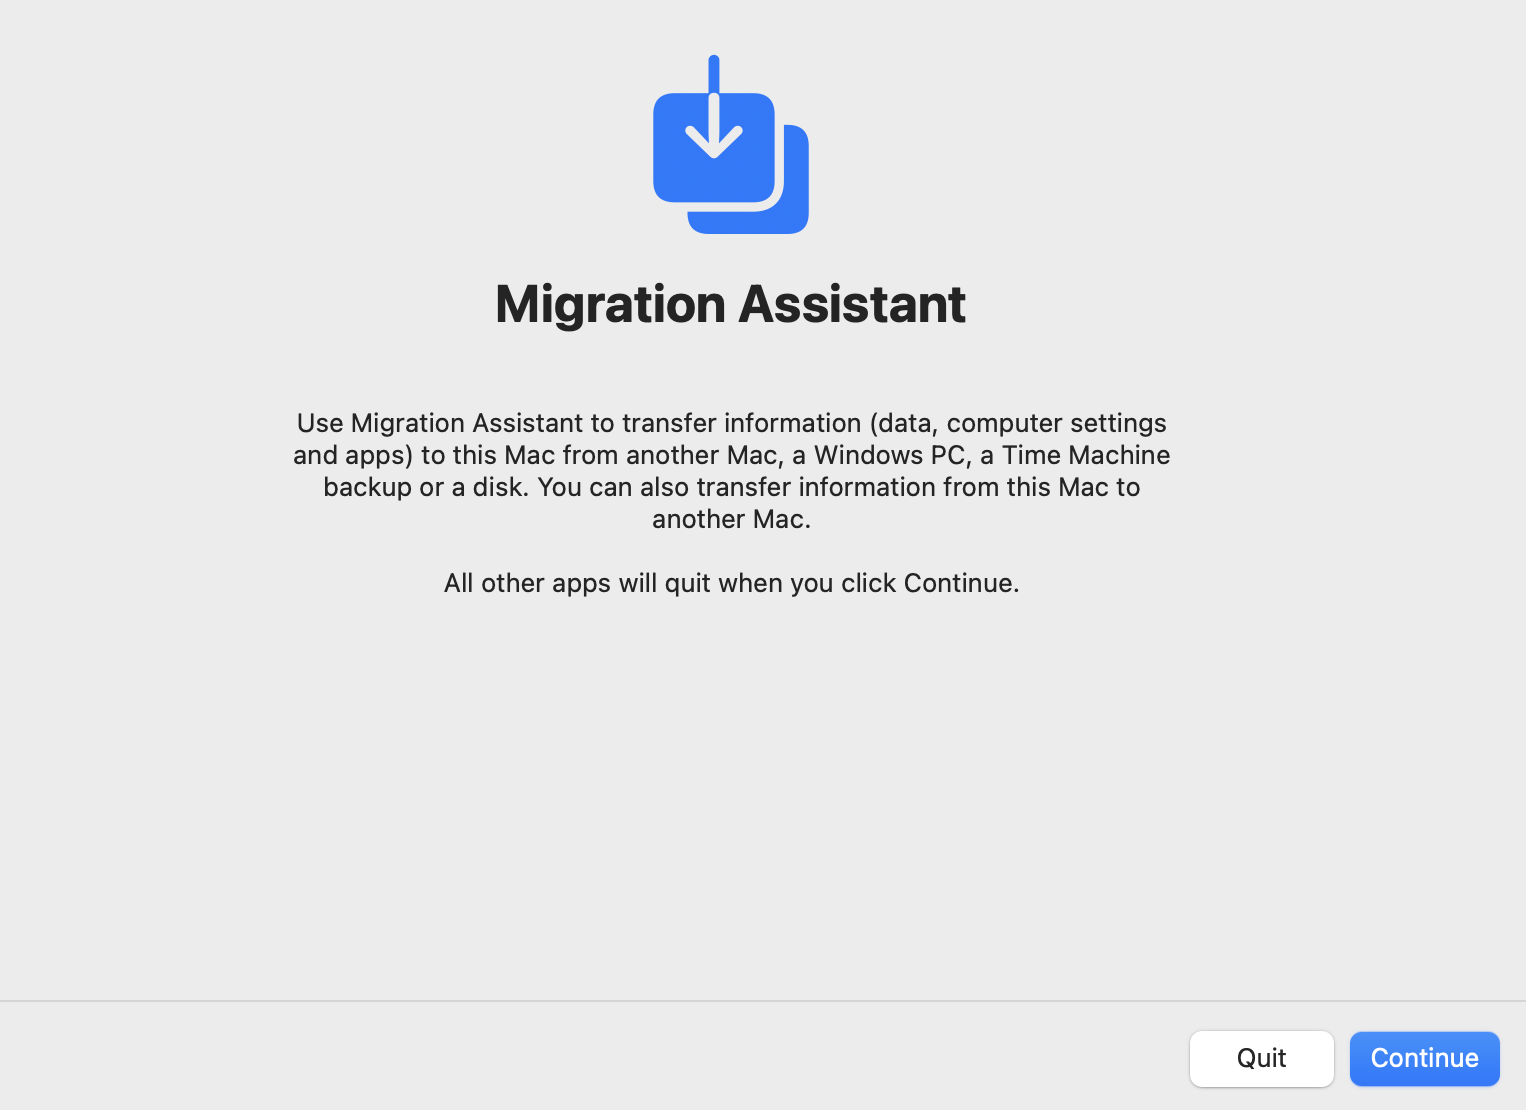
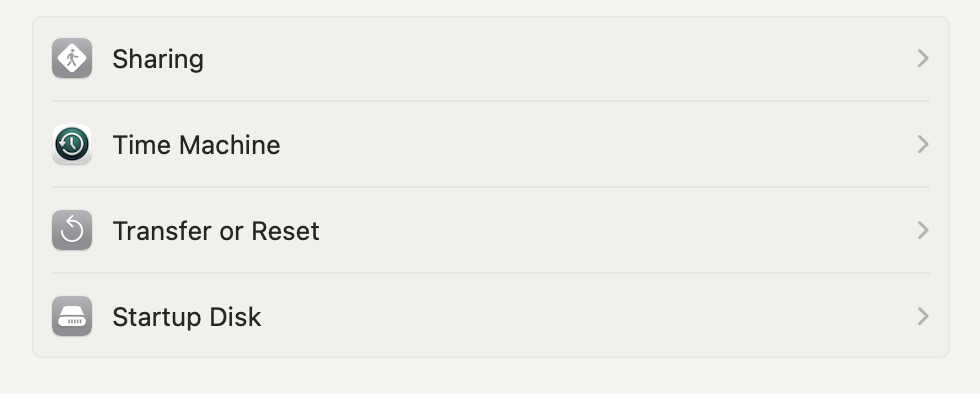
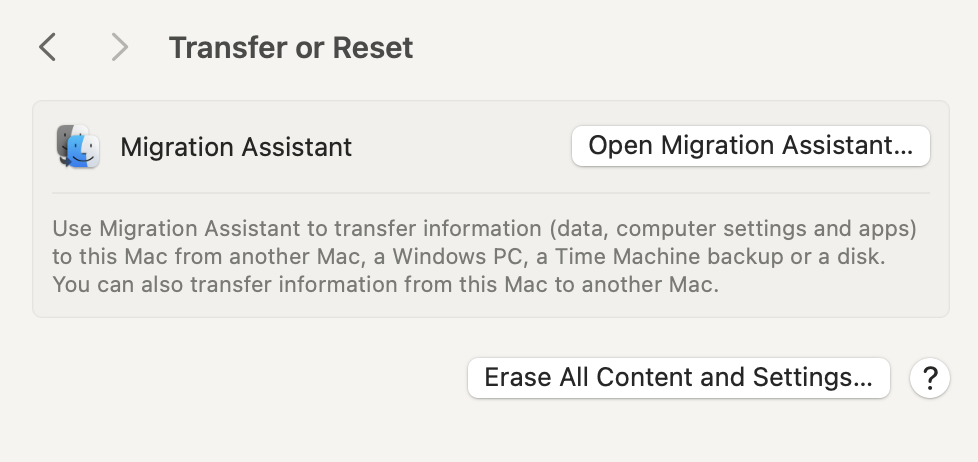
- Open Migration Assistant on your Mac and select Continue. Your apps will close during this process, and you’ll also be logged out.
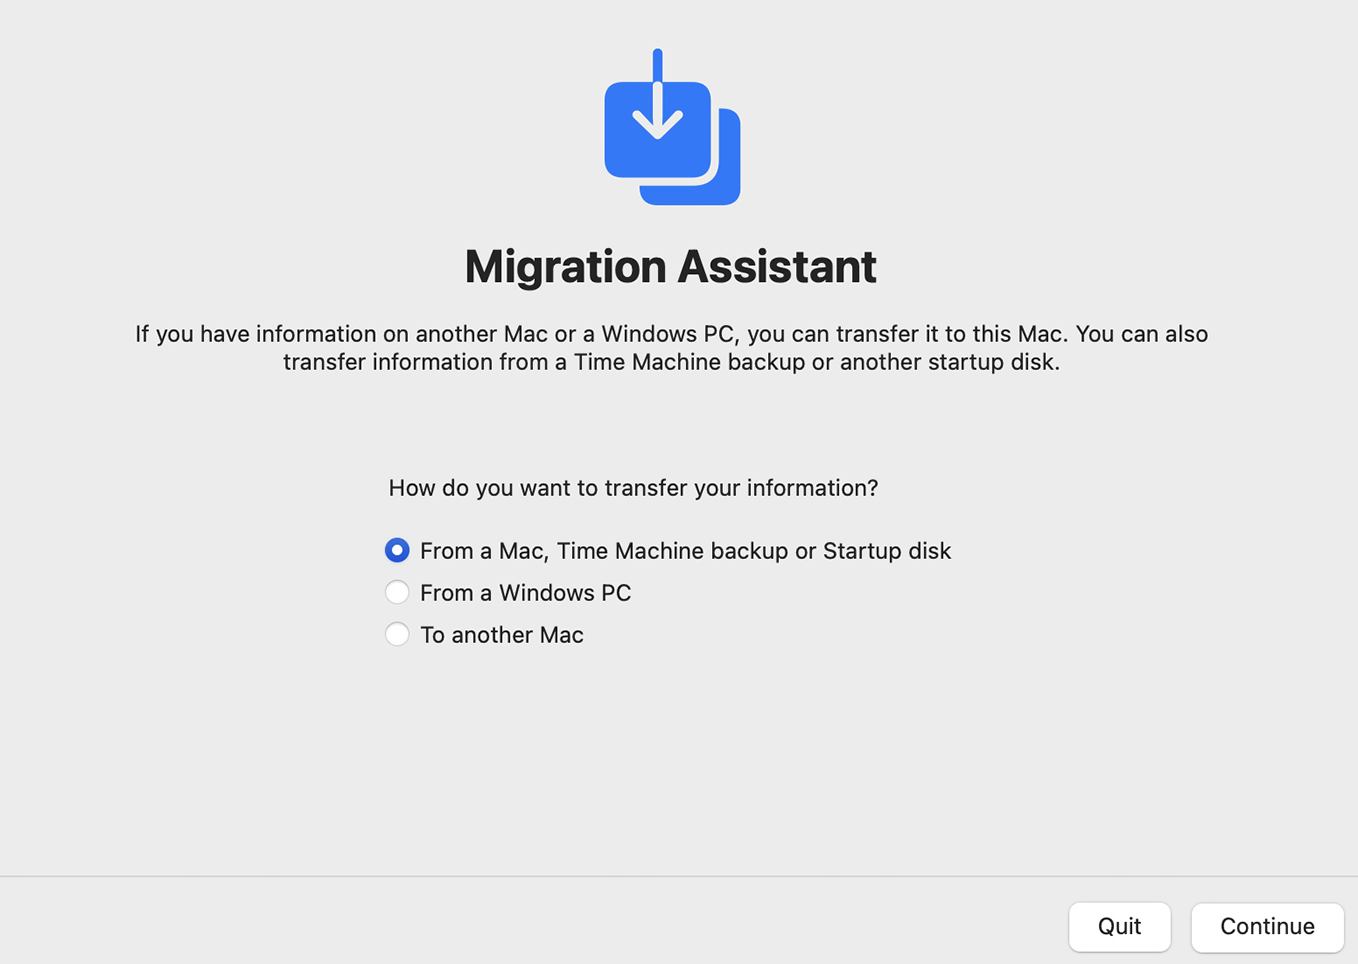
- When you’re given the next list of options, select From a Mac, Time Machine Backup or Startup Disk before tapping Continue again.
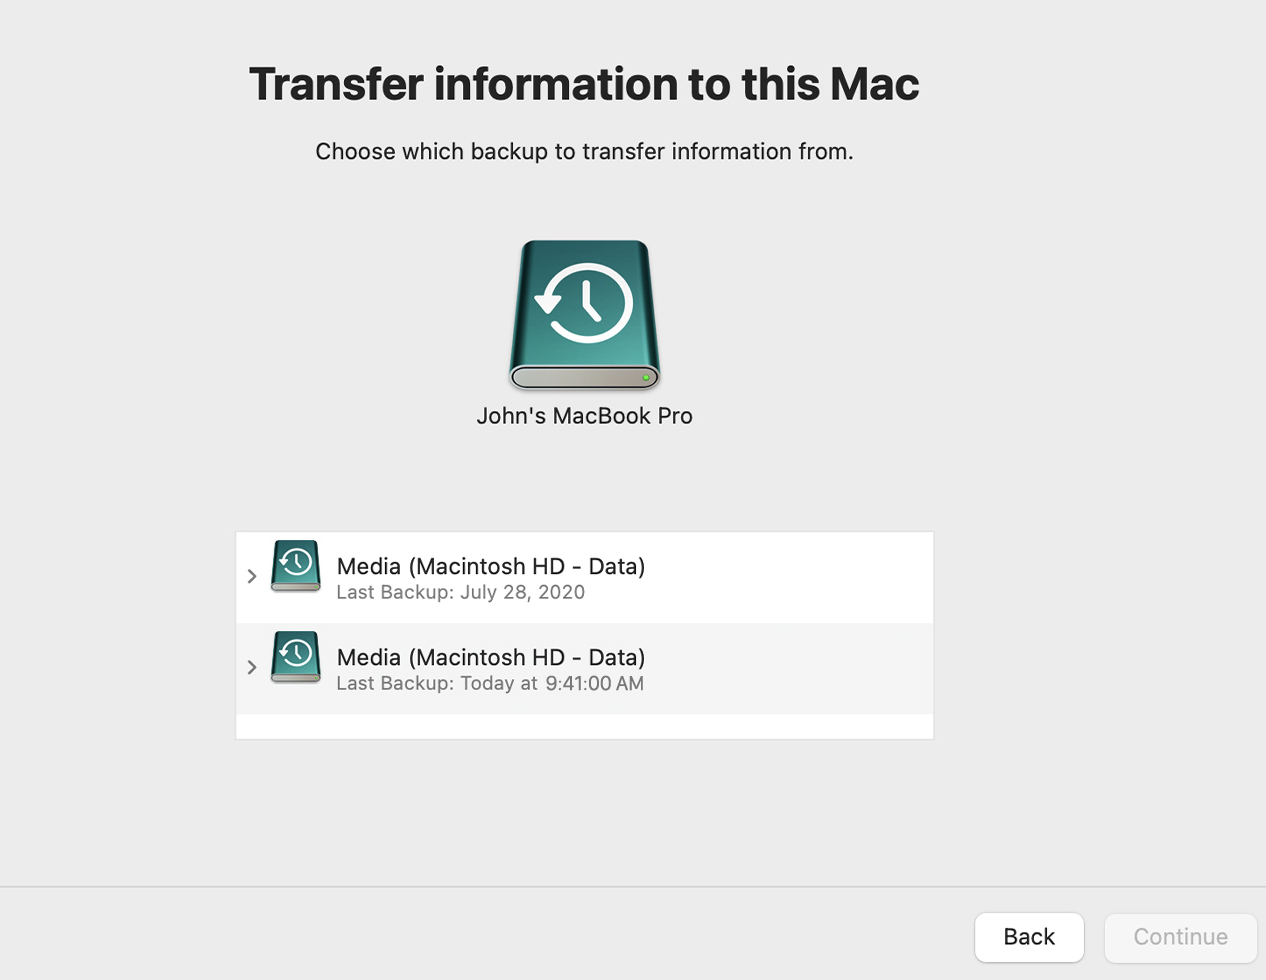
- Choose the Time Machine Backup you want that features the downgraded version of macOS. Then, tap Continue.
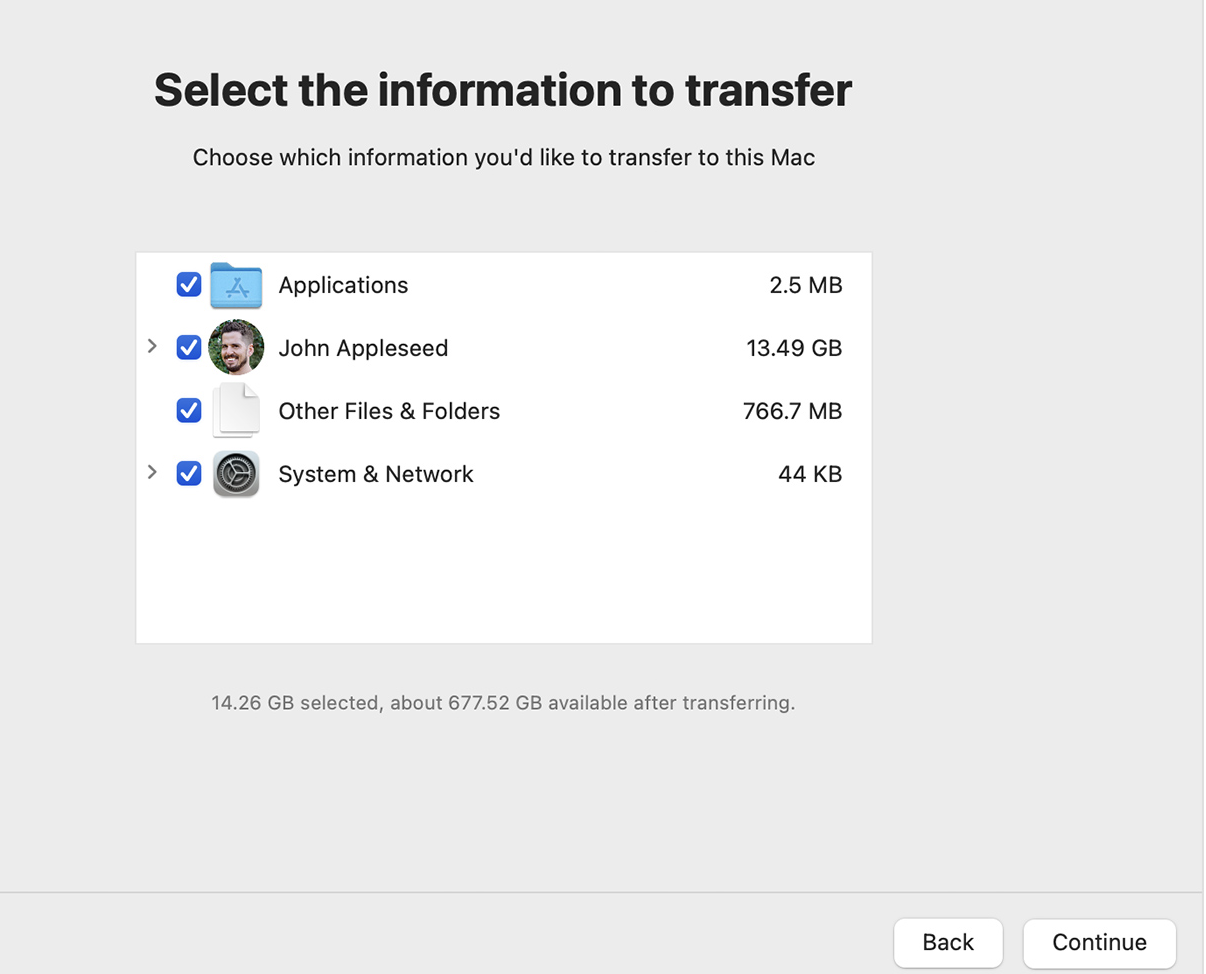
- Pick the settings you’d like to transfer, including System & Network.
15. Reset Mac to Factory Settings
Resetting your Mac to factory settings will wipe your device and return it to whatever the default software was when you initially bought it. While this can help to fix Finder, it’s a last resort option.
- Go to Settings > General > Transfer or Reset.
- Click on Erase All Content and Settings.
- Enter your Mac’s administrator password.
- When the uninstallation app opens, follow the remaining steps to restore your device.
Finder not working on Mac? Try these tips to fix the problem
If Finder won’t open or continuously stops working, you can try multiple steps to solve the issue. And considering how important Finder is for various actions on your device, fix the problem as soon as possible.
Among the whole host of solutions to stop Finder from not working, one of the most important is freeing up space. The task is easier to do using a third-party program like MacKeeper’s Safe Cleanup. You’ll save time and also ensure that you don’t delete essential processes.
FAQs
Why can't you open Finder on your Mac?
Finder may not open on your Mac for several reasons. It could be due to problems with your software, but your Mac might also struggle to handle many programs running at once.
Why does your Finder keep crashing?
Finder may keep crashing because of software glitches, but it’s probably because you’re asking your Mac to do more than it can. Solve this issue by freeing up space and closing needless programs.
Why is Finder stuck on Mac?
Finder might be stuck on your Mac because your device has low random access memory (RAM). Alternatively, you may be running too many windows or have outdated software.
Why is Mac Finder running slow?
The first and the most likely reason of Finder running slow is that you’re running short on storage. Use MacKeeper’s Safe Cleanup to get rid of the redundant files. Another contributor for a slow Mac Finder is Spotlight indexing. As it’s a normal process that happens whenever you update your software or transfer a large volume of data to a cloud or an external carrier, no action is required. Just wait for indexing to be finished. Finally, your Finder may be slow to respond due to a corrupt preference file. In this case, you’ll need to delete the preference files via Terminal.


