In this article you will find the following:
Macs are great, but they’re not immune to problems. As with other computers, they can go wrong, and you can end up losing important data, like work documents or treasured photos. That’s why it’s a good idea to backup Mac computers frequently.
There are a few key ways to create backups of your Mac:
- Manually backing up your Mac files
- Backing up your Mac with Time Machine
- Cloning your Mac’s hard drive
- Using iCloud to back up important files on your Mac
Before we start
If you’re making a full backup of your Mac, the smaller it is, the quicker it will be. So it’s a good idea to clear your Mac of unwanted apps before you make a backup. You can do this easily with MacKeeper’s Smart Uninstaller. It’ll remove apps without leaving any unnecessary files behind, which tends to happen if you just drag them to the trash.
- Select Smart Uninstaller from the left-side menu in MacKeeper.
- Click Start Scan.
- When it’s finished, click Applications and choose what to uninstall.
- Click Remove Selected.
You can try MacKeeper for free to see for yourself. It comes with one free fix, so you can decide whether it’s right for you or not.
Importance of backing up. Potential risks and consequences of not having a backup
You might be wondering if it’s really necessary to backup Mac files. The question you need to ask yourself is: if your Mac suddenly disappeared today, would you miss any of the data it contains? If the answer is yes, then backing up your computer is a must.
It’s impossible to predict when a Mac’s storage drive or logic board might fail. There’s also no telling if or when your machine could be lost or stolen. What you can be sure of is that if any of these things ever happen, all your data will be gone forever if you don’t backup your Mac system on a regular basis.
Types of Mac Backup–Overview of different backup methods
Fortunately, there are a number of different ways you can backup a Mac disk to prevent data loss in the event that your machine breaks down. In addition to using solutions built into macOS, such as the option to backup Mac to iCloud or Time Machine, you can backup Mac drives to other cloud services, to external drives, and more.
Local wired or wireless backups
You can use a wired or wireless external drive to backup Mac photos and other data as often as you wish. The simplest way to do this is with Time Machine, but if you prefer, you can also backup your data manually by simply transferring the files you want to copy to another drive.
Live backups
A live backup, sometimes referred to as a real-time backup, is a way to automatically backup your data on a continual basis. Live backup solutions are constantly looking for changes to your files, and whenever a change is detected, they backup the most recent data. Live backups rely on a third-party solution since the closest alternative that’s built into macOS is Time Machine, but that doesn’t work in real time.
Remote backups
Remote backups are essentially wireless backups that take place away from your Mac itself. This includes online backups to cloud services, such as backing up Mac to Google Drive, as well as backups to wireless external drives that are connected to your home network.
Online backups, including iCloud and other services
One of the simplest ways to backup Mac hard drives is to use an online or cloud-based service, such as iCloud. When you backup Mac using iCloud or a similar service, you only really have to worry about the initial setup. After that, the online service itself takes care of ensuring that all the important data on your computer is copied to the cloud so that if anything happens to your Mac, your data can be recovered later.
Reasons to back up your Mac. Various scenarios where a backup can be crucial
Apple computers are widely regarded as some of the most reliable on the market. However, that doesn’t mean that they don’t break down from time to time. This is one of the most important reasons why backing up your data is crucial. If your Mac’s hard drive or other components fail, it may be impossible to recover the data your Mac contains, and then everything you’ve saved is lost.
Another important reason to backup MacBook and other Mac computers is that they can get lost or stolen. Apple products tend to hold their values better than any other computer brand, so they’re a target for thieves who are looking to make money by selling stolen goods. By backing up your data, you can ensure that if your Mac gets lost or stolen, you won’t lose all of your data alongside it.
Finally, it’s important to have a backup of your Mac in the event that your machine needs to be serviced. Whenever you run into issues with your device, there’s always a chance that Apple may replace it with a new model—especially if it’s still covered by AppleCare. The new model won’t contain any of your old data, so all the files, photos, and other content on your old machine will be lost.
Using Time Machine for backups. Explanation of Time Machine as a built-in backup solution
Time Machine is the built-in backup app for Macs, designed to help you keep up-to-date copies of all your files. You can think of it like an iCloud backup, except instead of copying your files to the cloud, Time Machine automatically sends copies to an external drive so that your backup data is kept locally.
All you need to use Time Machine is an external storage device, one that’s at least twice as large as the amount of data you want to back up. For instance, if you have a Mac with a 256GB drive that’s pretty full, then a backup drive at least 512GB in size is what you’ll need for Time Machine to function correctly.
Step-by-step guide to setting up Time Machine for backups
Here’s how to backup your Mac with Time Machine:
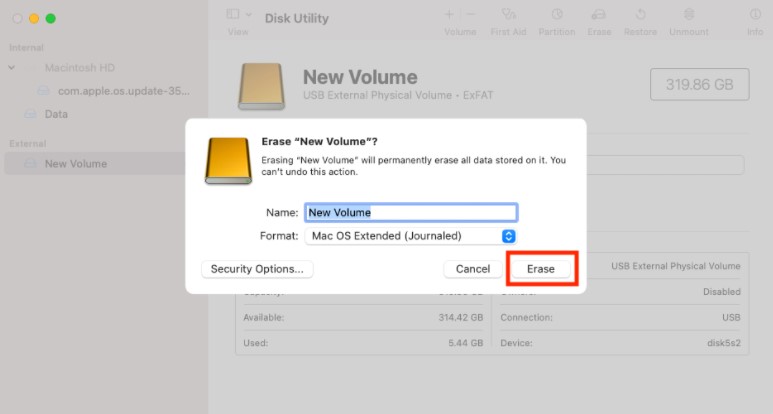
- Open Disk Utility, then select your external drive.
- Click the Erase button to format it, choosing the Mac OS Extended (Journaled) format.
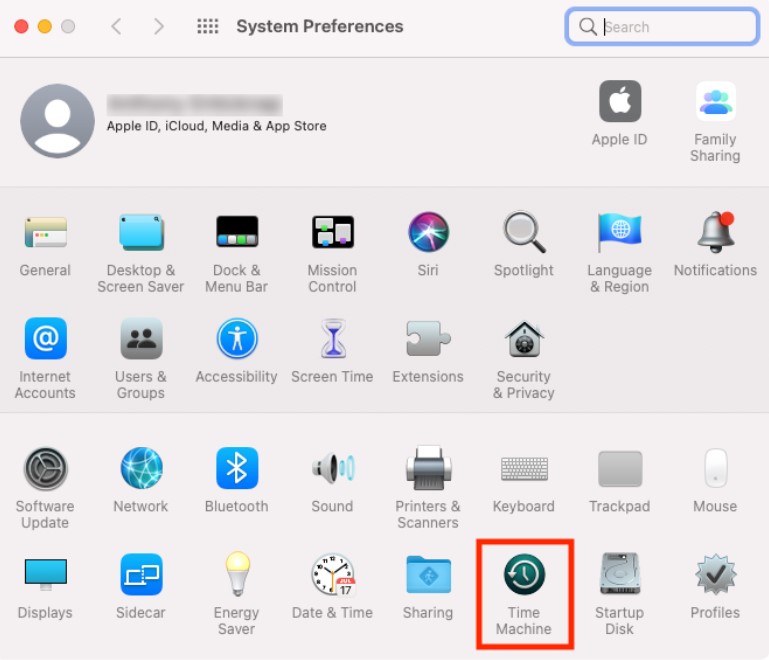
- Open Time Machine from the System Settings app.
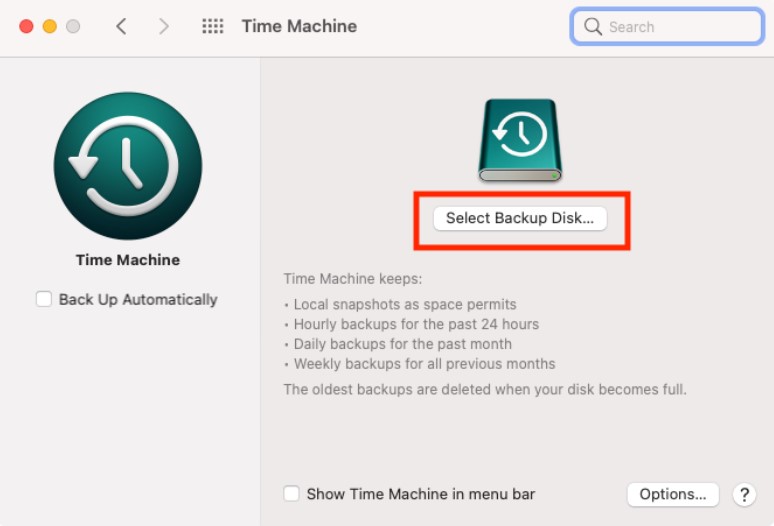
- Click Select Backup Disk.
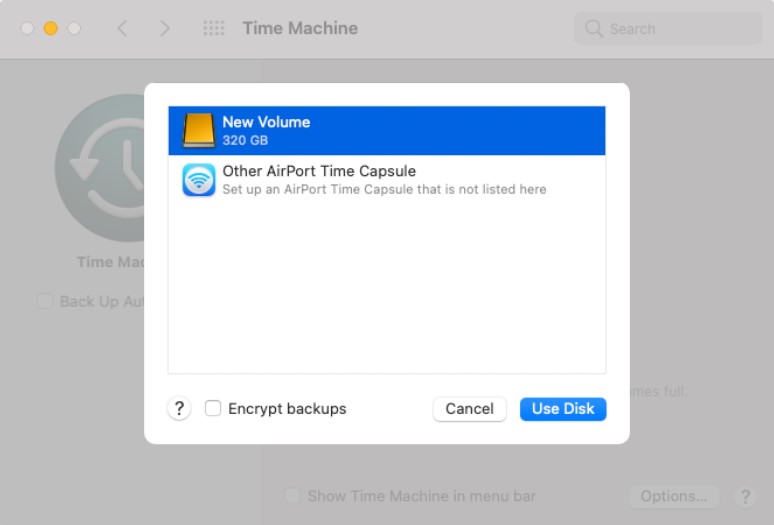
- Select your external drive, then click Use Disk.
- If you want Time Machine to automatically make backups, click the box next to Back Up Automatically.
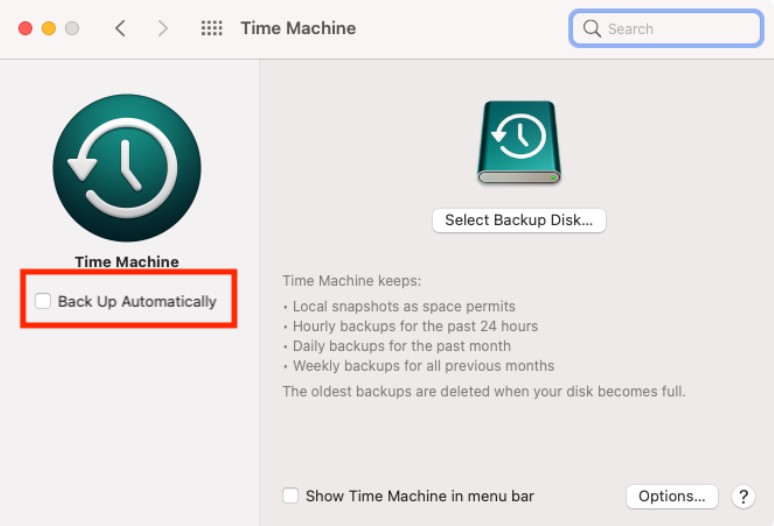
For more information about backing up a Mac with Time Machine, including formatting your drive, read our full guide.
How to initiate manual backups and manage backup frequency
The most basic way of backing up data on a Mac is to hook up a USB drive and then just drag and drop files onto it. It’s not sophisticated, and it’s only effective if you remember to do it. First, though, you’ll need to make sure your drive is ready for backups.
If it’s a drive you’ve used before, it should be ready to use as soon as you plug it into your Mac. If it’s new, you’ll need to prepare it by formatting it inside Disk Utility before you can backup Mac on an external hard drive.
To prepare an external drive for Mac backups in Disk Utility:
- Plug in an external drive, then open Disk Utility from Applications > Utilities.
- Select the drive from the list on the left, then click Erase.
- Choose a formatting option from the Format menu. If you want to be able to access the files on a Windows PC, select ExFat, otherwise choose Mac OS Extended or APFS.
- Click Erase.
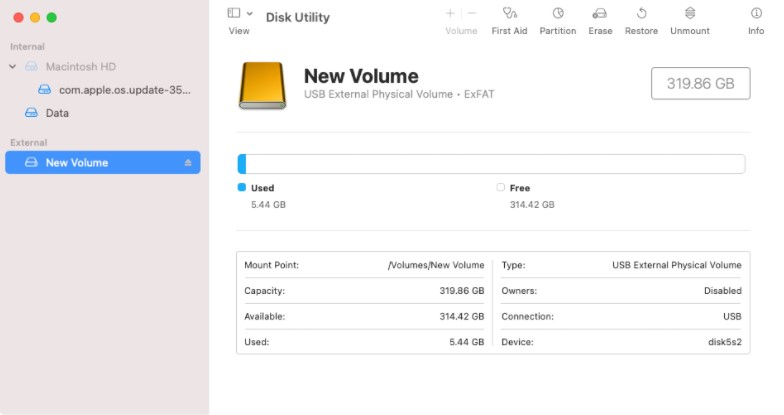
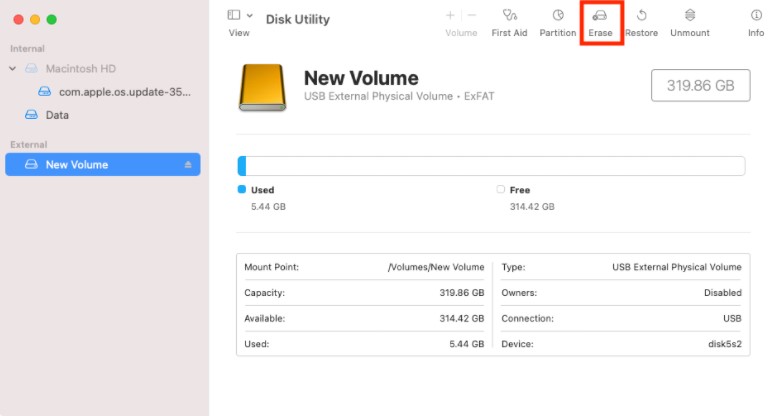
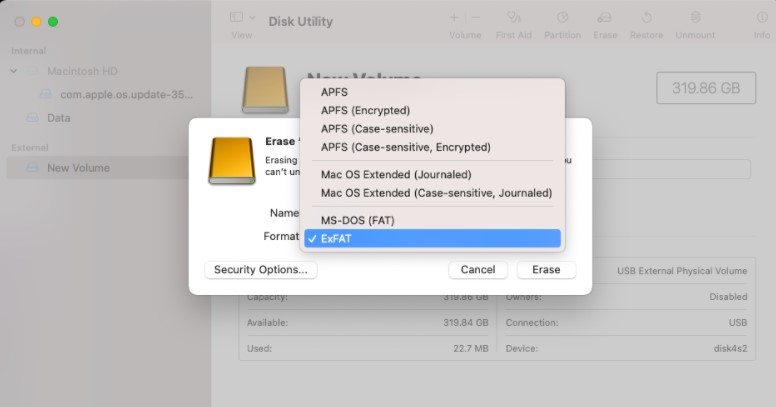
Your external drive is now ready to use. It should be recognized by your Mac as soon as you plug it in, and you can start copying files to it by simply dragging and dropping them onto the drive. Alternatively, you can use Time Machine or a third-party backup solution to automate this process.
Hint from our team:
You can also backup Mac from Disk Utility by cloning your Mac’s drive to an external disk. This creates a complete copy of your drive so that every piece of data is saved, however, it only works with drives that can be unmounted. In other words, you cannot clone your Mac’s startup disk while you’re using it—you’ll first need to boot from an external drive or the macOS Recovery volume, then clone the primary drive.
If that’s not an option for you, you can clone your Mac’s drive while using it using the free SuperDuper tool.
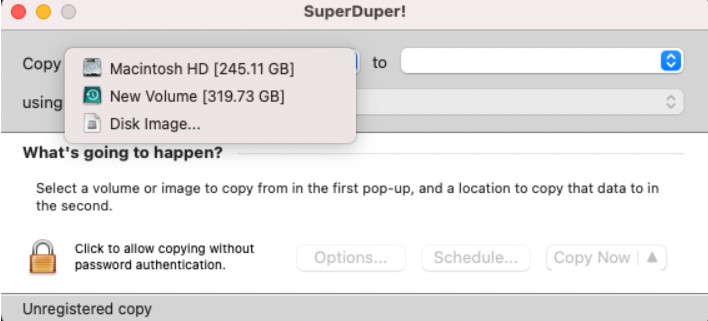
To backup your Mac’s hard drive by cloning it with SuperDuper:
- Download and install SuperDuper.
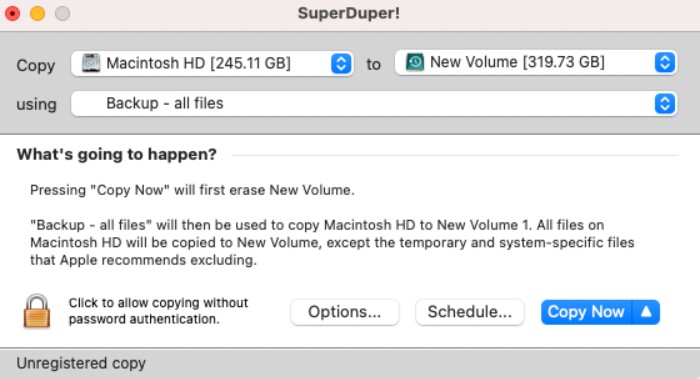
- Open SuperDuper and use the dropdown menu on the left to select the drive you want to back up. This should be called Macintosh HD if you’re cloning your Mac’s startup disk.
- Using the dropdown menu on the right, select your external drive, and click Copy Now.
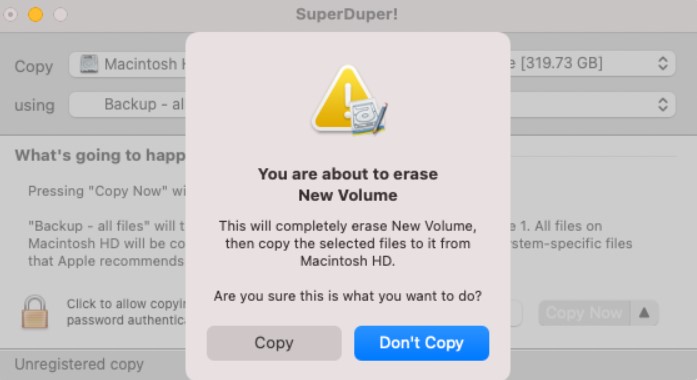
- Enter your password if prompted. You’ll see a warning about erasing the external drive. Click Copy to proceed.
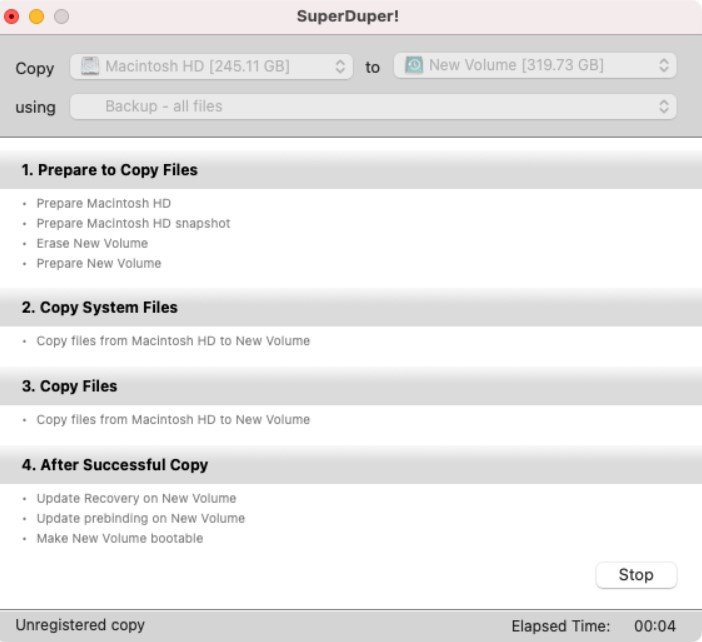
- Wait for SuperDuper to complete the backup.
To learn more about this process, check out How to Clone a Mac Hard Drive.
Backup up to iCloud and other online services
One of the easiest ways to backup your Mac is to use iCloud, Dropbox, Google Drive, or other online services. iCloud is the most seamless solution since it’s built into macOS, and it backs up all of your most important files by default, including Photos, Mail, Passwords, and your Desktop and Downloads folders.
You can still backup most of this data using a different online backup solution, but it’ll require a bit more setup. It’s also worth noting that certain things, such as your Passwords and Keychain, can’t be backed up by third-party providers. If you want to backup the Mac Keychain, iCloud is the only option.
Utilizing iCloud Drive for file storage and backup
iCloud is, of course, Apple’s cloud backup service for Mac and iOS devices. If you’re using the free plan, you only get 5GB of space. That might be enough for your needs, but you can easily expand it by paying for more storage space. You’ll need to set up an Apple ID first if you don’t already have one, but after that, iCloud backups are done automatically when enabled.
To enable iCloud backups:
- In System Settings, select Apple ID in the sidebar.
- Click iCloud, then select iCloud Drive.
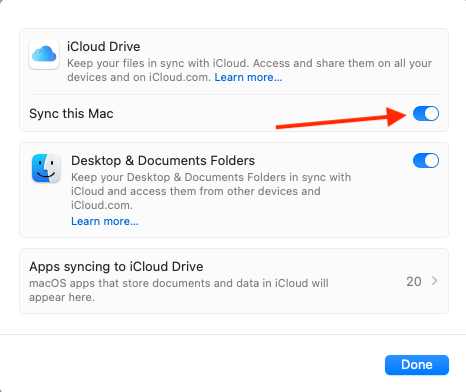
- Ensure Sync this Mac is enabled.
- To customize your iCloud backup so that only certain apps are backed up to iCloud, click Apps syncing to iCloud Drive.
- Enable or disable the apps you see in the list as you wish, then click Back.
- Click Done to finish.
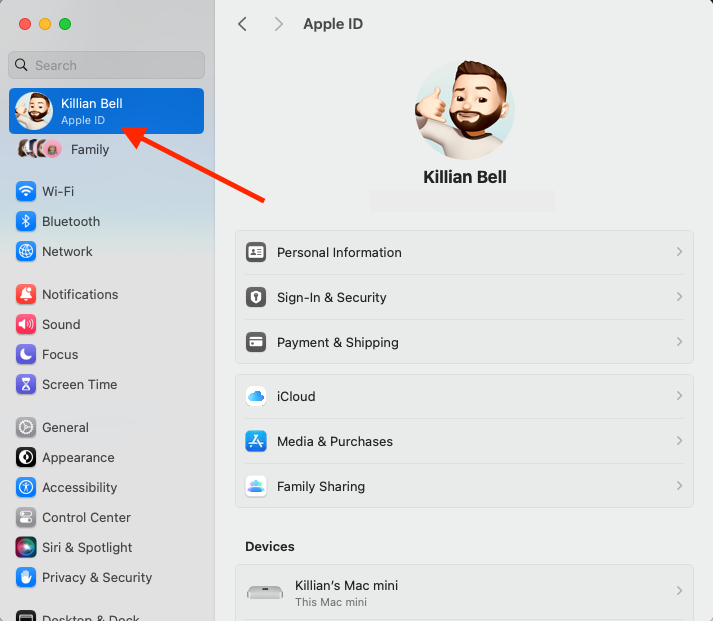
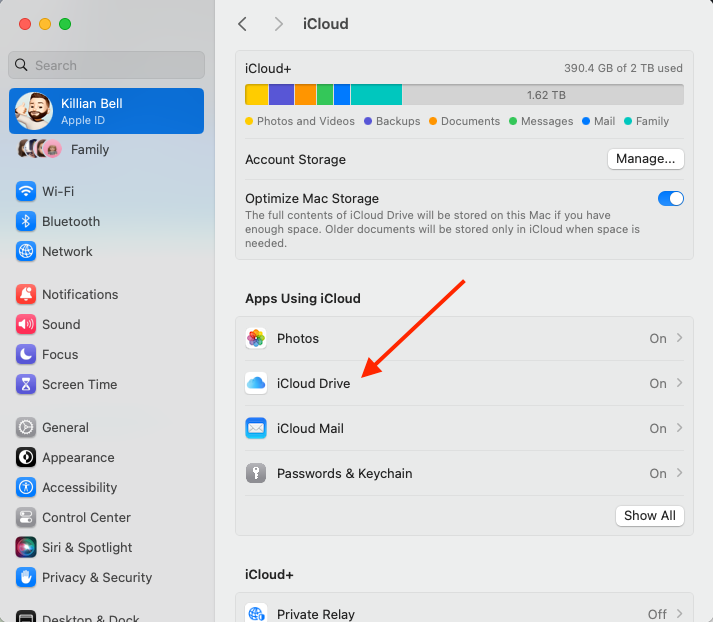
At the top of the iCloud menu in System Settings, you’ll see how much iCloud storage you have—and how much is used and remaining. This will help you manage your backup data to ensure that you don’t run out of storage space. If iCloud is the only backup solution you use on Mac, we recommend upgrading your account when you run out of space to ensure that your data can be backed up.
Exploring other online backup solutions such as Dropbox
If, for whatever reason, you don’t want to use iCloud, you can use another online backup solution to store copies of your most important files. Dropbox, Google Drive, OneDrive, Mega, and others can all send backups of your data to the cloud in case you need to recover it later.
The setup process for other online backup solutions differs depending on the provider you choose. However, in most cases, it involves downloading the cloud provider’s Mac app and then specifying how you want your backups to work.
For example, here’s how to backup Mac with Google Drive:
- Download and install the Google Drive app for Mac.
- Sign in to your Google account.
- Open Google Drive from your Mac’s menu bar, then click the Settings cog and select Preferences.
- Click Add folder, then select a folder on your Mac that you would like to backup to Google Drive. Click Open.
- Alternatively, open Finder, select Google Drive in the sidebar, then drag and drop files into it to back them up manually.
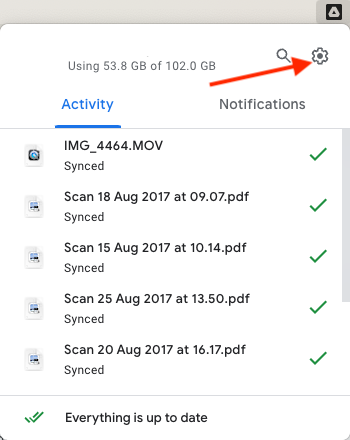
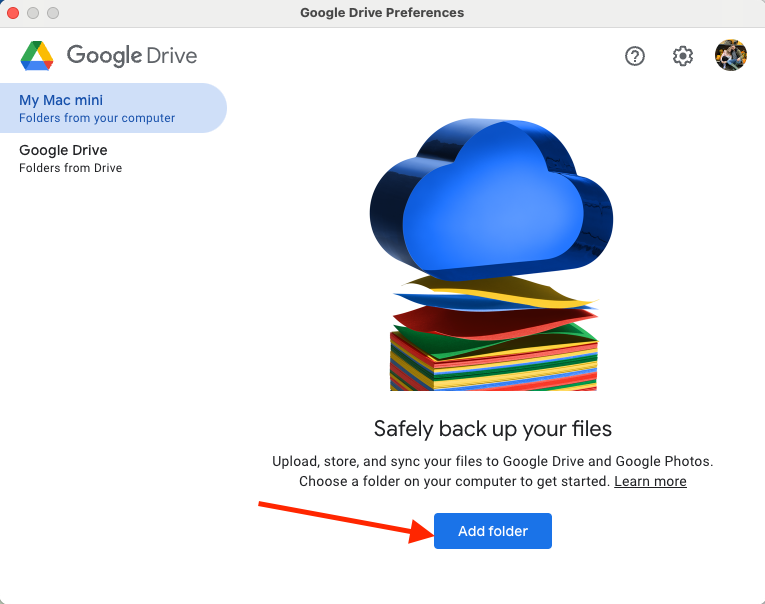
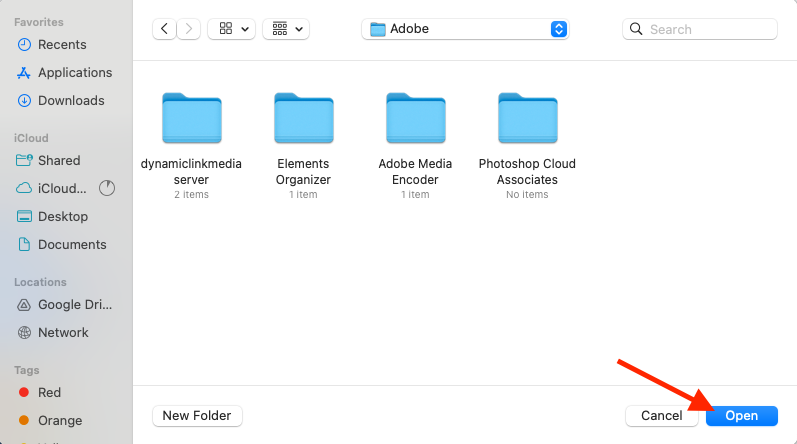
Again, the process will be slightly different with other cloud backup solutions, but for providers like Dropbox, OneDrive, and Mega, it’s very similar to that for Google Drive.
Read how to back up your data using Google Drive or Dropbox for a more detailed look at this process.
Comparing the benefits of cloud-based backups
If you’re looking to backup your Mac for the first time, you might be wondering whether local or cloud-based solutions are best. Both have their advantages and disadvantages, and it’s important to be aware of these before you decide which is right for you. Note, however, that you’re not limited to just one. Many Mac users rely on a combination of local and cloud-based backups to enjoy the best of both worlds.
Here are the key pros and cons of cloud-based backups:
Cloud backup pros | Cloud backup cons |
| Easy to set up | Can become expensive |
| Usually works automatically | Not accessible without internet |
| Can access files on any device | Can be more difficult to restore from backup |
| Option to increase storage as needed | |
| Many providers to choose from | |
| No need to worry about failing drives |
Here are the pros and cons of local backup solutions:
Local backup pros | Local backup cons |
| More control over backups | Can be harder to set up |
| No need to send your data elsewhere | More difficult and more costly to add extra storage |
| Can be more affordable over time | Backup drives can fail |
| Can access backups without internet | More difficult to access remotely |
| Better for backing up larger files |
Restoring your Mac from a backup
Now that you know how to backup a Mac laptop and desktop, it’s time to familiarize yourself with the process of restoring a Mac from backup. This may come in handy in the future if your Mac’s startup disk fails or your computer is stolen, and you need to move all your data over to a new machine.
Depending on which backup method you’ve chosen, the process for restoring your data will be a little different. iCloud and Time Machine are the only options that take care of most of the restore process for you, thanks to being built into macOS. Other methods require more manual work.
Step-by-step guide on how to restore your Mac from a backup
If you decide to use iCloud Drive to backup your Mac, you’re in luck, as this is by far the easiest when it comes to restoring your data. In fact, all you need to do is sign into the same iCloud account on your new Mac, and macOS will automatically sync all the data you have saved in the cloud.
If you use another method for backing, the restore process will be different. Let’s look at how to restore a Time Machine backup:
- When setting up a new Mac for the first time, follow the process until you see Migration Assistant.
- In Migration Assistant, select the option to transfer information From a Mac, Time Machine backup or Startup disk, then click Continue.
- Connect your Time Machine backup drive if it isn’t already connected, then choose the drive in Migration Assistant. Click Continue.
- Select your backup, then click Continue again.
- Confirm the data you wish to transfer, then allow Migration Assistant to perform the restore. Note that this could take several hours, depending on how large your backup is.
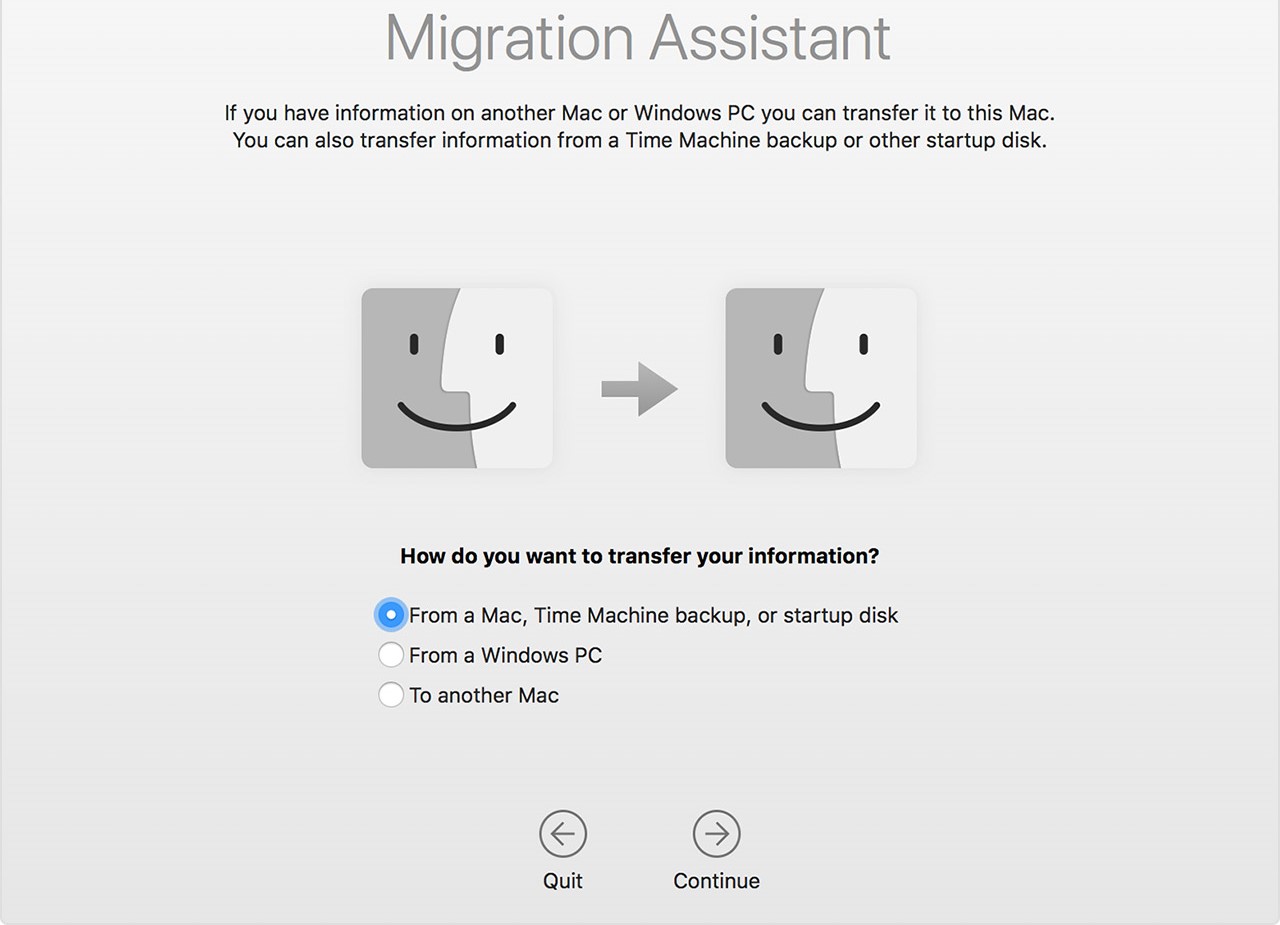
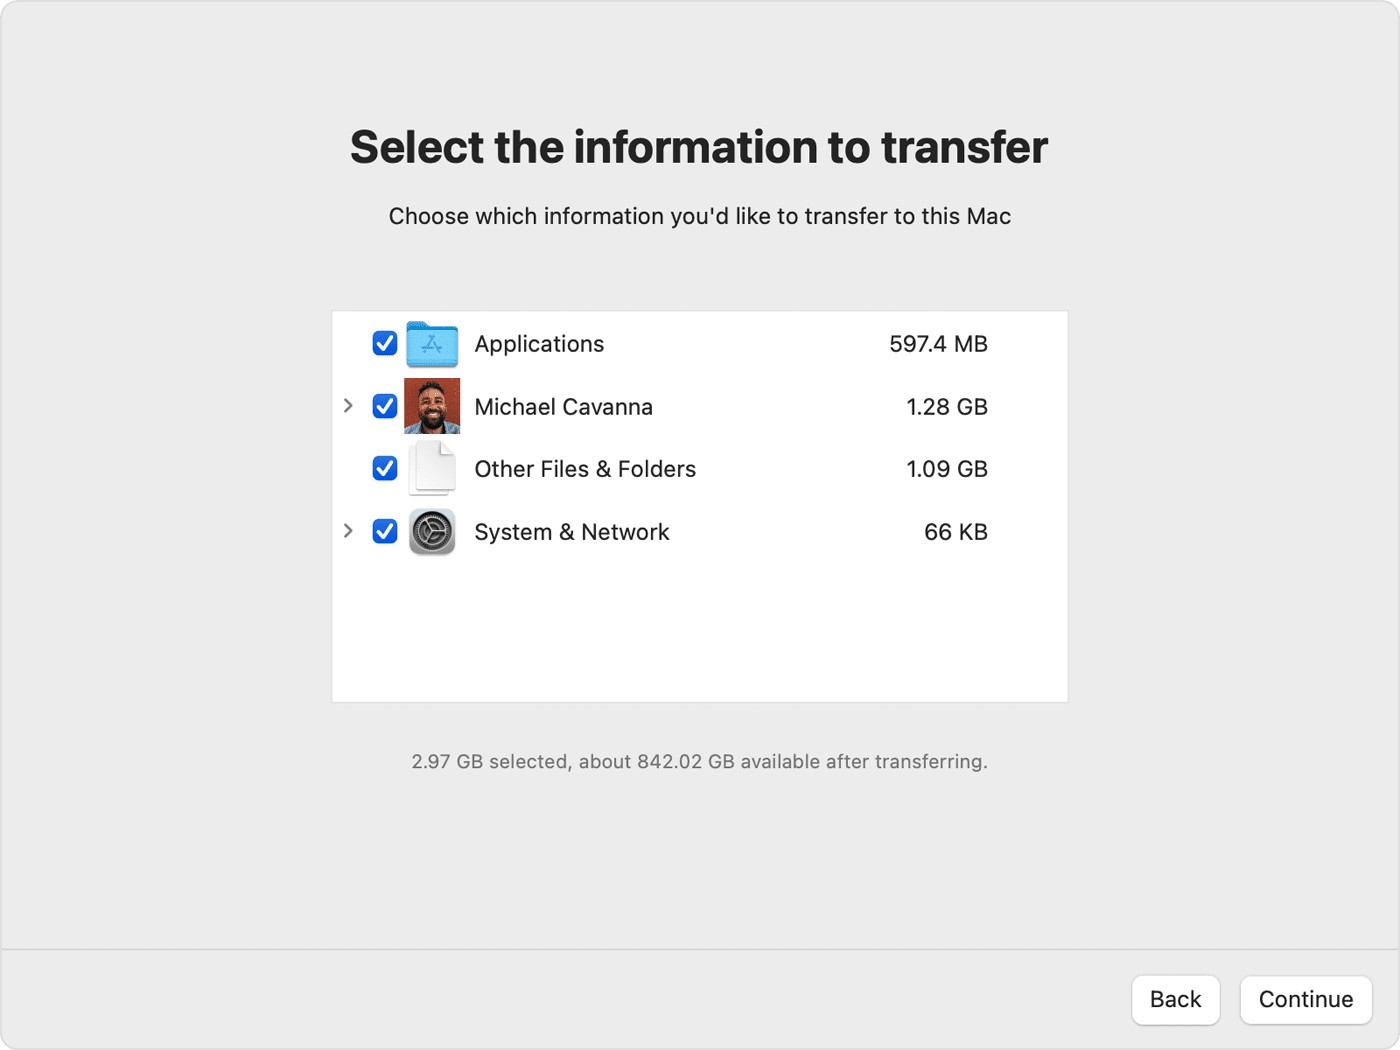
If you’re restoring an old Mac using Time Machine, you can follow the same process after installing a fresh copy of macOS.
If you’re restoring data from a clone of your Mac’s startup disk, perhaps made using SuperDuper, follow these steps:
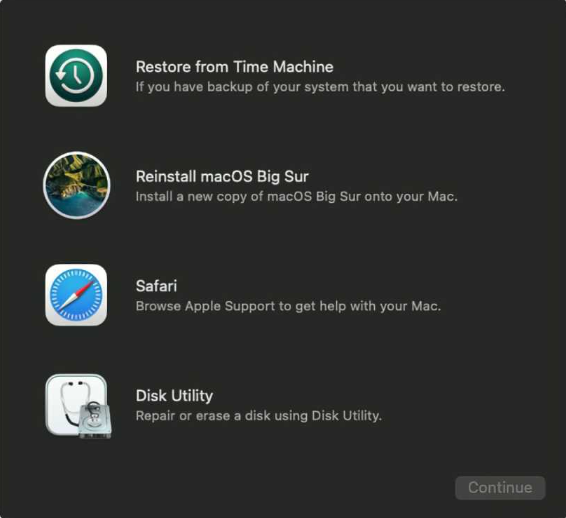
- Restart your Mac, then immediately hold down the Command + R keys on your keyboard.
- When your Mac boots into Recovery mode, select Disk Utility.
- Click Continue.
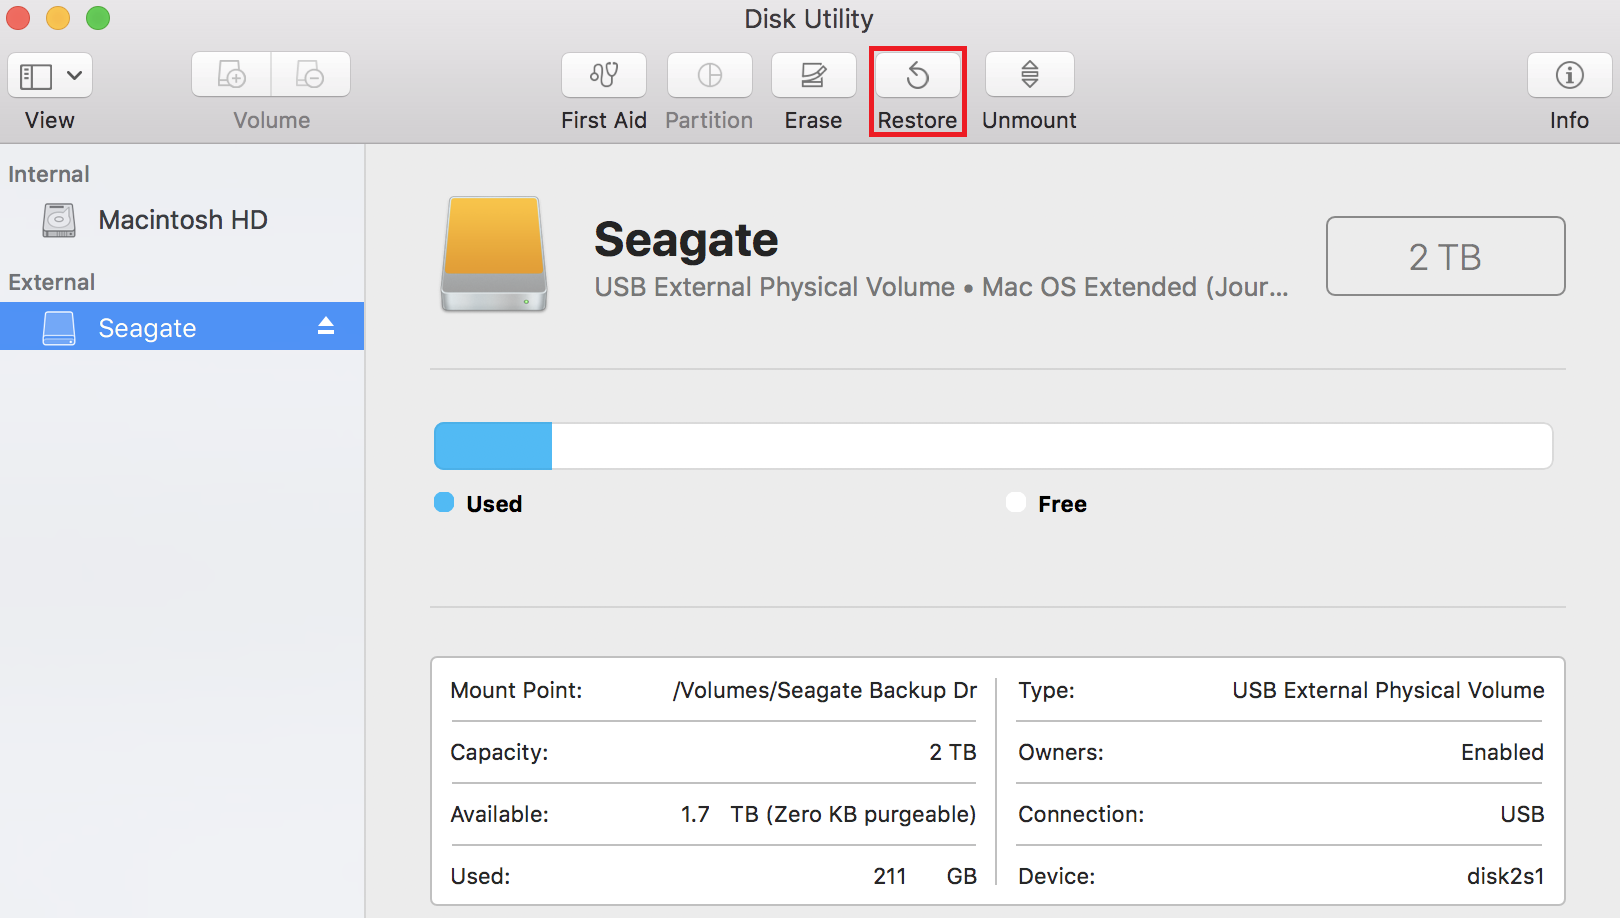
- Click the Restore tab in Disk Utility.
- Under Restore From, select the external drive that holds your Mac backup.
- Under Restore To, select your Mac’s primary storage drive.
- Click Restore, then wait for the process to complete. This could take several hours, depending on the amount of data you are restoring.
If you choose to manually backup your files by simply dragging and dropping them onto an external drive, you can reverse this process to restore them to your Mac. Locate the files you want to restore on your external drive, select them, and then drag them into a folder on your Mac.
The importance of knowing the restoration process
Knowing how to restore your Mac from a backup is almost as important as backing up itself. After all, creating copies of all your data is mostly a waste of time if the data is stuck somewhere else because you’re not sure how to get to it.
You may need to restore data to your Mac in lots of different situations. For instance, if your existing machine breaks down, gets lost, or is stolen, and you replace it with a new one, you’ll want to ensure all your files, documents, photos, and more can be transferred over so that they’re not lost forever.
You may also need to restore your data after your Mac has been serviced or repaired. Depending on the type of repair carried out, your machine may have a new logic board or other components that mean your old storage drive is lost. In this situation, restoring backed-up data is the only way to recover your files.
Steps to prepare your Mac for service, emphasizing the role of backups
Before taking your Mac for a service or repair, there are some important steps you should take. The most crucial of which is to create a fresh backup of all your data so that your most recent files, folders, and documents are saved. This will ensure they can be recovered later if you end up with a new machine or drive.
Other important steps you should take when preparing your Mac for service include:
- Ensure your Mac is password-protected so that repair technicians are unable to access your files.
- Remove all external drives, SD cards, and USB thumb drives.
- If you have particularly sensitive data on your machine, you may want to reset your Mac and wipe all its data (after backing up) before you send it in.
Of course, there may be times when you’re unable to use your Mac before taking it in for repair. If your startup disk or other components have failed, your Mac may not turn on or boot up properly. In this situation, you may not be able to create a fresh backup, which is why it’s important to ensure you backup on a regular basis.
Troubleshooting and best practices. Addressing common backup issues and troubleshooting tips
There may be times when backing up your Mac doesn’t go as smoothly as planned. This is usually the result of a problem with the backup solution you’re using, rather than with your Mac itself. However, there are some common troubleshooting steps you can take to fix most issues:
- If you’re backing up to an external drive using Time Machine or a similar solution, ensure you have plenty of free storage space available.
- If you’re backing up to a cloud-based service, confirm there is enough space available and a stable internet connection.
- If you’re backing up to a wireless drive over your home network, make sure you have a reliable Wi-Fi connection and that your Mac isn’t too far away from your router.
- When using third-party backup Mac software, ensure you have a valid license, that the software is up to date, and that you have plenty of storage space.
- Whenever a backup is taking place, ensure that your Mac does not go to sleep. If you’re using a MacBook, ensure that it’s plugged into power or has enough battery life to complete the backup.
- If you’re using iCloud Drive for backups and it’s not working, it could be that iCloud is down. Check Apple’s official System Status page to find out if there are any issues with the service.
Frequently asked questions about macOS update
Where are backups stored on Mac?
Mac backups may be stored in a number of different places, depending on which backup solution you’re using. If backing up to an external drive, your backups are stored on the drive itself. If backing up to a cloud-based service like iCloud, your backups will be stored on remote servers.
How to backup Mac Mail?
You can backup Mac Mail automatically by using iCloud. Ensure iCloud Drive is enabled that you have enough storage space, and all your data is saved. By the way, as emails are stored on remote servers, you won’t lose those if your Mac breaks down.
Where is iPhone backup on Mac?
If you’re wondering how to backup iPhone on MacBook, you can do this through Finder. Connect your iPhone to your Mac, open Finder, and select your iPhone in the sidebar. Click the Back Up Now button to create a local backup of your iPhone data. You can also backup your iPhone to iCloud, which allows you to restore your data from the cloud.
Can you backup Mac to iCloud?
Yes, iCloud backup is built into macOS. You can enable it by signing in to your iCloud account, then going to the iCloud menu in System Settings. Ensure iCloud Drive is enabled and that you have enough iCloud storage space to store all your files.
How to backup Mac Notes
You can backup Mac Notes by enabling iCloud Drive on your Mac from within System Settings. Notes data is automatically included in your backups. Alternatively, you can backup Mac Notes to Google Drive by going to Internet Accounts within System Preferences, then signing into your Google account and enabling Notes. You can do the same to backup Mac Notes to OneDrive.
Where does Time Machine backup to?
It’s up to you where Time Machine backups are saved. You must specify this when setting up Time Machine for the first time. You’ll usually use an external storage drive or USB drive, which must have at least twice as much storage as your Mac itself.
How do I do a full backup of my Mac?
There are a number of ways to backup Mac Pro and other Mac models. Using iCloud and Time Machine, you can create a full backup of all your data, which makes it easier to restore your Mac later on. You can also clone your Mac’s storage drive using Disk Utility or a third-party solution.
Does Mac backup to iCloud?
Yes, your Mac will backup to iCloud if you have iCloud Drive enabled. To do this, you’ll need an iCloud account. You can sign into it and enable iCloud Drive from within System Settings > Apple ID.
Does Mac backup automatically?
Your Mac will backup automatically if you’ve turned on iCloud Backup or Time Machine. These are the only solutions that work “out of the box,” but they require you to set them up when you first get your Mac. You can also set up automatic backups with third-party cloud storage providers, such as Google Drive, Dropbox, and OneDrive, but these will only backup certain files and folders that you’ve selected.


