In this article you will find the following:
Cleaning purgeable space on macOS Big Sur is a simple task if you know where to look. To start with, you can try restarting your Mac, which can help remove cache and temporary files. However, if the problem persists, you can use Apple’s Optimize Storage feature. You can find it by going to Apple > About This Mac > Storage > Manage.
Running out of disk storage on your Mac is a common issue that can have a negative impact on your device’s performance. It can prevent you from saving important documents and media, and make your computer run slower. The first step you can take to fix this inconvenient situation is to reclaim purgeable space by identifying and removing unnecessary files and apps on your computer.
Before we start
Receiving alerts about running out of disk space can be frustrating, but they’re important reminders that prompt you to clear your Mac of unnecessary files. Fortunately, MacKeeper’s Safe Cleanup tool is an excellent solution for Apple users to eliminate junk files slowing down their devices with just a single click. Moreover, you can schedule automatic daily scans for added convenience, and our app will notify you if it detects any suspicious files to be deleted.
Follow these steps to use MacKeeper’s Safe Cleanup on your Mac:
- Download MacKeeper and open the app on your device.
- Select the Safe Cleanup option from the left sidebar.
- Click Start Scan.
- When the scan is done, choose the files and folders you want to get rid of and click the Clean Junk Files button.
Now, read on to learn how to remove purgeable space on macOS Big Sur.
What is the purgeable storage on macOS Big Sur
Purgeable space on a Mac refers to the portion of disk storage that can be freed up when required. This can be done by deleting specific files, including system junk, caches, temporary files, backup files, and other unnecessary data. You can also remove apps and documents that you no longer need to free up more space and speed up macOS Big Sur.
Note from our experts: As you use your Mac, you tend to accumulate data that isn’t entirely essential for the proper functioning of your computer. However, this data can take up precious disk space, which can be an issue. These unnecessary files are known as purgeable files, and they appear when we make local snapshots using Time Machine or when we use any app. Additionally, duplicates and Trash files, as well as language files and dictionaries, are also included in this category.
How to find purgeable files on Mac Big Sur
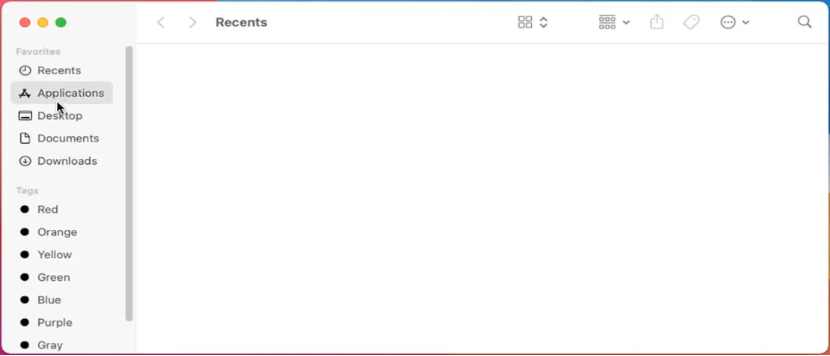
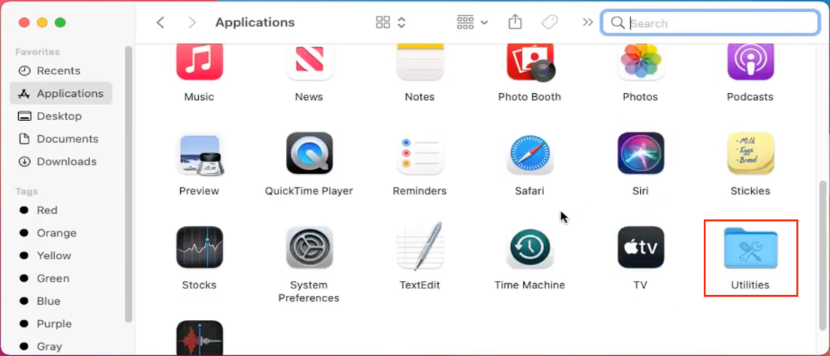
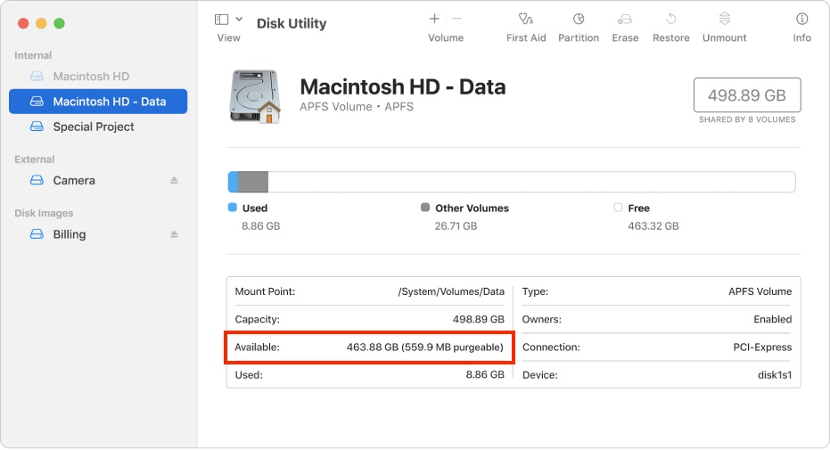
A simple way to determine whether unnecessary data is taking up space on your Mac is to check the amount of purgeable space. We explain how to do it below:
- Open Finder, then click Applications from the left sidebar.
- Find the Utilities folder and double-click on it to open it.
- Launch Disk Utility.
- Select your drive from the left side.
- Find the purgeable space in brackets next to Available.
How to remove purgeable space on Mac Big Sur internal drive
There are several ways to remove Mac purgeable space. Namely, you can manually delete cache and temporary files or use a cleaning app that is specifically designed for this purpose. Additionally, macOS Big Sur comes with several built-in features that can help you get rid of unnecessary purgeable files:
- Empty trash
- Reboot your Mac
- Optimize Storage with Storage Management
- Turn off local snapshots in the Time Machine
- Disable Optimize Mac Storage for iCloud drive
- Clear cache
1. Empty trash
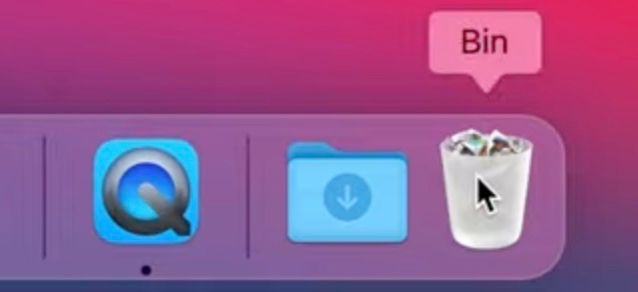
Let’s start by emptying the Trash on your Mac. If your documents have ended up in there, it’s because you no longer need them. There are several methods to clear the Trash, but here’s one of the most straightforward ones:
- Right-click the Trash icon in your Mac’s Dock.
- Choose Empty Trash from the dropdown menu.
- In the warning message that appears, click Empty Trash to confirm you want to erase all the items in the Trash.
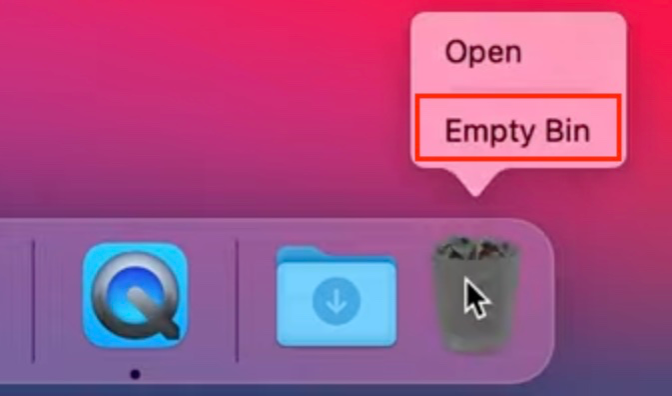

It’s a good idea for Mac users to make emptying the Trash a regular part of their routine. Although macOS will automatically do it for you after 30 days, you should do it more frequently to save disk space and to protect your privacy in case you share your computer with others. Just make sure to double-check that you don’t need the documents in your Trash before emptying it, as once you've emptied it, you won’t be able to retrieve them.
2. Reboot your Mac
As mentioned earlier, you can easily free up purgeable space on your Mac by simply restarting it. Here’s how:
- Click the Apple icon in the menu bar.
- Select the Restart… option from the dropdown menu.
- Click the Restart button to reboot your Mac.
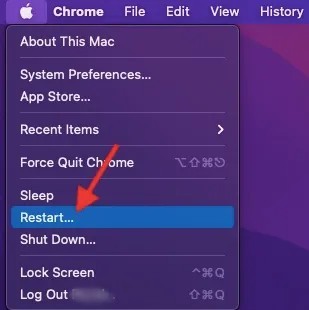
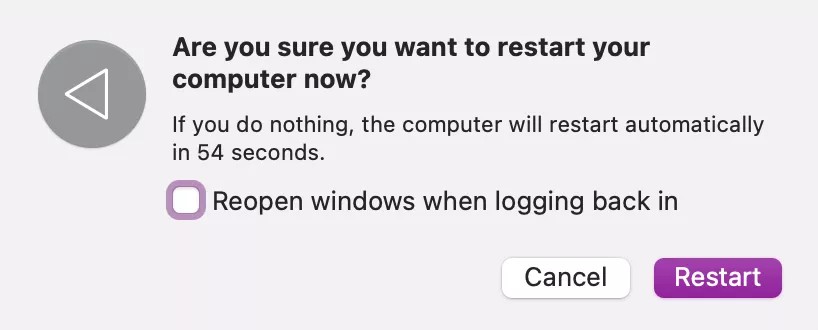
When you reboot your Mac, most of the files that are considered purgeable, such as temporary items and caches, are deleted. Although the space you can free up with this method is usually small, you shouldn’t skip this step if you need to clear your device’s storage. However, you may want to try other methods from this list first if you have several important processes running.
3. Optimize Storage with Storage Management
macOS Big Sur comes with a built-in feature named Optimize Storage that allows you to maximize your Mac’s disk space. To use it, do the following:
- Click the Apple icon in the menu bar.
- Select the About This Mac option from the dropdown menu.
- Click the Storage tab, then click the Manage… button.
- Select the Optimize… button next to Optimize Storage.
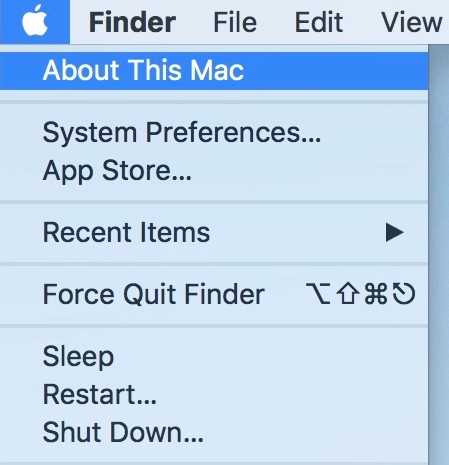

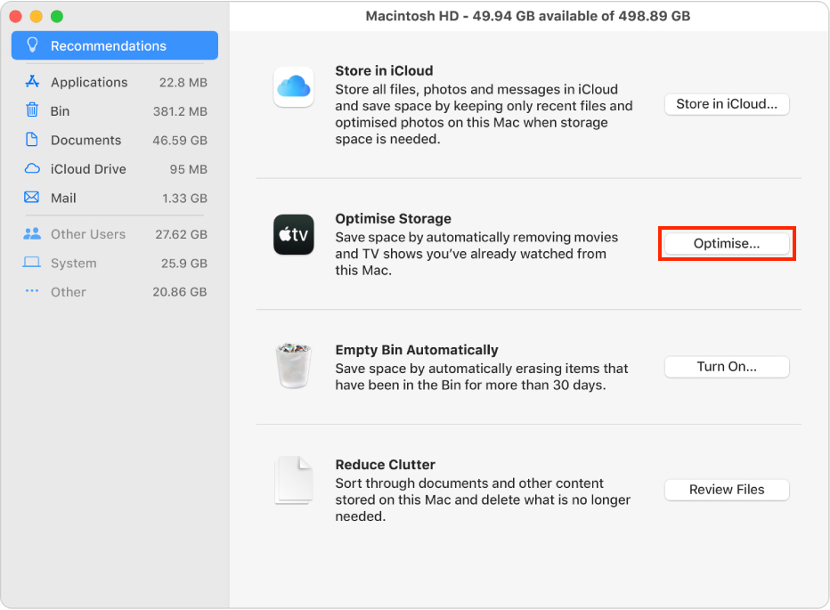
Optimize Storage is an ideal tool for removing purgeable space on Mac. When you're running low on storage, it will delete data that you no longer need. This includes your email attachments, keeping only the most recent ones. It will also remove Apple TV movies and shows that you’ve already watched or move large files to your iCloud account and delete them from your device.
4. Turn off local snapshots in the Time Machine
Here’s how to disable Time Machine local snapshots on your Mac:
- Click the Apple icon in the menu bar.
- Select System Preferences from the dropdown menu.
- Click the Time Machine option.
- Click the lock in the bottom left corner, then enter your administrator’s name and password to unlock it.
- Uncheck the box next to Back Up Automatically.
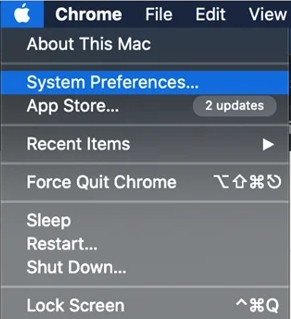
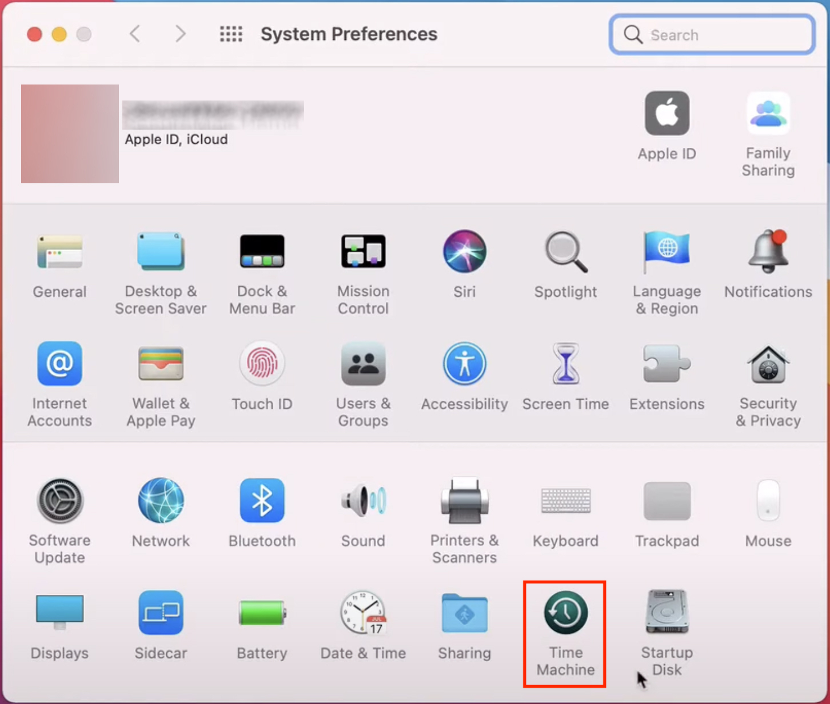
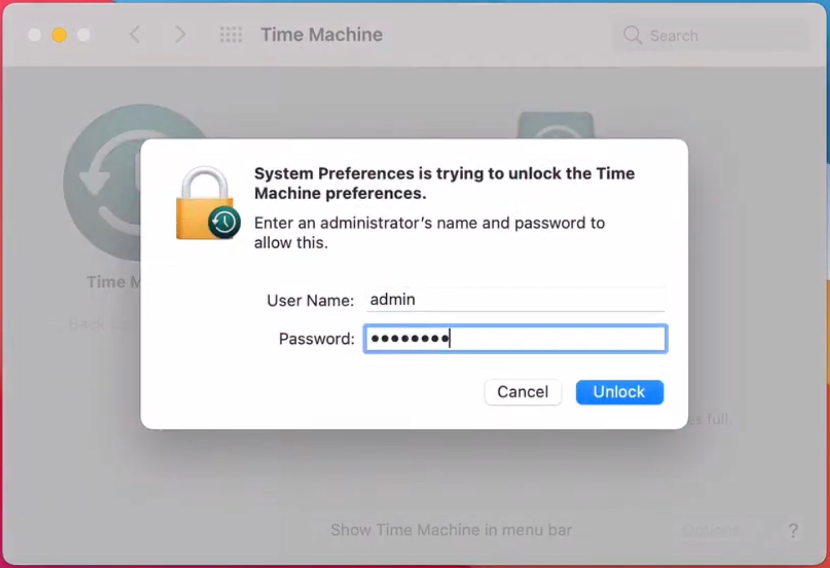
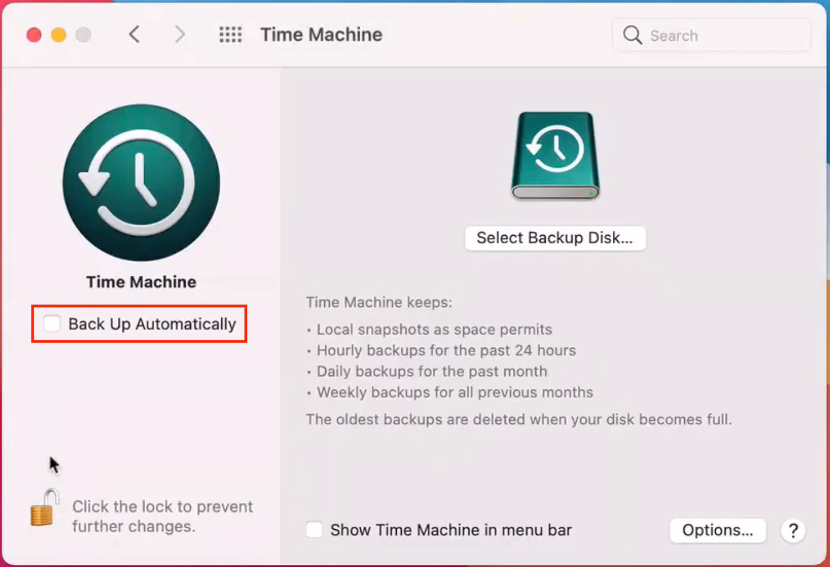
Over time, your Mac can accumulate local snapshots and backups, which can take up valuable disk space. If the Back Up Automatically option is enabled, Time Machine snapshots will be created and take up much of the purgeable space. To free up storage space for other purposes, you can disable this option. However, keep in mind that it may take a while before the purgeable space is relocated to free space.
5. Disable Optimize Mac Storage for iCloud drive
Find below the steps to turn off the Optimize Mac Storage feature on macOS Big Sur:
- Click the Apple icon.
- Select System Preferences from the dropdown menu.
- Click the Apple ID option.
- Choose iCloud from the left sidebar.
- Uncheck the box next to Optimize Mac Storage.
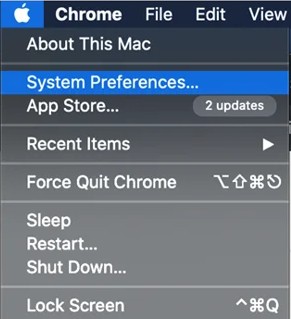
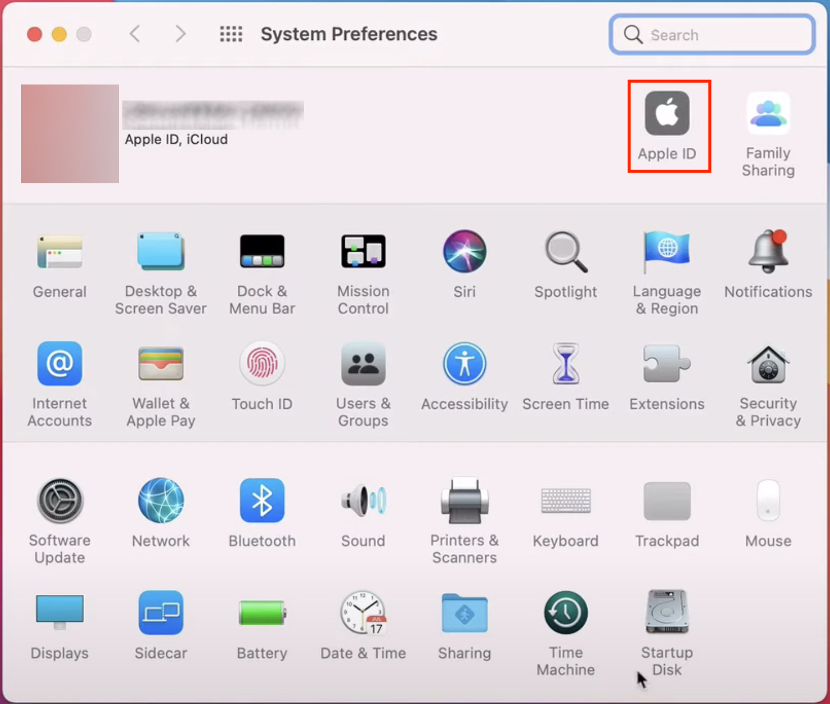
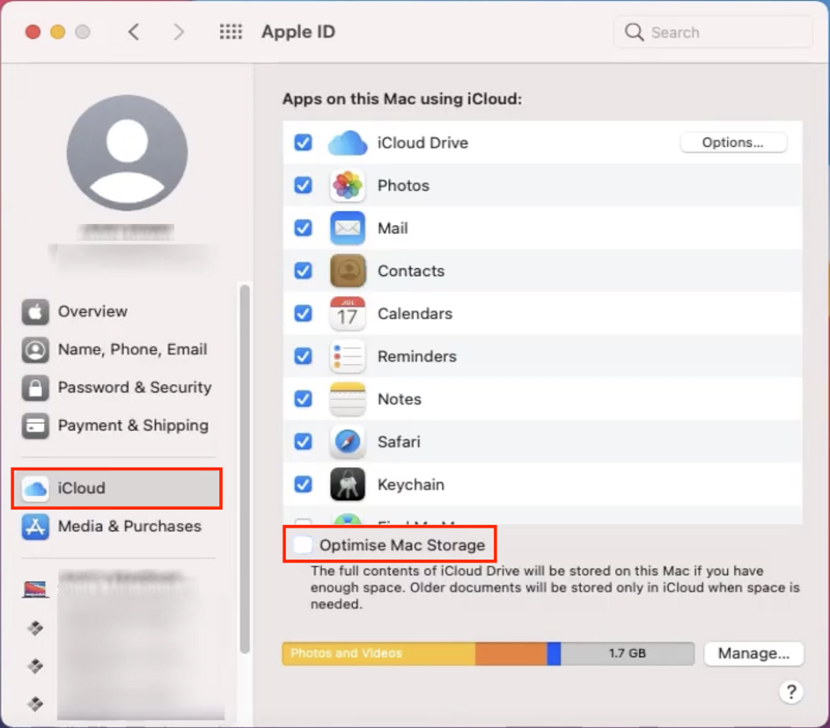
When the Optimize Mac Storage option is enabled by iCloud users, files that haven’t been used in a while are stored in the so-called purgeable space. If you need to clean up purgeable files on macOS Big Sur, we recommend that you disable this feature to prevent local copies from taking up valuable purgeable storage. Remember, though, that you may still encounter non-purgeable space problems.
6. Clear cache
Cache files are some of the easiest purgeable files to delete on a Mac. There are two main methods to achieve this—you can either clear the cache manually or remove it with the help of a cleaning app. If you’re wondering how to free space on Mac quickly, choose one of these two options:
6.1 Clear cache manually
You can get rid of all cache files manually via the Finder on macOS Big Sur:
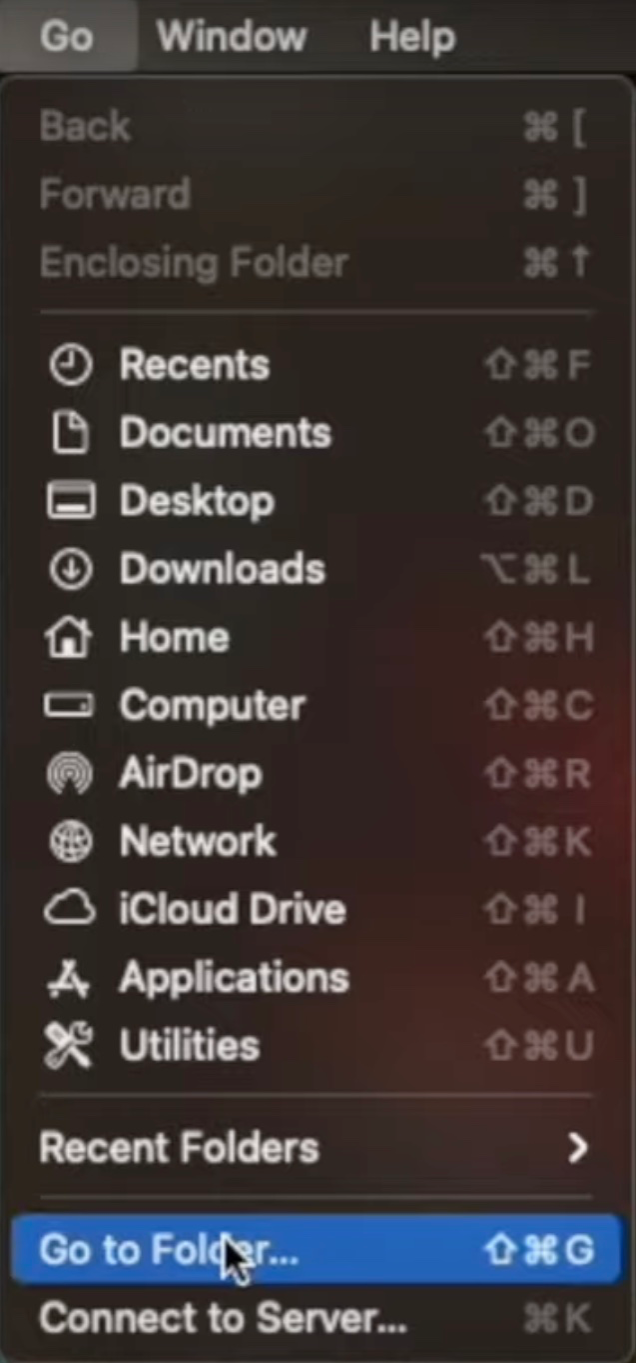
- Open Finder, next click on Go from the menu bar.
- Choose Go to Folder….
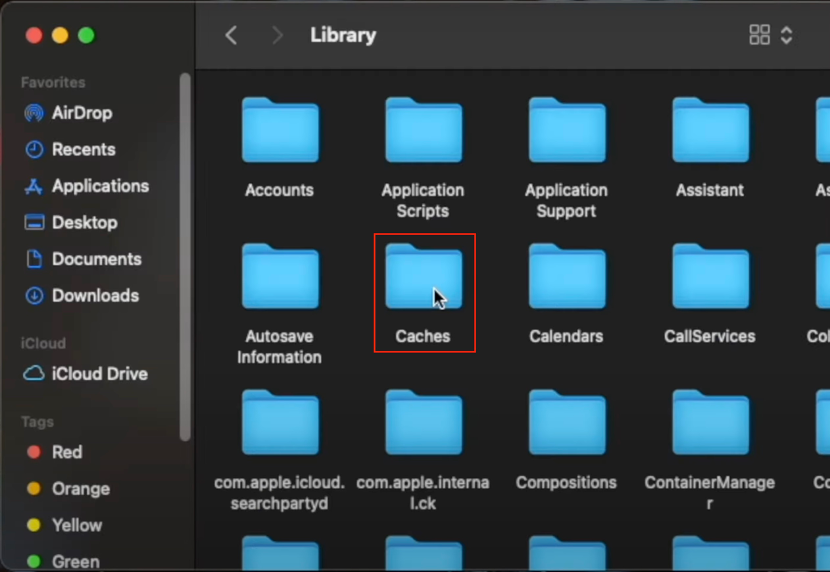
- Use the search bar to go to the ~/Library folder, then click Go.
- Open the Caches folder.
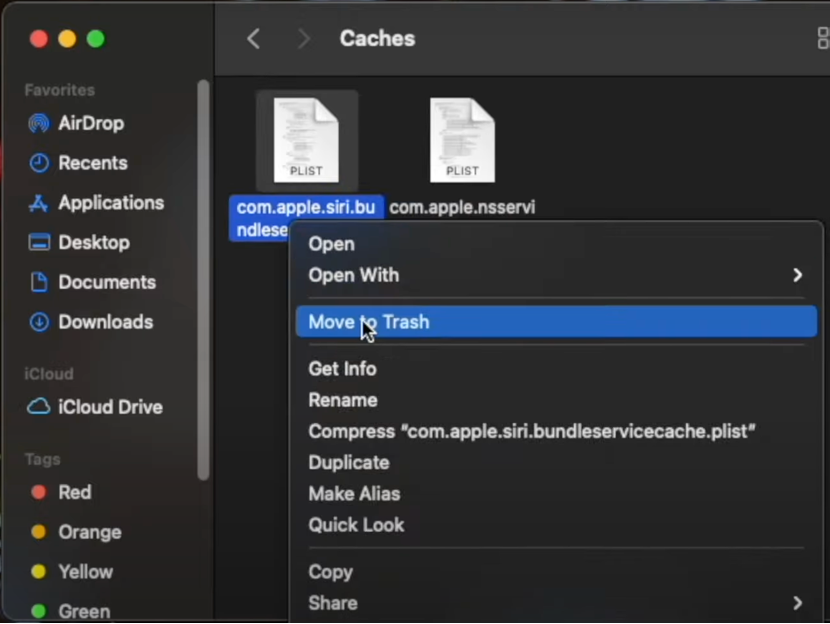
- Select all the cache files, right-click on them, and select Move to Trash from the dropdown menu.
- Right-click the Trash icon in the Dock and select Empty Trash to erase them for good from the system.

6.2 Clear cache with a cleaning app
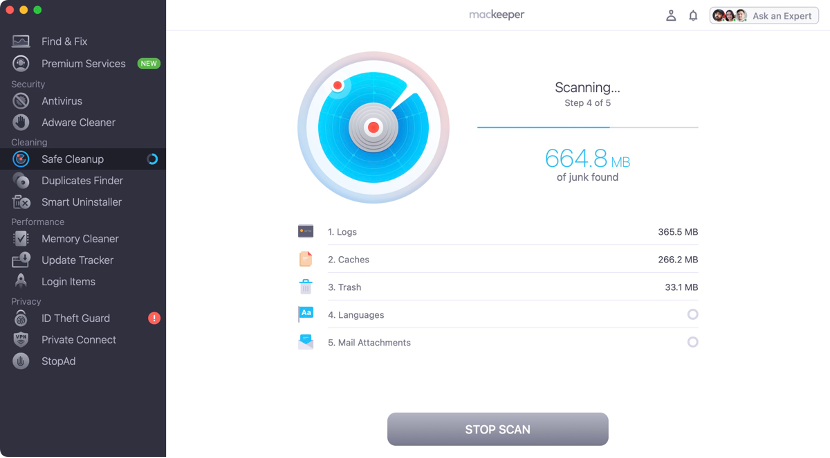
Alternatively, you can use MacKeeper’s Safe Cleanup to quickly find and remove the cache files on your Mac:
- Open the MacKeeper app on your Mac.
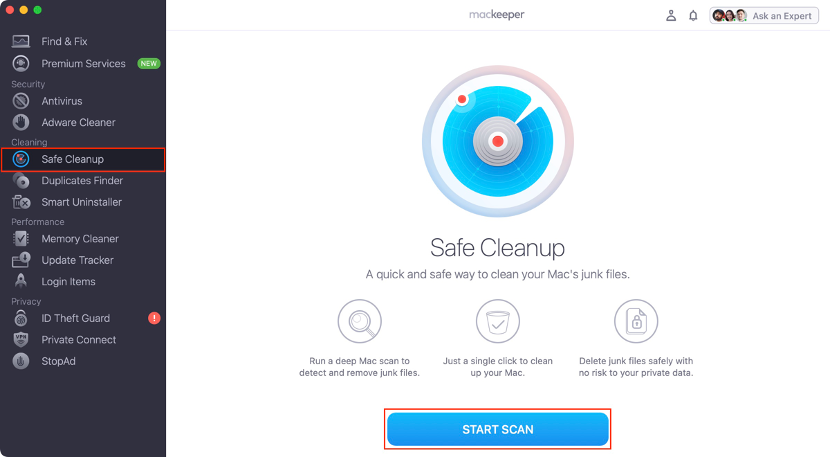
- Go to the Safe Cleanup tool from the sidebar.
- Click the Start Scan button.
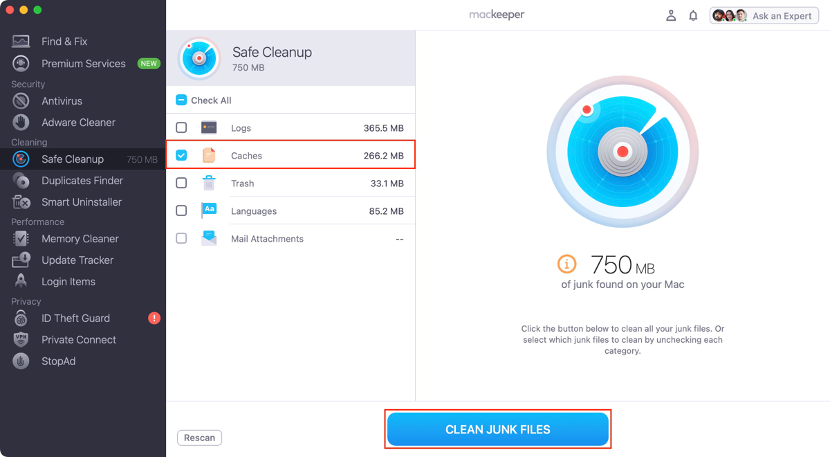
- Uncheck all categories except the Caches one.
- Click Clean Junk Files.
How to remove purgeable storage on Mac Big Sur with Terminal
To clear purgeable space on Mac using Terminal:
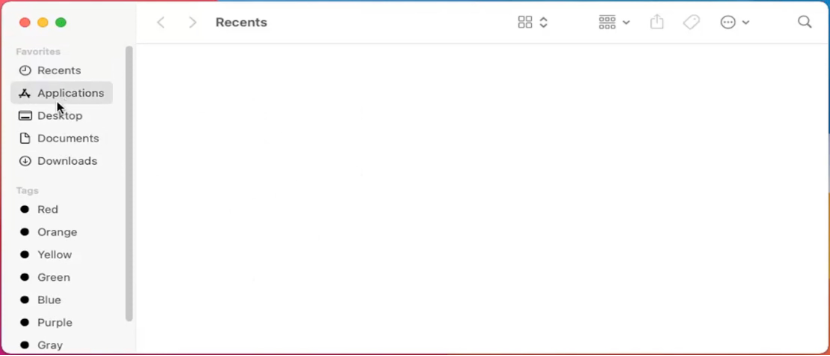
- Open Finder, then click Applications from the left sidebar.
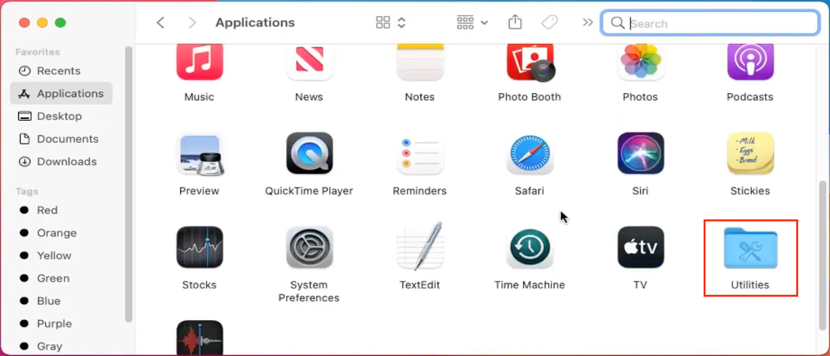
- Double-click the Utilities folder, then launch Terminal.
- Paste the following command: mkdir ~/largefiles, and press Enter.
- Type the following command: dd if=/dev/random of=~/largefiles/largefile bs=15m, then press Enter.
- Wait 5 minutes, then press Control+C.
- Paste the following command: cp ~/largefiles/largefile ~/largefiles/largefile2, and press Enter.
- Repeat the last step but this time changing it to largefile3, largefile4, and so on until the “disk is critically low” message appears.
- Type in the following command: rm -rf ~/largefiles/, then press Enter.
- Right-click the Trash icon in the Dock and select Empty Trash to erase the items permanently.
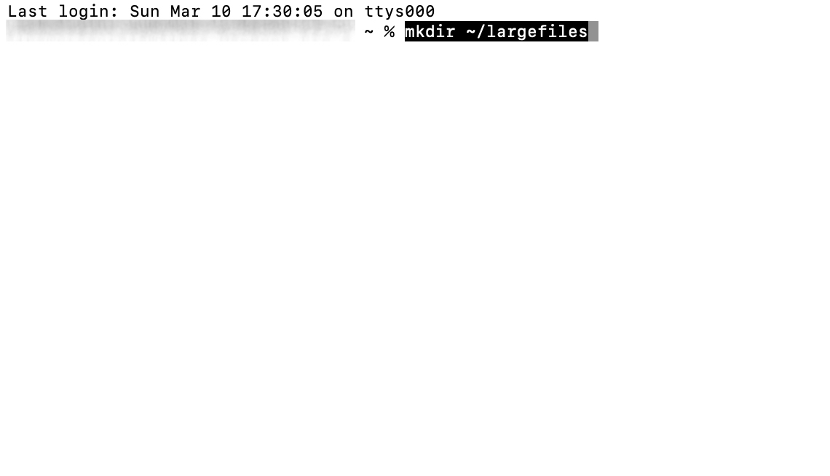
Hint from our team: We typically don’t recommend this method for those who aren’t comfortable using commands. However, if you’re a self-proclaimed tech-savvy user and want to learn some Terminal tricks to clear purgeable space, don’t hesitate to try your hand at it.
How to clear purgeable space on Mac Big Sur external hard drive
When you use an external disk like a USB flash drive, an external HDD, or an SSD, it tends to accumulate unnecessary data, just like your Mac’s internal disk. The purgeable space of an external disk is also made up of caches, temporary files, duplicates, and Trash documents, among others. When more space is needed, the system will automatically delete these purgeable files. So, the solution to a space problem on an external drive should be the same as on the internal drive.
Below, you’ll find the top tips for reclaiming purgeable space on an external drive connected to your Mac:
- Empty the Trash: If you’ve deleted any files from your external drive, make sure to empty the Trash as well. This will help you free up space on your drive. Also, remember to do this while the drive is still connected to your Mac.
- Disable Time Machine local snapshots: Some backup tools may keep snapshots of already deleted backups. If you’re using such tools, we advise you to turn off this option to free up space on your external drive.
- Run Terminal: You can also use Terminal to clear purgeable space on your external drive. Simply open Terminal and type the following command: diskutil list. Next, enter this command: dd if=/dev/zero bs=100m of=XYZ/Test (replace “XYZ” with your disk name). Finally, execute this command: rm -rf XYZ/Test.
- Erase the external disk: If you’ve tried everything and still want to free up space on your external drive, you can format it to return it to its original state. You can do this using Disk Utility. Just select the disk on the left and click on the Erase button.
However, you can also refer to the previous sections for more detailed information on some of these steps.
Use third-party apps to clear purgeable space on Mac Big Sur
Although Apple provides a good selection of apps and features, many of the Mac Big Sur issues users face can be solved easily with third-party software. This is particularly true for problems that arise due to a lack of disk storage.
Cleaning apps aren’t just for users who want to protect their devices from malware attacks. They’re also great for automating the process of removing files and apps that you no longer need, as well as duplicates, logs, caches, and temporary files.
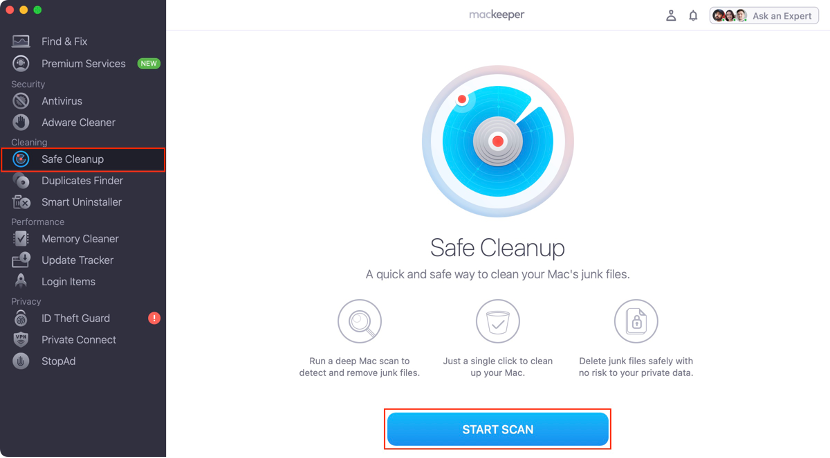
A brilliant tool that can help you with all this is MacKeeper. MacKeeper’s Safe Cleanup function is designed to make life easier for Mac users who want to free up valuable purgeable space. Here’s how you can make the most of it:
- Open MacKeeper on your Mac.
- Choose the Safe Cleanup tool from the left sidebar.
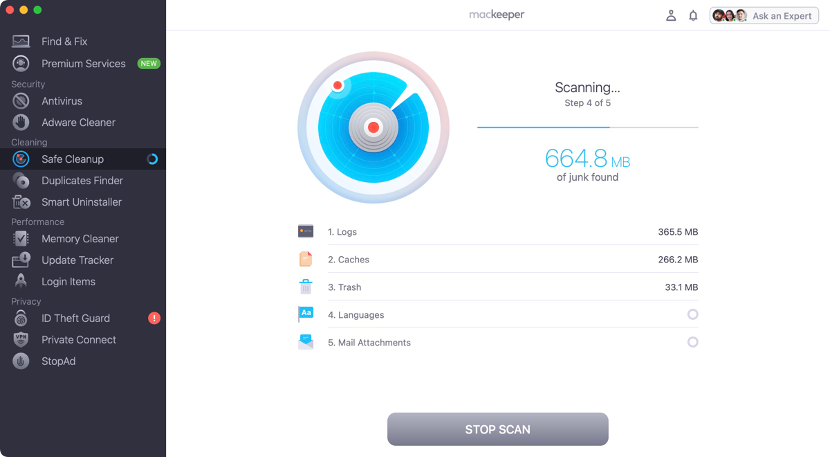
- Click Start Scan.
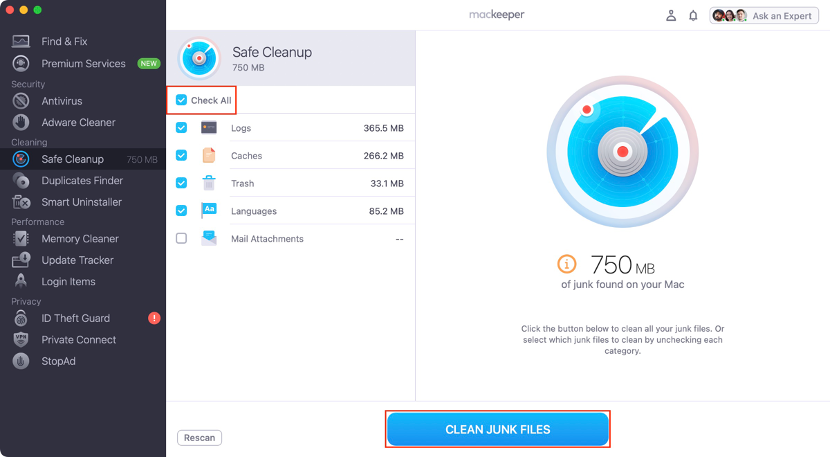
- Check all relevant categories—Logs, Caches, Trash, Languages, and/or Mail Attachments.
- Click the Clean Junk Files button.
Remove Purgeable Space Mac Big Sur now
It’s common to overlook the purgeable space available on your Mac when you’re trying to free up storage. This space is used by your device to automatically remove unnecessary data when it requires more storage for important files. So, the first thing you should do when you’re running low on storage is to to reclaim as much purgeable space as possible.
Our team of experts has provided several useful tips for freeing up purgeable space in this article. We’ve suggested simple steps like restarting your computer and clearing the Trash, and we’ve also explained how some built-in macOS Big Sur features work, such as Optimize Storage and Back Up Automatically (which should be unchecked).
Another quick way to recover purgeable storage is to delete cache files. For this purpose, we recommend using a cleaning app like MacKeeper. Its Safe Cleanup tool is designed to get rid of not only cache files, but also other types of junk files like logs, language files, and email attachments. Try it yourself.


