In this article you will find the following:
Picture this: you’re editing a picture in Photoshop, and everything looks good and smooth. But as you make more adjustments and add more layers, Photoshop suddenly begins to lag, and you eventually get an error that reads, “Could not complete your request because the scratch disks are full.”
And when you close and reopen the app, you get another error that says “Could not initialize Photoshop because the scratch disks are full.” What exactly do these error messages mean? What is a scratch disk? How does it get filled up? Why is the error interrupting your workflow or preventing you from opening Photoshop? And most importantly, how do you fix it?
Before we start
If you’re a big fan of Photoshop and use it on a frequent basis, you can lose track of how many duplicate files are accumulating after each change. But worry not, as MacKeeper’s Duplicates Finder can quickly find and remove all of those duplicate files for you.
Here’s how to use MacKeeper’s Duplicates Finder:
- Download MacKeeper and install it.
- Open the app and choose Duplicates Finder.
- Click on the Start Scan button.
- Wait while all your duplicate files are found, then choose the ones you don’t need anymore.
- Click Remove Selected to delete them.
What is a scratch disk?
By default, active applications store temporary files in your Mac’s RAM (random access memory). With Photoshop, however, things are a little different. In addition to using your RAM like any other app would, Photoshop also requires additional storage space where it can temporarily hold files while you’re using it.
This makeshift memory, known as a scratch disk, is used because many of the files you might work on inside Photoshop will be very large. Storing them and other temporary data in RAM—which is a lot smaller than Mac’s storage drive—would fill it up incredibly quickly, causing your Mac to grind to a halt.
Scratch disks ensure Photoshop can quickly access portions of your documents and the history of changes you’ve made to them. This helps make Photoshop as snappy as possible while also preventing it from bogging down your Mac and other applications you might need to run at the same time.
What causes Photoshop’s “scratch disk full” error?
As you create and edit images in Photoshop, the app simultaneously creates a bunch of temporary cache files in the background. These files help Photoshop run faster, but they can quickly accumulate, running into tens or even hundreds of gigabytes, and filling up your hard drive in the process.
This not only means that you run out of free space on your Mac’s storage drive, but it affects Photoshop's performance in the long run and can lead to “scratch disk full” errors that many Photoshop users run into. You may also experience these errors if the temporary files Photoshop saves during an editing session aren’t removed from the scratch disk when the application closes.
Typically, Photoshop, just like any other app, should purge temporary files from the RAM and scratch disk portions of your Mac’s hard drive when you’ve finished using it. But that’s not always the case. If Photoshop crashes during usage, or you force quit it, the temporary files remain and accumulate.
How to clear scratch disk in Photoshop on Mac
If you start running into scratch disk errors while using Photoshop, it’s a bad idea just to ignore them. They can not only make the app a lot slower and unstable, but they can also prevent it from running altogether. Fortunately, there are many ways to clear the scratch disk on Mac and fix Photoshop errors, including:
- Free up space on Mac
- Clear your Photoshop cache
- Remove hidden Photoshop files
- Delete Photoshop temporary files
- Move Photoshop scratch disk to an external hard drive
- Reset Photoshop preferences
- Change your scratch disk
- Free up your RAM in macOS Terminal
- Disable auto-recovery in Photoshop
- Defragment your HDD
- Go for SSD
1. Free up space on your Mac
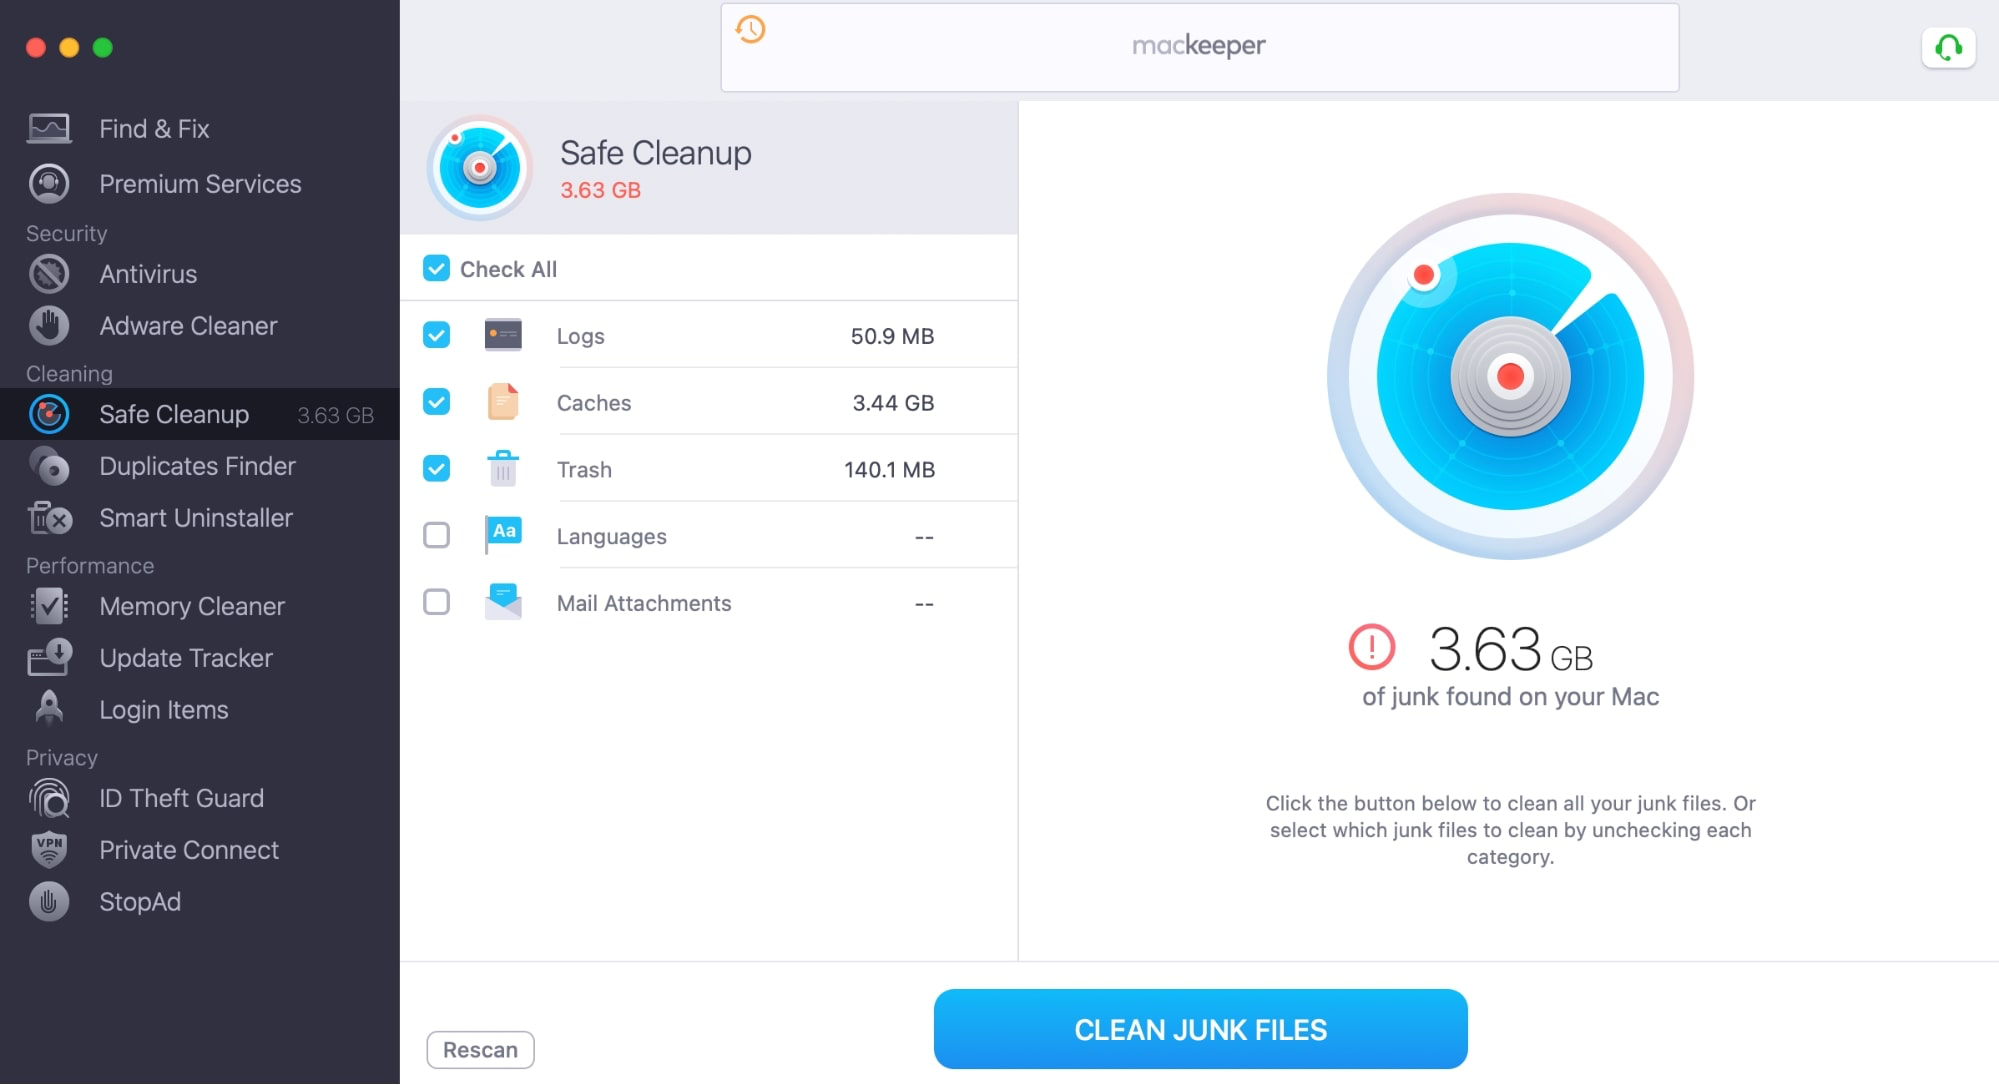
The Photoshop “scratch disk full” on Mac error usually presents itself when your hard disk is low on storage space. In this case, you need to free up disk space on your Mac by removing duplicate files, clearing browser caches, emptying the Trash, deleting unused applications (and their leftover files), and so on. You could do all of this manually, which can be time-consuming and ineffective, or you could let MacKeeper take care of the hard work for you. Here’s how:
- Download MacKeeper, install it, and open the app on your Mac.
- Go to the Safe Cleanup tab.
- Click Start Scan.
- Select the junk files you want to remove, then click Clean Junk Files.
Hint from our team:
As you can see, MacKeeper can not only find and remove duplicate files you’ve created in Photoshop (with a separate tool—Duplicated Finder), but it can also identify and clean junk files (with Safe Cleanup tool) that have built up on your Mac, freeing up plenty of storage space.
2. Clear your Photoshop cache
Now, we advise you to empty the scratch disk in Photoshop on Mac. This will resolve the “scratch disk is full” error and get Photoshop working correctly again. First, be sure to save the projects you’re working on so that you don’t lose any of your changes, then follow these steps:
- Launch Photoshop and open a project.
- Click the Edit menu, then go to Purge > All. This will clear all the various Photoshop caches.
- Click OK on the confirmation prompt.
- Repeat these steps for other projects, and check if that resolves the “scratch disk is full” error.

Before you clear your Photoshop caches, be aware that following these steps will delete previous versions of your projects, which will prevent you from undoing any changes you’ve saved. Only clear your project caches if you’re comfortable with this, as there’s no way to recover them later. Here’s what they contain:
- Clipboard: This is a record of things (files, elements, images, etc.) that you copy. You won’t be able to paste that data after clearing this cache.
- Histories: This temporary file holds the previous version(s) of your project. Deleting this cache file means you’ll no longer have access to changes made to your project.
- Video cache: It holds changes made to a video file or project. You can’t restore changes made to a video project when you delete this cache.
If an item/category is greyed out, that signifies that the cache has already been cleared, so no further action is required.
3. Remove hidden Photoshop files
Photoshop files can sometimes become hidden, which makes them difficult to find and remove when you need to free up space for your scratch disk. Fortunately, there’s a simple way to reveal them like so:
- Open Finder on your Mac, then navigate to your Photoshop folder.
- Press the Command + Shift + Period (.) keys on your keyboard to reveal all hidden file icons.
- Look for files that are greyed out, which indicates that they were previously hidden. Right-click any you don’t need, then select Move to Trash.
- Empty your Mac’s trash to remove the files from your computer.
Note from our experts: In some cases, files on your Mac are hidden because they aren’t supposed to be tampered with or deleted. With that in mind, be careful when selecting files for deletion to ensure you don’t remove anything that Photoshop relies on to function properly. Only wipe files you recognize and no longer need.
4. Delete Photoshop temporary files
In the rare instance that you cannot clear Photoshop’s cache using the method above, you can manually delete the app’s temporary files from Finder to free up space on the scratch disk on Mac. It requires more effort, but it gets the job done. Try following these steps:
- Save your Photoshop projects and quit the application.
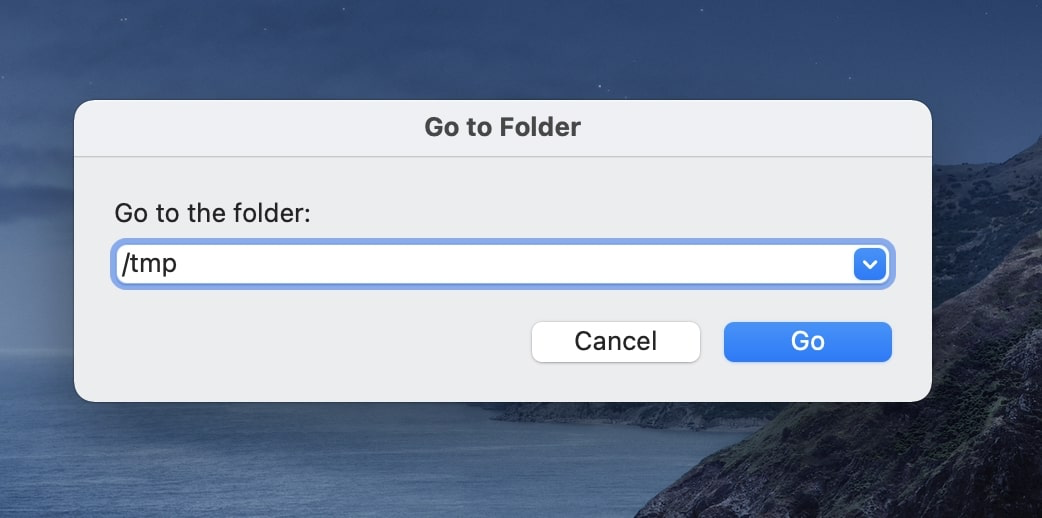
- Open Finder, then click Go > Go to Folder in the menu bar.
- Type /tmp in the dialog box, then click Go. This will open a new Finder window containing your Mac’s temporary files and folders.
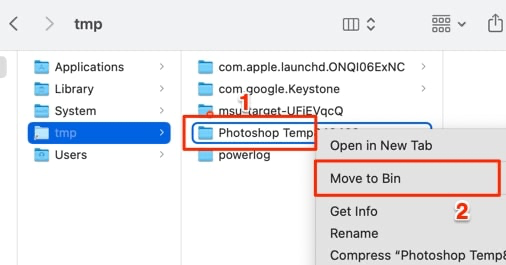
- Now, carefully peruse the folders and look out for folders or files starting that are named “Photoshop Temp,” followed by a string of numbers. Temporary files have a .tmp extension, so make sure you’re indeed deleting temporary files, not other file types.
- Find a typical Photoshop temporary file with this structure: Photoshop Temp78403. Right-click on these folders/files, then select Move to Trash/Bin.
- Delete as many temporary files as you can find, then Empty the trash on your Mac. Launch Photoshop again, and the error should no longer pop up on your screen.
5. Move Photoshop scratch disk to an external hard drive
If you’d rather not delete files on your hard disk, an effective workaround is to configure Photoshop’s scratch disk on an external drive:
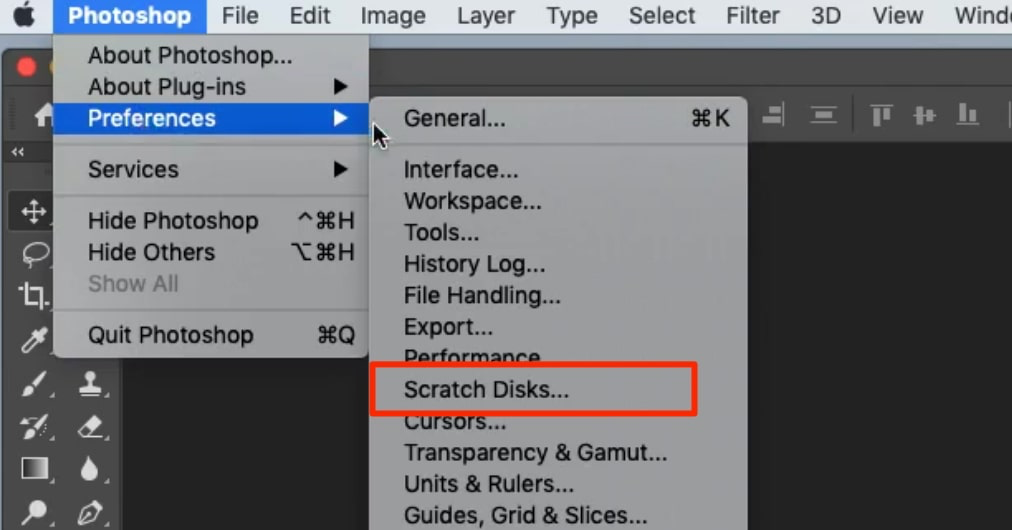
- Launch Photoshop and click Photoshop in the menu bar.
- Go to Preferences > Scratch Disks.
- In the Scratch Disk Preferences window, choose the external drive you want to use as the scratch disk and uncheck the built-in hard disk with low storage space.
- Click OK to proceed.
- Force quit Photoshop (use the Command + Option + Esc shortcut), and reopen the app. Photoshop will now use the external hard disk as the scratch disk.

If Photoshop won’t open due to the “scratch disk is full” error, follow the steps below to change Photoshop scratch disk settings without opening the app:
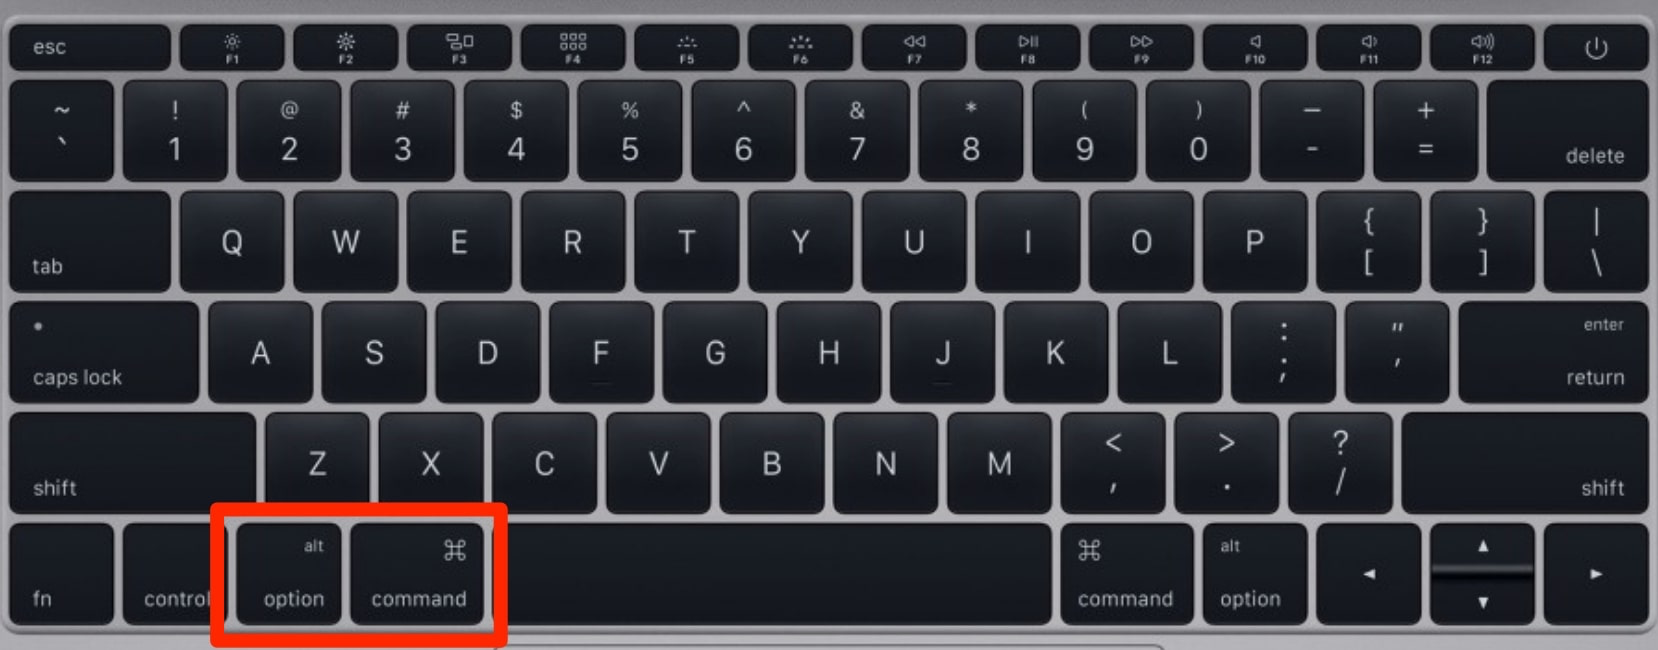
- Launch Photoshop, and hold the Command + Option keys immediately. This should launch the Scratch Disk Preferences window.
- Add the external hard drive as a scratch disk as explained above, then click OK to proceed.
There’s a catch to using the external drive method. As you might expect, you need to have this external disk plugged into your Mac at all times—or whenever you need to use Photoshop—in order for it to function properly.
6. Reset Photoshop preferences
By resetting Photoshop’s preferences, you’re basically restoring the app to factory settings. This has the potential to fix problems preventing Photoshop from working correctly, including the “scratch disks are full” error. There are two ways to reset Photoshop’s preferences: using keyboard shortcuts or from Photoshop’s preference menu.
6.1 Reset Photoshop preferences using a keyboard shortcut
You can reset Photoshop using a keyboard shortcut, and it works for all versions of Photoshop on Mac. Make sure you close or force-quit Photoshop before you proceed further.
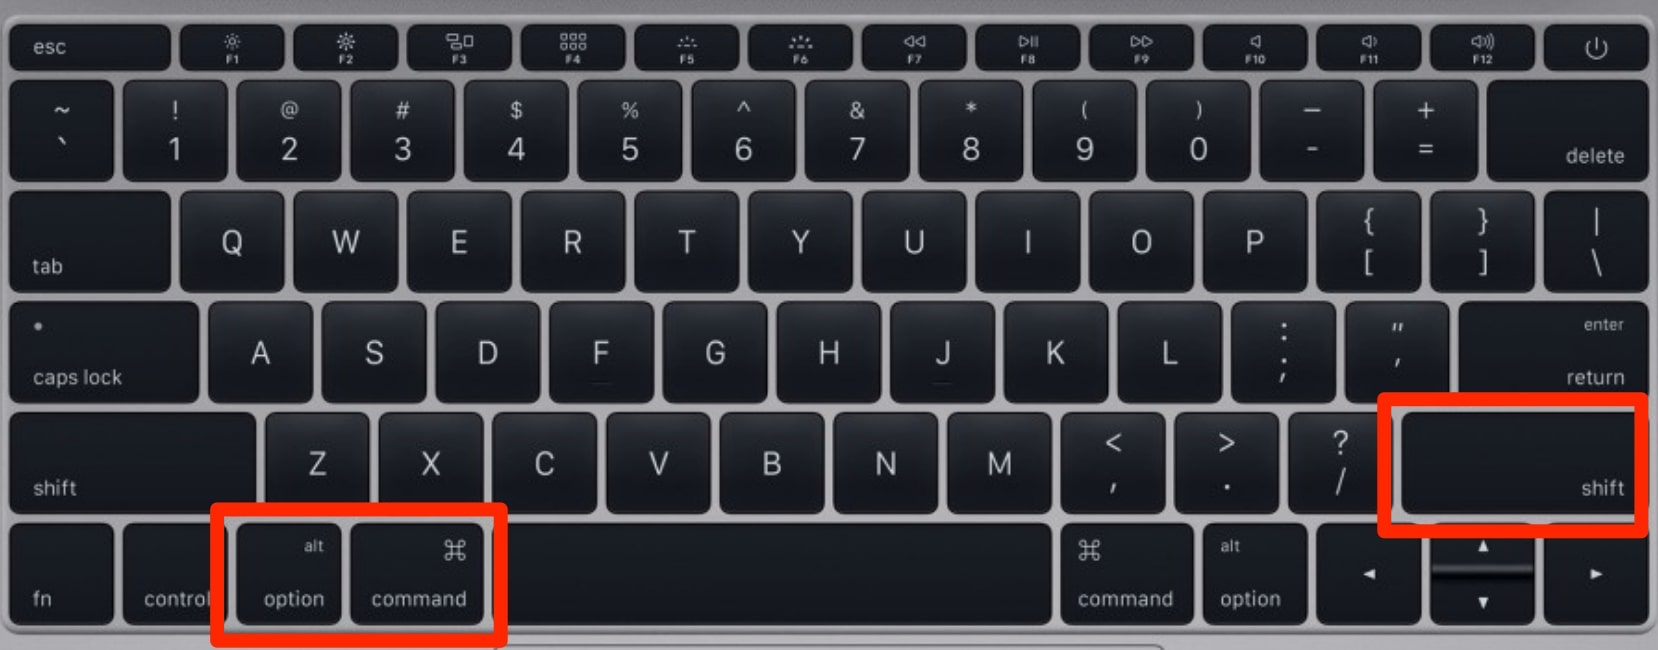
- Hold down the Command + Option + Shift keys on your Mac.
- Without releasing the keys, launch Photoshop.
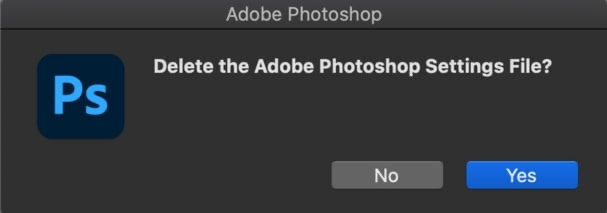
- A dialog box asking if you want to delete Photoshop’s settings file will pop up on the screen. Click Yes to proceed.
- Relaunch Photoshop and check if that fixes the error.
6.2 Reset Photoshop from the preference menu
Ensure that you’ve saved your projects in Photoshop so that you don’t lose any data, then follow these steps:
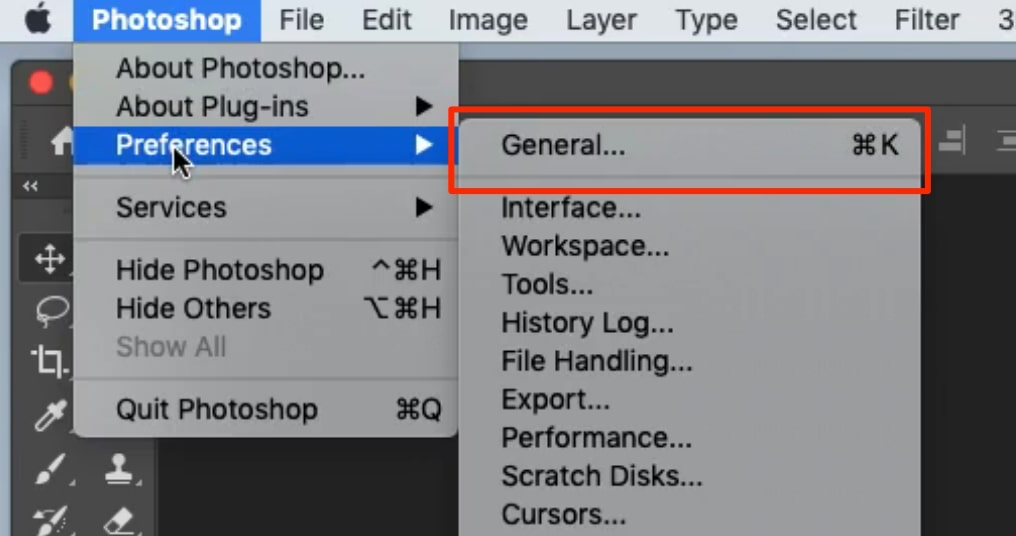
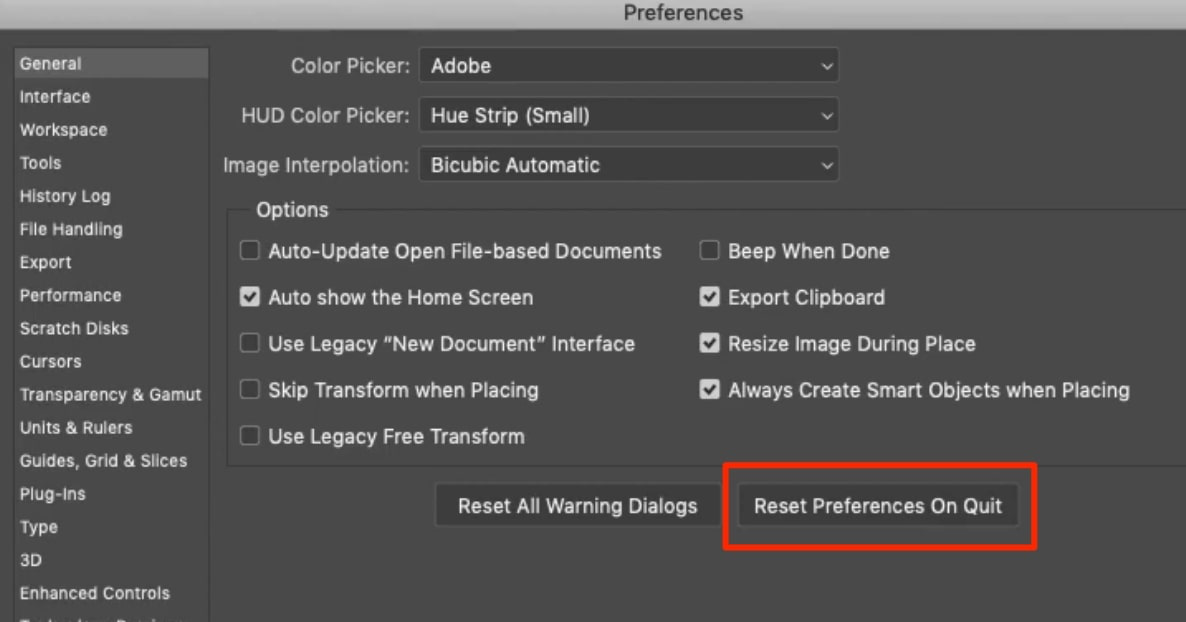
- From the menu, go to Photoshop > Preferences > General.
- In the General tab, click Reset Preferences On Quit.
- Click OK on the dialog box asking “Are you sure you want to reset preferences when quitting Photoshop?” to proceed.
- Close and relaunch Photoshop to reset the app’s preferences.
7. Change your scratch disk
Apple doesn’t pack a lot of storage space into modern Macs, which means your Photoshop scratch disk can free up quickly if you use the app a lot. You’ll experience a similar problem if you’re using an external drive with a smaller storage capacity. However, you can change your scratch disk at any time, like so:
- If you’re using an external drive for your scratch disk, connect it now.
- When Photoshop is running, click Photoshop in the menu bar.
- Select Settings, then Scratch Disks.
- You will see a list of available drives. Ensure the drive you want to use for your scratch disk is checked, and uncheck any drives you don’t want to use.
- If you’re using multiple drives simultaneously, you can change the order of their priority by using the arrows on the right of the list.
- Click OK to confirm your changes.
8. Free up your RAM in macOS Terminal
Because Photoshop also relies on your Mac’s RAM as well as its scratch disk, using Terminal to free up RAM space can help keep Photoshop running smoothly. Follow these steps:
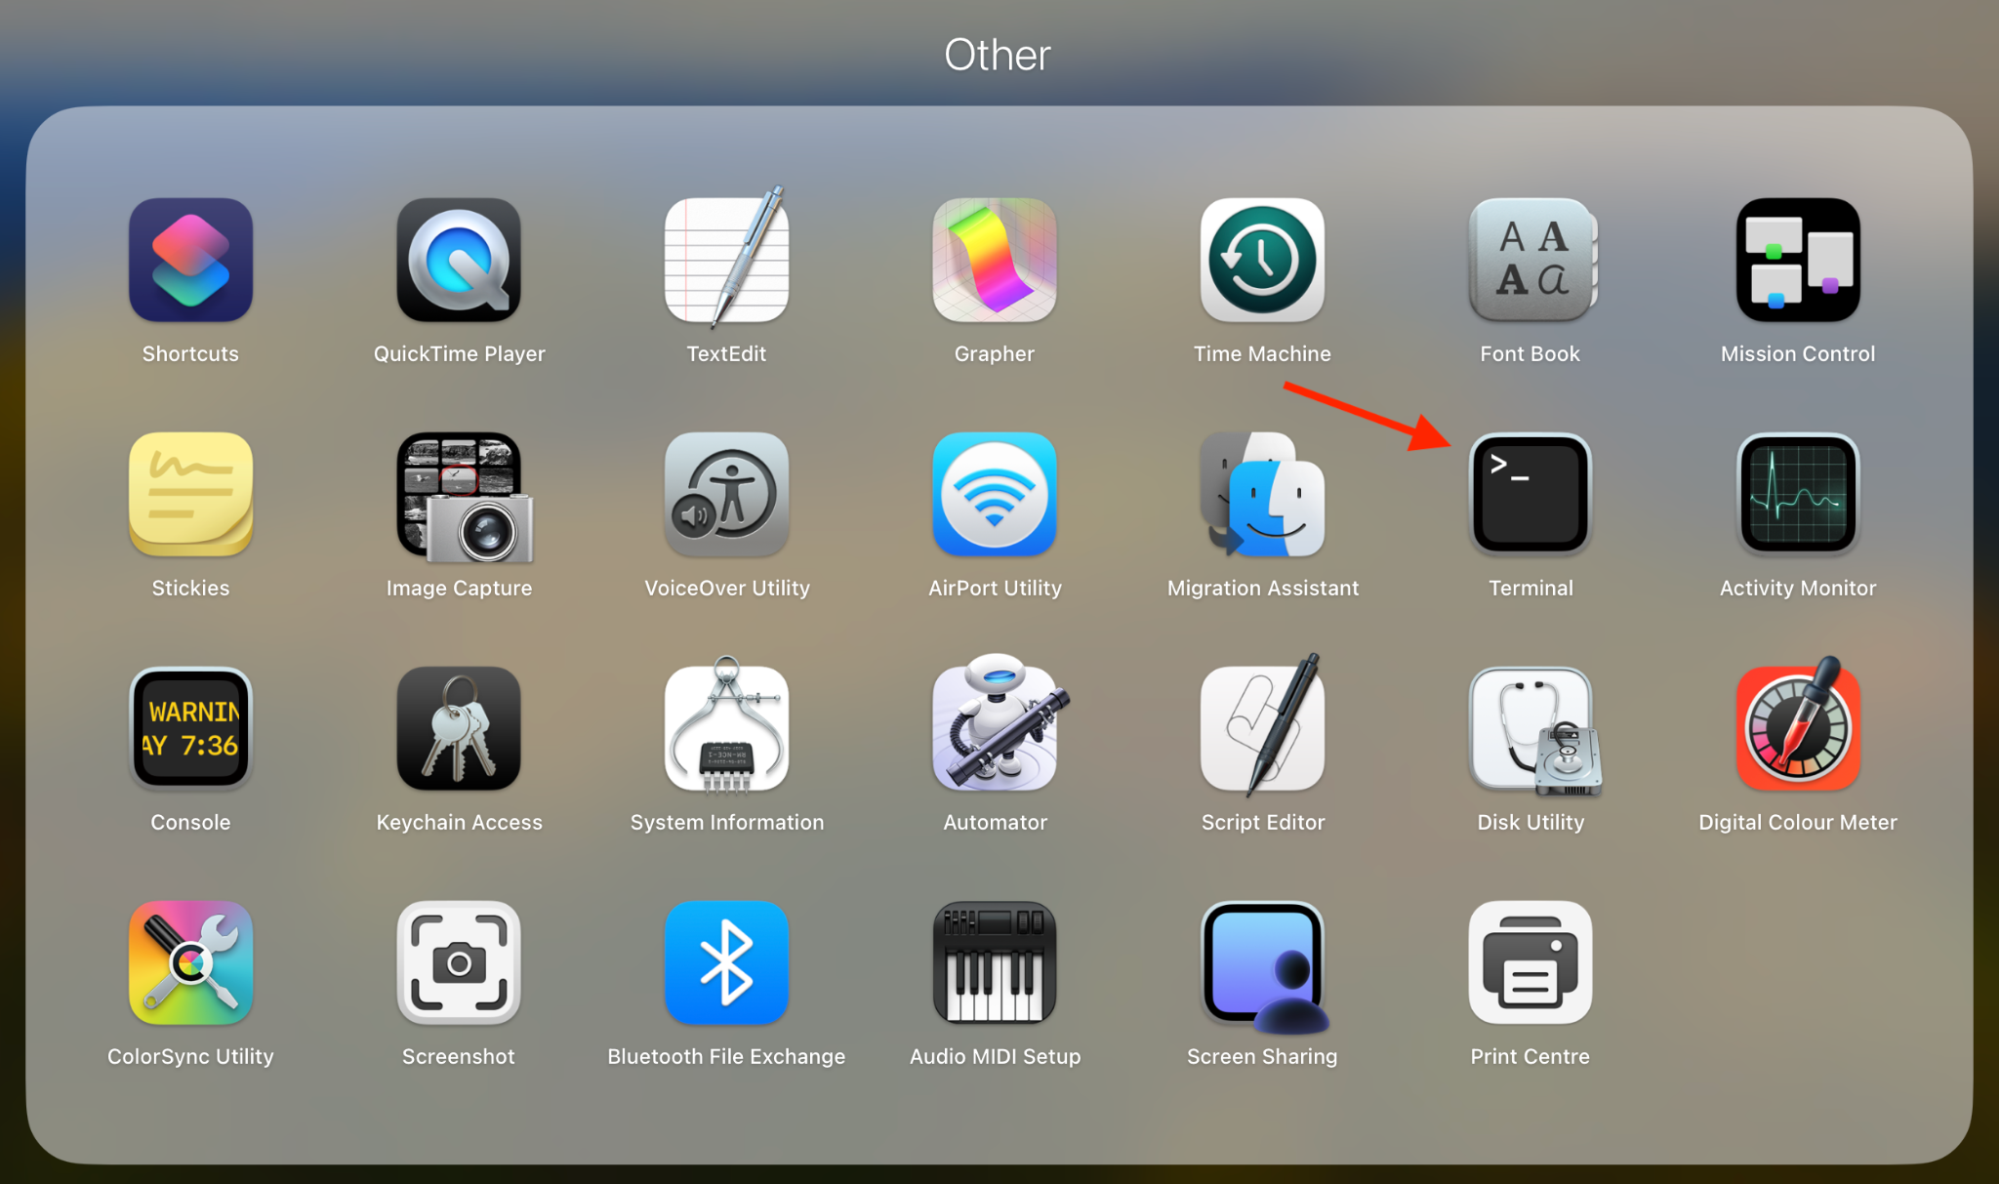
- Open Terminal from the Other folder in Launchpad.
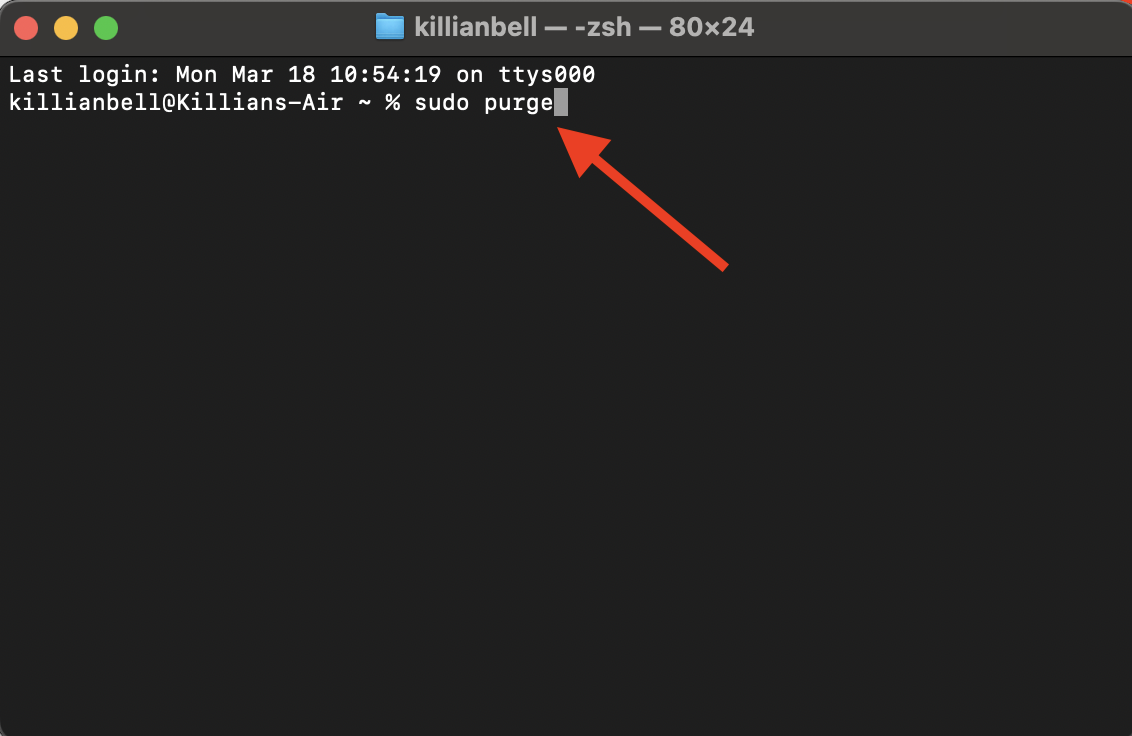
- Type sudo purge, then press enter on your keyboard.
- Enter your Mac’s password, then press enter again to clear your RAM.
9. Disable auto-recovery in Photoshop
By default, Photoshop saves your files and projects automatically at intervals from five minutes to one hour. Although this feature comes with its benefits, it causes Photoshop to consume a lot of memory and hard disk space. If you feel you can live without this feature, here’s how to disable it:
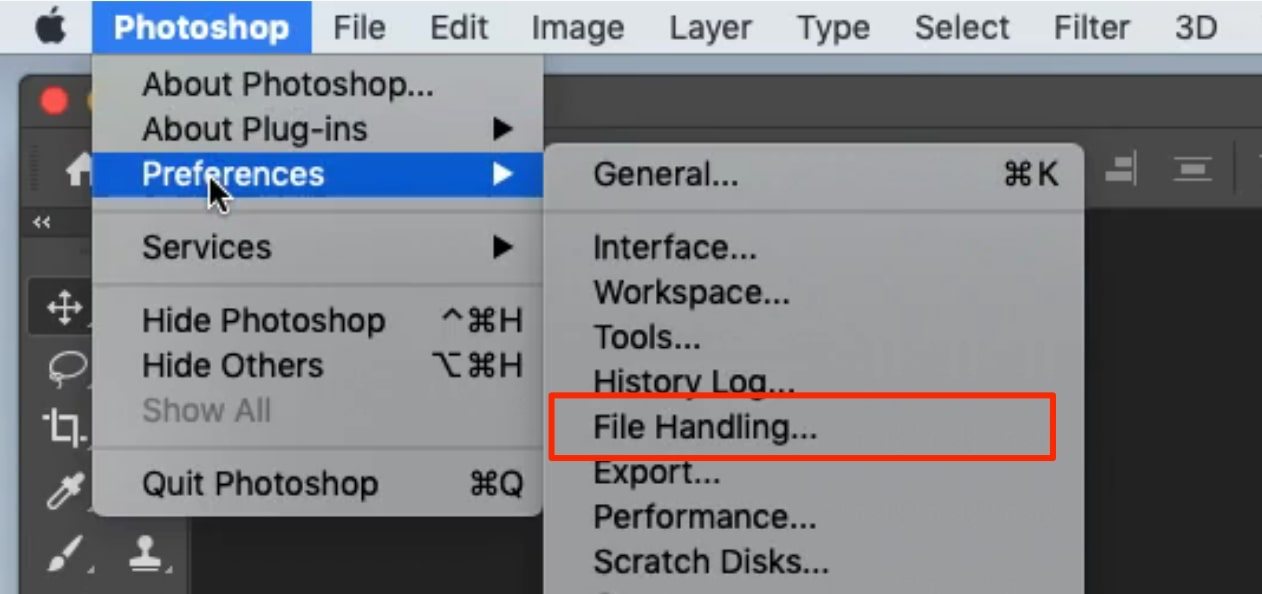
- Go to Photoshop > Preferences > File Handling in the menu bar.
- Uncheck the option that reads Automatically Save Recovery Information to disable it.
- Click OK to save your changes.

Important:
Disabling auto-recovery will reduce the amount of storage used by Photoshop, thereby freeing up space for temporary files (or scratch files). However, our team warns you always to save your projects before you close Photoshop so you don’t lose recent changes or modifications.
We don’t recommend disabling auto-recovery unless Photoshop is incredibly stable on your Mac. If you experience frequent crashes and other issues, it’s best to leave this feature on so that you can recover any work if necessary.
10. Defragment your HDD
If you’re still using an older Mac with a hard disk drive (HDD), or you’re using an external HDD for your Photoshop scratch disk, then defragmenting it can help free up some space and increase performance. It may take a while, especially for larger drives, but it can make a big difference. However, there’s a catch.
Unlike Windows, macOS doesn’t have a built-in defragmentation utility. That’s because macOS uses different file formats to Windows that simply don’t require defragmentation, so if your HDD was initialized using the HFS or APFS formats, you can skip this step.
If you originally initialized your drive on a Windows machine, or it uses a different file format, then you can defragment it either by connecting it to a Windows computer and using the built-in Disk Defragmenter or by using a third-party tool on macOS.
11. Go for SSD
The more effective alternative to defragmenting an HDD is to swap it for an SSD (solid state drive), preferably one with an even greater storage capacity. SSDs aren’t only significantly faster than HDDs, but they don’t require defragmentation, regardless of the file format they use.
If you’re using a modern Mac, it likely would have shipped with an SSD as standard. On older Apple computers, it’s possible to replace the HDD with an SSD, but this can be a difficult task. Instead, it’s easier to get an external SSD and use that as your Photoshop scratch disk, as outlined above.
External SSDs are much more affordable than they used to be, but it’s best to avoid skimping out on cheaper models with small storage capacities, which will fill up quickly and lead to “scratch disk full” errors more frequently, not to mention putting more strain on your CPU.
Fix scratch disk errors with ease
The most effective solution to fix scratch disk full errors in Photoshop on Mac is to free up additional space on your computer. Doing this manually can get exhausting, and it’s difficult to do it properly by yourself, so if you want to know how to clean up Mac quickly, we recommend you use an app like MacKeeper.
Our Safe Cleanup tool finds and removes unnecessary cache files, cookies, and junk at the click of a button, potentially freeing up gigabytes of storage. Also, try out the Duplicates Finder to delete redundant image copies and save even more space on your Mac.


