In this article you will find the following:
Does your Mac take longer to boot than it used to? Does it crash when you open multiple apps at once? Do you frequently run out of storage? With a good tuneup routine, your old Mac can run just as well as when it was new. All you need is to carry out a Mac cleanup to remove junk files and useless apps clogging up your machine.
In this guide, we’ll show you exactly how to do a cleanup on Mac. We’ll even throw in some bonus tips on cleaning up the outside of your Mac as well.
- Do Mac computers need to be cleaned?
- How to clean up Mac manually
- Automatically clean your Mac with a dedicated cleaning program
- Keep your MacBook clean for the best performance
Before we start
Need to free up space on your Mac? MacKeeper’s Safe Cleanup tool clears hidden junk files from your computer to give you back storage space. It seeks out unnecessary files you don’t need, then safely removes them without affecting the stability of your Mac.
Here’s how to use MacKeeper’s Safe Cleanup:
- Download MacKeeper and install it on your computer.
- When MacKeeper starts, select the Safe Cleanup tool.
- Click Start Scan to find all hidden junk.
- Select the files you want to remove, then click Remove Selected.
Do Mac computers need to be cleaned?
Regular cleaning is a crucial part of maintaining any Mac or PC. A buildup of unnecessary and unwanted data eats up storage space and can cause slowdowns and instabilities. If your Mac runs out of storage space, it’ll be affected by all kinds of issues, including:
- Apps crash or won’t open
- Browsers cannot load webpages
- The macOS operating system becomes unstable
- Features like Spotlight don’t work properly
- Files are difficult to locate
- Your Mac becomes slow and unstable
Does Mac have a clean-up tool?
There’s no dedicated cleaning or system optimization tool built into the Macintosh operating system. You can clear files and uninstall apps manually, but if you need help locating hidden junk, or your machine requires a deep cleanout, you’ll need to turn to third-party tools.
How to clean up Mac manually
While proper cleaning apps may be the easiest way to fix a Mac running slow, there are some manual optimization tools you can take advantage of on macOS to reduce data usage. The key ways to do it include the following tips:
- Clean Mac storage
- Clean up your Mac using the Finder
- Use System Preferences to clean up your Mac
- Stop rogue processes with Activity Monitor
- Clear your RAM using Terminal
- Get rid of plugins and extensions in browsers
1. Clean Mac storage
First, open the Storage tool in macOS by following these steps:
- Open the System Settings app on your Mac.
- In the sidebar, click General, then select Storage.
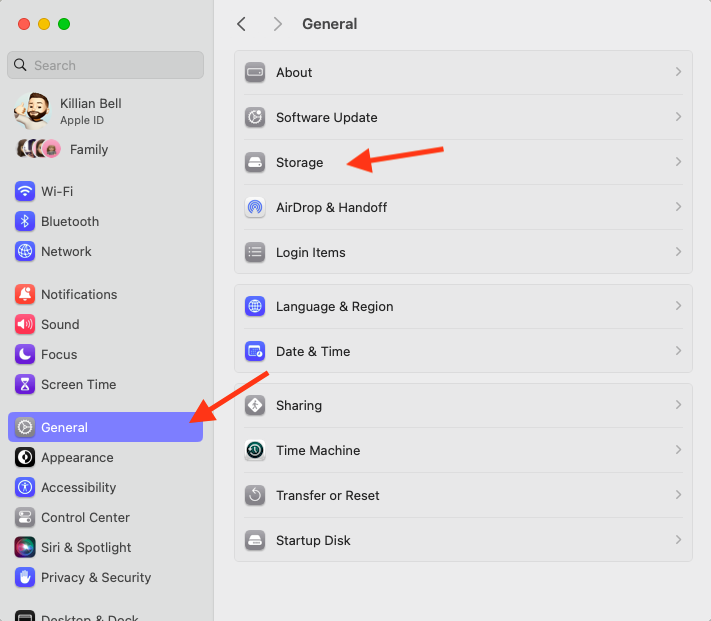
Here, you’ll see how much of your Mac’s storage is being used, and how much is left over. You can then follow the tips below to start optimizing your machine’s data storage.
1.1 Uninstall any applications you don’t use
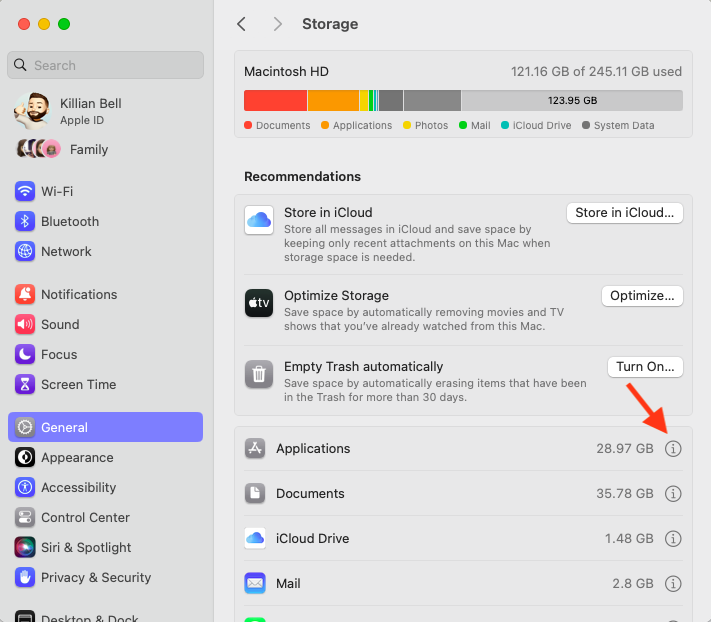
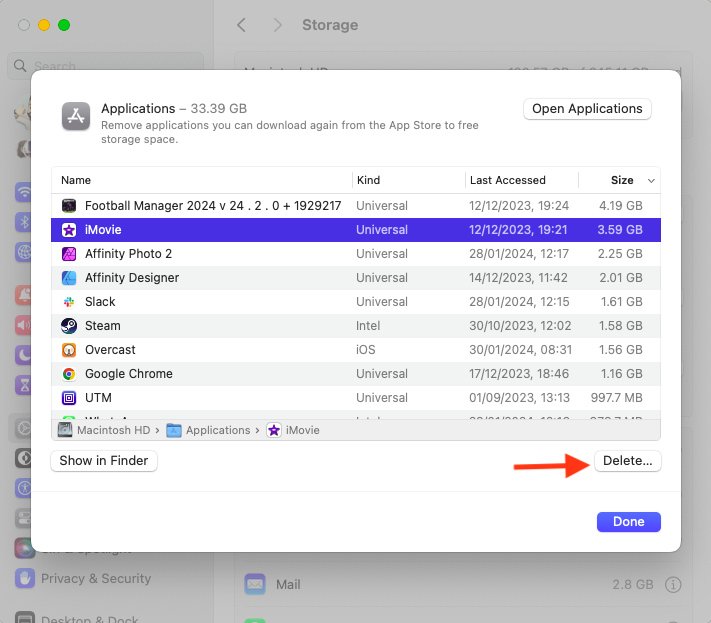
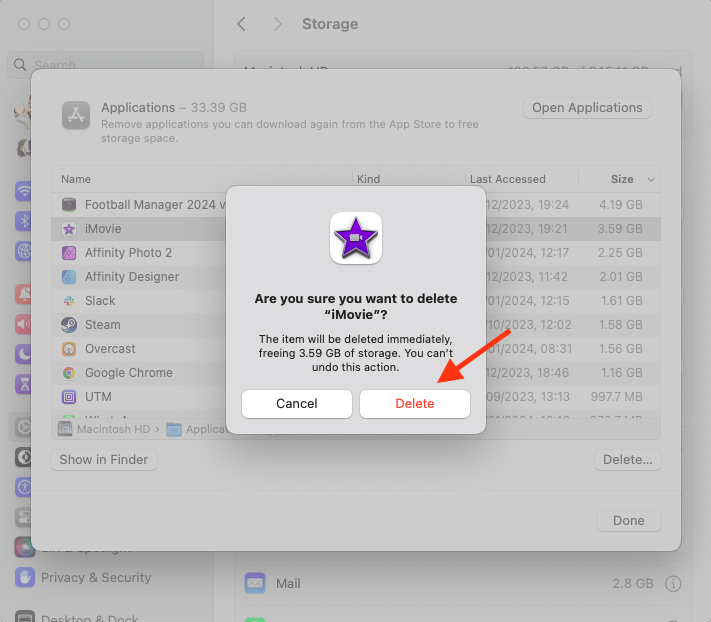
Apps take up a lot of space, so losing those you no longer use is a quick and simple way to reduce your storage usage. Here’s how to start a cleanout:
- In the Storage menu, click the i icon next to Applications.
- Select applications you don’t use, then click Delete.
- Click Delete in the popup window to confirm.
1.2 Delete your biggest documents to save space
The Storage menu in System Settings also gives you the option to remove unwanted files. Here’s how:
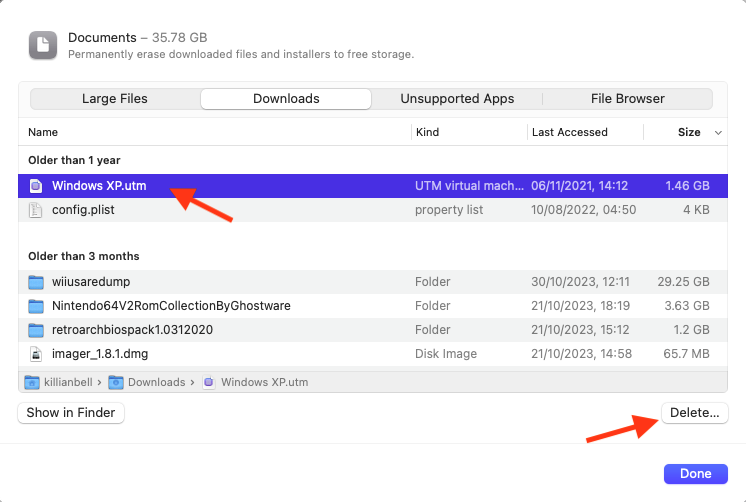
- Click the i icon next to Documents.
- You’ll notice there is a selection of tabs to choose from that can help you find the files you’re looking for: Large Files, Downloads, Unsupported Apps, File Browser. Select one, then choose the files you want to delete. You can select more than one at a time by dragging your mouse pointer, or by holding down the Command key while clicking them.
- Click the Delete button to remove the selected files.
- Click Delete in the popup window to confirm.
1.3 Remove old iOS backups
iPhone and iPad backups take up gigabytes of space on your Mac, so removing old ones can free up a lot of space in very little time. Here’s how:
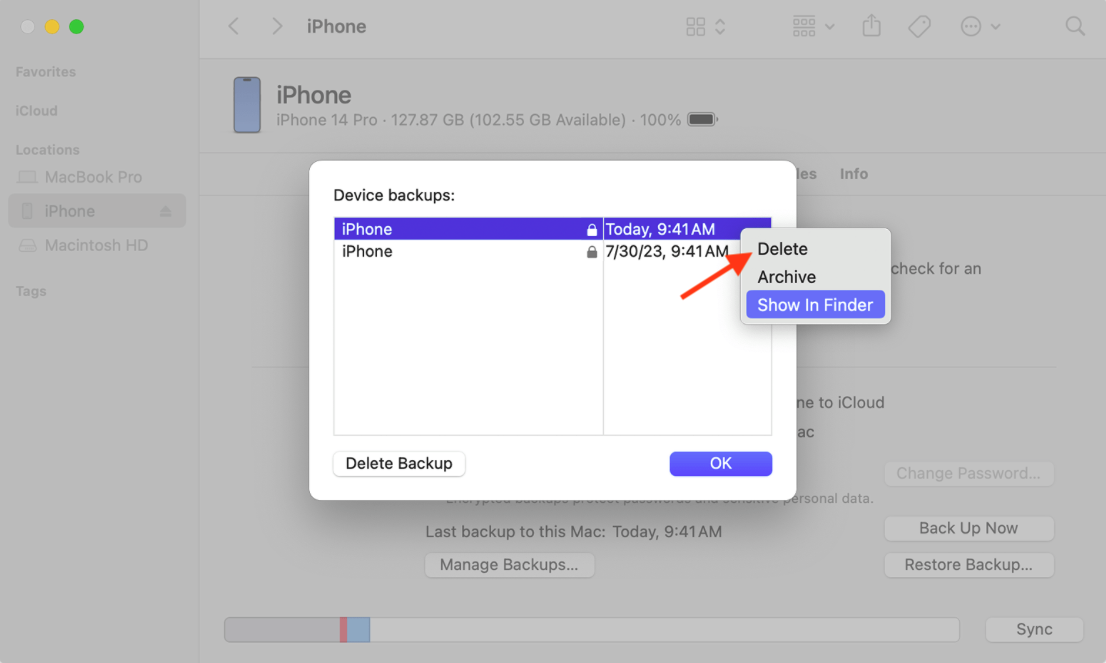
- Connect your iPhone or iPad to your Mac, then open Finder.
- Select your device in the sidebar.
- Under the General tab, click Manage Backups.
- Select an old backup you no longer need, then right-click it.
- Click Delete to remove the backup from your Mac.
1.4 Get rid of Messages to save more space
If you send and receive a lot of media through Messages on iMac, you’ll find that it takes up a lot of storage space over time, but you can easily remove old media like so:
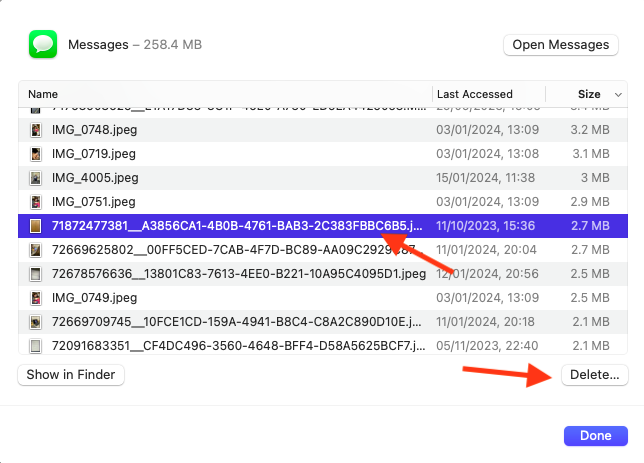
- In the Storage menu inside System Settings, click the i icon next to Messages.
- Select any photos and videos you don’t want, then select Delete.
- Click Delete in the popup window to confirm.
1.5 Clear the Bin
When you delete apps, documents, and other data on Mac, it doesn’t actually get removed from your laptop right away—it sits in the Trash or Bin until you manually empty it. Fortunately, it’s easy to do that:
- Right-click on the Trash or Bin icon in your Mac’s dock.
- Select Empty Trash or Empty Bin to clear all data.
- Click Empty Trash or Empty Bin in the popup window to confirm.

2. Clean up your Mac using the Finder
The most hands-on way to clean up your Mac is to sort through all your documents, caches, logs, and various other files using Finder. This can be quite a time-consuming process, but it also gives you the most control, if you know what you’re doing.
2.1 Search for duplicate files with Smart Folders
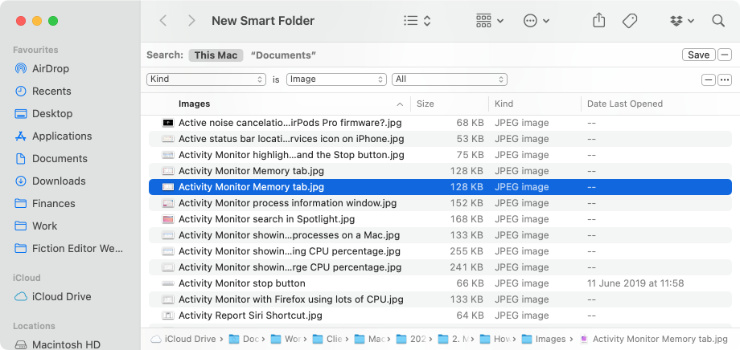
Duplicate files can take up a lot of space on your Mac unnecessarily, but by using Smart Folders, they can quickly be found and deleted:
- Open Finder and go to File > New Smart Folder.
- In the window that opens, click the + button to add a search filter.
- Use the second dropdown menu to search for a particular type of file, such as an Application, Document, or Image.
- When you select a file type, Finder will list all the matching files on your Mac.
- Go to View > As List and click the first column header to organize these files alphabetically.
- Scroll through the list until you find duplicates. To remove them, right-click them, then select Move to Trash. Remember to empty the Trash can later.
2.2 Clear the caches on your Mac
As you browse the web, your Mac stores images and files in caches to speed up the loading process if you revisit the same pages again. These can take up a lot of space over time, so it’s important to clear them regularly, like so:
- Open Finder and select Go > Go to Folder in the menu bar.
- Type ~/Library/Caches and hit Go.
- Find any cache files you don’t need, then delete them by right-clicking them, then selecting Move to Trash.
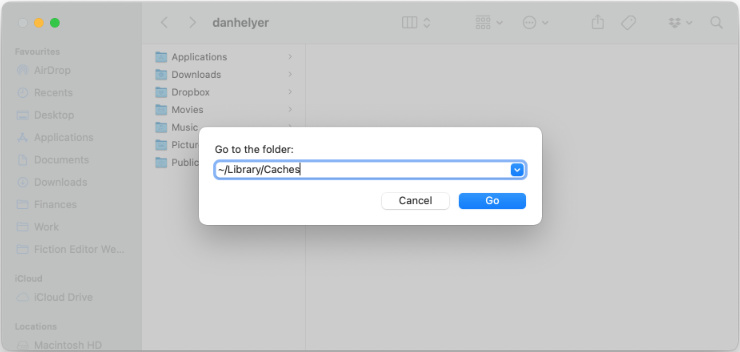
Be careful when deleting cache files on your Mac, since macOS requires some of these files to function properly. The best option is to remove caches and cookies from your browser settings.
2.3 Organize the desktop
Every time you log in to your Mac, Finder needs to load every file on your desktop. If you’re in the habit of dumping a lot of junk on your desktop, this can really slow down your Mac.
Here’s how to quickly organize all files on your desktop:
- Right-click on an empty space on the desktop.
- Click Use Stacks to organize all files into stacks categorized by file type.
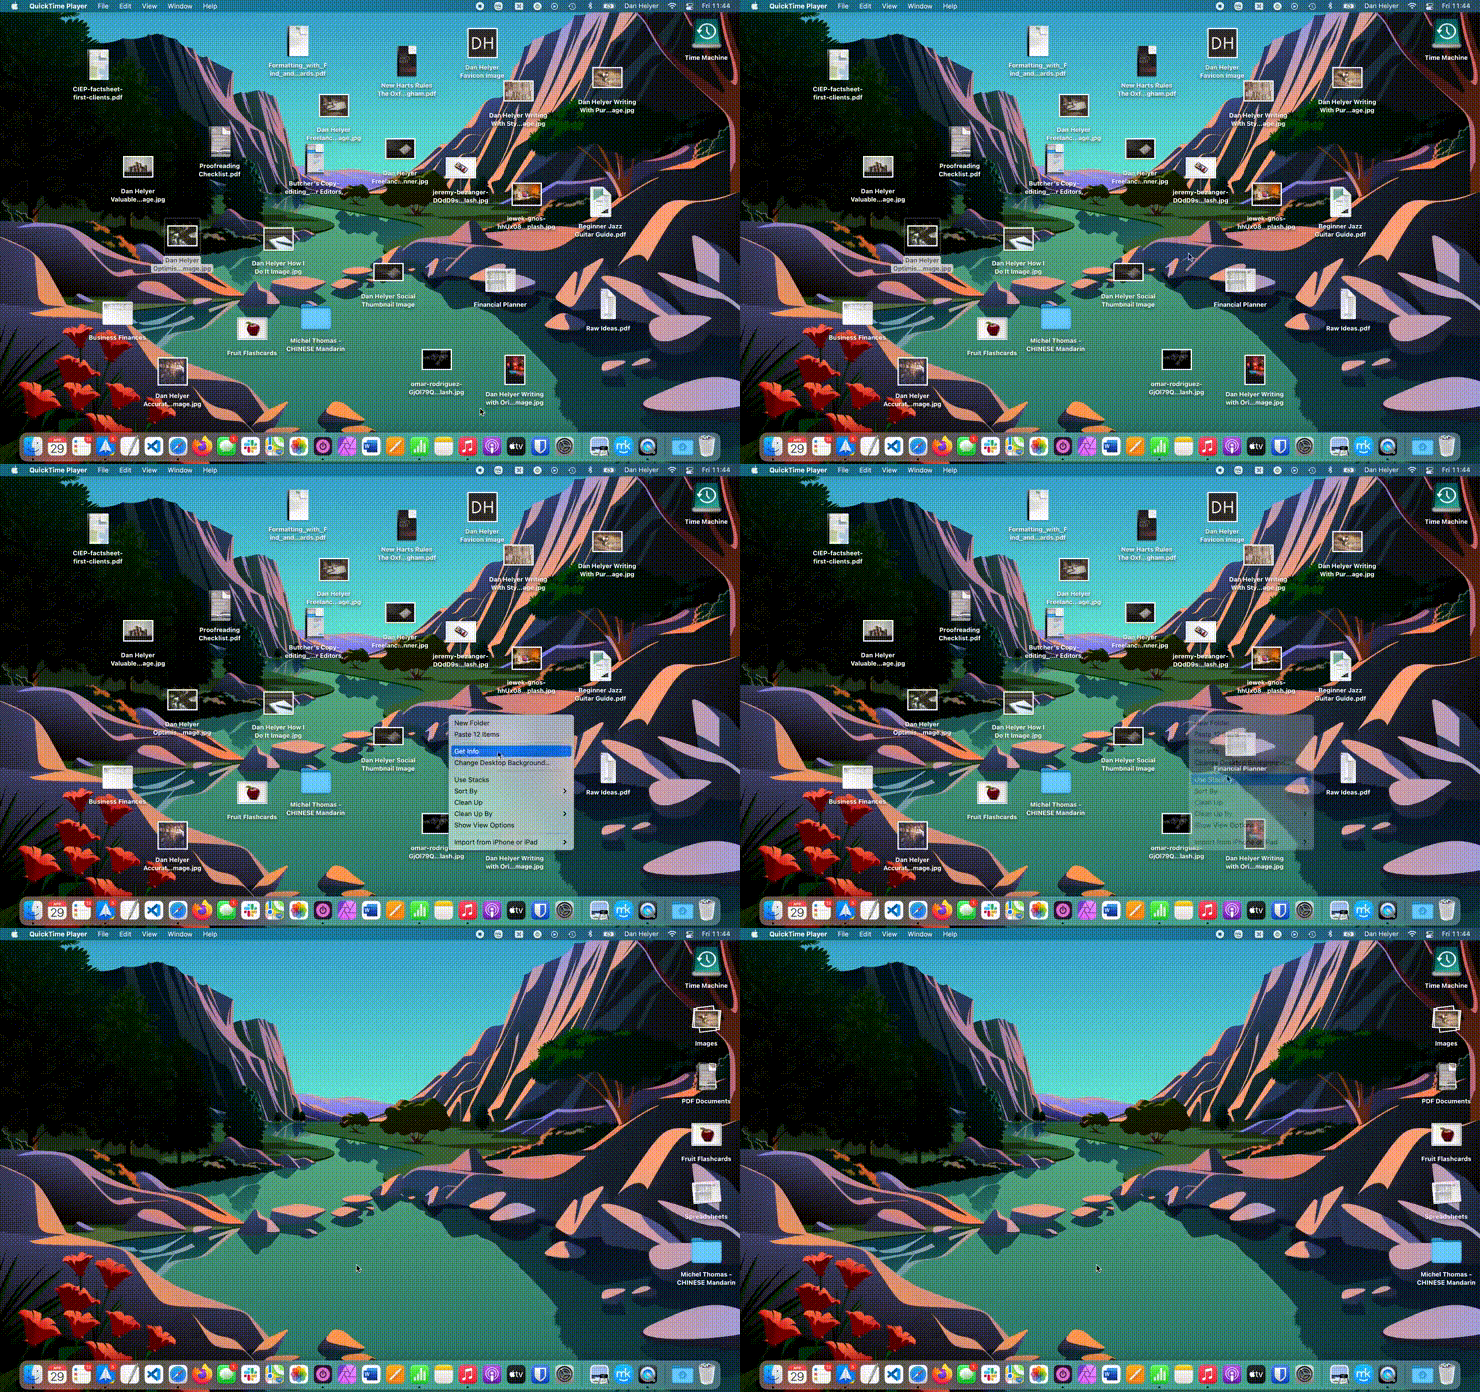
Your Mac’s desktop will now be considerably cleaner and more organized, and you’ll easily find the files you need.
3. Use System Preferences to clean up your Mac
Some of the best ways to clean out your Mac are actually hidden in System Settings. These options are far less fiddly than using Finder, but they can still make a big difference to everything from your storage space to your startup speed.
3.1 Delete your local Time Machine snapshots
If you use Time Machine for backing up the data on your Mac, snapshots are stored on your machine at various points in time so that you can quickly restore data if you need to. Removing old snapshots you no longer need is a great way to free up storage space. Here’s how
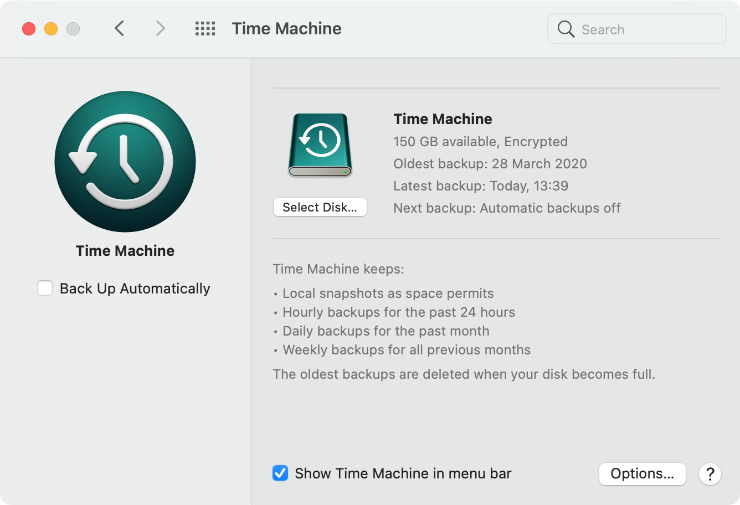
- In the System Settings app, select General then Time Machine.
- Uncheck Back Up Automatically to disable this feature.
- Wait a few minutes for macOS to delete all local snapshots, then re-enable automatic backups if you still want to use it.
3.2 Remove old user accounts from your Mac
Having multiple user accounts on your Mac is a great way to keep your documents and apps separate when multiple people use the same Mac, but each account comes with a host of hidden files that can clog up the storage and slow down your machine.
Help keep your Mac clean by removing old user accounts you don’t need:
- In System Settings, select Users & Groups.
- Click the i button next to an old user account you want to delete.
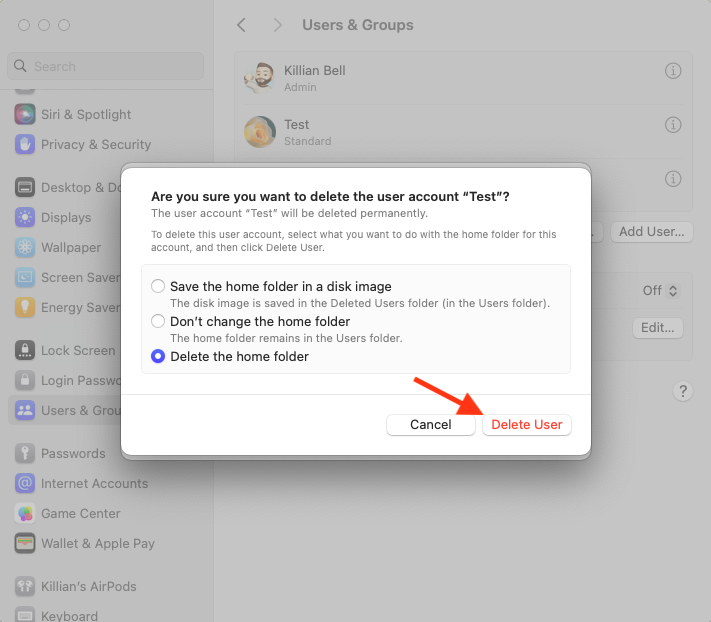
- Click Delete User.
- If the user account has its own Home folder, you’ll see several options for handling its data. You can either save the home folder as a disk image, leave it where it is, or delete it. We recommend selecting Delete the home folder to free up space, but only if the data saved to the account is no longer needed. You won’t be able to recover it later.
- To confirm, click the Delete User button.
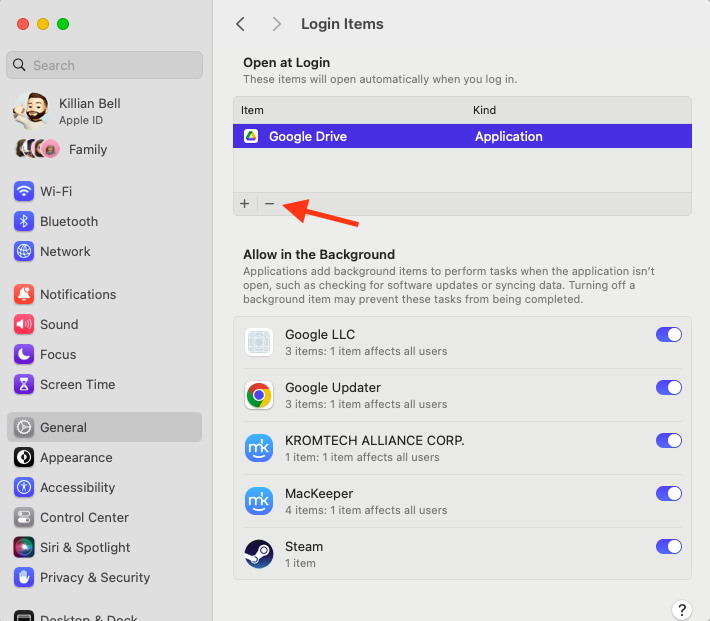
3.3 Clean up your login items
Another factor that could be slowing down your Mac is your login items. These are the apps and background processes that launch every time you log in to your Mac, and they can eat up a lot of processing power.
Here’s how to clean out those login items you don’t need:
- In the System Settings app, select General, then Login Items.
- In the Open at Login section, select an app that you don’t need to run automatically at startup, then click the – (minus) button to disable it.
4. Stop rogue processes with Activity Monitor
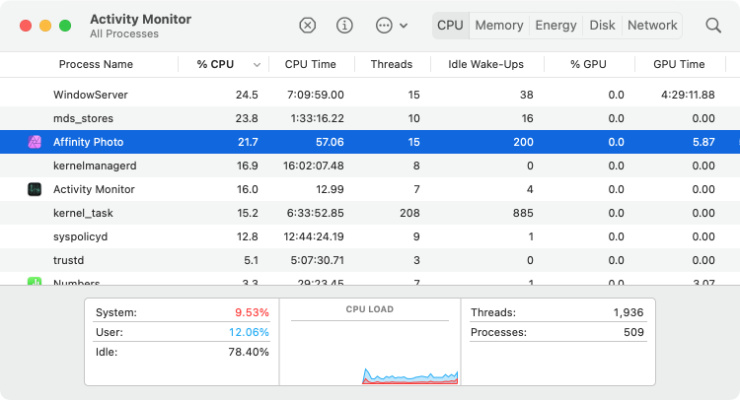
If an app stops working properly or gets stuck on your Mac, it might keep running in the background, meaning that it uses up all of your computer’s memory and processing power. Kill it with Activity Monitor:
- Open Activity Monitor from the Utilities folder within Applications.
- Go to the CPU tab, then click the % CPU column to sort all processes by CPU usage.
- Take a look at the processes using most of your CPU power and see if there are any you can stop. If you aren’t sure what it does, as this could affect the stability of your Mac.
- To stop a process, select it and click the X button in the Activity Monitor toolbar.
- Click Quit or Force Quit to confirm.
5. Clear your RAM using Terminal
Modern computers are pretty good at managing their RAM usage, but if your Mac is struggling to multitask, there might be a problem here. Hence, it can be helpful to clear the RAM storage and allow your Mac to build up using it again. You can do this in Terminal:
- Open Terminal from the Other folder in Launchpad.
- Type the following command: sudo purge.
- Hit Enter.
- Type your admin password, then hit Enter again to confirm.

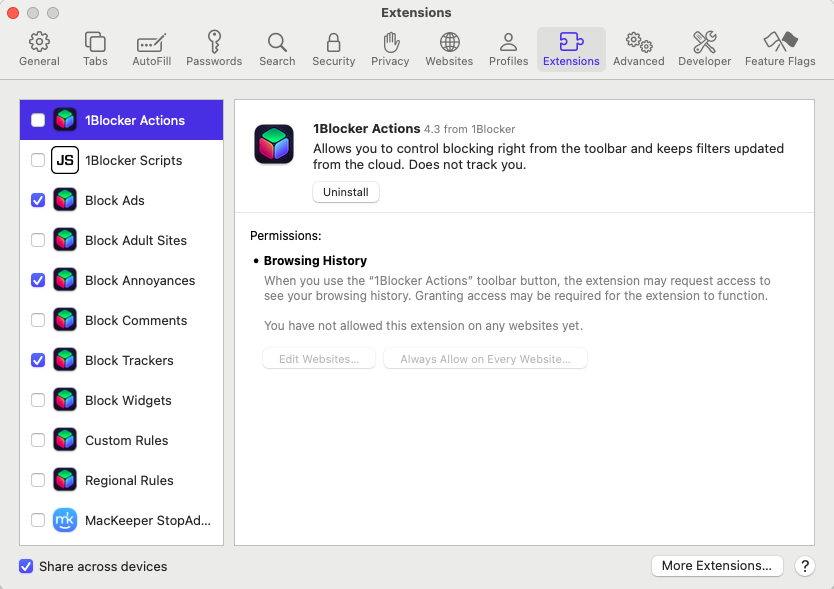
6. Get rid of plugins and extensions in browsers
It’s a good idea to regularly disable, uninstall, or delete any browser extensions or plugins you no longer need. You may even want to remove all of them to completely clean up your Mac browsers for the best performance. The method to delete extensions and plugins is slightly different for each browser, so here are some dedicated guides for the most popular browsers:
7. Run Apple Diagnostics
Performance problems on a Mac can indicate issues with your machine’s hardware. To find out if you have any hardware issues and whether your Mac needs to be repaired, you can use the Apple Diagnostics tool built into macOS. Here’s how:
On a Mac with Apple Silicon:
- Shut down your Mac.
- Press and hold your Mac’s power button until you see startup options.
- Release the power button, then press and hold the Command and D keys on your Mac’s keyboard until Apple Diagnostics starts to run.
On a Mac with an Intel processor:
- Shut down your Mac.
- Press your Mac’s power button, then immediately hold down the D key on your keyboard. If this doesn’t work, press and hold the Option and D keys at startup instead.
- Release the keys when you see the Apple Diagnostics progress bar.

Once the testing process is complete, Apple Diagnostics will show you the result, which will include one or more reference codes. You can find out what these codes mean on Apple’s website.
Automatically clean your Mac with a dedicated cleaning program
By far, the easiest way to clean your Mac is to use a dedicated cleaning app, such as MacKeeper Smart Cleanup. Solutions like this offer a variety of cleaning and optimization tools to clean up your Mac faster and easier. Note that a good Mac cleaner can help you clear disk space on Mac.
Here are some of the key features you can take advantage of:
- Clean disk space of junk files
- Remove duplicate and near-duplicate files
- Uninstall apps and delete leftover files
1. Clean disk space of junk files
Although macOS looks neat and tidy from the user’s perspective, it often collects a lot of junk files in hidden folders that can take up gigabytes of storage unnecessarily. These junk files often include logs, caches, language files, old mail attachments, and other storage hogs.
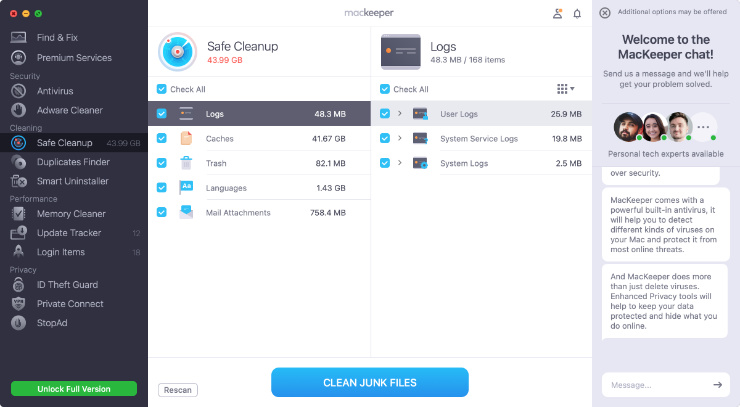
1.1 Clean up junk files in one click
If you’re looking at how to free up storage on Mac, using a dedicated cleaning app to clear hidden junk is a great place to start. For example, in MacKeeper, use the Safe Cleanup feature to quickly clear all junk files you don’t need:
- Open MacKeeper, then select Safe Cleanup in the sidebar.
- Click Start Scan to find all hidden junk on your Mac storage volumes.
- Select the junk files you want to remove, then click Clean Junk Files.
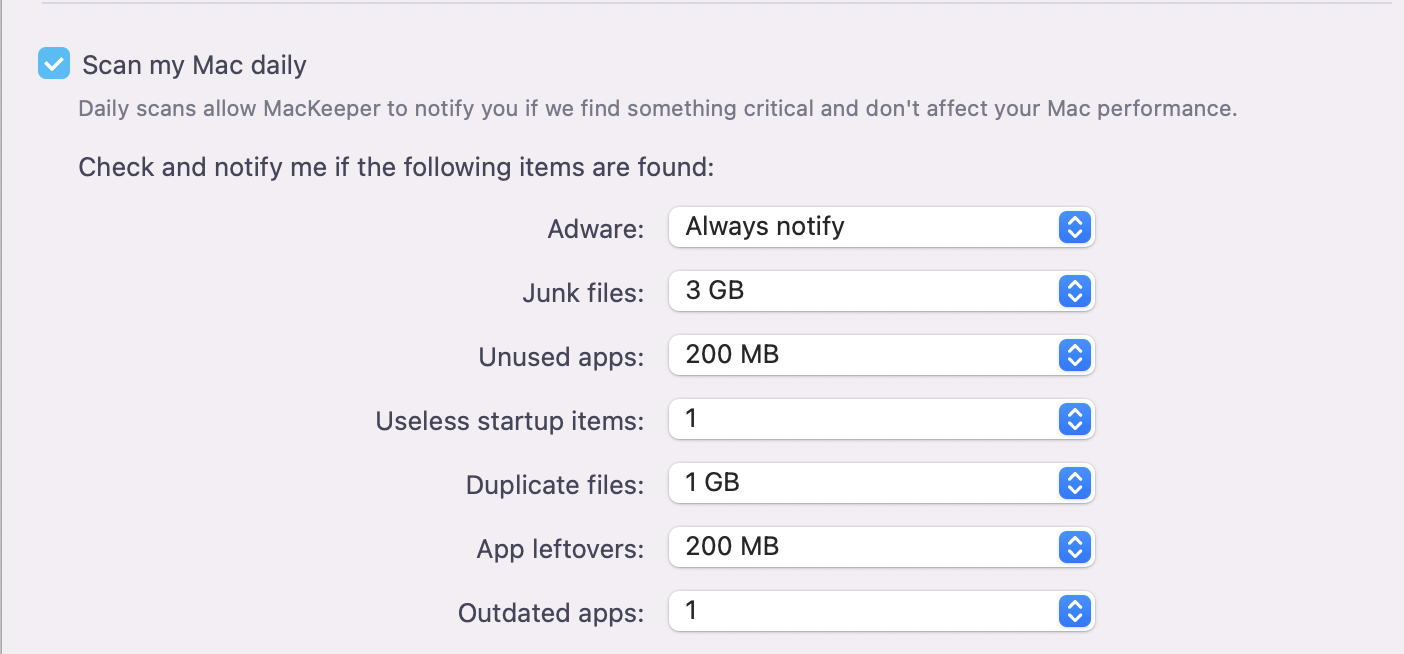
1.2 Run automatic scans in the background
Most Mac cleaning apps also allow you to schedule regular scans to automatically take place in the background. These scans will search for junk files, malware, unused apps, useless startup items, and other problems that might be slowing down your Mac, then prompt you to remove them.
Here’s how to schedule scans in MacKeeper:
- Open MacKeeper, then select MacKeeper > Settings in the menu bar.
- Select the Scan Options tab.
- Enable the Scan my Mac daily function, then choose the settings you prefer.
2. Remove duplicate and near-duplicate files
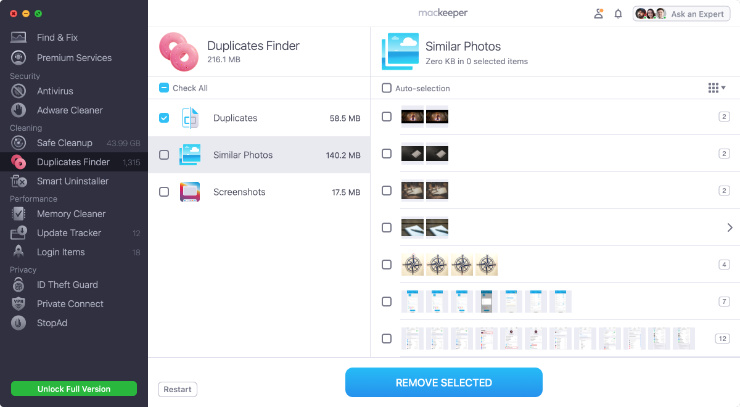
Sometimes, a lot of space gets used up on your Mac by duplicate versions of the same files.
Using a cleaning app to find all these duplicate and near-duplicate files is far quicker and easier than sorting through all the files yourself, and it’s a great way to clear identical photos when your scratch disks are full on Mac.
Here’s how to use the simple Duplicates Finder in MacKeeper:
- After opening MacKeeper, select Duplicates Finder in the sidebar.
- Click the Start Scan button.
- Select the duplicate files you want to delete, then click Remove Selected.
3. Uninstall apps and delete leftover files
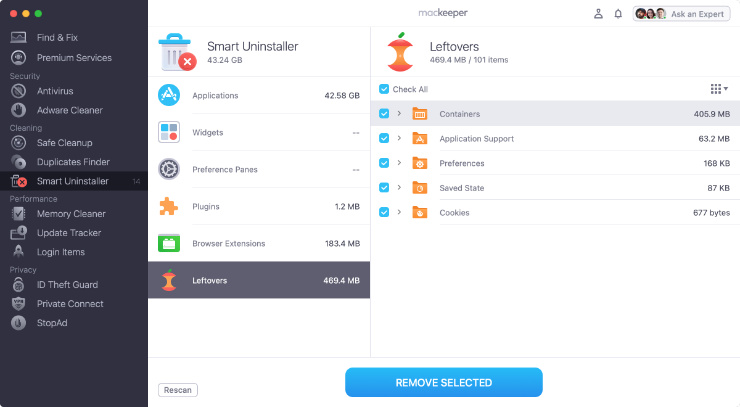
Although it’s usually very easy to uninstall apps on a Mac, doing so often leaves behind various hidden files in your macOS system folders. MacKeeper’s Smart Uninstaller cleans applications, widgets, plugins, browser extensions, and all the other leftover files from a Mac app. Simply follow these steps:
- In MacKeeper, select Smart Uninstaller in the sidebar.
- Click Start Scan.
- Select all the apps, widgets, extensions, and other items you want to remove, then click the Remove Selected button to uninstall them.
Keep your MacBook clean for the best performance
Even the best cleanup routine can’t stop your Mac from getting older, but it can keep it running smoothly for much longer. Following our advice to clear out storage, remove old apps, and generally keep your Mac sparkling is the best way to make sure it lasts as long as possible.
To make maintaining your Mac easier, use MacKeeper’s Safe Cleanup tool to find and remove hidden junk, including unused language packs, old email attachments, and temp files, freeing up space on your Mac’s storage drive and improving system performance.


