Need to move photos, videos, or a project folder to another device without email or the cloud? Mac file sharing lets you do exactly that over your local network. Before you start, MacKeeper’s Duplicates Finder clears out look-alike copies so you only share what matters.
File Sharing is a feature built into macOS that lets other devices or user accounts reach folders you choose to share. You decide which folders are visible and what each person can do with them, so nothing opens up unless you allow it. That makes file sharing for Mac a handy built-in option when you want transfers to stay on your own network.
Should you ever find macOS file sharing not working, the reasons are usually simple to spot and reverse.
When is File Sharing on Mac useful?
File sharing shines when you want to move data directly between machines on the same network. A file transfer in Mac like this saves you from uploading to the cloud or squeezing files into an email. Common moments when it helps:
Sharing large video files or a full media library with another Mac.
Handing a teammate access to a shared project folder.
Moving documents between your MacBook and a desktop Mac.
Sharing files across a local network (LAN) at home or in an office—the Macs only need to be connected to the same Wi-Fi network or Ethernet, so an active internet connection isn’t required.
If you share the same Mac computer with your family members or close ones, learning how other users and shared Mac storage work together helps you keep everyone’s files tidy.
A note from our experts:
Before you finally share files with someone, it’s always better to get them ready within the myriad files already on your Mac. Not to be confused, we suggest removing all duplicates to make it easier to navigate them for your comfort. Also, this way, you’ll free up more space on your Mac.
Here’s how to delete the unnecessary file copies from your computer:
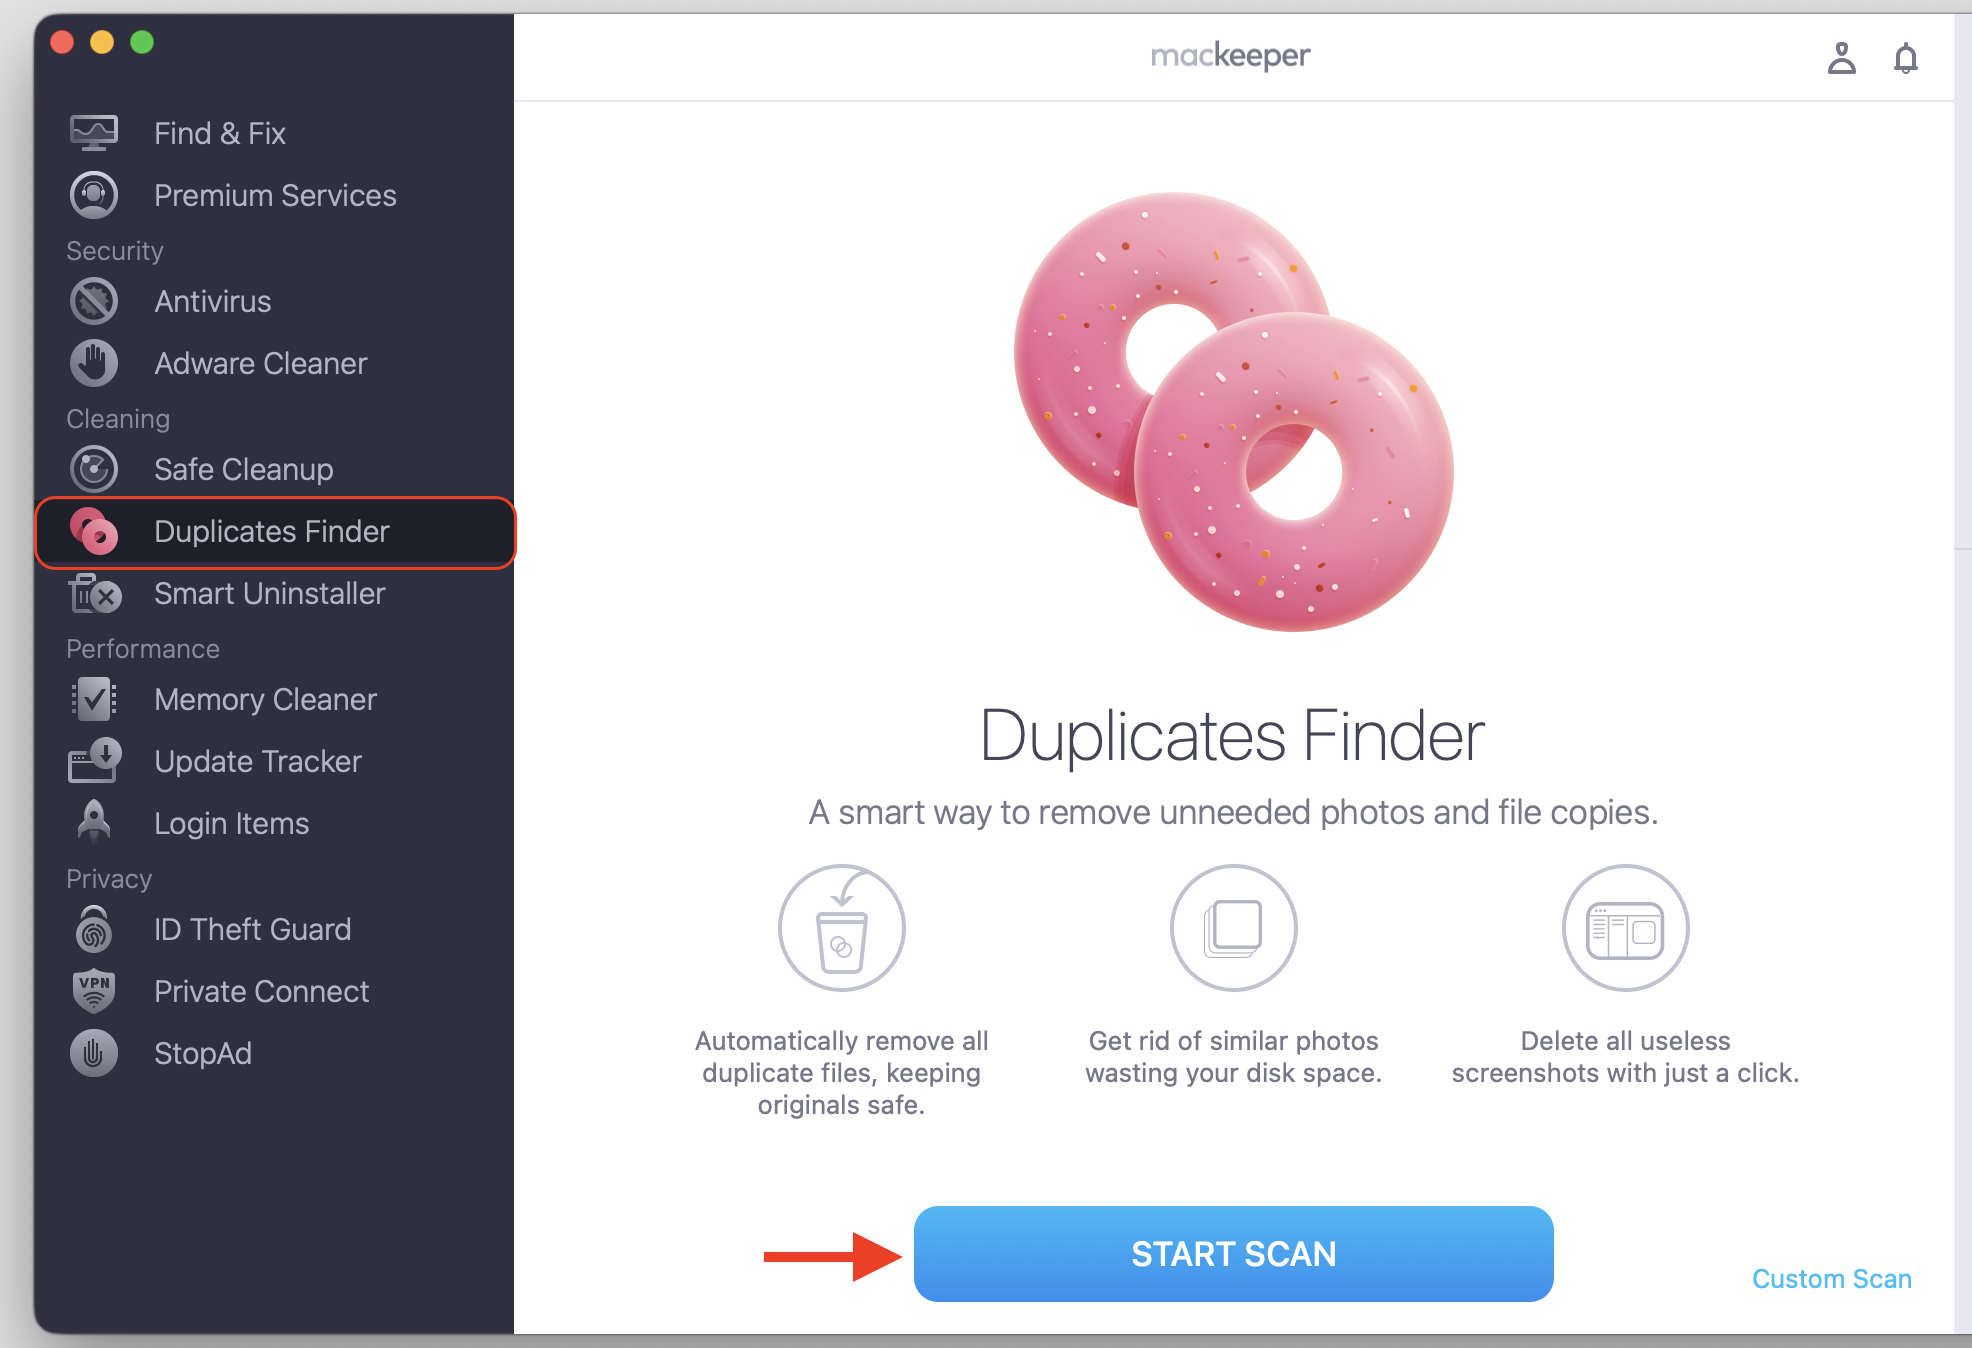
Choose Duplicates Finder on the left and click Start Scan.
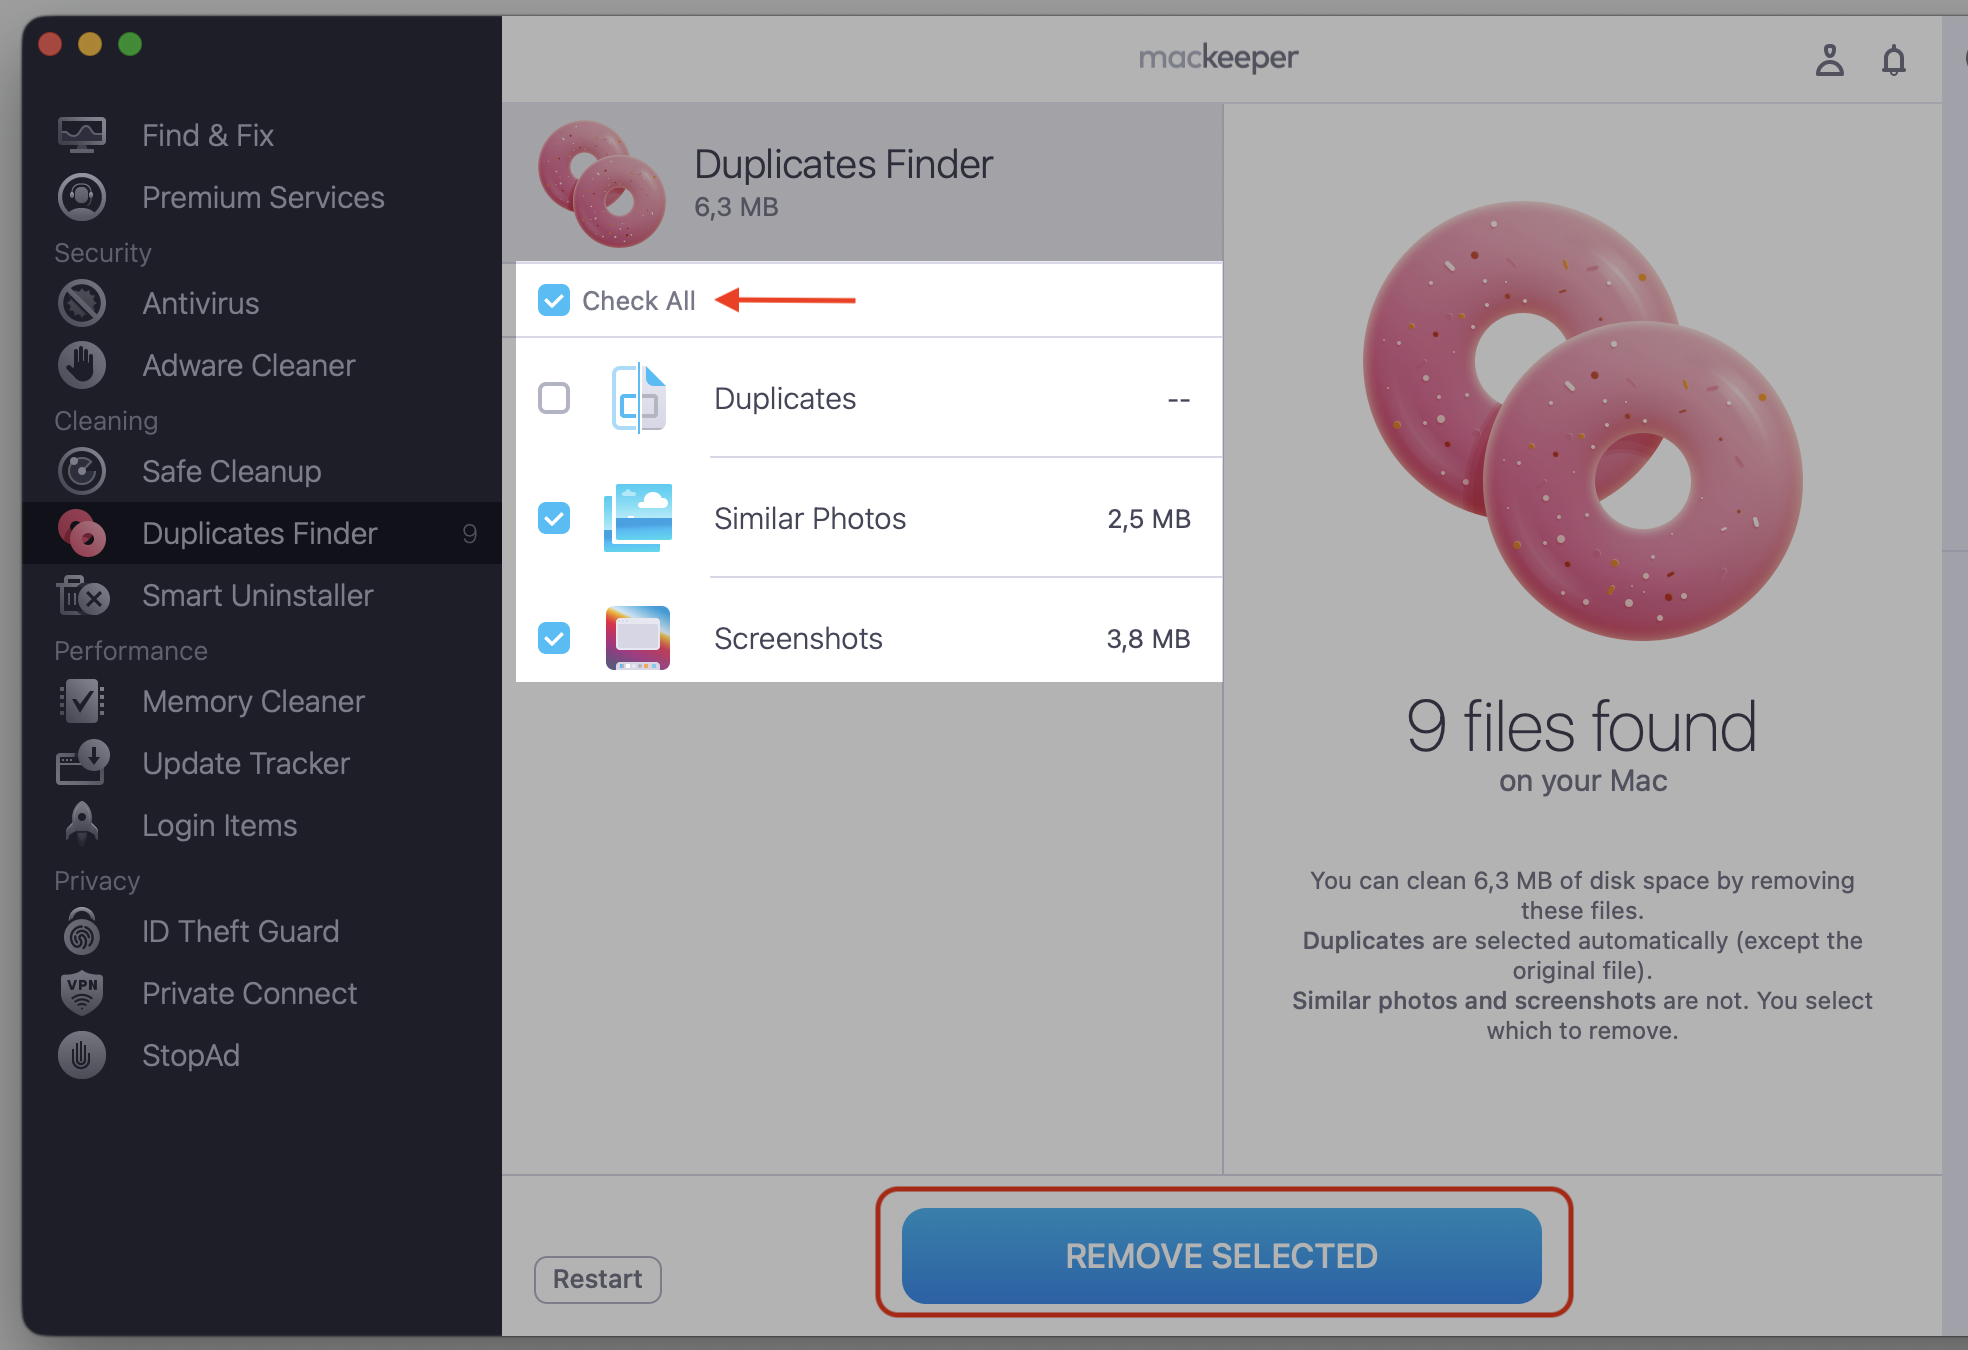
After the scan is complete, select Check All to view the file categories and select the necessary ones.
Confirm the duplicates deletion process with the Remove Selected button.
Step 1. Go to MacKeeper > Duplicate Finder > Start ScanStep 2. Select Check All > Remove Selected
How to turn on File Sharing on Mac?
To enable file sharing on Mac, you’ll work inside the Sharing settings, where you switch the feature on and pick the folders and people who get access. Most people never need Terminal for this—the Sharing settings cover everything. Here’s how to set up file sharing on Mac in a few steps:
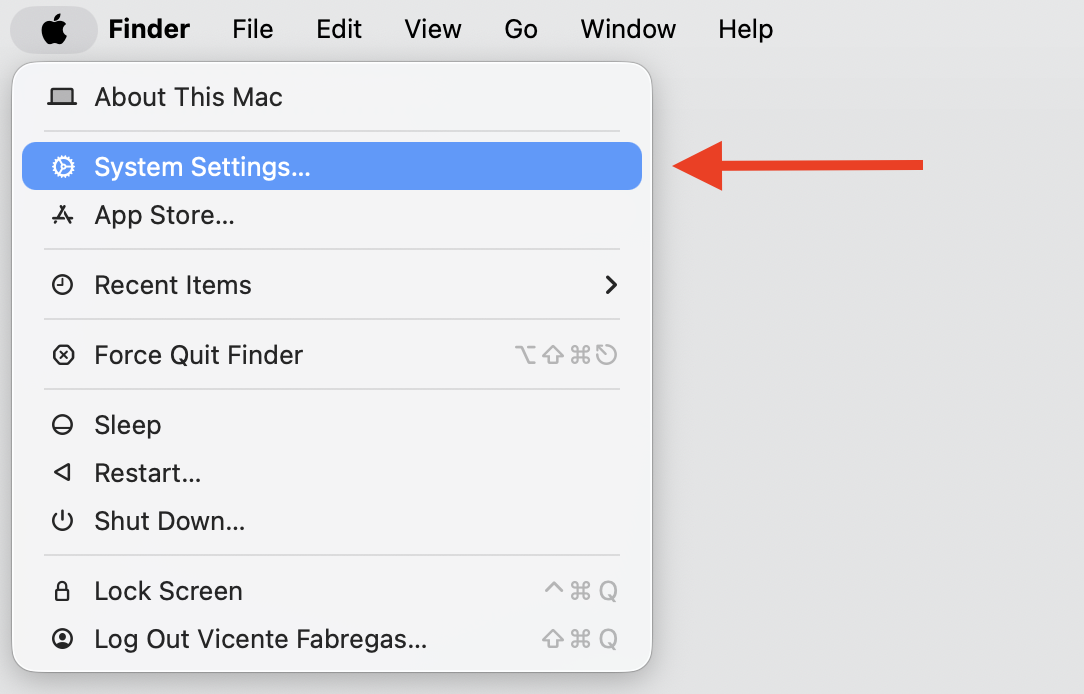
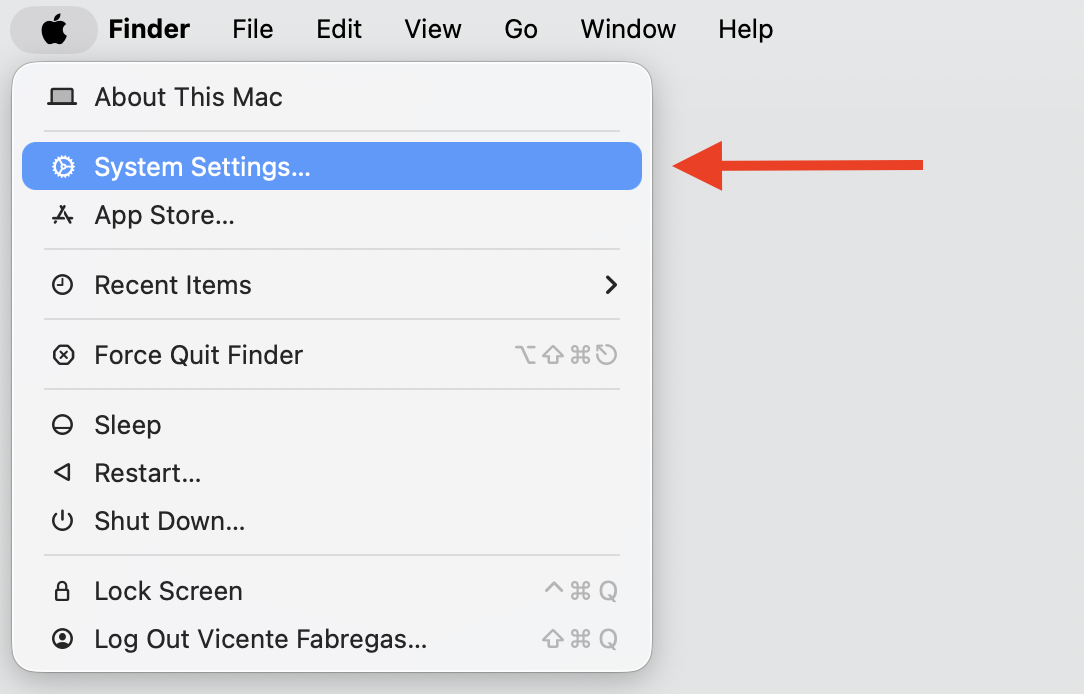
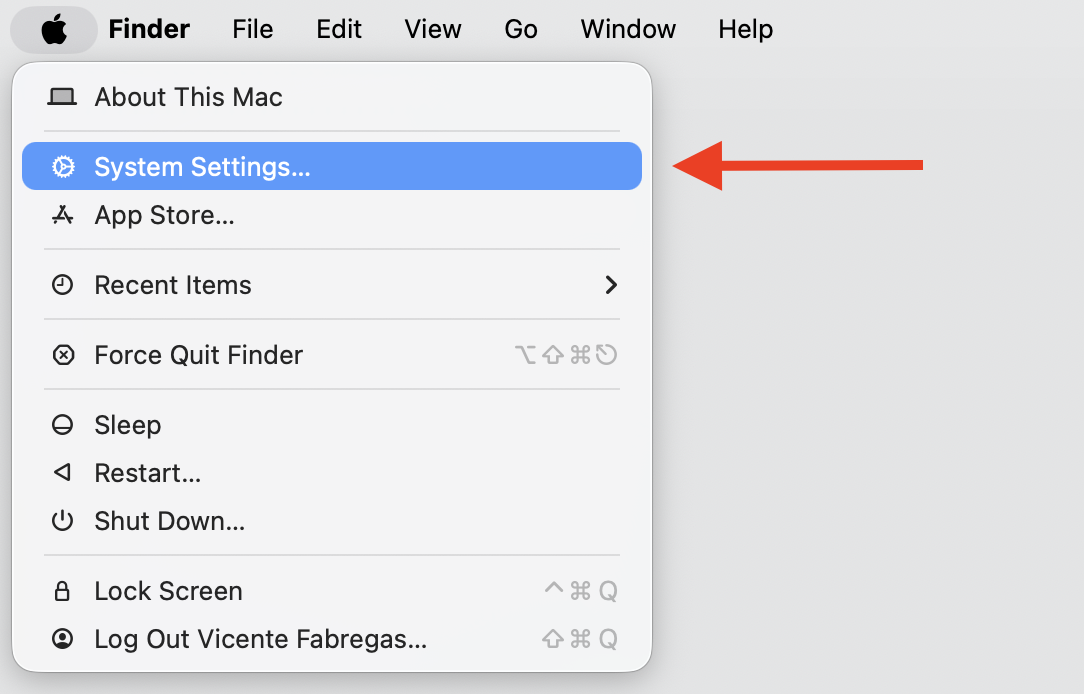
Click the Apple menu, then choose System Settings.
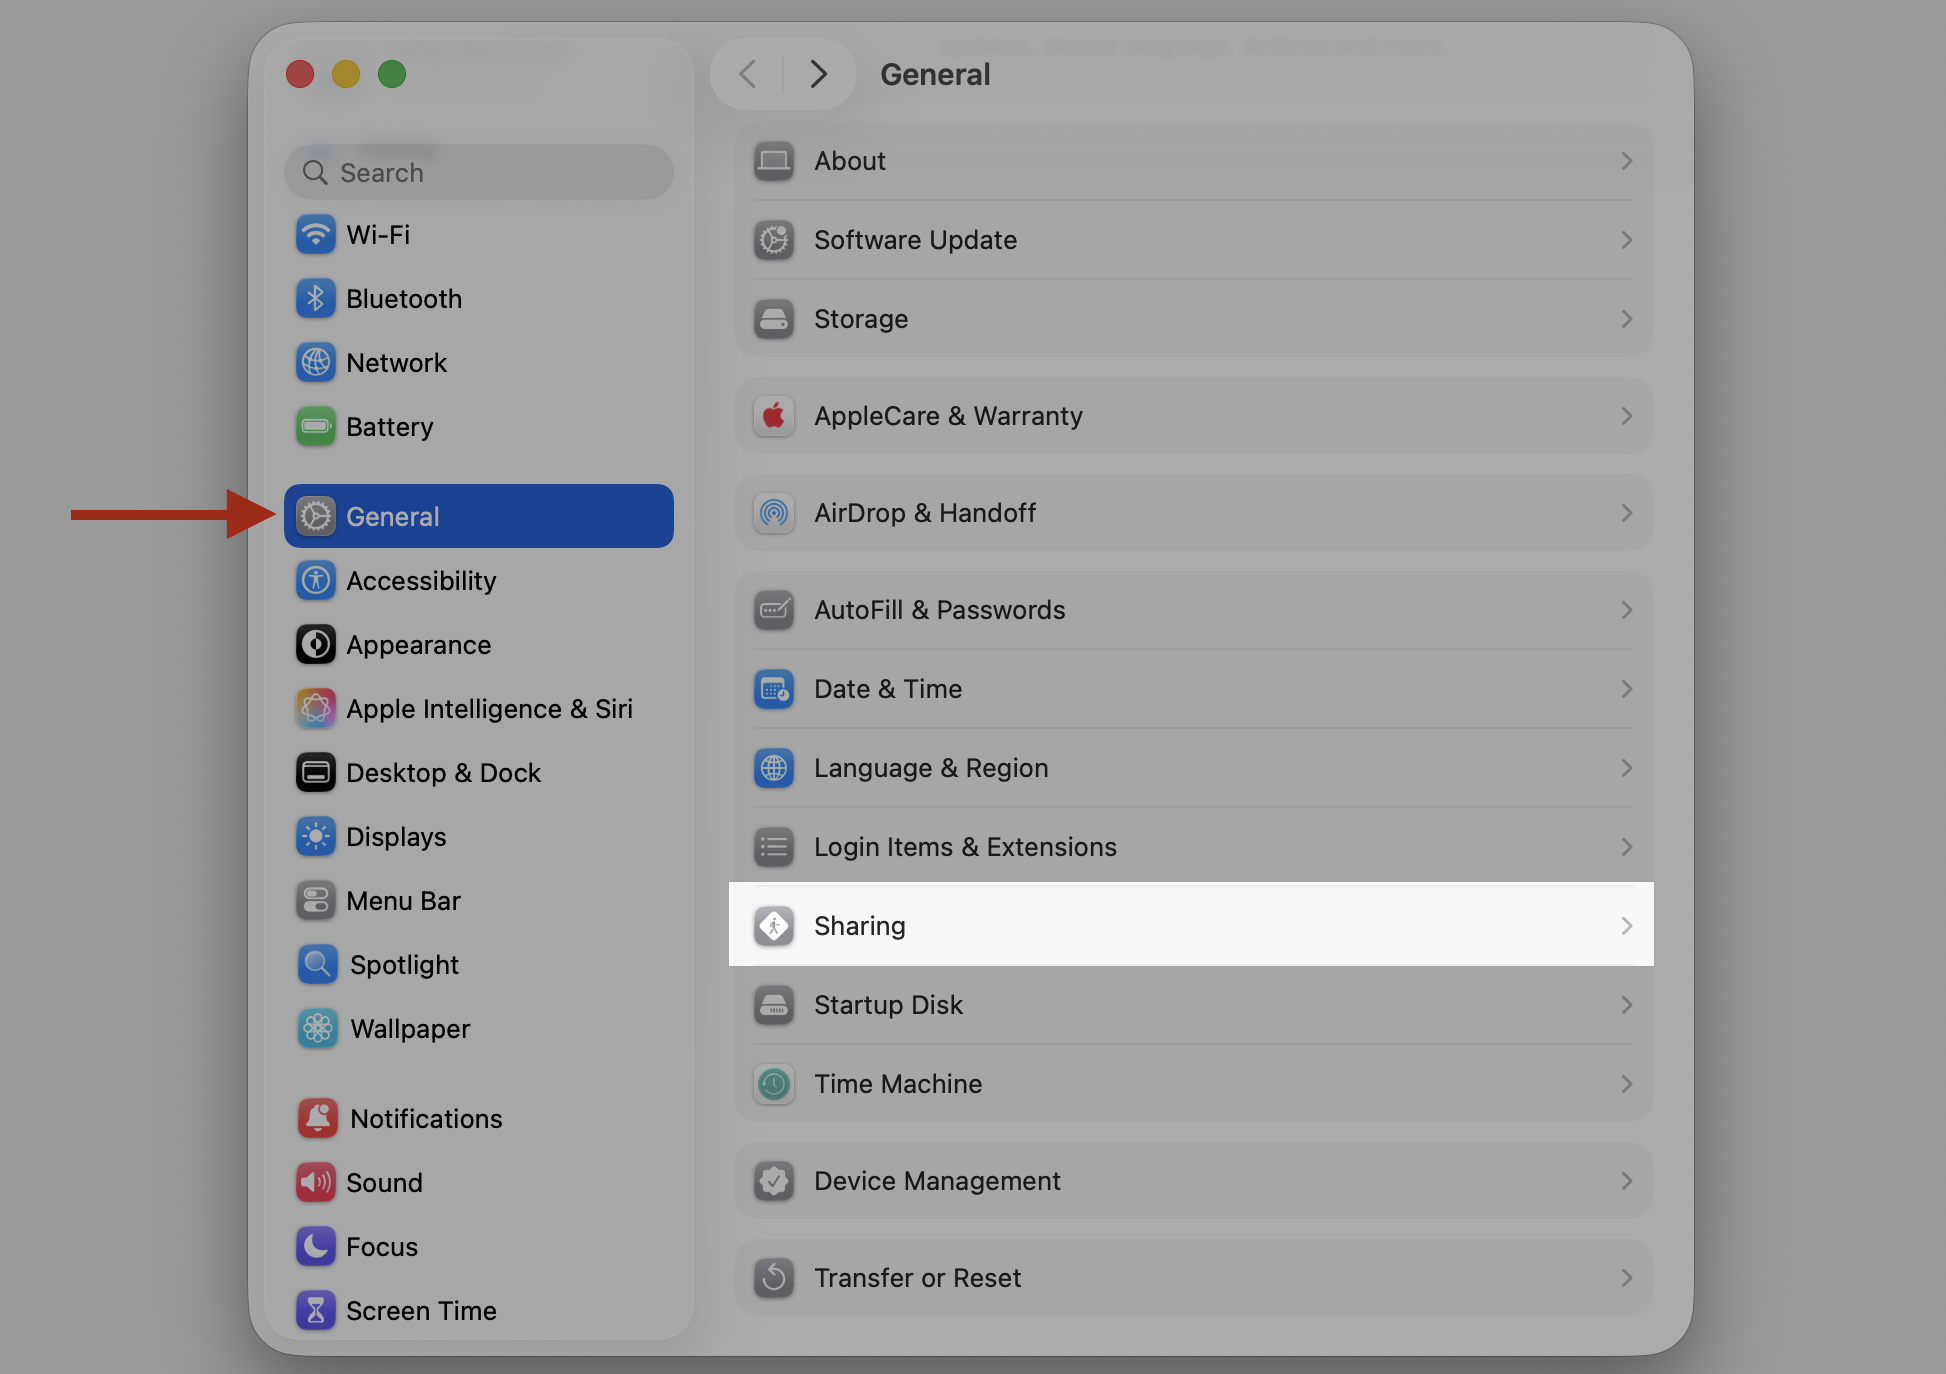
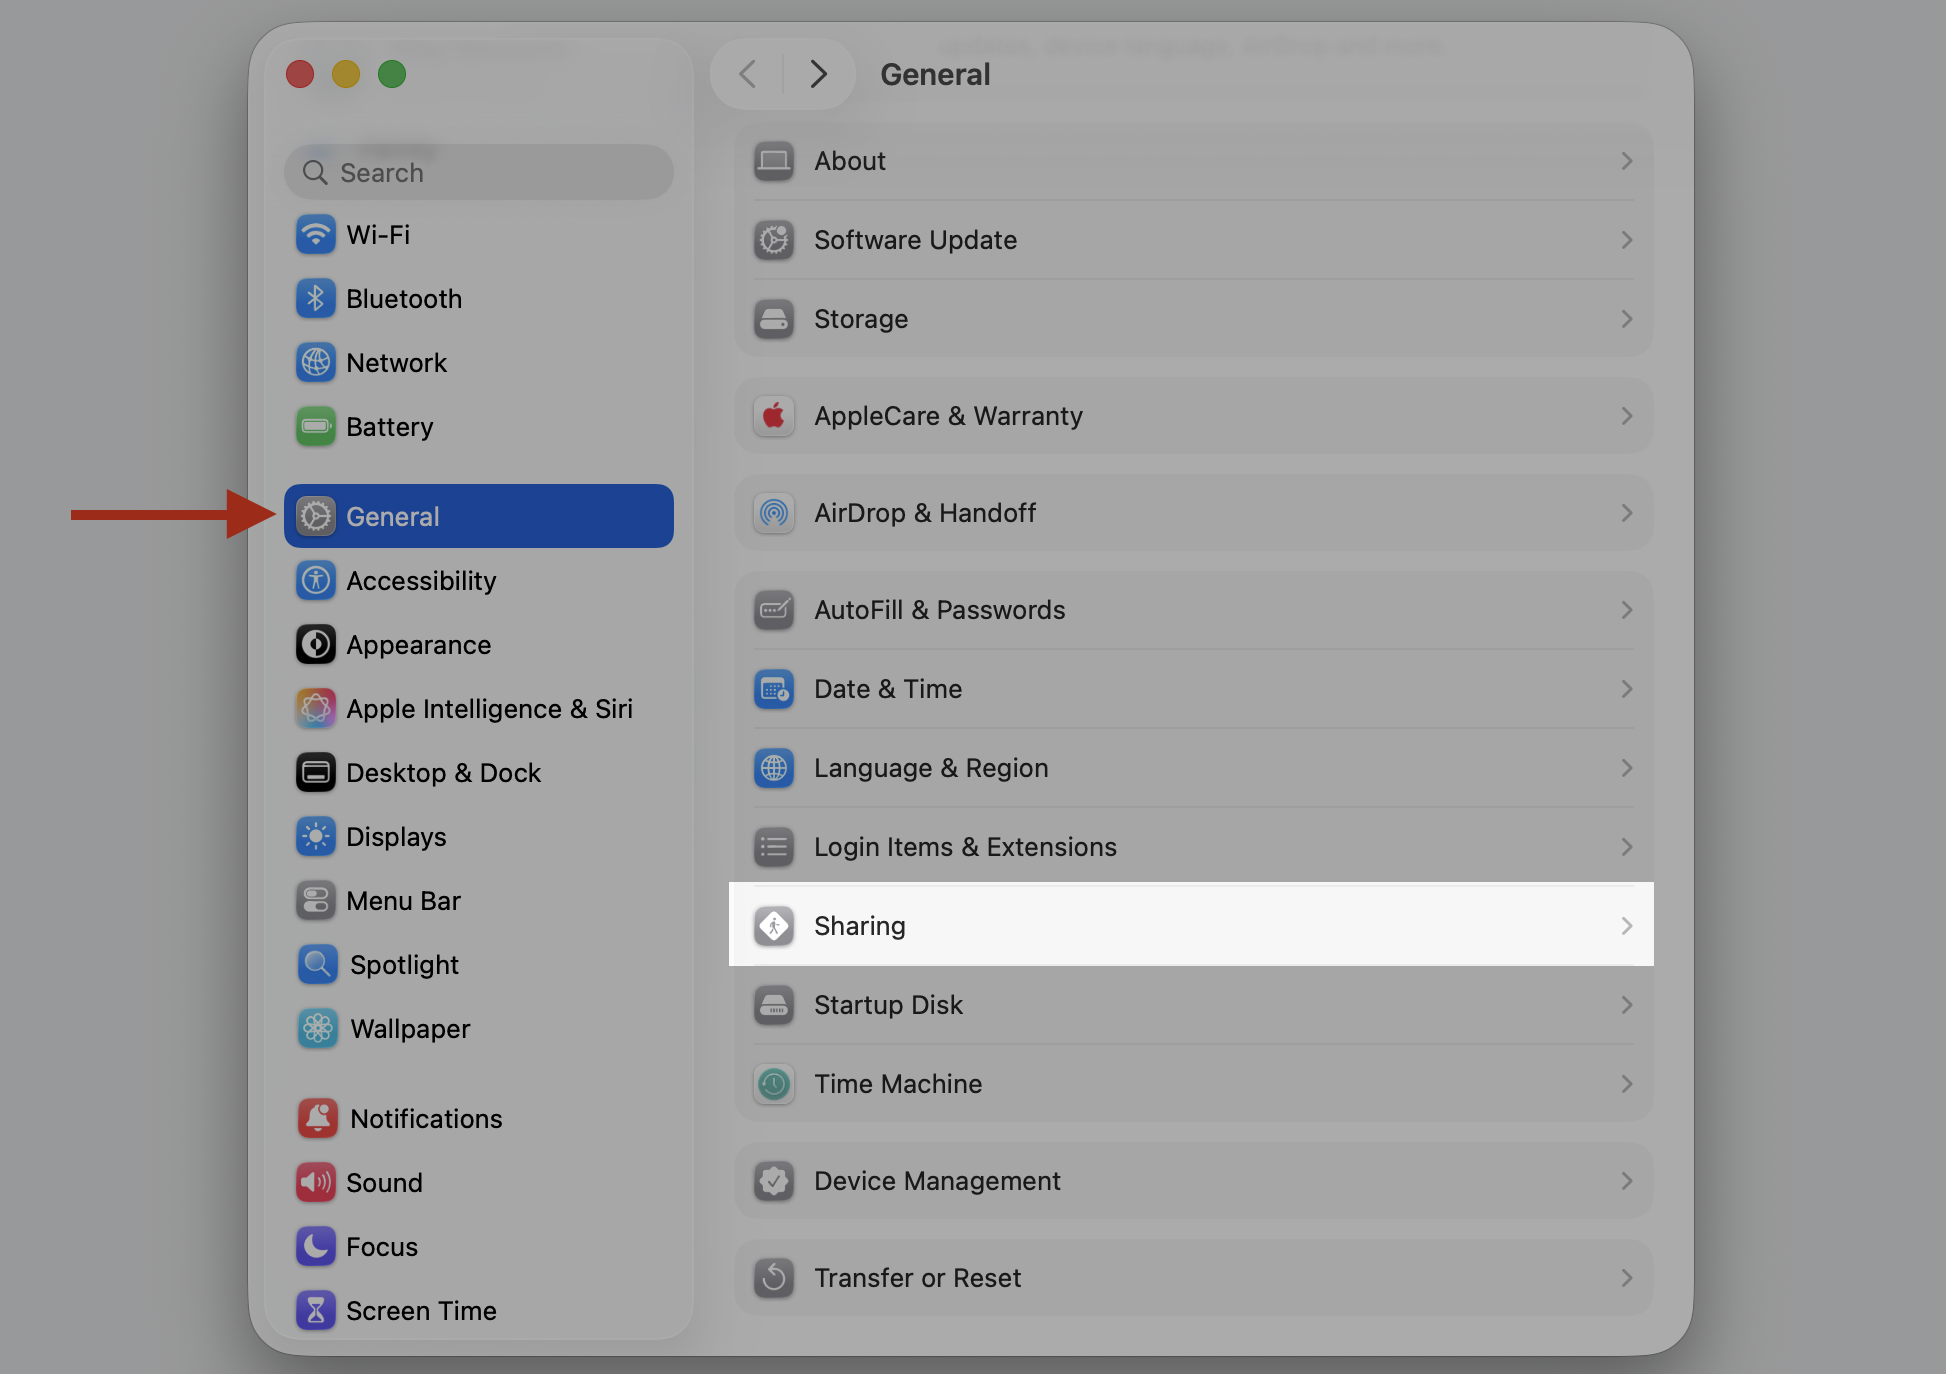
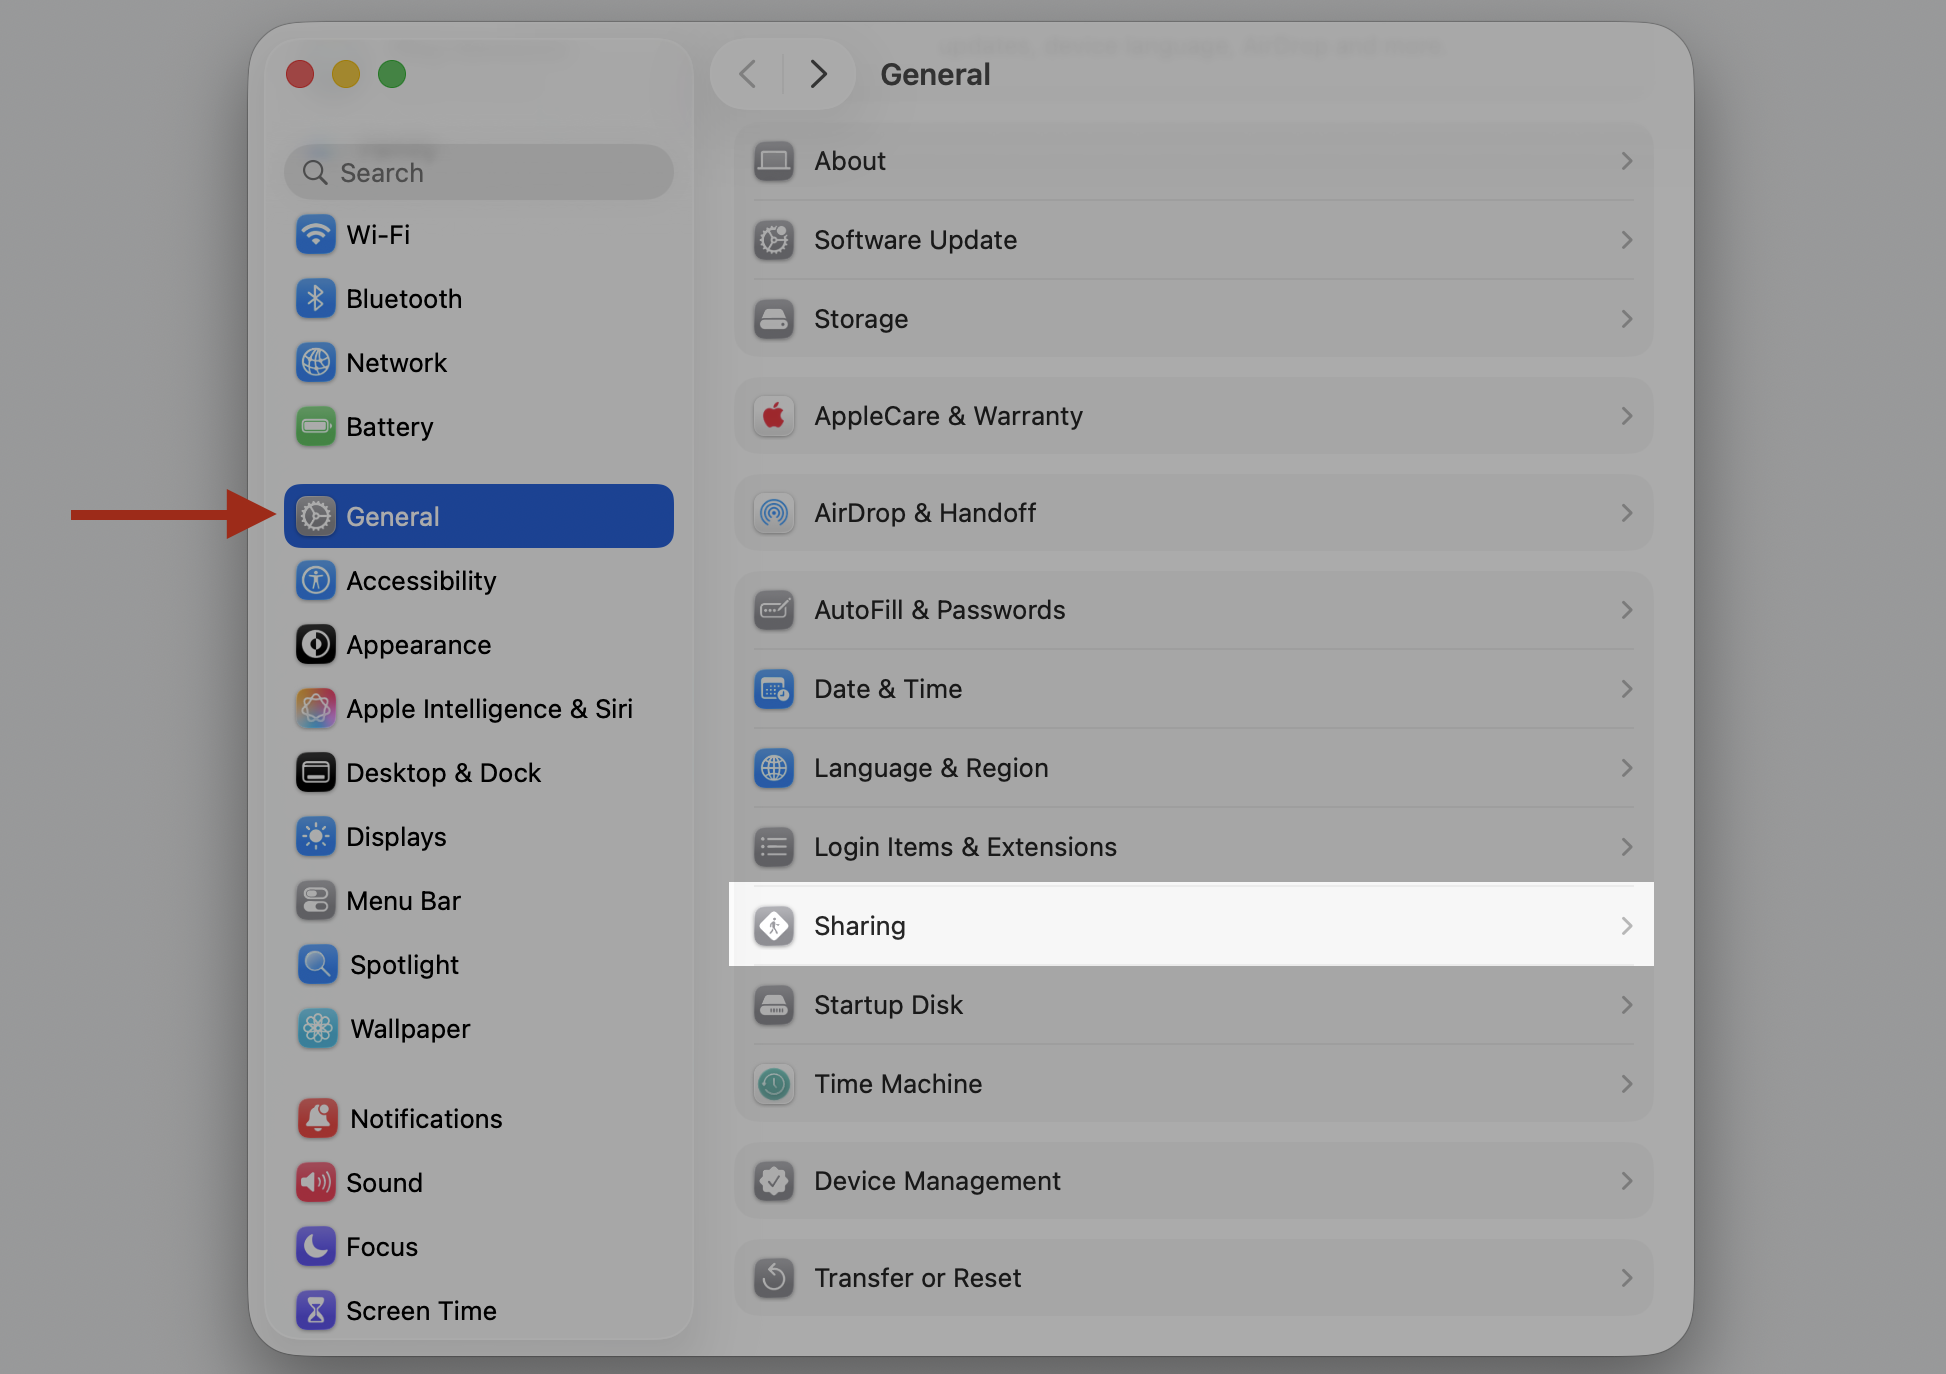
Select General in the sidebar, then click Sharing.
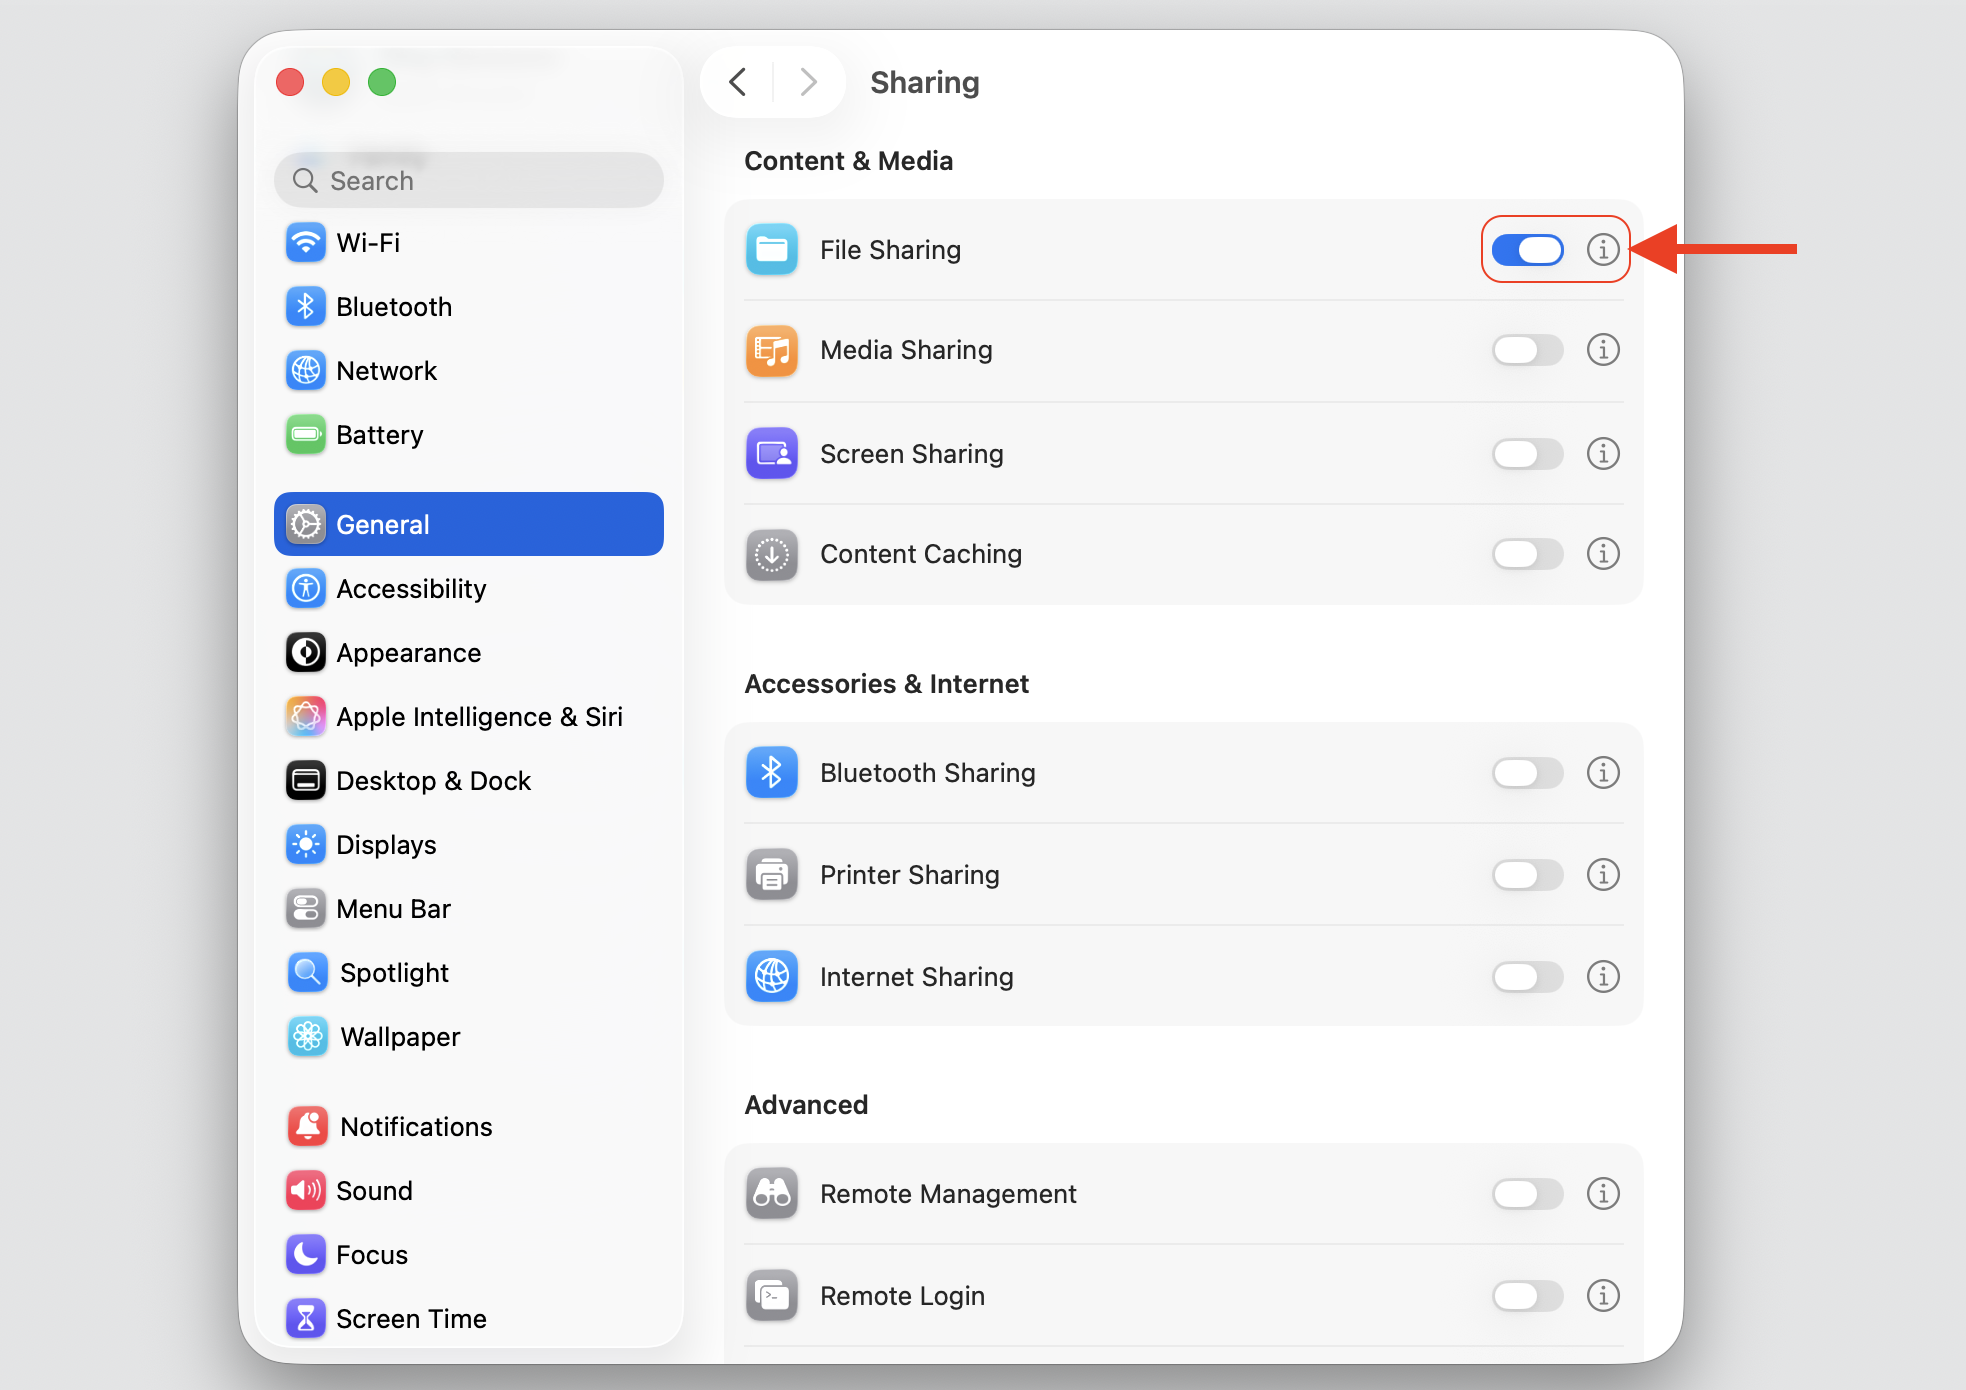
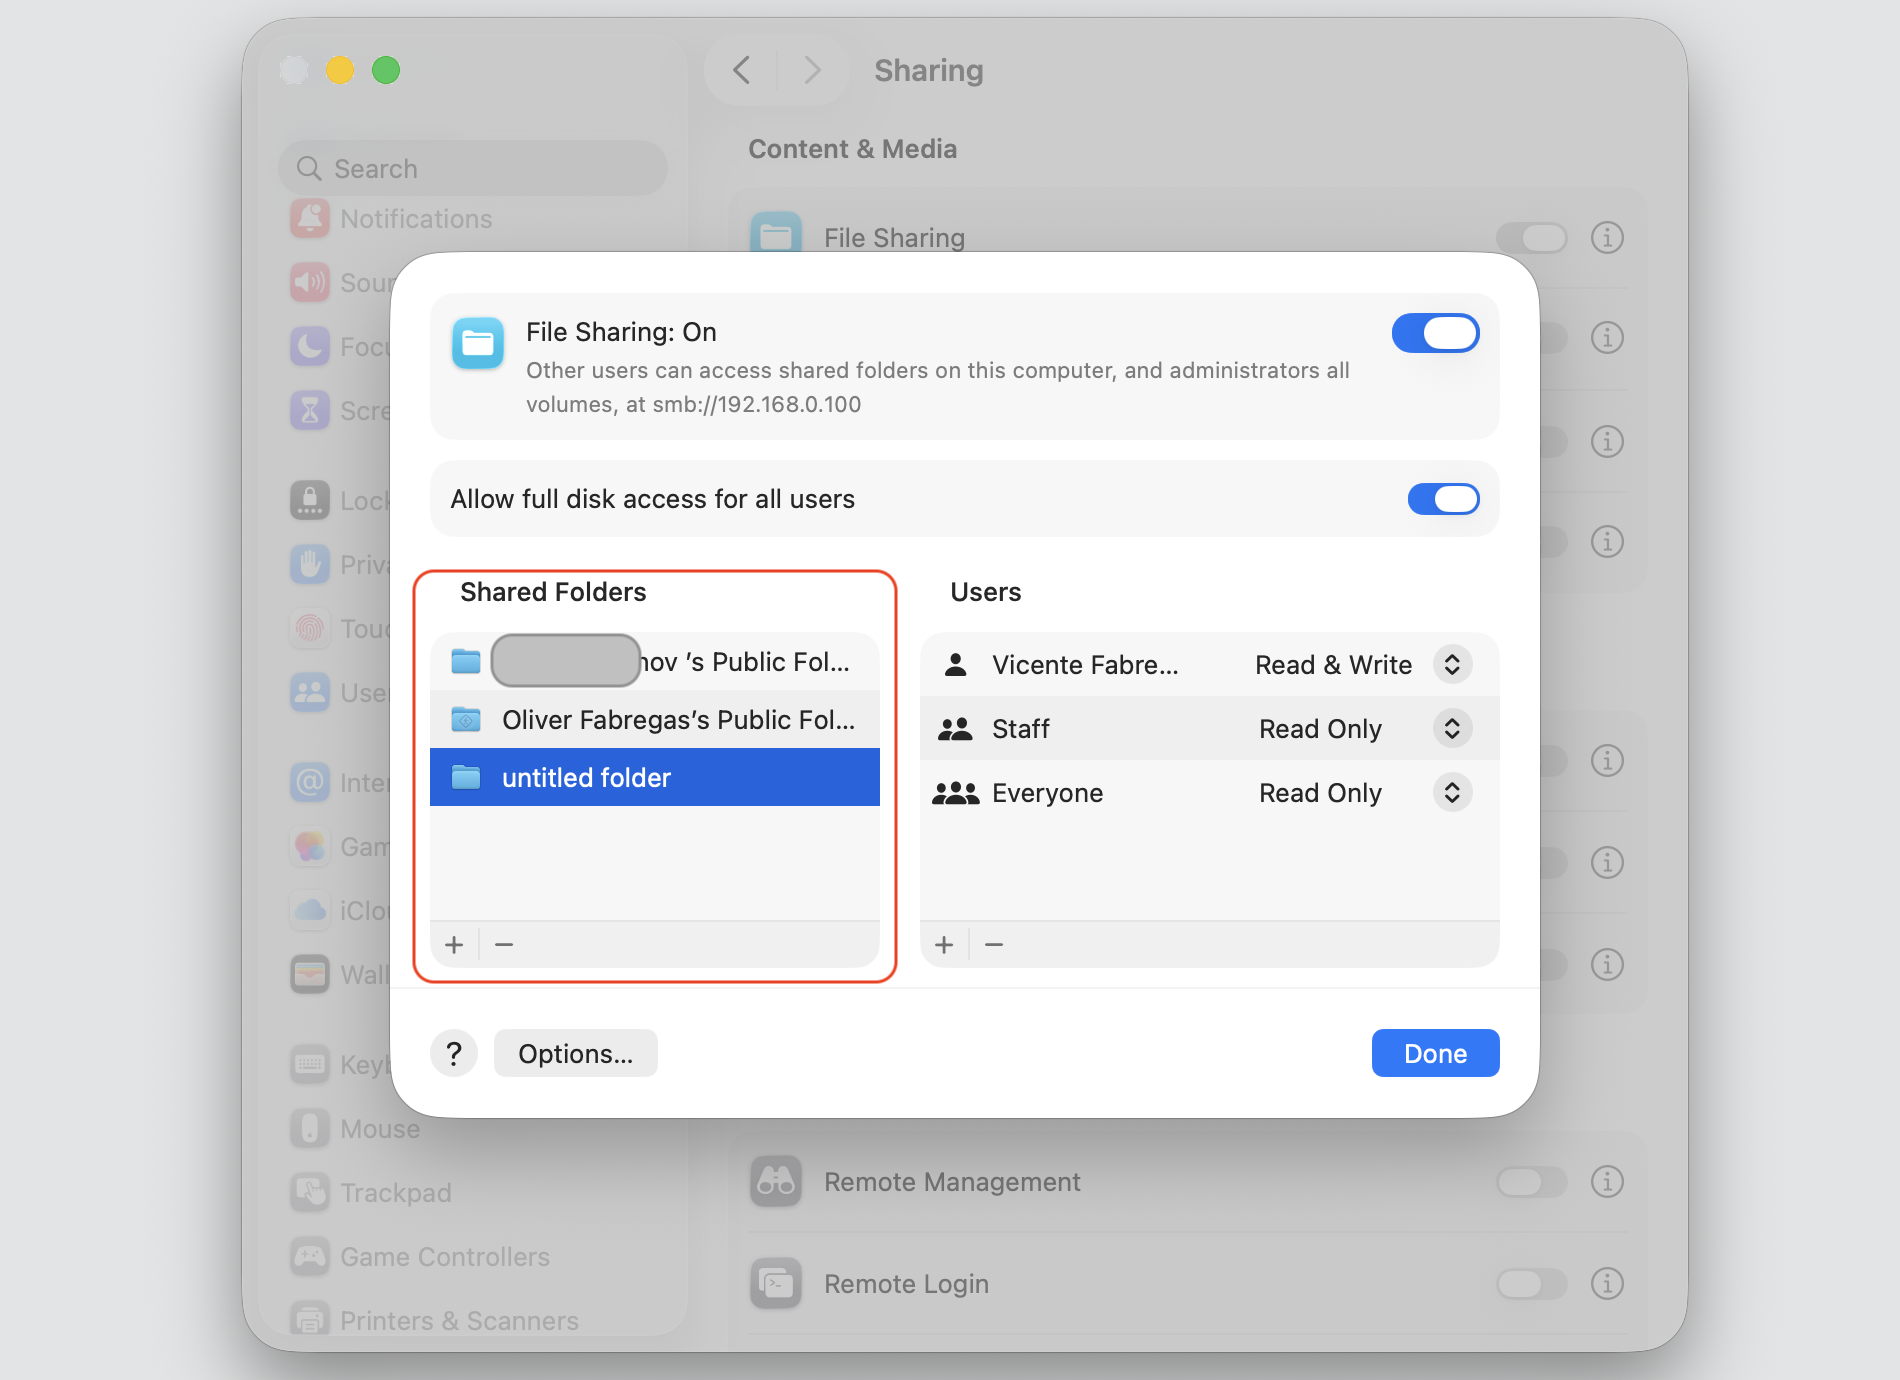
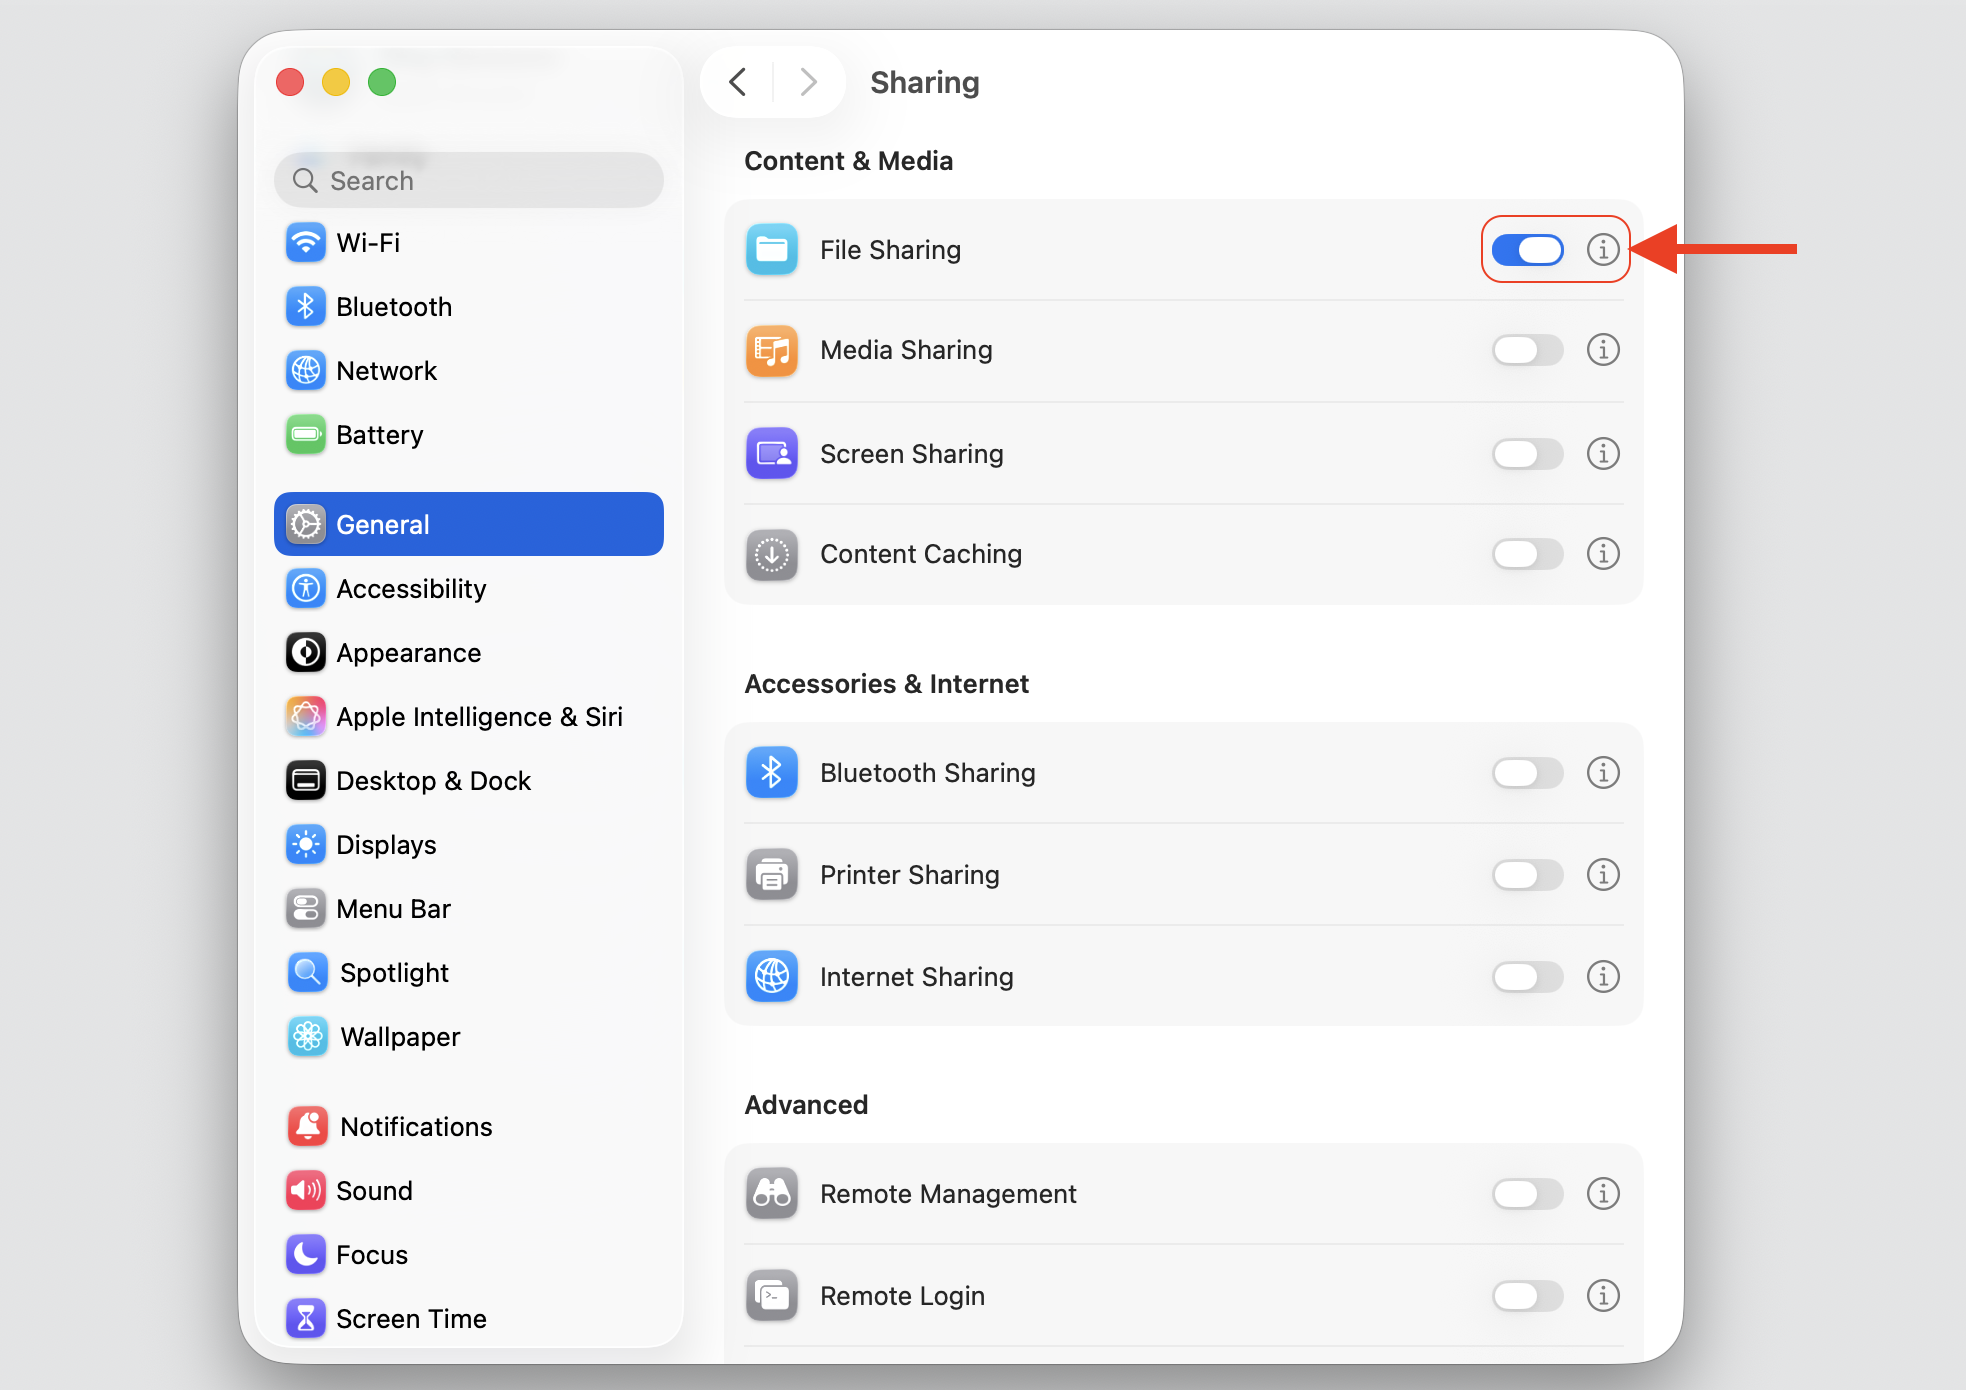
Turn on the File Sharing toggle.
Click the info (i) icon next to File Sharing to open its options.
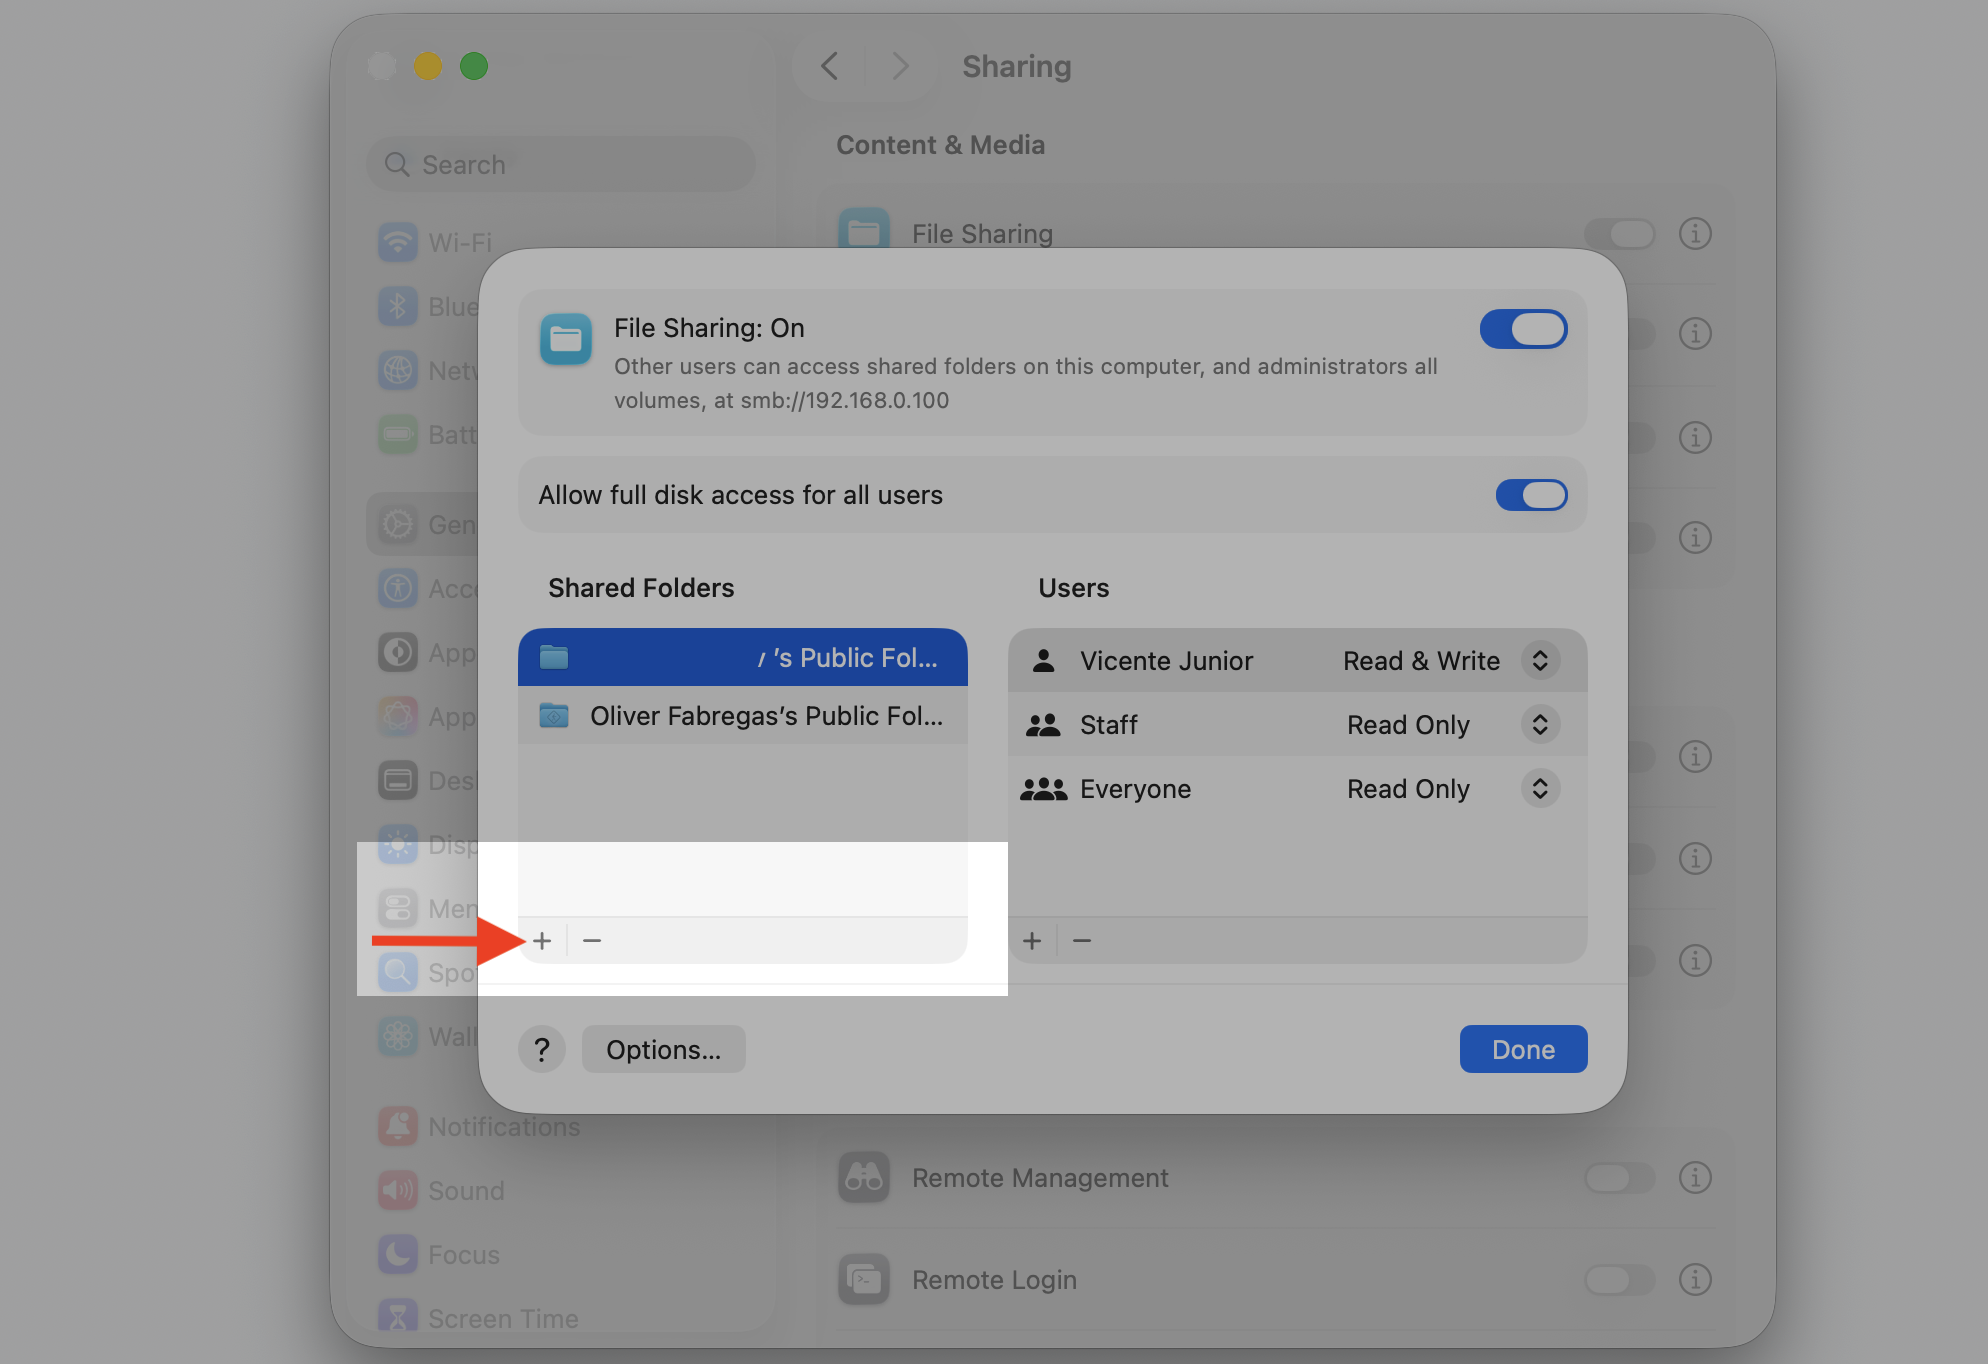
Under Shared Folders, click the add (+) button, pick a folder, then click Open.
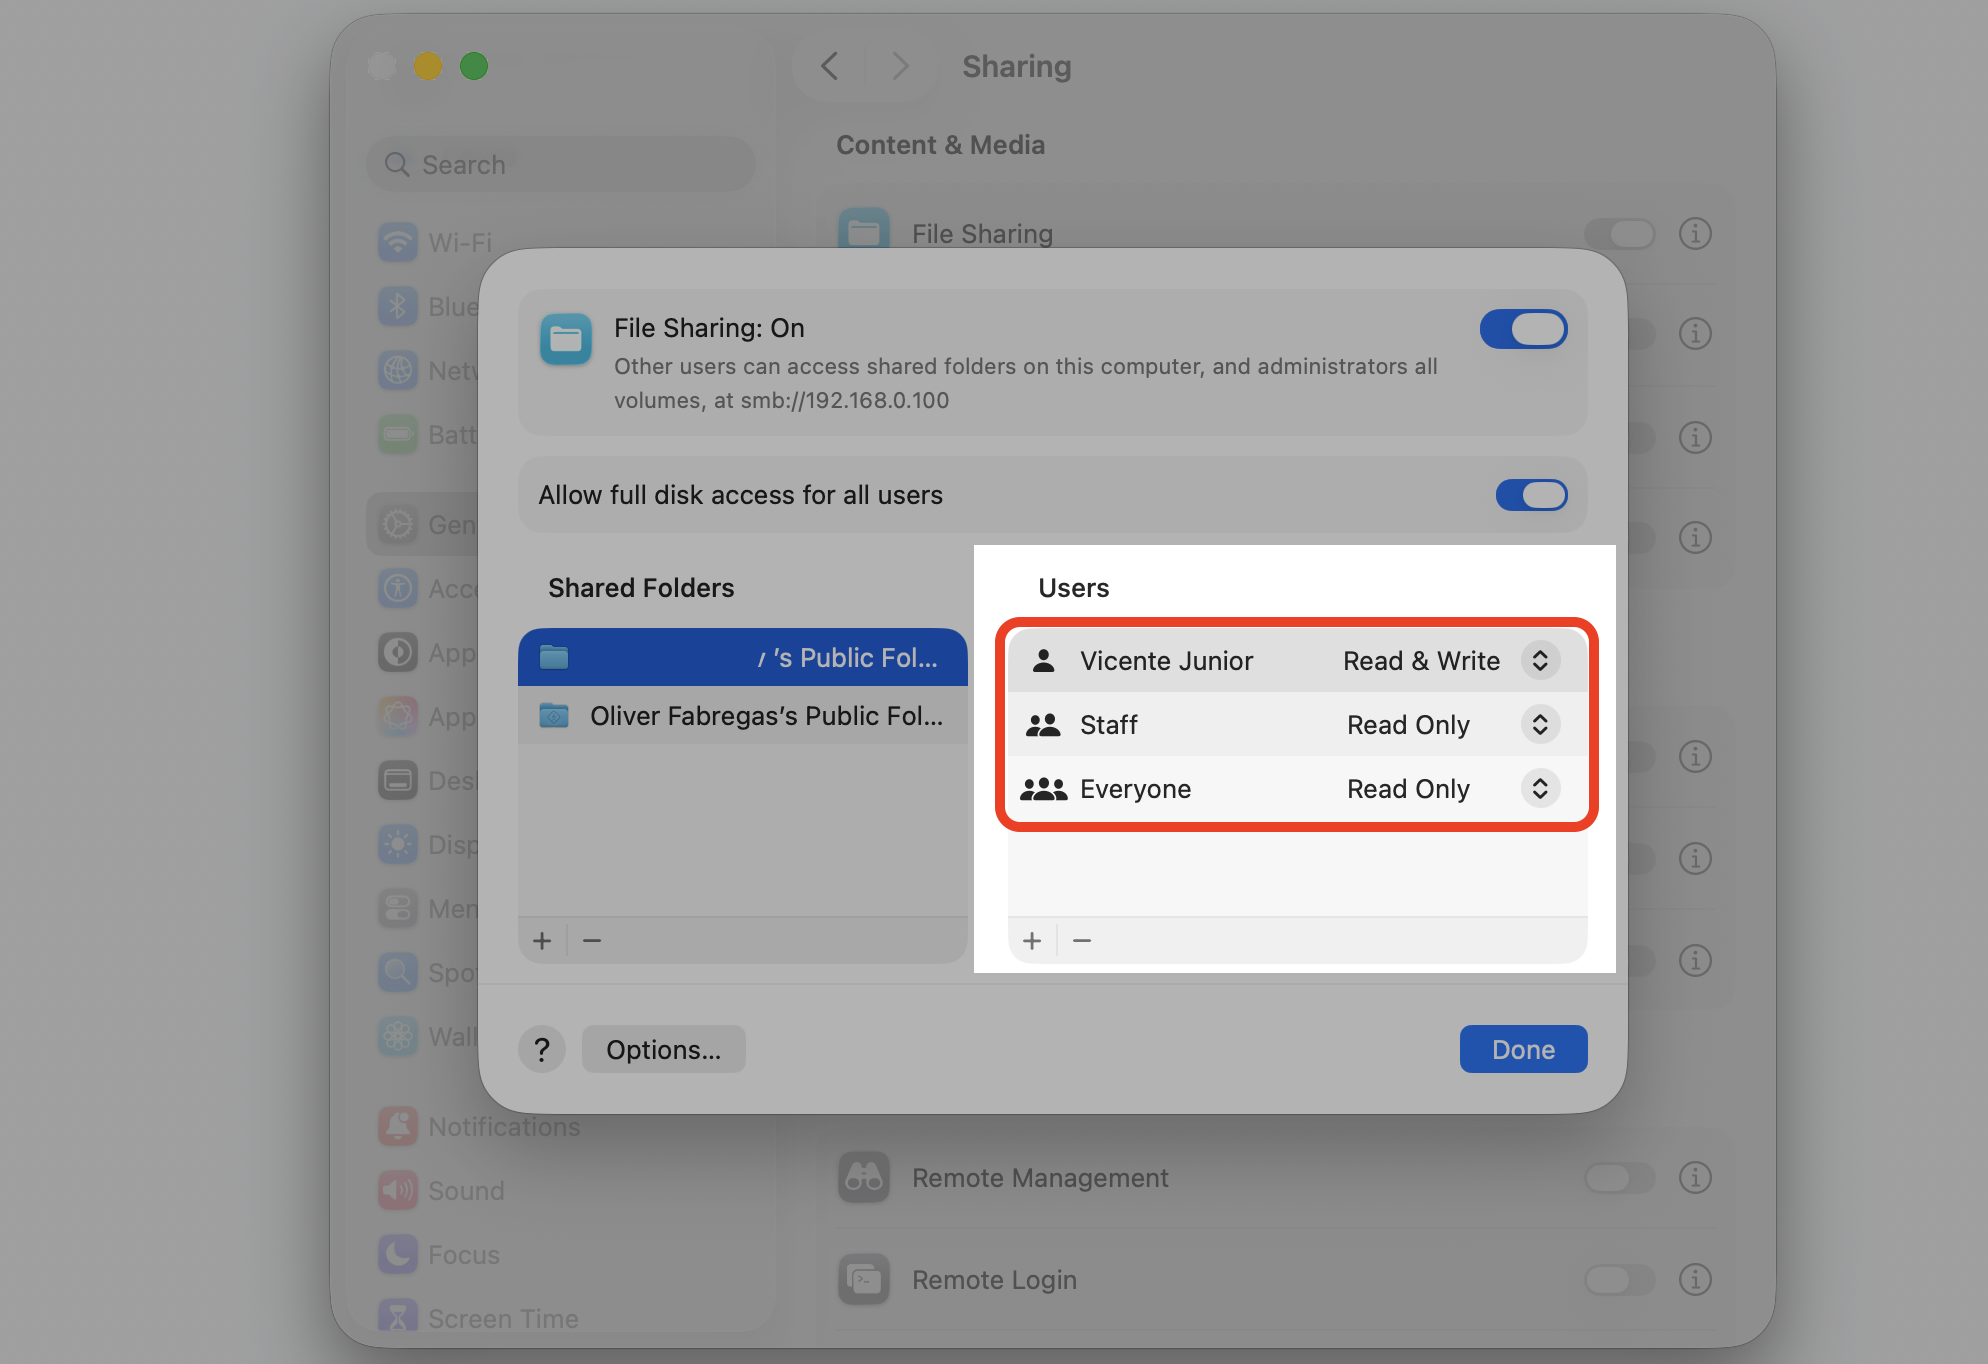
Under Users, choose who can connect and set what they’re allowed to do.
Step 1. Go to Apple Logo > System SettingsStep 2. Select General in the sidebar, then click SharingStep 3. Turn on the File Sharing toggle and click the info (i)Step 4. Under Shared Folders, click the add (+) button, pick a folder, then click OpenStep 5. Under Users, choose who can connect and set what they’re allowed to do
How to manage File Sharing permissions on Mac?
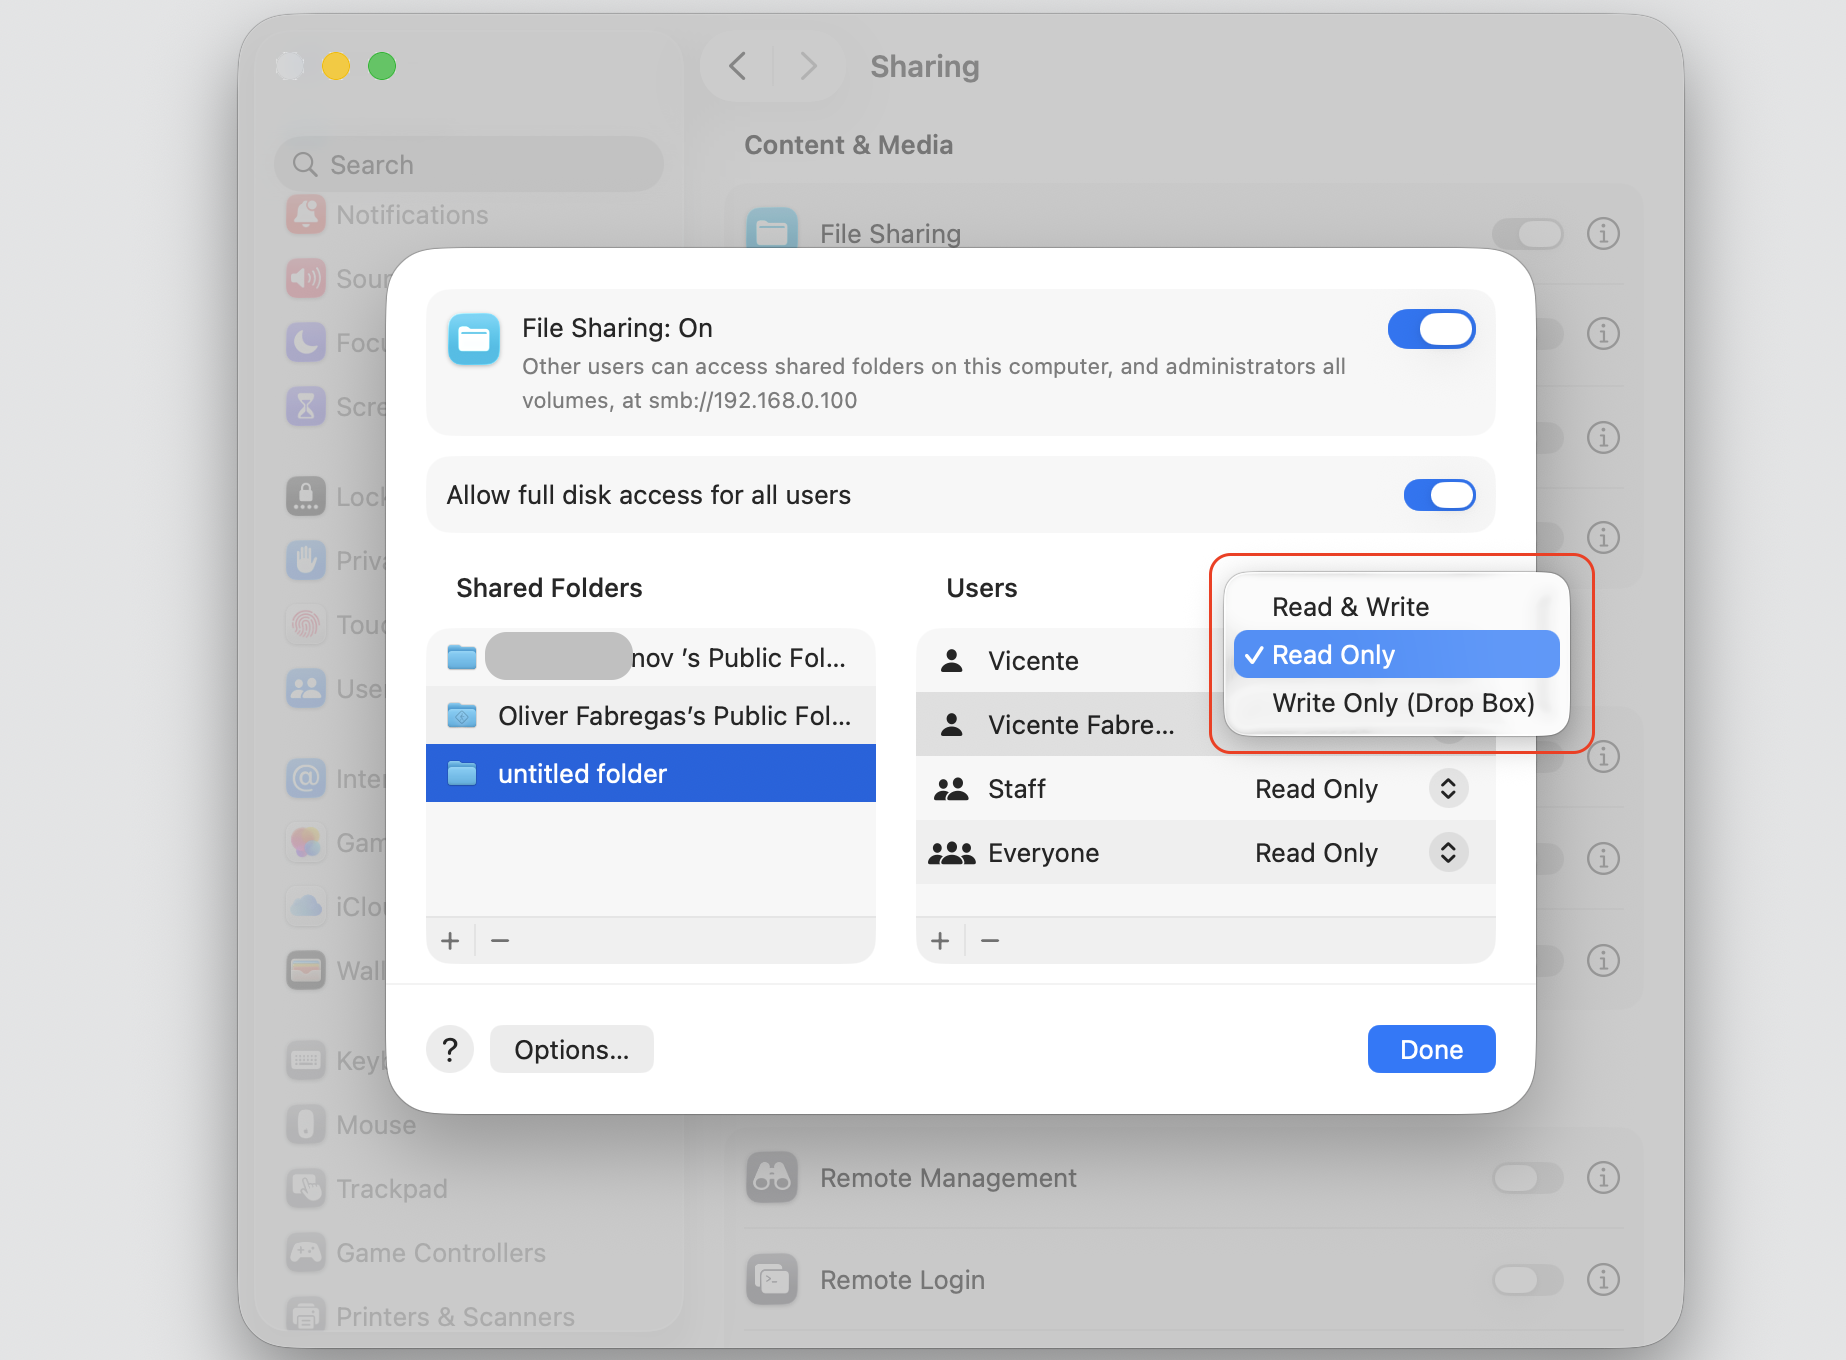
Permissions decide what each person can do once they reach a shared folder. Keeping access tight is the safe choice, so give wider access only when someone truly needs it. To put it simply, the three levels work like this:
Permission level
What the user can do
Read & Write
Open, edit, and add files
Read only
Open and copy files, but do not change them
Write only (Drop Box)
Drop files in the folder without modifying them and with no opportunity to open and view their contents
Now, when we’ve explained the difference between the file permission levels, manage it on your Mac this way:
Open System Settings > General > Sharing, then click the info (ⓘ) icon beside File Sharing.
Select a folder in the Shared Folders list.
In the Users list, click a person’s name.
Click the pop-up menu next to their name, then choose a permission level.
Give the lightest access that still gets the job done.
Step 1. Go to Apple Logo > System SettingsStep 2. Select General in the sidebar, then click SharingStep 3. Select a folder in the Shared Folders listStep 4. Click the pop-up menu next to their name, then choose a permission level
How to connect to a shared Mac from another Mac?
Another Mac can usually see your shared machine in Finder. If it doesn’t appear on its own, you can reach it by typing its address. This is a handy way to transfer data from one Mac to another without extra apps. Just follow our instructions:
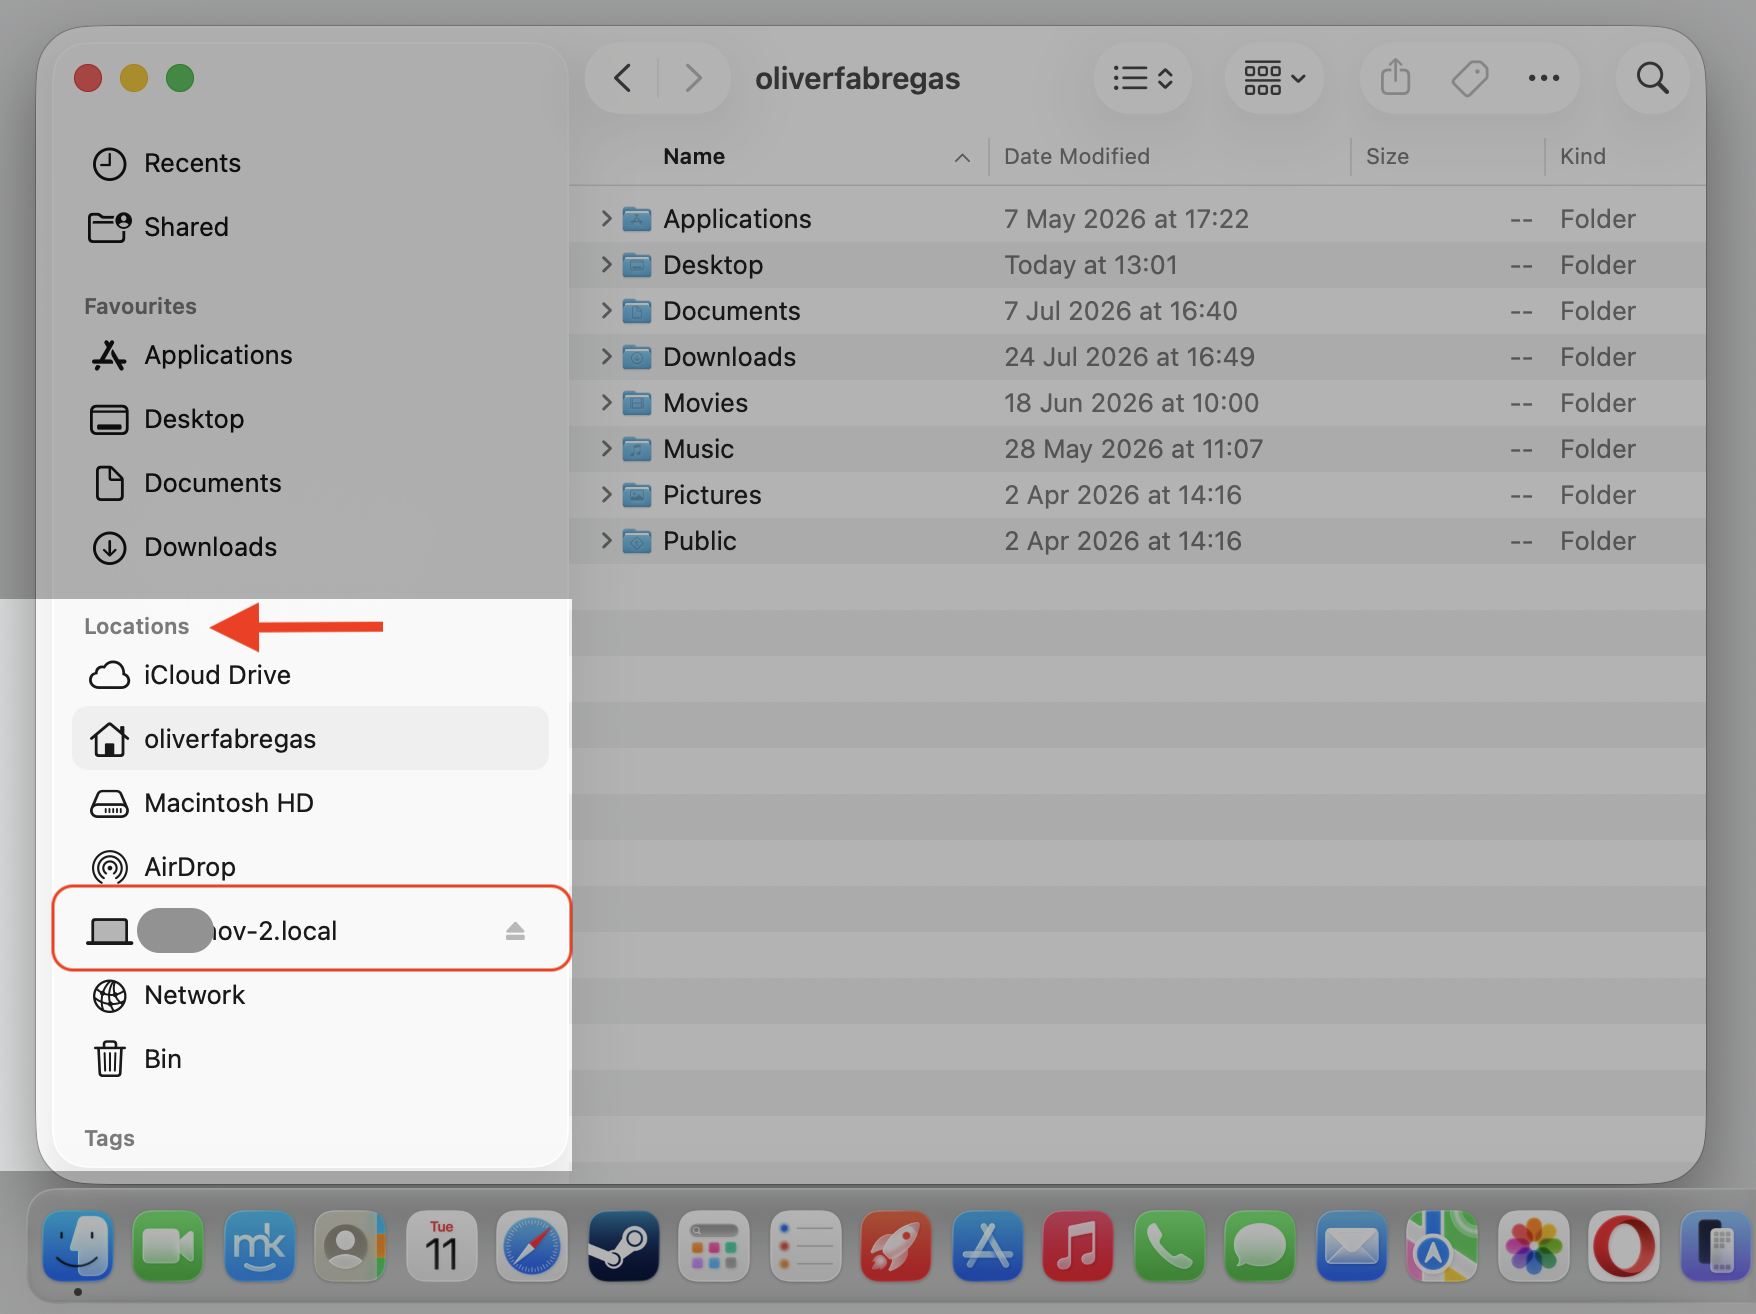
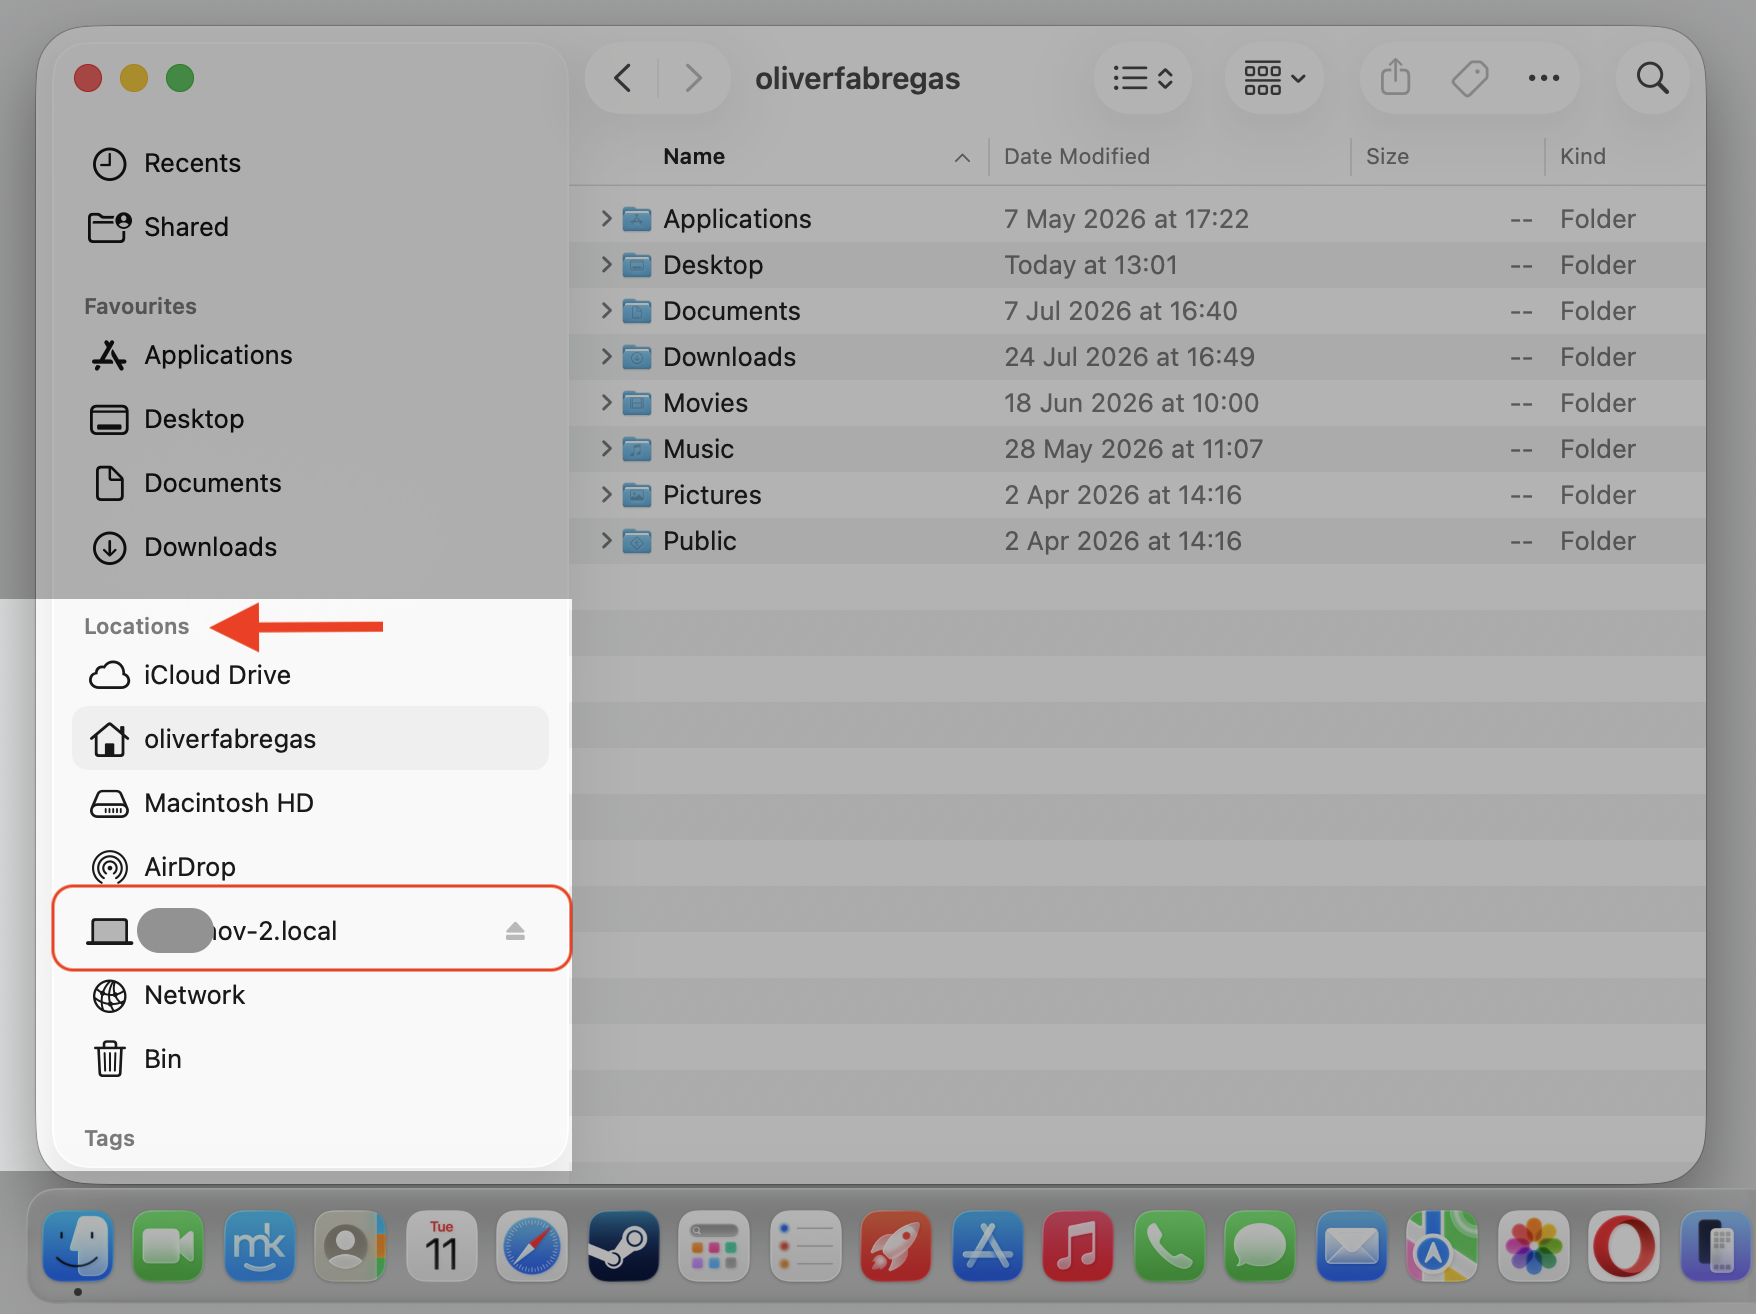
On the second Mac, open Finder and look under Locations in the sidebar.
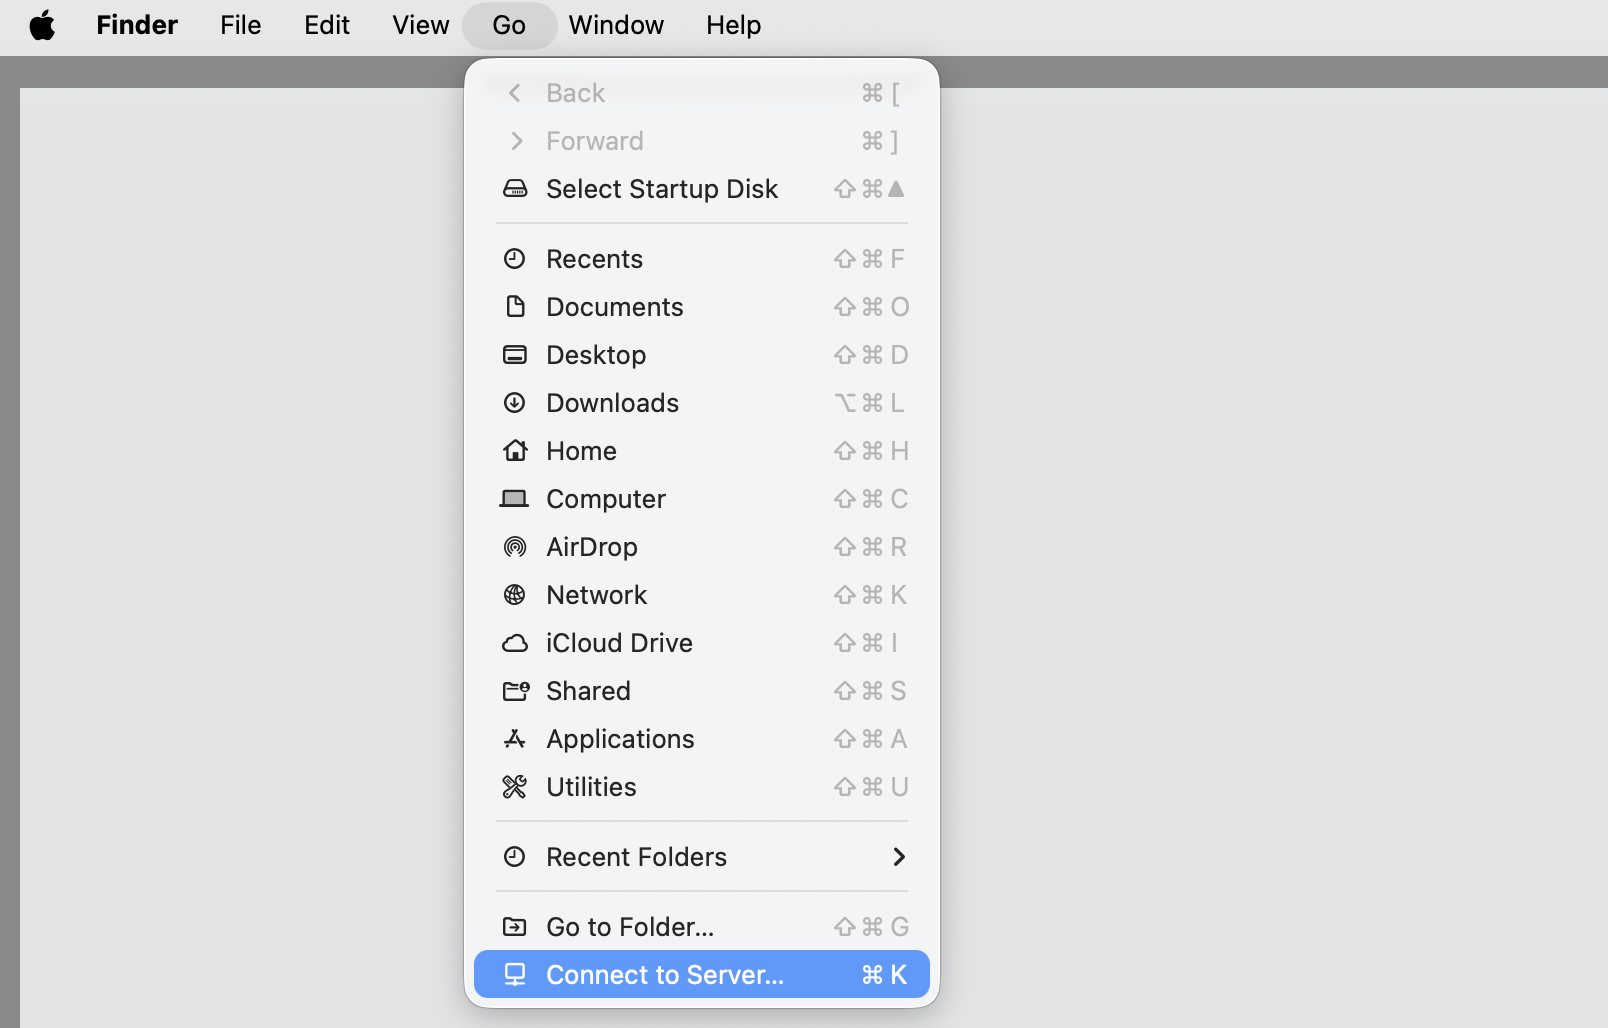
Select your local device. If it isn’t listed, choose Go > Connect to Server from the menu bar.
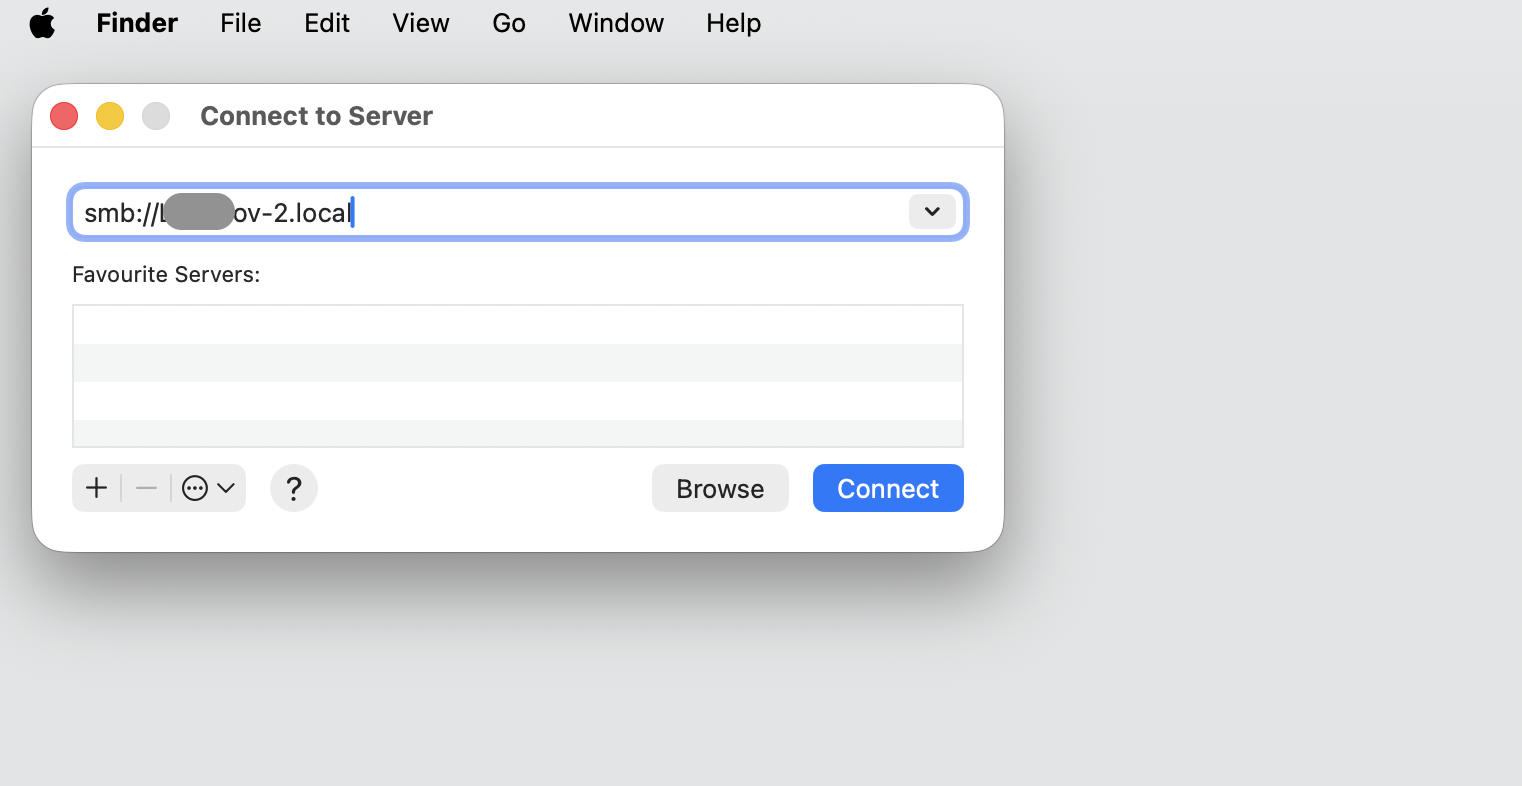
Type smb:// followed by the shared Mac’s IP address, then click Connect.
Go back to the Finder > Locations and select your connected Mac.
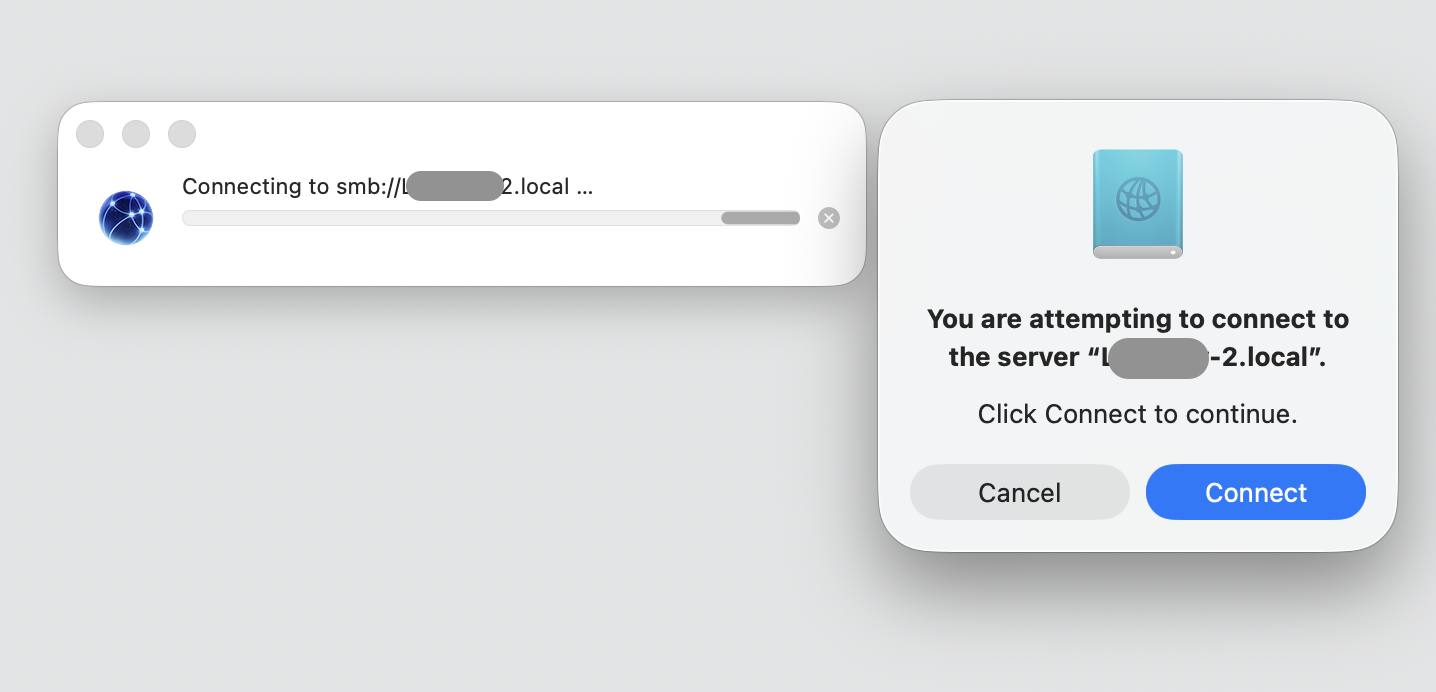
Step 1. Go to Finder > Locations > select your local deviceStep 1*. If you don’t see your device in the list, select Connect to Server in the Go menuStep 2. Type smb:// followed by the shared Mac’s IP address, then click ConnectStep 3. When the local machine appears, press ConnectStep 4. Go back to the Finder > Locations and select your connected Mac
How to share files between Mac and Windows?
Your Mac and a Windows computer can trade files once SMB sharing is on, which it is by default on modern macOS. Beyond a few menu names, the difference between Mac and Windows here is small—the Windows side just needs the right address and login. Now do the following to share the files between two systems:
On your Mac, open System Settings > General > Sharing, then click the info (ⓘ) icon beside File Sharing.
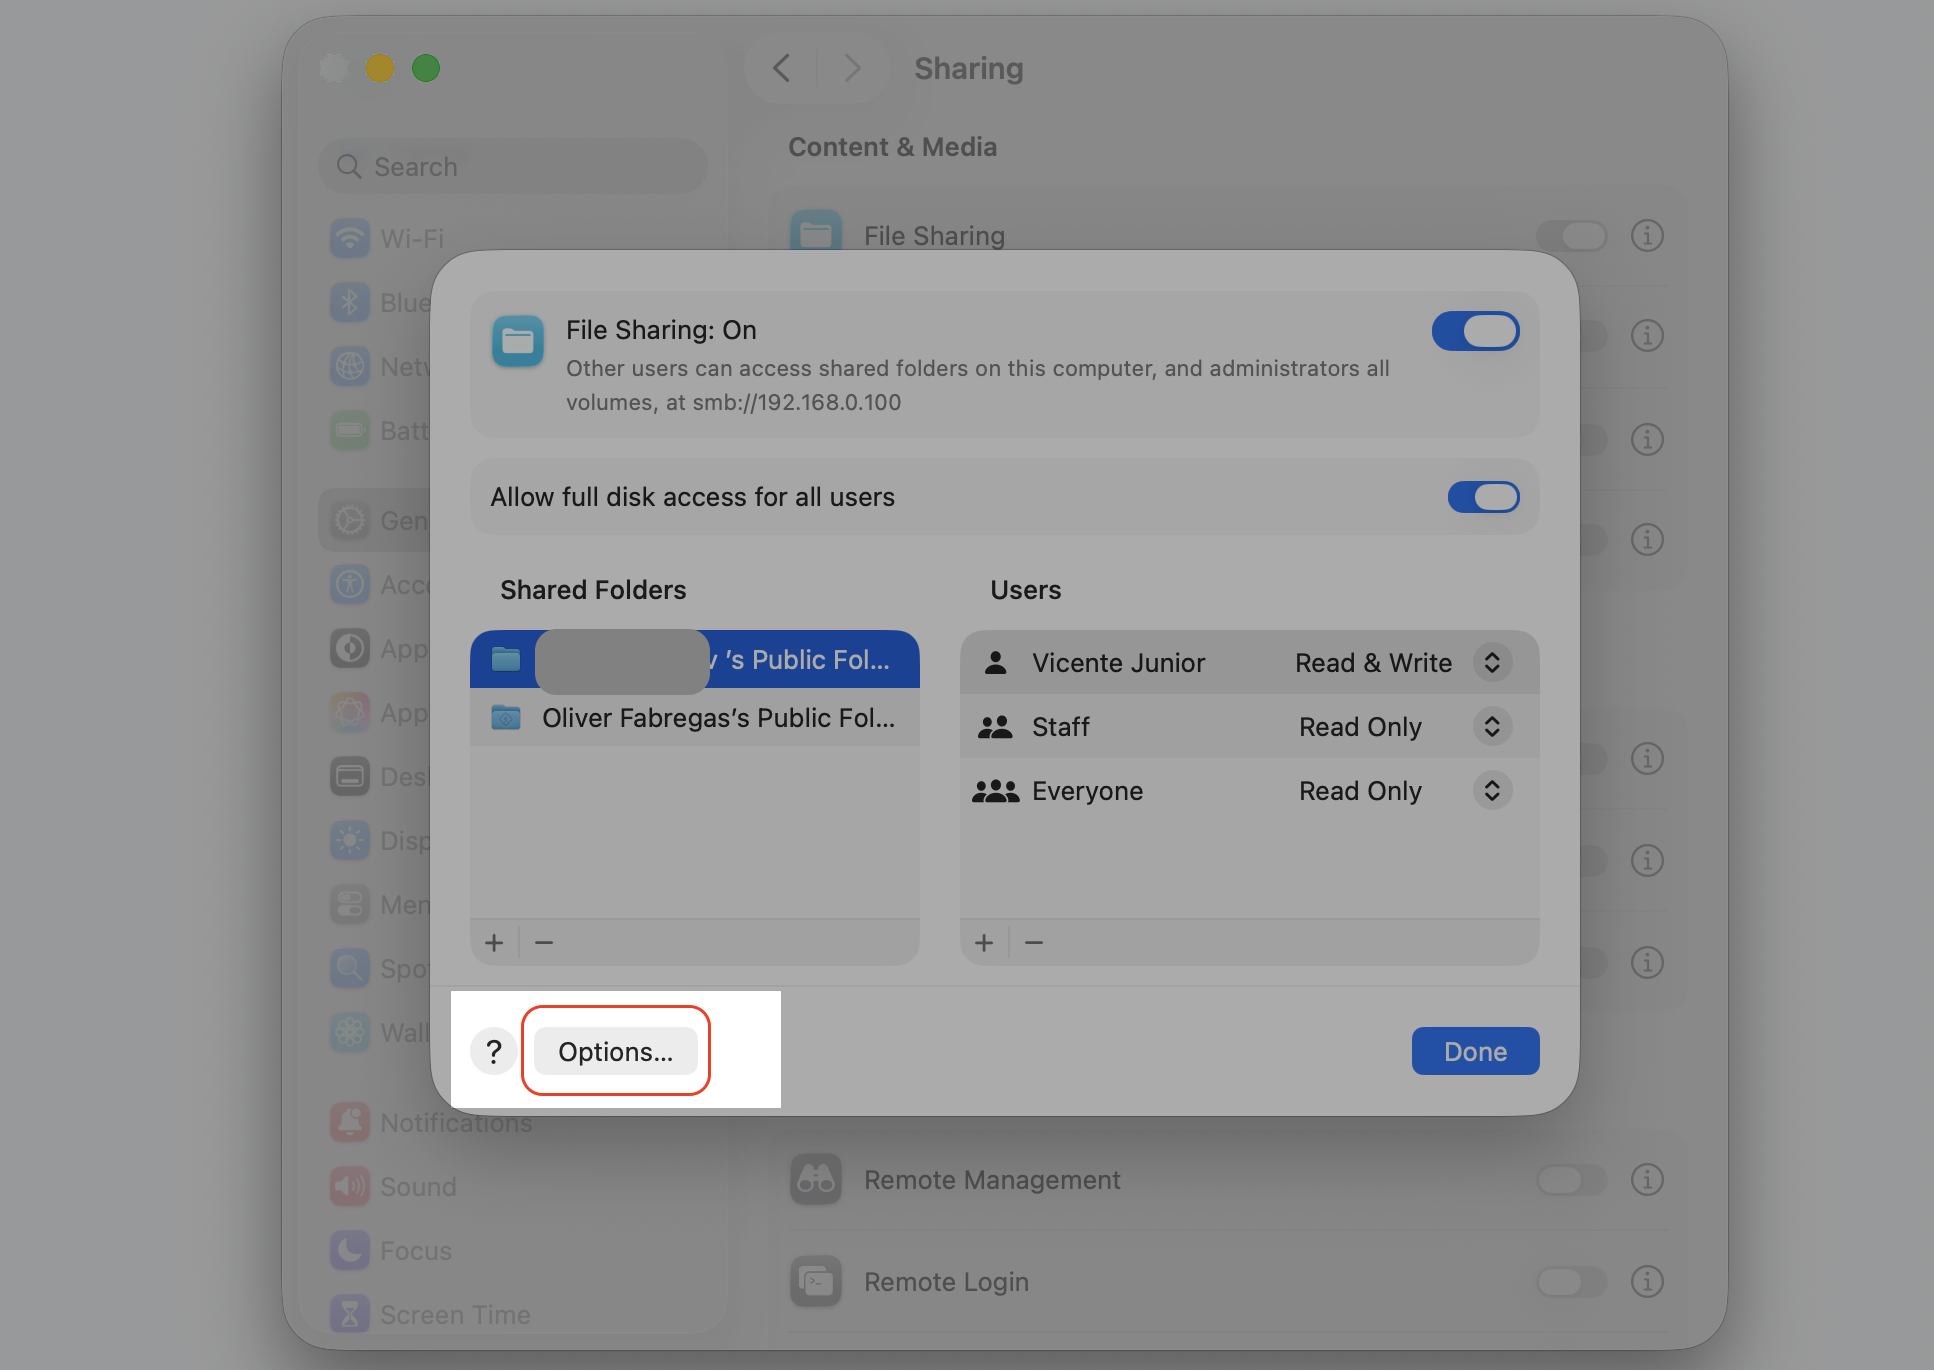
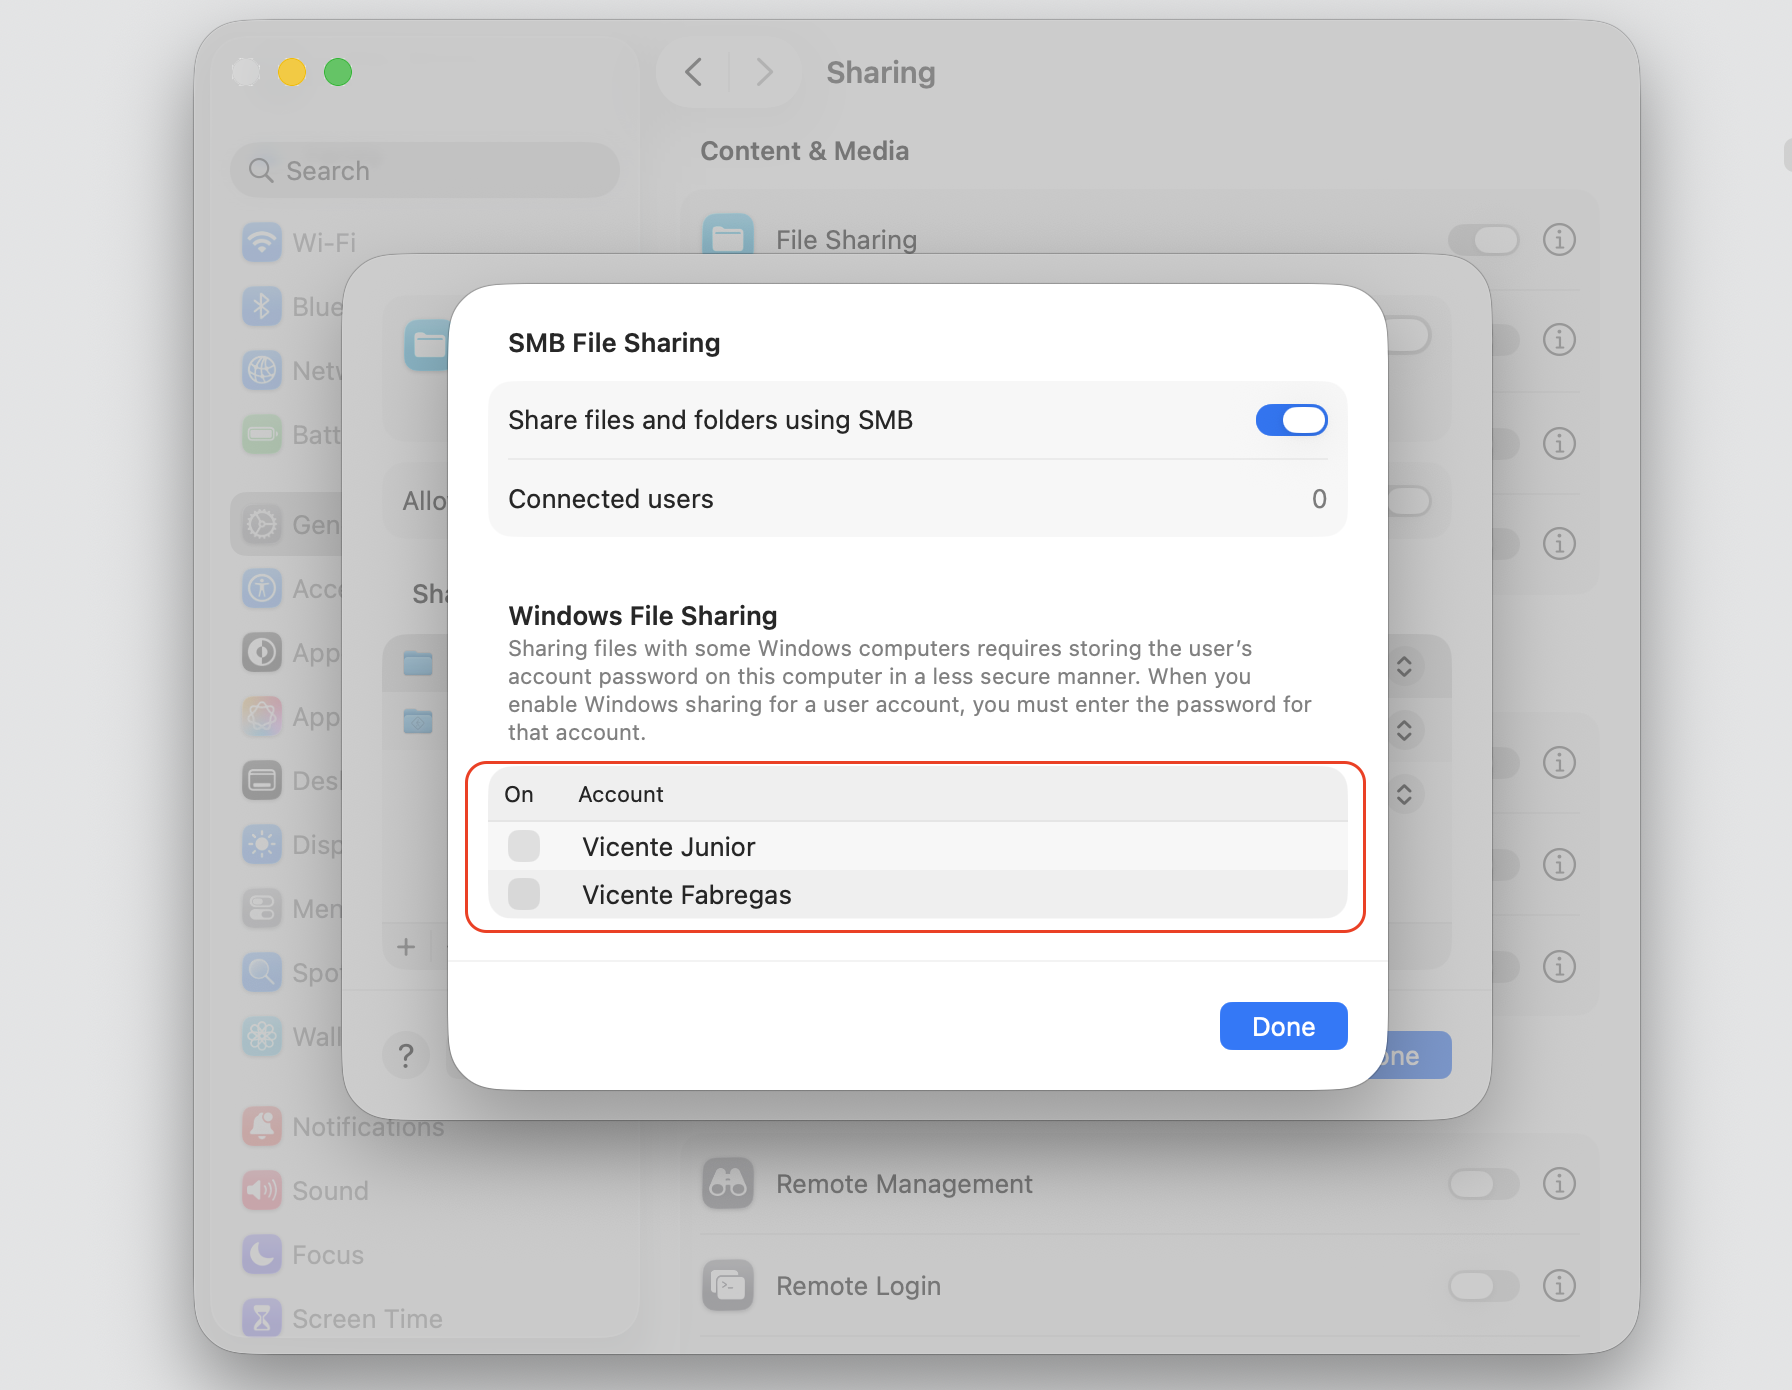
Click Options, then make sure Share files and folders using SMB is on.
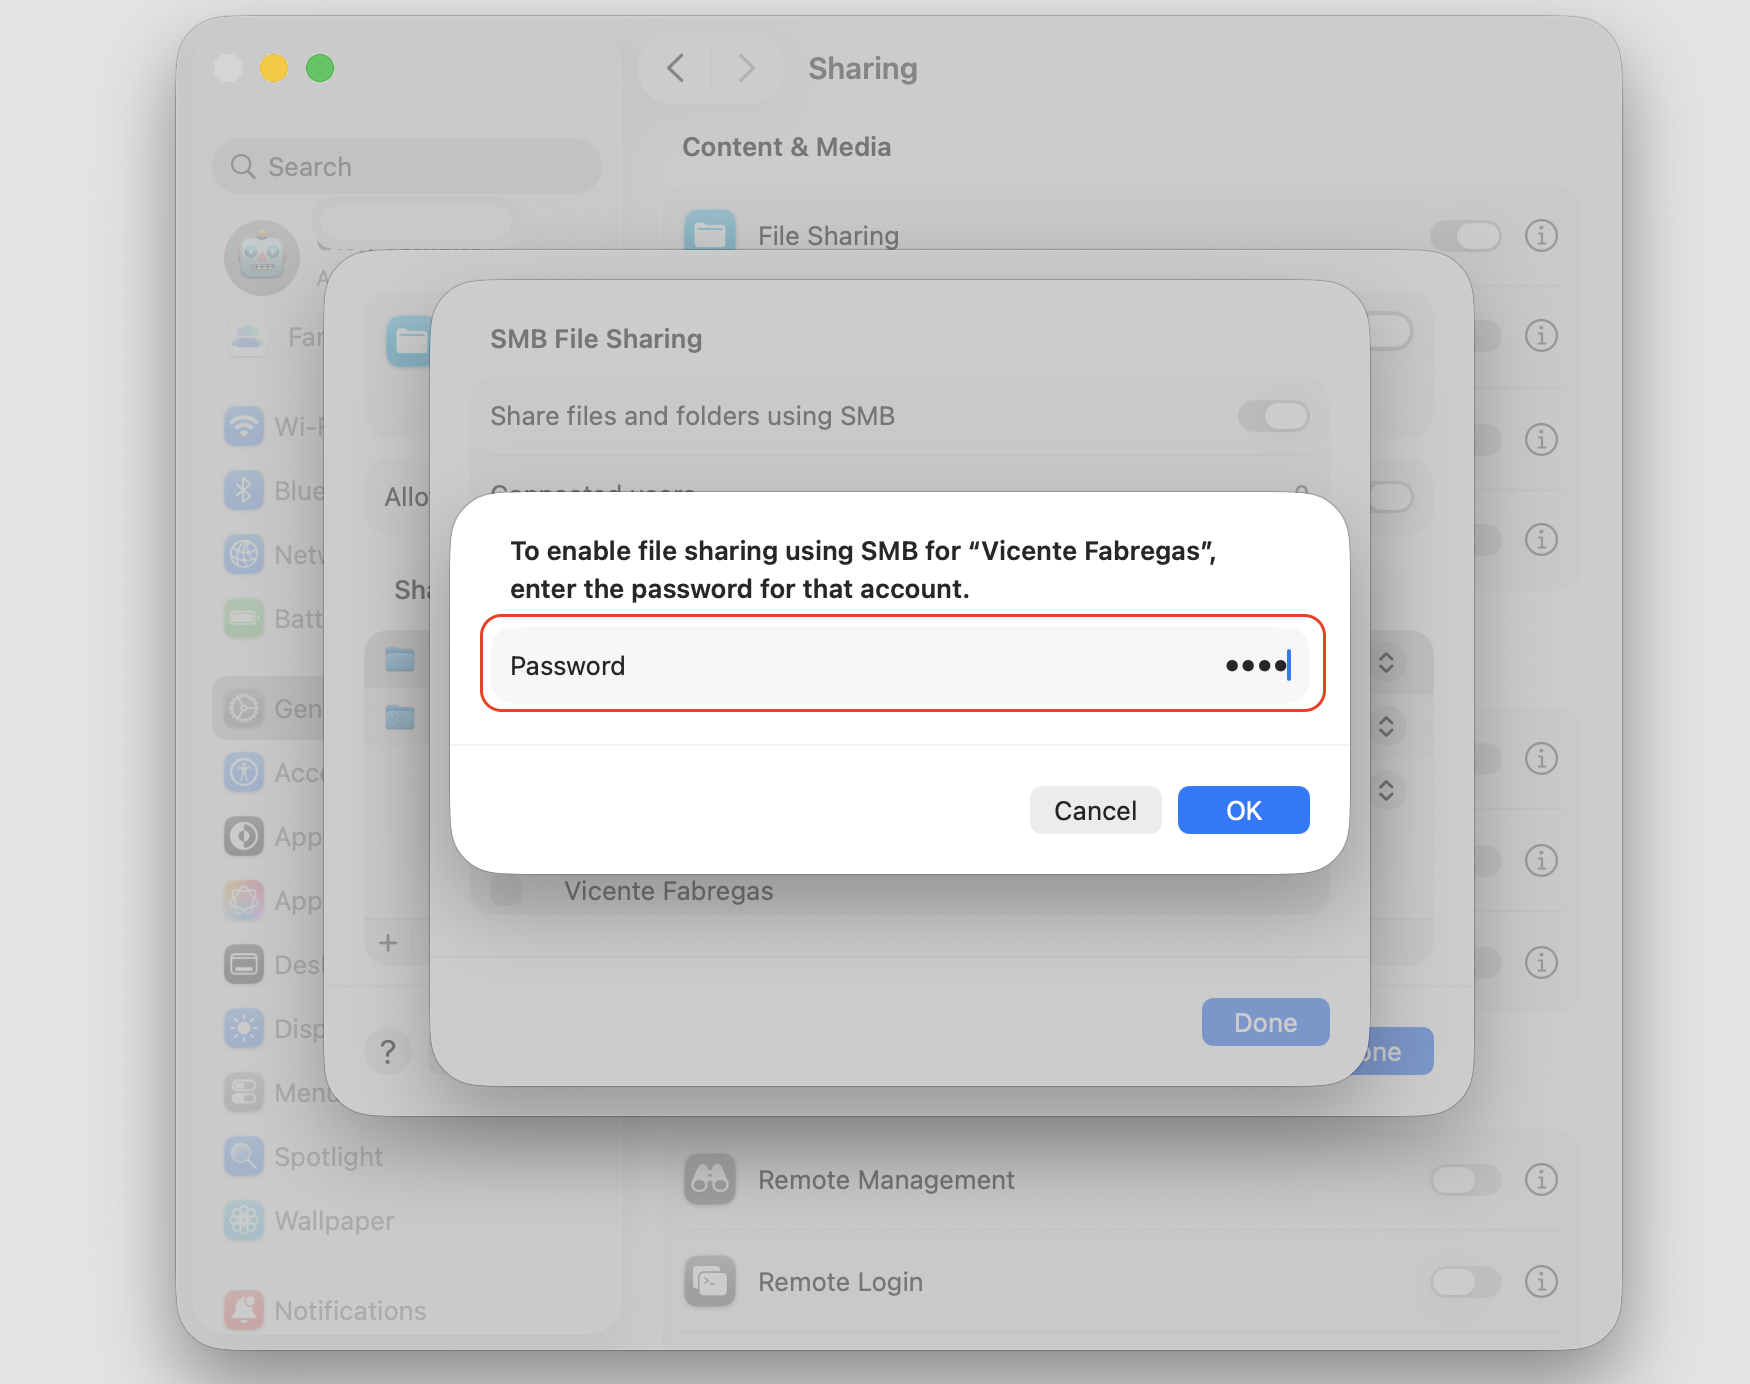
Select your account, enter your password, then click Done.
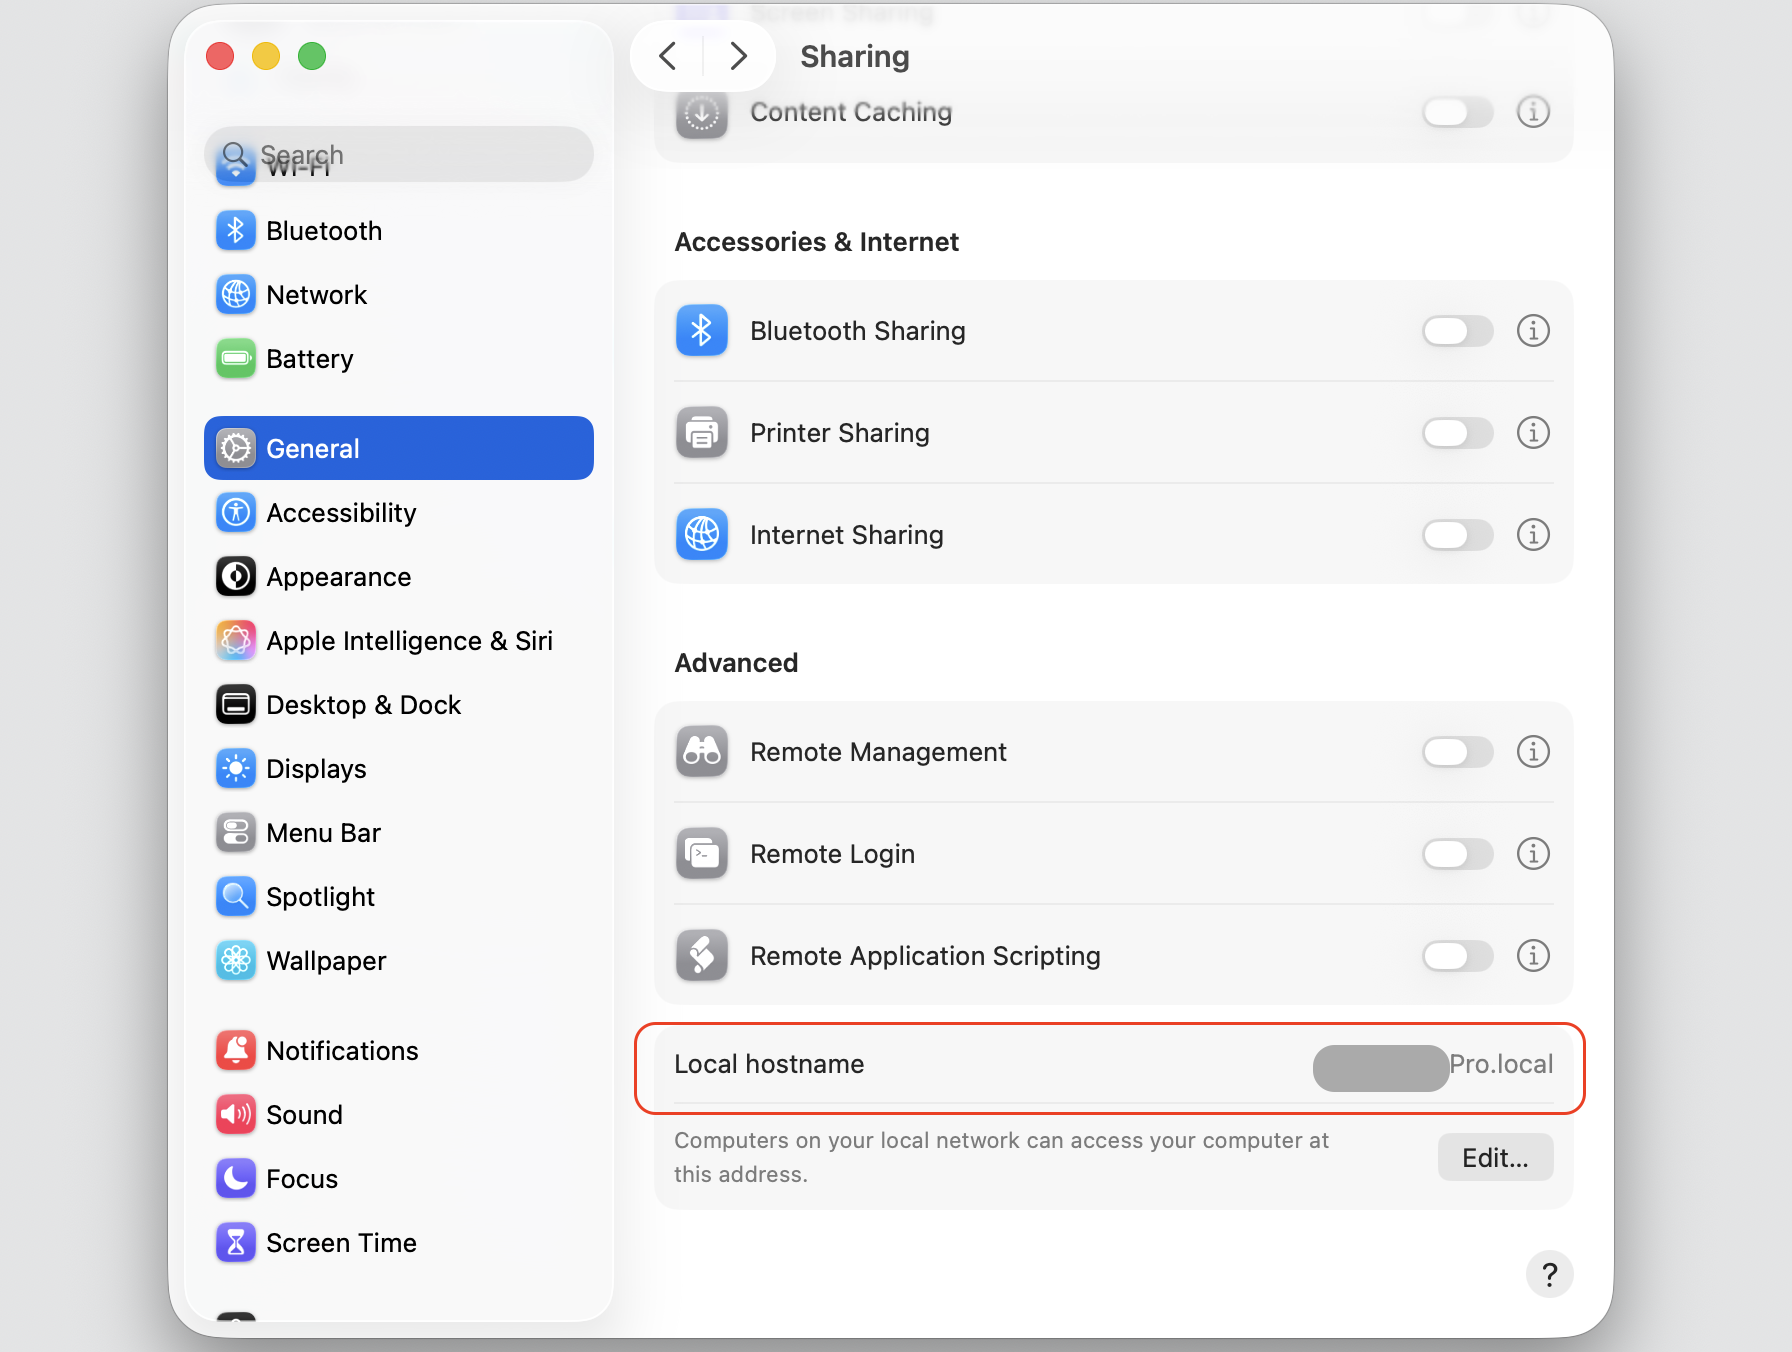
Note your Mac’s local hostname from System Settings > General > Sharing.
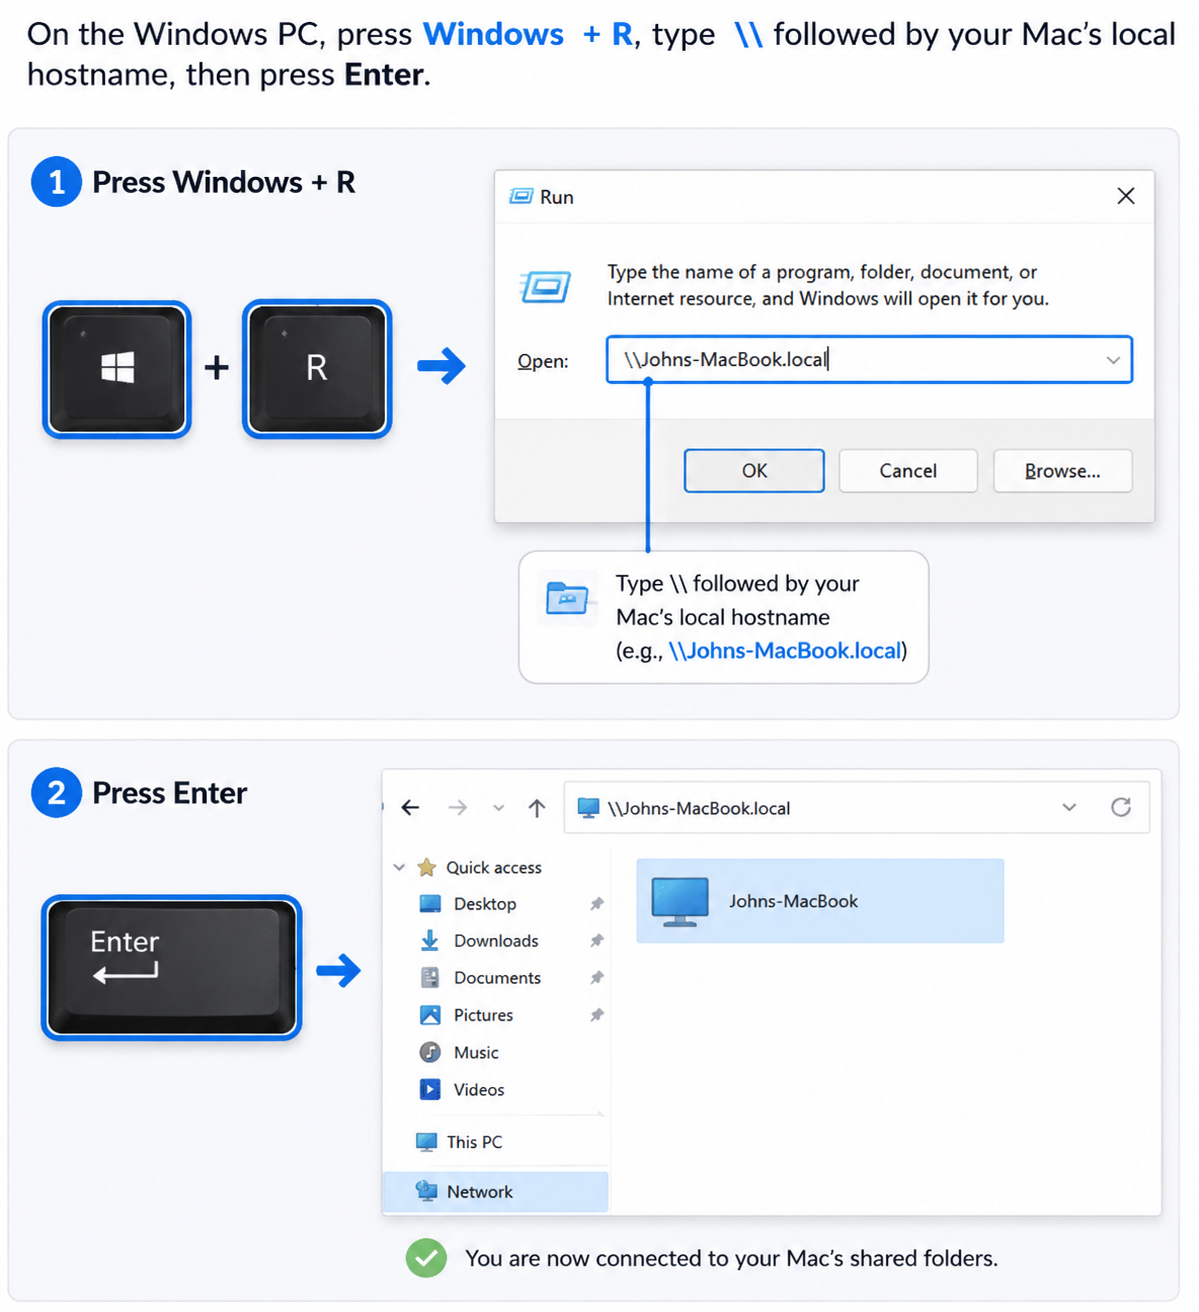
On the Windows PC, press Windows + R, type \\ followed by your Mac’s local hostname, then press Enter.
Enter your Mac username and password to reach the shared folder.
Step 1. Go to Apple logo > System SettingsStep 2. Select General in the sidebar, then click SharingStep 3. Turn on the File Sharing toggle and Click the info (i)Step 4. Click OptionsStep 5. Select the user account you want to shareStep 6. Enter the user password to enable the featureStep 7. Note your Mac’s local hostname from System Settings > General > SharingStep 8. On the Windows PC, press Windows + R, type \\ followed by your Mac’s local hostname, then press Enter
How to share files with another user on the same Mac?
When more than one account signs into the same Mac, you don’t need the network at all. Each account has a Public folder that the others can open, which makes quick handoffs easy. Just do this:
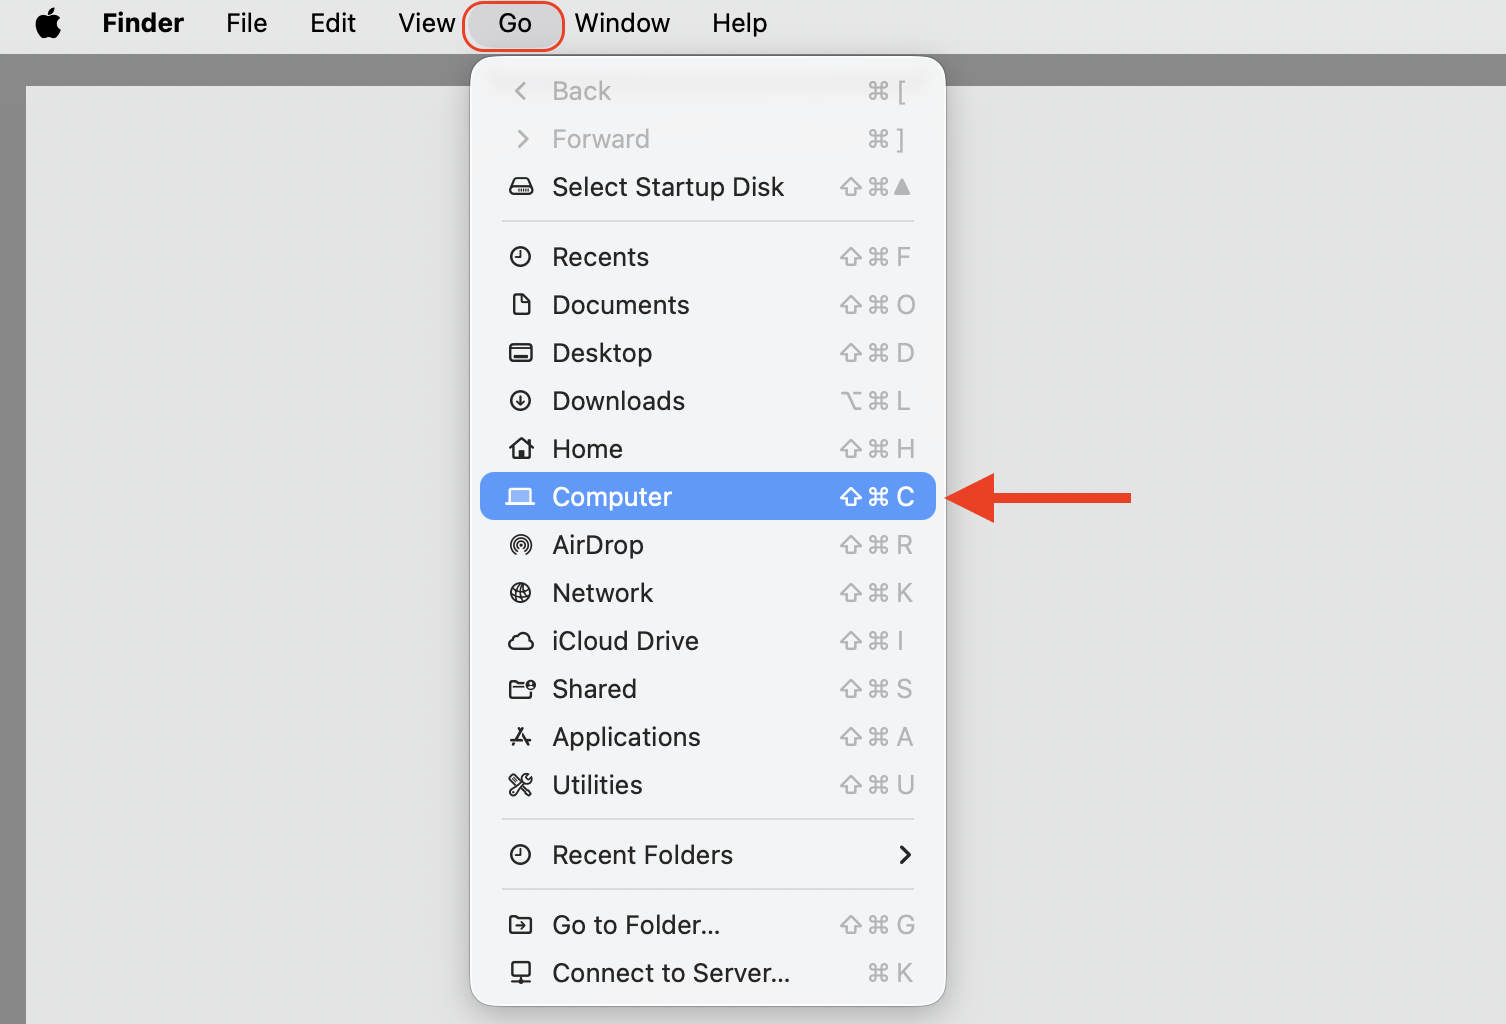
Open Finder, then choose Go > Computer from the menu bar.
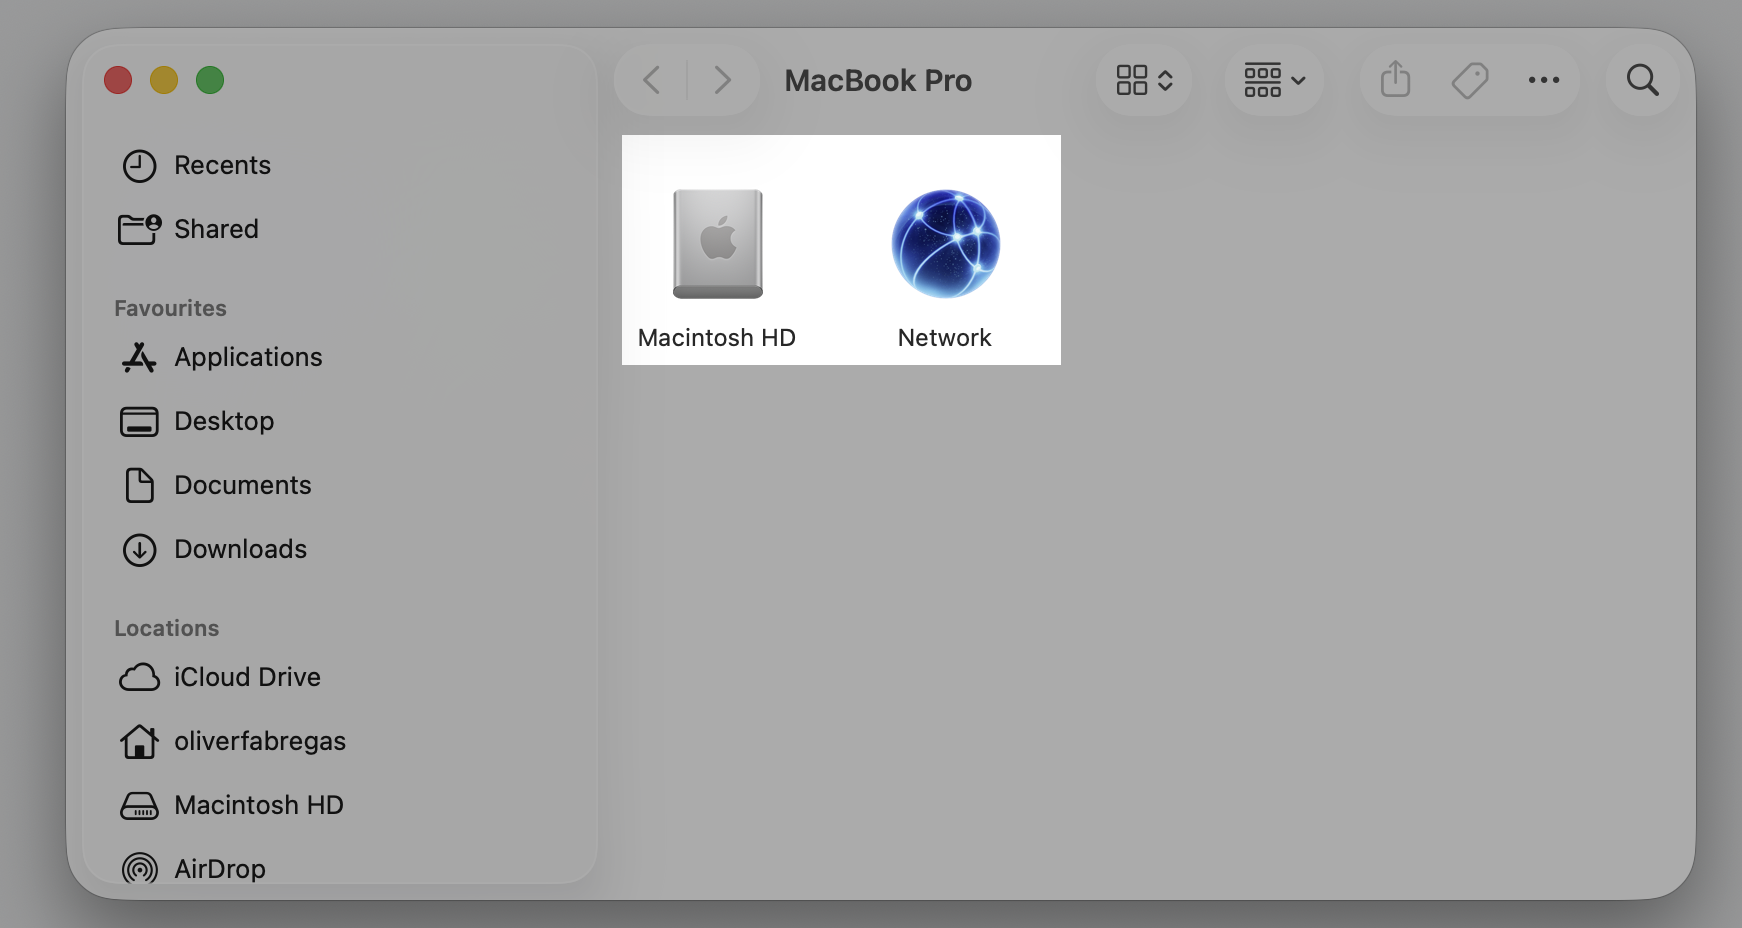
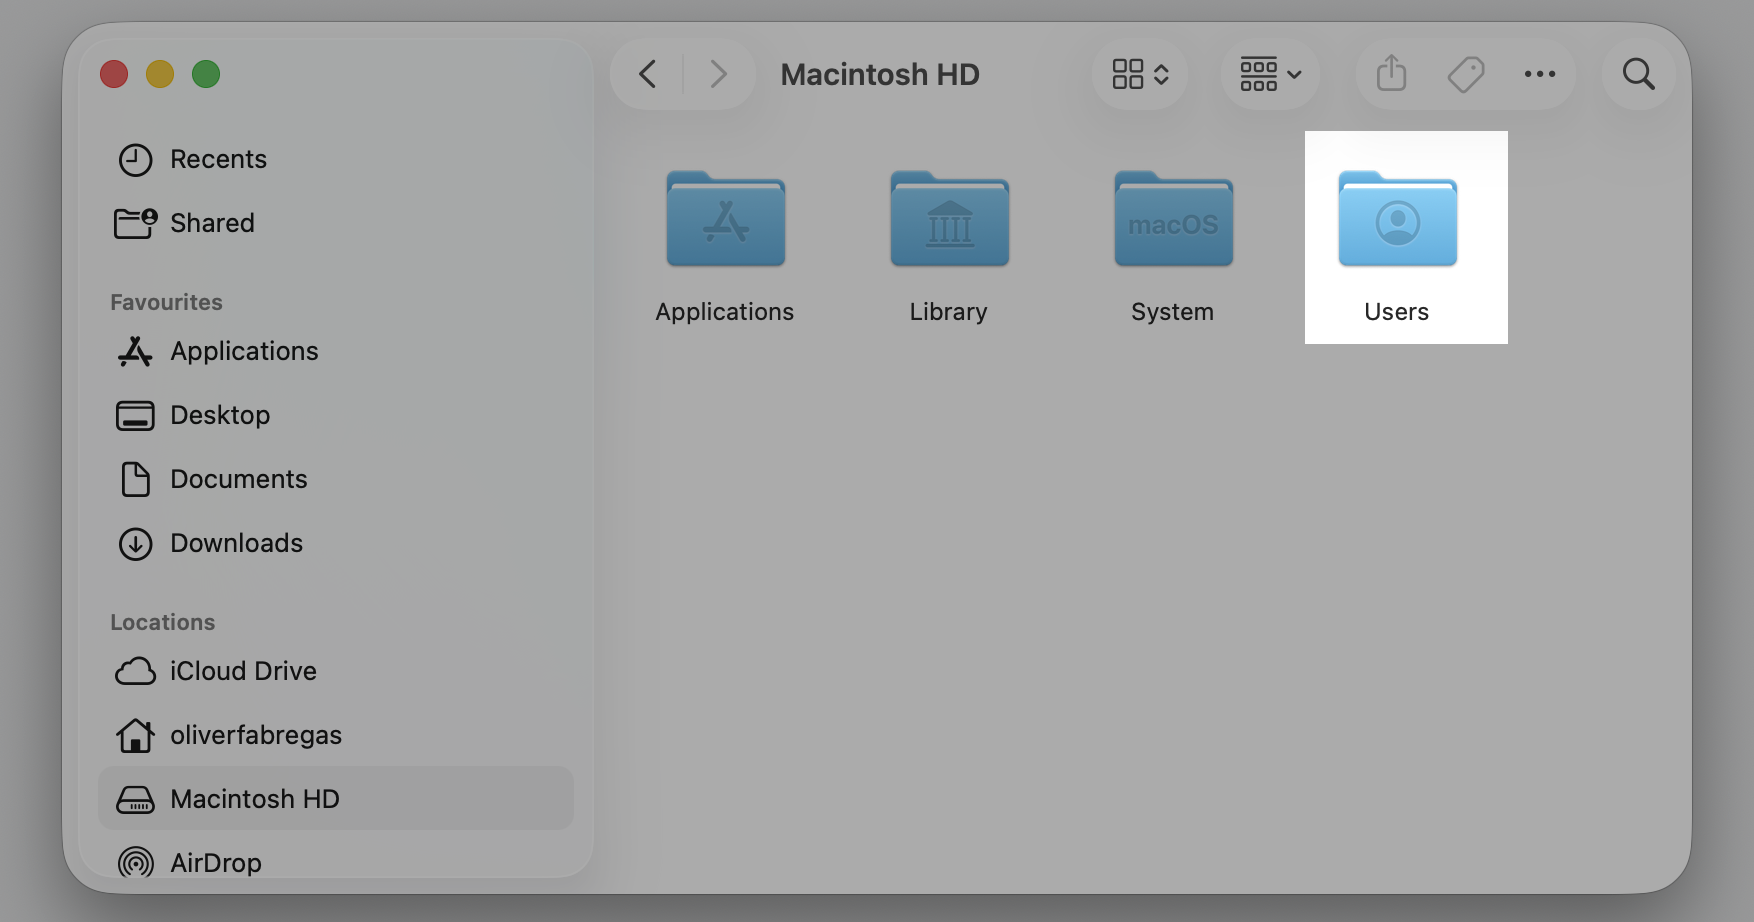
Open Macintosh HD > Users, where each account has its own folder.
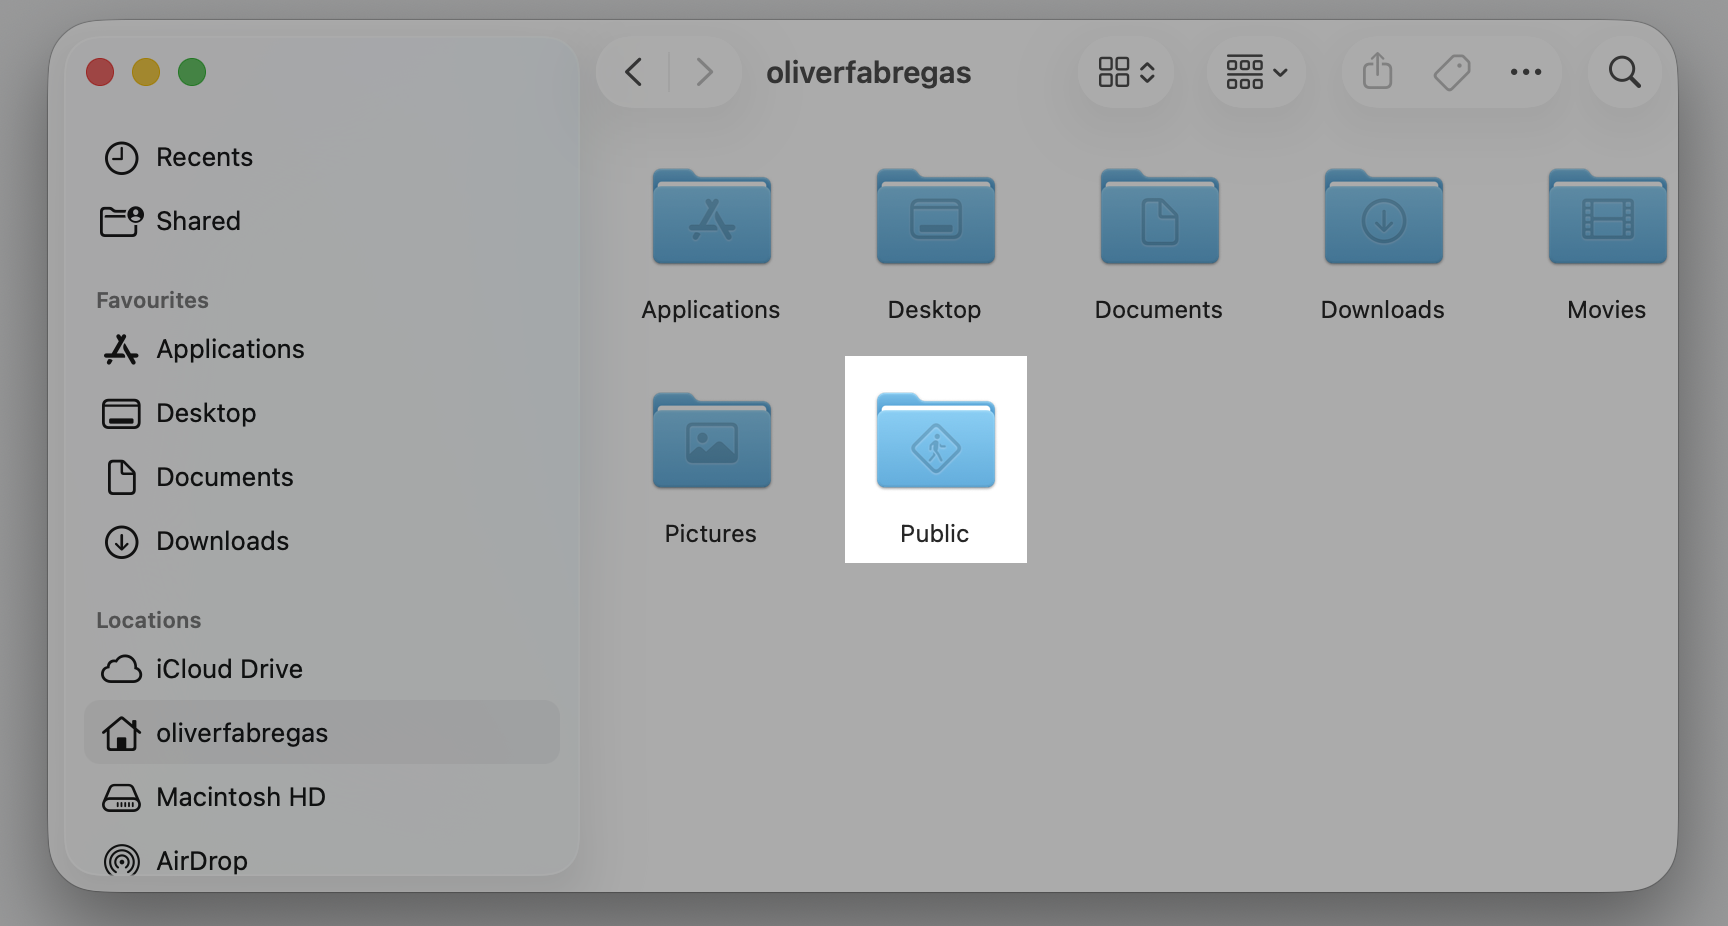
To share a file, drop it into your own Public folder so other accounts can read it.
To hand a file straight to someone, open their Public folder and place it in the Drop Box inside.
Step 1. Go to Finder > Go > ComputerStep 2. Open Macintosh HDStep 3. Select your User from Users folderStep 4. To share a file, drop it into your own Public folder
File Sharing on Mac vs AirDrop vs iCloud Drive
These three options solve different needs. File sharing is steady for ongoing access across a network, while AirDrop sends files quickly to a nearby device over Wi-Fi and Bluetooth, and iCloud Drive keeps files synced through the cloud. Here’s the quick summary from us for you:
Option
Useful for
How it works
File Sharing
Ongoing folder access on one network
Local network
AirDrop
A quick one-off transfer to a nearby device
Wi-Fi and Bluetooth
iCloud Drive
Reaching the same files from anywhere
Cloud sync
If AirDrop is slow when you try a quick handoff, file sharing can be the steadier pick for larger batches. And for very large transfers, an external hard drive remains a simple backup option.
Conclusion
File sharing on Mac is a simple, secure way to share chosen folders over your local network—it works well when you manage shared folders, permissions, and access with care. Wrestling with duplicate files before you share? We suggest using MacKeeper’s Duplicates Finder to spot look-alike copies and clear them while keeping your originals, so you send only what you need. Try it yourself!
We respect your privacy and
use cookies
for the best site experience.
Privacy Preferences Center
We use cookies along with other tools to give you the best possible experience while using the
MacKeeper website. Cookies are small text files that help the website load faster. The cookies we
use don’t contain any type of personal data meaning they never store information such as your
location, email address, or IP address.
Help us improve how you interact with our website by accepting the use of cookies. You can change
your privacy settings whenever you like.
Manage consent
All cookies
These cookies are strictly necessary for enabling basic website functionality (including page
navigation, form submission, language detection, post commenting), downloading and purchasing
software. The website might malfunction without these cookies.