Sharing a Mac with family or coworkers? You’ll need to switch between users on Mac without losing your open apps or files. While you’re managing multiple accounts, don’t forget about privacy. MacKeeper’s ID Theft Guard monitors data breaches, safeguards your passwords, and alerts you if personal information is exposed.
Before you can switch to a different user on Mac, a few things need to be in place. The most obvious one—you need more than one user account set up on your Macintosh. If you’re the only person using the laptop, you might not have additional accounts at all.
Here’s what to check:
Multiple user accounts. You’ll need at least two accounts—admin, standard, or guest—created in System Settings > Users & Groups.
Admin access. Some switching methods (like enabling fast user switching) require an admin account. If you forgotten admin password, we’ll remind you to reset it before proceeding.
Account passwords. Each user account on macOS needs a password (or Touch ID) to log in. Make sure every user knows their credentials.
macOS version awareness. Menu labels differ slightly between macOS versions—Ventura and Sonoma use System Settings, while older releases like Monterey use System Preferences.
Multiple accounts checkup & creation
A note from our experts:
While switching users on your Mac, you might be more or less concerned about your data privacy and the safety of each of your accounts. If so, you might be interested in safeguarding your emails and preventing a data breach.
Find the ID Theft Guard functionality on the left and click on it.
Activate the Data breach monitor function.
Then click to Scan new email and type in the field.
After typing your email, press Start Scan.
Step 1. MacKeeper > ID Theft Guard > Activate data breach monitorStep 2. Scan new email > Type it > Start Scan
Once these basics are covered, you’re ready to select a different user on a Mac using any of the methods below.
How to select a different user on Mac?
macOS offers multiple ways to switch between users on Mac—and the method you pick depends on your situation. Need to toggle accounts without closing anything? Fast user switching is your go-to. Want to free up memory? Logging out first is the smarter choice.
If someone needs temporary access to your Apple laptop, you can also add a guest account so they can browse without touching your files. Let’s walk through each method.
1. Fast user switching
Fast user switching is the quickest way to use a different user on Mac. It lets you jump to another account straight from the menu bar or Control Center—without logging out of your current session. Your apps, documents, and windows stay right where you left them.
The trade-off? Because both accounts stay active in the background, your Mac uses more memory. On laptops like the MacBook Air with limited RAM, this can slow things down if too many users are logged in at once.
Here’s how to switch users with fast user switching:
Click the Fast User Switching icon (a person silhouette or your account name) in the menu bar.
Select the account you want to switch to from the dropdown.
Enter the password for that account and press Return.
Step1. Navigate to the top-right corner and select the "Fast User Switching (account name)" iconor: Navigate to the top-right corner and select the "Fast User Switching (person silhouette)" iconStep 2. Select the account you want to switch to from the dropdownStep 3. Enter the password and press Return
If you don’t see the fast user switching icon, you’ll need to enable it first—we’ll cover that in the section below.
2. Switch users from Lock Screen
If your Mac goes to sleep or you’ve stepped away, the Lock Screen is a natural place to switch between users on Mac. We’d say that it’s especially handy in shared spaces—an office, a classroom, or a family desk—where people take turns at the same machine.
To switch users from the Lock Screen:
Go to the Apple menu and click Lock Screen. Or press Control + Command + Q to lock it instantly.
On the Lock Screen, tap the user icon located at the bottom of the lock screen. This will expand the Multiple users section, allowing you to switch user accounts.
Choose the account you’d like to log in to.
Enter the password and press Return.
Step 1. Go to the Apple menu and select “Lock Screen”Step 2. Select the user account you want to accessStep 3. Type the password and press Return
Want to customize what your Lock Screen looks like? Learn how to change lock screen on your Mac.
3. Log out and sign in to another account
This is the traditional way to choose a different user on Mac. When you log out, macOS closes your session entirely—freeing up memory, CPU, and disk resources that the account was using. From our point of view, it’s the cleanest method, though it does mean you’ll need to reopen your apps and documents when you log back in.
To log out and sign in as another user:
Click the Apple menu in the top-left corner of the screen and select Log Out.
Confirm by clicking Log Out in the dialog box.
On the login screen, click the user account you want to access.
Type the password and press Return.
Step 1. In the Apple menu, confirm action by clicking Log OutStep 2. Confirm to log outStep 3. Select the user account you want to accessStep 4. Type the password and press Return
An extra tip from us: If you have unsaved work, macOS will ask whether you’d like to save before logging out. Don’t dismiss this prompt too quickly—it’s easy to lose changes.
4. Use keyboard shortcuts to switch users
If you prefer keeping your hands on the keyboard, macOS offers shortcuts that speed up switching. These won’t switch you directly to another account, but they’ll get you to the login screen in a flash.
Here are the key combos:
Control + Command + Q—locks the screen and shows the login window. From there, click Switch User and pick a different account.
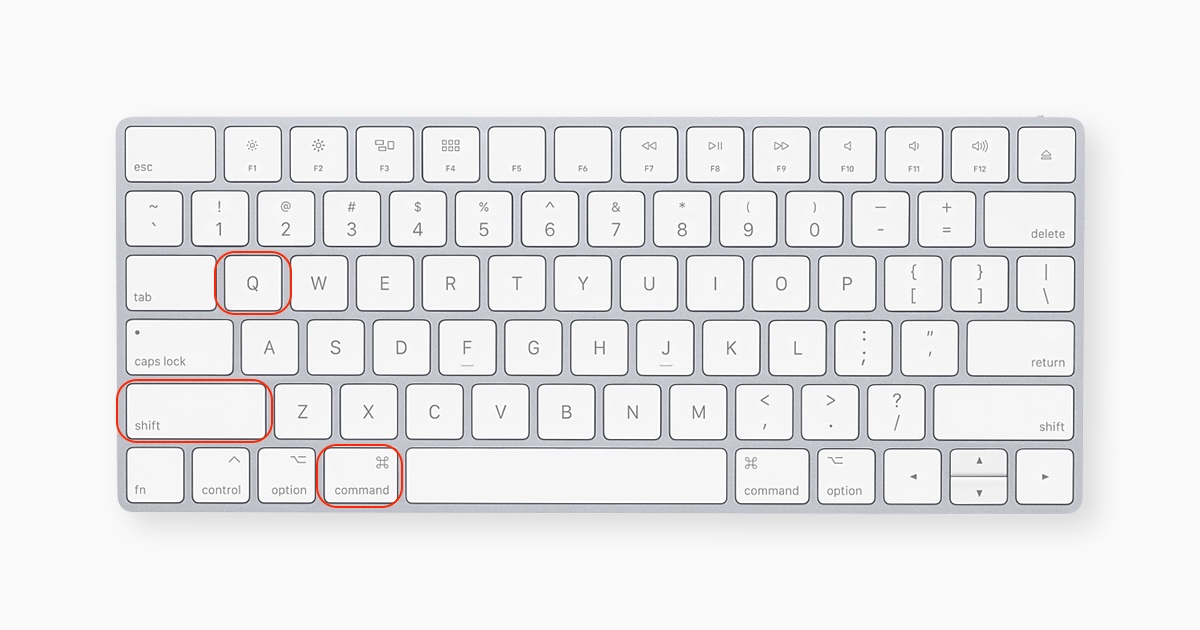
Shift + Command + Q—logs you out of the current account entirely and takes you to the login screen.
Control + Command + QShift + Command + Q
Be aware that macOS includes many handy keyboard shortcuts that help streamline everyday tasks, such as switching between users and switching between tasks. Use this opportunity to save your time!
5. Switch users through Terminal
Terminal isn’t the go-to tool for everyday account switching, but it’s useful when you need to access another user’s files or run commands with different permissions. Think of it as a behind-the-scenes approach rather than a visual toggle between accounts.
Here’s how to switch to another user environment in Terminal:
Open Terminal from Applications > Utilities.
Type login and press Return.
When prompted, enter the username of the account you want to access.
Type the password for that account and press Return.
Step 1. Go to Applications > UtilitiesStep 2. Expand the “Utilities Folder” and open “Terminal”Step 3. Type login and press ReturnStep 4. Type the username and password of the account you want to accessStep 5. Check the result
A hint from our team: You can also use the su command (e.g., su - username) to switch user identity in the same Terminal window. Keep in mind that this method doesn’t change the macOS desktop—it only switches your command-line environment.
6. Use Touch ID
If your MacBook Pro, MacBook Air, or Magic Keyboard has Touch ID, switching accounts is as simple as placing your finger on the sensor. Each user registers their own fingerprint, and macOS recognizes who’s logging in automatically—no typing required.
To set up Touch ID for user switching:
Sign in to the account you want to configure.
Go to Apple menu > System Settings > Touch ID & Password.
Click Add Fingerprint and follow the on-screen prompts to register your finger.
Toggle on Use Touch ID for fast user switching.
Repeat for each user account on the Mac.
Step 1. Go to Apple menu > System SettingsStep 2. Go to the Touch ID & Password and click Add FingerprintStep 3. Follow the on-screen prompts to register your fingerStep 4. Turn on Touch ID for fast user switching
Once set up, just press Touch ID at the Lock Screen or login window. macOS will identify which user’s fingerprint it detects and switch to that account instantly. If the Touch ID not working on Mac, it may be due to settings issues, software glitches, or other causes.
How to enable fast user switching on Mac?
Fast user switching isn’t enabled by default on macOS, so you’ll need to turn it on before you can use it from the menu bar or Control Center. You’ll need admin permissions to make this change.
Follow these steps to enable it:
Click on the Apple logo in the top-left corner of your screen.
Select System Settings (or System Preferences on older OS) from the dropdown menu.
Go to the Menu Bar section (or Dock & Menu Bar, depending on your macOS version).
Scroll down and find Fast User Switching.
Enable Fast User Switching.
Choose how you’d like the switcher to appear—Full Name, Account Name, or Icon.
In the same Menu Bar section, select Menu Bar Controls.
Choose Add Controls, then scroll down to the Fast User Switching option.
Select Icon, then click Add to the Control Center.
Open the Control Center from the top-right corner of the menu bar and verify that the Fast User Switching icon appears correctly.
Step 1. Click the Apple menu and open System SettingsStep 2. Go to the Menu Bar section and Enable Fast User SwitchingStep 3. Choose how you’d like the switcher to appear—Full Name, Account Name, or IconStep 4. From Menu Bar Menu Bar Controls > select “Add Controls”Step 5. Scroll down to the “Fast User Switching” windowStep 6. Select “Fast User Switching” icon and press “Add to Control Center,” then press “Done”Step 7. Open the Control Center from the top-right corner of the menu bar and select “Fast User Switching” iconStep 8. Check the result
A lifehack for you:
On older macOS versions, go to System Preferences > Users & Groups > Login Options and select Show fast user switching menu as.
Step 1. Go to System Preferences > Users & GroupsStep 2. From Login Options enable ‘Show fast user switching’ and hoose how you’d like the switcher to appear—Full Name, Account Name, or Icon
Which way to switch users on Mac suits you?
There’s no single “right” way to switch users—it depends on how you use your Mac. The table below can help you pick the method that fits your workflow.
Method
Works well when…
Keep in mind
Fast user switching
You toggle between accounts often and want to keep apps open.
Uses more memory because sessions stay active.
Lock Screen
Your Mac fell asleep or you’re in a shared space.
Still keeps the other user’s session running.
Log out / sign in
You want to free up resources or rarely switch.
Closes your session—unsaved work may be lost.
Keyboard shortcuts
You prefer hands-on-keyboard speed.
Takes you to the login screen, not directly to another user.
Terminal
You need command-line access to another account.
Doesn’t switch the macOS desktop—CLI only.
Touch ID
You want the fastest, most seamless experience.
Requires a Mac or keyboard with Touch ID sensor.
If you’ve been managing multiple accounts for a while and realize some are no longer needed, you can easily delete user accounts to free up disk space and simplify your login screen.
Keep your Mac accounts safe and organized
Now you know how to switch between users on Mac—whether through fast user switching, the Lock Screen, keyboard shortcuts, Terminal, or Touch ID. Each method serves a different need, so pick the one that matches your daily routine.
Managing multiple accounts means managing multiple sets of personal data. MacKeeper’s ID Theft Guard watches for data breaches, protects passwords, and keeps your credentials safe across every account on your Mac. Try it today and browse with peace of mind.
We respect your privacy and
use cookies
for the best site experience.
Privacy Preferences Center
We use cookies along with other tools to give you the best possible experience while using the
MacKeeper website. Cookies are small text files that help the website load faster. The cookies we
use don’t contain any type of personal data meaning they never store information such as your
location, email address, or IP address.
Help us improve how you interact with our website by accepting the use of cookies. You can change
your privacy settings whenever you like.
Manage consent
All cookies
These cookies are strictly necessary for enabling basic website functionality (including page
navigation, form submission, language detection, post commenting), downloading and purchasing
software. The website might malfunction without these cookies.