Seeing “ls: .: operation not permitted” in Terminal? It means macOS is blocking access to a protected file or folder—and it’s usually a quick fix. MacKeeper’s Premium Services bundle cleanup, security, and optimization tools with 24/7 expert support, so you’re never stuck.
What does “ls: .: operation not permitted” mean on Mac?
“ls: .: operation not permitted” means Terminal doesn’t have permission to look inside the file or directory you asked about. macOS guards certain areas of every Macintosh, and when an app tries to access without the right access, you’ll see the error every time instead of a result. In short, the system has denied Terminal what it needs.
Two security layers are usually behind it. Full Disk Access controls which apps can reach protected folders, while System Integrity Protection (SIP) shields core system files from changes. Both are simply doing their job—keeping your data safe—even when they get in your way.
If your window looks cluttered while you troubleshoot, a clear Terminal command on Mac tidies things up, making each message easier to read.
How to fix the “operation not permitted” error on Mac?
There’s no single switch here—the right approach depends on what’s blocking access. Most of the time, it comes down to permissions or system settings, both shaped by the security features of macOS that protect your machine.
In most cases, the culprit is one of a few things—Terminal lacking disk access, a locked file or folder, a restricted directory you’ve wandered into, settings that haven’t refreshed yet, or SIP guarding core files. Enabling full disk access, adjusting permissions, switching to a user directory, restarting, or briefly disabling SIP each tackles one of those causes.
If you’re running a Unix command and the issue is related to file permissions, you can also try running the command with administrator privileges using sudo.
A note from our experts:
As you can guess already, it’s not always easy to determine the cause behind the “ls: .: operation not permitted” issue from the first attempt. To support you on the way, we suggest contacting our Premium Services within the MacKeeper app and getting professional help with both identifying the issue and finding a solution.
Find the Premium Services feature and click the Chat Now button.
Use the text box to explain your issue, then try our specific advice.
We’ve lined up the methods that work most often below, so start at the top and work your way down.
1. Enable Full Disk Access for Terminal
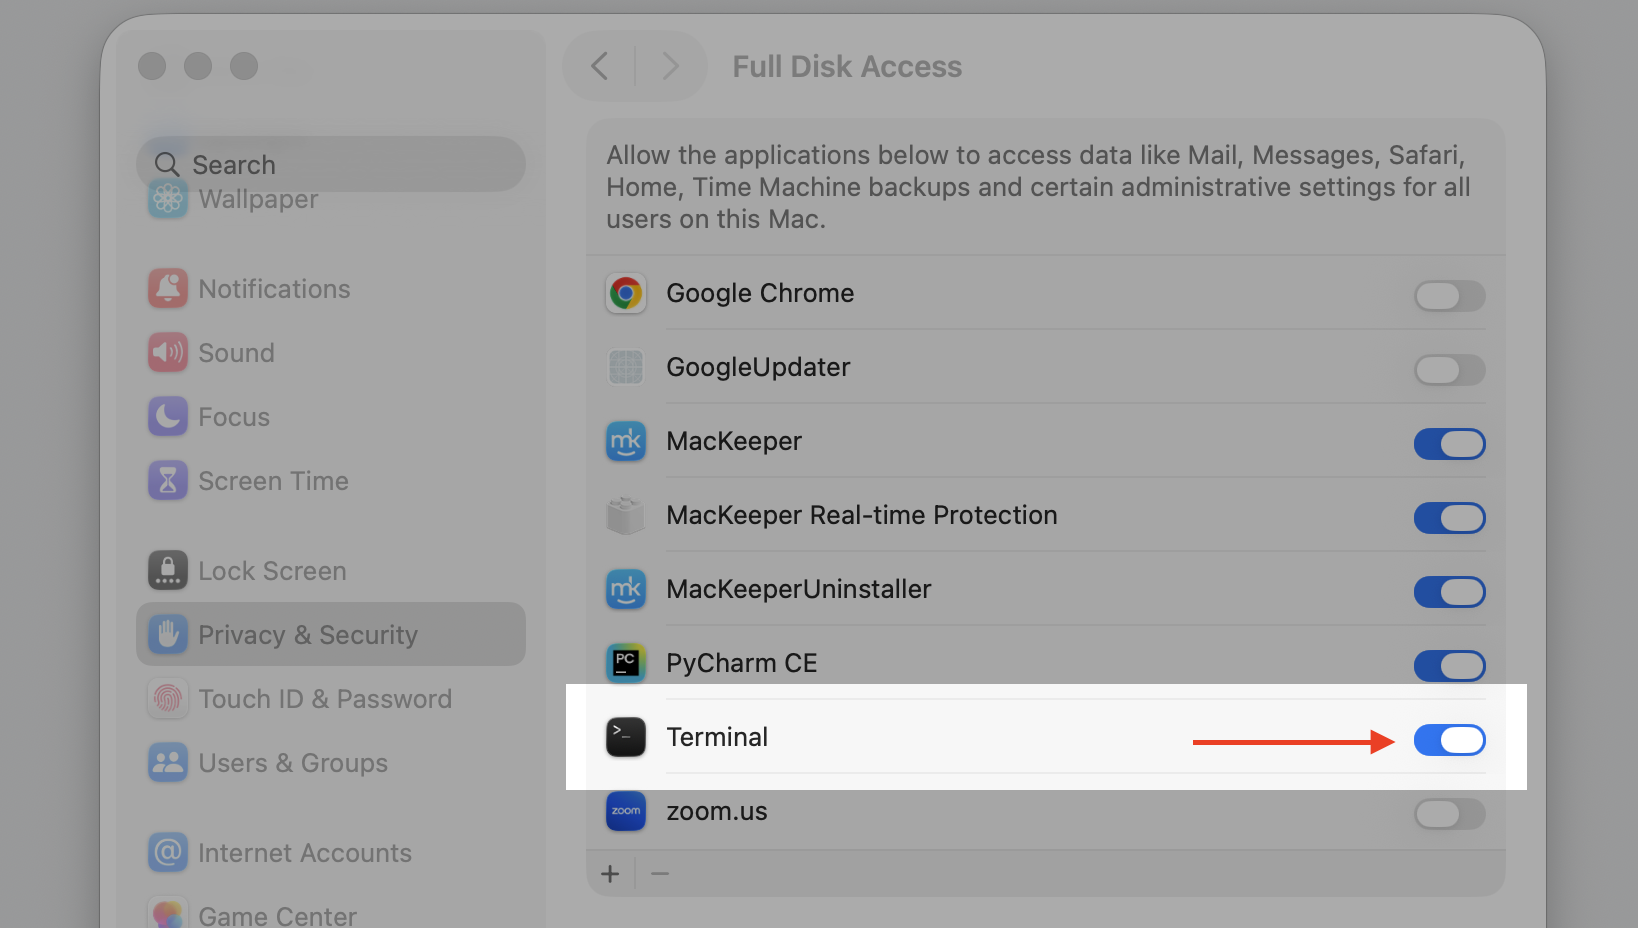
Granting Full Disk Access lets Terminal read the protected directories it’s currently locked out of, which clears the error in many cases. It’s the first thing we reach for.
Here’s how to turn it on:
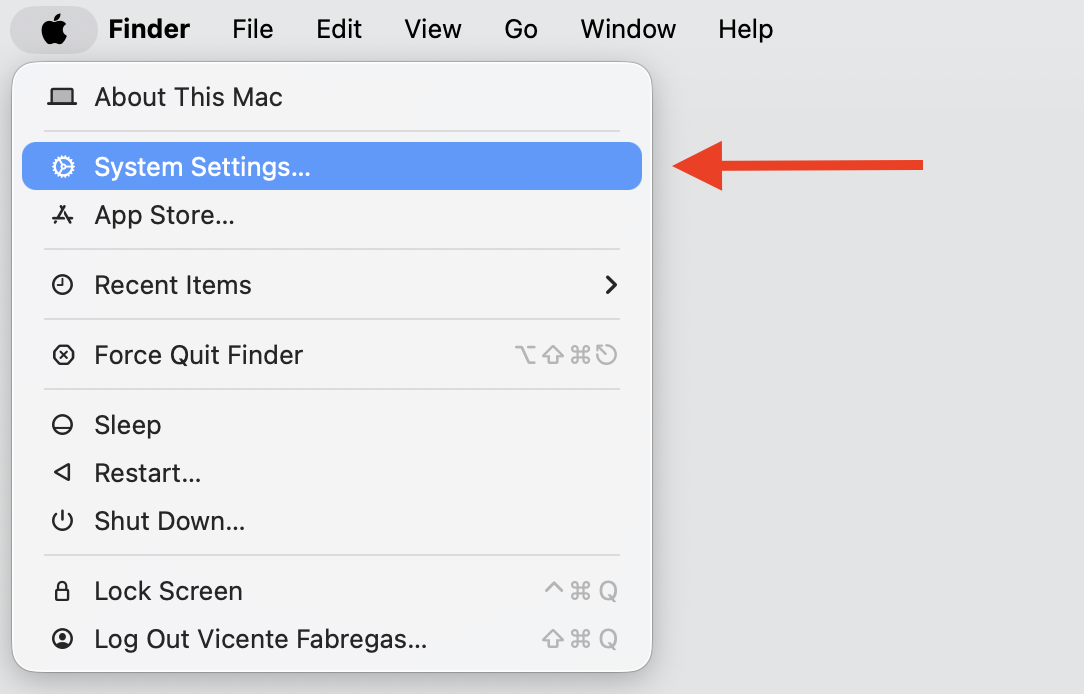
Open the Apple menu and choose System Settings.
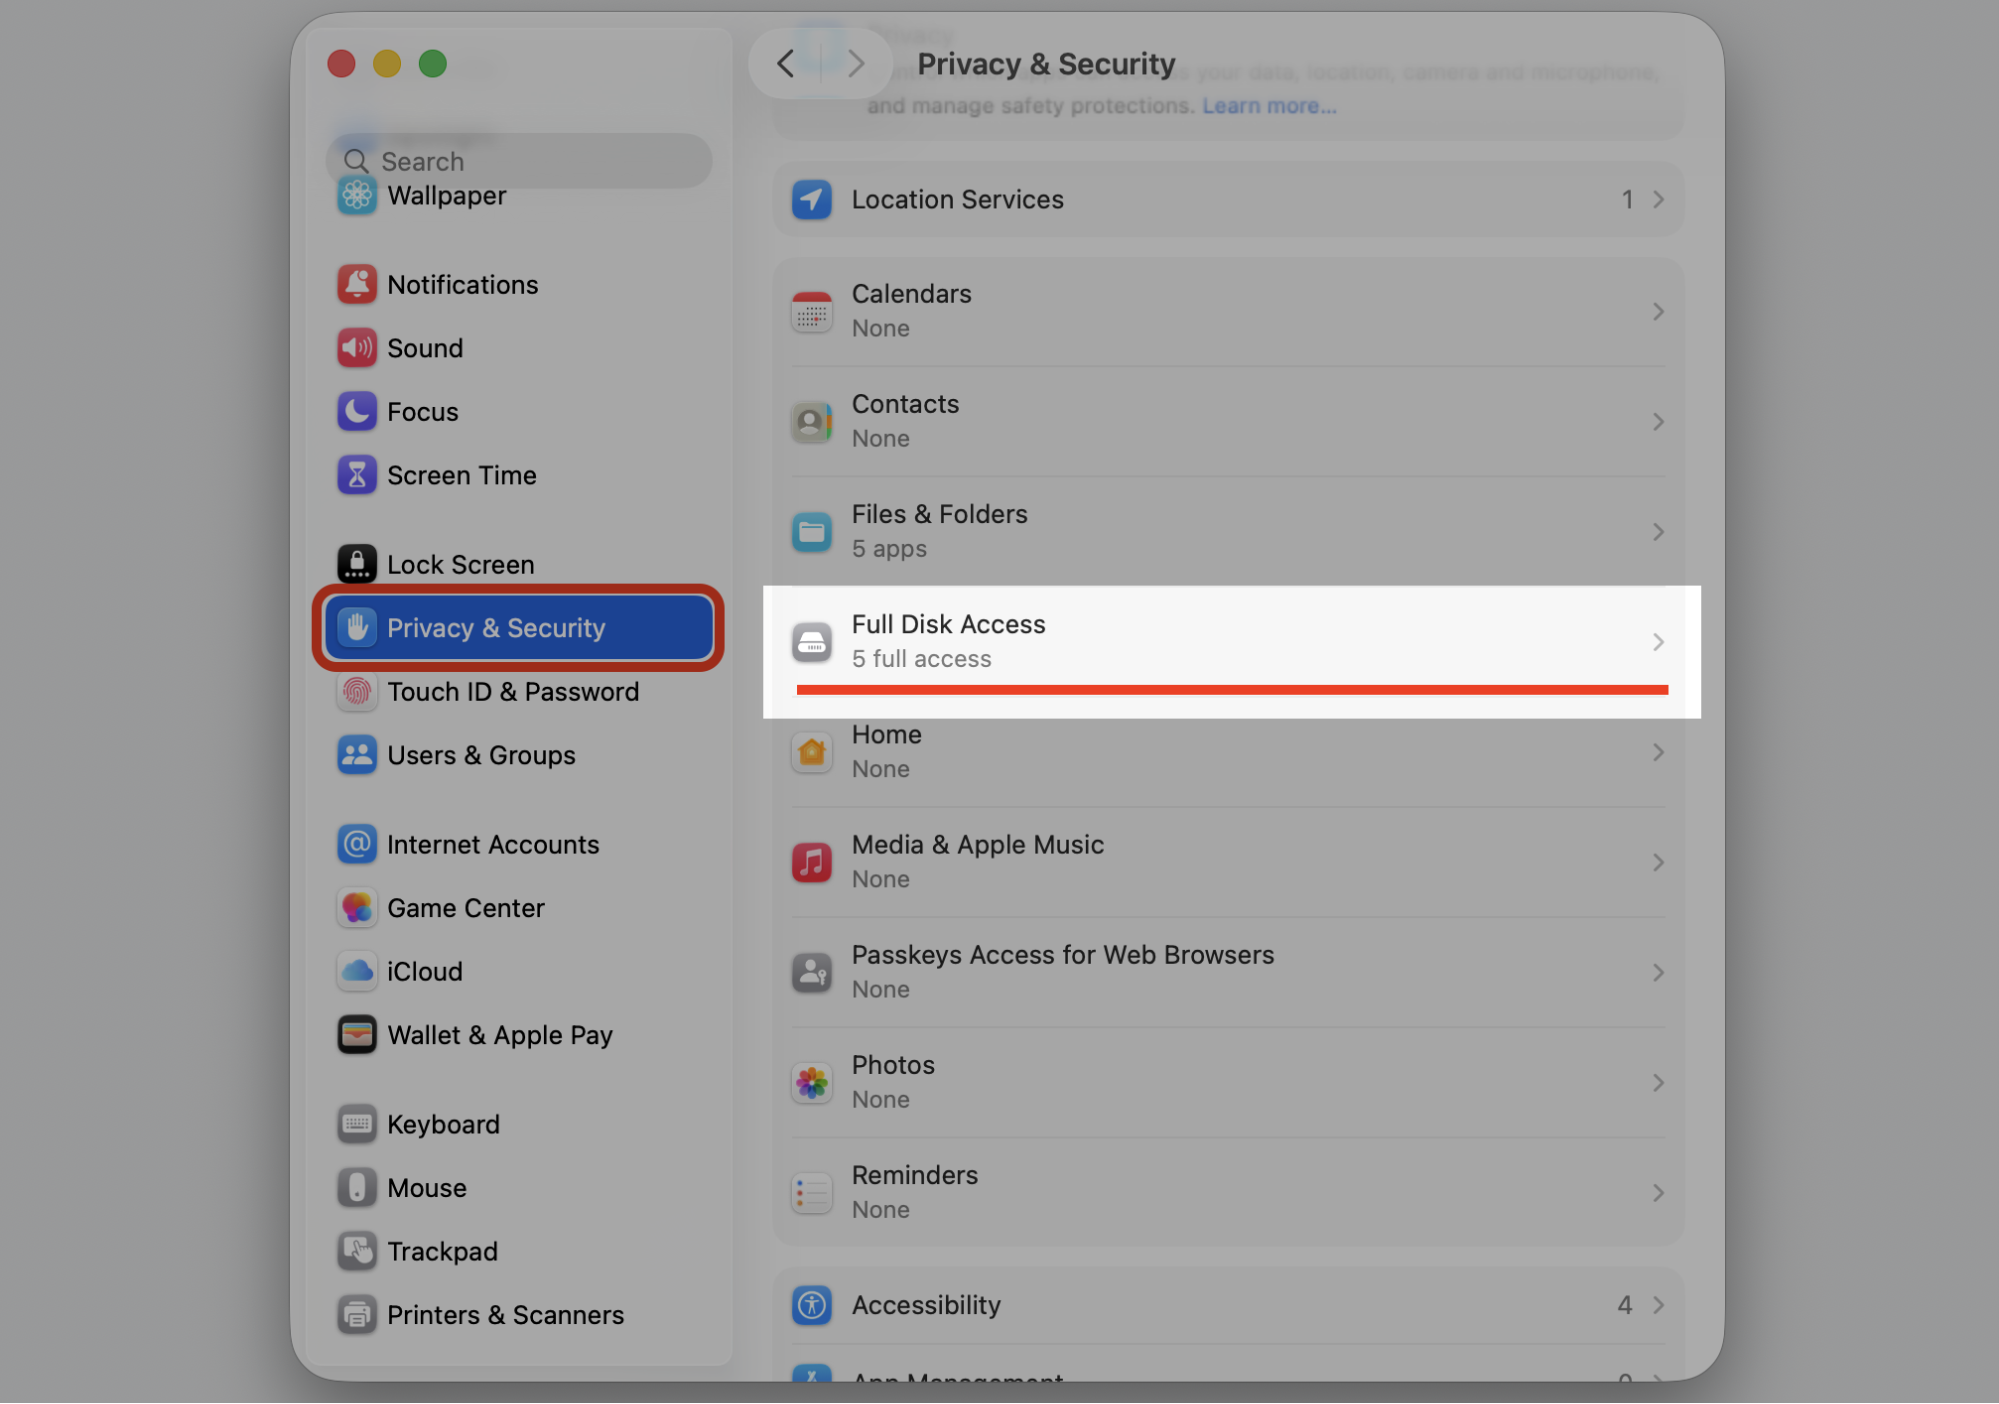
Click Privacy & Security, then select Full Disk Access.
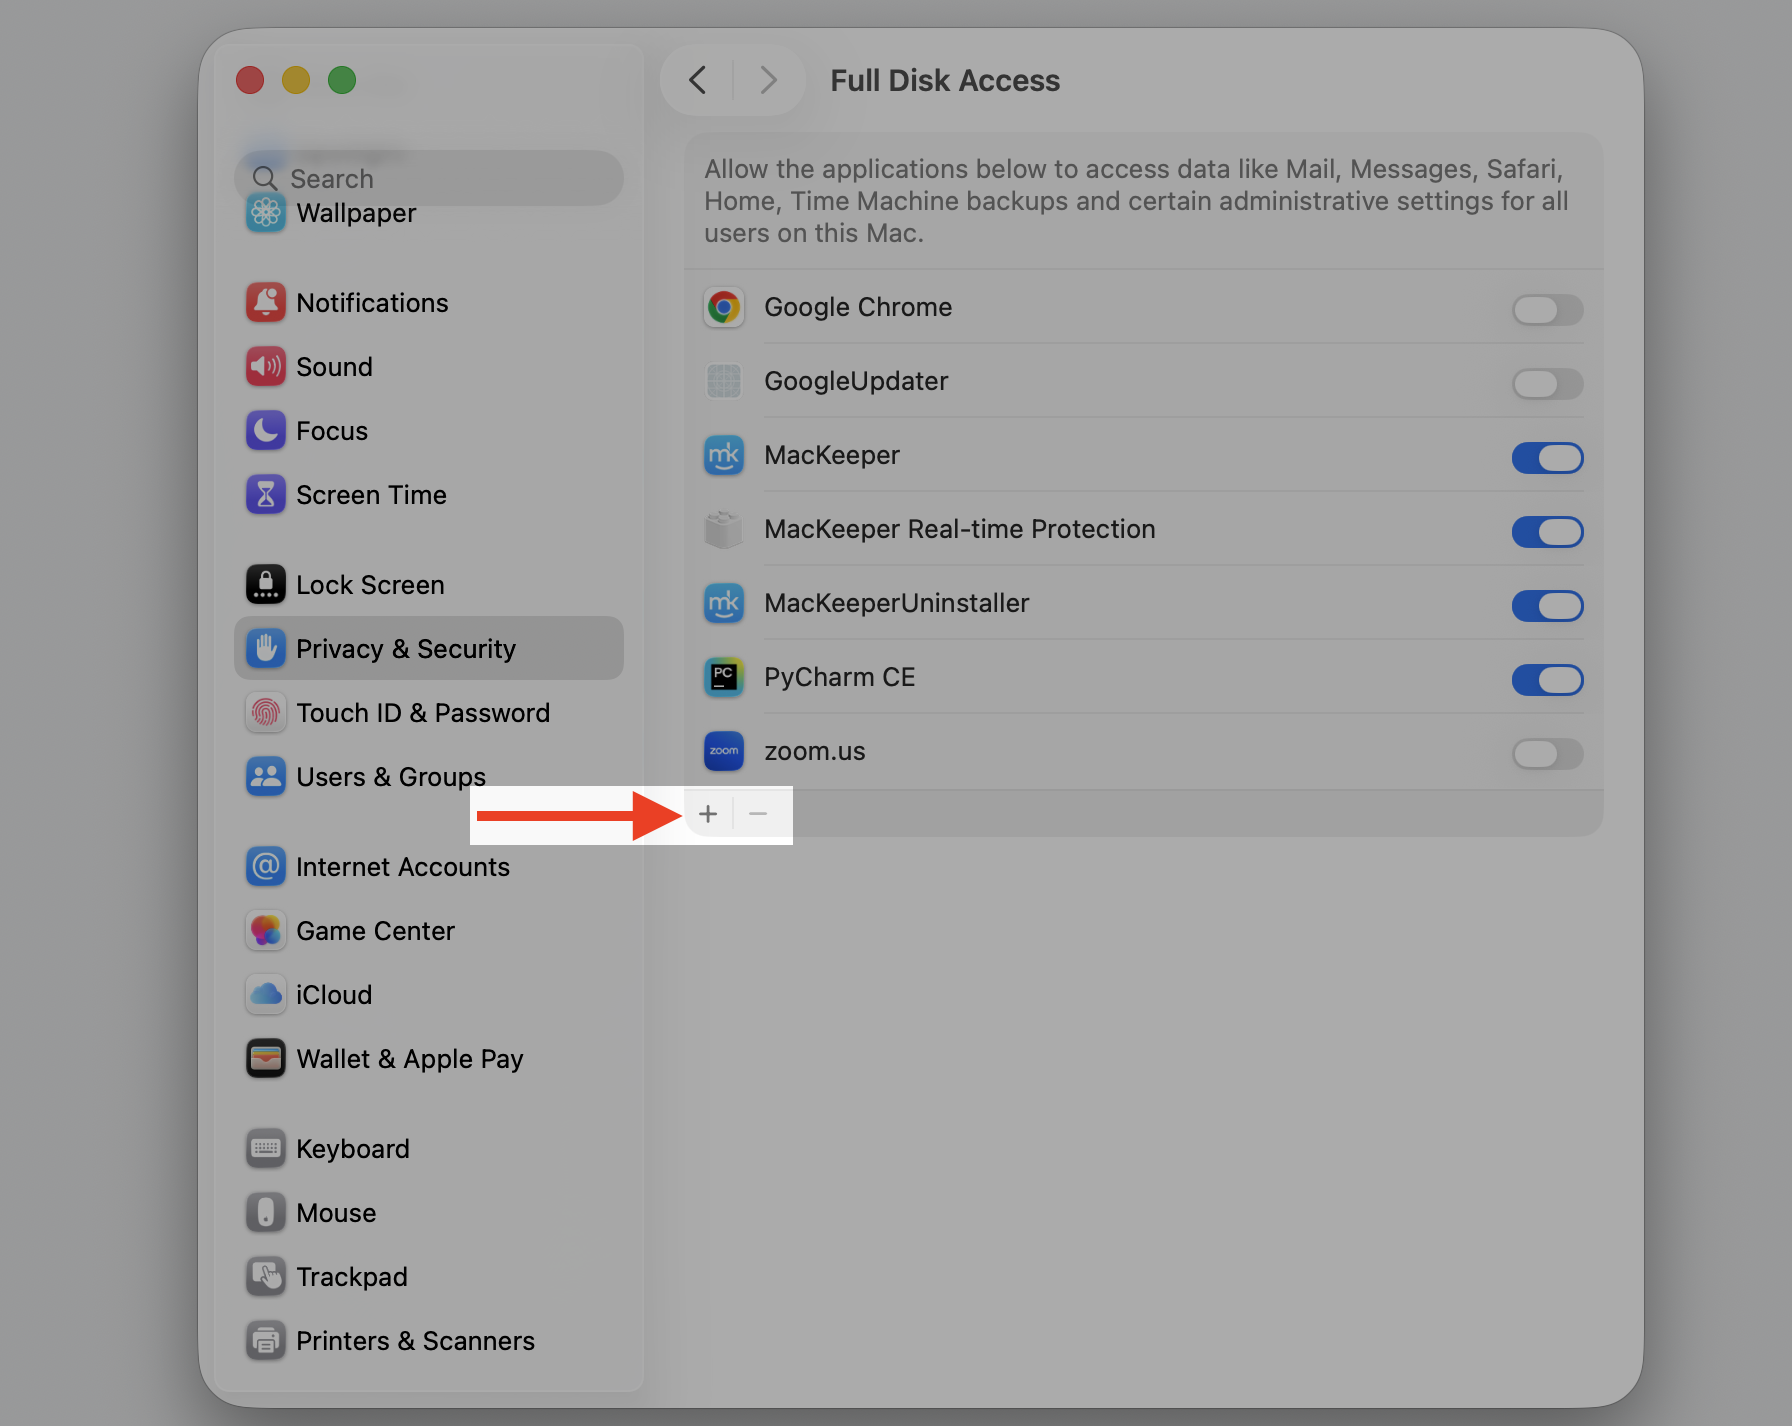
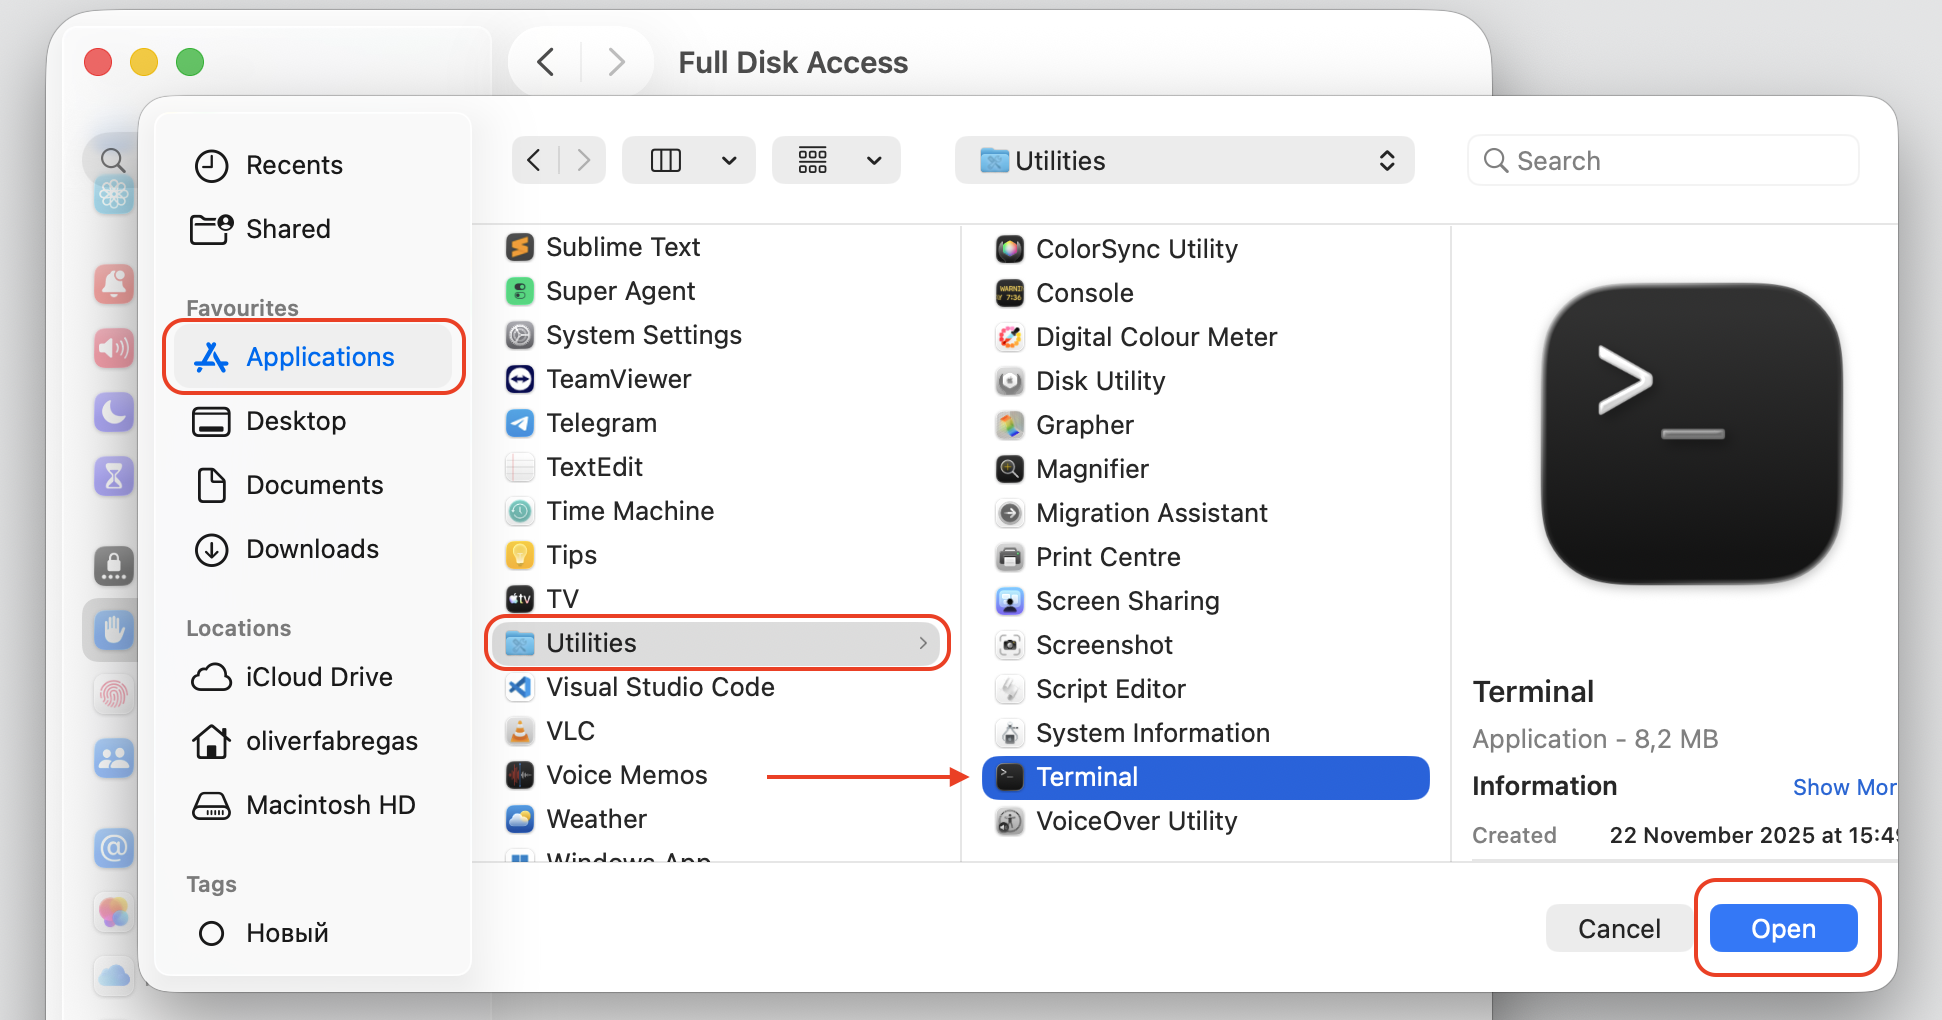
Switch on the toggle next to Terminal. If it isn’t listed, click the Add button (+) and pick it from Utilities.
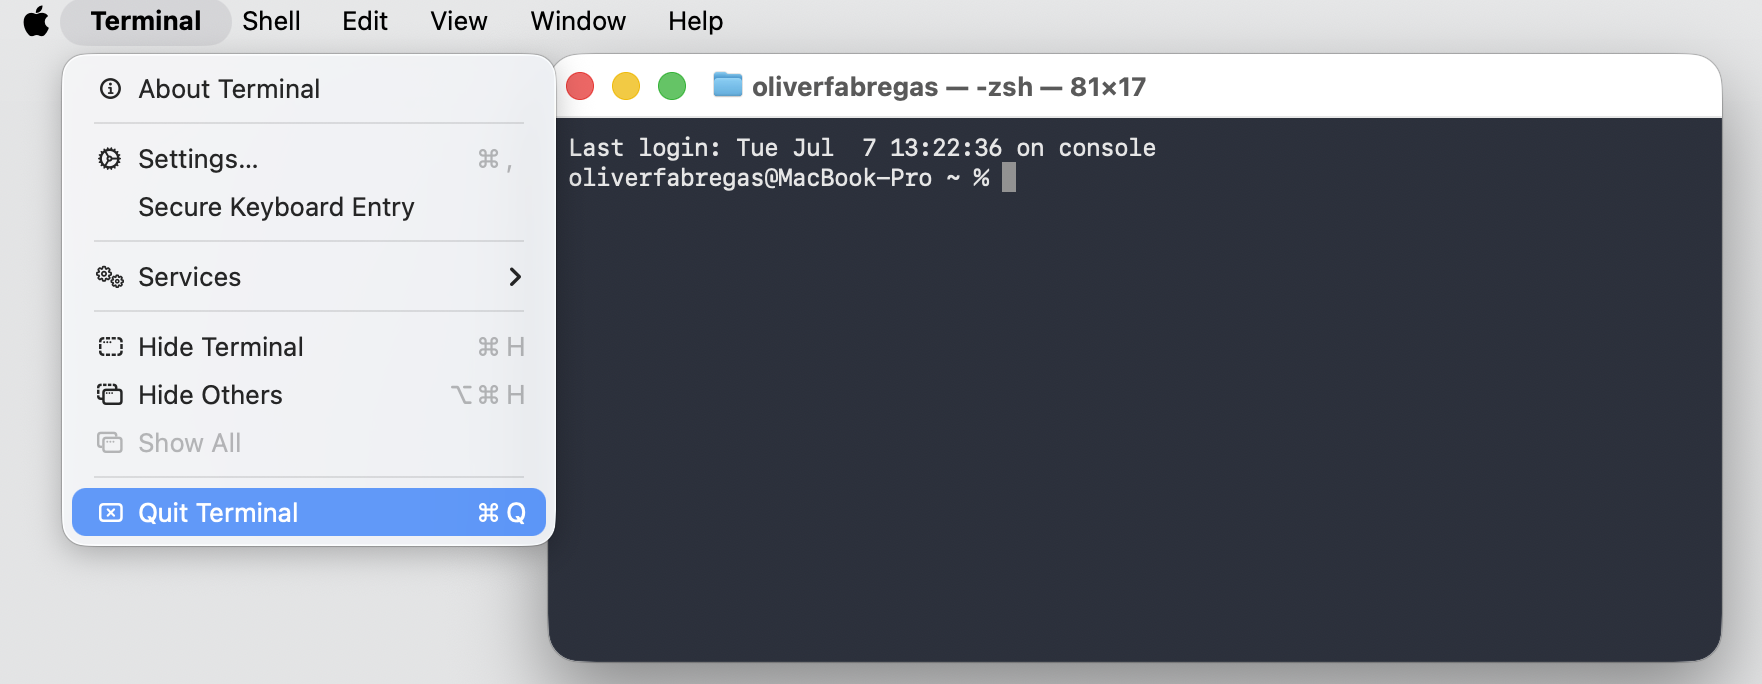
Quit and reopen Terminal so the change takes effect.
Step 1. Go to Apple Logo > System SettingsStep 2. Go to Privacy and Security > Full Disk AccessStep 3. If Terminal isn’t listed, click the Add button (+)Step 4. Pick Terminal from Applications > Utilities > TerminalStep 5. Switch on the toggle next to TerminalStep 6. Quit and Reopen Terminal
2. Check file and folder permissions
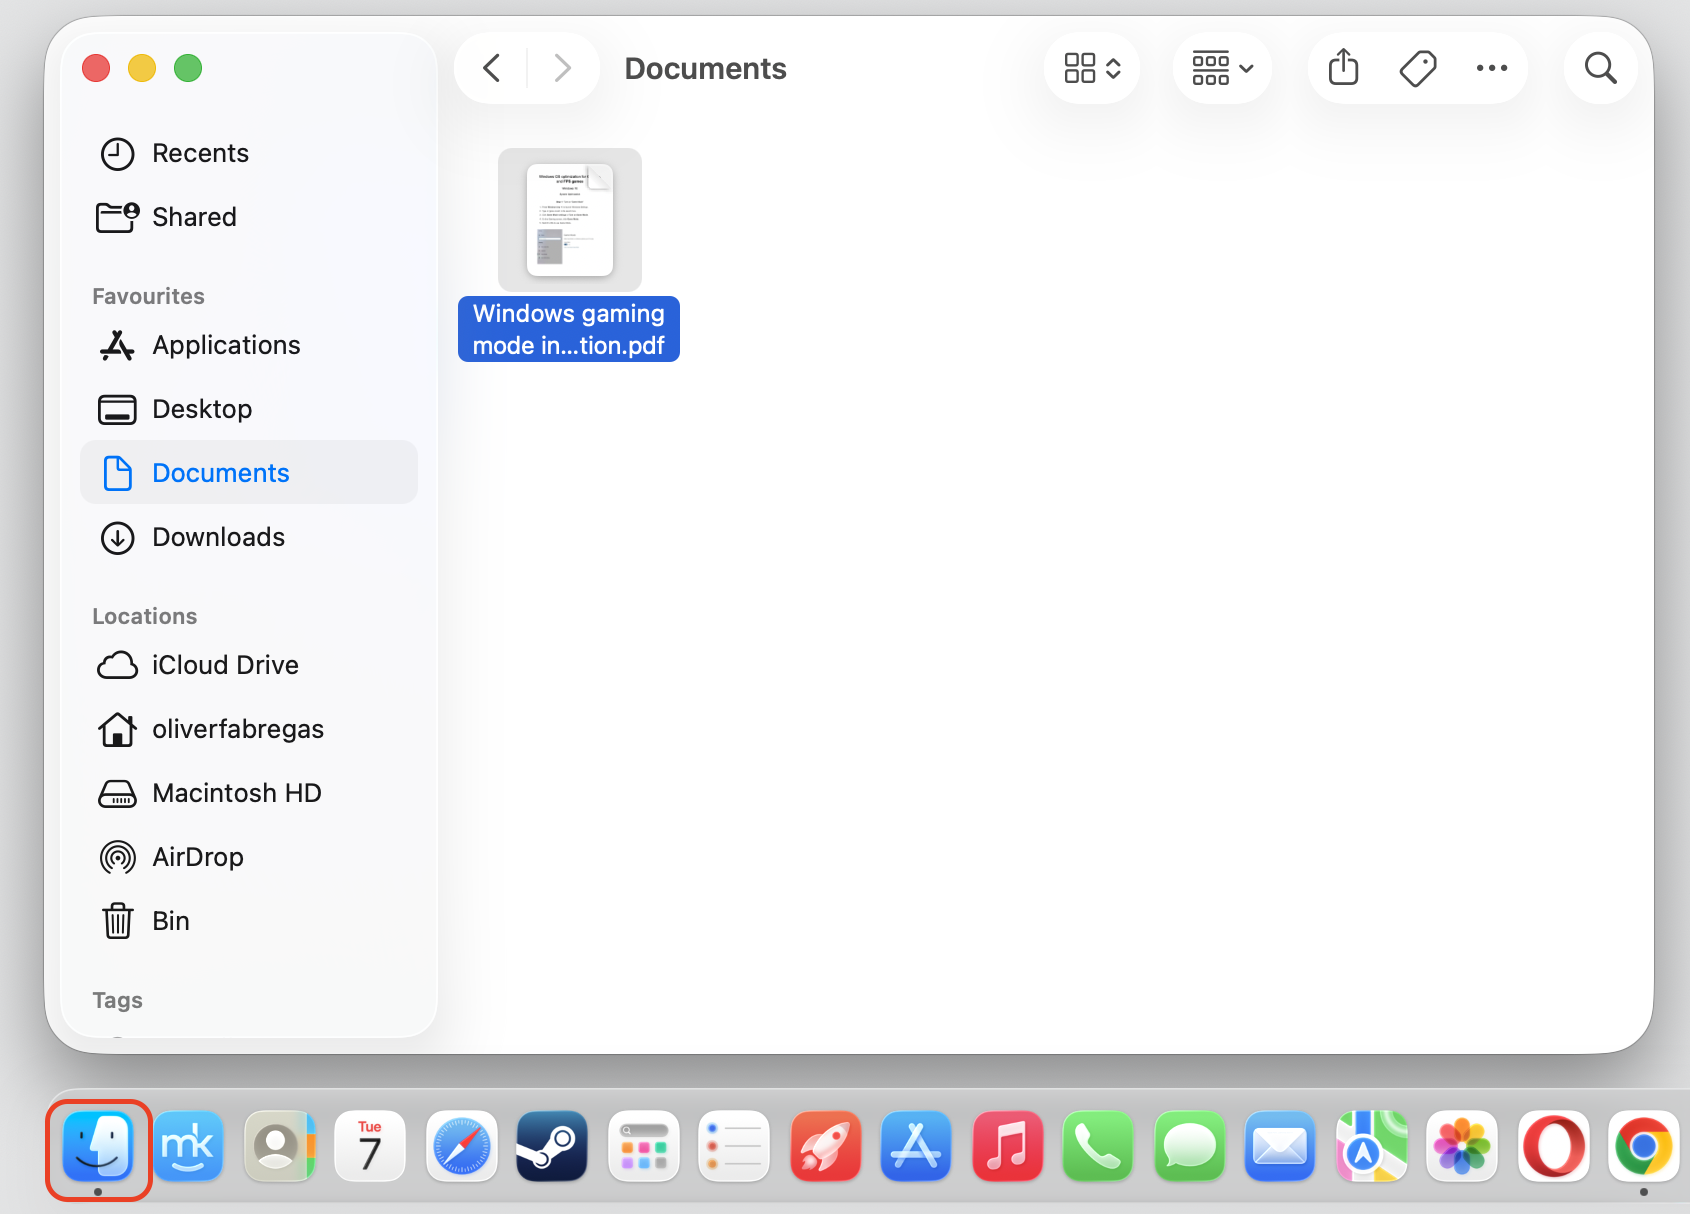
Sometimes the block isn’t system-wide—a single file or folder simply has access rights that shut you out. You can review and adjust those rights from Finder in a few clicks.
Follow these steps:
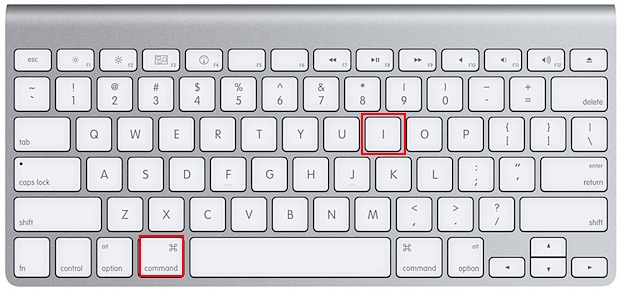
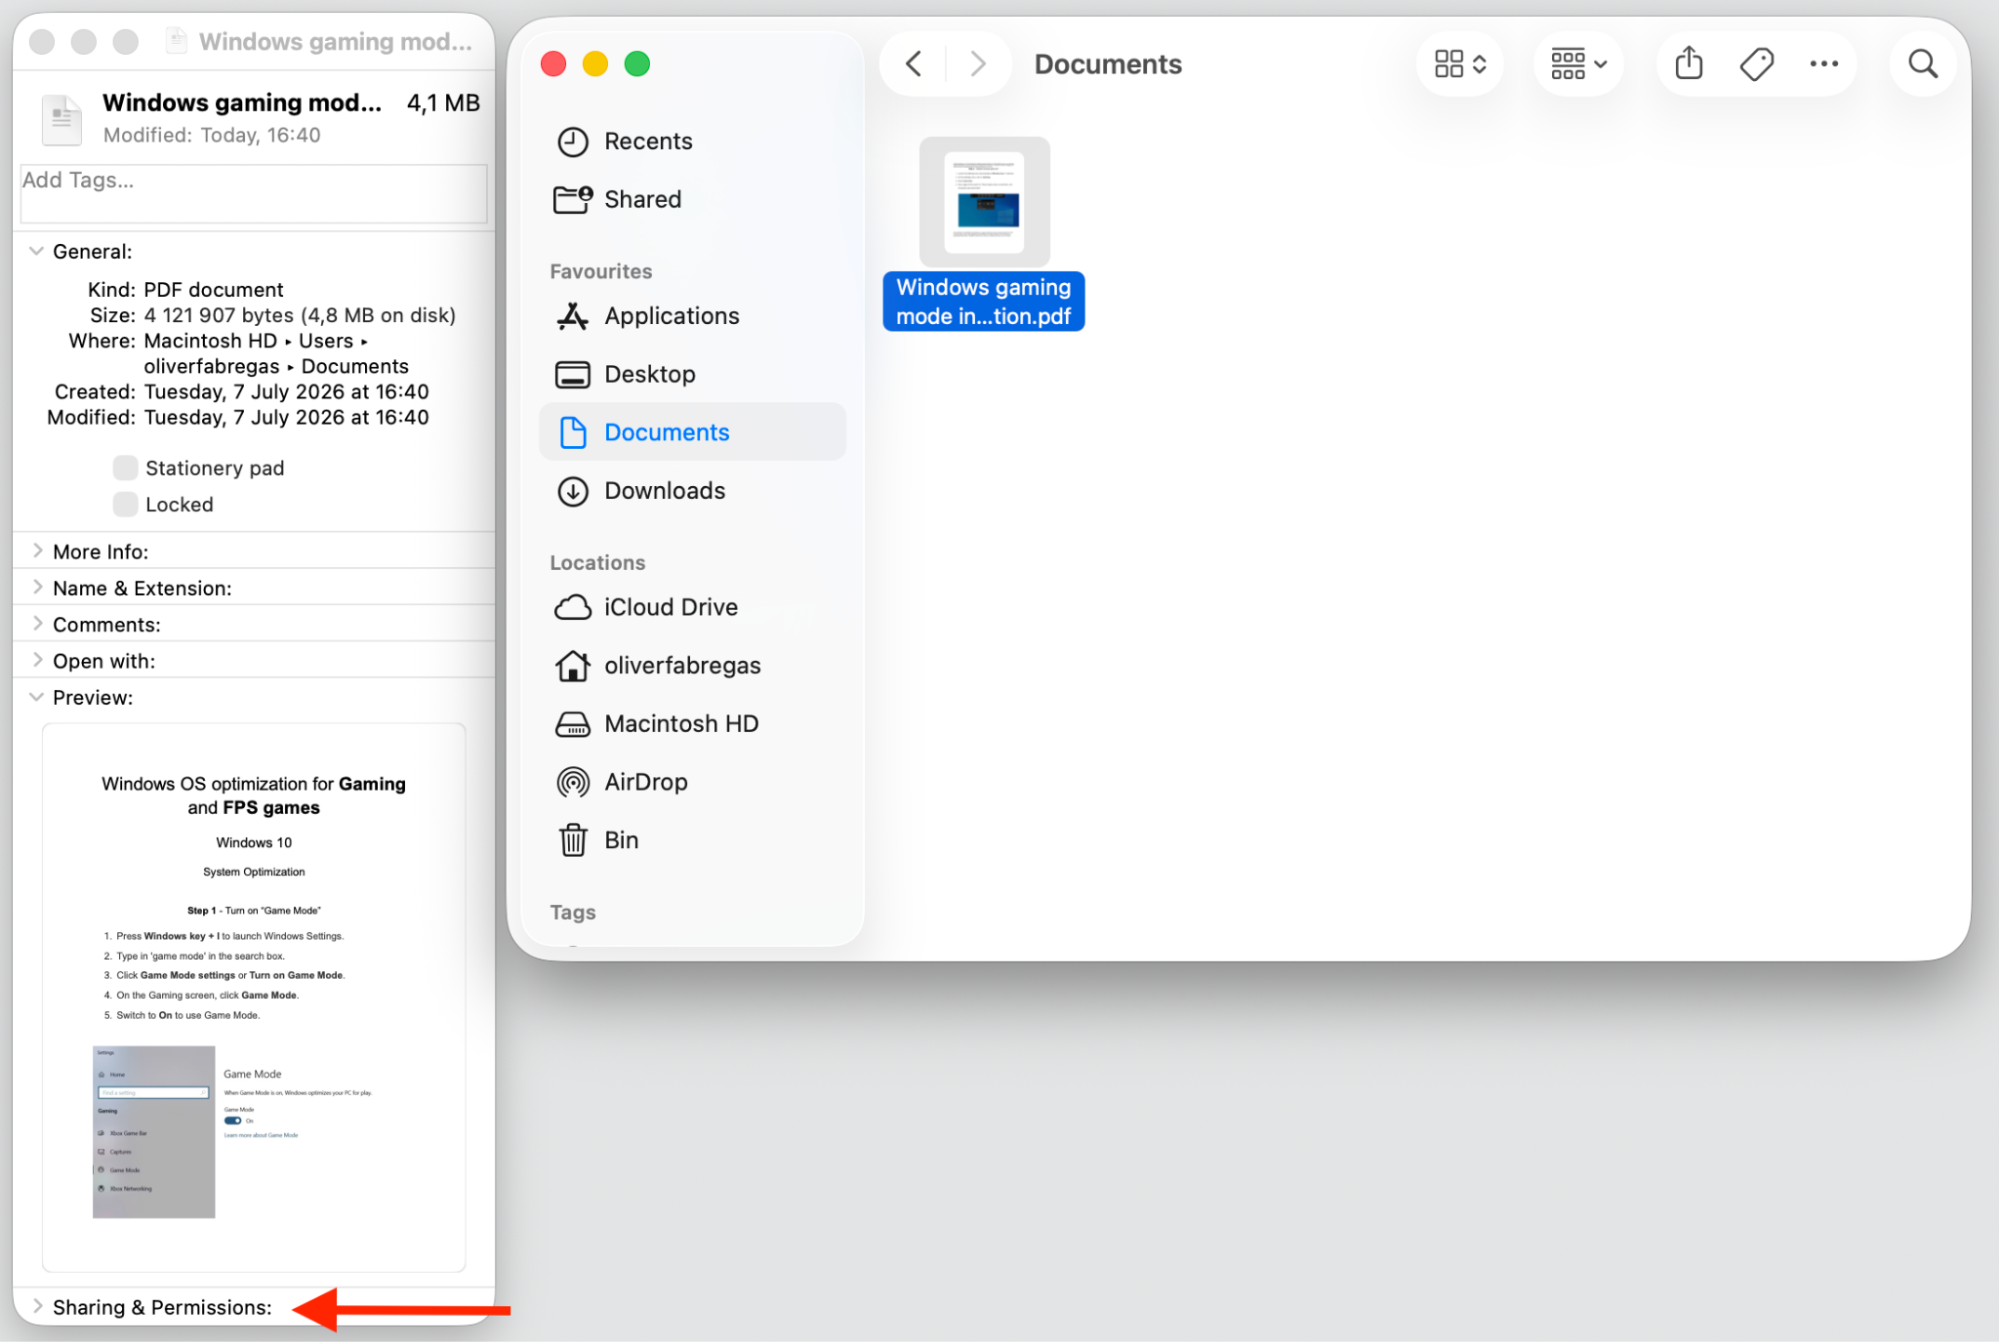
Select the file or folder in Finder, then press Command-I to open Get Info.
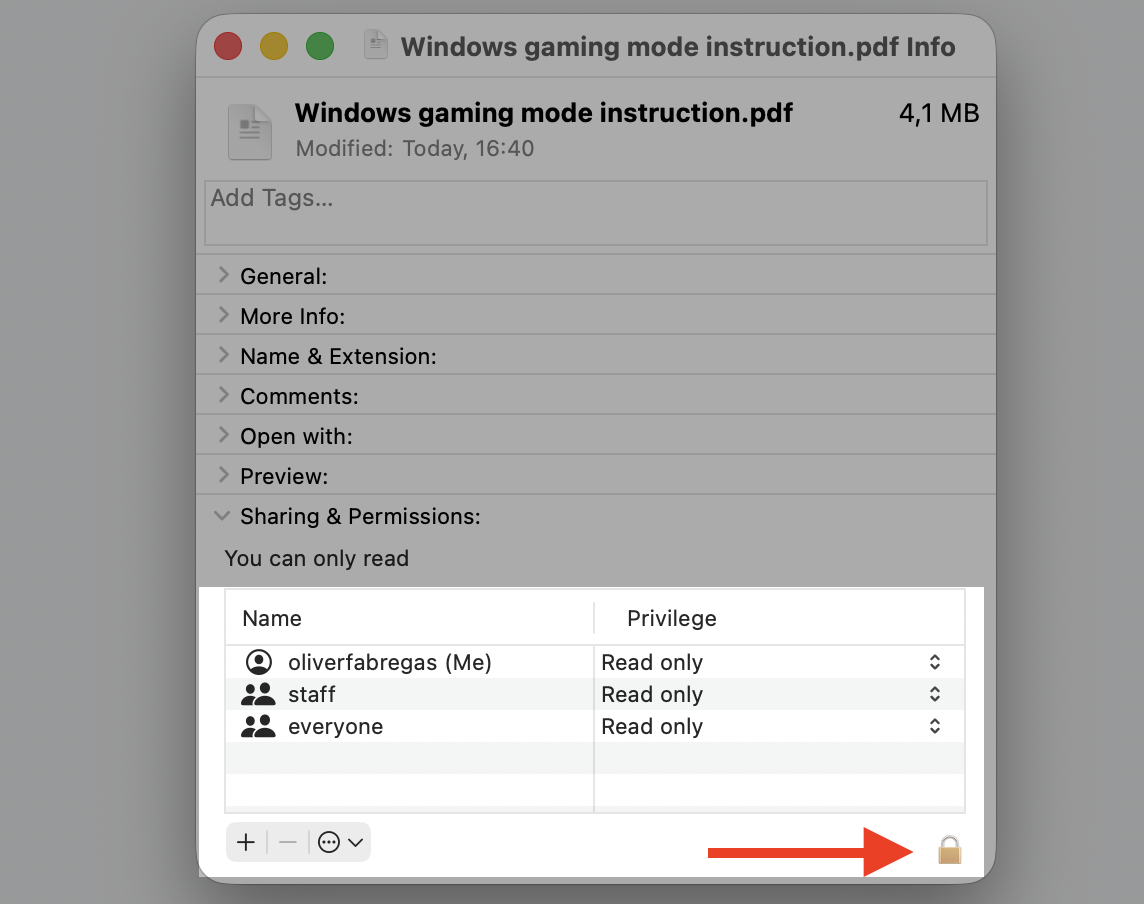
Scroll down to Sharing & Permissions at the bottom of the window.
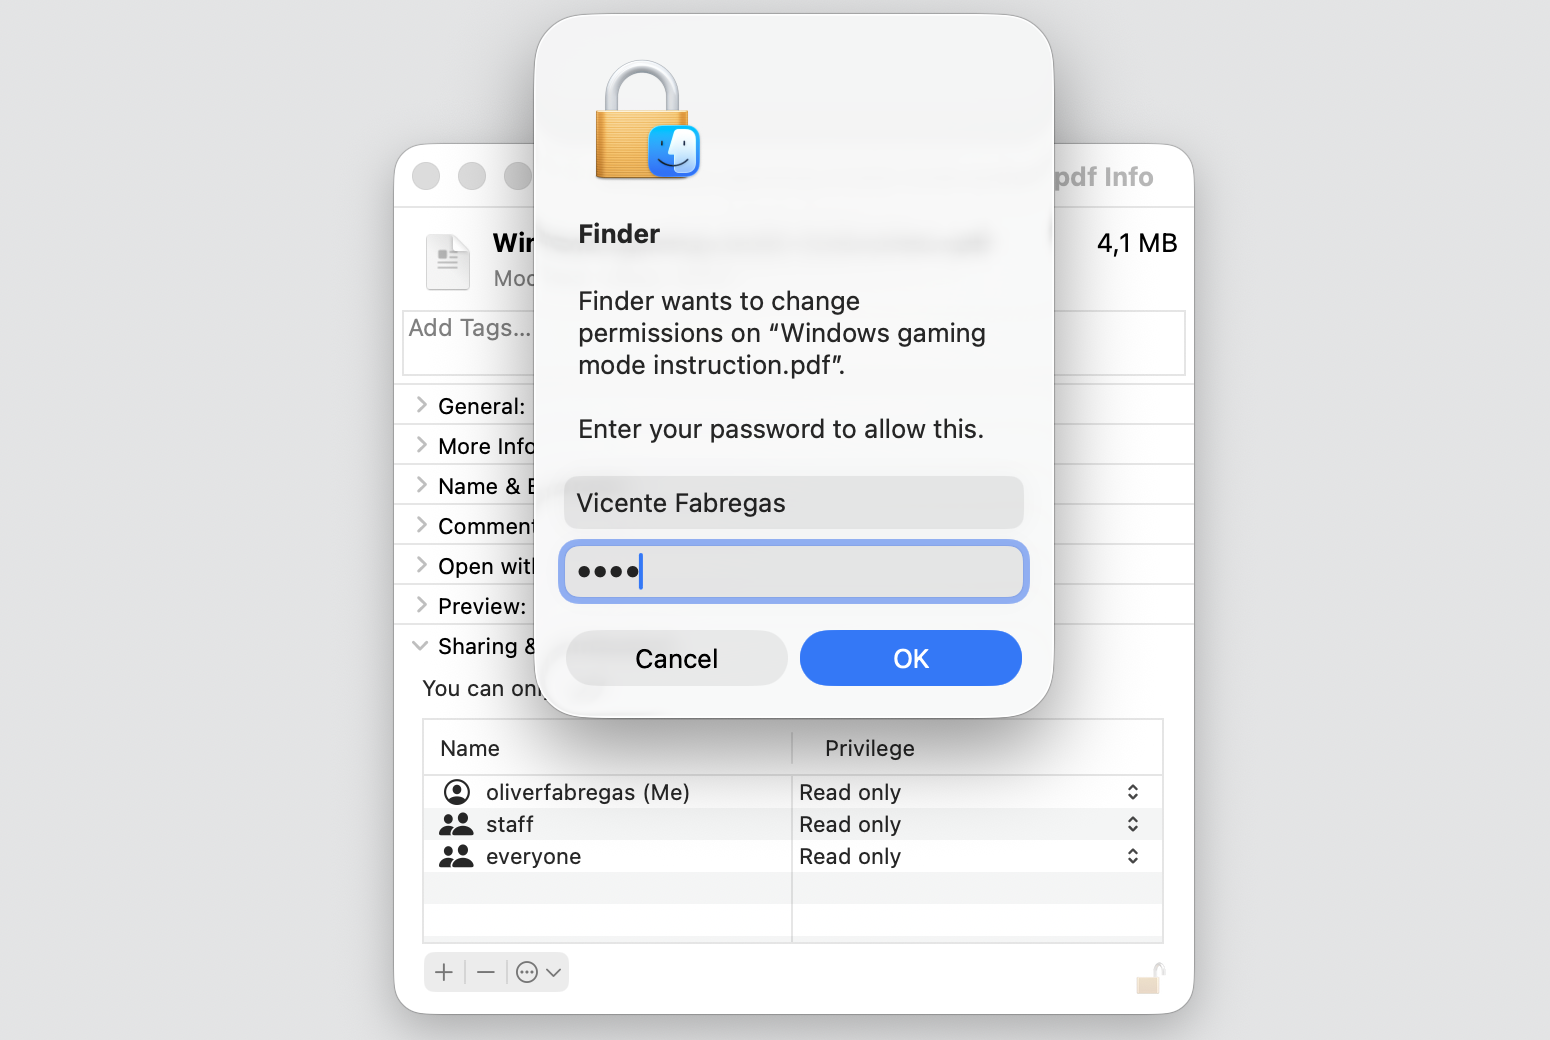
Click the lock icon and enter your password to allow changes.
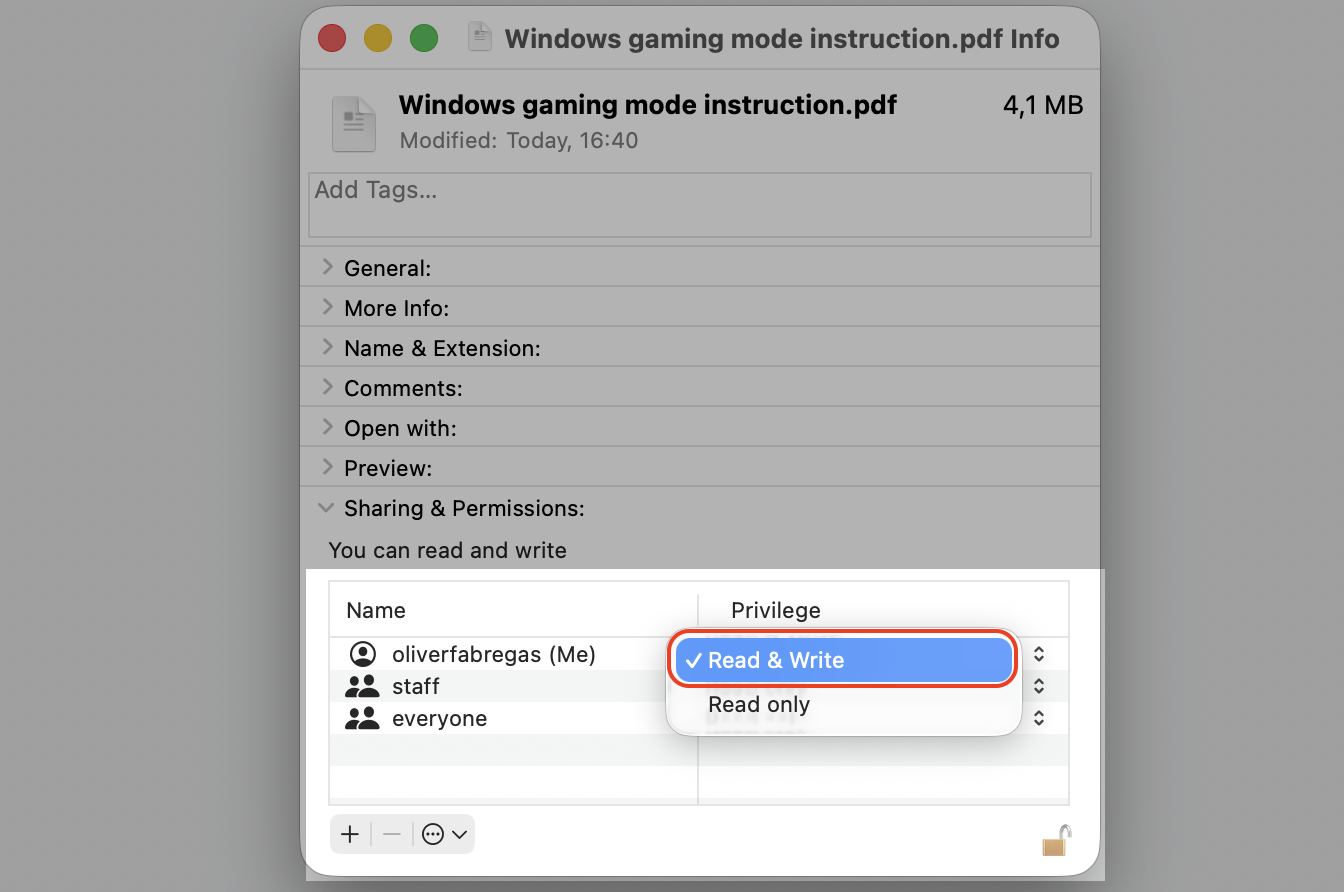
Set your account’s privilege to Read & Write, then quit and reopen Terminal.
Step 1. Select the file or folder in FinderStep 2. Press Command-I to open Get InfoStep 3. Go to Sharing and PermissionsStep 4. Click the lock iconStep 5. Enter your password to allow changesStep 6. Set your account’s privilege to Read & Write
3. Make sure you’re working in the correct directory
It’s not a real solution to your problem, but a necessary checkup to be done, as our practice shows that it’s easy to land in a folder macOS keeps off-limits without realizing it. If the error only shows up in certain spots, the directory itself may be the culprit—not your permissions.
Follow our guidelines below:
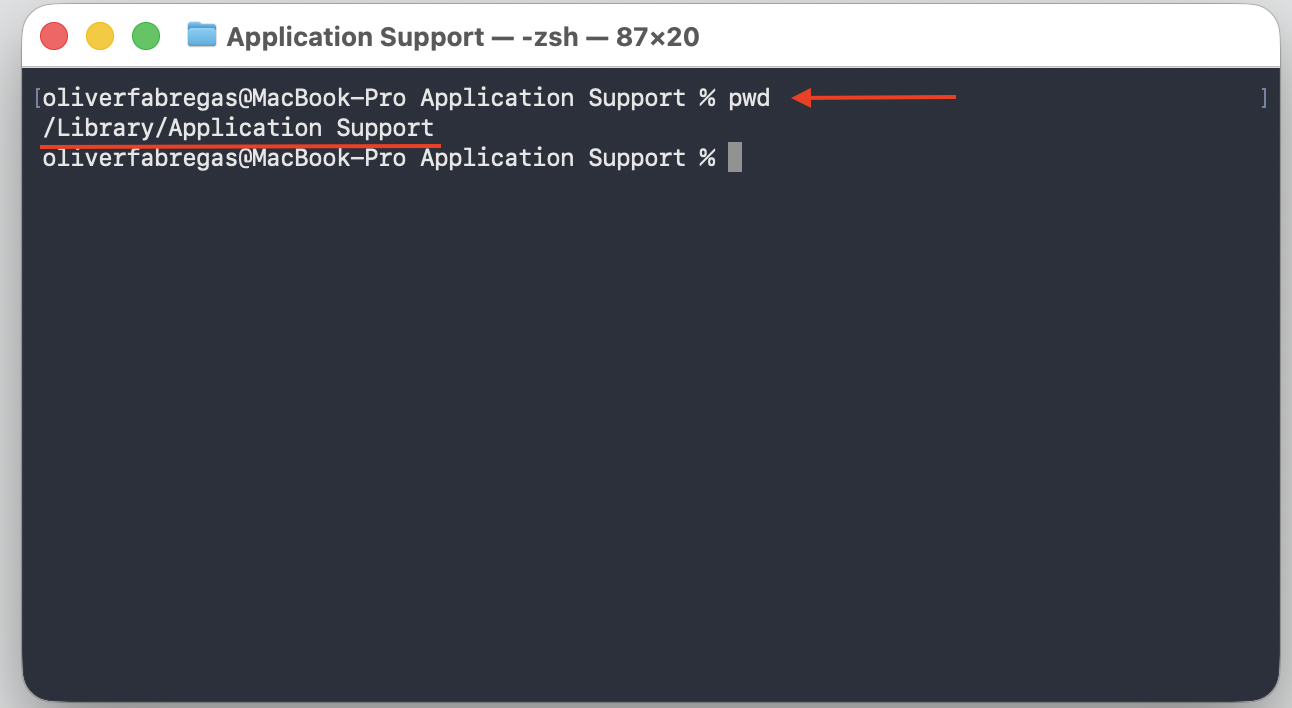
Type pwd in Terminal and press Return to see which directory you’re in.
If it’s a protected system folder, head somewhere user-friendly—your Home or Documents folder works well.
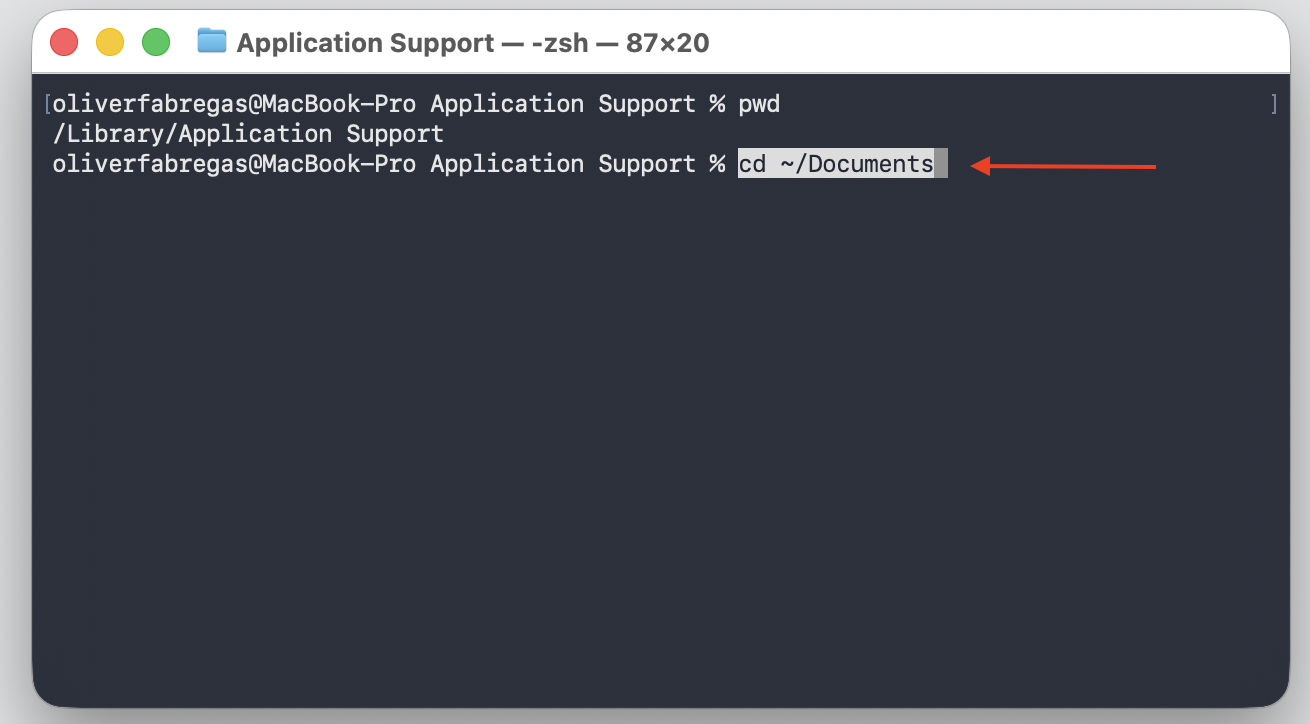
Run cd ~/Documents to switch there, then try your command again.
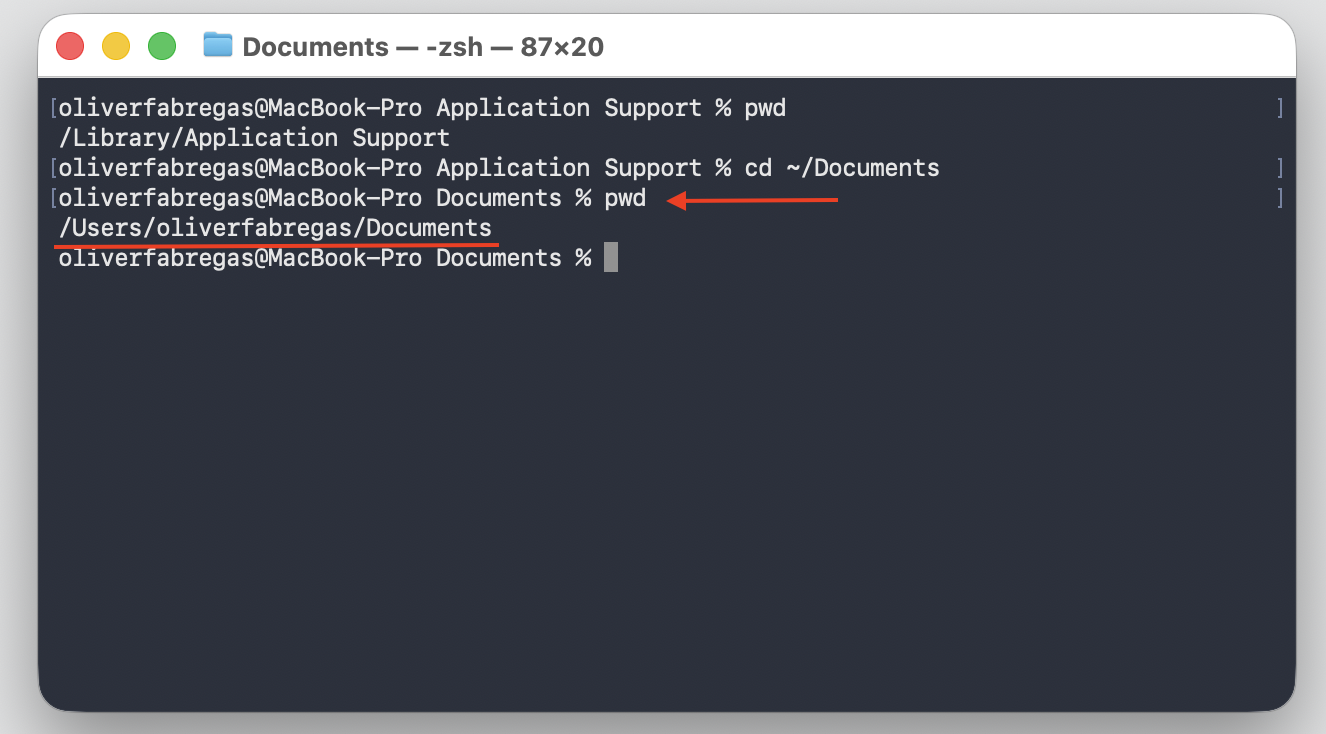
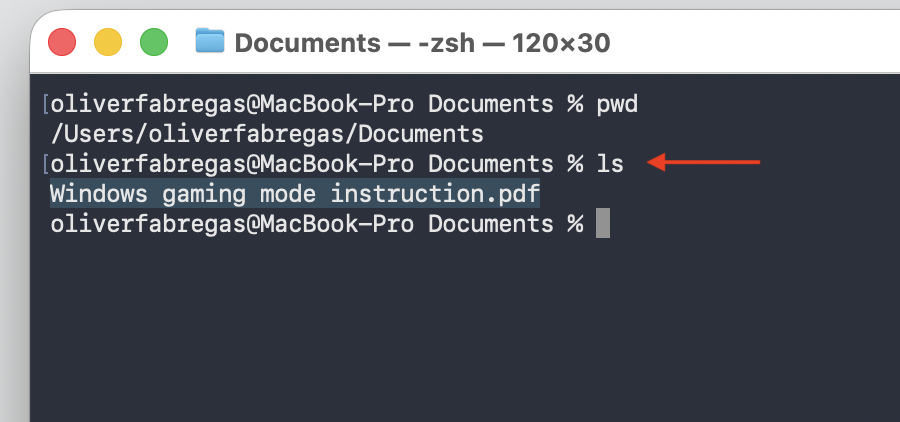
Step 1. Type pwd in Terminal and press Return to see which directory you’re inStep 2. Run cd ~/Documents to head user-friendly folderStep 3. Type again pwd in Terminal to see which directory you’re inStep 4. Check if command ls work
4. Restart Terminal or your Mac
Permission changes don’t always kick in right away. Quitting Terminal usually helps, and when it doesn’t, you may need to restart Mac so those settings load properly and any temporary glitch clears out.
Here’s the quick version from us:
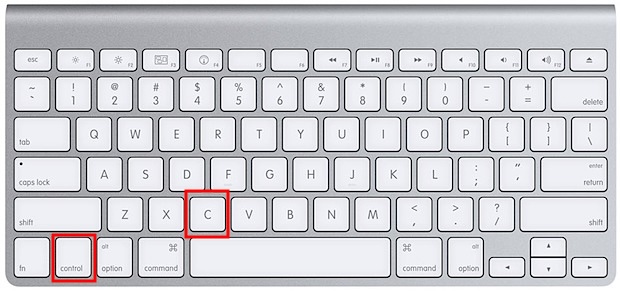
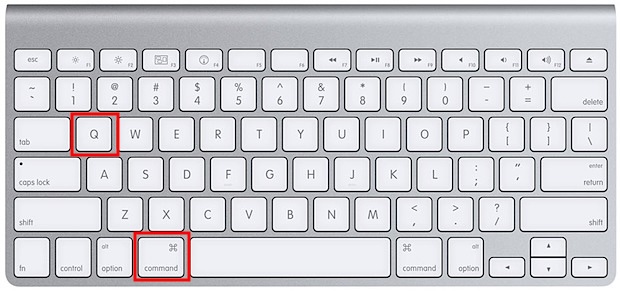
Press Control-C to stop any running command, then quit Terminal with Command-Q.
Reopen Terminal and run your command once more.
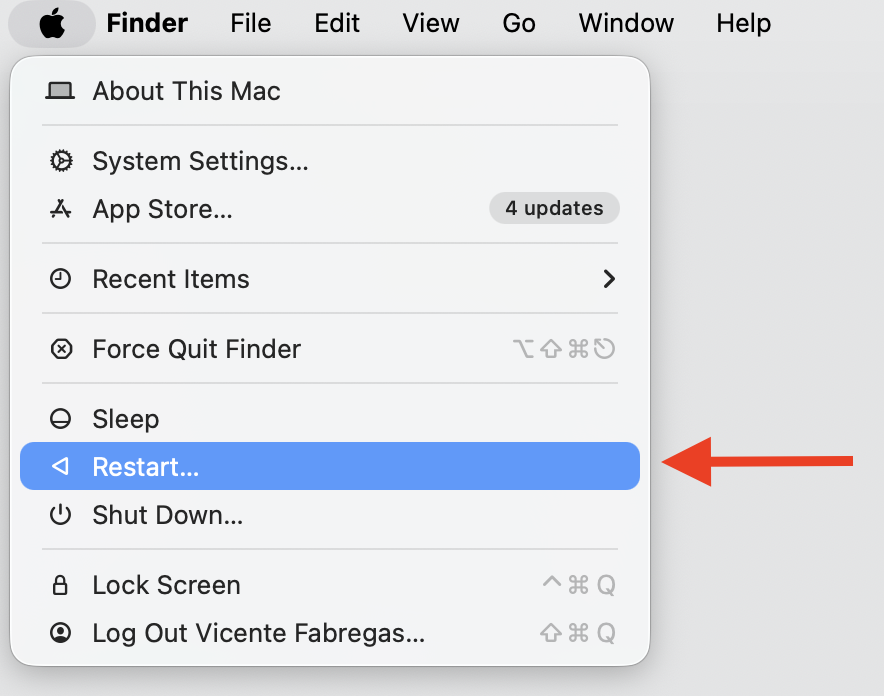
Still stuck? Restart your Mac from the Apple menu ▸ Restart, then test again.
Step 1. Press Control-C to stop any running commandStep 2. Press Command-Q to quit TerminalStep 3. If it still doesn't work, restart your Mac
5. Temporarily disable System Integrity Protection (advanced)
This one’s for stubborn cases only. System Integrity Protection (SIP) is a core protection layer that stops even administrators from changing protected system files. Turning it off can lift the block, but it leaves your Mac more exposed—so treat it as a last resort and switch it back on as soon as you’re done.
Here’s the process, and please go slowly:
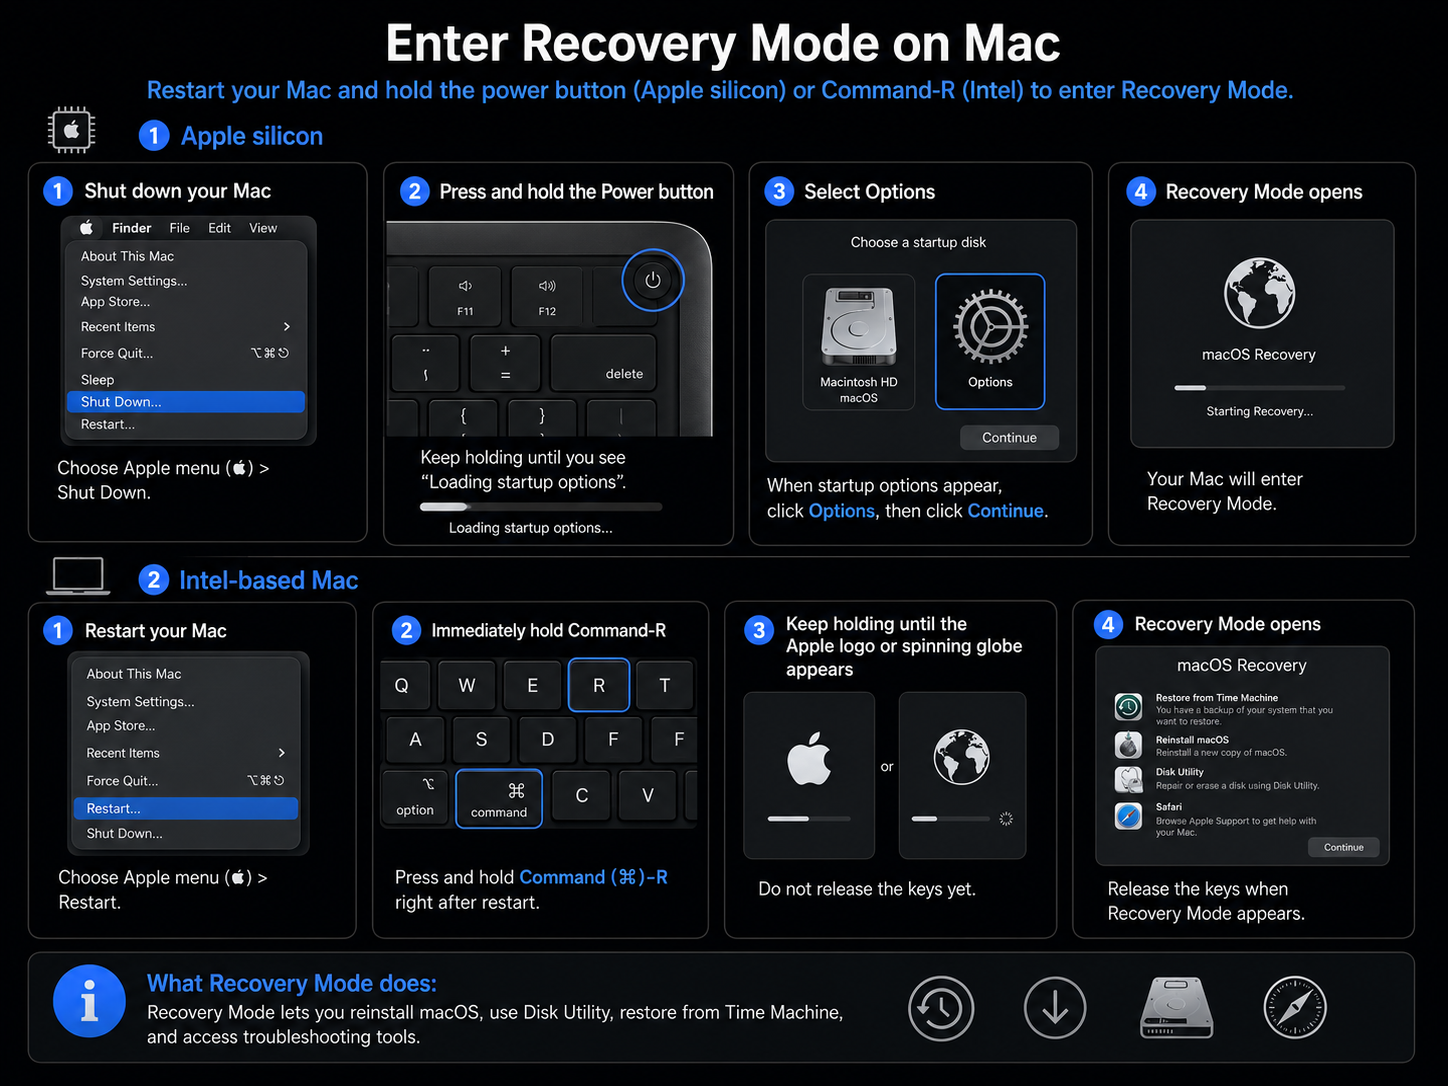
Restart your Mac and hold the power button (Apple Silicon) or Command-R (Intel) to enter Recovery Mode.
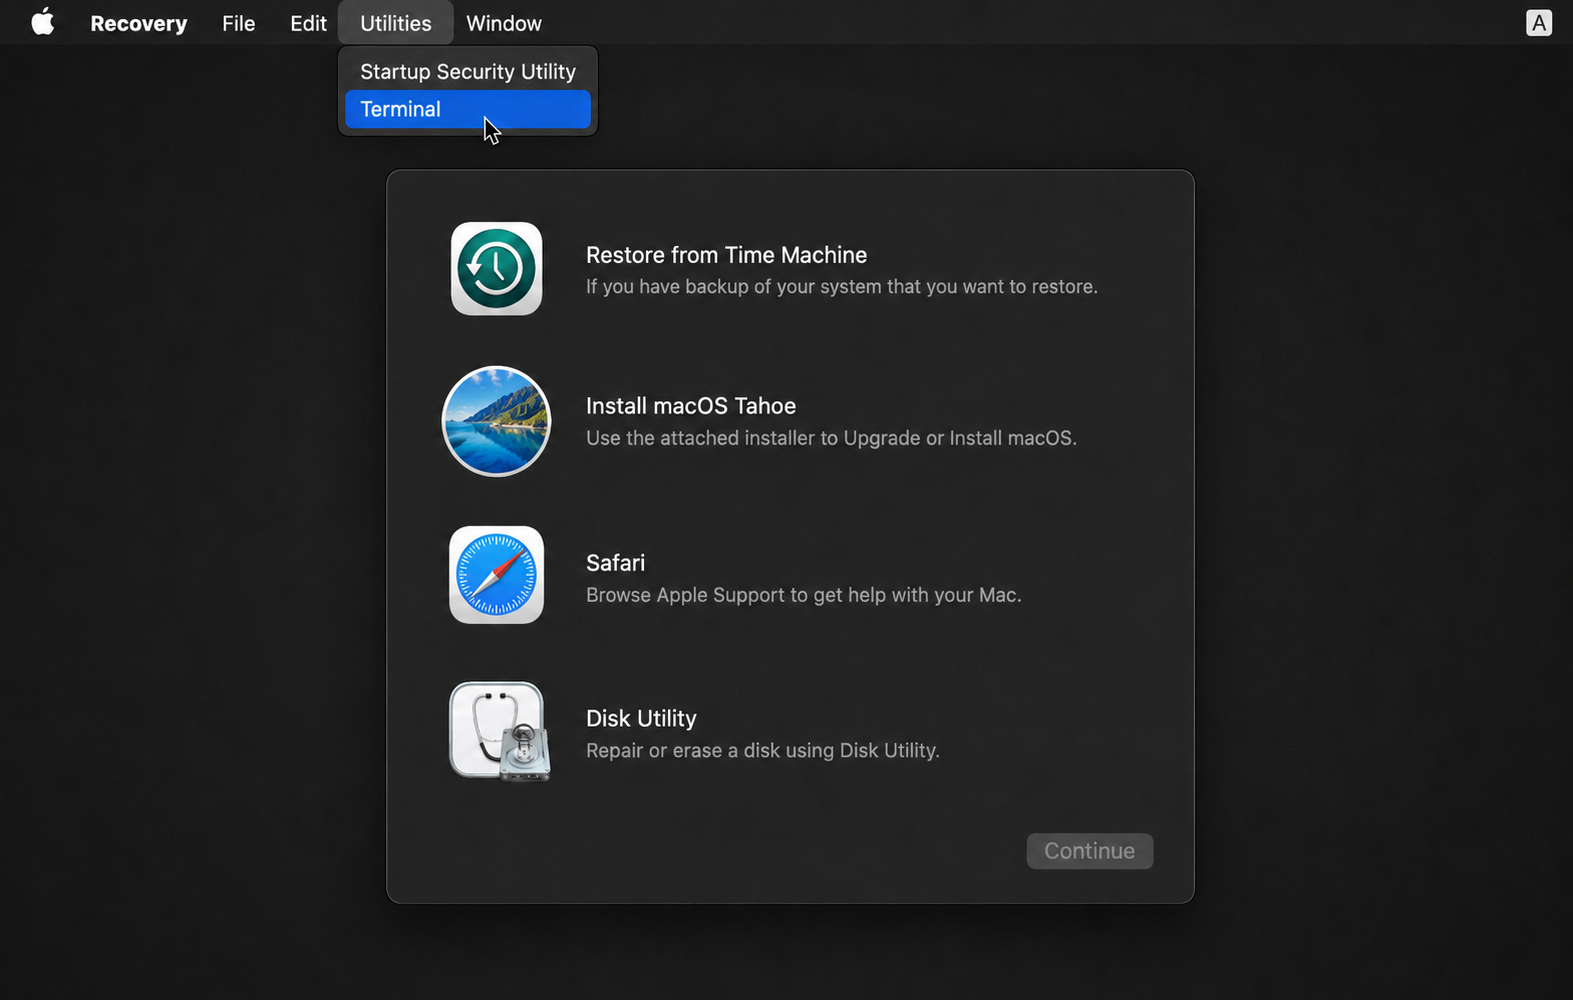
Open Utilities ▸ Terminal from the menu bar.
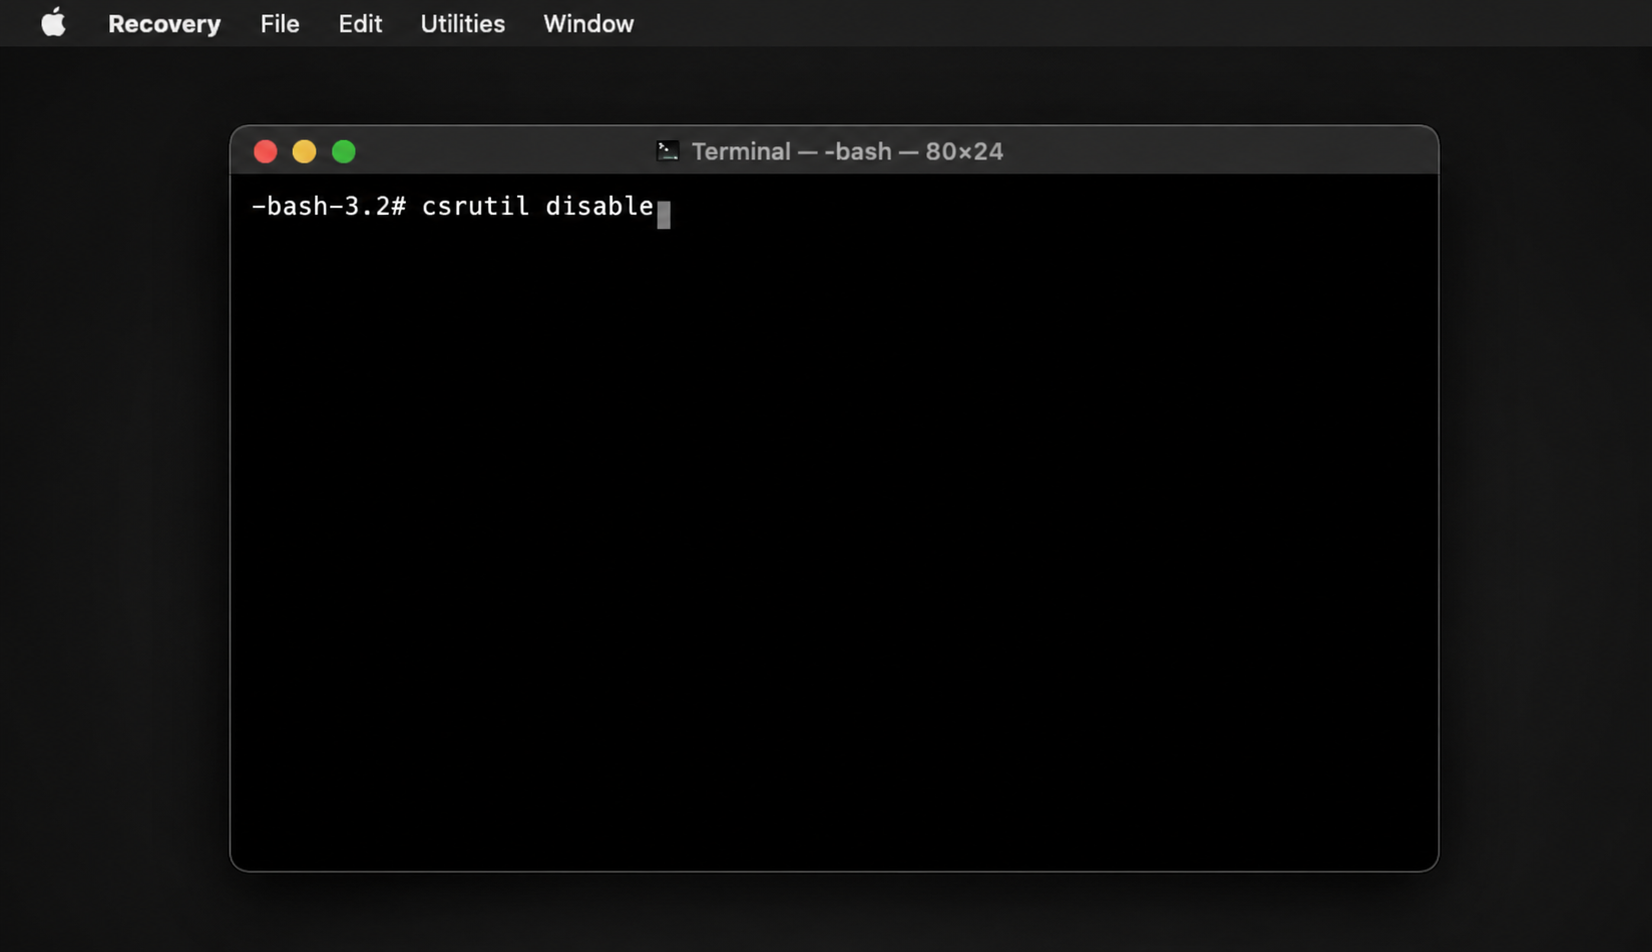
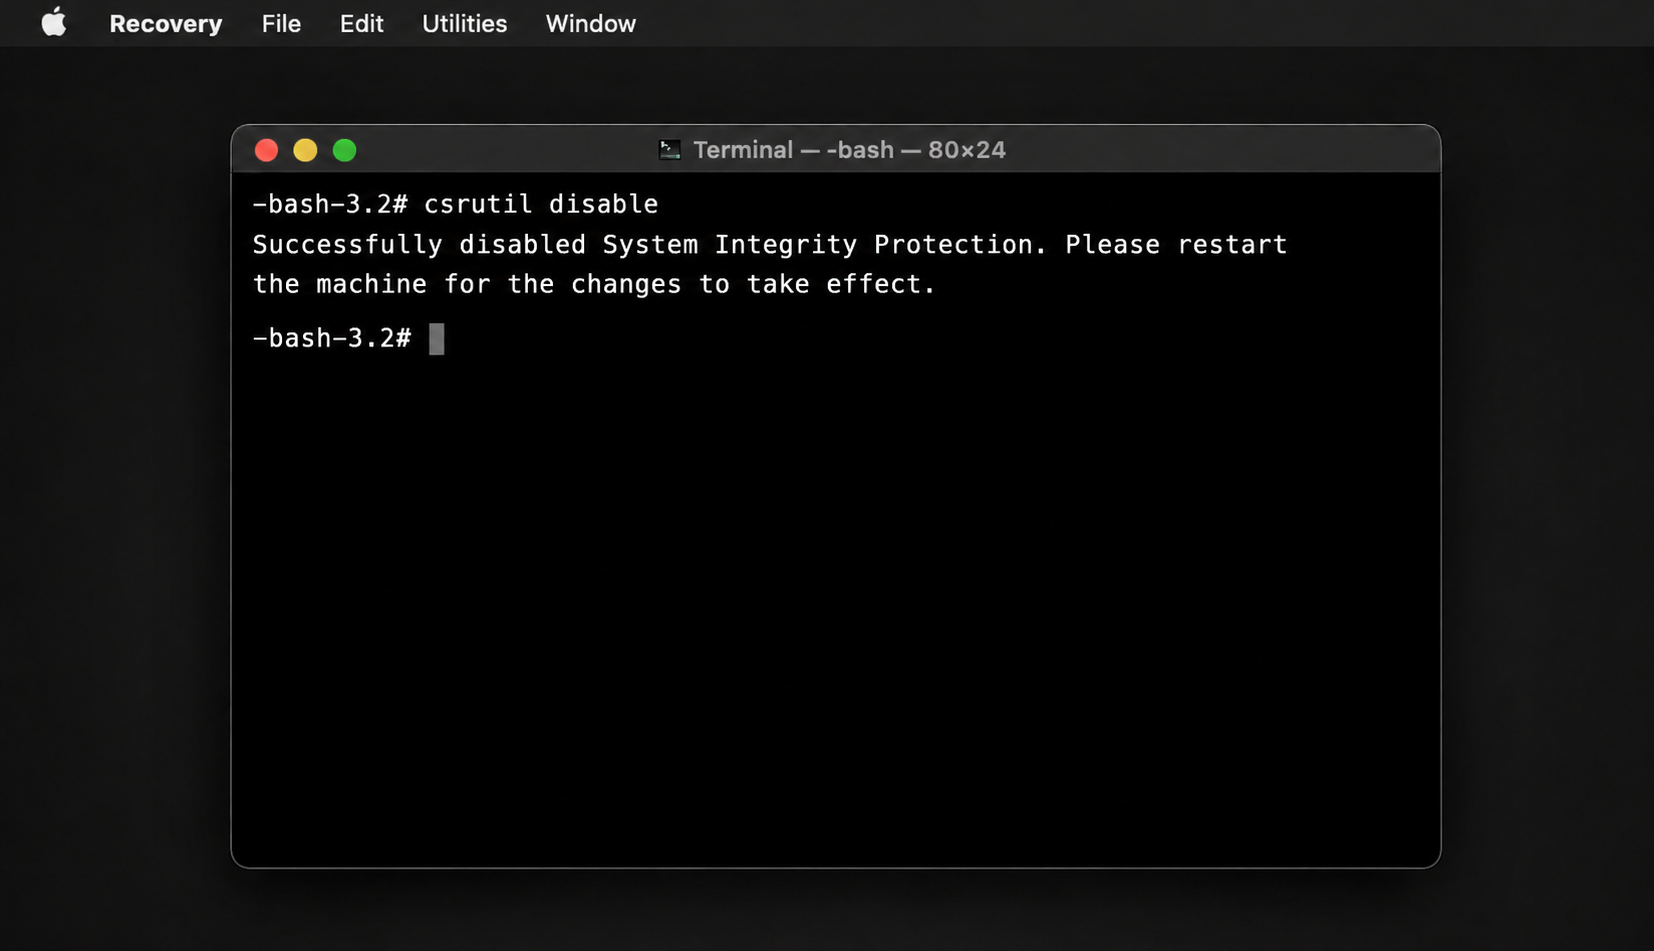
Type csrutil disable and press Return.
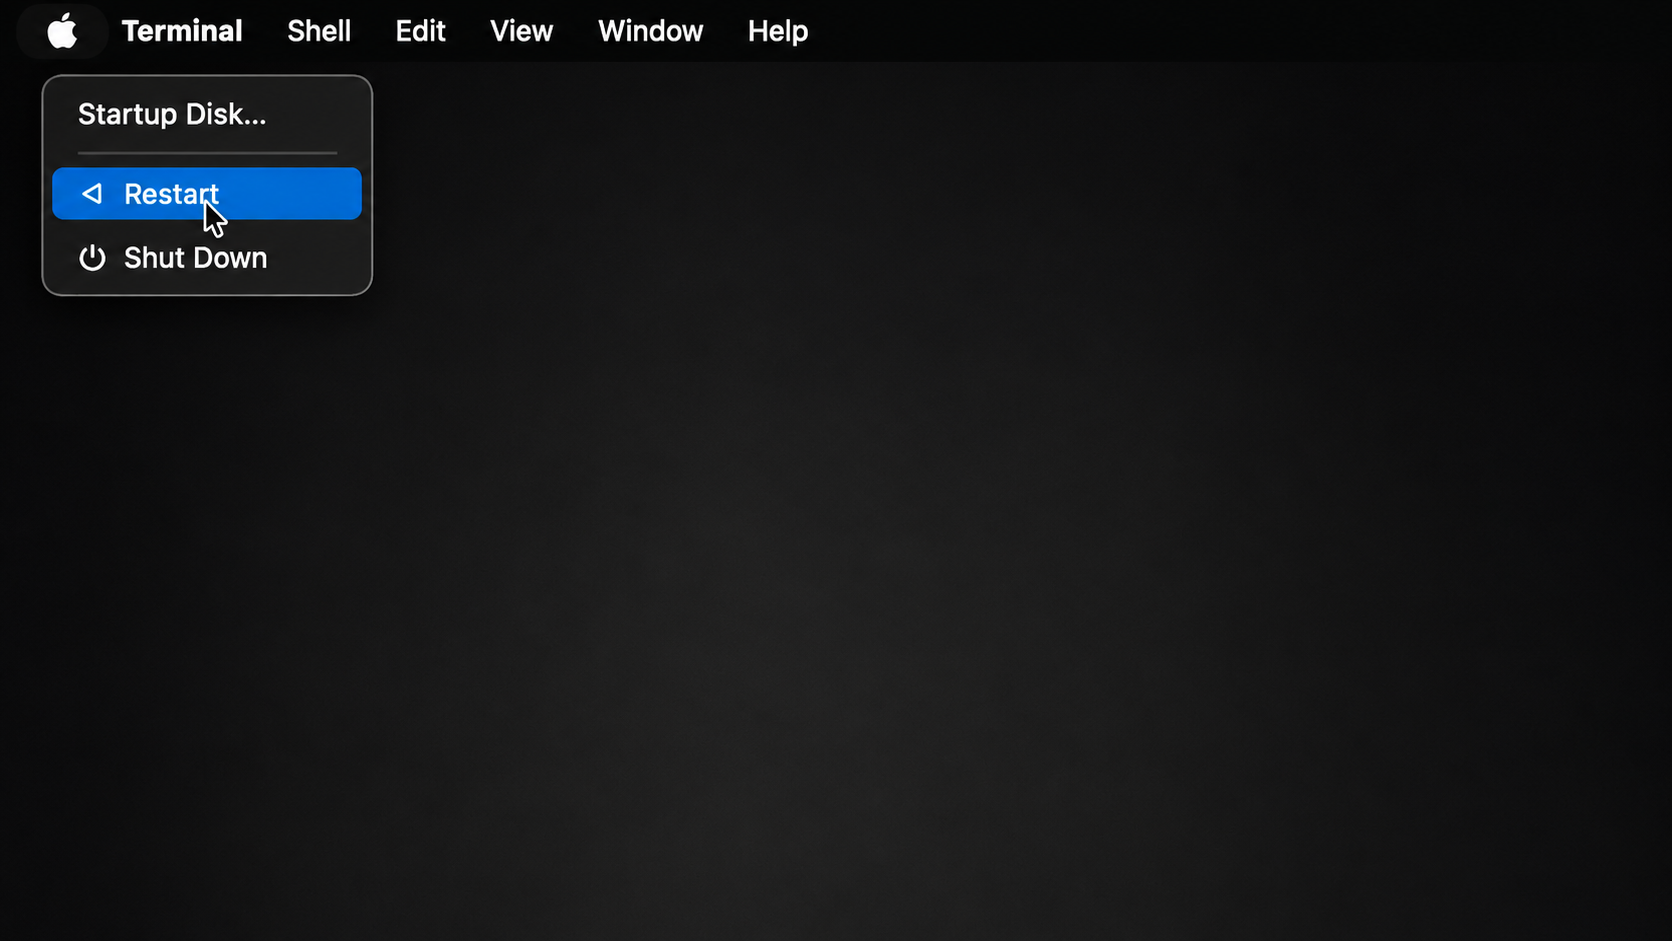
Restart, make your change, then return toRecovery Mode and run csrutil enable to switch protection back on.
Step 1. Enter Recovery ModeStep 2. Go to Utilities and select TerminalStep 3. Type csrutil disable and press ReturnStep 4. Check ResultStep 5. Restart Mac from Apple Logo or run the reboot command in Terminal
Can you permanently disable protections to bypass “ls: .: operation not permitted”?
Technically, yes—you can leave SIP off. But we don’t recommend it. With that protection gone, malware and unwanted apps can reach the very system files macOS works hard to guard, and a single bad install could do real harm.
Think of SIP as a seatbelt. You can unbuckle it for a moment if you truly need to, but riding around without it isn’t worth the gamble. Re-enable protection as soon as your task is finished, and you’ll keep your Mac on safe footing.
You might also run into “ls: .: operation not permitted” inside a Docker container, where the same permission rules apply—another reason to keep your system’s defenses intact.
What to do if “ls: .: operation not permitted” keeps appearing?
If the error sticks around after every method above, something deeper may be going on. Don’t worry—a few broader checks usually sort it out, whether you’re on a MacBook, an iMac, or a Mac mini. We recommend doing the following:
Revisit System Settings ▸ Privacy & Security to confirm Terminal still has the access you granted.
Think back to any recent changes—a new app, a system update, or a tweaked setting can quietly reset permissions.
As a final step, back up your files and reinstall macOS to give the machine a clean slate. A clean reinstall sounds drastic, but it’s a reliable way to clear lingering permission issues without losing your data when you’ve backed up first.
Conclusion
Nearly every time, “ls: .: operation not permitted” comes down to permissions—macOS simply protecting a file or folder behind its security layers. Grant Terminal the right access, double-check your directory, and the message usually disappears.
If you’d rather not manage all this by hand, MacKeeper’s Premium Services keep your Mac clean, secure, and running smoothly, with a 24/7 Help Center ready whenever a question pops up. Let our team handle the heavy lifting!
We respect your privacy and
use cookies
for the best site experience.
Privacy Preferences Center
We use cookies along with other tools to give you the best possible experience while using the
MacKeeper website. Cookies are small text files that help the website load faster. The cookies we
use don’t contain any type of personal data meaning they never store information such as your
location, email address, or IP address.
Help us improve how you interact with our website by accepting the use of cookies. You can change
your privacy settings whenever you like.
Manage consent
All cookies
These cookies are strictly necessary for enabling basic website functionality (including page
navigation, form submission, language detection, post commenting), downloading and purchasing
software. The website might malfunction without these cookies.