In this article you will find the following:
Are you using Apple's built-in antivirus XProtect to protect your Mac?
While it may seem like a convenient solution, XProtect has limitations and may not provide the level of protection you need. That's where MacKeeper's Antivirus comes in. With advanced features and real-time protection, MacKeeper's Antivirus provides you with the peace of mind you need to keep your Mac safe from malware and other threats.
This guide will explain everything you need to know about XProtect on your Mac. Let’s get started by learning what XProtect is in the first place.
BEFORE WE START
In the world of cybersecurity, you can't be too careful. This is especially true for Apple users who need a reliable and effective antivirus solution. Luckily, MacKeeper's Antivirus provides just that. With its handy features and frequent updates, MacKeeper's Antivirus is the perfect alternative to ensure the security of your Mac device.
Here’s how to protect your Mac with MacKeeper’s Antivirus:
- Download MacKeeper
- Launch MacKeeper
- Select Antivirus from the left side pane
- Click Enable to activate real-time protection
- Select Start Scan
- If you have any threats, they’ll be stated after the scan, and you can remove them.
What is XProtect on Mac?
XProtect, or File Quarantine, is a built-in anti-malware technology that detects malware using YARA signatures, introduced in 2009 with macOS X 10.6 Snow Leopard.
Unlike other antivirus software, XProtect only executes when you:
- Launch a downloaded app for the first time
- Change an app in the file system
- Update XProtect’s signatures.
Now that we’ve discussed what XProtect is, let’s dive into how Mac’s very own antivirus works.
How does XProtect work?
XProtect automatically updates as part of a routine, ensuring that it's always up-to-speed with the latest security definitions.
Mac’s built-in antivirus has minimal impact on system resources. Unlike other anti-malware programs, XProtect doesn't continuously monitor the system but operates silently in the background.
Its primary function is to scan downloads. Whenever you initiate a download, XProtect will analyze the file, comparing its contents to known virus definitions. If it detects any potential threats, it’ll alert you immediately. This process ensures you’re safe from malicious files without causing any significant disruption to your workflow.
Knowing what XProtect is and how it works is a must-have for this discusssion, but now we’ll explain another important nuance—how to activate it.
How to enable XProtect?
XProtect is a built-in tool on Mac that detects and blocks common threats. Therefore, you should keep XProtect up-to-date to ensure optimal protection against new malware.
Here are the steps to open XProtect on Mac and ensure it's automatically updated:
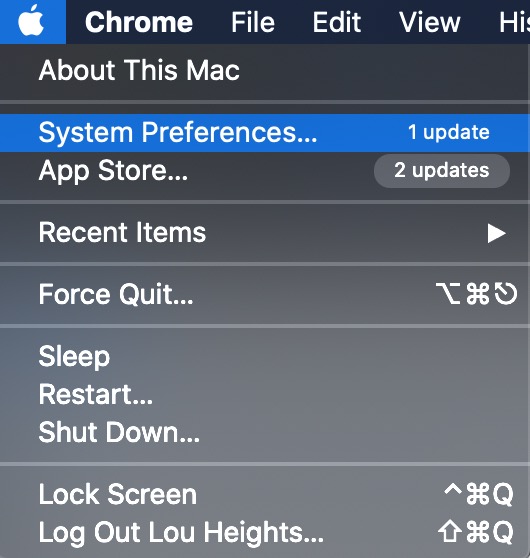
- Select the Apple icon in the top left corner and select System Preferences from the dropdown menu
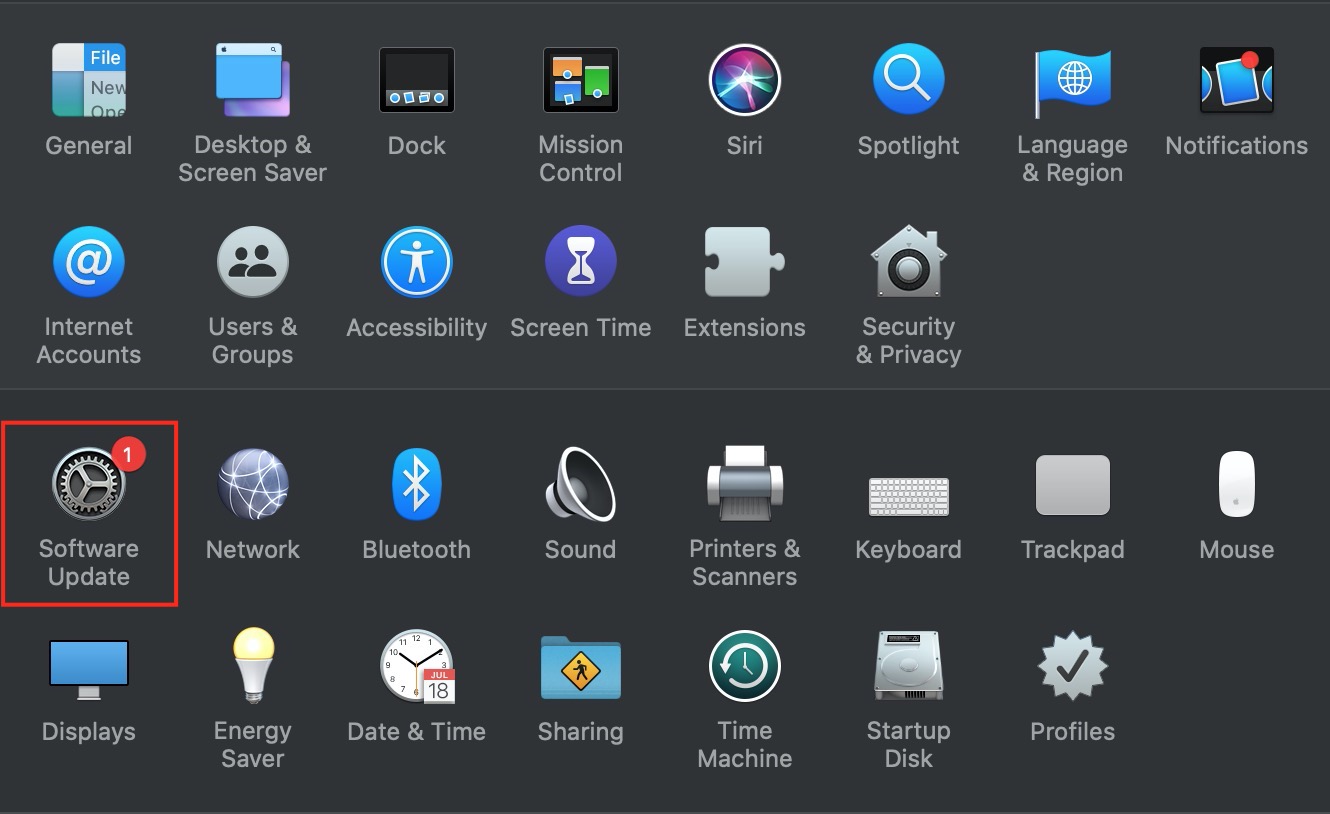
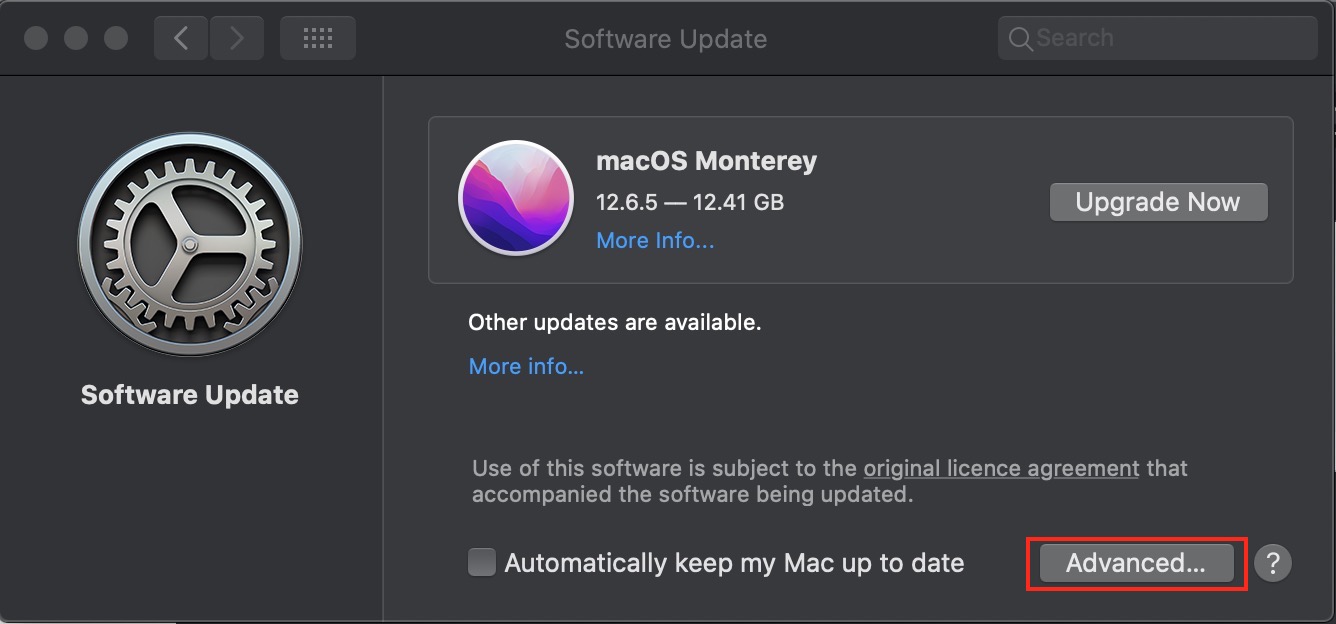
- Click Software Update
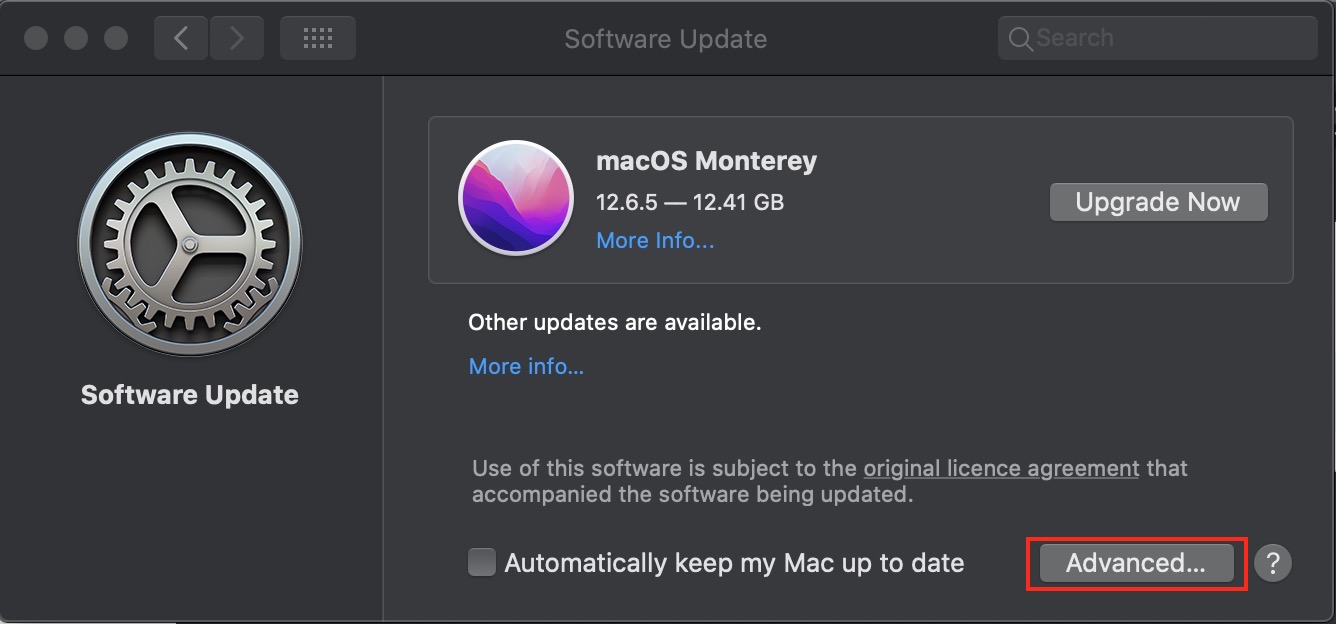
- Select the Advanced button at the bottom of the window
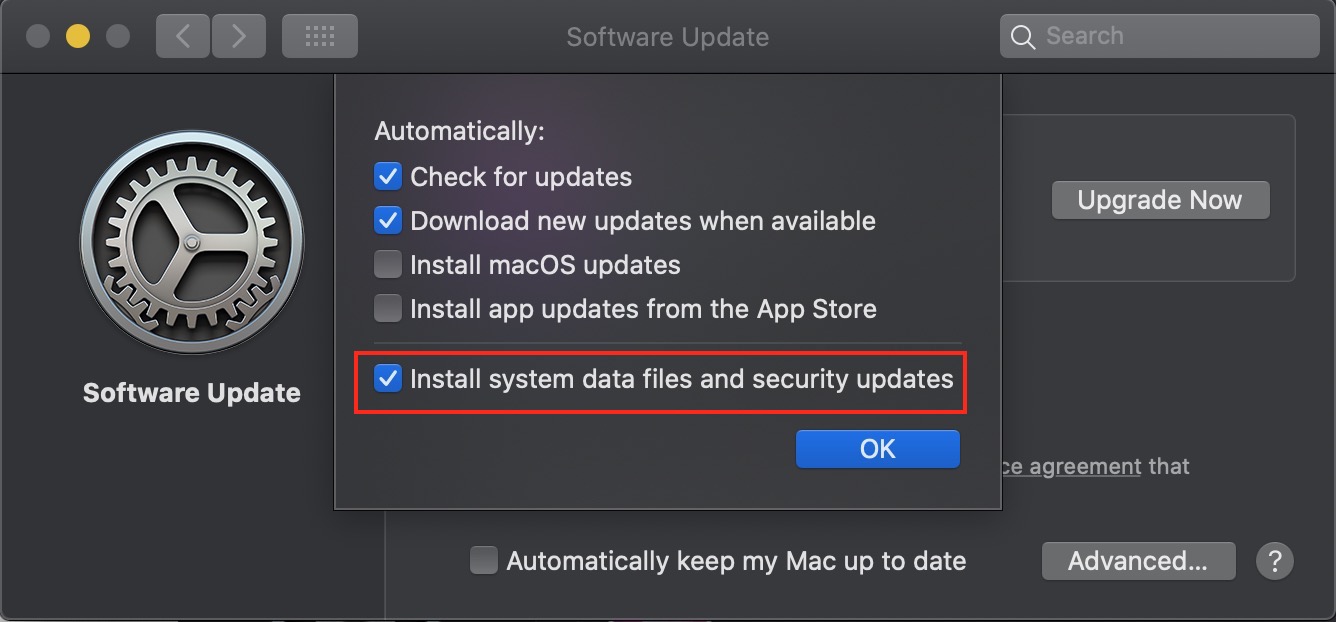
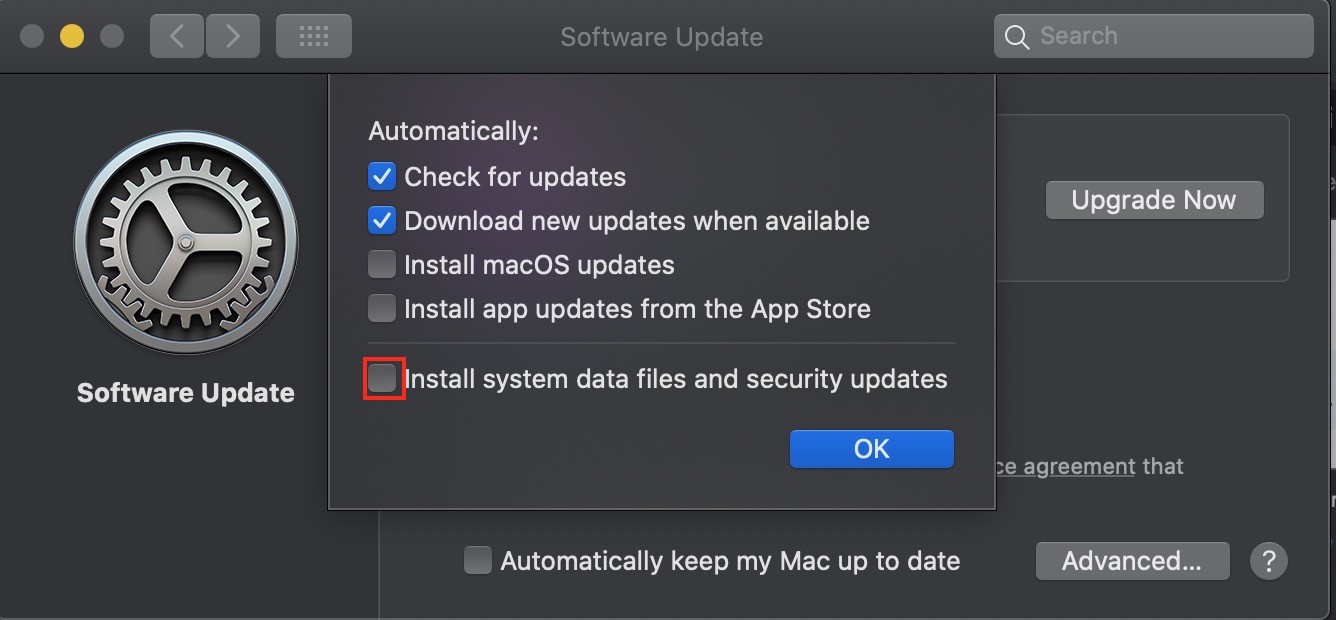
- Make sure the Install system data files and security updates option is ticked
- Close the System Preferences window.
Now, we’re all caught up with how to enable XProtect, we’ll take a look at how to find out the XProtect version you’re using.
How to check the XProtect version?
To ensure that your XProtect is running correctly and provides optimal protection against malicious threats on your Mac, check the current version of XProtect.
Here's a step-by-step guide to finding the XProtect version on your Mac:
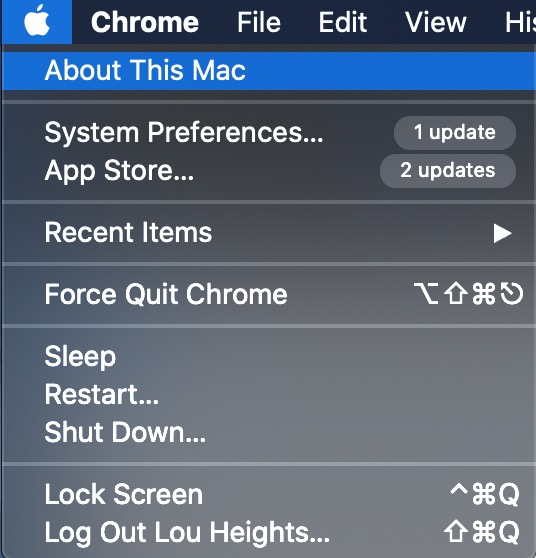
- Click on the Apple icon in the top left corner of your screen and select About This Mac from the dropdown menu
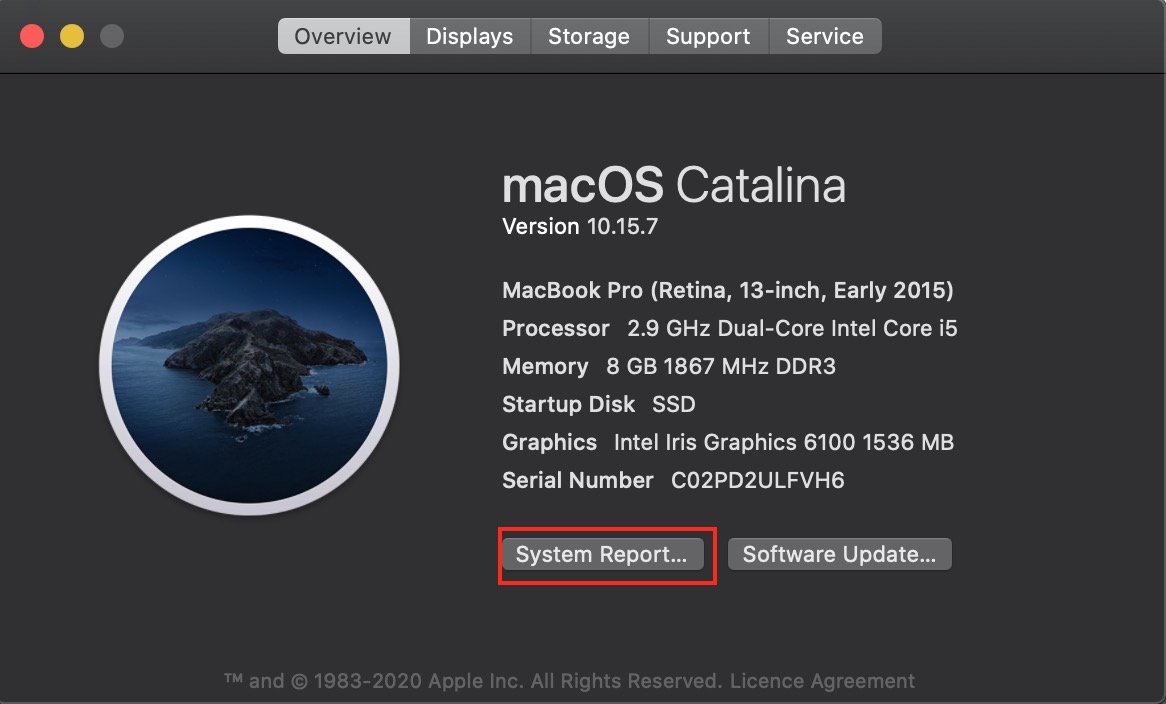
- Select the System Report button
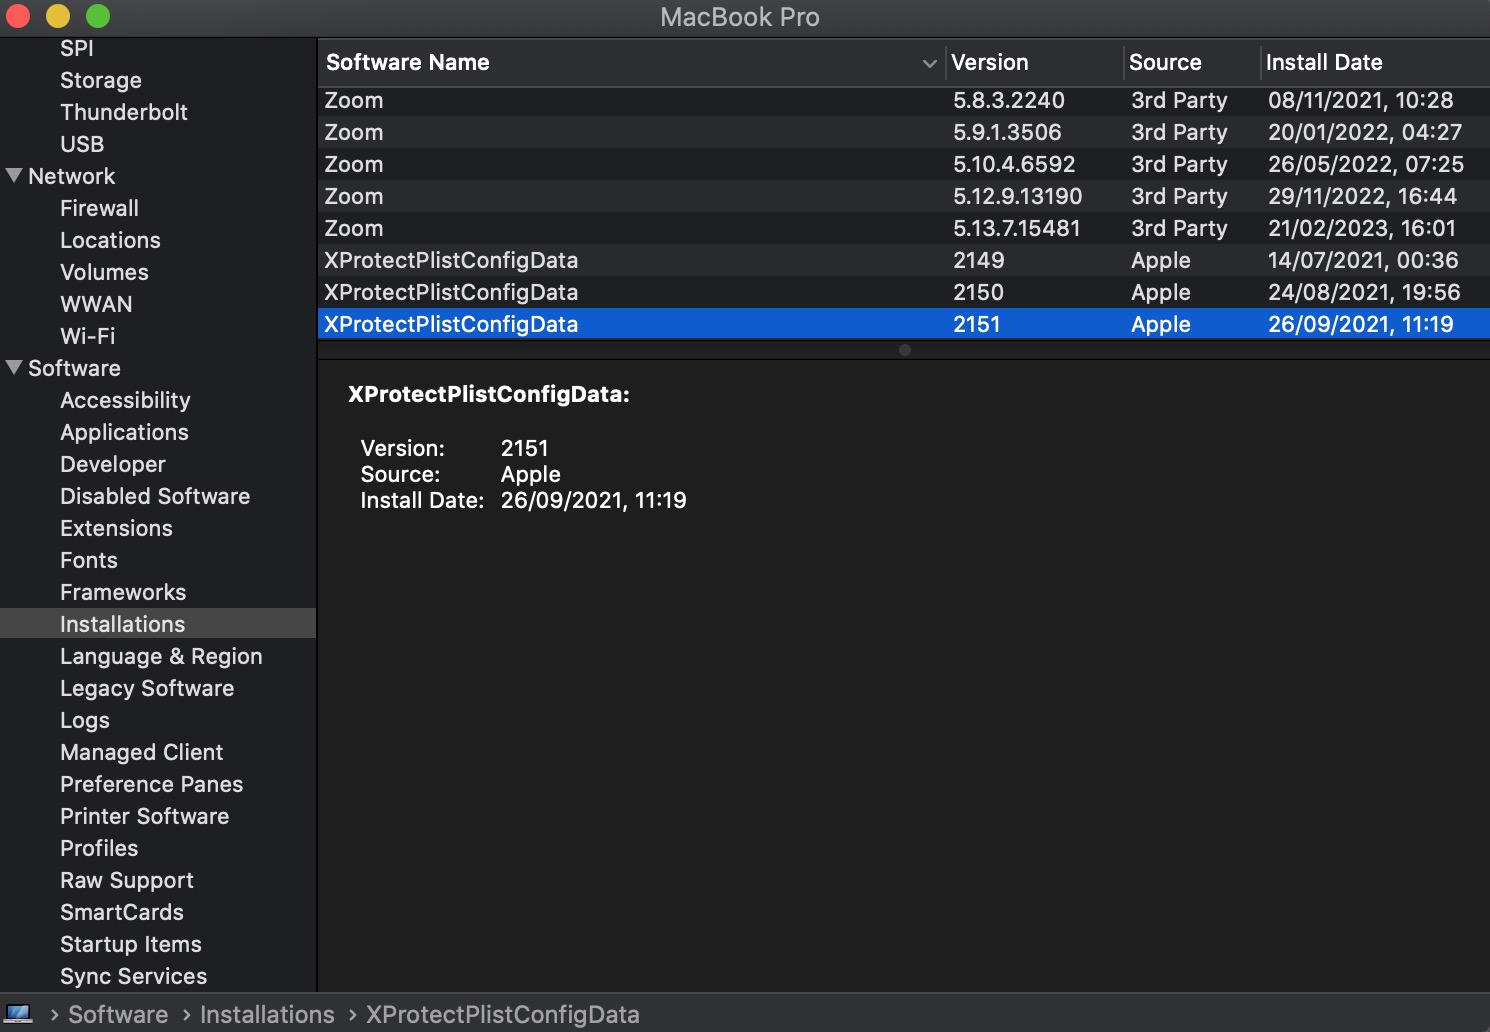
- In the System Information window, scroll down to the Software section in the left-hand sidebar and click it
- Click Installations
- Select the Software Name column header to sort the list by name
- Look for XProtectPlistConfigData in the list. The version number next to it indicates the current version of XProtect installed on your Mac.
How to access XProtect?
To access XProtect on your Mac, you don't need to do anything special. XProtect is a built-in feature of the macOS operating system, and it’s automatically enabled and updated in the background.
If you still want to access XProtect, specifically the list of malicious applications that macOS checks when opening a downloaded file, open XProtect with these steps on OS X El Capitan or later:
- Navigate to Macintosh HD/Library/Apple/System/Library/CoreServices/XProtect.bundle
- Control-click on XProtect.bundle and select Show Package Contents
- Click on Contents/Resources and press the Spacebar to open the XProtect.plist file.
Once the XProtect.plist file is open, you can view the list of malicious apps that macOS checks for.
Can the user disable XProtect?
Sure, you can turn off XProtect on your Mac, but it’s not advised, as it could leave your device vulnerable to malware and other security threats.
Although, if you still need to disable the antivirus, follow these steps to deactivate XProtect:
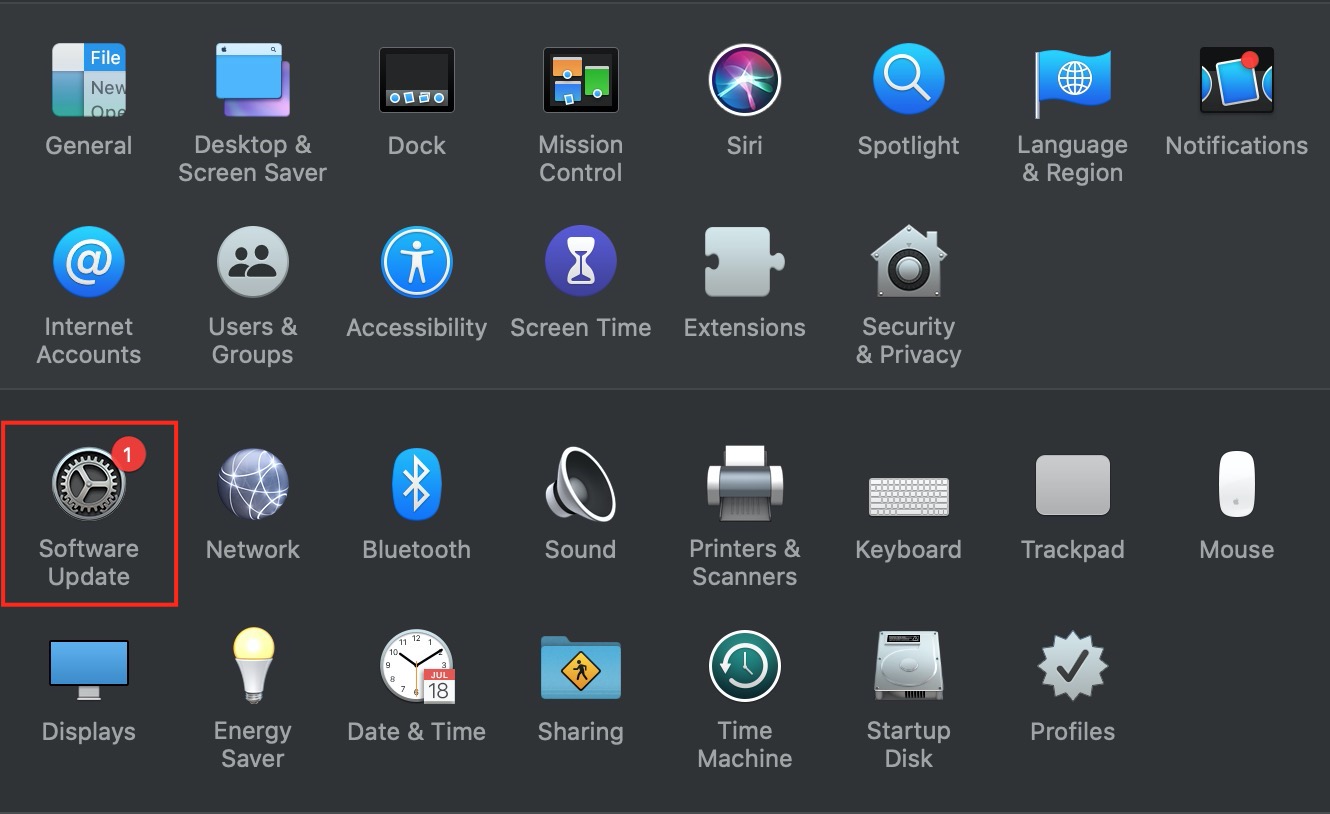
- Launch System Preferences and click on the Software Update icon
- Click Advanced
- Uncheck the box next to Install system data files and security updates
- Confirm the action by clicking OK
- Now, XProtect will be disabled.
Is XProtect secure enough?
XProtect on Mac primarily scans downloaded files and blocks known malware threats, but it may not be effective against new or more sophisticated malware that can evade detection.
As a wiser alternative, MacKeeper's Antivirus provides more comprehensive protection against attacks, including real-time scanning and threat detection, anti-phishing and anti-ransomware protection, and a firewall to prevent unauthorized access.
Here's a comparison table for your convenience:
Feature | XProtect | MacKeeper’s Antivirus |
Real-time scanning | No | Yes |
Threat detection | Basic | Advanced |
Anti-phishing protection | No | Yes |
Anti-ransomware protection | No | Yes |
Firewall | No | Yes |
System cleanup | No | Yes |
Performance optimization | No | Yes |
Online security tools | No | Yes |
Overall, while XProtect provides some protection against malware, a more advanced antivirus tool like MacKeeper can give better security for your Mac.
XProtect vs MacKeeper’s Antivirus: Which is better to secure your Mac?
As we discussed, macOS XProtect is an essential built-in security feature that helps protect your Apple device from malware and other threats. However, it's not always foolproof to run XProtect on Mac, and can be easily disabled, leaving your device vulnerable to attack.
To ensure maximum security, MacKeeper's Antivirus is a stronger alternative. It offers real-time protection against malware, ransomware, spyware, adware, and other threats that could harm your Mac.
For more information on how to keep your Mac safe and secure, we encourage you to check out our articles on how to scan Mac for malware, macOS security guide, and do Macs get viruses.


