Encountered a folder with a question mark on a Mac? Startup disk-related issues on a Mac could be the result of a host of other issues on your device. MacKeeper’s Find & Fix tool can quickly find errors and issues leading to startup disk failure.
You boot up your Mac, only to be met with an unusual sight—a flashing image of a Mac folder with a question mark. It’s an unusual sighting, and you wonder if your hard drive or computer is locked or damaged.
You can experience one of two scenarios when your MacBook is showing a folder with a question mark. Here’s what they mean:
Scenario 1: The folder with a question mark appears on the screen briefly and disappears as your Mac starts loading. This usually happens when your Mac’s default startup disk isn’t specified correctly. As a result, your Mac will search for an alternate disk and start loading once it finds the one containing macOS. That’s why the flashing image disappears
Scenario 2: The flashing folder with a question mark persists, and you’re stuck looking at it. This happens when your startup disk has a problem. For example, the disk could be damaged or corrupted. Either way, you’ll have to use your Mac in Recovery Mode.
Now that that’s out of the way, let’s move onto the crux of the matter—getting rid of the Mac blinking folder with question mark. The flashing folder is as inconvenient as a MacBook white screen, but it can be fixed.
A note from our experts
While it’s good to troubleshoot the issue of the flashing question mark folder on Mac, we advise you to tackle the root of the problem. Examine your Mac with MacKeeper’s Find & Fix to identify the root cause of an issue.
There are several ways to fix the issue of a folder with a question mark on MacBook startup:
Reset NVRAM
Check startup disk in System Preferences
Boot Mac in Recovery Mode
Reinstall macOS without losing data
Back up your data before reinstalling macOS
Reinstall macOS on your Mac
Format startup disk and reinstall macOS
Contact Apple Support.
Reset NVRAM
NVRAM/PRAM stores the system settings for your startup disk, screen resolution, audio settings, and more on your Mac. Although NVRAM doesn’t normally have issues, it may be experiencing some errors this time around. That’s why resetting NVRAM might help remove the question mark folder on your Mac.
Turn your Mac off by holding down the power button until the screen goes dark
Turn it on again and immediately press and hold the Alt + Command + P + R keys for approximately 20 seconds until your Mac starts up
Check if the folder is still there. If it is, move on to the next fix below.
Note: Apple Silicon MacBooks (with an M1 chip and later) don’t use NVRAM/PRAM. If you use an Apple Silicon Mac, simply shut down your device and switch it on again to solve the question mark folder problem.
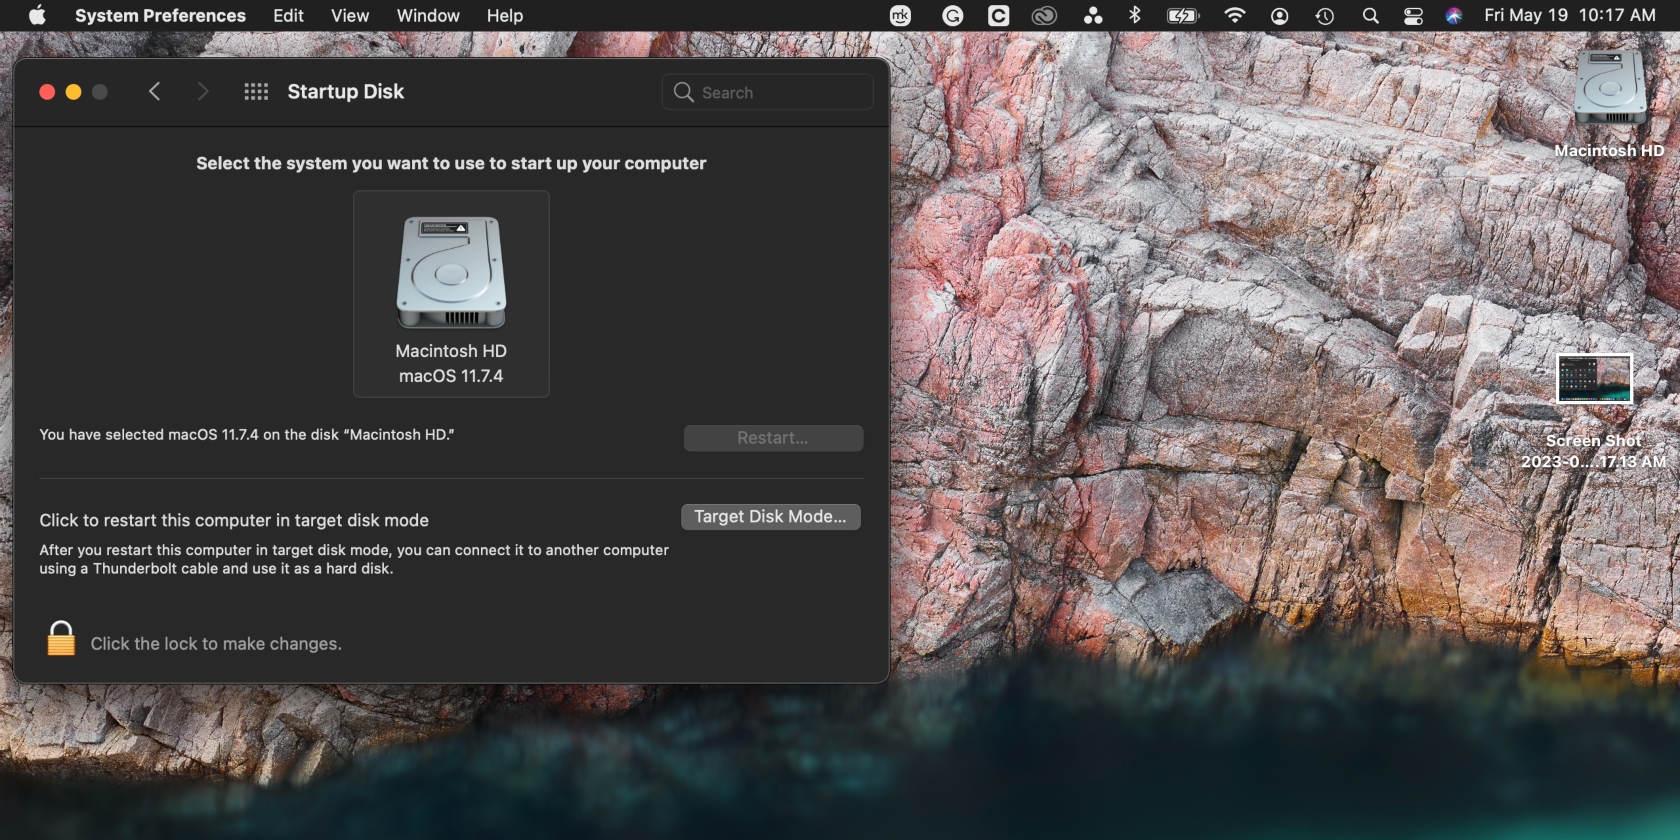
Check startup disk in System Preferences
It’s worth checking if your Mac is using the correct startup disk. If it’s using the wrong one, this may be the reason you’re seeing the question mark folder.
Click on the Apple menu and choose System Preferences.
Click Startup Disk to see which disk is selected for startup. In most cases, this should be Macintosh HD. If a different disk is selected, click the lock in the bottom-left corner of the window, choose the right disk, and click Restart.
Step 1. System PreferencesStep 2. Startup disk
Boot Mac in Recovery Mode
If your Mac still isn’t starting up, try booting it in Mac’s Recovery Mode and repairing it with Disk Utility.
While the screen is frozen, boot your Mac by holding down the power button until the screen goes black.
Switch your Mac on again and immediately hold down the power button until the startup options window appears on Apple Silicon Macs. Click Options and Continue. (Learn whether you’re using a Mac with Apple silicon.) On Macs with an Intel processor, hold down the Command + R keys until an Apple logo or another image appears.
Choose the Disk Utility option and click First Aid at the top of the Disk Utility window.
Click the Run button to look for any damage.
Step 1. Opening First AidStep 2. Running First Aid
Did you know that Mac’s Safe Mode is an alternate option to boot your Mac? You can start Mac in Safe Mode to determine if the issues you’re experiencing are caused by any apps that load at startup. We believe it’s especially useful when you need to resolve an issue that isn’t associated with a single app. Of course, you should always ensure your macOS is updated or upgrade it first before troubleshooting any problems you’re experiencing.
Recovery Mode, on the other hand, allows you to tackle and fix a faulty disk. You can restore data from Mac’s Time Machine Backup, find and correct errors in your hard drive in Mac’s Disk Utility, and even perform a new macOS installation.
Reinstall macOS without losing data
If Disk Utility didn’t achieve the desired results, reinstalling Mac software might be the solution you need to get rid of the question mark folder. It’ll also boost your Mac’s speed. The trick is to reinstall macOS in Recovery Mode to avoid losing your data.
Connect your Mac to a power source, follow the first two steps listed above, and select the Install/Reinstall option once in Recovery Mode.
Follow the prompts, choose the target hard drive, hit the Continue button, and wait for the process to finish.
Back up your data before reinstalling macOS
If installing macOS in Recovery Mode didn’t fix the problem, consider backing up your data and installing macOS again. This should fix any software issues on your laptop.
Here’s how to back up your data to avoid losing it:
Connect an external drive to your Mac, like a Thunderbolt or USB cable (it should be the same size as your startup disk or have more capacity).
Erase the external drive in macOS Recovery (see instructions in the “Format Startup disk and reinstall macOS” section below), and install macOS onto the external drive you’ve connected (ensure you don’t mistakenly choose Macintosh HD).
Your device will automatically restart from the external drive when the installation is complete. Choose the option to migrate your data from another disk in the setup assistant window that appears when your Mac starts up, and select your startup disk. This will begin the migration process.
Once the process is completed, follow the prompts to exit the assistant window and check that your data was successfully backed up on the external drive.
Reinstall macOS on your Mac
Now that your data is safely backed up, move on to reinstalling macOS on your device:
Safely eject the external drive from your computer.
Your Mac will start up on its own after the macOS installation is complete. Once that’s done, the setup assistant will prompt you to migrate your data. Connect your external drive and wait until it appears on your desktop.
Choose the Time Machine option in the setup assistant to start moving your data back to your startup disk from your external drive.
Your computer will restart after migrating your data. Check that all your data has been copied to your startup disk successfully before erasing it on your external drive. Consider using Mac’s Time Machine feature to back up your data.
Now, check if the flashing folder is still popping up.
Format startup disk and reinstall macOS
Formatting the startup disk and reinstalling macOS from scratch is your final option. This will hopefully rectify any errors present on the disk and remove the question mark folder on your Mac.
Follow the guide in the “Back up your data before reinstalling macOS” section first, and then proceed to format your disk.
Start your Mac in Recovery Mode and open Disk Utility.
Select the right disk (Macintosh HD) and click Erase.
Choose the Erase or Erase Volume Group option in the pop-up window to wipe your data and files.
Open Recovery Mode again and choose the Install/Reinstall option. Keep your Mac open during the installation to avoid interrupting the process.
Contact Apple Support
If nothing is working, hang it up and reach out to Apple Support. Alternatively, take your Mac to your nearest Apple Store to have a professional look into the problem.
Fix the question mark folder issue on Mac
As you’ve seen, there are various methods you can try to fix the suspicious question mark folder on your Mac. Use the tips in this article to remove the folder and start using your Mac normally again.
More importantly, support your MacBook Pro, MacBook Air, iMac, or Mac Mini by using MacKeeper’s Find & Fix tool. This handy software finds and patches urgent errors on your Mac, which could affect your startup disk. The result is a happy Mac that performs optimally, so you can focus on what’s important—work and play.
We respect your privacy and
use cookies
for the best site experience.
Privacy Preferences Center
We use cookies along with other tools to give you the best possible experience while using the
MacKeeper website. Cookies are small text files that help the website load faster. The cookies we
use don’t contain any type of personal data meaning they never store information such as your
location, email address, or IP address.
Help us improve how you interact with our website by accepting the use of cookies. You can change
your privacy settings whenever you like.
Manage consent
All cookies
These cookies are strictly necessary for enabling basic website functionality (including page
navigation, form submission, language detection, post commenting), downloading and purchasing
software. The website might malfunction without these cookies.