Is your older Mac feeling sluggish, with warnings that your startup disk is almost full? You’re not alone. To free up disk space on Mac Yosemite, you can clear out junk by hand — or let MacKeeper’s Safe Cleanup do the heavy lifting in one click, without touching your personal files.
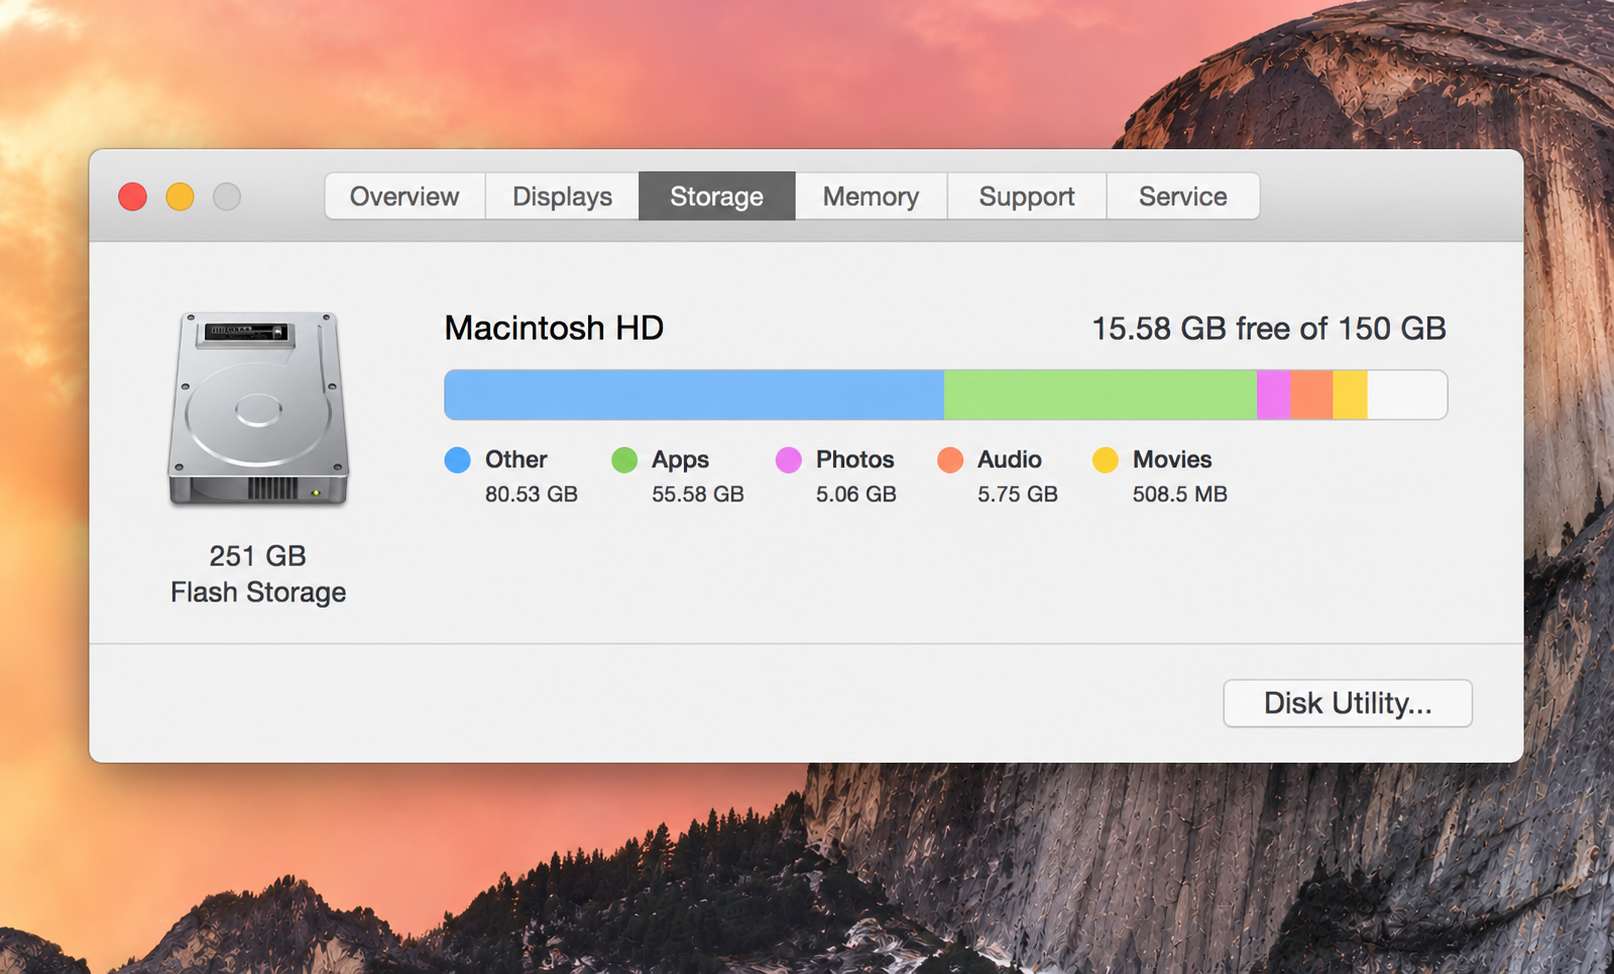
Before you start clearing storage on Mac Yosemite, it helps to know what’s eating up your disk. OS X 10.10 gives you a color-coded overview of used storage, split into Apps, Movies, Photos, Audio, and more.
It won’t offer the automated Manage or Optimize Storage tools you’ll find in newer macOS releases, so you’ll do the tidying yourself — and that’s easier than it sounds. This screen also gives you a baseline, so you can see how much storage on Mac you reclaim once you’re done.
We show you the quickest way to check your free space:
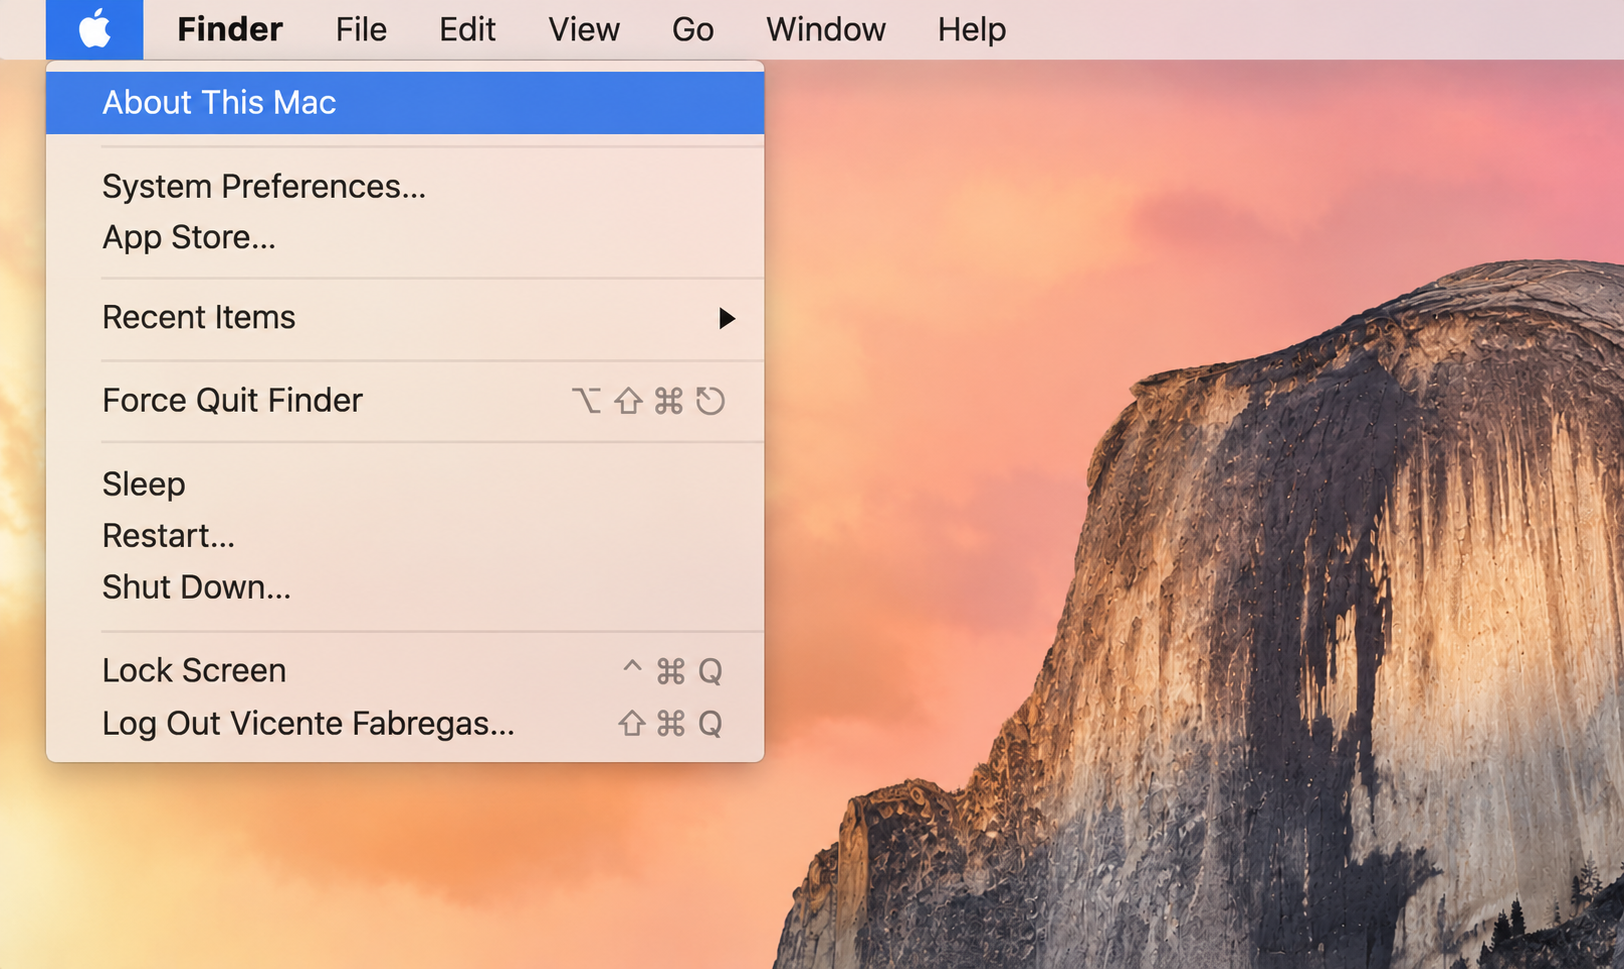
Click the Apple menu in the top-left corner of your screen.
Select About This Mac.
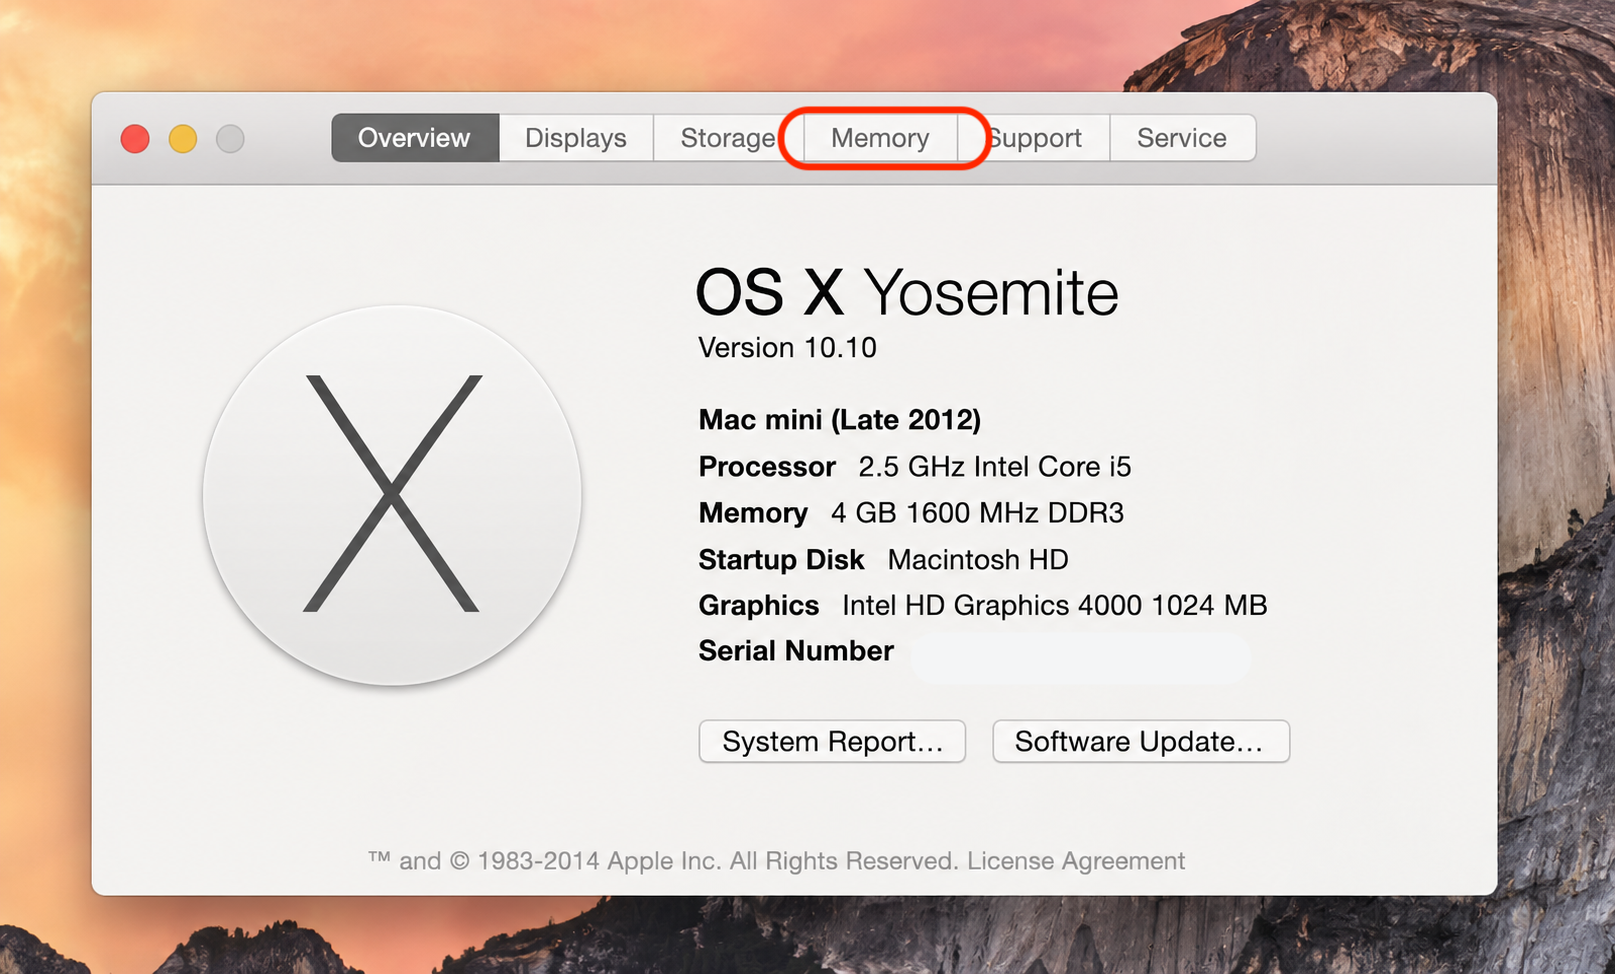
Open the Storage tab.
Review the color-coded bar to see what’s using your disk.
Step 1. Go to the Apple Logo > About This MacStep 2. Select the Memory tabStep 3. Review the color-coded bar to see what’s using your disk
A note from our experts:
The results of a storage check on your Mac Yosemite show that i’s starting to run low? We know what to do. You may try to clear it by yourself, but it takes you forever. However, the best option is to leave it to the third-party tool—MacKeeper’s Safe Cleanup.
Here are our directions on how to remove unnecessary files from your Mac Yosemite:
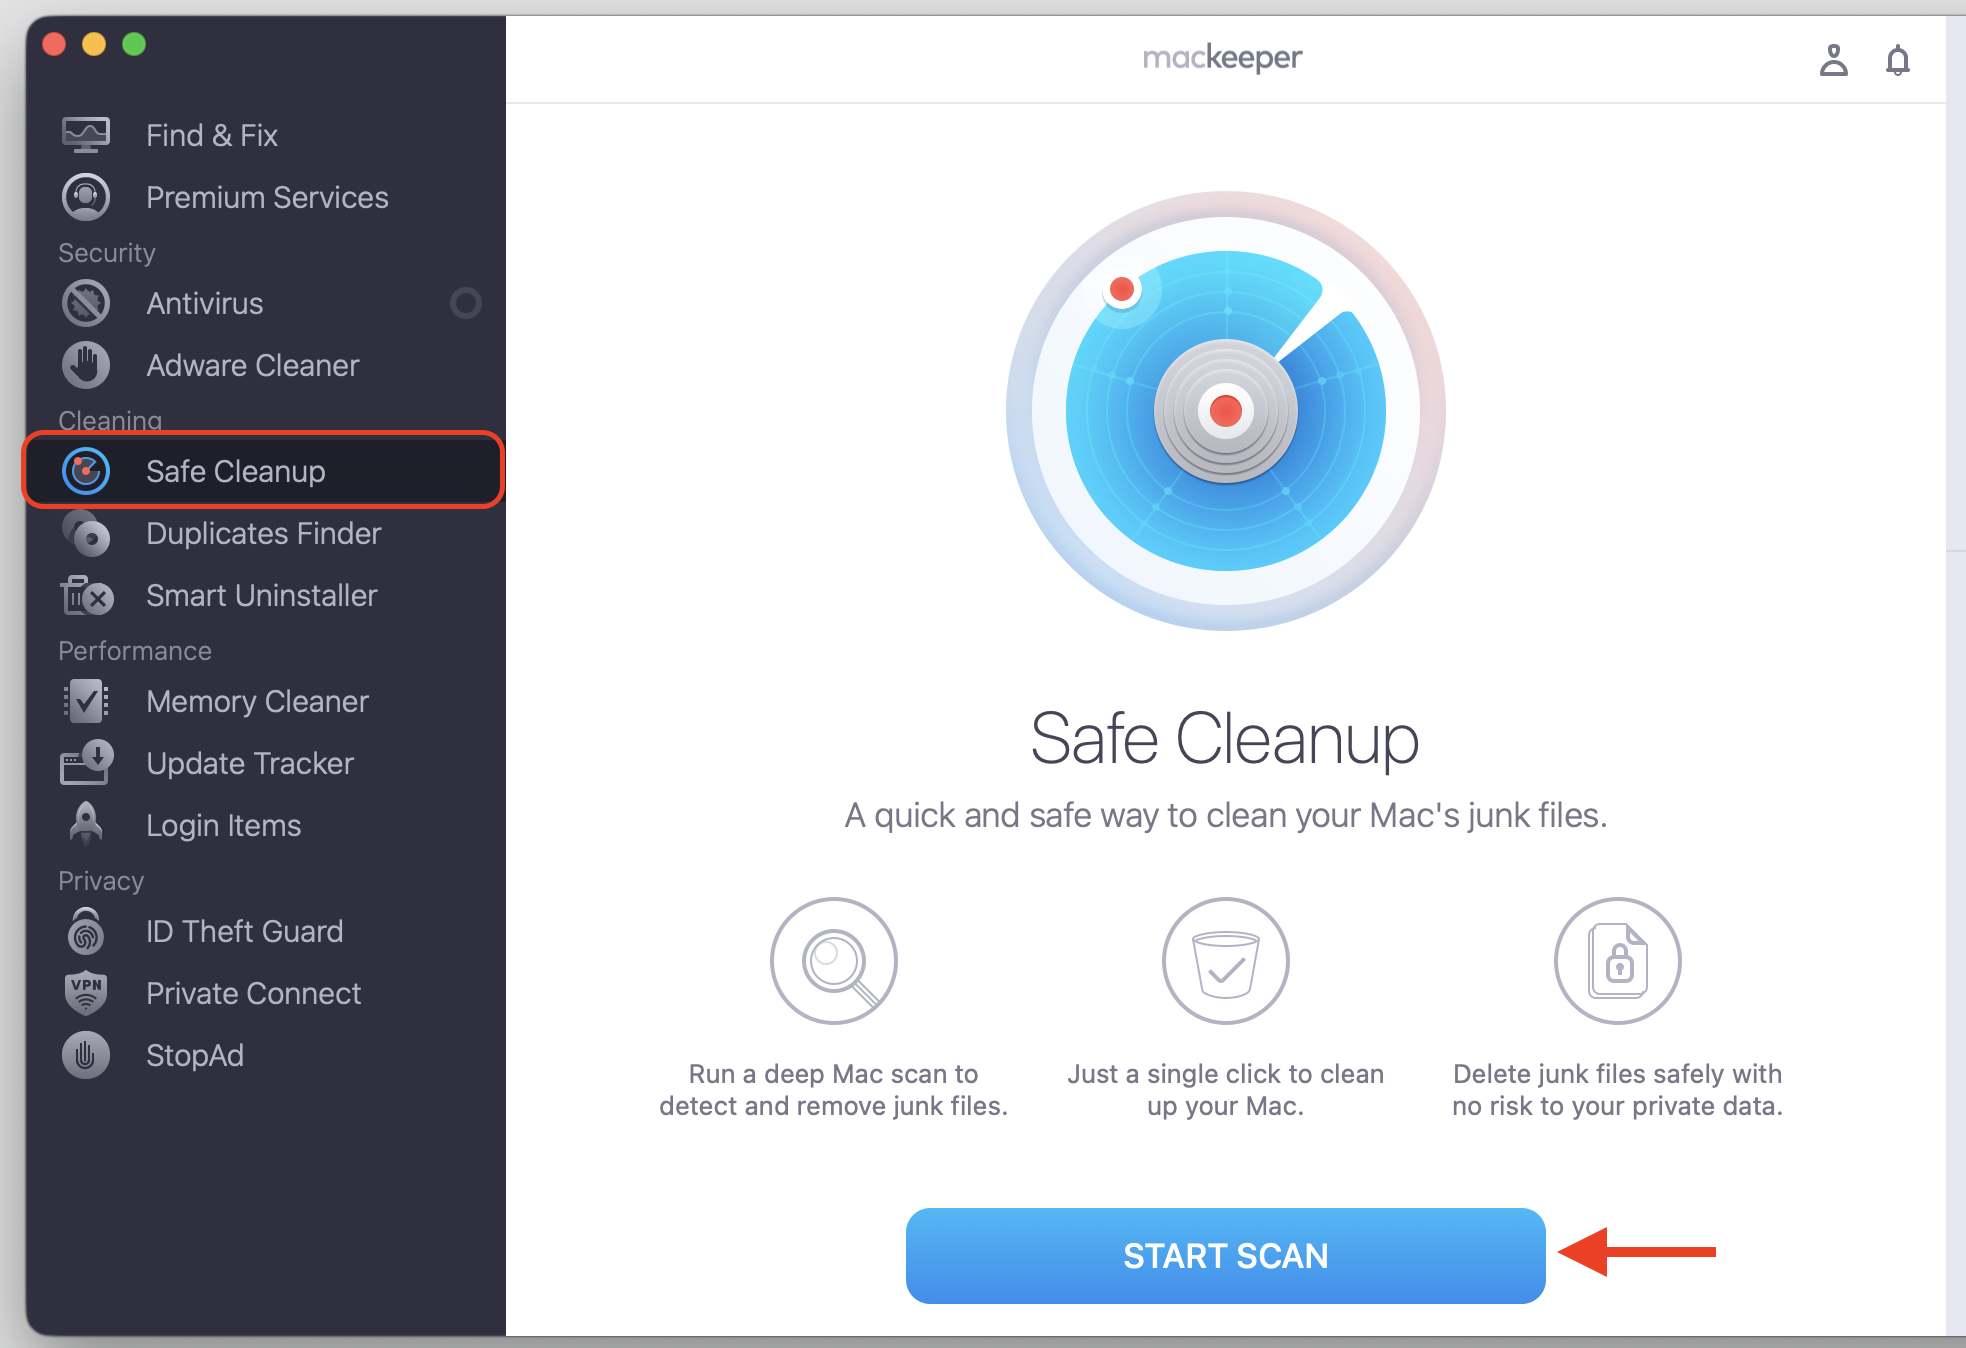
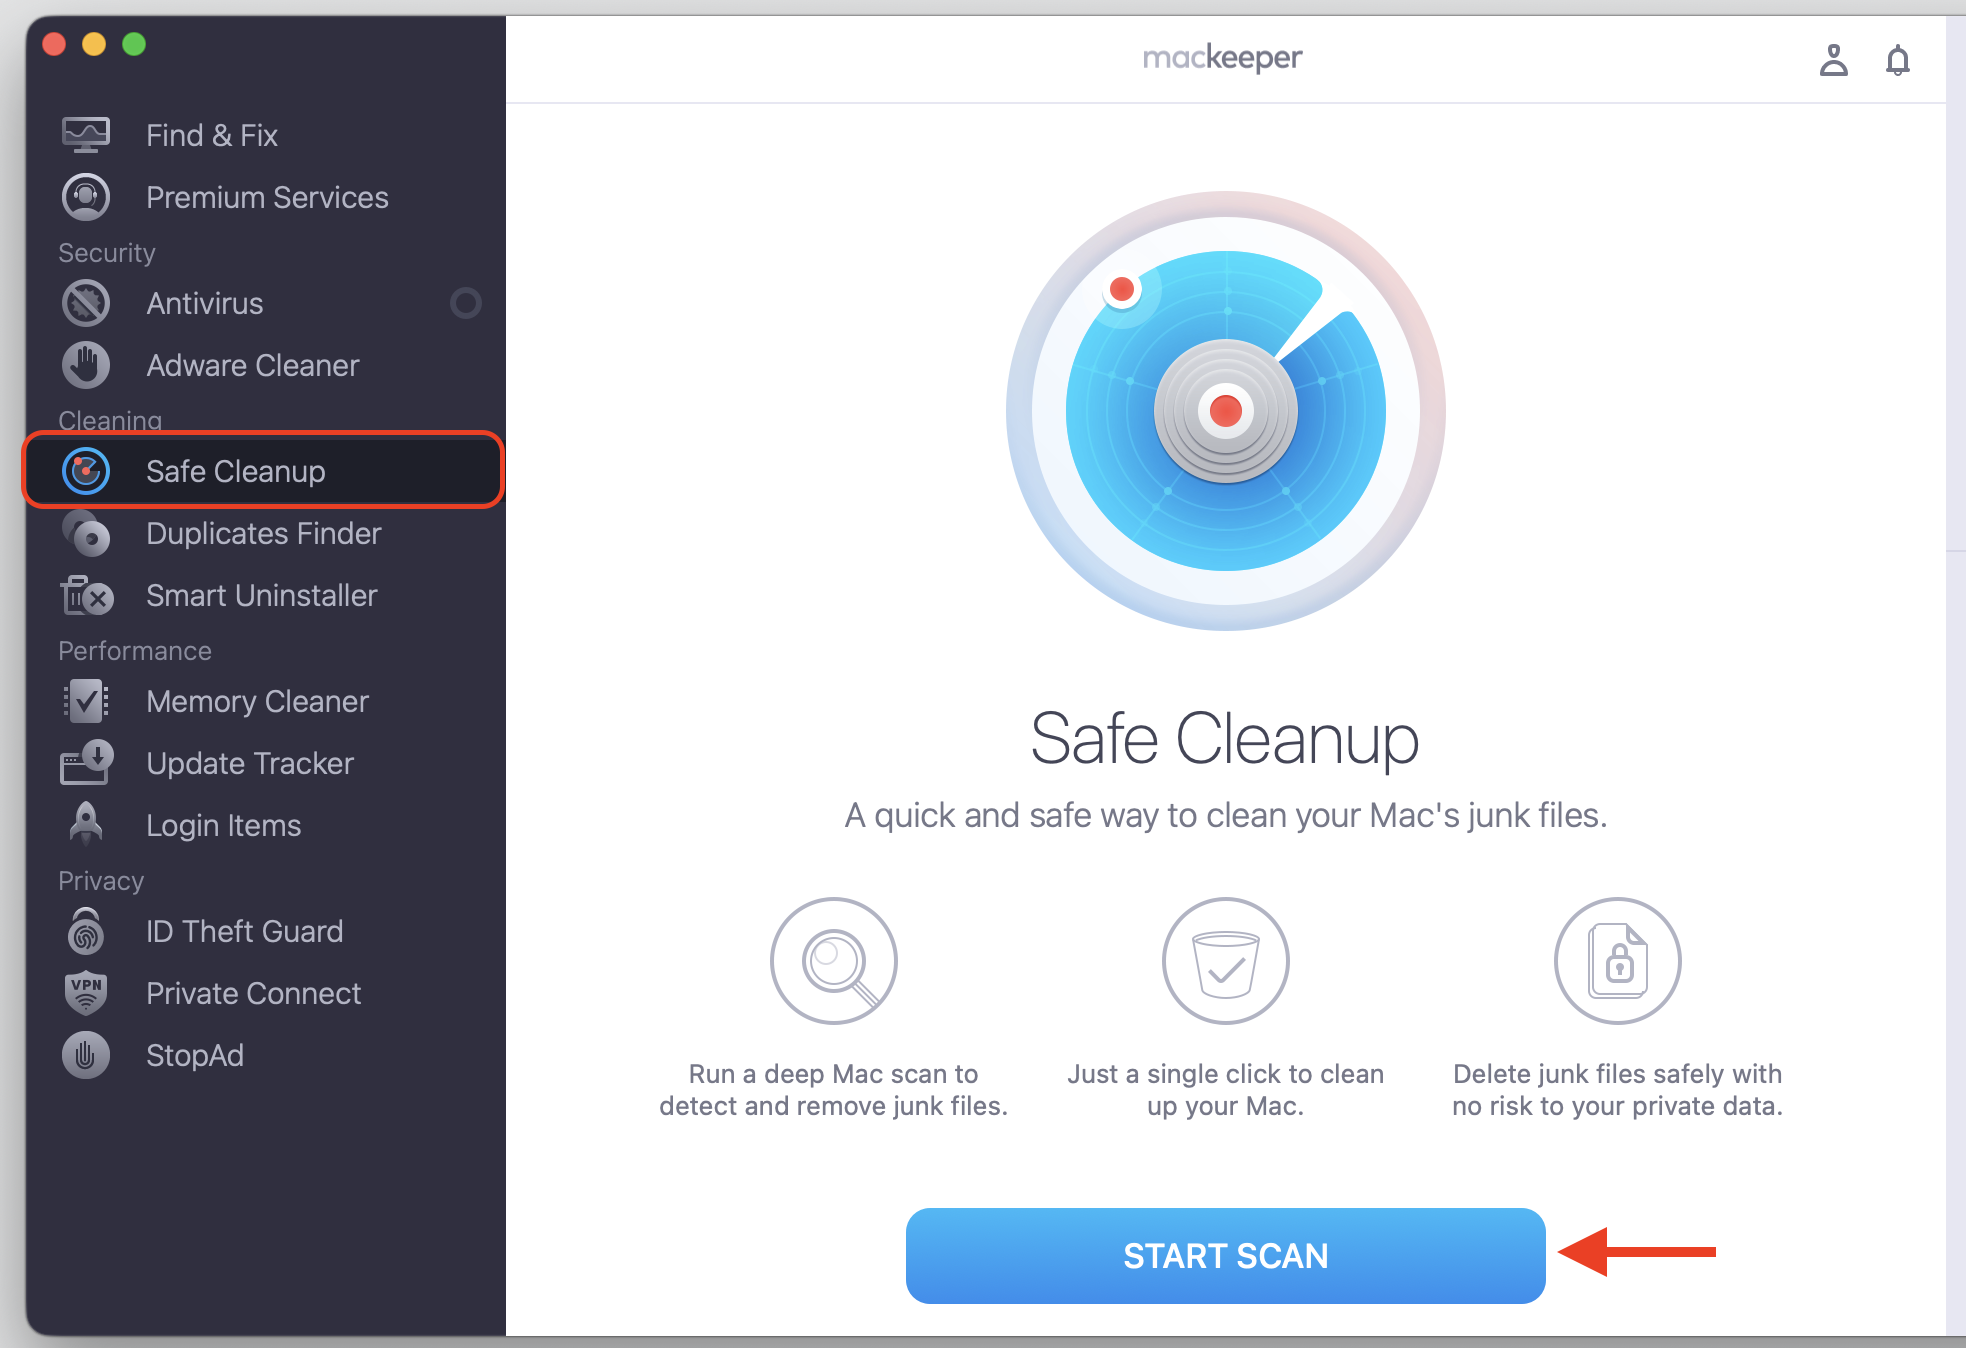
Select Safe Cleanup from the left-hand menu and click the Start Scan button.
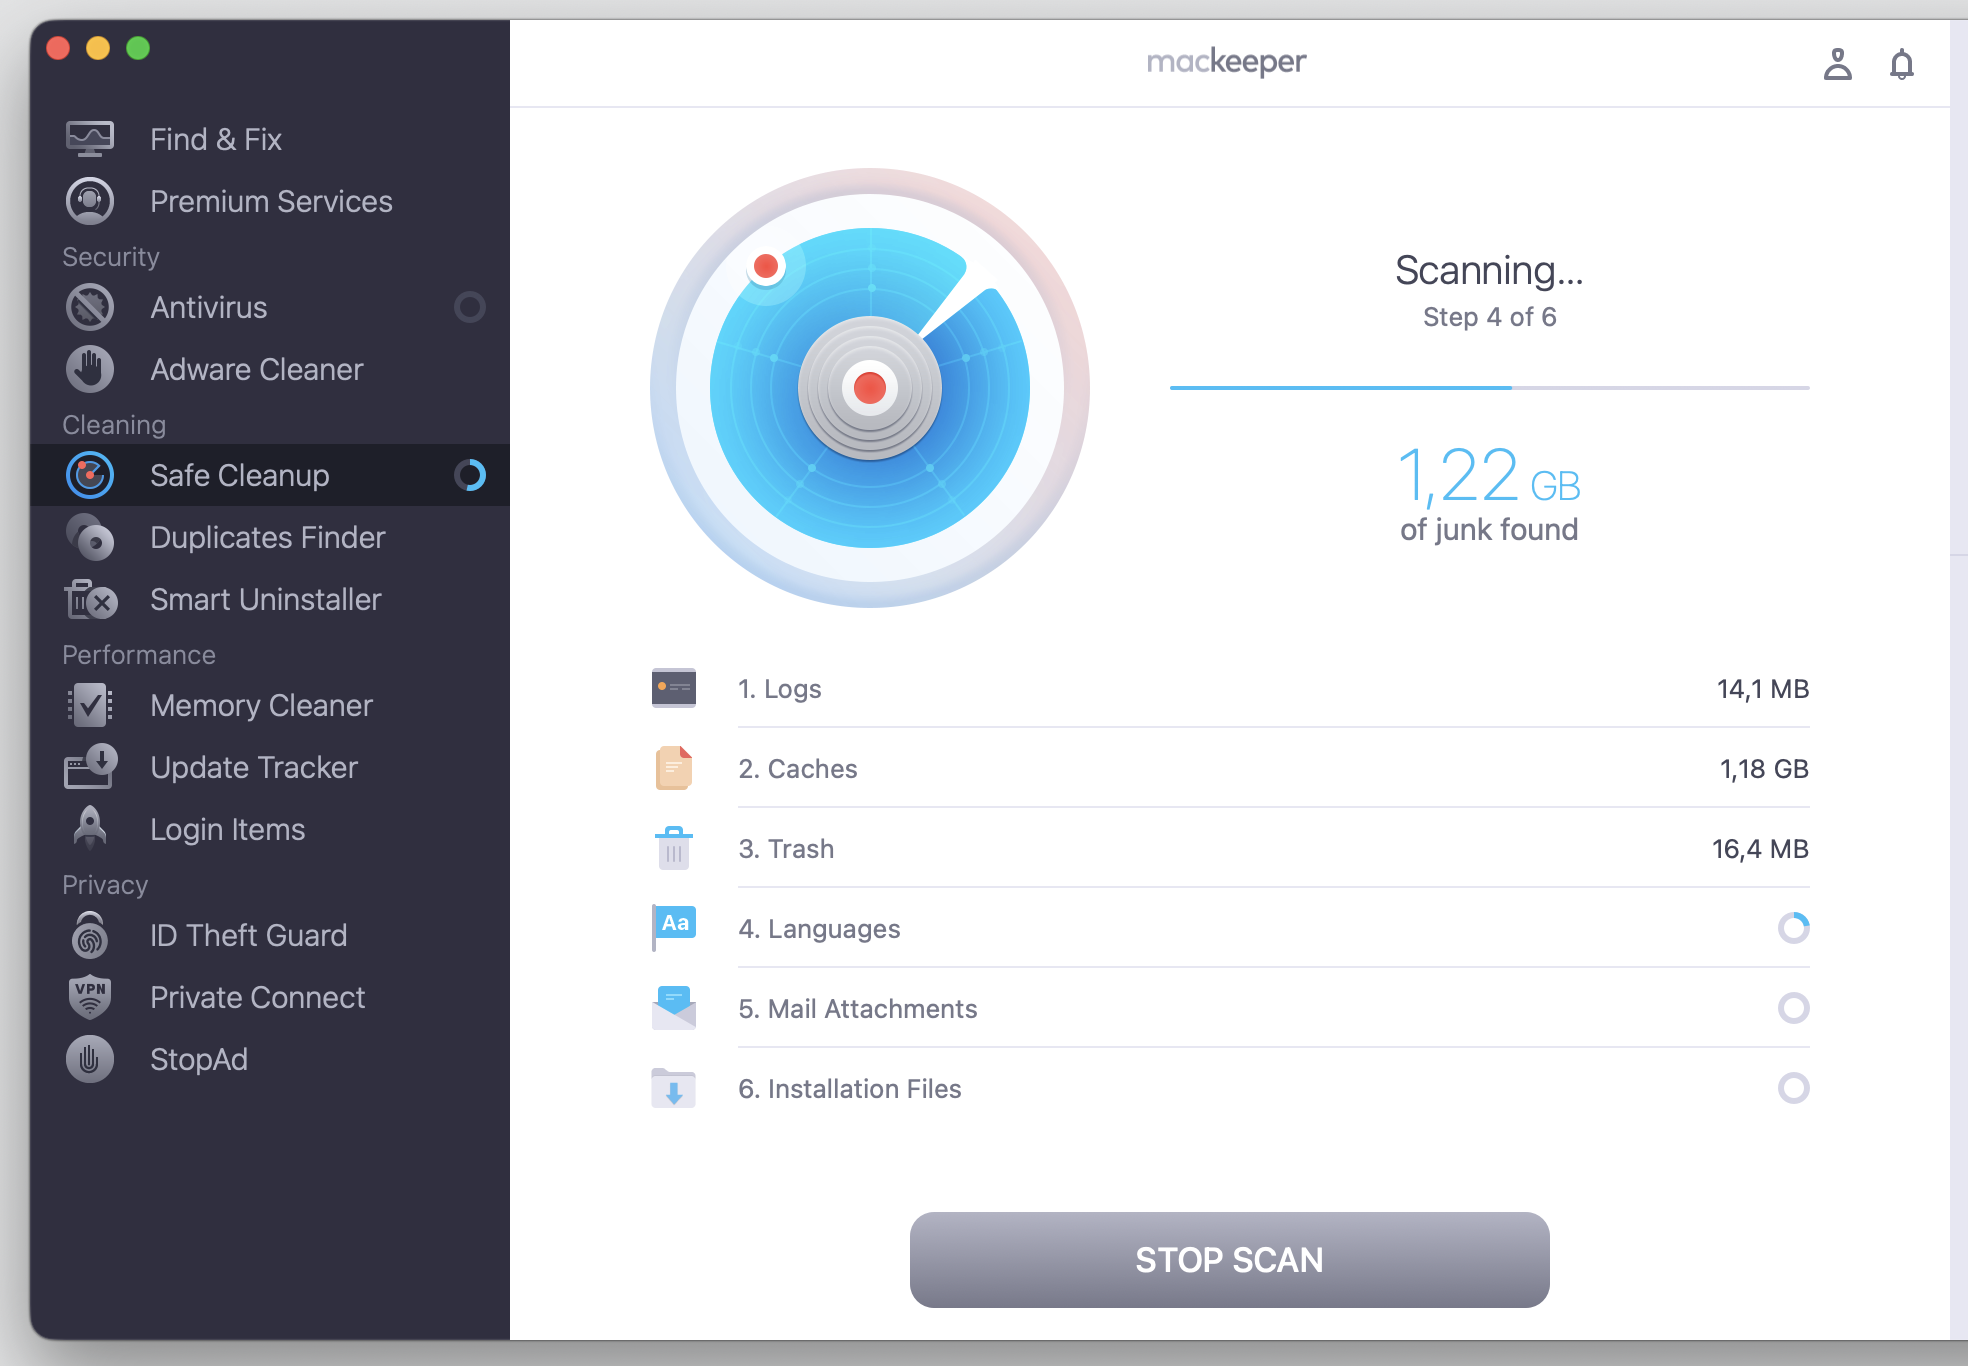
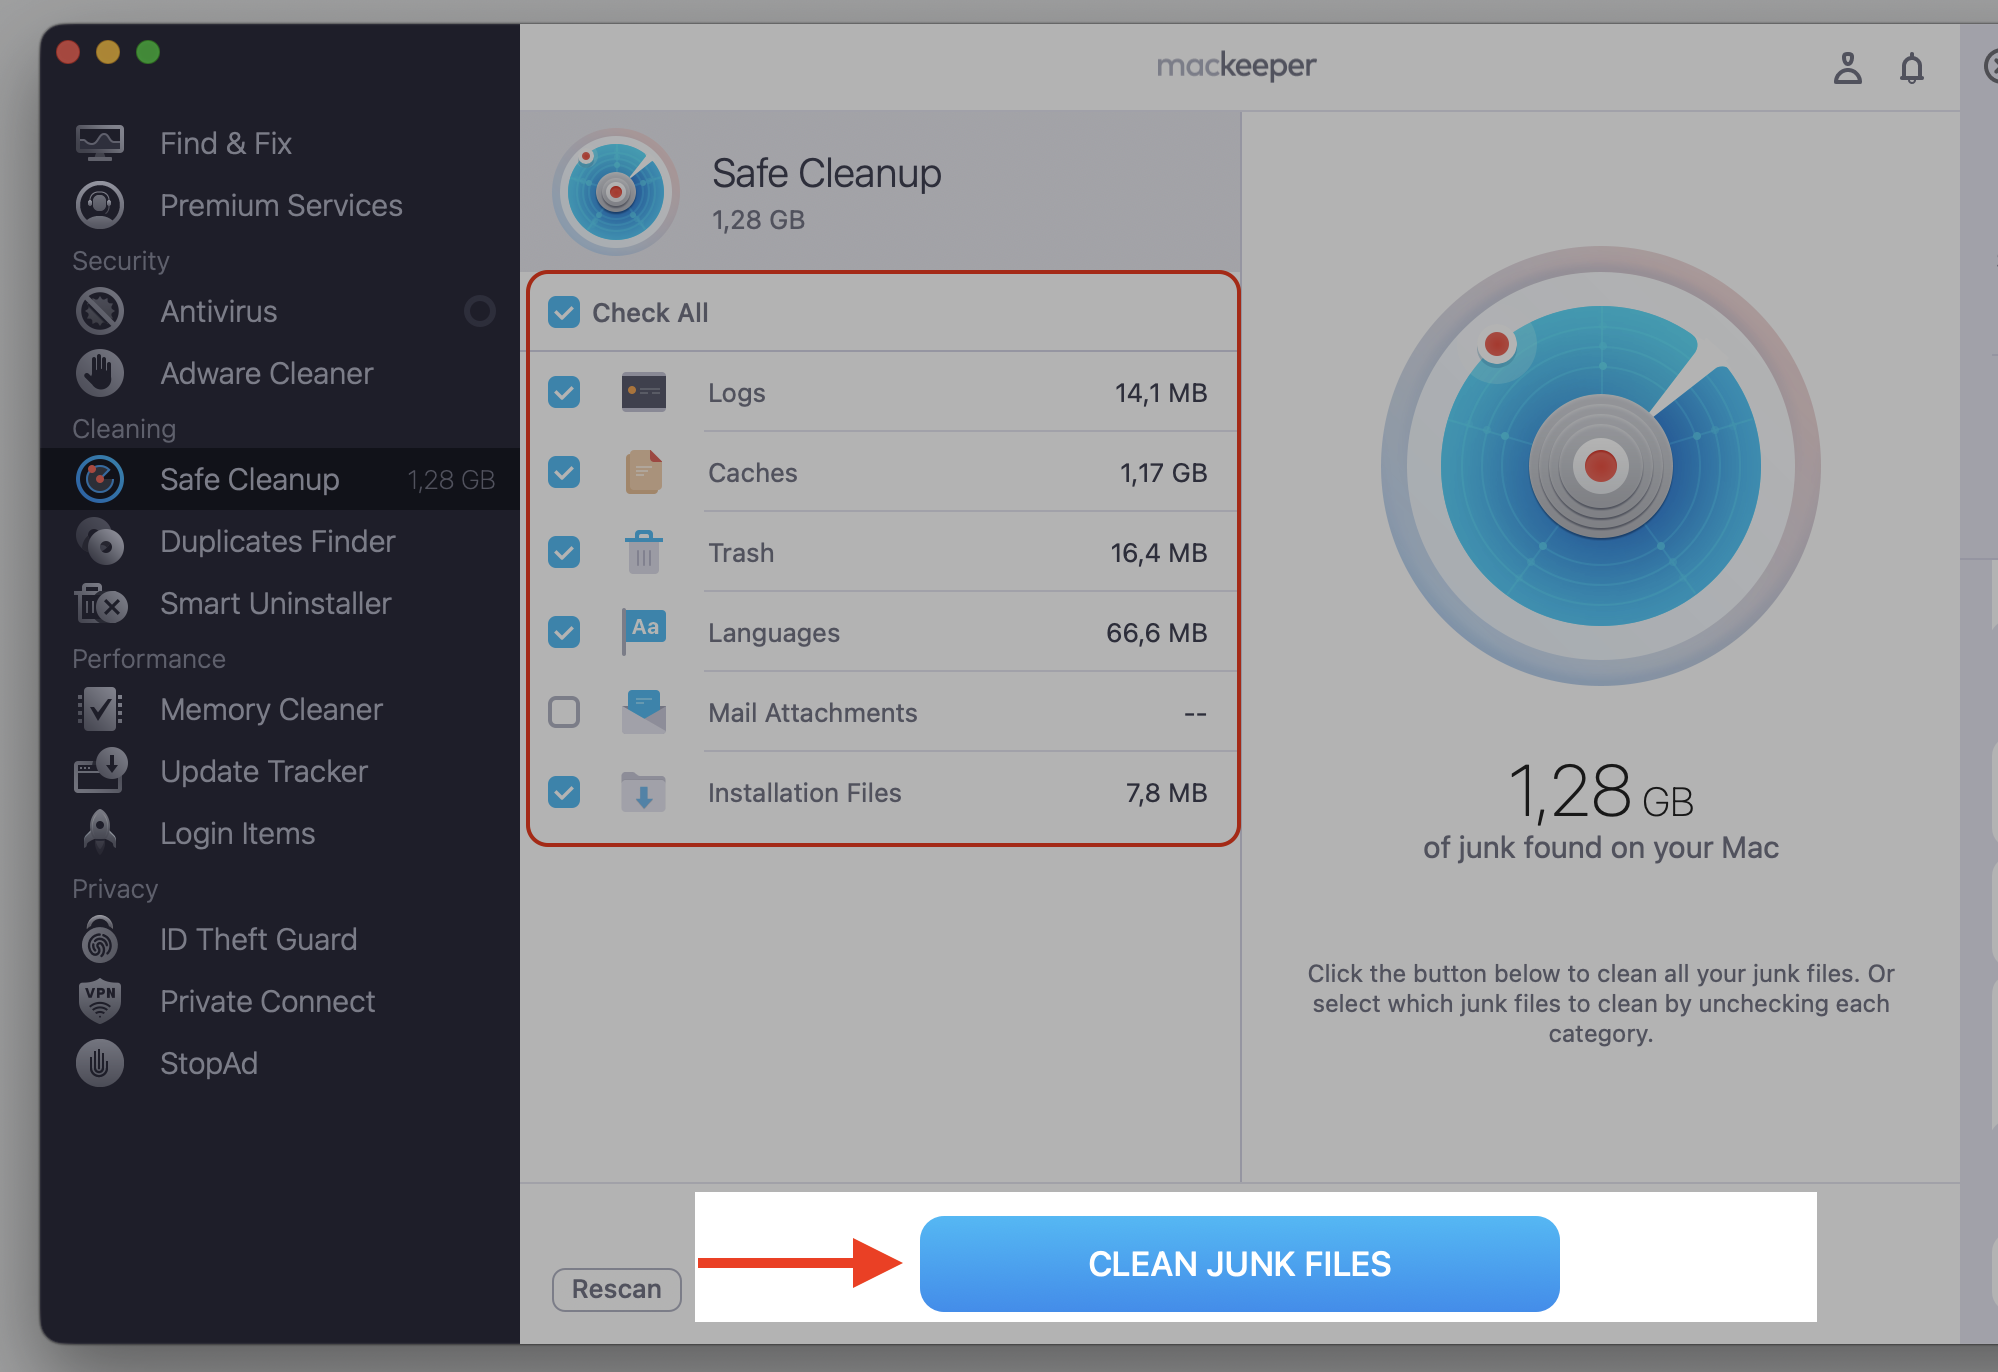
When the scanning is finished, check the results. Check the boxes next to the unnecessary files and click Clean Junk Files.
Step 1. Go to MacKeeper > Safe Cleanup and Start ScanStep 2. Wait until the scan is finishedStep 3. Check all the boxes and proceed with Clean Junk Files
How to clear disk space on OS X Yosemite?
Freeing up storage on OS X Yosemite comes down to manual decluttering and a bit of targeted maintenance, since this version relies on traditional file management rather than automated cleanup. The good news? Each step below is short, safe, and easy to follow.
Working through them in order is an easy way to clean up storage on Mac and get your Mac breathing again. Read through the nine methods below, starting with the quick wins and moving on to the deeper cleanup we save for last.
1. Clear Downloads folder
Your Downloads folder is usually the first place clutter piles up. Installer disk images (.dmg), zip archives, and files you opened once and forgot all sit here quietly using gigabytes. Sorting by size makes it easy to spot the biggest offenders, so we can quickly delete downloads on Mac that we no longer need. In our experience, tidying this one folder is often the easiest win of all.
Ready to clear out the clutter? Just follow our instructions:
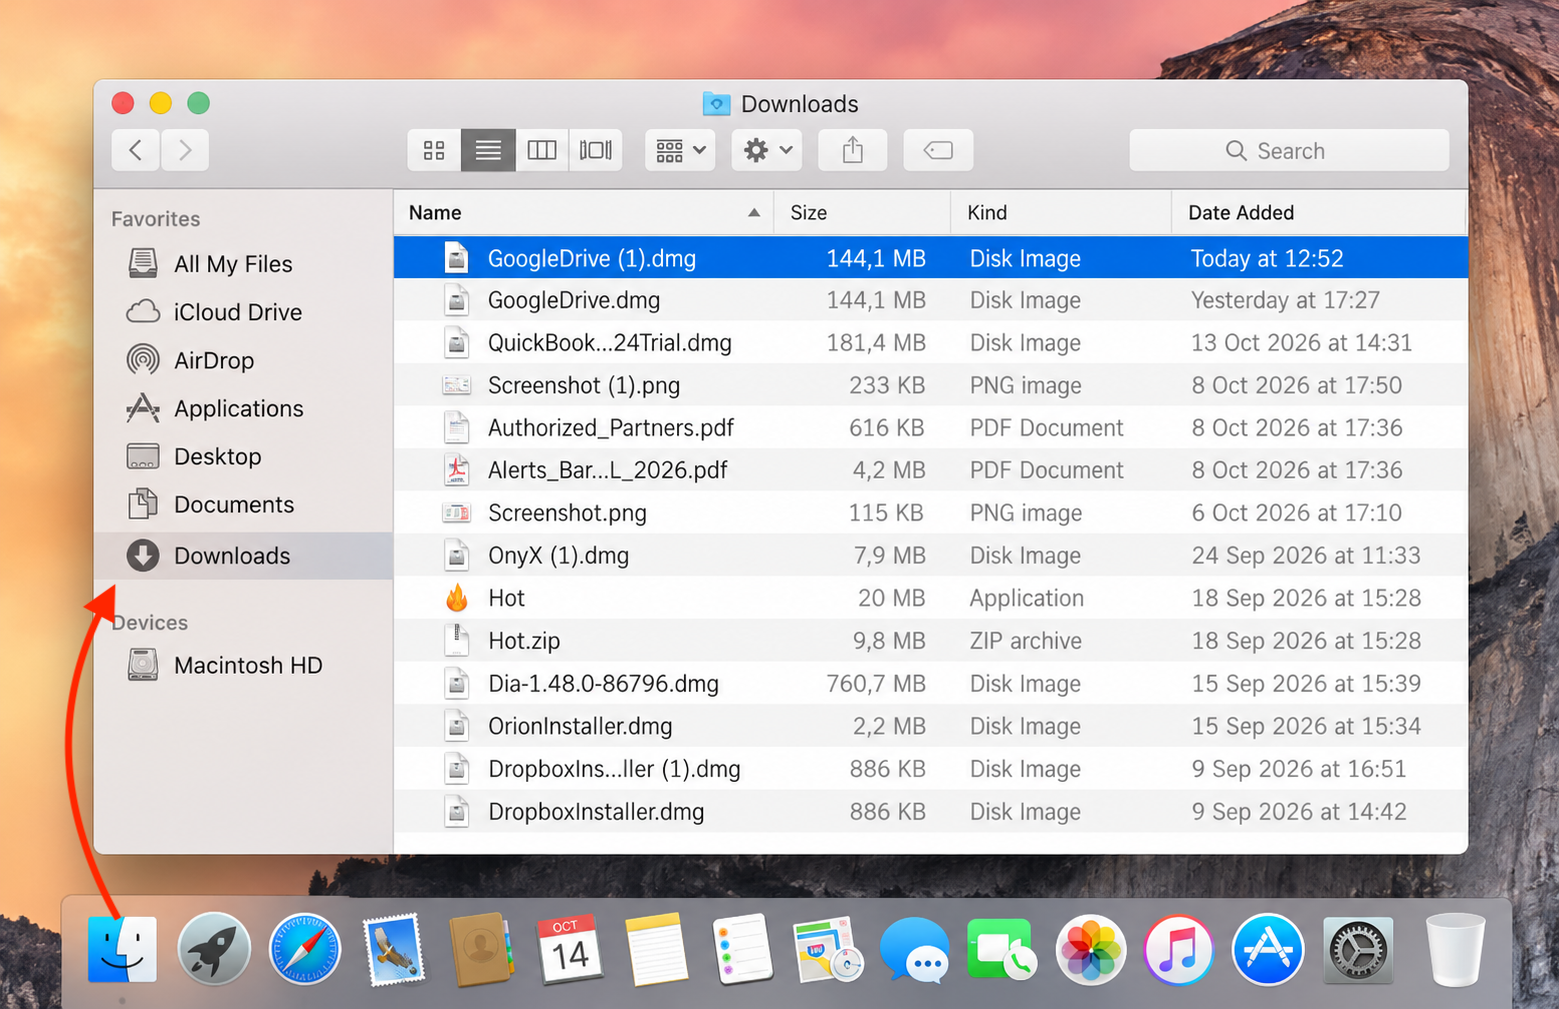
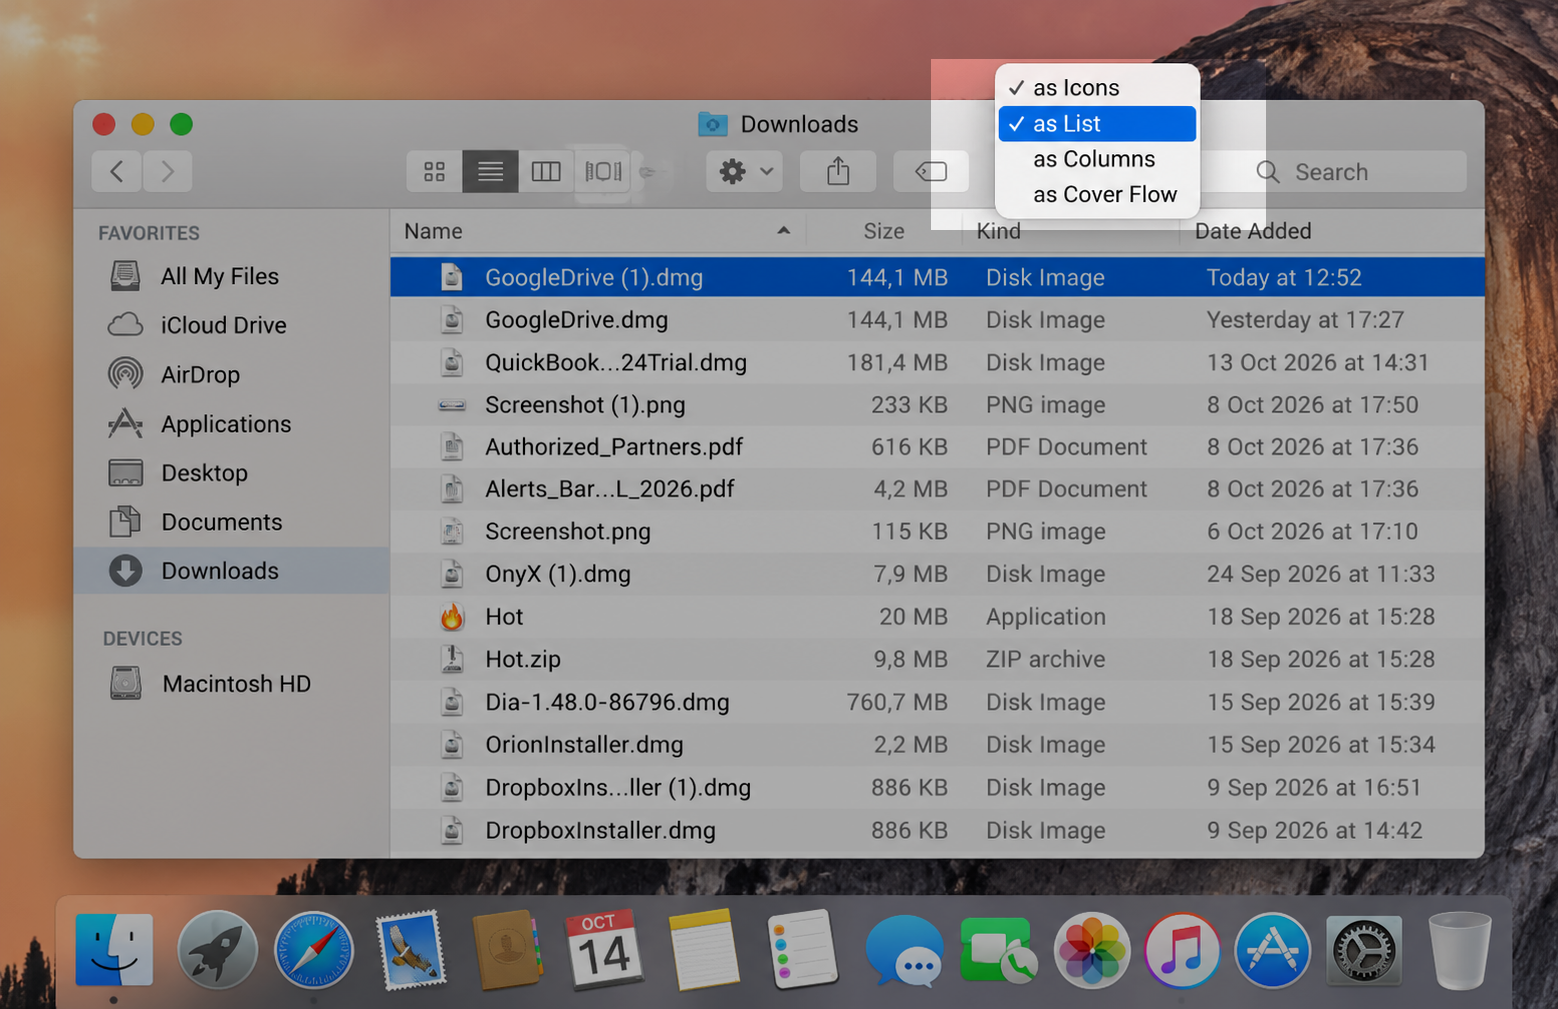
Open Finder and click Downloads in the sidebar.
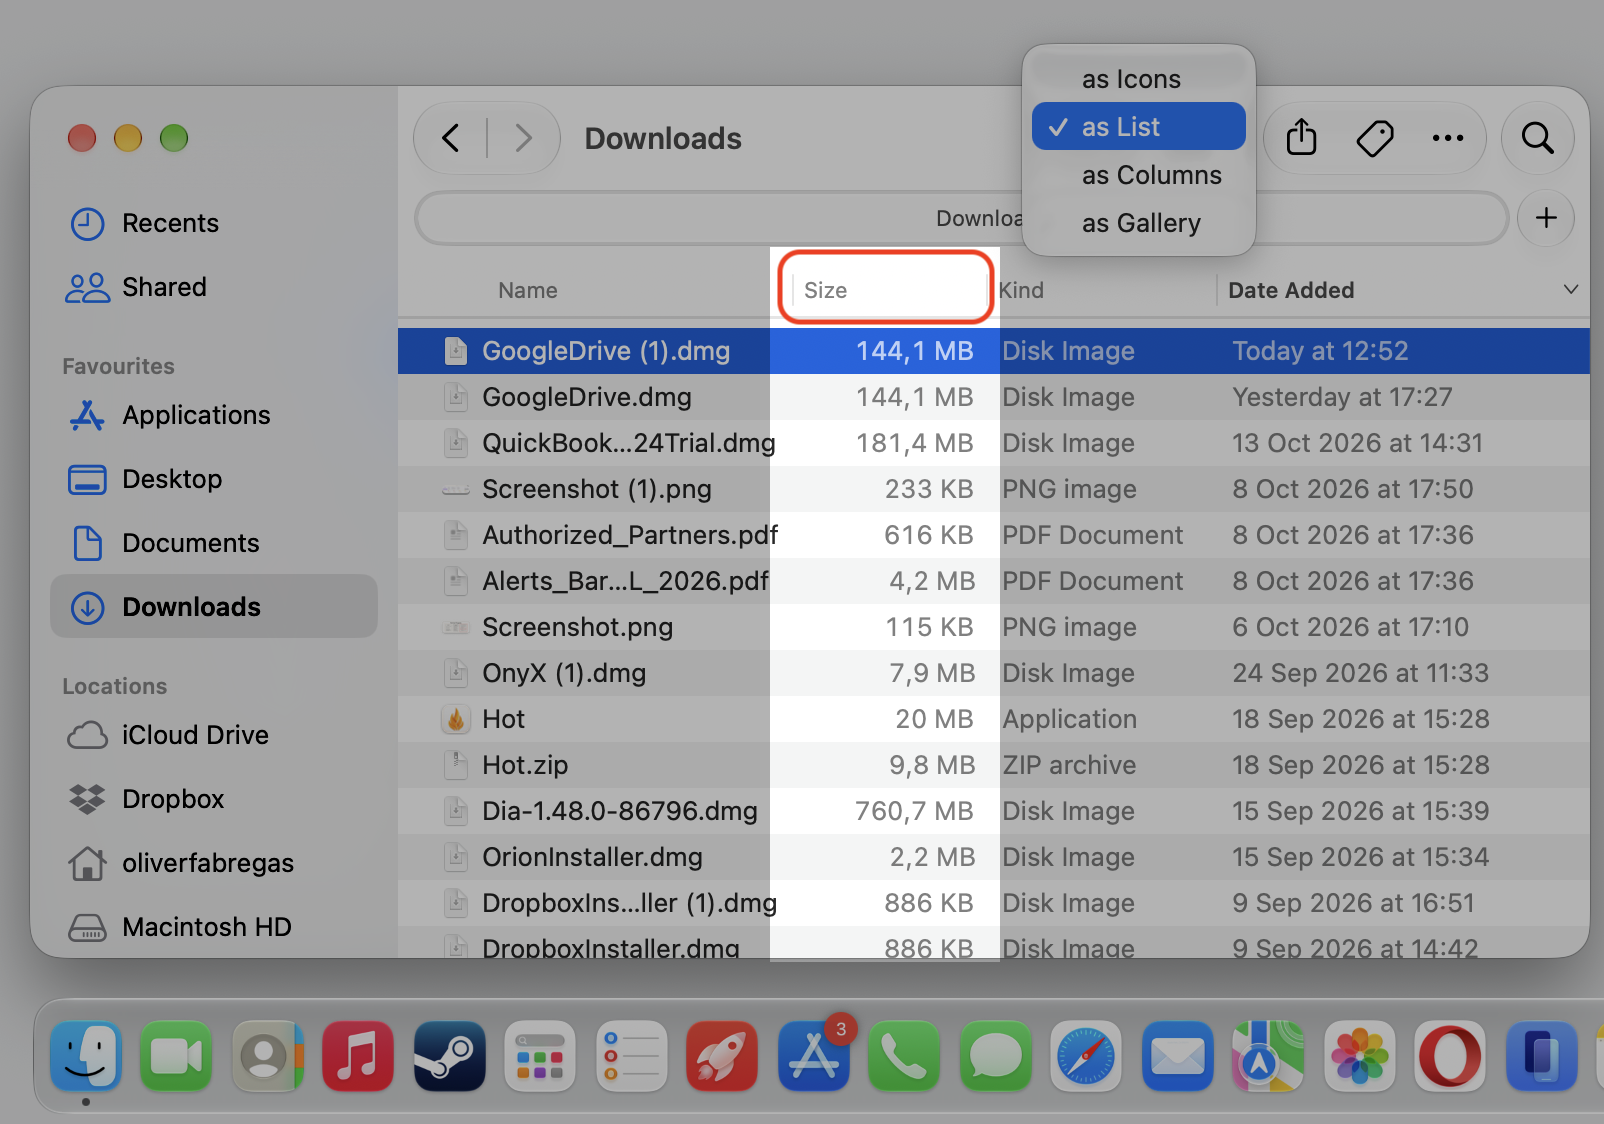
Choose View > as List, then click the Size column to sort by file size.
Drag old installers, .dmg files, and zip archives to the Trash.
Step 1. Go to Finder > DownloadsStep 2. Choose View > as ListStep 3. Sort by size and remove old dmg files
2. Empty Trash
Moving items to the Trash doesn’t actually reclaim any space — the files just wait there until you empty it. On OS X Yosemite, there’s no automatic emptying, so this is a manual habit worth building. When you clear Trash on Mac, that storage becomes available again right away.
Emptying it according to our guide takes just a moment:
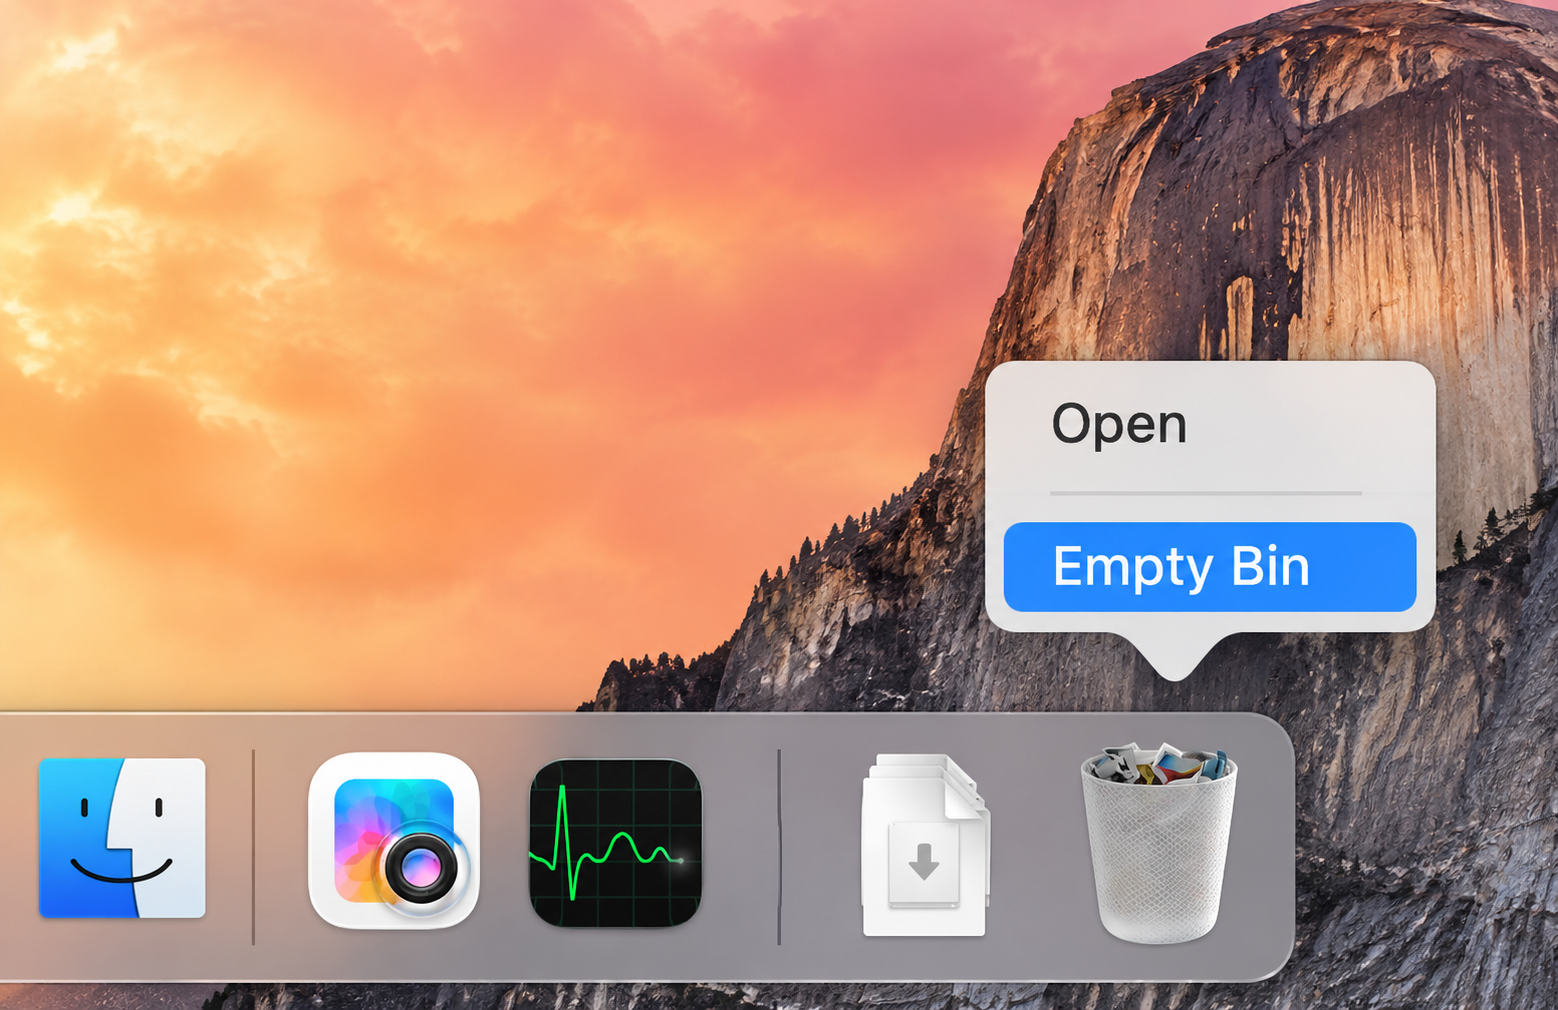
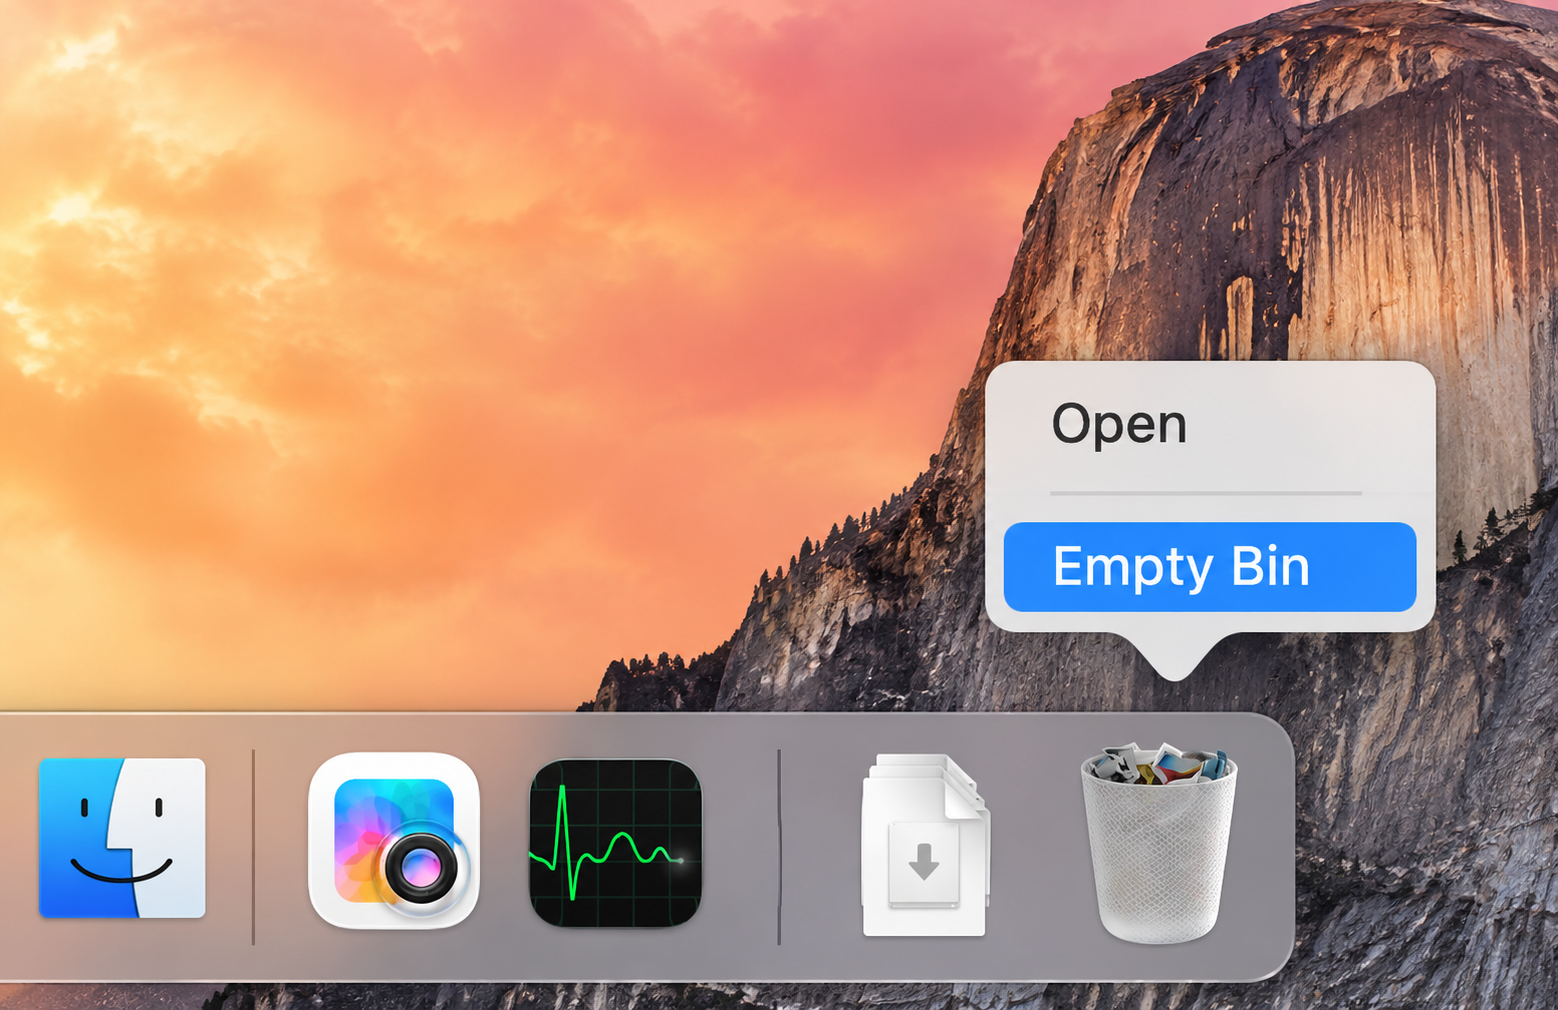
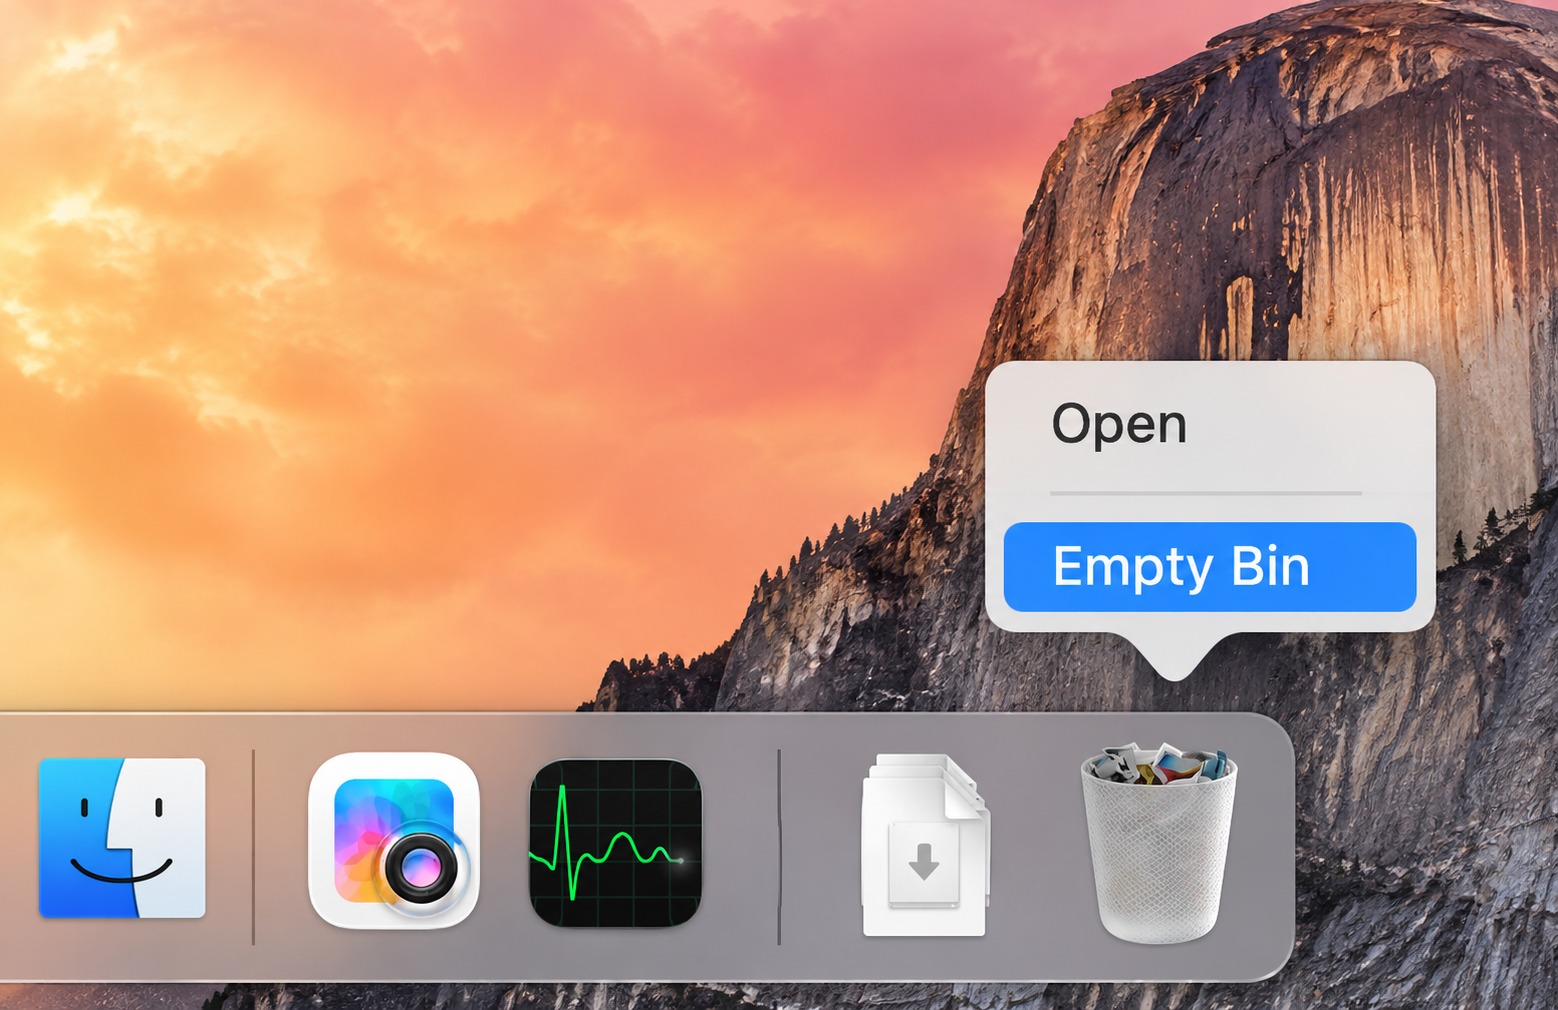
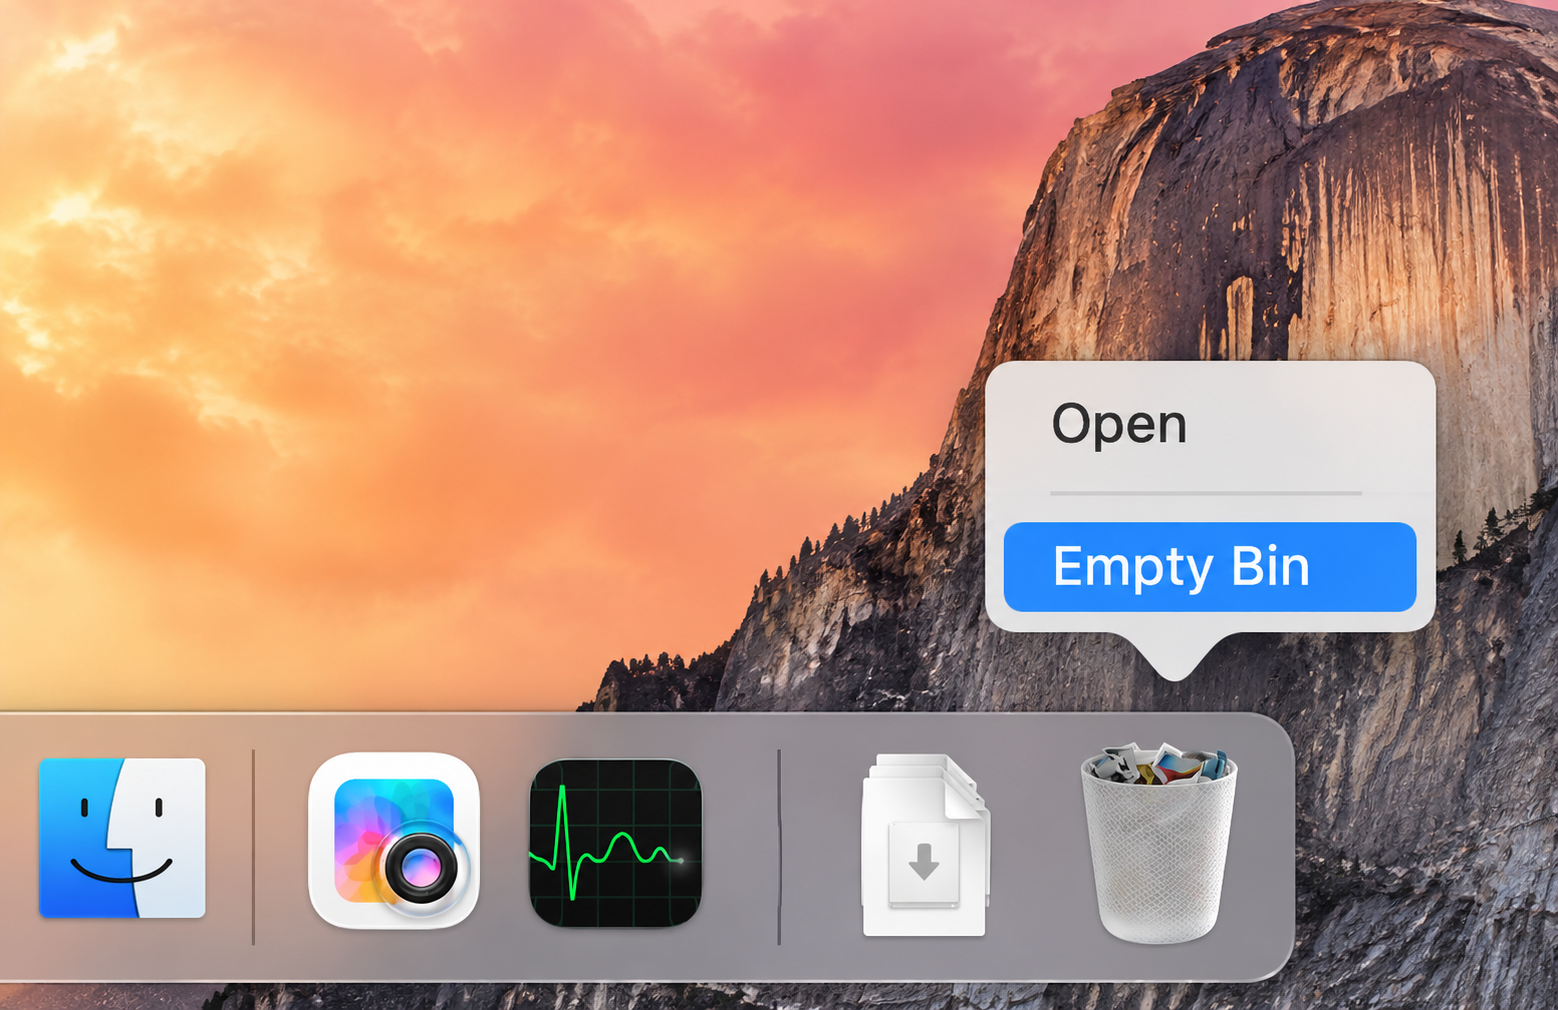
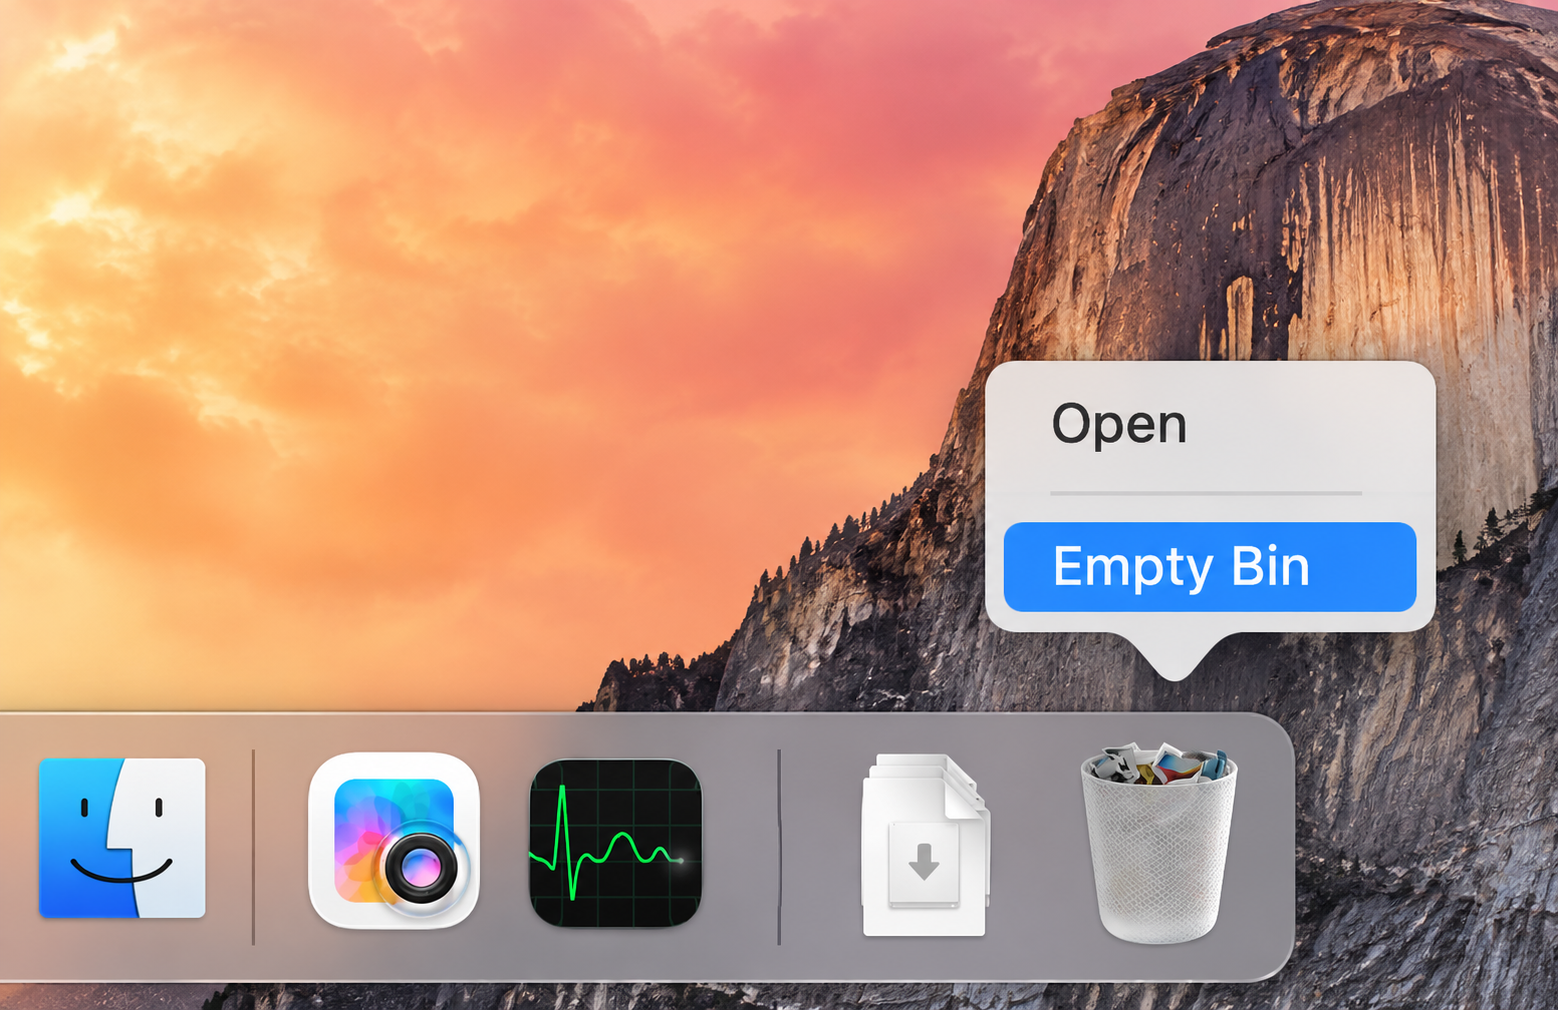
Ctrl-click the Bin icon in the Dock.
Select Empty Bin from the menu.
Confirm when OS X asks you to.
Empty the Bin
3. Remove user caches
Apps create temporary cache files so they load faster, but over time these can swell to several gigabytes. We can safely empty cache on Mac from the user Library — the apps simply rebuild what they need next time, so nothing important is lost.
Follow these steps to clear them out:
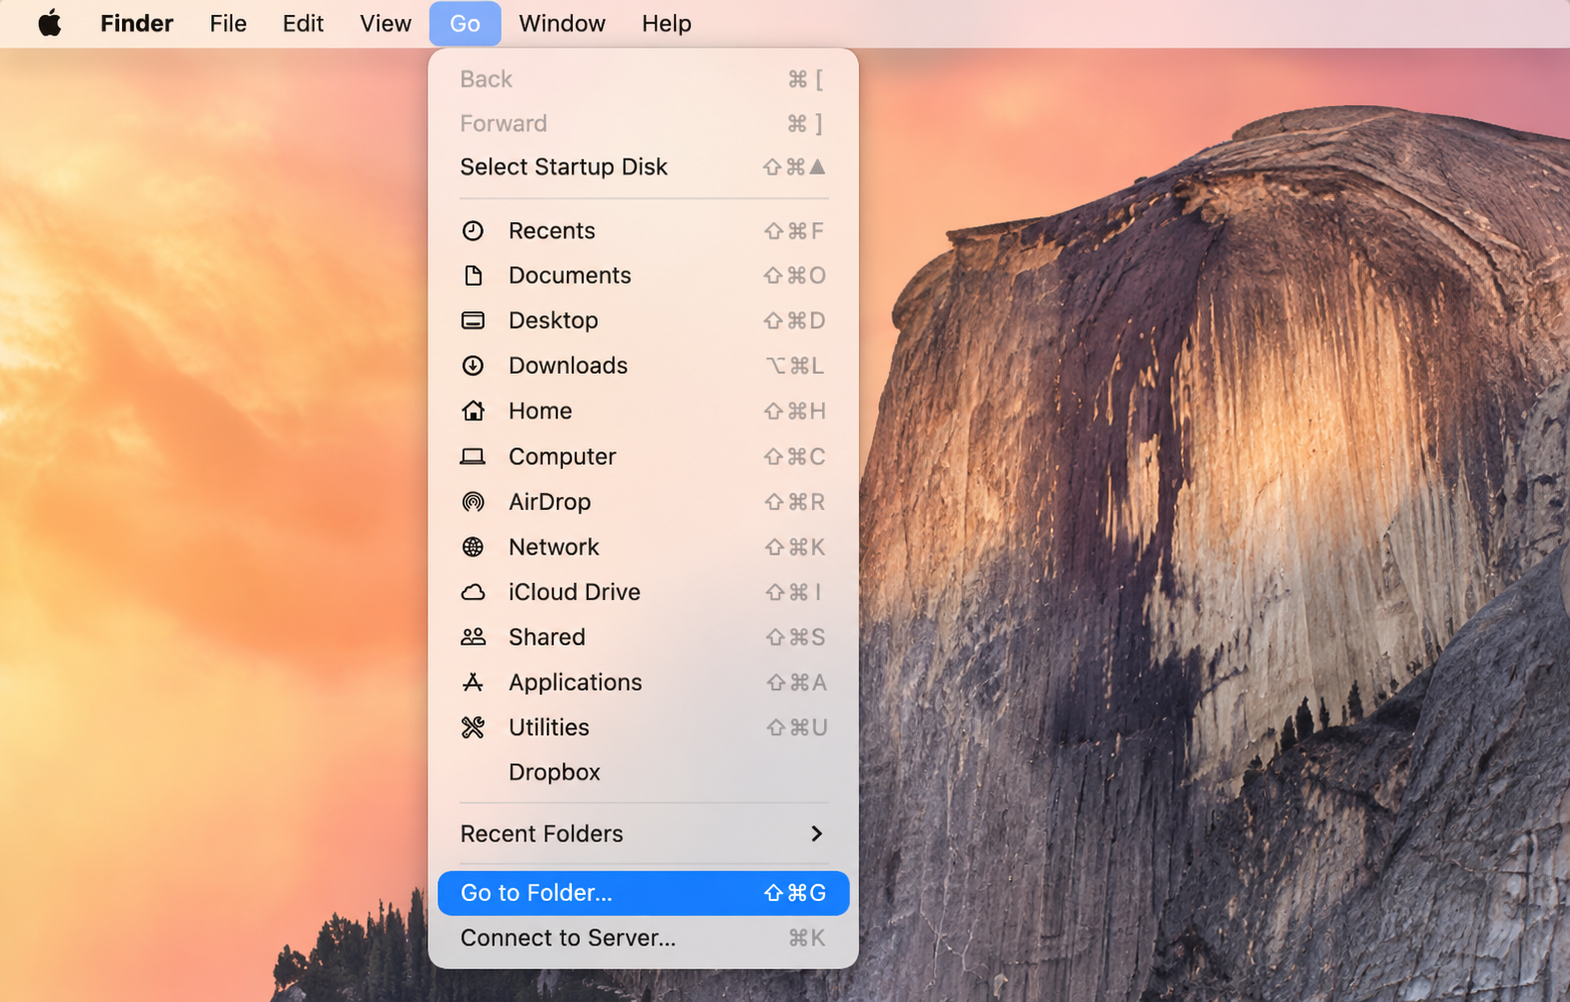
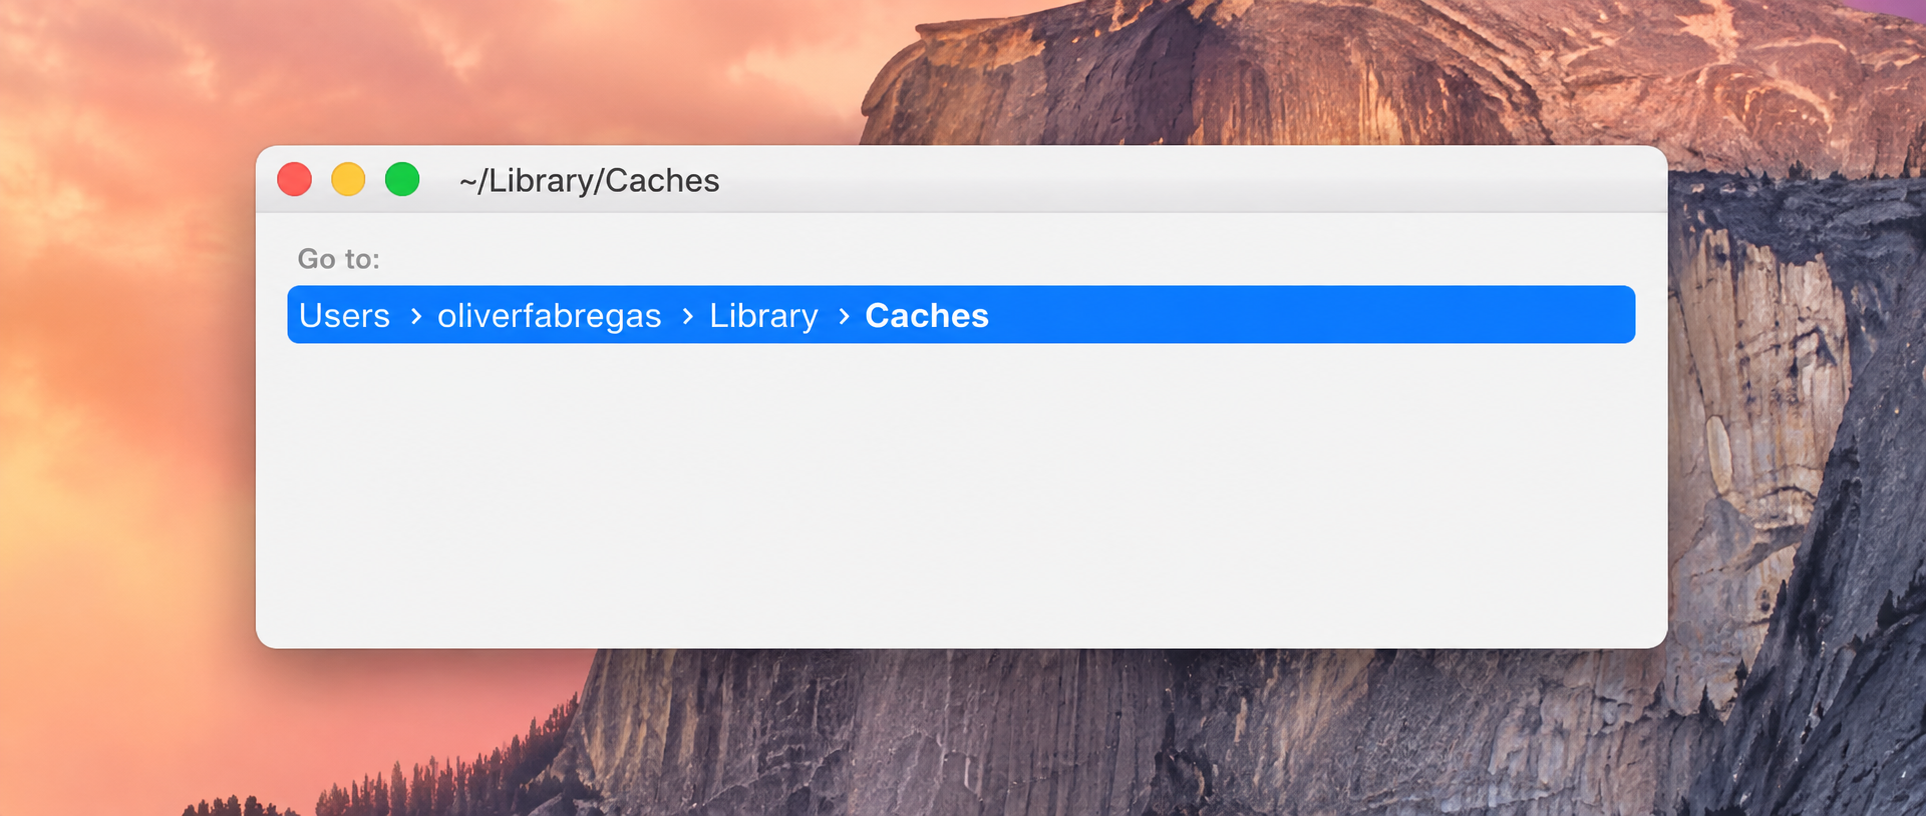
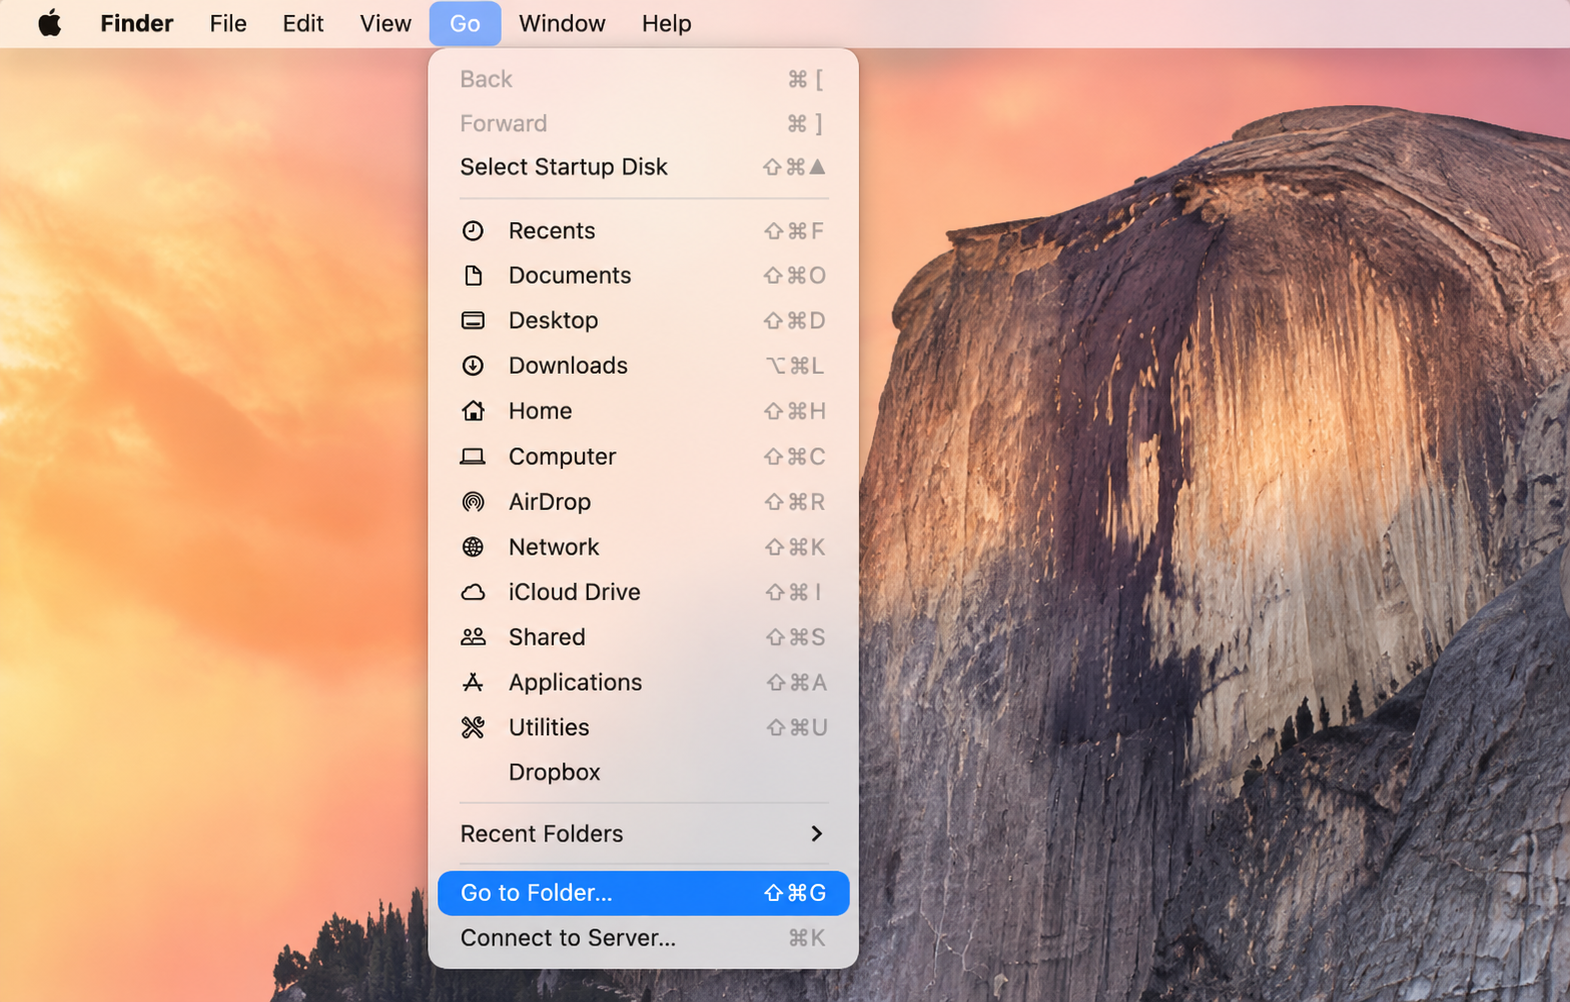
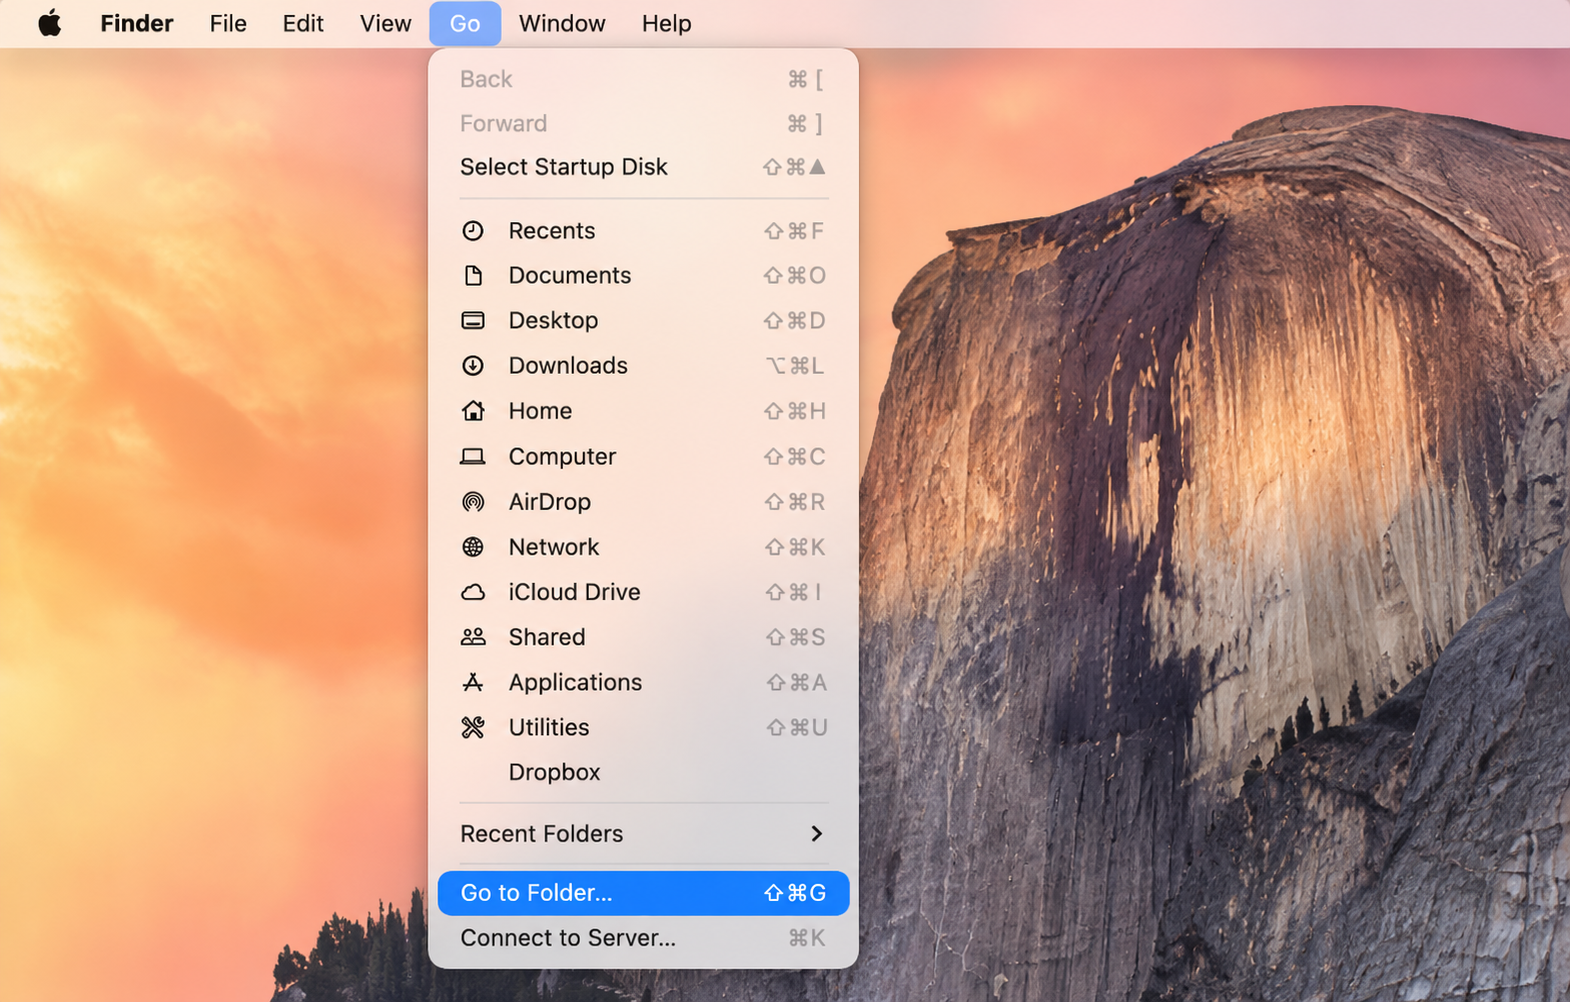
In Finder, click Go > Go to Folder in the menu bar.
Type ~/Library/Caches and press Return.
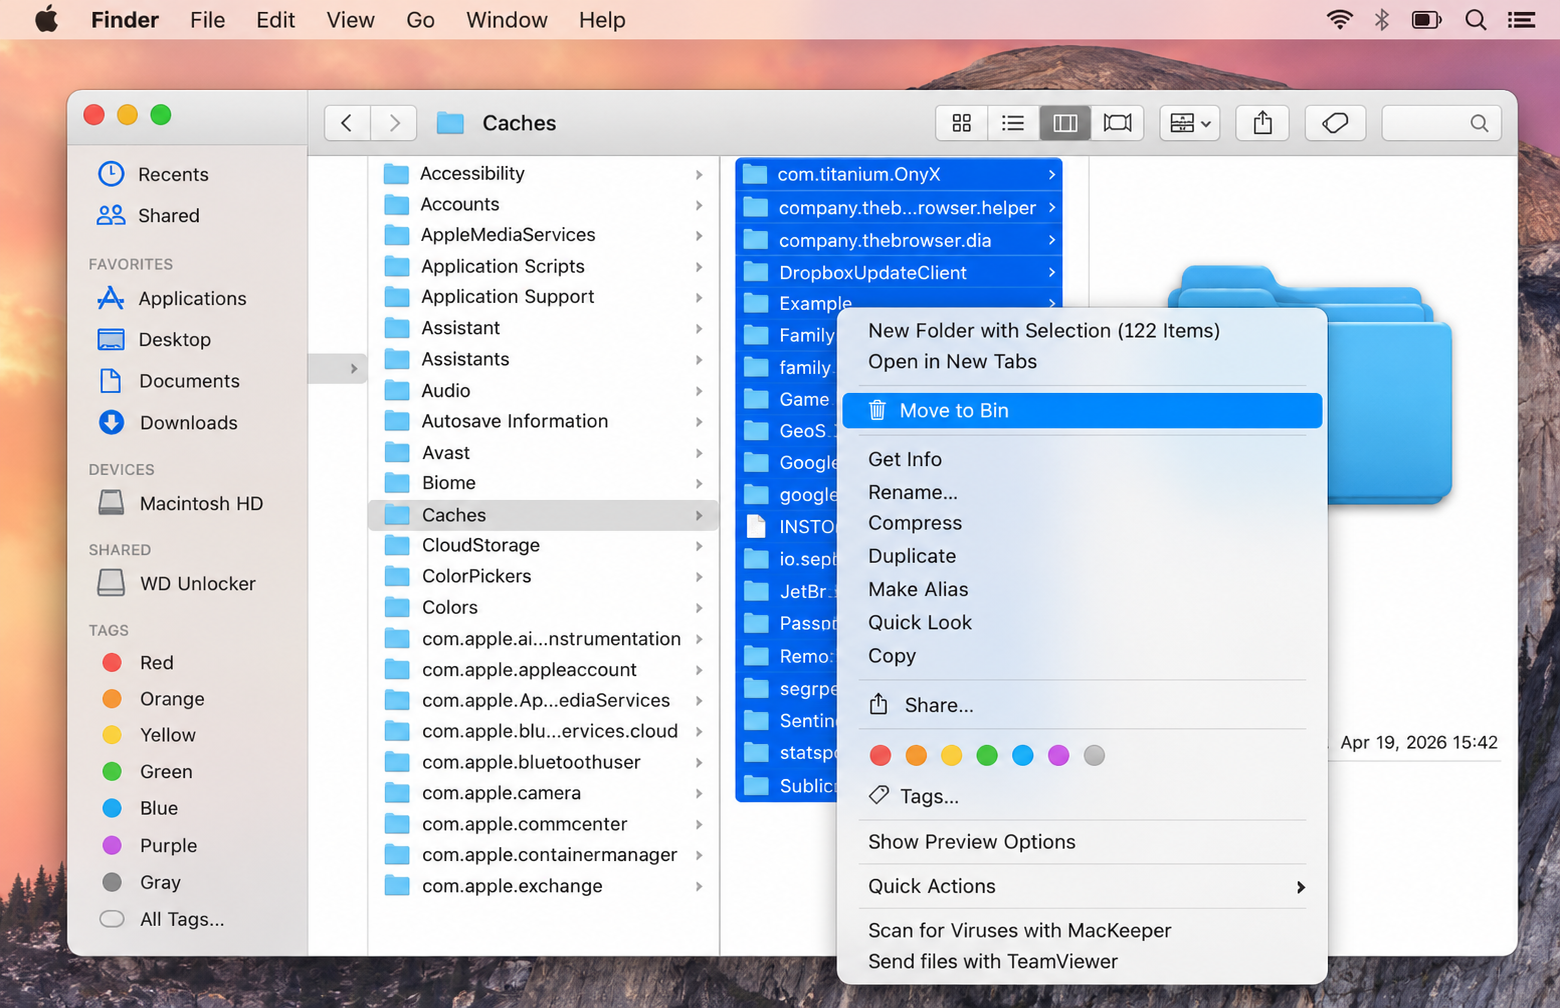
Open the Caches folder and drag its contents—not the folders themselves—to the Bin.
Empty the Trash to finish.
Step 1. In Finder, click Go > Go to Folder in the menu barStep 2. Type ~/Library/Caches and hit ReturnStep 3. Select all folders, Control-click the selection, and choose Move to BinStep 4. Click Empty Bin
4. Delete temporary files on Mac
Alongside caches, your Mac collects temporary system files and app leftovers as you work. These build up in hidden Library folders and rarely clear themselves out on Yosemite. When we delete temporary files on Mac regularly, we keep this quiet buildup from getting out of hand.
Here’s a safe way to remove them:
Open Finder and choose Go > Go to Folder.
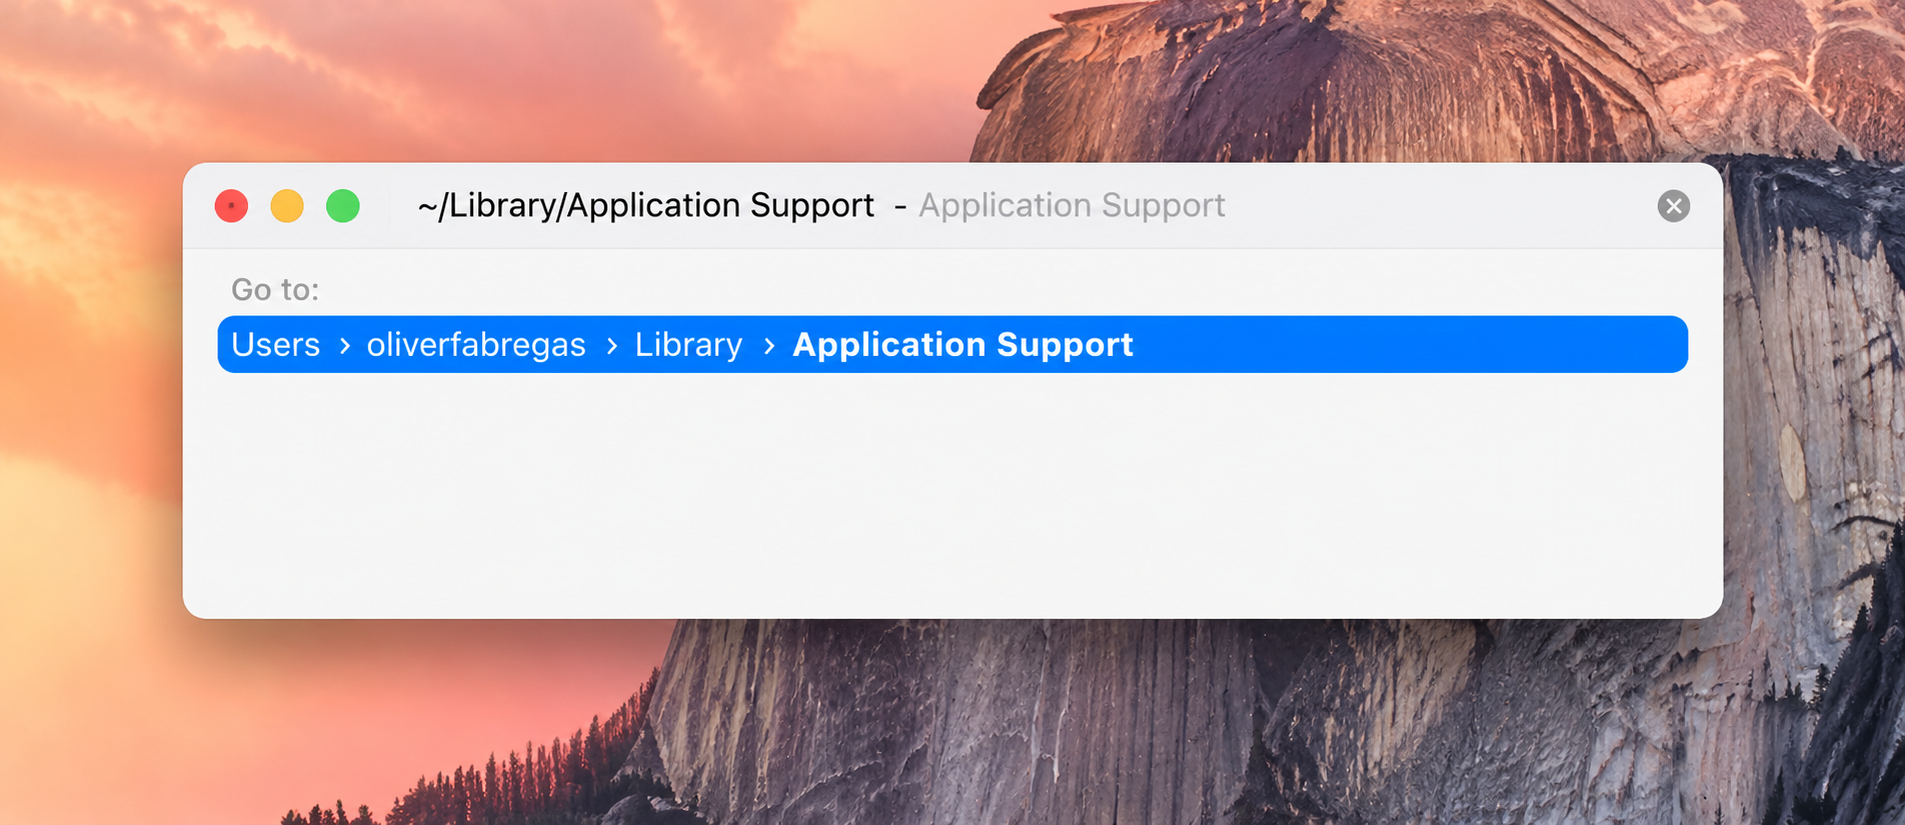
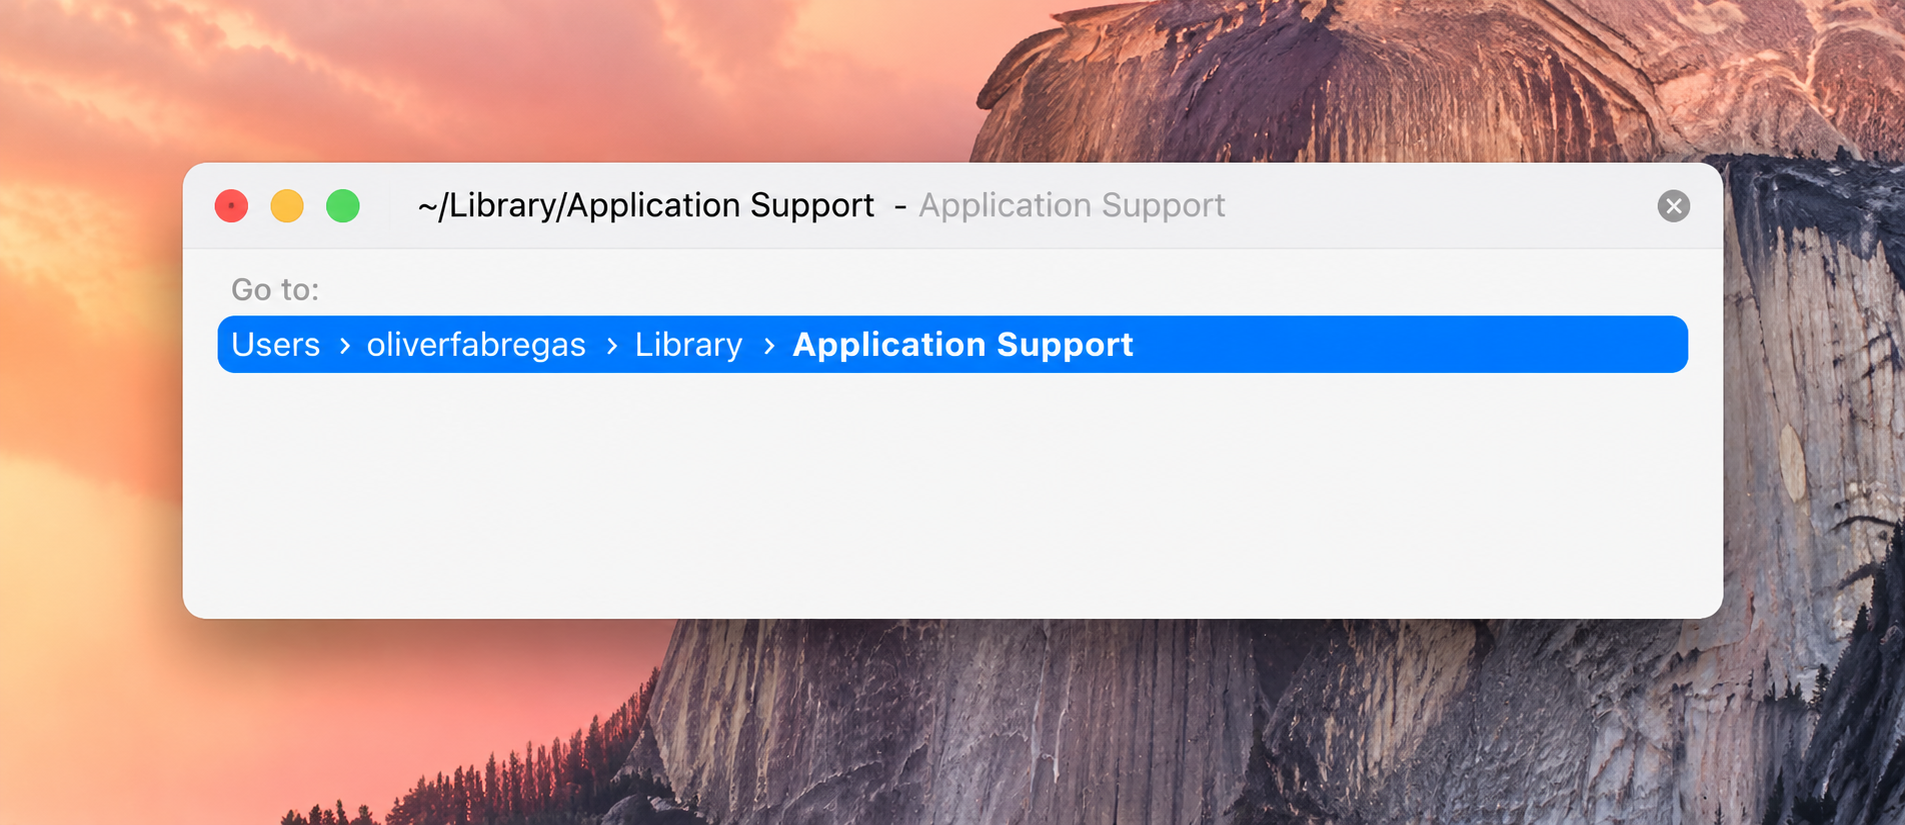
Enter ~/Library/Application Support and review folders tied to apps you’ve already removed.
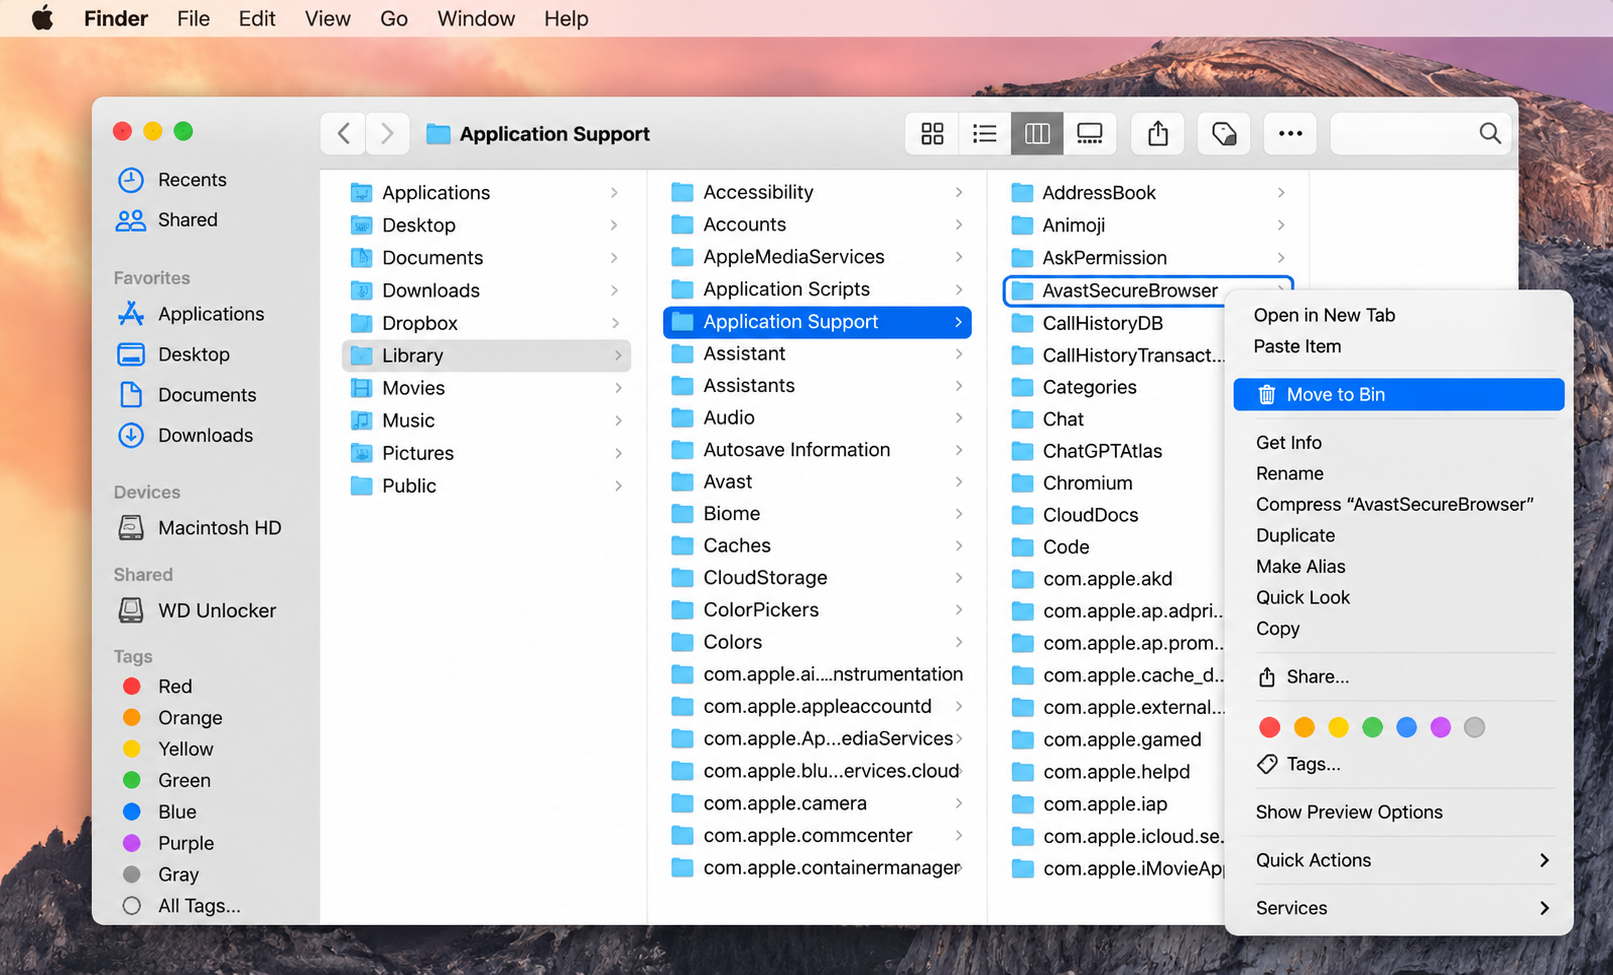
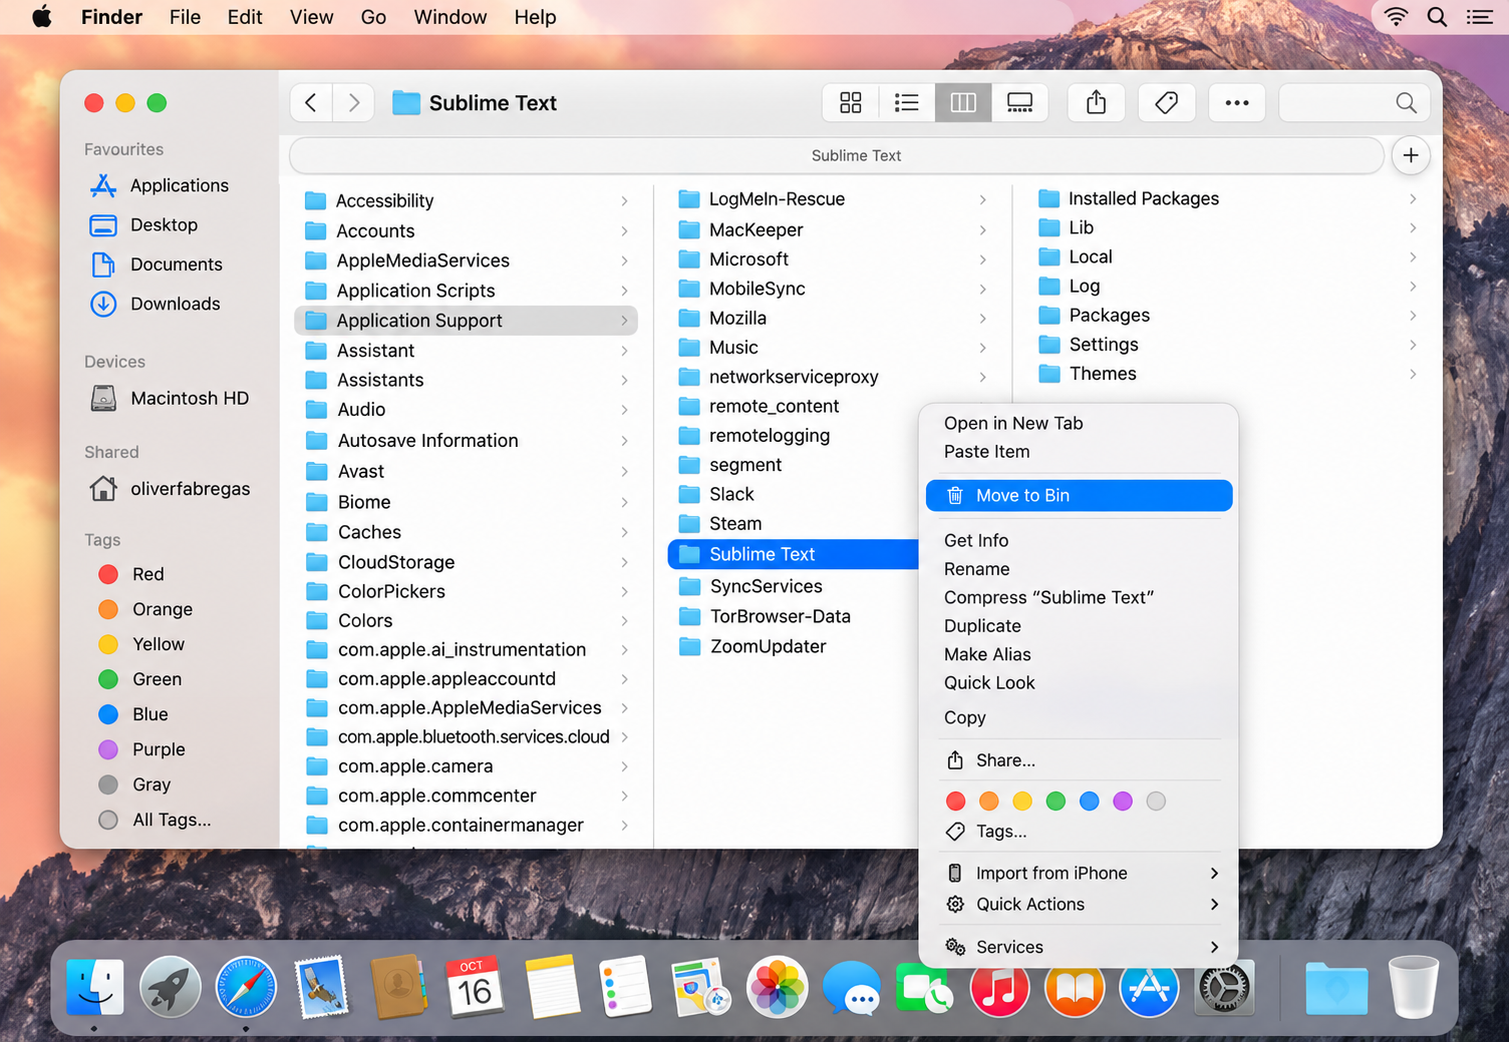
Select the leftovers folder, Control-click the selection, and choose Move to Bin.
Check ~/Library/Logs and clear out old log files too.
Step 1. In Finder, click Go > Go to Folder in the menu barStep 2. Type ~/Library/Application Support and hit ReturnStep 3. Select the leftovers folder, Control-click the selection, and choose Move to BinStep 4. Empty the Bin
5. Uninstall unused applications
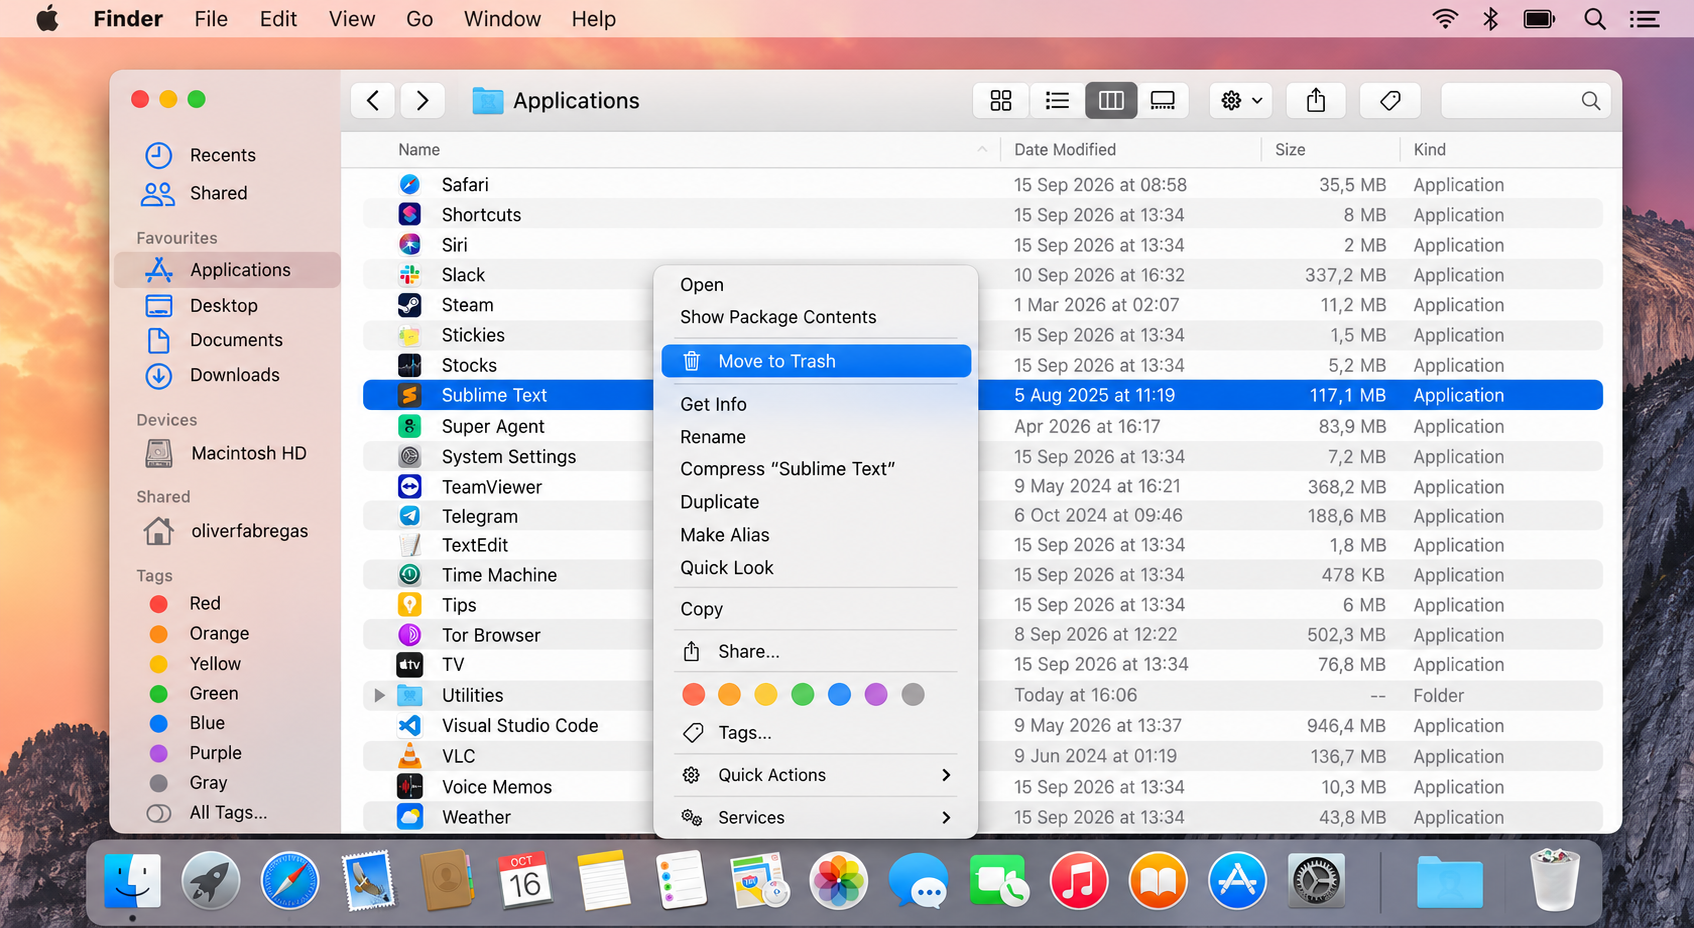
We all install apps we try once and never open again. Dragging an app to the Trash removes the main file, but support files and preferences often stay behind. To completely uninstall application on Mac and free up more space, we need to catch those leftovers too.
Just do the following:
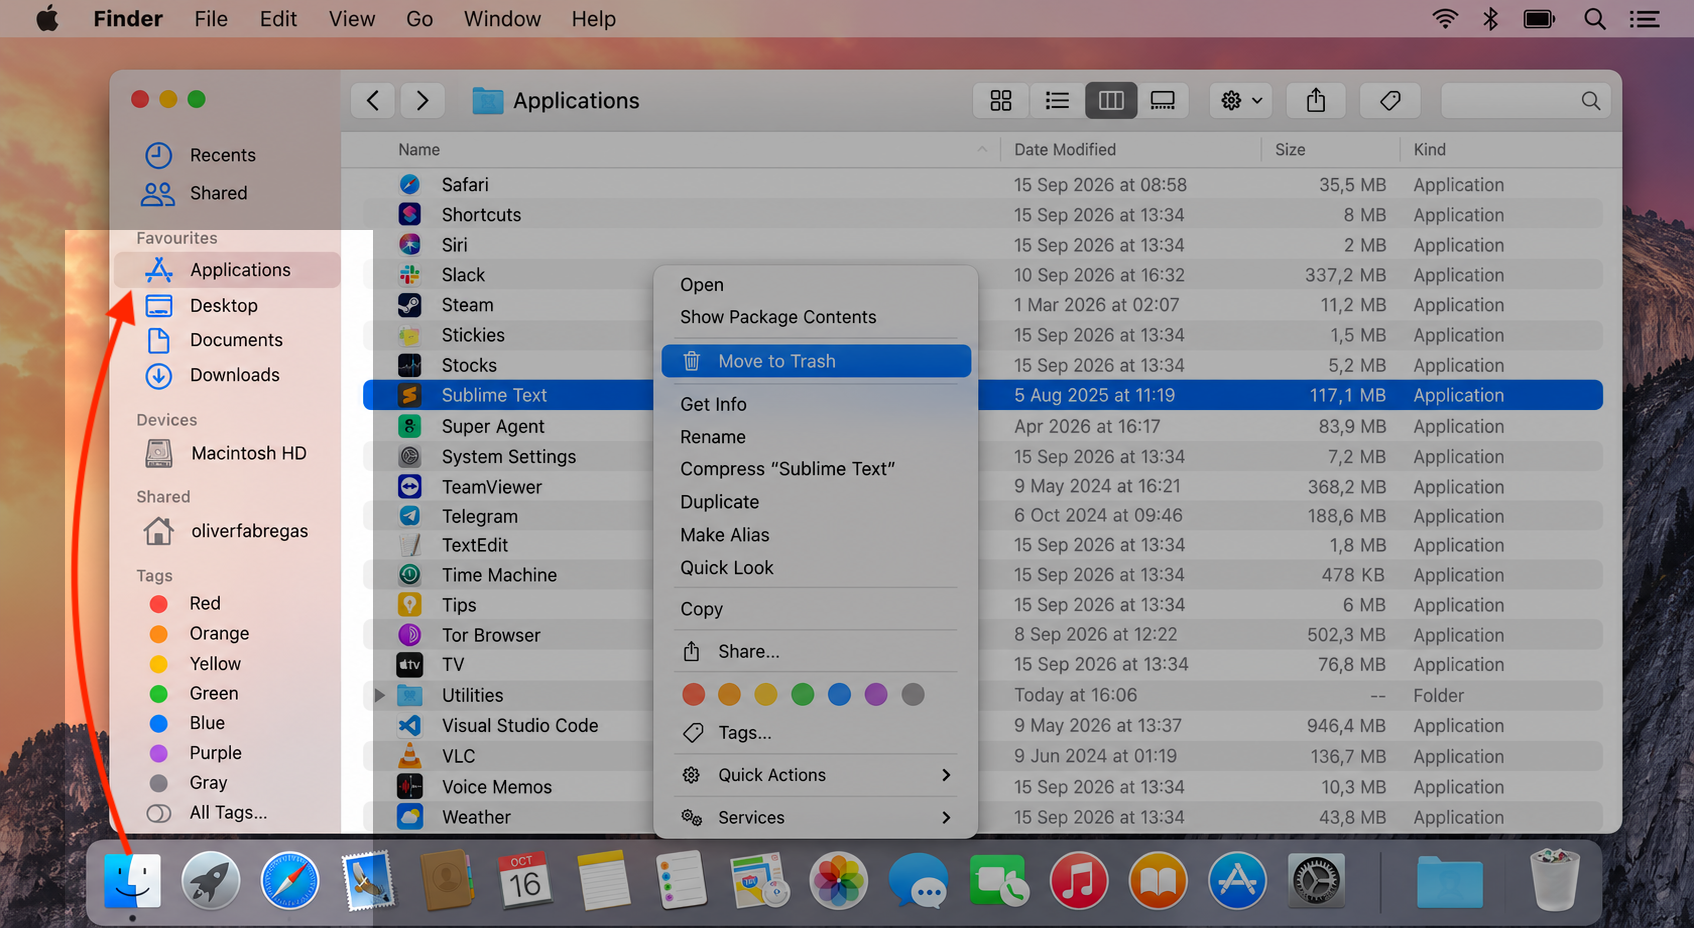
Open the Applications folder in Finder.
Select the app with Control-click, and choose Move to Bin.
Choose Go > Go to Folder and check ~/Library/Application Support and ~/Library/Preferences for files with the app’s name.
Move those leftovers to the Trash, then empty it.
Step 1. Go to Finder > ApplicationsStep 2. Select the App with Control-click, and choose Move to BinStep 3. In Finder, click Go > Go to Folder in the menu barStep 4. Type ~/Library/Application Support and hit ReturnStep 5. Select the leftover folder and move it to the Bin with Control-clickStep 6. Empty the Bin and repeat the same procedure with ~/Library/Preferences
6. Delete old iOS backups in iTunes
If you’ve ever synced an iPhone or iPad to this Mac, old device backups may be sitting on your disk — and each one can run into gigabytes. On OS X Yosemite, you manage these through iTunes, not Finder. It’s quick to delete iTunes backups from Mac storage once you know where to look.
We know where to find them:
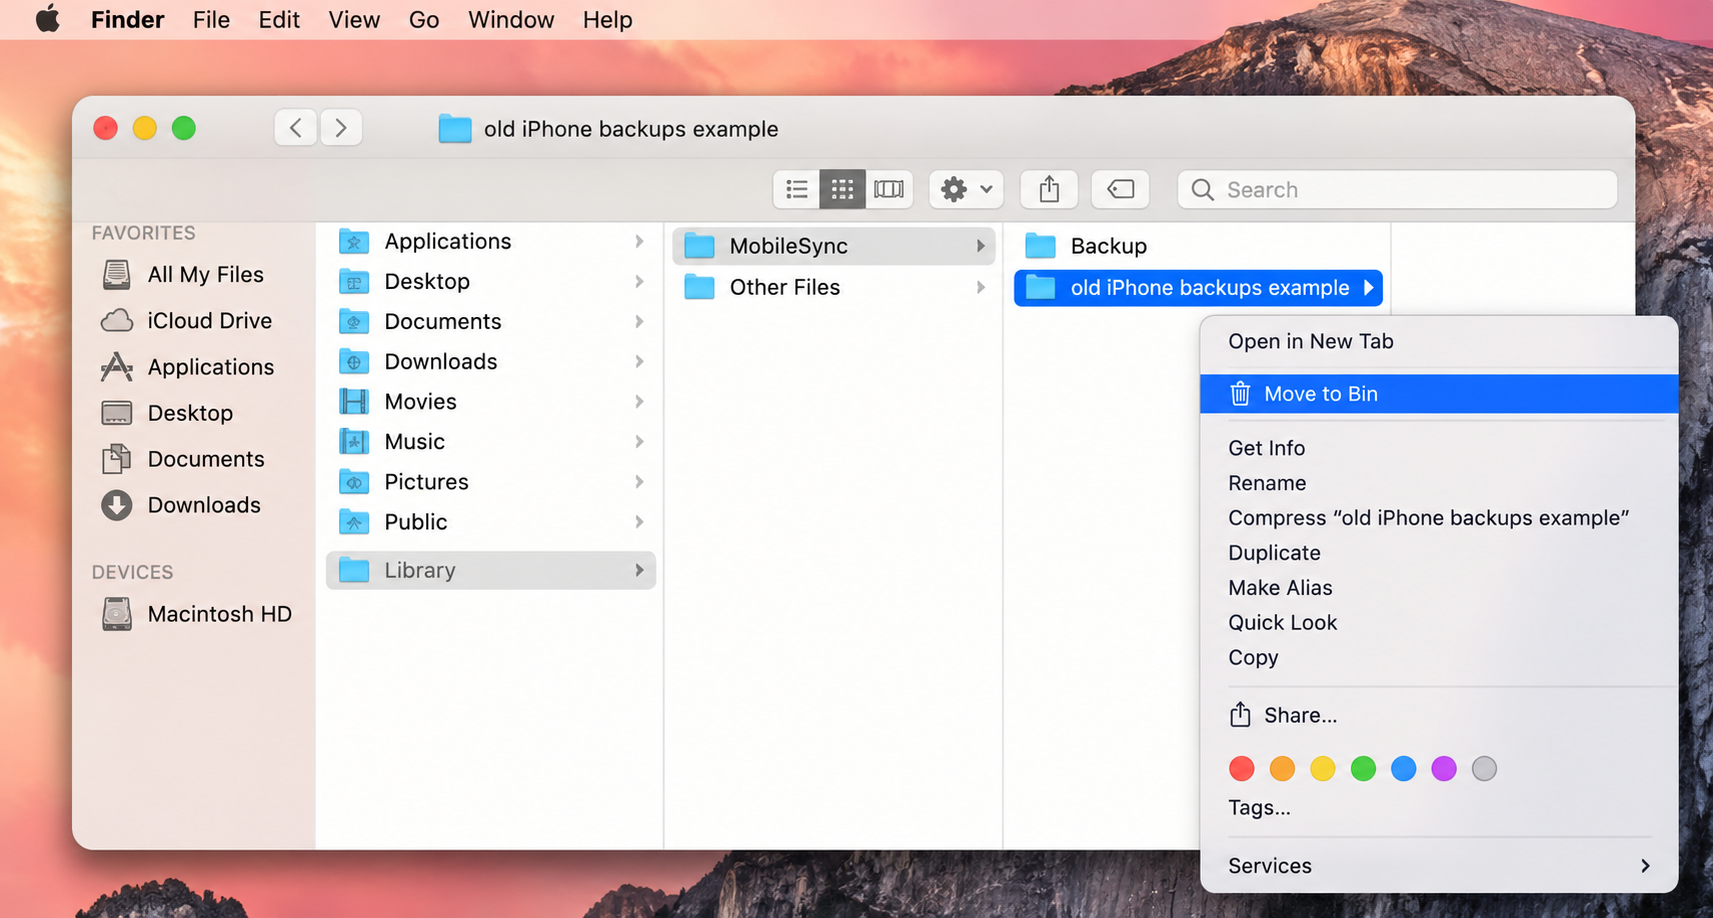
Open Finder on your Mac.
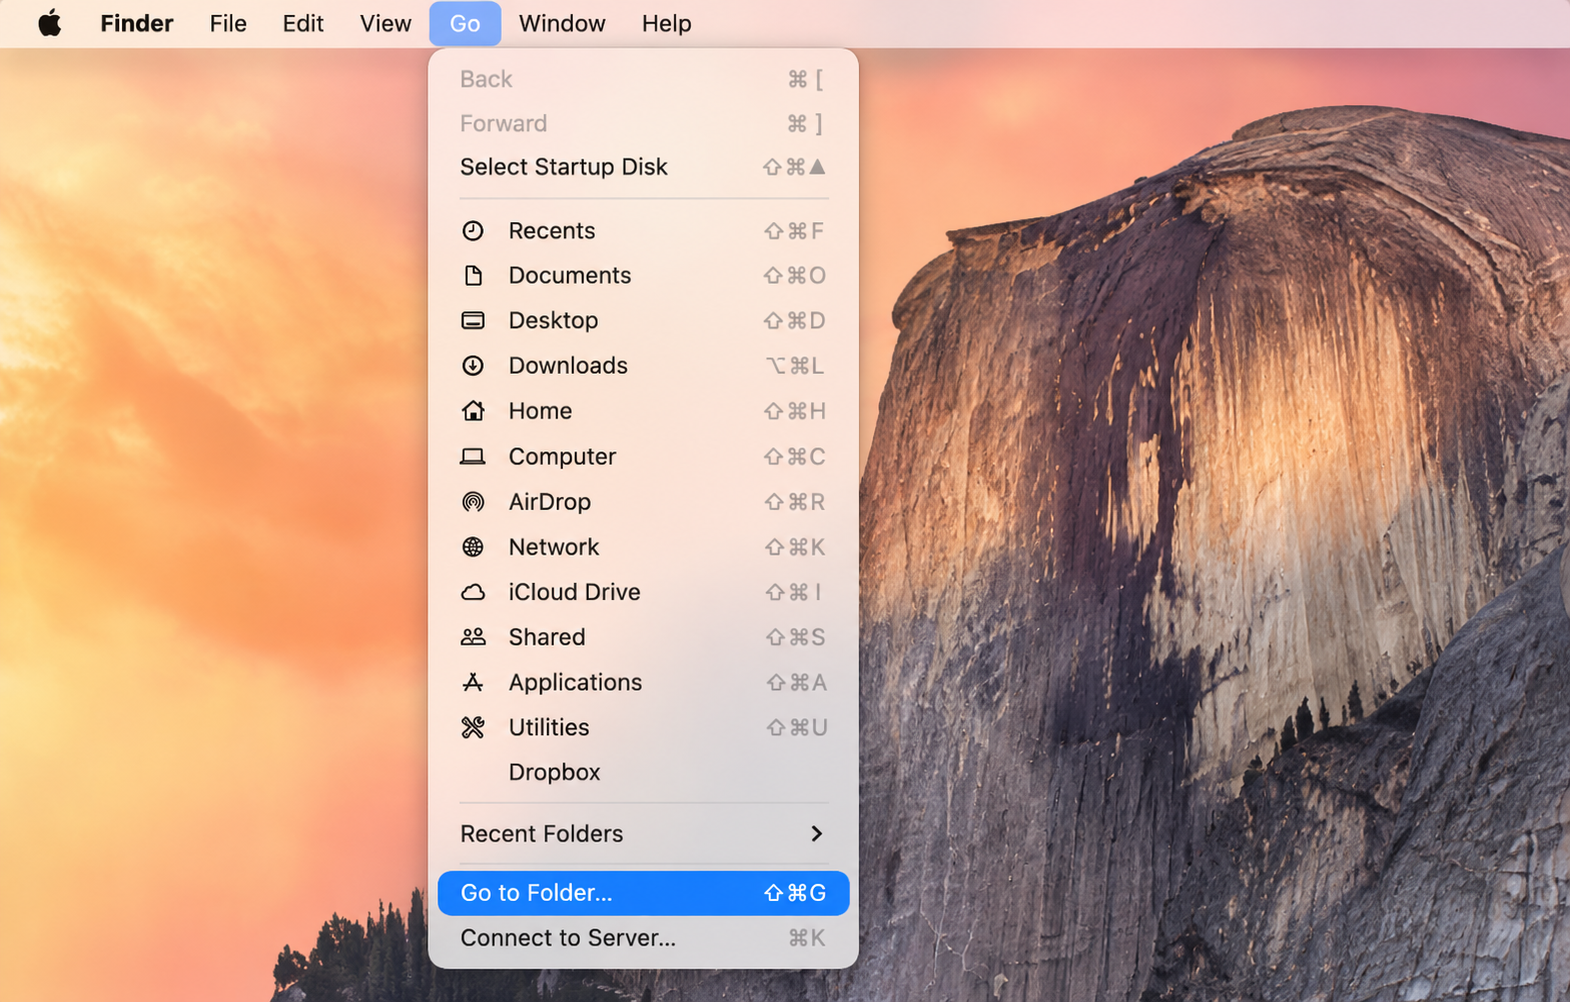
In the top menu bar, click Go > Go to Folder… or press Shift + Command (⌘) + G.
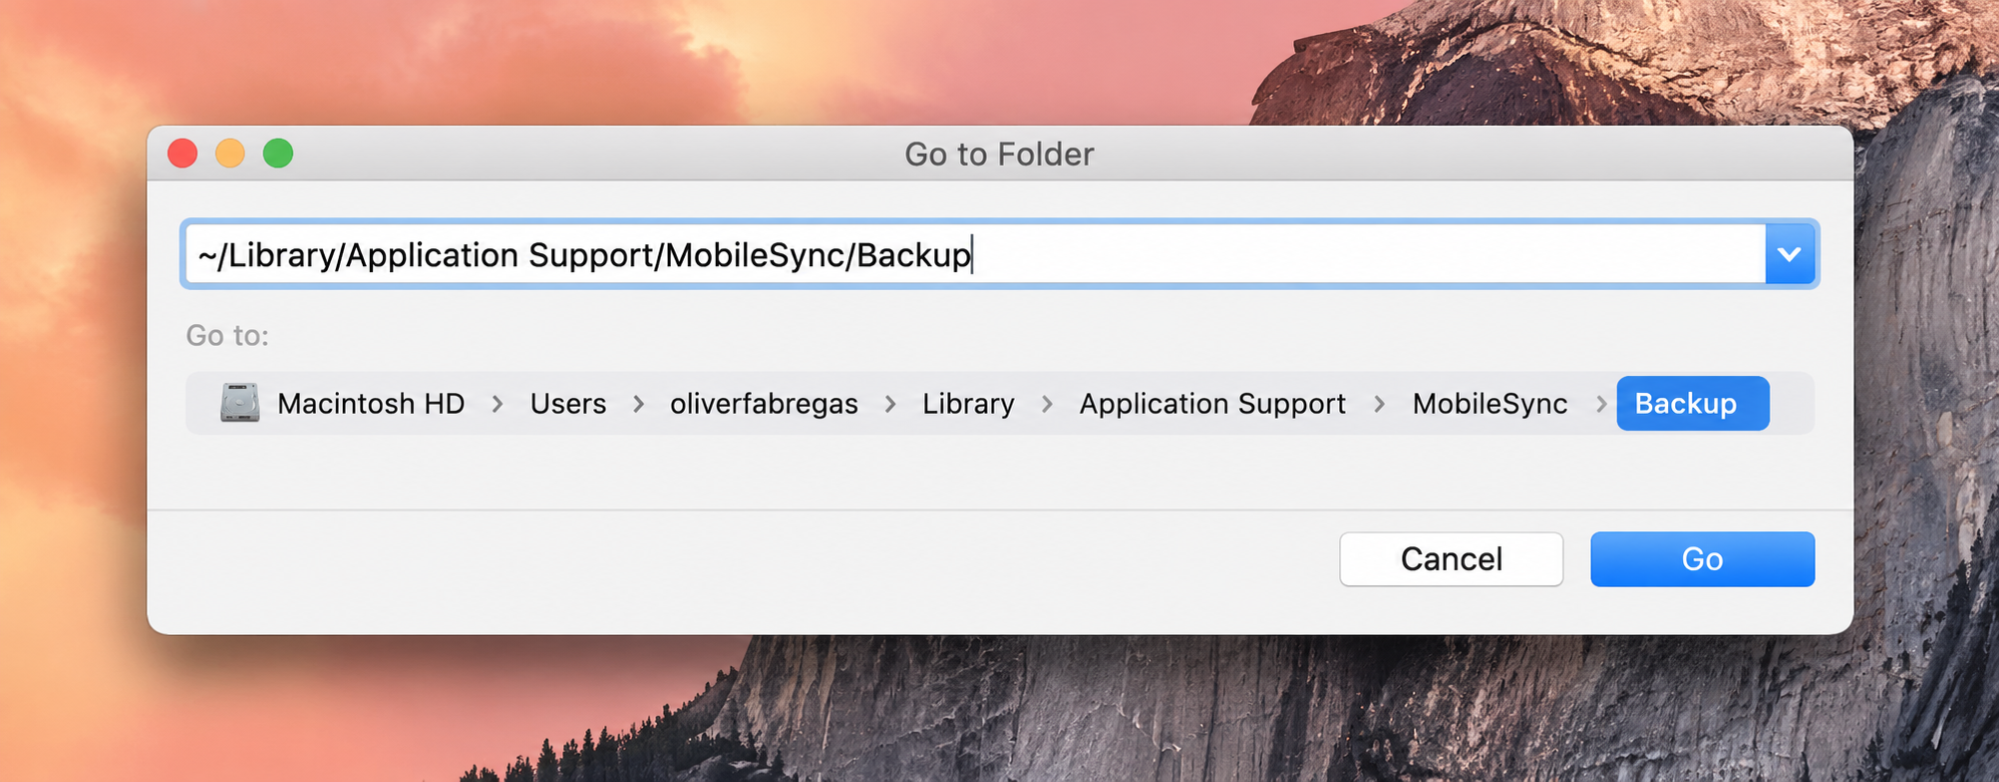
Copy and paste the ~/Library/Application Support/MobileSync/Backup/ path.
Press Return to open the folder.
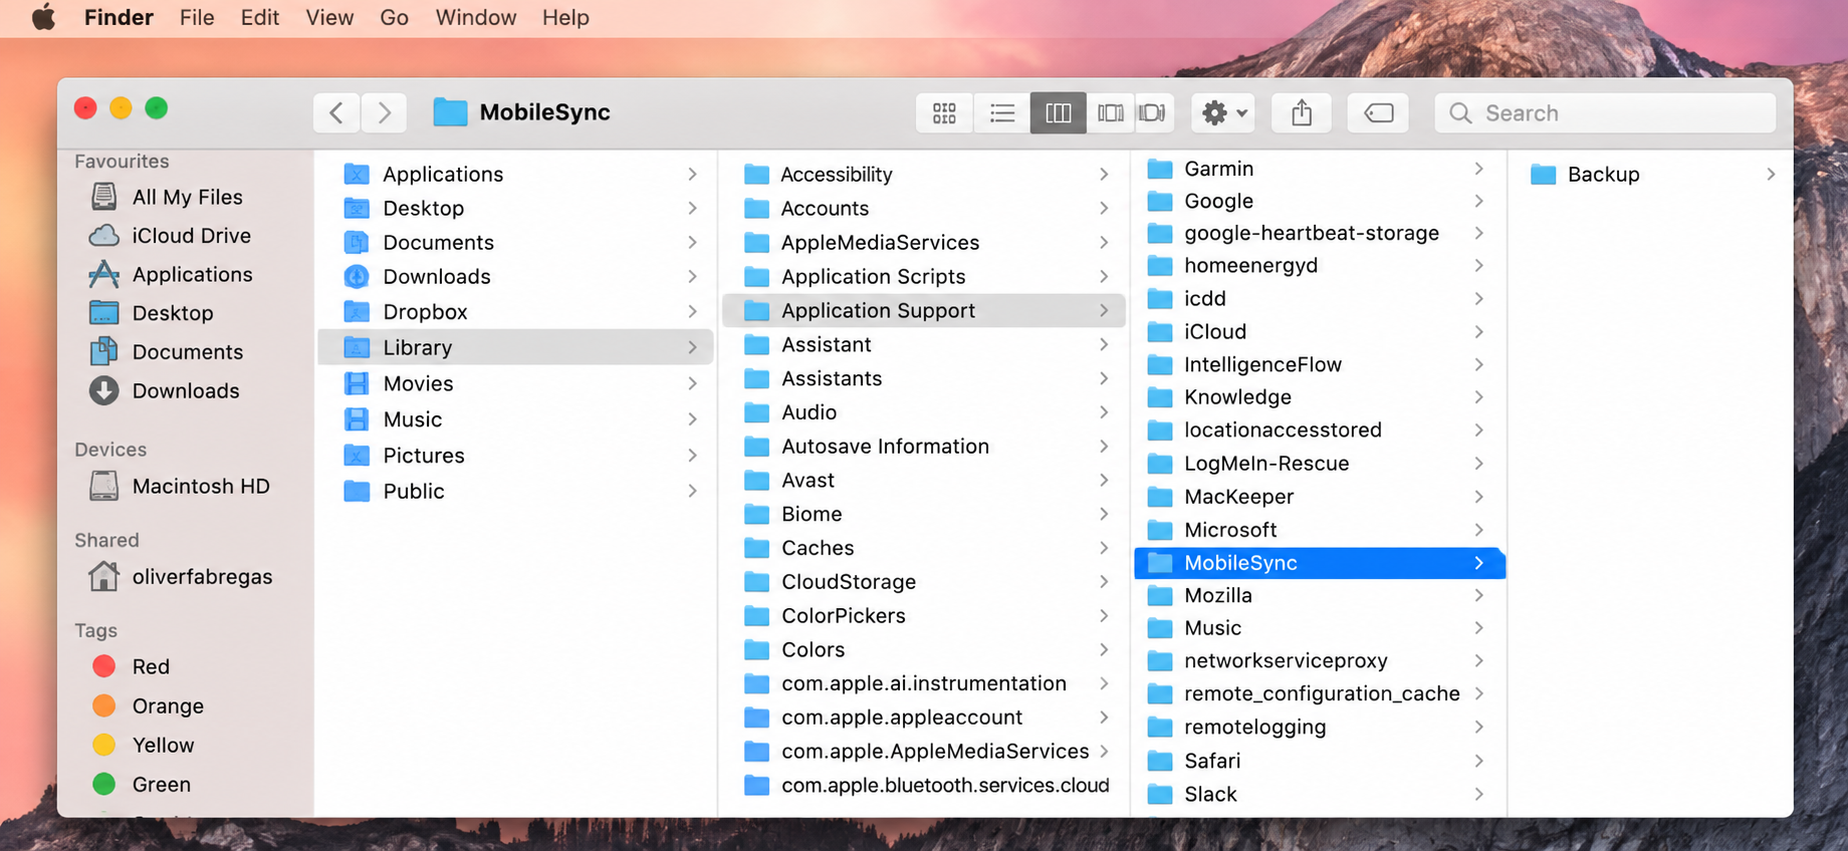
Inside the Backup folder, you will find folders with long combinations of letters and numbers. Each folder contains a local iPhone or iPad backup.
Delete old or outdated iPhone backup.
Step 1. In Finder, click Go > Go to Folder in the menu barStep 2. Type ~/Library/Application Support/MobileSync/Backup/ and hit EnterStep 3. Go to the Backup FolderStep 4. Move old or outdated backups to the BinStep 5. Empty the Bin
7. Find and delete large hidden files
Sometimes a single forgotten video or old installer quietly uses more space than everything else combined. Finder’s search filters let us find the largest files on Mac in seconds, so we can review them and delete what we don’t need. A visual disk scanner works too if you’d rather see your storage as a map.
We recommend trying this to track them down:
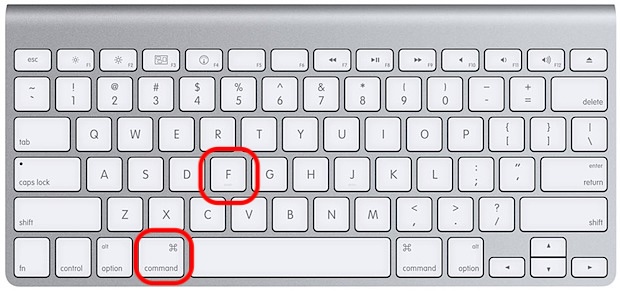
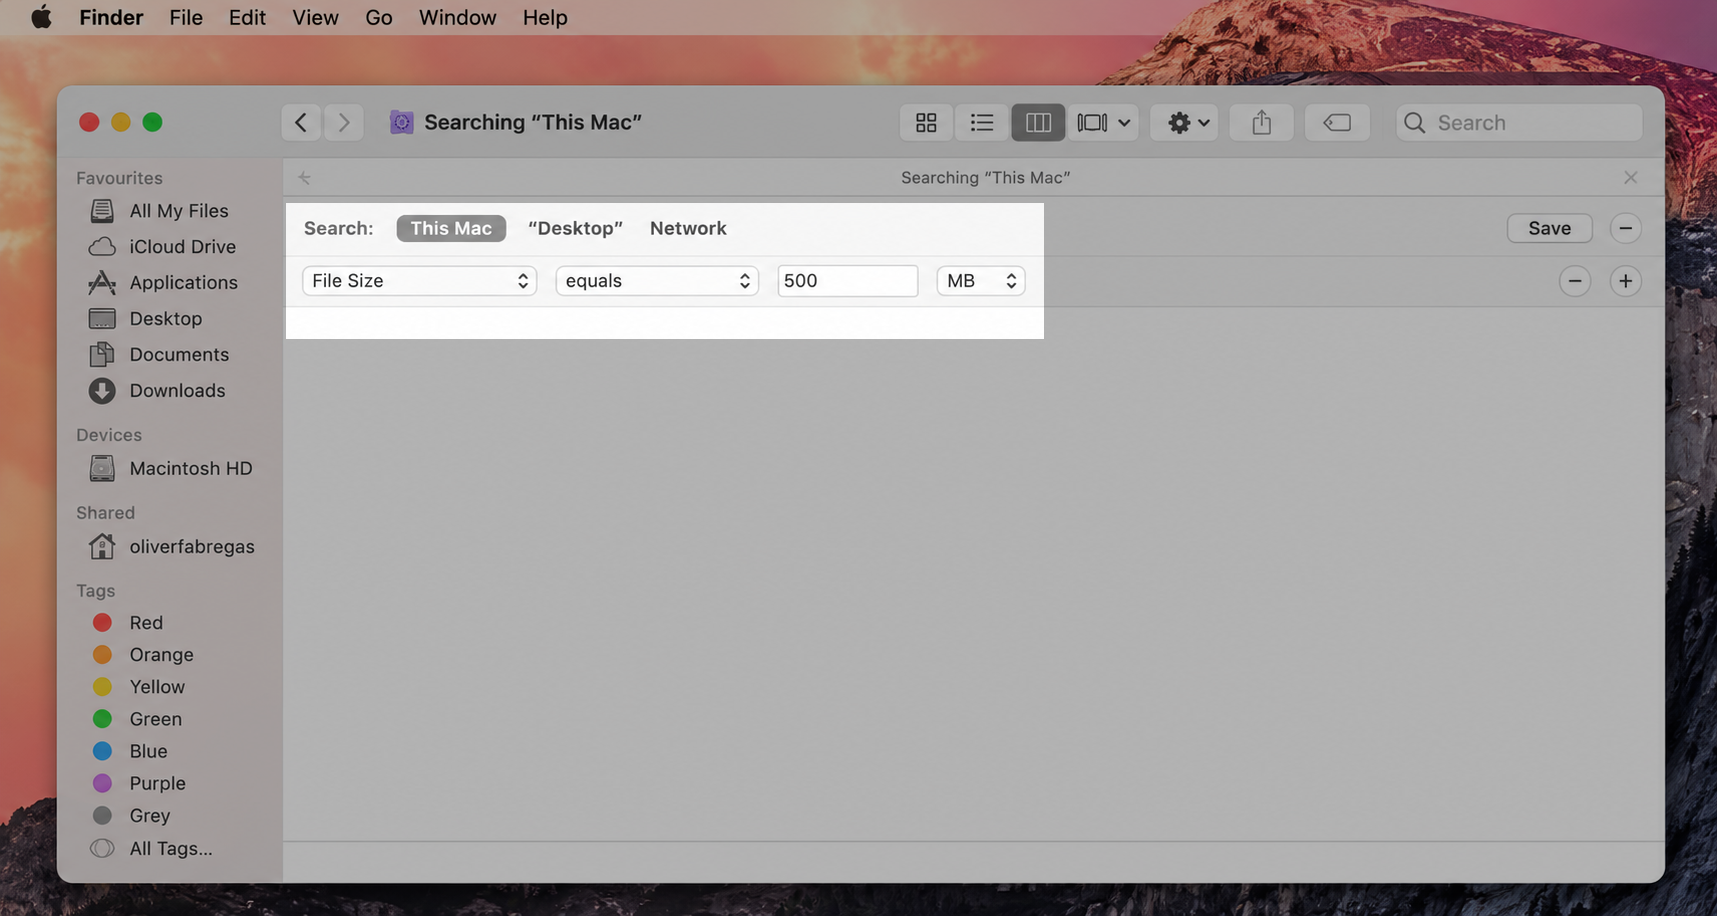
Open Finder and press Command + F.
Set the first filter to Kind, then change it to File Size.
Choose is greater than and enter a value such as 500 MB.
Review the results, then drag anything you don’t need to the Trash.
Step 1. Press Command + FStep 2. Set Kind and File Size. Delete any unnecessary large files
8. Use third-party Mac cleaning tools
Working through every folder by hand takes time, and it’s easy to miss hidden junk. A reputable utility built for OS X Yosemite — like MacKeeper — can scan for the system junk we tend to overlook, then remove it safely.
MacKeeper’s Safe Cleanup handles trash emptying, caches, and logs in one click, without touching your personal files, so your Mac has the room it needs to run well.
Use MacKeeper’s Safe Cleanup as the best cleaning solution for Macs
How to prevent storage clutter on OS X Yosemite?
Once you’ve cleared enough space, a few simple habits keep your Mac from filling up again. Below, we’ll share the three preventive measures we rely on to stay ahead of the clutter.
1. Keep up with Trash and Downloads maintenance
Emptying the Trash and clearing out your Downloads folder on a regular schedule stops installer packages and temporary files from piling up silently. A quick weekly sweep takes a minute and saves you a bigger cleanup later.
2. Move large media and archived files to external storage
Offloading old photos, movies, and finished projects to an external hard drive or cloud storage keeps your internal startup disk light and responsive. Your Macintosh stays quick, and your memories stay safe in a second place.
3. Use specialized software for automated maintenance
Dedicated Mac cleaning software can run background scans or scheduled cleanups automatically, so system junk, cache files, and logs never get the chance to build up. Additionally, you get a clear reminder whenever it’s time for a tidy-up, which makes staying clean effortless.
Keep your Mac clean and clutter-free
Keeping OS X Yosemite responsive really does come down to steady, manual upkeep — clearing caches, emptying the Trash, and moving on files you no longer need. A helpful rule of thumb is to keep at least 15-20% of your disk free, which gives the system the breathing room it needs to stay stable and avoid slowdowns.
If a full disk has been slowing you down, you don’t have to sort through every folder alone. When you want to free up disk space on Mac Yosemite without the guesswork, MacKeeper’s Safe Cleanup finds junk files, caches, and logs for you and clears them in a single click — leaving your personal files exactly where they are. Give it a run and enjoy a cleaner, roomier Mac.
We respect your privacy and
use cookies
for the best site experience.
Privacy Preferences Center
We use cookies along with other tools to give you the best possible experience while using the
MacKeeper website. Cookies are small text files that help the website load faster. The cookies we
use don’t contain any type of personal data meaning they never store information such as your
location, email address, or IP address.
Help us improve how you interact with our website by accepting the use of cookies. You can change
your privacy settings whenever you like.
Manage consent
All cookies
These cookies are strictly necessary for enabling basic website functionality (including page
navigation, form submission, language detection, post commenting), downloading and purchasing
software. The website might malfunction without these cookies.