Is your Mac dragging after the latest upgrade? MacKeeper’s Memory Cleaner frees up RAM by quitting idle processes and memory-draining apps, so you can improve Mac Sequoia speed in just a couple of clicks. Click the button below to free up memory and give your Mac a quick, clean start today.
Here’s the good news—macOS Sequoia isn’t a slow operating system by design. When people say macOS Sequoia is slow, they’re usually noticing a temporary dip right after the upgrade rather than a lasting fault.
Your Mac spends the first few hours after an update reindexing files, tidying settings, and finishing background tasks. On older Macs, unsupported models, or any Macintosh with 8GB of RAM, this catch-up work can feel like real macOS Sequoia slow performance. The lag almost always settles down on its own once those jobs wrap up.
Why is macOS 15 so slow?
So why is macOS 15 running slow when everything looked fine before? A few everyday culprits usually team up behind the scenes. Below, we’ll walk through the most common ones so you know exactly what you’re dealing with.
Background indexing—right after an update, Spotlight reindexes your drive, which spikes CPU use for a while.
Hungry new features—Sequoia’s fresh tools ask more of your CPU and RAM, which older hardware feels first.
Cluttered storage—when free disk space runs low, macOS has no room to breathe, and everything slows down.
Too many startup items—apps that boot automatically at login eat resources before you’ve even opened anything.
Outdated apps—software that hasn’t been updated for Sequoia can run slowly or stall.
Most of these overlap with other macOS Sequoia problems, and the reassuring part is that each one is simple to sort out yourself.
A note from our experts:
Are you struggling to enhance slow macOS Sequoia performance? We recommend starting with freeing up your Mac's RAM using a dedicated third-party app. Luckily, our MacKeeper’s Memory Cleaner feature helps you to manage your Mac’s memory in a few clicks.
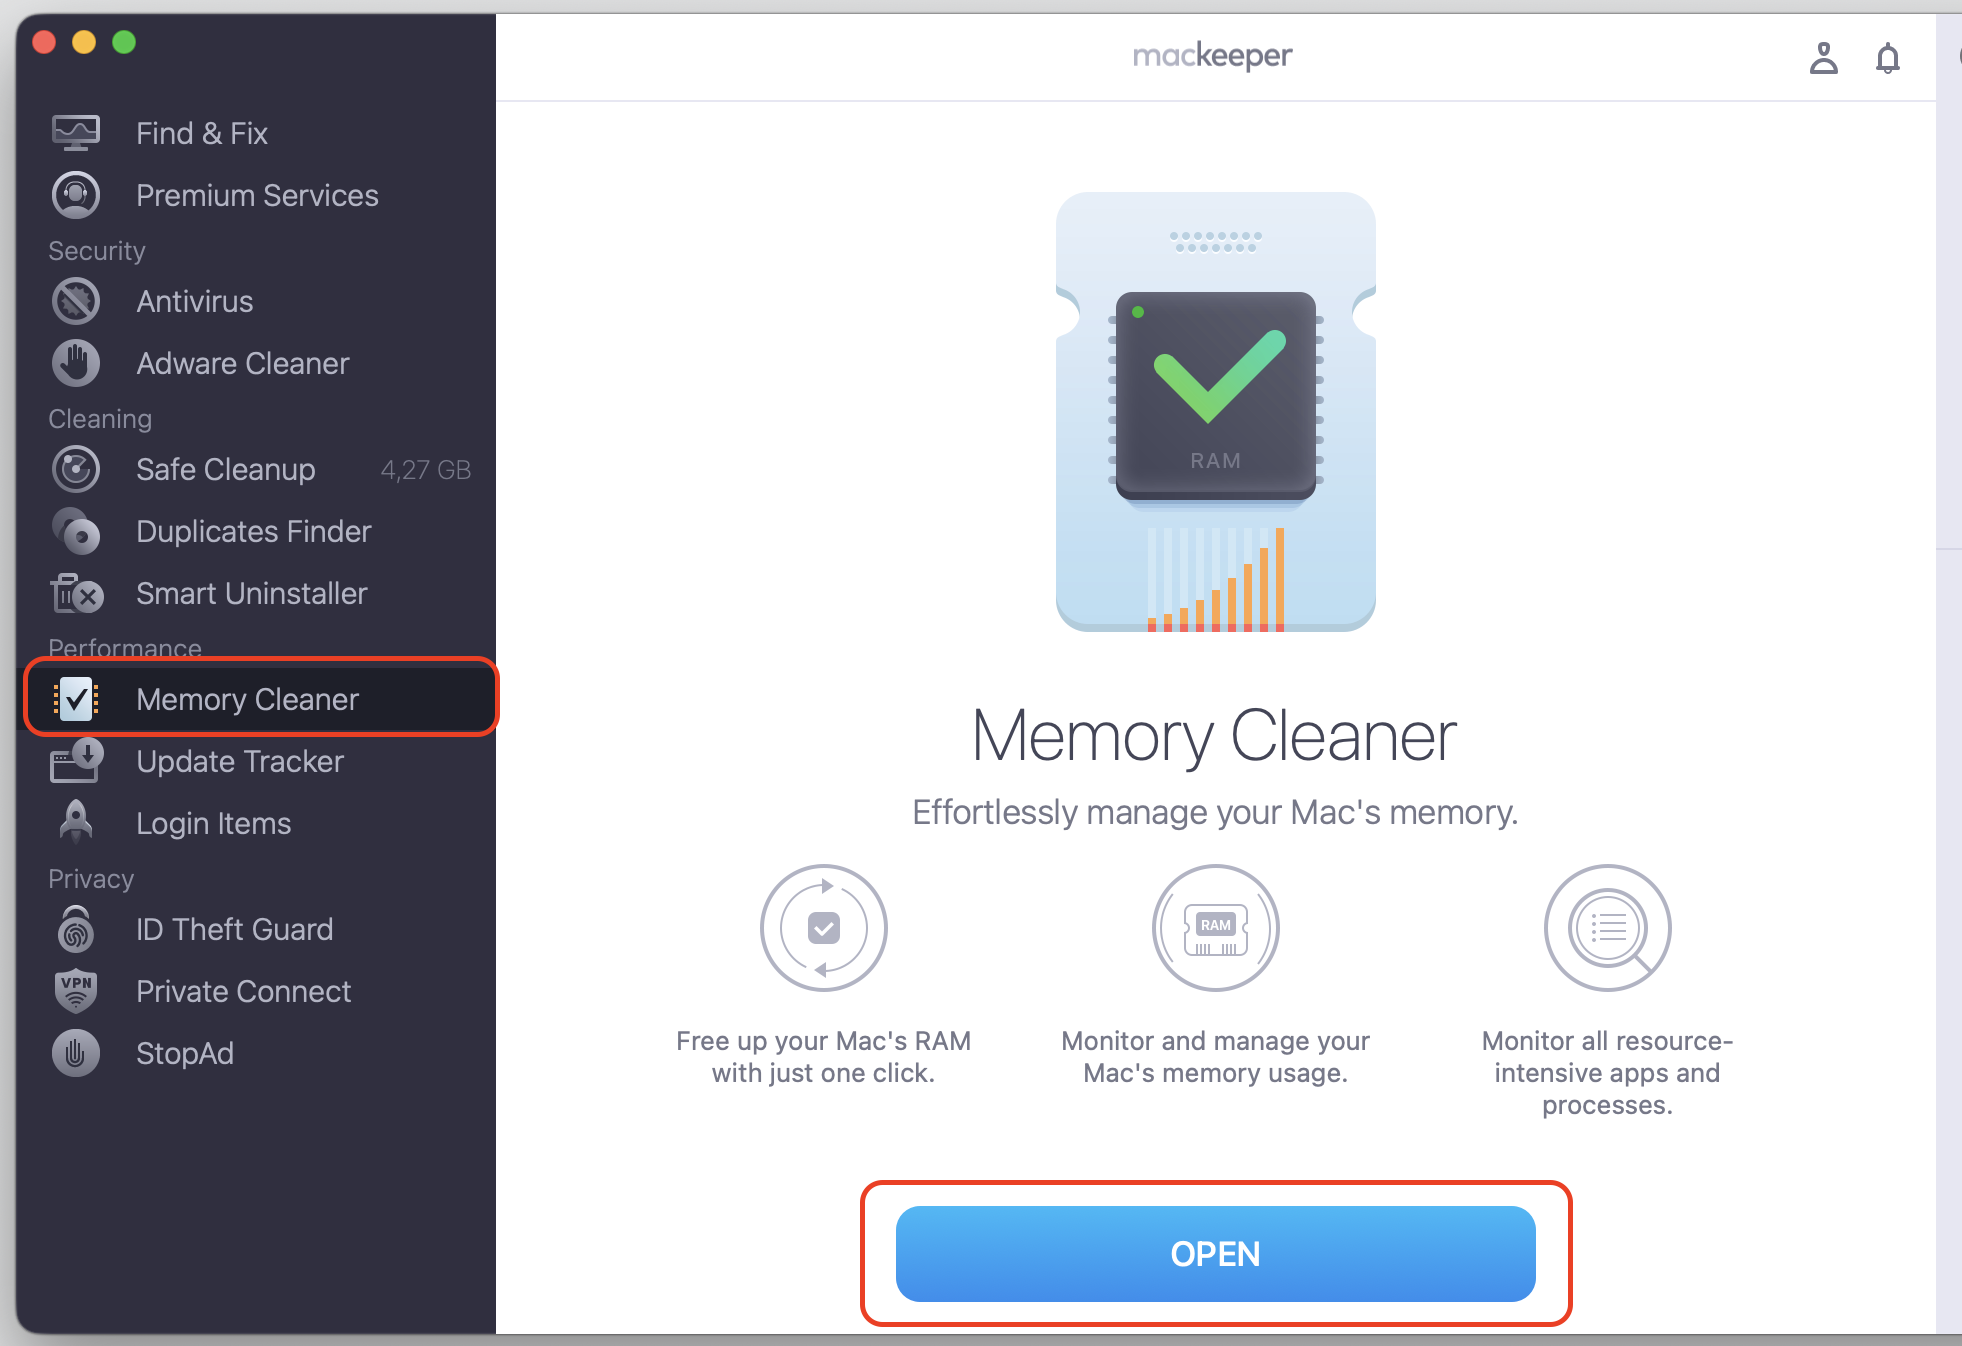
Select Memory Cleaner from the list and then click Open.
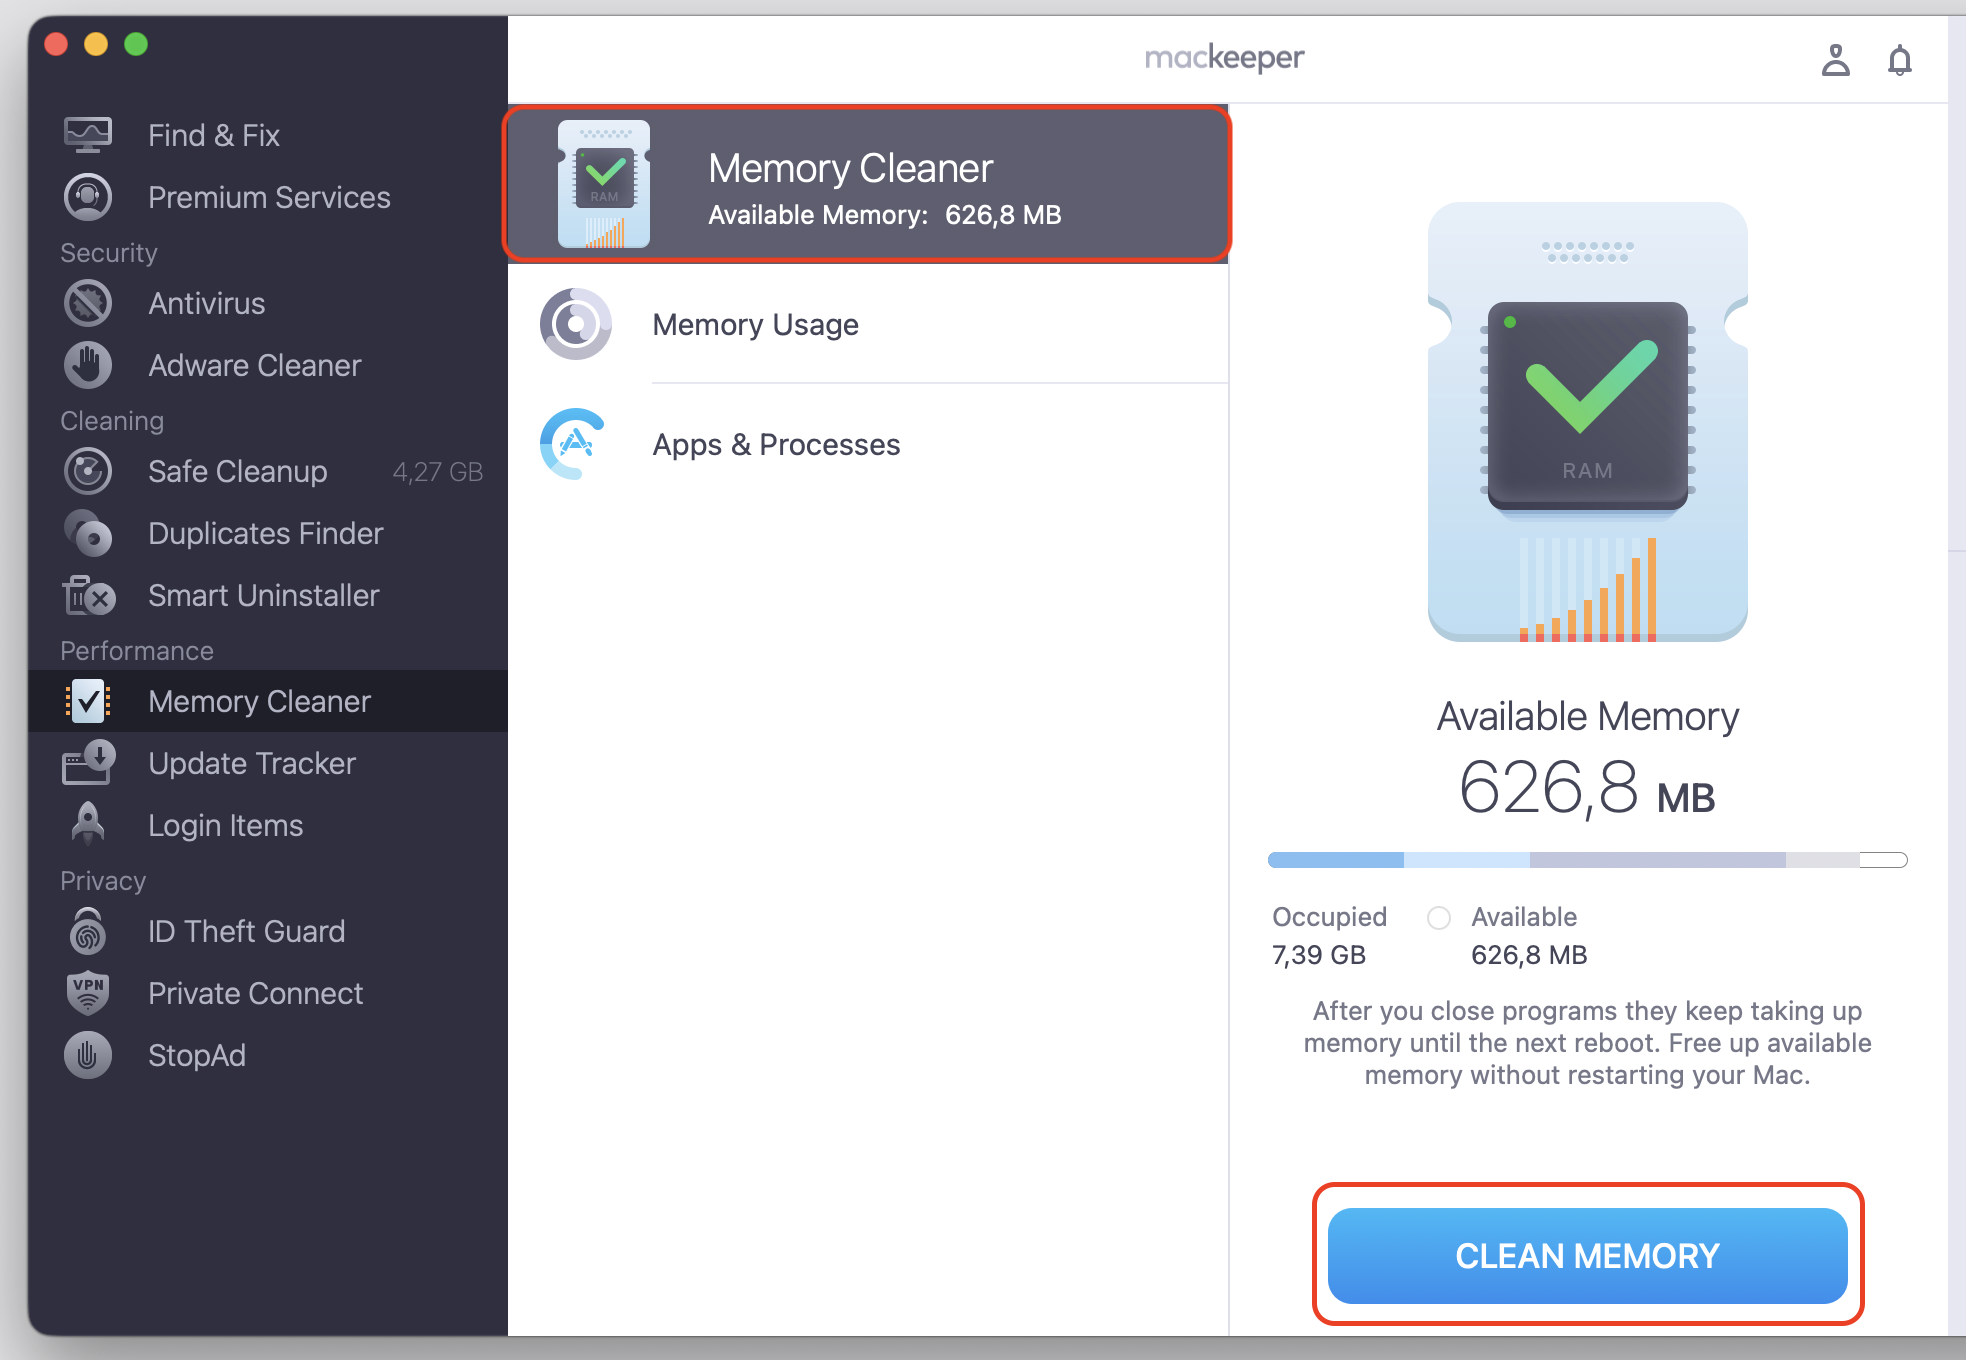
Review the report and proceed with the Clean Memory button.
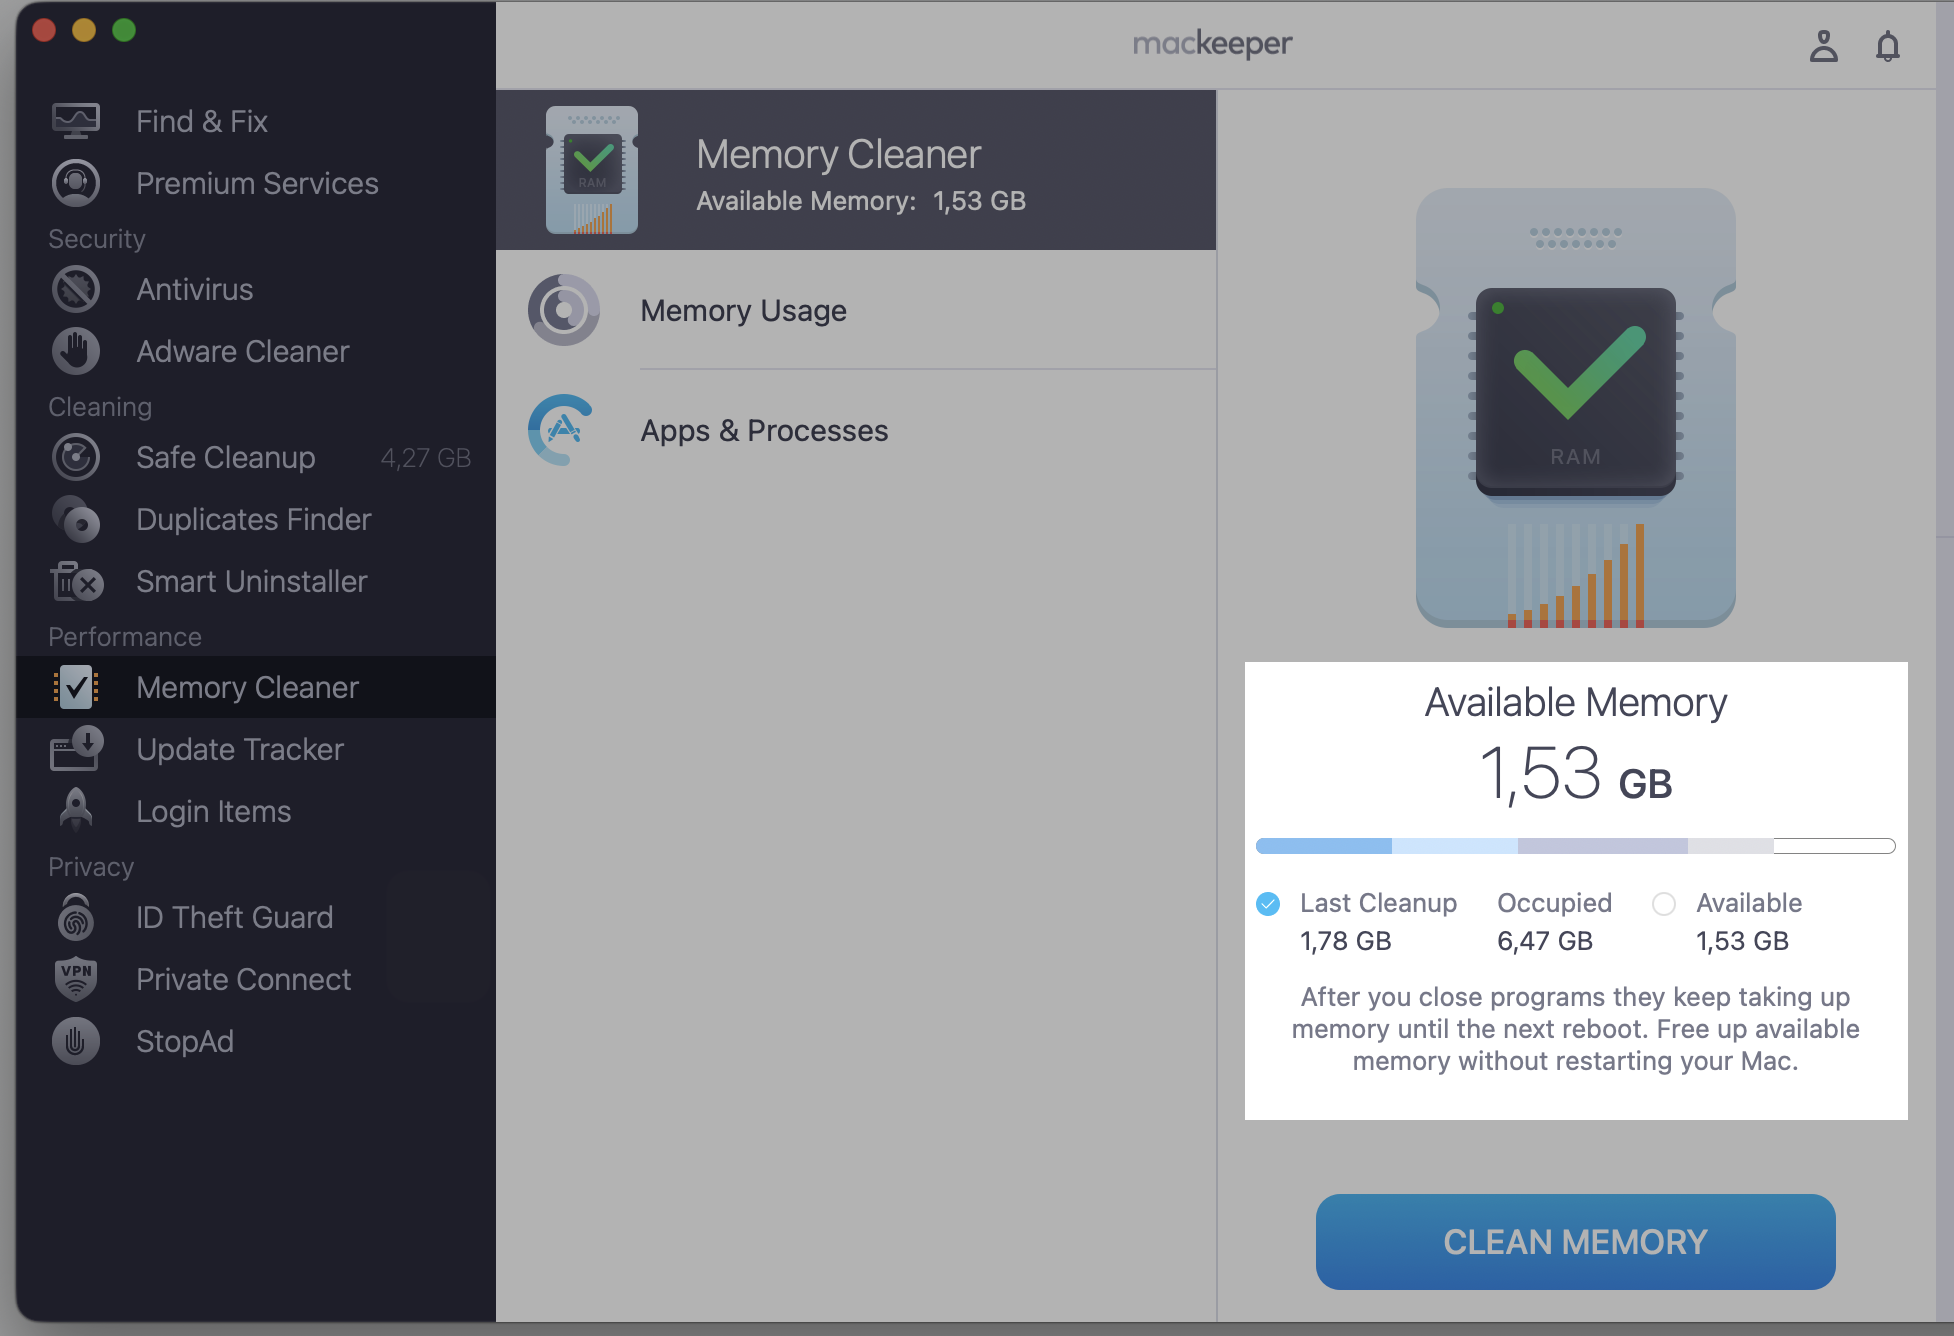
The app shows the available memory on your device.
Step 1. Choose MacKeeper’s Memory Cleaner > OpenStep 2. Click Memory Cleaner > Clean MemoryStep 3. Check the available memory after the cleaning is over
How to improve Mac Sequoia speed?
Ready to improve Mac Sequoia speed for good? We’ve ordered our methods below from the quickest wins to the deeper adjustments, and together they’re our go-to routine to fix slow Mac behavior after any big update. Work through them from the top and test how your Mac feels after each change, before you decide it needs a trip to the repair shop.
1. Restart your Mac regularly
When did you last shut down properly? A simple restart clears temporary cache files, stops runaway background processes, and refreshes your system memory—which is why we always try it first. Learning to restart your MacBook the right way takes seconds and often solves the lag on its own.
It takes just a moment:
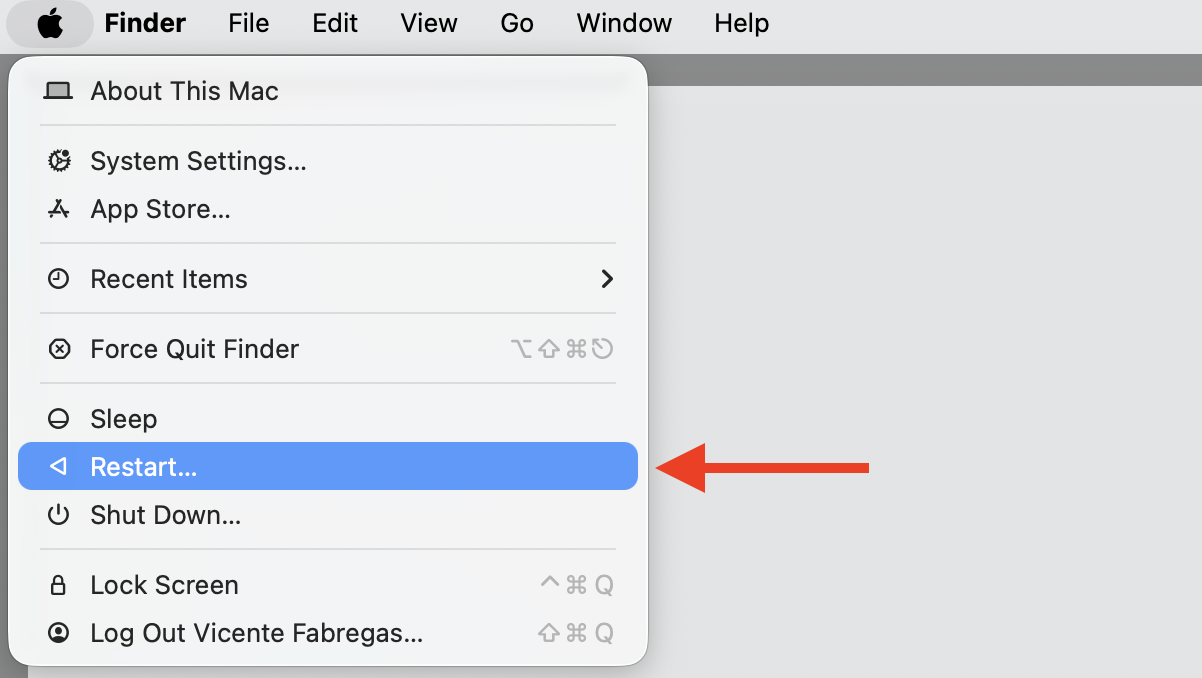
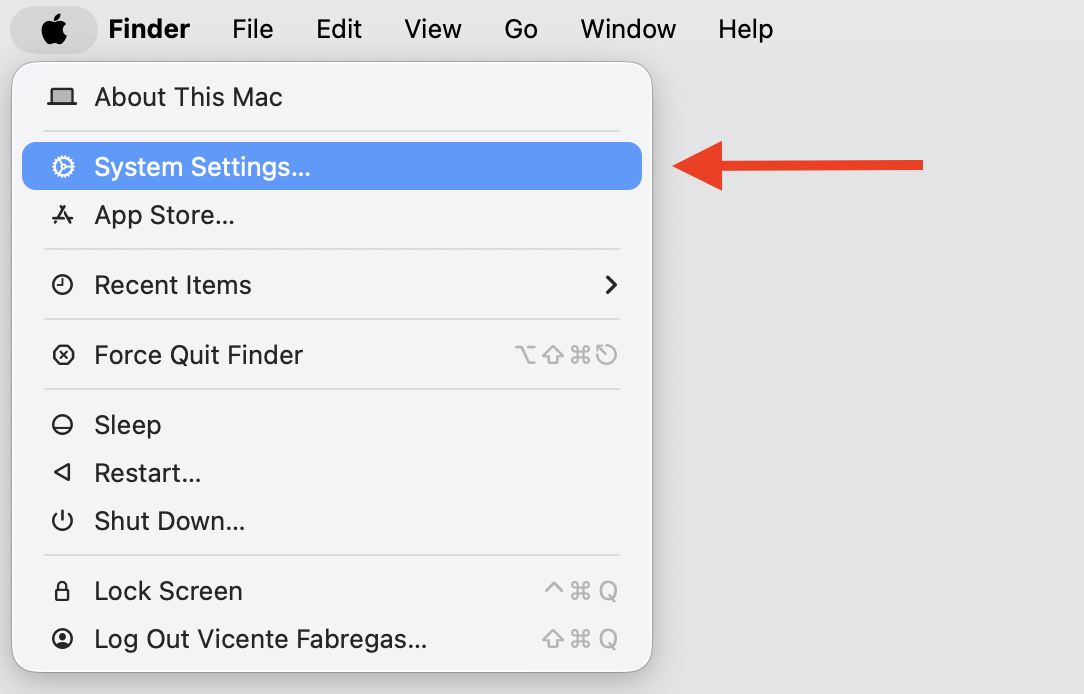
Click the Apple menu in the top-left corner of your screen.
Select Restart from the drop-down.
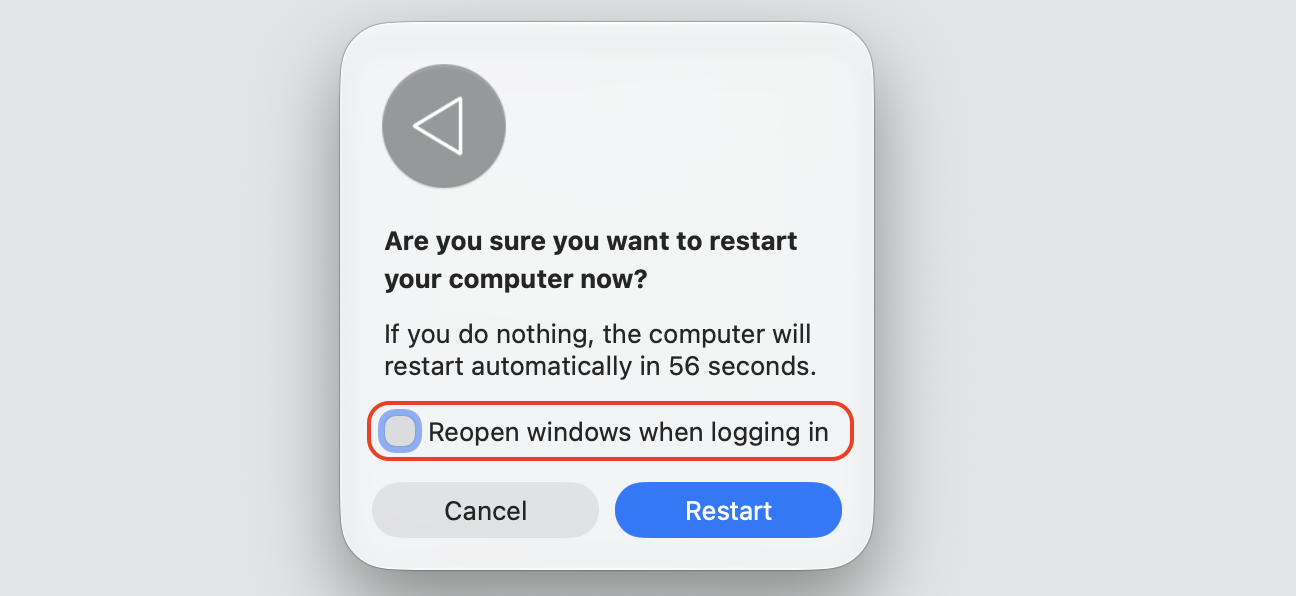
Deselect Reopen windows when logging back in so you start fresh.
Click Restart again to confirm.
Step 1. Restart your Mac from the Apple LogoStep 2. Deselect Reopen windows and proceed with Restart
2. Update macOS Sequoia and installed applications
Keeping everything current is one of the friendliest things you can do for your Mac. Apple ships regular patches that squash bugs and ease performance bottlenecks, so it’s worth taking a minute to install latest version macOS updates as they arrive. Updating your apps matters too—developers tune their software for each new macOS release.
Take these steps to get fully up to date:
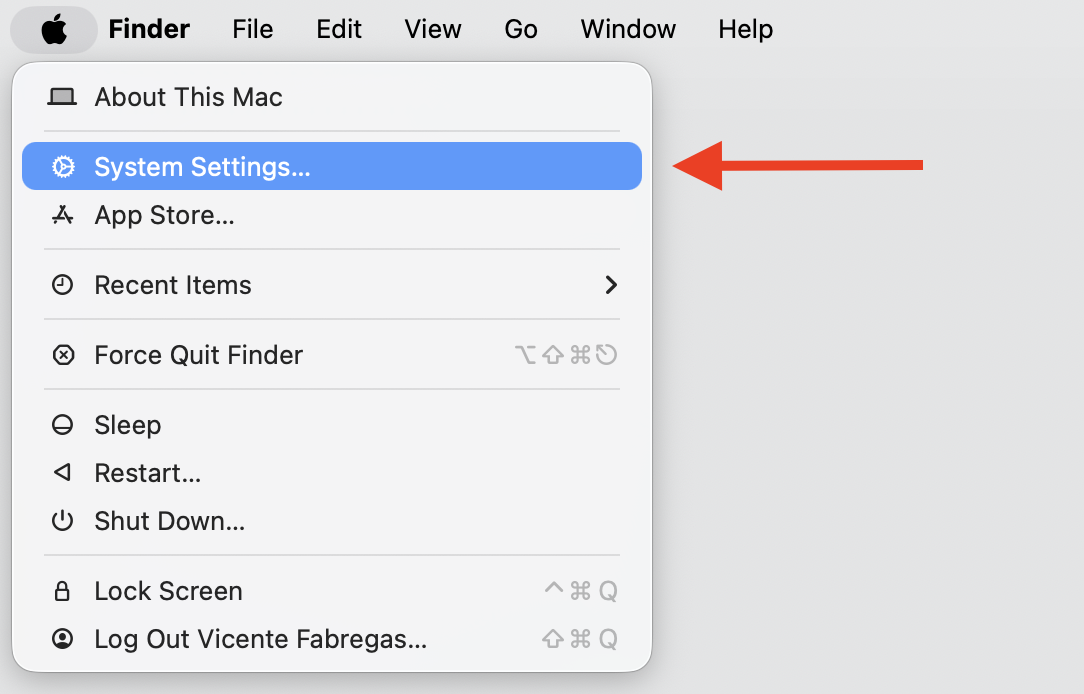
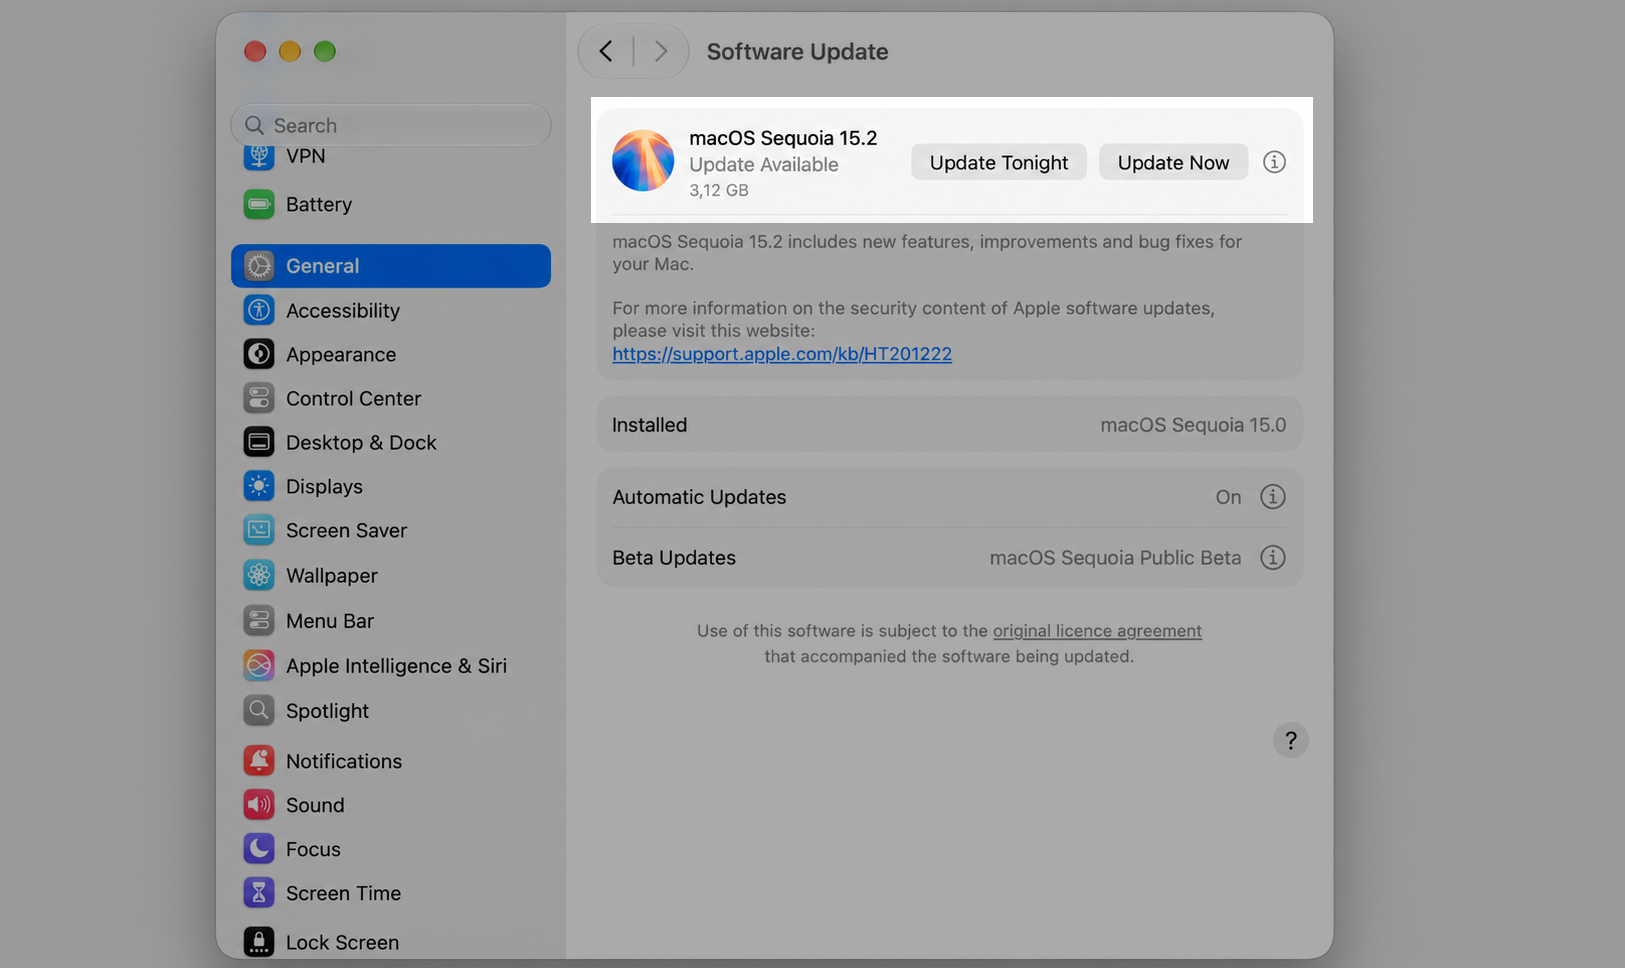
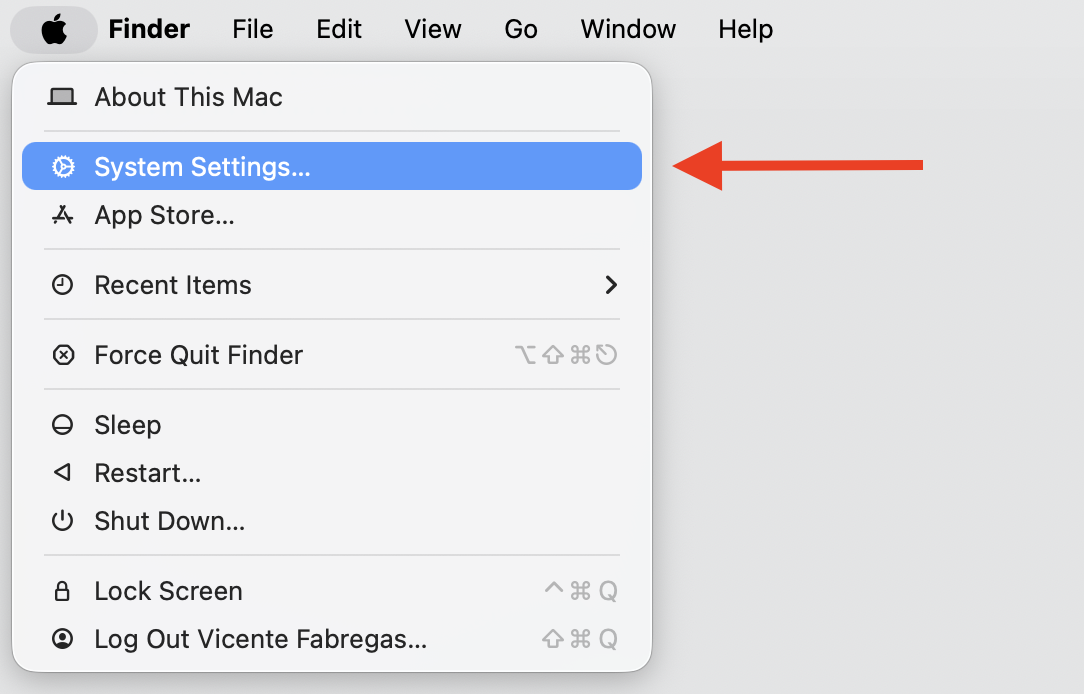
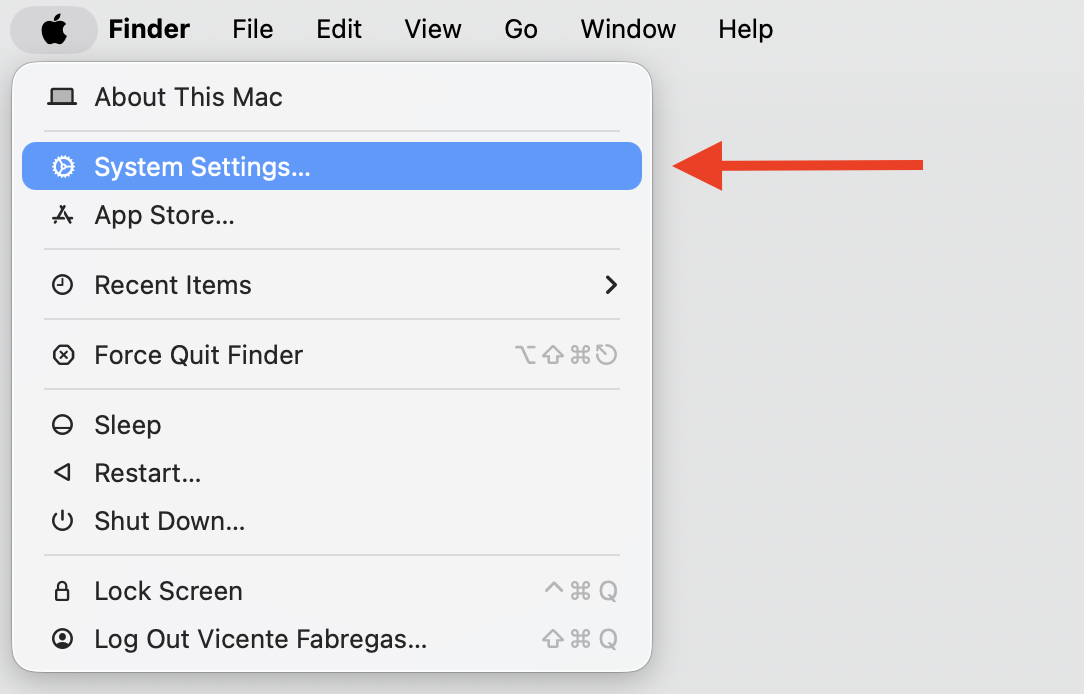
Open the Apple menu and choose System Settings.
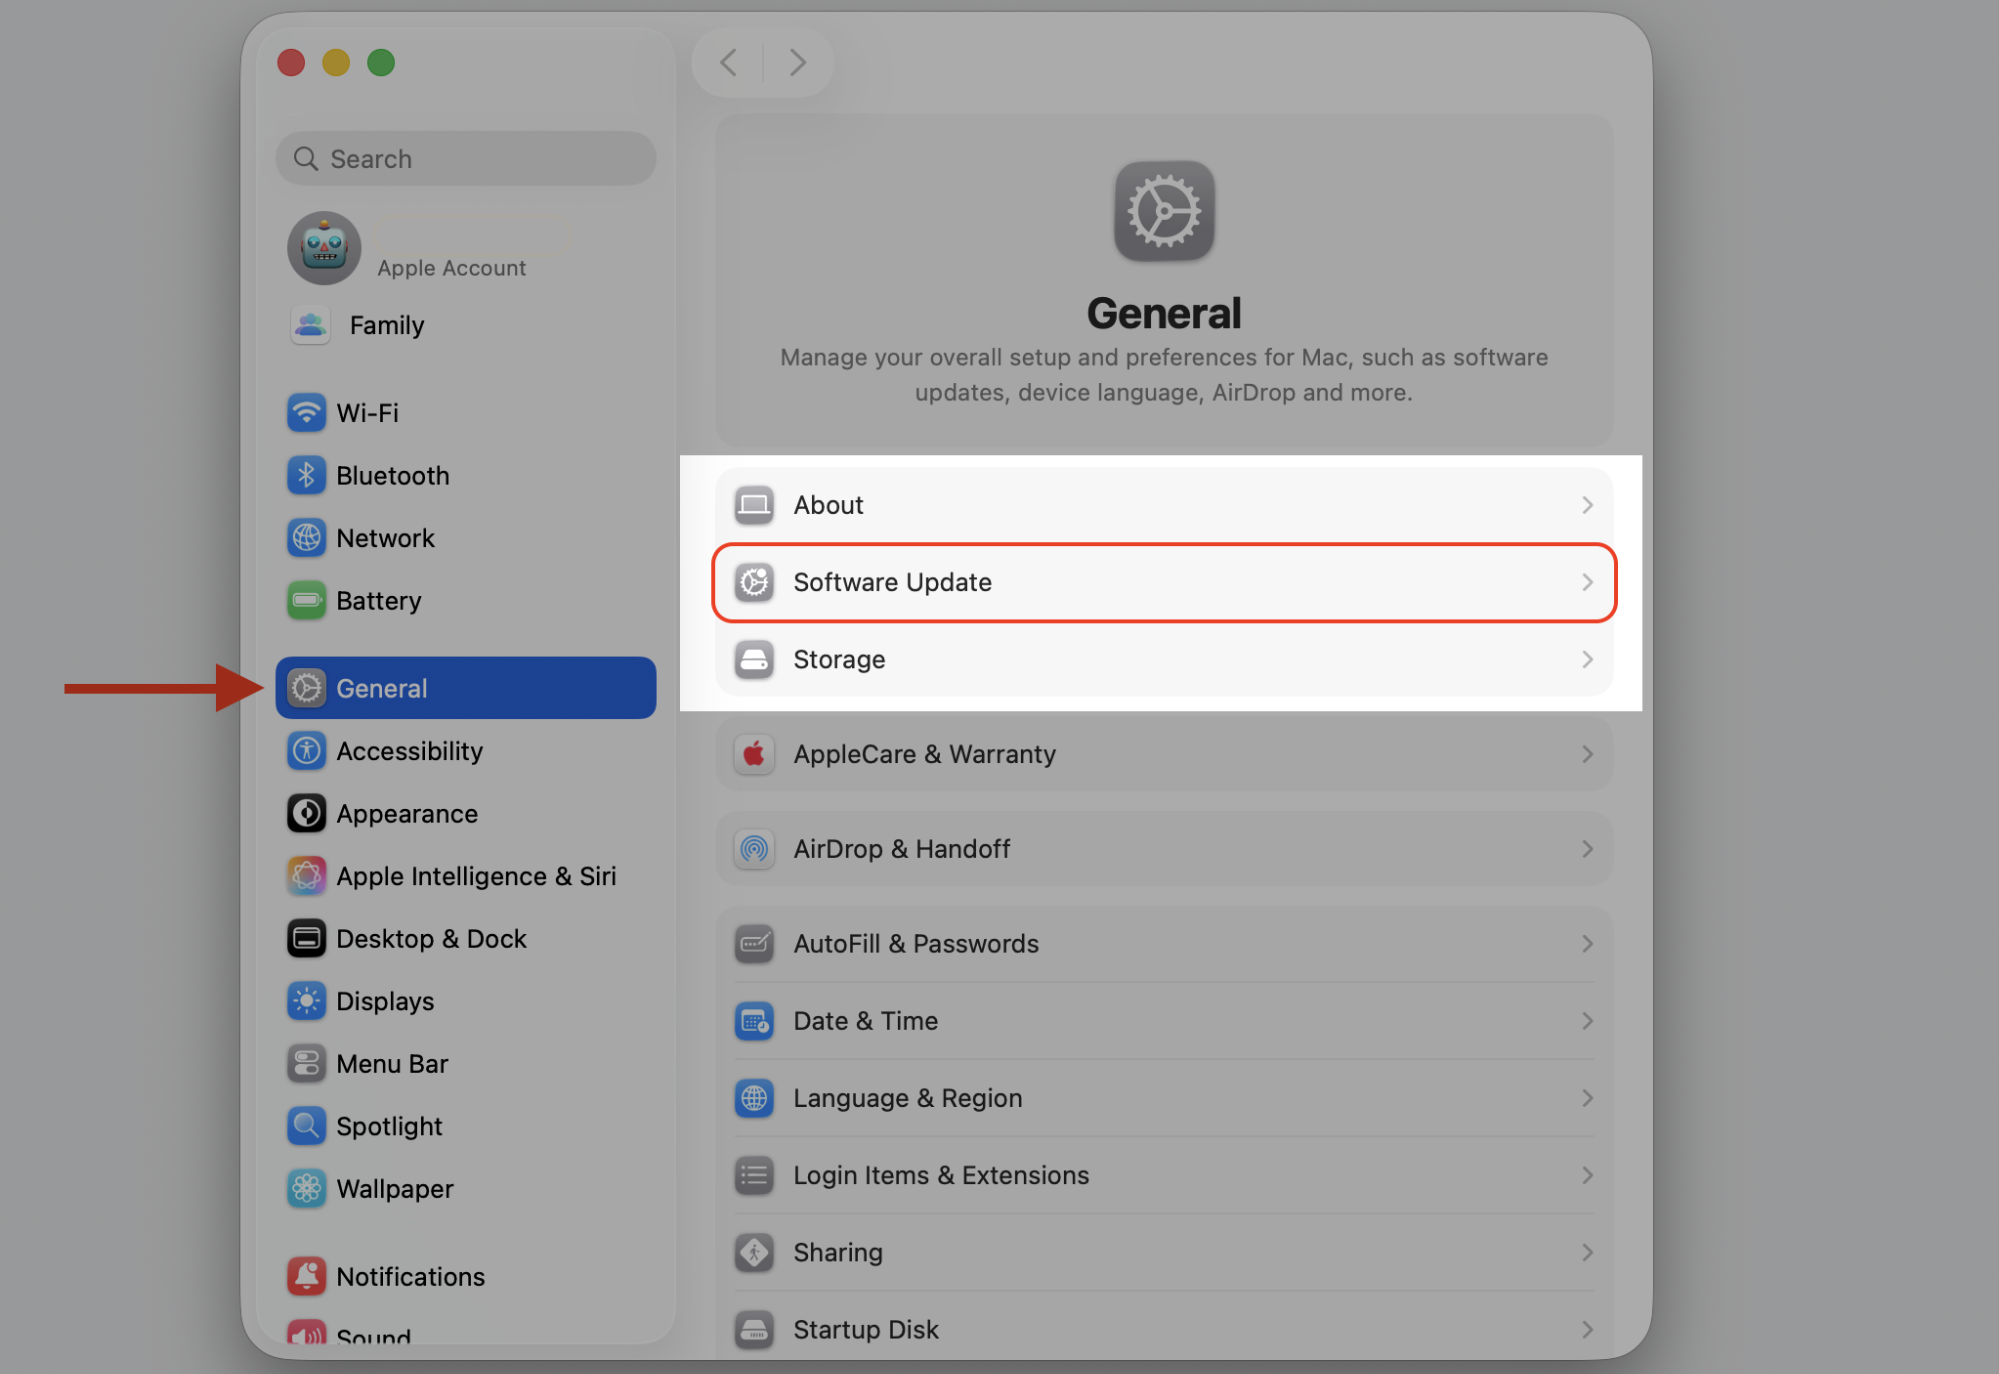
Go to General > Software Update and install anything that’s waiting.
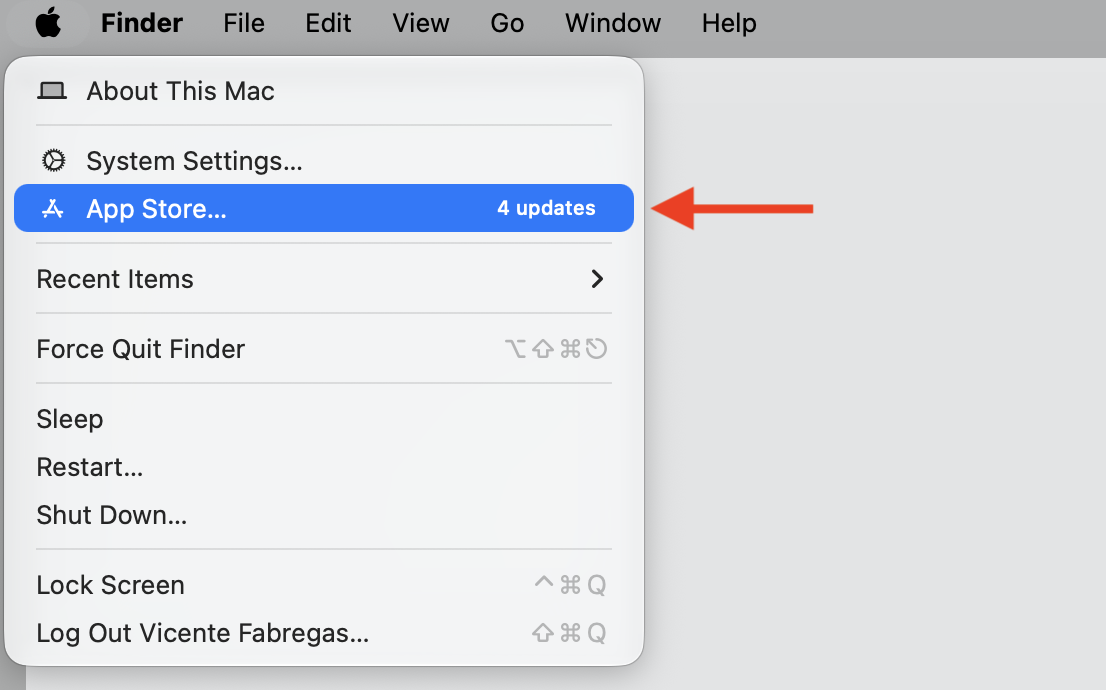
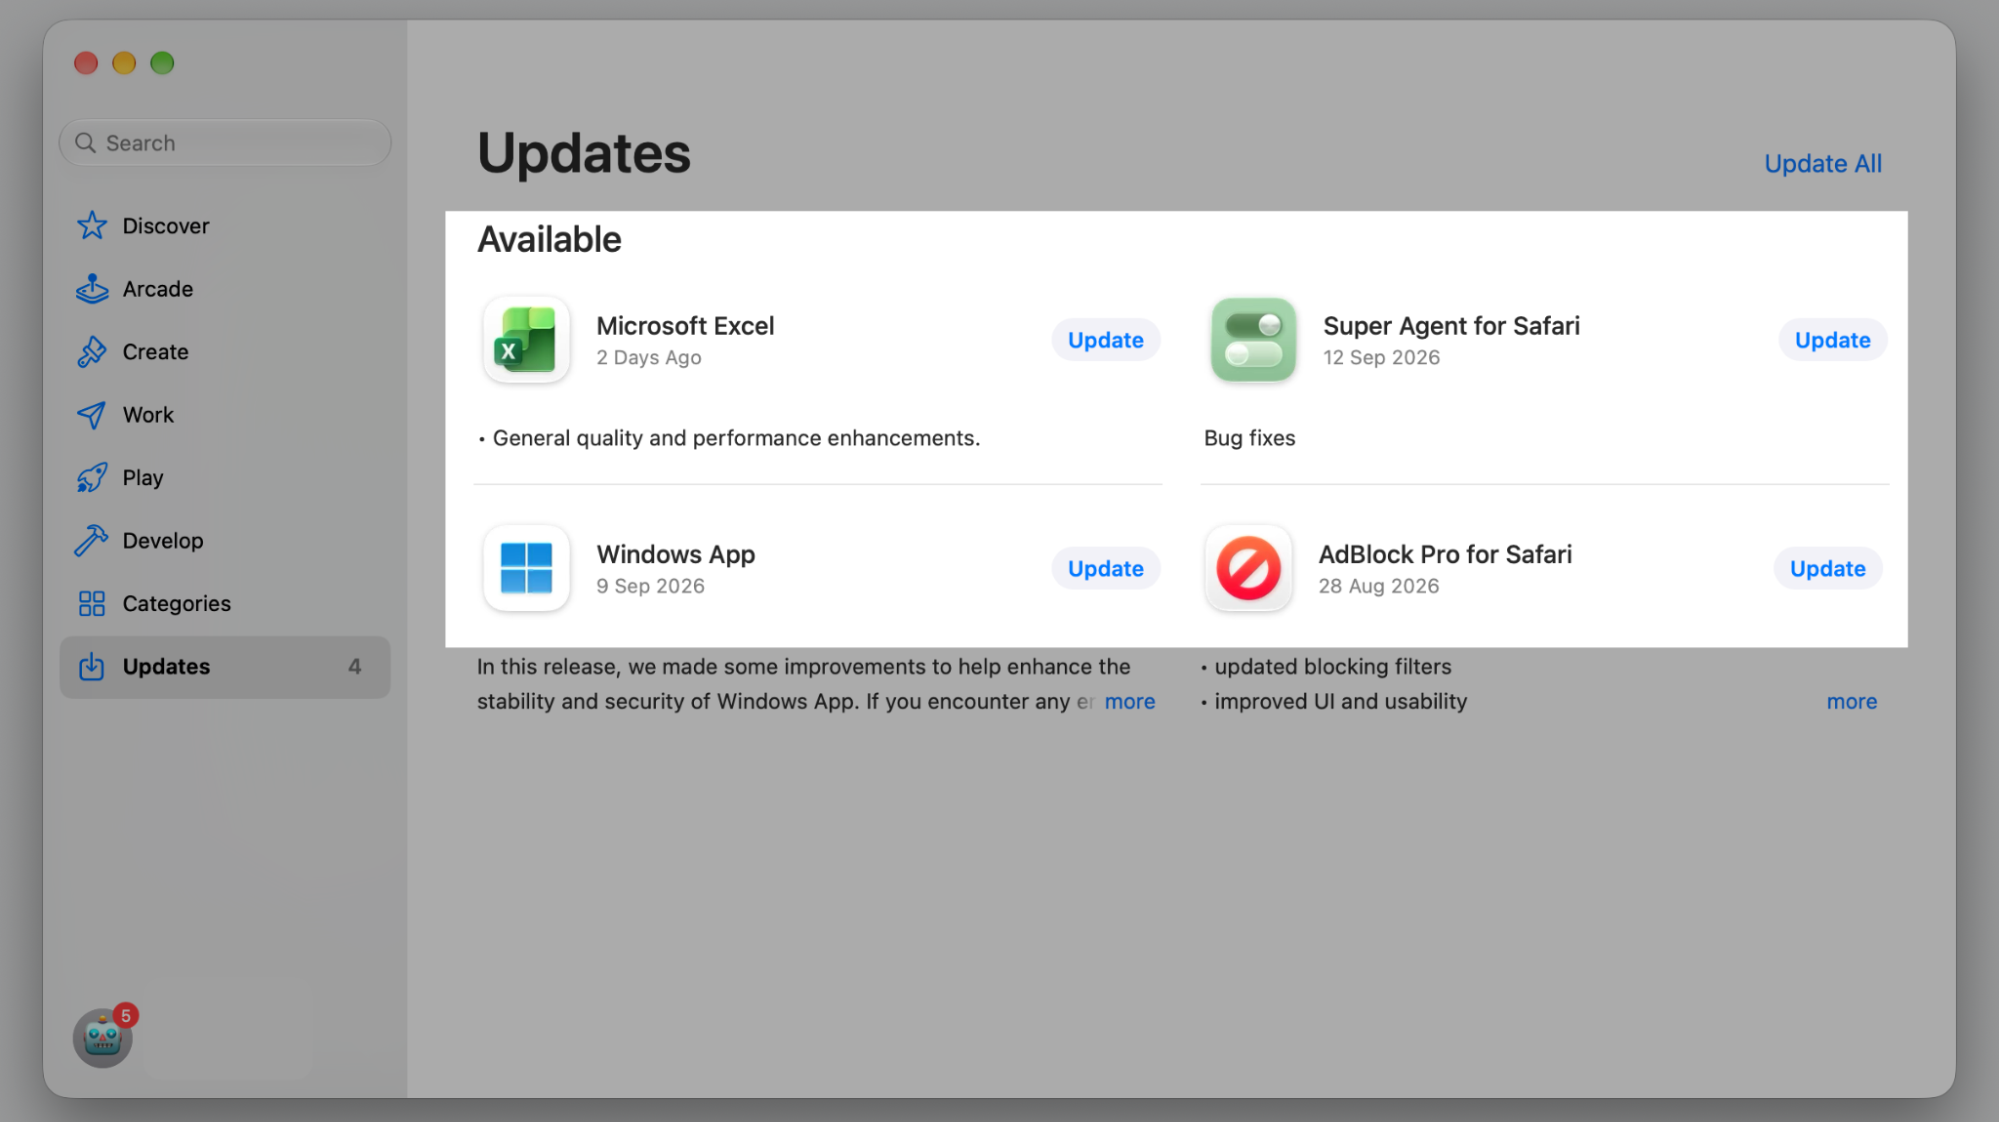
Open the App Store, then click Updates to refresh your apps.
For apps you downloaded elsewhere, check the developer’s website for the latest version.
Step 1. Go to the Apple Logo > System SettingsStep 2. Select Software Update from the General sectionStep 3. Select the Update Now optionStep 4. Open the Apple menu again and select App StoreStep 5. Update the App from the Available list
3. Disable heavy visual effects and animations
Sequoia’s smooth animations look lovely, but they lean on your graphics chip and CPU. If your Mac is lagging during everyday tasks, dialing them back reduces the load and frees up resources for the work that matters. This tip helps older Macs the most.
We suggest trying this to lighten the visual load:
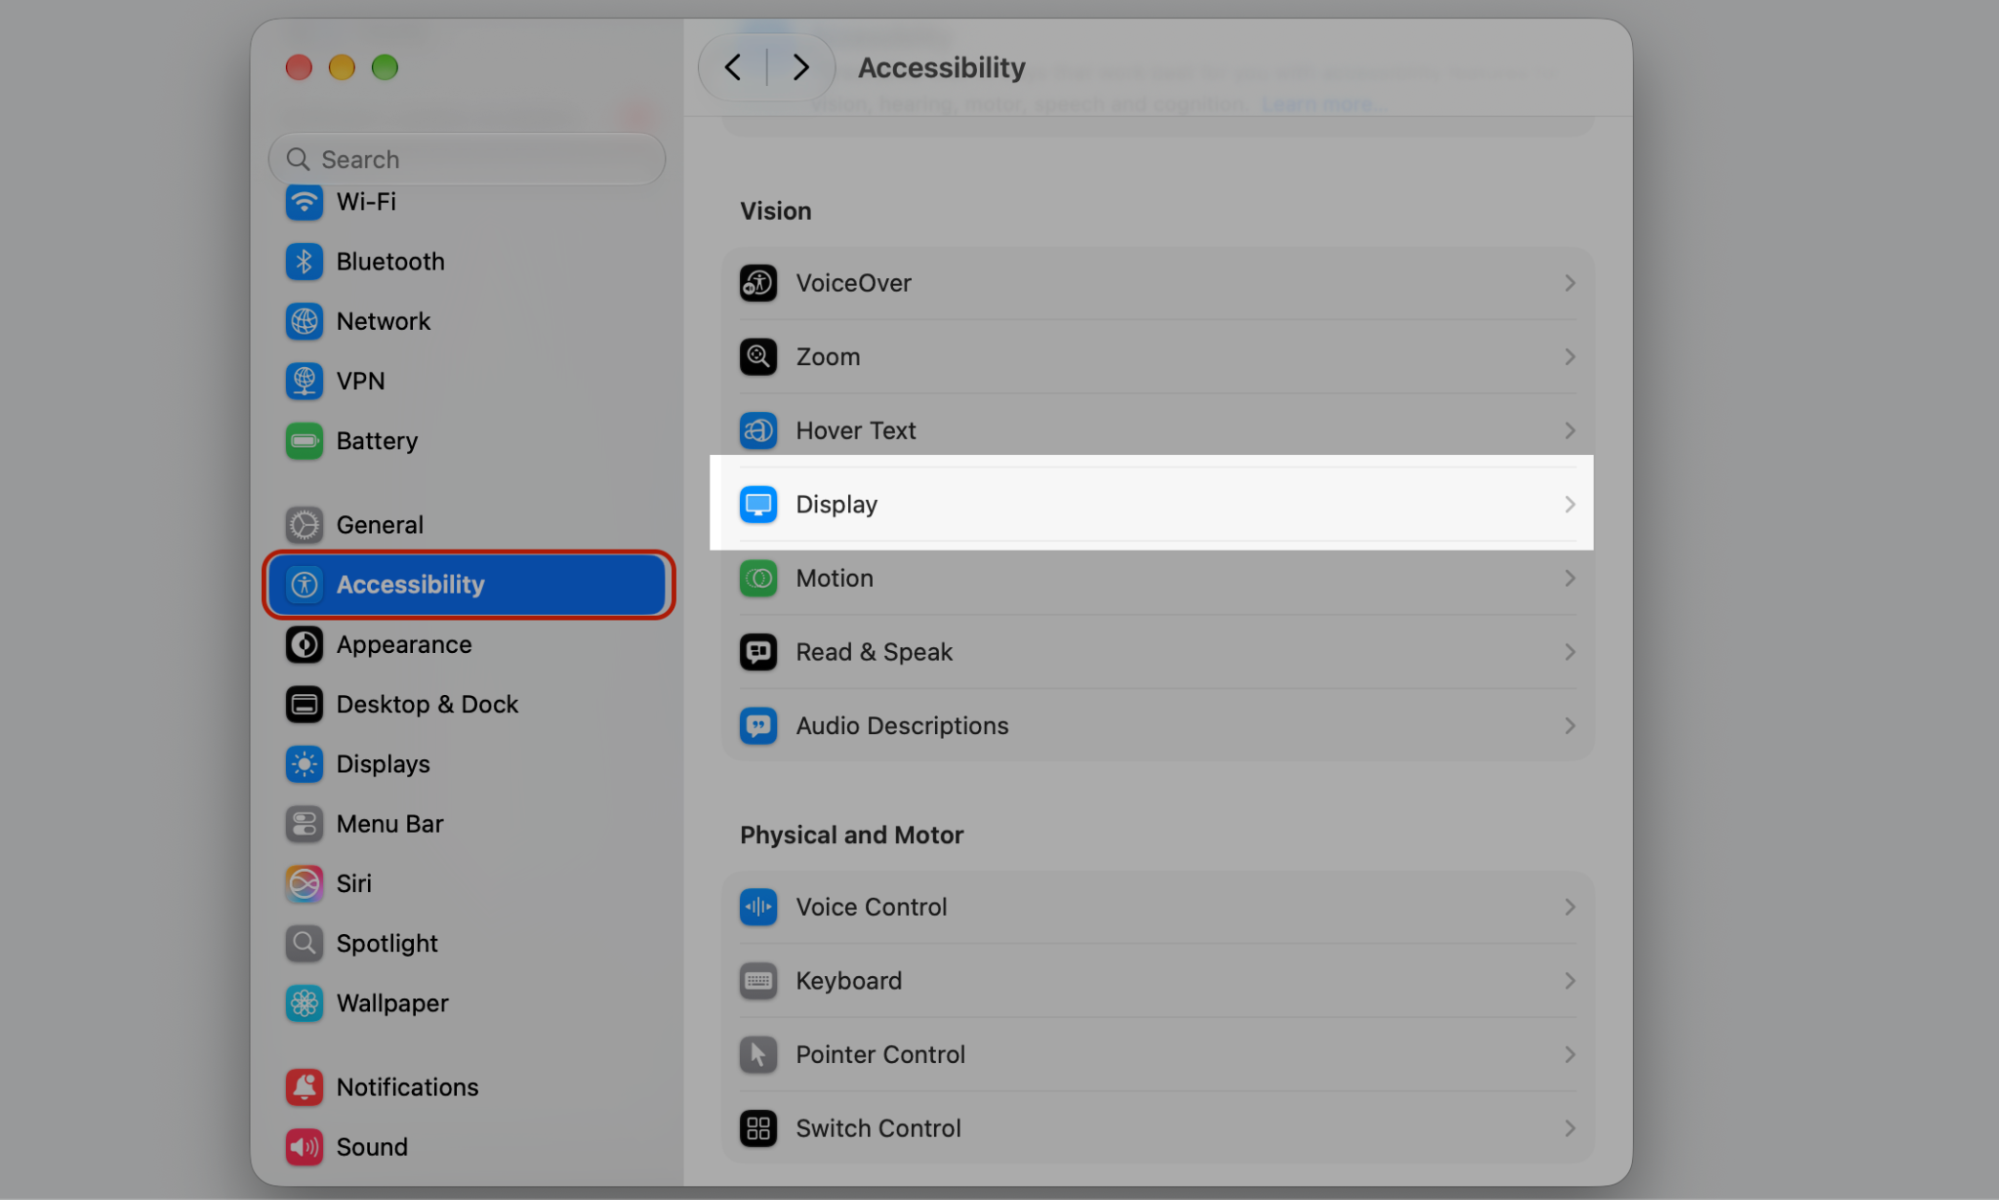
Open System Settings, then click Accessibility.
Select Display in the sidebar.
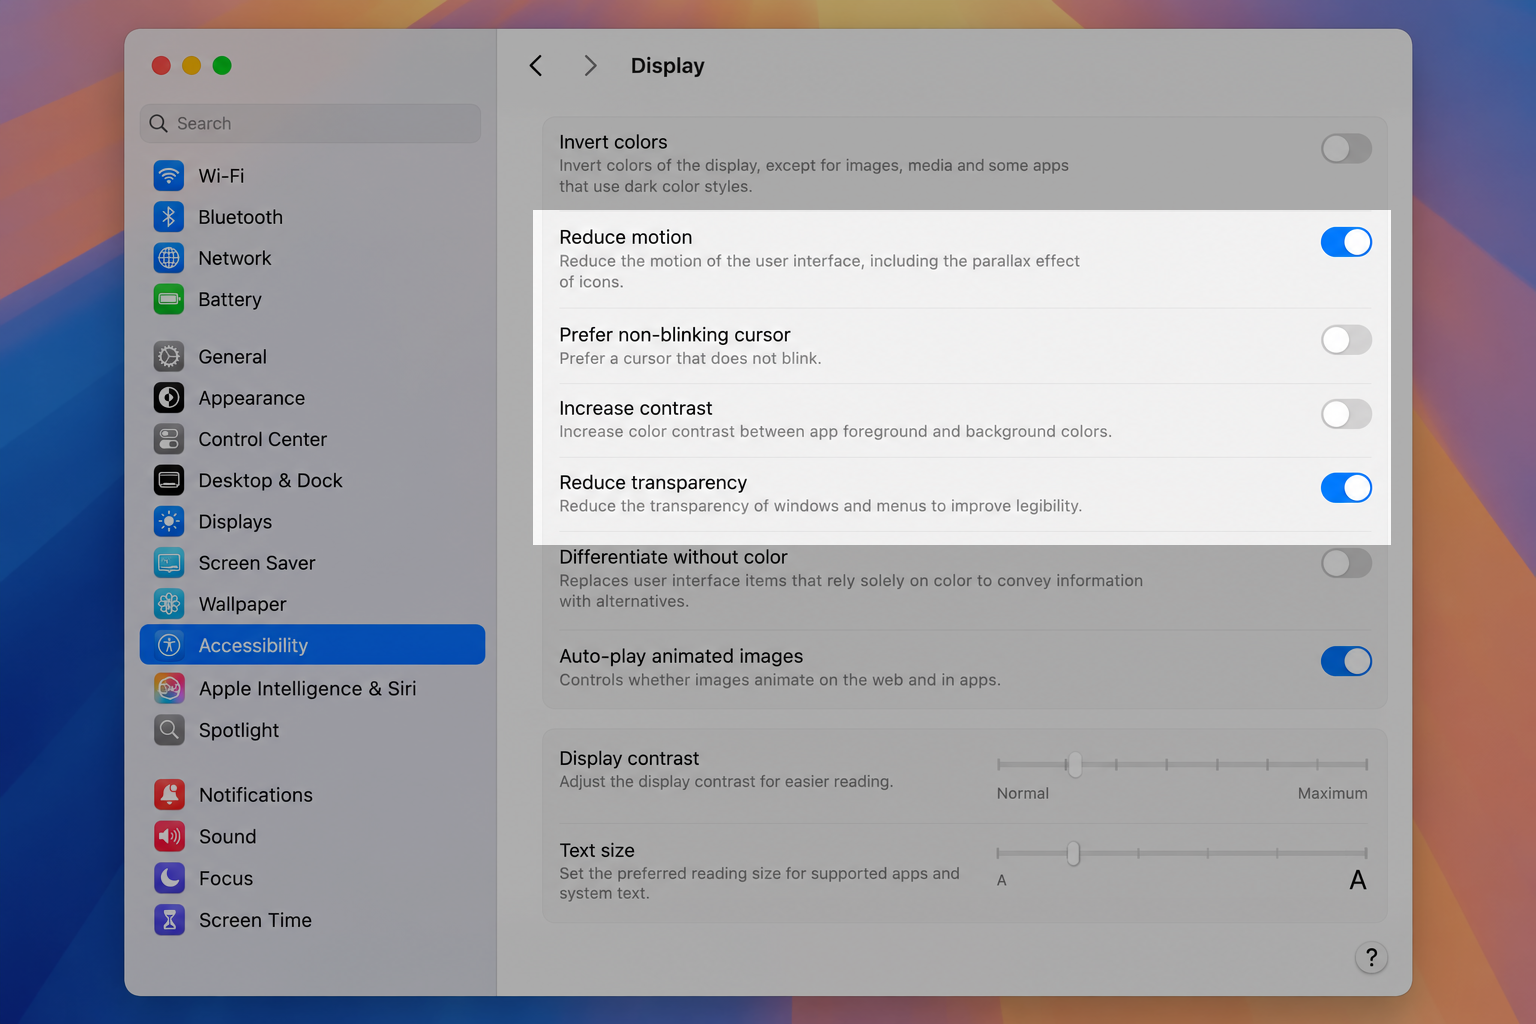
Turn on Reduce transparency and Reduce motion.
Restart any open app to feel the difference.
Step 1. Go to the Apple Logo > System SettingsStep 2. Select Display from AccessibilityStep 3. Turn on Reduce transparency and Reduce motion
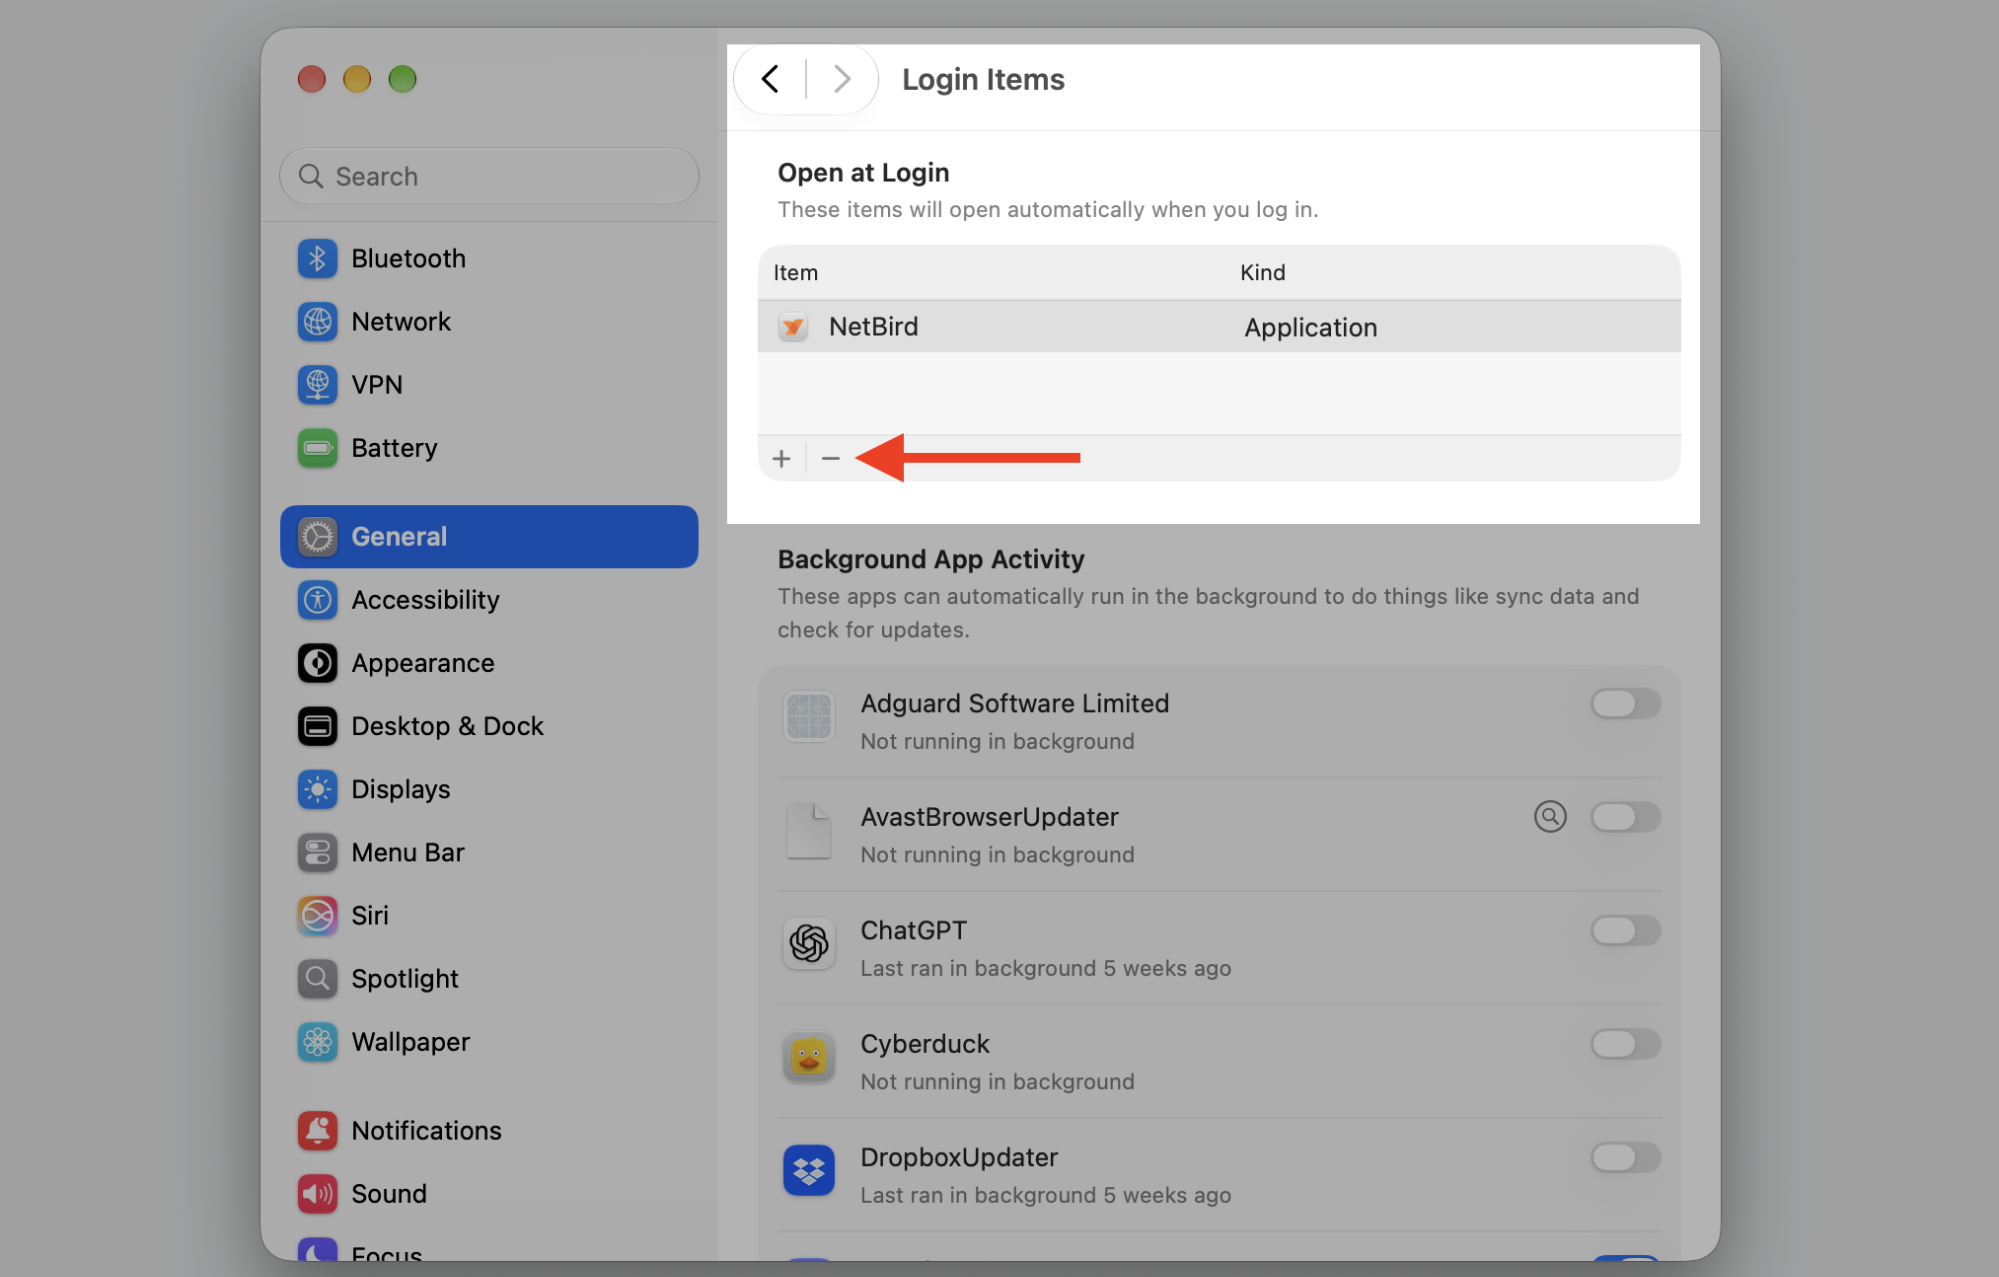
4. Manage startup apps and background login items
Do you know what launches the moment you log in? Every app that starts automatically adds to your boot time and quietly uses resources in the background. You can change startup apps on Mac from a single settings pane and reclaim that startup speed.
Here’s how to trim the list:
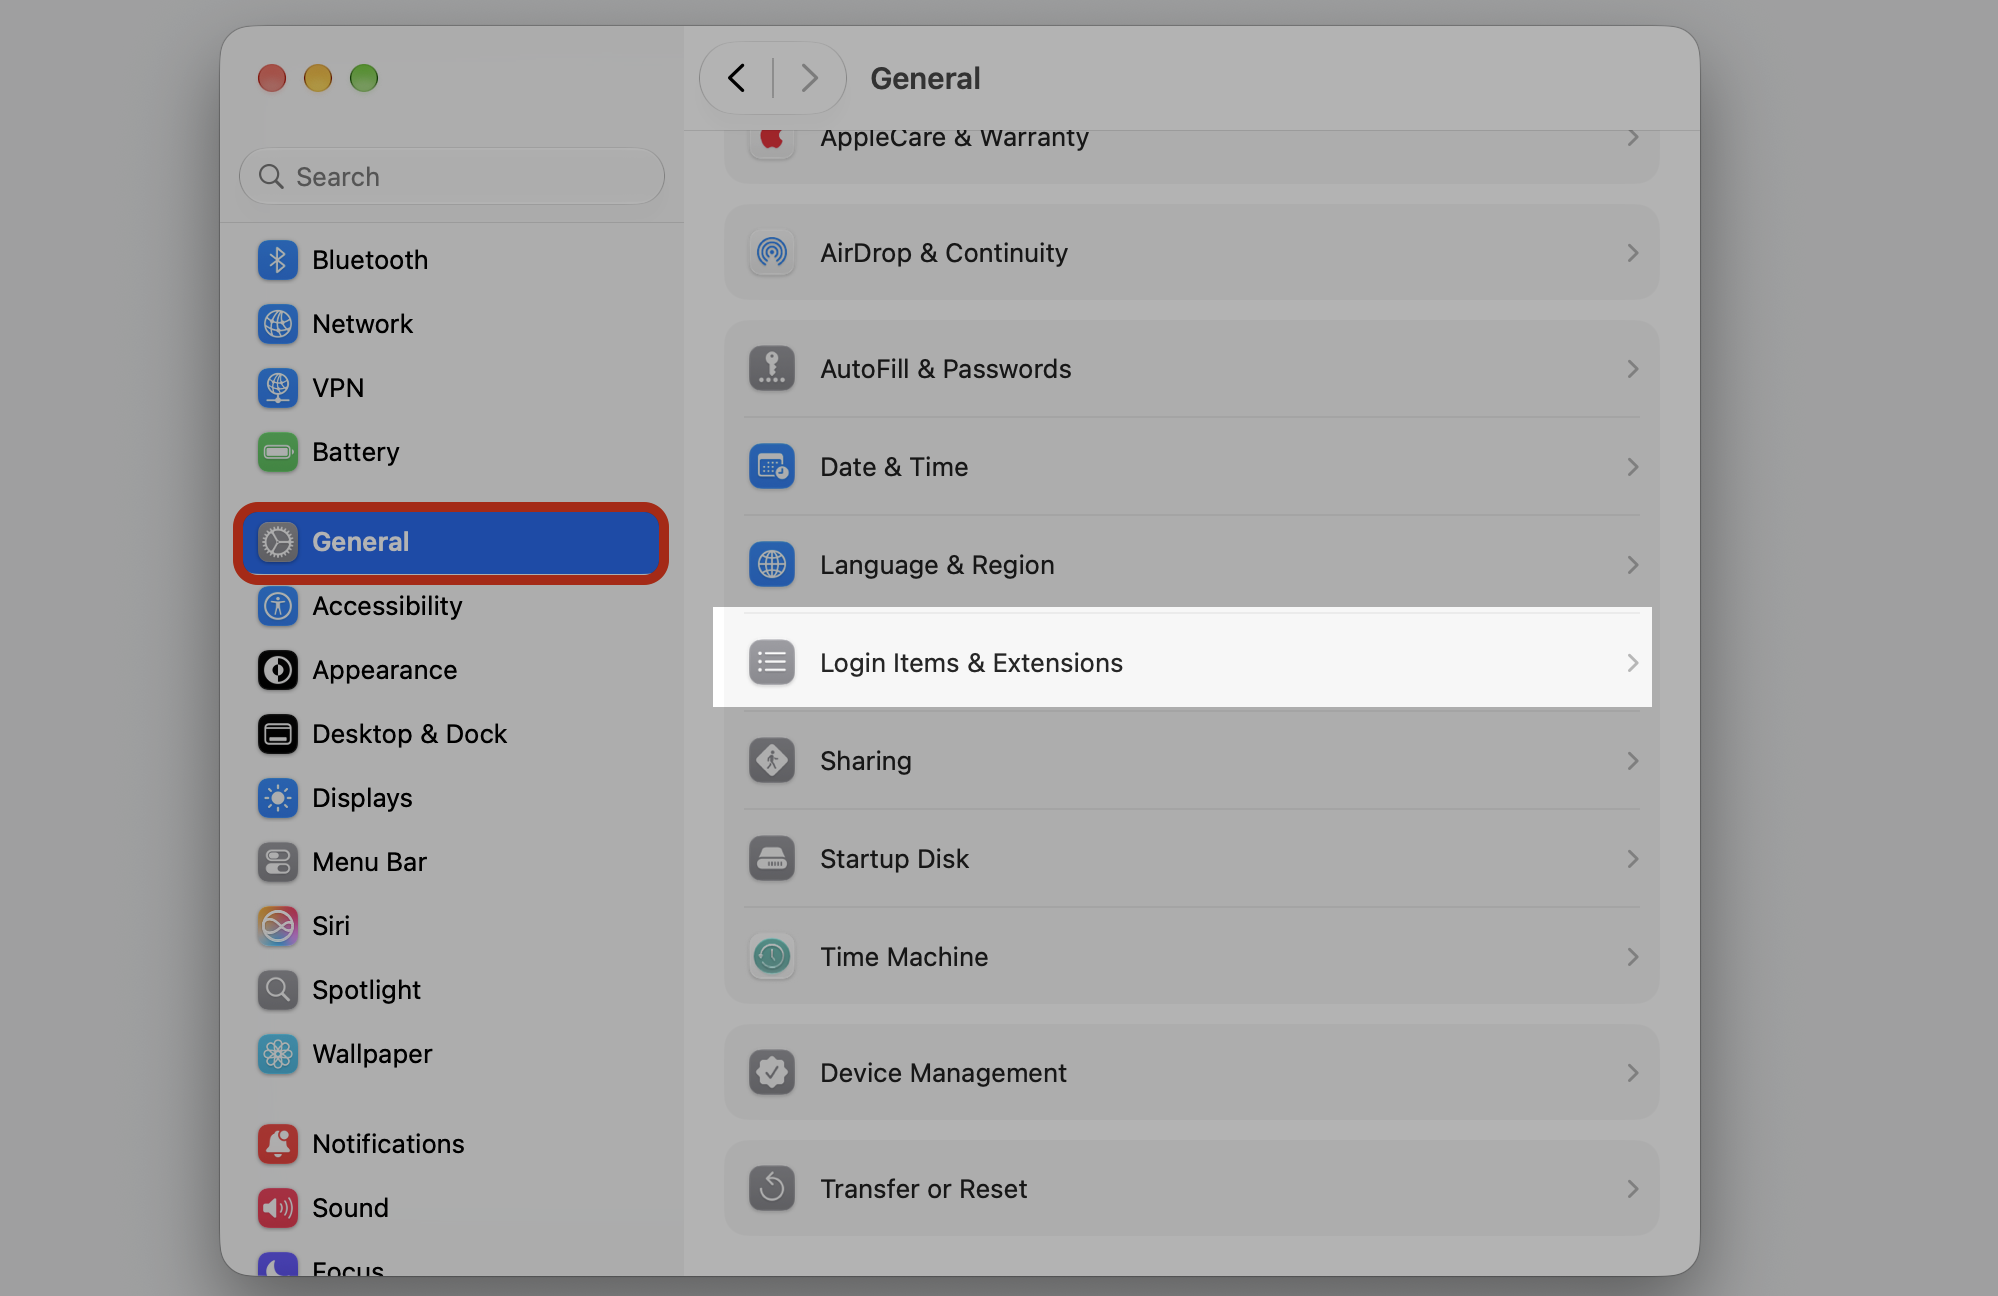
Open System Settings, then click General.
Select Login Items & Extensions.
Under Open at Login, choose any unnecessary app and click the minus (–) button.
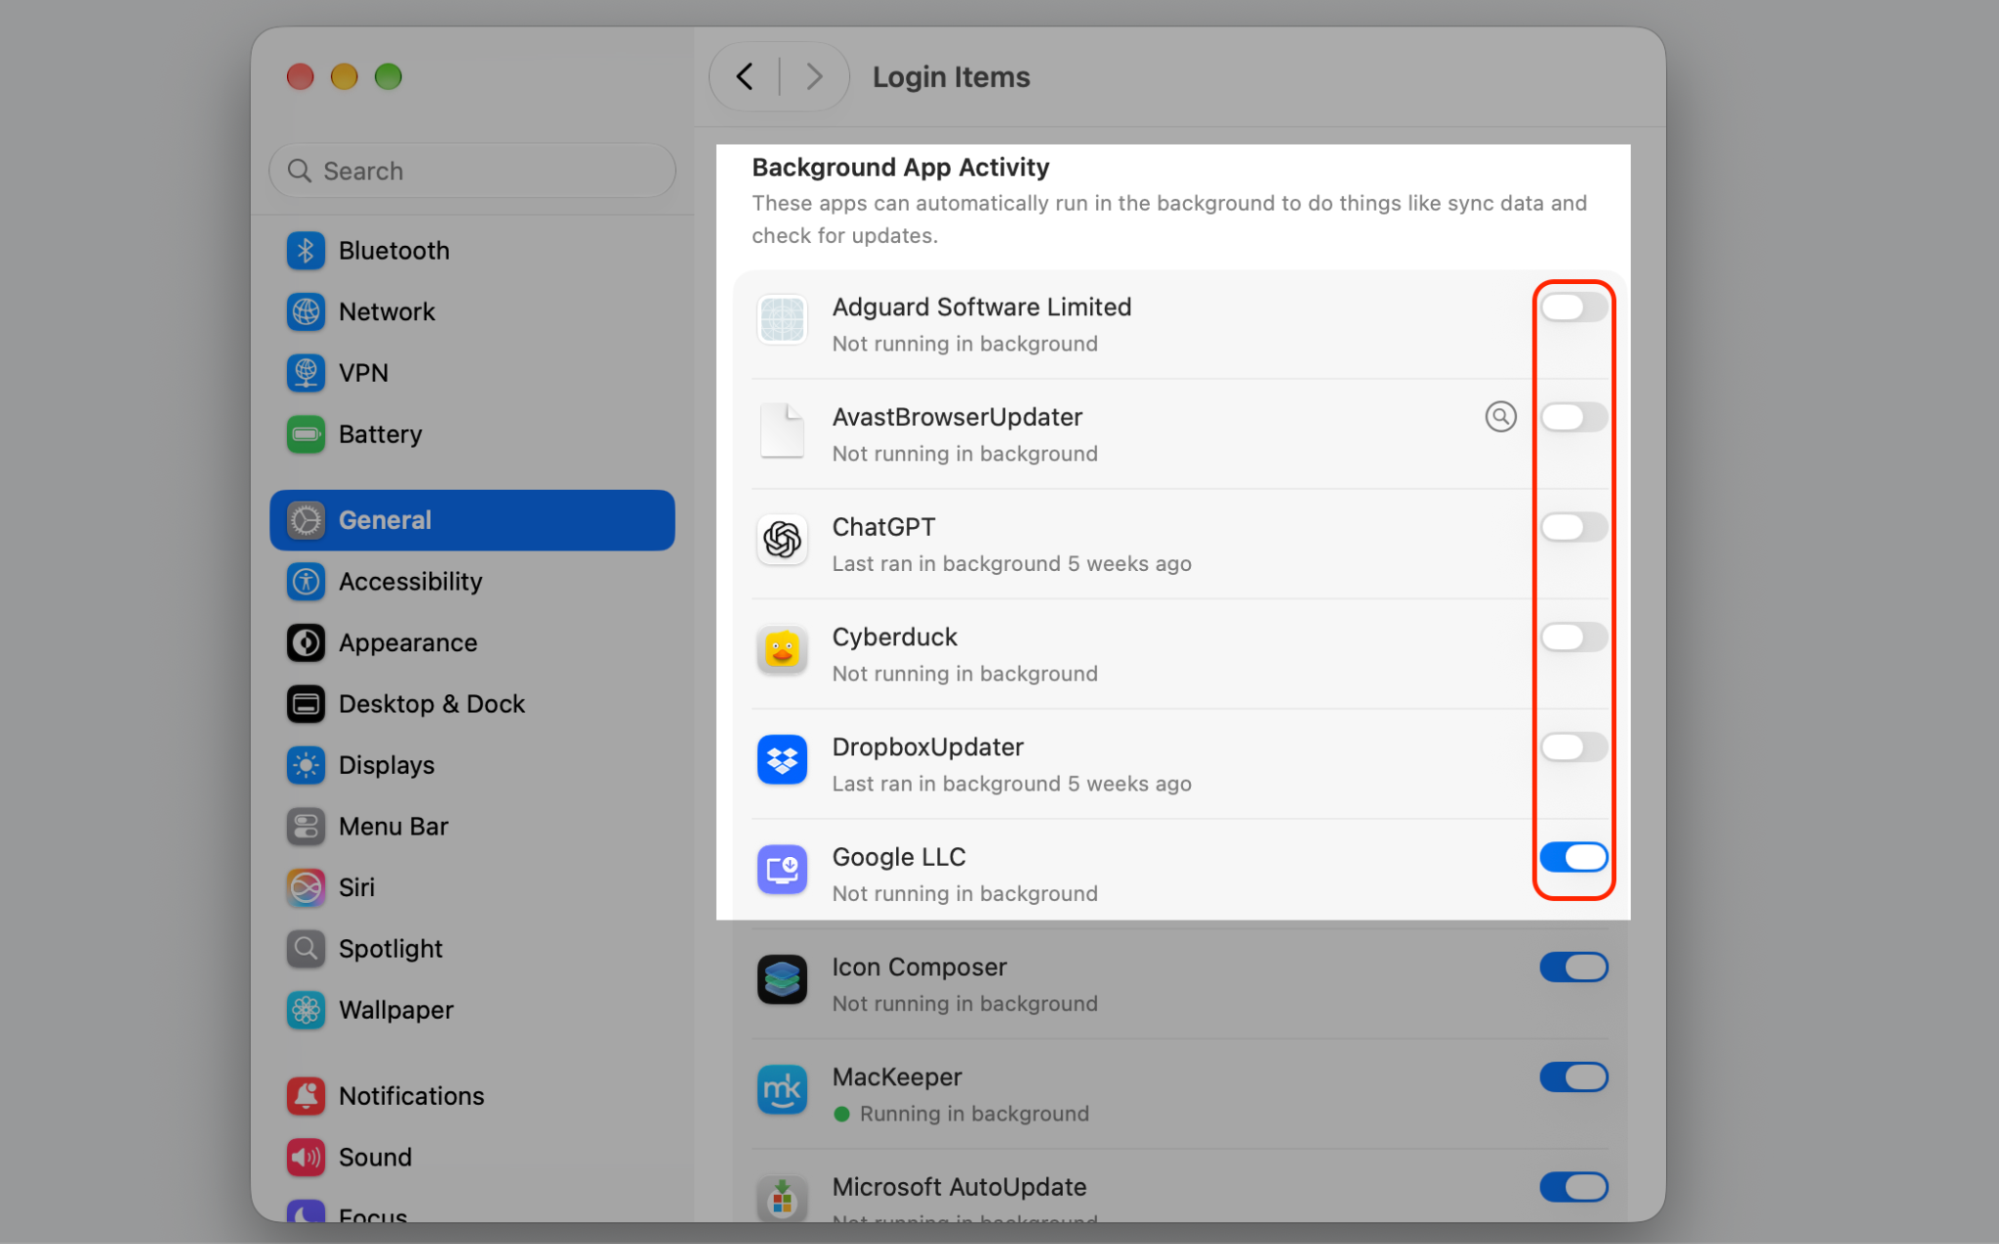
Scroll to the background extensions and toggle off anything you don’t need.
Step 1. Go to the Apple Logo > System SettingsStep 2. Under General, select Login Items & ExtensionsStep 3. Under Open at Login, select the App and click the minus (–) buttonStep 4. Scroll to the background extensions and toggle off anything you don’t need
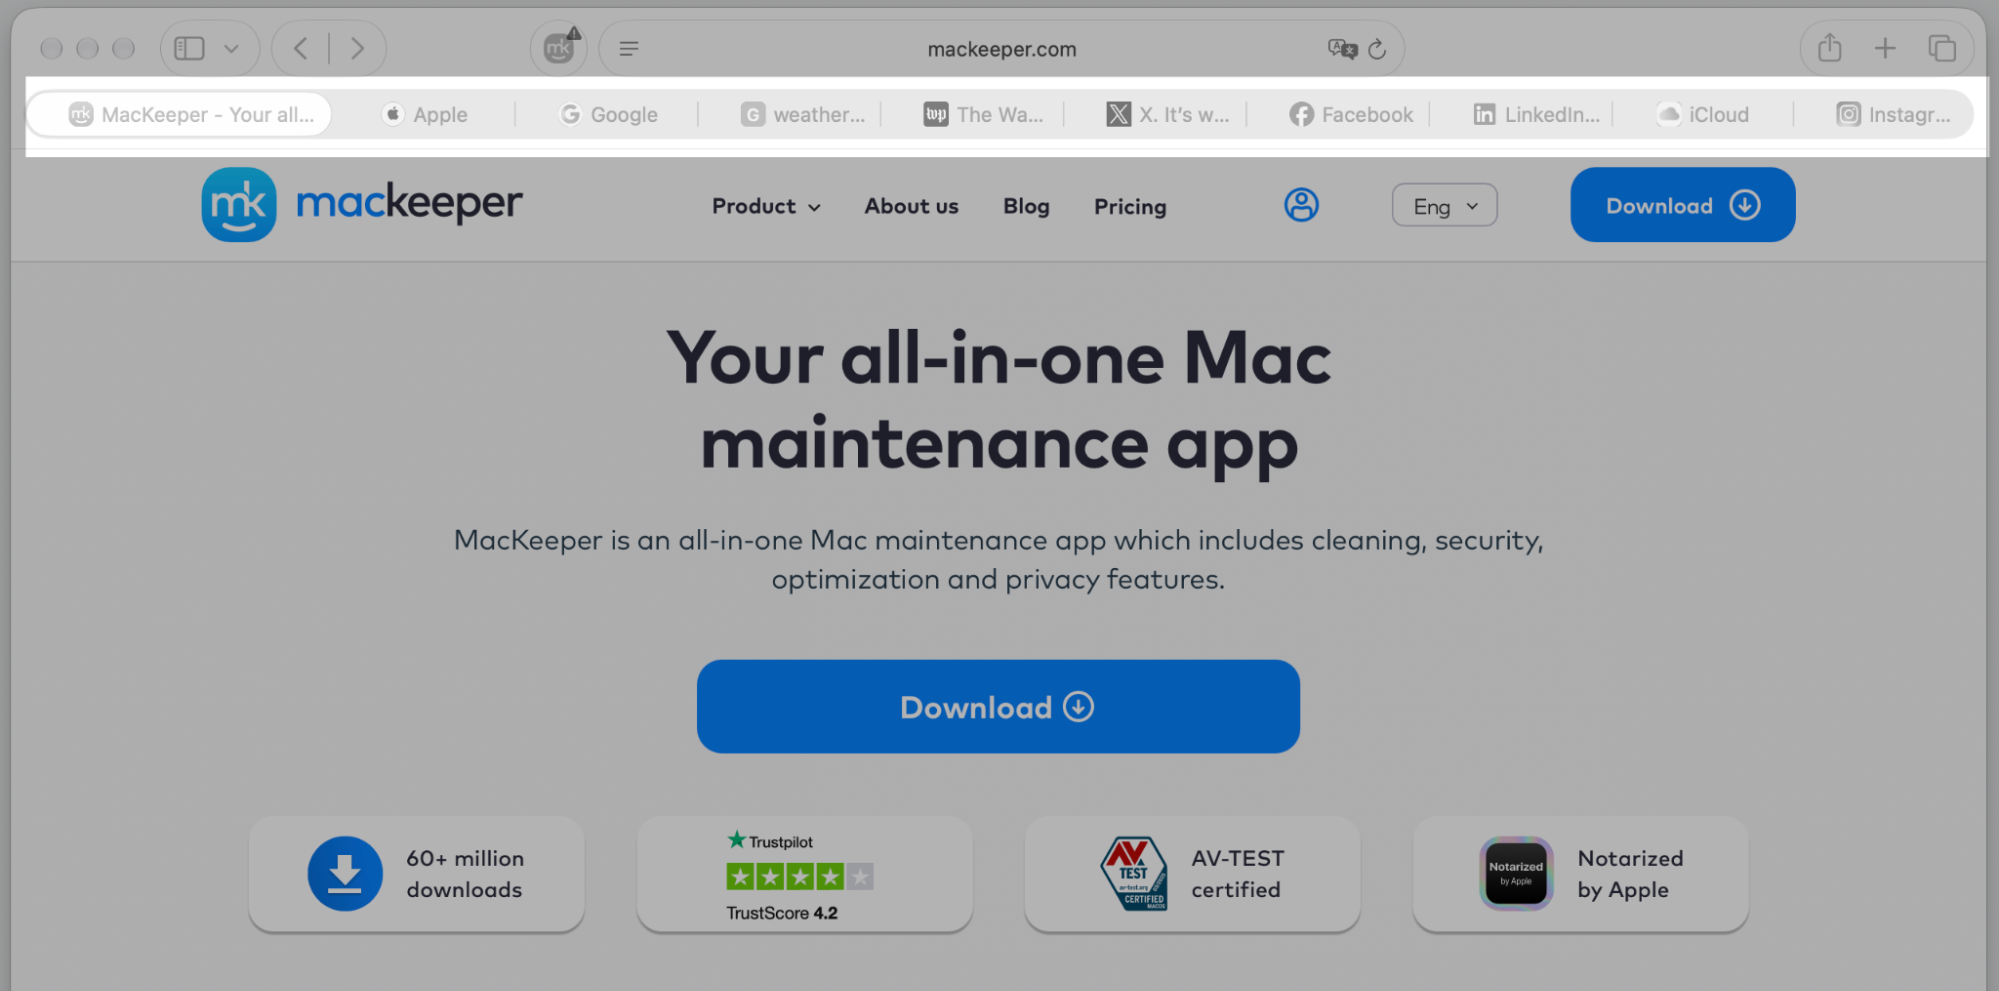
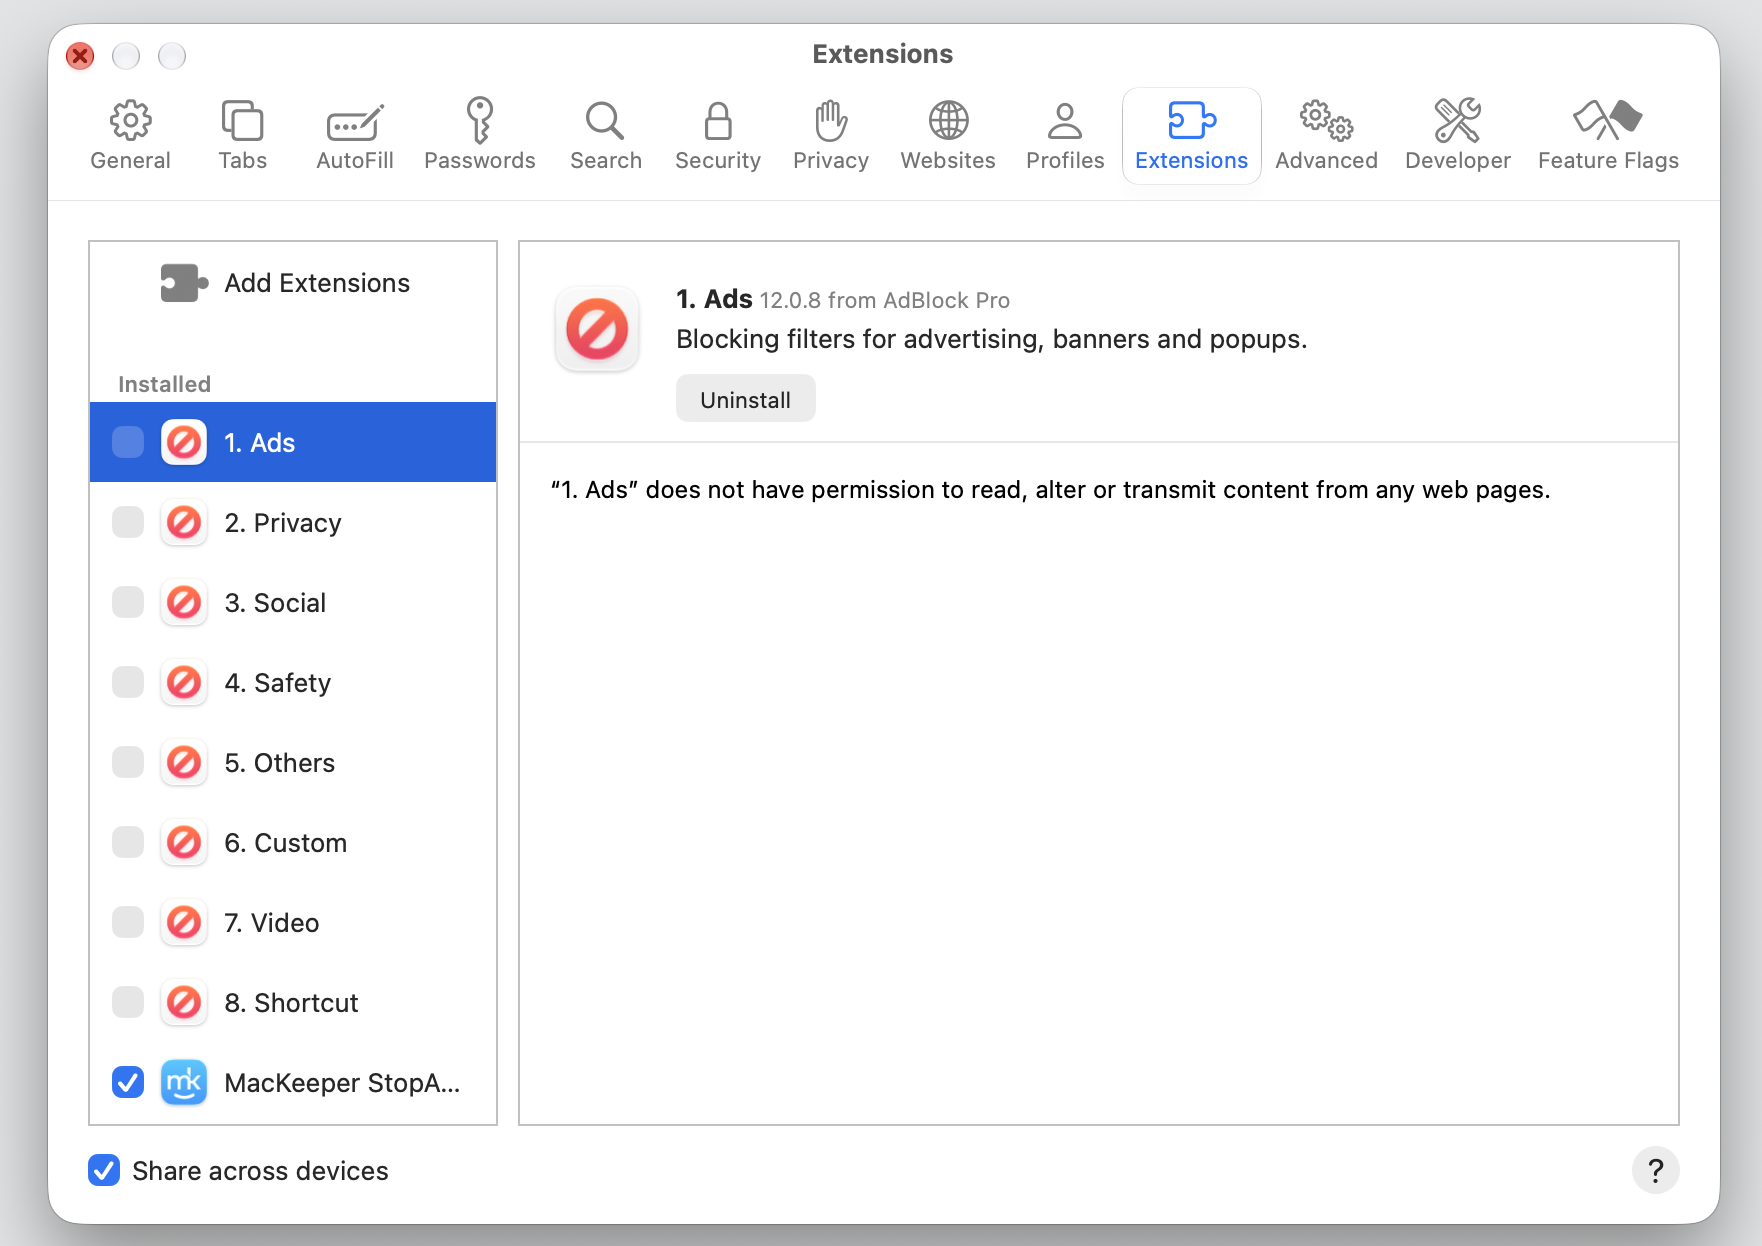
5. Close unused browser tabs and disable extensions
Every open tab is a little app running in the background, and heavy extensions pile on top. Twenty forgotten tabs can drain as much RAM as a full app, which is a common reason a Mac starts lagging mid-afternoon. Trimming them down is one of the fastest ways to free up resources.
Give your browser a quick cleanup:
Close any tabs you’re not actively using.
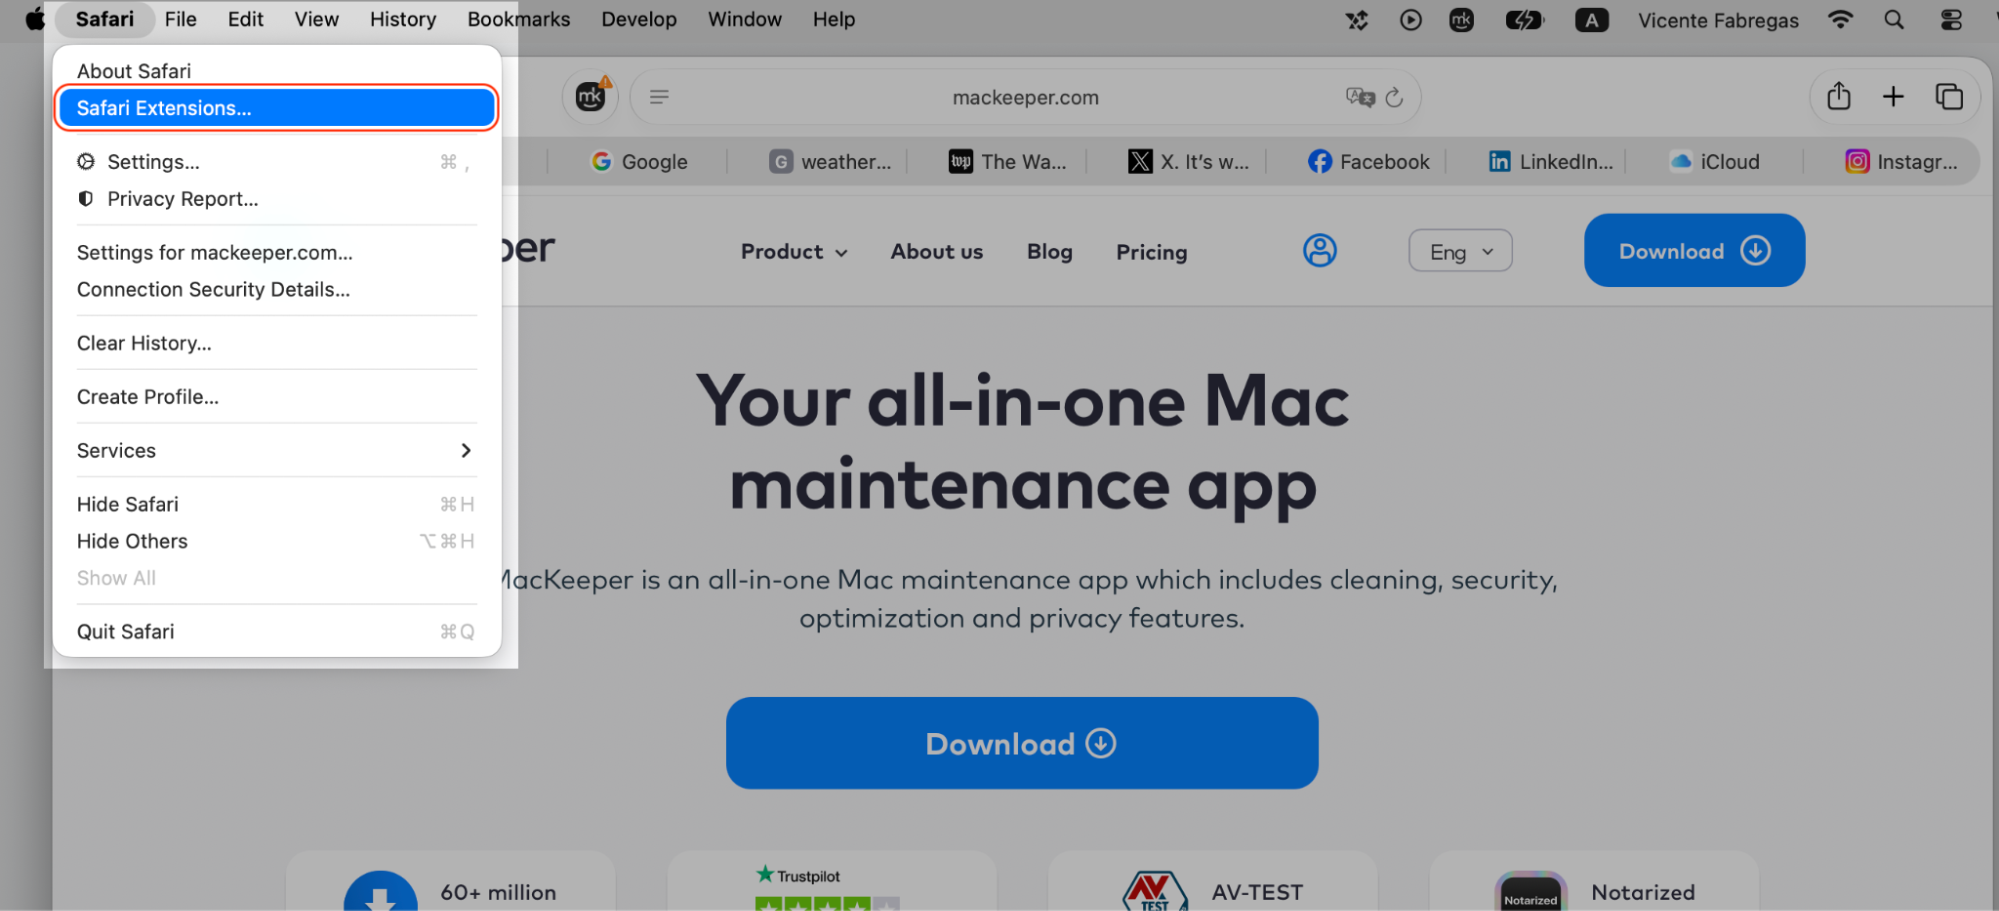
Open your browser’s extensions menu.
Remove or disable extensions you don’t recognize or rarely use.
Quit and reopen the browser to clear its memory.
Step 1. Close any tabs you’re not actively usingStep 2. Go to Safari Preferences and select Safari ExtensionsStep 3. Remove or disable extensions you don’t recognize or rarely use
6. Free up internal disk storage
When your drive fills up, macOS loses the scratch space it needs for smooth multitasking. We aim to keep at least 15–20% of the disk free—that headroom alone can help make Mac Sequoia faster. Taking a few minutes to clean up internal disk space on Mac clears out junk that’s been piling up since your last cleanout.
Reclaim some space in a few clicks:
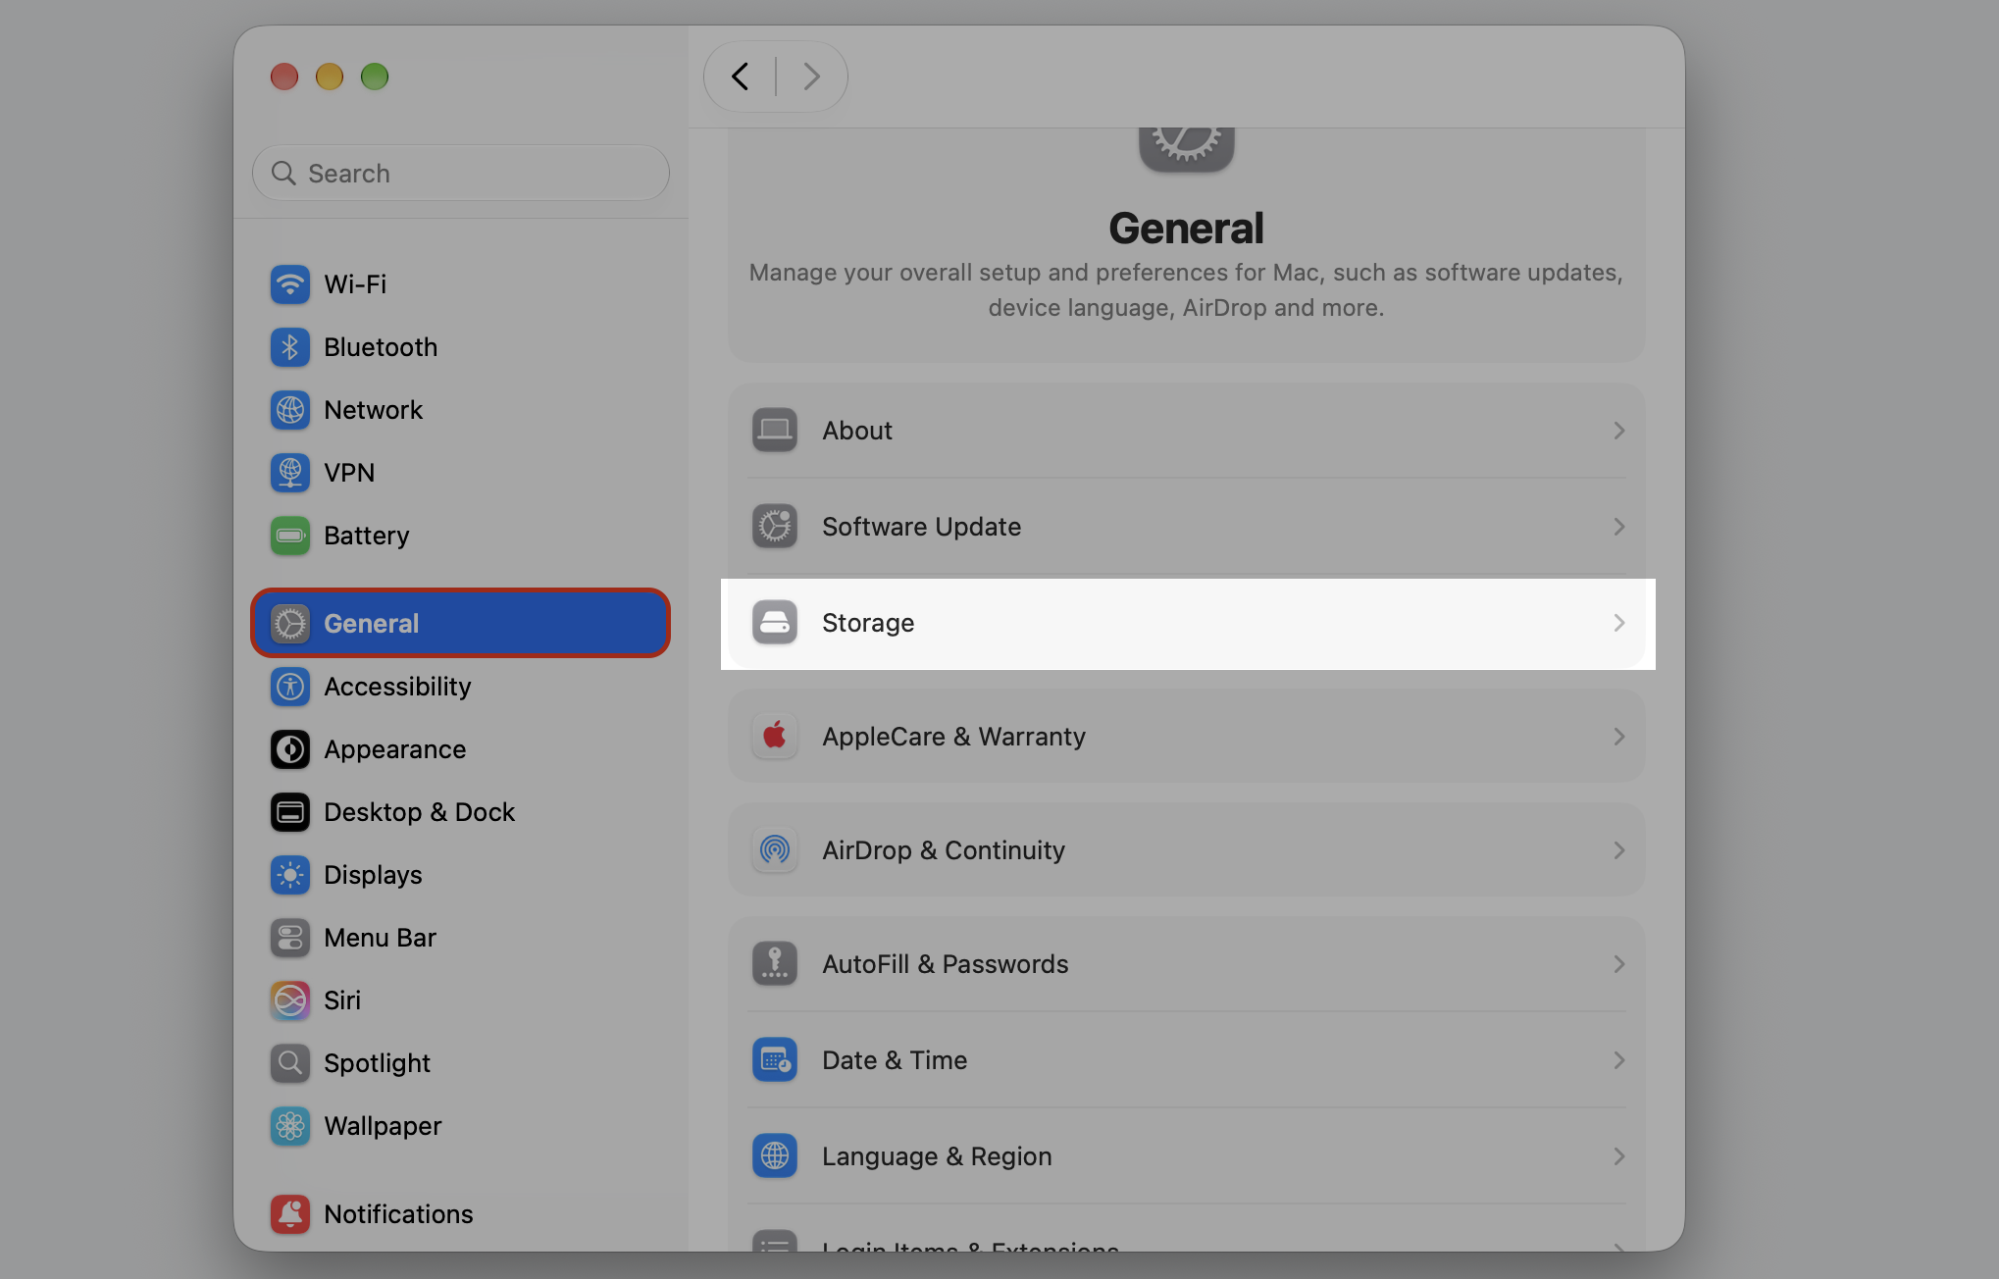
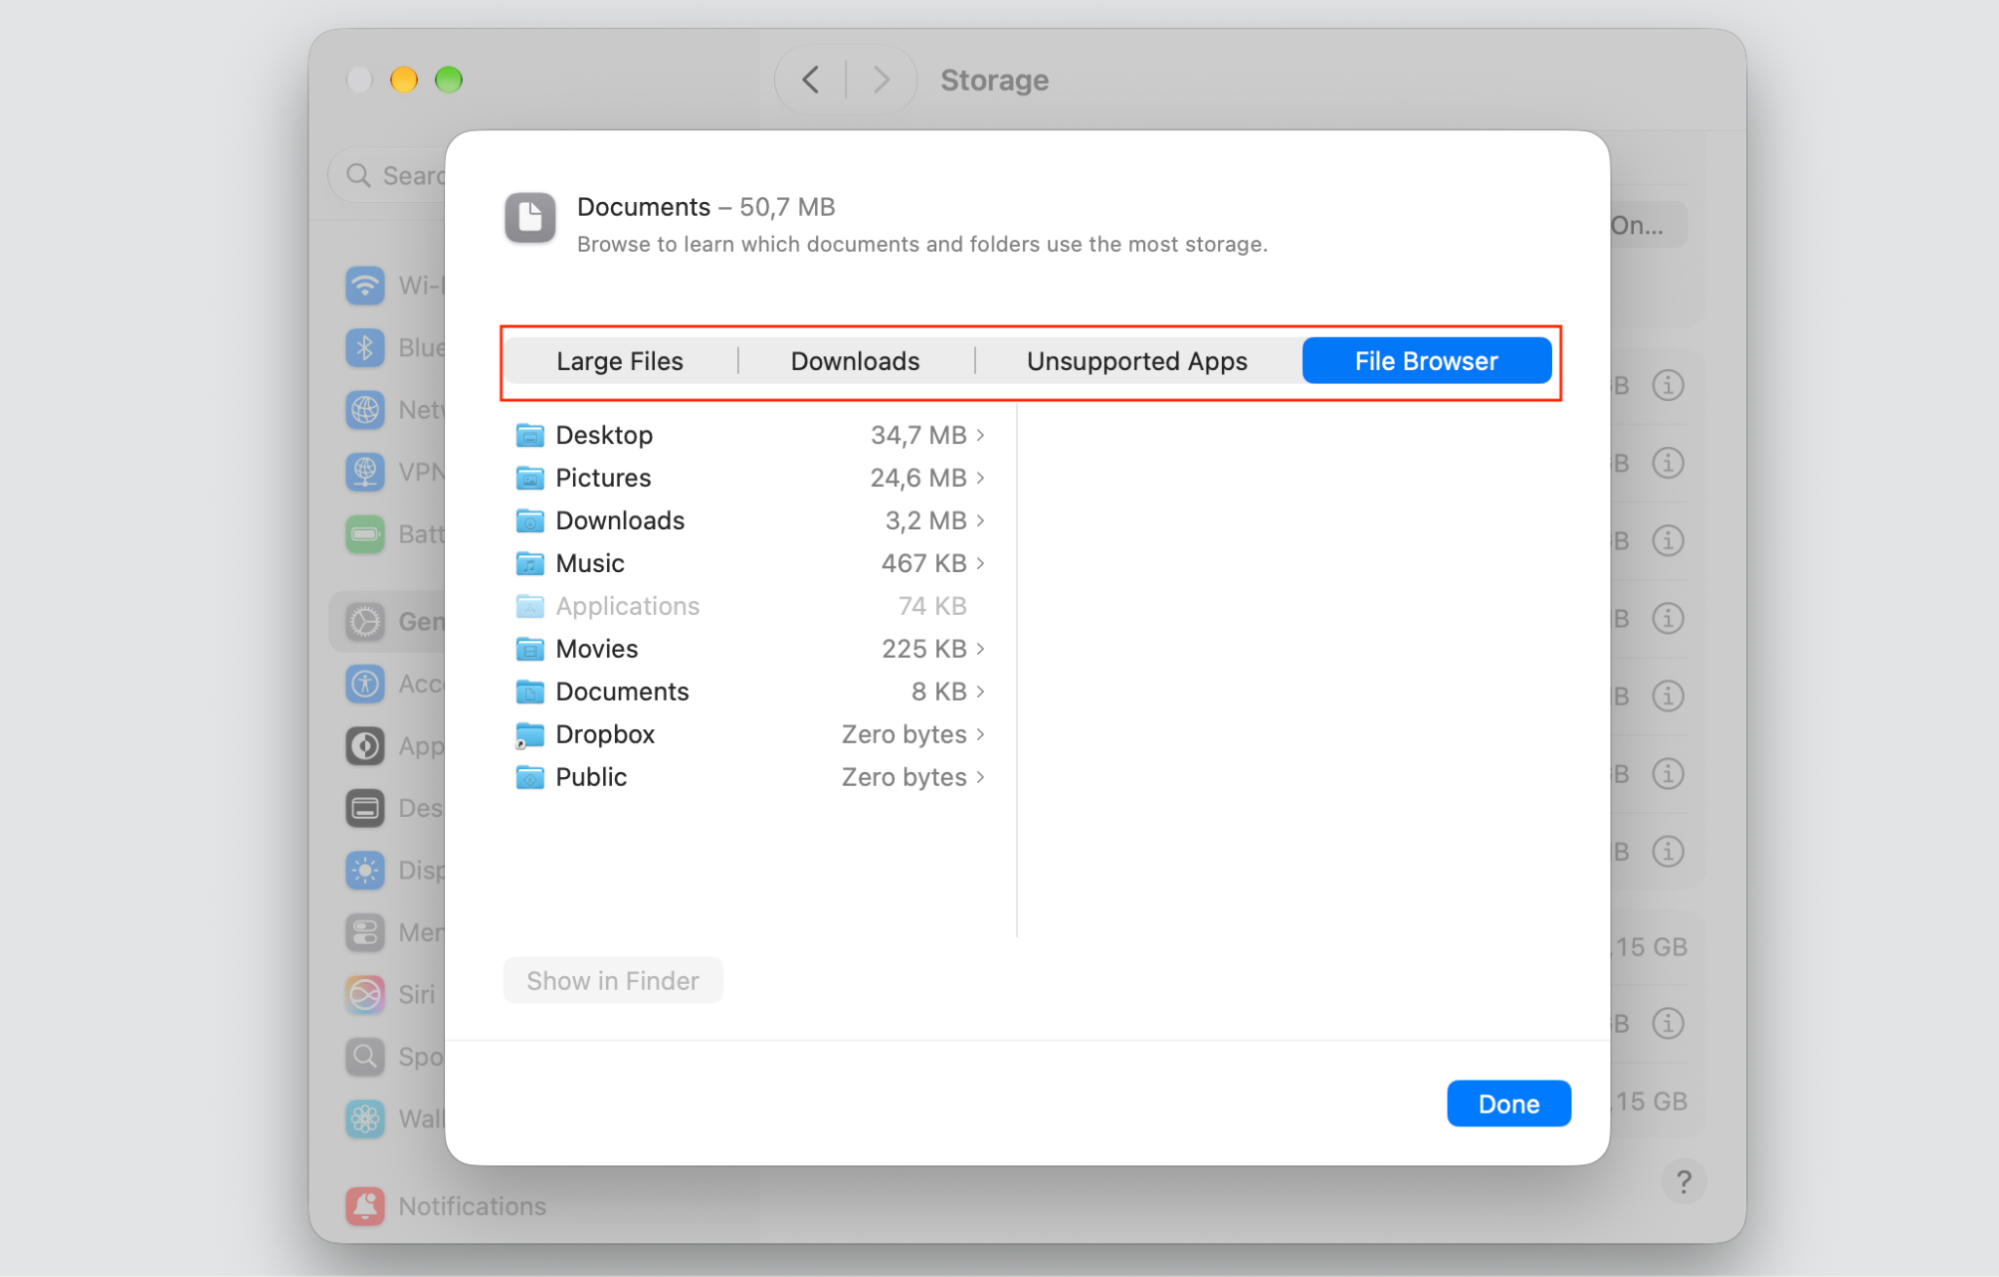
Open System Settings, then click General > Storage.
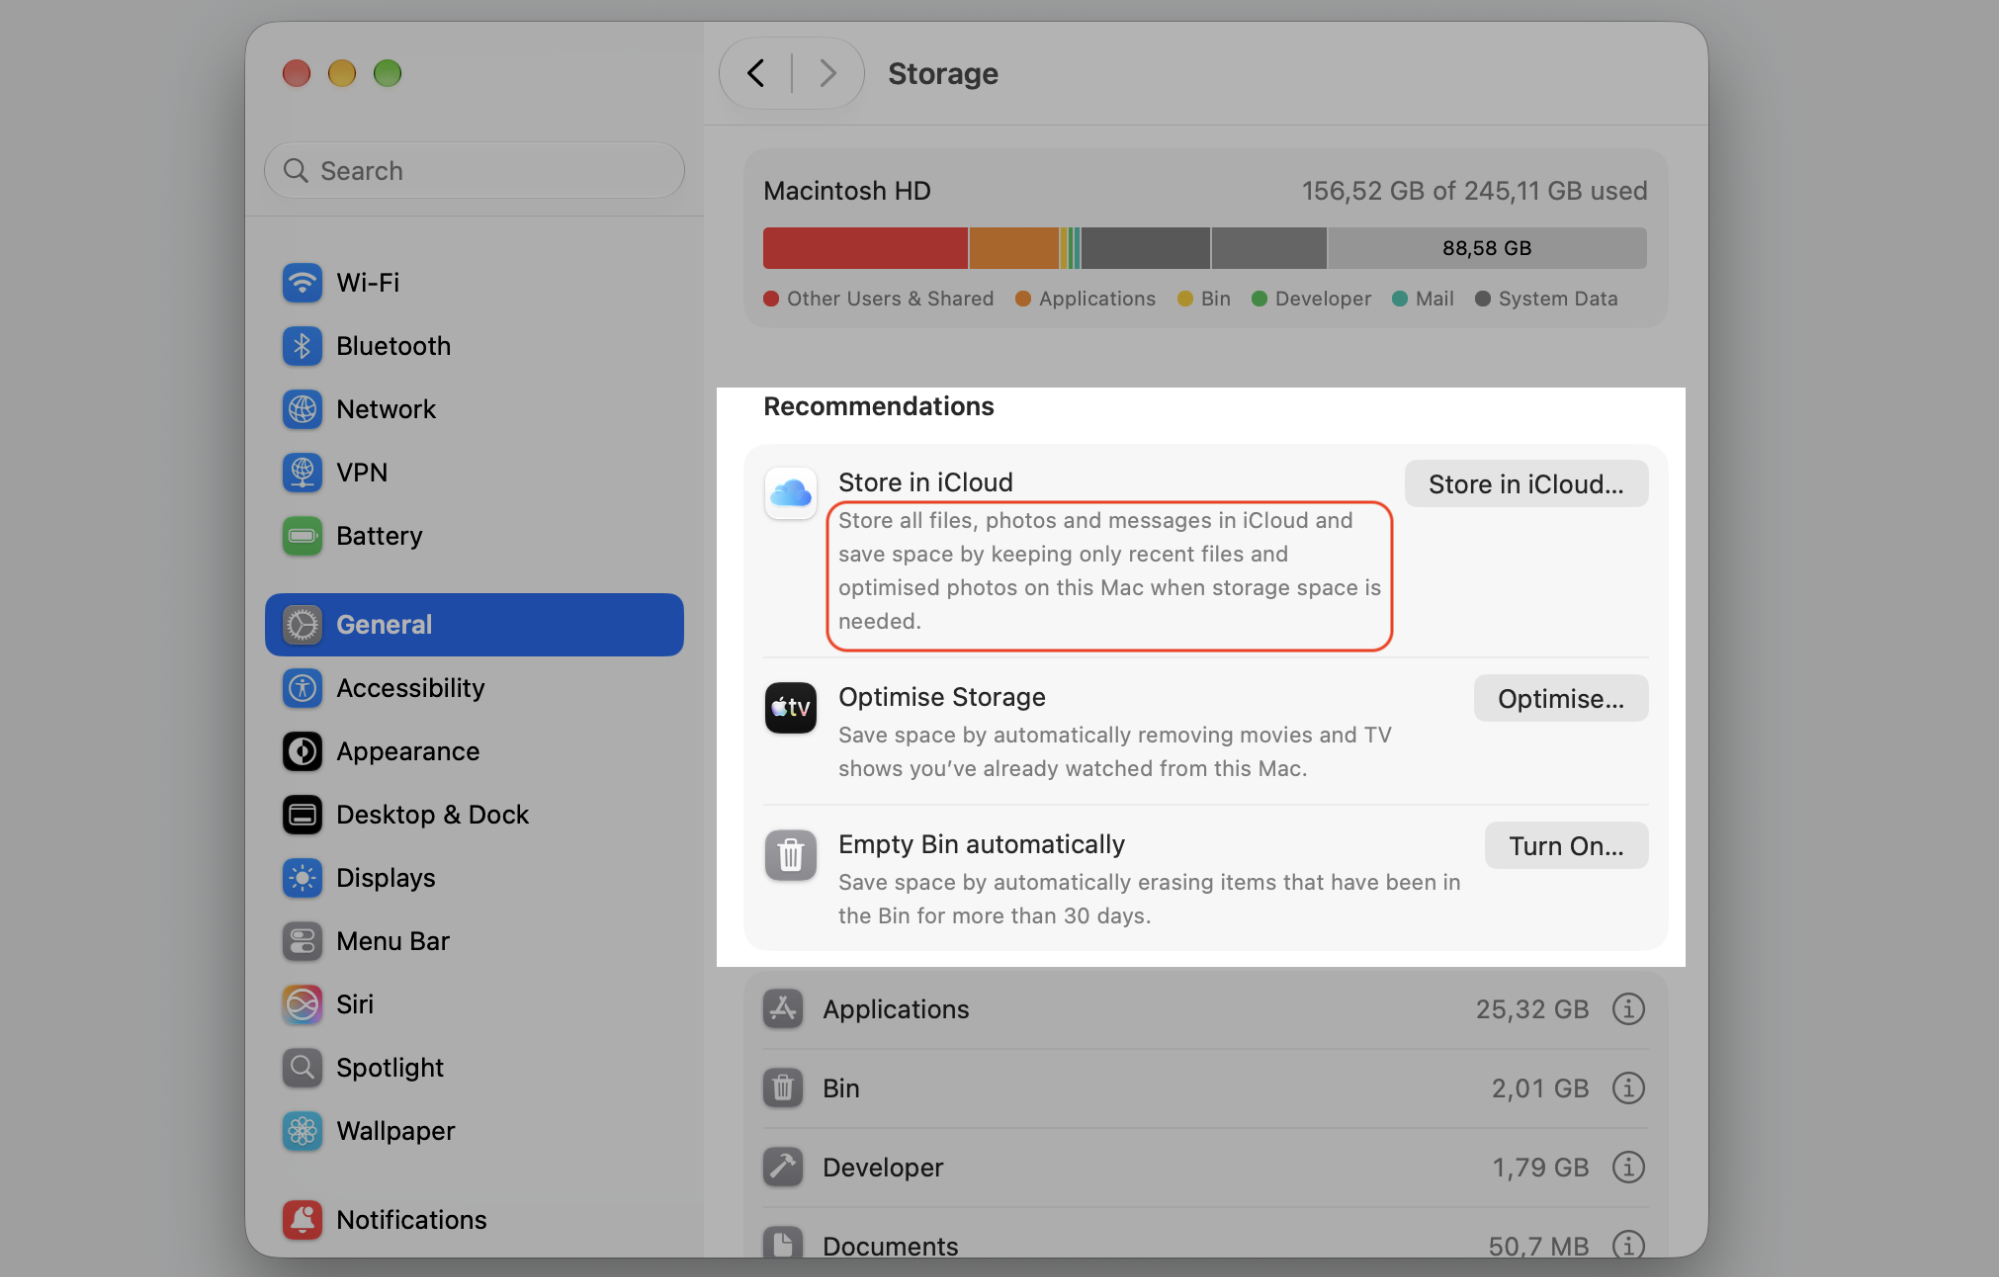
Review the recommendations and delete large files you no longer need.
Empty your Downloads folder of old installers and duplicates.
Move photos or videos to an external drive or the cloud.
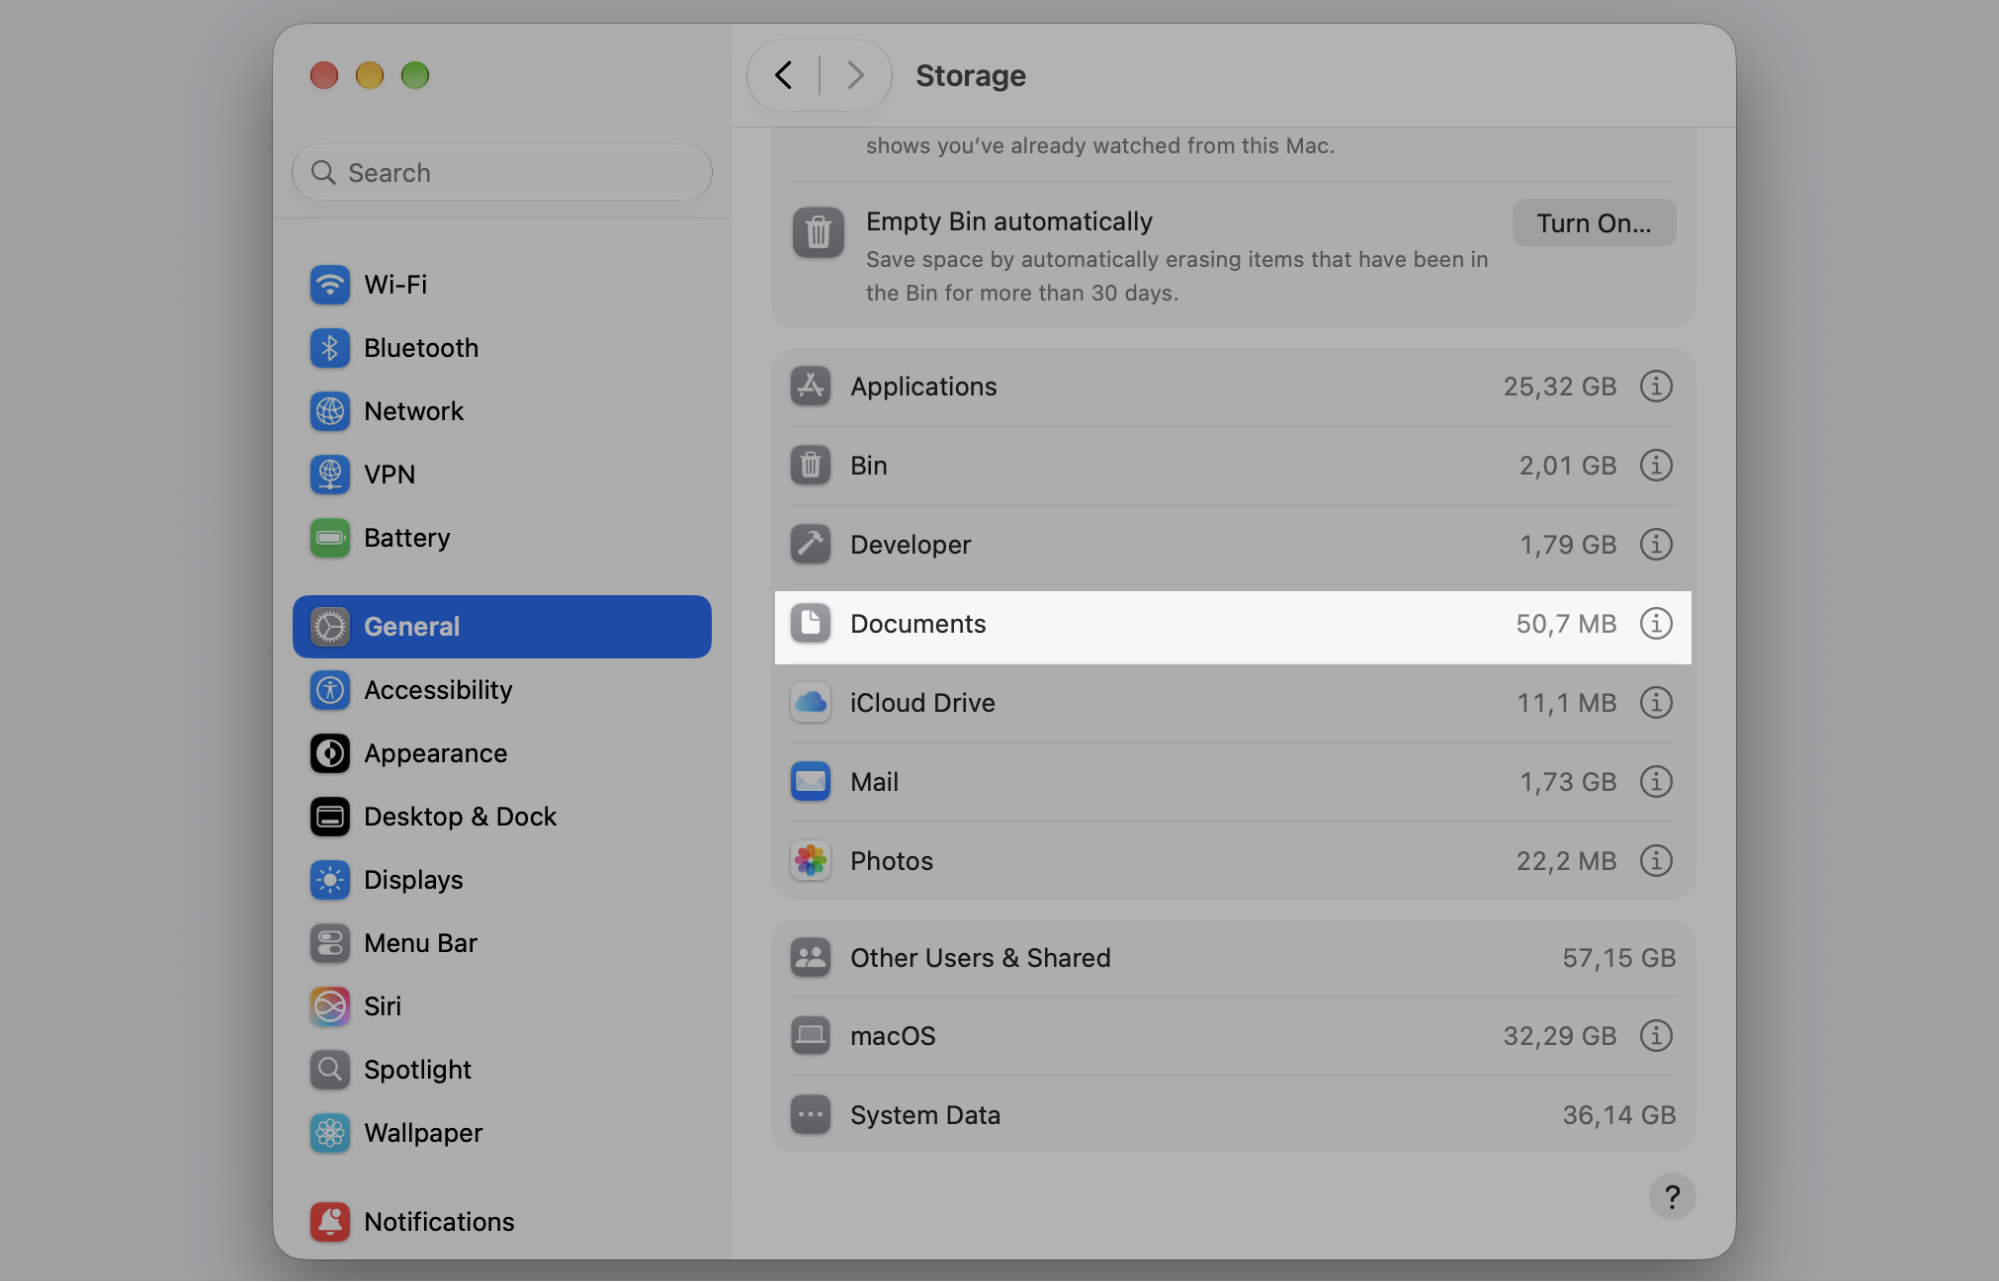
Step 1. Go to StorageStep 2. Review the recommendations and move photos or videos to iCloud or an external driveStep 3. Scroll down to the Documents sectionStep 4. Check and delete any large files you no longer need
7. Identify and quit resource-heavy processes in Activity Monitor
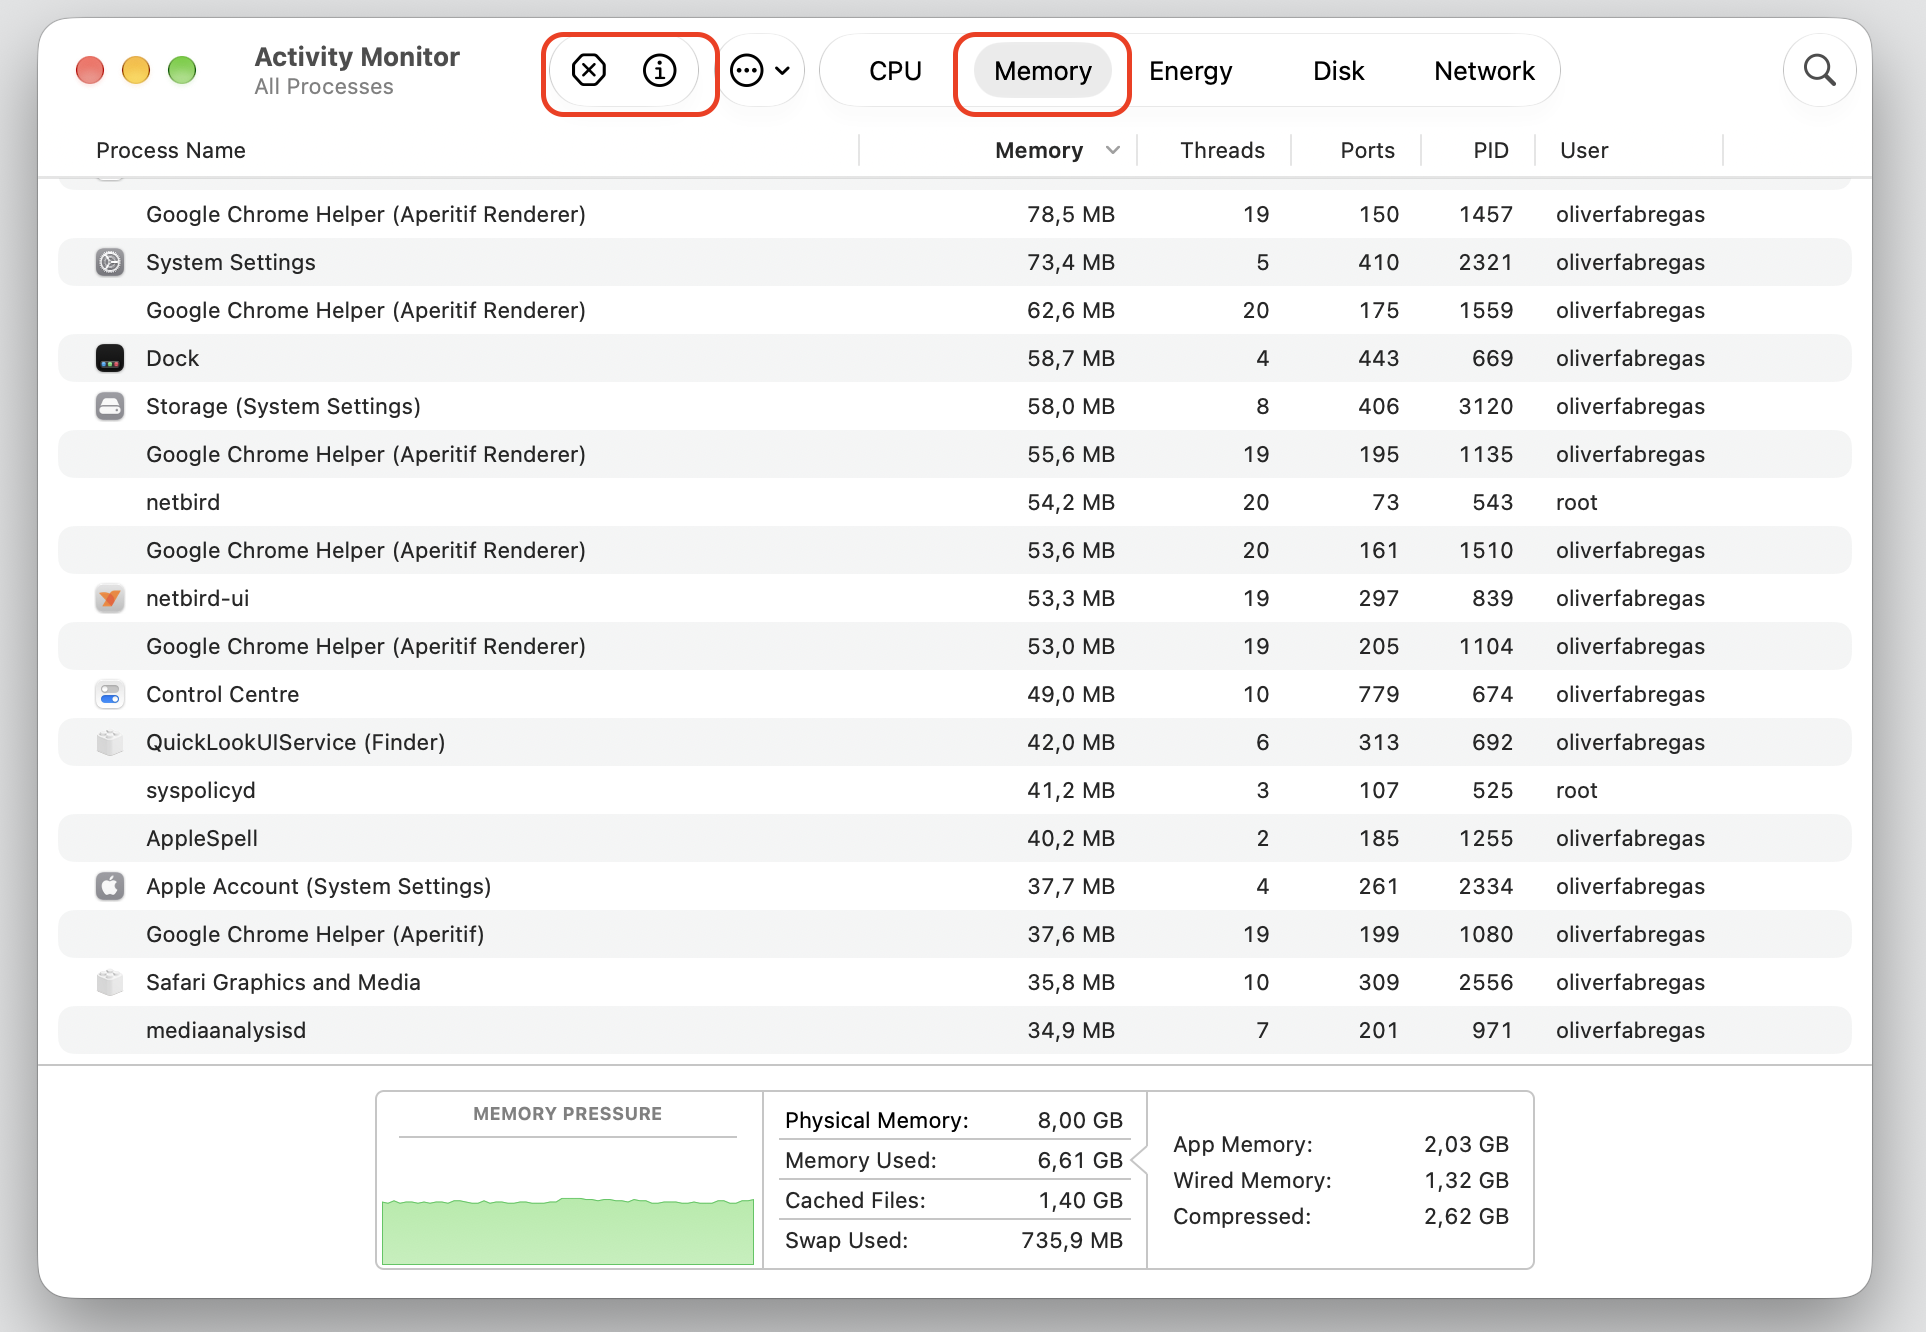
Sometimes a single misbehaving app hogs everything. Activity Monitor lets you see running apps on Mac and spot the ones pushing your CPU or memory pressure into the red. Once you’ve found the culprit, you can quit it and get your resources back.
Follow along to track down the app that works poorly:
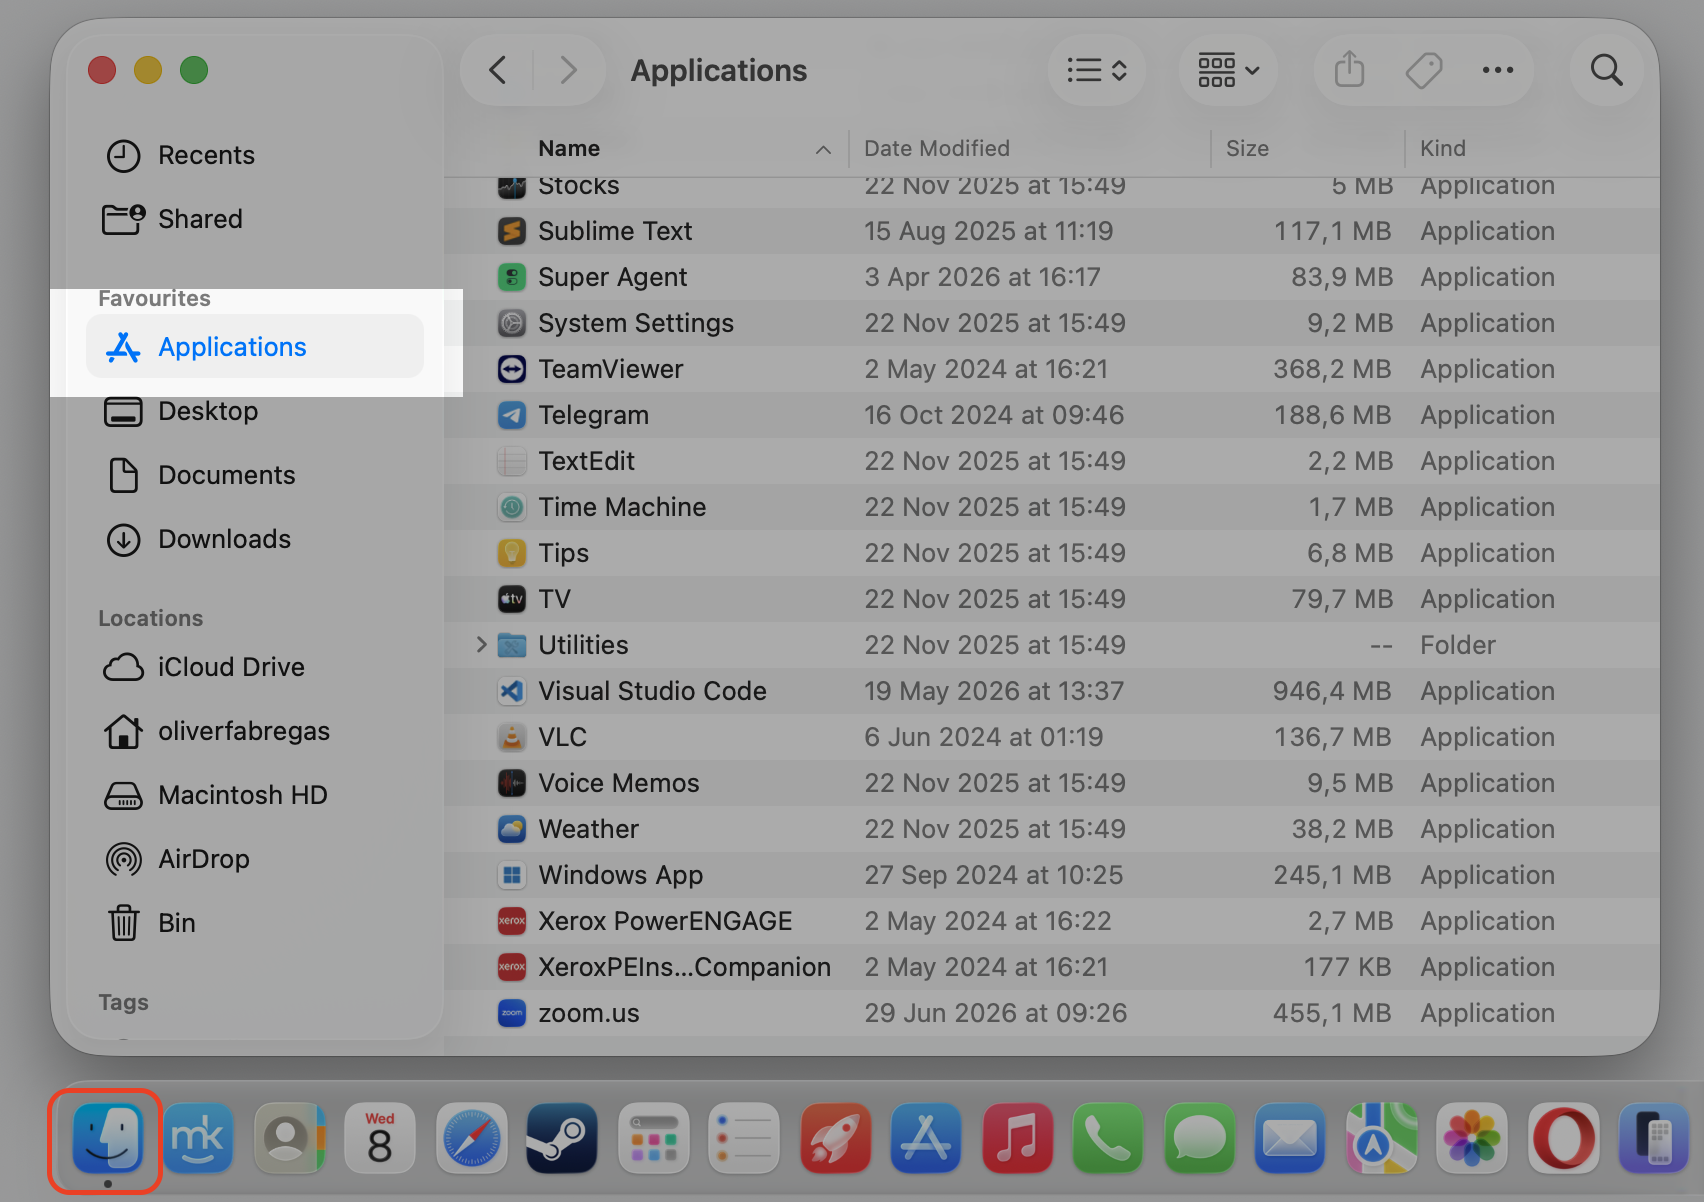
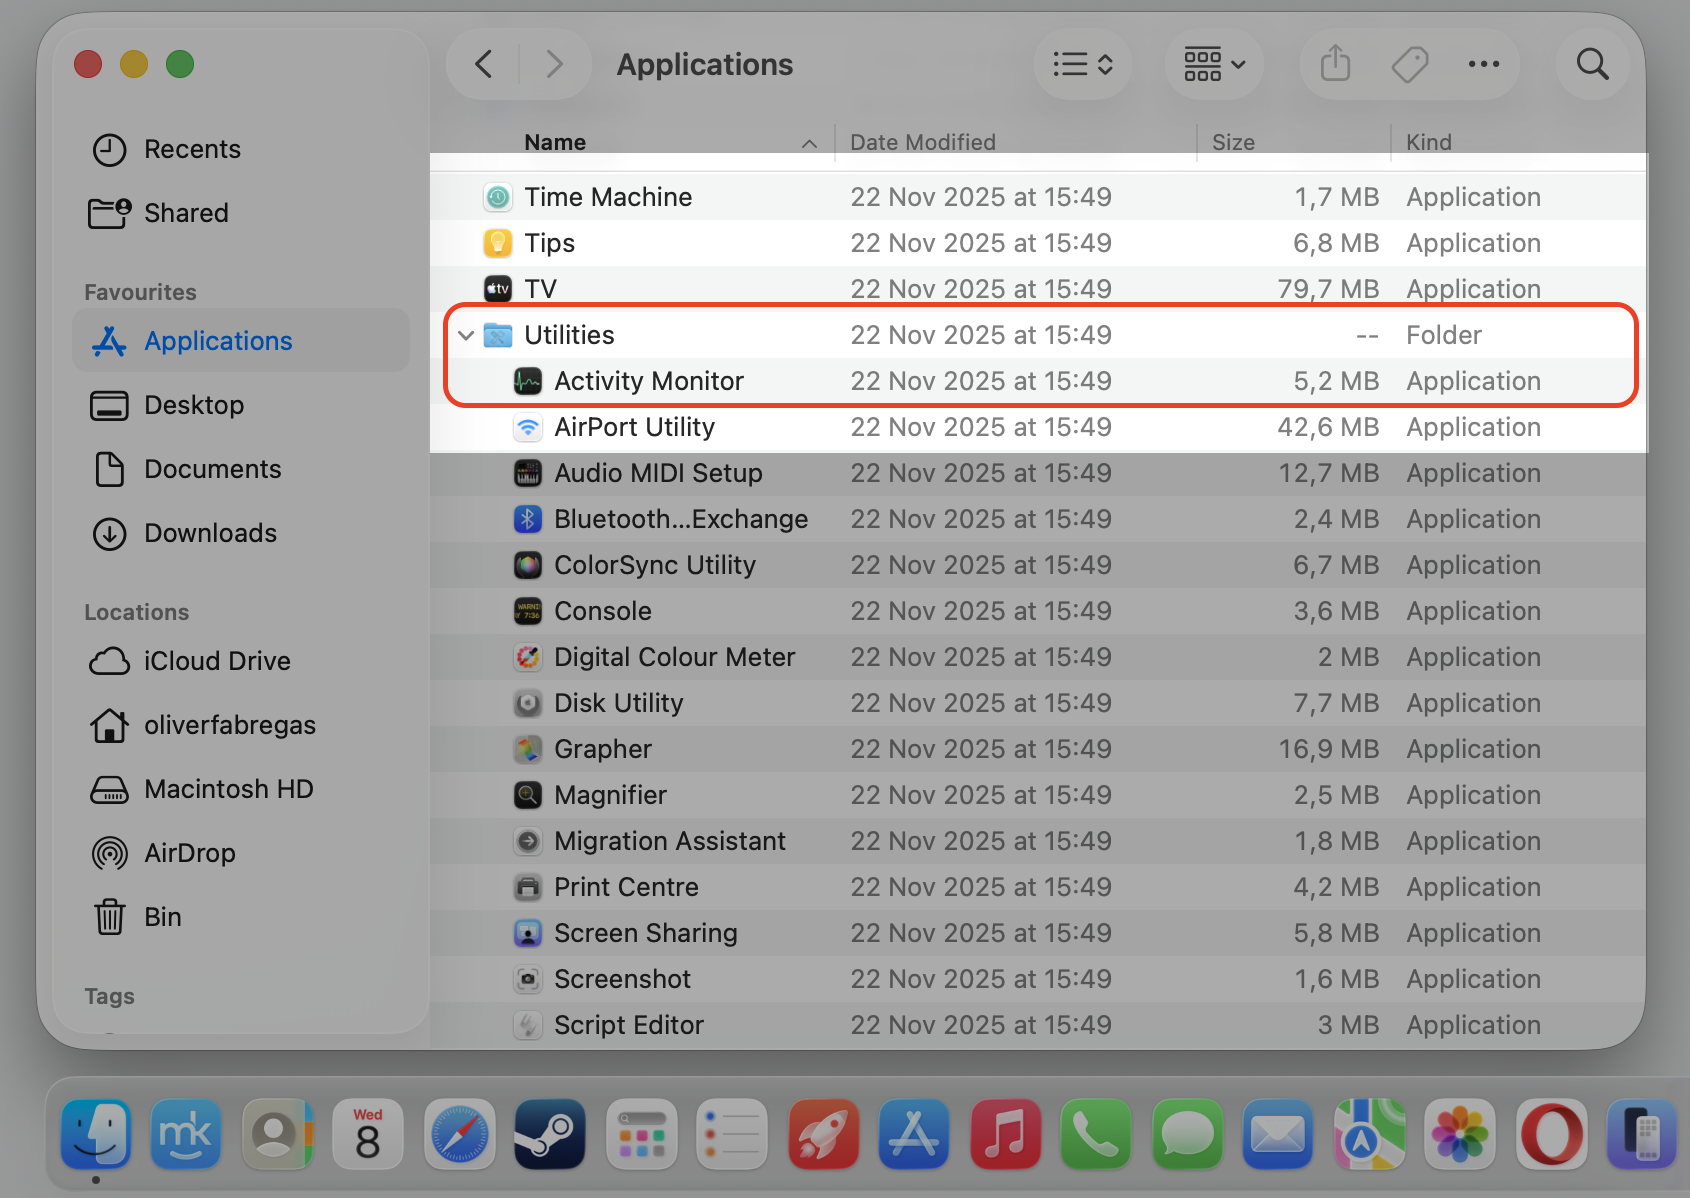
Open Activity Monitor from Applications > Utilities.
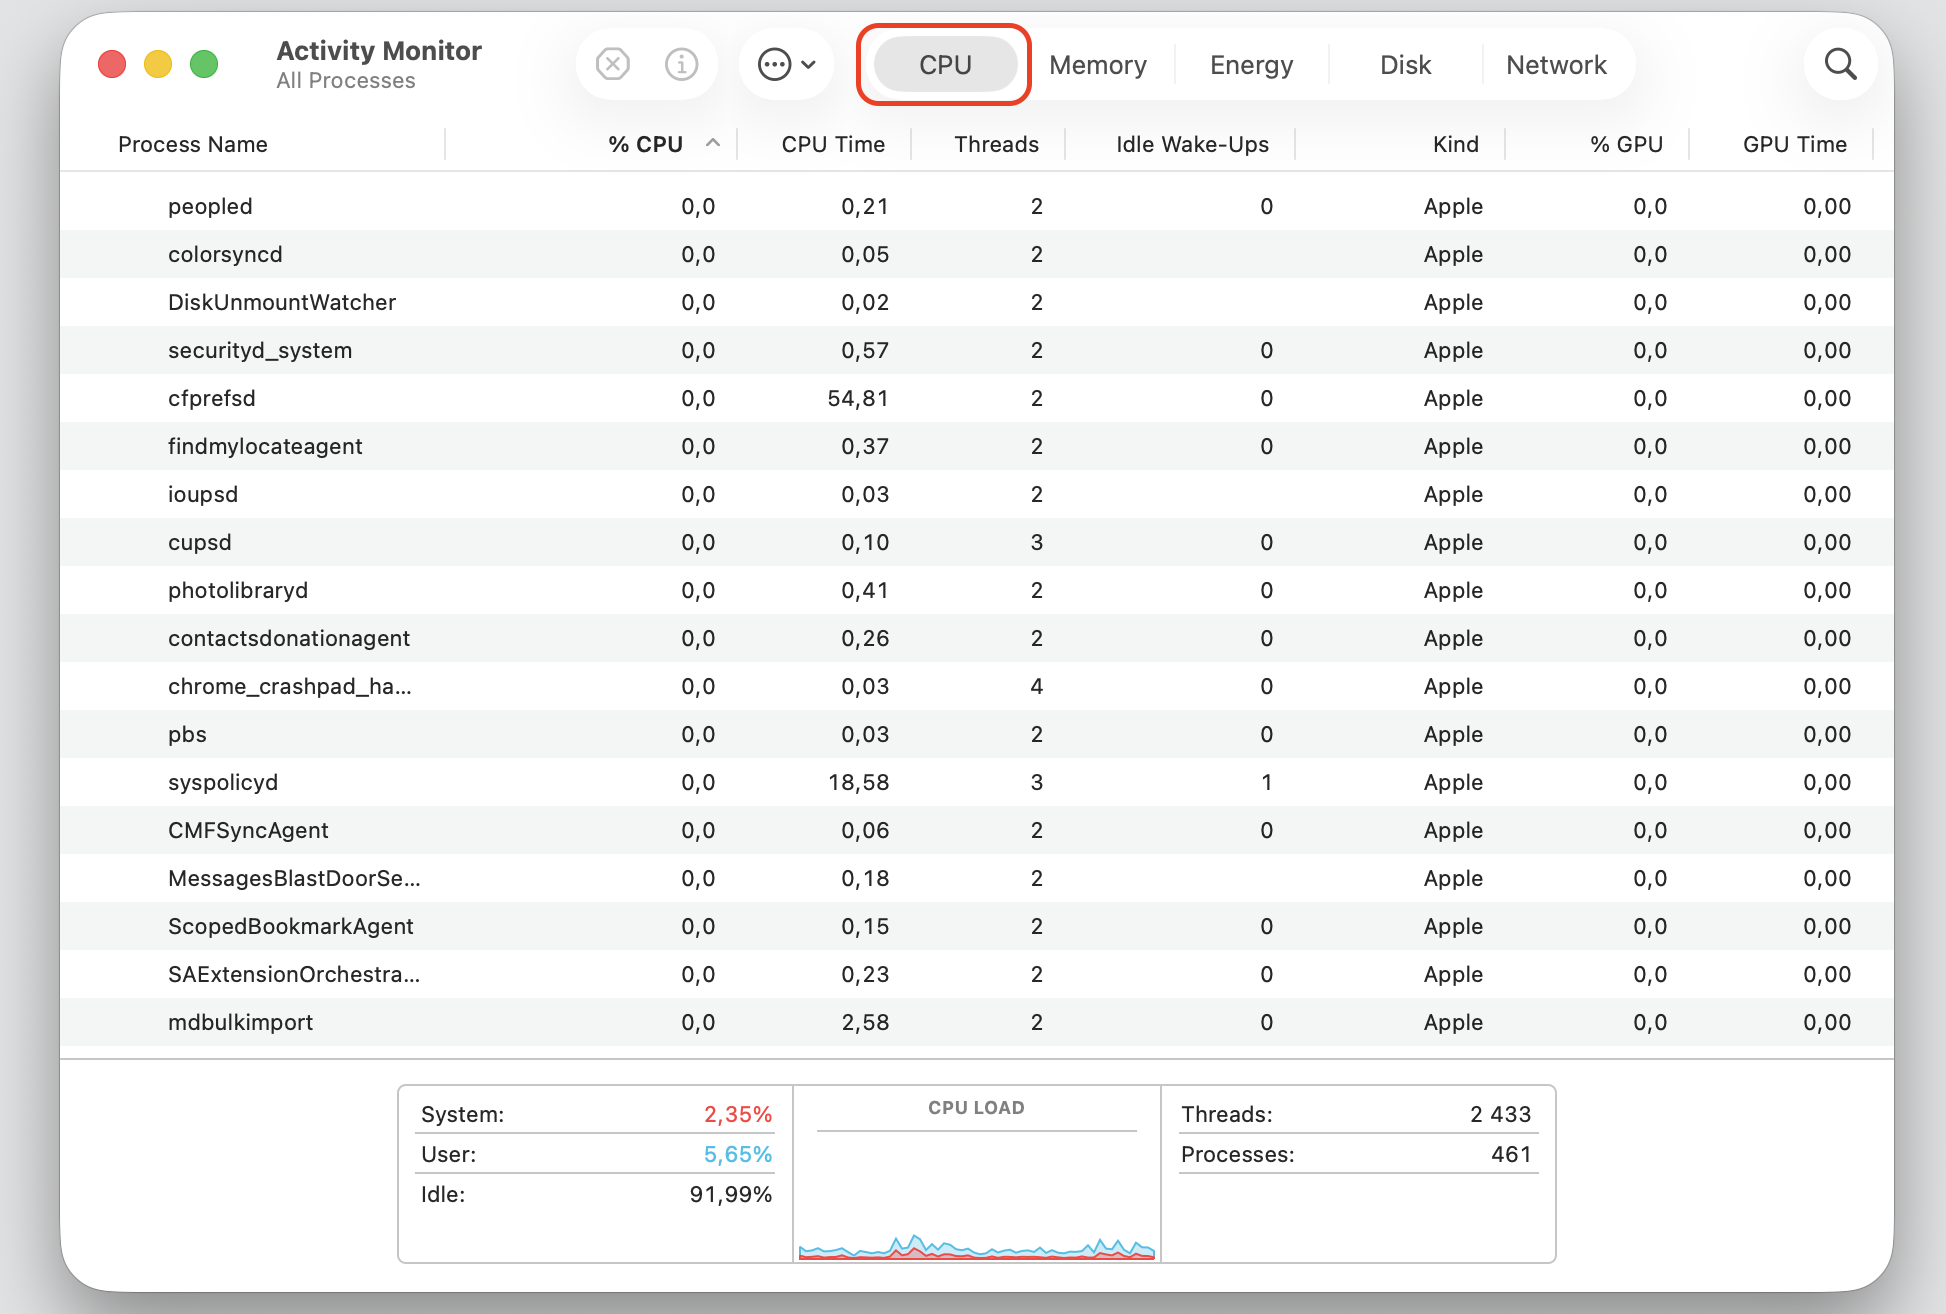
Click the CPU.
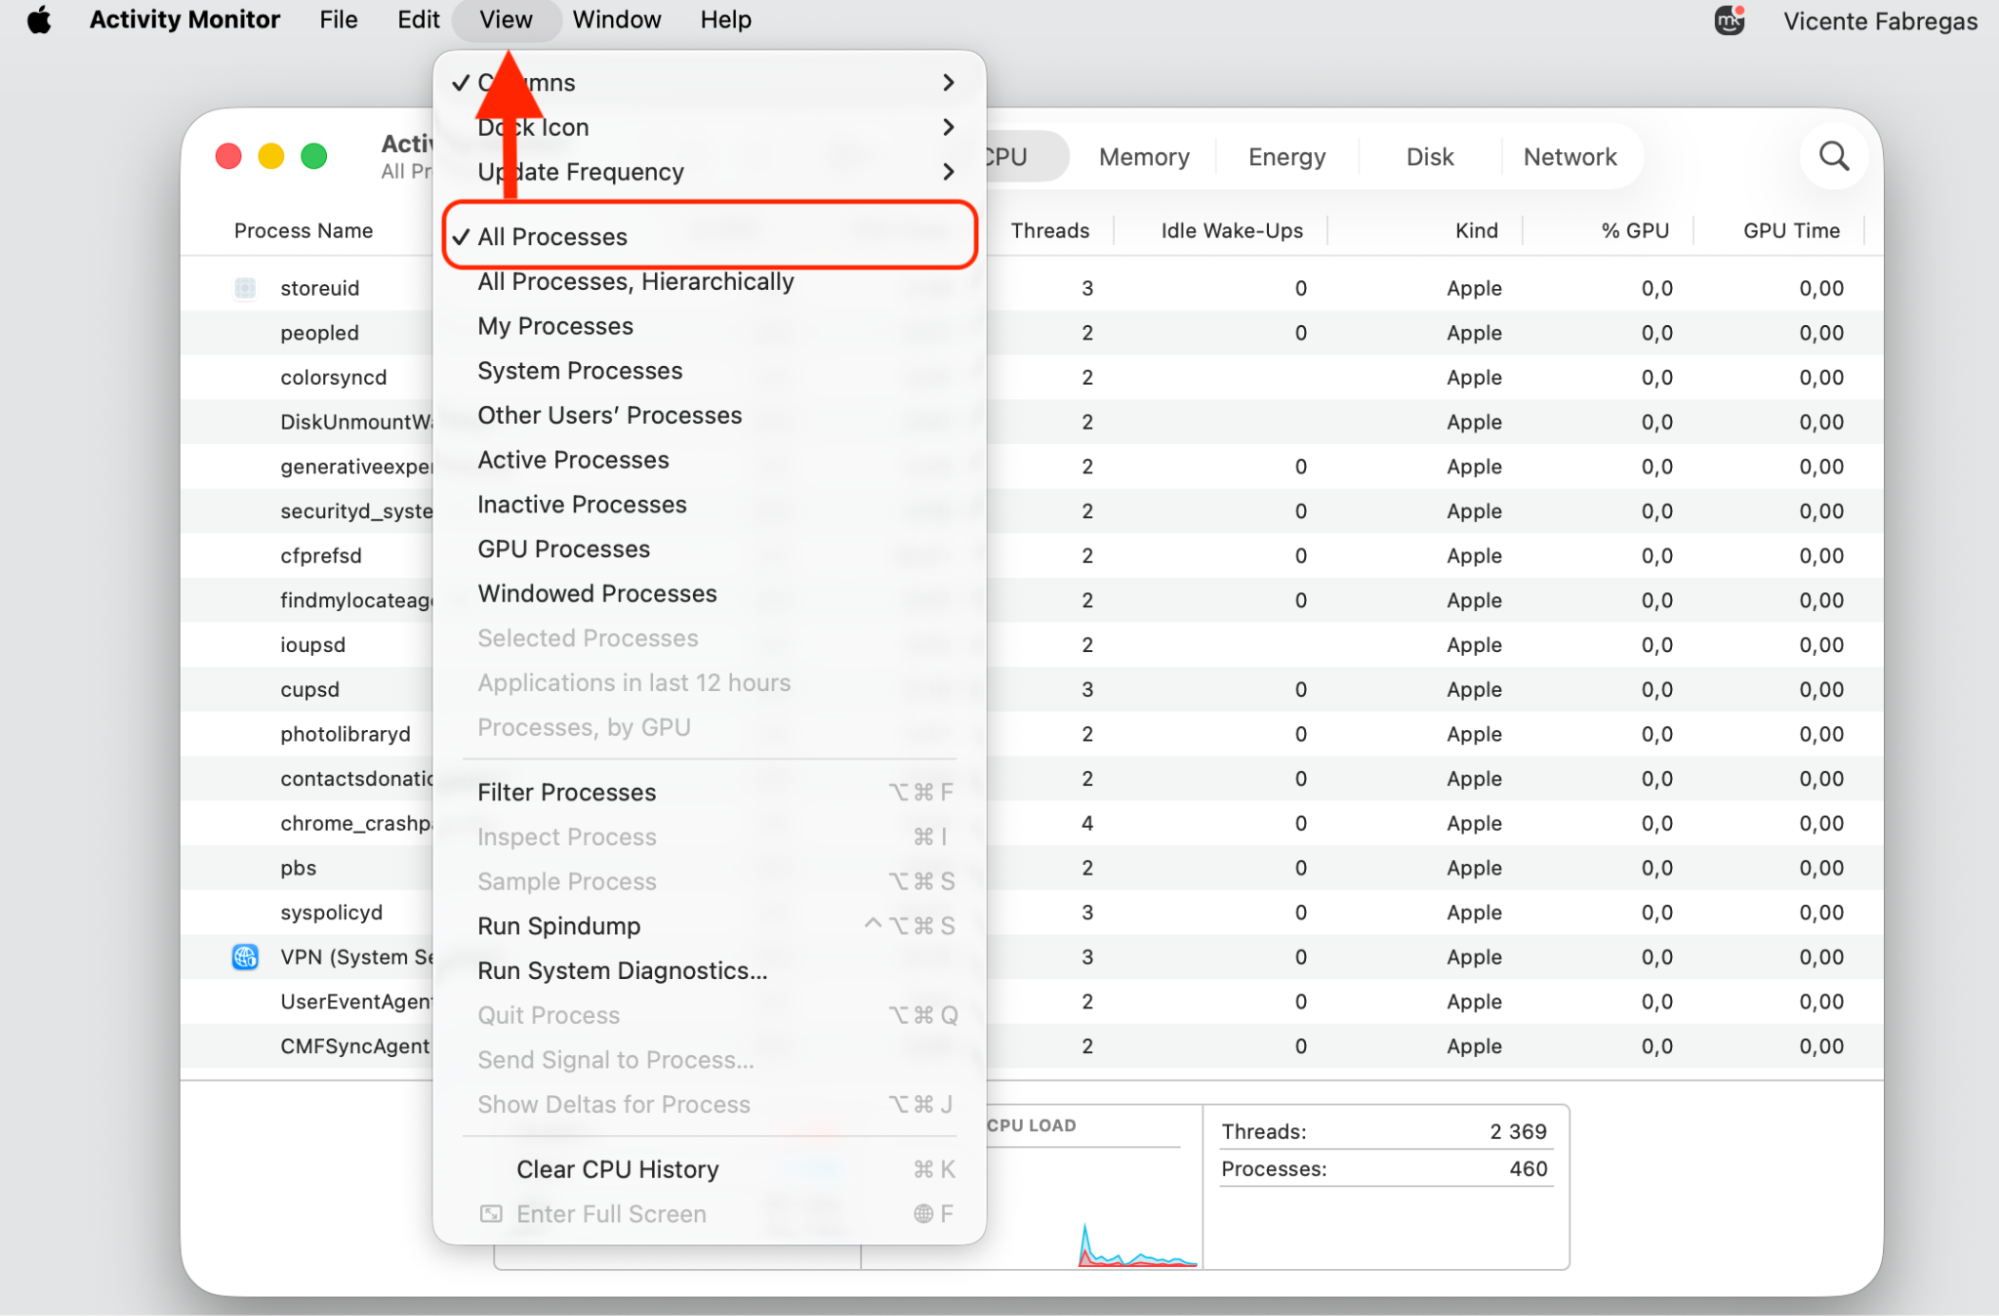
Select View > All Processes.
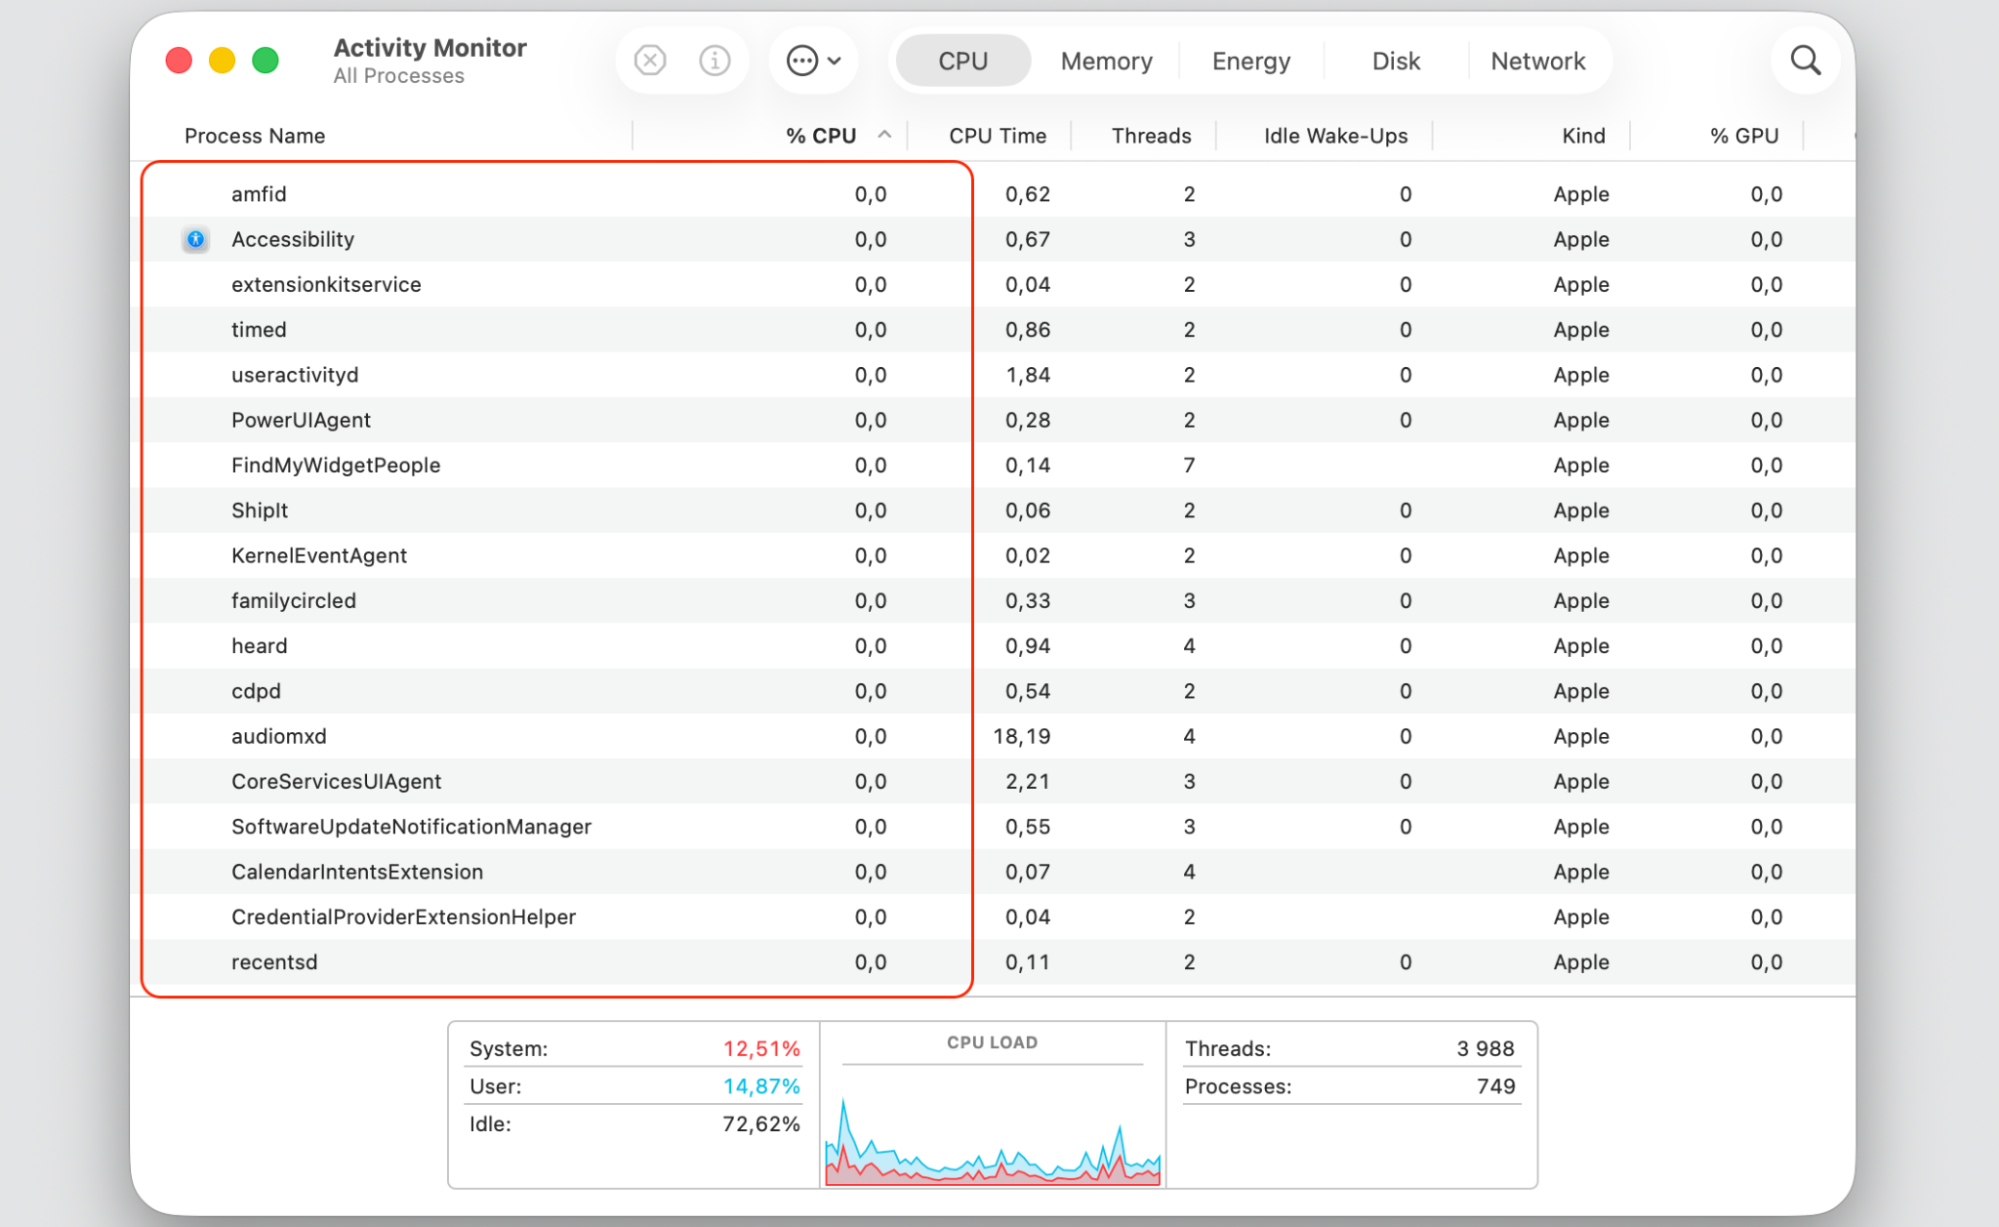
Select any app that’s using an unusually high share.
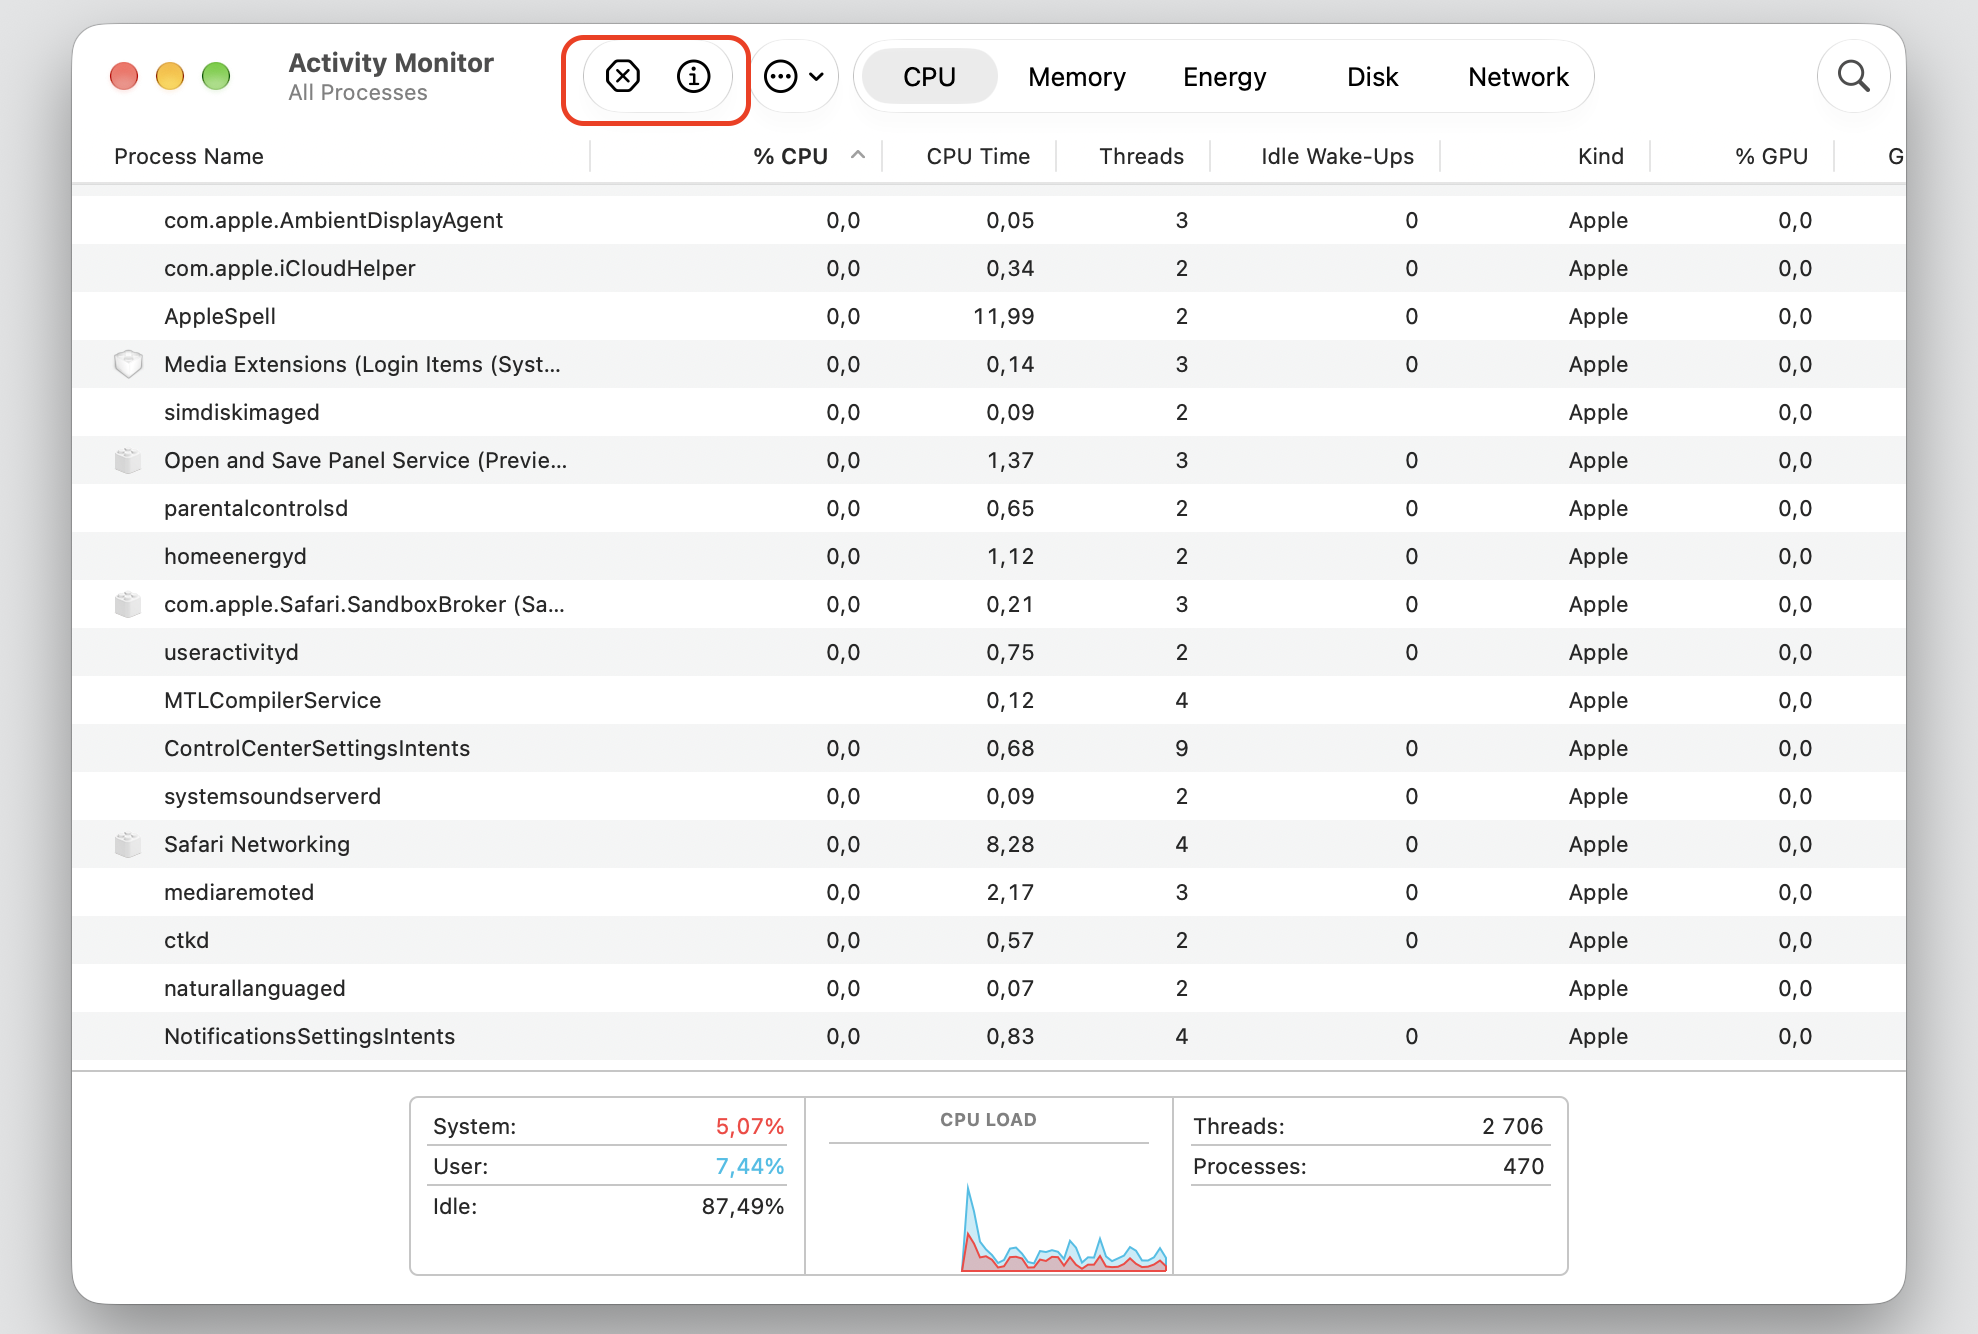
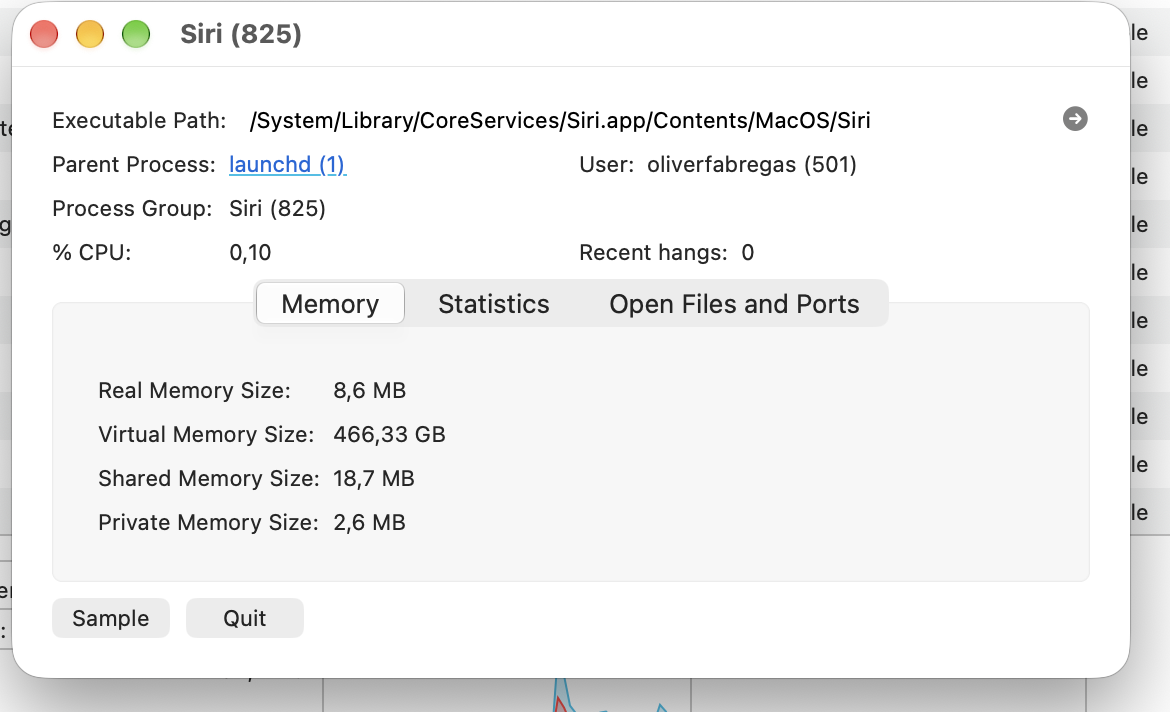
Click the Stop (X) button, then choose Force Quit.
Repeat the same action with the Memory Tab.
Step 1. Go to Finder > ApplicationsStep 2. Expand the Utilities folder and select the Activity Monitor appStep 3. Select the CPU tabStep 4. Select View > All ProcessesStep 5. Look for resource-intensive, non-system processesStep 6. Select any app that’s using an unusually high share and click the Stop (X) buttonStep 7. Confirm the action by clicking the Quit buttonStep 8. Repeat the same action with the Memory Tab
8. Rebuild Spotlight search index
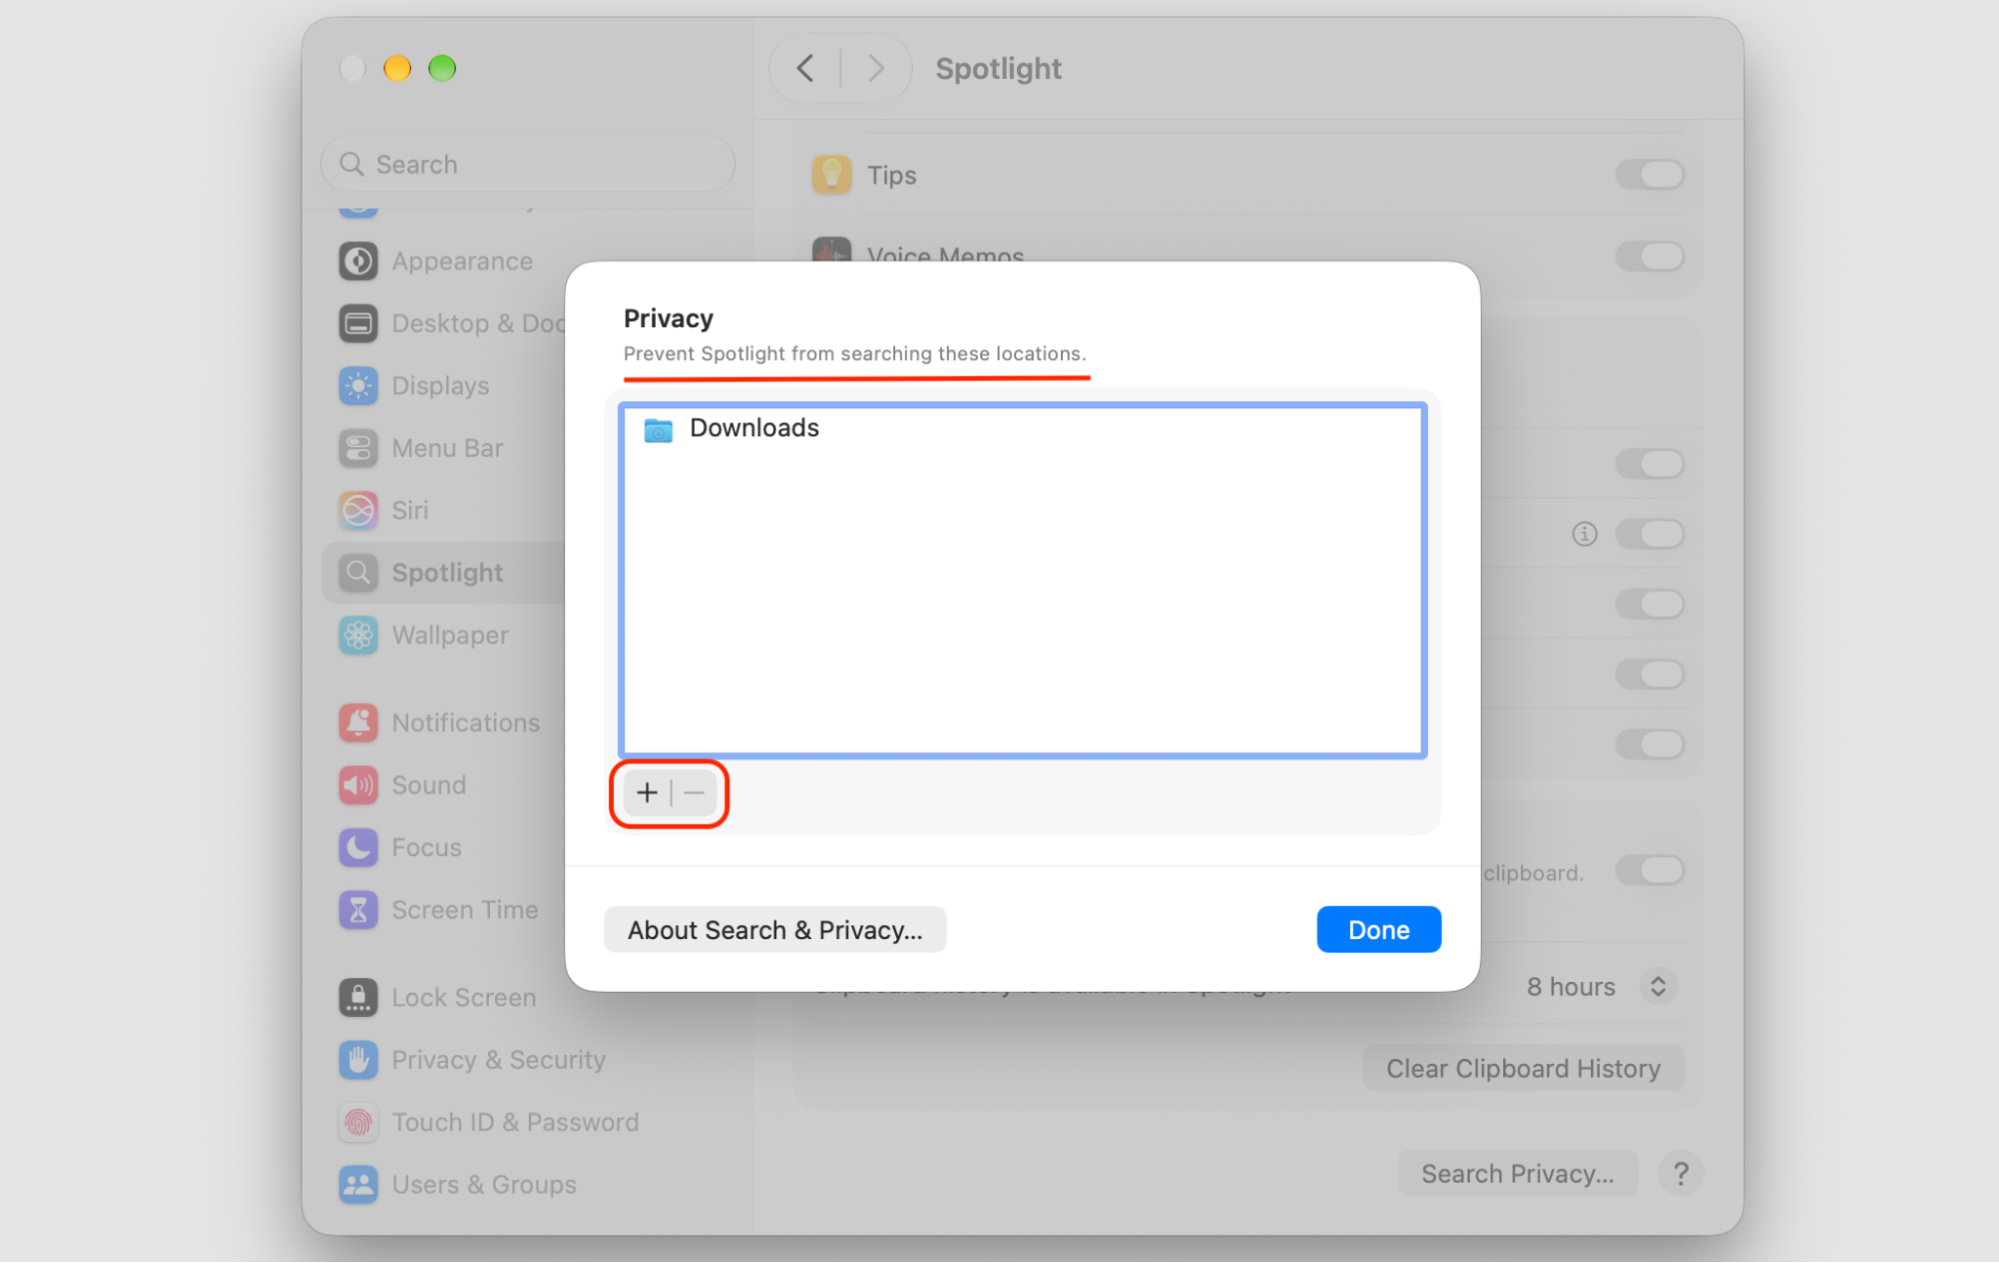
If searches feel sluggish or Spotlight keeps churning through your CPU, its index may have gotten tangled during the upgrade. You don’t have to disable Spotlight entirely—a quick rebuild usually does the trick. The workaround below tells macOS to forget the old index and build a clean one.
Rebuild the index like this:
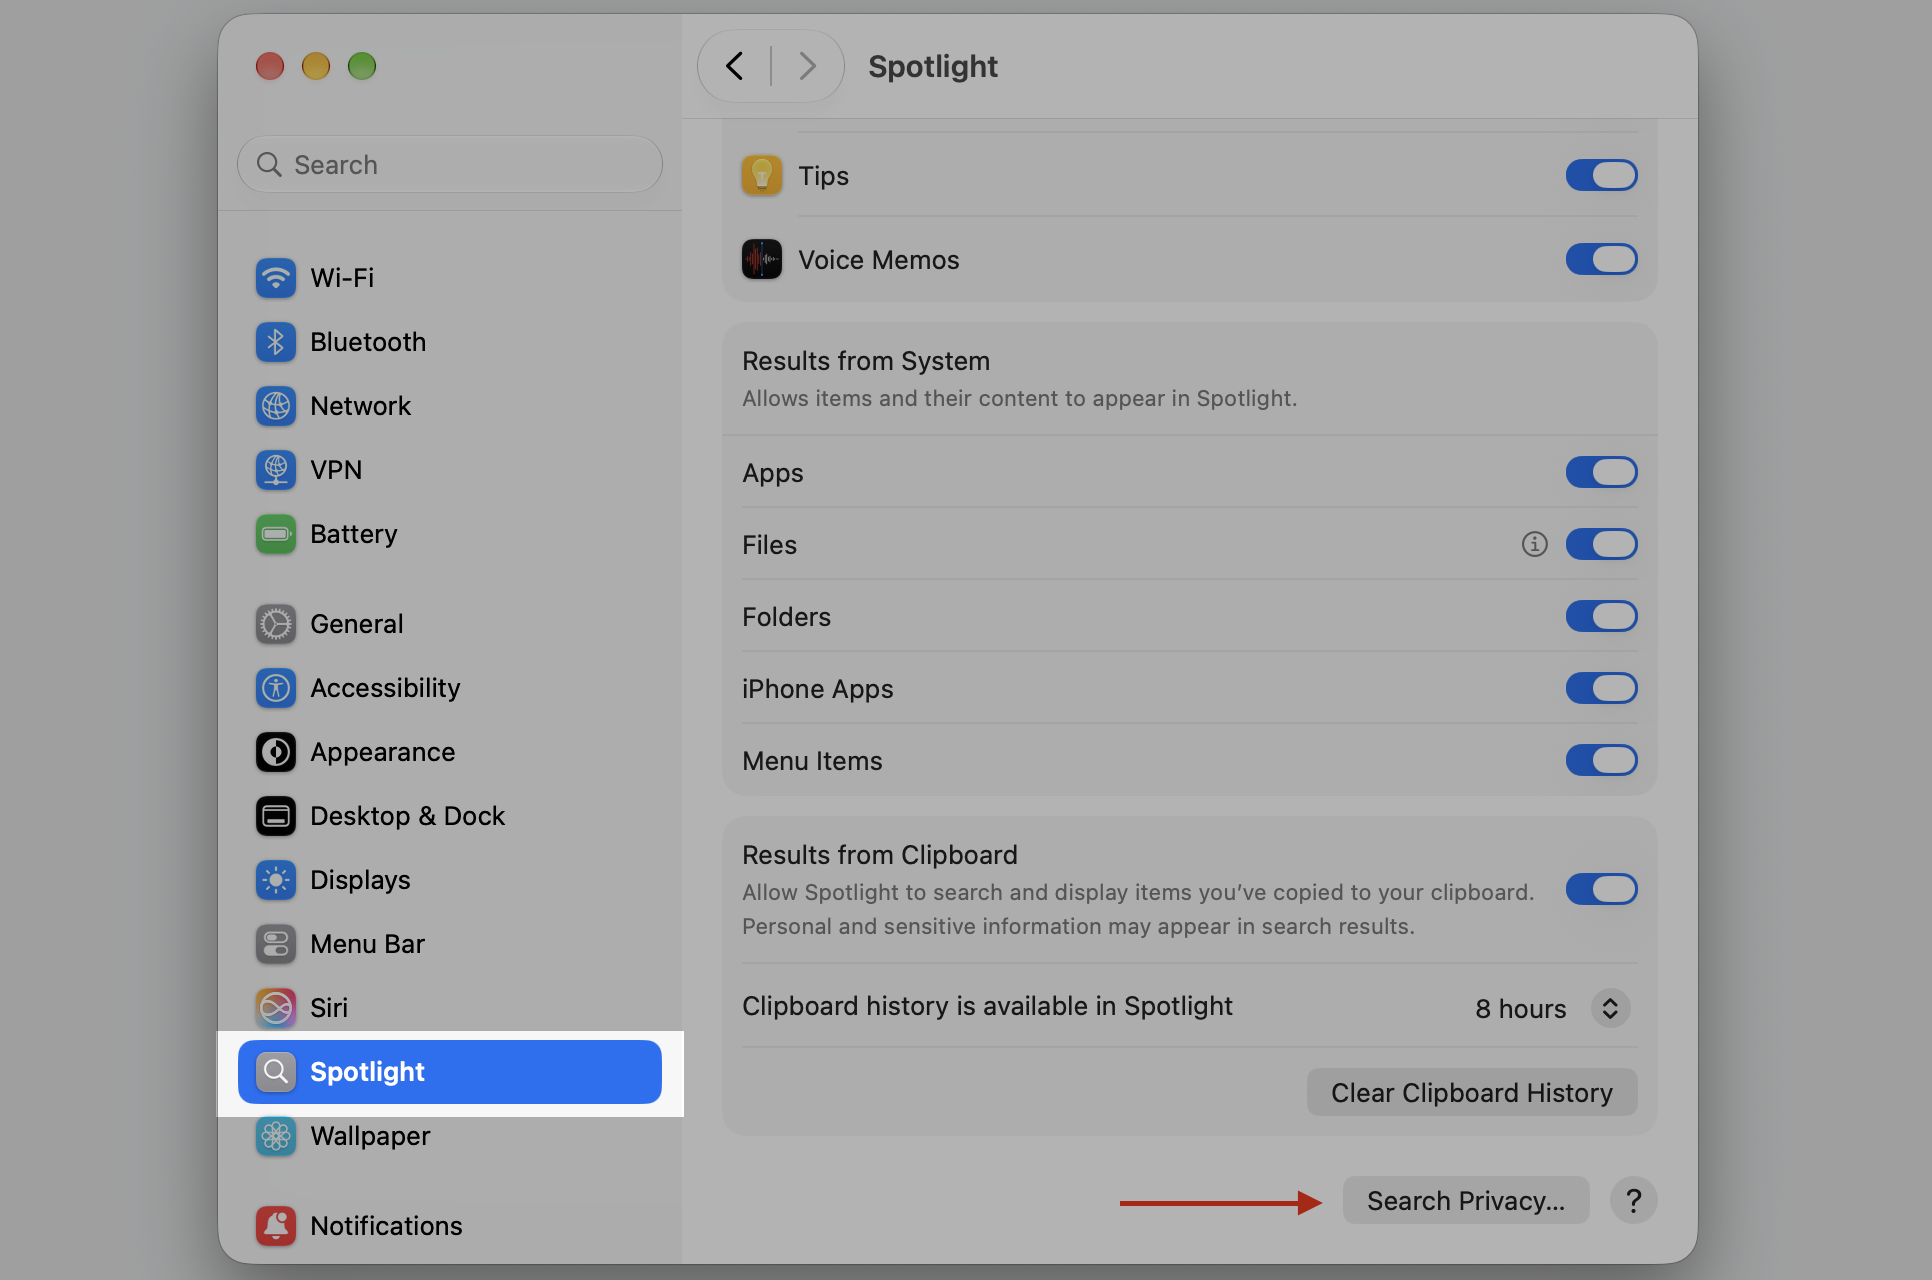
Open System Settings, then click Spotlight.
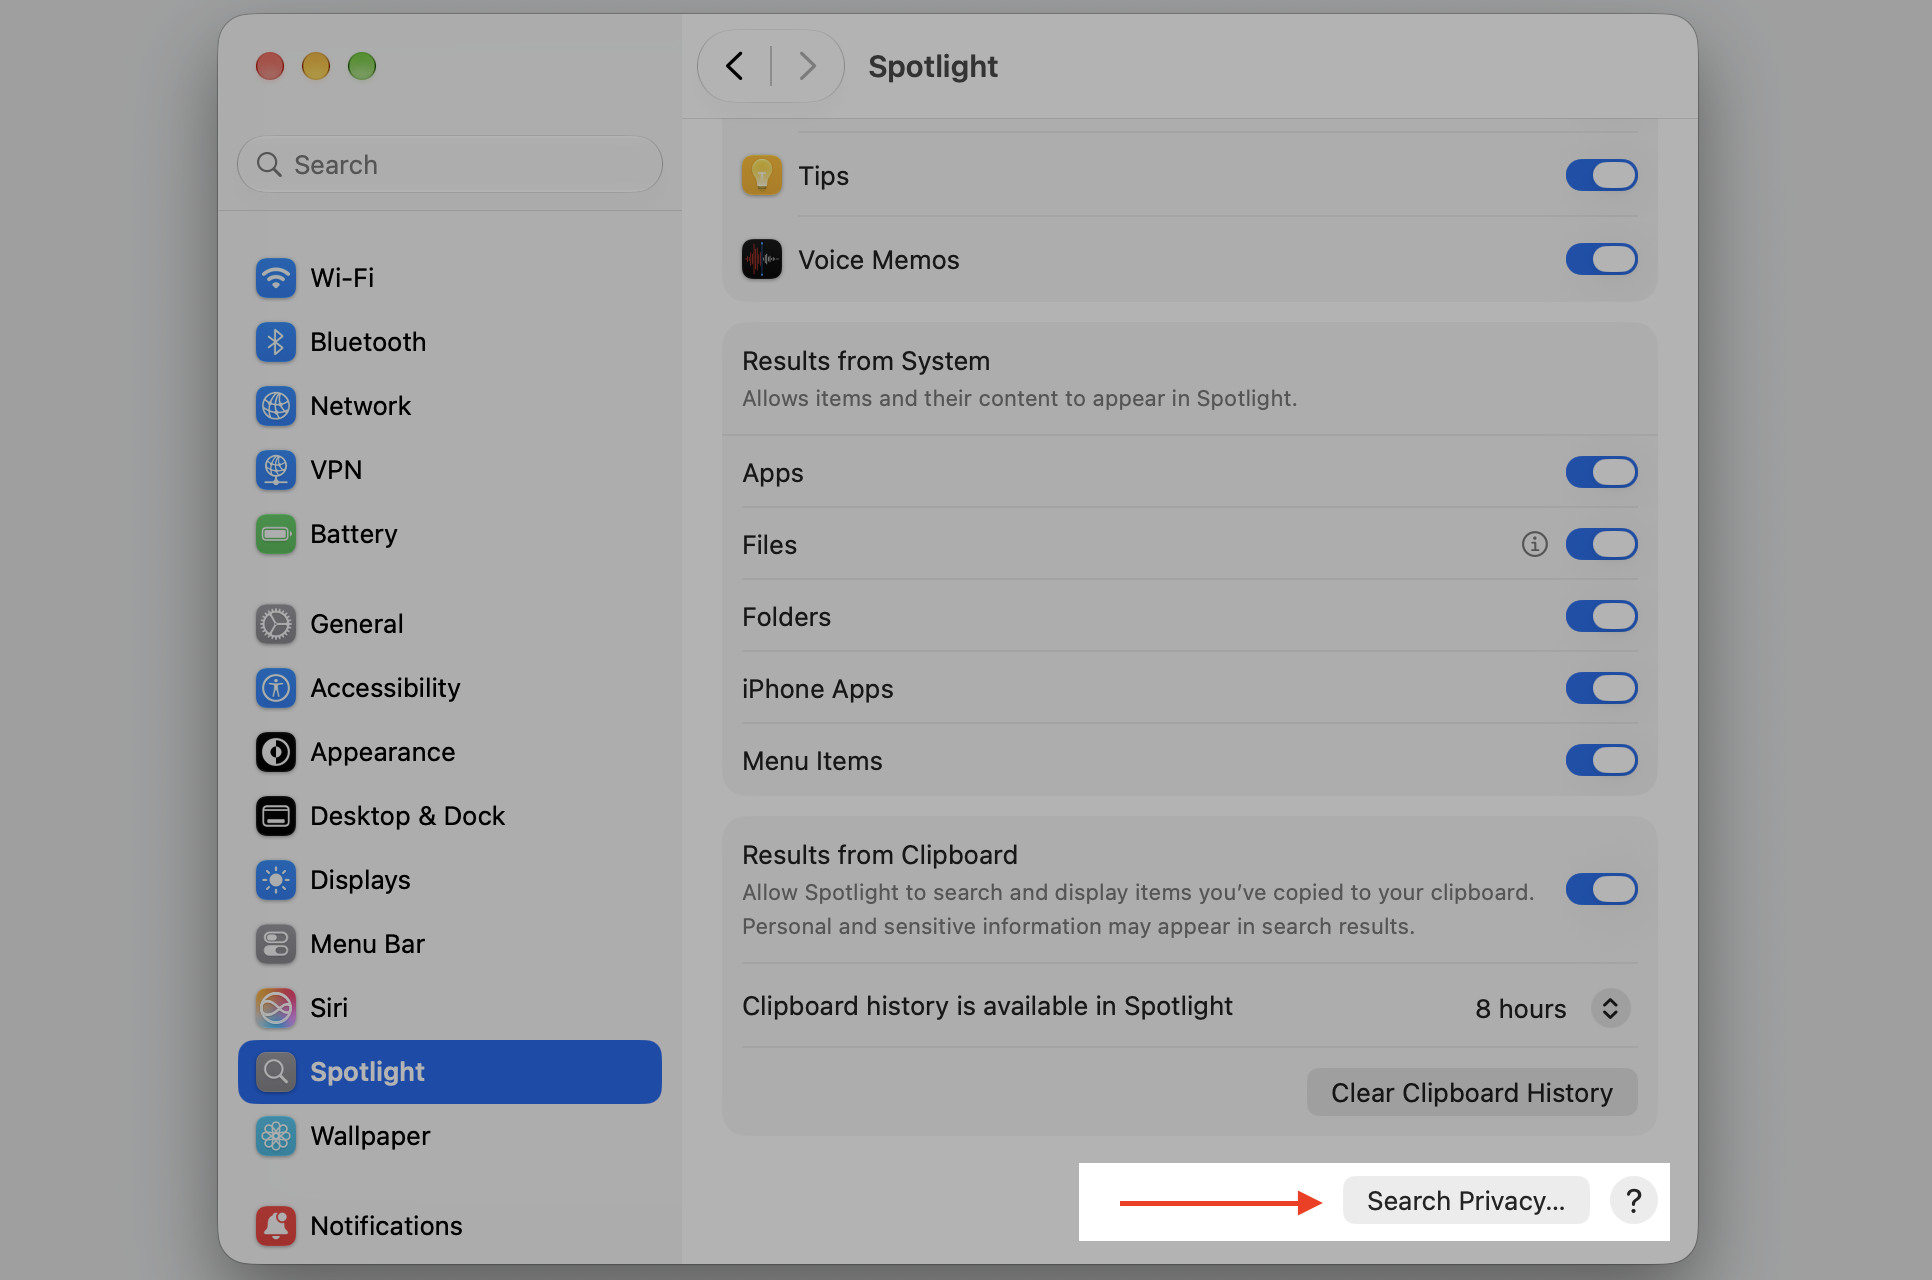
Scroll down and open Search Privacy.
Add the drive you want to exclude from Spotlight indexing.
Close the window and let macOS quietly rebuild the index in the background.
Step 1. Open System SettingsStep 2. Select Spotlight from the sidebarStep 3. Scroll down to the Search Privacy optionStep 4. Add the drive you want to exclude from Spotlight indexing
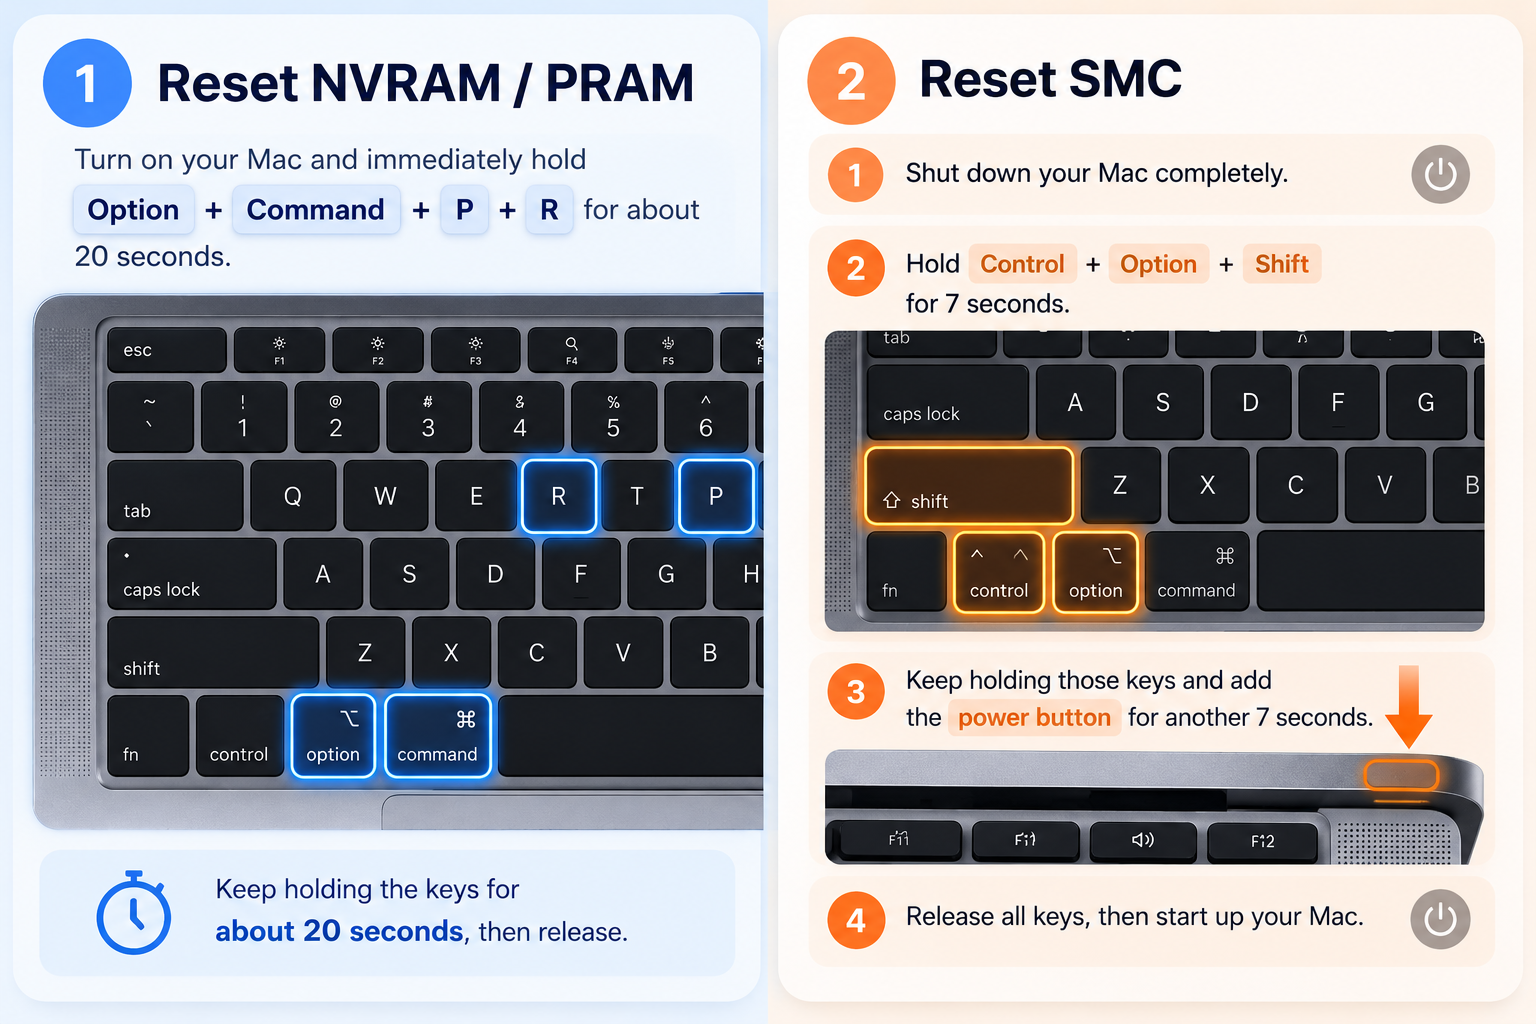
9. Reset system management settings (NVRAM/PRAM and SMC)
This one’s for Intel Macs. When you reset PRAM and SMC on Mac, you clear up low-level hardware glitches, odd fan behavior, and thermal throttling that no software tweak will touch. If you own an Apple Silicon Mac (M1 or later), you don’t have these chips, and a simple reboot does the same job.
Here’s the reset sequence for Intel models:
Shut down your Mac completely.
Turn it on and immediately hold Option + Command + P + R for about 20 seconds to reset the NVRAM/PRAM.
For the SMC, shut down again, then hold Control + Option + Shift for seven seconds.
Keep holding and add the power button for another seven seconds, then release and start up.
How to maintain long-term macOS Sequoia performance?
The steps above will get your Mac moving again, but a little routine keeps it that way. Think of regular maintenance for Mac like tidying your desk—small, frequent habits beat one big cleanout every year. A few simple routines go a long way toward steady performance.
Restart weekly—a quick reboot keeps memory fresh and stops small issues from stacking up.
Watch your storage—glance at your free disk space now and then, and clear junk before it piles up.
Update promptly—installing patches soon after release keeps your apps and macOS running efficiently.
Review startup items—every few months, check what’s launching automatically and prune the list.
Let a helper do the heavy lifting—MacKeeper’s Memory Cleaner and Safe Cleanup handle memory and junk monitoring for you.
Third-party utilities are handy here because they automate the boring parts. MacKeeper’s Safe Cleanup, for instance, removes caches and logs in one click without touching your personal files, so your Mac stays tidy with almost no effort.
Conclusion
So, why does macOS Sequoia feel sluggish at first? Usually it’s the upgrade settling in—background indexing, low free disk space, crowded startup items, and apps that haven’t caught up yet. The reassuring part is that macOS Sequoia's slow performance is almost always temporary and easy to sort out.
Stick with routine maintenance, manage your startup items, and keep your storage clean, and you’ll enjoy steady speed for the long haul. When you want a shortcut to improve Mac Sequoia speed, MacKeeper’s Memory Cleaner frees up RAM by quitting idle processes and heavy apps in a single click, giving your Mac room to breathe.
We respect your privacy and
use cookies
for the best site experience.
Privacy Preferences Center
We use cookies along with other tools to give you the best possible experience while using the
MacKeeper website. Cookies are small text files that help the website load faster. The cookies we
use don’t contain any type of personal data meaning they never store information such as your
location, email address, or IP address.
Help us improve how you interact with our website by accepting the use of cookies. You can change
your privacy settings whenever you like.
Manage consent
All cookies
These cookies are strictly necessary for enabling basic website functionality (including page
navigation, form submission, language detection, post commenting), downloading and purchasing
software. The website might malfunction without these cookies.