Spotify’s cached songs, local files, and support data can quietly eat up gigabytes on your MacBook. If the app’s been crashing, draining your battery, or you’ve simply switched to Apple Music, it’s time to uninstall Spotify on Mac and reclaim that storage. MacKeeper’s Smart Uninstaller removes the app and every hidden leftover in a single click, and today we’ll tell you more about Sportify deletion.
Every time you stream a song, Spotify saves a cached copy so it can play faster next time. Over weeks and months, that cache can grow to 8 GB or more—especially on a MacBook Air or Pro with limited SSD space. Deleting Spotify frees all of that storage at once.
Beyond the cache, we should say that Spotify installs support files, preferences, and saved playlists across several hidden macOS folders. Removing these files helps you free up space and can resolve slowdowns or unexpected app behavior that lingers after a buggy update.
If Spotify was launching at startup and running in the background, uninstalling it also reduces memory usage and helps your remaining apps run more smoothly.
Things to know before uninstalling Spotify
Before you remove Spotify from your Mac, take a moment to think about your account and data. Here are a few things worth keeping in mind:
Your account stays active. Uninstalling the app doesn’t cancel a Premium subscription or delete your Spotify profile. You’ll still be billed unless you cancel through Spotify’s website.
Playlists and saved songs live in the cloud. Your playlists, liked songs, and listening history are tied to your account—not to the app on your Mac. They’ll be waiting if you ever reinstall.
Downloaded songs will be lost. Any tracks you’ve saved for offline listening are stored locally. Once you delete Spotify, those files go with it. You’d need to re-download them after a fresh install.
Troubleshooting first? If you’re dealing with Spotify not working on your Mac—playback glitches, a black screen, or constant crashes—clearing the cache or reinstalling may solve the issue without a full removal.
How to completely uninstall Spotify on Mac?
Dragging Spotify to the Trash removes only the app itself—it doesn’t touch caches, preferences, or support files scattered across macOS. To completely uninstall applications on Mac, you need a more thorough approach. Below are three methods we advise—from hands-on manual steps to a quick one-click solution.
1. Manually uninstall Spotify from Mac
The manual method uses built-in macOS tools and doesn’t require any extra software. Make sure Spotify isn’t running before you start—otherwise, your Macintosh will tell you the file can’t be moved to trash because it’s open. Then, do the following:
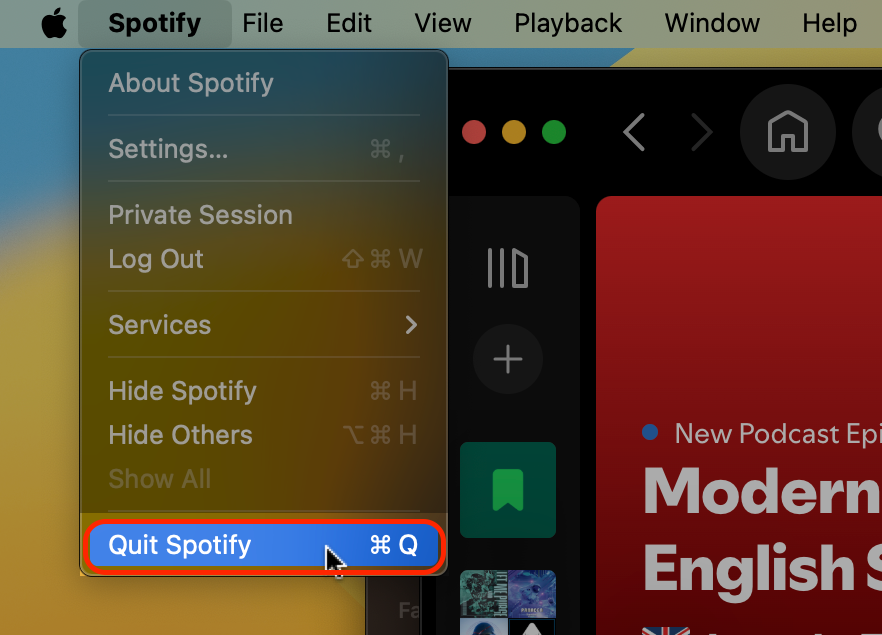
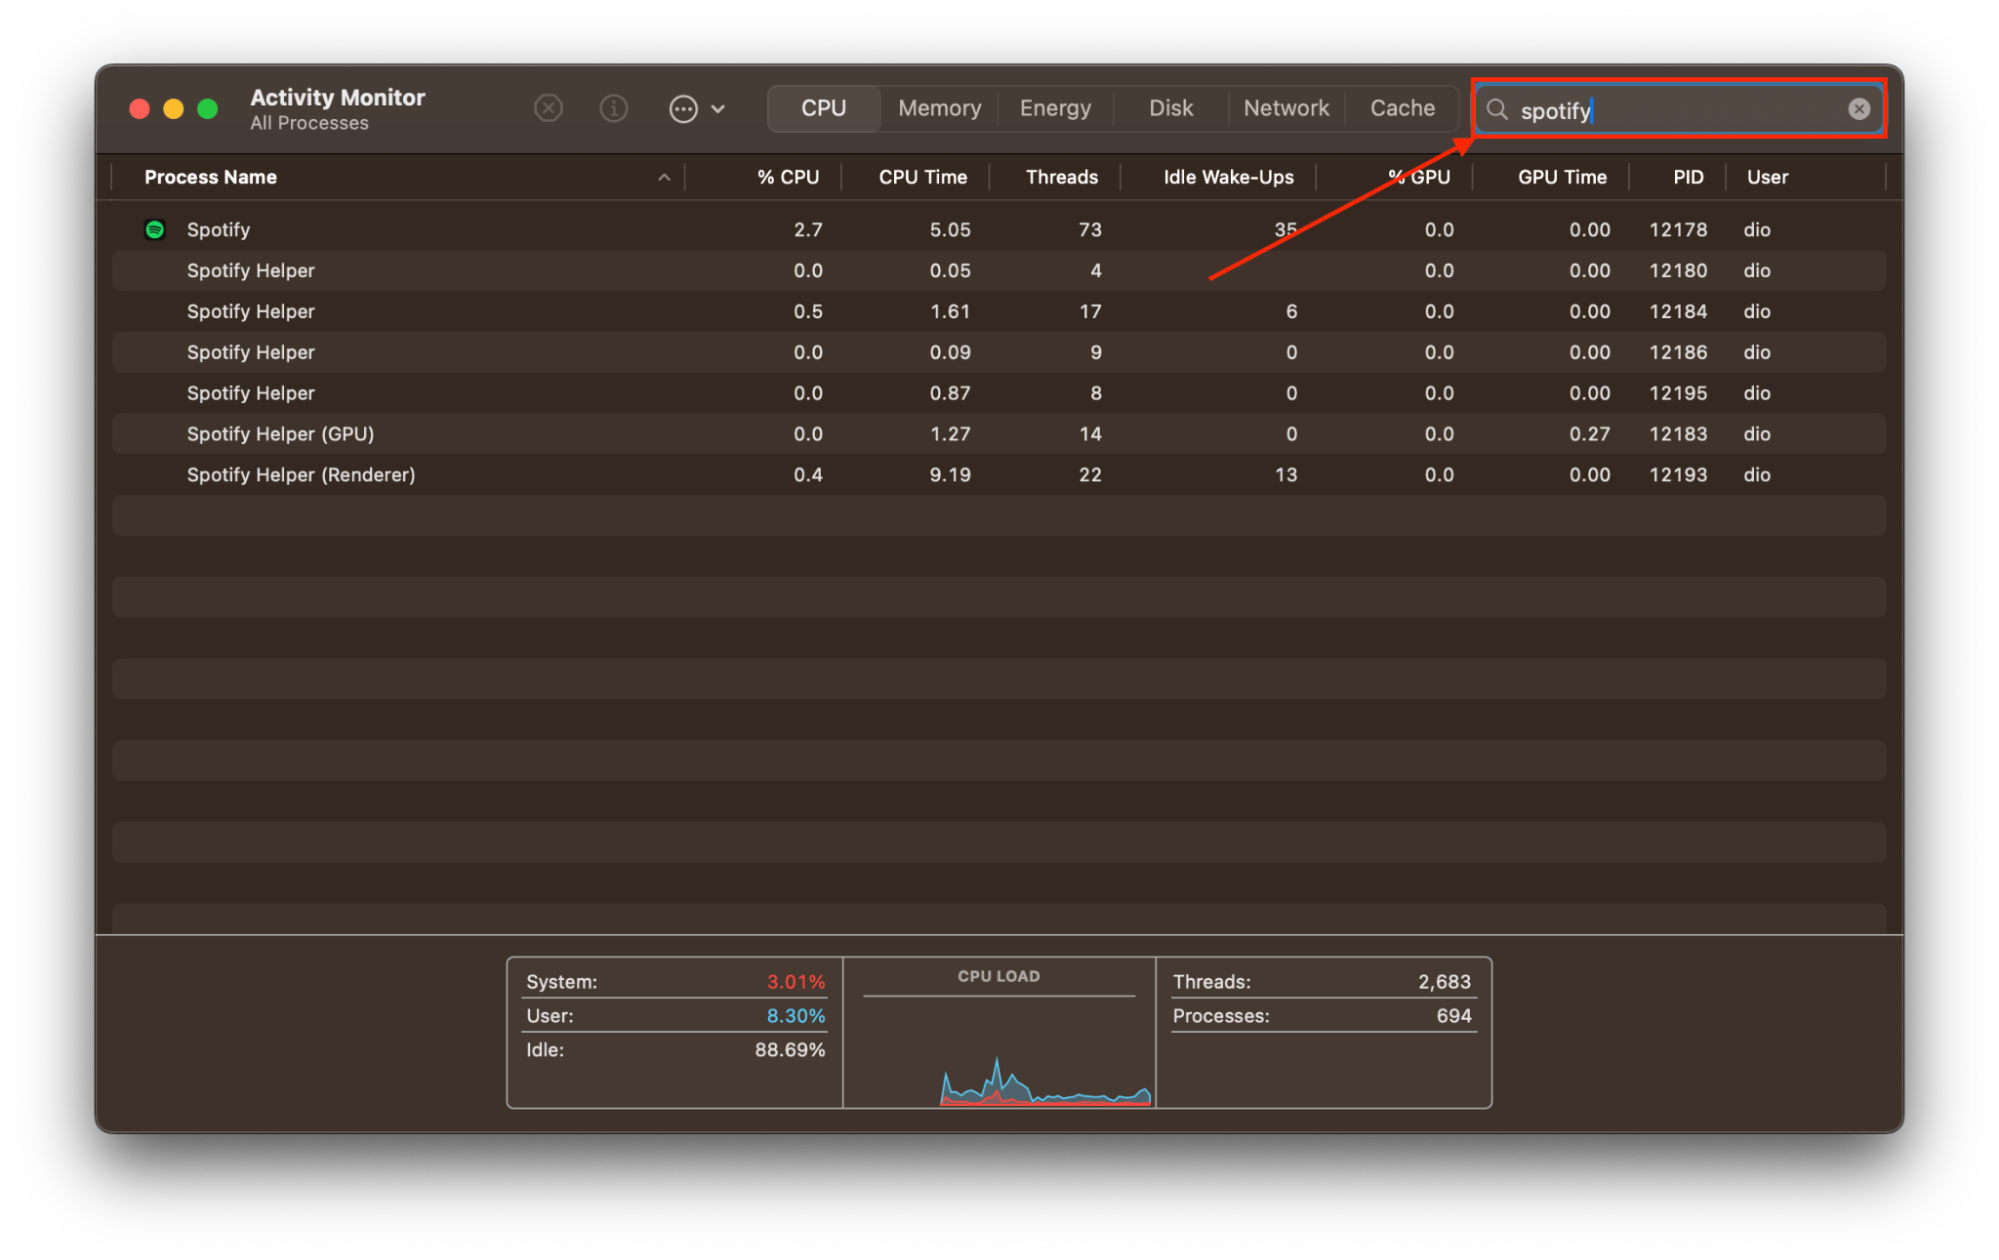
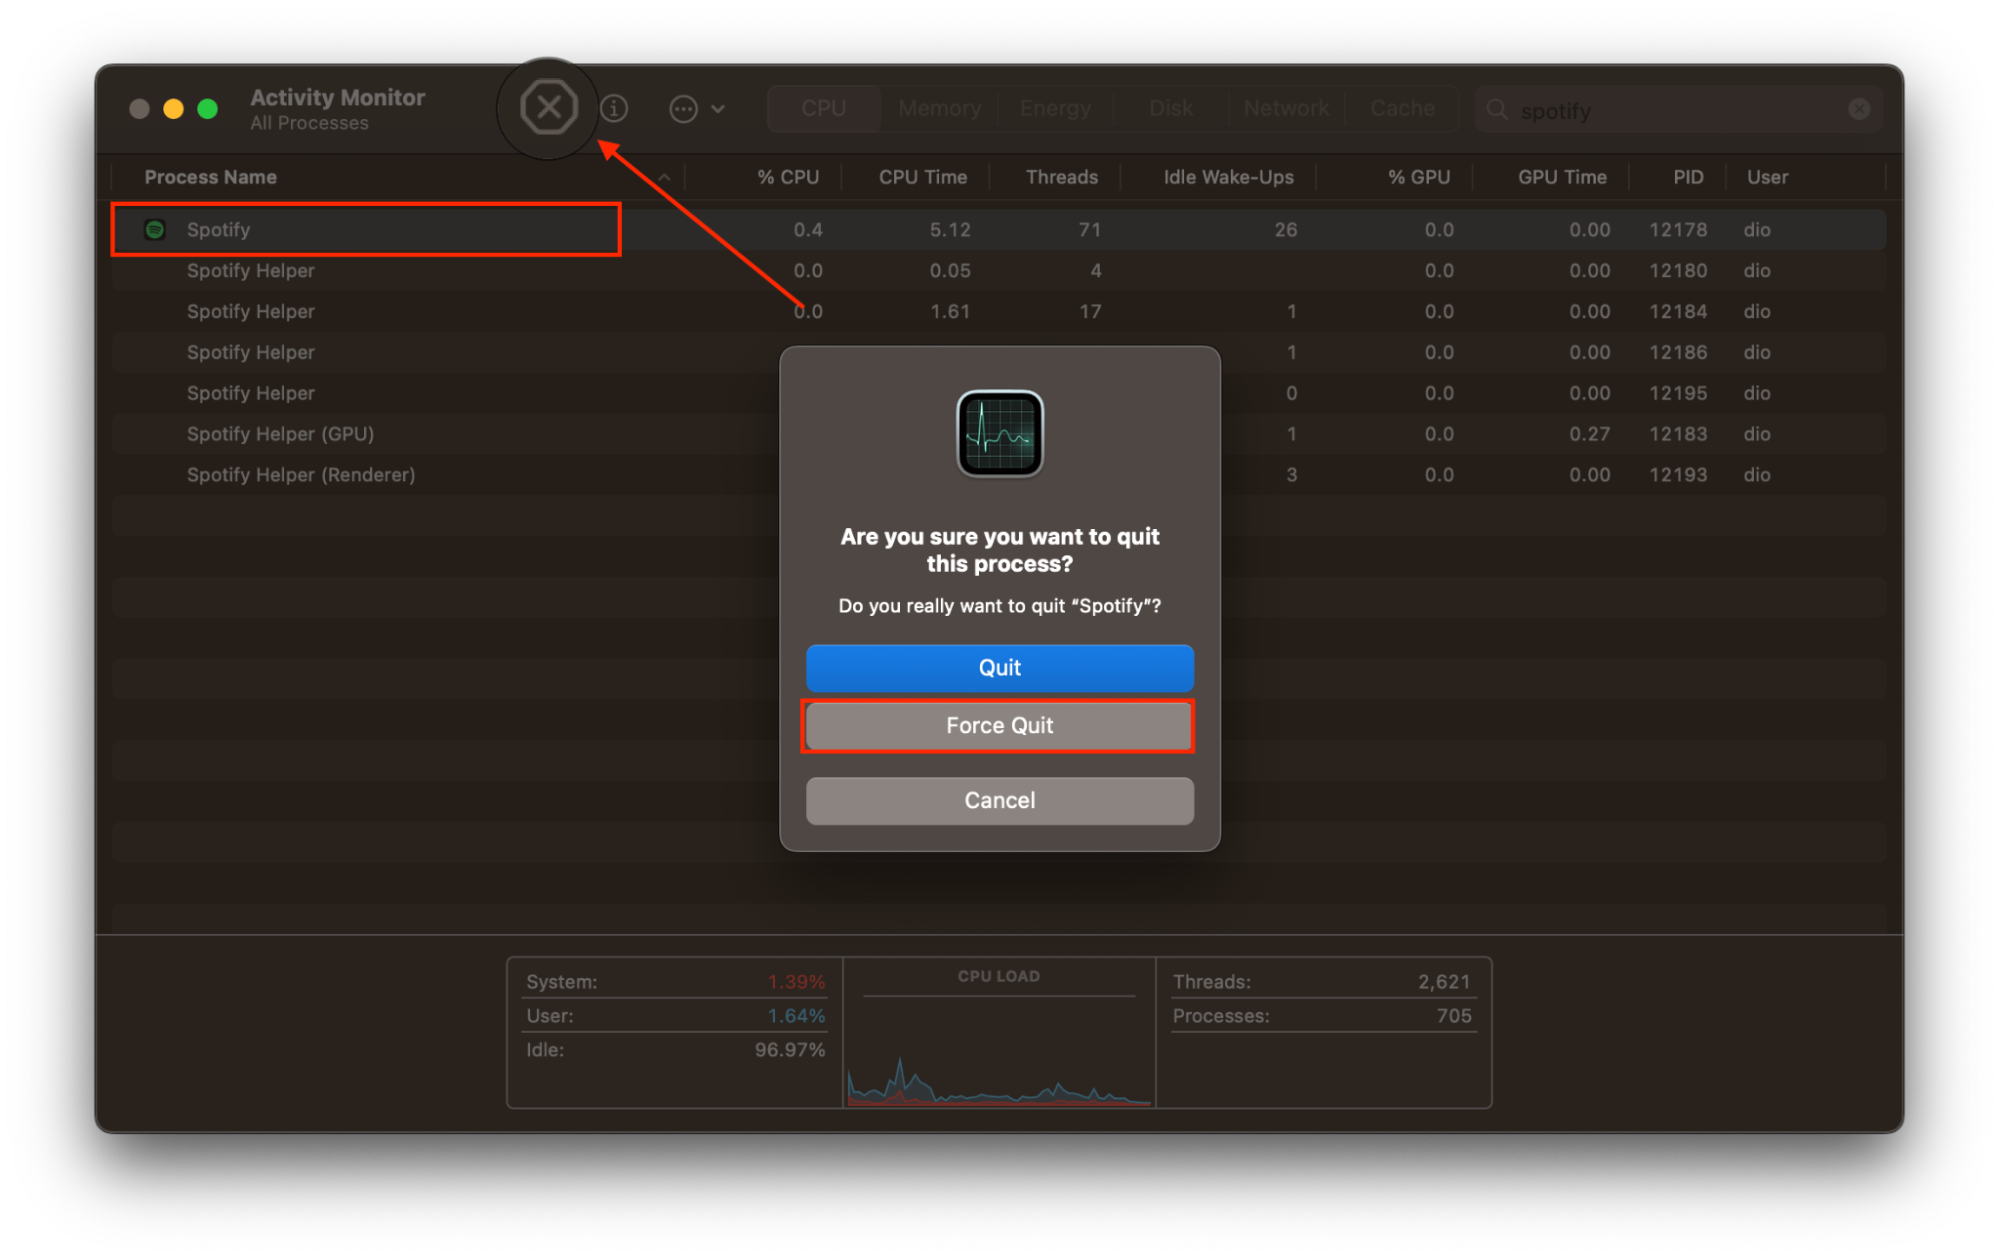
Click Spotify in the menu bar and choose Quit Spotify. If it won’t quit, open Activity Monitor (from Applications > Utilities), select any Spotify process with the search option, and click the X button to force it to stop.
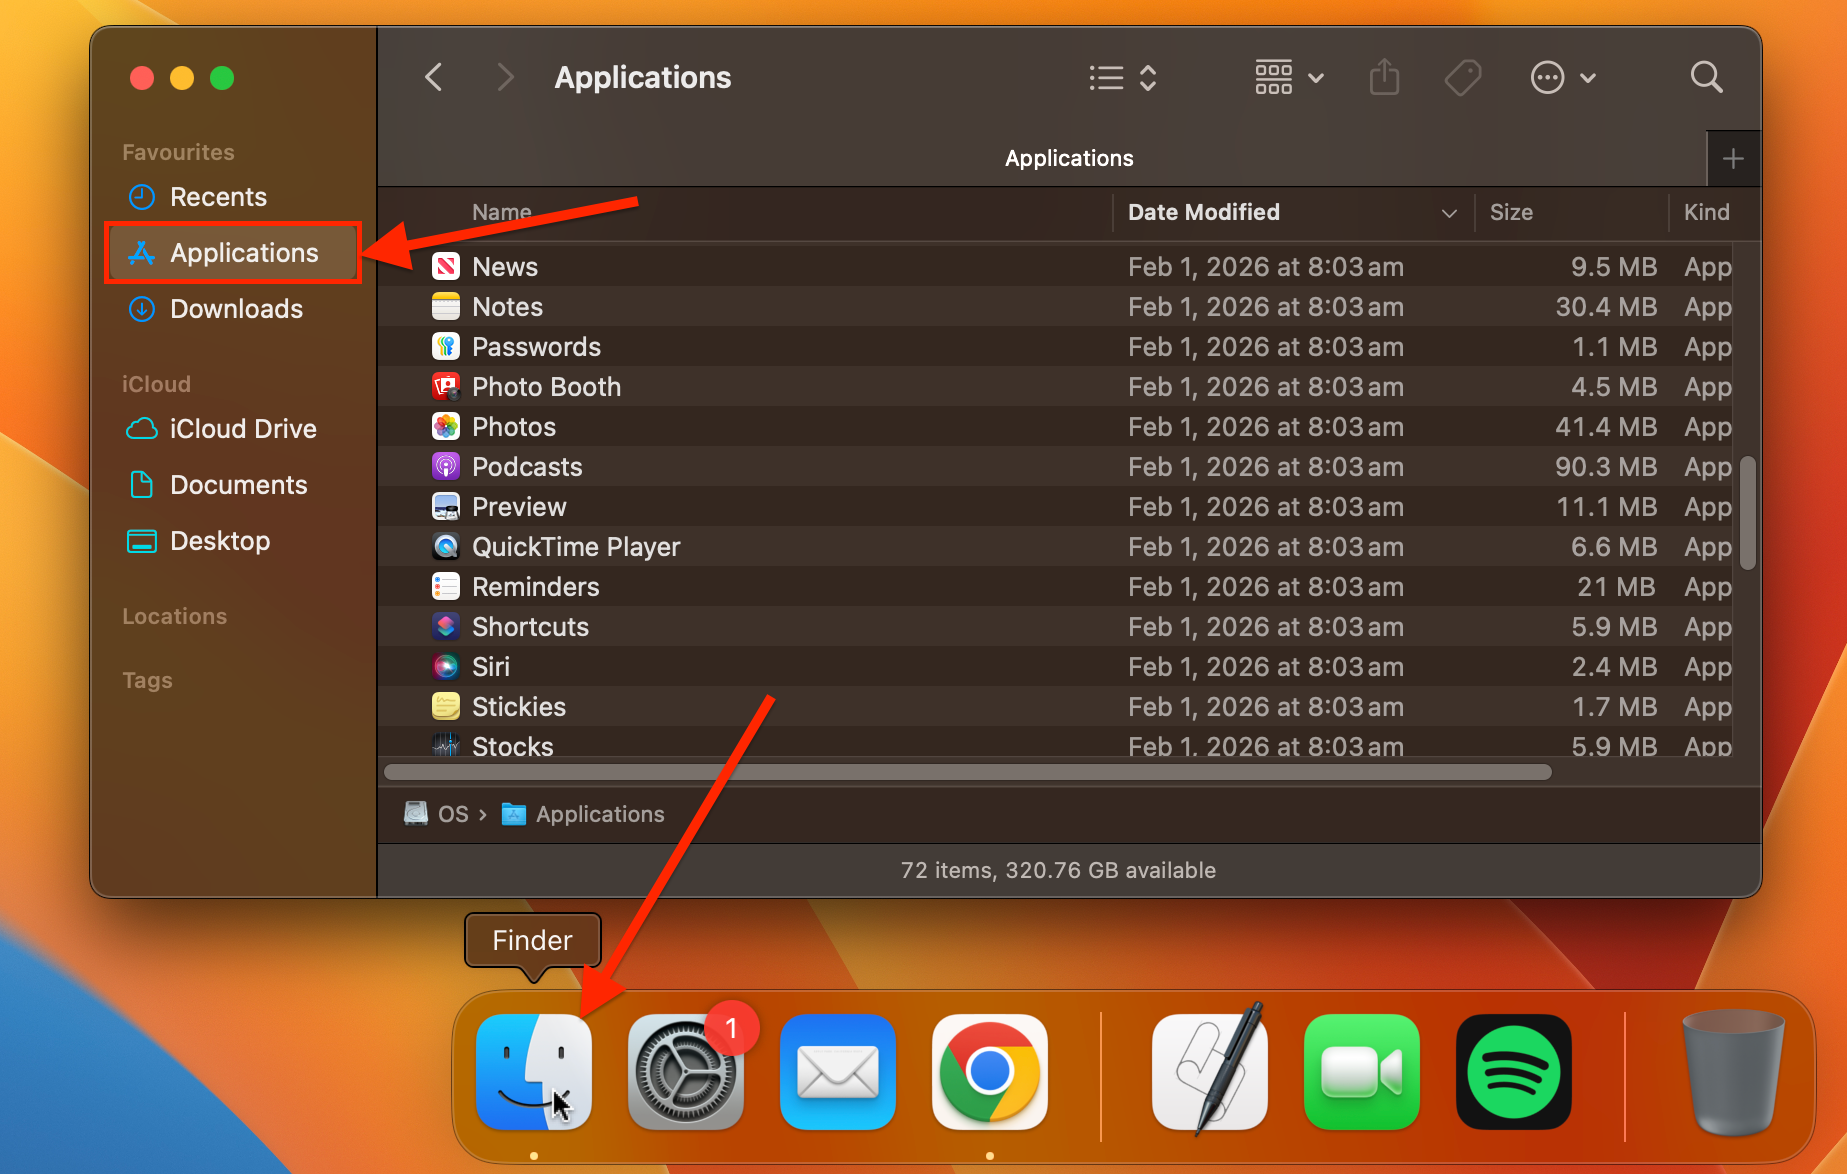
Open Finder and go to the Applications folder in the sidebar.
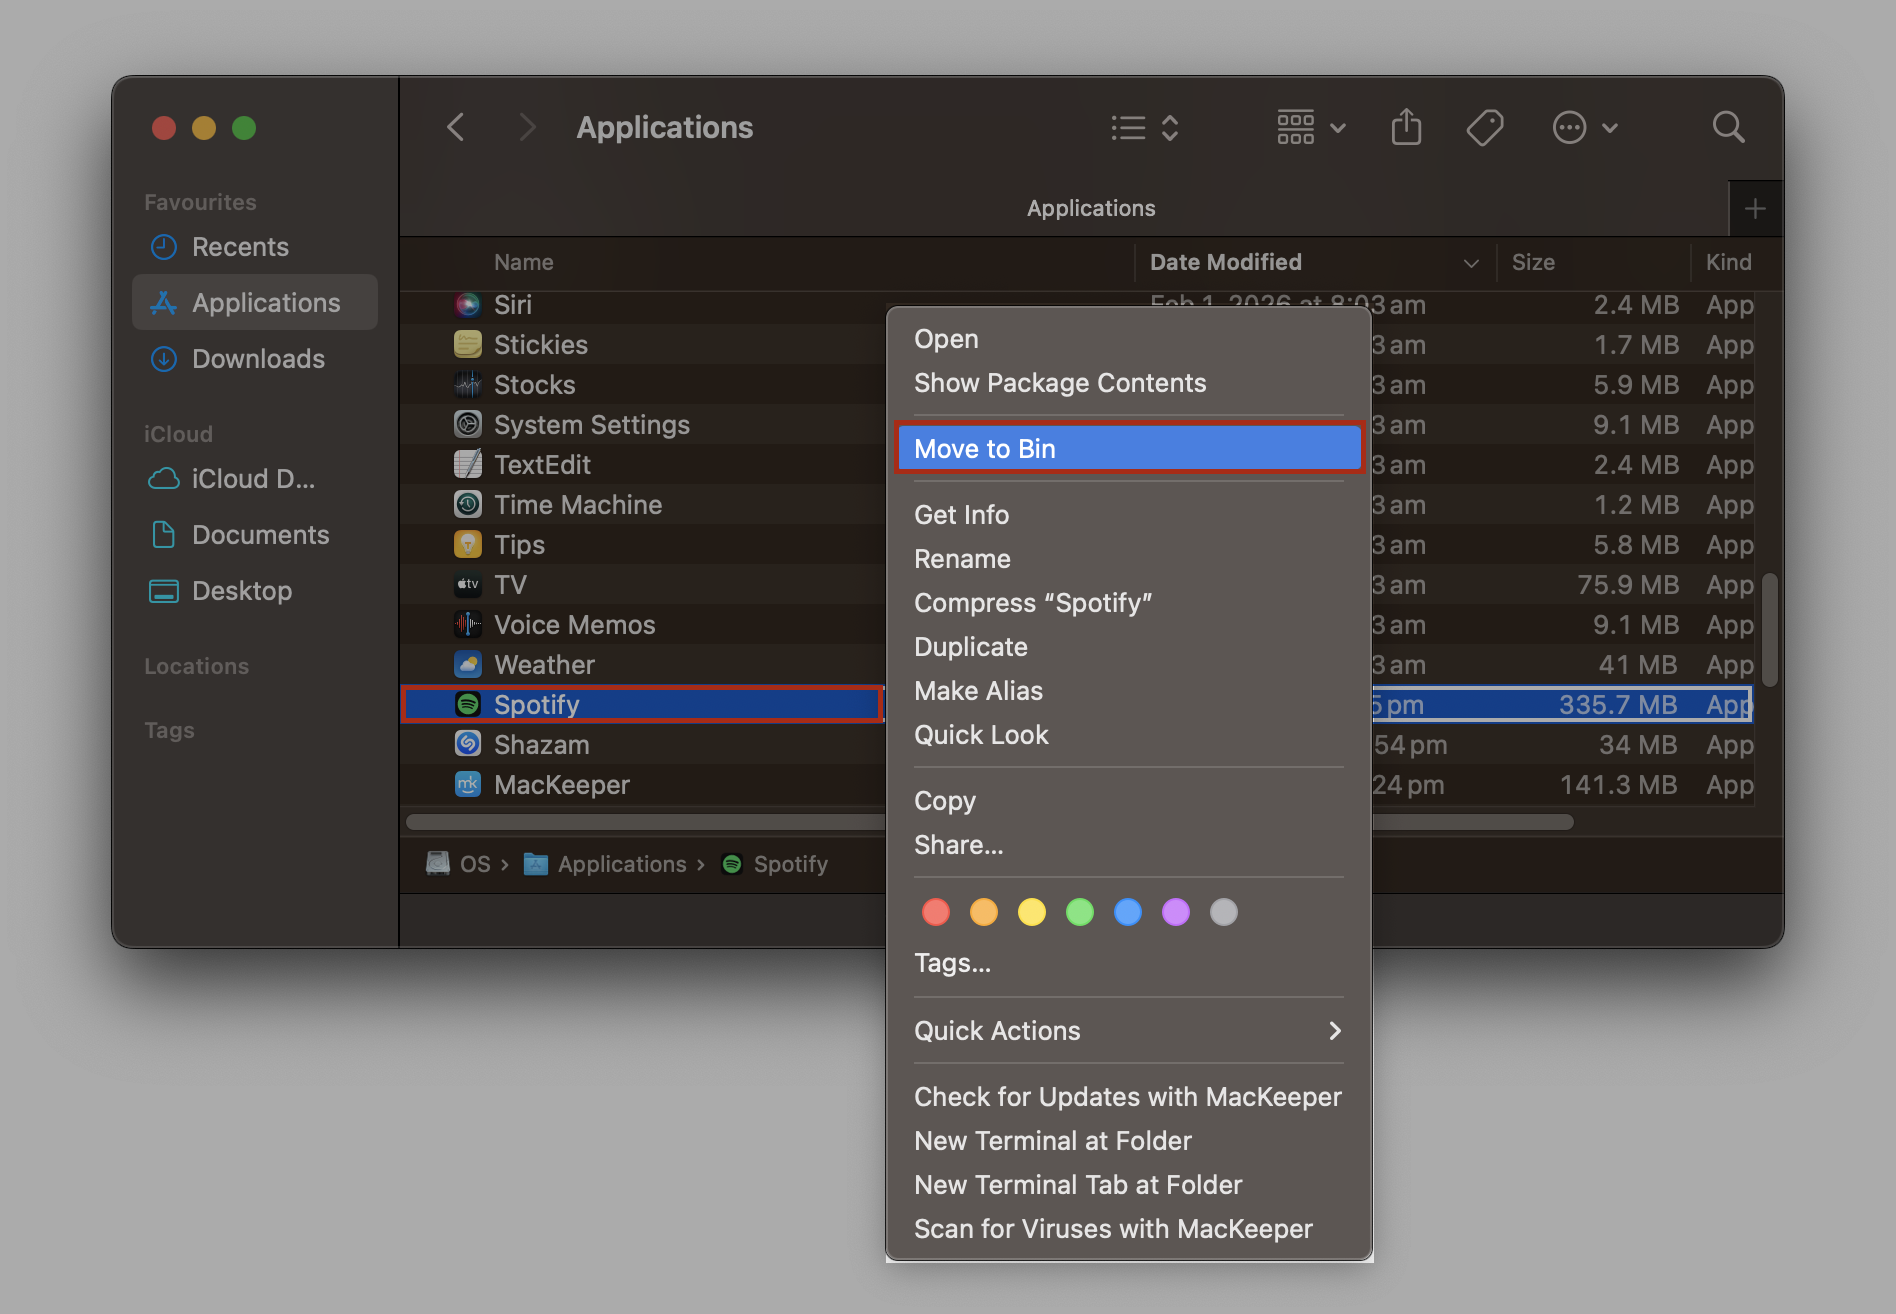
Find Spotify, right-click it, and select Move to Trash. You can also drag the icon straight to the Trash in the Dock.
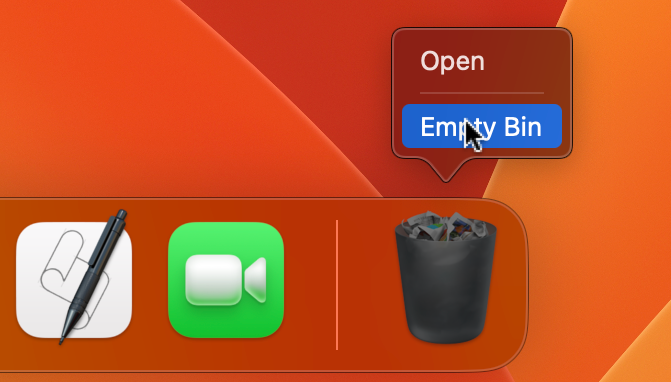
Right-click the Trash icon in the Dock and choose Empty Trash to delete the app permanently.
Step 1. Spotify menu > Quit SpotifyStep 2. Activity Monitor with "spotify" in searchStep 3. Force Quit confirmation dialog in Activity MonitorStep 4. Open Finder from Dock and go to Applications folderStep 5. Right-click Spotify in Applications > Move to BinStep 6. Spotify icon being dragged to Bin in DockStep 7. Right-click Bin > Empty Bin
This removes the main app, but Spotify’s support files—caches, preferences, and saved data—are still on your Mac. In the next section, we’ll show you how to find and delete them.
A note from our experts:
Manual app uninstallition isn’t the best approach, as may leftover files remain on your device unnoticed. This not only occupies precious space on your MacBook but also can create some app malfunctions. Try a better way with MacKeeper’s Smart Uninstaller—download it and see how it quickly and safely does its job.
2. Remove Spotify leftover files
Even after you delete Spotify from the Applications folder, macOS keeps its support data tucked inside the hidden Library folder. If you want to delete leftover files from uninstalled programs on Mac, follow these steps:
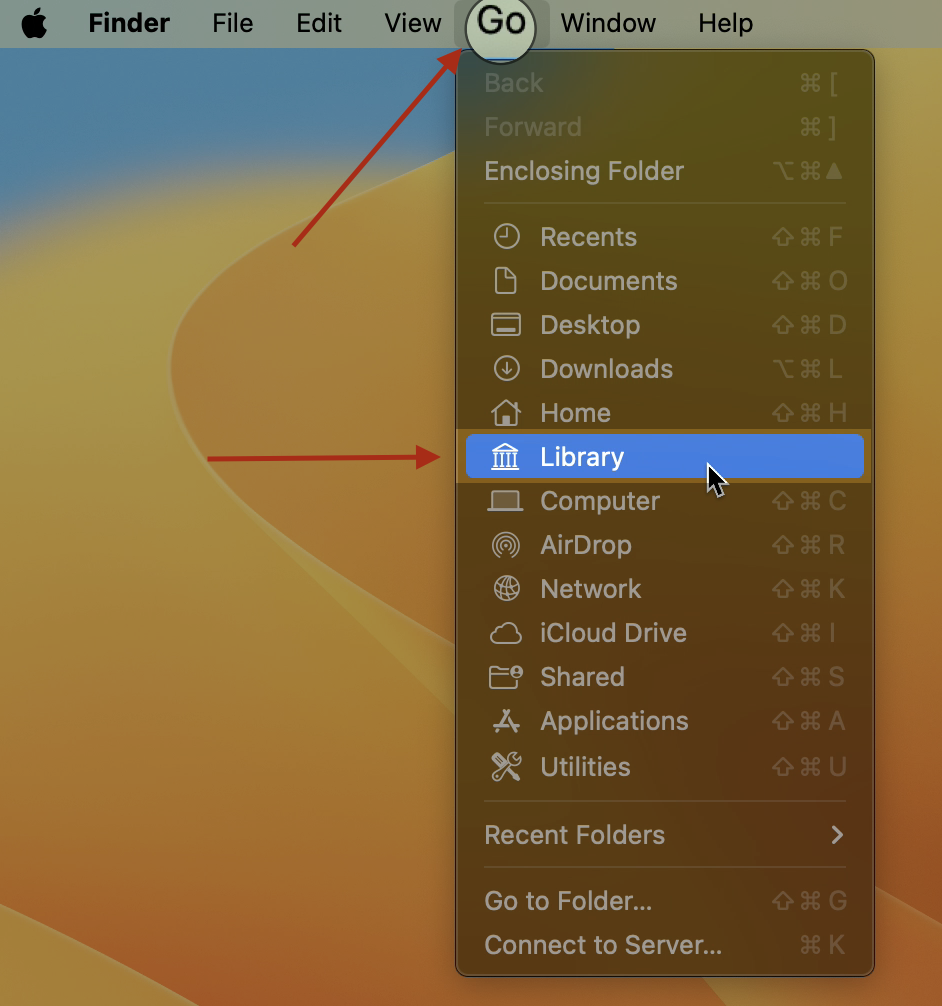
Open Finder, click Go in the menu bar, then hold the Option key and select Library.
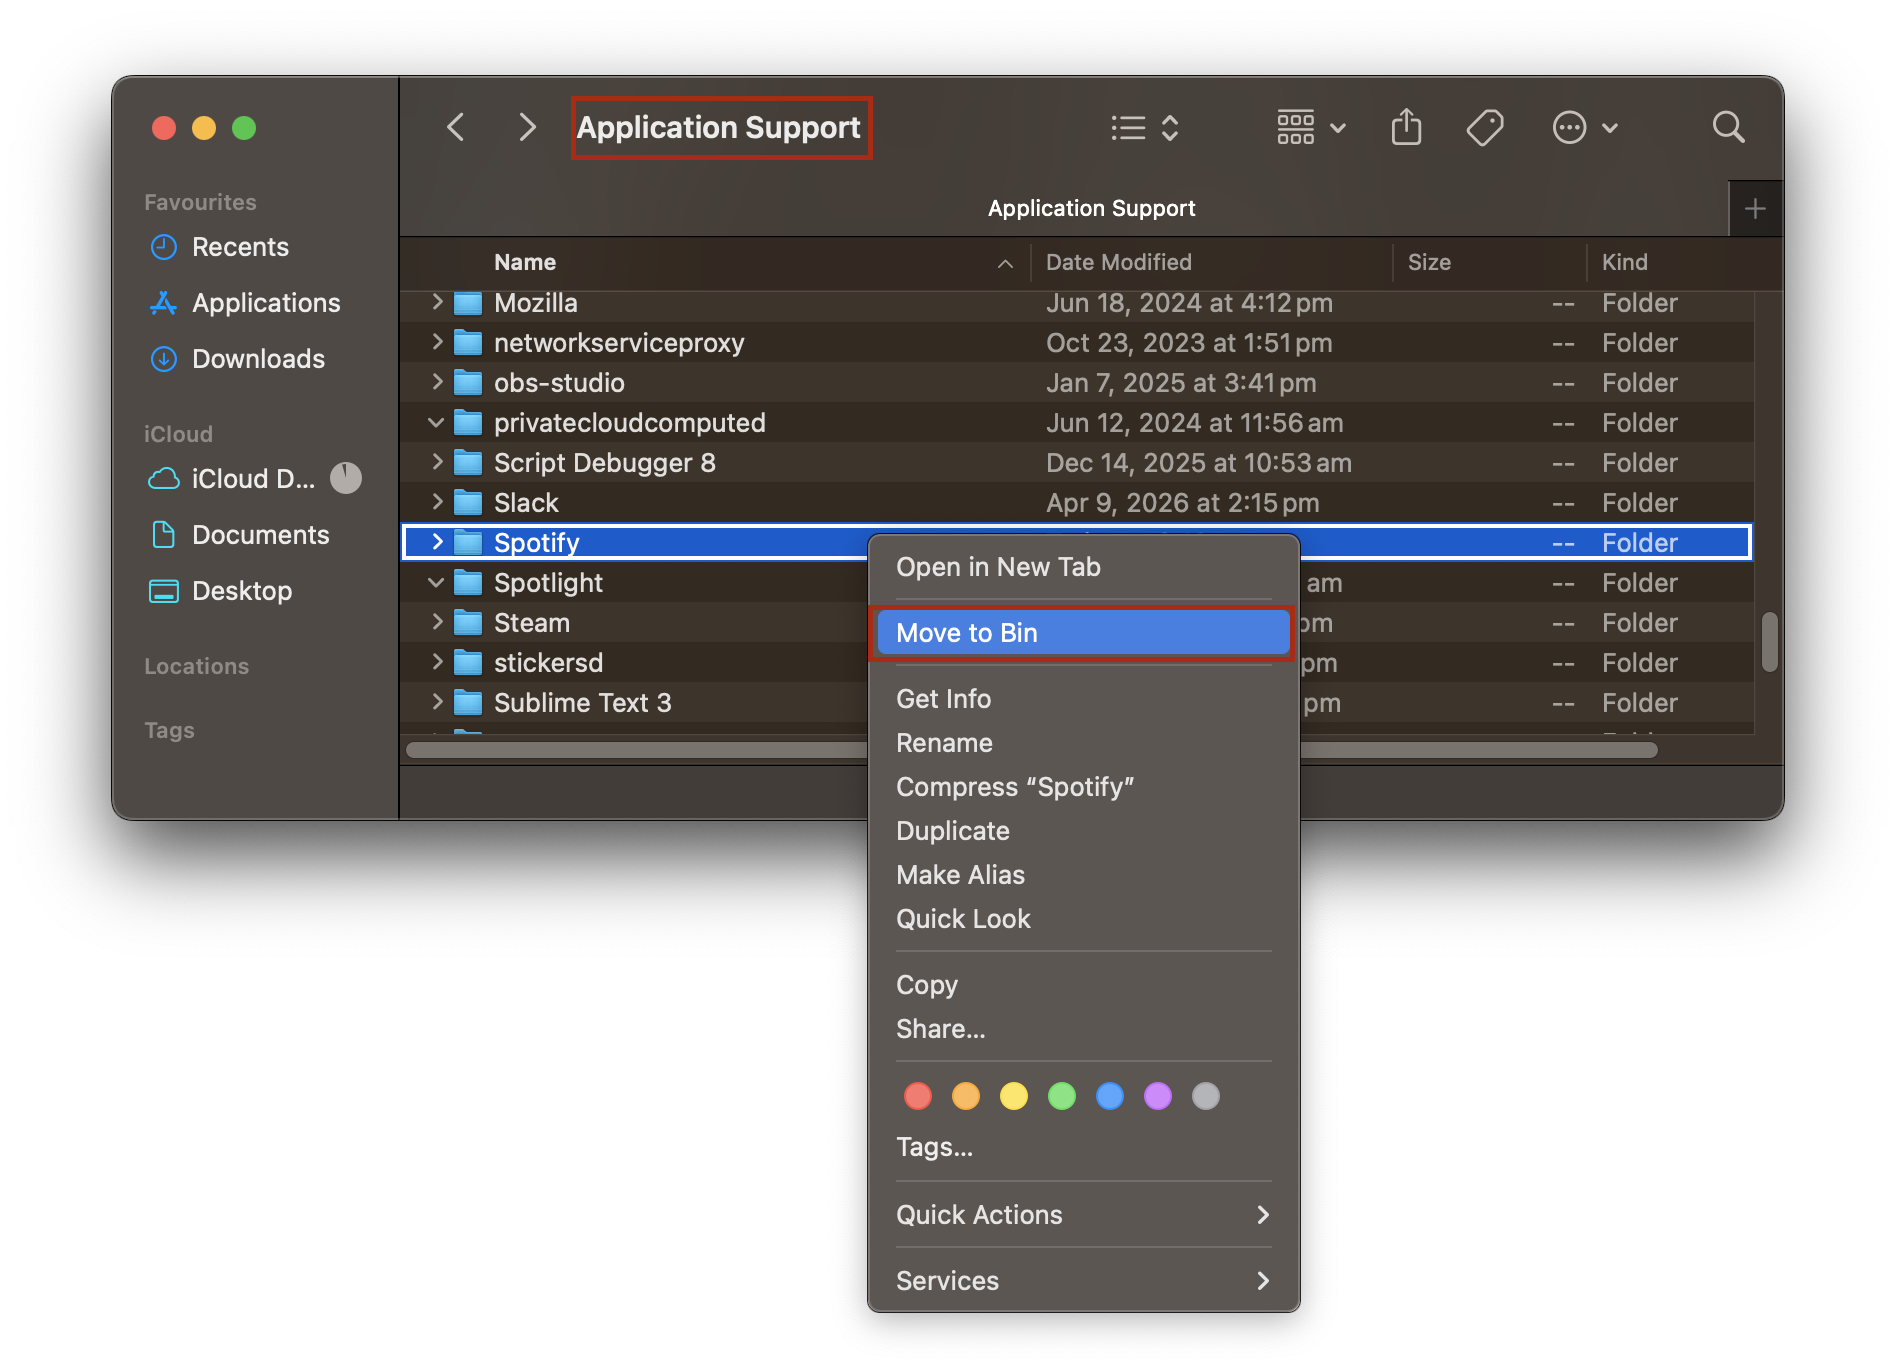
Navigate to Application Support and delete the Spotify folder.
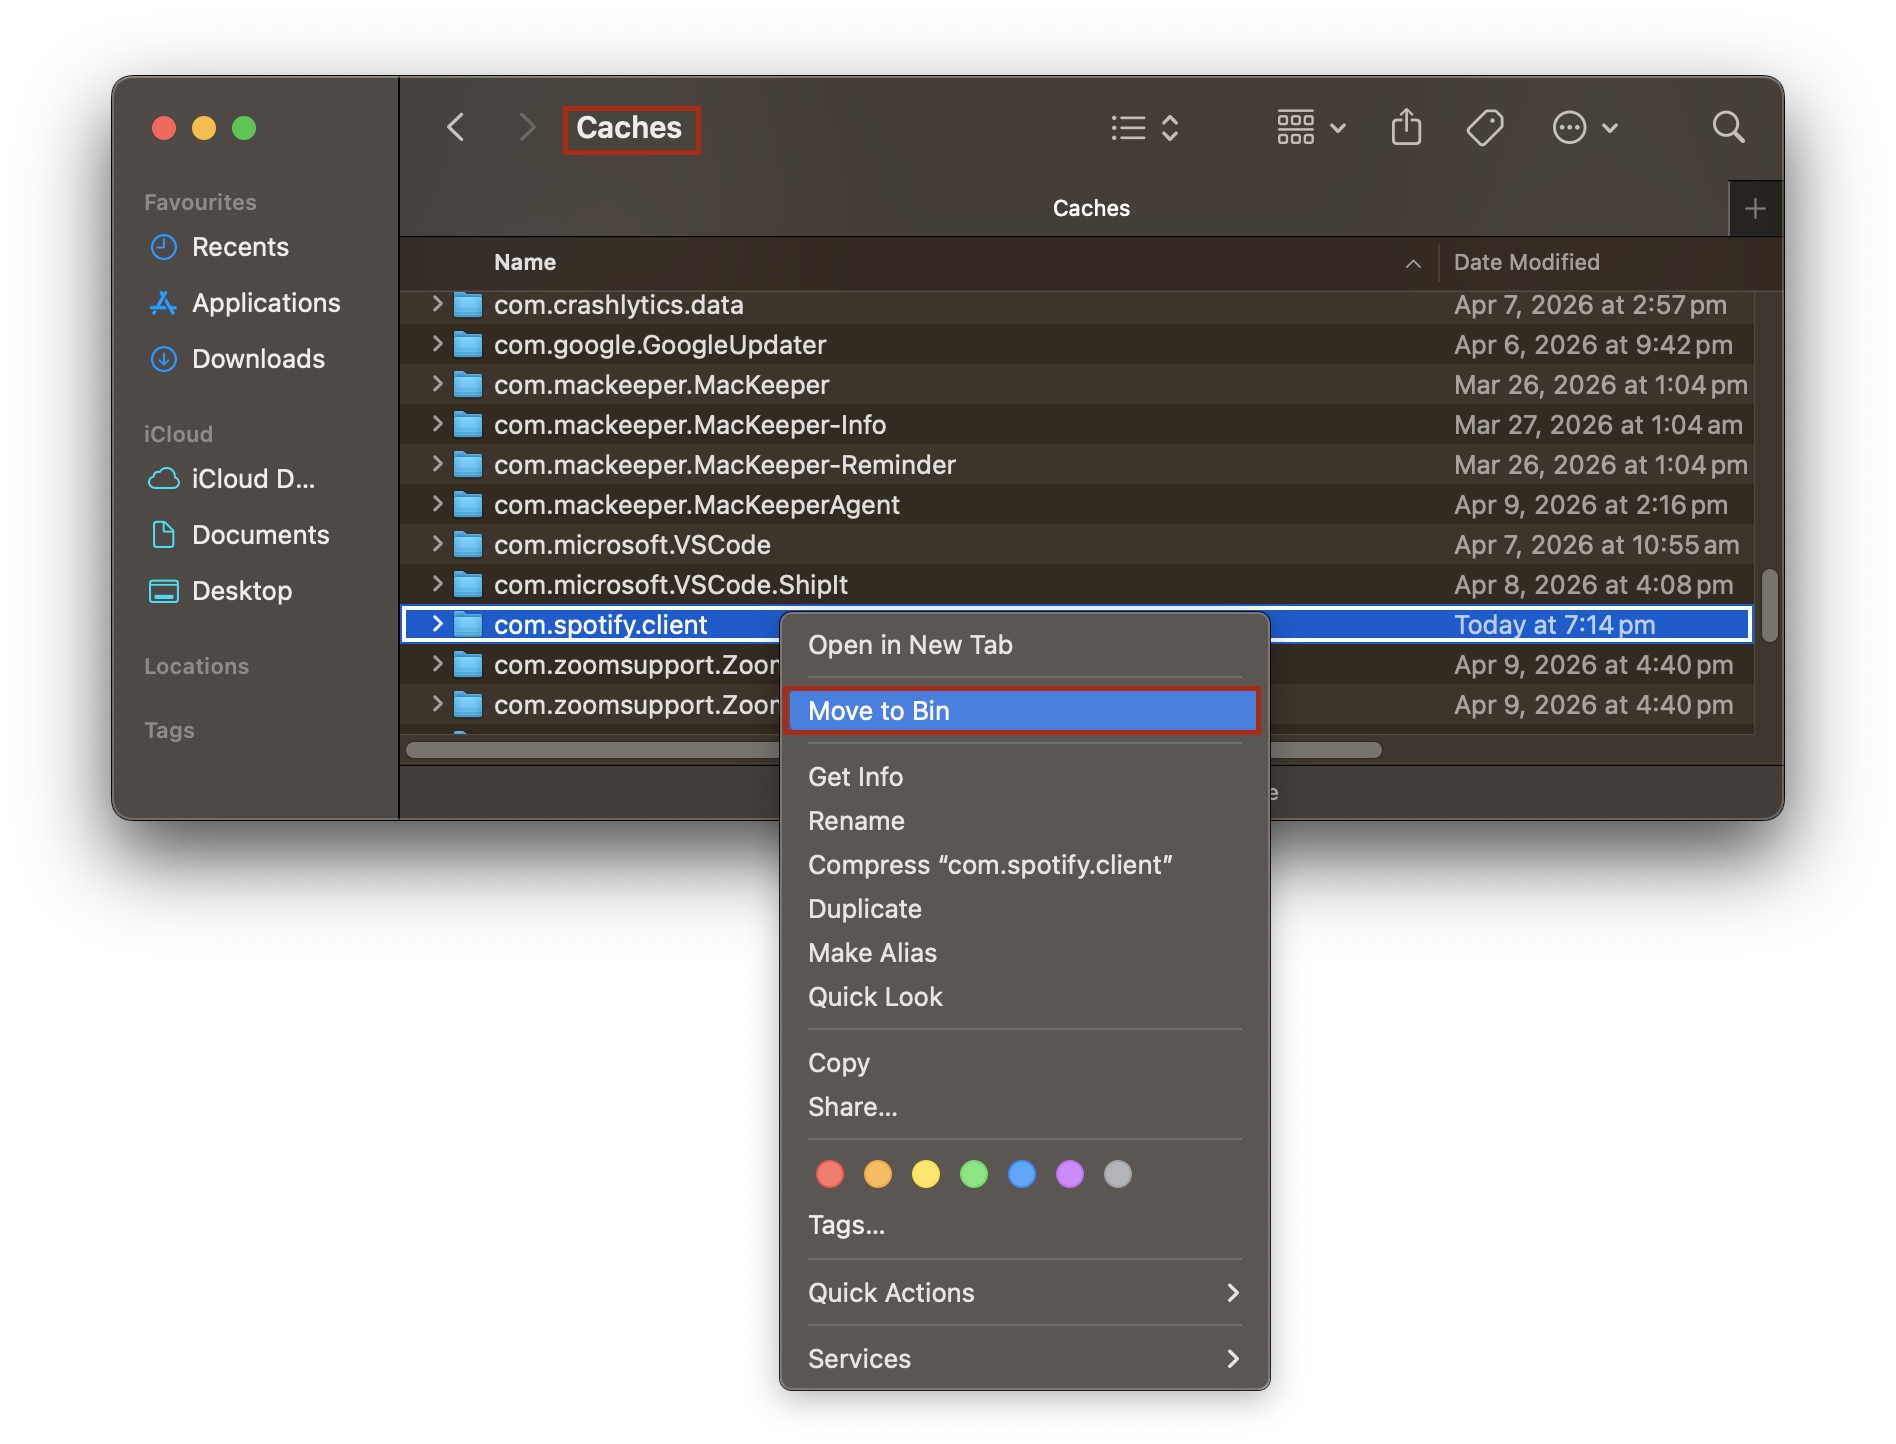
Go back to Library, open Caches, and delete the com.spotify.Client and com.spotify.client.helper folders.
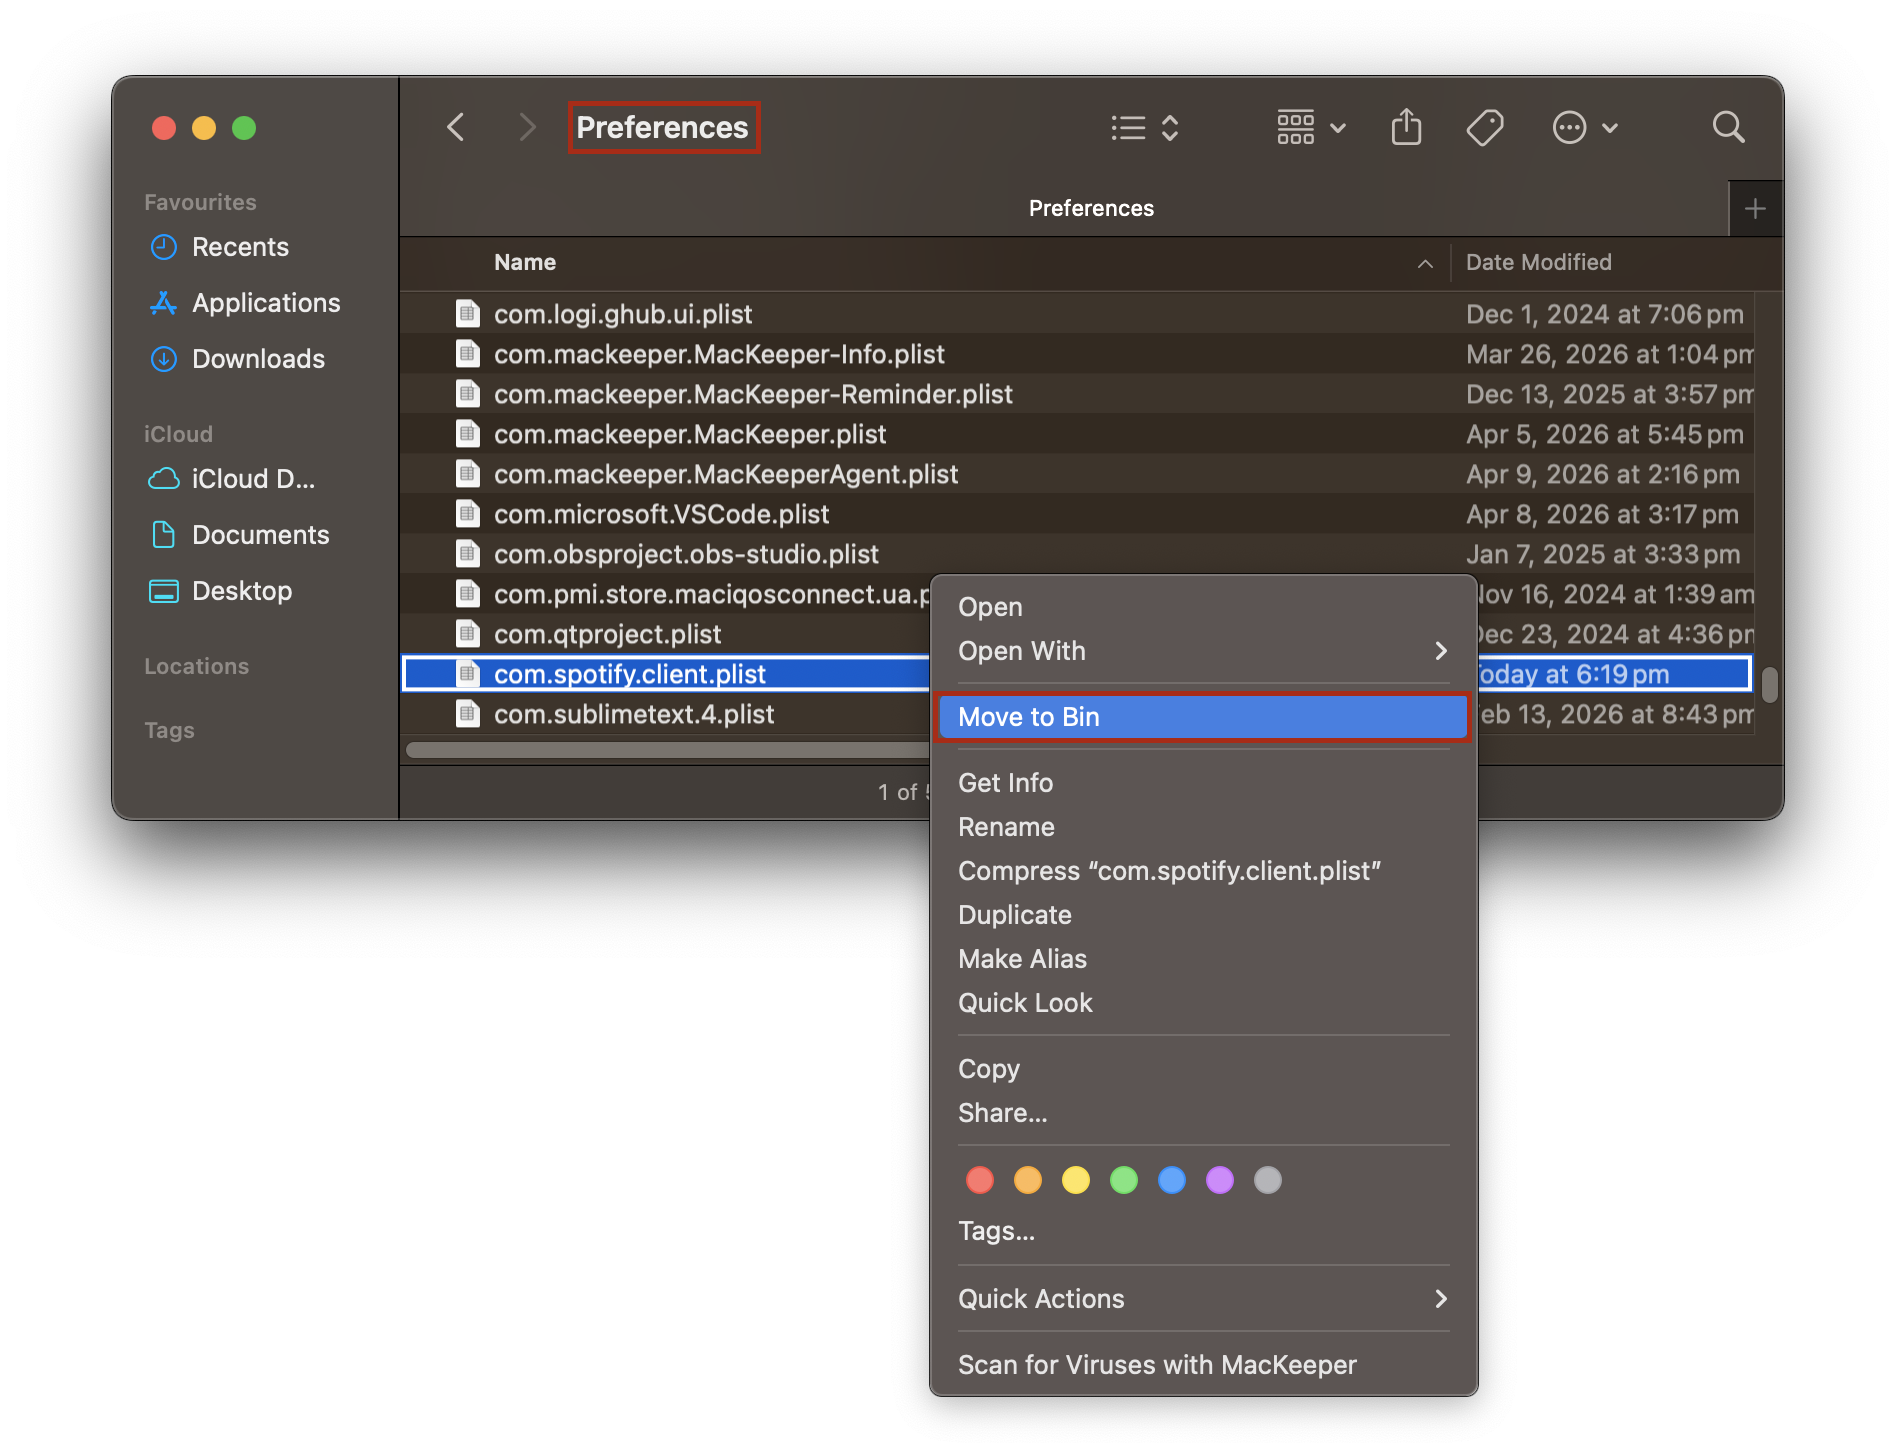
Return to Library once more, open Preferences, and remove any files that begin with com.spotify.
Empty the Trash to finalize the cleanup.
A prompt from us: The folder com.spotify.client.helper won't necessarily be present for all users—it's mainly used for the app's internal processes. If it's not there, that's fine—just delete `com.spotify.client`. If it is there, that's fine, too—delete both folders.
Step 1. Finder’s Go menu > LibraryStep 2. Application Support > Spotify > Move to BinStep 3. Caches > com.spotify.client > Move to BinStep 4. Preferences > com.spotify.client.plist > Move to Bin
A tip from our team: After emptying the Trash, use Finder’s search bar inside ~/Library to look for “Spotify.” If any stray files appear, delete them too. That way, you’ve completely removed Spotify from your Mac.
3. Uninstall Spotify using a MacKeeper
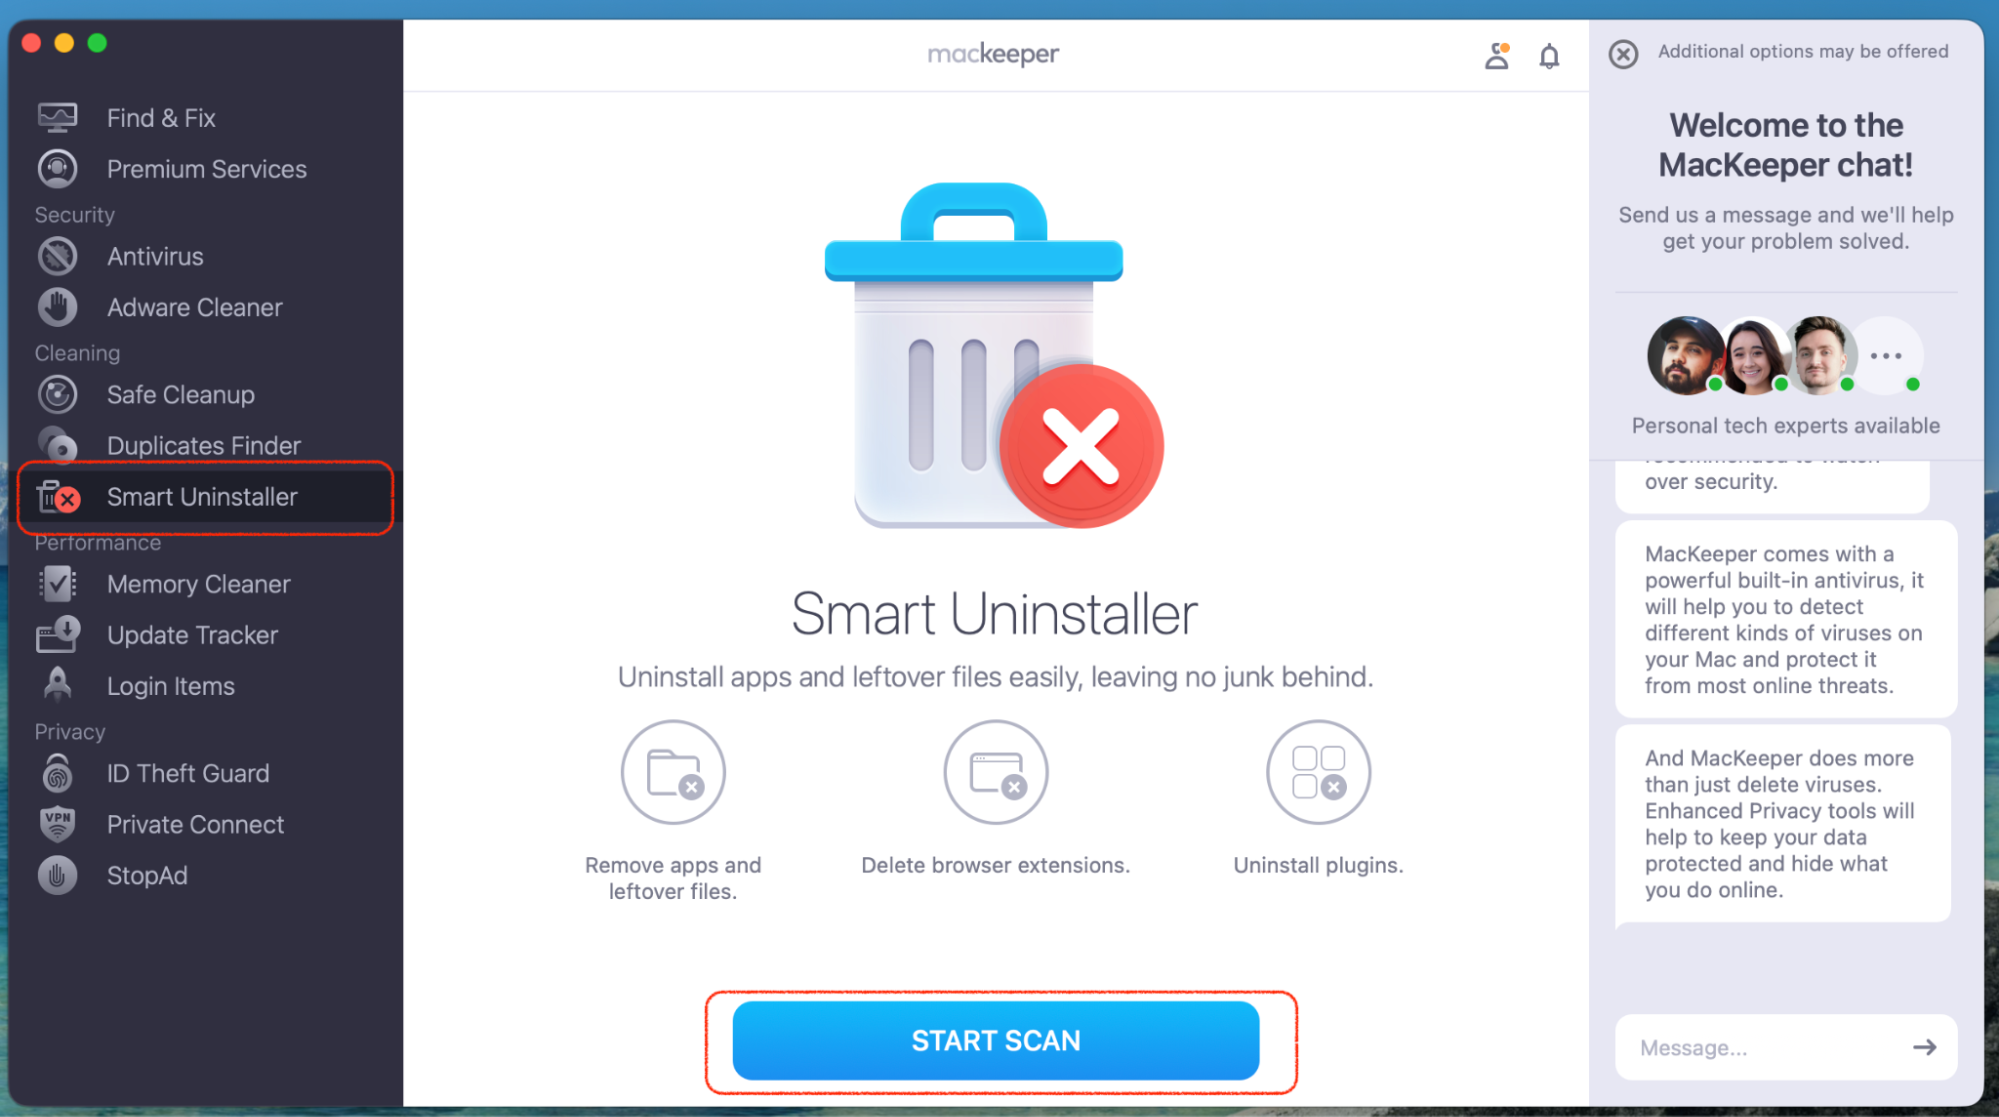
If digging through Library folders feels overwhelming, an uninstaller app can handle the entire process for you. These tools scan your Mac for every file associated with an app and remove them in one go—no manual searching required. Do the following:
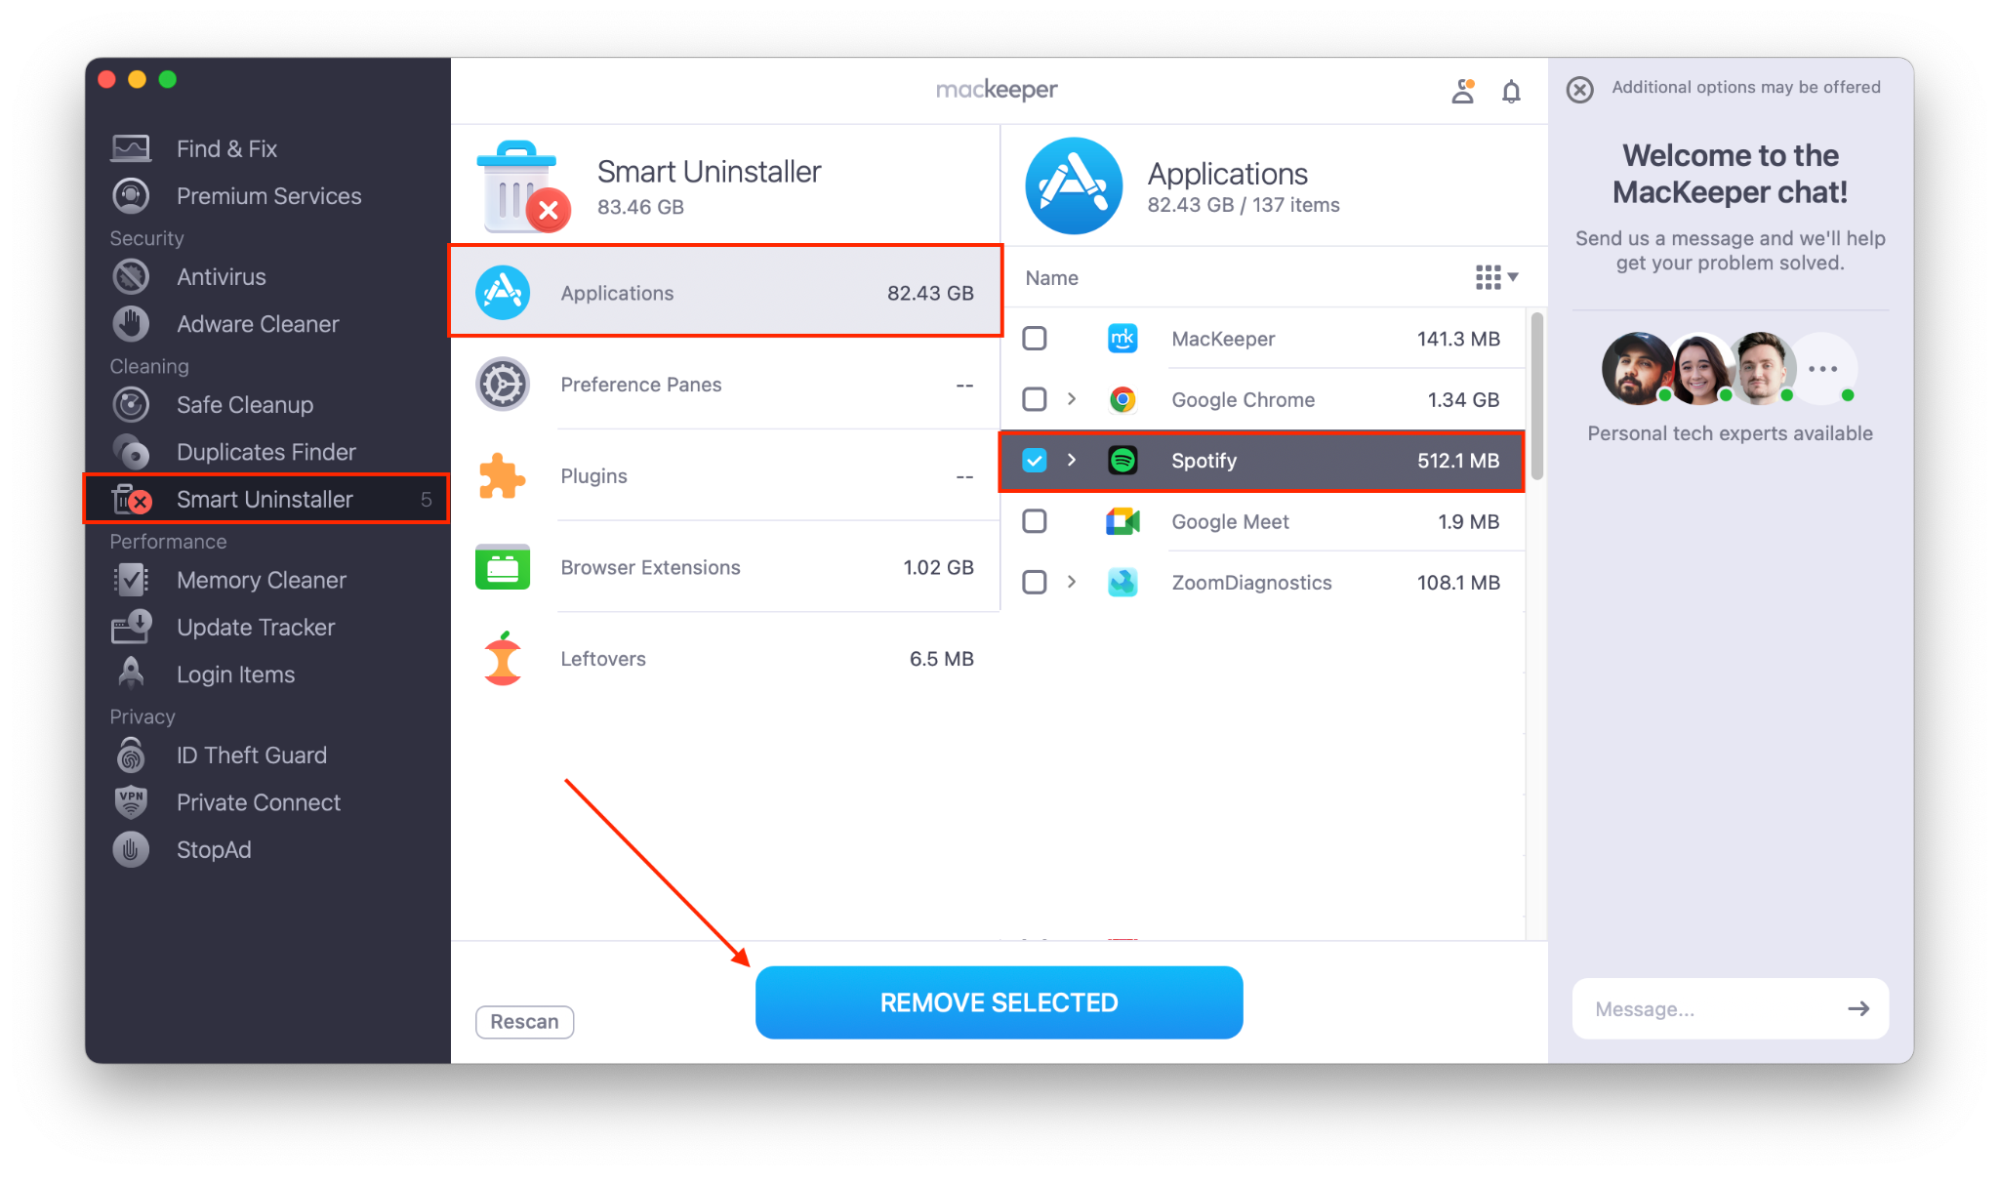
Let it scan your Mac, then find Spotify in the results list and select it.
Click Remove Selected and confirm. MacKeeper deletes the app along with its caches, preferences, and support files—so nothing gets left behind.
How to clear Spotify cache on Mac?
Not ready to uninstall? You might just need to delete Spotify cache on Mac. Clearing the cache removes temporary streaming data without touching your app or account. It’s a quick way to free up space and fix playback glitches, so follow our instructions below:
Quit Spotify completely.
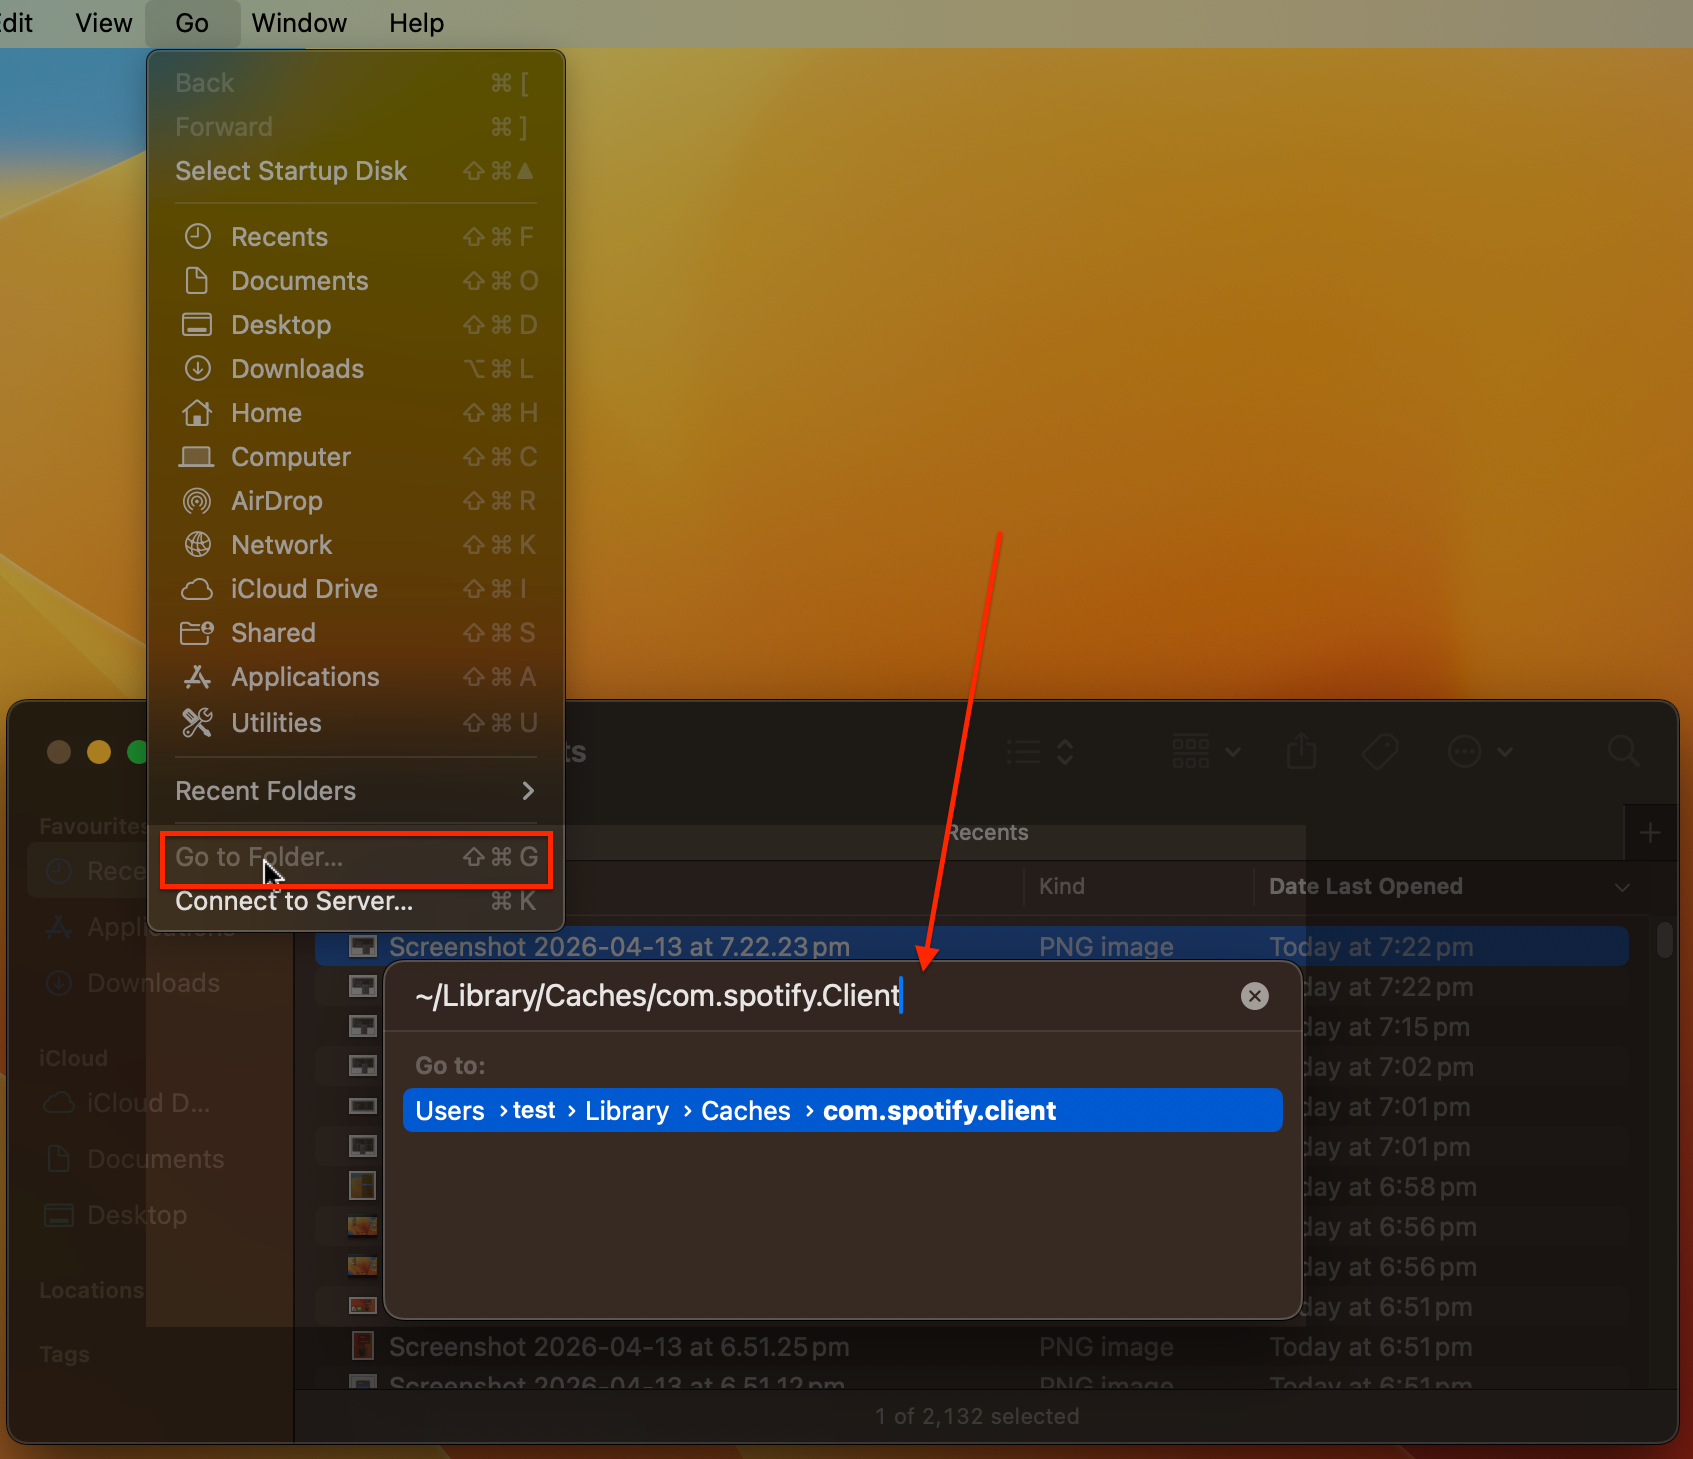
Open Finder, click Go › Go to Folder, and paste the ~/Library/Caches/com.spotify.Client command.
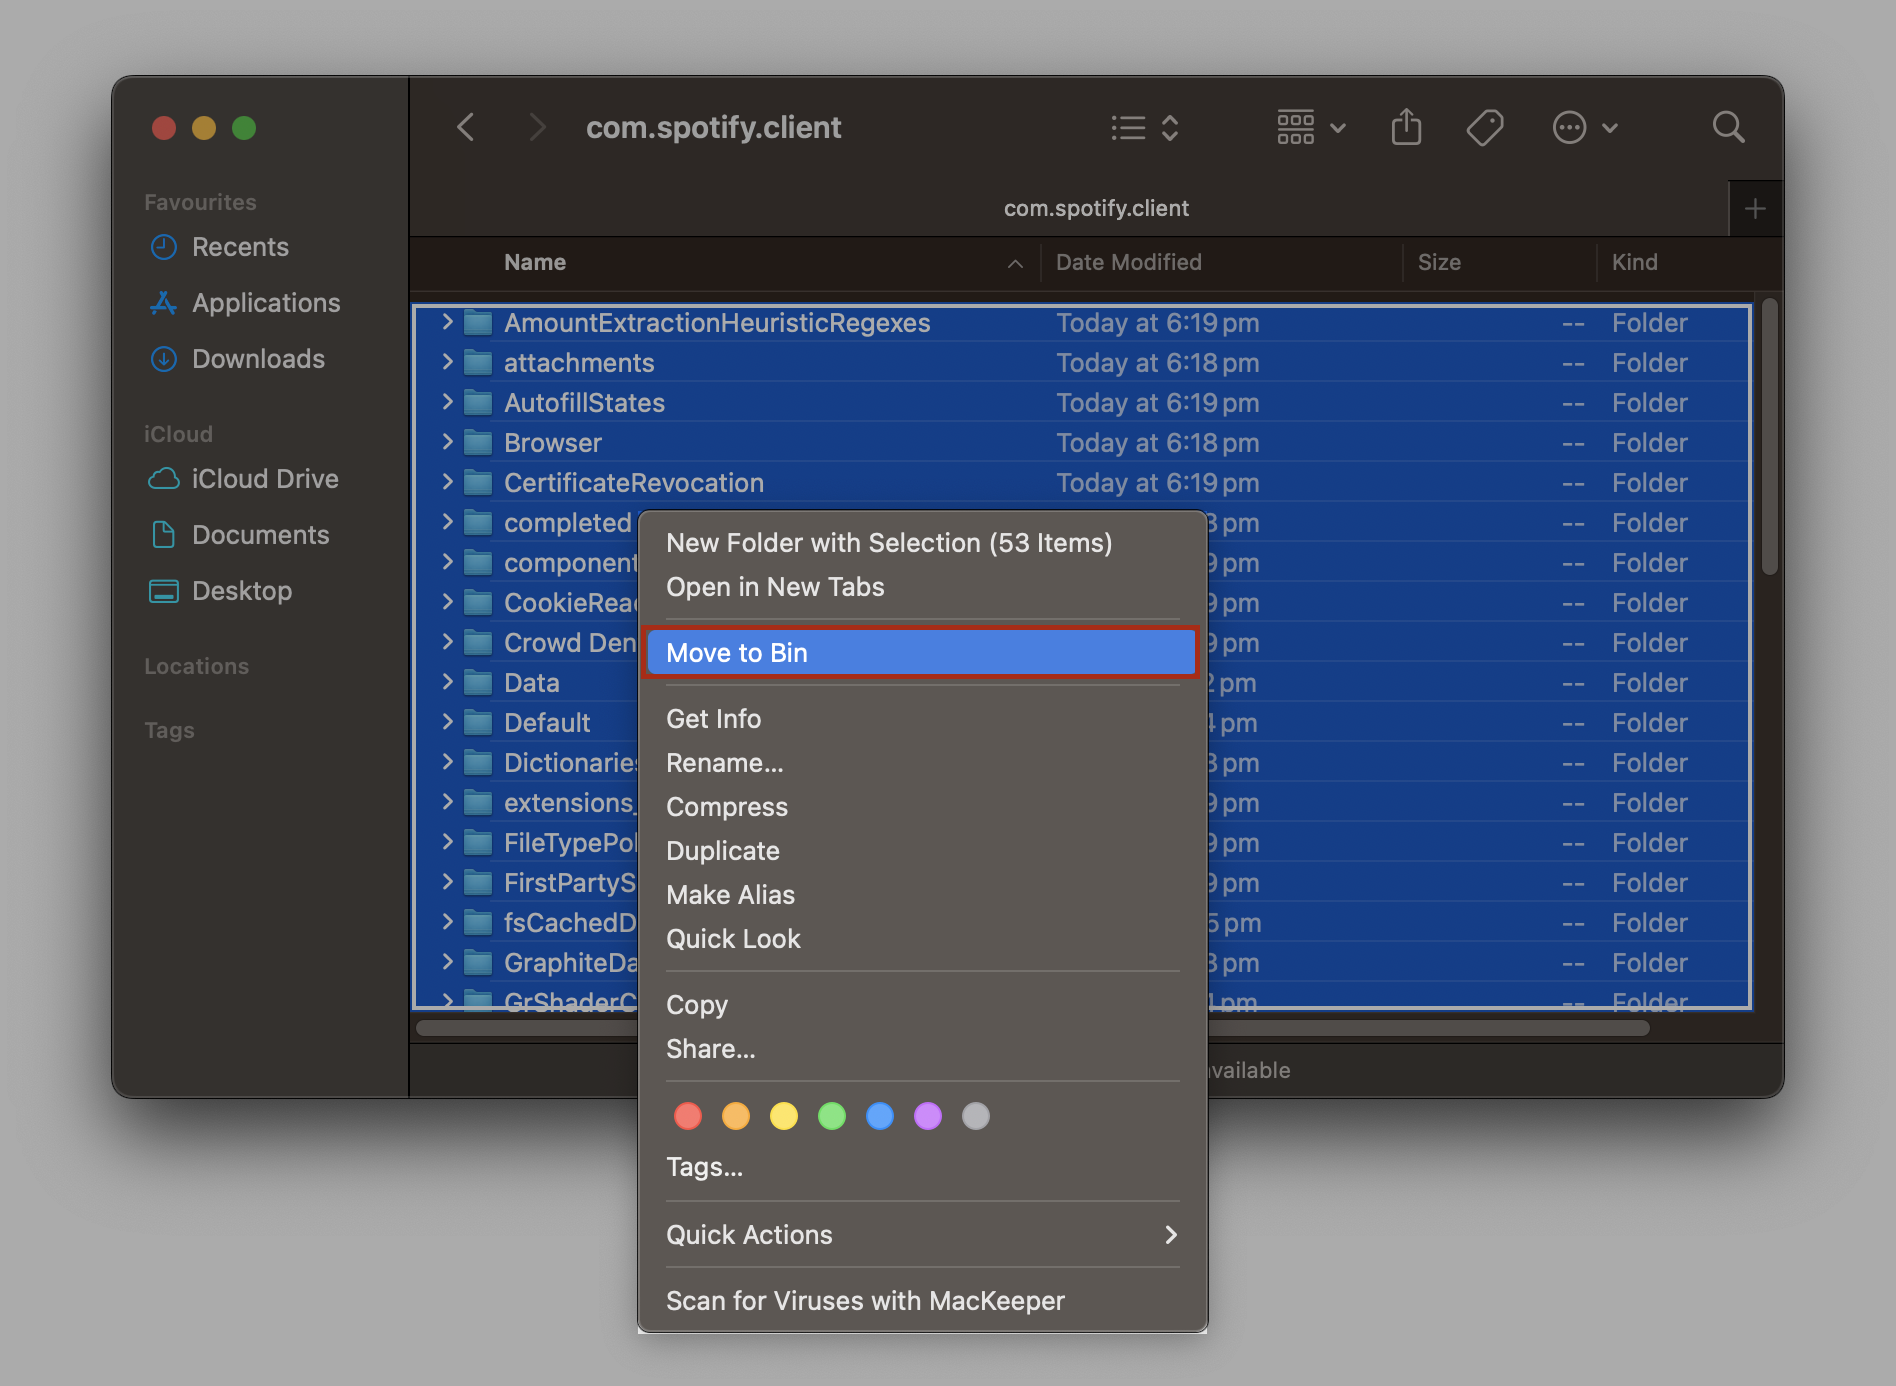
Delete the contents of this folder (or the folder itself).
Reopen Spotify. The app will rebuild a fresh cache as you listen.
Step 1. Finder’s Go menu > Go to Folder with pathStep 2. Choose com.spotify.client folder contents > Move to Bin
Keep in mind that clearing the cache removes offline songs stored on your Mac. You’ll need to re-download them if you want to listen without an internet connection.
Why can’t I delete Spotify from my Mac?
Ran into a wall trying to remove Spotify? You’re not alone. Here are the most common reasons the app refuses to budge—andwhat to do about each one:
Spotify is still running. macOS won’t delete an app that is open. Quit it from the menu bar or force-quit it through Activity Monitor before trying again.
A background process is active. Spotify sometimes runs helper processes even after you quit the main window. Check Activity Monitor for anything labeled “Spotify” and stop it.
File permissions are restricted. If your Mac says you don’t have permission, try right-clicking the app, selecting Get Info, and checking the sharing permissions at the bottom of the window.
If none of these tips work, we recommend you to learn how to delete an app that won’t delete on Mac for more in-depth troubleshooting steps.
Does uninstalling Spotify delete your account?
No, removing Spotify from your Mac only deletes the app and its local files. Your Spotify account—along with your playlists, followers, and listening history—lives on Spotify’s servers and stays untouched.
If you’re on a Premium plan, uninstalling the app won’t cancel your subscription either. You’ll keep getting charged until you manually cancel through your account settings on Spotify’s website. So if you’re leaving for good, remember to cancel first, then uninstall.
Want to delete your Spotify account entirely? That’s a separate process handled through Spotify’s Close your account page. It permanently erases your profile, playlists, and saved data, so make sure that’s really what you want before proceeding.
Conclusion
Whether you drag it to the Trash, clean up leftover files by hand, or let a tool do the heavy lifting, you now know how to uninstall Spotify on Mac the right way. For a fast, thorough removal—app, cache, and hidden files included—try MacKeeper’s Smart Uninstaller. We bet you’ll feel the difference quickly!
We respect your privacy and
use cookies
for the best site experience.
Privacy Preferences Center
We use cookies along with other tools to give you the best possible experience while using the
MacKeeper website. Cookies are small text files that help the website load faster. The cookies we
use don’t contain any type of personal data meaning they never store information such as your
location, email address, or IP address.
Help us improve how you interact with our website by accepting the use of cookies. You can change
your privacy settings whenever you like.
Manage consent
All cookies
These cookies are strictly necessary for enabling basic website functionality (including page
navigation, form submission, language detection, post commenting), downloading and purchasing
software. The website might malfunction without these cookies.